

Comando Remoto - Remote Control
Control Remoto - Απομακρυσμένο Χειριστήριο
SIME HOME
MANUALE PER L’INSTALLAZIONE E L’USO INSTALLATION AND USE MANUAL
MANUAL DE INSTALACIÓN Y USO ΕΓΧΕΙΡΊ∆ΙΟ ΕΓΚΑΤΆΣΤΑΣΗΣ ΚΑΙ ΣΥΝΤΉΡΗΣΗΣ
IT
Gi 20 Mar 2014Zona 1 10:30
EN
Fonderie SIME S.p.A.
Inverno manuale - set 20.0°C
Menu Modo
ES
EL
6318189 - 09/2014 - R0

IT
GAMMA
MODELLO CODICE
Sime HOME 8092280
DICHIARAZIONE CE DI CONFORMITÀ
Ai sensi della Direttiva “Bassa Tensione” 2006/95/CE e Direttiva “Compatibilità Elettromagnetica” 2004/108/CE, il produttore Fonderie SIME S.p.A., via Garbo 27, 37045 Legnago (VR),
DICHIARA CHE
forme alle medesime Direttive Comunitarie.
Il Direttore Tecnico
(Franco Macchi)
il Comando Remoto modello
Sime HOME
è con-
SIMBOLI
PERICOLO
Per indicare azioni che, se non effettuate correttamente, possono provocare infortuni di origine generica o possono generare malfunzionamenti o danni
materiali all’apparecchio; richiedono quindi particolare cautela ed adeguata preparazione.
PERICOLO
Per indicare azioni che, se non effettuate correttamente, possono provocare infortuni di origine elettrica; richiedono quindi particolare cautela e adeguata preparazione.
È VIETATO
Per indicare azioni che NON DEVONO essere eseguite.
2
AVVERTENZA
Per indicare informazioni particolarmente utili e importanti.

IT
INDICE
1 AVVERTENZE E REGOLE DI SICUREZZA 4
1.1 Avvertenze .....................................4
1.2 Divieti .........................................4
2 INSTALLAZIONE 5
2.1 Ricevimento del prodotto .........................5
2.2 Dimensioni e peso ...............................5
2.3 Temperature ...................................5
2.4 Montaggio a muro ...............................6
3 DESCRIZIONE 8
3.1 Caratteristiche..................................8
3.2 Encoder mutifunzione............................8
3.3 Interfaccia utente................................9
4 UTILIZZO 10
4.1 Messa in funzione ..............................10
4.2 Impostazioni da tasto MENU .....................10
4.2.1 Menù IMPOSTAZIONI GENERALI......... 10
4.2.2 Menù INFORMAZIONI.................. 13
4.2.3 Menù TECNICO ....................... 14
4.2.4 Albero di navigazione da tasto MENU ..... 16
4.2.5 Precisazioni tecniche .................. 17
4.3 Impostazioni da tasto MODO......................18
4.3.1 Programmazione oraria ................ 19
4.3.2 Funzione vacanze ..................... 20
4.3.3 Segnalazione anomalia ................ 21
4.3.4 Impostazioni rapide ................... 22
4.4 Navigazione da tasto MODO ......................23
3

1 AVVERTENZE E REGOLE DI SICUREZZA
IT
1.1 Avvertenze
AVVERTENZE
– Prima dell’installazione dell’apparecchio leggere
con attenzione il presente manuale.
– L’apparecchio è parte integrante dell’impianto ge-
stito. Riferirsi anche alla documentazione della
caldaia c
– L’installazione deve essere effettuata solo da Per
sonale Professionalmente Qualificato.
– Per assicurare una corretta rilevazione della tem-
peratura media dell’ambiente posizionare il Comando Remoto in luoghi riparati dal sole e dalle
correnti d’aria continue.
– Il costruttore non e responsabile di eventuali danni
a persone, animali o cose causati da una installazione o utilizzazione del Comando Remoto non
corrette o improprie.
ontrollata.
1.2 Divieti
-
È VIETATO
– Installare il Comando Remoto nelle vicinanze di
apparecchi che emettono radiazioni elettromagnetiche.
– L’uso del Comando Remoto ai bambini e alle per-
sone inabili non assistite.
4

IT
2 INSTALLAZIONE
2.1 Ricevimento del prodotto
Il Comando Remoto
protetto da un imballo in cartone.
All’interno della confezione, oltre al Comando Remoto
Sime HOME
– Manuale di installazione ed uso
– Tasselli ad espansione.
, vengono forniti:
È VIETATO
Disperdere nell’ambiente e lasciare alla portata dei
bambini il materiale dell’imballo in quanto può essere potenziale fonte di pericolo. Deve quindi essere
smaltito secondo quanto stabilito dalla legislazione
vigente.
Sime HOME
viene fornito in un unico collo
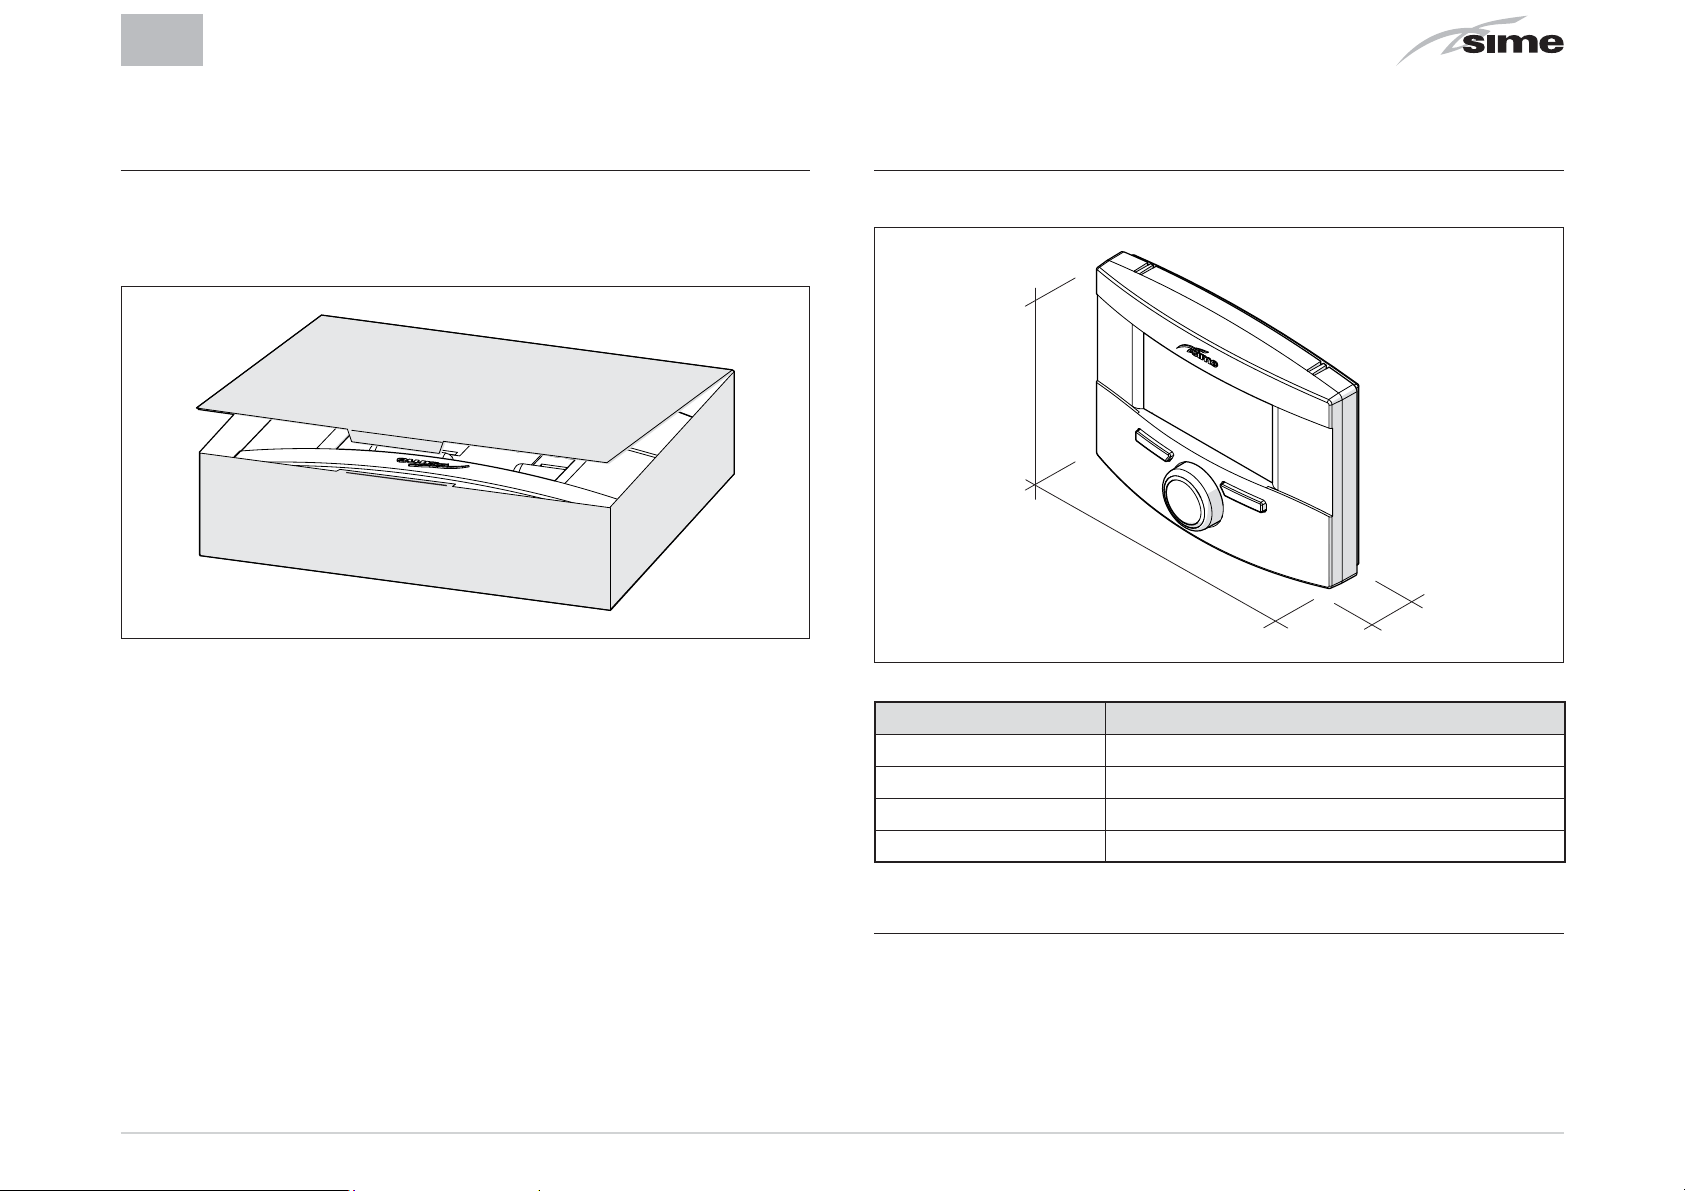
2.2 Dimensioni e peso
H
L
P
Descrizione Sime Home
L (mm) 160
H (mm) 105
P (mm) 40
Peso (g)
130
2.3 Temperature
Funzionamento: 0 ÷ 50°C
Stoccaggio: -10 ÷ +60°C
5

IT
2.4 Montaggio a muro
Dopo aver estratto il Comando Remoto
fezione:
– Spingere con un cacciavite la linguetta di fissaggio (1) per
sganciare la basetta (2) dall’interfaccia utente (3) facendo
attenzione a non far penetrare l’utensile all’interno
Sime HOME
12
dalla con-
3
– Predisporre il cavetto di comunicazione Bus (4), Open-
Therm, tra la caldaia ed il Comando Remoto
– Collegarlo alla caldaia ed ai morsetti (5) (Cavo: 2 x 0,75 mm
non polarizzati; Lunghezza max: 50 m)
4
5
– Fissare a muro la basetta (2) con le viti (6) e i tasselli (7),
forniti con il Comando Remoto
2
– Separare le 2 parti
6
7
2
6

IT
– Rimontare l’interfaccia Utente (3) sulla basetta (2) aggan-
ciandole correttamente con la linguetta (1)
2
3
AVVERTENZA
Fare in modo che non ci siano eccedenze di cavetto
tra la basetta (2) e l’interfaccia utente (3).
7

3 DESCRIZIONE
IT
3.1 Caratteristiche
Il Comando Remoto
funzionale ed elegante, studiato per un utilizzo facile e intuitivo grazie all’ampio display a matrice di punti che visualizza
tutte le possibili azioni che si possono compiere.
Il collegamento e la comunicazione con la caldaia avviene mediante bus bifilare non polarizzato e protocollo Open Therm
standard.
Le caratteristiche principali del Comando Remoto
sono:
– Selezione modalità di funzionamento (Estate/Inverno/Off)
– Regolazione Temperature riscaldamento e ACS
– Programmazione settimanale riscaldamento
– Regolazione climatica (con sonda esterna installata)
– Gestione dei parametri caldaia
– Impostazione temperatura antigelo
– Possibilità di programmazione di 4 fasce orarie giornaliere
– Possibilità di gestione del programma vacanze
– Visualizzazione continua di data e ora correnti
– Visualizzazione continua della temperatura ambiente
– Visualizzazione parametri di funzionamento impianto
– Visualizzazione degli allarmi storici e gestione di quelli
eventualmente presenti.
Sime HOME
è un complemento d’impianto
Sime HOME
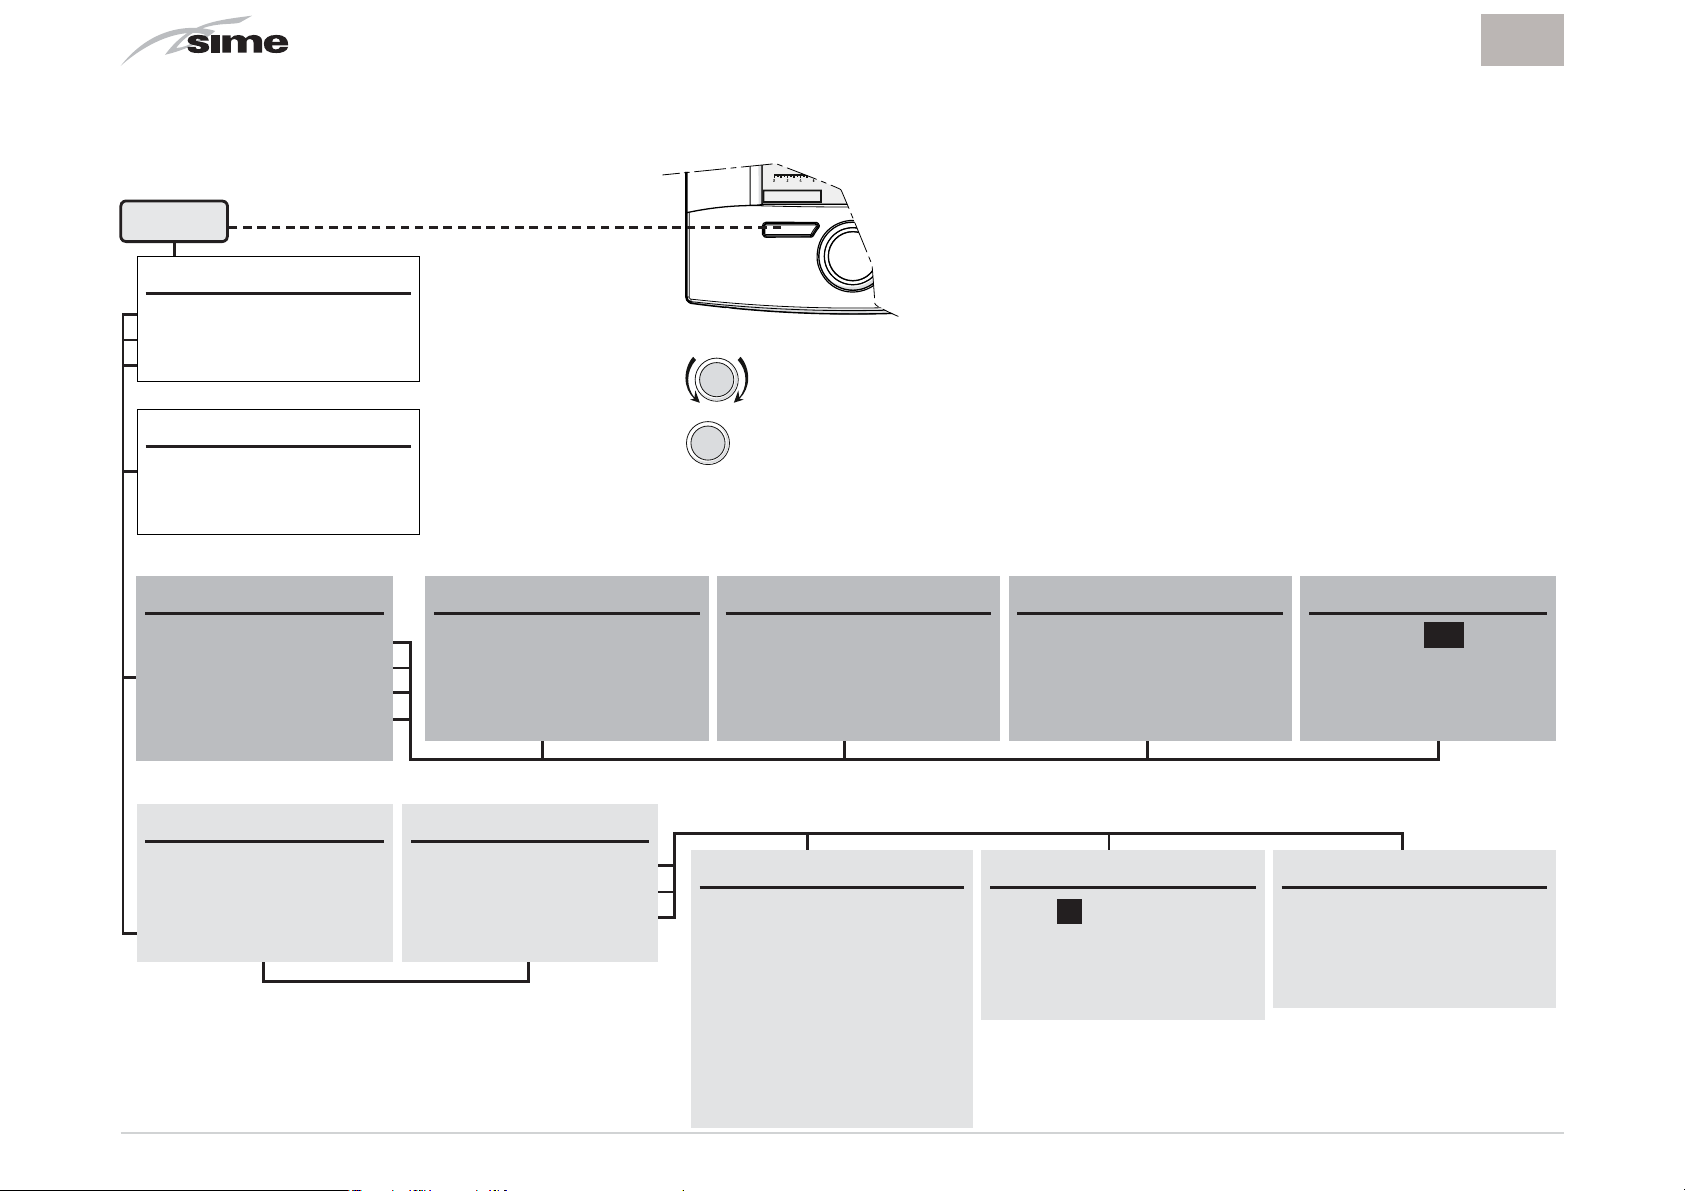
3.2 Encoder mutifunzione
L’encoder può agire nei modi seguenti.
Rotazione, che permette di:
– scorrere i menù, i sottomenù e le righe delle videate
– modificare i dati o i valori nelle aree modificabili
Pressione, che permette di:
– confermare le selezioni effettuate
– confermare le modifiche introdotte.
NOTA
In caso di mancanza di corrente tutte le impostazioni effettuate vengono mantenute memorizzate tranne la data e l’ora che
permangono per cir
8
ca 24 ore.
IT
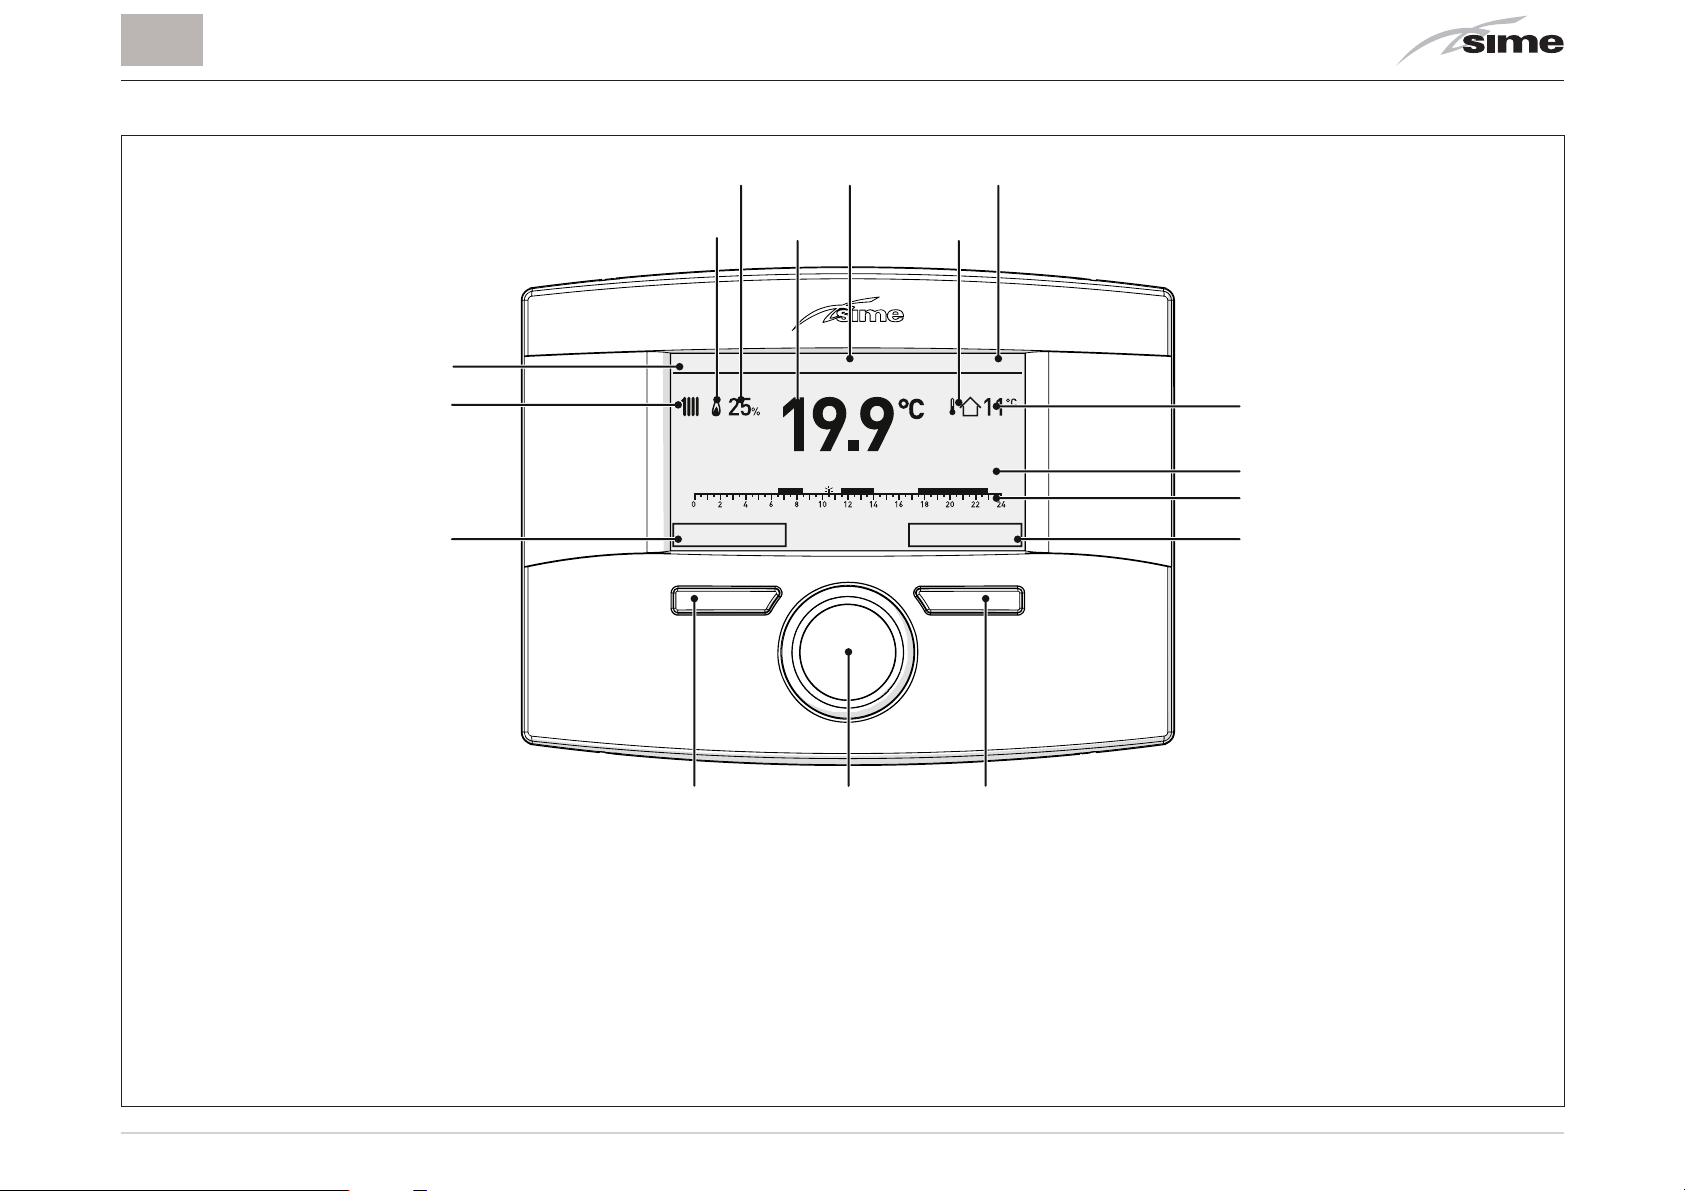
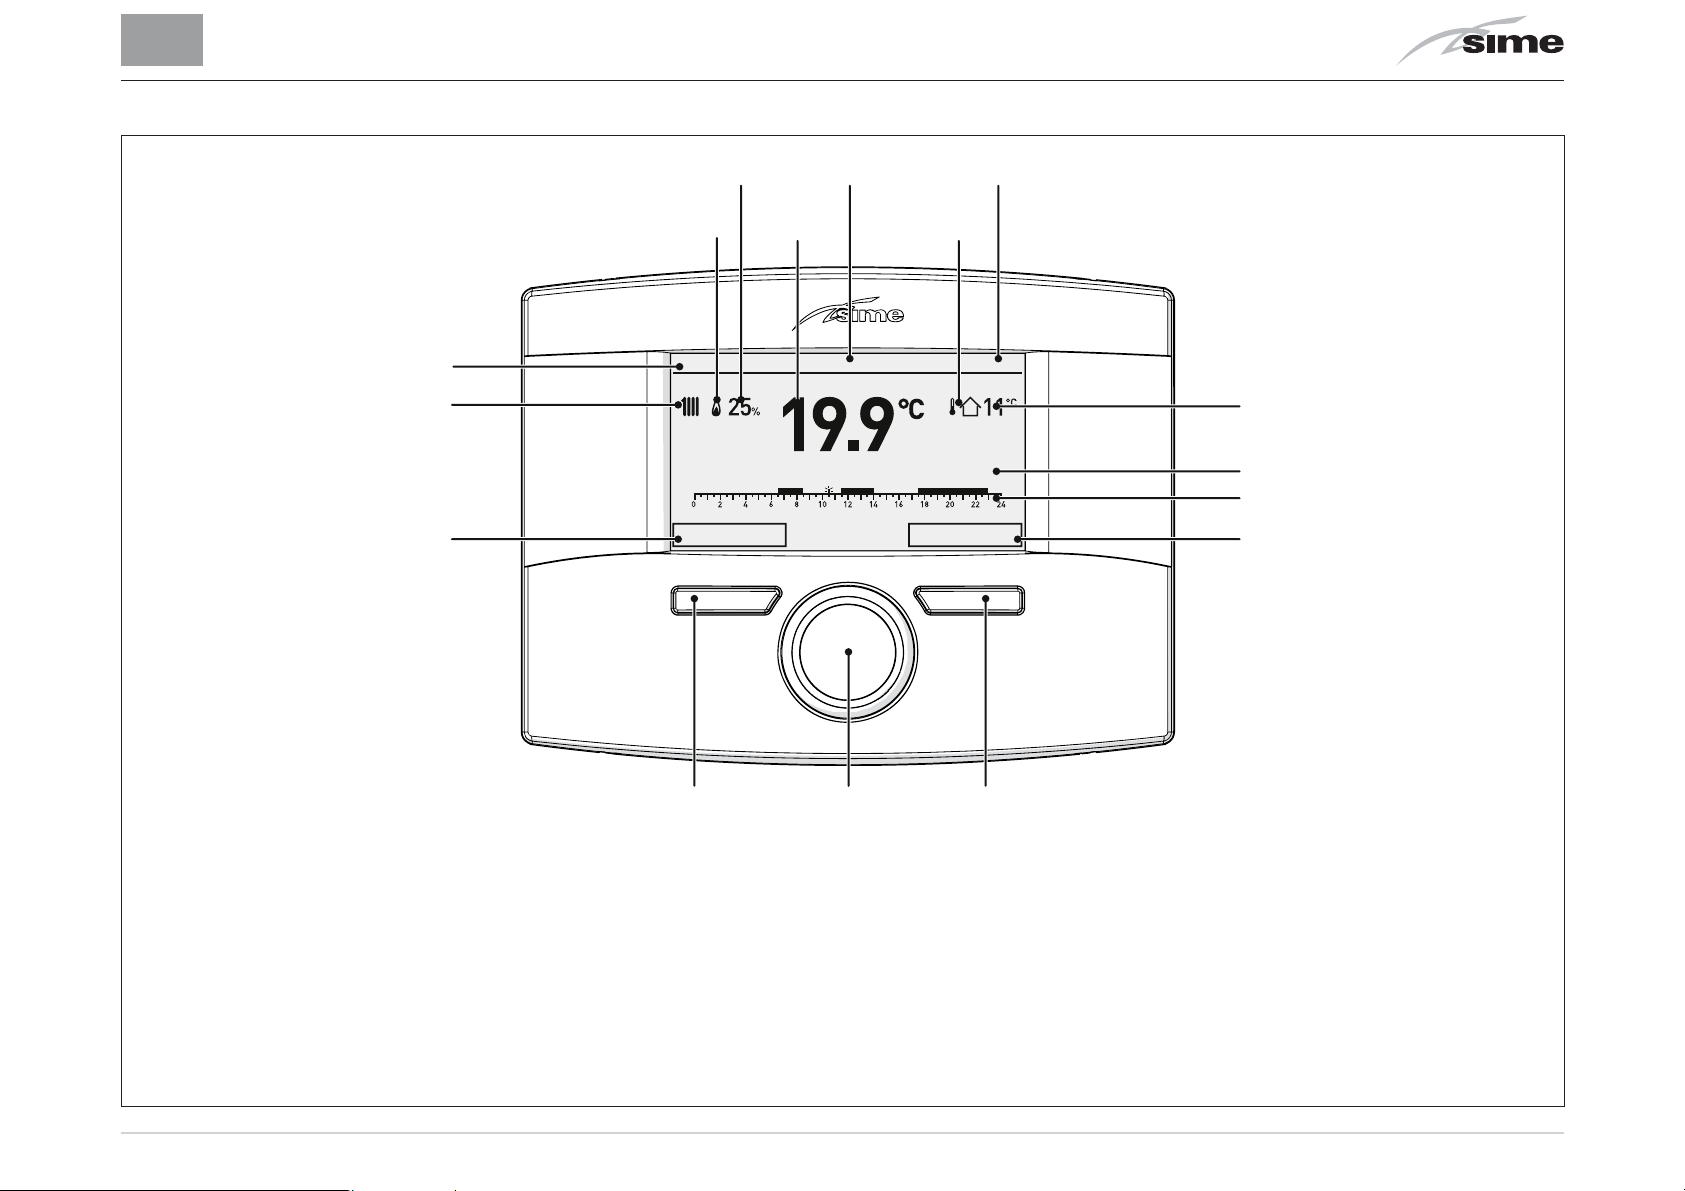
3.3 Interfaccia utente
14
15
16
12
13
Modo: Inverno Progr. automatico - Set 18,0°C fino alle 11:30
Menu Modo
10 8
11 9
Gi 20 Mar 2014Zona 1 10:30
7
6
5
4
1
Tasto (A)
2
Encoder multifunzione
3
Tasto (B)
4
Azione che viene eseguita premendo il tasto (B)
5
Fasce orarie programmate
6
Descrizione delle regolazioni in atto
7
Temperatura esterna misurata
8
Ora
123
9
Presenza Sonda Esterna (SE)
10
Data
11
Temperatura ambiente misurata
12
Percentuale di modulazione
13
Presenza fiamma
14
Zona controllata
15
Richiesta riscaldamento (rad) o acqua sanitaria (rub)
16
Azione che viene eseguita premendo il tasto (A)
9

4 UTILIZZO
k
Ling
IT
4.1 Messa in funzione
Ultimata l’installazione del Comando Remoto
cedere come segue:
– Posizionare l’interruttore generale dell’impianto su ON (ac-
ceso)
– Dal quadro comandi della caldaia impostare la modalità
“Stand-by”
ON
– Sul display del Comando Remoto
Sime HOME
zata la seguente videata.
Sime HOME
, pro-
viene visualiz-
4.2 Impostazioni da tasto MENU
4.2.1 Menù IMPOSTAZIONI GENERALI
Dalla
procedere come segue:
– Premere il tasto
“videata principale”
lezione dei
“Menù”
del Comando Remoto
Gi 20 Mar 2014Zona 1 10:30
Inverno manuale - set 20.0°C
Menu Modo
Menù
IMPOSTAZ. GENERALI [...]
IMPOSTAZ. GENERALI
INFORMAZIONI [...]
TECNICO [...]
Esci Indietro
per entrare nella videata di se-
MENU
Sime HOME
,
Off
– Premere l’encoder
per confermare il Menù evidenzia-
clic
to ed entrare nei sottomenù
Esci Indietro
Lingua ENG
Data e ora [...]
Impostazioni di fabbrica [...]
10
IMPOSTAZ. GENERALI
ua
Esci Indietro

IT
k
G
ITA
k
Ling
D
– Premere l’encoder
per confermare il sottomenù evi-
clic
denziato e selezionare l’area modificabile
IMPOSTAZ. GENERALI
Lingua ENG
Data e ora [...]
Impostazioni di fabbrica [...]
Esci Indietro
EN
– Ruotare l’encoder e modificare il
campo consentito (es: da ENG a ITA)
IMPOSTAZ. GENERALI
Lingua ITA
Data e ora [...]
Impostazioni di fabbrica [...]
Esci Indietro
–
“dato/valore”
, nel
– Ruotare l’encoder per selezionare un altro sottomenù
di interesse (es. Data e ora)
IMPOSTAZ. GENERALI
Lingua ITA
ata e ora
Data e ora [...]
Impostazioni di fabbrica [...]
Esci Indietro
– Premere l’encoder
per confermare il sottomenù evi-
click
denziato ed entrare nell’area modificabile
IMPOSTA DATA E ORA
– Il primo
Data 01 Gen 2014
Ora 06 : 36
Annulla Conferma
“dato/valore”
GIORNO MESE
ORA MINUTO
, modificabile è evidenziato (es. 06).
ANNO
– Premere l’encoder
nare ai sottomenù
Lingua ITA
Data e ora [...]
Impostazioni di fabbrica [...]
NOTA:
- la pressione del tasto
tro di una posizione
la pressione del tasto
-
“videata principale”
.
per confermare la modifica e tor-
clic
IMPOSTAZ. GENERALI
ua
Esci Indietro
Indietro
Esci
permette di tornare indie-
permette di ritornare alla
– Ruotare l’encoder
da 06 a 12)
– Premere l’encoder
lezionare il
“dato/valore”
36)
per modificare il
per confermare la modifica e se-
click
successivo, che si evidenzierà (es.
IMPOSTA DATA E ORA
GIORNO MESE
Data 01 Gen 2014
ORA MINUTO
Ora 12 : 36
Annulla Conferma
ANNO
“dato/valore”
(es.
11

IT
k
k
– Ruotare l’encoder per modificare il
“dato/valore”
(es.
da 36 a 50)
IMPOSTA DATA E ORA
– Premere l’encoder
lezionare il
“dato/valore”
GIORNO MESE
Data 01 Gen 2014
Ora 12 : 50
Annulla Conferma
ORA MINUTO
per confermare la modifica e se-
clic
successivo, che si evidenzierà (es.
ANNO
01)
– Continuare nello stesso modo fino al termine delle modifi-
che necessarie
– A modifiche ultimate premere il tasto
Conferma
per ritor-
nare al sottomenù di partenza (Data e ora).
NOTA:
Il modo di operare è CIRCOLARE (a “carosello”) quindi
si procede SEMPRE IN AVANTI, anche in caso di errore.
AVVERTENZA
È consigliato entrare in questo sottomenù
vuole ritornare alle
“Impostazioni di fabbrica”
lando tutte le impostazioni effettuata a livello utente.
In caso contrario premere il tasto
Indietro
.
Se si vuole proseguire:
– Premere l’encoder
per entrare nell’area modificabile.
clic
Si presenta la videata che offre le seguenti possibilità:
RICHIESTA DI CONFERMA
Confermare l’operazione?
Annulla Conferma
– Premere il tasto
Annulla
per tornare al
“Menù”
nato in precedenza (Impostazioni di fabbrica)
SOLO
se si
cancel-
Esci
selezio-
o
Conferma
per ripristinare le
“Impostazio-
e, dopo alcuni secondi, ritornare alla
“videata
– Ruotare l’encoder per selezionare un altro
“Menù”
di
– Premere il tasto
ni di fabbrica”
principale”
interesse (es. Impostazioni di fabbrica)
IMPOSTAZ. GENERALI
Lingua EN
Data e ora [...]
Impostazioni di fabbrica
Impostazioni di fabbrica [...]
Esci Indietro
Esci Indietro
12

IT
I
k
scald. d
k
S
Caldaia
k
4.2.2 Menù INFORMAZIONI
Il Menù INFORMAZIONI è di sola visualizzazione e NON è possibile effettuare modifiche dei dati.
Dalla
– Premere il tasto
– Ruotare l’encoder per selezionare il menù
“videata principale”
lezione dei
“Menù”
ZIONI”
Gi 20 Mar 2014Zona 1 10:30
Inverno manuale - set 20.0°C
Menu Modo
Menù
IMPOSTAZ. GENERALI [...]
NFORMAZIONI
INFORMAZIONI [...]
TECNICO [...]
Esci Indietro
per entrare nella videata di se-
MENU
“INFORMA-
– Ruotare l’encoder per selezionare il sottomenù di in-
teresse
– Premere l’encoder
per confermare il sottomenù se-
clic
lezionato ed entrare nell’area di visualizzazione dei dati relativi
INFORMAZIONI
Set ambiente 20.0°C
et ambiente
Set mandata 80°C
Temp. mandata 30°C
Esci Indietro
– Premere il tasto
– Ruotare l’encoder
Indietro
per selezionare un altro sottomenù
per ritornare ai sottomenù
di interesse
INFORMAZIONI
Riscald. di zona [...]
Caldaia [...]
Sanitario [...]
Allarmi [...]
Versione firmware 100
Esci Indietro
– Premere l’encoder
per confermare
clic
“INFORMAZIONI”
ed entrare nei sottomenù
INFORMAZIONI
Riscald. di zona [...]
Ri
Caldaia [...]
Sanitario [...]
Allarmi [...]
Versione firmware 100
i zona
Esci Indietro
– Premere l’encoder
lezionato ed entrare nell’area di visualizzazione dei dati relativi
per confermare il sottomenù se-
clic
13

k
k
– Continuare nello stesso modo fino al termine delle visualiz-
zazioni desiderate
– Premere il tasto
cipale”
.
Esci
per ritornare alla
Gi 20 Mar 2014Zona 1 10:30
“videata prin-
MENU
IMPOSTAZ. GENERALI [...]
INFORMAZIONI [...]
TECNICO
TECNICO [...]
Esci Indietro
IT
Inverno manuale - set 20.0°C
Menu Modo
4.2.3 Menù TECNICO
L’utilizzo del Menù TECNICO è consigliato al solo Personale
Professionalmente Qualificato, in quanto permette di modificare i dati caratteristici dell’impianto gestito.
Per quanto concerne il sottomenù
“Parametri caldaia”
sto l’inserimento del CODICE (o password)
Dalla
“videata principale”
Menu Modo
Gi 20 Mar 2014Zona 1 10:30
Inverno manuale - set 20.0°C
“1 2 3 4 5”
è previ-
.
– Premere l’encoder
per entrare nell’area modificabile.
clic
Si presenta la videata che offre le seguenti possibilità:
RICHIESTA DI CONFERMA
Confermare l’operazione?
Annulla Conferma
– Premere il tasto
– Premere il tasto
Annulla
Conferma
Riscald. di zona [...]
Parametri caldaia [...]
Reset totale fabbrica [...]
Esci Indietro
per tornare al menù
per entrare nei sottomenù
TECNICO
“TECNICO”
– Ruotare l’encoder per selezionare il sottomenù di in-
– Premere il tasto
lezione dei
“Menù”
– Ruotare l’encoder per selezionare il menù
14
Menù
per entrare nella videata di se-
“TECNICO”
teresse
– Premere l’encoder
per confermare il sottomenù sele-
clic
zionato ed entrare nell’area dei parametri modificabili.

IT
k
1
k
AVVERTENZA
Quando viene selezionato il sottomenù
caldaia”
alla conferma con la pressione dell’encoder
“parametri
si presenta la seguente videata:
clic
RICHIESTA CODICE ACCESSO
Codice: 000000
Annulla Conferma
– Ruotare l’encoder per modificare la prima cifra da 0
a 1
– Premere l’encoder
per confermare la modifica e sele-
click
zionare la cifra successiva
– Continuare nello stesso modo fino al completamento del
CODICE (o password)
“1 2 3 4 5”
– dove
“Indice parametro”
si riferisce alla tabella parametri
presente nel manuale della caldaia installata (es. 1=tS 0.1
oppure 1=PAR 01).
– Ruotare l’encoder
per scorrere la lista parametri e
verificarne il valore
– Nel caso il valore del parametro selezionato sia da modifi-
care:
– Premere l’encoder
per entrare nell’area di modifica
clic
del valore
Parametri caldaia
Indice parametro: 1
Valore parametro: 0
Esci Indietro
1--------42
RICHIESTA CODICE ACCESSO
Codice: 12345
Annulla Conferma
– Ruotare l’encoder per impostare il nuovo valore
– Premere l’encoder
per confermare la modifica e pro-
click
cedere con un ulteriore parametro.
– Premere il tasto
zione parametri”
Conferma
per entrare nell’area
della caldaia
Parametri caldaia
Indice parametro: 1
Valore parametro: 0
Esci Indietro
1--------42
“Imposta-
– Al termine delle visualizzazioni/modifiche premere il tasto
Esci
per ritornare alla
Gi 20 Mar 2014Zona 1 10:30
Inverno manuale - set 20.0°C
Menu Modo
“videata principale”
.
15
k
Modo: Inverno Progr. automatico - Set 18,0 Cfino alle 11:30
Menu Modo
4.2.4 Albero di navigazione da tasto MENU
MENU
MENÙ
IMPOSTAZIONI GENERALI [...]
INFORMAZIONI [...]
TECNICO [...]
IMPOSTAZIONI GENERALI
Lingua [...]
Data e ora [...]
Impostazioni di fabbrica [...]
(paragrafo 4.2.1 a pagina 10)
clic
Per
“selezionare”
Per
“confermare”
righe o
le selezioni o le modifiche
“modificare”
valori
IT
Riscald. di zona [...]
Caldaia [...]
Sanitario [...]
Allarmi [...]
Versione firmware 100
RICHIESTA DI CONFERMA
Confermare l’operazione?
[CONFERMA]
16
INFORMAZIONI
(paragrafo 4.2.2 a pagina 13)
(paragrafo 4.2.3 a pagina 14)
Riscaldamento di zona
Set ambiente 20.0°C
Set mandata 0°C
Temp. mandata 28.0°C
(Queste videate sono di sola visualizzazione. NON è possibile effettuare la modifica dei dati)
TECNICO
Riscald. di zona [...]
Parametri caldaia [...]
Reset totale fabbrica [...]
Caldaia
Temp. ritorno 25.0°C
Potenza bruciatore 0%
Pressione impianto 1.2bar
Temp. fumi _ _ _°C
Riscaldamento di zona
Rich. con sonda amb. SI
Modul. con sonda amb. SI
Modul. con sonda est. SI
Curva climatica 3.0
Offset curva climat. 0°C
Tempo off in isteresi 0.1°C
Inerzia impianto 10
Set minimo mandata 20°C
Attiva antigelo SI
Set antigelo 5.0°C
Correz. sonda amb. 0.0°C
Sanitario
Temp. acqua calda 51.2C
Set acqua calda 50°C
Portata flusso --l/min
RICHIESTA CODICE DI ACCESSO
Codice:
[CONFERMA]
0 0 0 0
0
(paragrafo 4.2.3 a pagina 14)
Storico allarmi
Indice storico:
Codice allarme: 255
255 - Anomalia tecnica
RICHESTA DI CONFERMA
1
Confermare l’operazione?
[CONFERMA]
1 -------- 5
< ultimo

IT
4.2.5 Precisazioni tecniche
Rich. con sonda amb.
Impostazione SI: la richiesta di calore dell’impianto di riscaldamento avviene solo se la temperatura ambiente risulta inferiore al set point ambiente impostato.
Impostazione NO: la richiesta di calore dell’impianto di riscaldamento è costantemente presente nelle modalità “Manuale”
e “AUTO COMFORT”. Nelle altre modalità la richiesta non è
presente.
Modul. con sonda amb.
Impostazione SI: la temperatura di mandata è modulata in
base allo scostamento tra la reale temperatura ambiente,
misurata dalla sonda interna al dispositivo, e al set ambiente
programmato
Impostazione NO: la temperatura di mandata sarà mantenuta
fissa al massimo permesso, durante tutti i periodi di richiesta
(gestione ad isteresi).
Modul. con sonda est.
Impostazione SI: la temperatura massima di mandata (e quella modulata se abilitata la modulazione con sonda ambiente)
è regolata in base al valore della temperatura esterna (se presente la sonda esterna), tenendo conto anche dei valori impostati per la Curva climatica e relativo Offset.
Temperatura di mandata
°C
90
80
70
60
50
40
30
20
20 15 10 5 0 -10 -15-5 -20
K=9 K=6 K=4,5 K=3
K=2,2
K=1,5
K=0,75
°C
Temperatura esterna
Offset curva climat.
E’ lo spostamento verticale della curva climatica, con cui correggere la temperatura di mandata calcolata.
Curva climatica
Pendenza della curva climatica selezionata, usata per modulare la temperatura di mandata in funzione della temperatura
esterna. I limiti inferiori e superiori delle curve dipendono dai
limiti di mandata della caldaia.
Tempo off in isteresi
È il valore da sommare alla temperatura di set ambiente, sopra al quale il dispositivo spegne la richiesta, esclusivamente durante la regolazione ad isteresi (modulazione con sonda
ambiente disabilitata, ma con uso sonda ambiente abilitata).
17

IT
k
Inerzia impianto
È un parametro che regola la velocità di reazione dell’algoritmo di regolazione, da associare all’inerzia o alla dimensione e
tipo di edificio e di sistema di riscaldamento.
Set minimo mandata
È il limite inferiore della temperature di mandata calcolata
(utile in caso di impianti con bassi rendimenti a basse temperature calcolate).
Attiva antigelo
Impostazione SI: abilitazione del programma di protezione
antigelo
Impostazione NO: il riscaldamento verrà mantenuto spento
nelle modalità di funzionamento OFF, ESTATE e nei periodi
Ridotto in Modalità AUTO se la sonda ambiente è disabilitata.
Set antigelo
È la temperatura ambiente (antigelo), sotto la quale il dispositivo esegue una richiesta di riscaldamento al set di mandata
minimo. La richiesta viene mantenuta attiva fino a quando la
temperatura ambiente ha superato il valore “antigelo impostato + 0.6°C”.
4.3 Impostazioni da tasto MODO
Dalla
– Premere il tasto
– Premere l’encoder
“videata principale”
lezione delle
“Modalità di funzionamento”
Gi 20 Mar 2014Zona 1 10:30
Inverno manuale - set 20.0°C
Menu Modo
Modo
per entrare nella videata di se-
dalità sarà evidenziata (es. “Inverno”)
Estate
Esci Indietro
clic
denziata ed entrare nelle
Inverno
per confermare la
“righe”
Off
. Una delle tre Mo-
“Modalità”
evi-
Correz. sonda amb.
È il valore utilizzato per correggere la lettura della temperatura ambiente, da parte della sonda interna al dispositivo.
Acqua calda MAN 40°C
Riscaldamento MAN 20.0°C
Funzione vacanze OFF
Esci Indietro
– Ruotare l’encoder per selezionare
18
Inverno
“Riscaldamento”

IT
odo fu
k
N
k
k
L
Ì
k
– Premere l’encoder
ed entrare nelle
“righe”
– Premere l’encoder
Modo funzionamento MAN
M
Set AUTO comfort 20.0°C
Set AUTO ridotta 18.0°C
Set MAN 20.0°C
Programmaz. oraria 20.0°C
Esci Indietro
per confermare
click
Riscaldamento
nzionamento
per confermare la
clic
ziata ed entrare nell’area modificabile
Riscaldamento
Modo funzionamento MAN
Set AUTO comfort 20.0°C
Set AUTO ridotta 18.0°C
Set MAN 20.0°C
Programmaz. oraria 20.0°C
Esci Indietro
MA
– Ruotare l’encoder per modificare il
campo consentito (es. MAN - AUTO - OFF)
“Riscaldamento”
“Riga”
“dato/valore”
eviden-
, nel
4.3.1 Programmazione oraria
Il Comando Remoto
Sime HOME
permette di regolare un mas-
simo di quattro fasce orarie giornaliere.
Durante la fascia oraria programmata la caldaia funziona in
modalità di riscaldamento COMFORT e al di fuori della fascia
oraria programmata la caldaia funziona in modalità di riscaldamento RIDOTTO,
– Premere l’encoder
ria”
ed entrare nell’area modificabile
Giorno/i:
024681012141618202224
[1] 06:00 - 08:00
[2] 11:00 - 13:00
per confermare
clic
PROGRAMMA ORARIO RISCALDAMENTO
LUNEDÌ
UNED
[3] [4] 18:00 - 23:00
Esci Indietro
– Ruotare l’encoder per selezionare i
“Programmaz. ora-
“Giorni singoli”
o i
“Gruppi di giorni”
– Premere l’encoder
difica effettuata e ritornare alla riga
– Ruotare l’encoder per selezionare un’altra
Programmaz. oraria
)
Modo funzionamento MAN
Set AUTO comfort 20.0°C
Set AUTO ridotta 18.0°C
Set MAN 20.0°C
Programmaz. oraria 20.0°C
Programmaz. oraria
Esci Indietro
per confermare l’eventuale mo-
clic
“Modo funzionamento”
“riga“
Riscaldamento
(es.
– Premere l’encoder
ferita ed entrare nel primo
Giorno/i:
024681012141618202224
[1] 06:00 - 08:00
[2] 11:00 - 13:00
Annulla Conferma
– Ruotare l’encoder per modificare il
base all’ora preferita
per confermare la selezione pre-
clic
“orario regolabile” [1]
PROGRAMMA ORARIO RISCALDAMENTO
LUNEDÌ
06:00
[3] [4] 18:00 - 23:00
“dato/valore”
in
19

IT
k
0
– Premere l’encoder
sare al
“dato/valore”
Giorno/i:
024681012141618202224
[1] 06:00 - 08:00
[2] 11:00 - 13:00
Annulla Conferma
per confermare la modifica e pas-
clic
successivo [2]
PROGRAMMA ORARIO RISCALDAMENTO
LUNEDÌ
[3] -
08:00
[4] 18:00 - 23:00
– Continuare nello stesso modo fino al termine delle modifi-
che necessarie per ogni giorno della settimana o per i gruppi di giorni.
NOTA:
Il modo di operare è CIRCOLARE (a “carosello”) quindi
si procede SEMPRE IN AVANTI anche in caso di errore.
AVVERTENZA
Nel caso NON si desideri utilizzare una fascia oraria, è necessario impostare gli orari di inizio e fine,
di tale fascia, allo stesso valore (es. 3 14:00-14:00).
– A modifiche ultimate premere il tasto
nare ai
“Giorni singoli”
– Premere il tasto
cipale”
.
o ai
Esci
“Gruppi di giorni”
per ritornare alla
Gi 20 Mar 2014Zona 1 10:30
Conferma
per ritor-
“videata prin-
4.3.2 Funzione vacanze
Questa funzione permette di disattivare sia il riscaldamento,
sia la produzione di acqua sanitaria per il periodo di vacan-
“impostato e attivato”
za
funzione antigelo (se impostata).
Per impostare la funzione vacanze, dalla
– Premere il tasto
– Premere l’encoder
funzionamento
Estate
– Ruotare l’encoder
– Premere l’encoder
ze”
ed entrare nell’area modificabile
durante il quale potrà essere attiva la
“videata principale”
Modo
click
o
Estate
Acqua calda MAN 40°C
Funzione vacanze OFF
Esci Indietro
click
Inizio: 05 02 2014 15 : 00
Fine:
Attiva vacanze: NO
Acqua calda OFF - Risc. OFF (antigelo attivo)
Annulla Conferma
.
per confermare una modalità di
Inverno
per selezionare
PROGRAMMA VACANZE
GIORNO MESE ANNO ORA
5
20 02 2014 15 : 00
.
“Funzione vacanze”
Inverno
Off
per confermare “
Funzione vacan-
:
Inverno manuale - set 20.0°C
Menu Modo
20
si evidenzierà.
– Ruotare l’encoder per modificare il
“dato/valore”
che

IT
k
0
k
– Premere l’encoder
sare al
“dato/valore”
Inizio: 05 02 2014 15 : 00
Fine:
Annulla Conferma
– Ruotare l’encoder per modificare il
per confermare la modifica e pas-
clic
successivo
PROGRAMMA VACANZE
GIORNO MESE ANNO ORA
5
20 02 2014 15 : 00
Attiva vacanze: NO
Acqua calda OFF - Risc. OFF (antigelo attivo)
“dato/valore”
in
base alla data di inizio della vacanza
– Premere l’encoder
sare al
“dato/valore”
per confermare la modifica e pas-
clic
successivo
– Continuare nello stesso modo fino al termine delle modifi-
che necessarie
NOTA:
Il modo di operare è CIRCOLARE (a “carosello”) quindi
si procede SEMPRE IN AVANTI anche in caso di errore.
– A modifiche ultimate premere il tasto
nare alla voce
“Funzione vacanze”
Conferma
per ritor-
4.3.3 Segnalazione anomalia
Nel caso si presenti un’anomalia di funzionamento apparirà la
videata
“Anomalia in Corso”
Per i principali codici anomalia viene visualizzata anche una
breve descrizione.
ANOMALIA IN CORSO
2 - Bassa press. impianto
Esci Indietro
Il tipo di anomalia può essere
Per ripristinare le condizioni di normale funzionamento:
– nel primo caso basta eliminare la causa dell’anomalia
– nel secondo caso è necessario eliminare la causa dell’ano-
malia e successivamente premere il tasto
Nel caso di
pianto
viene richiesto di caricare l’impianto e successivamente
di premere il tasto
mancanza acqua impianto o bassa pressione acqua im-
Conferma
ANOMALIA IN CORSO
al posto della
6 - Blocco bruciatore
Esci Reset
transitoria
(volatile) o
anziché
RICHIESTA DI CONFERMA
“videata principale”
ANOMALIA IN CORSO
di blocco
Reset
Reset
.
.
.
.
– Premere il tasto
cipale”
.
Esci
Inverno manuale - set 20.0°C
Menu Modo
per ritornare alla
Gi 20 Mar 2014Zona 1 10:30
“videata prin-
2 - Bassa press. impianto
Esci Carica
Confermare l’operazione?
Annulla Conferma
21

IT
k
Codice
allarme
1 Sicurezza fumi
2 Bassa press. impianto
3 Alta press. impianto
6 Blocco bruciatore Mancata rilevazione fiamma
7 Sovratemperatura
9 Mancata circolazione
13 Sovratemperatura fumi Intervento sonda fumi
20 Sovratemperat. zona 1
22 Sovratemperat. zona 2
42 Anomalia pulsanti Schiacciamento pulsanti
Anomalia Descrizione anomalia
Intervento termostato fumi
oppure Intervento sensore
pressostato aria
Bassa pressione acqua
impianto
Alta pressione acqua im-
pianto
Intervento termostato
sicurezza
Intervento doppia sonda CH
Mancata circolazione acqua
impianto
Anomalia intervento termo-
stato sicurezza zona mix 1
Anomalia intervento termo-
stato sicurezza zona mix 2
In entrambi i casi, dalla
– Premere l’encoder
“videata principale”
per visualizzare il valore di
clic
:
postato
SET SANITARIO
40.0
Set acqua calda
Annulla Conferma
– Ruotare l’encoder per impostare il nuovo
set”
– Premere il tasto
tornare alla
21.3
Manuale temporaneo
Conferma
per concludere la modifica e ri-
“videata principale”
SET AMBIENTE
.
SET AMBIENTE
21.3
Manuale
set
im-
“valore di
Altri Anomalia tecnica ...
4.3.4 Impostazioni rapide
Annulla Conferma
IMPORTANTE PER IL SET AMBIENTE
Il significato delle scritte sul display è il seguente:
Annulla Conferma
L’Utente, utilizzando l’encoder, può eseguire le impostazioni
rapide seguenti :
– modificare direttamente il
ESTATE
– modificare direttamente il
“set acqua calda”
in modalità
“set temp ambiente”
in modalità
Manuale temporaneo:
il
“modo di funzionamento”
in riscaldamento è impostato su AUTO e il valore di set letto sul display
sarà valido fino al successivo cambio di fascia oraria (set point
automatico)
INVERNO.
Manuale:
il
“modo di funzionamento”
in riscaldamento è impostato su MAN e il valore di set letto sul display sarà valido
permanentemente.
22

IT
k
Modo: Inverno Progr. automatico - Set 18,0 Cfino alle 11:30
Menu Modo
4.4 Navigazione da tasto MODO
MODO
Estate Inverno Off
Estate
Acqua calda MAN 50°C
_________________________________
Funzione vacanze OFF
Inverno
Acqua calda MAN 50°C
Riscaldamento MAN 20.0°C
_______________________________
Funzione vacanze OFF
Acqua calda
Modo funzionamento MAN
Set acqua calda 50°C
Acqua calda
Modo funzionamento MAN
Set acqua calda 50°C
Per
“selezionare”
clic
Inizio: 01 01 2014 07:00
Fine: 08 01 2014 07:00
Attiva vacanze: NO
Acqua calda OFF - Risc. Off (antigelo attivo)
Riscaldamento
Modo funzionamento MAN
Set AUTO comfort 20.0°C
Set AUTO ridotta 18.0°C
Set MAN 20.0°C
Programmaz. oraria [...]
Set max mandata 80°C
Per
“confermare”
PROGRAMMA VACANZE
GIORNO MESE ANNO Ora
(paragrafo 4.3.2 a pagina 20)
righe o
le selezioni o le modifiche
“modificare”
Inizio: 01 01 2014 07:00
Fine: 08 01 2014 07:00
Attiva vacanze: NO
Acqua calda OFF - Risc. Off (antigelo attivo)
valori
PROGRAMMA VACANZE
GIORNO MESE ANNO Ora
Off
PROGRAMMA ORARIO RISCALDAMENTO
Giorno/i:
0 2 4 6 8 10 12 14 16 18 20 22 24
LUNEDI’
______________________________
[1]04:00-08:00 [2]12:00-14:00
[3]16:00-18:15 [4]20:30-22:30
(paragrafo 4.3.2 a pagina 20)
(paragrafo 4.3.1 a pagina 19)
23

EN
RANGE
MODEL CODE
Sime HOME 8092280
EC DECLARATION OF CONFORMITY
In accordance with "Low Voltage" Directive 2006/95/EC,
"Electromagnetic Compatibility" Directive 2004/108/EC, the
manufacturer Fonderie SIME S.p.A., via Garbo 27, 37045
Legnago (VR),
complies with the Directives in question.
The Technical Manager
(Franco Macchi)
DECLARES THAT
the Remote Control model
Sime HOME
SYMBOLS
DANGER
To indicate actions which, if not carried out correctly,
can result in injury of a general nature or may damage or cause the appliance to malfunction; these
actions therefore require particular caution and adequate preparation.
DANGER
To indicate actions which, if not carried out correctly,
could lead to injury of an electrical nature; these
actions therefore require particular caution and adequate preparation.
IT IS FORBIDDEN
To indicate actions which MUST NOT BE carried out.
24
WARNING
To indicate particularly important and useful information.

EN
INDEX
1 SAFETY WARNINGS AND REGULATIONS 26
1.1 Warnings .....................................26
1.2 Restrictions ...................................26
2 INSTALLATION 27
2.1 Receiving the product ...........................27
2.2 Dimensions and weight..........................27
2.3 Temperatures..................................27
2.4 Wall mounting .................................28
3 DESCRIPTION 30
3.1 Characteristics ................................30
3.2 Multifunction encoder...........................30
3.3 User interface .................................31
4 USE 32
4.1 Start-up ......................................32
4.2 Settings from the MENU button...................32
4.2.1 GENERAL SETTINGS Menu ............. 32
4.2.2 INFORMATION Menu .................. 35
4.2.3 TECHNICAL Menu..................... 36
4.2.4 MENU button for navigation tree ......... 38
4.3.5 Technical specifications ................ 39
4.3 Settings from the MODE button ...................40
4.3.1 Program. time........................ 41
4.3.2 Holiday function ...................... 42
4.3.3 Fault warnings ....................... 43
4.3.4 Quick settings ........................ 44
4.4 Navigating from the MODE button.................45
25

1 SAFETY WARNINGS AND REGULATIONS
EN
1.1 Warnings
WARNINGS
– Read this manual carefully before installing the
appliance.
– The appliance is an integral part of the system.
Refer also to the documentation of the controlled
boiler.
– Installation may only be carried out by Profession
ally Qualified
– To ensure a correct reading of the average room
temperature, do not place the Remote Control
in direct sunlight or in the path of continuous
draughts.
– The manufacturer is not responsible for any dam-
age to people, animals or objects resulting from
incorrect or improper installation or use of the
Remote Control.
Personnel.
1.2 Restrictions
-
IT IS FORBIDDEN
– Install the Remote Control near appliances which
emit electromagnetic radiation.
– The Remote Control is not to be used by children
or unassisted disabled persons.
26
EN
2 INSTALLATION
2.1 Receiving the product
The
Sime HOME
age, protected by cardboard.
In addition to the
also supplied:
– Use and installation manual
– Expansion plugs
IT IS FORBIDDEN
Do not leave packaging material around or near
children since it could be dangerous. Dispose of it as
prescribed by legislation in force.
Remote Control is supplied in a single pack-
Sime HOME
Remote Control, the following are
2.2 Dimensions and weight
H
L
Description Sime Home
W (mm) 160
H (mm) 105
D (mm) 40
Weight (g)
130
P
2.3 Temperatures
Operation: 0 - 50°C
Storage: -10 - +60°C
27

EN
2.4 Wall mounting
After having taken the
packaging:
– Use a screwdriver to push the fastening tab (1) to release
the base (2) from the user interface (3) making sure that the
screwdriver does not penetrate.
Sime HOME
Remote Control out of its
3
12
– Position the Bus communication cable (4), Open Them, be-
tween the boiler and the Remote Control
– Connect the boiler to the terminals (5) (Cable: 2 x 0.75 mm
unpolarised, Max. length: 50 m)
4
5
– Secure the base (2) to the wall using the screws (6) and the
plugs (7) supplied with the Remote Control
2
– Separate the 2 parts
28
7
2
6

EN
– Refit the User interface (3) on the base (2) hooking the tab
(1) correctly
2
3
WARNING
Make sure that there is no excess cable between the
base (2) and the user interface (3).
29

3 DESCRIPTION
EN
3.1 Characteristics
The
Sime HOME
complementary product for the system which has been designed specifically to be used easily and intuitively as all operations which can be carried out are indicated on a large dotmatrix display.
The connection to and communication with the boiler is by
means of the unpolarised bifilar bus and Open Therm standard protocol.
The main characteristics of the
are:
– Function mode selection (Summer/Winter/Off)
– Heating and DHW Temperature Adjustment
– Weekly programming for heating
– Temperature adjustment (with external sensor installed)
– Boiler parameter management
– Anti-freeze temperature setting
– Option of programming 4 daily time bands
– Option of system management while on holiday
– Constant date and time display
– Constant room temperature display
– Display of system operation parameters
– Display of alarm history and management of those present.
Remote Control is a functional yet elegant
Sime HOME
Remote Control
3.2 Multifunction encoder
The encoder can be operated in the following ways.
Rotation, allowing the user to:
– scroll through the menus, submenus and the rows on the
screen
– modify data or values in certain areas
Pressure, allowing the user to:
– confirm the selections made
– confirm the modifications made
NB.
If there is a power failure, all settings are stored with the exception of the date and time which are only stored for approximately 24 hours.
30

EN
3.3 User interface
14
15
16
12
13
Mode: Winter Progr. automatic - Set 18,0°C until 11:30
Menu Mode
10 8
11 9
Th 20 Mar 2014Zone 1 10:30
7
6
5
4
1
Button (A)
2
Multifunction encoder
3
Button (B)
4
Action carried out by pressing button (B)
5
Programmed time band
6
Description of adjustments in course
7
Measured external temperature
8
Time
123
9
Presence of External Sensor (ES)
10
Date
11
Measured room temperature
12
Modulation percentage
13
Presence of flame
14
Controlled area
15
Request for heating (rad) or hot water (tap)
16
Action carried out by pressing button (A)
31

4 USE
G
Languag
EN
4.1 Start-up
Once installation of the
completed, proceed as follows:
– Set the main system switch to ON (on)
– From the boiler control panel, set "Stand-by" mode
ON
– The following screen appears on the
Control.
Sime HOME
Remote Control has been
Sime HOME
O
Remote
4.2 Settings from the MENU button
4.2.1 GENERAL SETTINGS Menu
From the
ceed as follows:
– Press the button
“Menu”
“main screen”
GENERAL SETTINGS [...]
INFORMATION [...]
TECHNICAL [...]
of the
Menu Mode
Menu
ENERAL SETTINGS
Esc Back
Sime HOME
Th 20 Mar 2014Zone 1 10:30
Winter manual - set 20.0°C
to go into the screen to select
MENU
Remote Control, pro-
32
Esc Back
– Press the encoder
and go into the submenu
Language ITA
Date and time [...]
Factory settings [...]
to confirm the Menu highlighted
click
GENERAL SETTINGS
e
Esc Back

EN
k
ITA
G
k
Languag
D
k
k
– Press the encoder
to confirm the submenu highlight-
clic
ed and select the modifiable area
GENERAL SETTINGS
Language ITA
Date and time [...]
Factory settings [...]
Esc Back
– Rotate the encoder and modify the
field allowed (eg: from ITA to ENG)
GENERAL SETTINGS
Language ENG
Date and time [...]
Factory settings [...]
Esc Back
EN
“data/value”
in the
– Rotate the encoder to select another submenu (eg.
Date and time)
GENERAL SETTINGS
Language ENG
ate and time
Date and time [...]
Factory settings [...]
Esc Back
– Press the encoder
to confirm the submenu highlight-
clic
ed and go into the modifiable area
SETTING DATE AND HOUR
– The first modifiable
DAY MONTH
Date 01 Jan 2014
HOUR MINUTE
Hour 06 : 36
Cancel Confirm
“data/value”
YEAR
is highlighted (eg. 06).
– Press the encoder
back to the submenu
Language ENG
Date and time [...]
Factory settings [...]
NB.:
- pressing the button
to confirm the modification and go
clic
GENERAL SETTINGS
e
Esc Back
Back
allows the user to go back by
– Rotate the encoder
from 06 to 12)
– Press the encoder
lect the next
“data/value”
Date 01 Jan 2014
Hour 12 : 36
Cancel Confirm
to modify the
to confirm the modification and se-
clic
“data/value”
which will be highlighted (eg. 36)
SETTING DATE AND HOUR
DAY MONTH
HOUR MINUTE
YEAR
(eg.
one position
- pressing the button
“main screen”
the
.
Esc
allows the user to go back to
33

EN
k
F
– Rotate the encoder to modify the
“data/value”
(eg.
from 36 to 50)
SETTING DATE AND HOUR
– Press the encoder
lect the next
“data/value”
DAY MONTH
Date 01 Jan 2014
Hour 12 : 50
Cancel Confirm
HOUR MINUTE
to confirm the modification and se-
clic
which will be highlighted (eg. 01)
YEAR
– Continue in this way until all the necessary modifications
have been made
– After all modifications have been made, press the button
Confirm
NB:
The user must work in a CIRCULAR manner ("rounda-
bout") therefore,
to go back to the initial submenu (Date and time).
ALWAYS MOVING FORWARDS, even if a mis-
take has been made.
WARNING
It is recommended that you
if you want to go back to
“Factory settings”
ONLY
go into this submenu
settings made by the user.
Otherwise, press the button
Esc
If you wish to proceed:
– Press the encoder
to go into a modifiable area. A
click
screen appears offering the following options:
CONFIRM REQUEST
Confirm operation?
Cancel Confirm
– Press the button
Cancel
to go back to the
lected previously (Factory settings)
– Press the button
and after a few seconds go back to the
Confirm
to restore the
“main menu”
deleting all
or
Back
“Menu”
.
se-
“Factory settings”
– Rotate the encoder to select another
“Menu”
(eg. Fac-
tory settings)
GENERAL SETTINGS
Language ENG
Date and time [...]
actory settings
Factory settings [...]
Esc Back
34

EN
I
k
Z
g
k
g
Boiler
k
4.2.2 INFORMATION Menu
The INFORMATION menu is for display purposes only and no
modification of the data can be made.
From the
– Press the button
“Menu”
– Rotate the encoder to select the menu
“main screen”
GENERAL SETTINGS [...]
NFORMATION
INFORMATION [...]
TECHNICAL [...]
Th 20 Mar 2014Zone 1 10:30
Winter manual - set 20.0°C
Menu Mode
Menu
Esc Back
to go into the screen to select
MENU
“INFORMATION”
– Rotate the encoder to select the required submenu
– Press the encoder
to confirm the submenu selected
clic
and go into the display area for the relevant data
INFORMATION
Room temperature 20.0°C
Room temperature
Heating set 80°C
Heating temp. 30°C
Esc Back
– Press the button
– Rotate the encoder
Back
to go back to the submenus
to select another submenu
INFORMATION
Zone heating [...]
Boiler [...]
Hot water [...]
Alarms [...]
Firmware version 100
Esc Back
– Press the encoder
into the submenu
Zone heating [...]
Boiler [...]
Hot water [...]
Alarms [...]
Firmware version 100
to confirm
clic
INFORMATION
one heatin
Esc Back
“INFORMATION”
and go
– Press the encoder
to confirm the submenu selected
clic
and go into the display area for the relevant data
35

k
– Continue in this way until all the necessary information has
been shown
– Press the button
Esc
to go back to the
Th 20 Mar 2014Zone 1 10:30
“main screen”
EN
MENU
GENERAL SETTINGS [...]
.
INFORMATION [...]
TECHNICAL
TECHNICAL [...]
Esc Back
Winter manual - set 20.0°C
Menu Mode
4.2.3 TECHNICAL Menu
It is recommended that the TECHNICAL Menu is only used by
Professionally Qualified Personnel, since it is used to modify
system management data.
The submenu
word)
From the
“1 2 3 4 5”
“main screen”
“Boiler parameters”
to be entered.
Winter manual - set 20.0°C
Menu Mode
requires the CODE (or pass-
Th 20 Mar 2014Zone 1 10:30
– Press the encoder
to go into a modifiable area. A
click
screen appears offering the following options:
CONFIRM REQUEST
Confirm operation?
Cancel Confirm
– Press the button
Cancel
to go back to the menu
NICAL”
– Press the button
Confirm
Zone heating [...]
Boiler parameters [...]
Total reset [...]
Esc Back
to go into the submenus
TECHNICAL
“TECH-
– Press the button
“Menu”
– Rotate the encoder to select the menu
Menu
to go into the screen to select
“TECHNICAL”
– Rotate the encoder to select the required submenu
– Press the encoder
to confirm the submenu selected
clic
and go into the area for modifiable parameters.
36

EN
k
1
k
k
WARNING
When the submenu
“boiler parameters”
is selected,
the following screen appears when the the encoder
is pressed.
clic
ENTER ACCESS CODE
Code: 000000
Cancel Confirm
– Rotate the encoder to modify the first digit from 0 to 1
– Press the encoder
to confirm the modification and
click
select the next digit
– Continue in this way until the CODE (or password)
“1 2 3 4 5”
has been completed
– where
“Parameter index”
refers to the parameter table in the
manual of the installed boiler (eg. 1=tS 0.1 or 1=PAR 01).
– Rotate the encoder
to scroll through the list of pa-
rameters and check the value
– If the value of the selected parameter is to be modified:
– Press the encoder
to go into the value modification
clic
area
Boiler parameters
Parameter Index: 1
Parameter Value: 0
1--------42
Esc Back
ENTER ACCESS CODE
Code:
Cancel Confirm
12345
– Press the encoder to set the new value
– Press the encoder
to confirm the modification and
clic
move on to another parameter.
– Press the button
tings”
area for the boiler
Confirm
Parameter Index: 1
Parameter Value: 0
Esc Back
to go into the
Boiler parameters
1--------42
“Parameter set-
– Once all the displays/modifications have been completed,
press the button
Esc
Menu Mode
to go back to the
Th 20 Mar 2014Zone 1 10:30
Winter manual - set 20.0°C
“main screen”
.
37

k
Modo: Inverno Progr. automatico - Set 18,0 Cfino alle 11:30
Menu Modo
4.2.4 MENU button for navigation tree
MENU
MENU
GENERAL SETTINGS [...]
INFORMATION [...]
TECHNICAL [...]
GENERAL SETTINGS
Language [...]
Date and time [...]
Factory settings [...]
(paragrafo 4.2.1 a pagina 32)
clic
To
“select”
To
“confirm”
rows or
“modify”
the selections or modifications
values
EN
INFORMATION
Zone heating [...]
Boiler [...]
Hot water [...]
Alarms [...]
Firmware version 100
Confirm operation?
[CONFIRM]
38
(paragrafo 4.2.2 a pagina 35)
CONFIRM REQUEST
(paragrafo 4.2.3 a pagina 36)
Zone heating
Room set 20.0°C
Heating set 0°C
Heating temp. 28.0°C
(These screens are for display purposes only. It is NOT possible to modify the data)
TECHNICAL
Zone heating [...]
Boiler parameters [...]
Total reset [...]
Boiler
Return temperature 25.0°C
Power output 0%
System pressure 1.2bar
Exhaust temp. _ _ _°C
Zone heating
Room probe run YES
Room probe modul. YES
Ext. probe modul. YES
Weather comp.curve 3.0
Weather comp. offset 0°C
Backlash off temp. 0.1°C
System inertia 10
Flow temp.min. set 20°C
Antifreeze enable YES
Antifreeze set 5.0°C
Room probe offset 0.0°C
Hot water
Hot water temp 51.2C
Hot water set 50°C
Flow rate --l/min
ENTER ACCESS CODE
Code:
[CONFIRM]
0 0 0 0
0
(paragrafo 4.2.3 a pagina 36)
Alarm history
Historical index:
Alarm code: 255
255 - Technical problem
CONFIRM REQUEST
1
Confirm operation?
[CONFIRM]
1 -------- 5
< ultimo

EN
4.3.5 Technical specifications
Room probe run
YES setting
room temperature is below the set room set point.
NO setting: the heating system heat request is constantly present in “Manual” and “AUTO COMFORT” mode. The request is
not present in other modes.
: the heating system heat request only occurs if the
Heating temperature
°C
90
80
K=9 K=6 K=4,5 K=3
Room probe modul.
YES setting
: the flow temperature is modulated on the basis
of the offset between the real room temperature, measured
by the sensor inside the device, and the programmed room
temperature
NO setting: the flow temperature will be maintained at the
maximum allowed during the request period (backlash management).
Ext. probe modul.
YES setting
: the maximum delivery temperature (and the modulated temperature if modulation has been enabled with the
room sensor) is adjusted on the basis of the external temperature (if there is an external sensor), taking into account
the values set for the weather comp. curve and corresponding
Offset.
Weather comp. curve
The incline of the selected weather comp. curve used to modulate the flow temperature on the basis of the external temperature. The upper and lower limits for the curve depend on
the boiler delivery limits.
70
60
50
40
30
20
20 15 10 5 0 -10 -15-5 -20
K=2,2
K=1,5
K=0,75
°C
External temperature
Weather comp. offset
This is the vertical movement of the weather comp. curve
which is used to correct the calculated delivery temperature.
Backlash off temp.
It is the value to be added to the room temperature above
which the device will switch off the request, exclusively during
backlash adjustment (modulation with room sensor disabled,
but with room probe use enabled)
39

EN
k
System inertia
This is a parameter which adjusts the reaction time of the adjustment algorithm, to be associated with inertia or with the
size and type of building and the heating system.
Flow Temp. min. set
It is the lower limit of the calculated flow temperature (useful in the case of low efficiency systems with low calculated
temperatures)
Antifreeze enable
YES setting
: enable the antifreeze protection program
NO setting: the heating will remain off when in the function
mode OFF, SUMMER and in periods of Reduced mode AUTO if
the room sensor is disabled.
Antifreeze set
This is the room temperature (antifreeze) below which the device makes a heating request at the minimum flow set. The
request remains active until the room temperature has exceeded the "antifreeze temperature + 0.6°C”
Room probe offset
This is the value used to correct the room temperature reading by the sensor inside the device.
4.3 Settings from the MODE button
From the
– Press the button
“Function mode”
(eg. “Winter”)
– Press the encoder
and go into the
“main screen”
One of the three Modes will be highlighted
Summer
“rows”
Hot water MAN 40°C
Heating MAN 20.0°C
Holiday function OFF
Th 20 Mar 2014Zone 1 10:30
Winter manual - set 20.0°C
Menu Mode
Mode
Esc Back
clic
Esc Back
to go into the screen to select
Winter
Off
to confirm the highlighted
Winter
“Mode”
– Rotate the encoder to select
40
“Heating”

EN
Functio
ode
MAN
k
k
– Press the encoder
“rows”
the
– Press the encoder
Function Mode MAN
Set AUTO comfort 20.0°C
Set AUTO reduced 18.0°C
Set MAN 20.0°C
Program. Time 20.0°C
Esc Back
to confirm
click
Heating
n M
to confirm the highlighted
click
“Heating”
and go into the modifiable area
Heating
Function Mode MAN
Set AUTO comfort 20.0°C
Set AUTO reduced 18.0°C
Set MAN 20.0°C
Program. Time 20.0°C
Esc Back
– Rotate the encoder to modify the
“data/value”
permitted field (eg. MAN - AUTO - OFF)
– Press the encoder
and go back to the row
to confirm any modifications made
clic
“Function mode”
– Rotate the encoder to select another
gram. Time
)
Heating
Function Mode MAN
Set AUTO comfort 20.0°C
Set AUTO reduced 18.0°C
Set MAN 20.0°C
Program. Time 20.0°C
Program. Time
Esc Back
and go into
“Row”
in the
“row“
(eg.
Pro-
4.3.1 Program. time
The
Sime HOME
four daily time bands.
During the programmed time band, the boiler works in COMFORT heating mode while outside the programmed time band
it works in REDUCED heating mode.
– Press the encoder
into the modifiable area
– Rotate the encoder to select the
“Group of days”
the
– Press the encoder
and go into the first
– Rotate the encoder to modify the
basis of the required time
Remote Control allows the user to adjust up to
to confirm
clic
HEATING TIME PROGRAM
Day/s:
024681012141618202224
[1] 06:00 - 08:00
[2] 11:00 - 13:00
Esc Back
click
MONDAY MONDAY
[3] [4] 18:00 - 23:00
to confirm the required selection
“Program. time”
“Single days”
and go
or
“adjustable time” [1]
HEATING TIME PROGRAM
Day/s:
024681012141618202224
[1] 06:00 - 08:00
06:00
[2] 11:00 - 13:00
Cancel Confirm
MONDAY
[3] [4] 18:00 - 23:00
“data/value”
on the
41

EN
k
0
– Press the encoder
move to the next
“data/value”
Day/s:
024681012141618202224
[1] 06:00 - 08:00
[2] 11:00 - 13:00
Cancel Confirm
to confirm the modification and
click
[2]
HEATING TIME PROGRAM
MONDAY
[3] -
08:00
[4] 18:00 - 23:00
– Continue in this way until all the necessary modifications
have been made for each day of the week or group of days.
NB:
The user must work in a CIRCULAR manner ("rounda-
bout") therefore,
ALWAYS MOVING FORWARDS, even if a mis-
take has been made.
WARNING
If NO time band is required, the start and stop times
of that band must be set to the same value (eg. 3
14:00-14:00).
4.3.2 Holiday function
This function allows the user to deactivate both heating and
hot water production during a
“set and activated”
riod during which the antifreeze function can be active (if set).
To set the holiday function from the
– Press the button
– Press the encoder
modes,
Summer
or
– Rotate the encoder
Summer
Hot water MAN 40°C
Holiday function OFF
– Press the encoder
Mode
click
Winter
Esc Back
clic
.
to confirm one of the function
.
to select
Winter
to confirm “
“main screen”
“Holiday function”
Off
Holiday function”
into the modifiable area
holiday pe-
:
and go
HOLIDAY SCHEDULE
– Once the modification has been made, press the button
Confirm
– Press the button
to go back to
Esc
“Single days”
or
to go back to the
Th 20 Mar 2014Zone 1 10:30
“Group of days”
“main screen”
.
– Rotate the encoder to modify the
Winter manual - set 20.0°C
Menu Mode
42
will be highlighted.
DAY MONTH YEAR HOUR
Start: 05 02 2014 15 : 00
Stop:
Cancel Confirm
5
20 02 2014 15 : 00
Enable holiday: NO
Hot water OFF - Heat. OFF (nofrost active)
“data/value”
which

EN
0
– Press the encoder
move to the next
“data/value”
Start: 05 02 2014 15 : 00
Stop:
Cancel Confirm
– Rotate the encoder to modify the
to confirm the modification and
click
HOLIDAY SCHEDULE
DAY MONTH YEAR HOUR
5
20 02 2014 15 : 00
Enable holiday: NO
Hot water OFF - Heat. OFF (nofrost active)
“data/value"
on the
basis of the holiday start date
– Press the encoder
move to the next
“data/value”
to confirm the modification and
click
– Continue in this way until all the necessary modifications
have been made
NB:
The user must work in a CIRCULAR manner ("rounda-
bout") therefore,
ALWAYS MOVING FORWARDS, even if a mis-
take has been made.
4.3.3 Fault warnings
If a fault occurs, the screen
in place of the
“main screen”
description will appear.
ANOMALY IN PROGRESS
2 - Low pressure
Esc Back
The fault maybe a
blocks
the appliance.
transient
To restore normal operating conditions:
– if the fault is transient, eliminate the cause of the fault
– if the fault causes a block, eliminate the cause of the fault
and then press the button
If there is
system
the button
no water in the system
there will be a request to fill the system and then press
Confirm
rather than
“Anomaly in progress”
will appear
. For the main fault codes, a brief
ANOMALY IN PROGRESS
6 - Burner block
Esc Reset
(volatile) fault or a fault which
Reset
or
.
low water pressure in the
Reset
.
– When all modifications have been made, press the button
Confirm
– Press the button
to go back to the item
Esc
Menu Mode
to go back to the
Th 20 Mar 2014Zone 1 10:30
Winter manual - set 20.0°C
“Holiday function”
“main screen”
.
ANOMALY IN PROGRESS
2 - Low pressure
Esc Charge
Cancel Confirm
CONFIRM REQUEST
Confirm operation?
43

EN
k
Alarm
code
1 Smoke safety
2 Low pressure
3 High pressure
6 Burner block No flame detection
7 Over temperature
9 Circulation Failure
13 Smoke over temperature Smoke probe intervention
20 Zone 1 over temperature
22 Zone 2 over temperature
42 Button fault Buttons compressed
Other Technical problem ...
Fault Description of the fault
Smoke thermostat interven-
tion Air pressure switch
sensor intervention
Low water pressure in
system
High water pressure in
system
Safety thermostat
intervention
CH dual sensor intervention
No water circulating in the
system
Fault in zona mix 1 safety
thermostat intervention
Fault in zone mix 2 safety
thermostat intervention
In both cases, from the
– Press the encoder
“main screen”
to display the
clic
HOT WATER SET
:
40.0
Set hot water
Cancel Confirm
– Rotate the encoder to set the new
– Press the button
and return to the
ROOM SET
21.3
Manual temporary
Cancel Confirm
Confirm
to complete the modification
“main screen”
.
21.3
Cancel Confirm
set
value
“set value”
ROOM SET
Manual
IMPORTANT INFORMATION FOR THE ROOM SET
4.3.4 Quick settings
Using the encoder, the user can carry out the following quick
settings:
– modify the
– modify the
“set hot water”
“set room temperature”
directly in SUMMERmode
directly in WINTER mode.
The meaning of the words on the display are as follows:
Manual temporary:
the
“function mode”
in heating is set to AUTO
and the value of the set read on the display will be valid until
the next time band change (automatic set point)
Manual:
the
“function mode”
in heating is set to MAN and the
value of the set read on the display will be permanently valid
44

EN
k
Modo: Inverno Progr. automatico - Set 18,0 Cfino alle 11:30
Menu Mode
4.4 Navigating from the MODE button
MODE
Summer
Summer
Hot water MAN 50°C
_________________________________
Holiday function OFF
Hot water MAN 50°C
Heating MAN 20.0°C
_______________________________
Holiday function OFF
Winter Off
Winter
Hot water
Function mode MAN
Hot water set 50°C
Hot water
Function mode MAN
Hot water set 50°C
To
“select”
clic
To
“confirm”
HOLIDAY SCHEDULE
DAY
Start: 01 01 2014 07:00
Stop: 08 01 2014 07:00
Enable holiday: NO
Hot water OFF - Heat. Off (Nofrost active)
(paragrafo 4.3.2 a pagina 42)
Heating
Function mode MAN
Set AUTO comfort 20.0°C
Set AUTO reduced 18.0°C
Set MAN 20.0°C
Program. time [...]
Set max flow 80°C
rows or
“modify”
values
the selections or modifications
MONTH
YEAR
Hour
Start: 01 01 2014 07:00
Stop: 08 01 2014 07:00
Enable holiday NO
Hot water OFF - Heat. Off (Nofrost active)
HOLIDAY SCHEDULE
DAY
MONTH
YEAR
Hour
Off
HEATING TIME PROGRAM
Day/s:
0 2 4 6 8 10 12 14 16 18 20 22 24
MONDAY
______________________________
[1]04:00-08:00 [2]12:00-14:00
[3]16:00-18:15 [4]20:30-22:30
(paragrafo 4.3.2 a pagina 42)
(paragrafo 4.3.1 a pagina 41)
45

ES
GAMA
MODELO CÓDIGO
Sime HOME 8092280
DECLARACIÓN CE DE CONFORMIDAD
Con arreglo a la Directiva de “Baja Tensión” 2006/95/CE y a la
Directiva de “Compatibilidad Electromagnética” 2004/108/CE,
el fabricante Fonderie SIME S.p.A., con domicilio en via Garbo 27, 37045 Legnago (VR),
modelo
tarias.
El Director Técnico
(Franco Macchi)
Sime HOME
es conforme a dichas Directivas Comuni-
DECLARA QUE
el Control Remoto
SÍMBOLOS
PELIGRO
Para indicar acciones que, de no efectuarse correctamente, pueden provocar accidentes de origen genérico o pueden generar fallos de funcionamiento o
daños materiales en el aparato; así pues, requieren
un especial cuidado y una debida preparación.
PELIGRO
Para indicar acciones que, de no efectuarse correctamente, pueden provocar accidentes de origen
eléctrico; así pues, requieren un especial cuidado y
una debida preparación.
SE PROHÍBE
Para indicar acciones que NO SE DEBEN llevar a
cabo.
46
ADVERTENCIA
Para indicar una información especialmente útil e
importante.

ES
ÍNDICE
1 ADVERTENCIAS Y NORMAS DE SEGURIDAD 48
1.1 Advertencias ..................................48
1.2 Prohibiciones ..................................48
2 INSTALACIÓN 49
2.1 Recepción del producto..........................49
2.2 Dimensiones y peso ............................49
2.3 Temperaturas .................................49
2.4 Montaje mural .................................50
3 DESCRIPCIÓN 52
3.1 Características.................................52
3.2 Encoder mutifunción............................52
3.3 Interfaz de usuario .............................53
4 USO 54
4.1 Puesta en servicio ..............................54
4.2 Ajustes mediante la tecla MENÚ ..................54
4.2.1 Menú AJUSTE GENERAL ............... 54
4.2.2 Menú INFORMACIÓN .................. 57
4.2.3 Menú TÉCNICO ....................... 58
4.2.4 Esquema en árbol de la navegación con la
tecla MENÚ .......................... 60
4.3.5 Detalles técnicos...................... 61
4.3 Ajustes mediante la tecla MODO ..................62
4.3.1 Programación horaria ................. 63
4.3.2 Función vacaciones.................... 64
4.3.3 Indicación de fallo..................... 65
4.3.4 Ajustes rápidos ....................... 66
4.4 Navegación con la tecla MODO....................67
47

1 ADVERTENCIAS Y NORMAS DE SEGURIDAD
ES
1.1 Advertencias
ADVERTENCIAS
– Lea detenidamente este manual antes de instalar
el aparato.
– El aparato forma parte integrante de la instalación
gestionada. Consulte también la documentación
de la caldera controlada.
– La instalación deberá ser realizada únicamente
por personal profesional cualificado.
– Para garantizar una medición correcta de la tem-
peratura ambiente media, sitúe el Control Remoto
en lugares no expuestos a la luz del sol ni a constantes corrientes de aire.
– El fabricante no se responsabiliza de posibles da-
ños ocasionados a personas, animales o cosas a
causa de una instalación o uso incorrectos o indebidos del Control Remoto.
1.2 Prohibiciones
SE PROHÍBE
– Instalar el Control Remoto cerca de aparatos que
emitan radiaciones electromagnéticas.
– El uso del Control Remoto por parte de niños y
personas discapacitadas sin asistencia.
48

ES
2 INSTALACIÓN
2.1 Recepción del producto
El Control Remoto
protegido por un embalaje de cartón.
El paquete contiene, además del Control Remoto Sime HOME:
– Manual de instalación y uso
– Tacos de expansión.
SE PROHÍBE
Liberar al medio ambiente y dejar al alcance de los
niños el material del embalaje, ya que puede constituir una fuente de peligro potencial. Así pues, deberá eliminarse de acuerdo con las disposiciones de la
legislación vigente.
Sime HOME
se entrega en un único bulto
2.2 Dimensiones y peso
H
L
Descripción Sime Home
L (mm) 160
H (mm) 105
P (mm) 40
Peso (g)
130
2.3 Temperaturas
P
Funcionamiento: 0 ÷ 50°C
Almacenamiento: -10 ÷ +60°C
49

ES
2.4 Montaje mural
Después de desembalar el Control Remoto
– Presione sobre la lengüeta de fijación (1) con un destornilla-
dor para desenganchar la base (2) de la interfaz de usuario
(3), asegurándose de no introducir la herramienta hasta el
interior
12
Sime HOME:
3
– Tienda el cable de comunicación Bus (4), OpenTherm, entre
la caldera y el Control Remoto
– Conéctelo a la caldera y a los bornes (5) (Cable: 2 x 0,75 mm
sin polarizar; Longitud máx: 50 m)
4
5
– Fije la base (2) a la pared con los tornillos (6) y los tacos (7),
incluidos con el Control Remoto
2
– Separe las 2 partes
50
7
2
6

ES
– Vuelva a montar la interfaz de usuario (3) en la base (2),en-
ganchándolas correctamente con la lengüeta (1)
2
3
ADVERTENCIA
Asegúrese de que no quede cable sobrante entre la
base (2) y la interfaz de usuario (3).
51

3 DESCRIPCIÓN
ES
3.1 Características
El Control Remoto
talaciones funcional y elegante, estudiado para un uso fácil e
intuitivo gracias a su amplia pantalla de matriz de puntos, que
muestra todas los acciones que se pueden realizar.
La conexión y la comunicación con la pantalla se realizan mediante bus de dos hilos sin polarizar y protocolo
Estas son las principales características del Control Remoto
Sime HOME
– Selección del modo de funcionamiento (Verano/Invierno/Off)
– Regulación de las temperaturas de calefacción y ACS
– Programación semanal de la calefacción
– Regulación climática (con sonda externa instalada)
– Gestión de los parámetros de la caldera
– Ajuste de la temperatura antihielo
– Posibilidad de programar 4 franjas horarias diarias
– Posibilidad de gestionar el programa de vacaciones
– Visualización continua de la fecha y hora actuales
– Visualización continua de la temperatura ambiente
– Visualización de los parámetros de funcionamiento de la
instalación
– Visualización del histórico de las alarmas y gestión de las
que estén activas.
:
Sime HOME
es un complemento para ins-
Open Therm estándar.
3.2 Encoder mutifunción
El encoder puede utilizarse de las siguientes maneras.
Girándolo, lo cual permite:
– desplazar los menús, los submenús y las líneas de las pan-
tallas
– modificar los datos o valores en las áreas modificables
Pulsándolo, lo cual permite:
– confirmar las selecciones realizadas
– confirmar las modificaciones introducidas.
NOTA
Si se produce un corte de corriente, se mantienen memorizados todos los ajustes salvo la fecha y la hora, que permanecen
unas 24 horas.
52
ES
3.3 Interfaz de usuario
14
15
16
12
13
Modo: Invierno Progr. automatico - Set 18,0°C hasta 11:30
Menu Modo
10 8
11 9
Ju 20 Mar 2014Zona 1 10:30
7
6
5
4
1
Tecla (A)
2
Encoder multifunción
3
Tecla (B)
4
Acción que se realiza al pulsar la tecla (B)
5
Franjas horarias programadas
6
Descripción de los ajustes actuales
7
Temperatura exterior registrada
8
Hora
123
9
Presencia de sonda externa (SE)
10
Fecha
11
Temperatura ambiente registrada
12
Porcentaje de modulación
13
Presencia de llama
14
Zona controlada
15
Demanda de calefacción (rad) o agua sanitaria (grifo)
16
Acción que se realiza al pulsar la tecla (A)
53

4 USO
k
Leng
ES
4.1 Puesta en servicio
Una vez terminada la instalación del Control Remoto
Sime HOME,
– Ponga el interruptor general de la instalación en ON (en-
cendido)
– Seleccione el modo “Stand-by” en el cuadro de mandos de
la caldera
– La pantalla del Control Remoto
guiente.
siga estos pasos:
ON
Sime HOME
mostrará lo si-
4.2 Ajustes mediante la tecla MENÚ
4.2.1 Menú AJUSTE GENERAL
En la
estos pasos:
– Pulse la tecla
“pantalla principal”
lección de
“Menú”
del Control Remoto
Ju 20 Mar 2014Zona 1 10:30
Invierno manual - set 20.0°C
Menu Modo
Menú
AJUSTE GENERAL [...]
AJUSTE GENERAL
INFORMACION [...]
TECNICO [...]
Salida Atrás
para entrar en la pantalla de se-
MENU
Sime HOME,
siga
O
– Pulse el encoder
para confirmar el Menú resaltado y
clic
entrar en los submenús
Salida Atrás
Lengua ENG
Fecha y hora [...]
Ajuste de fabrica [...]
Salida Atrás
54
AJUSTE GENERAL
ua

ES
G
k
Leng
Fecha y h
k
k
– Pulse el encoder
para confirmar el submenú resalta-
click
do y seleccionar el área modificable
AJUSTE GENERAL
Lengua ENG
Fecha y hora [...]
Ajuste de fabrica [...]
Salida Atrás
EN
– Gire el encoder y modifique el
po habilitado (ej: de ING a ESP)
AJUSTE GENERAL
Lengua ESP
Fecha y hora [...]
Ajuste de fabrica [...]
Salida Atrás
ESP
“dato/valor”
, en el cam-
– Gire el encoder para seleccionar otro menú deseado
(ej. Fecha y hora)
AJUSTE GENERAL
Lengua ESP
ora
para confirmar el submenú resalta-
– Pulse el encoder
Fecha y hora [...]
Ajuste de fabrica [...]
Salida Atrás
clic
do y entrar en el área modificable
FIJAR FECHA Y HORA
– El primer
Fecha 01 Gen 2014
Hora 06 : 36
Anular
“dato/valor”
DIA MES
HORA MINUTO
modificable aparece resaltado (ej. 06).
AÑO
Confirmacion
– Pulse el encoder
volver a los submenús
Lengua ESP
Fecha y hora [...]
Ajuste de fabrica [...]
NOTA:
- pulsando la tecla
- pulsando la tecla
pal”
.
para confirmar la modificación y
clic
AJUSTE GENERAL
ua
Salida Atrás
Atrás
Salida
se retrocede un paso
se vuelve a la
“pantalla princi-
– Gire el encoder
06 a 12)
– Pulse el encoder
leccione el
“dato/valor”
(ej. 36)
para modificar el
para confirmar la modificación y se-
clic
“dato/valor”
siguiente, que aparecerá resaltado
FIJAR FECHA Y HORA
DIA MES
Fecha 01 Gen 2014
HORA MINUTO
Hora 12 : 36
Anular
AÑO
Confirmacion
(ej. de
55

ES
k
Aj
k
– Gire el encoder para modificar el
“dato/valor”
(ej. de
36 a 50)
FIJAR FECHA Y HORA
– Pulse el encoder
leccione el
“dato/valor”
DIA MES
Fecha 01 Gen 2014
Hora 12 : 50
Anular
clic
HORA MINUTO
para confirmar la modificación y se-
siguiente, que aparecerá resaltado
AÑO
Confirmacion
(ej. 01)
– Continúe de esta manera hasta realizar todas las modifica-
ciones necesarias
– Una vez concluidas las modificaciones, pulse la tecla
Confirmación
NOTA:
La modalidad operativa es CÍCLICA (en “carrusel”), por
para volver al submenú de partida (Fecha y hora).
lo que SE AVANZA SIEMPRE, incluso en caso de error.
ADVERTENCIA
SE recomienda entrar en este submenú
desea restablecer el
“Ajuste de fábrica”
, eliminando
SOLO
todos los ajustes realizados a nivel de usuario.
En caso contrario pulse las teclas
Atrás
.
Salida
Si se desea continuar:
– Pulse el encoder
para entrar en el área modificable.
clic
Aparecerá la pantalla que ofrece las siguientes posibilidades:
SOLICITUD DE CONFIRMACION
Confirmar la operación?
– Pulse la tecla
Anular
Anular
para volver al
Confirmacion
“Menú”
seleccionado
previamente (Ajuste de fábrica)
si se
o
– Pulse la tecla
– Gire el encoder para seleccionar otro
“Menú”
deseado
(ej. Ajuste de fábrica)
AJUSTE GENERAL
Lengua ESP
Fecha y hora [...]
uste de fabrica
Ajuste de fabrica [...]
Salida Atrás
56
brica”
cipal”
y, al cabo de unos segundos, volver a la
Confirmación
para restablecer el
“Ajuste de fá-
“pantalla prin-

ES
I
k
Calefaccion de zona
k
Set ambiente
C
a
k
4.2.2 Menú INFORMACIÓN
El Menú INFORMACIÓN es de solo consulta, NO se pueden
modificar los datos.
En la
– Pulse la tecla
– Gire el encoder para seleccionar el menú
“pantalla principal”
ción de
“Menú”
CIÓN”
Ju 20 Mar 2014Zona 1 10:30
Invierno manual - set 20.0°C
Menu Modo
Menú
AJUSTE GENERAL [...]
INFORMACION [...]
TECNICO [...]
para entrar en la pantalla de selec-
MENU
NFORMACION
Salida Atrás
“INFORMA-
– Gire el encoder para seleccionar el submenú deseado
– Pulse el encoder
para confirmar el submenú selec-
clic
cionado y entrar en el área de consulta de los datos correspondientes
INFORMACION
Set ambiente 20.0°C
Set ida 80°C
Temperatura ida 30°C
Salida Atrás
– Pulse la tecla
– Gire el encoder
Atrás
para volver a los submenús
para seleccionar otro submenú de-
seado
INFORMACION
Calefaccion de zona [...]
Caldera [...]
alder
Sanitario [...]
Alarma [...]
Version firmware 100
Salida Atrás
– Pulse el encoder
clic
entrar en los submenús
Calefaccion de zona [...]
Caldera [...]
Sanitario [...]
Alarma [...]
Version firmware 100
Salida Atrás
para confirmar
INFORMACION
“INFORMACIÓN”
y
– Pulse el encoder
para confirmar el submenú selec-
clic
cionado y entrar en el área de consulta de los datos correspondientes
57

k
k
– Continúe de esta manera hasta realizar todas las consultas
necesarias
– Pulse la tecla
Salida
para volver a la
Ju 20 Mar 2014Zona 1 10:30
“pantalla principal”
ES
MENU
AJUSTE GENERAL [...]
.
INFORMACION [...]
TECNICO
TECNICO [...]
Salida Atrás
Invierno manual - set 20.0°C
Menu Modo
4.2.3 Menú TÉCNICO
Se recomienda que el Menú TÉCNICO sea utilizado únicamente por personal profesional cualificado, ya que permite modificar los datos característicos de la instalación gestionada.
En lo que se refiere al submenú
“Parámetros caldera”
sario introducir el CÓDIGO (o contraseña)
En la
“pantalla principal”
Menu Modo
Ju 20 Mar 2014Zona 1 10:30
Invierno manual - set 20.0°C
“1 2 3 4 5”
, es nece-
.
– Pulse el encoder
para entrar en el área modificable.
clic
Aparecerá la pantalla que ofrece las siguientes posibilidades:
SOLICITUD DE CONFIRMACION
Confirmar la operación?
– Pulse la tecla
– Pulse la tecla
Anular
Anular
Confirmación
Calefaccion de zona [...]
Parametros caldera [...]
Rearme total [...]
para volver al menú
para entrar en los submenús
Salida Atrás
Confirmacion
“TÉCNICO”
TECNICO
– Pulse la tecla
ción de
“Menú”
Menú
para entrar en la pantalla de selec-
– Gire el encoder para seleccionar el menú
“TÉCNICO”
– Gire el encoder para seleccionar el submenú deseado
– Pulse el encoder
para confirmar el submenú selec-
clic
cionado y entrar en el área de los parámetros modificables.
58
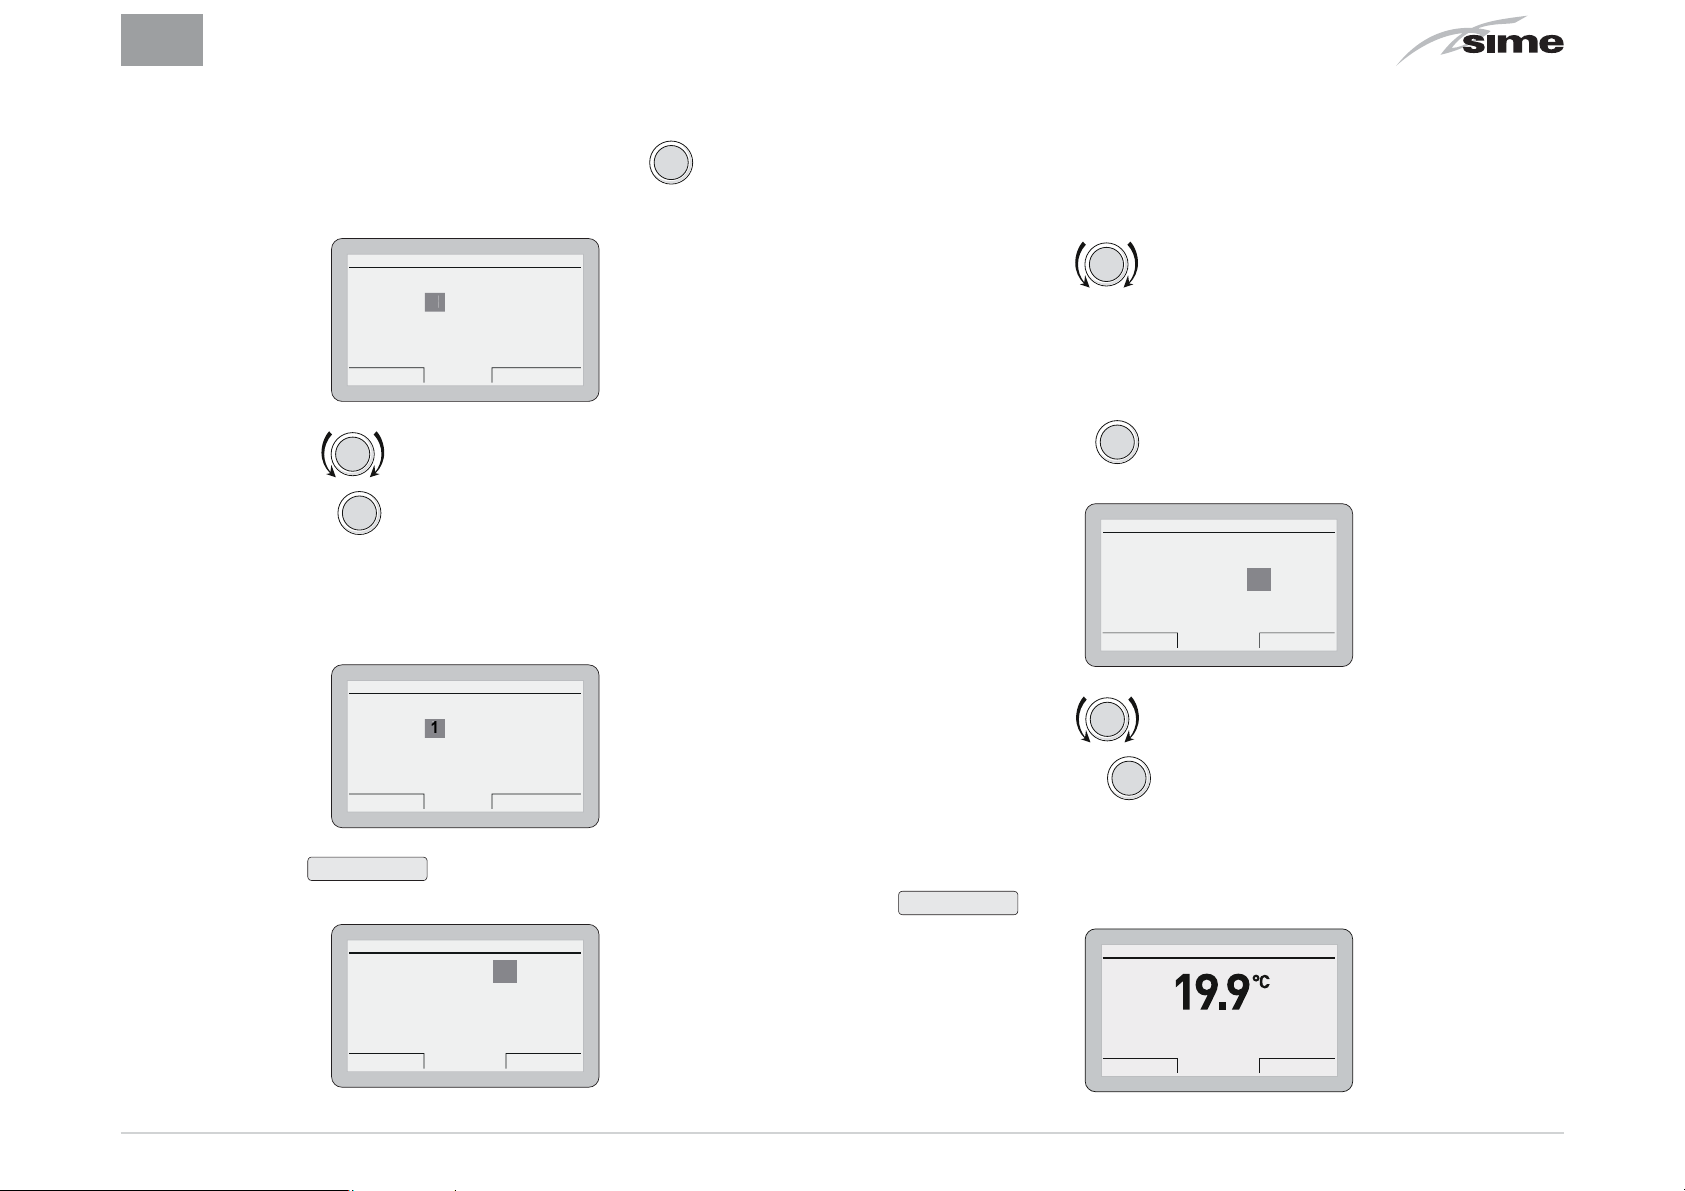
ES
k
k
1
k
k
ADVERTENCIA
Cuando se selecciona el submenú
ra”
, al confirmar pulsando el encoder
la siguiente pantalla:
INTRODUCIR CODIGO ACCESO
Codigo: 000000
Anular
Confirmacion
“parámetros calde-
aparece
clic
– Gire el encoder para cambiar el primer dígito de 0 a 1
– Pulse el encoder
para confirmar la modificación y se-
clic
leccionar el dígito siguiente
– Continúe de esta manera hasta completar el CÓDIGO (o
contraseña)
“1 2 3 4 5”
– donde
“Índice parámetro”
se refiere a la tabla de parámetros
que figura en el manual de la caldera instalada (ej. 1=tS 0.1
o bien 1=PAR 01).
– Gire el encoder
para desplazar la lista de parámetros
y comprobar sus valores
– Si se debe modificar el valor del parámetro seleccionado:
– Pulse el encoder
para entrar en el área de modifica-
clic
ción del valor
Parametros caldera
Indice parametro: 1
Valor parametro: 0
Salida Atrás
1--------42
INTRODUCIR CODIGO ACCESO
Codigo:
Anular
12345
Confirmacion
– Gire el encoder para definir el nuevo valor
– Pulse el encoder
para confirmar la modificación y
clic
proseguir con otro parámetro.
– Pulse la tecla
rámetros”
Confirmación
de la caldera
Indice parametro: 1
Valor parametro: 0
Salida Atrás
para entrar en el área
Parametros caldera
1--------42
“Ajuste pa-
– Al finalizar las consultas/modificaciones, pulse la tecla
Salida
para volver a la
Invierno manual - set 20.0°C
Menu Modo
“pantalla principal”
Ju 20 Mar 2014Zona 1 10:30
.
59

k
Modo: Inverno Progr. automatico - Set 18,0 Cfino alle 11:30
Menu Modo
4.2.4 Esquema en árbol de la navegación con la tecla MENÚ
MENÚ
MENÚ
AJUSTE GENERAL [...]
INFORMACIÓN [...]
TÉCNICO [...]
Para
“seleccionar”
AJUSTE GENERAL
Lengua [...]
Fecha y hora [...]
Ajuste de fábrica [...]
(paragrafo 4.2.1 a pagina 54)
clic
Para
“confirmar”
líneas o
las selecciones o modificaciones
“modificar”
valores
ES
Calefacción de zona [...]
Caldera [...]
Sanitario [...]
Alarma [...]
Versión firmware 100
SOLICITUD DE CONFIRMACIÓN
Confirmar la operación
[CONFIRMACIÓN]
60
INFORMACIÓN
(paragrafo 4.2.2 a pagina 57)
(paragrafo 4.2.3 a pagina 58)
Calefacción de zona
Set ambiente 20.0°C
Set ida 0°C
Temperatura ida 28.0°C
TÉCNICO
Calefacción de zona [...]
Parámetros caldera [...]
Rearme total [...]
Caldera
Temperatura retorno 25.0°C
Potencia del quemador 0%
Presión instalación 1.2bar
Temperatura de humos _ _ _°C
(Estas pantallas son de solo consulta. NO se pueden modificar los datos)
Calefacción de zona
Demanda calor por sonda ambiente
Modulación con sonda ambiente SÍ
Modulación con sonda externa SÍ
Curva climática 3.0
Offset curva climática 0°C
Temperatura off por diferencia 0.1°C
Inercia de la instalación 10
Set mínimo de impulsión 20°C
Activación antihielo SÍ
Set antihielo 5.0°C
Corrección de temperatura 0.0°C
SÍ
Temperatura del agua caliente 51.2C
Set agua caliente 50°C
Caudal flujo --l/min
INTRODUCIR CÓDIGO ACCESO
Código:
[CONFIRMACIÓN]
Sanitario
0 0 0 0
0
(paragrafo 4.2.3 a pagina 58)
Histórico de alarmas
1 -------- 5
1
Índice histórico:
Código alarma: 255
255 - Anomalía técnica
SOLICITUD DE CONFIRMACIÓN
< último
Confirmar la operación
[CONFIRMACIÓN]

ES
4.3.5 Detalles técnicos
Demanda calor por sonda ambiente
Opción SÍ: la demanda de calor de la instalación de calefacción se produce solo si la temperatura ambiente está por debajo del set ambiente definido.
Opción NO: la demanda de calor de la instalación de calefacción es constante en las modalidades “Manual” y “AUTO DE
TEMP. COMFORT”. En las demás modalidades no hay demanda.
Temperatura de impulsión
°C
90
80
70
K=9 K=6 K=4,5 K=3
K=2,2
Modulación con sonda ambiente
Opción SÍ: la temperatura de impulsión se modula en función
de la desviación entre la temperatura ambiente real, medida
por la sonda interna del dispositivo, y el set ambiente definido
Opción NO: la temperatura de impulsión se mantendrá fija al
valor máximo admitido durante todos los periodos de demanda (control por diferencia).
Modulación con sonda externa
Opción SÍ: la temperatura máxima de impulsión (y la modulada si está habilitada la modulación con sonda ambiente) se
regula en función del valor de la temperatura exterior (si está
instalada la sonda externa), teniendo en cuenta también los
valores definidos para la Curva climática y el Offset correspondiente.
Curva climática
Pendiente de la curva climática seleccionada, que se utiliza
para modular la temperatura de impulsión en función de la
temperatura exterior. Los límites inferiores y superiores de
las curvas dependen de los límites de impulsión de la caldera.
60
K=1,5
50
40
K=0,75
30
20
20 15 10 5 0 -10 -15-5 -20
°C
Temperatura exterior
Offset curva climática
Es la desviación vertical de la curva climática, con la que se
corrige la temperatura de impulsión calculada.
Temperatura off por diferencia
Es el valor que se debe sumar a la temperatura del set ambiente, por encima del cual el dispositivo desactiva la demanda, únicamente durante la regulación por diferencia (modulación con sonda ambiente deshabilitada, pero con uso de sonda
ambiente habilitada).
61

ES
Inercia de la instalación
Es un parámetro que regula la velocidad de reacción del algoritmo de regulación, a asociar a la inercia o al tamaño y tipo de
edificio y de sistema de calefacción.
Set mínimo de impulsión
Es el límite inferior de la temperatura de impulsión calculada
(útil en caso de instalaciones con bajos rendimientos a bajas
temperaturas calculadas).
Activación antihielo
Opción SÍ: habilitación del programa de protección antihielo
Opción NO: la calefacción permanecerá apagada en las modalidades de funcionamiento OFF, VERANO y en los periodos de
temperatura reducida en Modalidad AUTO si está deshabilitada la sonda ambiente.
Set antihielo
Es la temperatura ambiente (antihielo) por debajo de la cual
el dispositivo activa una demanda de calefacción al set de impulsión mínimo. La demanda permanecerá activa hasta que
la temperatura ambiente haya superado el valor “antihielo
definido + 0,6°C”.
4.3 Ajustes mediante la tecla MODO
En la
– Pulse la tecla
– Pulse el encoder
“pantalla principal”
lección del
“Modo funcionamiento”
Ju 20 Mar 2014Zona 1 10:30
Invierno manual - set 20.0°C
Menu Modo
Modo
para entrar en la pantalla de se-
de los tres modos (ej. “Invierno”)
Invierno
para confirmar el
y entrar en las
Verano
Salida Atrás
click
“líneas”
Aparecerá resaltado uno
Off
“Modo”
resaltado
Corrección de temperatura
Es el valor que se utiliza para corregir la medición de la temperatura ambiente por parte de la sonda interna del dispositivo.
62
Invierno
Agua caliente MANUAL 40°C
Calefaccion MANUAL 20.0°C
Funcion vacaciones OFF
Salida Atrás
– Gire el encoder para seleccionar
“Calefacción”

ES
k
odo funcionamiento
k
S
k
– Pulse el encoder
trar en las
“líneas”
– Pulse el encoder
para confirmar
clic
Calefaccion
Modo funcionamiento MANUAL
M
Set auto de temp. comfort 20.0°C
Set auto de temp. reducida 18.0°C
Set manual 20.0°C
Programacion horaria 20.0°C
Salida Atrás
para confirmar la
click
y entrar en el área modificable
Calefaccion
Modo funcionamiento MANUAL
Set auto de temp. comfort 20.0°C
Set auto de temp. reducida 18.0°C
Set manual 20.0°C
Programacion horaria 20.0°C
Salida Atrás
MANUAL
– Gire el encoder para modificar el
campo habilitado (ej. MAN - AUTO - OFF)
“Calefacción”
“Línea”
resaltada
“dato/valor”
y en-
, en el
4.3.1 Programación horaria
El Control Remoto
cuatro franjas horarias diarias.
Durante la franja horaria programada, la caldera funciona en
modo de calefacción COMFORT y, fuera de la franja horaria
programada, la caldera funciona en modo de calefacción con
temperatura REDUCIDA,
– Pulse el encoder
ria”
y entrar en el área modificable
– Gire el encoder para seleccionar los
“Grupos de días”
los
Sime HOME
click
PROGRAMA HORARIO CALEFACCION
Dia/s:
024681012141618202224
[1] 06:00 - 08:00
[2] 11:00 - 13:00
Salida Atrás
permite ajustar un máximo de
para confirmar
LUNESLUNE
[3] [4] 18:00 - 23:00
“Programación hora-
“Días sueltos”
o
– Pulse el encoder
– Gire el encoder para seleccionar otra
para confirmar la modificación que
clic
se haya realizado y volver a la línea
gramación horaria
)
Calefaccion
Modo funcionamiento MANUAL
Set auto de temp. comfort 20.0°C
Set auto de temp. reducida 18.0°C
Set manual 20.0°C
Programacion horaria 20.0°C
Programacion horaria
Salida Atrás
“Modo funcionamiento”
“línea“
(ej.
Pro-
– Pulse el encoder
y entrar en el primer
para confirmar la selección deseada
clic
“horario ajustable” [1]
PROGRAMA HORARIO CALEFACCION
Dia/s:
024681012141618202224
[1] 06:00 - 08:00
06:00
[2] 11:00 - 13:00
Anular
LUNES
[3] [4] 18:00 - 23:00
Confirmacion
– Gire el encoder para modificar el
acuerdo con la hora deseada
“dato/valor”
de
63

ES
k
k
k
0
– Pulse el encoder
sar al
“dato/valor”
para confirmar la modificación y pa-
clic
siguiente [2]
PROGRAMA HORARIO CALEFACCION
Dia/s:
024681012141618202224
[1] 06:00 - 08:00
[2] 11:00 - 13:00
Anular
08:00
LUNES
[3] [4] 18:00 - 23:00
Confirmacion
– Continúe de esta manera hasta realizar todas las modifi-
caciones necesarias para cada día de la semana o para los
grupos de días.
NOTA:
La modalidad operativa es CÍCLICA (en “carrusel”), por
lo que SE AVANZA SIEMPRE incluso en caso de error.
ADVERTENCIA
Si NO se desea utilizar una franja horaria, hay que
definir con el mismo valor las horas de inicio y fin de
esa franja (ej. 3 14:00-14:00).
– Una vez concluidas las modificaciones, pulse la tecla
Confirmación
para volver a los
“Días sueltos”
o a los
“Grupos
de días”
– Pulse la tecla
Salida
para volver a la
Ju 20 Mar 2014Zona 1 10:30
“pantalla principal”
.
4.3.2 Función vacaciones
Esta función permite desactivar tanto la calefacción como la
producción de agua sanitaria en el periodo de vacaciones
finido y activado”
, durante el cual podrá estar activa la función
antihielo (si está configurada).
Para configurar la función vacaciones, en la
– Pulse la tecla
– Pulse el encoder
namiento,
Verano
– Gire el encoder
– Pulse el encoder
Modo
o
Verano
Agua caliente MANUAL 40°C
Funcion vacaciones OFF
Salida Atrás
clic
.
para confirmar un modo de funcio-
clic
Invierno
.
para seleccionar
Invierno
Off
para confirmar “
“pantalla principal”
“Función vacaciones”
Función vacaciones”
y entrar en el área modificable
PROGRAMA VACACIONES
DIA MES AÑO HORA
Inicio: 05 02 2014 15 : 00
Fin:
5
20 02 2014 15 : 00
Activar vacaciones: NO
Agua caliente OFF - Calefaccion OFF (antihielo activo)
Anular
Confirmacion
“de-
:
Invierno manual - set 20.0°C
Menu Modo
64
aparecerá resaltado.
– Gire el encoder para modificar el
“dato/valor”
, que

ES
k
0
k
– Pulse el encoder
sar al
“dato/valor”
– Gire el encoder para modificar el
para confirmar la modificación y pa-
clic
siguiente
PROGRAMA VACACIONES
DIA MES AÑO HORA
Inicio: 05 02 2014 15 : 00
Fin:
Anular
5
20 02 2014 15 : 00
Activar vacaciones: NO
Agua caliente OFF - Calefaccion OFF (antihielo activo)
Confirmacion
“dato/valor”
de
acuerdo con la fecha de inicio de las vacaciones
– Pulse el encoder
sar al
“dato/valor”
para confirmar la modificación y pa-
clic
siguiente
– Continúe de esta manera hasta realizar todas las modifica-
ciones necesarias
NOTA:
La modalidad operativa es CÍCLICA (en “carrusel”), por
lo que SE AVANZA SIEMPRE incluso en caso de error.
– Una vez concluidas las modificaciones, pulse la tecla
Confirmación
para volver a la opción
“Función vacaciones”
4.3.3 Indicación de fallo
Si se produce un fallo de funcionamiento, aparecerá la panta-
“Fallo en progreso”
lla
los principales códigos de fallo se ofrece también una breve
descripción.
FALLO EN PROGRESO
2 - Baja presion en la instalacion
Salida Atrás
El tipo de fallo puede ser
Para restablecer las condiciones de funcionamiento normales:
– en el primer caso solo hay que eliminar la causa del fallo
– en el segundo caso hay que eliminar la causa del fallo y
luego pulsar la tecla
En caso de
en la instalación
falta de agua en la instalación o baja presión de agua
se solicita que se llene la instalación y se pul-
se luego la tecla
FALLO EN PROGRESO
en lugar de la
transitorio
Rearme
Confirmación
en lugar de la
“pantalla principal”
FALLO EN PROGRESO
6 - Bloqueo quemador
Salida Rearme
(temporal) o
de bloqueo
.
Rearme
SOLICITUD DE CONFIRMACION
. Para
.
.
– Pulse la tecla
Salida
para volver a la
Ju 20 Mar 2014Zona 1 10:30
Invierno manual - set 20.0°C
Menu Modo
“pantalla principal”
.
2 - Baja presion en la instalacion
Salida Carga
Confirmar la operación?
Anular
Confirmacion
65

ES
k
Código
alarma
1 Seguridad humos
2
3
6 Bloqueo quemador No se detecta la llama
7 Sobre temperatura
9 Falta circulación
13
20
22
Baja presión en la instalación
Alta presión en la instalación
Sobre temperatura humos
Sobre temperatura
Sobre temperatura
Fallo Descripción del fallo
Disparo del termostato de
humos o disparo del sensor
del presostato de aire
Baja presión de agua en la
instalación
Alta presión de agua en la
instalación
Disparo del termostato
de seguridad
Disparo de la doble sonda CH
No hay circulación de agua
en la instalación
Disparo de la sonda de
humos
Fallo de disparo del termos-
zona 1
zona 2
tato de seguridad de la zona
mix 1
Fallo de disparo del termos-
tato de seguridad de la zona
mix 2
Para ambos casos, en la
– Pulse el encoder
clic
“pantalla principal”
para consultar el valor de
:
nido
SET SANITARIO
40.0
Set agua caliente
Anular
– Gire el encoder para definir el nuevo
– Pulse la tecla
ver a la
“pantalla principal”
Confirmación
SET AMBIENTE
para concluir la modificación y vol-
21.3
Manual temporal
Anular
Confirmacion
Confirmacion
.
SET AMBIENTE
21.3
Manual
Anular
set
defi-
“valor de set”
Confirmacion
42 Fallo de los botones Botones aplastados
Otros Anomalía técnica ...
4.3.4 Ajustes rápidos
El usuario puede realizar los siguientes ajustes rápidos usando el encoder:
– modificar directamente el
“set agua caliente”
RANO
– modificar directamente el
“set temp ambiente”
VIERNO.
66
en modo VE-
en modo IN-
IMPORTANTE PARA EL SET AMBIENTE
Los mensajes de la pantalla tienen los siguientes significados:
Manual temporal:
el
“modo funcionamiento”
en calefacción está
puesto en AUTO y el valor de set que indica la pantalla será
válido hasta el siguiente cambio de franja horaria (set point
automático)
Manual:
el
“modo funcionamiento”
en calefacción está puesto
en MAN y el valor de set que indica la pantalla será válido
permanentemente.

ES
k
Modo: Inverno Progr. automatico - Set 18,0 Cfino alle 11:30
Menu Modo
4.4 Navegación con la tecla MODO
MODO
Verano Invierno Off
Verano
Agua caliente MAN 50°C
_________________________________
Función vacaciones OFF
Invierno
Agua caliente MAN 50°C
Calefacción MAN 20.0°C
_______________________________
Función vacaciones OFF
Agua caliente
Modo funcionamiento MAN
Set agua caliente 50°C
Agua caliente
Modo funcionamiento MAN
Set agua caliente 50°C
Para
“seleccionar”
clic
Para
“confirmar”
PROGRAMA VACACIONES
DÍA
MES
AÑO
Inicio: 01 01 2014 07:00
Fin: 08 01 2014 07:00
Activar vacaciones: NO
Agua caliente OFF - Calefacción Off (antihielo activo)
(paragrafo 4.3.2 a pagina 64)
Calefacción
Modo funcionamiento MAN
Set auto de temp. comfort 20.0°C
Set auto de temp. reducida 18.0°C
Set manual 20.0°C
Programación horaria [...]
Set max ida 80°C
líneas o
“modificar”
valores
las selecciones o modificaciones
Hora
PROGRAMA VACACIONES
DÍA
MES
Inicio: 01 01 2014 07:00
Fin: 08 01 2014 07:00
Activar vacaciones: NO
Agua caliente OFF - Calefacción Off (antihielo activo)
AÑO
Hora
Off
PROGRAMA HORARIO CALEFACCIÓN
Día/s:
0 2 4 6 8 10 12 14 16 18 20 22 24
LUNES
______________________________
[1]04:00-08:00 [2]12:00-14:00
[3]16:00-18:15 [4]20:30-22:30
(paragrafo 4.3.2 a pagina 64)
(paragrafo 4.3.1 a pagina 63)
67
EL
ΓΚΆΜΑ
ΜΟΝΤΕΛΟ ΚΩΔΙΚΟΣ
Sime HOME 8092280
ΔΉΛΩΣΗ ΣΥΜΜΌΡΦΩΣΗΣ CE
Σύµφωνα µε την Οδηγία “Χαµηλής Τάσης” 2006/95/ΕΚ και
την Οδηγία “Ηλεκτροµαγνητικής Συµβατότητας” 2004/108/ΕΚ,
ο κατασκευαστής Fonderie SIME S.p.A., via Garbo 27, 37045
Legnago (VR),
ντέλο
νοτικές Οδηγίες.
Ο Τεχνικός ∆ιευθυντής
(Franco Macchi)
Sime HOME
ΔΗΛΩΝΕΙ ΟΤΙ
είναι συµβατό µε τις προαναφερόµενες Κοι-
το Αποµακρυσµένο Χειριστήριο µο-
ΣΎΜΒΟΛΑ
ΚΙΝΔΥΝΟΣ
∆είχνει ενέργειες που, εάν δεν εκτελεστούν σωστά,
µπορούν να προκαλέσουν ατυχήµατα γενικής φύσης
ή µπορούν να προκαλέσουν δυσλειτουργίες ή υλικές
βλάβες στη συσκευή και κατά συνέπεια απαιτούν ιδιαίτερη προσοχή και κατάλληλη προετοιµασία.
ΚΙΝΔΥΝΟΣ
∆είχνει ενέργειες που, εάν δεν εκτελεστούν σωστά,
µπορούν να προκαλέσουν ατυχήµατα ηλεκτρικής φύσης και κατά συνέπεια απαιτούν ιδιαίτερη προσοχή
και κατάλληλη προετοιµασία.
ΑΠΑΓΟΡΕΥΕΤΑΙ
∆είχνει ενέργειες που ∆ΕΝ ΠΡΕΠΕΙ να εκτελεστούν.
ΠΡΟΕΙΔΟΠΟΙΗΣΗ
∆είχνει ιδιαίτερα χρήσιµες και σηµαντικές πληροφορίες.
68

EL
ΠΕΡΙΕΧΟΜΕΝΑ
1 ΠΡΟΕΙΔΟΠΟΙΗΣΕΙΣ ΚΑΙ ΚΑΝΟΝΕΣ ΑΣΦΑΛΕΙΑΣ 70
1.1 Προειδοποιήσεις ...............................70
1.2 Απαγορεύσεις..................................70
2 ΕΓΚΑΤΑΣΤΑΣΗ 71
2.1 Παραλαβή του προϊόντος .........................71
2.2 ∆ιαστάσεις και βάρος............................71
2.3 Θερµοκρασίες..................................71
2.4 Επιτοίχια τοποθέτηση ...........................72
3 ΠΕΡΙΓΡΑΦΗ 74
3.1 Χαρακτηριστικά.................................74
3.2 Πολυχρηστικό encoder ..........................74
3.3 ∆ιεπαφή χρήστη ................................75
4 ΧΡΗΣΗ 76
4.1 Θέση σε λειτουργία..............................76
4.2 Ρυθµίσεις από το κουµπί ΜΕΝΟΥ ..................76
4.2.1 Μενού ΓΕΝΙΚΕΣ ΡΥΘΜΙΣΕΙΣ............. 76
4.2.2 Μενού ΠΛΗΡΟΦΟΡΙΕΣ ................. 79
4.2.3 Μενού ΤΕΧΝΙΚΟΣ ..................... 80
4.2.4 Δένδρο πλοήγησης από το κουμπί ΜΕΝΟΥ. . 82
4.3.5 Τεχνικές διευκρινίσεις.................. 83
4.3 Ρυθµίσεις από κουµπί ΤΡΟΠΟΣ ...................84
4.3.1 Προγραμματισμός ώρας................. 85
4.3.2 Λειτουργία διακοπές ................... 86
4.3.3 Επισήμανση δυσλειτουργίας ............. 87
4.3.4 Γρήγορες ρυθμίσεις .................... 88
4.4 Πλοήγηση από κουµπί ΤΡΟΠΟΣ ...................89
69

1 ΠΡΟΕΙΔΟΠΟΙΉΣΕΙΣ ΚΑΙ ΚΑΝΌΝΕΣ ΑΣΦΑΛΕΊΑΣ
EL
1.1 Προειδοποιήσεις
ΠΡΟΕΙΔΟΠΟΙΗΣΕΙΣ
– Πριν εγκαταστήσετε τη συσκευή διαβάστε µε προ-
σοχή το παρόν εγχειρίδιο.
– Η συσκευή αποτελεί αναπόσπαστο τµήµα της δια-
χειριζόµενης εγκατάστασης.
σης και τα έγγραφα του ελεγχόµενου λέβητα.
Η εγκατάσταση πρέπει να εκτελεστεί µόνον από
–
Επαγγελµατικά ∆ιαπιστευµένο Προσωπικό
– Για να εξασφαλίσετε τη σωστή ανίχνευση της µέσης
θερµοκρασίας του χώρου τοποθετήστε το Αποµακρυσµένο Χειριστήριο σε µέρη προστατευµένα από
τον ήλιο και από τα συνεχή ρεύµατα του αέρα.
– Ο κατασκευαστής δεν ευθύνεται για ενδεχόµενες
βλάβες σε πρόσωπα, ζώα ή πράγµατα που οφείλονται σε µη σωστή ή ανάρµοστη εγκατάσταση ή χρήση του Αποµακρυσµένου Χειριστηρίου.
Συµβουλευτείτε επί-
1.2 Απαγορεύσεις
ΑΠΑΓΟΡΕΥΕΤΑΙ
– Η εγκατάσταση του Αποµακρυσµένου Χειριστηρίου
κοντά σε συσκευές που εκπέµπουν ηλεκτροµαγνητικές ακτινοβολίες.
– Η χρήση του Αποµακρυσµένου Χειριστηρίου από
παιδιά και από άτοµα µε ειδικές ανάγκες χωρίς βοήθεια.
70

EL
2 ΕΓΚΑΤΆΣΤΑΣΗ
2.1 Παραλαβή του προϊόντος
Το αποµακρυσµένο χειριστήριο
ενιαίο κιβώτιο προστατευόµενο από µία συσκευασία από χαρτόνι.
Στο εσωτερικό της συσκευασίας, εκτός από το Αποµακρυσµένο
Χειριστήριο
– Εγχειρίδιο εγκατάστασης και χρήσης
– Βίδες και ούπατ.
Sime HOME
ΑΠΑΓΟΡΕΥΕΤΑΙ
Να πετάτε στο περιβάλλον και να αφήνετε κοντά σε
παιδιά το υλικό συσκευασίας καθώς µπορεί να αποτελέσει πιθανή πηγή κινδύνου. Πρέπει κατά συνέπεια να
διατεθεί ως απόρριµµα σύµφωνα µε τα όσα ορίζονται
από την ισχύουσα νοµοθεσία.
, παρέχονται:
Sime HOME
παρέχεται σε ένα
2.2 Διαστάσεις και βάρος
H
L
Περιγραφή Sime Home
Μ (mm) 160
Υ (mm) 105
Π (mm) 40
Βάρος (g)
130
2.3 Θερμοκρασίες
Λειτουργία: 0 ÷ 50°C
Αποθήκευση: -10 ÷ +60°C
P
71

EL
2.4 Επιτοίχια τοποθέτηση
Αφού βγάλετε το Αποµακρυσµένο Χειριστήριο
τη συσκευασία:
– Σπρώξτε µε ένα κατσαβίδι τη γλωσσίτσα στερέωσης (1) για
να αποσυνδέσετε τη βάση (2) από τη διεπαφή του χρήστη (3)
προσέχοντας να µην περάσει το εργαλείο στο εσωτερικό
12
Sime HOME
3
από
– Προβλέψτε το καλώδιο επικοινωνίας Bus (4), OpenTherm,
ανάµεσα στο λέβητα και το Αποµακρυσµένο Χειριστήριο
– Συνδέστε το στο λέβητα και στους ακροδέκτες (5) (Καλώδιο: 2
2
x 0,75 mm
– Στερεώστε στον τοίχο τη βάση (2) µε τις βίδες (6) και τα ούπα
(7), που παρέχονται µε το Αποµακρυσµένο Χειριστήριο
µη πολωµένα, Μήκος max: 50 m
4
5
– Χωρίστε τα 2 µέρη
72
7
2
6

EL
– Τοποθετήστε και πάλι τη διεπαφή Χρήστη (3) επάνω στη βάση
(2) συνδέοντας αυτές σωστά µε τη γλωσσίτσα (1)
2
3
ΠΡΟΕΙΔΟΠΟΙΗΣΗ
Φροντίστε να µην περισσεύει το καλώδιο ανάµεσα στη
βάση (2) και τη διεπαφή χρήστη (3).
73

3 ΠΕΡΙΓΡΑΦΉ
EL
3.1 Χαρακτηριστικά
Το Αποµακρυσµένο Χειριστήριο
γικό και κοµψό εξάρτηµα της εγκατάστασης, το οποίο έχει µελετηθεί για µία εύκολη και διαισθητική χρήση χάρη στην άνετη
οθόνη µε µήτρα σηµείων που προβάλλει όλες τις δυνατές ενέργειες που είναι δυνατόν να εκτελεστούν.
Η σύνδεση και η επικοινωνία µε το λέβητα γίνεται µέσω bus µε δύο
µη πολωµένα καλώδια και πρωτόκολλο Open Therm standard.
Τα κύρια χαρακτηριστικά του Αποµακρυσµένου Χειριστηρίου
Sime HOME
– Επιλογή τρόπου λειτουργίας (Καλοκαίρι/Χειµώνας/Off)
– Ρύθµιση Θερµοκρασιών θέρµανσης και ΖΝΧ
– Εβδοµαδιαίος προγραµµατισµός θέρµανσης
– Κλιµατική ρύθµιση (µε εγκαταστηµένο εξωτερικό αισθητήρα)
– ∆ιαχείριση των παραµέτρων του λέβητα
– Ρύθµιση θερµοκρασίας αντιπαγωτικής προστασίας
– ∆υνατότητα προγραµµατισµού 4 καθηµερινών ζωνών ωραρίου
– ∆υνατότητα διαχείρισης του προγράµµατος διακοπών
– Συνεχής προβολή τρέχουσας ηµέρας και ώρας
– Συνεχής προβολή της θερµοκρασίας χώρου
– Προβολή παραµέτρων λειτουργίας εγκατάστασης
– Προβολή του ιστορικού των αλάρµ και διαχείριση αυτών που
είναι ενδεχοµένως παρόντα.
είναι:
Sime HOME
είναι ένα λειτουρ-
3.2 Πολυχρηστικό encoder
Ο χειρισµός του encoder µπορεί να γίνει µε τους ακόλουθους
τρόπους.
Περιστροφή, που επιτρέπει:
– την αναφορά στα µενού, τα υποµενού και τις σειρές των εν-
δείξεων της οθόνης
– την τροποποίηση των στοιχείων ή των τιµών στις τροποποιή-
σιµες περιοχές
Πίεση, που επιτρέπει:
– την επιβεβαίωση των επιλογών που έχουν γίνει
– την επιβεβαίωση των τροποποιήσεων που έχουν εισαχθεί.
ΣΗΜΕΙΩΣΗ
Σε περίπτωση διακοπής του ρεύµατος όλες οι ρυθµίσεις που
έχουν πραγµατοποιηθεί διατηρούνται αποθηκευµένες εκτός
από την ηµέρα και την ώρα που παραµένουν για περίπου 24
ώρες.
74

EL
3.3 Διεπαφή χρήστη
14
15
16
12
13
Tropos: Xeimonas Progr. automato - Set 18,0°C mexri tis 11:30
Menu Tropos
10 8
11 9
Pe 20 Mar 2014Zoni 1 10:30
7
6
5
4
1
Κουµπί (Α)
2
Πολυχρηστικό encoder
3
Κουµπί (Β)
4
Ενέργεια που εκτελείται πατώντας το κουµπί (Β)
5
Προγραµµατισµένες ζώνες ωραρίου
6
Περιγραφή των τρεχουσών ρυθµίσεων
7
Εξωτερική θερµοκρασία
8
Ώρα
123
9
Παρουσία Eξωτερικού Aισθητήρα (SE)
10
Ηµέρα
11
Θερµοκρασία χώρου
12
Ποσοστό ρύθµισης
13
Παρουσία φλόγας
14
Ελεγχόµενη ζώνη
15
Ζήτηση θέρµανσης (καλ) ή νερού χρήσης (βαν)
16
Ενέργεια που εκτελείται πατώντας το κουµπί (Α)
75
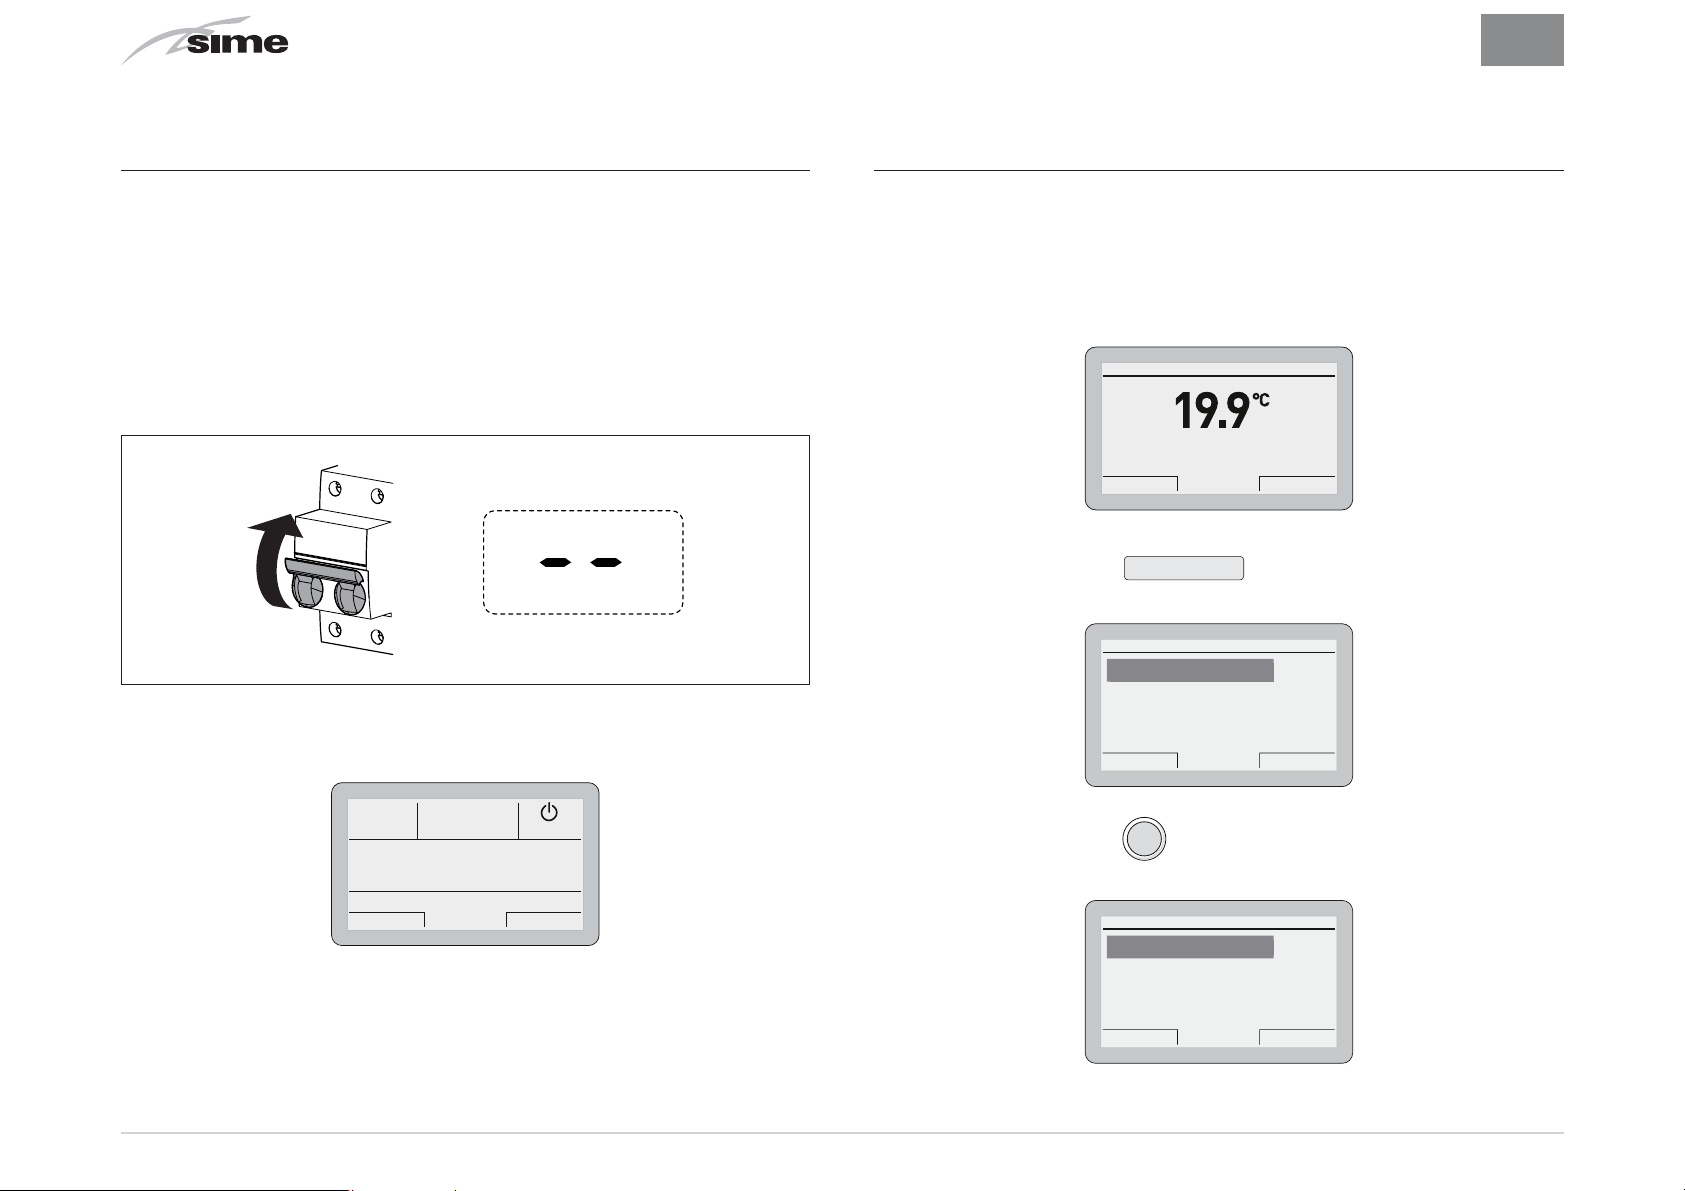
4 ΧΡΉΣΗ
G
k
G
EL
4.1 Θέση σε λειτουργία
Αφού τελειώσετε την εγκατάσταση του Αποµακρυσµένου Χειριστηρίου
Sime HOME
– Τοποθετήστε το γενικό διακόπτη της εγκατάστασης στο ON
(ανοιχτό)
– Από τον πίνακα εντολών του λέβητα ρυθµίστε τη λειτουργία
“Stand-by”
ON
– Στην οθόνη του Αποµακρυσµένου Χειριστηρίου
προβάλλεται η ακόλουθη ένδειξη οθόνης.
, προχωρήστε όπως αναφέρεται ακολούθως:
Sime HOME
4.2 Ρυθμίσεις από το κουμπί ΜΕΝΟΥ
4.2.1 Μενού ΓΕΝΙΚΕΣ ΡΥΘΜΙΣΕΙΣ
Από την
ρίου
– Πατήστε το κουµπί
οθόνης επιλογής των
“κύρια ένδειξη οθόνης”
Sime HOME
, προχωρήστε ως εξής:
GENIKES RITHMISEIS [...]
PLIROFORIES [...]
TEXNIKOS [...]
Exodos Piso
του Αποµακρυσµένου Χειριστη-
Pe 20 Mar 2014Zoni 1 10:30
Xeimonas xeirokinito - set 20.0°C
Menu Tropos
Μενού
για να µπείτε στην ένδειξη
“Μενού”
MENU
ENIKES RITHMISEIS
O
– Πατήστε το encoder
για να επιβεβαιώσετε το Μενού το
clic
οποίο είναι τονισµένο και για να µπείτε στα υποµενού
Exodos Piso
Glossa ENG
Imera kai ora [...]
Ergostasiake Ritmisi [...]
Exodos Piso
76
GENIKES RITHMISEIS
lossa

EL
G
GRC
G
I
k
k
– Πατήστε το encoder
για να επιβεβαιώσετε το υποµενού που
click
είναι τονισµένο και για να επιλέξετε την τροποποιήσιµη περιοχή
IMPOSTAZ. GENERALI
Glossa ENG
Imera kai ora [...]
Ergostasiake Ritmisi [...]
Exodos Piso
– Γυρίστε το encoder και τροποποιήστε το
τιμή”
, στο επιτρεπόµενο πεδίο (π.χ.: από ENG σε GRC)
GENIKES RITHMISEIS
Glossa GRC
Imera kai ora [...]
Ergostasiake Ritmisi [...]
Exodos Piso
EN
“στοιχείο/
– Γυρίστε το encoder για να επιλέξετε ένα άλλο υποµενού
που σας ενδιαφέρει (π.χ. Ηµέρα και ώρα)
GENIKES RITHMISEIS
Glossa GRC
mera kai ora
Imera kai ora [...]
Ergostasiake Ritmisi [...]
Exodos Piso
– Πατήστε το encoder
για να επιβεβαιώσετε το υποµενού
clic
που είναι τονισµένο και να µπείτε στην τροποποιήσιµη περιοχή
EISAGOGI IMERAS ORAS
–
Το πρώτο
Imera 01 Gen 2014
Ora 06 : 36
Akirosi
“δεδομένο/τιμή”
IMERA MINAS
ORA LEPTO
, το οποίο µπορεί να τροποποιηθεί
XRONOS
Epivevaiosi
είναι τονισµένο (π.χ. 06).
– Πατήστε το encoder
για να επιβεβαιώσετε την τροπο-
click
– Γυρίστε το encoder
τιμή”
(π.χ. από 06 έως 12)
για να τροποποιήσετε το
“δεδομένο/
ποίηση και να επιστρέψετε στα υποµενού
Glossa GRC
lossa
Imera kai ora [...]
Ergostasiake Ritmisi [...]
Exodos Piso
ΣΗΜΕΙΩΣΗ:
- το πάτηµα του κουµπιού
GENIKES RITHMISEIS
Πίσω
επιτρέπει την επιστροφή
– Πατήστε το encoder
ποίηση και να επιλέξετε το ακόλουθο
τονιστεί (π.χ. 36)
Imera 01 Gen 2014
Ora 12 : 36
Akirosi
για να επιβεβαιώσετε την τροπο-
clic
“στοιχείο/τιμή”
EISAGOGI IMERAS ORAS
IMERA MINAS
ORA LEPTO
XRONOS
Epivevaiosi
που θα
κατά µία θέση πίσω
- το πάτηµα του κουµπιού
“κύρια ένδειξη οθόνης”
στην
Έξοδος
.
επιτρέπει την επιστροφή
77

EL
Erg
k
– Γυρίστε το encoder για να τροποποιήσετε το
τιμή”
(π.χ. από 36 έως 50)
EISAGOGI IMERAS ORAS
IMERA MINAS
Imera 01 Gen 2014
Ora 12 : 50
Akirosi
– Πατήστε το encoder
ORA LEPTO
για να επιβεβαιώσετε την τροπο-
click
ποίηση και να επιλέξετε το ακόλουθο
XRONOS
Epivevaiosi
“δεδομένο/τιμή”
“δεδομένο/
, που θα
τονιστεί (π.χ. 01)
– Συνεχίστε µε τον ίδιο τρόπο µέχρι να ολοκληρώσετε τις απα-
ραίτητες τροποποιήσεις
– Αφού ολοκληρώσετε τις τροποποιήσεις πατήστε το κου-
µπί
Επιβεβαίωση
για να επιστρέψετε στο υποµενού εκκίνησης
(Ηµέρα και ώρα).
ΠΡΟΕΙΔΟΠΟΙΗΣΗ
ΣΥΝΙΣΤΆΤΑΙ να µπείτε σ' αυτό το υποµενού
εάν θέλετε να επιστρέψετε στις
μίσεις”
σβήνοντας όλες τις ρυθµίσεις που έχουν γίνει
“Εργοστασιακές ρυθ-
ΜΟΝΟ
σε επίπεδο χρήστη.
Στην αντίθετη περίπτωση πατήστε το κουµπί
Έξοδος
ή
Πίσω
.
Εάν θέλετε να συνεχίσετε:
– Πατήστε το encoder
για να µπείτε στην τροποποιήσιµη
clic
περιοχή. Εµφανίζεται η ένδειξη οθόνης που παρέχει τις ακόλουθες δυνατότητες:
AITIMA EPIVEVAIOSIS
Epivevaiosi leitougias?
Akirosi
Epivevaiosi
ΣΗΜΕΙΩΣΗ:
ζέλ”) στη συνέχεια προχωρήστε Π
σε περίπτωση σφάλµατος.
Ο τρόπος χειρισµού είναι ΚΥΚΛΙΚΟΣ (τύπου “καρου-
ΑΝΤΑ ΜΠΡΟΣΤΑ, ακόµη και
– Πατήστε το κουµπί
νού”
που έχετε επιλέξει προηγουµένως (Εργοστασιακές ρυθ-
Ακύρωση
για να επιστρέψετε στο
“Mε-
µίσεις)
– Γυρίστε το encoder για να επιλέξετε ένα άλλο
που σας ενδιαφέρει (π.χ. Εργοστασιακές ρυθµίσεις)
“Mενού”
– Πατήστε το κουµπί
γοστασιακές ρυθμίσεις”
επιστρέψτε στην
GENIKES RITHMISEIS
Glossa GRC
Imera kai ora [...]
ostasiake Ritmisi
Ergostasiake Ritmisi [...]
Exodos Piso
78
Επιβεβαίωση
για να επαναφέρετε τις
και, µετά από µερικά δευτερόλεπτα,
“κύρια ένδειξη οθόνης”
“Ερ-

EL
k
Thermansi zonis
k
Th
Levitas
k
4.2.2 Μενού ΠΛΗΡΟΦΟΡΙΕΣ
Το Mενού ΠΛΗΡΟΦΟΡΙΕΣ προβάλλεται µόνο και ∆ΕΝ είναι δυνατόν να κάνετε τροποποιήσεις των δεδοµένων
Από την
– Πατήστε το κουµπί
οθόνης επιλογής των
– Γυρίστε το encoder για να επιλέξετε το µενού
ΦΟΡΙΕΣ”
“κύρια ένδειξη οθόνης”
Pe 20 Mar 2014Zoni 1 10:30
Xeimonas xeirokinito - set 20.0°C
Menu Tropos
Μενού
“Μενού”
GENIKES RITHMISEIS [...]
PLIROFORIES
PLIROFORIES [...]
TEXNIKOS [...]
Exodos Piso
για να µπείτε στην ένδειξη
“ΠΛΗΡΟ-
MENU
– Γυρίστε το encoder για να επιλέξετε το υποµενού που
σας ενδιαφέρει
– Πατήστε το encoder
για να επιβεβαιώσετε το υποµενού
clic
που έχετε επιλέξει και να µπείτε στην περιοχή προβολής των
σχετικών δεδοµένων
PLIROFORIES
Therm. xorou 20.0°C
erm. xorou
Therm. thermansis 80°C
Therm. prosagogis 30°C
Exodos Piso
– Πατήστε το κουµπί
Πίσω
για να επιστρέψετε στα υπο-
µενού
– Γυρίστε το encoder
για να επιλέξετε ένα άλλο υποµενού
που σας ενδιαφέρει
PLIROFORIES
Thermansi zonis [...]
Levitas [...]
Nero xrisis [...]
Allarm [...]
Ekdosi firmware 100
Exodos Piso
– Πατήστε το encoder
ΡΙΕΣ”
και να µπείτε στα υποµενού
για να επιβεβαιώσετε
clic
PLIROFORIES
Thermansi zonis [...]
Levitas [...]
Nero xrisis [...]
Allarm [...]
Ekdosi firmware 100
Exodos Piso
“ΠΛΗΡΟΦΟ-
– Πατήστε το encoder
για να επιβεβαιώσετε το υποµενού
clic
που έχετε επιλέξει και να µπείτε στην περιοχή προβολής των
σχετικών δεδοµένων
79

k
k
– Συνεχίστε µε τον ίδιο τρόπο µέχρι να ολοκληρωθούν οι προ-
βολές που επιθυµείτε
– Πατήστε το κουµπί
ένδειξη οθόνης”
.
Έξοδος
για να επιστρέψετε στην
Pe 20 Mar 2014Zoni 1 10:30
“κύρια
MENU
GENIKES RITHMISEIS [...]
PLIROFORIES [...]
TEXNIKOS
TEXNIKOS [...]
Exodos Piso
EL
Xeimonas xeirokinito - set 20.0°C
Menu Tropos
4.2.3 Μενού ΤΕΧΝΙΚΟΣ
Η χρήση του Μενού ΤΕΧΝΙΚΟΣ συνιστάται µόνο για το Επαγγελµατικά ∆ιαπιστευµένο Προσωπικό, καθώς επιτρέπει την τροποποίηση των χαρακτηριστικών δεδοµένων της διαχειριζόµενης
εγκατάστασης.
Όσον αφορά το υποµενού
Παράμετροι λέβητα”
εισαγωγή του ΚΩ∆ΙΚΟΥ (ή password)
Από την
“κύρια ένδειξη οθόνης”
Pe 20 Mar 2014Zoni 1 10:30
Xeimonas xeirokinito - set 20.0°C
Menu Tropos
“1 2 3 4 5”
προβλέπεται η
.
– Πατήστε το encoder
για να µπείτε στην τροποποιήσιµη
clic
περιοχή. Εµφανίζεται η ένδειξη οθόνης που παρέχει τις ακόλουθες δυνατότητες:
AITIMA EPIVEVAIOSIS
Epivevaiosi leitougias?
– Πατήστε το κουµπί
Akirosi
Ακύρωση
Epivevaiosi
για να επιστρέψετε στο µενού
“ΤΕΧΝΙΚΟΣ”
– Πατήστε το κουµπί
Επιβεβαίωση
Thermansi zonis [...]
Parametroi levita [...]
Epanafora ergostasia [...]
Exodos Piso
για να µπείτε στα υποµενού
TEXNIKOS
– Πατήστε το κουµπί
οθόνης επιλογής των
– Γυρίστε το encoder για να επιλέξετε το µενού
Μενού
“Μενού”
για να µπείτε στην ένδειξη
“TEΧΝΙ-
ΚΟΣ”
80
– Γυρίστε το encoder για να επιλέξετε το υποµενού που
σας ενδιαφέρει
– Πατήστε το encoder
για να επιβεβαιώσετε το υποµενού
clic
που έχετε επιλέξει και να µπείτε στην περιοχή των παραµέτρων που µπορούν να τροποποιηθούν.

EL
k
1
k
k
ΠΡΟΕΙΔΟΠΟΙΗΣΗ
Όταν επιλέγετε το υποµενού
την επιβεβαίωση πατώντας το encoder
νίζεται η παρακάτω ένδειξη οθόνης:
ZITISI KODIKOU PROSVASIS
Kodikos: 000000
Akirosi
“παράμετροι λέβητα”
Epivevaiosi
µε
εµφα-
clic
– Γυρίστε το encoder για να τροποποιήσετε το πρώτο ψη-
φίο από 0 έως 1
– Πατήστε το encoder
για να επιβεβαιώσετε την τροπο-
click
ποίηση και να επιλέξετε το επόµενο ψηφίο
– Συνεχίστε µε τον ίδιο τρόπο µέχρι να ολοκληρωθεί ο ΚΩ∆ΙΚΟΣ
(ή password)
“1 2 3 4 5”
– όπου
“Ένδειξη παραμέτρου”
αναφέρεται στον πίνακα παραµέτρων που υπάρχει στο εγχειρίδιο του εγκατεστηµένου λέβητα
(π.χ. 1=tS 0.1 ή 1=PAR 01).
– Γυρίστε το encoder
για να τρέξετε τη λίστα παραµέτρων
και να επαληθεύσετε την τιµή
– Σε περίπτωση που η τιµή της παραµέτρου που έχει επιλεγεί
πρέπει να τροποποιηθεί:
– Πατήστε το encoder
για να µπείτε στην περιοχή τροπο-
clic
ποίησης της τιµής
Parametroi levita
EndixiParametrou:
Timi parametrou:
Exodos Piso
1
0
1--------42
ZITISI KODIKOU PROSVASIS
Kodikos: 12345
Akirosi
– Πατήστε το κουµπί
“Ρύθμιση παραμέτρων”
Επιβεβαίωση
του λέβητα
Parametroi levita
EndixiParametrou:
Timi parametrou:
Exodos Piso
Epivevaiosi
για να µπείτε στην περιοχή
1--------42
1
0
– Γυρίστε το encoder για να ρυθµίσετε τη νέα τιµή
– Πατήστε το encoder
για να επιβεβαιώσετε την τροπο-
clic
ποίηση και να προχωρήσετε µε µια περαιτέρω παράµετρο.
– Στο τέλος των προβολών/τροποποιήσεων πατήστε το κουµπί
Έξοδος
για να επιστρέψετε στην
Pe 20 Mar 2014Zoni 1 10:30
Xeimonas xeirokinito - set 20.0°C
Menu Tropos
“κύρια ένδειξη οθόνης”
.
81

k
Modo: Inverno Progr. automatico - Set 18,0 Cfino alle 11:30
Menu Modo
4.2.4 Δένδρο πλοήγησης από το κουμπί ΜΕΝΟΥ
ΜΕΝΟΎ
ΜΕΝΟΥ
ΓΕΝΙΚΕΣ ΡΥΘΜΙΣΕΙΣ [...]
ΠΛΗΡΟΦΟΡΙΕΣ [...]
ΤΕΧΝΙΚΟΣ [...]
ΓΕΝΙΚΕΣ ΡΥΘΜΙΣΕΙΣ
Γλώσσα [...]
Ηµέρα και ώρα [...]
Εργοστασιακές ρυθµίσεις [...]
(paragrafo 4.2.1 a pagina 76)
clic
Για να
“επιλέξετε”
Για να
“επιβεβαιώσετε”
σειρές ή να
“τροποποιήσετε”
τις επιλογές ή τις τροποποιήσεις
EL
τιµές
Θέρµανση ζώνης [...]
Λέβητας [...]
Νερό χρήσης [...]
Αλάρµ [...]
Έκδοση firmware 100
ΑΙΤΗΜΑ ΕΠΙΒΕΒΑΙΩΣΗΣ
Επιβεβαίωση λειτουργίας?
[ΕΠΙΒΕΒΑΙΩΣΗ]
82
ΠΛΗΡΟΦΟΡΙΕΣ
(paragrafo 4.2.2 a pagina 79)
(paragrafo 4.2.3 a pagina 80)
Θέρµανση ζώνης
Θερµοκρασία χώρου 20.0°C
θερµοκρασία θέρµανσης 0°C
Θερµ. προσαγωγής 28.0°C
(Αυτές οι ενδείξεις οθόνης είναι µόνο για προβολή. ∆ΕΝ είναι δυνατόν να εκτελεστεί η τροποποίηση των δεδοµένων)
ΤΕΧΝΙΚΟΣ
Θέρµανση ζώνης [...]
Παράµετροι λέβητα [...]
Επαναφορά εργοστασιακή [...]
Λέβητας
Θερµ. επιστροφής 25.0°C
Ισχύς καυστήρα 0%
Πίεση εγκατάστασης 1.2bar
Θερµοκρ. καυσαερίων _ _ _°C
Θέρµανση ζώνης
Ζήτ. µε αισθητήρα χώρου ΝΑΙ
Ρύθµ. µε αισθητήρα χώρου ΝΑΙ
Ρύθµ. µε εξωτ. αισθητήρα ΝΑΙ
Κλιµατική καµπύλη 3.0
Τροποποίηση κλιµατική 0°C
Θερµ. off υστέρηση 0.1°C
Αδράνεια εγκατάστασης 10
Min Θερµοκρασία νερού 20°C
Ενεργοποίηση Αντιπαγωτικής προστασίας ΝΑΙ
Θερµοκρασία Αντιπαγωτικής προστασίας 5.0°C
∆ιόρθ. αισθητήρα χώρου 0.0°C
Νερό χρήσης
Θερµ. ζεστού νερού 51.2C
Ρύθµιση ζεστού νερού 50°C
Παροχή --l/min
ΖΗΤΗΣΗ ΚΩ∆ΙΚΟΥ ΠΡΟΣΒΑΣΗΣ
Κωδικός:
[ΕΠΙΒΕΒΑΙΩΣΗ]
0 0 0 0
0
(paragrafo 4.2.3 a pagina 80)
Ιστορικό αλάρµ
Ιστορικό ενδείξεων:
Κωδικός αλάρµ: 255
255 - Τεχνική δυσλειτουργία
ΑΙΤΗΜΑ ΕΠΙΒΕΒΑΙΩΣΗΣ
1
Επιβεβαίωση λειτουργίας?
[ΕΠΙΒΕΒΑΙΩΣΗ]
1 -------- 5
< τελευταίο

EL
4.3.5 Τεχνικές διευκρινίσεις
Ζήτ. με αισθητήρα χώρου
Ρύθµιση ΝΑΙ: η ζήτηση θερµότητας της εγκατάστασης θέρµανσης πραγµατοποιείται µόνον εάν η θερµοκρασία χώρου είναι
µικρότερη από την επιθυµητή θερµοκρασία χώρου.
ΡΥΘΜΙΣΗ ΟΧΙ: η ζήτηση θερµότητας της εγκατάστασης θέρµανσης υπάρχει σταθερά στις λειτουργίες “Χειροκίνητο” και “ΘΕΡΜΟΚΡΑΣΙΑ ΑΝΕΣΗΣ AUTO”. Στις άλλες λειτουργίες η ζήτηση
αυτή δεν υπάρχει.
Θερμοκρασία προσαγωγής
°C
90
80
70
K=9 K=6 K=4,5 K=3
K=2,2
Ρύθμ. με αισθητήρα χώρου
Ρύθµιση ΝΑΙ: η θερµοκρασία προσαγωγής ρυθµίζεται ανάλογα
µε την απόκλιση ανάµεσα στην πραγµατική θερµοκρασία χώρου, η οποία µετριέται από τον εσωτερικό αισθητήρα της διάταξης, και την θερµοκρασία χώρου που έχει προγραµµατιστεί
Ρύθµιση ΟΧΙ: η θερµοκρασία προσαγωγής θα διατηρηθεί σταθερή στο µέγιστο επιτρεπτό, κατά τη διάρκεια όλων των περιόδων ζήτησης (διαχείριση µε υστέρηση).
Ρύθμ. με εξωτ. αισθητήρα
Ρύθµιση ΝΑΙ: η µέγιστη θερµοκρασία προσαγωγής (και η ρυθµιζόµενη εάν είναι ενεργοποιηµένη η ρύθµιση µε αισθητήρα
χώρου) ρυθµίζεται ανάλογα µε την τιµή της εξωτερικής θερµοκρασίας (εάν υπάρχει ο εξωτερικός αισθητήρας), λαµβάνοντας
υπόψη και τις τιµές που έχουν καθοριστεί για την Κλιµατική καµπύλη και το σχετικό Offset.
Κλιματική καμπύλη
Κλίση της επιλεγόµενης κλιµατικής καµπύλης, που χρησιµοποιείται για τη ρύθµιση της θερµοκρασίας προσαγωγής σε συνάρτηση µε την εξωτερική θερµοκρασία. Τα κατώτερα και ανώτερα όρια των καµπυλών εξαρτώνται από τα όρια προσαγωγής
του λέβητα.
60
K=1,5
50
40
K=0,75
30
20
20 15 10 5 0 -10 -15-5 -20
°C
Εξωτερική θερμοκρασία
Τροποποίηση κλιματική
Είναι η κάθετη µετατόπιση της κλιµατικής καµπύλης, µε την
οποία διορθώνεται η θερµοκρασία προσαγωγής που έχει υπολογιστεί.
Θερμοκρασία off υστέρηση
Είναι η τιµή που προστίθεται στη θερµοκρασία χώρου, πάνω από
την οποία η συσκευή σβήνει τη ζήτηση, αποκλειστικά κατά τη
διάρκεια της ρύθµισης µε υστέρηση (ρύθµιση µε απενεργοποιηµένο αισθητήρα χώρου, αλλά µε ενεργοποιηµένη χρήση αισθητήρα χώρου).
83
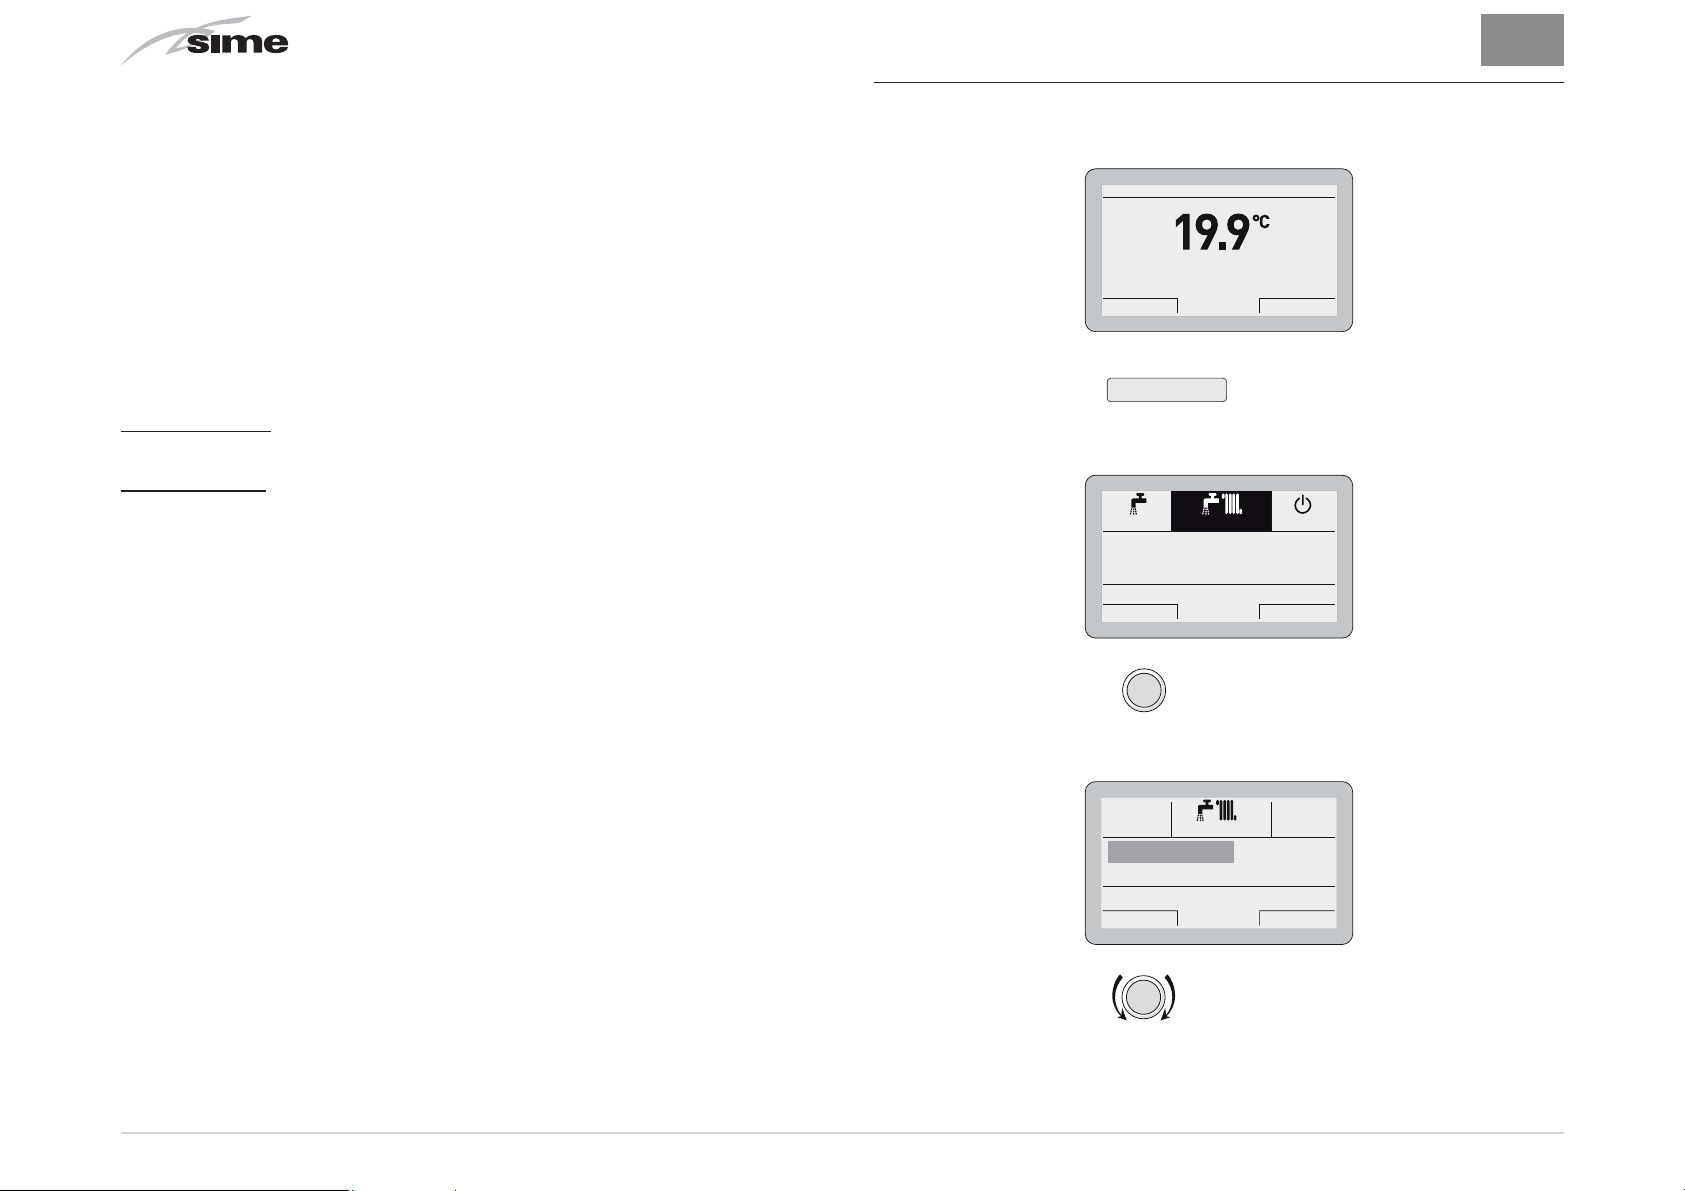
EL
Αδράνεια εγκατάστασης
Είναι µία παράµετρος που ρυθµίζει την ταχύτητα αντίδρασης του
αλγορίθµου ρύθµισης, που συνδυάζεται µε την αδράνεια ή τη διάσταση και τον τύπο του κτιρίου και του συστήµατος θέρµανσης.
Min θερμοκρασίας νερού
Είναι το κατώτερο όριο της θερµοκρασίας προσαγωγής που έχει
υπολογιστεί (χρήσιµη σε περίπτωση εγκαταστάσεων µε χαµηλές
αποδόσεις σε χαµηλές υπολογιζόµενες θερµοκρασίες).
Ενεργοποίηση αντιπαγωτικής προστασίας
Ρύθµιση ΝΑΙ: ενεργοποίηση του προγράµµατος αντιπαγωτικής
προστασίας
Ρύθµιση ΟΧΙ: η θέρµανση θα διατηρηθεί σβηστή κατά τη διάρκεια των λειτουργιών OFF, ΚΑΛΟΚΑΙΡΙ και κατά τις περιόδους
Οικονοµίας στη λειτουργία AUTO εάν ο αισθητήρας χώρου είναι
απενεργοποιηµένος.
Θερμοκρασία αντιπαγωτικής προστασίας
Είναι η θερµοκρασία χώρου (αντιπαγωτική), κάτω από την οποία
η συσκευή εκτελεί µία ζήτηση θέρµανσης στην ελάχιστη θερµοκρασία θέρµανσης. Η ζήτηση διατηρείται ενεργή µέχρις ότου η
θερµοκρασία χώρου υπερβεί την τιµή “αντιπαγωτικής προστασίας + 0.6°C που έχει ρυθµιστεί”.
4.3 Ρυθμίσεις από κουμπί ΤΡΟΠΟΣ
Από την
– Πατήστε το κουµπί
επιλογής
τρεις Τρόπους λειτουργίας (π.χ. “Χειµώνας”)
– Πατήστε το encoder
γία”
ρές”
“κύρια ένδειξη οθόνης”
Xeimonas xeirokinito - set 20.0°C
Menu Tropos
Τρόπος
“Τρόποι λειτουργίας”
Kalokairi
Exodos Piso
click
Pe 20 Mar 2014Zoni 1 10:30
για να µπείτε στη βιντεοσελίδα
. Θα επισηµανθεί ένας από τους
Xeimonas
Off
για να επιβεβαιώσετε τη
που επισηµαίνεται τονισµένη και για να µπείτε στις
“Λειτουρ-
“σει-
Διόρθ. αισθητήρα χώρου
Είναι η τιµή που χρησιµοποιείται για τη διόρθωση της ανάγνωσης της θερµοκρασίας χώρου, από την πλευρά του αισθητήρα
που βρίσκεται µέσα στη συσκευή.
84
Xeimonas
Zestou nerou XEIRO 40°C
Thermansi XEIRO 20.0°C
Litourgia Diakopes OFF
Exodos Piso
– Γυρίστε το encoder για να επιλέξετε
“Θέρμανση”

EL
k
k
O
k
k
DEUTERA
k
– Πατήστε το encoder
και να µπείτε στις
“σειρές”
– Πατήστε το encoder
Tropos leitourgias XEIRO
Tropos leitourgias
TermokrAnesis AUTO 20.0°C
TermokrOikonomAUTO 18.0°C
TermokrAnesis XEIRO 20.0°C
Programatismos oras 20.0°C
Exodos Piso
για να επιβεβαιώσετε
clic
Thermansi
για να επιβεβαιώσετε τη
clic
“Θέρμανση”
“Σειρά”
είναι τονισµένη και να µπείτε στην περιοχή που θα τροποποιήσετε
Thermansi
Tropos leitourgias XEIRO
TermokrAnesis AUTO 20.0°C
TermokrOikonomAUTO 18.0°C
TermokrAnesis XEIRO 20.0°C
Programatismos oras 20.0°C
Exodos Piso
– Γυρίστε το encoder για να τροποποιήσετε το
τιμή”
, στο επιτρεπτό πεδίο (π.χ. ΧΕΙΡΟ - AUTO - OFF)
XEIR
“δεδομένο/
που
4.3.1 Προγραμματισμός ώρας
Το Αποµακρυσµένο Χειριστήριο
Sime HOME
επιτρέπει τη ρύθµι-
ση το ανώτερο τεσσάρων ζωνών ωραρίου καθηµερινά.
Κατά τη διάρκεια της προγραµµατισµένης ζώνης ωραρίου ο λέβητας λειτουργεί στη λειτουργία θέρµανσης ΑΝΕΣΗ και εκτός
της προγραµµατισµένης ζώνης ωραρίου ο λέβητας λειτουργεί
στη λειτουργία θέρµανσης ΟΙΚΟΝΟΜΙΑ,
– Πατήστε το encoder
τισμός ώρας”
και να µπείτε στην περιοχή που θέλετε να τρο-
για να επιβεβαιώσετε
clic
“Προγραμμα-
ποποιήσετε
PROGRAMMA ORARIOU THERMANSIS
Imera/e:
024681012141618202224
[1] 06:00 - 08:00
[2] 11:00 - 13:00
Exodos Piso
– Γυρίστε το encoder για να επιλέξετε τις
Ημέρες”
ή τα
“Γκρουπ ημερών”
DEUTERA
[3] [4] 18:00 - 23:00
“Μεμονωμένες
– Πατήστε το encoder
µενη τροποποίηση που έχετε κάνει και να επιστρέψετε στην
σειρά
“Τρόπος λειτουργίας”
– Γυρίστε το encoder για να επιλέξετε µία άλλη
Προγραμματισμός ώρας
(π.χ.
Tropos leitourgias XEIRO
TermokrAnesis AUTO 20.0°C
TermokrOikonomAUTO 18.0°C
TermokrAnesis XEIRO 20.0°C
Programatismos oras 20.0°C
Programatismos oras
Exodos Piso
για να επιβεβαιώσετε την ενδεχό-
clic
)
Thermansi
“σειρά“
– Πατήστε το encoder
που προτιµάτε και να µπείτε στο πρώτο
Imera/e:
024681012141618202224
[1] 06:00 - 08:00
06:00
[2] 11:00 - 13:00
Akirosi
– Γυρίστε το encoder για να τροποποιήσετε το
τιμή”
σύµφωνα µε την επιθυµητή ώρα
για να επιβεβαιώσετε την επιλογή
clic
“ρυθμίσιμο ωράριο” [1]
PROGRAMMA ORARIOU THERMANSIS
DEUTERA
[3] [4] 18:00 - 23:00
Epivevaiosi
“δεδομένο/
85

EL
k
k
0
– Πατήστε το encoder
ποίηση και να περάσετε στο επόµενο
Imera/e:
024681012141618202224
[1] 06:00 - 08:00
[2] 11:00 - 13:00
Akirosi
για να επιβεβαιώσετε την τροπο-
click
“δεδομένο/τιμή”
PROGRAMMA ORARIOU THERMANSIS
DEUTERA
[3] -
08:00
[4] 18:00 - 23:00
Epivevaiosi
[2]
– Συνεχίστε µε τον ίδιο τρόπο µέχρι να ολοκληρώσετε τις απα-
ραίτητες τροποποιήσεις για κάθε ηµέρα της εβδοµάδας ή για
τα γκρουπ ηµερών.
ΣΗΜΕΙΩΣΗ:
ζέλ”) στη συνέχεια προχωρήστε Π
Ο τρόπος χειρισµού είναι ΚΥΚΛΙΚΟΣ (τύπου “καρου-
ΑΝΤΑ ΜΠΡΟΣΤΑ, ακόµη και
σε περίπτωση σφάλµατος.
ΠΡΟΕΙΔΟΠΟΙΗΣΗ
Σε περίπτωση που ∆ΕΝ επιθυµείτε να χρησιµοποιήσετε µία ζώνη
ωραρίου, είναι απαραίτητο να ρυθµίσετε τα ωράρια έναρξης και τέλους, της συγκεκριµένης ζώνης, στην ίδια τιµή (π.χ. 3 14:00-14:00).
4.3.2 Λειτουργία διακοπές
Η λειτουργία αυτή επιτρέπει την απενεργοποίηση της θέρµανσης και της παραγωγής ζεστού νερού χρήσης κατά την περίοδο των διακοπών που έχει
“ρυθμιστεί και ενεργοποιηθεί”
τη διάρκεια της οποίας θα µπορεί να είναι ενεργή η λειτουργία
αντιπαγωτικής προστασίας (εάν έχει ρυθµιστεί).
Για να ρυθµίσετε τη λειτουργία διακοπές, από την
– Πατήστε το κουµπί
– Πατήστε το encoder
λειτουργίας
Καλοκαίρι
– Γυρίστε το encoder
Τρόπος
clic
ή
Χειμώνας
.
για να επιβεβαιώσετε έναν τρόπο
.
για να επιλέξετε
“κύρια ένδειξη οθόνης”
“Λειτουργία δια-
κοπές”
Kalokairi
Zestou nerou XEIRO 40°C
Litourgia Diakopes OFF
Exodos Piso
Xeimonas
Off
κατά
:
– Αφού ολοκληρωθούν οι τροποποιήσεις πατήστε το κουµπί
Επιβεβαίωση
“Γκρουπ ημερών”
στα
– Πατήστε το κουµπί
ένδειξη οθόνης”
86
για να επιστρέψετε στις
Έξοδος
για να επιστρέψετε στην
.
Pe 20 Mar 2014Zoni 1 10:30
Xeimonas xeirokinito - set 20.0°C
Menu Tropos
“Μεμονωμένες ημέρες”
“κύρια
ή
– Πατήστε το encoder
διακοπές”
και να µπείτε στην περιοχή που µπορείτε να τρο-
για να επιβεβαιώσετε “
clic
ποποιήσετε
PROGRAMA DIAKOPON
IMERA MINAS XRONOS ORA
Arxi: 05 02 2014 15 : 00
Telos:
Akirosi
5
20 02 2014 15 : 00
Ener/siDiakopes: OXI
Zestou nerou OFF - Term. OFF (AntipagoEnergi)
Epivevaiosi
– Γυρίστε το encoder για να τροποποιήσετε το
τιμή”
που θα τονιστεί.
Λειτουργία
“δεδομένο/

EL
0
– Πατήστε το encoder
ποίηση και να περάσετε στο
Arxi: 05 02 2014 15 : 00
Telos:
Zestou nerou OFF - Term. OFF (AntipagoEnergi)
Akirosi
– Γυρίστε το encoder για να τροποποιήσετε το
τιμή”
ανάλογα µε την ηµέρα έναρξης των διακοπών
– Πατήστε το encoder
ποίηση και να περάσετε στο
για να επιβεβαιώσετε την τροπο-
click
“δεδομένο/τιμή”
PROGRAMA DIAKOPON
IMERA MINAS XRONOS ORA
5
20 02 2014 15 : 00
Ener/siDiakopes: OXI
Epivevaiosi
για να επιβεβαιώσετε την τροπο-
click
“δεδομένο/τιμή”
που ακολουθεί
που ακολουθεί
“δεδομένο/
– Συνεχίστε µε τον ίδιο τρόπο µέχρι να ολοκληρώσετε τις απα-
ραίτητες τροποποιήσεις
ΣΗΜΕΙΩΣΗ:
ζέλ”) στη συνέχεια προχωρήστε Π
Ο τρόπος χειρισµού είναι ΚΥΚΛΙΚΟΣ (τύπου “καρου-
ΑΝΤΑ ΜΠΡΟΣΤΑ, ακόµη και
σε περίπτωση σφάλµατος.
4.3.3 Επισήμανση δυσλειτουργίας
Σε περίπτωση που παρουσιαστεί µία δυσλειτουργία θα εµφανιστεί η ένδειξη οθόνης
ένδειξης οθόνης”
. Για τους κύριους κωδικούς δυσλειτουργίας
“Δυσλειτουργία”
προβάλλεται και µία σύντοµη περιγραφή.
DISLEITOURGIA
2 - Xamili piesi egkatastasis
Exodos Piso
Ο τύπος δυσλειτουργίας µπορεί να είναι
ακός) ή
εμπλοκής
.
Για να αποκαταστήσετε τις συνθήκες κανονικής λειτουργίας:
– στην πρώτη περίπτωση αρκεί να εξαλείψετε την αιτία της δυ-
σλειτουργίας
– στη δεύτερη περίπτωση είναι απαραίτητο να εξαλείψετε την
αιτία της δυσλειτουργίας και στη συνέχεια να πατήσετε το
κουµπί
Reset
.
στη θέση της
DISLEITOURGIA
6 - Blokarisma kaustira
Exodos Reset
παροδικός
(περιστασι-
“κύριας
– Αφού ολοκληρωθούν οι τροποποιήσεις πατήστε το κουµπί
Επιβεβαίωση
– Πατήστε το κουµπί
ένδειξη οθόνης”
για να επιστρέψετε στην ένδειξη
Έξοδος
για να επιστρέψετε στην
.
Pe 20 Mar 2014Zoni 1 10:30
Xeimonas xeirokinito - set 20.0°C
Menu Tropos
“Λειτουργία διακοπές”
“κύρια
σης νερού εγκατάστασης
και στη συνέχεια να πατήσετε το κουµπί
Reset
.
2 - Xamili piesi egkatastasis
Exodos Plirosi
Στην περίπτωση
απουσίας νερού στην εγκατάσταση ή χαμηλής πίε-
θα ζητηθεί να γεµίσετε την εγκατάσταση
DISLEITOURGIA
Επιβεβαίωση
AITIMA EPIVEVAIOSIS
Epivevaiosi leitougias?
Akirosi
αντί του
Epivevaiosi
87

EL
Κωδικός
αλάρμ
1 Ασφάλεια καυσαερίων
2
3
6 Μπλοκάρισµα καυστήρα Απουσία ανίχνευσης φλόγας
7 Υπερθέρµανση
9 Απουσία κυκλοφορίας
13
20 Υπερθέρµανση ζώνης 1
22 Υπερθέρµανση ζώνης 2
42 ∆υσλειτουργία πλήκτρων Πάτηµα πλήκτρων
Δυσλειτουργία Περιγραφή δυσλειτουργίας
Επέµβαση θερµοστάτη
καυσαερίων ή Επέµβαση
αισθητήρα πιεσοστάτη αέρα
Χαµηλή πίεση εγκατάστασης
Υψηλή πίεση εγκατάστασης
Υπερθέρµανση καυσαερίων
Χαµηλή πίεση νερού εγκατά-
στασης
Υψηλή πίεση νερού εγκατά-
στασης
Επέµβαση θερµοστάτη
ασφαλείας.
Επέµβαση διπλού αισθητήρα
CH
Απουσία κυκλοφορίας νερού
εγκατάστασης
Επέµβαση αισθητήρα καυ-
σαερίων
∆υσλειτουργία επέµβασης
θερµοστάτη ασφάλειας ζώνης
mix 1
∆υσλειτουργία επέµβασης
θερµοστάτη ασφάλειας ζώνης
mix 2
Και στις δύο περιπτώσεις, από την
– Πατήστε το encoder
ρύθμισης
που έχει καθοριστεί
click
THERMOKRASIA ZNX
“κύρια ένδειξη οθόνης”
για να προβάλλετε την τιµή της
40.0
RithmisiZestouNerou
Akirosi
– Γυρίστε το encoder για να ρυθµίσετε τη νέα
μισης”
– Πατήστε το κουµπί
Επιβεβαίωση
ποποίηση και να επιστρέψετε στην
THERMOKRASIA XOROU
21.3
Xeirokinito prosorinos
Akirosi
Epivevaiosi
Epivevaiosi
για να ολοκληρώσετε την τρο-
“κύρια ένδειξη οθόνης”
THERMOKRASIA XOROU
21.3
Xeirokinito
Akirosi
Epivevaiosi
:
“τιμή ρύθ-
.
Άλλοι Τεχνική δυσλειτουργία ...
4.3.4 Γρήγορες ρυθμίσεις
Ο Χρήστης, χρησιµοποιώντας το encoder, µπορεί να εκτελέσει
τις ακόλουθες γρήγορες ρυθµίσεις:
– απ' ευθείας τροποποίηση της
λειτουργία ΚΑΛΟΚΑΙΡΙ
– απ' ευθείας τροποποίηση της
στη λειτουργία ΧΕΙΜΩΝΑΣ.
88
“ρύθμισης ζεστού νερού”
“ρύθμισης θερμοκρασίας χώρου”
στη
ΣΗΜΑΝΤΙΚΟ ΓΙΑ ΤΗ ΘΕΡΜΟΚΡΑΣΙΑ ΧΩΡΟΥ
Η έννοια των ενδείξεων στην οθόνη είναι η ακόλουθη:
Χειροκίνητο προσωρινώς:
ο
“τρόπος λειτουργίας”
στη θέρµανση
είναι ρυθµισµένος στο AUTO και η τιµή της ρύθµισης που εµφανίζεται στην οθόνη θα ισχύει µέχρι την επόµενη αλλαγή ζώνης
ωραρίου (αυτόµατη ρύθµιση θερµοκρασίας)
Χειροκίνητο:
ο
“τρόπος λειτουργίας”
στη θέρµανση είναι ρυθµισµένος στο ΧΕΙΡΟ και η τιµή ρύθµισης που εµφανίζεται στην
οθόνη θα έχει µόνιµη ισχύ.

EL
k
Modo: Inverno Progr. automatico - Set 18,0 Cfino alle 11:30
Menu
Tropos
4.4 Πλοήγηση από κουμπί ΤΡΟΠΟΣ
ΤΡΟΠΟΣ
Kalokairi
Καλοκαίρι
Ζεστό νερό ΧΕΙΡΟ 50°C
_________________________________
Λειτουργία διακοπές OFF
Ζεστό νερό ΧΕΙΡΟ 50°C
Θέρµανση ΧΕΙΡΟ 20.0°C
_______________________________
Λειτουργία διακοπές OFF
Xeimonas
Χειµώνας
Off
Ζεστό νερό
Τρόπος λειτουργίας ΧΕΙΡΟ
Ρύθµιση ζεστού νερού 50°C
Ζεστό νερό
Τρόπος λειτουργίας ΧΕΙΡΟ
Ρύθµιση ζεστού νερού 50°C
Για να
clic
“επιλέξετε”
Για να
“επιβεβαιώσετε”
σειρές ή να
ΠΡΟΓΡΑΜΜΑ ∆ΙΑΚΟΠΩΝ
ΗΜΕΡΑ
ΜΗΝΑΣ
ΧΡΟΝΟΣ
Αρχή: 01 01 2014 07:00
Τέλος: 08 01 2014 07:00
Ενερ/ση ∆ιακοπές: ΟΧΙ
Ζεστό νερό OFF - Θέρµ. Off (αντιπαγωτ.ενεργή)
(paragrafo 4.3.2 a pagina 86)
Θέρµανση
Τρόπος λειτουργίας ΧΕΙΡΟ
Θερµοκρ.Άνεσης AUTO 20.0°C
Θερµοκρ.Οικονοµ.AUTO 18.0°C
Θερµοκρ.Άνεσης ΧΕΙΡΟ 20.0°C
Προγραµµατισµός ώρας [...]
Max Θερµοκρ.Θέρµαν. 80°C
“τροποποιήσετε”
τιµές
τις επιλογές ή τις τροποποιήσεις
Ώρα
ΠΡΟΓΡΑΜΜΑ ∆ΙΑΚΟΠΩΝ
ΗΜΕΡΑ
MΗΝΑΣ
ΧΡΟΝΟΣ
Αρχή: 01 01 2014 07:00
Τέλος: 08 01 2014 07:00
Ενερ/ση ∆ιακοπές: ΟΧΙ
Ζεστό νερό OFF - Θέρµ. Off (αντιπαγωτ.ενεργή)
Ώρα
OFF
ΠΡΟΓΡΑΜΜΑ ΩΡΑΡΙΟΥ ΘΕΡΜΑΝΣΗΣ
Ηµέρα/ες:
0 2 4 6 8 10 12 14 16 18 20 22 24
∆ΕΥΤΕΡΑ
______________________________
[1]04:00-08:00 [2]12:00-14:00
[3]16:00-18:15 [4]20:30-22:30
(paragrafo 4.3.2 a pagina 86)
(paragrafo 4.3.1 a pagina 85)
89

90

91

Fonderie Sime S.p.A - Via Garbo, 27 - 37045 Legnago (Vr)
Tel. +39 0442 631111 - Fax +39 0442 631292 - www.sime.it
Fonderie SIME SpA si riserva di variare in qualunque momento e senza preavviso i propri prodotti
nell’intento di migliorarli senza pregiudicarne le caratteristiche essenziali.
Fonderie SIME SpA reserves the right to make changes at any time without prior notice in order to improve its products
without compromising the essential characteristics.
Fonderie SIME SpA se reserva la facultad de modificar sus productos en cualquier momento y sin previo aviso,
con el objetivo de mejorarlos sin perjudicar sus características básicas.
Η Fonderie SIME SpA διατηρεί το δικαίωµα να µεταβάλλει οποιαδήποτε στιγµή και χωρίς προειδοποίηση τα προϊόντα
της µε σκοπό τη βελτίωση αυτών χωρίς να επηρεαστούν τα βασικά χαρακτηριστικά.
 Loading...