

Page 1

MiND
Network Streaming Player
MOON intelligent Network Device
MiND App User Guide
v1.3.0 (iOS)
v1.3.0 (Android)
Page 2
MiND App User Guide
We strongly recommend updating the firmware of your
MiND module before proceeding (refer to page 26).
If you are using any MOON components with your MiND module,
they should have the latest firmware update so you can take
full advantage of the MiND’s various features and functions.
Contact your MOON retailer for further details.
Page 3

MiND App User Guide
Table of Contents
What is MiND ? 4
Streaming Module Features 4
Application Module Features 4
Device Compatibility 4
What’s new 5
Starting the MiND App 5
MiND App screen layout 6
Adding tracks to the QUEUE 9
Playing tracks to the QUEUE 11
Position Slider 12
Random and Repeat Play 12
Volume and Muting 12
SimLink™ 13
Information Displayed in the QUEUE 13
Editing The Queue 14
Clearing The Queue 15
Saving The Queue as a Playlist 16
Accessing music stored on your App controller 17
Search function 18
Input switching for MiND equipped MOON DAC’s 19
vTuner Radio 20
TIDAL 22
MiND Firmware Updates Procedure 26
MiND Hardware Reset Procedure 29
wwww.simaudio.com
Simaudio Ltd., 1345 Newton Road
Boucherville, Québec J4B 5H2 CANADA
Date Code: 20161111
Page 4

MiND App User Guide
What is MiND ?
MiND is the future of music playback.
MiND transmits music from your digital music library and a variety of internet
sources to multiple audio systems throughout your home.
MiND allows you to organize the presentation of your music by virtually any means.
MiND offers uncompromised sonic performance, convenience, ease-of-use and sophistication.
MiND gives you uncomplicated and efficient access to large collections of music.
MiND works with virtually any hand-held Apple device (Android under development).
Streaming Module Features:
UPnP Renderer (Universal Plug & Play) ● DLNA 1.5 Compatibility ● TIDAL ● vTuner Internet Radio ●
Future “Music Services” upgrades ● Local Playlists ● Gapless Playback ● Silent track scanning ●
Supported file formats: Wave, FLAC, FLAC HD, AIF, AAC, ALAC, MP3 (vbr/cbr), WMA-9 ,OGG Vorbis ●
File Support to 24-bit/192kHz on all file formats ●
File support for DSD64 on MiND modules installed in MOON DAC’s ●
100Base-T RJ45 Ethernet interface & IEEE 802.11 b/g/n Wi-Fi interface inputs ●
S/PDIF, TosLink & AES/EBU digital outputs ● WEP, WPA, WPA2 Wi-Fi encryption support.
Application Control Features:
iPhone, iPad, iPod touch and Android compatible control software ●
Independant control for each zone using a SimLink equipped MOON Preamplifier or Integrated Amplifier ●
Zone selection ● Permanent zone naming.
Hardware Device Compatibility:
This MiND App will ONLY work on following devices:
● Apple iPad: All generations
● Apple iPhone: 3GS and more recent versions
● Apple iPod touch: 3
● Android devices with the Android 5.0 (Lollipop) operating system or higher
For smaller devices such as the iPhone and iPod touch, you will only see one of the MiND App’s three columns
at a time on your screen. As with many apps, you will need to swipe the screen, left or right, to view the entire
app. As well, you will need to swipe, up and down, to view and use the QUEUE column once a track is playing.
This “User Guide” will be updated occasionally, just like the App software, as improved functionality and new features become available. We
encourage you to visit our website and check for newer versions of this document; the version number appears below the “Table of Contents”.
rd
generation and more recent versions
____________________________________________________________________________________
4
Page 5
MiND App User Guide
What’s New in version 1.2.4 (iOS) (November 2016) / version 1.3.0 (Android) (November 2016)
y Deezer music service now available (iOS & Android)
y TuneIn music service now available (iOS & Android)
y Various bug fixes (Android)
Starting the MiND App:
Before proceeding, you must have successfully followed the instructions outlined in the MiND Setup Guide, whereby all
your components are properly connected and your MiND device(s) is successfully configured into your network.
This “App User Gude” and the “MiND Setup Guide” are both available at:
www.simaudio.com/en/mind.html.
Tap the “MiND” icon to launch the MiND app. All available MiND ZONES will appear in the left column. There
will be one ZONE for each MiND hardware device connected to your network (figure 1), based on the
previously assigned ZONE names, as outlined in the MiND Setup Guide procedure. For the examples that
follow in this guide, we will select the ZONE named “Stage” by simply tapping on it (figure 2).
Figure 1 Figure 2
The ZONE list is used to manage all zones that are part of your network. Each ZONE requires its own unique MiND
hardware device and they can all operate independently of one another. The MiND app essentially manages the music
you can play in multiple entertainment systems. To edit a ZONE’s settings (as descibed in the MiND Setup Guide), simply
tap on the icon, located at the top right of the list.
The zone where the icon appears indicates which zone your APP is currently communicating with. Tapping on this
icon will result in the APP disconnecting from the zone.
Note: You can refresh the zone list at anytime by placing your finger near the top of the zone list
and swiping it downwards – a message will apear at the top of the zone list “Pull to rescan network”
____________________________________________________________________________________
5
Page 6
MiND App User Guide
MiND App Screen Layout:
Figure 3
After selecting a ZONE, the default MiND App screen appears (figure 3) and is divided into two sections: the QUEUE on
the left third of the screen and the BROWSER, occupying the other two-thirds of the screen. The ZONE list can be
accessed any time by simply tapping on the home icon located at the bottom left of the app screen. To hide the ZONE
list and switch back to the QUEUE/Browser view, simply select a zone from the list. Note: the ZONE list is hidden after you
select your ZONE since it is not required beyond the start up of the MiND app, unless you want to control another MiND
device in your network.
The BROWSER section allows you to browse through all of the MiND supported music
files - Wave, FLAC, FLAC HD, AIF, AAC, ALAC, MP3 (vbr/cbr), WMA-9 ,OGG Vorbis, up to 24bit/192kHz - available on your network; It is based on the UPnP protocol, so you must
have compatble server software on your NAS or computer. Initially, the contents of the
BROWSER will be from the library that you previously used, listed by musical genre. To
select a “Library”, tap on the icon located at the top left of the BROWSER section
(figure 4).
The “Library” lists of all the Network Attached Storage devices, computers, etc. that
contain music files, and are connected to your router. In this example there are 10
different entries Selecting one of these entries, allows you access to the music stored on
that device. In this example, we are going to select “APP Guide MiND” library.
Once selected, you can choose from various options (Figure 5) to view the music available
on the “APP Guide MiND” device. These display options are based how you configure the
settings of your server software on your NAS or computer, and are independant of the
MiND app. Display options in this example include Artist/Album, Album, Title (track/song
name), Composer and More (for more options).
Figure 4
____________________________________________________________________________________
6
Page 7
MiND App User Guide
MiND App Screen Layout (cont’d)
Figure 5
Tapping on the “Album” tab, the BROWSER section will show an Album index (Figure 6) that allows you to search albums
in alphabetical order; select a letter by tapping on either the tile or the vertical alphabetical index on the far right side.
Alternatively, you can tap on the [All Albums] tile option which displays an alphabetically ordered tile view every album
available in the current library “APP Guide MiND” (Figure 7). Notice how the “Album” tab is highlighted in a light gray
when selected, compared to the other tabs.
Figure 6 Figure 7
The Back button, located at the top right corner of the BROWSER. makes navigating the BROWSER an easy process.
When you want to return to the previous BROWSER screen, simply tap on the “Back” button.
To scroll though the entire list of available albums, simply swipe your finger (up or down) over the BROWSER section. To
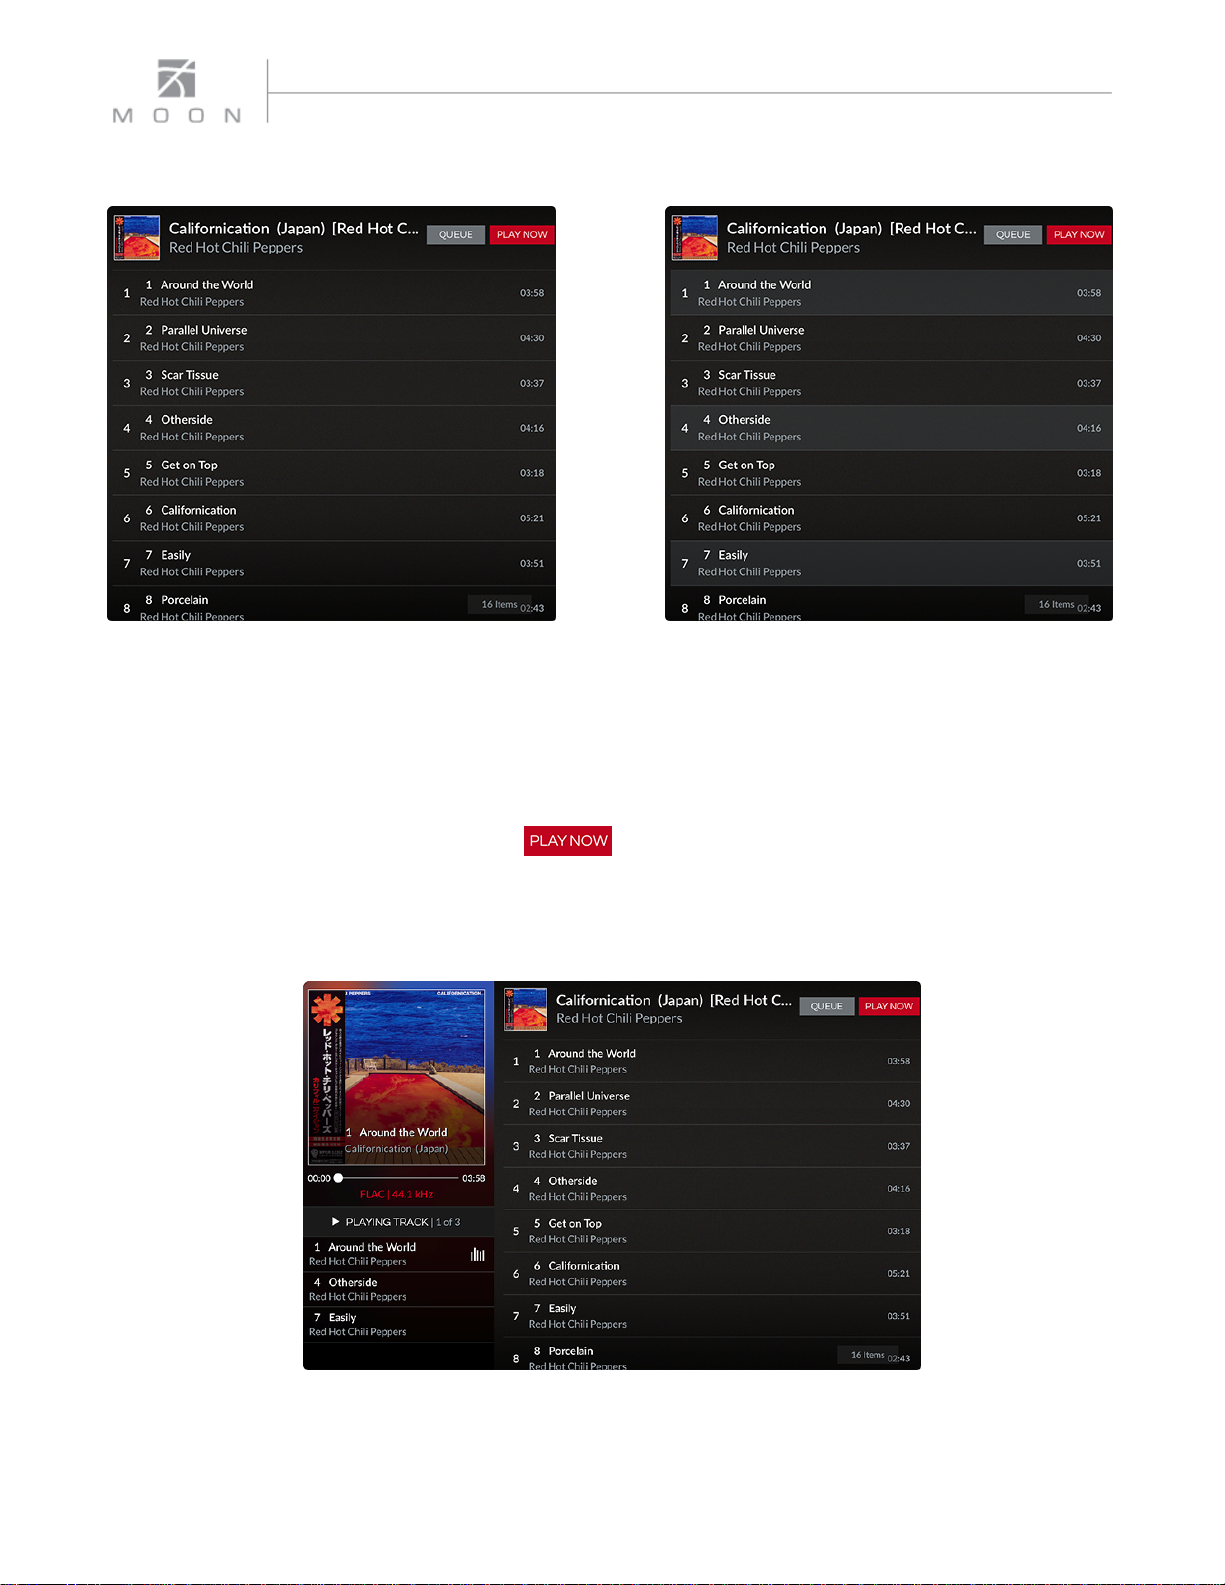
select an album, tap on the album name and the BROWSER screen will change, showing you a list of all the tracks from
the selected album (figure 8); “Californication” by the “Red Hot Chili Peppers” which has a total of 16 tracks as indicated
by an icon located in the bottom right corner of the BROWSER. Since only 12 of these tracks are visible in the BROWSER,
you can use one of your fingers to swipe on the screen to scroll down and see the 4 remaining tracks of this album.
You can now select the tracks that you want to listen to. This is done by adding them to the QUEUE: Simply tap on each
track that you want to add to the QUEUE (figure 9) and they will be highlighted. Tap on a track a second time and it will
no longer be highlighted. In this example, we have selected tracks 1, 4 and 7.
____________________________________________________________________________________
7
Page 8
MiND App User Guide
MiND App Screen Layout (cont’d)
The QUEUE section manages the music you will be listening to and displays information about the song currently
playing. It allows you to specify, by individual song/track, the exact order in which you can play your music. The contents
of the QUEUE is essentially a “Playlist”. At any time, you can change the order of the songs, add more songs, remove
songs or delete its entire contents and build a new one. The QUEUE can hold a maximum of 250 tracks. You can also save
the contents of the QUEUE as a “Playlist” for future use (refer to page 16).
To create a QUEUE, tap on the “Play Now” button located in the top right corner of the BROWSER and these 3
tracks will be added to the QUEUE (figure 10) which occupies the left side of the MiND app screen. The same logic applies
if you are using another search option such as “Artist/Album”, “Title” (song) or “Composer”. If you wanted to add all 16
tracks from this album to the QUEUE, simply tap on the “Play Now” button without highlighting any tracks. You can
always change the contents of your QUEUE by editing it (refer to page 14).
Figure 8 Figure 9
Figure 10
____________________________________________________________________________________
8
Page 9
MiND App User Guide
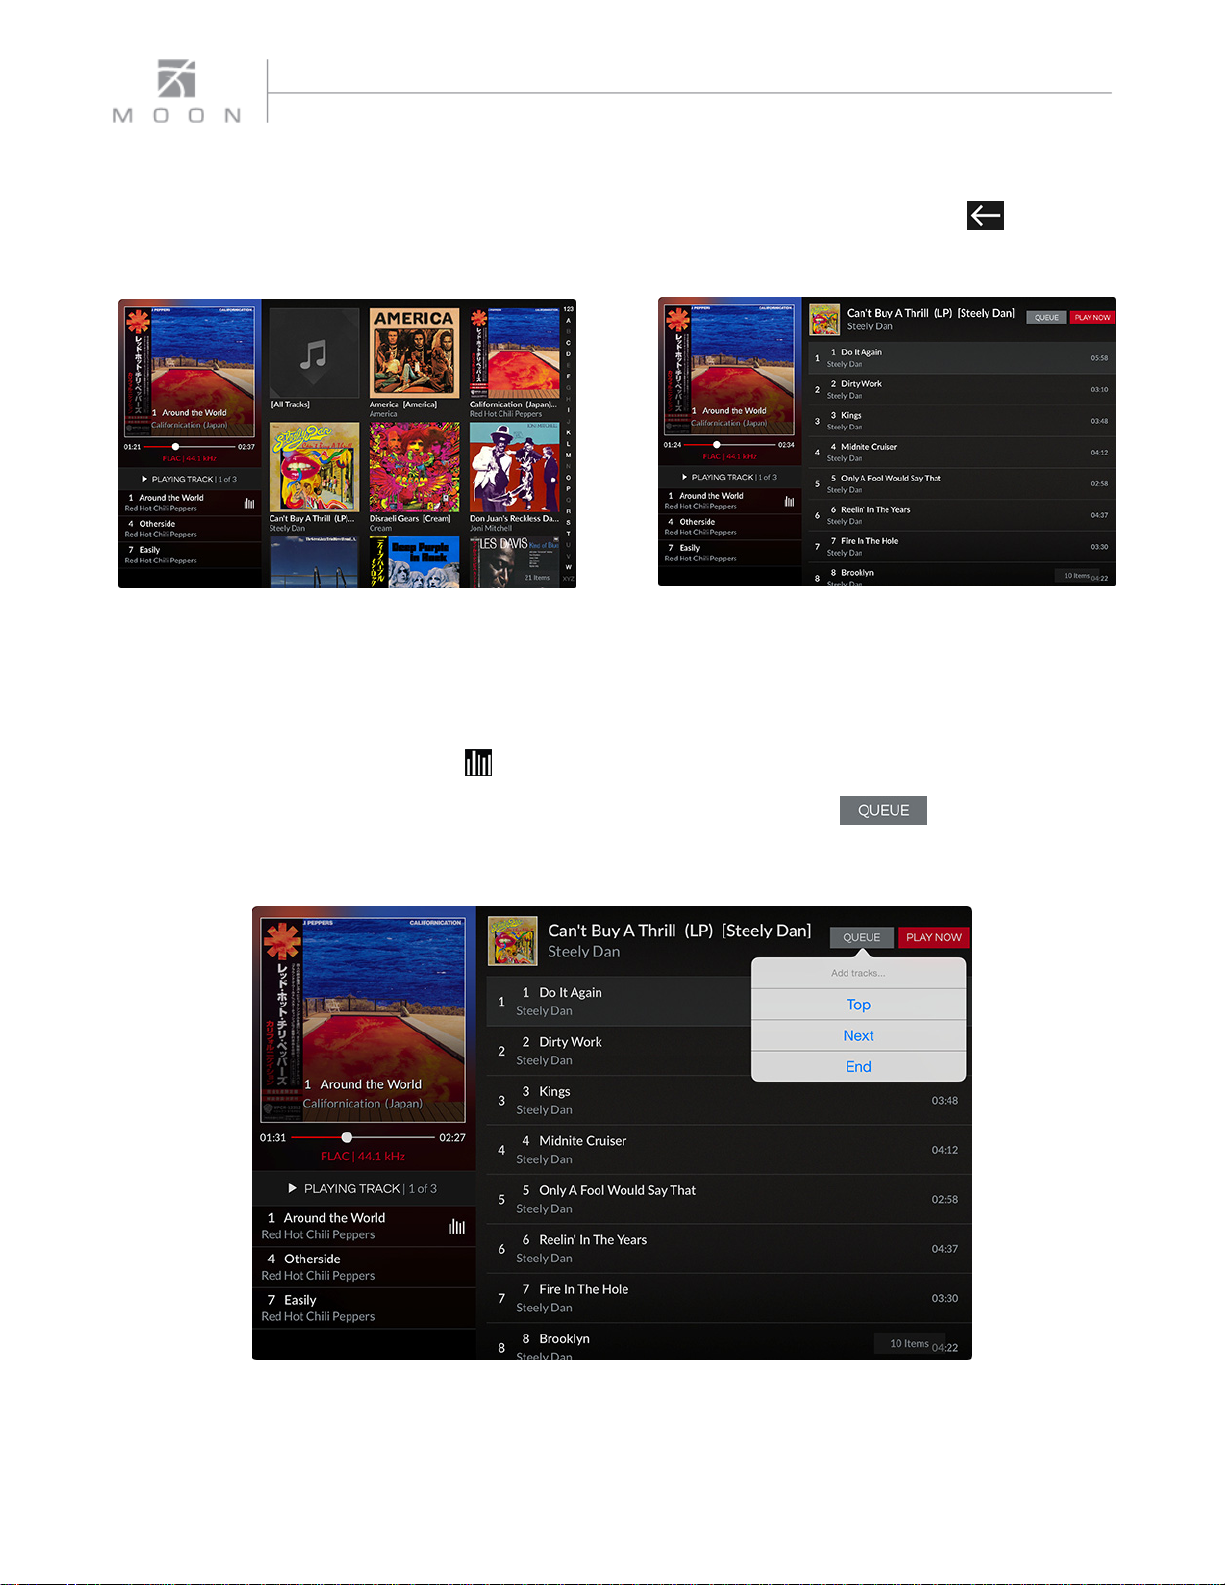
Adding tracks to the QUEUE:
You can add music from a different album to the QUEUE that was just created. Using the back button return to the
tile view of the “Album” index (figure 11), select an album - “Can’t Buy A Thrill” by artist “Steely Dan” - and highlight the
first track “Do It Again” (figure 12)
In this example the current track in the QUEUE is “Around The World” from the album “Californication” by the “Red Hot
Chili Peppers”. The current track is always displayed in the top half of the QUEUE, along with its corresponding album
information. It can easily be identified in the QUEUE list (bottom half of the QUEUE where all tracks are displayed in
playback order) by the “current track” icon located on the right side of the track name.
There are four (4) ways to add music to a QUEUE: When you tap on the “Queue” button to the left of the “Play
Now” button, a pulldown menu will appear (figure 13) with the following three (3) “Add Tracks…” options: “Top”, “Next”,
and “End”. The fourth option is “Play Now”. Each of these options works differently.
Figure 11 Figure 12
Figure 13
____________________________________________________________________________________
9
Page 10

MiND App User Guide
Adding tracks to the QUEUE (cont’d)
Tapping on the “Top” button in the “Add Tracks …” pop-up window adds “Do It Again” to the top of the QUEUE (figure
14). The current track “Around The World” remains unchanged and continues playing.
Tapping on the “Next” button inserts “Do It Again” right after
The World” remains unchanged and continues playing.
Tapping on the “End” button inserts “Do It Again” to the end of the QUEUE (figure 16) The current track “Around The
World” remains unchanged and continues playing.
Tapping on the “Play Now” button, inserts “Do It Again” in the QUEUE, right after “Around The World” and immediately
begins to play it (figure 17). “Do It Again” is now the current track and the QUEUE now contains 5 tracks.
Figure 14 Figure 15
“Around The World” (figure15). The current track “Around
When the QUEUE is empty, any of these four options will load the QUEUE in the exact same way.
Note:
If you do not select any tracks from the album displayed in the browser and tap one
of these four (4) buttons, the contents of the entire album will be added to the QUEUE.
____________________________________________________________________________________
10
Page 11

MiND App User Guide
Figure 16 Figure 17
Playing tracks in the QUEUE:
Once your QUEUE contains one or more tracks, you may begin playing these tracks by simply tapping on the X (play)
button (Figure 18). The first track in the QUEUE will begin playing. To temporarily stop playing this track, tap on the
(pause) button (Figure 19). The X and button are in the same location and alternate, depending on the status of the
MiND app: When a track is “Playing” the button will appear as ; When a track is “Paused” or “Stopped” the button will
appear as X.
Figure 18 Figure 19
The previous track and next track buttons (Figure 19b) only function when a track in the QUEUE is either playing or
paused. Tapping on the button will play the current track from the beginning. Tapping on it again will take you to the
beginning of the previous track in the QUEUE and start playing it. Tapping on the button will play the next track in the
QUEUE from the beginning.
Finally, by tapping on a track listed in QUEUE, the MiND App will immediately play that track from the beginning.
____________________________________________________________________________________
11
Page 12

MiND App User Guide
Position Slider in the QUEUE:
This real-time feature allows you to navigate, forward or backward, within the
current track. You can move to the exact location, by time, of the track. This
comes in handy when you want to skip over the intro of a track or go back to
hear a section of the current track again. Simply place your finger on the round
button of the slider (Figure 20) and move it to either the left (to go backward) or
to the right (to go forward).
Located directly below the cover art, the time displayed left side of the slider indicates the elapsed time of the current
track; the time on the right side indicates remaining time. You can move the slider when the track is playing or paused; If
you move it while the track is paused, it will begin playing again once you take your finger off the button.
Figure 20
Shuffle and Repeat Play:
The MiND app allows you to shuffle the contents of the QUEUE so the tracks will play in a random order, as opposed to
the way they are listed. To activate the “shuffle” mode, simply tap on the icon located in the top left corner of the QUEUE
column (Figure 21a). Once activated, the icon will change color from white to
Figure 21a
red. To exit “shuffle” mode, tap the icon again.
You can play the current track repeatedly by simply tapping the “repeat” icon, located in the top right corner of the
QUEUE column (figure 21b). Once activated, the icon will change color from
white to red and a “1” will appear in the bottom right corner of the icon. This
indicates that the “repeat” mode is set for a single track.
Figure 21b
Finally, the MiND app allows you to play the entire QUEUE, from start to finish repeatedly, by tapping the same “repeat”
icon a second time. The color will remain red and the “1” will disappear (figure 21c). To exit from “repeat” mode, simply
tap on the “repeat” icon a third time; the color of the icon will change back to
white, indicating regular playback has resumed. Note: “shuffle” and “repeat”
modes can be used together.
Figure 21c
Volume and Muting:
The MiND app allows you to increase, decrease and mute the volume. However, the MiND unit must be physically
connected to a SimLink
the volume tool bar located in the bottom right area of the app (figure 22a), below the BROWSER column. To decrease
the volume level simply tap on middle icon; to increase the volume level simply tap the right icon. To adjust the volume
level in small increments you can tap repeatedly on either volume icon. Touch and hold either volume icon to adjust the
volume in larger increments. To mute the output, tap on the left icon. When the MiND’s output signal is muted, the mute
icon will change color from white to red (figure 22b). To cancel the mute function, tap on the icon again.
™
equipped MOON integrated ampifier or preamplifier. These functions are accomplished using
Figure 22a
Figure 22b
The mute function will only work if your SimLink equipped MOON component has been
updated with a firmware release (ver. 30) available from January 2013 onwards.
____________________________________________________________________________________
12
Page 13

MiND App User Guide
SimLink and MiND
Your SimLink equipped MOON Preamplifier or Integrated Amplifier will automatically switch to the input configured for
MiND under the following scenarios:
Tapping on the X button,
Tapping on the track name in the QUEUE list
Tapping “Play Now” button
:
Figure 23
Another SimLink function included with the MiND app is the ability to turn your MOON system on and off:
When you select a zone (figure 2), all MOON components connected via SimLink will power up in that zone;
When you tap the “On/Off”
button, located in the bottom right corner of the selected ZONE (figure 23), all
MOON components connected via SimLink will go into “Standby” mode in that zone.
Information Displayed in the QUEUE:
The QUEUE is divided into four (4) sections (figure 24): The header or 1st section will
display your current MiND zone. The 2nd section provides information about the
current track, the 3rd section provides a status of the QUEUE and the bottom
section displays a listing of all the tracks loaded into the QUEUE in their playback
order.
The Header: As well as indicating your current zone, the previously described
“Shuffle” and “Repeat” icons can be found on either side of the zone name.
Current Track Information: Album cover artwork related to the current track is
displayed, followed by the aforementioned “Position Slider”, elapsed track time
and remaining track time. The track name, in this example “Take It To The Limit”
appears under the position slider. Below is the album name “One of These Nights”.
The last line contains, from left to right, the file format of the track (FLAC), the
name of the artist (Eagles) and then the track’s sample rate (24/192.0kHz).
Track Status: The current track “Take It To The Limit” can be either “Paused” or
“Playing”. “Stopped” will only appear when the QUEUE has yet to be played or you
have reached the end of the QUEUE. Below this is an indicator which shows the
current track’s position in the QUEUE. In this example, “Take It To The Limit” is track
“3” in a QUEUE that has a total of “4” tracks.
QUEUE List: The entire contents of your QUEUE – a maximum of 250 tracks – are
displayed here, in their playing order. Due to space restrictions, only four (4) tracks
can be shown at once. However, using your finger, you can swipe up or down over
this section to browse the contents of your QUEUE. Each entry contains both the
track name and the album name. Finally, the current track can be identified by the
“current track” icon located to the right side of the entry.
Note: Tapping on the current track’s album cover art will launch a larger version of the image; tapping on the enlarged
image will revert back to the previous (standard) screen layout.
Figure 24
____________________________________________________________________________________
13
Page 14

MiND App User Guide
Editing the QUEUE:
The MiND app allows you to modify the contents of the QUEUE at any time. You can
delete individual tracks, change the playing order of the tracks, or delete the entire
contents of the QUEUE. You can even edit your QUEUE when a track is playing, paused
or stopped. Our QUEUE contains four (4) tracks for this example (figure 25).
To begin editing your QUEUE, tap on the “Edit Queue” button located below the
QUEUE List (and to the right of the “Zones” button) to place the QUEUE into edit mode
(figure 26). Three large buttons will appear directly above the “Edit Queue” button you
just tapped: “Clear” (red), “Save” and “Edit”. The “Clear” button will delete the entire
contents in the QUEUE. “Edit” allows you to modify the existing contents of the QUEUE
by the individual track. The “Save” button allows you to save the QUEUE as a Playlist
(refer to page 16).
To edit the contents of the QUEUE, tap on the white “edit” button. The QUEUE is now
in edit mode (figure 27). Left of each track name is a red circle with a minus sign
and to the right are three horizontal bars . These are used to delete or move tracks,
respectively. To scroll through all of the tracks in the QUEUE, touch any area other than
these two symbols and swipe up or down.
Figure 25
Figure 26 Figure 27 Figure 28
Touching and leaving your finger on the three horizontal bars to the right of the track’s name will allow you to change
rd
its position in the QUEUE by simply dragging it up or down. In this example, we moved the 3
nd
position. As a result, the 2
track “Forever” is now the 3rd track (figure 28).
track “City” up one
Currently the QUEUE contains 4 tracks.
tap on the symbol to delete a track.
A “Remove Track” button will now
appear in a red colored box to the right
of the track name “Somebody” (figure
29),. Next, tap on the red “Remove
Track” button and the track will be
removed from the QUEUE (figure 30),
leaving 3 tracks in the QUEUE.
Figure 29 Figure 30
____________________________________________________________________________________
14
Page 15

MiND App User Guide
Editing the QUEUE (cont’d)
Once you have finished editing your
QUEUE, tap on the “Edit Queue” button
aga in (figure 31). The same 3 buttons will
appear: Tap on the “Done” button to save
the changes to your QUEUE (figure 32).
Your QUEUE now has 3 tracks and their
order is different from when we started
(figure 25).
NOTE: You cannot edit the “Current Track”
F igure 31
Figure 32
Clearing the QUEUE:
You also have the option to clear the QUEUE. This deletes all of the tracks in the QUEUE in one single action. Tap on the
“Edit Queue” button to place the QUEUE into edit mode (figure 33). Then tap on the red “Clear” button; A pop-up
window will appear (figure 34) to conform that you want to clear the queue; You can either “Cancel” this operation or tap
“OK” to clear the QUEUE. All tracks currently in the QUEUE will be deleted leaving you with an empty QUEUE (figure 35).
Figure 33 Figure 34 Figure 35
When you are satisified with the contents of your QUEUE and begin playing its contents, you can shut down the
Note:
MiND app on your tablet since the QUEUE has been physically saved to the memory of the MiND hardware device. Next
time you launch the MiND App, your QUEUE will be exactly the same as how you left it.
____________________________________________________________________________________
15
Page 16

MiND App User Guide
Saving the QUEUE as a Playlist:
The MiND App allows you to save a QUEUE as a “Playlist” so that you can listen to it
later on. In this example we will save a QUEUE with 10 tracks; Tap on the edit
QUEUE button and select the “Save” option (figure 36).
Tapping on "Save" launches a keyboard so that you can assign a name to the
“Playlist” (figure 37). We have named the new “Playlist” “Seventies Rock” as shown
in the upper left corner. When you have finished typing the name of your “Playlist”,
simply tap on the “Done” key on the far right side of the keyboard. You can also tap
on the blue colored “Done” button located above the “Playlist” name window.
Note: The cover artwork for the “Playlist” is randomly assigned from the contents of
that “Playlist”. Finally, you may create as many Playlists as you want.
To access your “Seventies Rock” “Playlist” at any time, simply tap on the library icon
and and select “Playlists” (figure 38). Your saved “Playlist” will appear in the
BROWSER (figure 39).
Tapping on the cover artwork for “Seventies Rock” will launch the contents of the
“Playlist” in the BROWSER (Figure 40), where you will see details for each track in
this “Playlist”. To begin playing this “Playlist”, tap on the button when
the QUEUE is empty, and the entire contents of the “Seventies Rock” “Playlist” will
appear in the QUEUE and begin playing (figure 41). Finally, to permanently delete a
saved “Playlist”, tap on the button to the left of the “QUEUE” button and
you will be prompted by a pop-up window to confirm or cancel this delete.
Figure 36
Figure 37
____________________________________________________________________________________
16
Page 17

MiND App User Guide
Figure 38 Figure 39
Figure 40 Figure 41
Accessing music stored on your App controller:
The music stored on your iPad, iPhone, etc. (psrt of your iTunes music collection) can be
loaded into the BROWSER and used to create a QUEUE, just like any other library in your
MiND setup. Tap on the icon and select the related option for your device, in this
example, “My iPad” (figure 42). This is the name that was assigned to this device via its
iTunes account. Once selected, all of the music that is stored on “My iPad” will appear in the
BROWSER and can be used to create a QUEUE as previously described.
Figure 42
____________________________________________________________________________________
17
Page 18

MiND App User Guide
Search Function:
The MiND app allows you to search the contents of your library from within a specific library view such as Album, Title,
Artist/Album, etc. For example, if you want to search by song name, select the “Title” view of your current library (figure
43) and tap on the [All Titles] icon to retrieve a list of all songs available in the library (figure 44). To start searching, tap on
search bar located in the top right corner of the BROWSER and a keyboard will appear (figure 45). As we
type the word “Blue” to find all songs with the word “Blue” in their title, the search result will yield fewer tracks as each
letter is typed. This is because the MiND app search function operates in real-time. Once you are finished typing your
search word(s), tap on the keyboard icon located in the bottom right corner and the search results will appear in the
BROWSER (figure 46); in this example 7 songs with the word “Blue” in their title. Now you can add any or all of these
songs to the QUEUE. Finally, to clear the contents of the search bar, simply tap on the “X” located on the
right side of the search bar.
Figure 43 Figure 44
Figure 45 Figure 46
____________________________________________________________________________________
18
Page 19

MiND App User Guide
Input switching for MiND equipped MOON DAC’s:
For MOON DAC’s equipped with a MiND hardware module, the MiND APP allows you to change the DAC’s active digital
input. Any zone using a MOON DAC equipped with the MiND will have the following icon appear between the home
and edit QUEUE icons. This allows you to listen to music through your MOON DAC from another digital source while you
are creating/editing the QUEUE on your MiND APP. To revert back to the DAC’s predetermined MiND input, you can tap
on the “PLAY NOW” button or any track listed within the QUEUE.
In the example below using a MOON Neo 380D DAC, the current input is the MiND (figure 47). By tapping on the “OPT1”
input, the 380D’s active input changes to the first optical input. Also, “OPT 1” will be display in the QUEUE (figure 48).
Figure 47 Figure 48
____________________________________________________________________________________
19
Page 20

MiND App User Guide
“vTuner is your guide to Internet streamed media. The vTuner platform connects
your Internet enabled product to the wide world of streamed music, talk, and
video. vTuner gives you access to: radio, TV stations, audio and video podcasts
as well as other content like premium services, weather, horoscopes, etc.”
“With vTuner's list of radio stations at your fingertips, there is no need to browse the Web to find radio broadcasts. The
Internet provides a global antenna for vTuner, which enables you to find and arrange thousands of RealPlayer, Windows
Media and MP3 radio stations on the Internet. vTuner provides access to tens of thousands of stations, which you can
browse by station format, and location or of course search. In addition to the station guide, a show guide is also included,
allowing you to find your favorite show, and browse entire program schedules for thousands of stations.”
__________________________________________
For vTuner to operate you must be connected to the internet. To access vTuner, simply tap on and select
“vTuner Radio”. Once connected to vTuner, you will see a list of searchable options - Canada (or your own country),
Recently Played, Location, Genre and More (for additional search options) - will appear across the top of the BROWSER
(figure 49).
Figure 49
In this example we will seach for a vTuner station by “Genre” simply by tapping on the corresponding option; a
searchable list of different musical genres will appear (Alternative, Blues, Classical, etc) in the BROWSER and the “Genres”
option on top will be highlighted (figure 50). We select “Classic Rock” as our genre; (figure 51). Here we can search
through “All Stations” available for the “Classic Rock”, by country of origin or by those classified as “High Quality” (better
sounding than standard MP3).
Figure 50 Figure 51
____________________________________________________________________________________
20
Page 21

MiND App User Guide
vTuner (cont’d)
By selecting “All Stations” the browser will list all available “Classic Rock”stations in alphabetical order (figure 52). From
the list of all “Classic Rock”internet radio stations appearing in the BROWSER, we select “93.9 Classic Hits” by tapping on
it.s logo. Once connected to this station, music will begin playing and details about both this station and the music
currently playing, will appear in the QUEUE (figure 53).
When the station logo is available, it will appear in the “Current Track Information” section of the QUEUE along with
the elapsed time of your connection to the station. The name of the track and the artist will appear below the station
logo. On the next line, from left to right, the file format of the track (AAC), the name of the station (93.9 Classic Hits)
and then the track’s sample rate (64kbps) are displayed. The “Track Status” section of the QUEUE will display either
“Playing Track” when streaming a station or “Stopped” when no signal is being received. Finally, the “QUEUE List” will
display both the track name and name of the artist. Depending on the station, some of this information may not be
available for display in the QUEUE.
Figure 52 Figure 53
Note: When you select a station in vTuner, it will begin playing only once a connection has
been established over the internet. A connection may take up to one minute to establish.
____________________________________________________________________________________
21
Page 22

MiND App User Guide
EXPERIENCE, ENJOY, DISCOVER your favorite artists.
TIDAL offers high-fidelity CD sound quality, high quality video, expertly
curated content and editorial, and unique artists experiences.
Seamless listening across mobile, tablet, desktop and network players.
Enjoy lossless music streaming on Apple devices from iPhone, iPad and
iPod to Mac, as well as on PC and Android systems. Plus integration in a
wide range of high fidelity network players.
__________________________________________
Getting Started
Setting up your TIDAL Subscription: For MiND customers with a TIDAL voucher code, you must first register with TIDAL
to subscribe to their service visit the tidal.com website; click on the menu bar in the upper right hand corner and select
"download". Scroll down to the "MOON by Simaudio" then point-and-click on "read more" to enter the "MOON + TIDAL"
page. Then enter your voucher code and point-and-click on "GET STARTED". If you don’t have a voucher, you will need to
create a TIDAL account by selecting the “TRY NOW” option from the main menu on the TIDAL website.
Activating TIDAL on your smart device: For TIDAL to operate with MiND you must be connected to the internet. To
access TIDAL in the MiND App, simply tap on and select from the scroll down menu. You will
be prompted for your username and password.
If Tidal does not appear in the scroll down menu, then you must update your MiND app (to 1.2 or later) from the
note:
App Store. Enter your TIDAL username and password to activate the service.
Using TIDAL
Once connected to TIDAL, you will see the following screen: The default screen "New" displays "New playlists", "New
releases" and "New tracks" that are available from TIDAL.
Figure 54
____________________________________________________________________________________
22
Page 23

MiND App User Guide
The other four (4) available tabs on the default TIDAL screen (figure 55) besides "New" are "Rising" and "Discovery", both
of which include "Albums" and "Tracks" sub-menus created by TIDAL (figure 56), as well as “Playlists” and “More”.
Figure 55
Figure 56
TIDAL’s "Playlists" (figure 57) are available in three (3) unique categories: "Mood", "New Playlists" and "Recommended":
Figure 57
____________________________________________________________________________________
23
Page 24

MiND App User Guide
The "More" tab (figure 58) has the following subsections of "Genres", "My Music" and "Logout":
Figure 58
The "My Music" section (figure 59) of TIDAL includes the following sub-menus: "Playlists" which contains your own
personally created “Playlists”, "Artists", "Albums" and "Tracks" each containing items in these categories that you have
previously saved as your preferences.
Figure 59
Some important considerations when using TIDAL:
When TIDAL is active you will always see in the top right corner of the APP screen.
The search feature in TIDAL works the same way as the aforementioned MiND search on page 18.
It is not necessary to "Logout" of TIDAL. Doing so will require you to login again with your user-name and password
next time you wish to use TIDAL. Therefore it is better to remain logged in.
The top left section of the browser section, to the right of the TIDAL logo will always indicate exactly where you are
located within TIDAL. For example, indicates that you are located in the “New Releases” menu
of the “New” tab.
____________________________________________________________________________________
24
Page 25

MiND App User Guide
Features
TIDAL offers a very useful and powerful feature for "Albums", "Tracks" and their predetermined "Playlists".
Located in the far right area of the browser section, beside each track name, album name an Playlist name you will see
the following icon . Tapping on this icon will launch an popup screen with several options:
For "Albums" (figure 60) it allows you to add the entire album's tracks to your library or display additional information
about the artist:
Figure 60
For "Tracks" (figure 61) it allows you to add the track to your library, add the track to a playlist, display additional
information about the artist or display the entire album that the track is from. The latter 2 choices provide additional
information that leads to more available music from the artist :
Figure 61
For the predetermined TIDAL "Playlists" ( "Mood", "New Playlists" and "Recommended") tapping on the will display
comprehensive details about the selected "Playlist".
____________________________________________________________________________________
25
Page 26

MiND App User Guide
MiND Firmware Update Procedure
MiND firmware can be updated using the MiND app by following these simple steps:
(1) Go to the ZONE list by simply tapping on the home icon located at the bottom left of the MiND app screen:
(2) Tap on the icon located at the top right of the list. The icon will change to indicating you are now in the
“Zone Settings” mode
(3) Select the Zone from “ZONES MiND” list. In this example we will use the “380DAV” zone which, when selected,
will appear highlighted in light gray, and its “Zone Settings” will appear to the right. When the MiND’s firmware
is out of date and a new version is available for download, the current “Firmware Version” will appear in red
(1.5). To update the firmware, simply tap on “Update Firmware”. The process is fully automated and requires
approximately 10 minutes to complete. You should close down the MiND app while this process is running.
(4) Once the process is completed restart the MiND app. Then return to the “Zone Settings” screen and you will see
that the “Firmware Version” is no longer red and a the version number has changed (1.19):
____________________________________________________________________________________
26
Page 27

MiND App User Guide
MiND Firmware Update Procedure (cont’d)
The 180 MiND can also be updated directly from the network by following these steps:
(1) Take note of your network settings from the MiND App (refer to the MiND Setup Guide procedure), since
a firmware update will automatically reconfigure these settings back to their factory defaults.
(2) If the app is running, double-click the home button, select the MiND application and shut it down.
(3) Disconnect the DC power cable (3) from the rear of the 180 MiND, but keep it connected to both your network
(wired) and the internet.
(4) Press and hold the “UPDATE” button (4) located on the back panel (on the right side of the “ETHERNET”
cable input). This will require a small pin since the button is slightly recessed behind the rear panel.
(5) While still holding the “UPDATE” button (4), reconnect the DC power cable to the 180 MiND and wait
for the “UPDATE” LED to begin flashing in green (5). Then you may release the “UPDATE” button.
(6) Allow the unit to reprogram itself; this automated process may take as long as ten minutes to complete.
The “UPDATE” LED will only stop flashing, but stay illuminated in green (5) once this process is
finished.
(7) “Reboot” the 180 MiND by disconnecting the DC power cable (3) again and waiting a few seconds.
Then reconnect the DC power cable. Now your unit is ready to use.
(8) You may now re-enter your network settings from step 1.
4 5 3
____________________________________________________________________________________
27
Page 28

MiND App User Guide
MiND Firmware Update Procedure (cont’d)
MOON components equipped with the MiND option (such as the Nēo 280D , Nēo 380D and Evolution series 780D
Streaming DACs) can also be updated directly from the network by following these steps:
(1) Take note of your network settings from the MiND App (refer to the MiND Setup Guide procedure), since
a firmware update will automatically reconfigure these settings back to their factory defaults.
(2) If the app is running, double-click the home button, select the MiND application and shut it down.
(3) Turn off the rocker switch (position ‘0’) (3) located on the rear of your MOON component, but keep it
connected to both your network (wired or wirelessly) and the internet.
(4) Press and hold the “UPDATE” button (4) located on the back panel (on the left side of the “ETHERNET”
cable input). This will require a small pin since the button is slightly recessed behind the rear panel.
(5) While still holding the “UPDATE” button, turn on the rocker switch (position ‘1’) and wait for
the “UPDATE” LED to begin flashing in green (5). Then you may release the “UPDATE” button.
(6) Allow the unit to reprogram itself; this automated process may take as long as ten minutes to complete.
The “UPDATE” LED will only stop flashing, but stay illuminated in green (5) once this process is
finished.
(7) “Reboot” your MOON component by turning off (position ‘0’) (3) the rear panel rocker switch and
waiting a few seconds, then turning the rocker switch back on (position ‘1’). Now your unit is ready to
use.
(8) You may now re-enter your network settings from step 1.
5 4 3
____________________________________________________________________________________
28
Page 29

MiND App User Guide
MiND Hardware Reset Procedure
(1) Take note of your network settings in your MiND App (refer to the MiND Setup Guide procedure), since a
firmware update will automatically reconfigure these settings back to their factory defaults.
(2) Power down the MiND by removing the DC cable. It does not matter whether or not you leave an
ethernet cable connected.
(3) Insert the tip of the paperclip into the rear panel little hole labelled "Reset". There is a small push
switch just beneath the surface of the back panel, and when you insert the paperclip properly, and
push on the switch, you'll feel it click. Hold the switch press down - do not remove the paperclip
until step #4!
(4) While the switch is pressed down, re-insert the DC cable to power up the unit.
remove the paperclip !
Do Not
(5) Wait approximately two seconds, then remove the paperclip. You will probably notice that the WLAN
LED continues to flash. This is unrelated to the resetting of the unit, and is part of the normal boot-up
process of the MiND. In a like manner, the front-panel blue LED will continue to flash until it finally
goes solid blue.
(6) Once the front-panel blue LED stops flashing and stays on constantly, the MiND is fully booted and
ready to use. At this point you may re-enter your network settings from step 1.
____________________________________________________________________________________
29
 Loading...