

Simarghu SIMFIRE ARB-1, SIMFIRE ARB-2 M, SIMGEM ARB-3 User Manual
www.simarghu.com
Arborist Harness
Baumzüchter-Klettergurt
Harnais d’arboriste
Arnés del arborista
Imbracatura per arborista
Arborist uitrusting
UK
DE
FR
ES
IT
NL
MADE IN THE UK

2
CONTENTS 1. GENERAL INFORMATION
DESCRIPTION
This harness has been designed and manufactured specially for
arborists. It MUST NOT be used under any circumstances to
arrest a fall.
This product is manufactured and tested to conform with:
EN 813:1997 EN 358:2000
SIMARGHU
®
PO BOX 412
Carlisle
CA1 9GR
T: +44 (0)1228 371 583
E: info@simarghu.com
www.simarghu.com
PATENT PENDING
1
General Information
2-3
2
Use
4
2.1
Sizes
4
2.2
Part Identication – Male (FIRE) & Female (GEMINI)
4-6
2.3
How to put on Harness
7
2.4.1
Adjustment - Waste Belt
8
2.4.2
Adjustment - Leg Strap
8
2.4.3
Adjustment - Rear Straps
8
2.4.4
Adjustment - Sub Harness (Gemini Only)
9
3
Floating Rope Bridge
9
3.1
Leg Riser Adjustment
9
4
Lower Multi Rings
10
5
Attachment Points – Male (FIRE) & Female (GEMINI)
11
5.1
Rope Bridge Set Up
12
6
Suspension Trauma
12
7
Harness Labelling
13
8
Harness Inspection
13
9
Maintenance & Storage
14
10
Service Life
14
11
Examination Form
15
12
Certicate of Conformity
16

3
UK
WARNING
Incorrect use of this harness could be fatal, so prior to
use YOU MUST:
• Read and thoroughly understand this operating manual before
using this harness.
• Be a person in t medical condition that can work at height and
do so in both normal and emergency situations. If there are any
points in this operating manual that you are unsure of, seek
advice from a trained individual.
• Be fully trained and competent in the use of the harness and
familiar with the correct actions in case of an emergency prior
to working at height.
• Carry out appropriate visual and functionality checks before
wearing this harness.
• Assess the work area to ensure adequate supporting structural
attachments are to be used.
• Understand and accept the risk involved in use of this product.
WARNING
If you are in any doubt about the condition or function
of this harness you must remove it from service
immediately and contact the seller or manufacturer.
A rescue plan should always be put in place ahead of working at
height to ensure procedures can be put into action in the event of
an accident or problem.
This product must only be serviced by a trained and competent
individual. Under no circumstances should the integrity of this
harness be undermined by making modications, repairs or
alterations.
FAILURE TO COMPLY WITH ANY OF THESE
FACTORS MAY RESULT IN SERIOUS INJURY
OR DEATH.

4
UK
WARNING
Although each harness is similar, there are important
dierences. Please ensure that you select the correct size and
fit for your build.
2. USE
2.1 SIZES 2.2 PART IDENTIFICATION
MODEL
SIZE
GUIDE
WAIST THIGH
SIMFIRE ARB-1
Small/
Medium
Min 27” (68cm)
/ Max 34” (86cm)
Min 17” (43cm)
/ Max 27” (68cm)
SIMFIRE ARB-2
Medium/
Large
Min 34” (86cm)
/ Max 42” (106cm)
Min 17” (43cm)
/ Max 27” (68cm)
SIMGEM ARB-3
Small/
Medium
Min 26” (66cm)
/ Max 34” (86cm)
Min 17” (43cm)
/ Max 27” (68cm)
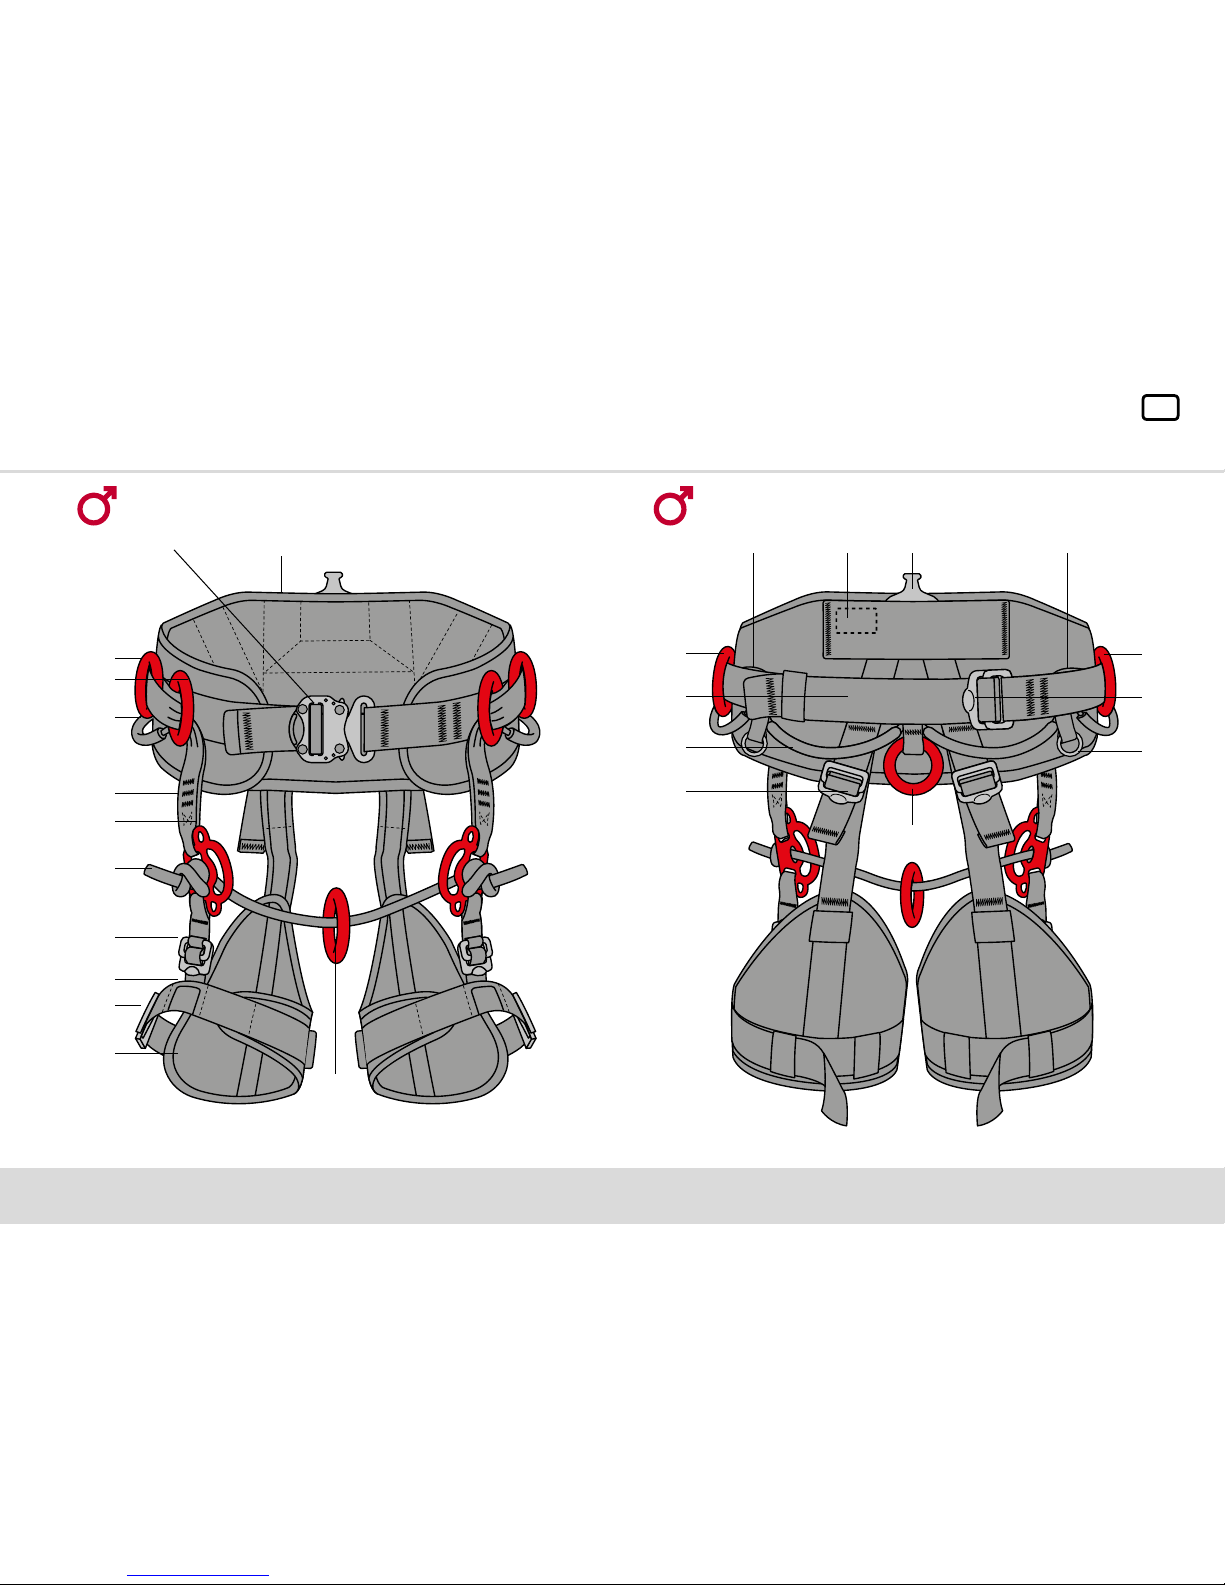
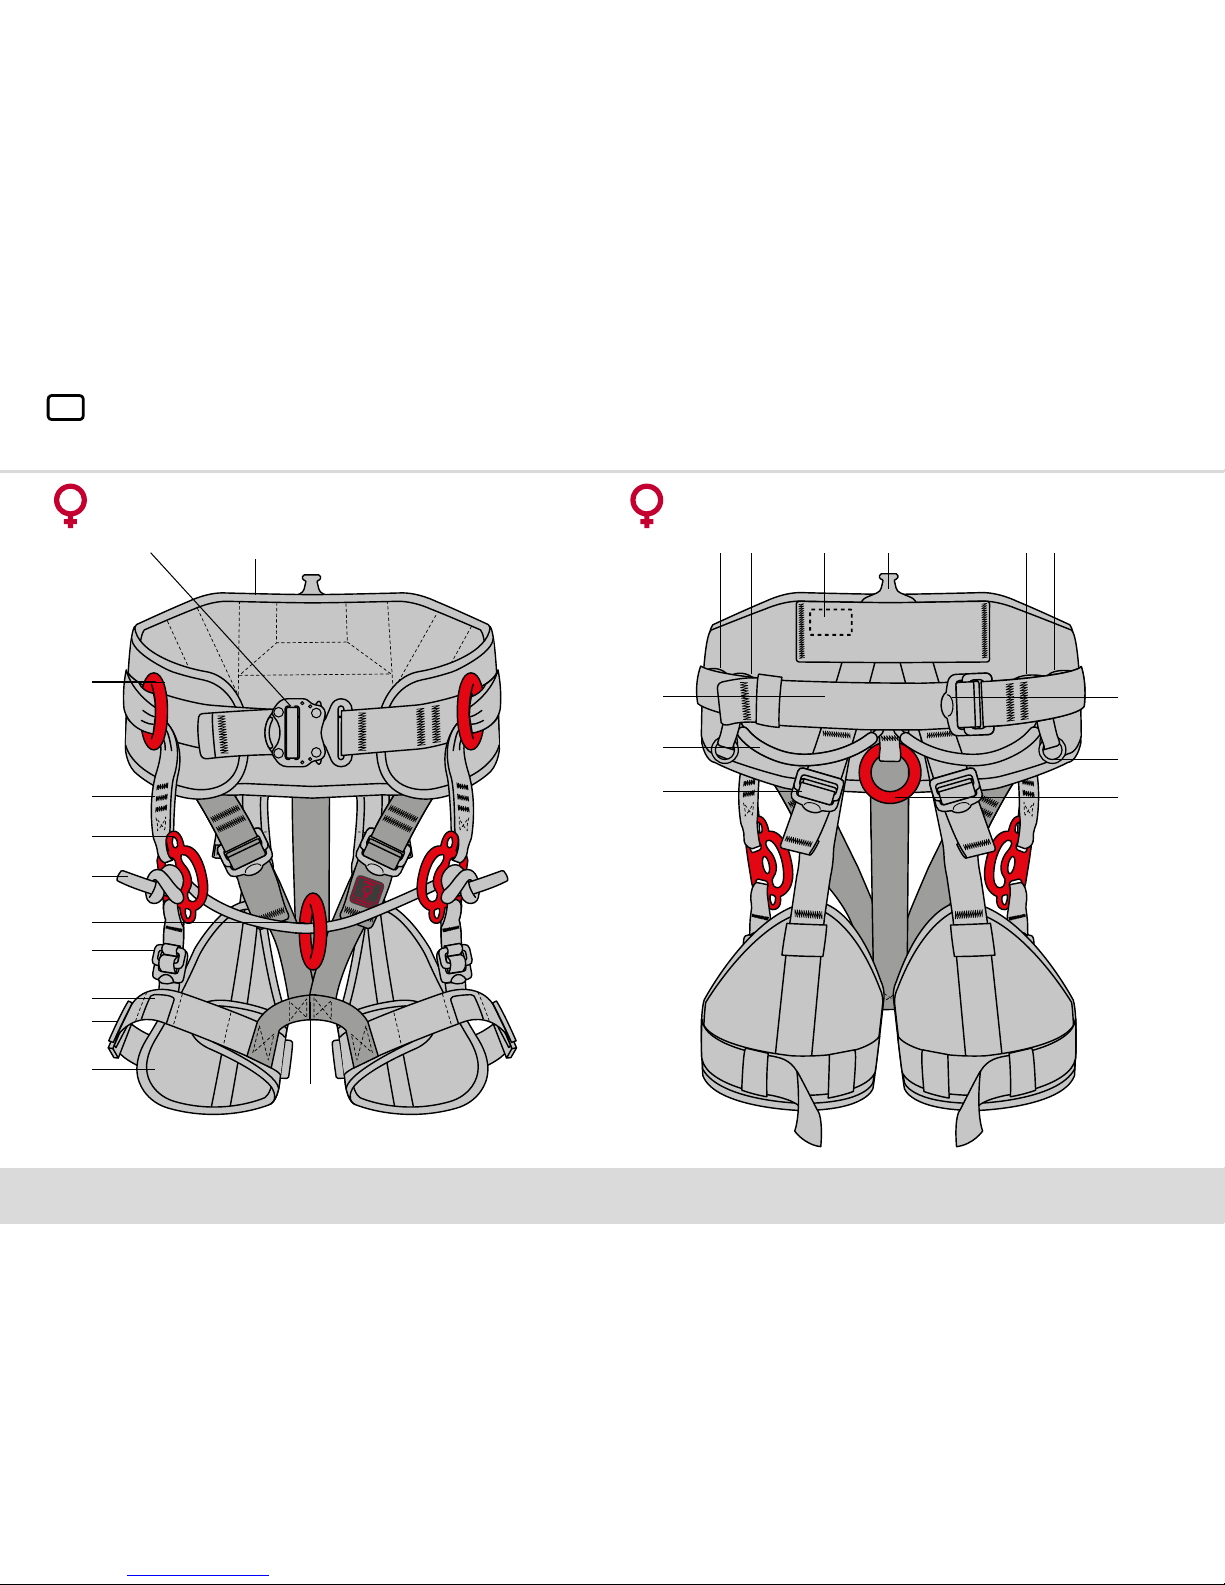
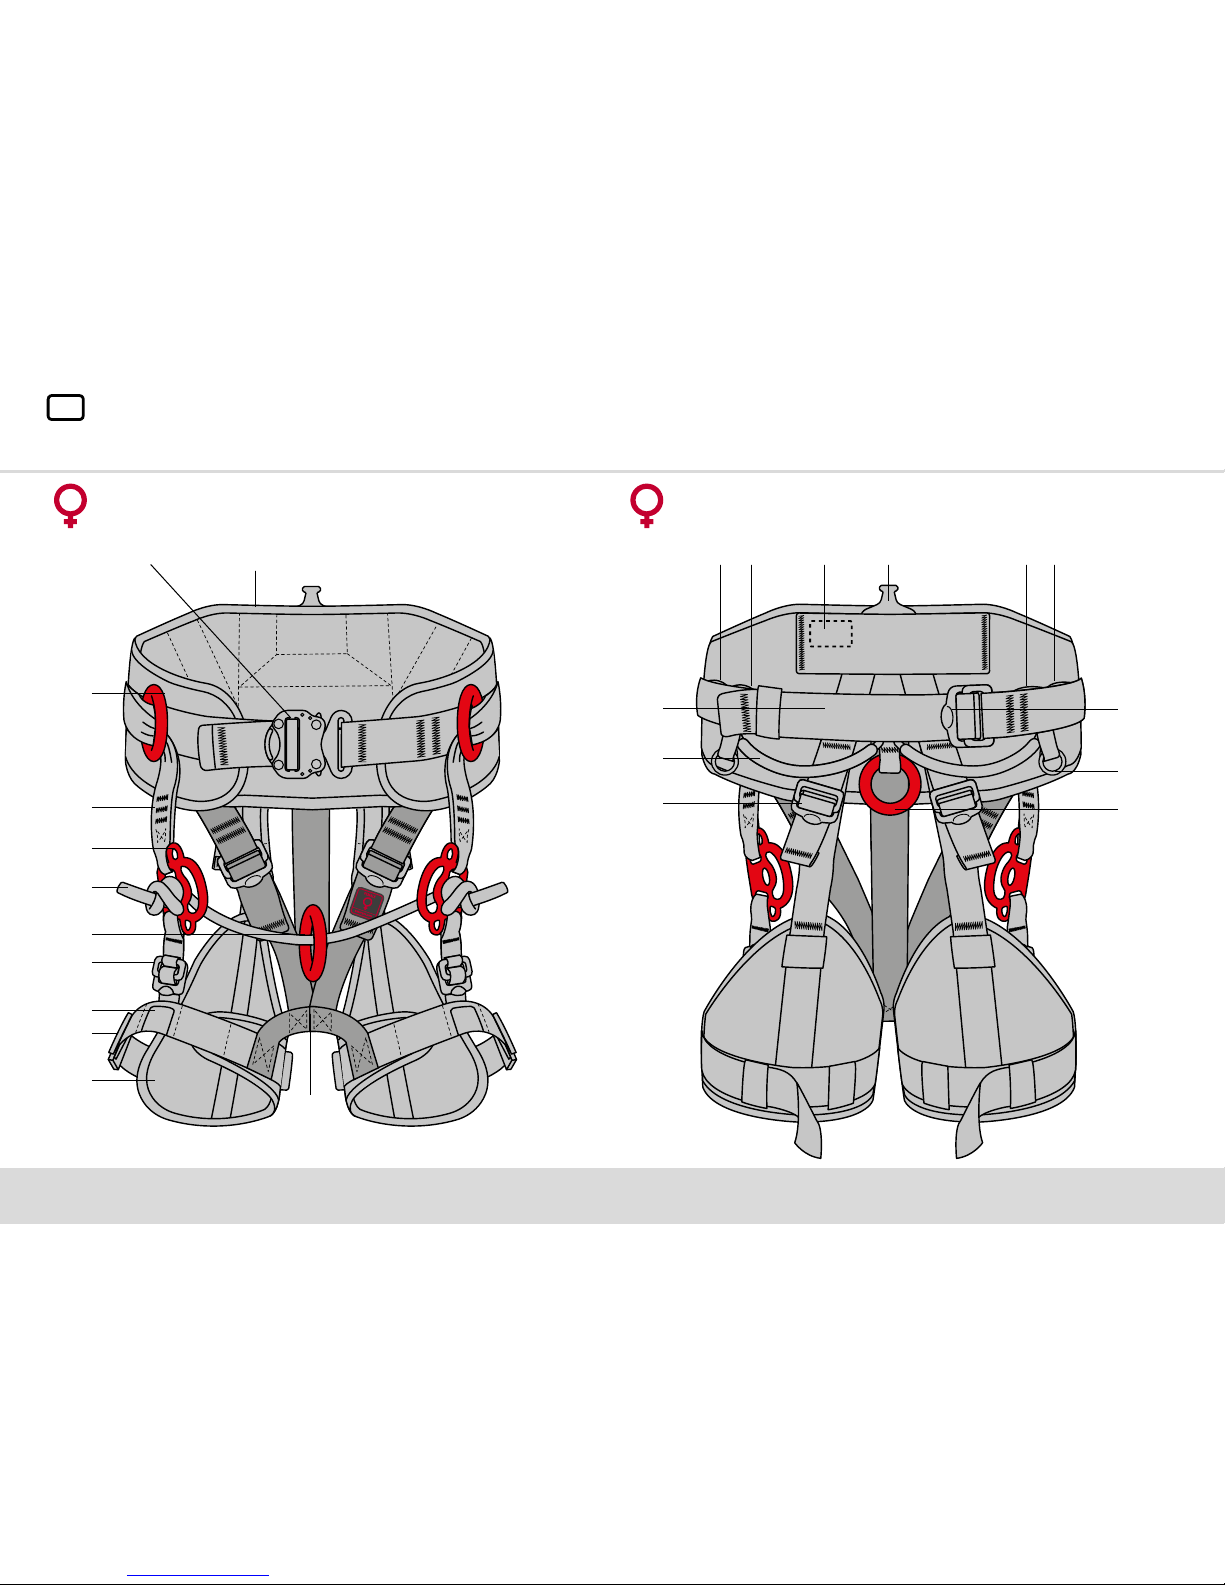
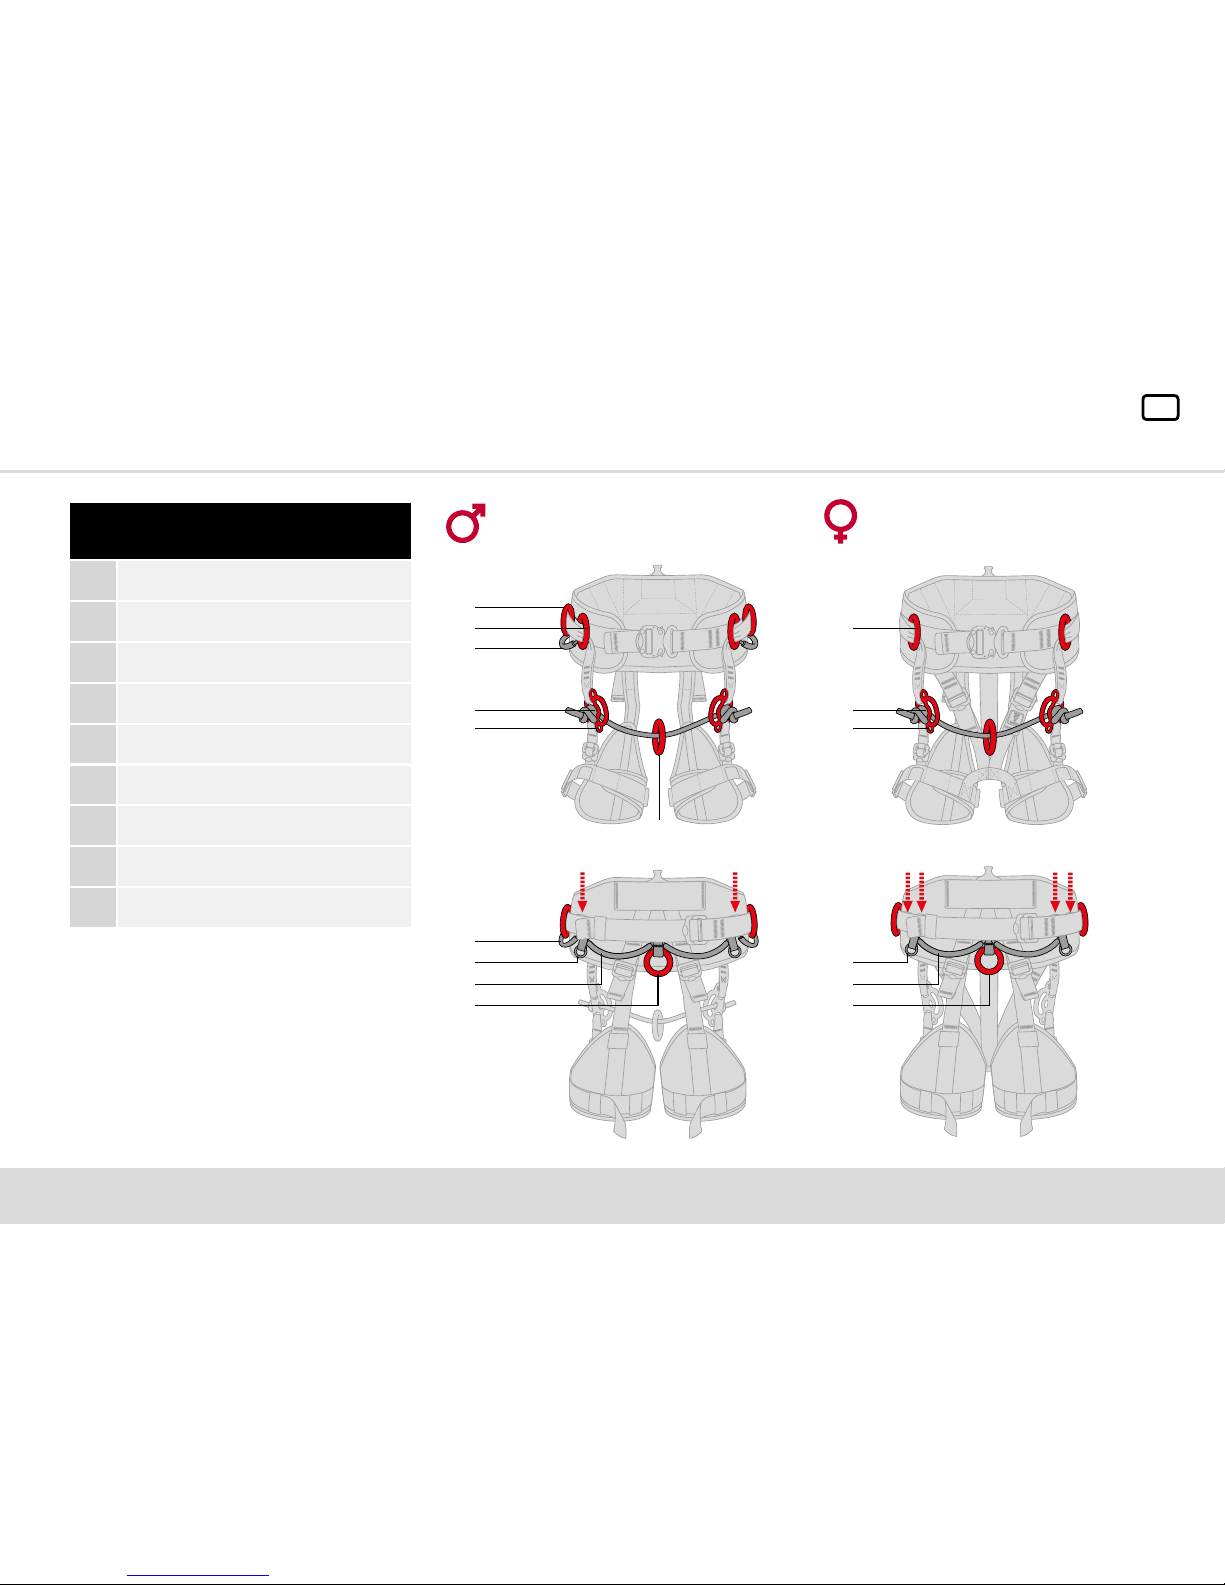
FEATURES
1
Back Pad
2
Leg Loops
3
Leg Strap Adjustment Buckles
4
Leg Pads
5
Waist Belt Adjustment Buckle
6
Rope Bridge
7
Rings - Side ‘D’ Rings, 7a Front ‘D’ Rings, 7b Bridge Ring
8
Lower Multi Rings
9
Rear Straps Adjustments Buckles
10
Shoulder Strap Attachment
11
Accessory Loops
12
Accessory Rings
13
Chainsaw Attachment Points
14
Floating Bridge Adjustment Buckles
15
Floating Bridge Strap
16
Leg Riser Adjustment Buckles
17
Label (below stretch panel)
18
Sub Harness (female GEMINI only)
19
Tool Hooks Points
5
UK
1
4
2
3
7b
16
15
8
6
7
11
7a
5 101719 19
13
15
7
9
11
14
7
12
MALE (FIRE) HARNESS - FRONT VIEW MALE (FIRE) HARNESS - BACK VIEW
6
UK
1
4
2
3
18
16
7b
15
8
6
7a
5 10
15
9
11
14
12
13
FEMALE (GEMINI) HARNESS - FRONT VIEW FEMALE (GEMINI) HARNESS - BACK VIEW
171919 19 19
7
UK
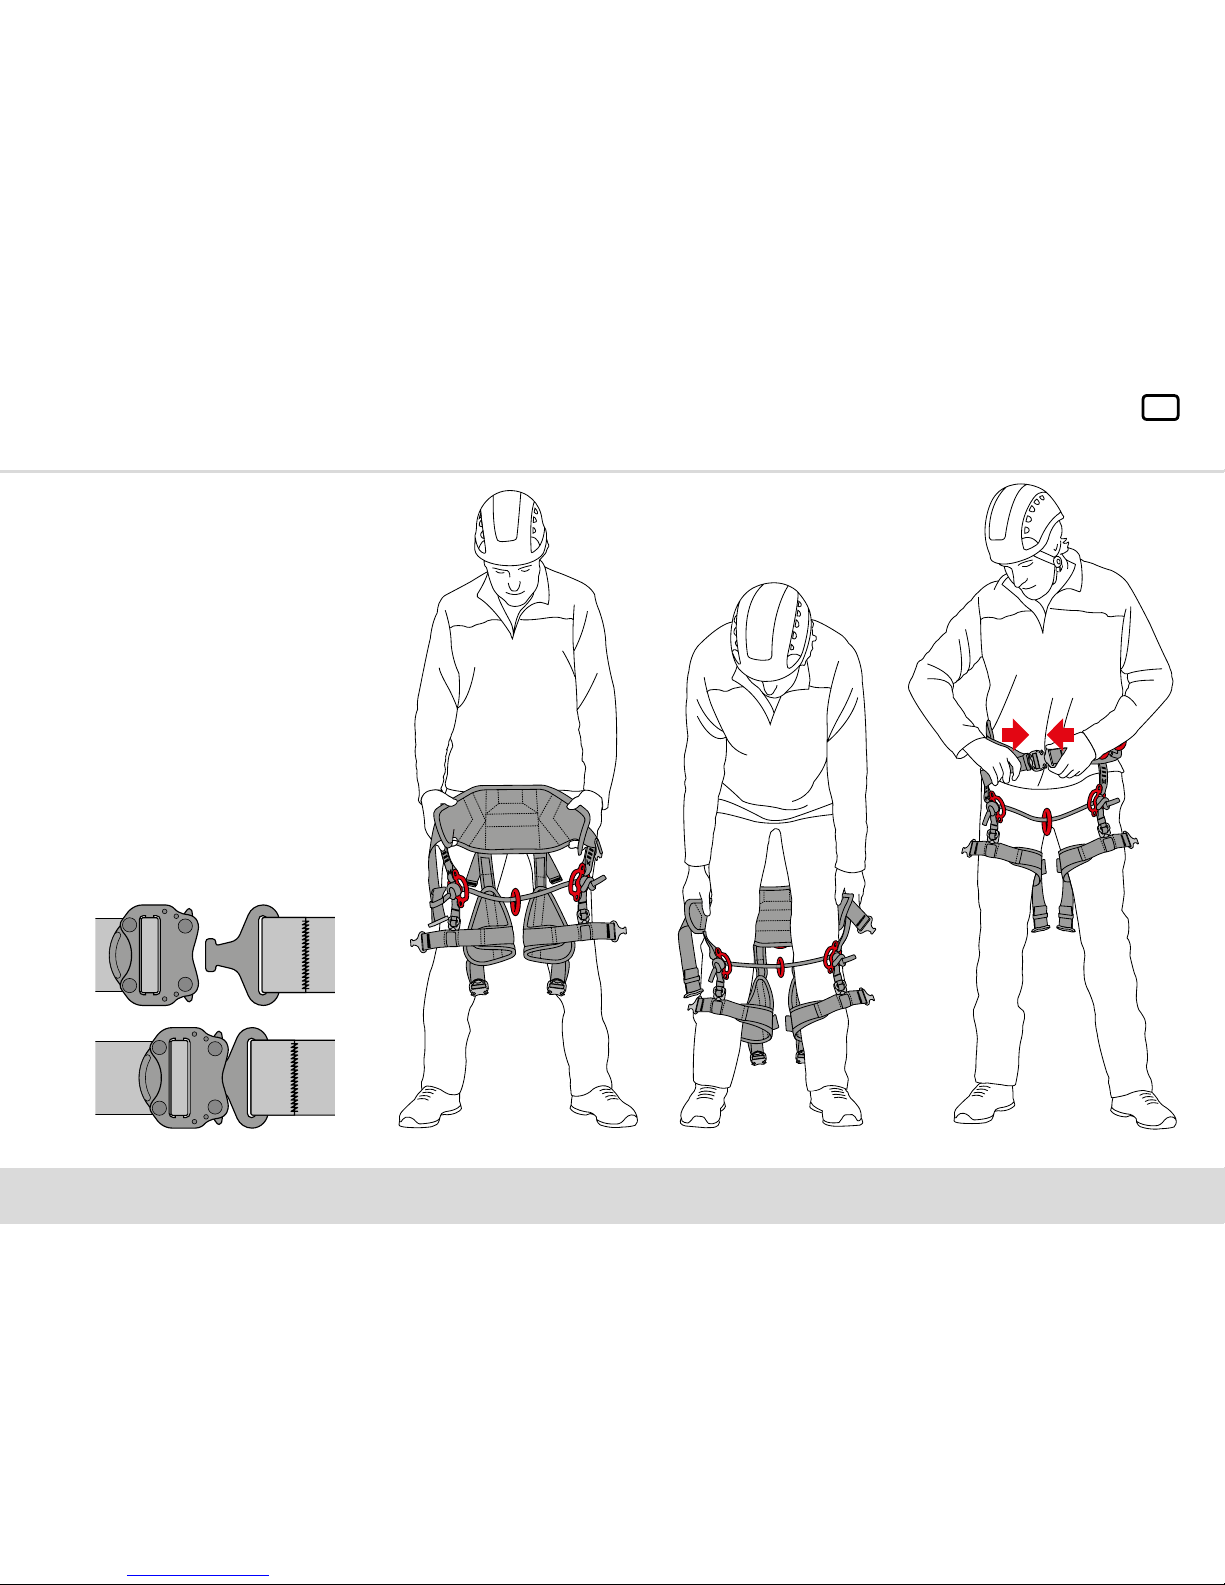
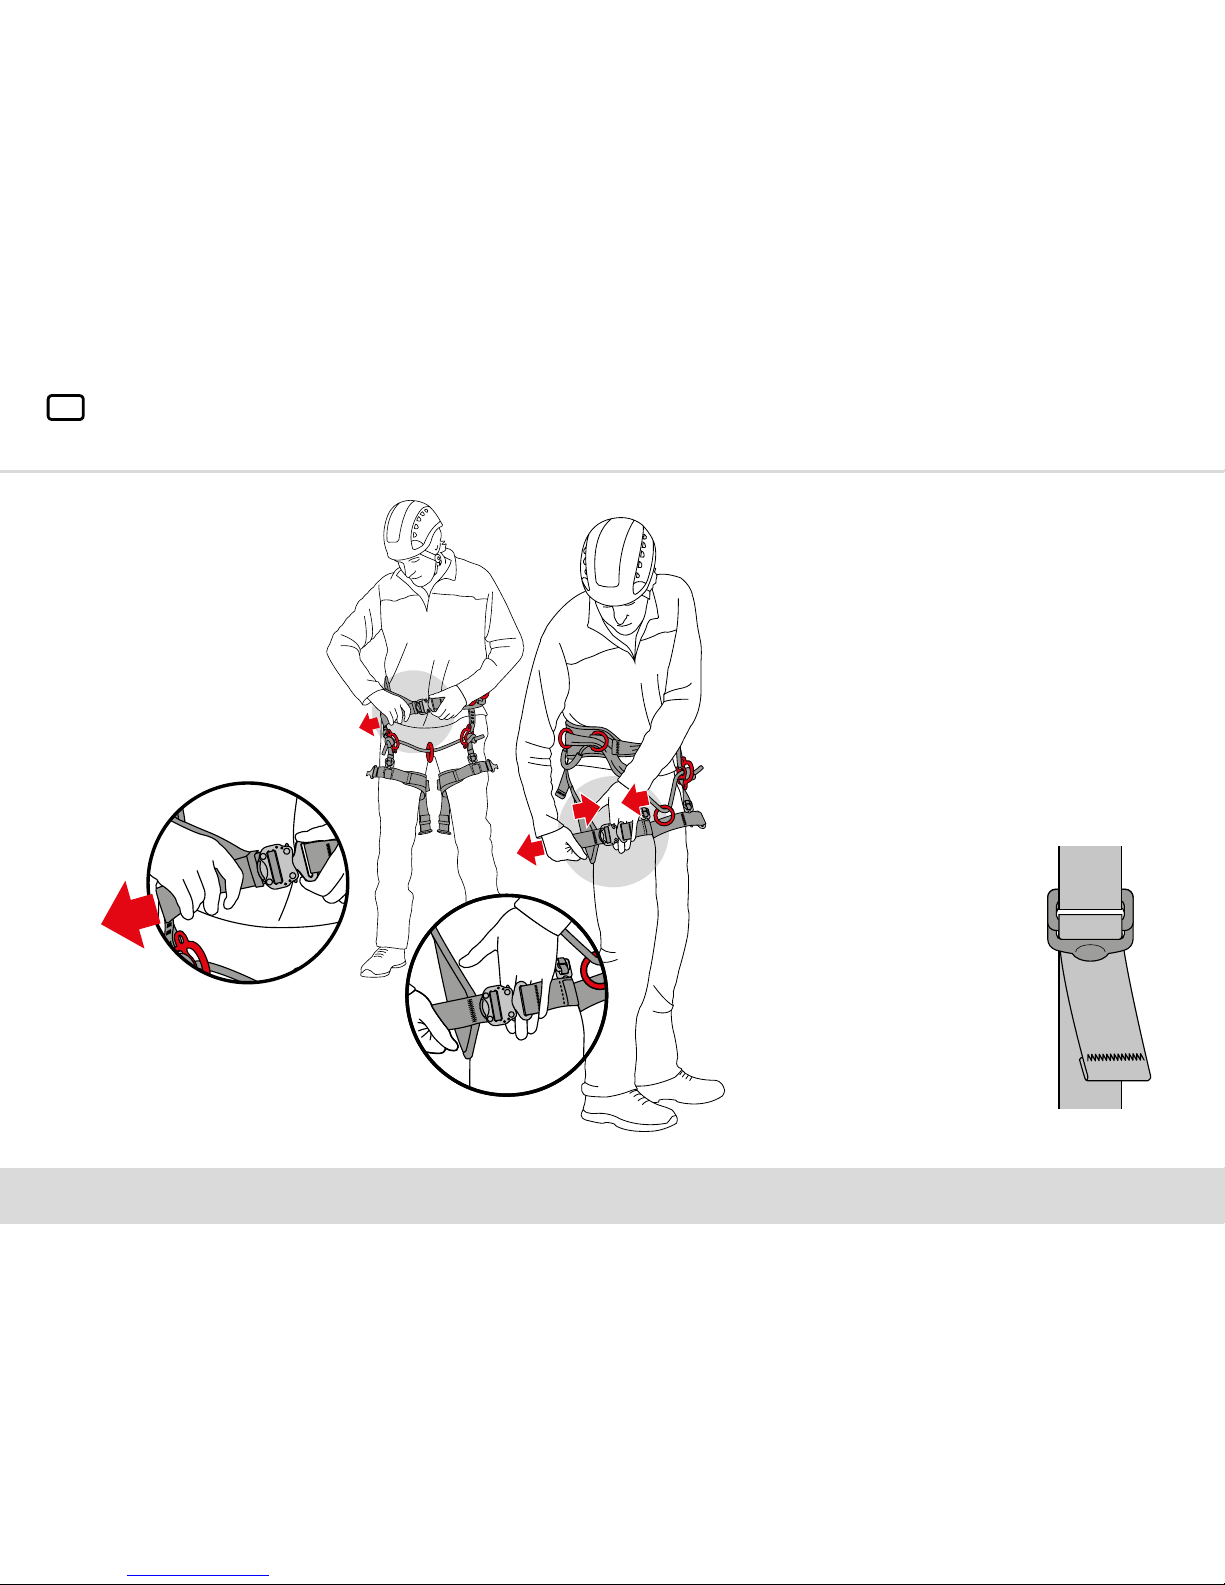
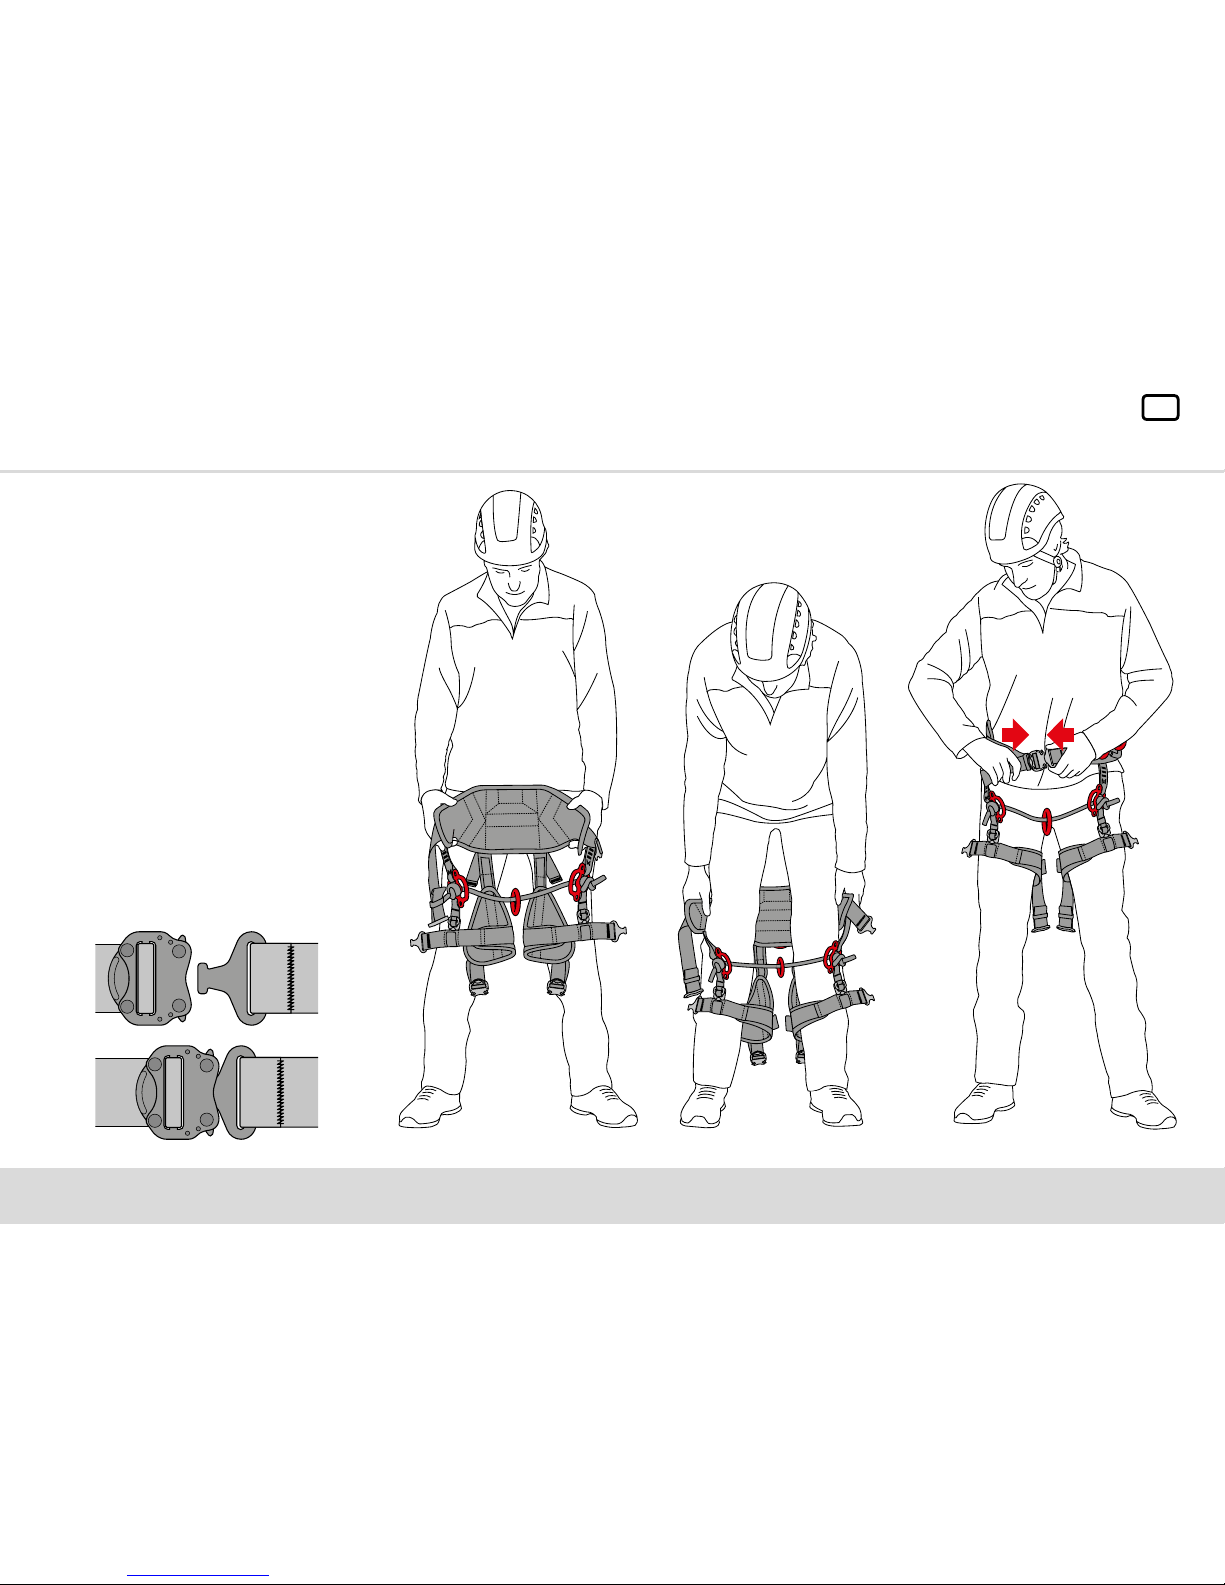
2.3 HOW TO PUT ON THE HARNESS
1. Open waist belt buckle.
2. Open leg strap buckles.
3. Hold the harness using the back
pad on each side and step in.
4. Ensure it is in the correct position,
just above the hip bones.
5. Close the waist belt buckle and
adjust to a comfortable t.
6. Close leg strap buckle and adjust.
Ensure that they are not twisted,
and the leg pads are at the back of
the thighs.
8
UK
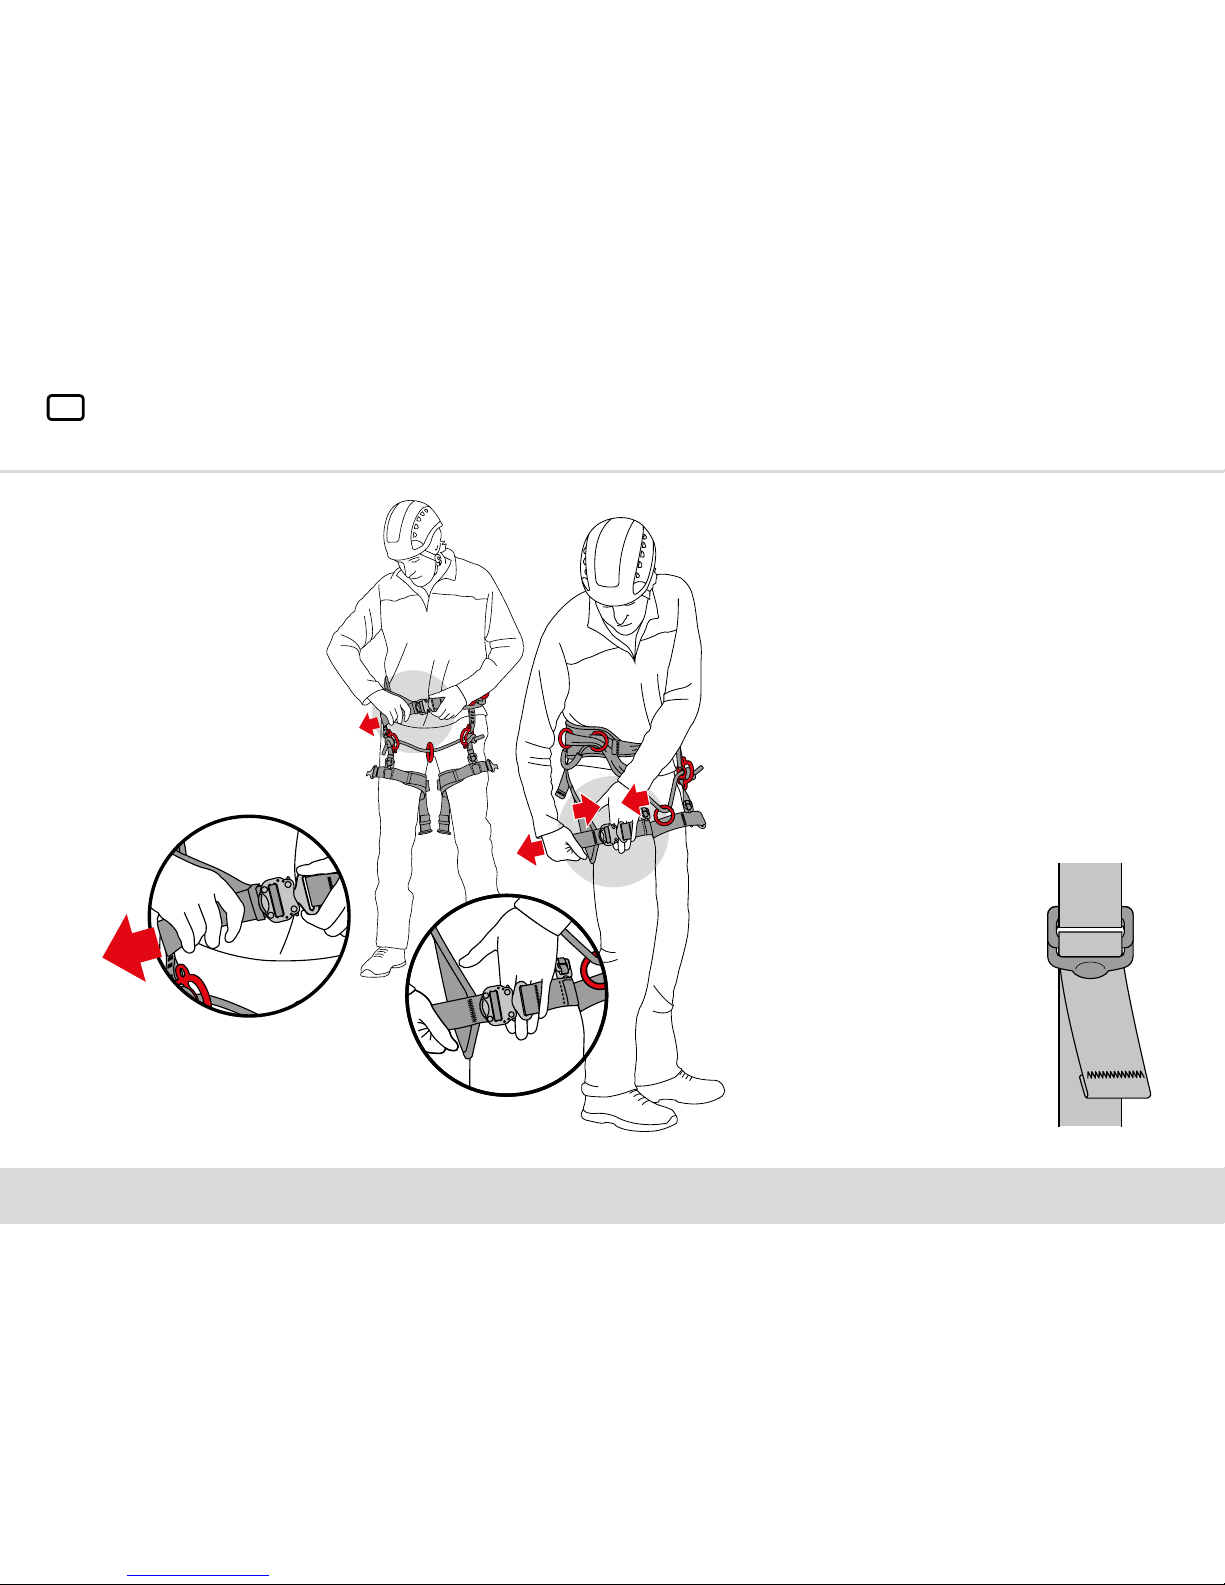
2.4.1 ADJUSTMENT - WAIST BELT 2.4.2 ADJUSTMENT - LEG STRAP
Adjust leg strap pads by simply moving the webbing
through leg adjustment buckle, if any further
adjustments are needed release webbing from the
keeper and slide through to your required length. Any
excess webbing needs to be tucked neatly back into
the keeper.
PLEASE NOTE: The leg straps are intended to be a
relaxed fit at the thigh, as shown, however if preferred a
tighter fit can be used.
2.4.3 ADJUSTMENT - REAR STRAPS
The rear straps set the position
between the leg loop and the waist
belt. This ensures that the harness
is not slack and supports the thighs
without causing discomfort.
Adjust these straps by feeding the
webbing through the buckle to a
position which provides the best
balanced and comfort.
The waist belt should be adjusted
so that your body feels supported
and comfortable.
This adjustment is only required
once.
PLEASE NOTE: Any excess
webbing needs to be tucked neatly
back into the keeper.
9
UK
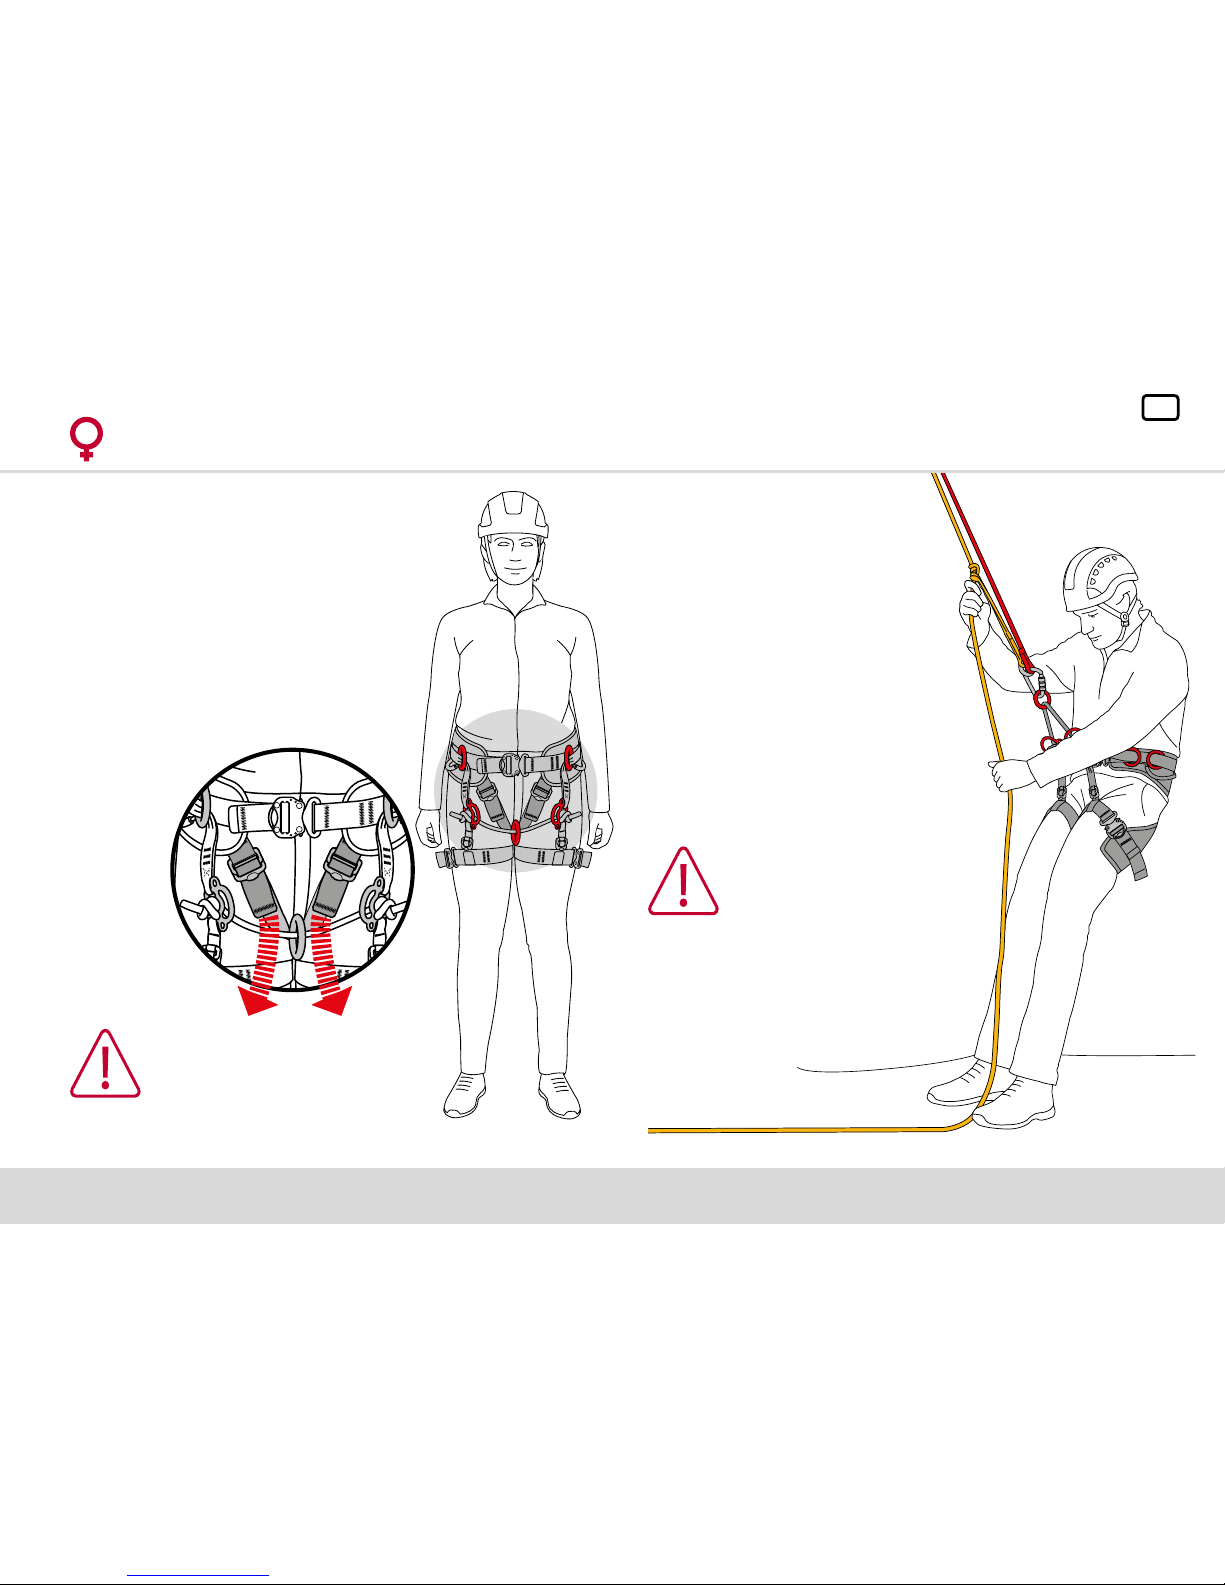
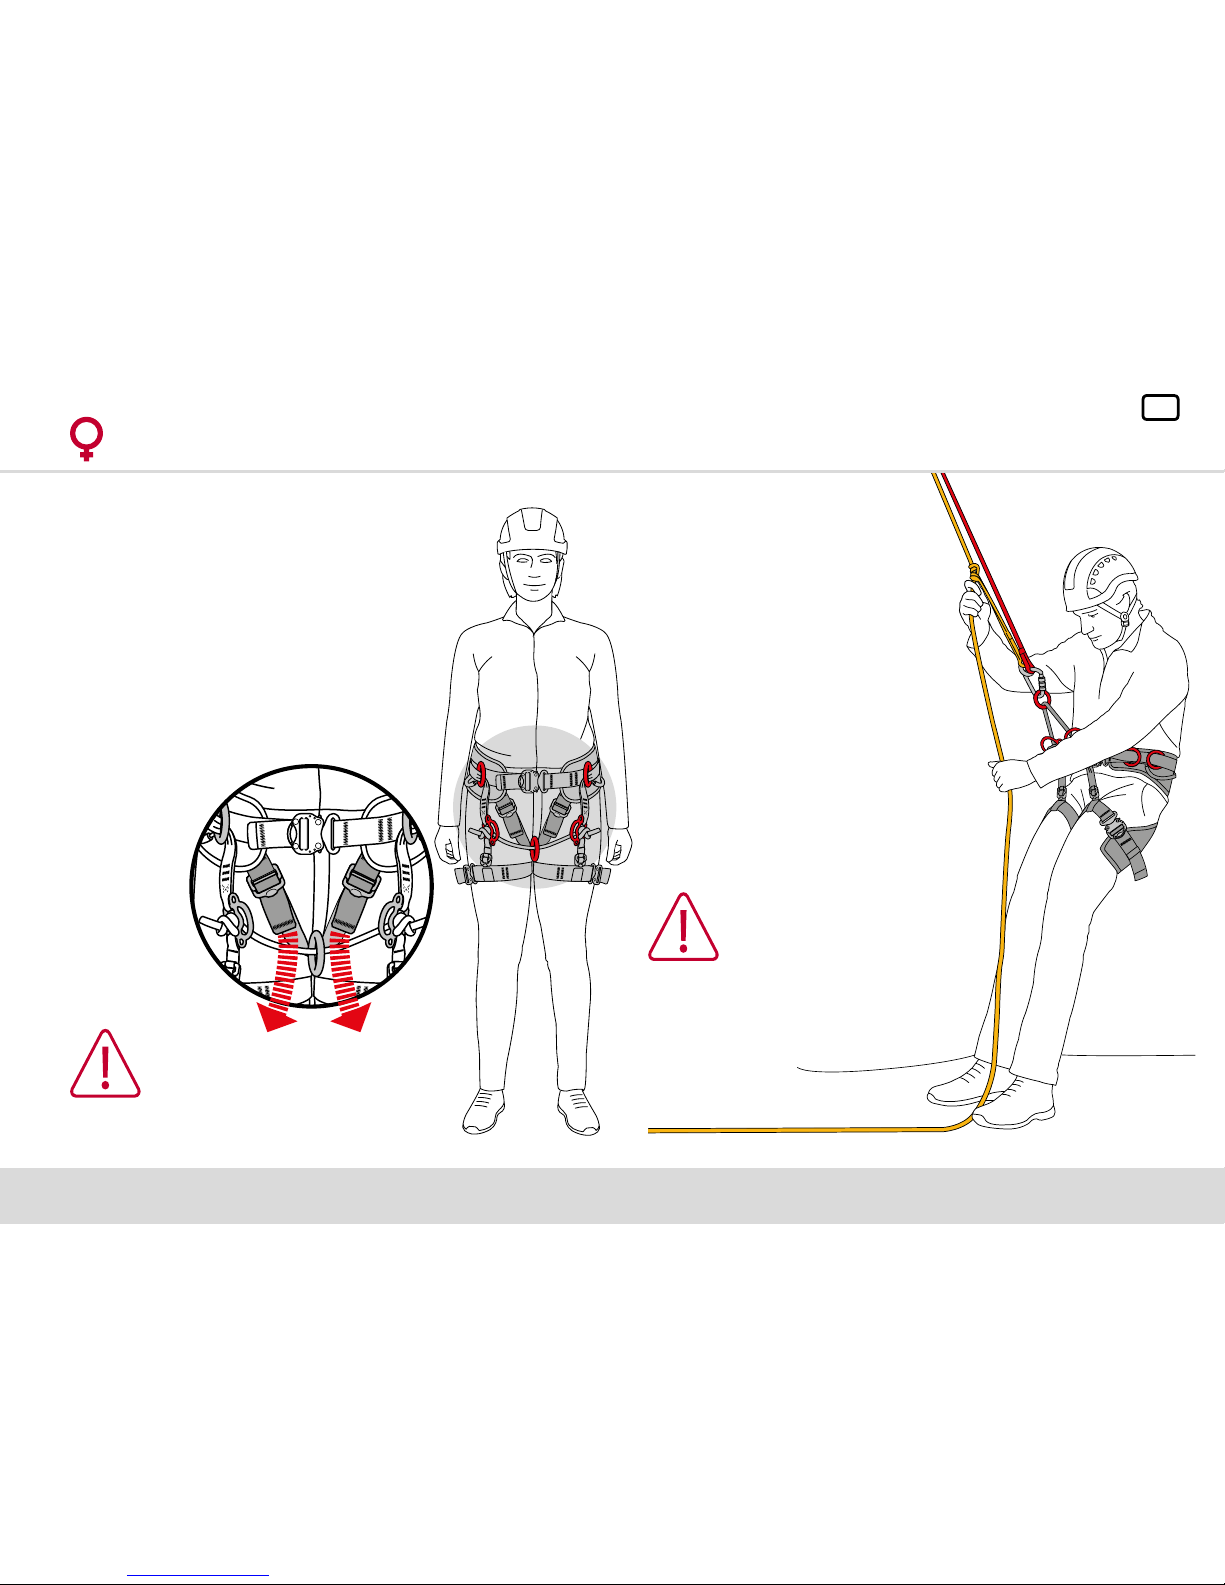
2.4.4 FEMALE (GEMINI) HARNESS ONLY
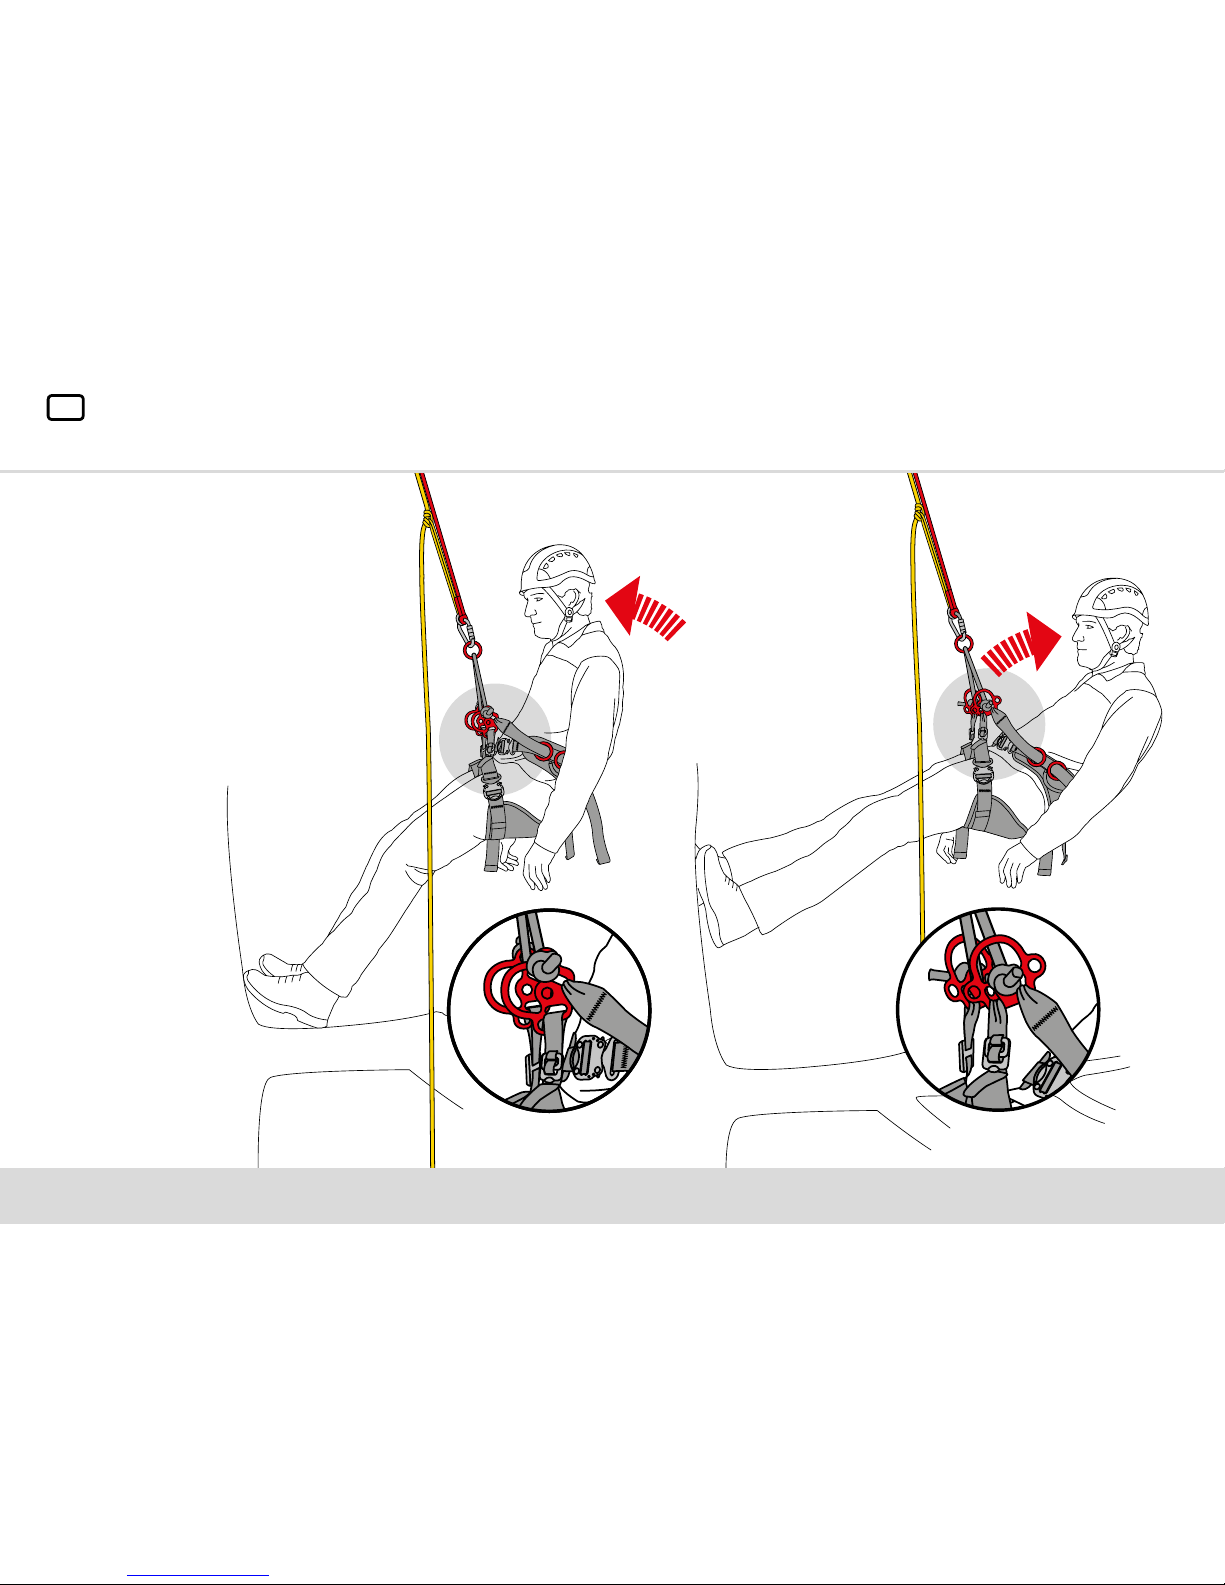
3. FLOATING BRIDGE
3.1 LEG RISER ADJUSTMENT
With a combination of adjustments
to the leg riser (16) and the oating
bridge strap (15) an optimum
position for the lower multi rings
(8), can be customised for each
user. This unique customisation
can be further enhanced by
selecting a suitable corresponding
position for the bridge rope.
The lower multi rings can be tted
with more than one rope bridge,
part number SBR125.
The female harness (GEMINI) comes with the
same benets and features but with the addition
of a sub harness.
The sub harness has been specially
designed for female anatomical support to
reduce potential injury in the event of a fall.
These straps should be pulled down and
adjusted to a ‘snug t’.
WARNING
The female harness (GEMINI) should
NOT be used by a male. The harness
has been designed to fit the female
form only.
WARNING
No more than three rope
bridges should be used
at any one time.

10
UK
4. LOWER MULTI RINGS
The two unique lower multi rings
give the exibility of three alternative
placement points allowing for a
maximum of three separate bridges.
The wearer can set the most suitable
angle by choosing either one of the
placement points. This exibility
ensures optimum balance and superior
comfort.

11
UK
5. ATTACHMENT POINTS
DESCRIPTION
1
Side ‘D’ Rings
2
Front ‘D’ Rings
3
Rope Bridge Hole
4
Lower Multi Rings
5
Accessory Loops
6
Accessory Rings
7
Tool Hooks
8
Chainsaw Attachment Points
9
Main Attachment Point
9
1
2 2
5
3 3
4 4
PLEASE NOTE: The medium/large harness
(male SIMFIRE ARB-2) comes with 2 side and
2 front ‘D’ rings along with 4 accessory loops.
Both the smaller FIRE harness (male SIMFIRE
ARB-1) and the GEMINI Harness (female
SIMGEM ARB-3) come with 2 front ‘D’ rings
and 2 accessory loops.
MALE (FIRE) HARNESS
FEMALE (GEMINI) HARNESS
FRONT
BACK
6
5
8
7 7 77 77
5
6
8
5
12
UK
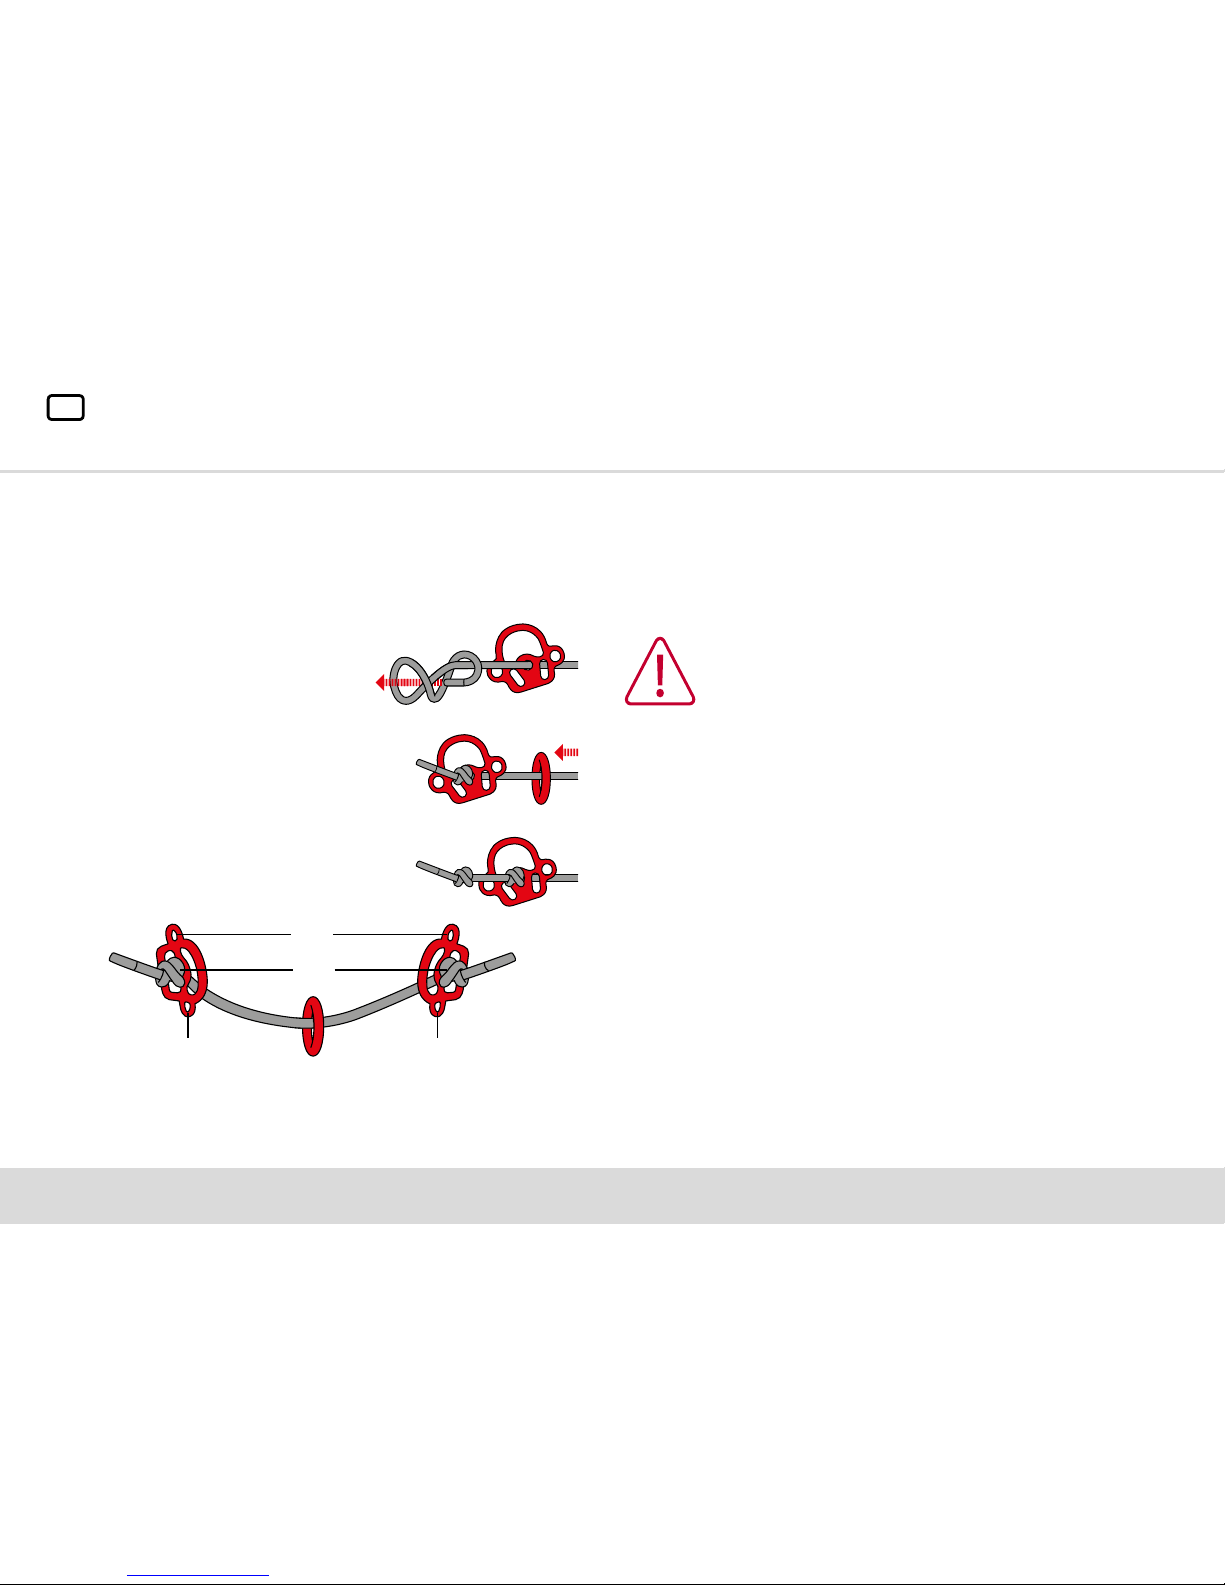
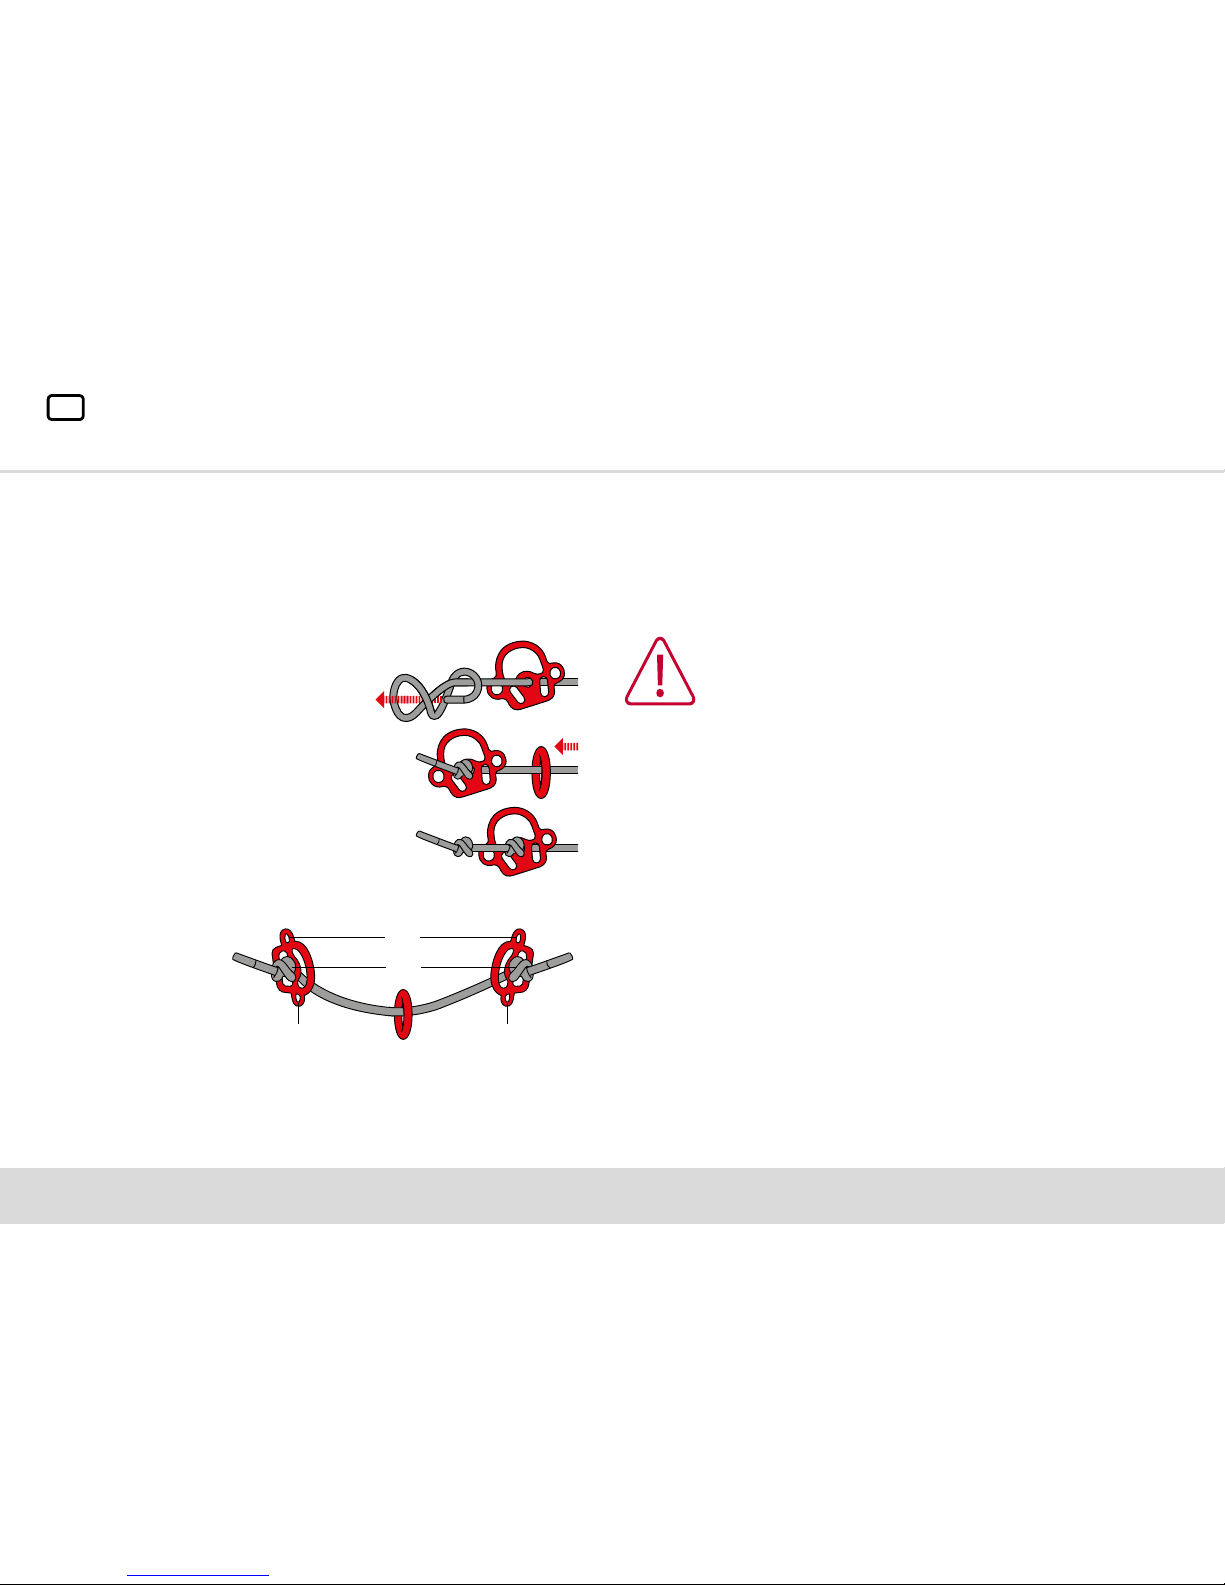
5.1 ROPE BRIDGE SET UP
To secure the rope bridge a stopper knot is required. This ensures
that the rope does not pass through the connecting lower multi
ring. For extra security ensure that there is at least a 75mm (3”) tail
when tying o the knot.
a. Pass the rope through the main
centre hole (main connection point)
from outside to inside, and tie o.
c. Pass the other end of the rope through
the centre hole of the second multi ring
from inside to outside and tie o.
b. Feed ring through rope.
Lower multi ring holes (2) can only be used for bridge rope
attachment and must not be used as an attachment point for
anything else. Large hole (3) can be used as an attachment point.
PLEASE NOTE: In some situations you may
need to shorten the rope bridge. To do this tie
a secondary stopper knot.
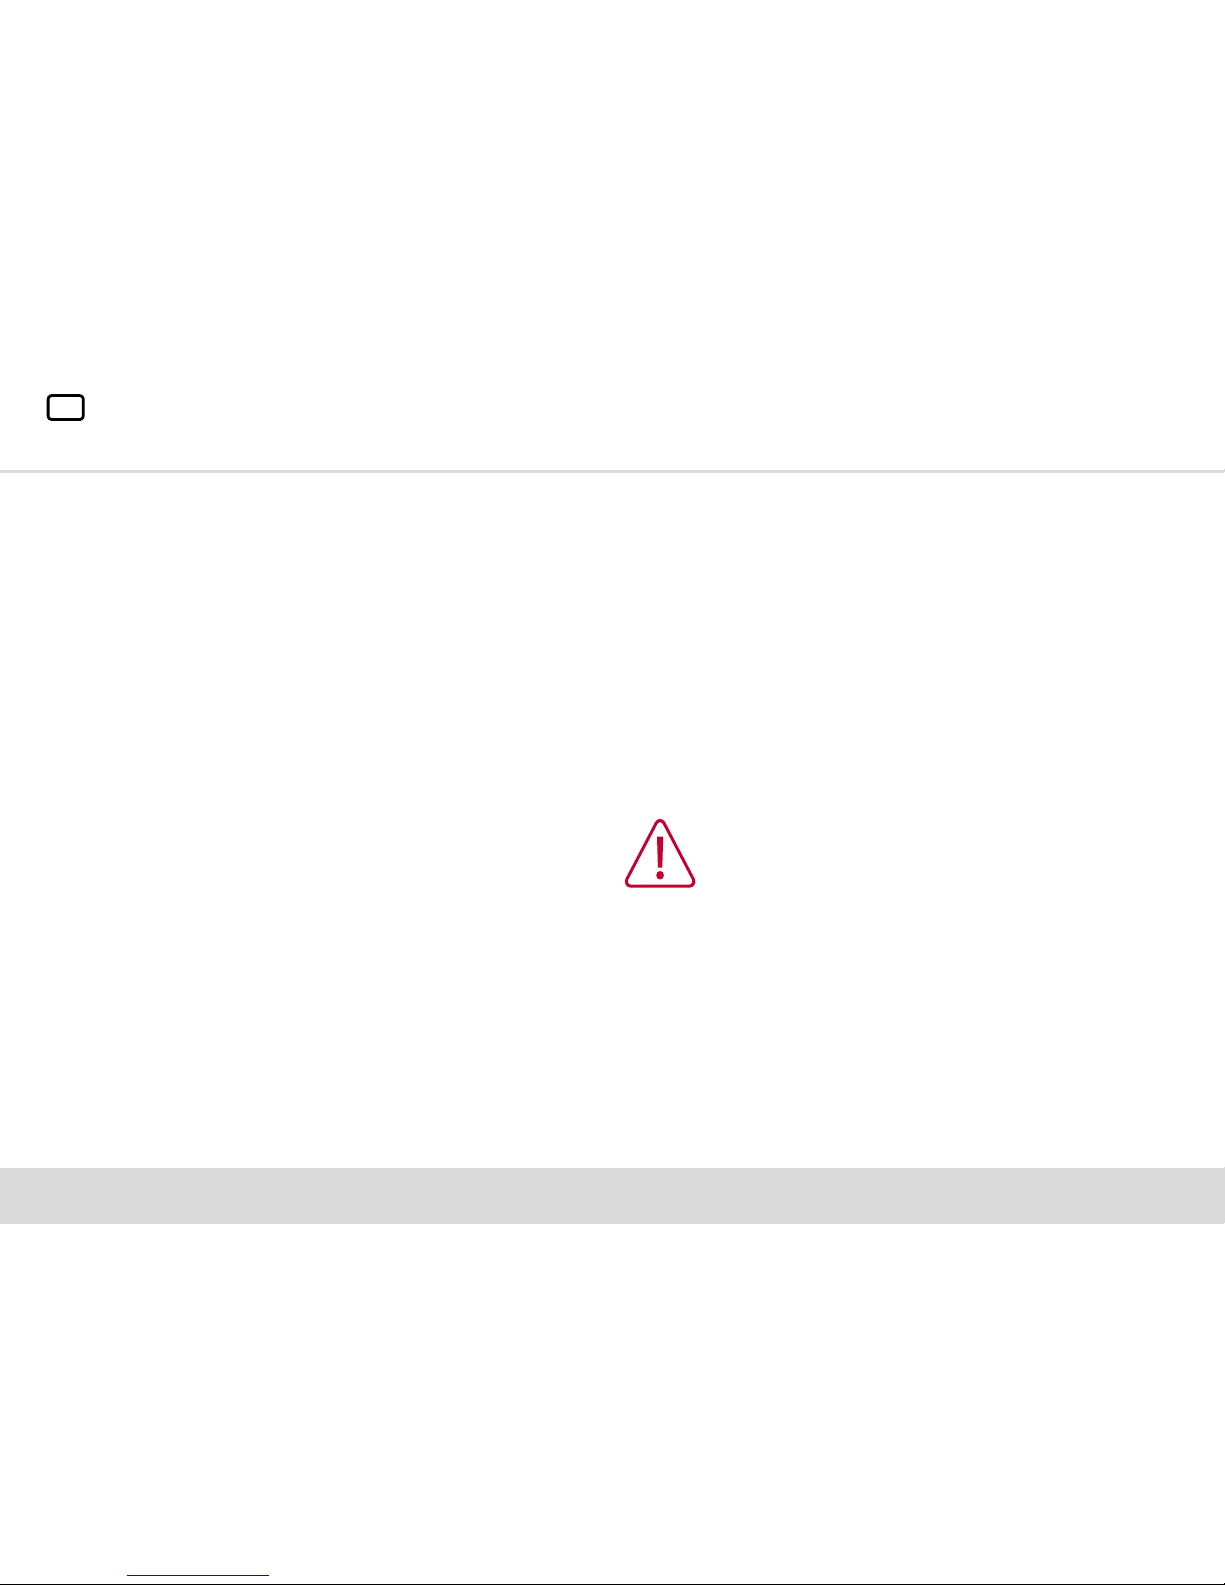
Hanging in the harness for long periods of time without movement
will cause the ow of blood to be restricted. This will eventually
lead to orthostatic intolerance or HSS (Harness Hang Syndrome).
In such an event the FOLLOW YOUR RESCUE PLAN AND
CALL THE EMERGENCY SERVICES.
6. SUSPENSION TRAUMA
2
3
2 2
WARNING
Typical symptoms of HSS include sweating, shortness of
breath, blurred vision, dizziness, nausea, hypertension and
numbness of the legs etc. These symptoms will vary from
person to person.
13
UK
WEBBING
Examine for cuts, cracks, tears, abrasions* and scorch
marks, burns or chemical attack.
STITCHING
Look for broken stitches, lose or worn threads.
METALWARE
Inspect for any signs of damage, distortion, or corrosion
as well as ensuring correct operation.
LABELLING
Ensure all label information is still legible.
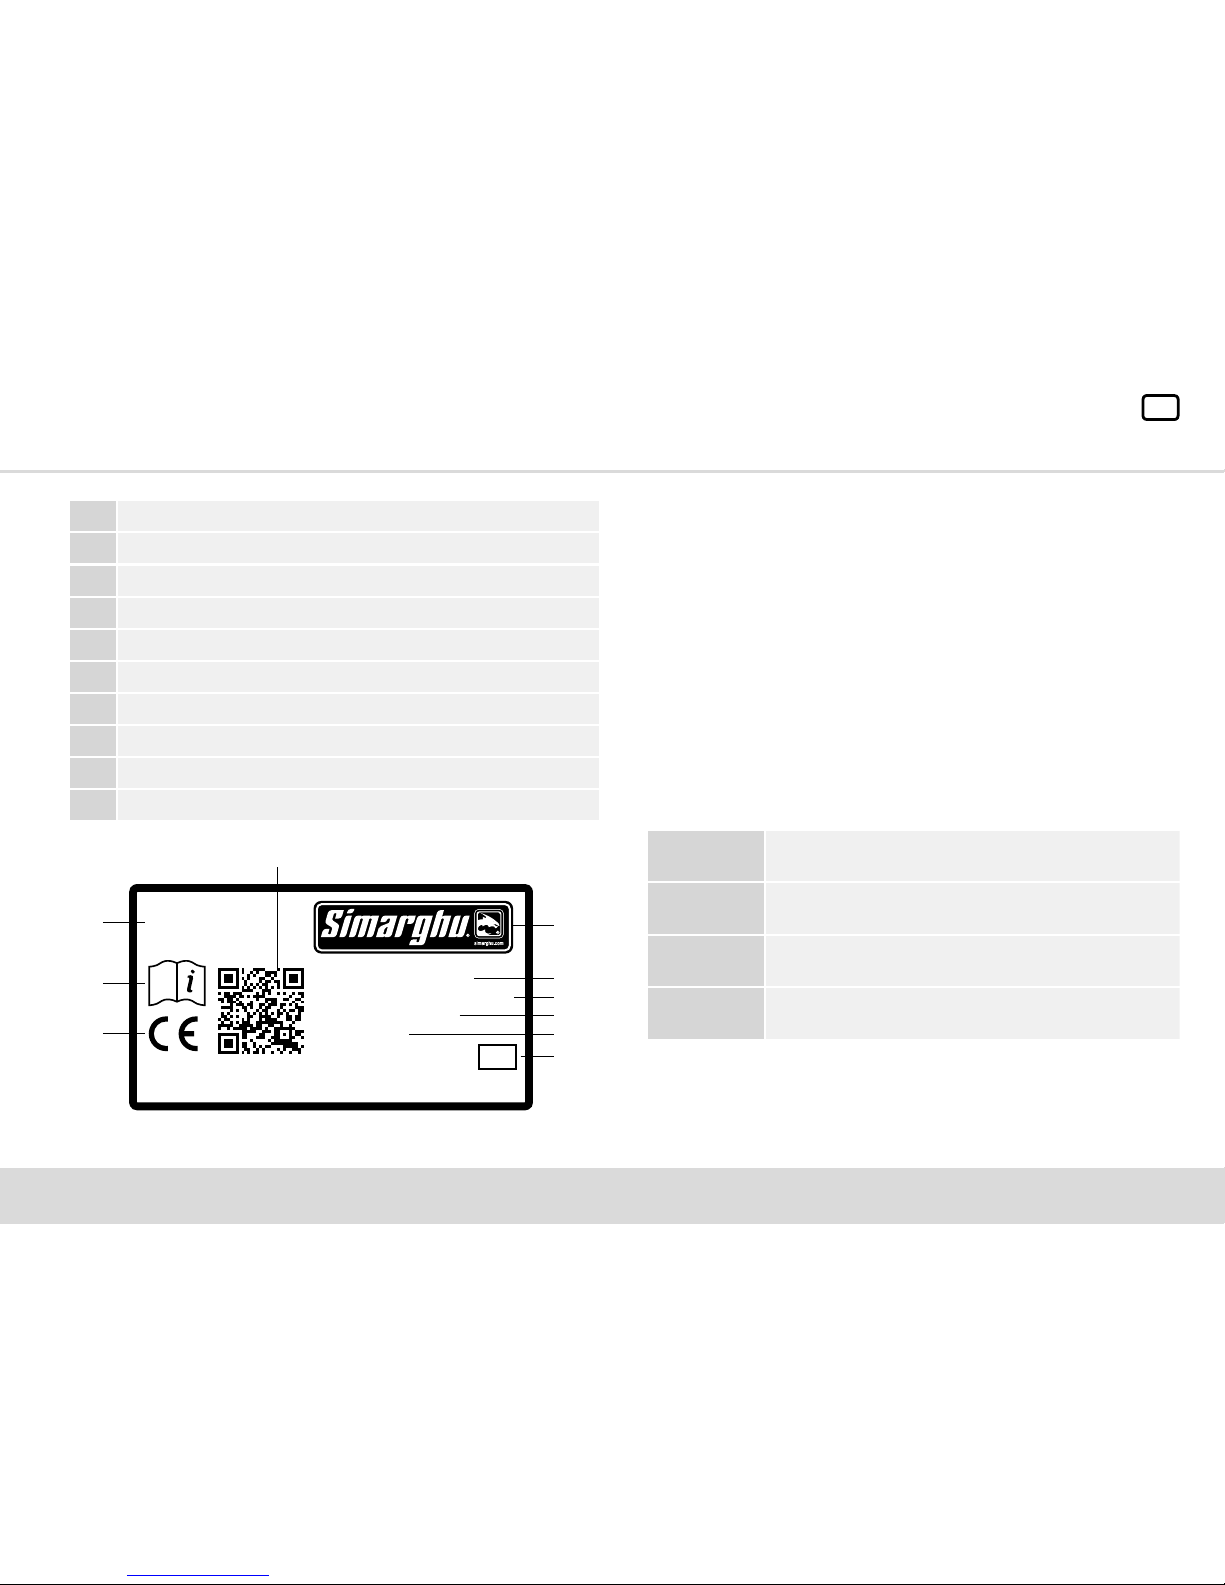
7. HARNESS LABELLING 8. HARNESS INSPECTION
REGULAR CHECKING AND RECORD KEEPING
This harness and all other equipment must be visually inspected
by a competent individual when delivered to site, and thoroughly
inspected before and after every use. If you are unsure or have
any doubt about the condition of the harness you MUST
remove it from service.
A record card is included with this manual and should be lled
in after each routine inspection. Registration and record keeping
can also be completed online by visiting www.simarghu.com/
register and entering the product’s unique serial number.
*Common abrasion wear within webbing may be caused by passage over
sharp edges when under tension which may result in serious weakening. Slight
damage to the outer bres and threads could be considered harmless; however
serious damage such as reduction of the thickness or width of webbing should
lead to rejection and immediately removed from service.
1
CE Mark
2
EN Standards
3
Manufacture
4
Max Load
5
Product Reference
6
Serial Number
7
Date of Manufacture
8
Read Manual
9
QR Code
10
Size Guide
THOROUGH INSPECTION IS TO BE GIVEN TO EACH OF
THE FOLLOWING KEY AREAS:
POSITIONING ONLY! - NOT FOR FALL ARREST
EN358: 2000
EN813: 1997
MAX LOAD: 120KG
MODEL: SIMFIRE ARB-1
SN: ARB1-000000
DOM: 0317
2
8
9
1
4
5
6
7
10
S/M
3
14
UK
9. MAINTENANCE & STORAGE
All maintenance work MUST be carried out by a competent fully
trained person. However users should clean the harness when
required.
CLEANING SHOULD BE DONE WHEN:
• The harness has been used in salty environment.
• If the harness has a coating of oil, soil, mud or any contaminant.
WHEN CLEANING:
Place the harness on a at surface. Using a damp sponge wipe
down harness to remove excess dirt, dust or sand. DO NOT
use cleaners that contain chlorine, bleach or abrasives. DO NOT
immerse the harness in water.
If the harness is defective in any way please complete the
Examination Form stating all defects and remove from service
immediately, and contact:
SIMARGHU
®
PO BOX 412
Carlisle
CA1 9GR
T: +44 (0)1228 371 583
E: info@simarghu.com
www.simarghu.com
10. SERVICE LIFE
This product has a life of 10 years from date of manufacture and 5
years from date of rst use.
Extreme factors may considerably reduce the serviceable life of
a harness. For example, if the harness has been damaged due
to mechanical wear, harsh treatment, prolonged exposure to UV
Rays or other environmental factors such as contact with salt or
sand, exposure to high heat or cold and icy conditions.
If the harness is bleached of colour, abraded, worn or cracked
bres then it MUST be removed from service.
WARNING
If the user is in any doubt about the condition of the product
however insignificant, they must either render it unusable
and remove from service immediately or place in quarantine
so that it may not be used by mistake. The harness can
only be returned to service by written authorisation by
manufacturer or a trained individual.

15
UK
11. EXAMINATION FORM
Harness Serial Number :
DESCRIPTION
STRAPS - Check ALL webbing for any damage. This may include cuts, burns, cracks and tears
due to heat or chemical contact. Examine waist belt strap, leg loop/straps and shoulder straps if
present. NOTE: remember to check webbing hidden by buckles.
ADJUSTMENT BUCKLES - Examine the condition of the buckles for any marks, cracks, ware and
tear, deformation or corrosion. Check that the buckles are fully functional and are threaded
correctly with no twists.
ATTACHMENT POINTS - Examine the condition of the metal attachments for any marks, cracks,
wear and tear, deformation or corrosion. Check the textile attachments for any cuts, abrasions or
tears. NOTE: Ensure that ALL attachments are present.
SEWING - Check ENTIRE HARNESS for any broken, cut loose or worn thread on structural
bartacks.
LABELLING - Check that label is present and legible. Check date to ensure product is within its life
span.
COMFORT PARTS - Examine backpad, leg pads, keepers, accessory loops for any cuts, burns,
wear and tear, cracks.
CONDITION
PASS FAIL
List all salient points about each
part stating all issues present
DEFECTS
Tested by :
UNFIT FOR USEFIT FOR USEVERDICT
Signature : Date of Examination :
Next Examination Due :
Date of Manufacture : Date Issued :
Registration and Record Keeping can also be completed online by visiting www.simarghu.com/register and entering the product’s
unique serial number. Registering in this way will ensure that the harness is kept in optimum condition throughout its working life.
16
UK
VISUAL INSPECTION –– 100% Each and every
product covered by this certicate has been visually
inspected during manufacture and on packing. The
following points were addressed and checked against
the approved build standard:
Correct webbing used (Black/Red – Female
and Black/Grey – Male)
All webbing checked for damage/wear or
cuts
All structural stitching checked
completeness loose threads
Adjustment buckles function correctly and
checked for any damage
All attachment points present and
examined for damage
All engraving examined on hardware
ensuring quality and correctness
Labelling inspected for both clarity,
correctness and position
Goods inspected to both working sample
and approved specication
All comfort parts examined (back pad, leg
pads) keepers and accessory loops
Stowage bag checked
12. CERTIFICATE OF CONFORMITY
ARBORIST HARNESS
HARDWARE STATIC TESTING –– 1 o part per
batch was tested to ensure the product functioned as
per specication. The part was attached to a test rig,
and then load was applied and recorded by a digital
load cell:
Multi ring held for 3 min with a load of 15kN
34mm/40mm ring held for 3 min with a load
of 30kN
Parts were checked for damage, all observations and
results were recorded.
DECLARATION –– All test equipment is maintained
in a calibrated condition and inspected periodically
to assure conformance with national standards. All
inspection and test was performed by trained and
competent personnel and the product was found to
conform to European Standard BS EN 358: 2002 and
EN 813:1997.
SIMARGHU®, PO BOX 412, Carlisle, CA1 9GR
T: +44 (0)1228 371 583 E: info@simarghu.com
www.simarghu.com
MANUFACTURE –– This product has been
manufactured to the regimented and documented
procedures within a quality environment that ensures
that all material is traceable back to specication and
source. Specication and inspection is documented
under...
MODEL NO.:
DESCRIPTION:
DATE OF MANUFACTURE:
SERIAL NO.:
QUANTITY:
SIGNED:
INSPECTOR:
DATE:
REF:
BATCH NUMBER(S):
PATENT PENDING

Baumzüchter-Klettergurt
DE

18
DE
INHALTSVERZEICHNIS 1. ALLGEMEINE INFORMATIONEN
BESCHREIBUNG
Dieser Klettergurt wurde speziell für Baumpeger entworfen und
hergestellt. Er sollte AUF KEINEN FALL verwendet werden, um
einen Sturz aufzuhalten.
Dieses Produkt ist hergestellt und getestet nach den Normen:
EN 813:1997 EN 358:2000
SIMARGHU
®
PO BOX 412
Carlisle
CA1 9GR
T: +44 (0)1228 371 583
E: info@simarghu.com
www.simarghu.com
PATENT ANGEMELDET
1
Allgemeine Informationen
18-19
2
Verwendung
20
2.1
Grössen
20
2.2
Zuordnung der Einzelteile
– Männlich (FIRE) & Weiblich (GEMINI)
20-22
2.3
Anziehen des Klettergurt
23
2.4.1
Anpassung - Rüchenpolster
24
2.4.2
Anpassung - Beingurt
24
2.4.3
Anpassung - Hinterriemen
24
2.4.4
Anpassung - Untergurt
(Nur Gemini)
25
3
Schwimmende Seilbrücke
25
3.1
Anpassung des Beinaufstellers
25
4
Untere Multiringe
26
5
Befestigungspunkte
– für Männer (FIRE) & für Frauen (GEMINI)
27
5.1
Einrichtung der Seilbrücke
28
6
Durch Hängetrauma
28
7
Kennzeichnung des Klettergurt
29
8
Überprüfung des Klettergurt
29
9
Pege & Lagerung
30
10
Lebensdauer
30
11
Prüfungsformular
31
12
Konformitätszertikat
32
19
DE
ACHTUNG
Falsche Verwendung des Klettergurt kann fatale Folgen
haben, deshalb MÜSSEN Sie im Vorfeld der Nutzung:
• Diese Bedienungsanleitung vor der Verwendung des
Klettergurts lesen und komplett verstehen.
• Eine im medizinischen Sinne tte Person sein, die in der
Höhe arbeiten kann und das sowohl in normalen wie in
Notfallsituationen. Wenn es irgendwelche Punkte in der
Bedienungsanleitung gibt, derer Sie sich nicht ganz sicher sind,
suchen Sie bitte den Rat einer qualizierten Person.
• Seien Sie voll ausgebildet und kompetent bei der Verwendung
des Klettergurt und machen Sie sich vertraut mit den richtigen
Handlungsweisen im Fall eines Notfalls bevor Sie in der Höhe
arbeiten.
• Führen Sie sorgfältige visuelle und Funktionalitätschecks vor
dem Tragen des Klettergurt.
• Schätzen Sie den Arbeitsbereich ein, um sich zu vergewissern,
dass es adäquate unterstützende Anschlagpunkte gibt, die
benutzt werden können.
• Verstehen und akzeptieren Sie das Risiko, das mit der
Benutzung dieses Produkts verbunden ist.
ACHTUNG
Wenn Sie nur den geringsten Zweifel in Bezug auf den
Zustand oder die Funktionsfähigkeit des Klettergurts
haben, müssen sie ihn sofort aus der Verwendung
entnehmen und den Verkäufer oder Hersteller
kontaktieren.
Ein Fluchtplan sollte immer dort angebracht sein, wo in der Höhe
gearbeitet wird, um sicherzustellen, dass Prozesse im Fall eines
Unfalls oder eines Problems in die Wege geleitet werden können.
Dieses Produkt sollte nur von geschulten und kompetenten
Personen bedient werden. Unter keinen Umständen sollte die
Integrität des Klettergurts durch Modikationen, Reparaturen oder
Anpassungen untergraben werden.
NICHTBEACHTUNG JEGLICHER DIESER FAKTOREN
KANN IN SCHWERWIEGENDEN VERLETZUNGEN
ODER SOGAR TOD RESULTIEREN.

20
DE
ACHTUNG
Obwohl jeder Klettergurt gleich ist, gibt es wichtige
Unterschiede. Vergewissern Sie sich bitte, dass Sie die richtige
Größe und Passform für Ihre Statur auswählen.
2. VERWENDUNG
2.1 GRÖSSEN 2.2 ZUORDNUNG DER EINZELTEILE
FUNKTIONEN
1
Rückenpolster
2
Beinschlaufen
3
Einstellschließen für Beinschlaufen
4
Beinauagen
5
Einstellschließen für den Beckengurt
6
Seilbrücke
7
Ringe
– Seiten-D-Ringe, 7a Vorder-D-Ringe, 7b Brückenringe
8
Untere Mehrfachringe
9
Einstellschließen für Hinterriemen
10
Schultergurtaufsatz
11
Zubehörschleifen
12
Zubehörringe
13
Kettensägenbefestigungspunkte
14
Schwimmende Brückenverstellungsschnallen
15
Schwimmende Brückenbügel
16
Beinaufsteigerschnallen
17
Etikett (unter dem Stretch-Panel)
18
Untergeschirr (nur weibliche GEMINI-Modelle)
19
19 Werkzeughakenpunkte
MODEL
GRÖSSE
FÜHRUNG
TAILLE SCHENKEL
SIMFIRE ARB-1
Small/
Medium
Min 27” (68cm)
/ Max 34” (86cm)
Min 17” (43cm)
/ Max 27” (68cm)
SIMFIRE ARB-2
Medium/
Large
Min 34” (86cm)
/ Max 42” (106cm)
Min 17” (43cm)
/ Max 27” (68cm)
SIMGEM ARB-3
Small/
Medium
Min 26” (66cm)
/ Max 34” (86cm)
Min 17” (43cm)
/ Max 27” (68cm)

21
DE
1
4
2
3
7b
16
15
8
6
7
11
7a
5 101719 19
13
15
7
9
11
14
7
12
KLETTERGURT FÜR MÄNNER (FIRE) VORDERANSICHT
KLETTERGURT FÜR MÄNNER (FIRE) HINTERANSICHT
22
DE
1
4
2
3
18
16
7b
15
8
6
7a
5 10
15
9
11
14
12
13
KLETTERGURT FÜR FRAUEN (GEMINI) VORDERANSICHT
KLETTERGURT FÜR FRAUEN (GEMINI) HINTERANSICHT
171919 19 19
23
DE
2.3 ANZIEHEN DES KLETTERGURT
1. Önen der Taillengurtschnalle.
2. Önen der Beinriemenschnallen.
3. Halten des Klettergurt mit Hilfe des
Rückenpolsters und einsteigen.
4. Sicherstellen, dass es in der richtigen
Position ist, gerade so oberhalb der
Beckenknochen.
5. Schließen der Taillengurtschnalle und
einstellen des bequemen Sitzes.
6. Schließen und anpassen der
Beinriemenschnallen. Sicherstellen,
dass sie nicht verknotet sind und die
Beinauagen auf der Hinterseite der
Schenkel sind.
24
DE
2.4.1 ANPASSUNG RÜCKENPOLSTER
2.4.2 ANPASSUNG - BEINGURT
Passen Sie die Beinriemen durch einfaches Bewegen
des Gurtbandes durch die Beinverstellschlaufe, sollten
weitere Anpassungen notwendig sein, geben Sie
Gurtband vom Keeper frei und lassen es durchgleiten
bis zur gewünschten Länge. Überschüssiges
Gurtband muss sorgfältig zurück in den Keeper
gesteckt werden.
BITTE BEACHTEN: Die Beinriemen sollten an den
Schenkeln entspannt anliegen, wie gezeigt, wenn jedoch
anders bevorzugt, kann auch ein engerer Sitz verwendet
werden.
2.4.3 ANPASSUNG - HINTERRIEMEN
Die Hinterriemen benden sich
zwischen den Beinschlaufen und
dem Rückenpolster. Das versichert,
dass der Klettergurt nicht schla ist
und unterstützt die Schenkel ohne
unbequem zu sein.
Passen Sie diese Riemen an durch
das Einspeisen des Gurtbands
durch die Schnalle and die Position,
die sich am ausgewogensten und
bequemsten anfühlt.
Der Rückenpolster sollte so
eingestellt werden, dass Ihr
Körper sich gut unterstützt und
komfortabel fühlt.
Diese Anpassung muss nur einmal
vorgenommen werden
BITTE BEACHTEN:
Überschüssiges Gurtband muss
ordentlich in den Keeper gesteckt
werden.
25
DE
2.4.4 ANPASSUNG - UNTERGURT FÜR
FRAUEN (NUR GEMINI)
3. SCHIMMENDE SEILBRÜCKE
3.1 ANPASSUNG DES
BEINAUFSTELLERS
Mit einer Kombination von
Justierungen an den Beinaufstellern
(16) und der schwimmenden
Seilbrücke (15) kann die optimale
Position für die unteren Multiringe (8)
für jeden Nutzer angepasst werden.
Diese einzigartige Anpassbarkeit kann
durch die Auswahl einer geeigneten
Position für das Brückenseil weiter
verbessert werden.
Die unteren Multiringe können mit
mehr angebracht Seilbrücke Are
equipped werden, Teil-Nr. SBR125.
Der Klettergurt für Frauen (GEMINI) hat die gleichen
Vorteile und Eigenschaften, allerdings hat er noch
einen zusätzlichen Untergurt.
Der Untergurt wurde speziell für Frauen zur
anatomischen Unterstützung entworfen, um
potentielle Verletzungen im Fall eines Sturzes
zu minimieren.
Diese Gurte sollten heruntergezogen und bis
zu einer bequemen
Passform
angepasst
werden.
ACHTUNG
Das Modell für Frauen (GEMINI) sollte
NICHT von Männern getragen werden.
Der Klettergurt wurde so entworfen,
dass er nur Frauen passt.
ACHTUNG
Es sollten zu keiner Zeit
mehr als drei Seilbrücken
verwendet werden.
26
DE
4. UNTERE MULTIRINGE
Die zwei einzigartigen unteren
Multiringe geben die Flexibilität von drei
unterschiedlichen Platzierungspunkten, die
das Maximum an drei separaten Brücken
erlauben.
Der Träger kann den am besten
passenden Winkel einstellen, indem er
einen der Platzierungspunkte auswählt.
Diese Flexibilität sichert das optimale
Gleichgewicht und einen fantastischen
Komfort.
27
DE
5. BEFESTIGUNGSPUNKTE
BESCHREIBUNG
1
Seiten-D-Ringe
2
Vorder-D-Ringe
3
önung für Zentrale Seilbrücke
4
Untere Multiringe
5
Zubehörschlaufen
6
Zubehörringe
7
Werkzeughaken
8
Kettensägenbefestigungspunkte
9
Hauptbefestigungspunkt
9
1
2 2
5
3 3
4 4
BITTE BEACHTEN: Der Klettergurt in der Größe
Medium / Large (das Modell für Männer SIMFIRE
ARB-2) kommt mit zwei Seiten- und zwei VorderD-Ringen und vier zusätzlichen Zubehörschlaufen.
Sowohl der kleinere FIRE-Klettergurt (Modell für
Männer SIMFIRE ARB-1) als auch das GEMINIModell (für Frauen SIMGEM ARB-3) kommen mit
zwei Vorder-D-Ringen und zwei Zubehörschlaufen.
MÄNNER-KLETTERGURT (FIRE)
FRAUEN-KLETTERGURT (GEMINI)
VORNE
HINTEN
6
5
8
7 7 77 77
5
6
8
5
28
DE
5.1 EINRICHTUNG DER SEILBRÜCKE
Zur Sicherung der Seilbrücke ist ein Stopperknoten notwendig.
Dieser versichert, dass das Seil nicht durch den verbindenden
unteren Multiring rutscht. Zur Extra-Absicherung vergewissern Sie
sich, dass ein mindestens 75 mm (3”) langes Seil beim Abbinden
des Knotens übrig ist.
a. Ziehen Sie das Seil durch den
Hauptbefestigungspunkt von außen
nach innen und binden es ab.
c. Ziehen Sie das andere Ende des Seils
durch den Hauptbefestigungspunkt
des zweiten Multirings von innen nach
außen und binden es ab.
b. Ziehen Sie den Ring durch das Seil.
Die unteren Multiringlöcher (2) können nur für die
Brückenseilbefestigung verwendet werden und sollten nicht als
Befestigungspunkte für irgendetwas anderes genutzt werden. Das
große Loch (3) kann al sein Befestigungspunkt verwendet werden.
BITTE BEACHTEN: In manchen Situationen müssen Sie die
Seilbrücke eventuell etwas verkürzen. Um dies zu tun, knoten Sie
einen zweiten Stopperknoten rein.
Das Hängen im Klettergurt für eine lange Zeit ohne Bewegung
wird eine Reduzierung des Blutusses verursachen. Das kann
unter Umständen zur orthostatischen Intoleranz oder zum
Hängetrauma führen. In so einem Fall FOLGEN SIE BITTE
IHREM RETTUNGSPLAN UND RUFEN SIE DEN NOTDIENST.
6. ERSETZEN HÄNGETRAUMA
2
3
2 2
ACHTUNG
Typische Symptome eines Hängetraumas sind Schwitzen,
Kurzatmigkeit, verschwommene Sicht, Schwindel, Übelkeit,
Hypertonie und Taubheit der Beine etc. Diese Symptome sind
von Person zu Person unterschiedlich.

29
DE
GURTBAND
Überprüfung auf Schnitte, Risse, Abrieb* und Brandspuren, Brandlöcher
oder chemische Einwirkungen.
NÄHTE
Schauen Sie nach aufgegangenen Nähten, losen oder abgenutzten Fäden.
METALL W AREN
Überprüfen Sie auf jegliche Anzeichen von Zerstörung, Distorsion oder
Korrosion wie auch auf die korrekte Funktionsweise.
ETIKETTEN
Vergewissern Sie sich, dass alle Etiketteninformationen immer noch
lesbar sind.
7. KENNZEICHNUNG DES KLETTERGURT 8. ÜBERPRÜFUNG DES KLETTERGURT
REGULÄRE ÜBERPRÜFÜNG UND AUFZEICHNUNG
Dieser Klettergurt und jegliches Equipment müssen visuell von einer
kompetenten Person bei Anlieferung überprüft werden. Auch vor und nach
jedem Gebrauch sollte eine Inspektion stattnden. Wenn Sie unsicher sind
oder jegliche Zweifel bzgl. Des Zustands haben, MÜSSEN Sie ihn aus
dem Betrieb nehmen.
Eine Aufzeichnungskarte ist dieser Anleitung beigelegt und sollte nach jeder
Routineprüfung ausgefüllt werden. Registrierung und Aufzeichnung können
auch online auf www.simar ghu.com/register gemacht werden durch die
Registrierung und das Eintragen der einzigartigen Seriennummer.
*Häuger Abrieb innerhalt des Gurtbands kann durch das Schrammen an
scharfen Ecken unter Spannung verursacht werden, was zu einer ernsthaften
Materialermüdung führen kann. Leichte Schäden an dem äußeren Gewebe und
Fäden kann als harmlos eingestuft werden; Ernsthafte Beschädigung wie die
Dickereduktion des Gurtbandes sollte zurückgewiesen und sofort aus dem Betrieb
genommen werden.
1
CE Mark
2
EN-Standards
3
Hersteller
4
Maximale Belastung
5
Produktreferenz
6
Seriennummer
7
Herstellungsdatum
8
Lesen der Anleitung
9
QR-Code
10
Größen-Guide
EINE GRÜNDLICHE INSPEKTION IST BEI JEDEM DIESER
BEREICHE DURCHZUFÜHREN:
POSITIONING ONLY! - NOT FOR FALL ARREST
EN358: 2000
EN813: 1997
MAX LOAD: 120KG
MODEL: SIMFIRE ARB-1
SN: ARB1-000000
DOM: 0317
2
8
9
1
4
5
6
7
10
S/M
3
30
DE
9. PFLEGE & LAGERUNG
Die komplette Pege MUSS von einer kompetenten,
ausgebildeten Person durchgeführt werden. Nutzer sollten jedoch
den Klettergurt nach Bedarf reinigen.
REINIGUNG SOLLTE DURCHGEFÜHRT WERDEN WENN:
• Der Klettergurt in einer salzigen Umgebung benutzt wurde.
• Der Klettergurt einen öligen, schlammigen, matschigen oder
anderweitigen Belag hat.
BEIM REINIGEN:
Platzieren Sie den Klettergurt auf einen achen Untergrund.
Verwenden Sie einen feuchten Schwamm, um überschüssigen
Dreck, Staub oder Sand zu entfernen. Verwenden Sie KEINE
Reiniger, die Chloride, Bleichmittel oder Scheuermittel enthalten.
Tauchen Sie den Klettergurt NICHT in Wasser.
Wenn der Klettergurt in irgendeiner Form Mängel aufweist,
füllen Sie bitte das Prüfungsformular aus, indem Sie alle Mängel
eintragen und nehmen Sie den Klettergurt unverzüglich aus dem
Betrieb. Kontaktieren Sie:
SIMARGHU
®
PO BOX 412
Carlisle
CA1 9GR
T: +44 (0)1228 371 583
E: info@simarghu.com
www.simarghu.com
10. LEBENSDAUER
Dieses Produkt hat eine Lebensdauer von 10 Jahren ab
Herstellungsdatum und 5 Jahre ab dem ersten Gebrauch.
Extremfaktoren können die Lebensdauer des Klettergurt
beträchtlich reduzieren, z. B. wenn der Klettergurt durch
mechanischen Verschleiß, raue Behandlung, langes Aussetzen
den UV-Strahlen oder andere Umweltfaktoren wie Kontakt mit
Sand oder Salz, das Aussetzen hohen Temperaturen oder kalten
und eisigen Konditionen, beschädigt wurde.
Wenn der Klettergurt ausgeblichen oder abgetragen ist oder
das Material abgetragen oder rissig ist, dann MUSS es aus dem
Betrieb genommen werden.
ACHTUNG
Wenn der Nutzer nur irgendeinen Zweifel an dem Zustand
des Produkts hat, egal wie insignifikant dieser erscheint,
muss es entfernt werden, sodass eine fälschliche
Verwendung nicht möglich ist. Der Klettergurt kann nur
zurück in den Betrieb zurückkehren durch die schriftliche
Bestätigung des Herstellers oder einer entsprechend
ausgebildeten Person.
 Loading...