

Page 1

SIMADO GFXD1111S
Quick Start
Page 2

Page 3
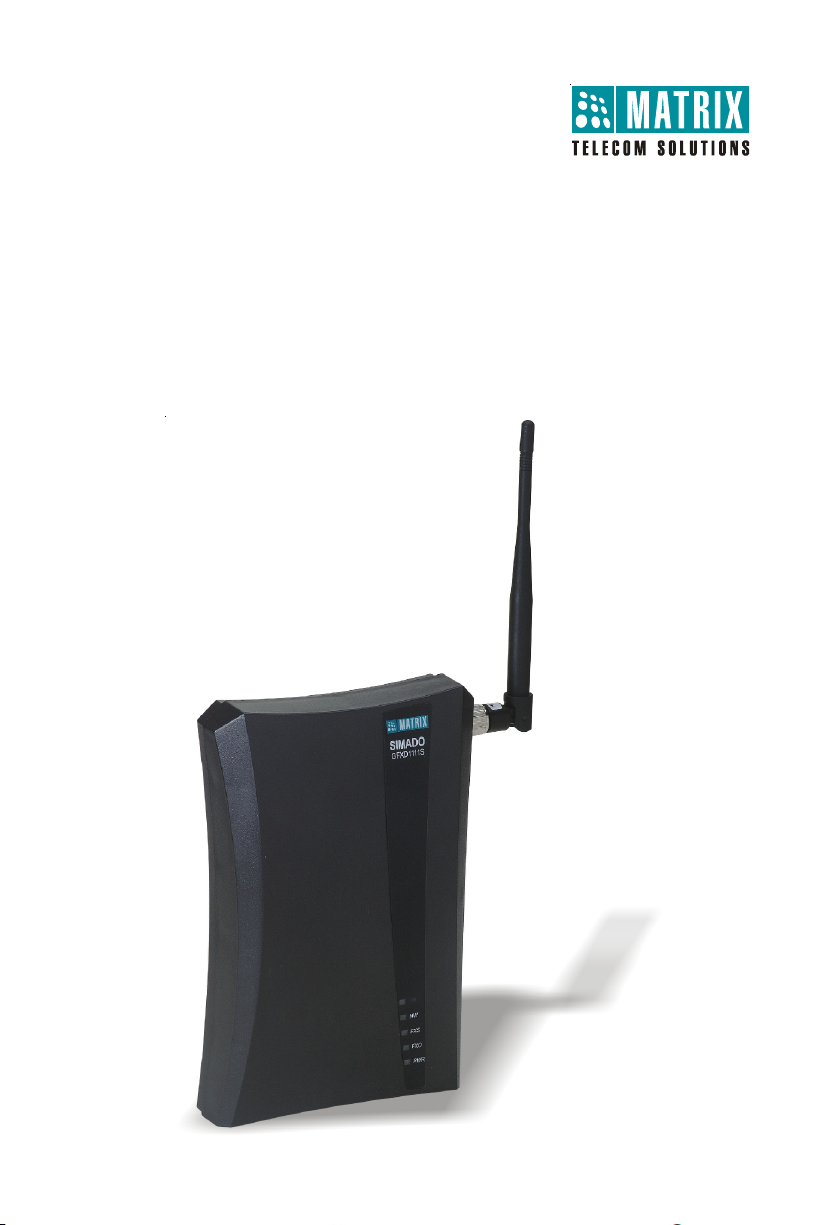
SIMADO GFXD1111SSIMADO GFXD1111S
SIMADO GFXD1111S
SIMADO GFXD1111SSIMADO GFXD1111S
Fixed Cellular Terminal and Router with Data Port
Quick Start
Page 4
Introduction
Thank You for choosing Matrix SIMADO GFXD1111S! Please read the instructions
given in this quick start before you install this feature reached system.
This quick start is meant to help you to install the basic features and parameters
of the system. For the detailed information on installing and configuring SIMADO
GFXD1111S, please refer 'SIMADO GFXD1111S System Manual' provided to
you on the CD-ROM.
Either GSM or CDMA module can be installed in the Mobile Port of GFXD1111S
as per the requirement of the user. Therefore, the Mobile Port can be either GSM
or CDMA.
• SIM Card is installed in the GSM Port and RUIM Card is installed in the
CDMA Port of the gateway.
• Consider SIM as RUIM if CDMA module is installed in the gateway.
Call Divert feature will not work If the CDMA module is installed in the Mobile
port of SIMADO GFXD1111S.
SIMADO GFXD1111S supports 3G module for voice. When 3G module is
installed in the system, it will have following effect:
• Frequency Band Selection not required.
• Current calls will be disconnected if Call Waiting Service is not disabled
in the SIM Card. Disable Call Waiting in SIM Card before inserting it in
SIMADO GFXD1111S.
Know your SIMADO GFXD1111S
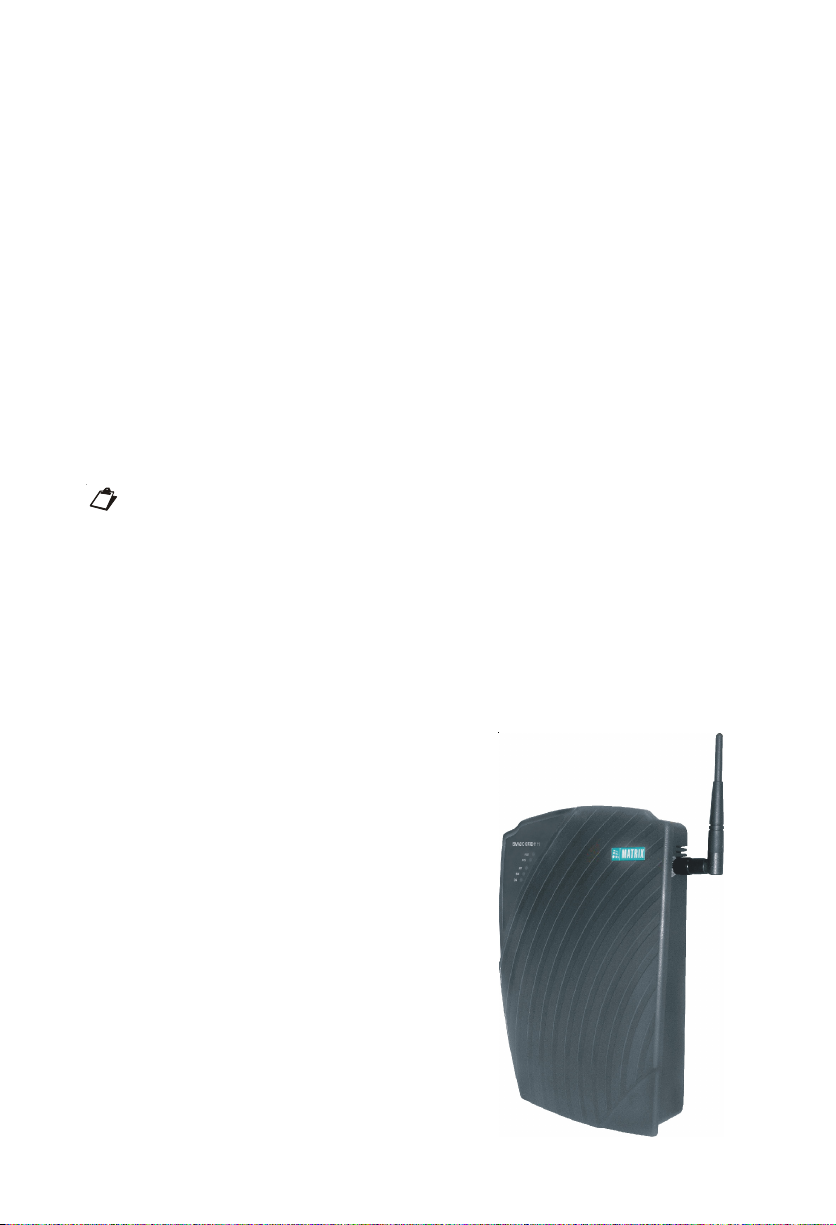
SIMADO GFXD1111 has
1 FXS Port,
1 FXO Port,
a Communication Port,
a SIM Card Slot,
an Antenna Connecter,
AC Mains Socket and
5 LEDs.
Page 5
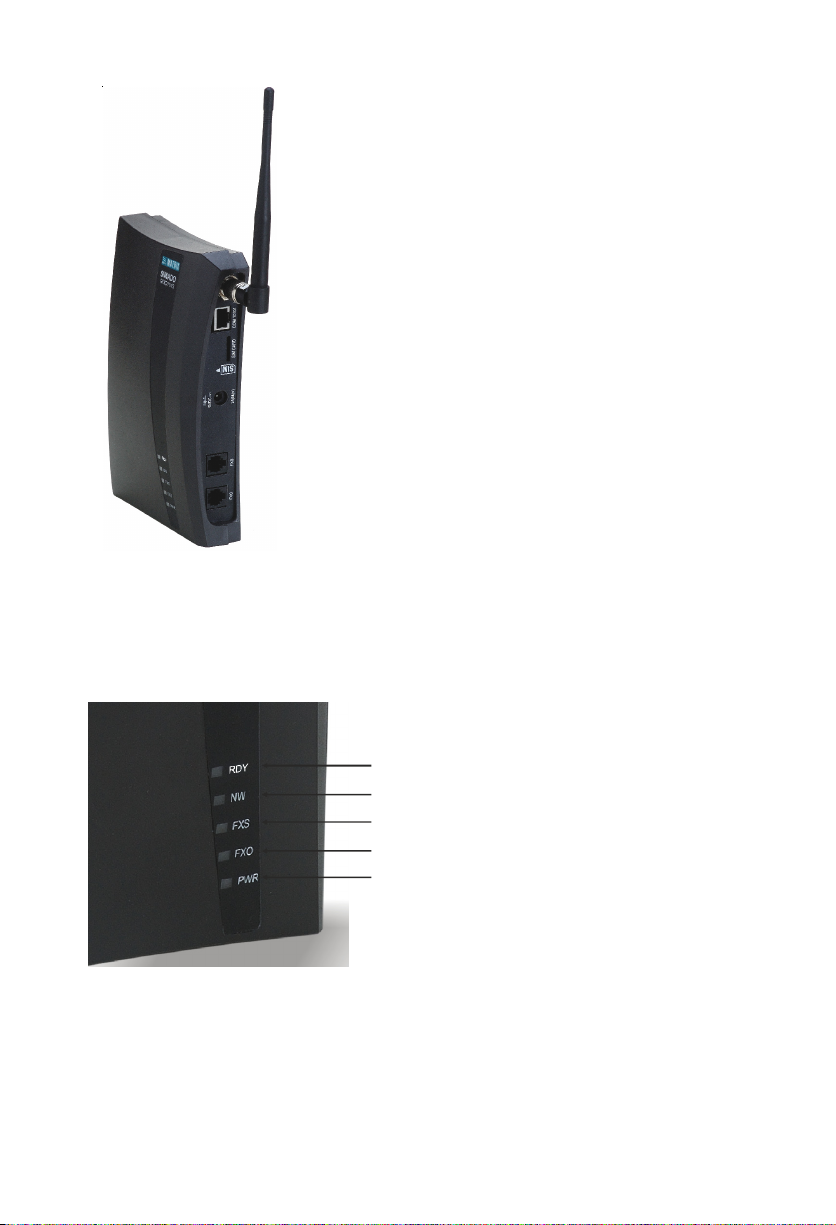
SIMADO GFXD1111S has
1 FXS Port,
1 FXO Port,
a Communication Port,
a SIM Card Slot,
an Antenna Connecter,
a Power Socket and
5 LEDs.
LEDs
5 LEDs labeled as FXS, FXO, NW, RDY and PWR are as shown in the figure
below. These LEDs indicate the status of the ports, various events occurring on
the ports and also the error conditions.
Ready
Network
FXS
FXO
Power
Applications of SIMADO GFXD1111S
SIMADO GFXD1111S finds its applications in corporate business establishments,
STD/PCO booth, SOHO etc… Various applications of SIMADO GFXD1111S are
as shown below:
Page 6
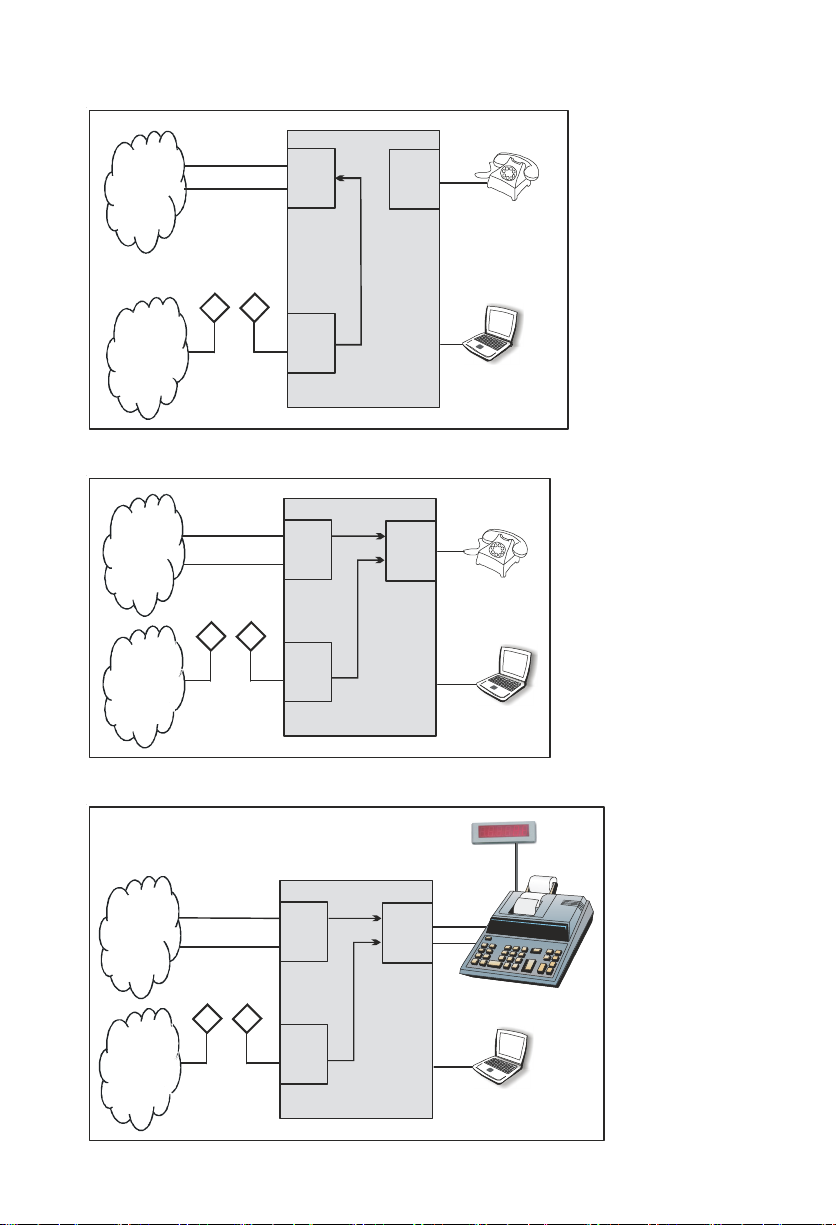
Case 1: SIMADO GFXD1111S as Stand-alone (Mobile-FXO Mode)
CDMA
Network
PSTN
GSM/
FXO
Port
RJ-11
GSM/
CDMA
GF XD1111S
FXS
Port
COM
FSK/DTMF
Telephone
Instrument
Case 2: SIMADO GFXD1111S as Stand-alone (Mobile-FXS Mode)
Network
PSTN
GSM/
CDMA
FXO
Port
RJ-11
GSM/
CDMA
GFXD1111S
FXS
Port
COM
Case 3: SIMADO GFXD1111S connected to PCO Machine
Network
PSTN
GSM/
CDMA
FXO
Port
RJ-11
GSM/
CDMA
GF XD1111S
FXS
Port
COM
PCO Machine
Page 7
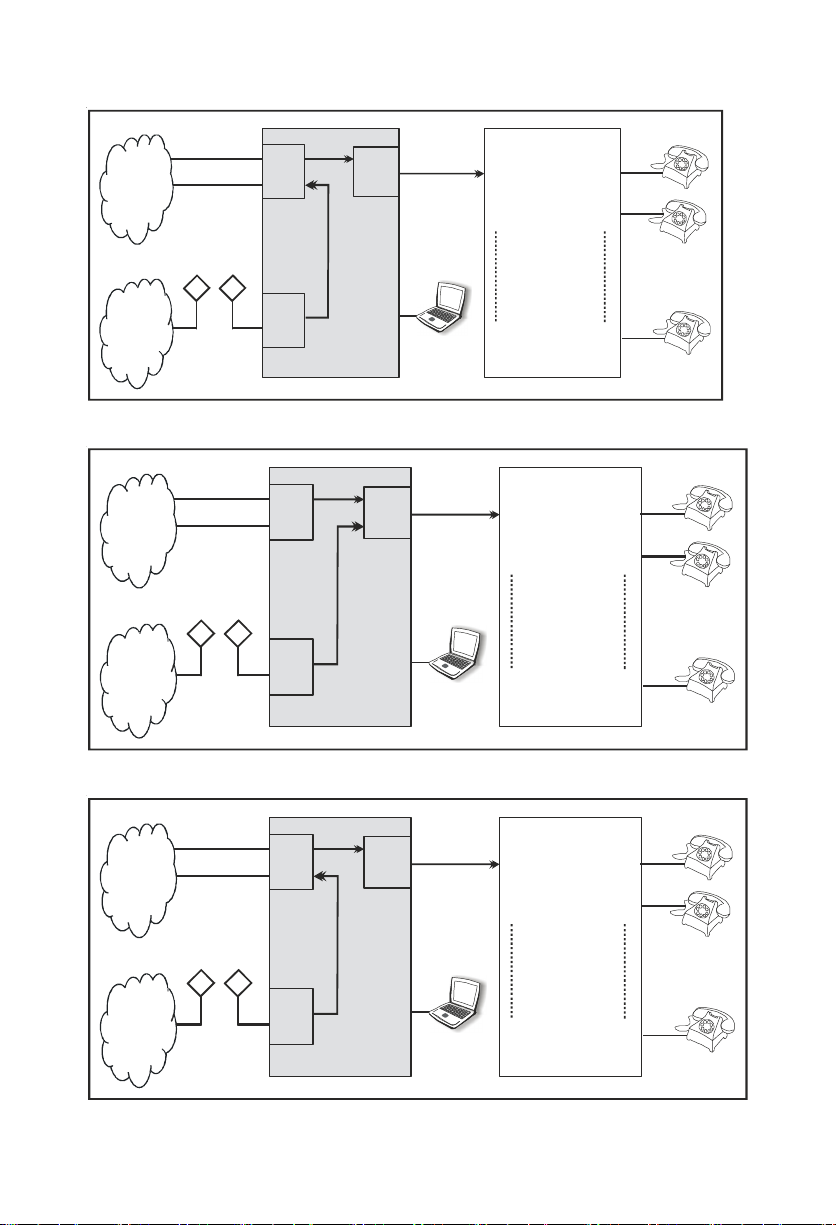
Case 4: SIMADO GFXD1111S interfaced with FXO Port of PBX (Mobile-FXO Mode)
Network
PSTN
GSM/
CDMA
FXO
Port
RJ-11
GSM/
CDMA
GFXD1111S
FXS
Port
COM
T1
T2
Tn
S1
S2
PBX
Sn
Case 5: SIMADO GFXD1111S interfaced with FXO Port of PBX (Mobile-FXS Mode)
Network
PSTN
GSM/
CDMA
FXO
Port
RJ-11
GSM/
CDMA
GF XD1111S
FXS
Port
COM
T1
T2
Tn
S1
S2
PBX
Sn
Case 6: SIMADO GFXD1111S interfaced with FXS Port of PBX (Mobile-FXO Mode)
Network
PSTN
GSM/
CDMA
FXO
Port
RJ-11
GSM/
CDMA
GF XD1111S
FXS
Port
COM
T1
T2
Tn
S1
S2
PBX
Sn
Page 8
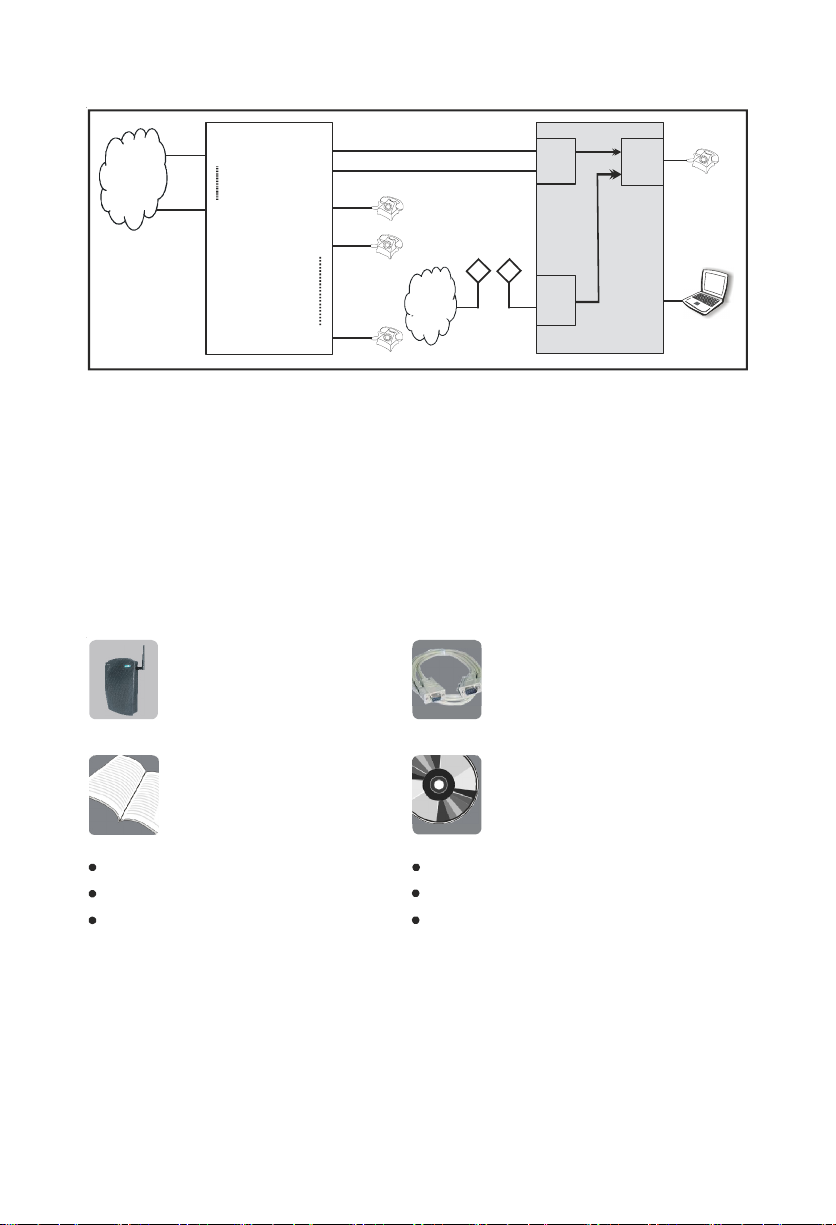
Case 7: SIMADO GFXD1111S interfaced with FXS Port of PBX (Mobile-FXS Mode)
PBX
S1
S2
S3
S4
T1
PSTN
Tn
FXO
Port
RJ-11
FXS
Port
RJ-11
GSM/
CDMA
N/w
Sn
GSM/
CDMA
COM
GF XD1111 S
Before You Start
Verify Package Contents:
Before installing SIMADO GFXD1111S, verify the package contents.
The Sales Kit of SIMADO GFXD1111 contains:
SI M A DO GFXD1111
with Antenna TNC Male
Quick Start
Power Cord (Country specific)
Fuse Fast Blow 5x20 2Amp.
Fuse Slow Blow 5x20 1Amp.
Two Screws M 7/30 with Grips
A Mounting Template
A Warranty Card set
COM Port Cable (RS232)
CD containing System
Manual and Quick Start
Page 9
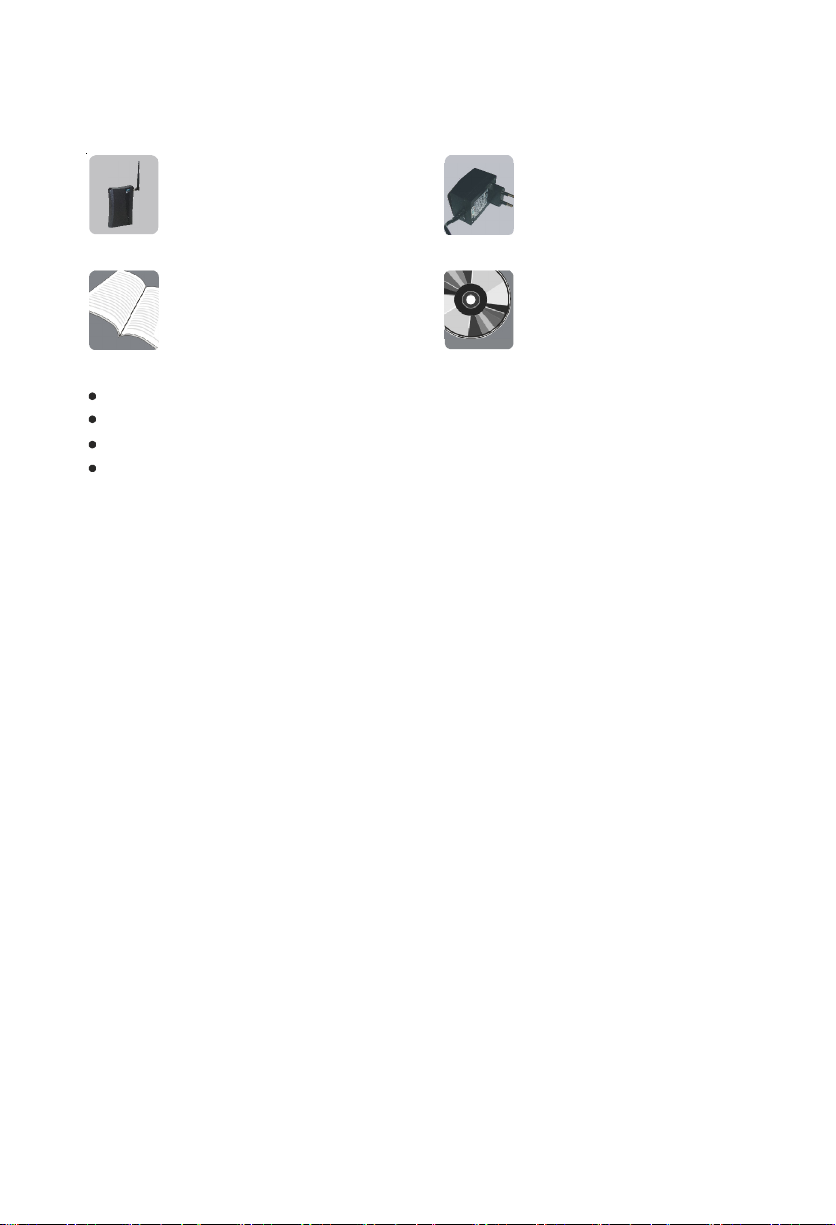
The Sales Kit of SIMADO GFXD1111S contains:
SI M A DO GFXD1111 S
with Antenna TNC Male
Quick Start
Two Screws M 7/30 with Grips
Cable for Modem
A Mounting Template
A Warranty Card set
Make sure that all the above mentioned components are present when you open
the Sales Kit of SIMADO GFXD1111S. In case any of the part is missing or
damaged, contact the vendor from whom you have purchased the system.
Get following things ready:
1. One SIM card from GSM service provider.
2. One telephone instrument with LCD display. (Stand-alone)
3. One analog line (trunk line) from PSTN.
4. One computer for programming and generating reports on HyperTerminal.
5. Connection to Mains power.
Adaptor 12VDC, 1.25A
(Country Specific)
CD containing System
Manual and Quick Start
Installing SIMADO GFXD1111S
Precautions and Safety Instructions:
Take proper precautions while installing SIMADO GFXD1111S to reduce the risk
of fire, electric shock and injury to the system as well as the person using it.
(Refer 'Protecting SIMADO GFXD1111S' topic in the System Manual for details)
Mounting SIMADO GFXD1111S on Wall:
• Install GFXD1111S at the any dust free and moisure free place.
• Select a suitable place on the wall for mounting the SIMADO GFXD1111S.
• Put the mounting template on the wall and mark the nail hole on the wall.
• Drill a hole of appropriate size.
• Insert the nail grip in the hole.
• Insert the screw and tighten it leaving the screw head a few millimeters
protruded of the wall.
Page 10

• Check the strength of the nail.
• Hang SIMADO GFXD1111S on the wall.
Connecting SIMADO GFXD1111S:
SIMADO GFXD1111S can be used as stand-alone system as well as it can also
be interfaced with the PBX.
Follow the steps given below to connect GFXD1111:
• Place SIMADO GFXD1111 at a place where it can get AC power supply and
network signals.
• Connect Antenna provided with the system to the TNC connector, labeled
as 'ANT' of GFXD1111.
• Connect telephone instrument with CLI display to the FXS Port of GFXD1111
with the help of RJ11 cable. You can also connect FXS Port of GFXD1111 to
the FXO Port of the PBX.
• Connect PSTN (CO) line to the FXO Port of GFXD1111 with the help of RJ11
cable. You can also connect FXO Port of GFXD1111 to the FXS Port of the
PBX.
• Connect a computer to the COM Port of GFXD1111 with the help of COM
Port cable.
• Insert SIM Card/RUIM Card of the service provider in the SIM Card Slot of
GFXD1111.
• Connect AC Mains input of GFXD1111 to the AC Mains Socket and Power
ON the system.
Follow the steps given below to connect GFXD1111S:
• Place SIMADO GFXD1111S at a place near wall Socket and where it can
get proper network signals.
• Connect Antenna provided with the system to the TNC connector, labeled
as 'ANT' of GFXD1111S.
• Connect telephone instrument with CLI display to the FXS Port of GFXD1111S
with the help of RJ11 cable. You can also connect FXS Port of GFXD1111S
to the FXO Port of the PBX.
• Connect PSTN (CO) line to the FXO Port of GFXD1111S with the help of
RJ11 cable. You can also connect FXO Port of GFXD1111S to the FXS Port
of the PBX.
• Connect a computer to the COM Port of GFXD1111S with the help of Ethernet
cable.
• Insert SIM Card/RUIM Card of the service provider in the SIM Card Slot of
GFXD1111S.
To protect the SIM Card inserted in the system from being mis-used, SE is
recommended to enable SIM Protection and change the SIM PIN. (Refer
'Step 2: SIM PIN' below for details)
Page 11
• Connect Power Socket of GFXD1111S to the DC Jack using 12V DC Power
Adaptor provided to you and switch ON the power supply.
Switching ON SIMADO GFXD1111S
After connecting the system as shown above, switch ON the power supply.
At Power ON (During Reset Sequence):
• LED labeled as 'PWR' will glow green continuously.
• LED labeled as 'FXO', 'FXS' and 'RDY' will blink (RED) four times (500ms
On, 500ms Off) and then turns Off.
• LED labeled as 'NW' starts blinking (RED) after few seconds of Power On. It
indicates the network availability.
• When SIM Card is detected, LED labeled as 'RDY' will start blinking (RED)
slowly (1 sec On- 1 sec Off) till successful network registration. After that, it
will glow RED continuously. Network registration takes approximately 90
seconds.
• LED labeled as 'RDY' will blink (RED) fast (100 msec On- 100 msec Off) if
SIM Card is absent or deactivated or SIM PIN is faulty or SIM PUK is required.
Once the system is switched ON, it attains the normal working position in few
minutes.
During Normal Functioning:
Following table shows various LED indications during the normal functioning of
the system:
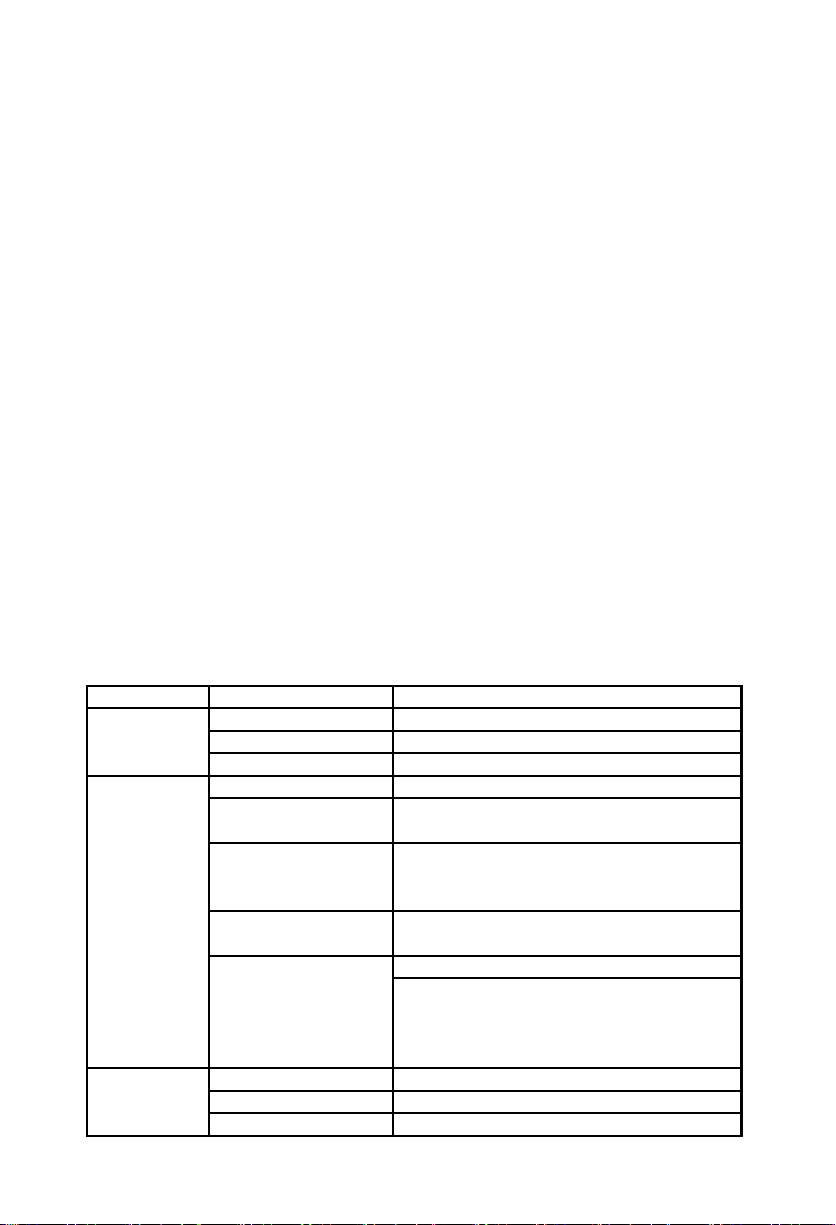
LED Indication
PWR ON
RDY ON
Activity
OFF
Blinking
Off
Blinking (100 msec On100 msec Off)
Indicates that GFXD1111S is power On.
Indicates that GFXD1111S is power Off.
NA
SIM Card is present and active.
GFXD1111S powered On but SIM Card is
not detected.
SIM card is absent or de-activated or SIM
PIN is faulty or SIM PUK is required.
Blinking (1 sec On-1
sec Off)
Blinking (2000 msec
On- 2000 msec Off)a
FXS ON
OFF
Blinking
SIM Card detected but is not registered with
the network.
Indicates that either:
1. 20 minutes or less than 20 minutes of free
Call Minutes are left.
2. The free Call Minutes allocated to the
Mobile Port are utilized.
Indicates that FXS Port is OFF-Hook.
Indicates that FXS Port is ON-Hook.
Indicates that FXS Port is ringing.
OR
Page 12

LED Indication
FXO ON
NW
(controlled by
Module)
Activity
OFF
Blinking
ON
OFF
Blinking
Indicates that FXO Port is OFF-Hook.
Indicates that FXO Port is ON-Hook.
Indicates that FXO Port is ringing.
NA
SIM module is OFF.
Slow SIM module is ON and is registered with the
network i.e. network is available.
Fast SIM module is ON but is not registered with
the network i.e. network not available.
a. Applicable only when Call Minutes feature is enabled for Mobile Port. (Refer
'Call Minutes' for more details)
Programming SIMADO GFXD1111S
Programming of SIMADO GFXD1111S can be done in following ways:
1. Programming through COM Port
To program the system using communication port, follow the steps given
below:
• Program the SIMADO GFXD1111S in 'Report Generation' mode using
command 231-3-#*.
• Prepare a text file (*.txt) containing programming commands in the
notepad.
• Upload this text file into SIMADO GFXD1111S using Hyper-Terminal.
(Refer 'Programming GFXD1111S through COM Port' in the System Manual
for more details)
2. Programming through FXS Port
In SIMADO GFXD1111S, programming can be done at two levels viz. System
Engineer Level and System Administrator level:
System Engineer Level
At this level, System engineer does the programming.
For programming in SE mode, follow the steps given below:
• Lift the handset of the telephone instrument connected to the system.
• Dial #*-19-SE Password (Default SE Password = 1234) to enter
programming mode.
• Enter the programming command.
• Dial 00-#* to exit the programming mode.
Page 13

You can reset the SE password to the default value by changing the jumper
position (J5). For more details, please refer System Security (Passwords)
feature in the System Manual.
System Administrator Level
At this level, system administrator does the programming. SA can program
and access only limited features that are required for the administrative
purpose. Following are the features that can be programmed from SA mode:
• Change SA Password
• Display Software Version-Revision
• Display Call Duration
• Clear Call Duration
• Call Divert
For programming in SA mode, follow the steps given below:
• Lift the handset of the telephone instrument connected to the system.
• Dial #*-18-SA Password (Default SA Password = 1111) to enter
programming mode.
• Enter the programming command.
• Dial 00-#* to exit the programming mode.
SE can reset SA password from the SE mode. For more details, please refer
System Security (Passwords) feature in the System Manual.
(Refer 'Programming GFXD1111S through FXS Port' in the System Manual
for more details)
3. Programming through Mobile Port
To program the system using Mobile Port, follow the steps given below:
• Program the SIMADO GFXD1111S in 'Speech + SMS' mode using
command 231-1-#*.
• Prepare a text file (*.txt) containing programming commands in the
notepad.
• Get data services activated from the service provider for the SIM card
that is to be used for the programming in GFXD1111S.
• Set up the modem, in the computer from where programming is to be
done.
• Create hyper terminal connection. Establish the connection to upload
this text file into SIMADO GFXD1111S using Hyper-Terminal.
(Refer 'Programming GFXD1111S through Mobile Port' in the System Manual
for more details)
Page 14

4. Programming using SMS
To program the system using SMS, follow the steps given below:
• Enable 'SMS Based Configuration' option using command:
112-Code-#*, where Code is 0 for Disable and 1 for Enable.
• Type a text message in your cell phone. Include all the desired
configuration commands in the message in required format.
• SMS meant for configuring the system should always start with
#*19-SE Password i.e. the command for entering the programming mode
and should end with 00#* i.e. the command to exit the programming
mode.
• The commands for configuring the system should be typed between the
command for entering and exiting the programming mode.
• Maximum message length of SMS meant for configuring the system is
160 characters.
• After typing the message send it to the SIM Card number installed in
GFXD1111S.
• When GFXD1111S receives this SMS, it will execute the commands in
the SMS and thus configure the system.
(Refer 'Programming GFXD1111S using SMS' in the System Manual for more
details)
Programming of various features of SIMADO GFXD1111S is shown below:
Step 1: Configuration Type
SIMADO GFXD1111S can be configured either in Mobile-FXS Mode or MobileFXO Mode.
• In Mobile-FXS Mode, all three ports viz. Mobile, FXO and FXS are functional.
By default, system is configured in this mode of operation.
• In Mobile-FXO Mode, only two ports viz. FXO and Mobile are functional. In
this type of configuration, FXS port is used only for programming the system.
This type of configuration is useful when a mobile user wants to access the
station/trunk line of the PBX via GSM/CDMA network.
Use following command to set the Configuration Type for SIMADO
GFXD1111S:
100-Configuration Type-#*
Where,
Configuration Type Meaning
1 Mobile-FXS Mode
2 Mobile-FXO Mode
By default, Configuration Type is Mobile-FXS mode.
Page 15

Step 2: SIM PIN
SIM PIN is a security feature used by the GSM network. This feature is used to
protect the SIM card inserted in the system from being mis-used.
Follow the steps given below to enable SIM protection in GFXD1111S:
• Switch Off GFXD1111S.
• Remove SIM card and insert the same in the mobile instrument.
• Enable 'SIM PIN at Power ON' parameter in the SIM card.
• Change the SIM PIN of the SIM card to 1234. (Default SIM PIN programmed
in the system is 1234) The SIM PIN of the card and that of the system
should be same else the SIM PIN will not be accepted by the GSM module
at power on.
• Remove SIM card from the mobile instrument and insert it in GFXD1111S.
• Switch on the system and change the default SIM PIN after GFXD1111S
attains normal working position.
SE should take above steps to change the SIM PIN of the SIM card in case
SIM protection of SIM card is enabled and SIM PIN of SIM Card and
GFXD1111S is different else GFXD1111S will not initialize.
Use following command to change the SIM PIN:
113-New SIM PIN-#*
Where,
New SIM PIN can be of minimum 4 digits and maximum 6 digits.
Valid digits for SIM PIN are 0 to 9.
By default, it is 1234.
Use following command to register Personal Unlock Key:
114-PUK Number-SIM PIN-#*
Where,
PUK number is unique 8 digit number assigned to the SIM card.
SIM PIN is old/(default) four digit PIN number of SIM card.
SIM PIN feature is also supported when Wavecom-CDMA (Q2438K) module
is installed in SIMADO GFXD1111S.
(Refer 'SIM PIN' feature in System Manual for more details)
Step 3: Date and Time
SIMADO GFXD1111S is equipped with built in Real Time Clock (RTC) circuit.
This circuit is to be set once with current date and time values. It then updates
itself regularly to keep track of the parameters.
Page 16
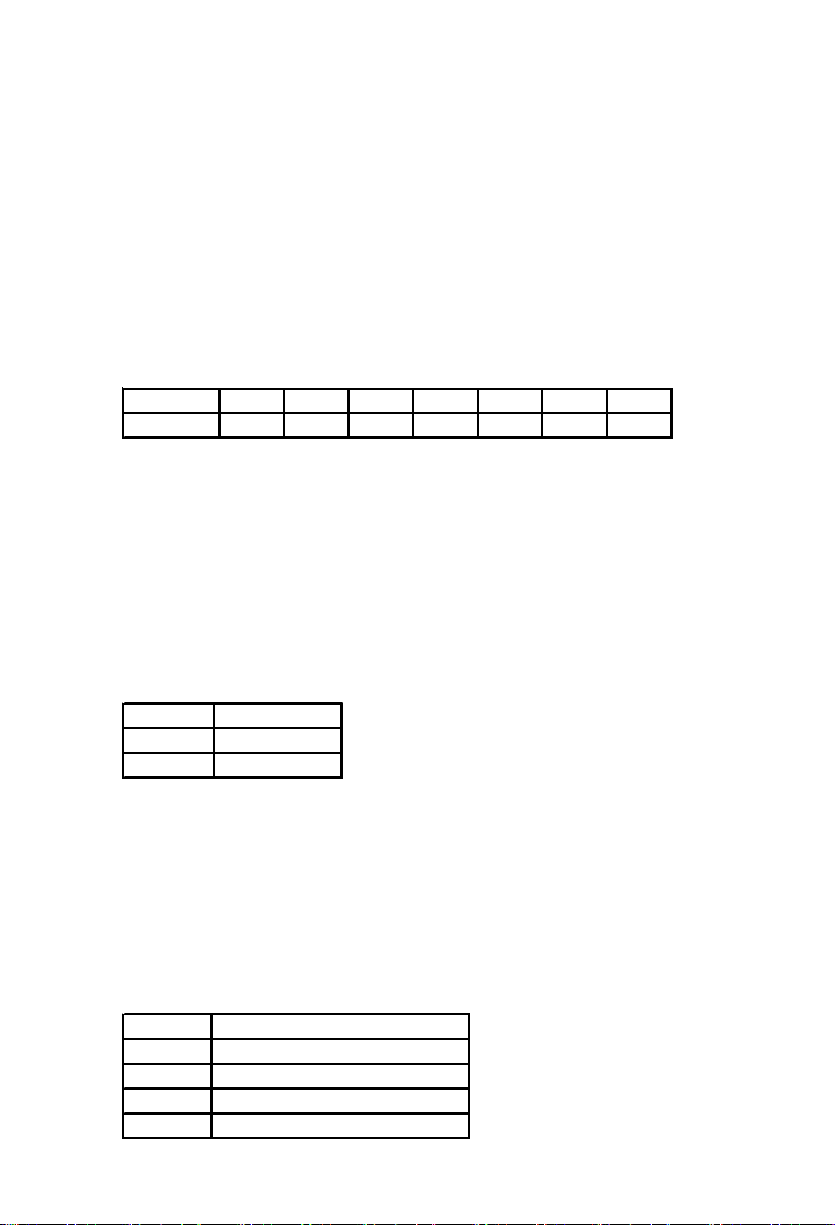
Use following command to set date and time parameters:
251-DD-MM-YY-HH-MM-#*
Where,
DD indicates date in two digits from 01 to 31.
MM indicates month in two digits from 01 to 12.
YY indicates year in two digits from 00 to 99.
HH indicates hours in 24-hours format in two digits from 00 to 23. MM indicates
minutes in two digits from 00 to 59.
By default, date is 01-01-2006 and time is 09-00.
Use following command to program the day:
252-Day-#*
Where,
Day
Meaning
1234567
Sun Mon Tue Wed Thu Fri Sat
By default, Day is 1 i.e. Sunday.
Step 4: Mobile Network selection
At each power-ON, the SIM inserted in GFXD1111S will start searching for the
network and will register automatically with the available network. However,
GFXD1111S enables you to select the network to register your SIM manually also.
Use following command to program network selection mode for mobile port:
331-Network Selection Mode-#*
Where,
Mode Meaning
1 Automaitc
2 Manual
By default, Network Selection Mode is 1.
Use following command to program network operator's code in priority table:
332-Priority-Code-#*
Where,
Priority is from 1 to 9.
Code = MCC-MNC. It can be of maximum 5 digits.
By default, Network Operator Code is 00000 for Priority 1 to Priority 4.
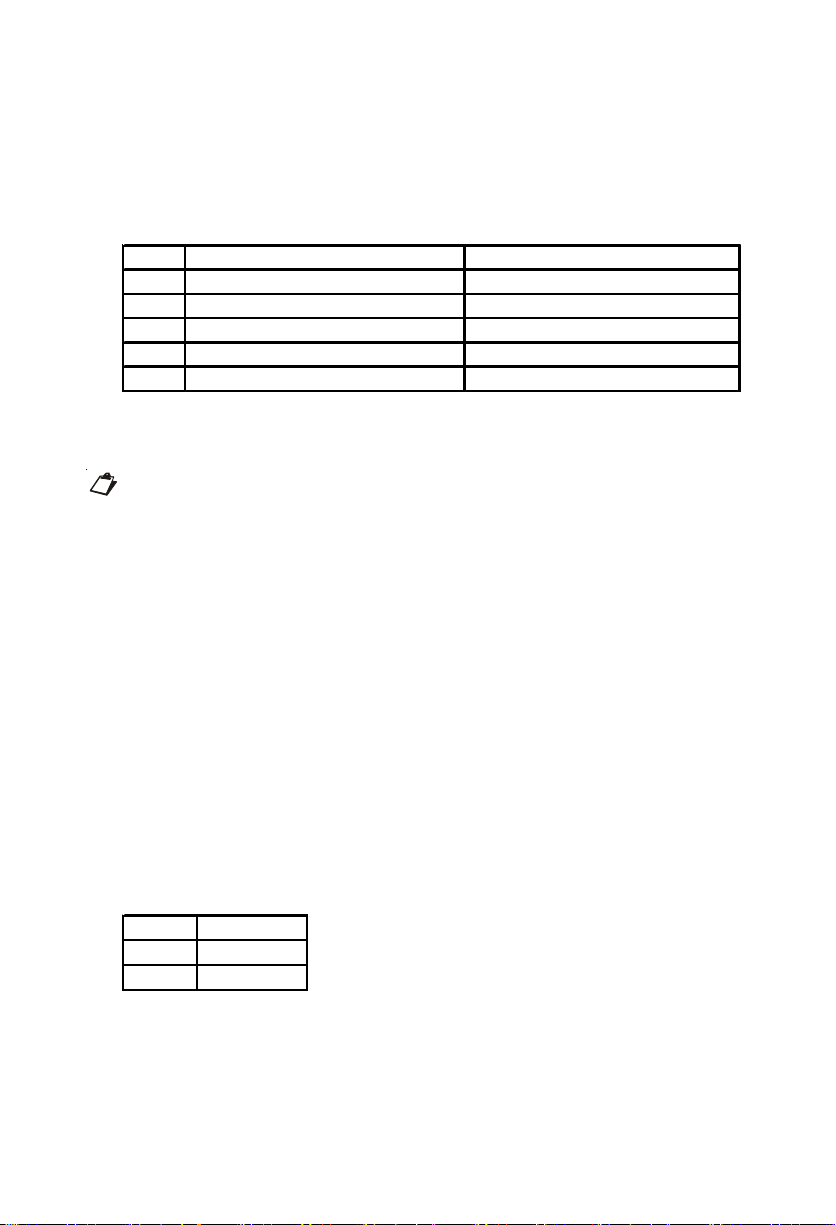
The default priority table programmed in the system will be as shown below:
Priority Network Operator Code
1 00000
2 00000
::
9 00000
Page 17
Use following command to clear network operator code in priority table:
332-Priority-#*
Use following command for selecting Mobile Frequency Band supported by
your network operator:
333-Mobile Band Selection-#*
Where,
Code Frequency in MHz for GSM Frequency Band for CDMA
1 900 Any CDMA
2 1800 Cellular A or B
3 1900 Cellular A
4 850 + 1900 Cellular B
5 900 + 1800 Any CDMA
By default, Mobile Band Selection for GSM will be '900 + 1800' and for
CDMA it will be 'Any CDMA'.
Frequency Band selection not required if 3G module is installed in
SIMADO GFXD1111S.
(Refer 'Mobile Network Selection' feature in System Manual for more details)
You can check the strength of network signals on the LCD of telephone
instrument connected to the FXS port of GFXD1111S.
Use following command to display the Signal Strength:
#*11
(Refer 'Signal Strength' feature in System Manual for more details)
Step 5: Port Parameters-Mobile
Enable/Disable Mobile Port:
Use following command to enable/disable the Mobile Port:
201-Flag-#*
Where,
Flag Meaning
0 Disable
1 Enable
By default, the mobile port is enabled.
Enable/Disable CLIR on the Mobile Port:
Use following command to enable/disable CLIR on the mobile port:
202-Flag-#*
Where,
Page 18
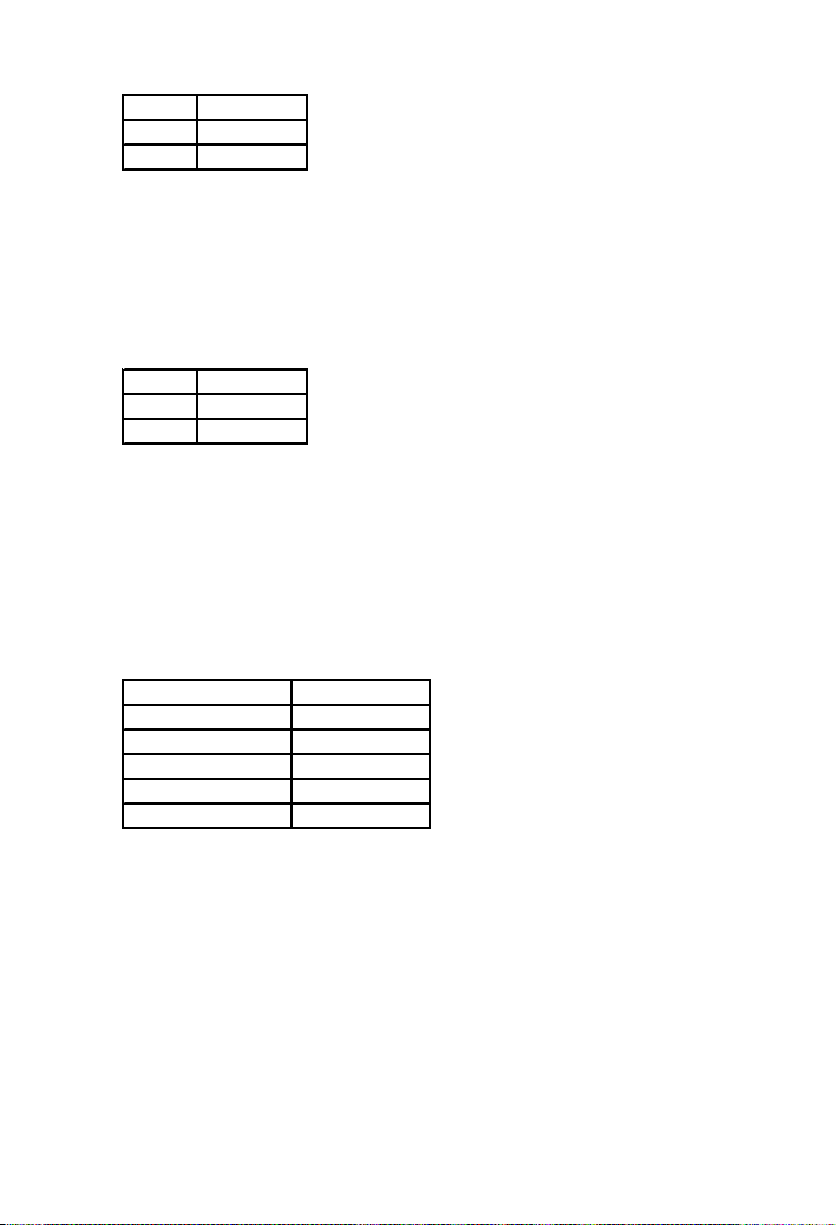
Flag Meaning
0 Disable
1 Enable
By default, CLIR is disabled.
(Refer 'Port Parameters-Mobile' feature in System Manual for more details)
Enable/Disable the notification of incoming SMS:
Use following command to enable/disable the notification of incoming SMS:
203-Flag-#*
Where,
Flag Meaning
0 Disable
1 Enable
By default, the notification of incoming SMS is disabled.
(Refer 'Short Messaging Services' feature in System Manual for more details)
Receive Gain
Use following command to program the receive gain of the mobile port:
271-Receive Gain-#*
Where,
Receive Gain range is from 1 to 5, where 1 is minimum and 5 is maximum
gain.
Receive Gain Meaning
1Very Low
2 Low
3Normal
4High
5 Very High
By default, Receive Gain is 3.
Use following command to default the receive gain at mobile port:
271-0-#*
Transmit Gain
Use following command to program the transmit gain of the mobile port:
272-Transmit Gain-#*
Where,
Transmit Gain range is from 1 to 5, where 1 is minimum and 5 is maximum
gain.
Page 19
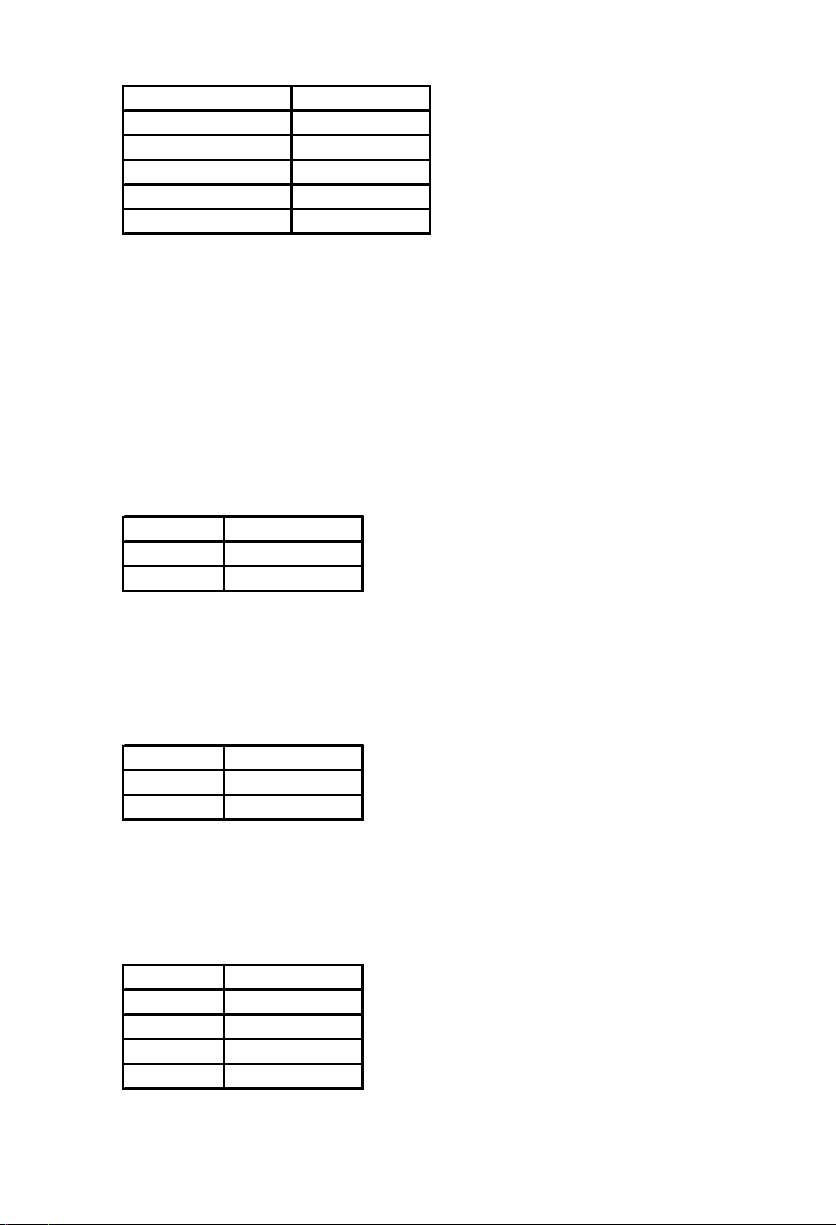
Transmit Gain Meaning
1Very Low
2 Low
3Normal
4High
5 Very High
By default, Transmit Gain is 3.
Use following command to default the transmit gain of the mobile port:
272-0-#*
Step 6: Port Parameters-FXO
Enable/Disable FXO Port:
Use following command to enable/disable the FXO Port:
211-Code-#*
Where,
Code Meaning
0 Disable
1 Enable
By default, the FXO port is enabled.
Dial Type:
Use following command to program the dial type for the FXO Port:
212-Code-#*
Where,
Code Meaning
1 Tone (DTMF)
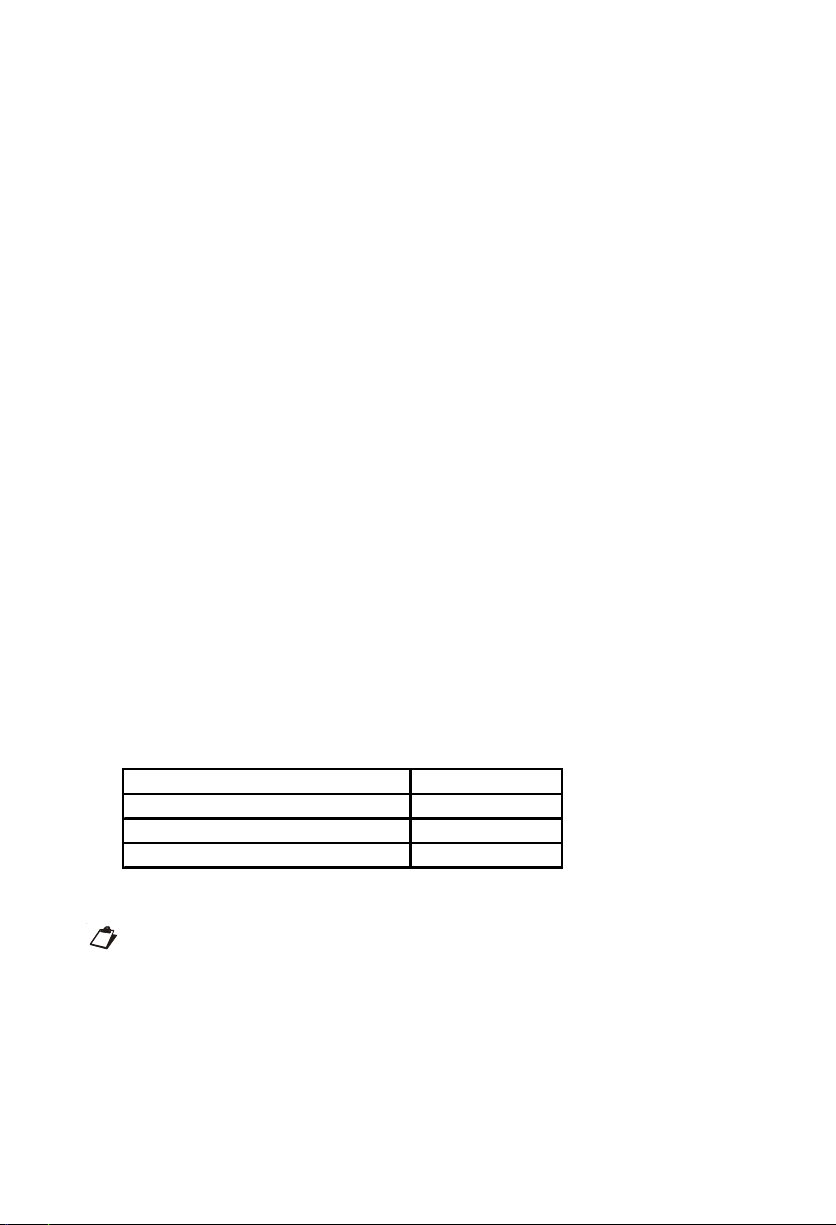
2Pulse
By default, dial type selected for FXO port is Tone.
Calling Line Identification (CLI) Type:
Use following command to program the CLI type for the FXO Port:
241-CLI Type-#*
Where,
CLI Type Meaning
1None
2DTMF
3 V.23 FSK
4 Bellcore FSK
By default, CLI type selected is DTMF.
Page 20
CLI type 'None' is selected when the exchange does not support any type of
CLI or user does not want to detect the CLI. Detecting CLI takes time and
thus the routing of call gets delayed by 2-3 seconds, this delay can be avoided
by using CLI type = 'None'.
Pause Timer:
Use following command to program Pause Timer for FXO Port:
217-Pause Timer-#*
Where,
Pause Timer is from 1 to 9 seconds.
By default, Pause Timer is 2 seconds for the FXO Port.
Example: If number string to be dialed out on the FXO port is PPP234 and
pause timer is programmed as 3 seconds then GFXD1111S will dial out digit
2 after P+P+P seconds i.e. 3+3+3=9 seconds.
(Refer 'Port Parameters-FXO' feature in System Manual for more details)
Ring Cadence OFF Timer:
Use following command to program the ring cadence off timer for FXO Port:
215-Ring Cadence Off Timer-#*
Where,
Ring Cadence Off Timer is from 1 to 9 seconds.
By default, it is 4 seconds.
Answer Supervision on FXO Port:
Use following command to program the Answer Supervision Signal on FXO
port:
213-Answer Supervision Signal-#*
Where,
Answer Supervision Signal Meaning
0 None
1 Battery Revrsal
2 12/16 KHz
By default, Answer Supervision Signal is None.
It is recommended to set the same answer signaling on FXO port as
supported by the CO (PSTN) network else the system might fail to detect
the correct signaling on the FXO port resulting in inaccurate billing etc.
(Refer 'Port Parameters- FXO' in System Manual for more details)
Disconnect Supervision:
Use following command to program the disconnect signal on the FXO Port:
218-Disconnect Signal-#*
Page 21
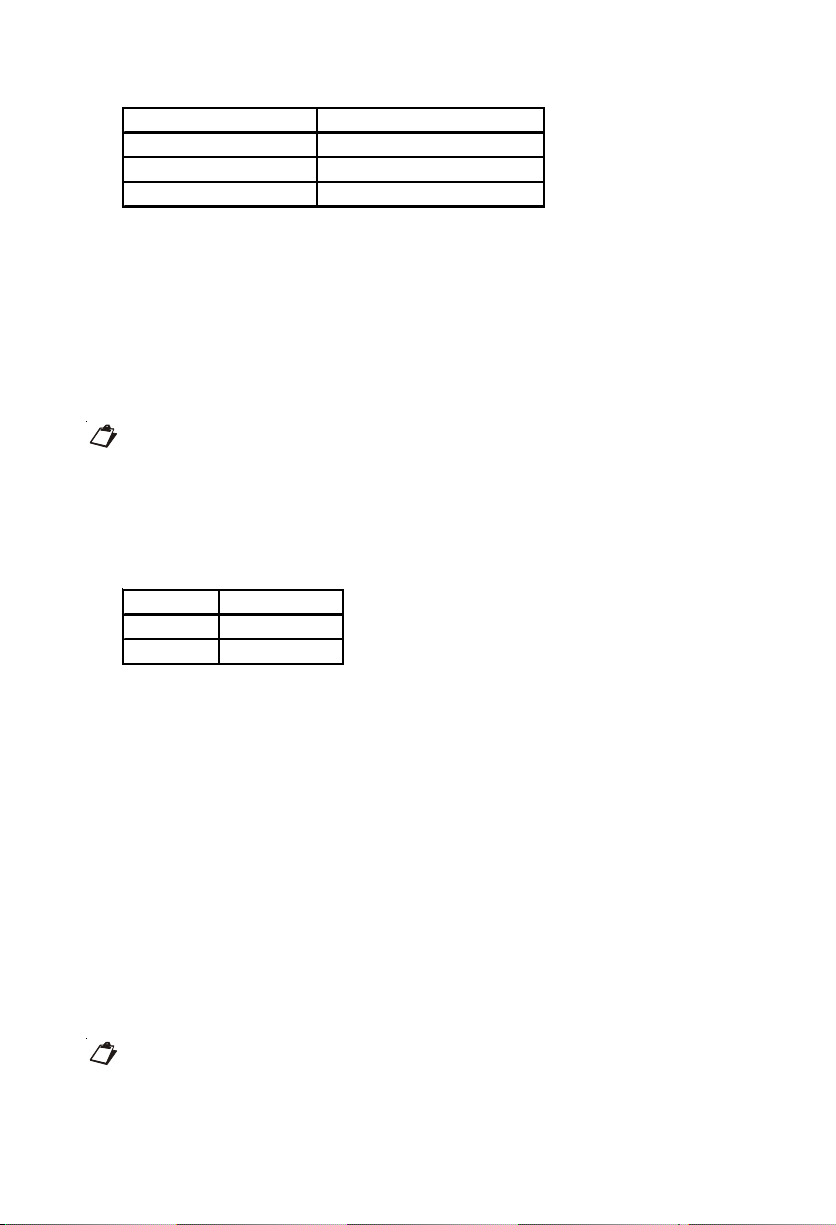
Where,
Disconnect Signal Meaning
0 None
1 Battery Revrsal
2 Open Loop Disconnect
By default, Disconnect Signal is Battery Reversal.
Use following command to program Open Loop Disconnect Timer on the
FXO Port:
219-Open Loop Disconnect Timer-#*
Where,
Open Loop Disconnect Timer is from 001 to 999 ms.
By default, it is 200 ms.
Keep Open Loop Disconnect Timer as less than what is actually supported
by the PSTN network.
Use following command to enable/disable disconnect tone detection on FXO
Port:
320-Code-#*
Where,
Code Meaning
0 Disable
1 Enable
By default, it is enabled.
Use following command to program Disconnection Tone's ON Time for FXO
Port:
321-ON Time-#*
Where,
ON Time is form 0001 to 9999 ms.
By default, it is 750ms.
Use following command to program Disconnection Tone's Off Time for FXO
Port:
322-Off Time-#*
Where,
Off Timer is form 0001 to 9999 ms.
By default, it is 750ms.
When call is disconnected, the user will get error tone.
(Refer 'Port Parameters- FXO' in System Manual for more details)
Page 22
Step 7: Port Parameters-FXS
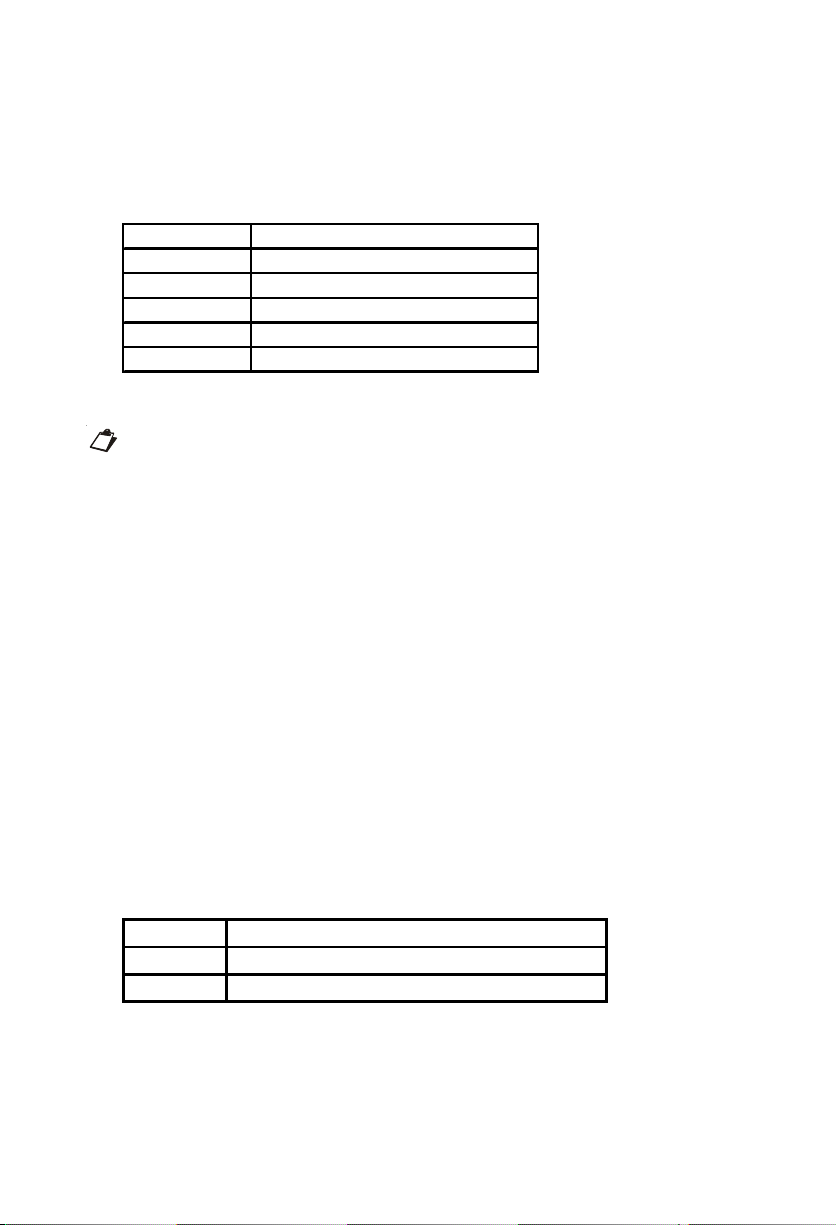
CLI Type
Use following command to program the CLI type for the FXS port:
222-CLI Type-#*
Where,
CLI Type Meaning
1 None
2 DTMF (Number, Ring)
3 ITU-T V.23 FSK
4 Bellcore FSK
5 DTMF ('D', Number, 'C', Ring)
By default, CLI type is 3.
CLI type 'None' is selected when the telephone instrument connected to the
FXS port does not have the LCD to display the number or user does not
want to detect the CLI. Detecting CLI takes time and thus the routing of call
gets delayed by 2-3 seconds, this delay can be avoided by using CLI type =
'None'.
Replacing + by DTMF digits in CLI
Use following command to program the digits which will replace '+' in the
CLI:
301-Number String-#*
Where,
Number string can be of maximum four digits.
By default, Number String programmed is 00.
Use following command to clear the digits programmed:
301-#*
End of Dialing
Use following command to use # as end of dialing digit:
110-Code-#*
Where,
Code Meaning
1 Use # as end of dialing digit
0 Do not use # as end of dialing digit
By default, # is used as end of dialing digit.
Answer Signaling on FXS Port
Use following command to program the answer signal to be generated on
FXS Port:
Page 23
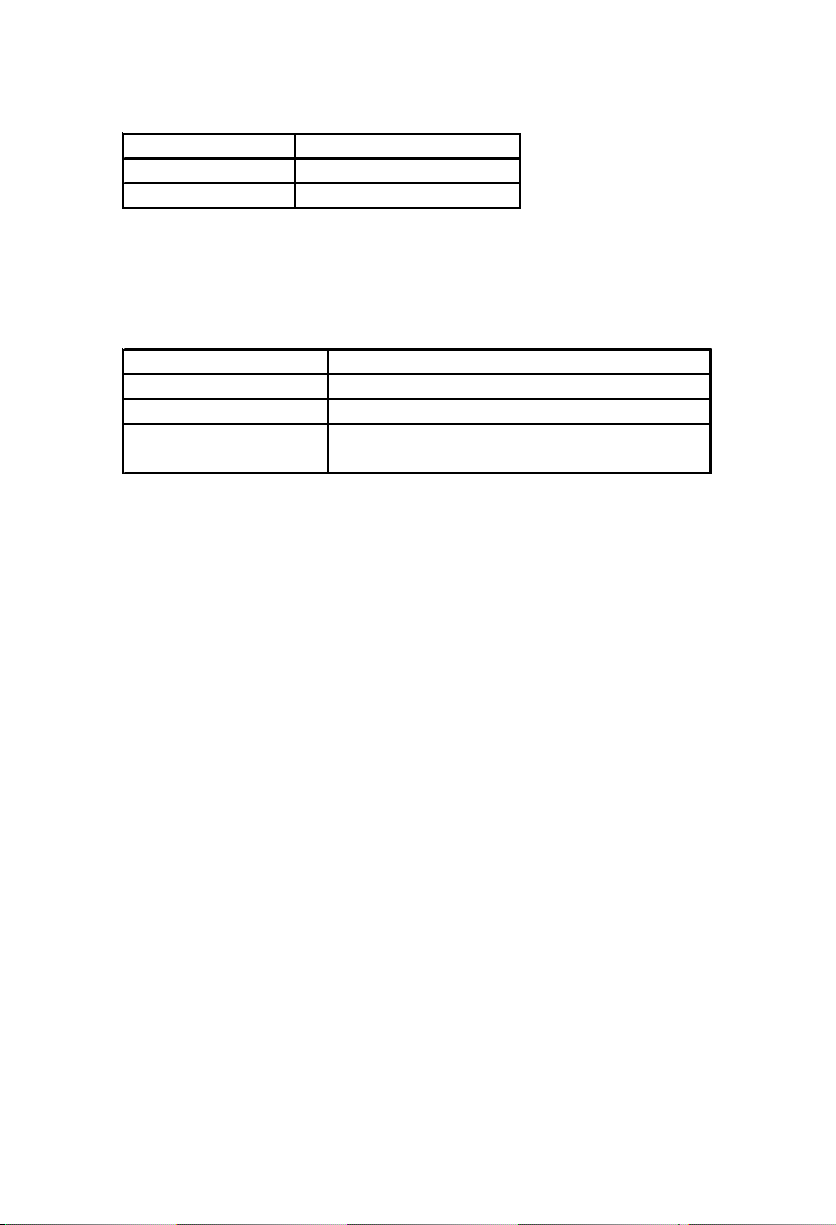
221-Answer Signal-#*
Where,
Answer Signal Meaning
0None
1 Polarity Reversal
By default, Polarity Reversal is selected.
Disconnect Signaling on FXS port
Use following command to program the disconnect signal on the FXS Port:
248-Disconnect Signal-#*
Where,
Disconnect Signal Meaning
0 None
1 Polarity Reversal
2 Open Loop Disconnect (Battery Removal or
Current Removal)
By default, Polarity Reversal is selected.
Use following command to program Open Loop Disconnect Timer on FXS
Port:
249-Open Loop Disconnect Timer-#*
Where,
Open Loop Disconnect timer is from 001 to 999 ms.
By default, it is 500 ms.
(Refer 'Port Parameters-FXS' in System Manual for more details)
Step 8: Call Progress Tones and Ring Type
SIMADO GFXD1111S gives flexibility to the SE to match the frequency and
cadences of the rings and call progress tones supported by the gateway to that
of the country standard in which it is installed.
Use following command to program CPT for a specific country:
104-Code-#*
Where,
Page 24
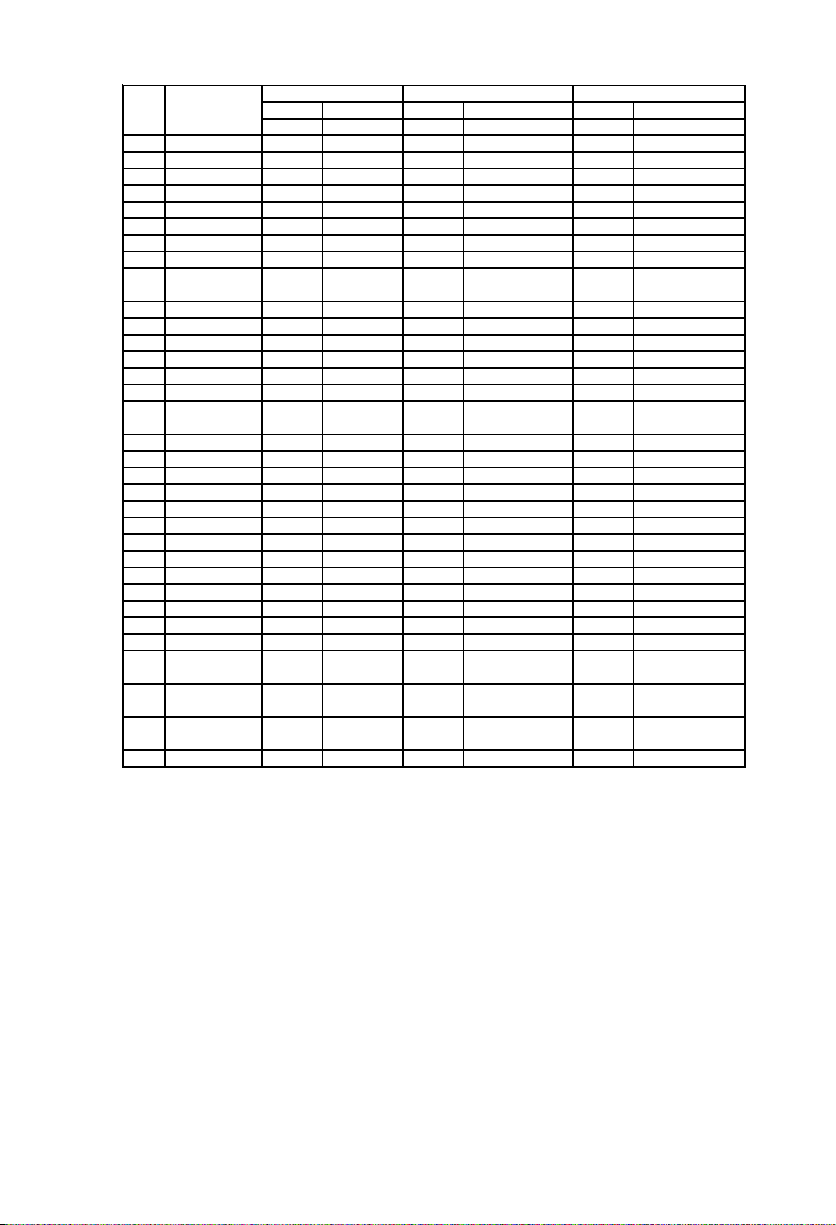
Code Country
01 Australia 425*25 cont. 425 0.375on 0.375off 425 0.375on 0.375off
02 Argentina 425 cont. 425 0.3on 0.2off 425 0.3on 0.4off
03 Belgium 425 cont. 425 0.5on 0.5off 425 0.167on 0.167off
04 Brazil 425 cont. 425 0.25on 0.25off 425 0.25on 0.25 off
05 China 450 cont 450 0.35 on 0.36off 450 0.7on 0.7off
06 Egypt 425*50 cont 425*50 1.0on 4.0off 450 0.5on 0.5off
07 France 440 cont 440 0.5on 0.5off 440 0.25on 0.25off
08 Germany 425 cont 425 0.48on 0.48off 425 0.24on 0.24off
09 Greece 425
10 India 400*25 cont 400 0.75on 0.75off 400 0.25on 0.25off
11 Indonesia 425 cont. 425 0.5on 0.5off 425 0.25on 0.25off
12 Iran 425 cont 425 0.5on 0.5off 425 0.25on 0.25off
13 Israel 400 cont 400 0.5on 0.5off 400 0.25on 0.25off
14 Italy 425 cont. 425 0.5on 0.5off 425 0.2on 0.2off
15 Japan 400 cont 400 0.5on 0.5off 400 0.25on 0.25off
16 Kenya 425 cont 425
17 Korea 350+440 cont 480+620 0.5on 0.5off 480+620 0.3on 0.2off
18 Malaysia 425 cont 425 0.5on 0.5off 425 0.5on 0.25off
19 Mexico 425 cont. 425 0.25on 0.25off 425 0.25on 0.25off
20 New Zealand 400 cont. 400 0.5on 0.5off 400 0.25on 0.25off
21 Phillippines 425 cont. 480+620 0.5on 0.5off 480+620 0.25on 0.25off
22 Poland 425 cont. 425 0.5on 0.5off 425 0.5on 0.5off
23 Portugal 425 cont. 425 0.5on 0.5off 450 0.33on 1.0off
24 Russia 425 cont. 425 0.4on 0.4off 425 0.25on 0.25off
25 Saudi Arabia 425 cont. 425 0.5on 0.5off 425 0.25on 0.25off
26 Singapore 425 cont. 425 0.75on 0.75off 425 0.25on 0.25off
27 South Africa 400*33 cont. 400 0.5on 0.5off 400 0.25on 0.25off
28 Spain 425 cont. 425 0.2on 0.2off 425 0.25on 0.25off
29 Thailand 400*50 cont. 400 0.5on 0.5off 400 0.3on 0.3off
30 Turkey 450 cont. 450 0.5on 0.5off 450
31 UAE 350+440 cont. 400 0.375on 0.375off 400
32 UK 350+440 cont. 400 0.375on 0.375off 400
33 USA/Canada 350+440 cont. 480+620 0.5on 0.5off 480+620 0.25on 0.25off
Dial Tone Busy Tone
Freq. Cadence Freq. Cadence Freq. Cadence
Hz second Hz second Hz second
0.2on 0.3off
0.7on 0.8off
425 0.3on 0.3off 425 0.15on 0.15off
0.2on 0.6off 0.2on
0.6off
Error Tone
425 0.2on 0.6off
0.2on 0.2off 0.6on
0.2off
0.4on 0.35off
0.225on 0.525off
0.4on 0.35off
0.225on 0.525off
Select the country in which SIMADO GFXD1111S is installed.
In above table, * refers to modulation of two frequencies (f1 and f2) and +
refers to addition of two frequencies. Cont. is abbreviation for continuous.
Confirmation tone for all countries is: 400Hz, 0.1 on 0.1 off
Programming tone for all countries is: 400Hz, 0.1 on 0.9 off
By default, Code is 10 (India)
Use following command to select the country for matching the ring type:
311-Code-#*
Where,
Page 25
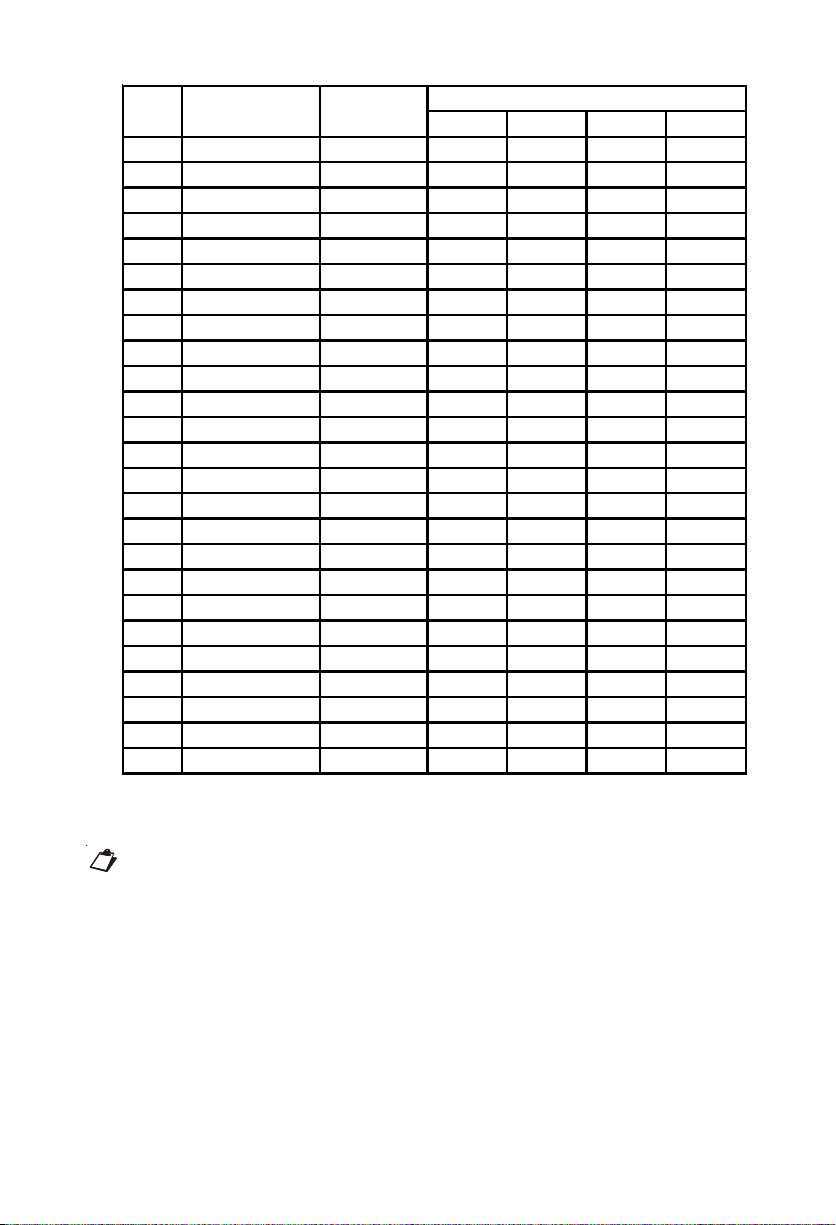
Code Country
01 Australia 25 0.4 0.2 0.4 2
02 Belgium 25 1 3
03 Brazil 25 1 4
04 China 25 1 3
05 Egypt 25 2 4
06 France 25 1.5 3.5
07 Germany 25 3.5 5.5 0.79 1.1
08 Greece 25 1 4
09 India 25 0.4 0.2 0.4 2
10 Israel 25 2 3
11 Italy 25 1 4
12 Japan 25 1 2
13 Korea 25 1 3
14 Malaysia 25 2 3
15 New Zealand 25 2 3
16 Poland 25 2 3
17 Portugal 25 1 5
18 Russia 25 1 3
19 Singapore 25 0.4 0.2 0.4 2
20 South Africa 25 0.4 0.2 0.4 2
21 Spain 25 1.5 3
22 Thailand 25 2 3
23 UAE 25 2 3
24 UK 25 0.4 0.2 0.4 2
25 USA/Canada 25 2 4
Frequency
(Hz)
Cadence (in second)
ON1OFF1ON2OFF2
By default, Code 09 i.e. India is selected.
Default values for all ring types for all the countries as per ETSI standard is
programmed in the system. Ring Type table programmed in the GFXD1111S
is shown above.
Step 9: Reinstate the Default Settings
GFXD1111S is supplied with a pre-defined set of variables like Mobile Port
Parameters, FXS Port Parameters, SIM PIN, Call Divert, Call Progress Tones
etc. If the default setting suits your requirement then you may not even need to
program the system, as the system is designed to work efficiently with the default
settings. However, you may program the parameters to match your requirements.
Page 26

Sometimes, due to some programming error or due to some operating mistake,
GFXD1111S goes haywire and it become difficult to analyze the problem. In
such a situation, it is advisable to load default values in the system.
On defaulting GFXD1111S, following parameters will not change i.e. will not be
defaulted:
• Call Divert
• Call Progress Tones
• Ring Type
• Enable/Disable SIM PIN
Default settings can be loaded or restored from the System Engineer mode.
Use following command to load the default configuration:
106-Reverse SE Password-#*
Reverse SE password is a number string of maximum 4 digits.
By default, SE Password is 1234. Therefore, Reverse of SE Password is
4321.
GFXD1111S will restart as soon as command to load the default configuration
is issued.
Ensure that the SIMADO GFXD1111S is set to Speech + SMS mode, when
command to restore the default configuration is issued else the system will
not be defaulted.
Step 10: Test Calls
Making a Call
• Lift the handset of the telephone instrument connected to SIMADO
GFXD1111S. You will get the dial tone.
• Dial the desired number. You will hear the RBT.
• Talk when the called party answers the call.
• Replace the handset to disconnect the call.
Receiving a Call
• Ring on telephone instrument connected to SIMADO GFXD1111S.
• Lift the handset to talk.
• You will be in speech with the calling party.
• Replace the handset when the call is disconnected.
Page 27

Appendices
FAQs
Q.1. Though SIM card is inserted in the SIM card slot, LED labeled as
SIM is blinking in Power On state?
Ans: Check whether the SIM card is inserted properly. If not, insert SIM card
properly and restart the system. Also check whether the SIM is activated.
If deactivated, activate the SIM and check.
Q.2. LEDs are not glowing after power up?
Ans: Check the power supply between mains and DC jack of SIMADO
GFXD1111S.
Q.3. Can I use the SIM PIN protection in SIMADO GFXD1111S?
Ans: Yes, you can enable the SIM PIN protection in SIMADO GFXD1111S.
When this feature is enabled, the network will ask the user to enter SIM
PIN at every Power On. (Refer 'SIM PIN' for more details)
Q.4. I am unable to make outgoing calls from FXS port. However, I am
receiving incoming calls?
Ans: Check whether the number is allowed as per allowed and denied list.
(Refer 'Allowed-Denied Numbers' for more details)
Q.5. SIMADO GFXD1111S does not get registered to GSM network?
Ans: Check whether the SIM card is properly inserted and it is activated.
Check SIM PIN. Check the availability of good GSM signal. Check the
connectivity of antenna etc. (Refer 'SIM PIN' and 'Signal Strength' for
more details)
Q.6. Incoming calls on Mobile port are not being placed on FXS Port
however, caller still gets ring back tone.
Ans: Check the connectivity of analog phone to the FXS port of SIMADO
GFXD1111S.
Q.7. I am hearing garbled voice. What should I do?
Ans: If you are using antenna without wire, use wired antenna for better gain.
If you are using wired antenna, change the antenna position.
Q.8. I have EPABX with FXS and FXO interface. Can SIMADO GFXD1111S
be integrated with existing EPABX and also reduces the call cost?
Ans: Yes. You can connect SIMADO GFXD1111S with your existing EPABX.
When connected with FXO port of EPABX, it enables you to make calls
from the extensions of EPABX, directly to GSM network which bypass
the PSTN exchange and results in significant saving in call costs. You
can also connect SIMADO GFXD1111S with FXS port of EPABX.
Page 28
Q.9. I have FXO/FXS-VoIP gateway. Can SIMADO GFXD1111S be
intergraded with existing gateway and also reduces the call cost?
Ans: Yes, you can connect SIMADO GFXD1111S with your existing FXO-
VoIP gateway. When installed with FXO port of VoIP gateway, it enables
the direct routing of call between GSM and VoIP network which bypass
the PSTN exchange and results in significant saving in call costs. You
can also connect SIMADO GFXD1111S with FXS port of EPABX.
Q.10. CDMA module is installed in my GFXD1111S. Whether I will be able
to use all the features in the same way as when GSM module is
installed?
Ans: No you will not be able to use following features when CDMA module is
installed in GFXD1111S:
1. Call Divert
2. Manual Network Selection
In CDMA module, there is an Electronic Serial Number viz. ESN, which
is similar to the IMEI number of GSM module.
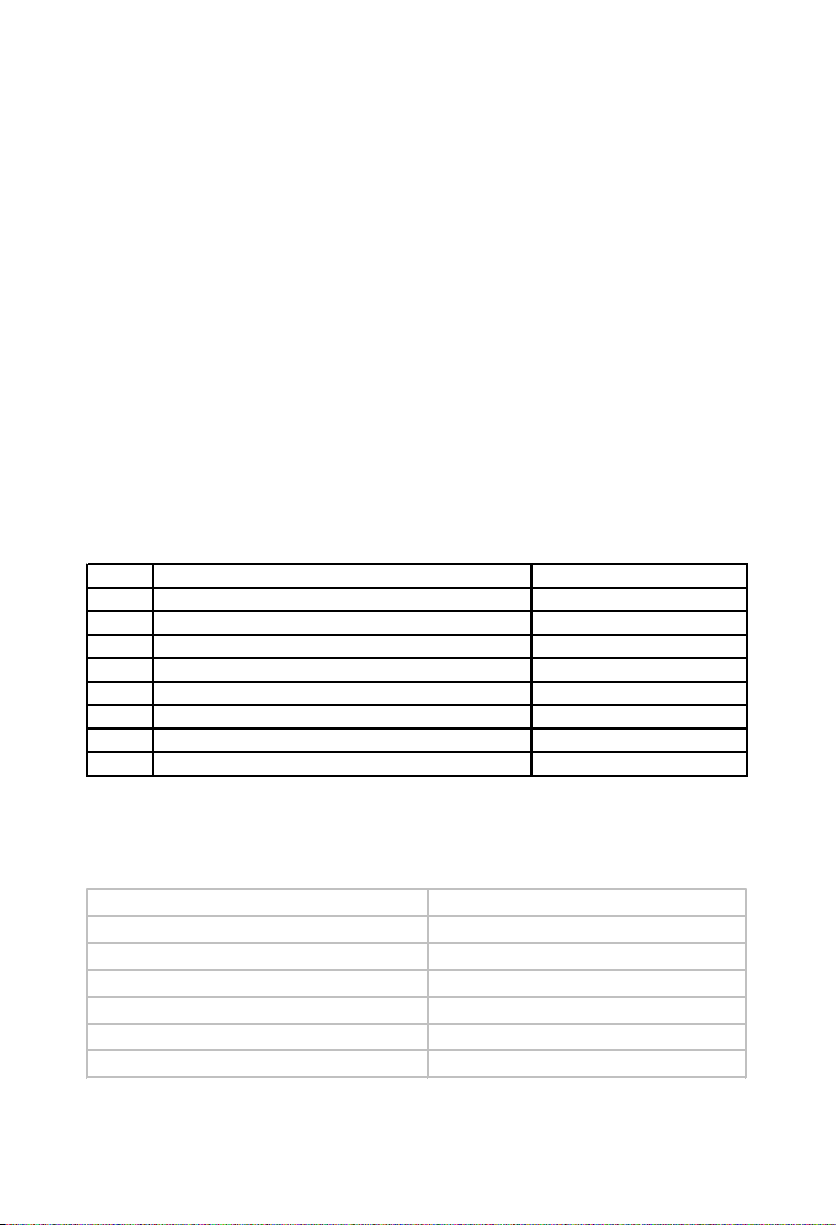
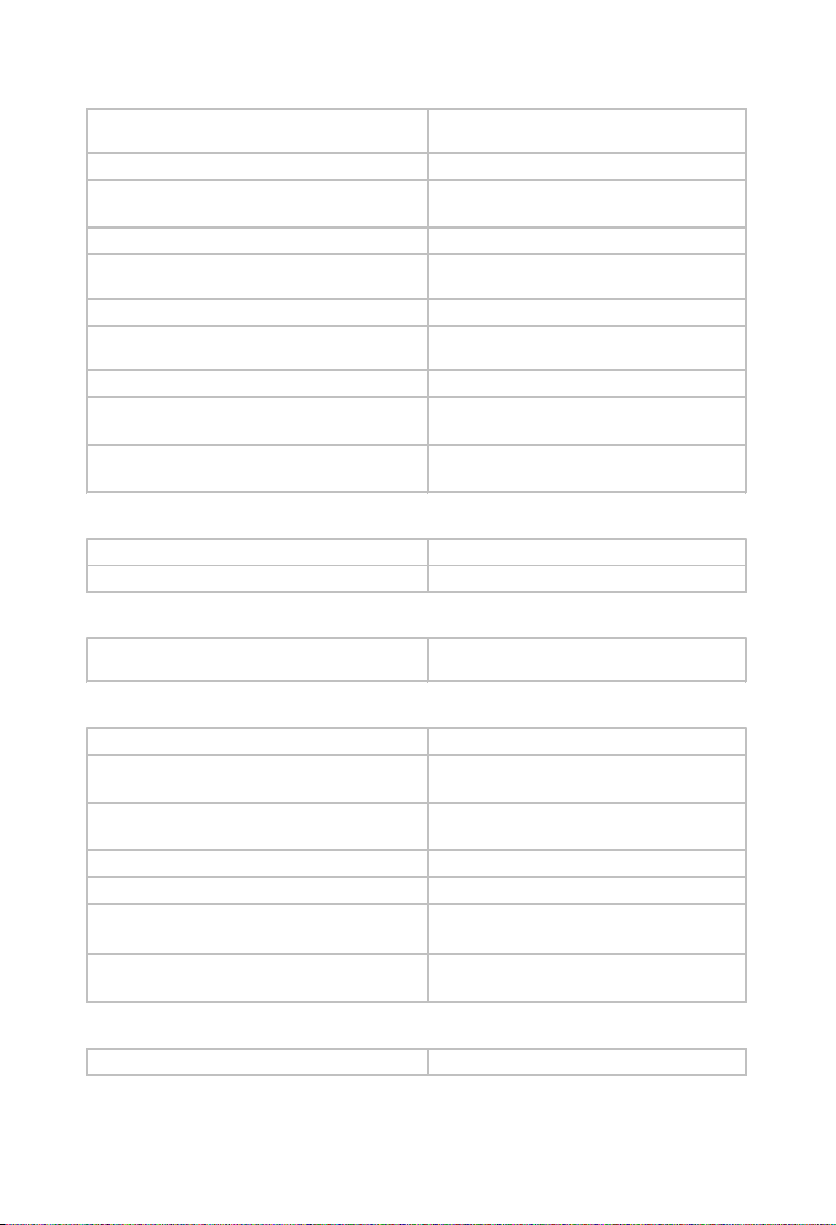
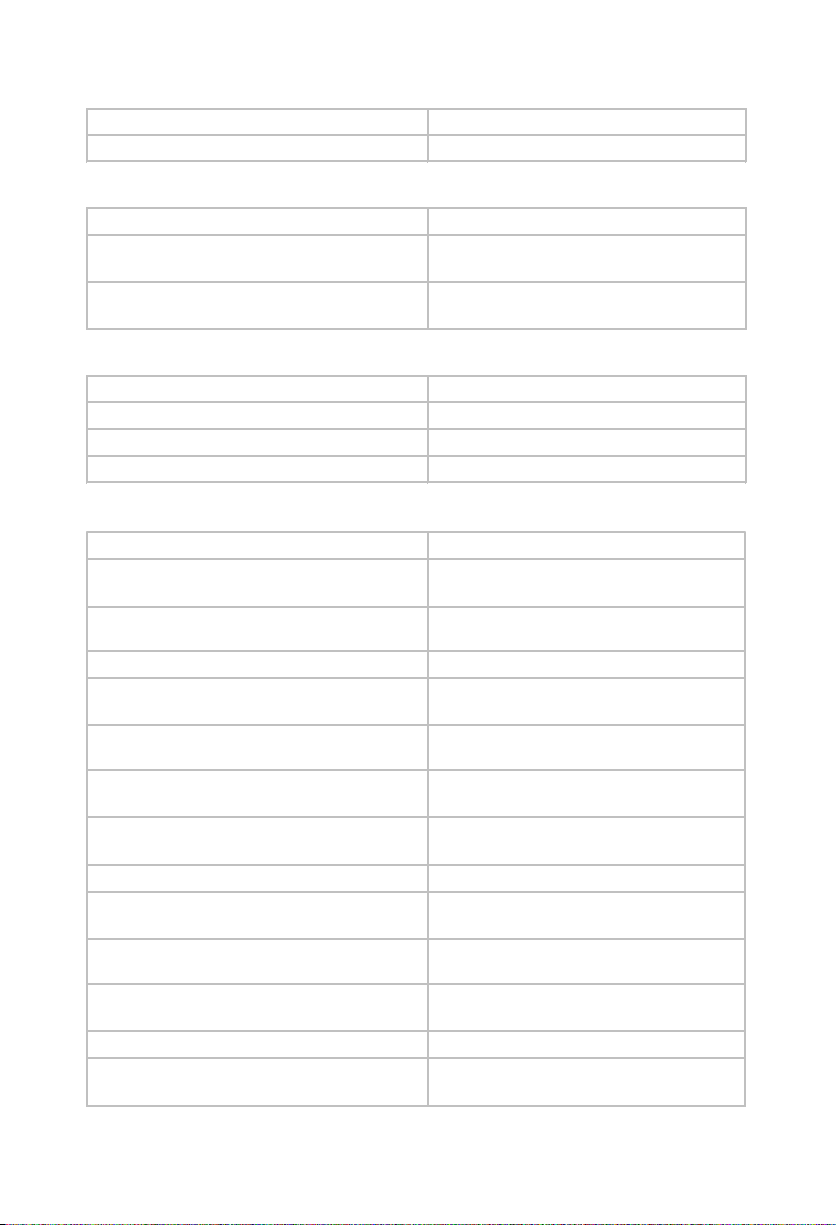
Features at Glance
Sr. Description Feature Commands
1 To know the Signal Strength
2 To know the Location Information
3 To know the IMEI code
4 To enter into SA mode
5 To enter into SE mode
6 To exit SE/SA mode
7 Reading SMS using telephone instrument
8 Deleting SMS using telephone instrument
#*-11
#*-12
#*-13
#*-18-SA Password
#*-19-SE Password
00-#*
#*-21-Index
#*-22-Index
System Commands
Allowed and Denied Lists
To program numbers in allow ed list
To program numbers in denied list
To clear one location f rom allow ed list
To clear all locations f rom allow ed list
To clear one location f rom denied list
To clear all locations f rom denied list
To print allow ed/denied lists
261-Location Index-Number-#*
262-Location Index-Number-#*
261-Location Index-#*
261-00-#*
262-Location Index-#*
262-00-#*
545-List Type-#*
Page 29
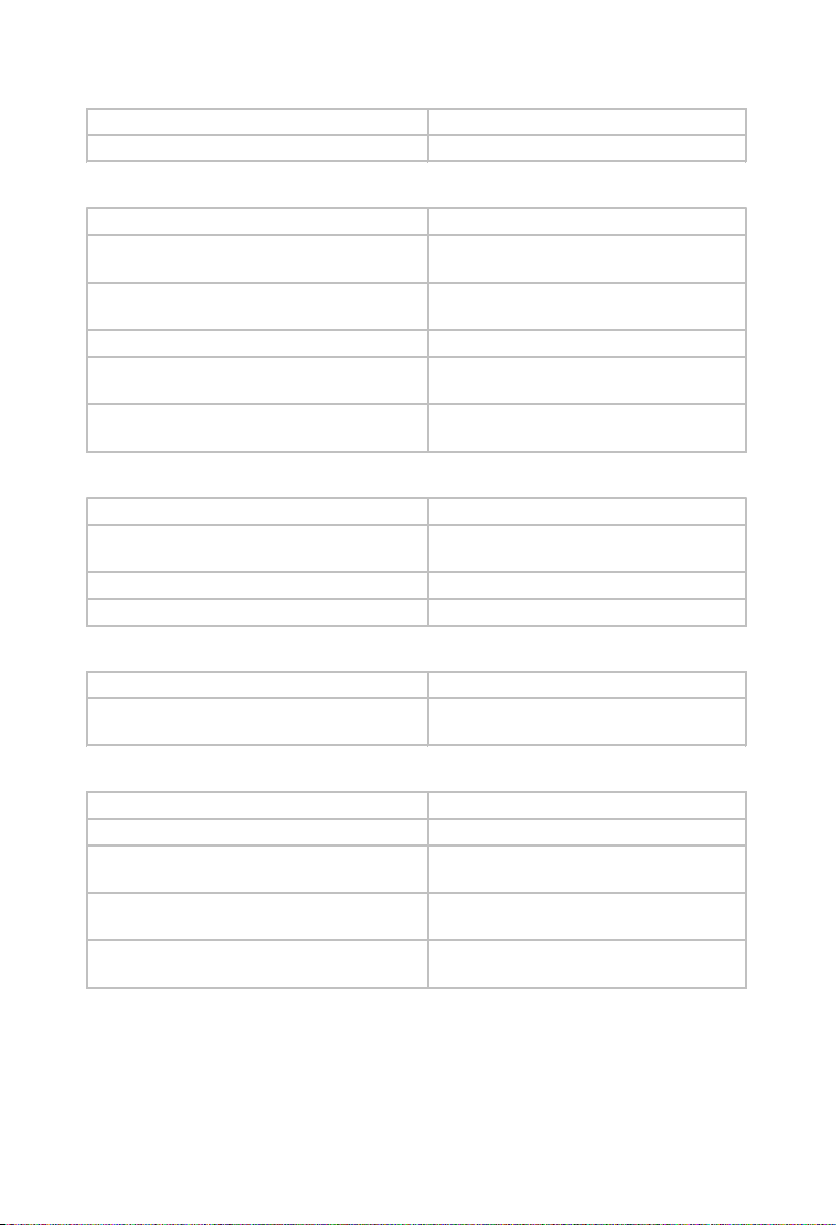
Automatic Number Translation
To program dialed string for Mobile port
To clear dialed string for Mobile port
To program substitute string for Mobile port
To clear subs titute string for Mobile port
To program dialed string for FXO
To clear dialed string for FXO
To program substitute string for FXO
To clear subs titute string for FXO
To clear automatic number translation table
291-Number Index-Dialed
String/Substring-#*
291-Number Index-#*
292-Number Index-Substitute
String/Substring-#*
292-Number Index-#*
293-Number Index-Dialed
String/Substring-#*
293-Number Index-#*
294-Number Index-Substitute
String/Substring-#*
294-Number Index-#*
290-Port Type-#*
To print FXO/Mobile automatic number
translation
Call Duration Display
To view the duration type of the last call
To clear duration timer for all types
Call Divert
To set call divert
Call Minutes
To enable/disable Call Minutes
To program free Call Minutes f or a Mobile
Po r t
To enable/disable Scheduled Reset for Call
Min ut es
To program the date for Scheduled Reset
To reset Minutes manually f or Mobile Port
To program the option w hen Minutes Used
is equal to or greater than Minutes Allow ed
To display Minutes Used on the telephone
instrument
546-Port Type-#*
610-Ca l l Type-#*
610-0-#*
620-Option-Flag-Destination
Number-#*
341-Flag-#*
342-M inutes Al l owed-#*
343-Flag-#*
344-Date-#*
345-#*
346-Option-#*
347-#*
Call Progress Tones
To program CPTG for a c ountry
104-Code-#*
Page 30
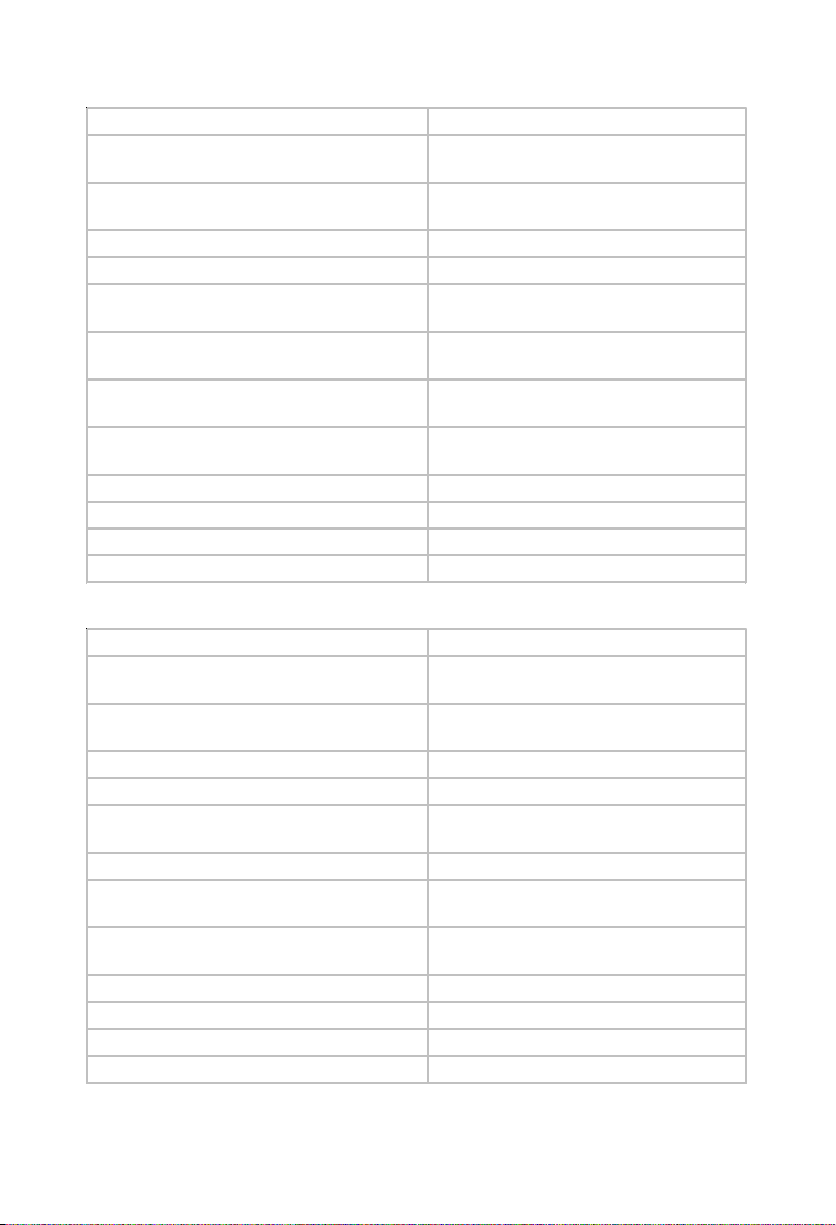
Date and Time
To set date and time parameters
To program the day
Emergency Number Dialing
To program the emergency number
To clear the Emergency Number at an index
251-DD-M M -YY-HH-M M-#*
252-Da y-#*
151-Index-Emergency Number -#*
151-Index-#*
To assign destination port f or the
Emergency Number
Hotline
To enable/disable hotline
To program the hotline destination number
To clear the hotline number string
To set the hotline delay timer
Least Cost Routing (CLR)
To program LCR type
To enable/disable the rotation of call landing
To program time zone index
To program service provider s equence
To set default the Time Zone w ise LCR
table
To program the number string
To clear the number string from number
based LCR
To program the SP sequence f or each
number
To default the number w ise LCR table
To program Time Zone index f or mixed LCR
To program number index f or mixed LCR
To program SP sequence f or number and
time zone
To set default mixed LCR table
To print LCR for number w ise, TZ
wise/mixed
152-Index-Destination Port-#*
281-Flag-#*
282-Destination Number-#*
282-#*
283-Seconds-#*
411-LCR Type-#*
412-Flag-#*
421-Time Zone Index-Start Ti meEnd Time-#*
422-Time Zone Index-S1-SP2-#*
423-#*
431-Number Index-Number Stri ng#*
431-Number Index-#*
432-Number Index-SP1-SP2-#*
433-#*
441-Time Zone Index-Start Ti meEnd Time-#*
442-Number Index-Number Stri ng#*
443-Number Index-TZ Index-SP1SP2-#*
444-#*
547-LCR Type-#*
Page 31
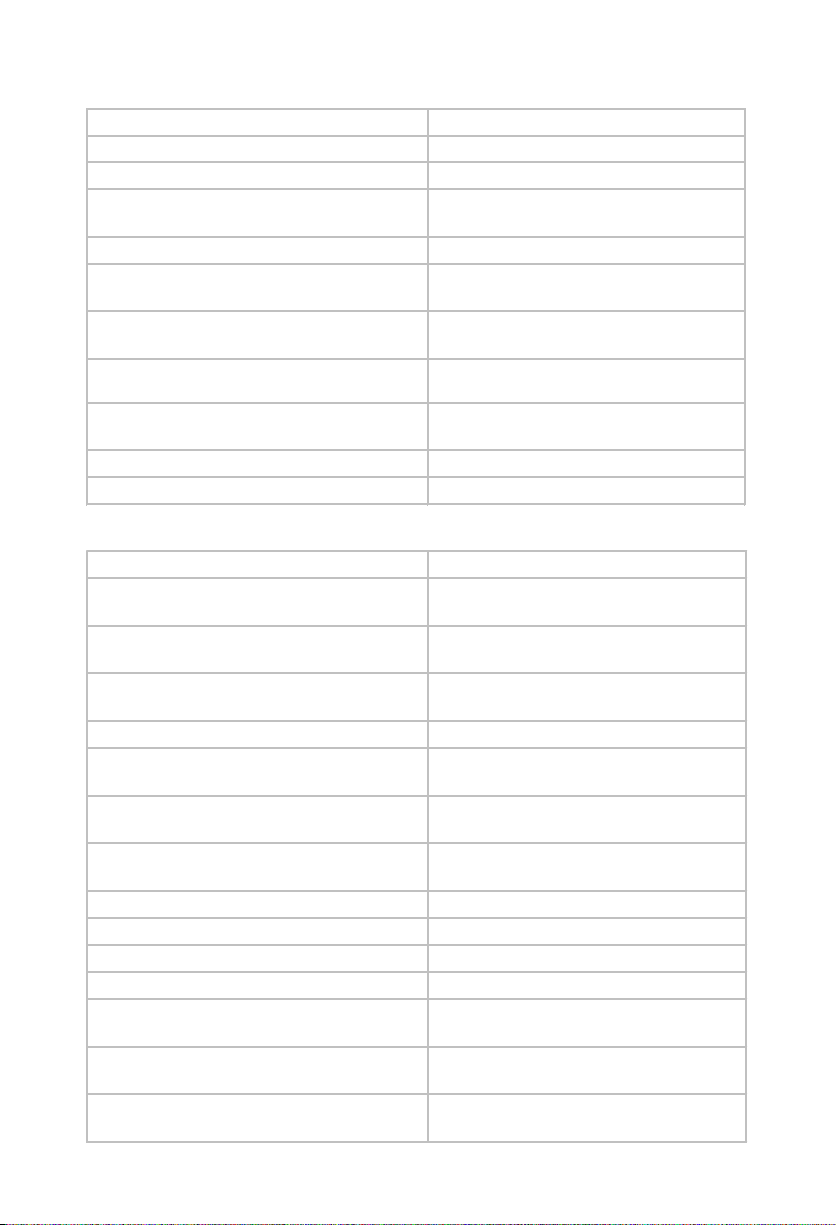
Metering on FXS Port
To program metering pulse type
To program the pulse w idth 12/16KHz
Mobile-FXO Mode
To set Mobile Port-Routing Type
To program Mobile Port-Destination Number
string
To clear Mobile Port-Destination Number
string
To set FXO Port-Routing Type
To program FXO Port-Destination Number
string
To clear FXO Port-Destination Number
string
Mobile Network Selection
To select netw ork selection mode
To select netw ork operator number w ith
priority
To clear netw ork operator number
To select Mobile Frequency band
Mode of Operation
To set communication path
To set Baud Rate (SMS+Internet+Fax+Data)
223-Code-#*
501-P ul se Wi d th-#*
101-Routing Type-#*
102-Destination Number-#*
102-#*
161-Routing Type-#*
162-Destination Number-#*
162-#*
331-M ode-#*
332-P ri or i ty-Code- #*
332-P ri or i ty-#*
333-M obi l e Frequency Ba nd-#*
231-Pa th Type-#*
232-Baud Ra te-#*
PCO Application
To enable/disable PCO application
To print area code for database 1 or 2
To print normal/conc essional rate in
database 1/2
To print normal/conc essional time in
database 1/2
To print concess ional dates in database 1/2
500-Flag-#*
541-Code-#*
542-Code-#*
543-Code-#*
544-Code-#*
Page 32
Database1 (for Mobile Port)
To program an area code
To program normal pulse rate f or pulse rate
type
To program conces sional rate for pulse
rate type
To delete an entry f rom pulse rate table
To delete all entries from pulse rate table
To program pulse rate type f or an area
code
To delete an entry f rom area code pulse
table
To delete all entries f rom area code pulse
table
To program conces sional timing f or the day
To assign def ault conces sional timings
To program conces sional dates
To delete particular concessional date
To delete all conc essional dates
Database2 (for FXO Port)
To program an area code
To program normal pulse rate f or pulse rate
type
To program conces sional rate for pulse
rate type
To delete an entry f rom pulse rate table
To delete all entries from pulse rate table
To program pulse rate type f or an area
code
To delete an entry f rom a code pulse table
To delete all entries f rom a code pulse table
531-Ar ea Code Index-Area Code-#*
534-P ul se Ra te Type-Norma l P ul se
Rate-#*
535-P ul se Ra te Type-Concessional
Pulse Rate-#*
536-P ul se Ra te Type-#*
536-00-#*
532-Ar ea Code Index-Pul se Rate
Type-#*
533-Ar ea Code Index-#*
533-0000-#*
537-Index-Concessi onal Start TimeConcessi onal End Time-#*
537-#*
538-Index-Date-M onth-#*
539-Index-#*
539-00-#**
511-Ar ea Code Index-Area Code-#*
514-P ul se Ra te Type-Norma l P ulse
Rate-#*
515-P ul se Ra te Type-Concessional
Pulse Rate-#*
516-P ul se Ra te Type-#*
516-00-#*
512-Ar ea Code Index-Pul se Rate
Type-#*
513-Ar ea Code Index-#*
513-0000-#*
To program conces sional timing f or the day
To assign def ault conces sional timings
To program conces sional dates
To delete particular concessional date
To delete all conc essional dates
517-Index-Concessi onal Start TimeConcessi onal End Time-#*
517-#*
518-Index-Date-M onth-#*
519-Index-#*
519-00-#*
Page 33
Port Parameters-FXO
To enable/disable FXO port
To program the dial type of the FXO
To program the CLI type f or the FXO
To program ring cadence off timer f or FXO
211-Code-#*
212-Code-#*
214-CLI Type-#*
215-Ring Cadence OFF Timer-#*
To program the pause timer
To program answ er s upervision to be
generated on FXO port
To program the disconnect signal detected
on FXO
To program open loop disc onnect timer
To enable/disable disc onnect tone
detection f or IC & OG
To program disconnection ON time
To program disconnection OFF time
Port Parameters-FXS
To set Frw d Calls to FXO-When No Reply
To program Frw d Calls to FXO PortDestination Number
To c lear Fr w d Calls t o FXO Por t-
Destination Number
To program Frw d Calls to FXO Port- When
No Repl y Time r
To set Frw d Calls to Mobile-When No Reply
To program Frw d Calls to Mobile Port -
Destination Number
To clear Frw d Calls to Mobile PortDestination Number
To program Frw d Calls to Mobile PortWhen No Reply Timer
To program the CLI type for the FXS Port
To program No. string to replace w ith ‘+’
To clear the digit programmed
To use # as end of dialing
To program answ er signaling to be
generated on FXS port
To program disconnect signal to be
generated on FXS Port
To prg. open loop disconnect timer on FXS
Po r t
217-P a use Ti mer -#*
213-Answer Supervision Signal-#*
218-Di sconnect Si gna l -#*
219-Open Loop Disconnect Timer#*
320-Flag-#*
321-ON Time-#*
322-OFF Time-#*
131-Code-#*
132-Desti nati on Number- #*
132-#*
133-No Reply Ti mer-#*
134-Code-#*
135-Desti nati on Number- #*
135-#*
136-No Reply Ti mer-#*
222-CLI Type-#*
301-Number String-#*
301-#*
110-Code-#*
221-Answer Signa ling-#*
248-Di sconnect Signal-#*
249-Open Loop Disconnect Timer#*
Page 34
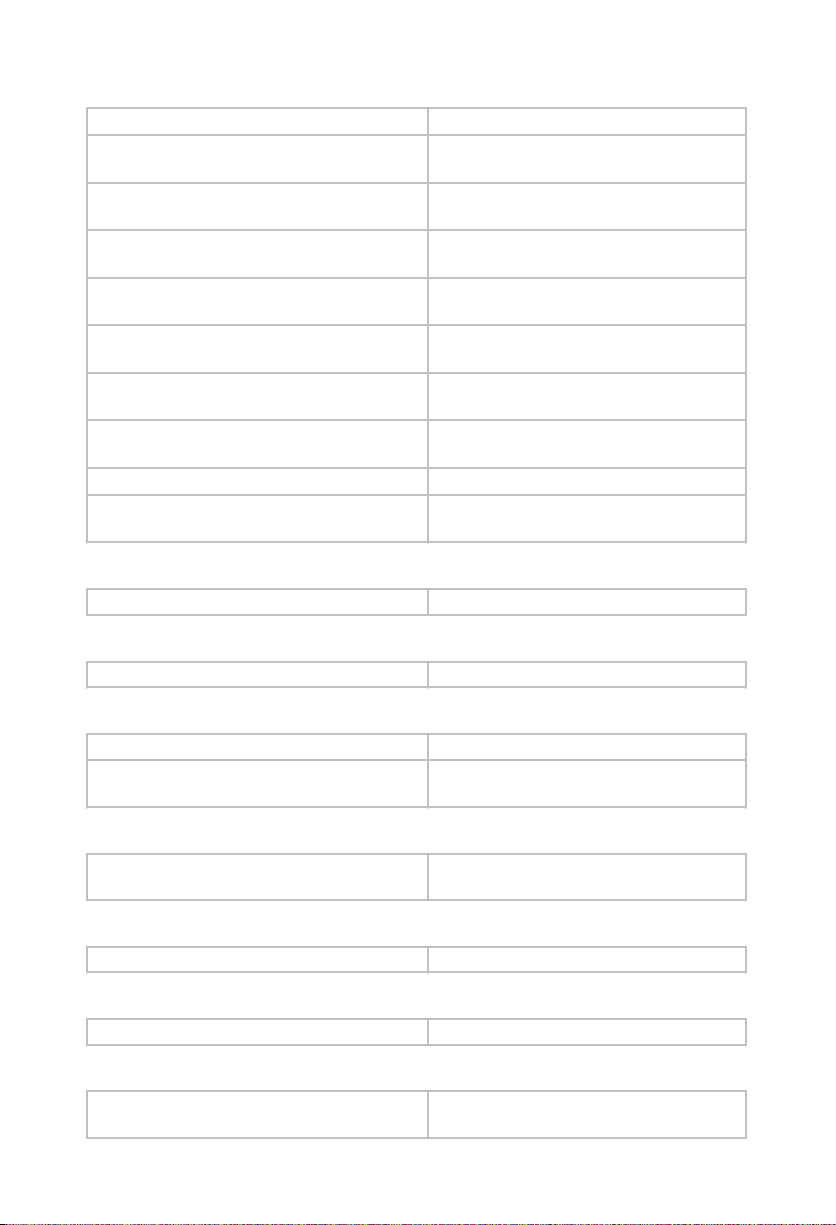
Port Parameters-Mobile
To enable/disable Mobile Port
To enable/disable the CLIR on the Mobile
Po r t
To enable/disable the notification of IC SMS
201-Flag-#*
202-Flag-#*
203-Flag-#*
To enable/disable the location Information
Identification on Mobile
To program the receive gain of the Mobile
Po r t
To set default the receive gain of the Mobile
Po r t
To program the transmit gain of the Mobile
Po r t
To set default the trans mit gain of the
Mobile Port
To program Pause Timer for Mobile Port
To p r ogr a m DTMF Dia l ing Met h o d f or Mo b ile
Po r t
205-Flag-#*
271-Receive Ga i n-#*
271-0-#*
272-Transmit Gain-#*
272-0-#*
275-Pause Timer-#*
273-Code-#*
Port Released Timer
To program Port Release Timer
256-Port Rel ea se Timer-#*
Programming the System through COM Port
To invoke Zmodem to dow nload data
510-#*
Programming the System through Mobile Port
To change login name through Zmodem
To change login passw ord through
Zmodem
121-New Login Name-#*
122-New Login Password-#*
Programming the System through SMS
To enable/disable SMS Based Configuration
Reinstate the Default Settings
To load the default configuration
Restart the System
To restart the system
Ring Type
To select the c ountry f or matching the Ring
Type
112-Code-#*
106-Reverse SE Pa sswor d-#*
105-SE Passwor d-#*
311-Code-#*
Page 35
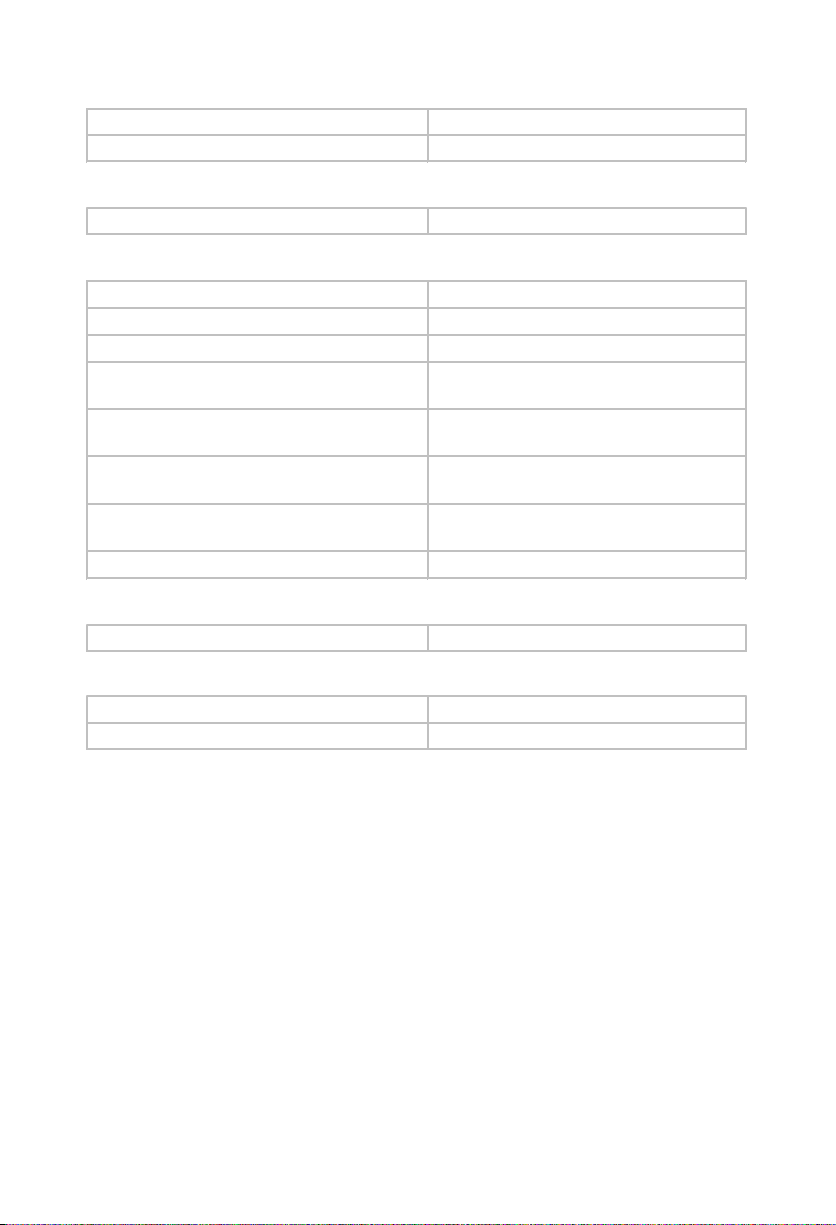
SIM PIN
To change the SIM PIN
To register/set personal unlock key
Software Version and Revision Display
To know the sof tw are version and rev ision
System Parameters
To set conf iguration type of the sy stem
To program the first digit w ait timer
To program the inter digit w ait timer
To program DTMF out dial ON time for
Mobile/FXO Port
To program Inter Digit Pause Time for
Mobile/FXO Port
To program DTMF Out Dial Level for
Mobile/FXO Port
To program the Call Proceeding Tone for
Mobile/FXO Port
To enable/disable Modified Routing
System Report
To print the configuration report
113-New SIM PIN-#*
114-PUK Number-SIM PIN-#*
109-#*
100-Configuration Type-#*
240-Duration-#*
226-Duration-#*
241-Code-#*
242-Code-#*
243-Code-#*
246-Ca l l Proceedi ng Tone-#*
111-Code-#*
540-#*
System Security (Passwords)
To change the SE pass w ord
To change the SA pas sw ord
107-New SE Pa sswor d-#*
108-New SA Password-#*
Page 36

MATRIX TELECOM PVT. LTD.MATRIX TELECOM PVT. LTD.
MATRIX TELECOM PVT. LTD.
MATRIX TELECOM PVT. LTD.MATRIX TELECOM PVT. LTD.
Corporate Office:
394-GIDC, Makarpura, Vadodara - 390010, India.
Tel.:+91 265 2630555, Fax: +91 265 2636598
E-mail: [email protected]
Factory:
39-GIDC, Waghodia - 391760, Dist. Vadodara, India.
Tel.: +91 2668 262056/57
Technical Support:
Tel.: +91 2668 263172/73, Fax: +91 2668 262631
E-mail: [email protected]
www.MatrixTeleSol.com
Version 3, January 2010
 Loading...