

User Manual for
PC Link Software
(Version 1.17)
For use with the IM-100/120

Sima Products Corporation
140 Pennsylvania Ave.
Bldg. #5
Oakmont, PA 15139
800-345-7462
www.simacorp.com
2

PC Link Manual Table of Contents
Introduction................................................................................................... 4
Important Safety Instructions: .................................................................................... 4
Accessories included: ................................................................................................. 4
PC Link Software Overview:....................................................................... 5
Making Connections ..................................................................................... 6
Parallel Port – with standard parallel port .................................................................. 6
USB Connection – with optional USB adapter .......................................................... 7
Installing PC Link Software ........................................................................ 8
Starting PC Link........................................................................................... 9
Interface Diagram ..................................................................................................... 10
PC Menu ................................................................................................................... 10
Add - Creates a cue of copied files from your PC to the I-Mix side.
I-Mix Menu............................................................................................................... 10
........................... 10
Using PC Link - Overview ......................................................................... 11
File transfer flow chart.............................................................................................. 11
PC Link interface........................................................................................ 12
PC Link Functions ...................................................................................... 13
Edit............................................................................................................................ 13
Sorting and Organizing –.......................................................................................... 15
Export and Copy ....................................................................................................... 16
Other PC Link Functions........................................................................... 17
Download.................................................................................................................. 17
Delete ........................................................................................................................ 17
Reset.......................................................................................................................... 17
PC Menu ...................................................................................................... 17
Overview................................................................................................................... 17
Refresh ...................................................................................................................... 17
Add............................................................................................................................ 17
Add – cont................................................................................................................. 18
Album info ................................................................................................... 19
Overview................................................................................................................... 19
CDDB Registration................................................................................................... 19
Accessing Web database........................................................................................... 21
Troubleshooting .......................................................................................... 23
3

PC Link Manual
Introduction
Introduction
Important Safety Instructions:
Read these instructions and keep them for future reference.
Heed all warnings and follow all instructions.
Do not use this apparatus near water.
Clean only with a damp cloth.
Do not install near any heat-producing surfaces such as radiators, heat registers, stoves or
other apparatus (including amplifiers) that produce heat.
Only use attachment/accessories specified by the manufacturer.
Unplug this apparatus during lightening storms or when unused for long periods of time.
Accessories included:
PC Link Cable
PC Link Software
PC Link manual (this document)
USB-to-parallel port adapter (optional)
4

PC Link Manual Overview
PC Link Software Overview:
The PC Link software for the Sima IM-100 / IM-120 provides the tools to organize,
edit and expand the list of CD song/album/artist titles in your unit. In addition to editing
the I-Mix’s internal list of titles, you can also use PC Link to access websites such as
Gracenote’s CDDB, which contains a database of over 500,000 CD titles. You can also
transfer MP3 files from your PC to the I-Mix hard drive.
This manual will take you through the steps to connect the I-Mix to your PC, install
the appropriate software and complete the following functions:
• Edit CD titles, song names and artist names in the internal database using your PC
keyboard.
• Access the CDDB website to identify and transfer album, song and artist
information.
• Transfer MP3 files from your PC to the I-Mix.
• Print out a portion or all of the titles in your I-Mix music archive.
Windows 98 and Windows ME support the PC Link Software provided with this unit.
Earlier versions, such as Windows 3.1 or Windows 95, do not support PC Link.
Check our website at www.simacorp.com for updates on the PC Link software and this
manual.
Important note:
When using the PC Link software program, the
I-Mix unit becomes dedicated to file management functions and both
the deck and remote control functions are temporarily disabled. You
must quit the PC Link program to resume normal I-Mix functions.
5
PC Link Manual Getting Started
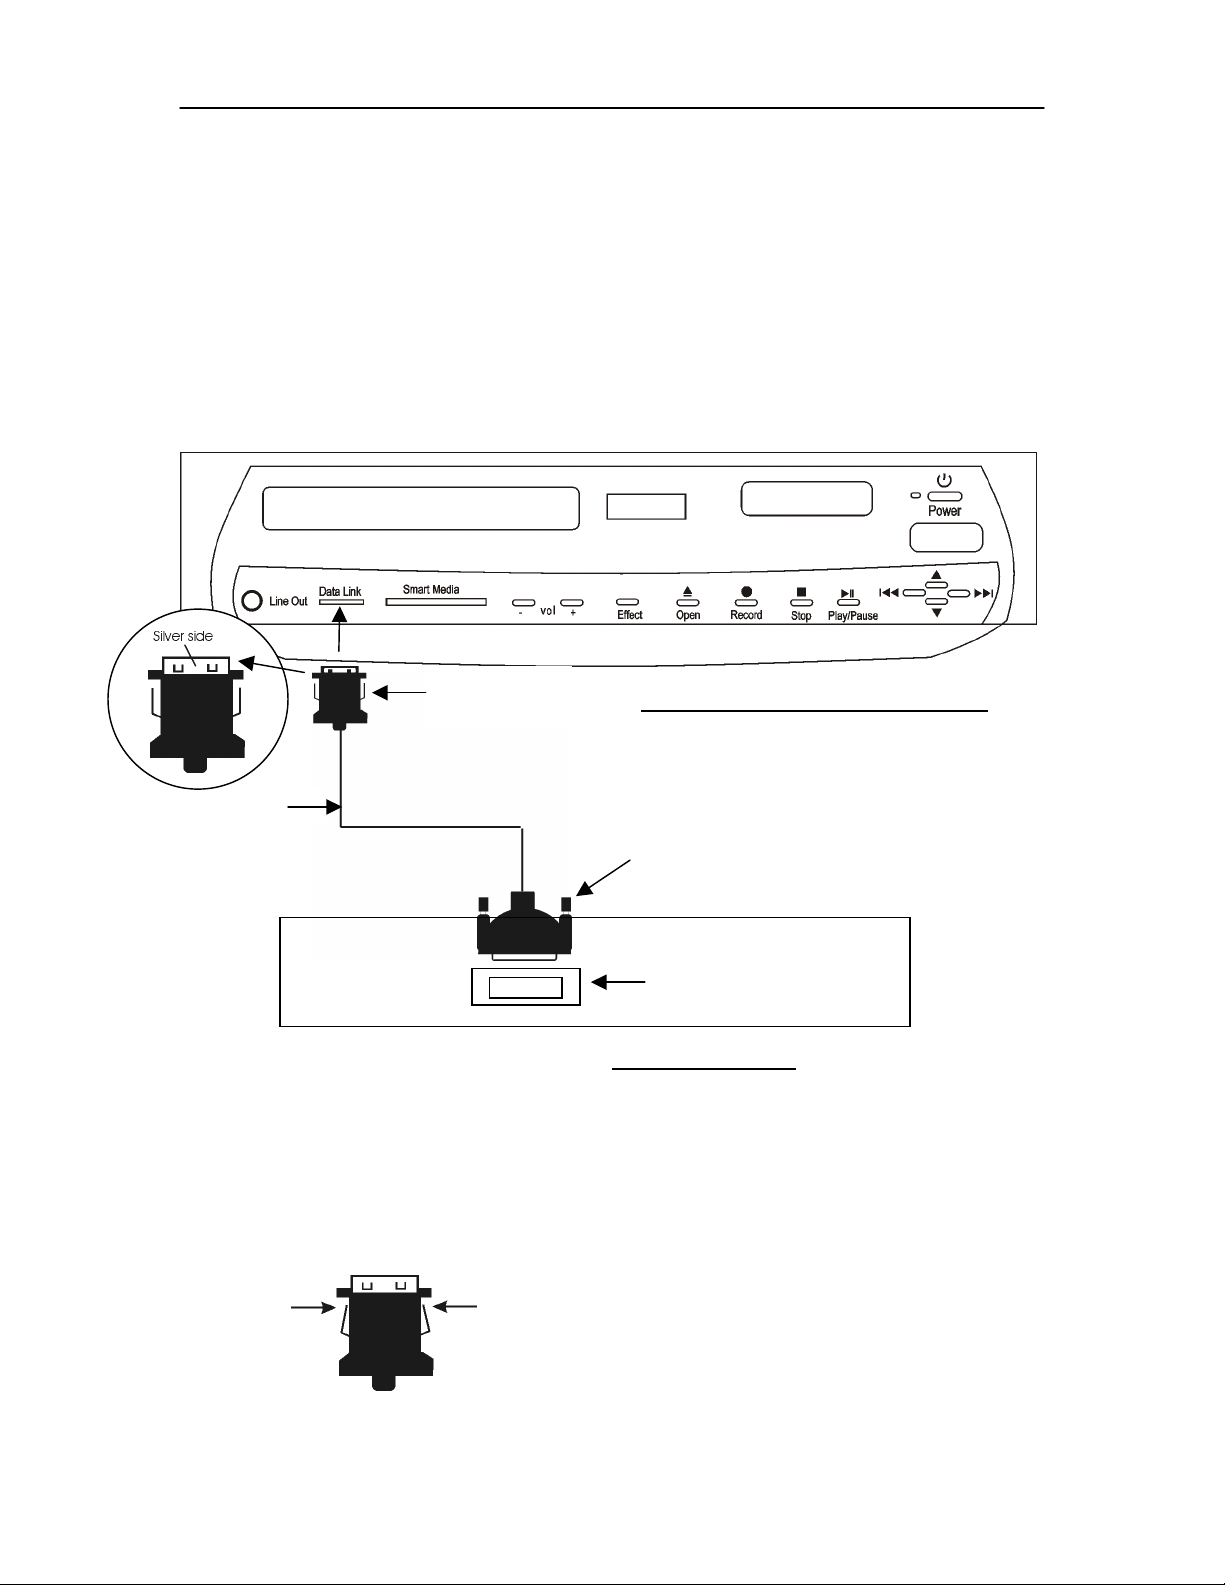
Making Connections
Parallel Port – with standard parallel port
The PC Link cable provided with your I-Mix unit is unique. It is fitted with a parallel port adapter
for your PC on one end, and a Data Link adapter for the I-Mix on the other. If you want to
connect to a USB port on your computer you must use the optional USB-1 parallel-to-USB
converter. These converters are custom made for the I-Mix and can be ordered from Sima. See
Accessories for order information. To connect the I-Mix to a USB port on your PC, refer to page
7.
Data link adapter
2
Front Diagram IM – 100 / IM-120
PC Link cable
1
Parallel port adapter
..........
........
PC Parallel Port
Rear Diagram PC
Using the diagram above, follow these steps to connect the I-Mix to your PC:
1. Connect the parallel port adapter of the PC Link cable to your computer’s parallel port.
2. Plug the Data Link adapter, silver side facing up, into the I-Mix unit.
: the Data Link adapter plugs into the slot on the front of the unit. It will click when seated
Note
properly.
Squeeze the sides of the Data Link
cable to release the safety catch and
remove it from the I-Mix.
6

PC Link Manual Getting Started
USB Connection – with optional USB adapter
Data link slot Front Diagram IM-100 / IM-120
1
Note:
The USB to parallel port adapter is
equipped with a small LED
indicator light which shows that
the adapter has power and which
blinks as data is being transferred.
USB to parallel
port adapter
(optional)
Standard USB
cable
(not supplied)
PC link
cable
2
3
Rear diagram of PC
4
USB port
Using the diagram above, follow these steps to connect the I-Mix to the USB port on your PC:
1. Plug the Data Link adapter, silver side facing up, into the I-Mix unit.
Link adapter plugs into the Data Link slot on the front of the unit. It will click when
seated properly. To remove Data Link cable from I-Mix, squeeze sides to release
safety catch.
2. Connect the USB-to-parallel port adapter to the parallel port end of the PC link cable.
3. Connect a standard USB cable (not supplied) to the USB-to-parallel port adapter.
4. Connect the USB cable to the USB port on your PC.
: the Data Link adapter plugs into the slot on the front of the unit. It will click when seated
Note
properly.
Squeeze the sides of the Data Link
cable to release the safety catch and
remove it from the I-Mix.
Note
: the Data
7
PC Link Manual Installing PC Link
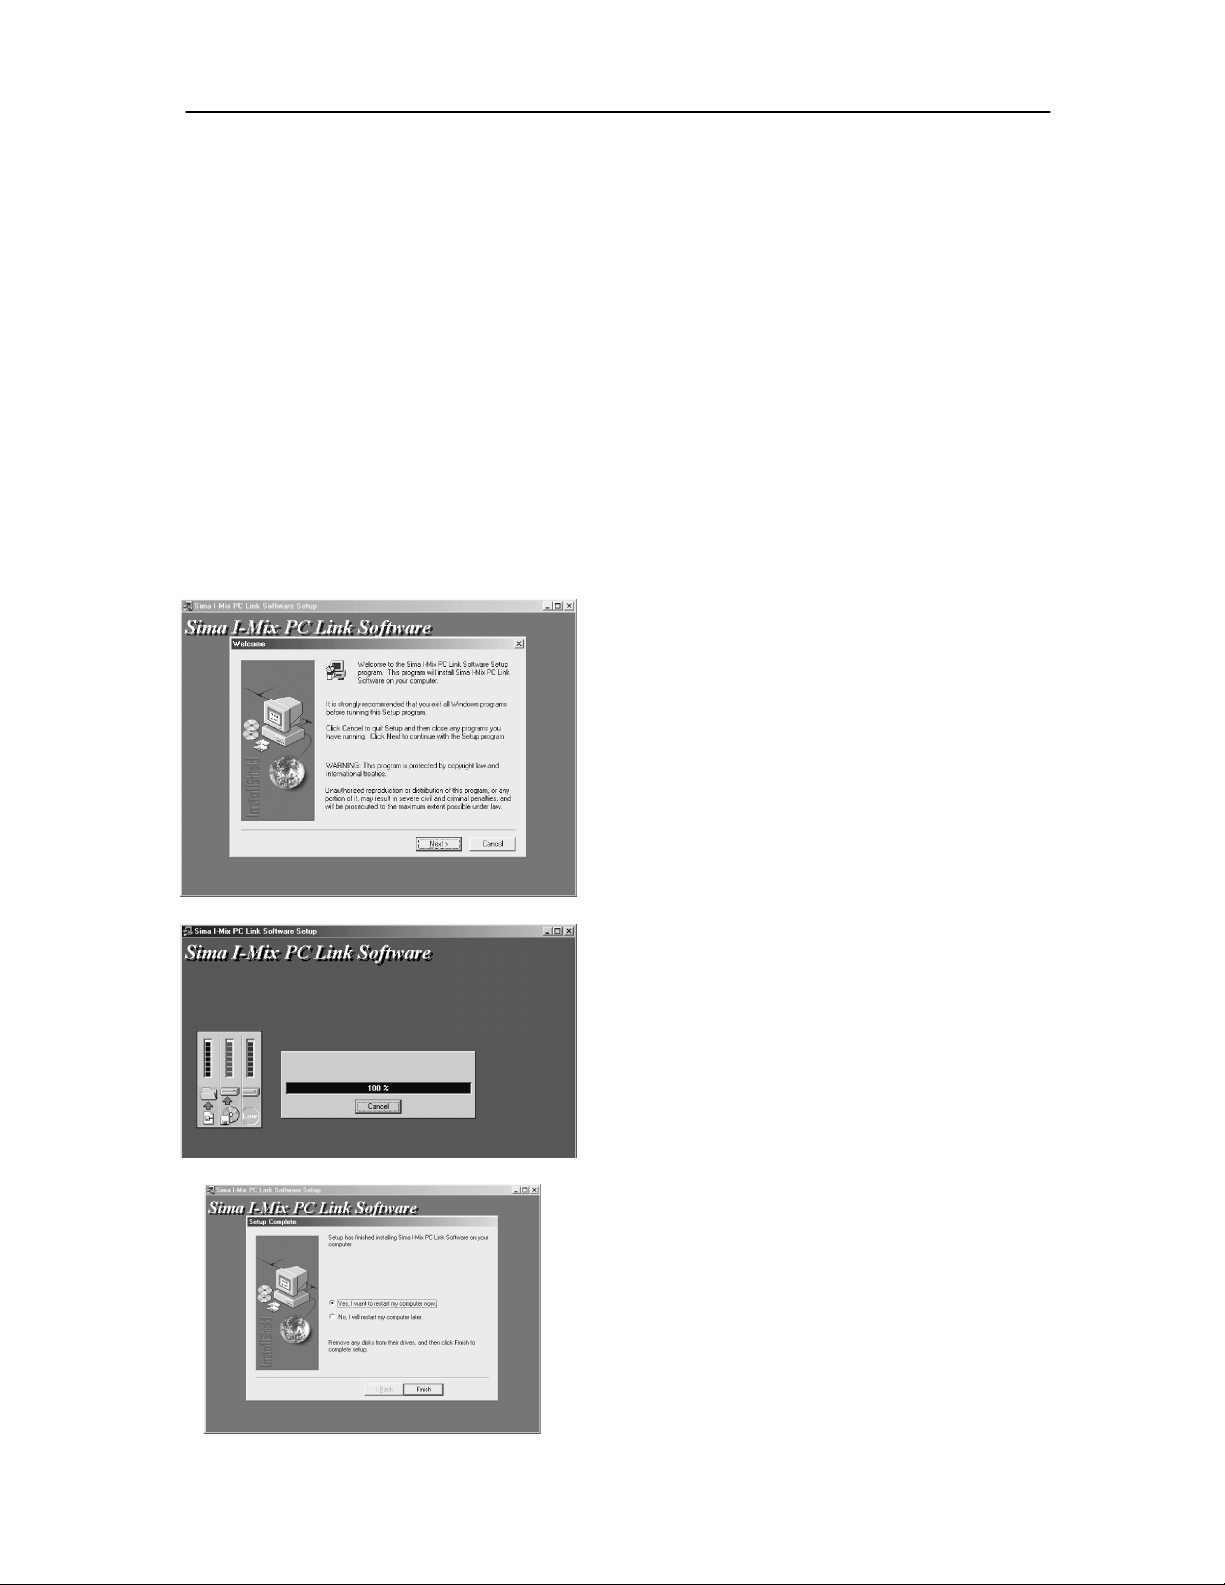
Installing PC Link Software
To install PC Link software:
1. Insert the PC Link CD –ROM into your computer’s CD drive
Note: In some cases, Windows may automatically execute the installation.
To initiate installation yourself:
2. Click on the “Start” button in Windows.
3. Select “Run”.
4. Select “Browse”.
5. Choose the disc drive containing the PC Link CD-ROM
6. Select “setup.exe”.
7.
Click “OK”.
Once set-up has begun, follow the prompts as needed.
The PC Link install screen will appear as follows:
Click on ”Next” to proceed. PC
Link will identify the
destination directory into which
the program will be installed. If
you want to install PC Link into
another folder, click “browse”
and select another folder. Then
click on the “Next” button
The installation of PC Link
will be completed
automatically. When finished,
click on the “Finish” button to
restart your computer.
8

PC Link Manual Starting PC Link
Starting PC Link
To start the PC Link program, be sure the I-Mix is powered on and the PC Link cable is
connected between the I-Mix and your PC. Begin from the main menu.
PC screen I-Mix Display
Window
Click on the “Start” menu in Windows, select “Programs” and
Choose the Sima I-Mix folder.
Click on the Sima I-Mix PC Link Software
CD
3. PC message will read: “Connecting to I-Mix”
and PC Link will attempt to connect the I-Mix to your PC.
I-Mix will display “Parallel Port Connecting…” message,
PC Link software will automatically determine whether your PC is
talking to the I-mix unit with a parallel or USB port.
After a few seconds, I-Mix will acknowledge whether or not a successful
connection has been made. If successful the I-Mix will display “Parallel
Port” in the LCD window.
If the connection is not successful, the I-Mix and you PC will both
display a failed connection message. If the connection is unsuccessful,
refer to the Trouble Shooting Guidein this manual.
Parallel Port
Connecting ...
Parallel Port
Connect Success!!!
Parallel Port
Parallel Port
Connect Failed
9

PC Link Manual Using PC Link
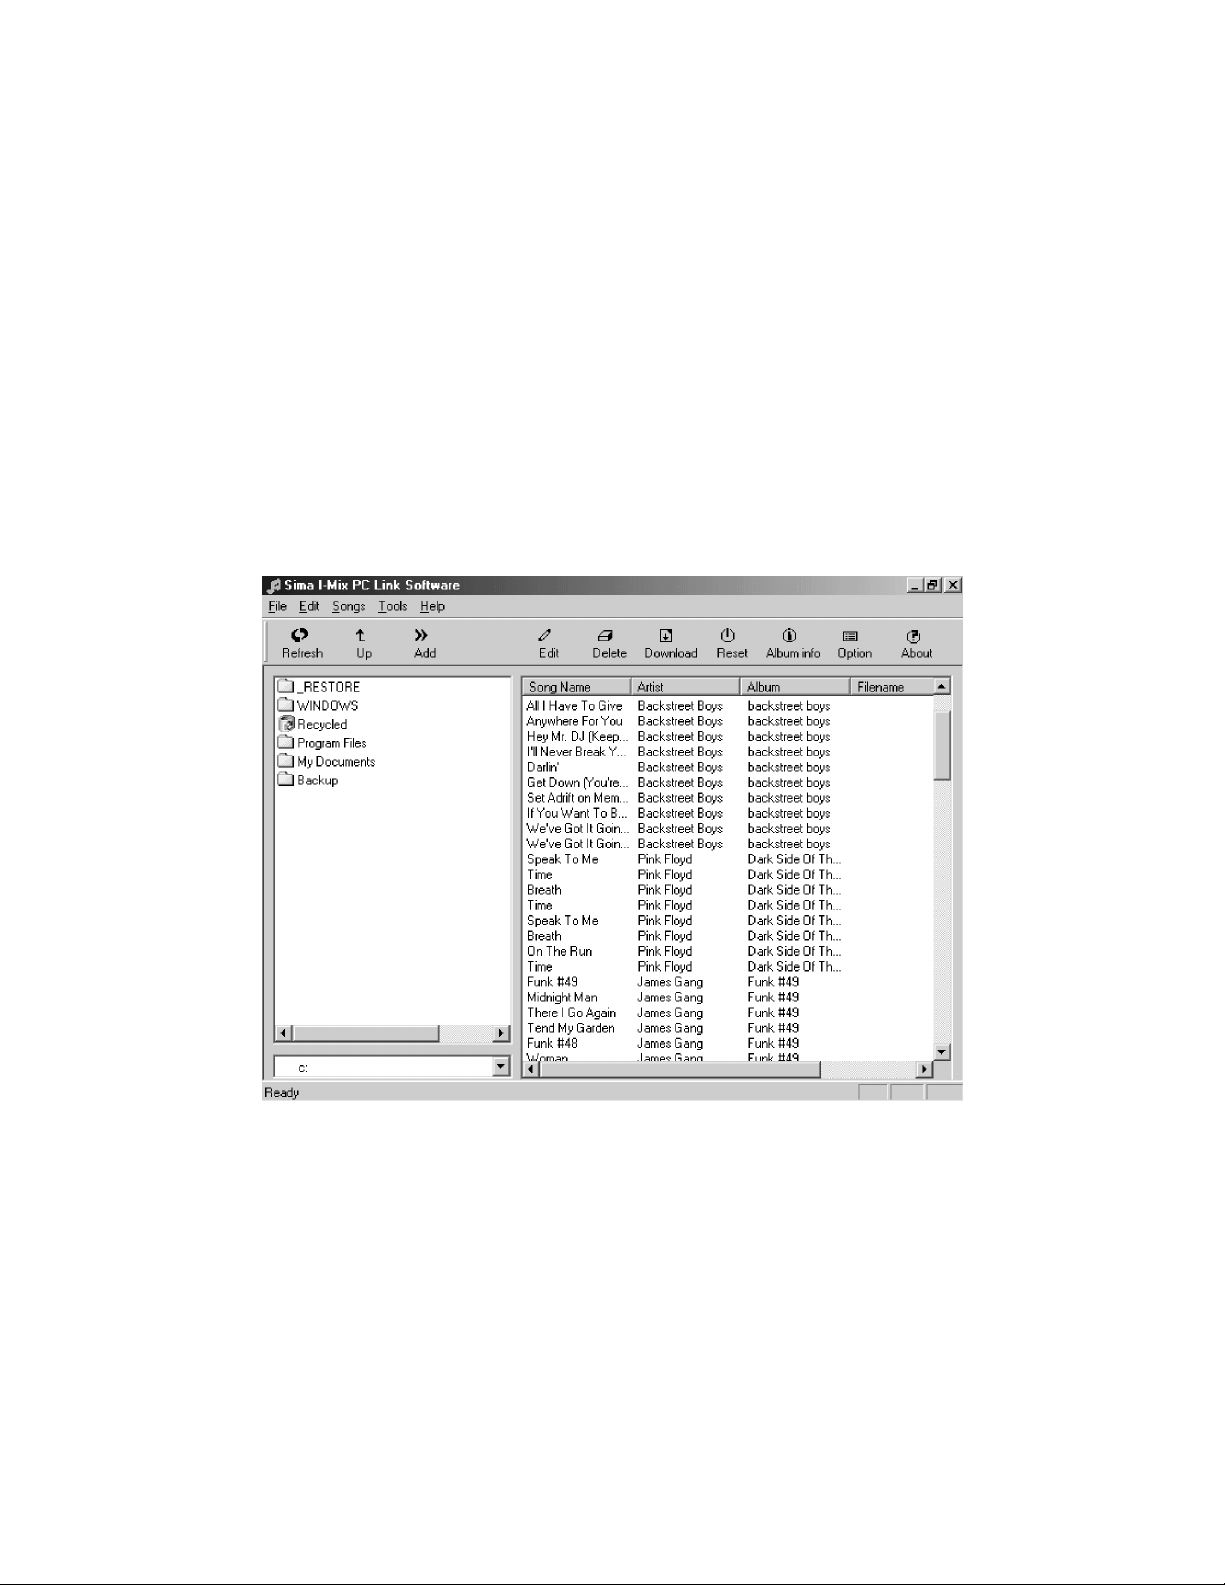
Interface Diagram
After successfully connecting, you will see the screen below.
PC Side
Refresh Add Edit Download Album info About
Up Delete Reset Option
I- Mix Side
PC directory
PC Menu
Refresh
Up Add
- Updates screen in active folder on PC side.
Moves back one level in the directory tree.
Creates a cue of copied files from your PC to the I-Mix side.
-
I-Mix Menu
Edit -
- To delete MP3 files from the copy cue before they are transferred to the I-Mix
Delete
Download
- To update the screen display of the I-Mix menu.
Reset
Album Info
Option -
- Provides PC Link software version number and website address for Sima Corp.
About
10
To change names of albums, songs or artists in the I-Mix.
- To transfer changes made to the songlist using PC Link.
- Provides access to CDDB.
Allows you to select either parallel port or USB connection mode.

PC Link Manual Using PC Link
Using PC Link - Overview
When CDs are recorded into the I-Mix, the album, song and artist titles are assigned a generic
sequence name such as !Album 0001, Track 01, !Artist 0001 etc.... They retain the generic names
until you identify them.
There are four ways to name CD songs, albums and artists:
• Use the internal Intelligent CD recognition database in the I-Mix,
• Type in the names using the RM-12 remote control.
• Change titles using PC and PC Link software
• Accessing the CDDB database using PC and PC Link software.
PC Link uploads the songlist (not the music!) from the I-Mix to your PC for editing. (The
actual music files remain in the I-Mix.) In this way, you can use the power of your PC to make
changes in the I-Mix songlist.
File transfer flow chart
CDDB
Optional access to
CDDB to transfer music
titles using your PC.
Open PC Link on your computer to
1.
gain access to the I-Mix database.
3a
on your PC, making
changes as needed.
3b
Edit songlist
I-Mix automatically
2.
transfers its songlist
to your PC for
fast and easy editing.
4.
Download and Save button
saves changes and returns
songlist to the I-Mix’s hard
drive.
11

PC Link Manual Using PC Link
PC Link interface
As with other Windows-compatible applications, the PC Link window can be re-sized
and custom-shaped to meet your preference.
Pull down menus – contain same functions,
(Edit, Delete, etc..) as buttons below.
The _ X buttons (located
in the upper right corner)
control the Minimize ( _ )
Maximize () and Close
(X) functions.
Scroll arrows and bars –
scrolls window from top to
bottom and side to side.
Sizing arrow- re-sizes
entire window. Click and
hold while re-sizing
12

PC Link Manual Using PC Link
PC Link Functions
Overview:
As your music library grows, identifying and organizing your music information will prove to
be a powerful tool. You may want to rename albums or artists in order to find them more easily
and efficiently. For example, you may want to eliminate “The” from artist titles. Alphabetically,
“The Who” and “The Beatles” and “The Grateful Dead” will all appear listed under the letter “T”.
Using the Edit function, you can change all of “The Beatles” titles to “Beatles” at once.
If you have two albums with the same exact name, such as “Greatest Hits” by the Monkees and
“Greatest Hits “ by Todd Rungren, I-Mix will combine all the songs under one album heading
called “Greatest Hits”. However, the song and artist names will retain the appropriate
information. Use the Edit menu to separate and re-name them.
Edit
The
Edit
can also name music recorded from analog sources, such as tapes, records and line-in recordings.
Intelligent CD Recognition and CDDB do not identify analog recordings.
To use the Edit menu follow the steps below:
Hint: You can quickly move the cursor
to a letter category in the list by typing
the first letter of a song name on your PC
keyboard. For example, typing the letter
“a” will highlight the first song name
beginning with the letter “a”. Typing “a”
a second time, will select the next song
beginning with the letter “a” and so on.
function allows you to rename songs, albums or artists using your PC keyboard. You
1. Select an individual title or a group
1
of titles using the “Song Name”
column on the I-Mix (right-hand
side) of the screen. See Tip below.
Tip:
PC Link uses standard Windows
selection options. To select more than
one song, hold down the control button
(“Ctrl”) on your PC keyboard, while
using the left mouse button to select
songs.
To select a continuous block of songs,
click on the first song, hold the “shift”
button down and click on the last song.
All songs in between will be highlighted.
Pressing a single letter on your PC
keyboard will select the first entry in
that letter category.
A slow double-click on a song name will
enable you to edit it without entering the
Edit menu
.
13

PC Link Manual Using PC Link
2 3
4 5
2. Click on the “Edit” button
The Edit menu will appear as illustrated
in Fig. 2 at left.
3. Make changes as needed.
A single song name can be edited
by itself. However, if more than one
song is selected, only the artist and
album names can be edited for the
selected group.
Click “OK”
4.
Save the changes you’ve made
by clicking the Download
button.
5. You can exit PC Link at this
time by clicking the “Close”
button (X) in the upper right hand
corner.
After exiting PC Link, the I-mix will
return to its normal function.
Or
6. You can make additional
changes using other functions in
PC Link.
14

PC Link Manual Using PC Link
Sorting and Organizing
1. Column width - The width of the song/artist/album columns are adjustable by sliding
the divider bars located in the shaded column-heading space. To change the width of a
column, click and hold the cross-hair that appears when the cursor passes over the
column divider bars, then slide the column width right or left as needed.
2. List order - The categories in the songlist can be organized or grouped either by the
song name, artist, or album. Click on the shaded category heading to sort the lists. The
lists in all columns are automatically adjusted to reflect the sorting performed by the
selected column.
.
by Songs:
The song list can be sorted into alphabetical order by clicking once on the shaded
“Song Name” button at the top of the song list. Click a second time to invert the order
from bottom to top. When songs are sorted alphabetically, album and artist name lists are
mixed to reflect the song order.
2
–
1
by Albums:
Albums can also be sorted by alphabetical order. Click once on the shaded “Album”
button at the top of the Album list to sort by alphabetical order. Click a second time to
invert the order from bottom to top. When sorted by album, song and artist lists will be
grouped to reflect album track order. (This is the order tracks appear on the CD.)
by Artists
Artists’ names can be sorted alphabetically by clicking once on the shaded button located
at the top of the “Artist” list. Click a second time to invert the order from bottom to top.
When sorting by artist, songs will be sorted using the criteria they were last sorted on. For
example, if you first sort songs alphabetically and then sort by artist, the songs for a given
artist will be sorted alphabetically. On the other hand, if you sort first by album, then by
artist, the songs will be in album track order.
15

PC Link Manual Using PC Link
Export and Copy
You can export all or a portion of your I-Mix songlist as a tab delimited text file (.txt) in order to
paste it into other applications, such as word processing or spreadsheet programs. In addition, you
can copy all or a portion of your I-Mix songlist to the Windows clipboard and paste it into other
applications.
Export
To export the songlist as a text (.txt) file follow the steps below:
1. Select the titles you want to export. (Use “select all” to select all entries at once.)
2.
Click on the right-hand mouse button.
down while clicking mouse. Otherwise highlighted items will be de-selected.
3. Select Export.
4. Select a directory.
5. Type in a file name. (“xxxx.txt”)
6. Click “OK”
7. File “xxxx.txt” will appear in the directory indicated in step 4.
Tip: click over shaded area or hold Shift button
Copy
To copy the songlist to the Windows clipboard follow the steps below:
1. Select the titles you want to export. (Use “select all” to select all entries at once.)
2.
Click the right-hand mouse button.
down while clicking mouse. Otherwise highlighted items will be de-selected.
3. Select “Copy”.
4. Click “OK”
5. Highlighted titles will be copied to Windows clipboard
6. Enter your application of choice
7.
Select “Paste” to copy from clipboard.
Tip: click over shaded area or hold shift button
16

PC Link Manual Using PC Link
Other PC Link Functions
Download
The Download function executes the changes made to the songlist and saves them on the
I-Mix’s hard drive. Note: Any title edits or file transfers must be downloaded to be
saved permanently. Titles downloaded from CDDB, however, are automatically saved
the I-Mix’s hard drive when the “Accept” button on the CDDB menu is clicked.
Delete
The Delete function allows you to undo the cue of MP3 files copied from the PC for
downloading to the I-Mix songlist. Use the delete function prior to downloading. Once
downloaded, files cannot be deleted from the I-Mix songlist using the delete function in
PC link. Note: this delete function does not delete any songs from the I-Mix – only
from the list to be copied from your PC.
Reset
The Reset function updates the I-Mix portion of the PC Link screen by re-loading the
songlist from the I-Mix unit. Reminder: If you select the Reset button, before
saving your changes with the Download button, the changes will be lost.
PC Menu
Overview
If you have MP3 songs on your computer that either were copied from CDs or otherwise
obtained, these songs can be transferred to the I-Mix. The left-hand of the PC Link screen
displays all of the folders and any MP3 songs in a given directory on your PC. Choose
the directory your want by using the PC directory window located in the bottom left
corner of the screen.
Refresh
The Refresh function updates the PC side of the PC Link screen to reflect any changes
you have made.
Add
The Add function adds the name of a song to cue of MP3 songs to be downloaded to the
I-Mix. Note: To look at the MP3 copy cue, scroll to the bottom of the “Song Name”
column. All copied files will be added at the end of the songlist. Their original directory
locations will be listed under the “Filename” column. Only the MP3 songs in the copy
cue will have a directory reference listed in the “Filename” column. After downloading to
the I-Mix’s hard drive, the directory reference will no longer appear.
17

PC Link Manual Using PC Link
Add – cont.
When copying MP3 songs to the I-Mix from your PC, allow approximately 1 minute per
each Mb of information for songs compressed at 128K bps. Note: the I-Mix does not
modify compression rates. Songs will be transferred and played at the rate of
compression selected when the MP3 file was created. A 4-minute song, compressed at
128Kbps, will take about 4 minutes to download to the I-Mix. A 4-minute song
compressed at 256Kbps will take about 8 minutes to download to the I-Mix.
18

PC Link Manual Album Information
Album info
Overview
Although the I-Mix 100/120 comes with a large built-in CD title database, the
function connects you to the CDDB website, which maintains a list of over 500,000
song/album/artist titles. CDDB may be able to provide information for rare, hard-to-find albums,
which are not included in the I-Mix’s internal database.
Your computer needs to be connected to the Internet, or you will not be able to access CDDB.
If you subscribe to America Online or another Internet provider that requires the use of their
gateway to the Internet, you must first connect to the provider and enter the Internet, before
selecting Album Info.
The first time you select Album Info, you will be required to complete the registration
process outlined below.
CDDB Registration
Album Info
Note:
on your initial visit, you will automatically begin CDDB from step 6 in subsequent
sessions.
Registering with CDDB is a one-time process. After completing the registration
1. Click on the Album Info button. 1
2. To register with CDDB for the first time, select the “new registration” option
A “Terms of use” screen will appear with
a legal explanation of the rules regarding
registering with CDDB. You must agree
to the terms of use to proceed.
Click in the “ I agree” box and then
click on the “Next” button at the
bottom of the screen.
.
2
19

PC Link Manual Album Information
You will see the CDDB registration screen below.
3. After completing the
click on the
registration menu,
“Next” button.
An “E-mail” and a “Personalized
service” screen will appear
through which you can authorize
CDDB to provide special
services. Click “Next” on each
screen to proceed
4. An address screen will appear.
5. You have successfully registered with CDDB.
3
Complete the information requested.
20

PC Link Manual Album Information
Accessing Web database
After your initial registration with CDDB, the
“Get Album Information” screen. To use Album Info, follow the steps below.
Album Info
Get Album Information menu
6 7
8
6. Highlight the albums in the I-Mix that you
want to identify.
You can select individual or multiple albums.
7. Click on the Match button.
8. When CDDB identifies the albums you have
selected, it will display the album/artist/song title
information in the “Potential Matches” window
button will automatically bring up the
Overview
You can select one or more
albums in the “Albums on
I-Mix” window on top. When
you click “Match”, CDDB
attempts to match your
selection(s) for display in the
“Potential matches” window.
Note: CDDB compares the
number of tracks and the
length of each track on your
album request to determine if it
matches an album in the
CDDB database.
21

PC Link Manual Album Information
8 9
10
8. Click on the “Accept” button to download the
CDDB information.
The album/artist/song title information will be
transferred directly to the I-Mix’s hard drive. It
takes about 5 seconds per album to transfer. After
the information has been transferred, the songlist
will be updated on the PC screen. Depending on the
size of your songlist, it may take up to 1 minute to
update the songlist on your PC screen.
There are two possible fail-to-match messages
Note:
that may appear at this point.
1. Not a valid CD –
files or analog recordings. Typically CDDB will
only identify standard original music CDs.
2.
No match –
CDDB database. If CDDB cannot identify the
album, it will display a message stating the
album is not available and will give you an
option to provide album information.
CDDB will not identify MP3
New or rare CDs may not be in the
9. Using the “More” button, you can also get
detailed information about the album such as the
year, record label, notes, credits and website links.
10. To exit the “More” menu, click the “Close”
button (X) in the upper right hand corner or the
“OK” button at the bottom of the screen.
22
To exit the Album Info screen, click on the “Close”
button or the “X” at the top of the screen.
If you exit the Album Info screen by using the
“Close” button, the PC Link screen will be
refreshed to reflect the changes. If you exit the
Album Info screen by using the “X” button, the
information provided by CDDB will be saved in the
I-Mix, however to view the changes on the PC Link
screen, you must press the Download button.

PC Link Manual Troubleshooting
Troubleshooting
Problem
PC will not connect to I-Mix
Cannot connect to the Internet or no
open sockets.
For current updates to PC link software and this manual, see
the Sima website at www.simacorp.com
Remedy
Note: The parallel port on your PC should be in
the EPP mode. If you do not know how to reconfigure the port setting, consult the
documentation for your PC.
* Check cables and connections making sure that
all connectors are firmly and properly seated.
* Be sure the I-Mix is on, the main menu selected
and no music is playing.
* To reconfigure the parallel port of your PC, enter
the CMOS menu for your PC during the boot-up
process. (See your PC documentation for specific
instructions.)
The parallel port configuration may vary from one
computer to the next. Typically the port can be
configured as Normal, EPP, ECP or ECP/EPP and
a bi-directional setting. Select the EPP setting and
reboot the computer. Try to run the PC Link
software again. If unsuccessful, try the ECP/EPP,
ECP or bi-directional settings.
If your PC is not compatible with a parallel port
and has a USB port, you may need to use the USB
to parallel port adapter. Contact Sima to order.
If using AOL or another ISP with a gateway, you
must log on to AOL or your provider and select
Internet before selecting Album Info.
23

PC Link Manual
Sima Products Corporation
140 Pennsylvania Ave.
Bldg. #5
Oakmont, PA 15139
800-345-7462
www.simacorp.com
questions? Contact us at info@simacorp.com
p/n 21636 / 0105-v117 © 2001 Sima Products Corp.
24
 Loading...