

PROTECTION FROM WITHIN
PANTHER
user guide
®
[1]
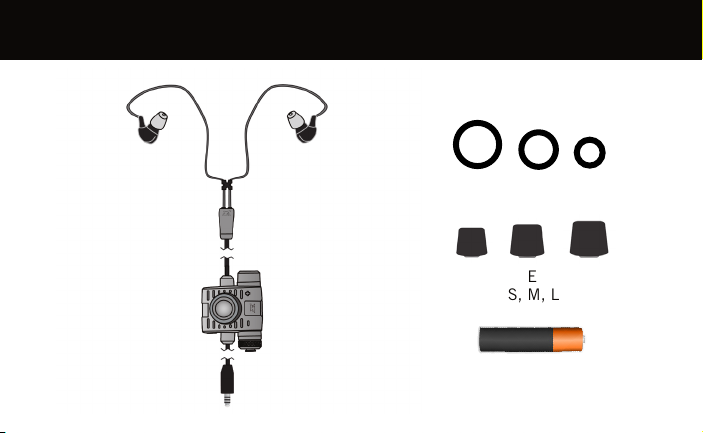
PANTHER SYSTEM COMPONENTS
In-Ear Headset
TM
Contact Rings
SureFit
Foam Ear Tips
Control Unit
S, M, L
Nexus Male TP-120
Connector
AAA Battery

PANTHER HEADSET
[2]
[4]
Ear Bud
Nape Adjuster
System On / Off
Hear-Thru Volume
Nexus Male TP-120
Connector
External Microphone
Foam Ear Tip
AAA Battery Chamber

[3]
[5]
Panther uses bone conduction microphone (BCM) technology for voice transmissions through the
system. This means that contact between the ear cartlage toward the front of the ear (called the
tragus) and the BCM should be maximized to ensure the clearest transmission. To assist with this,
three sizes of SureFitTM Contact Rings that compress are provided to assist contact with the tragus
(Fig 1). Size for the typical user is small. If clear audio is not achieved with the small size, replace
with medium or large by removing the ring from the earbud and simply snapping another size into the
slotted fitment. (Fig 1a)
When properly fit, Panther ear bud should be positioned in the outer ear horizontally such that the
center axis of the earbud is parallel with the ground. Cable should be routed around the ear and back
behind the head. (Fig. 2)
Ensure the microphone blister is in contact with the ear’s tragus (Fig 3).
PANTHER EAR BUD
TRAGUS
FIG 1 FIG 2 FIG 3
FIG 1a

INSERTING EAR BUD
R
[6]
[4]
(1) Gently apply foam ear tip
to ear bud stem by pushing
and slightly twisting.
(3) Ensure SureFit
inside concha bowl of outer ear.
TM
Contact Ring is
(1a) Attach SureFit
Ring to ear bud to seal ear
bud in ear.
TM
Contact
(4) Route cables behind the ear, then use cable
nape adjuster to secure cable behind the head.
(2) Roll Foam tip between
fingers. Insert ear bud into ear
canal with a twisting motion.
(See details in “Panther Ear
Bud” section)

[5]
-+
AAA
[3]
OPERATION
(1) Insert a single AAA
battery.
(2) Connect PANTHER to
U94 (or other PTT System
with Nexus female jack).
(3) To power on, press and
hold the center button for 5
seconds, until you hear the
voice prompt, “Unit On”.
(4) Press center button to
increase / decrease Hear-Thru
sensitivity level.
(5) To key your radio press the
PTT button on your U94.
(6) To power off, press and
hold the center button for 5
seconds, until you hear the
voice prompt, “Unit Off”.

1-YEAR LIMITED WARRANTY
Silynx Communications, Inc. warrants that this product will be free from defects in design, material,
and workmanship during normal use for a period of one (1) year from the date of product purchase.
This warranty shall extend only to the buyer on the original receipt and may not be transferred to any
other party. This warranty is valid only when and if:
(a) Written notice of the product failure is received within the warranty period;
(b) The product is properly packed and returned by the buyer; and
(c) The product has not been subjected to misuse, neglect, improper use, accident, acts
of war, or any unauthorized modification, repair, or alteration, as determined solely by
Silynx Communications, Inc.
This warranty excludes consumable items such as ear retainers, foam ear plugs, batteries, and similar
items. During the warranty period, the exclusive obligation of Silynx Communications, Inc. shall be
limited to repair or replacement of any defective part or parts, or a full refund of the price originally
paid for the product, based on the sole discretion of Silynx Communications, Inc. There are no other
warranties, either express or implied, and in no event shall Silynx Communications, Inc. be liable
for any losses or damages caused by floods, lightening, other acts of nature, or any Force Majeure.
[2]

1.866.325.1731 | info@silynxcom.com | customersupport@silynxcom.com
www.silynxcom.com
PANTHER User Guide - Rev 01, Dec 2017 ALL RIGHTS RESERVED COPYRIGHT
 Loading...