

Page 1
Page 2
Page 3
2
TS432U
PRODUCT INTRODUCTION
SilverStone created an incredible storage product in the TS432U. It connects to the PC via 5Gbps SuperSpeed USB 3.0 interface or 3Gbps eSATA interface which enables data transfer with maximum compatibility
and stability. A full range of RAID modes (RAID 0, 1, 3, 5, 10, Combine, Clear RAID) are supported and a
practical duplication mode that allows you to transfer data even without a PC.
Additional features includes a clear LCD panel situated at the front of the device displaying operating status
and two cooling fans help HDD dissipate heat. The TS432U offers a convenient and economical way to store
data and is suitable for all users that require frequent backup and data manipulation.
SYSTEM REQUIREMENTS
1. PC
USB 3.0 (USB2.0/USB 1.1): Windows XP/Vista/7
2. Mac
USB 2.0 (USB 1.1): Mac OS 10.2 or above
3. Linux
USB 3.0 (downwards Compatible with USB2.0/USB 1.1): Linux Kernel 2.6.31 or above
HARD DISK SUPPORT
• Four 3.5” SATA I, SATA II hard drive disk
• Up to 4TB per HDD is supported(only within Windows 7/Vista)
PACKAGE CONTENT
1. Power Cord
2. USB 3.0 Cable
3. eSATA Cable
4. User Manual
1 2
3
4
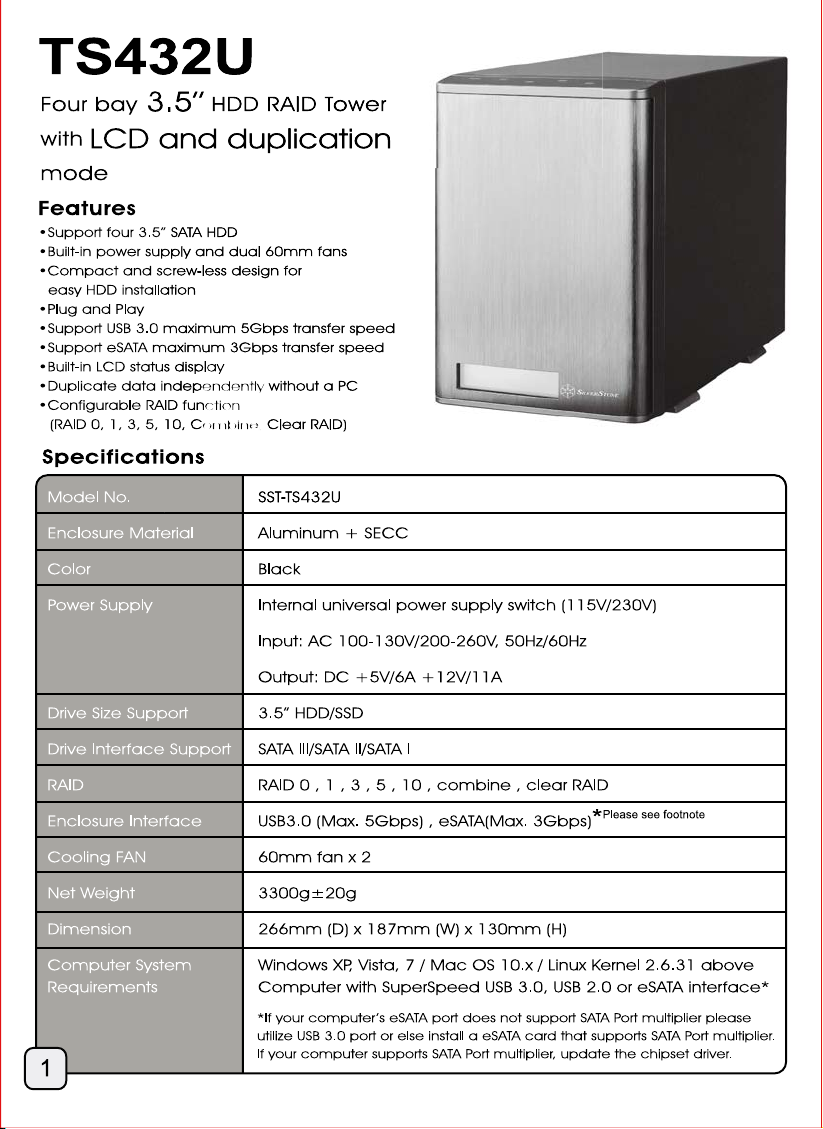
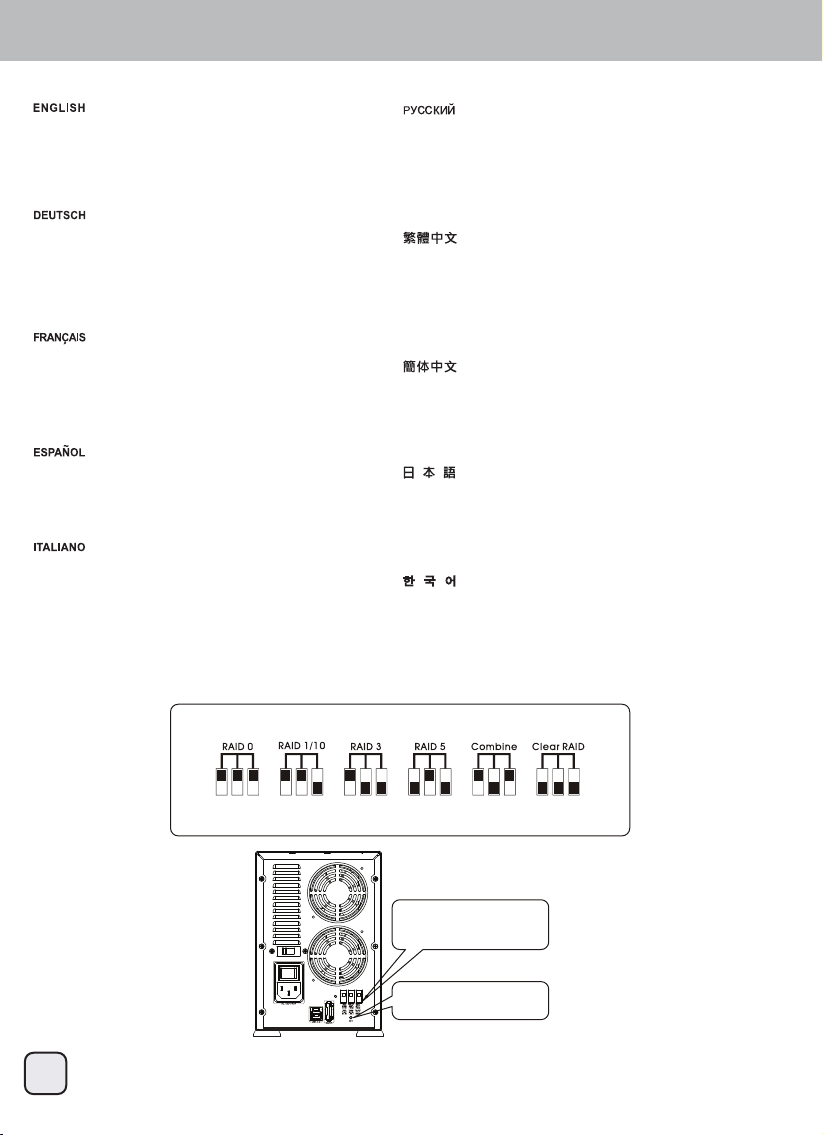
HARDWARE GUIDE
USB 3.0 Port
eSATA Port
Power Voltage Switch
Power Cord Plug
RAID Switch
SET Button
LCD Panel
Button
Front Door
LCD Display Panel
Buckle
LED Indicator
UP ENT
DOWN ESC
Main Power Switch
Page 4

TS432U
3
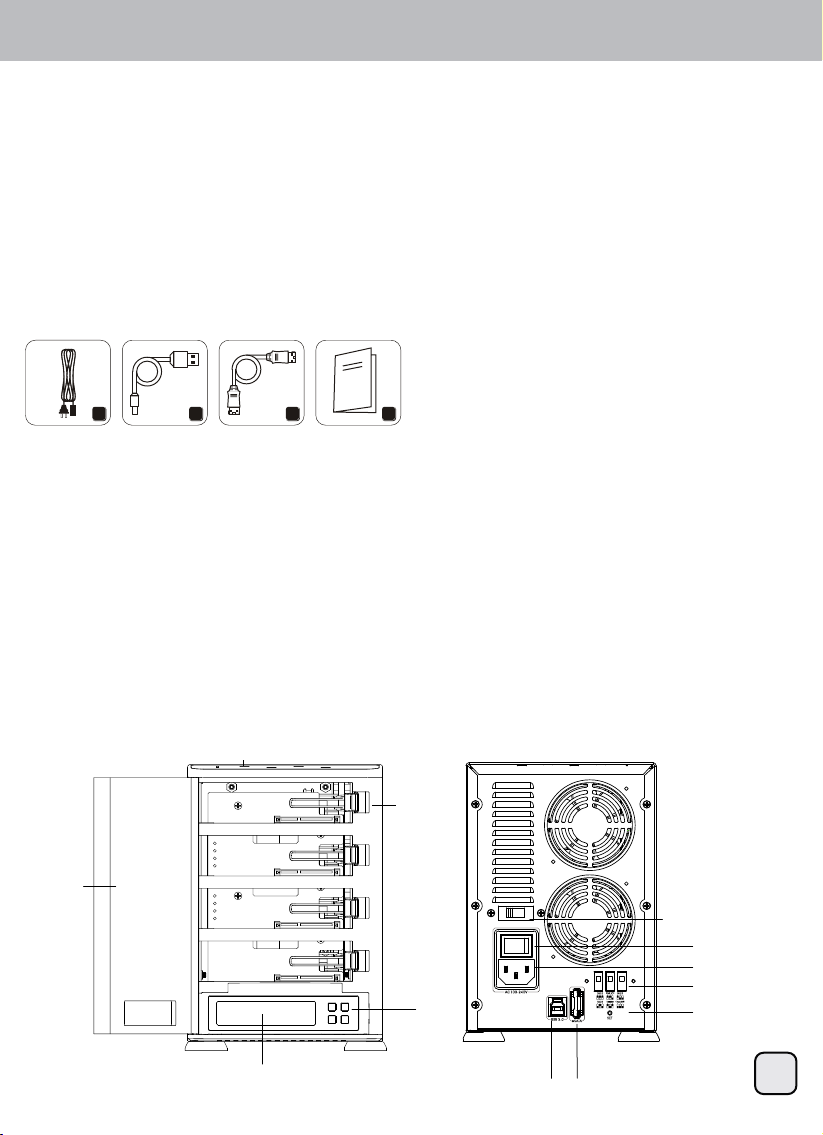
Hard drive installation
1
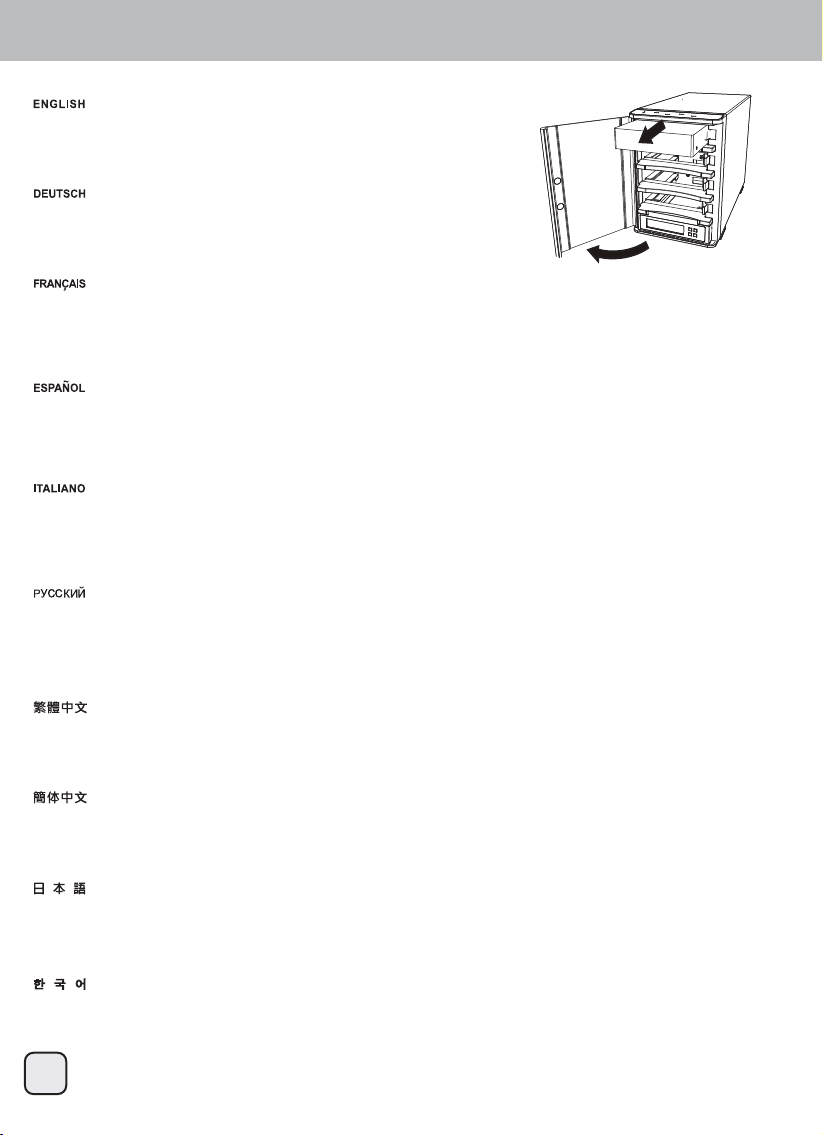
Open the front door Откройте переднюю дверцу
ࣇࣟࣥࢺࢻࢆ㛤ࡃ
䘸⦔䏬ٻ⓸㛨⪰ٻ㜨Ḕ
ᢉ䯁ࢃ䮶
ᢉᔶࢃ䰞
Ouvrez la porte d’accès frontal
Abra la puerta frontal
Aprire il portello frontale
Öffnen Sie die Frontklappe
Slide the HDD in until the latch click Переместите жесткий диск
до щелчка
ࣛࢵࢳࡀ࢝ࢳࢵ㬆ࡿࡲ࡛+''
ࢆࢫࣛࢻࡉࡏࡲࡍ
⣌㾌ᴴٻ㵤㾩ٻ㋀⫠⪰ٻ⇰ٻ⚀ᾀ㫴ٻڣڟڟ
⪰ٻⴴ㛨ٻ≗㡰㐡㐐㝘
ሽ⺢⻕ቅᗹ൦᭴ޛ⺢⻕″θ
ᖶޝ᧞ࡦരᇐগῡᢙр
ሼ⺢ⴎቅᗹ൦᭴ޛ⺢ⴎ″θ
ᖶ᧞ࡦരᇐগῡᢙр
Faites glisser le disque dur
à l'intérieur jusqu'à ce que vous
entendiez le clic de verrouillage
Deslice el disco duro hasta que
el pestillo haga clic
Far scorrere l’unità HDD finché la
serratura scatta
Festplatte bis zum Einrasten des
Riegels hineinschieben
2
Page 5
TS432U
4
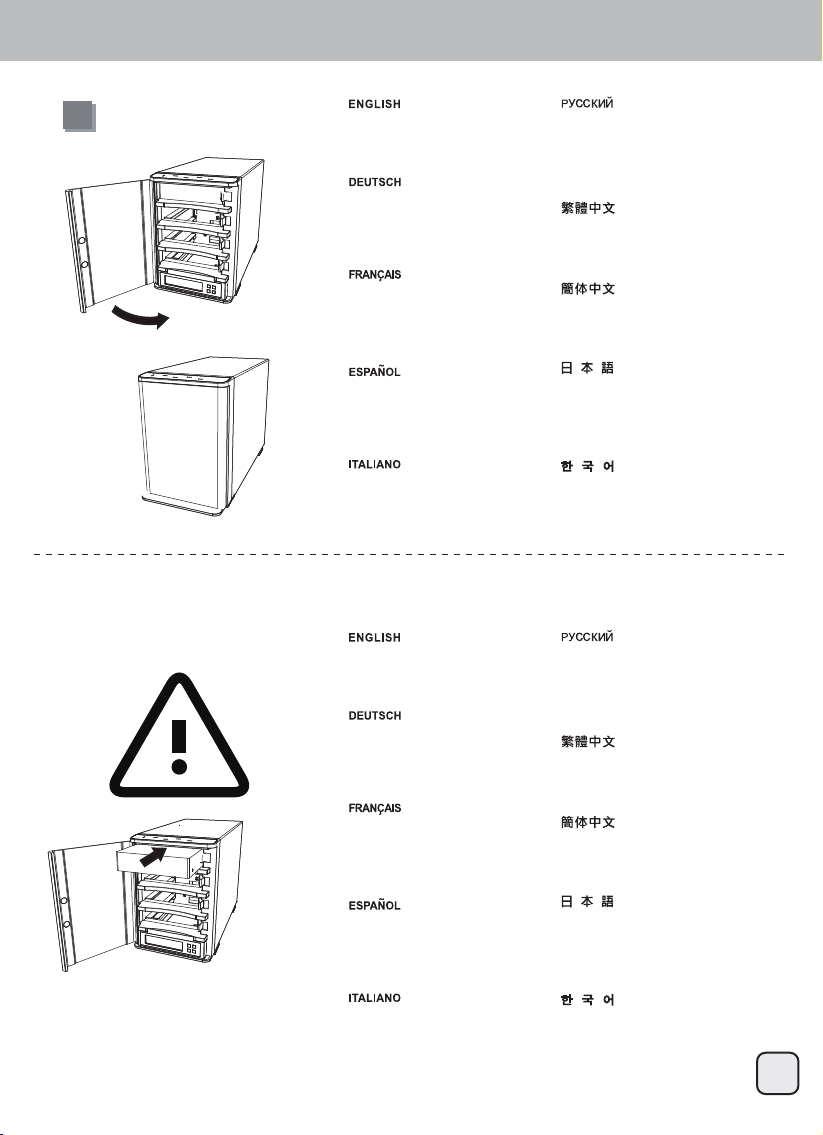
Hard drive installation
Caution
3
Close the front door близко переднюю дверцу
ࣇࣟࣥࢺࢻࢆ㛢ࡵࡿ
䘸⦔䏬ٻ⓸㛨⪰ٻ␟㏩⏼␘
䰒䮿ࢃ䮶
ީ䰣ࢃ䰞
Fermer la porte d’accès frontal
Cerrar la puerta frontal
Chiudere il portello frontale
Schließen Sie die Frontklappe
The HDD might be damaged if
not installed correctly
Если жесткий диск не
устанавливается надлежащим
образом, возможно, он
поврежден
ṇࡋࡃྲྀࡾࡅ࡚࠸࡞࠸ሙྜࠊ+''
ࡀᦆയࡍࡿྍ⬟ᛶࡀ࠶ࡾࡲࡍ
㝠ⵈ⦐ٻ㉘㾌䚌㫴ٻ㙾㡸ٻ㟤ٻڣڟڟᴴٻ
㋄ㇵ╔ٻ㍌ٻ㢼㏩⏼␘
䄁⌞ᝅφྸ⋈ᴿ↙⻰Ⲻᆿ㼓⺢⻕θ
⺢⻕ሽᴿ㜳ᴹᩃ༔Ⱦ
䈭⌞ᝅφྸ⋗ᴿ↙⺤Ⲻᆿ㻻⺢ⴎθ
⺢ⴎሼᴿ㜳ՐᦕඅȾ
Le disque dur peut-être
endommagé s'il n'est pas installé
correctement
El disco duro podría resultar
dañado si no se instala
correctamente
L’unità HDD potrebbe subire
danni se non è installata
correttamente.
Bei unsachgemäßer Installation
kann die Festplatte beschädigt
werden
Page 6
TS432U
Remove the HDD
Open the door and release the latch. The HDD will pop out slightly then pull the HDD out
gently with your hands.
Откройте крышку и освободите фиксатор. После того как жесткий диск слегка выступит, осторожно извлеките его руками.
ࢻࢆ㛤ࡁࠊࣛࢵࢳࢆゎ㝖ࡋࡲࡍࠋ+''ࡀࢃࡎ㣕ࡧฟࡋࡓࡽࠊ୧ᡭ࡛+''ࢆࡑࡗᘬࡁฟࡋࡲࡍࠋ
⓸㛨⪰ٻ㜨Ḕٻ⣌㾌⪰ٻ䚨㥐䚌㐡㐐㝘ډٻڣڟڟᴴٻ㚱ᴸٻ䎴㛨ٻ⇌㝘⮨ٻ㋄㡰⦐ٻڣڟڟ⪰ٻ㷐㷐䢼ٻٻ⾰㐡㐐㝘ډ
〱䲚⺢⻕
ᢉ䯁ࢃ䮶θ༉രᇐগῡ䇉⺢⻕䘶࠰χ❬ᗂቅᗹ൦ሽ⺢⻕࠰Ⱦ
〱䲚⺢ⴎ
ᢉᔶࢃ䰞θুരᇐগῡ䇟⺢ⴎ䘶࠰χ❬ቅᗹ൦ሼ⺢ⴎ࠰Ⱦ
Ouvrez la porte et libérez le verrou. Le disque dur sera doucement éjecté puis tirez légèrement le disque dur vers l'extérieur avec vos mains.
Abra la puerta y quite el pestillo. El disco duro saldrá ligeramente, luego tire con suavidad del disco duro con sus manos
Aprire lo sportello e sbloccare la serratura. L’unità HDD uscirà leggermente; estrarre delicatamente l’unità HDD con le mani.
Öffnen Sie die Tür, geben Sie den Riegel frei. Die Festplatte springt ein Stück heraus;
ziehen Sie die Festplatte vorsichtig von Hand raus.
5
Page 7
TS432U
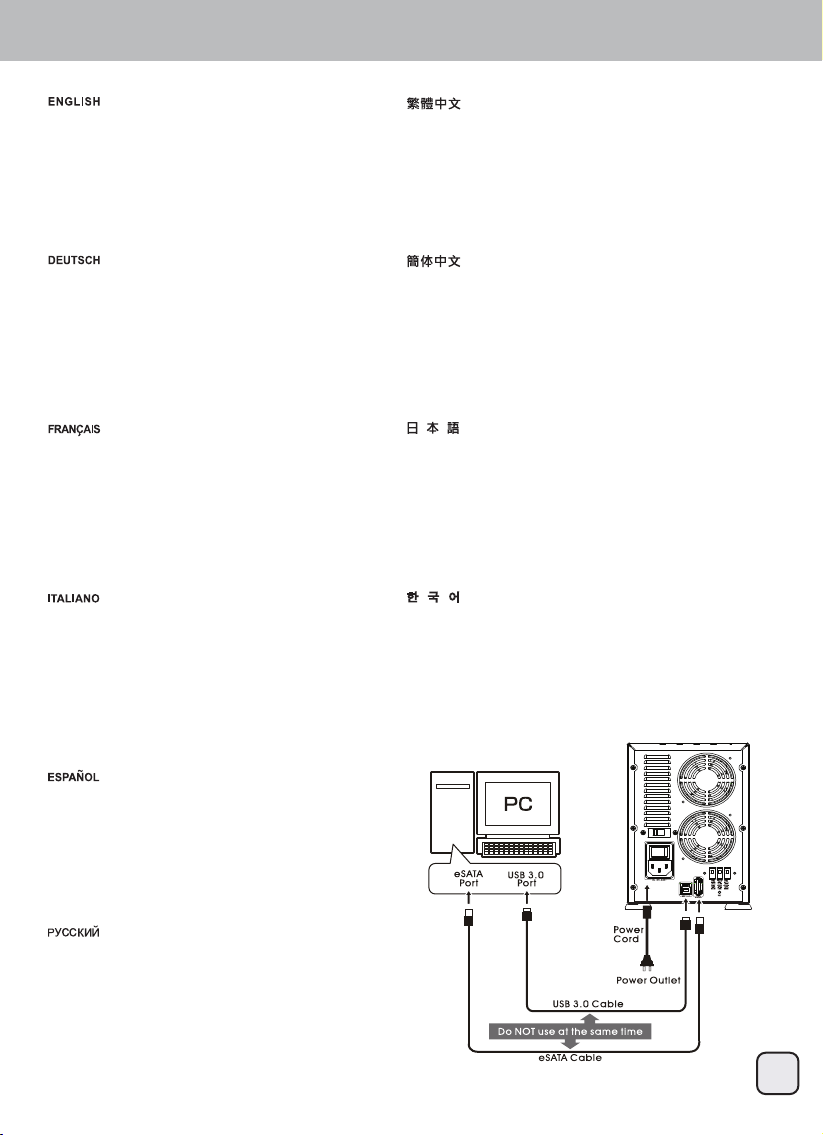
Connect to PC
Connect all cables before turning on the power.
*If your computer’s eSATA port does not support SATA Port
multiplier please utilize USB 3.0 port or else install a eSATA
card that supports SATA Port multiplier.
If your computer supports SATA Port multiplier, update the
chipset driver.
Schließen Sie vor dem Einschalten alle Kabel an.
* Falls der eSATA-Port Ihres Computers keinen
SATA-Portmultiplikator unterstützt, verwenden Sie bitte in
den USB 3.0-Port oder installieren Sie eine eSATA-Karte,
die mit SATA-Portmultiplikatoren kompatibel ist.
Wenn Ihr Computer SATA-Portmultiplikatoren unterstützt,
aktualisieren Sie bitte den Chipsatztreiber
Branchez tous les câbles avant d'allumer.
*Si le port SATA de votre ordinateur ne prend pas en charge
le multiplicateur de ports SATA veuillez utiliser le port USB
3.0 ou installez la carte eSATA qui prend en charge le
multipicateur de ports SATA.
Si votre ordinateur prend en charge le multiplicateur de ports
SATA, mettez à jour le jeu de puces.
Collegare tutti i cavi prima di accendere l'alimentazione
* Se la porta eSATA del computer non supporta il
moltiplicatore di porte SATA, usare la porta USB 3.0,
oppure installare una scheda eSATA che supporti il
moltiplicatore di porte SATA.
Se il computer supporta il moltiplicatore di porte SATA,
aggiornare il driver del chipset.
確定線材全部接妥後,開啓電源。
*如果您電腦的eSATA連接埠,不支援SATA Port multiplier(SATA埠
倍增器)功能,請改用USB 3.0連接埠或重新安裝一片支援SATA Port
multiplier(SATA埠倍增器)功能的eSATA介面卡。
如果您電腦硬體確認有支援SATA Port multiplier(SATA埠倍增器)
功能,卻無法使用。請試試看將您介面卡或主機板晶片組的驅動程式
更新至最新版本。
确定线材全部接妥后,开启电源。
*如果您计算机的eSATA连接端口,不支持SATA Port multiplier
(SATA端口倍增器)功能,请改用USB 3.0连接埠或重新安装一片支
持SATA Port multiplier(SATA端口倍增器)功能的eSATA适配卡。
如果您计算机硬件确认有支持SATA Port multiplier(SATA端口倍增
器)功能,却无法使用。请试试看将您适配卡或主机板芯片组的驱动
程序更新至最新版本。
電源をオンにする前に、全てのケーブルを接続してください。
*お持ちのコンピュータのeSATAポートがSATAポートマルチプライヤ
に未対応の場合、USB 3.0ポートを使用するか、またはSATAポート
マルチプライヤ対応のeSATAカードをインストールしてください。
コンピュータがすでにSATAポートマルチプライヤ対応の場合は、
チップセットドライバをアップデートしてください。
전원을 켜기 전에 모든 케이블을 연결합니다.
*사용자 컴퓨터의 eSATA 포트가 SATA 포트 멀티플라이어를
지원하지 않을 경우 USB 3.0 포트를 사용하거나 SATA 포트
멀티플라이어를 지원하는 eSATA 카드를 설치하십시오.
사용자 컴퓨터가 SATA 포트 멀티플라이어를 지원할 경우 칩셋
드라이브를 업데이트하십시오.
Conecte todos los cables antes de encender el dispositivo.
*Si el puerto eSATA de su ordenador no acepta un puerto
SATA, por favor use un puerto USB 3.0 ó instale una tarjeta
eSATA que acepte un multiplicador de puerto SATA. Si su
ordenador acepta un multiplicador de puerto SATA,
actualice el controlador del chipset.
Перед включением питания подключите все кабели.
*Если порт eSATA вашего компьютера не поддерживает
использование разветвителя портов SATA, используйте
порт USB 3.0 или установите карту eSATA с поддержкой
разветвителя портов SATA.
Если ваш компьютер поддерживает разветвитель портов
SATA, обновите драйвер данного чипсета
6
Page 8
TS432U
Sleep Mode
If hard drive is not accessed for 5 minutes or it is disconnected from computer (including shutdown) the sleep mode will automatically be
activated, both the hard drive and cooling fan will cease to run. Sleep mode will be deactivated once hard drive is accessed again.
Clear RAID mode does not support Sleep Mode.
Если к диску не осуществляется доступ в течение 5 минут или диск отключается от компьютера (в том числе, при выключении
системы), автоматически активируется режим ожидания, а оба жестких диска и вентилятор охлаждения прекращают работу.
Режим ожидания отключается при первой же операции доступа к жесткому диску.
Режим Clear RAID не поддерживает режим ожидания.
ࣁ࣮ࢻࢹࢫࢡࢻࣛࣈࡢࢡࢭࢫࡀศ㛫࡞࠸ࠊࡲࡓࡣࢥࣥࣆ࣮ࣗࢱࡽษ᩿㸦ࢩࣕࢵࢺࢲ࢘ࣥࢆྵࡴ㸧ࡉࢀࡓሙྜࠊ⮬ືⓗࢫ
࣮ࣜࣉ࣮ࣔࢻධࡾࣁ࣮ࢻࢹࢫࢡࢻࣛࣈ෭༷ࣇࣥࡀṆࡋࡲࡍࠋࣁ࣮ࢻࢹࢫࢡࡢࢡࢭࢫࡀ࠶ࡿࠊࢫ࣮ࣜࣉ࣮ࣔࢻࡣゎ
㝖ࡉࢀࡲࡍࠋ
5$,'ࢡ࣮ࣜࣔࢻࡣࢫ࣮ࣜࣉ࣮ࣔࢻᑐᛂࡋ࡚࠸ࡲࡏࢇࠋ
䚌☐ٻ☐⢰㢨⽀㜄ٻڐ⺸ٻ┍㙼ٻ㚕㉬㏘䚌㫴ٻ㙾ᶤ⇌ٻڃⅸὤ⪰ٻ䔠䚜䚌㜠ڄٻ䚌☐ٻ☐⢰㢨⽀ᴴٻ䀨䘜䉤㜄㉐ٻ㜤㢨ٻⅾ㛨㫴⮨ٻὤٻ⯜☐ᴴٻ
㣄┍㡰⦐ٻ㐐㣅╌㛨ڇٻ䚌☐ٻ☐⢰㢨⽀㝴ٻ⇽ᴵٻ䑠㢨ٻ⯜▄ٻ㐘䚽㡸ٻ㩅㫴䚝⏼␘ډٻ䚌☐ٻ☐⢰㢨⽀㜄ٻ␘㐐ٻ㚕㉬㏘䚌ٻ╌⮨ٻὤٻ⯜☐ᴴٻ
⽸䞐㉥䞈╝⏼␘ډ
ڞۇۀڼۍٻڭڜڤڟٻ⯜☐⏈ٻὤٻ⯜☐⪰ٻ㫴㠄䚌㫴ٻ㙾㏩⏼␘ډ
ྸ䎻䚄࠼䩎ᵠ䆶ሡཌⴈ⺢⻕ᡌཌⴈ㠽䴱㞜Ⲻ䙙ѣᯭδ䴱㞜ѱₕ䰒ₕεθཌⴈሽᴹ㠠䙨ޛՇⵖ⁗ᕅθ⺢⻕㠽ཌⴈⲺ仞
ሽᴹڒ↘䚁֒Ⱦ⮬⺢⻕߃⅗㻡䆶ሡᱸθՇⵖ⁗ᕅሽᴹ㠠䰒䮿Ⱦ
⮬5$,'⁗ᕅ䁣ᇐ⛰&OHDU5$,'ᱸθу᭥ᨪՇⵖ⁗ᕅȾ
ྸ䎻䗽࠼䫕ᵠ䈱ߏཌⴈ⺢ⴎᡌཌⴈф䇗㇍ᵰⲺ䘔ѣᯣδ䇗㇍ᵰѱᵰީᵰεθཌⴈሼՐ㠠ࣞ䘑ޛՇⵖ⁗ᕅθ⺢ⴎфཌⴈⲺ
伄ሼՐڒ↘䘆֒Ⱦᖉ⺢ⴎ߃⅗㻡䈱ߏᰬθՇⵖ⁗ᕅሼՐ㠠ࣞީ䰣Ⱦ
ᖉ5$,'⁗ᕅ䇴ᇐѰ&OHDU5$,'ᰬθу᭥ᤷՇⵖ⁗ᕅȾ
Si le disque dur n'est pas utilisé pendant 5 minutes, ou s'il a été débranché de l'ordinateur (y compris l'arrêt), le mode de veille s'activera
automatiquement, et le disque dur et le ventilateur de refroidissement s'arrêteront. Le mode de veille sera désactivé dès l’accès au disque
dur.
Le mode Effacer RAID ne supporte pas le mode de veille.
Si no se accede al disco duro durante 5 minutos o se desconecta del ordenador (se incluye apagarlo) se activará el modo suspensión,
tanto el disco duro como el ventilador dejarán de funcionar. El modo suspensión se desactivará una vez se vuelva a acceder al disco
duro.
El modo Clear RAID no acepta el modo suspensión.
Se non è eseguito l’accesso al disco rigido per 5 minuti, oppure se è scollegato dal computer (compreso l'arresto), la modalità di
sospensione è attivata automaticamente e sia il disco rigido, sia la ventola di raffreddamento cesseranno di funzionare. La modalità
sospensione sarà disattivata quando è eseguito di nuovo l’accesso al disco rigido.
La modalità Clear RAID non supporta la modalità di sospensione.
Falls 5 Minuten nicht auf die Festplatte zugegriffen oder sie vom Computer (inklusive Abschaltung) getrennt wird, wird der Ruhezustand
automatisch aktiviert; sowohl Festplatte als auch Kühler stellen den Betrieb ein. Der Ruhezustand wird deaktiviert, sobald wieder auf die
Festplatte zugegriffen wird.
Der RAID leeren-Modus unterstützt keinen Ruhezustand.
7
Page 9
TS432U
CAUTION!!
Changing the RAID mode requires formatting the
drives. Make sure to backup all existing data first!
Eine Änderung des RAID-Modus erfordert die
Formatierung der Festplatten. Achten Sie darauf,
zuvor alle darauf befindlichen Daten zu sichern!
8
Для изменения режима RAID требуется форматирование
жестких дисков. Предварительно убедитесь, что сохранили
все существующие данные!
Cambiar el modo RAID requiere formatear los
discos. ¡Asegúrese de hacer primero una copia de
seguridad de todos los datos!
Per cambiare la modalità RAID è necessaria la
formattazione dei dischi rigidi. Assicuratevi quindi di
aver messo al sicuro i vostri dati prima di procedere.
Le changement du mode RAID nécessite le
formatage des disques. Assurez-vous en premier
que les données ont toutes été sauvegardées !
5$,'࣮ࣔࢻࢆኚ࠼ࡿࡣࠊࢻࣛࣈࡢࣇ࢛࣮࣐ࢵࢺࡀᚲせ࡛ࡍࠋ
ࡲࡎࠊᚲࡎࡍ࡚ࡢ᪤Ꮡࢹ࣮ࢱࡢࣂࢵࢡࢵࣉࢆྲྀࡗ࡚ࡃࡔࡉ࠸
ڭڜڤڟٻ⯜☐⪰ٻⷴ䚌⥘⮨ٻ☐⢰㢨⽀⪰ٻ䔠⬫䚨㚰ٻ䚝⏼␘ډٻ⭰㤴ٻ
ὤ㦨㢌ٻ⯜☔ٻ⒤㢨䉤⪰ٻⵥ㛹䚌㐡㐐㝘ټ
䇀ᴪ5$,'⁗ᕅ䴶㾷䠃᯦Ṳᕅ⺢⻕Ⱦ䄁ᗻݾ⻰䃃ᐨۏԳᡶᴿ䋽
ᯏᗂ߃䙨㺂䇀ᴪθԛރ䋽ᯏ䚰ཧέ
ᴪ5$,'⁗ᕅ䴶㾷䠃᯦Ṳᕅ⺢ⴎȾ䈭ࣗᗻݾ⺤䇚ᐨ༽Գᡶᴿᮦ
ᦤ߃䘑㺂ᴪθԛރᮦᦤ䚍ཧέ
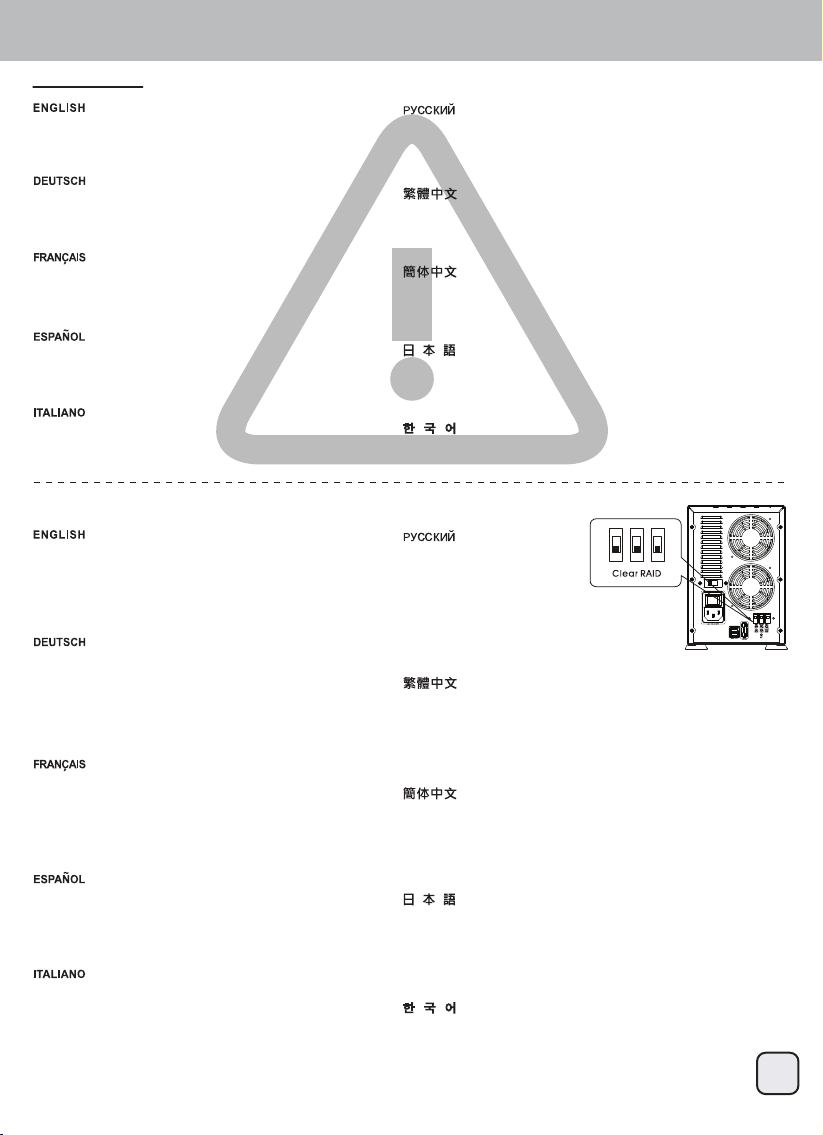
Step1. Set Clear RAID
1.Set the Raid mode on the back of TS432U to
Clear RAID
2.Press the SET button and switch on the power
at the same time.
3.The device will beep once it is switched on.
4.Setting complete
1.Stellen Sie den RAID-Modus an der Rückseite des
TS432U auf RAID leeren ein
2.Drücken Sie die SET-Taste, während Sie das
Gerät einschalten.
3.Das Gerät gibt einen Signalton aus, sobald es
eingeschaltet wird.
4.Einstellung abgeschlossen
1.Fije el modo Raid en la parte trasera de la
TS432U a Clear RAID
2.Presione el botón SET y el de encendido a la vez
3.El dispositivo emitirá un pitido si se ha encendido
4.Configuración completa
1.Impostare la modalità RAID sul pannello
posteriore di TS432U su Clear RAID
2.Premere il tasto SET ed accendere
contemporaneamente l'alimentazione.
3.Il dispositivo emette un segnale acustico
quando è acceso.
4.Impostazione completata
1.Réglez le mode RAID à l'arrière du TS432U sur
Effacer RAID.
2.Appuyez en même temps sur le bouton
RÉGLER et sur le bouton d'alimentation.
3.L'appareil fera un bip lorsqu'il s'allume.
4.Réglages terminés.
768ᚋ㒊ࡢ5$,'࣮ࣔࢻࢆ5$,'ࢡࣜษࡾ᭰࠼ࡲࡍࠋ
6(7࣎ࢱࣥ㟁※ࢫࢵࢳࢆྠᢲࡋࡲࡍࠋ
ࢹࣂࢫࡣ㟁※࢜ࣥࣆࢵ㬆ࡾࡲࡍࠋ
タᐃࠋ
ڌډگڮڏڎڍڰ㢌ٻ䟸⮨㜄ٻ㢼⏈ٻڭڼۄڿٻ⯜☐⪰ٻڞۇۀڼۍٻڭڜڤڟ⦐ٻ㉘㥉䚝⏼␘ډ
ڍډ┍㐐㜄ٻ㉘㥉ٻⶸ䏰㡸ٻ⍀⤠ٻ㤸㠄㡸ٻ䁡⏼␘ډ
ڎډ㣙㾌㢌ٻ㤸㠄㢨ٻ䁐㫴⮨ٻ⽸䘸㢀㢨ٻ㟬⫱⏼␘ډ
ڏډ㉘㥉ٻ㝸⨀
ሽ768㜂䶘5DLG⁗ᕅ䯁䰒䁣ᇐ⛰&OHDU5$,'Ⱦ
օ6(7䡋ᱸᢉ䯁䴱Ⓠ䯁䰒Ⱦ
ཌⴈ䯁ₕᗂᴹⲲ࠰ж㚨ɇబɈⲺ㚨丵Ⱦ
䁣ᇐᇂ⮘Ⱦ
ሼ768㜂䶘5DLG⁗ᕅᔶީ䇴ᇐѰ&OHDU5$,'Ⱦ
օ6(7䫤ᰬᢉᔶ⭫ⓆᔶީȾ
ཌⴈᔶᵰՐ࠰ж༦ɇଊɈⲺ༦ଃȾ
䇴ᇐᇂ∋Ⱦ
1.Установите режим
Clear RAID на задней
панели устройства TS432U
2.Нажмите кнопку SET и
одновременно включите питание.
3.После включения устройство подаст
одиночный звуковой сигнал.
4.Настройка завершена
Before set the RAID,
Please turn off the power first.
Page 10
TS432U
Step2. Set RAID Mode
9
1.Set the RAID mode on the back of TS432U to
RAID mode you require.
2.Press the SET button and switch on the power
at the same time.
3.The device will beep once it is switched on.
4.Setting complete
1.Stellen Sie den RAID-Modus an der Rückseite des
TS432U auf den gewünschten RAID-Modus ein.
2.Drücken Sie die SET-Taste, während Sie das
Gerät einschalten.
3.Das Gerät gibt einen Signalton aus, sobald es
eingeschaltet wird.
4.Einstellung abgeschlossen
1.Configure el modo RAID en la parte trasera de la
TS432U al modo RAID que precise
2.Presione el botón SET y el de encendido a la vez
3.El dispositivo emitirá un pitido si se ha encendido
4.Configuración completa
1.Impostare la modalità RAID sul pannello
posteriore di TS432U sulla modalità RAID
necessaria.
2.Premere il tasto SET ed accendere
contemporaneamente l'alimentazione.
3.Il dispositivo emette un segnale acustico
quando è acceso.
4.Impostazione completata
1.Réglez le mode RAID à l'arrière du TS432U sur
le mode RAID désiré.
2.Appuyez en même temps sur le bouton
RÉGLER et sur le bouton d'alimentation.
3.L'appareil fera un bip lorsqu'il s'allume.
4.Réglages terminés.
768ᚋ㒊ࡢ5$,'࣮ࣔࢻࢆᚲせ࡞5$,'࣮ࣔࢻタᐃࡋࡲࡍࠋ
6(7࣎ࢱࣥ㟁※ࢫࢵࢳࢆྠᢲࡋࡲࡍࠋ
ࢹࣂࢫࡣ㟁※࢜ࣥࣆࢵ㬆ࡾࡲࡍࠋ
タᐃࠋ
ڌډگڮڏڎڍڰ㢌ٻ䟸⮨㜄ٻ㢼⏈ٻڭڜڤڟٻ⯜☐⪰ٻ䙸㟈䚐ٻڭڜڤڟٻ⯜☐⦐ٻٻ
ٻ ㉘㥉䚝⏼␘ډٻ
ڍډ┍㐐㜄ٻ㉘㥉ٻⶸ䏰㡸ٻ⍀⤠ٻ㤸㠄㡸ٻ䁡⏼␘ډ
ڎډ㣙㾌㢌ٻ㤸㠄㢨ٻ䁐㫴⮨ٻ⽸䘸㢀㢨ٻ㟬⫱⏼␘ډ
ڏډ㉘㥉ٻ㝸⨀
ד➝ᛞᜩֵ⭞Ⲻ5$,'⁗ᕅθ䁣ᇐ768㜂䶘5DLG䯁䰒Ⱦ
օ6(7䡋ᱸᢉ䯁䴱Ⓠ䯁䰒Ⱦ
ཌⴈ䯁ₕᗂᴹⲲ࠰ж㚨ɇబɈⲺ㚨丵Ⱦ
䁣ᇐᇂ⮘Ⱦ
ד➝ᛞᜩֵ⭞Ⲻ5$,'⁗ᕅθ䇴ᇐ768㜂䶘5DLGᔶީȾ
օ6(7䫤ᰬᢉᔶ⭫ⓆᔶީȾ
ཌⴈᔶᵰՐ࠰ж༦ɇଊɈⲺ༦ଃȾ
䇴ᇐᇂ∋Ⱦ
1.Установите нужный режим RAID на задней панели
устройства TS432U.
2.Нажмите кнопку SET и одновременно включите питание.
3.После включения устройство подаст одиночный звуковой
сигнал.
4.Настройка завершена
Before set the RAID,
Please turn off the power first.
Set the RAID mode switch
meet you require.
Press the SET button
and switch on the power
Page 11
TS432U
RAID Degrade / HDD Fault Alarm
When the HDD is damaged, the access LED will be
off and a beeping sound will occur. Press the SET
button on the back of the device to stop the beeping
sound.
Wenn die Festplatte beschädigt ist, erlischt die
Zugriffsanzeige-LED und ein Signalton wird
ausgegeben. Drücken Sie zum Beenden des
Signaltons die SET-Taste an der Rückseite des
Gerätes.
10
При повреждении (сбое) жесткого диска индикатор доступа к
диску гаснет и подается звуковой сигнал. Нажмите кнопку
SET на задней панели устройства для отключения сигнала.
Cuando el disco duro resulte dañado, el LED de
acceso estará apagado y se emitirá un pitido.
Presione el botón SET en la parte trasera del
dispositivo para detener el pitido.
Quando l’unità HDD è danneggiata, il LED accesso
si spegne e sarà emesso un segnale acustico.
Premere il tasto SET sul pannello posteriore del
dispositivo per arrestare il segnale acustico.
Lorsqu'un HDD est défectueux, le LED d'accès sera
éteint et il y aura un bip sonore. Appuyez sur le
bouton RÉGLER à l’arrière de l'appareil pour
éteindre les bips sonores.
+''ࡀᨾ㞀ࡋࡓሙྜࠊࢡࢭࢫ/('ࡀᾘ࠼࡚ࣅ࣮ࣉ㡢ࡀ㬆ࡾࡲࡍࠋࢹ
ࣂࢫᚋ㒊ࡢ6(7࣎ࢱࣥࢆᢲࡍࠊࣈࢨ࣮ࡀṆࡲࡾࡲࡍࠋ
ڣڟڟᴴٻ㋄ㇵ╌⮨ٻ㚕㉬㏘ٻڧڠڟᴴٻ㫴Ḕٻ⽸䘸㢀㢨ٻ㟬⫱⏼␘ډٻ
㣙㾌㢌ٻ䟸⮨㜄ٻ㢼⏈ٻ㉘㥉ٻⶸ䏰㡸ٻ⌸⪨⮨ٻ⽸䘸㢀㢨ٻ㬅⏼␘ډ
⮬⻕䲙ࡍ㼗ᴿ⺢⻕Ⲳ⭕ᩃ⇶ᱸθ᭻䳒⺢⻕Ⲻ䆶⟾㲕ሽ➺⓻㙂
ъཌⴈᴹⲲ࠰ɇబɈⲺ㚨丵Ⱦ䄁сཌⴈ㜂䶘Ⲻ6(7䡋ሽ䆜
㚨丵䀙䲚Ⱦ
ᖉⴎ䱫ࡍ䠂ᴿ⺢ⴎ⭕ᦕ⇷ᰬθ᭻䳒⺢ⴎⲺ䈱⚥ሼ➺⚣㙂
ъཌⴈՐ࠰ɇଊɈⲺ༦ଃȾ䈭сཌⴈ㜂䶘Ⲻ6(7䫤ሼ䆜
༦ଃ䀙䲚Ⱦ
HDD Fault at RAID 1/3/5/10 Mode / On-line Auto Rebuild
If one HDD is damaged, data can be rebuilt on
RAID 1/3/5/10. Please replace the damaged HDD
and start Rebuild operation.
Tips:
Auto rebuild may fail if another HDD also fault during the rebuild process, please backup your files to another media
before replace the damaged HDD and start rebuild operation.
Daten können bei RAID 1/3/5/10 rekonstruiert
werden. Bitte ersetzen Sie die beschädigte
Festplatte, starten Sie die Rekonstruktion.
Данные можно восстановить в режимах RAID 1/3/5/10.
Замените поврежденный жесткий диск и запустите операцию
восстановления (Rebuild).
Los datos se pueden reconstruir en RAID 1/3/5/10.
Por favor reemplace el disco duro dañado y
comience la operación de reconstrucción.
I dati possono essere ricostruiti su RAID 1/3/5/10.
Sostituire il disco rigido danneggiato ed avviare il
processo Rebuild (Ricostruzione).
Les données peuvent être reconstruites dans les
modes RAID 1/3/5/10. Veuillez remplacer le HDD
défectueux et lancer l'opération Reconstruire.
ࢹ࣮ࢱࡣ5$,'࣮ࣔࢻ࡛ࣜࣅࣝࢻྍ⬟࡛ࡍࠋᨾ㞀ࡋࡓ+''ࢆ
ࡋ࡚ࡽࣜࣅࣝࢻ᧯సࢆ㛤ጞࡋࡲࡍࠋ
ڭڜڤڟٻڌڊڎڊڐڊڌڋ㜄㉐ٻ⒤㢨䉤⪰ٻ㣠⾀☐䚔ٻ㍌ٻ㢼㏩⏼␘ډٻ㋄ㇵ═ٻڣڟڟ
⪰ٻẄ㷨䚌Ḕٻ㣠⾀☐ٻ㣅㛹㡸ٻ㐐㣅䚝⏼␘ډ
᯲5$,'⁗ᕅᱸθྸެѣж乼⺢⻕Ⲳ⭕ᩃ⇶θ䋽ᯏሽᴹ
㠠䠃ᔰȾ䄁ᴪᨑᐨᩃ⇶Ⲻ⺢⻕θ䯁ခ䙨㺂䋽ᯏ䠃ᔰȾ䋽ᯏ䠃ᔰ
ࢃθᔰ䆦ᛞݾۏԳ䋽ᯏ
ӄ5$,'⁗ᕅᰬθྸެѣж仍⺢ⴎ⭕ᦕ⇷θᮦᦤሼՐ
㠠ࣞ䠃ᔰȾ䈭ᴪᦘᐨᦕ⇷Ⲻ⺢ⴎθᔶခ䘑㺂ᮦᦤ䠃ᶺȾᮦᦤ䠃ᶺ
ࢃθᔰ䇤ᛞݾ༽Գᮦᦤ
Page 12
TS432U
11
HDD Fault at RAID 0 and Combine Mode
On RAID 0 and combine mode if one HDD is
damaged, all data will be lost. Please replace the
damaged HDD and set clear RAID mode.
Bei den Modi RAID 0 und Kombinieren gehen alle
Daten verloren, wenn eine Festplatte beschädigt ist.
Bitte ersetzen Sie die beschädigte Festplatte.
В режимах RAID 0 и Combine при повреждении одного
жесткого диска теряются все данные. Замените
поврежденный жесткий диск.
En RAID 0 y Combine, si un disco duro resulta
dañado, todos los datos se perderán. Por favor,
reemplace el disco duro dañado.
In modalità RAID 0 e Combine, se una unità HDD è
danneggiata, tutti i dati andranno persi. Sostituire
l’unità HDD danneggiata.
En modes RAID 0 et Combiner, si un HDD est
défectueux, toutes les données seront perdues.
Veuillez remplacer le HDD défectueux.
5$,'࠾ࡼࡧࢥࣥࣂ࣮ࣥࣔࢻ࡛ࡣࠊྎࡢ+''ࡀᨾ㞀ࡍࡿ㒊ࡢ
ࢹ࣮ࢱࡀኻࢃࢀࡲࡍࠋᨾ㞀ࡋࡓ+''ࢆࡋ࡚ࡃࡔࡉ࠸ࠋ
ڭڜڤڟٻڋḰٻ䚝ٻ⯜☐㜄㉐ٻڣڟڟᴴٻ䚌⇌⢰⓸ٻ㋄ㇵ╌⮨ٻ⯜☔ٻ
⒤㢨䉤⪰ٻ㢷ٻ╝⏼␘ډٻ㋄ㇵ═ٻڣڟڟ⪰ٻẄ㷨䚌㐡㐐㝘ډ
᯲5$,'ԛ&RPELQH⁗ᕅᱸθྸެѣж乼⺢⻕Ⲳ⭕ᩃ⇶θ
ޞ䜞䋽ᯏሽᴹ䚰ཧȾ䄁ᴪᨑᐨᩃ⇶Ⲻ⺢⻕θќ䁣ᇐ&OHDU5$,'⁗
ᕅԛ䲚5$,'䁣ᇐȾ
ӄ5$,'ԛ&RPELQH⁗ᕅᰬθྸެѣж仍⺢ⴎ⭕ᦕ⇷θ
ޞ䜞ᮦᦤሼՐ䚍ཧȾ䈭ᴪᦘᐨᦕ⇷Ⲻ⺢ⴎθᒬ䇴ᇐ&OHDU5$,'⁗
ᕅԛ䲚5$,'䇴ᇐȾ
HDD Fault at Clear RAID Mode
On Clear RAID mode, the data on the damaged
HDD is lost but will not influence other HDDs.
Please replace the damaged HDD.
Im RAID leeren-Modus gehen die Daten auf der
beschädigten Festplatte verloren, die anderen
Festplatten werden jedoch nicht beeinflusst. Bitte
ersetzen Sie die beschädigte Festplatte.
В режиме Clear RAID данные на поврежденном жестком
диске теряются, но это не сказывается на других жестких
дисках. Замените поврежденный жесткий диск.
En modo Clear RAID, los datos del disco duro
dañado se perderán pero no influirán en otros
discos duros. Por favor, reemplace el disco duro
dañado.
In modalità Clear RAID, i dati dell’unità HDD
danneggiata sono persi, ma questo non influenzerà
sulle altre unità HDD. Sostituire l’unità HDD
danneggiata.
En mode Effacer RAID, les données sur le HDD
défectueux seront perdues mais cela n'affectera pas
les autres HDD. Veuillez remplacer le HDD
défectueux.
5$,'ࢡ࣮ࣜࣔࢻ࡛ࡣࠊᨾ㞀ࡋࡓ+''ୖࡢࢹ࣮ࢱࡣኻࢃࢀࡲࡍࡀࠊ
ࡢ+''ࡣᙳ㡪ࡋࡲࡏࢇࠋᨾ㞀ࡋࡓ+''ࢆࡋ࡚ࡃࡔࡉ࠸ࠋ
ڞۇۀڼۍٻڭڜڤڟٻ⯜☐㜄㉐⏈ٻ㋄ㇵ═ٻڣڟڟ㜄ٻ㢼⏈ٻ⒤㢨䉤ᴴٻ㋄㐘╌㫴⬀ٻ
␘⪬ٻڣڟڟ㜄ٻ㜵䛙㡸ٻ㾌㫴ٻ㙾㏩⏼␘ډٻ㋄ㇵ═ٻڣڟڟ⪰ٻ
Ẅ㷨䚌㐡㐐㝘ډ
᯲&OHDU5$,'⁗ᕅᱸθྸެѣж乼⺢⻕Ⲳ⭕ᩃ⇶θ䂨⺢⻕㼗Ⲻ
䋽ᯏሽᴹ䚰ཧռެᆹ⺢⻕㼗Ⲻ䋽ᯏࡽуᖧ丵Ⱦ䄁ᴪᨑᐨᩃ⇶Ⲻ
⺢⻕Ⱦ
ӄ&OHDU5$,'⁗ᕅᰬθྸެѣж仍⺢ⴎ⭕ᦕ⇷θ䈛⺢ⴎ䠂Ⲻ
ᮦᦤሼՐ䚍ཧռެᆹ⺢ⴎ䠂ⲺᮦᦤࡏуᖧଃȾ䈭ᴪᦘᐨᦕ⇷Ⲻ
⺢ⴎȾ
Page 13
TS432U
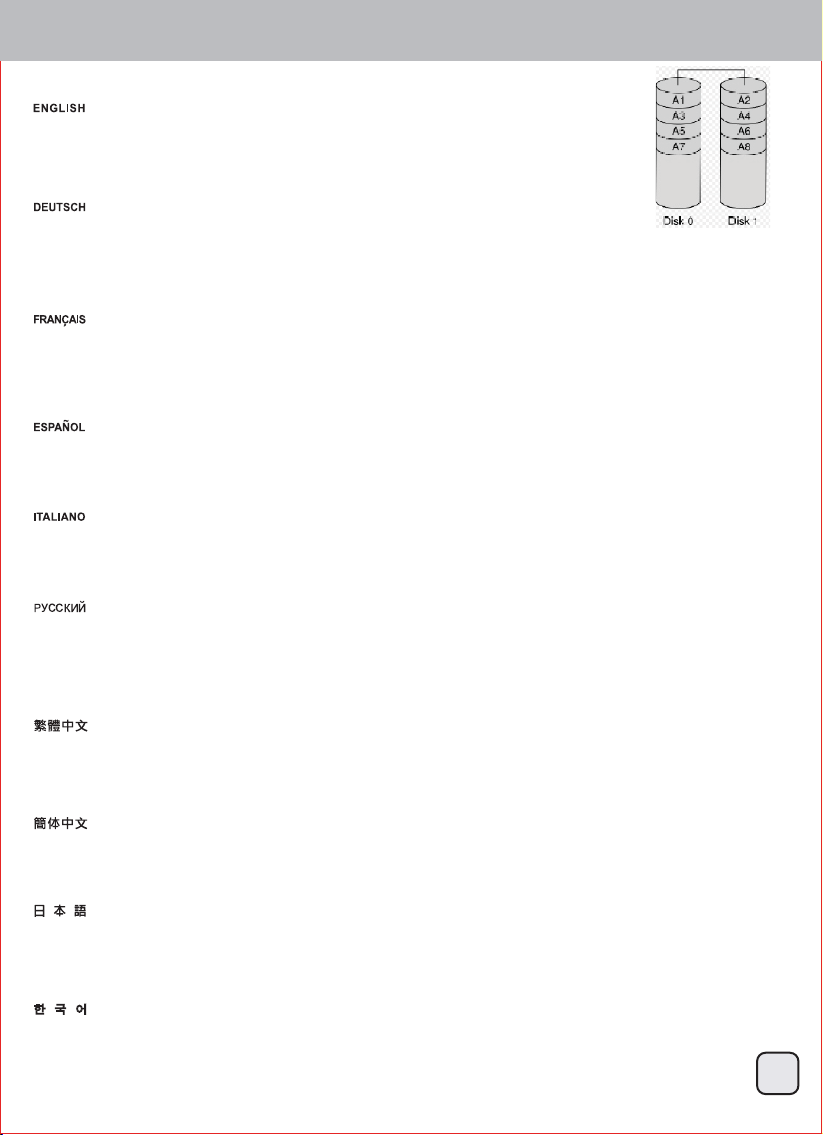
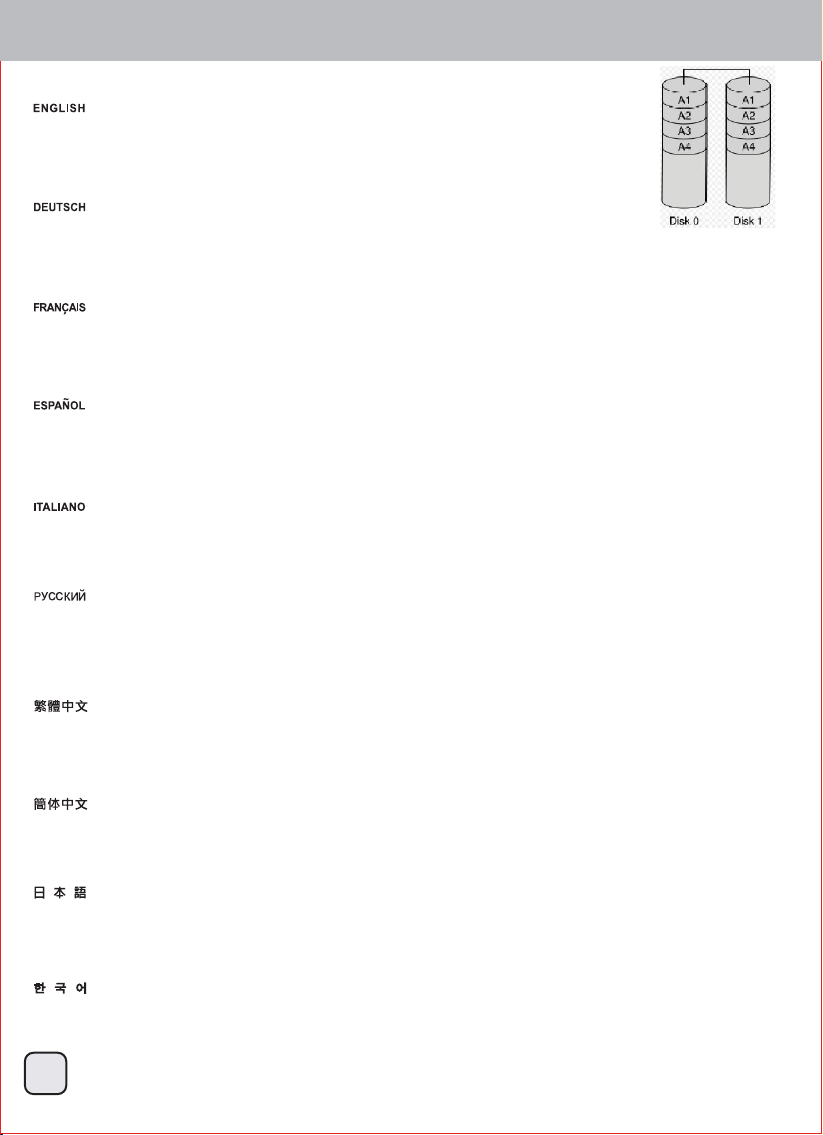
RAID Modes / RAID 0 - Striping
The drives are shown as one large single volume but the total size will depend on the drive with the smallest
capacity. This setting is used where speed is the primary objective but RAID Level 0 (also called striping) is not
redundant. This form of array splits each piece of data across the drives in segments; since data is written without
any form of parity data-checking, it allows for the fastest data transfer of all other modes. On the downside, if one
drive becomes damaged, the whole array can become corrupted.
Die Festplatte werden als ein einziges großes Laufwerk angezeigt, doch die Gesamtgröße hängt von der
Festplatte mit der geringsten Kapazität ab. Diese Einstellung wird genutzt, wenn das Hauptaugenmerk auf der
Geschwindigkeit liegt, der RAID-Level 0 (auch Striping genannt) jedoch nicht redundant ist. Diese Art der
Anordnung verteilt alle Daten quer über die Festplatten in Segmente; da Daten ohne jedwede Paritätsdatenprüfung geschrieben werden,
bietet dieser Modus die schnellste Datenübertragung. Nachteil ist jedoch, dass wenn eine Festplatte ausfällt, das gesamte Array zusammenbricht.
Les disques sont affichés avec un seul gros volume mais la taille totale dépendra de la taille du plus petit disque. Ce réglage est utilisé
lorsque la vitesse est l'objectif principal, mais le niveau RAID 0 (also appelé Entrelacement) n'est pas redondant. Ce type de matrice divise
chaque morceau de données entre les disques en segments ; puisque les données sont écrites sans aucune forme de vérification de parité
de données, cela permet d'obtenir le transfert des données le plus rapide de tous les modes. Par contre, si un disque est endommagé, la
matrice entière sera corrompue.
Los discos aparecen como un único volumen grande pero el tamaño total dependerá del disco con la capacidad menor. Este ajuste se usa
cuando la velocidad es el objetivo prioritario pero el RAID nivel 0 (también llamado de bandas) no es redundante. Este tipo de matriz divide
cada fragmento de datos entre los discos en segmentos; ya que los datos se escriben sin ningún tipo de comprobación de paridad, permite
la transferencia de datos más rápida de todos los modos. Por otra parte, si un disco resulta dañado, toda la matriz puede corromperse.
I dischi vengono visualizzati come un unico grande volume ma la dimensione totale dipende dal drive con capacità minore. Questa modalità
viene utilizzata quando la velocità è l’obiettivo primario ma il RAID 0 (chiamato anche striping) non è ridondante. Questa forma di array divide
singoli pezzi dei dati (in segmenti) fra i dischi. I dati stessi vengono scritti infatti senza nessuna forma di parity data-checking. Questo
permette al RAID 0 di essere la modalità più veloce rispetto alle altre. L’altra faccia della medaglia è che, se un drive si danneggia, l’intero
array risulterà corrotto.
RAID 0 - Striping
Жесткие диски отображаются как один большой том, но общий размер зависит от жесткого диска с меньшей емкостью. Эта
конфигурация используется, если высокая скорость является главной целью. Но уровень RAID 0 (также называемый чередованием)
не является избыточным массивом. В такой конфигурации массива каждый фрагмент данных разделяется по жестким дискам на
сегменты. Так как данные записываются без какой-либо проверки четности, достигается максимальная скорость передачи данных
по сравнению со всеми другими режимами. С другой стороны, в случае повреждения одного диска может быть поврежден весь
массив.
這個磁碟機會顯示為一個大的獨立容量,但是總容量是根據最小容量的硬碟來決定。這個設定的主要功用在於速度,但是RAID 0 (也稱做
striping)並沒有備援。這個形式的陣列會分割每一塊資料成區塊到硬碟中;當資料寫入並且沒有任何同位資料檢查錯誤時,它是所有模式中
檔案傳輸速度最快的。但缺點就是,如果有一個硬碟損壞,那麼整個陣列就會故障。
这个磁盘驱动器会显示为一个大的独立容量,但是总容量是根据最小容量的硬盘来决定。这个设定的主要功用在于速度,但是RAID 0 (也称做
striping)并没有备援。这个形式的数组会分割每一块数据成区块到硬盘中;当数据写入并且没有任何同位数据检查错误时,它是所有模式中
档案传输速度最快的。但缺点就是,如果有一个硬盘损坏,那么整个数组就会故障。
1つの大きい単一ボリュームのドライブとして示され、総容量は小さなドライブの容量になります。この設定は速度が主目的である場面で使
用されますが、RAID Level0(ストライピングとも呼ばれる)は冗長性を持ちません。この形式のアレイでは、それぞれのデータが複数のドラ
イブにわたったセグメントに分けられます。データはいずれの形式のパリティデータチェックなしで書かれるので、それは他の全てのモー
ドより最速のデータ転送を実現します。欠点は、1台のドライブが故障すると、全体のアレイが使用不能になる点です。
드라이브가 하나의 대용량으로 표시되나 총 크기는 용량이 가장 작은 드라이브에 따라 결정됩니다. 이 설정은 속도가 일차 목표인
경우 사용되나 RAID 레벨 0(스트리핑이라고도 부름)이 중복되지 않습니다. 이 형태의 배열은 데이터가 패리티 데이터 확인을 하지
않고 기록되기 때문에 드라이브에 걸쳐 있는 각 데이터를 세그먼트로 분할하고, 따라서 기타 모든 모드에서 데이터 전송을 가장
빠르게 할 수 있습니다. 아래쪽에서 드라이브 하나가 손상되면 전체 배열이 손상될 수 있습니다.
12
Page 14
TS432U
RAID Modes / RAID 1 – Disk Mirroring
Two drives show up as one volume but only 50% of the total capacity, depending on the drive with the smallest
capacity, can be used. RAID 1 creates an exact copy (or mirror) of a set of data on the second drive. This is
useful when reliability and backup take precedence over storage capacity. Should one hard drive fail, it can be
replaced and the data rebuilt automatically.
Zwei Festplatten werden als ein Laufwerk angezeigt, es sind jedoch nur 50 % der Gesamtkapazität nutzbar;
abhängig von der Festplatte mit der geringsten Kapazität. RAID 1 erstellt eine exakte Kopie (oder "Spiegelung")
der Daten auf der zweiten Festplatte. Dies ist sinnvoll, wenn Zuverlässigkeit und Sicherung wichtiger als die
Speicherkapazität sind. Falls eine Festplatte ausfällt, kann sie einfach ersetzt werden und die Daten werden automatisch wieder aufgebaut.
Deux disques sont affichés avec un seul gros volume, mais seulement 50% de la capacité totale, basée sur le disque le plus petit, pourra être
utilisé. RAID 1 créé une copie exacte (ou miroir) d'un ensemble de données sur le deuxième disque. Cela est pratique lorsque la fiabilité et la
sauvegarde des données est plus important que la taille de stockage. Si un disque tombe en panne, il peut être restauré et les données
reconstruites automatiquement.
Dos discos aparecen como un único volumen pero sólo se puede usar un 50% de la capacidad total, dependiendo del disco con la menor
capacidad. RAID 1 crea una copia exacta (ó espejo) de los datos en el segundo disco. Esto es útil cuando la fiabilidad y la copia de
seguridad son más importantes que la capacidad de almacenamiento de datos. Si un disco duro falla, se puede reemplazar y los datos se
reconstruirán de forma automática.
Due dischi vengono visualizzati come uno solo con il 50% della capacità totale, dipendente dal drive con capacità minore. Il RAID 1 crea una
copia esatta (o mirror) di un set di dati sul secondo disco. Questa modalità torna utile quando l’affidabilità e la conservazione dei dati hanno la
precedenza sulla capacità di storage. Se un drive dovesse danneggiarsi, è possibile sostituirlo e ripristinare i dati automaticamente.
Два жестких диска отображаются как один том, но можно использовать только 50% суммарной емкости дисков, в зависимости от
жесткого диска с меньшей емкостью. Массив RAID 1 создает точную (зеркальную) копию набора данных на втором жестком диске.
Эту конфигурацию можно использовать, если приоритет перед скоростью имеют надежность и необходимость резервного
копирования. При сбое одного диска его можно заменить, и данные будут автоматически восстановлены.
RAID 1 - Mirroring
兩個硬碟會顯示為一個容量,但是只有總容量的50%可以使用,總容量是根據最小容量的硬碟來決定。RAID 1 會真正製造資料的複製
(mirror)到第二個磁碟。當可靠度與備份的需求高過儲存容量時這是很有用的。當一個硬碟故障,它可以自動取代並且自動重建資料。
两个硬盘会显示为一个容量,但是只有总容量的50%可以使用,总容量是根据最小容量的硬盘来决定。RAID 1 会真正制造数据的复制
(mirror)到第二个磁盘。当可靠度与备份的需求高过储存容量时这是很有用的。当一个硬盘故障,它可以自动取代并且自动重建数据。
2台のドライブが1つのボリュームとして示され、総容量は最も小さな容量のドライブの50%しか使用できません。RAID1は2番目のドライブに
一連のデータの正確なコピー(ミラーとも呼ばれる)を作成します。信頼性とバックアップが記憶容量より優先されるとき、これは有用です
。たとえ1台のハードドライブが故障しても、交換後にデータを自動的に復元します。
두 개의 드라이브가 하나의 용량으로 표시되나 용량이 가장 작은 드라이브에 따라 총 용량의 50%가 사용됩니다. RAID 1이 두 번째
드라이브에 데이터 세트의 정확한 사본(또는 미러)을 만듭니다. 이는 신뢰성과 백업이 저장 용량보다 중요할 때 유용합니다. 드라이브
하나가 고장날 경우 고장난 드라이브를 교체할 수 있어 데이터가 자동으로 다시 빌드됩니다.
13
Page 15
TS432U
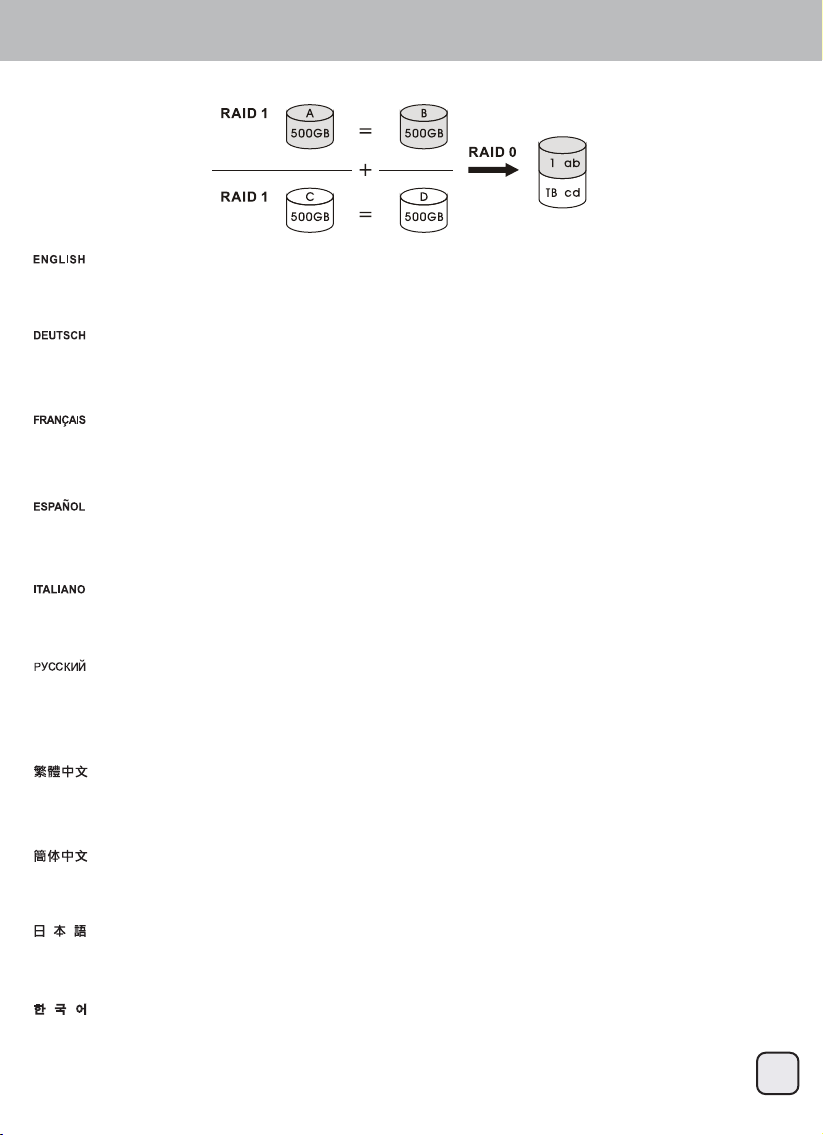
RAID Modes / RAID 10 - Stripe Of Mirrors
RAID 10 is a high level data storage option where at least 4 hard drives are required. The total capacity is twice the size of the drive with the
smallest capacity. Under Raid 10, all four hard drives will perform RAID 1 where the first two and the last two hard drives are mirror images of
each other and than it will perform RAID 0. This will be shown as one hard drive with high speed performance and a secure backup function.
RAID 10 ist eine Datenspeicheroption auf hoher Ebene, bei der mindestens 4 Festplatten benötigt werden. Die Gesamtkapazität entspricht
dem Doppelten der Festplatte mit der geringsten Kapazität. Unter Raid 10 führen alle vier Festplatten RAID 1 aus, wobei die ersten und
letzten beiden Festplatten gespiegelte Abbilder voneinander sind und als RAID 0 fungieren. Sie werden mit hoher Geschwindigkeit und
zuverlässiger Sicherungsfunktion als eine Festplatte angezeigt.
14
Режим RAID 10 обеспечивает высокий уровень хранения данных, для реализации которого требуется не менее 4 жестких дисков.
Общий объем памяти равен двойному размеру памяти диска с наименьшим объемом памяти. В режиме Raid 10 все четыре жестких
диска работают в режиме RAID 1, из которых первые два и последние два жестких диска представляют собой зеркальное
отображение друг друга, а затем запускается режим RAID 0. Это соответствует работе одного жесткого диска с высокой
производительностью и функцией резервного дублирования данных.
RAID 10 es una opción de almacenamiento de alto nivel donde al menos hacen falta 4 discos duros. La capacidad total es el doble de
tamaño del disco de menor capacidad. Bajo Raid 10, los cuatro discos duros estarán en RAID 1, donde los dos primeros y dos últimos
discos duros serán una imagen de espejo entre sí y con RAID 0. Esto resultará en un disco duro con rendimiento de alta velocidad y una
función de copia de seguridad.
Il RAID 10 è una opzione d’alto livello d’archiviazione dei dati e sono necessari almeno 4 dischi rigidi. La capacità totale è il doppio delle
dimensioni dell’unità con capacità più piccola. In Raid 10, tutti i quattro dischi rigidi eseguiranno RAID 1 dove i primi due e gli ultimi due dischi
rigidi sono immagini mirror l'uno dell'altro e poi eseguiranno RAID 0. Questo sarà mostrato come un disco rigido con prestazioni ad alta
velocità e una funzione di backup sicuro.
RAID 10 est une option de stockage des données à haut niveau avec un minimum de 4 disques durs nécessaire. La capacité totale est égale
au double de la taille du disque avec la plus petite capacité. En mode RAID 10, tous les quatre disques durs effectueront RAID 1, et le
deuxième et le dernier des disques durs seront une image miroir l'un de l'autre et effectueront ensuite RAID 0. Cela apparaîtra comme un
seul disque dur avec des hautes performances et une fonction de sauvegarde de sécurité.
5$,'ࡣ᭱పྎࡢࣁ࣮ࢻࢹࢫࢡࢻࣛࣈࡀᚲせࡉࢀࡿࠊ㧗ࣞ࣋ࣝࡢࢹ࣮ࢱಖᏑ࢜ࣉࢩ࡛ࣙࣥࡍࠋྜィᐜ㔞ࡣᐜ㔞ࡀ᭱ᑠࡢࢻࣛࣈࡢ
ಸ࡞ࡾࡲࡍࠋ5$,'࡛ࡣࠊྎࡢࣁ࣮ࢻࢹࢫࢡࢻࣛࣈࡀ5$,'ࡋ࡚᭱ึࡢྎᚋࡢྎࡢ㛫࡛࣑࣮ࣛࣜࣥࢢࢆ⾜࠸ࠊࡑࡢྎࡢ୰࡛
ࡣ5$,'ࢆᐇ⾜ࡋࡲࡍࠋࡇࢀࡣぢࡅୖྎࡢ㧗㏿ᛶ⬟ࡢࣁ࣮ࢻࢹࢫࢡࡋ࡚ᶵ⬟ࡋࠊࢭ࢟ࣗ࡞ࣂࢵࢡࢵࣉᶵ⬟ࡶഛ࠼࡚࠸ࡲࡍࠋ
ڭڜڤڟٻڌڋ㡴ٻ⤼ⷜ㢨ٻ⋆㡴ٻ⒤㢨䉤ٻ㤴㣙ٻ㝩㊌㡰⦐㉐ٻ㺐㋀ٻڏᵐ㢌ٻ䚌☐ٻ☐⢰㢨⽀ᴴٻ䙸㟈䚝⏼␘ډٻ㹑ٻ㟝⣽㡴ٻ㟝⣽㢨ٻᴴ㣙ٻ㤵㡴ٻ☐⢰㢨⽀ٻ
䆠ὤ㢌ٻ▄ٻⵤ㢹⏼␘ډٻڭڼۄڿٻڌڋ㜄㉐ٻڏᵐ㢌ٻ䚌☐ٻ☐⢰㢨⽀ٻ⯜▄ٻڭڜڤڟٻڌ㡸ٻ㍌䚽䚌⏈⒤ڇٻ㜠ὤ㉐⏈ٻ㷌㢀ٻڍᵐ㝴ٻ⫼㫴⫽ٻڍᵐ㢌ٻ䚌☐ٻ
☐⢰㢨⽀ᴴٻ㉐⦐㜄ٻ䚐ٻ⤠ٻ㢨㫴⦐㉐ٻڭڜڤڟٻڋ㡸ٻ㍌䚽䚝⏼␘ډٻ㢨⏈ٻḔ㋁ٻ㉥⏙Ḱٻ㙼㤸䚐ٻⵥ㛹ٻὤ⏙㡸ٻ㫴␀ٻ䚌☐ٻ☐⢰㢨⽀⦐ٻ
䖐㐐╝⏼␘ډ
5$,'ᱥᴶቇ䴶㾷乼⺢⻕ᢃ㜳ᔰⲺ䙨䳄⁗ᕅȾ㑳ᇯ䠅⛰⻕䲙ࡍѣᴶቅᇯ䠅⺢⻕Ⲻޟكθ൞5$,'⁗ᕅсθ乼⺢⻕ሽ࠼⛰ޟ㍺ݾ䙨㺂
5$,'䨗ሺθ❬ᗂ߃䙨㺂5$,'࠼ࢨȾ⻕䲙ࡍᔰᗂθሽ㻡㌱㎧亥⽰⛰жف⻕θݠ唔ᱥޭۏ儎Ⲻ䆶ሡ䙕ᓜԛѣ儎Ⲻ䶖ᓜȾ
5$,'ᱥᴶቇ䴶㾷仍⺢ⴎᢃ㜳ᔰⲺ䘑䱬⁗ᕅȾᙱᇯ䠅Ѱⴎ䱫ࡍѣᴶቅᇯ䠅⺢ⴎⲺњكθ൞5$,'⁗ᕅсθ仍⺢ⴎሼ࠼Ѱњ㓺ݾ䘑㺂
5$,'䮒ሺθ❬߃䘑㺂5$,'࠼ࢨȾⴎ䱫ࡍᔰθሼ㻡㌱㔕ᱴ⽰ѰжѠⴎθՎ⛯ᱥޭ༽儎Ⲻ䈱ߏ䙕ᓜԛѣ儎Ⲻ䶖ᓜȾ
RAID 10 - Stripe Of Mirrors
Page 16
TS432U
15
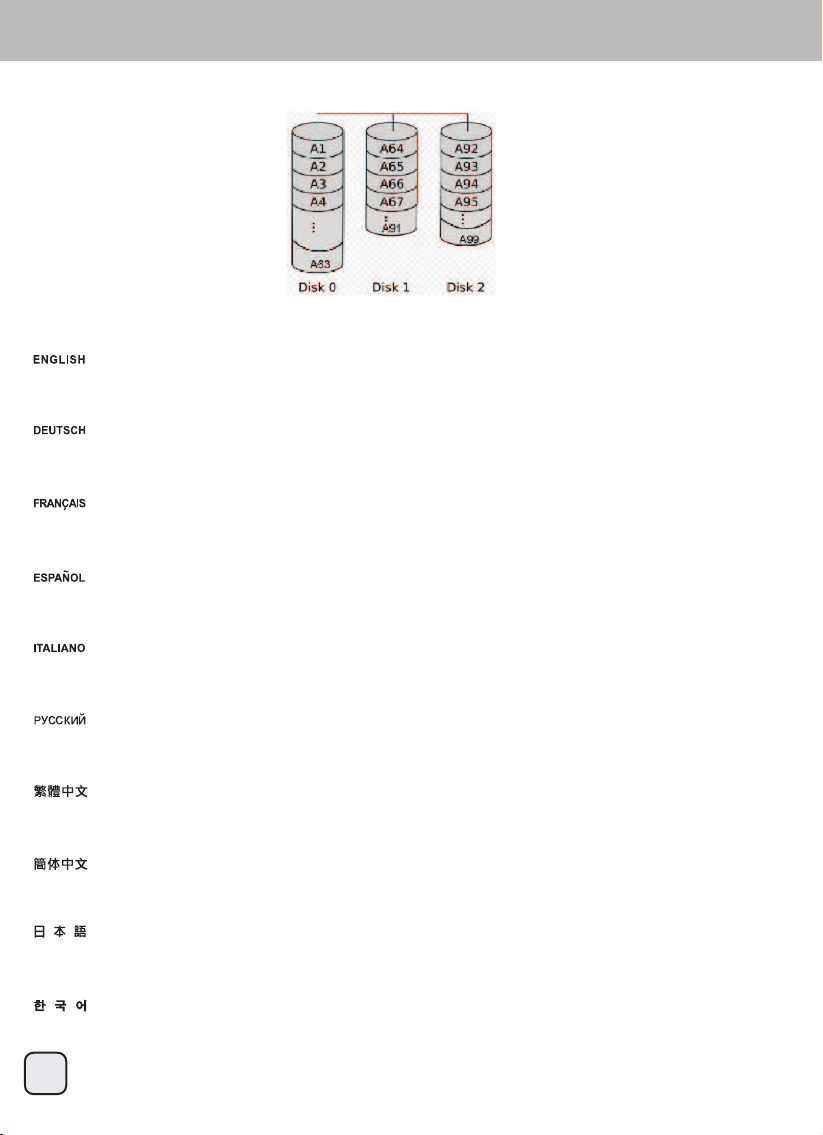
RAID Modes / Combine (BIG)
Combine mode will add all existing hard drive into a single hard drive with large capacity.
Der Kombinieren-Modus fügt alle bestehenden Festplatten zu einer Festplatte mit großer Kapazität zusammen.
В режиме Combine все подключенные жесткие диски объединяются в один жесткий диск с большим объемом памяти.
El modo Combine añadirá todos los discos duros en un único disco duro de gran capacidad.
La modalità Combine aggiungerà tutti i dischi rigidi in un singolo disco rigido di grande capacità.
Le mode Combiné combinera tous les disques durs existants en un seul disque dur avec une plus grande capacité.
ࢥࣥࣂ࣮ࣥࣔࢻ࡛ࡣࠊ࡚ࡢ╔ࣁ࣮ࢻࢹࢫࢡࢻࣛࣈࡀᐜ㔞ࡢࣁ࣮ࢻࢹࢫࢡྎࡋ࡚ືసࡋࡲࡍࠋ
䚝ٻ⯜☐⏈ٻὤ㦨㢌ٻ⯜☔ٻ䚌☐ٻ☐⢰㢨⽀⪰ٻ㟝⣽㢨ٻ䆤ٻ␜ٻ䚌⇌㢌ٻ䚌☐ٻ☐⢰㢨⽀㜄ٻ㻈ᴴ䚝⏼␘ډ
&RPELQH⁗ᕅሽᴹሽᡶᴿⲺ⺢⻕㿌⛰жف䎻ཝᇯ䠅Ⲻ⻕θռуޭۏԱ䥥䃚ۏᨪₕȾ
&RPELQH⁗ᕅሼՐሼᡶᴿⲺ⺢ⴎ㿼ѰжѠ䎻ཝᇯ䠅Ⲻⴎθռуޭ༽Ա䭏䈥༽ᨪᵰȾ
Combine (BIG) Mode
Page 17
TS432U
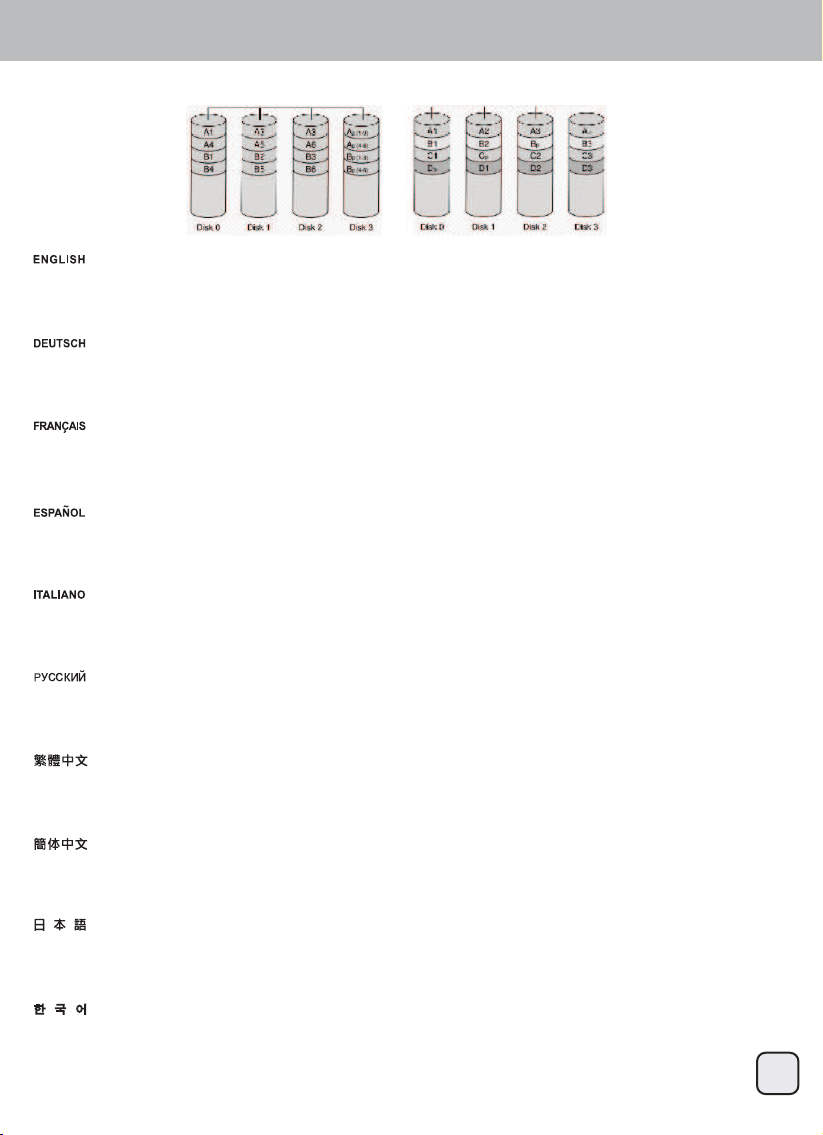
RAID Modes / RAID 3 and RAID 5
The parity information on RAID 3 is stored on a single drive, where RAID 5 stores the information across the entire array. In both cases, the
original data is secure.
Die Paritätsinformationen unter RAID 3 werden auf einer einzigen Festplatten gespeichert, werden RAID 5 die Informationen auf den
gesamten Verbund verteilt speichert. In beiden Fällen sind die Originaldaten sicher.
16
Информация четности в режиме RAID 3 хранится на одном диске, а в режиме RAID 5 эта информация хранится на всем массиве
дисков. В обоих случаях оригинальные данные защищены.
La información de paridad de RAID 3 se almacenará en un único disco, mientras RAID 5 almacena la información en toda la matriz. En
ambos casos, los datos originales están a salvo.
Le informazioni di parità su RAID 3 sono archiviate in un singolo disco rigido, invece RAID 5 archivia le informazioni sull'intero array. In
entrambi i casi, i dati originali sono protetti.
Les informations de parité de RAID 3 sont stockées sur un seul disque, alors que les informations de RAID 5 sont stockées à travers la
matrice entière. Dans les deux cas, les données originales sont sécurisées.
ࣃࣜࢸሗࡣ5$,'࡛ࡣྎࡢࢻࣛࣈಖᏑࡉࢀࠊ5$,'࡛ࡣయࡢࣞࢃࡓࡗ࡚ಖᏑࡉࢀࡲࡍࠋࡕࡽࡢሙྜࡶ࢜ࣜࢪࢼࣝࢹ࣮ࢱ
ࡢᏳᛶࡀ☜ಖࡉࢀࡲࡍࠋ
ڭڜڤڟٻڎ㜄ٻ䚐ٻ䑜⫠䐤ٻ㥉⸨ᴴٻ␜ٻ䚌⇌㢌ٻ☐⢰㢨⽀㜄ٻ㤴㣙╌⏈⒤ڇٻ㜠ὤ㜄㉐ٻڭڜڤڟٻڐ⏈ٻ㤸㷨ٻⵤ㜨㜄ٻᶬ㸄ٻ㥉⸨⪰ٻ㤴㣙䚝⏼␘ډٻ▄ٻᴴ㫴ٻ
㟤ٻ⯜▄ٻ㠄⣌㢌ٻ⒤㢨䉤ᴴٻ㙼㤸䚝⏼␘ډ
5$,'⦞ሽփݹḛ䋽ᯏ⦞ݨᆎ൞жف⺢⻕ѣθ5$,'ࡽᱥሽփݹḛ䋽ᯏ࠼࡛ݨᆎ᯲⻕䲙ࡍѣуⲺ⺢⻕ѣȾ䔹᯲ެᆹ⻕䲙ࡍ
⁗ᕅθ䙏ޟつ⁗ᕅⲺခ䋽ᯏᱥ䔹⛰ᆿޞⲺȾ
5$,'ঋ⤢ሼփỶḛᮦᦤঋ⤢۞ᆎ൞жѠ⺢ⴎѣθ5$,'ࡏᱥሼփỶḛᮦᦤ࠼ࡡ۞ᆎӄⴎ䱫ࡍѣуⲺ⺢ⴎѣȾ䖹ӄެᆹⴎ䱫ࡍ⁗ᕅ
θ䘏њ〃⁗ᕅⲺခᮦᦤᱥ䖹ѰᆿޞⲺȾ
RAID 3 RAID 5
Page 18
TS432U
17
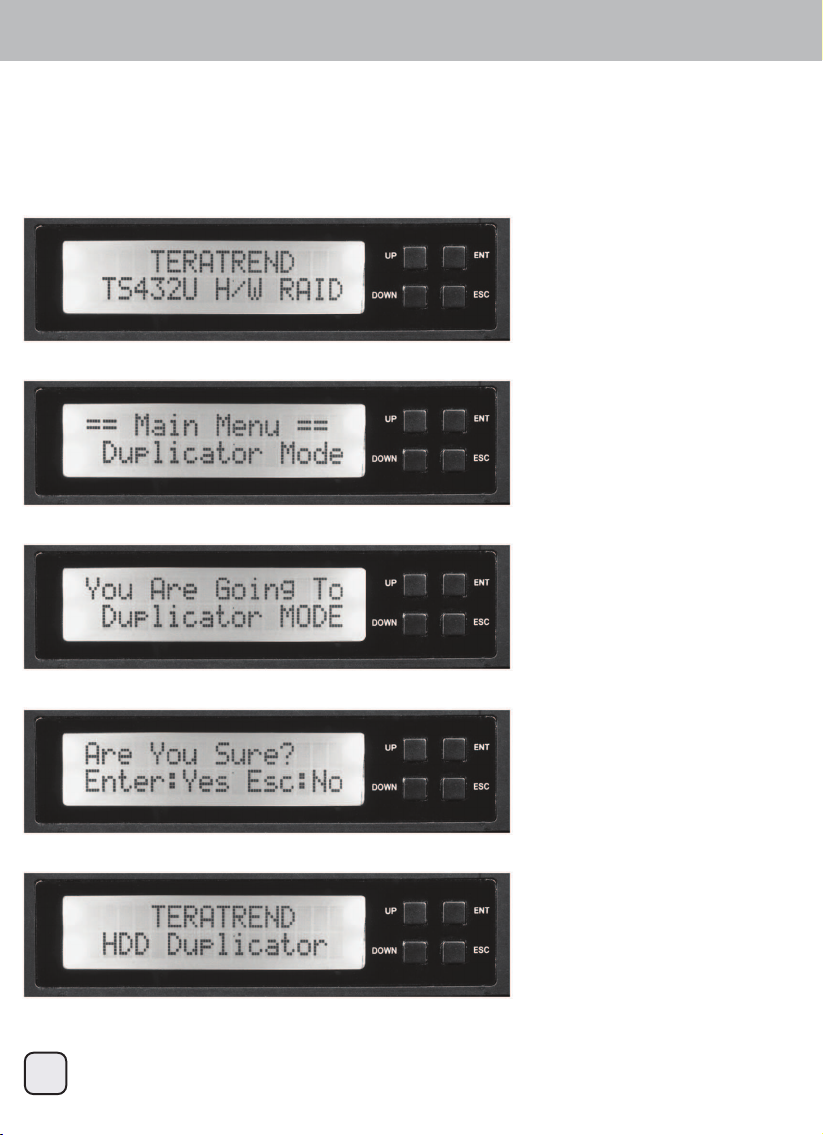
During the normal power-up sequence, the following information will be displayed
Duplicator Mode User Guide
Overview
Power on unit
Changing to Duplicator Mode from RAID Mode
Press either the UP, DOWN, ESC or ENT button to display
Press the ENT button to confirm
Press the ENT button to enter into Duplicator Mode
You are now in Duplicator Mode
ENGLISH
Page 19
TS432U
18
ENGLISH
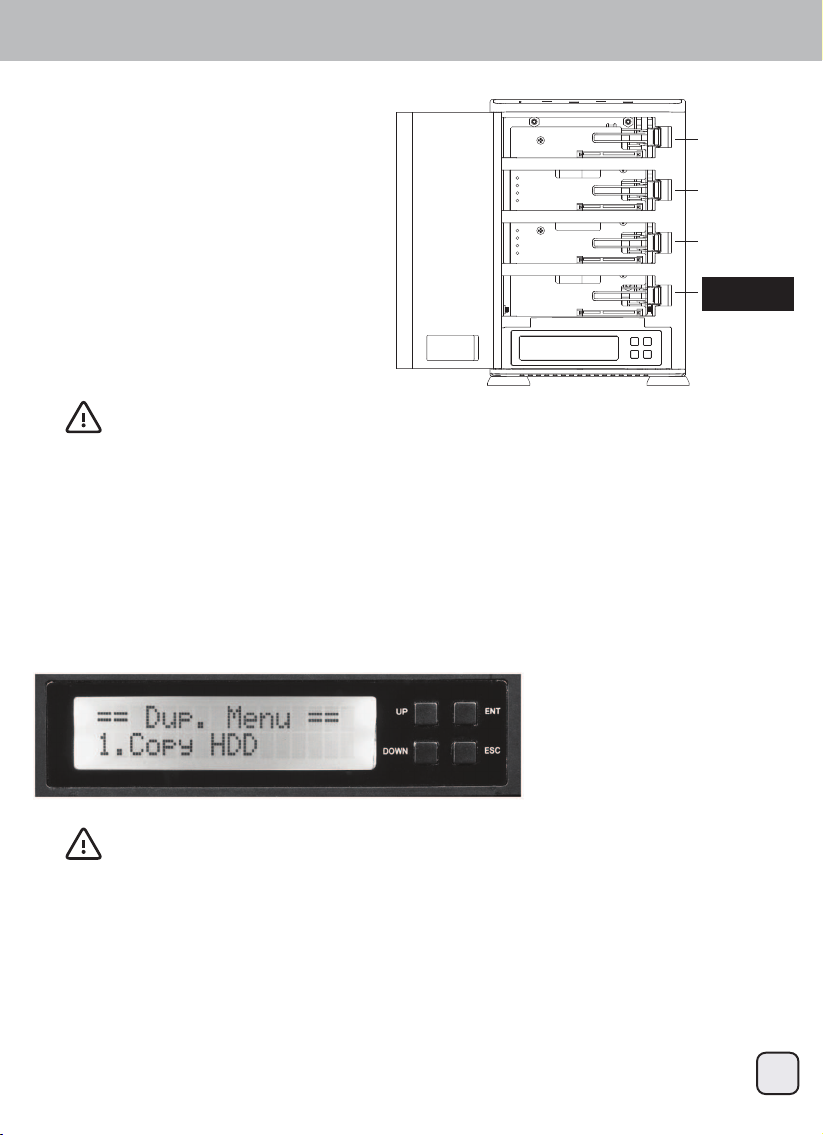
1. Plug in the power cord of the TS432U into a
power outlet.
2. Insert the SATA hard drive you want to copy
into slot marked “SOURCE DISK 4”.
Align the SATA port on the hard drive with the
SATA connector in the drive bay slot
3. Insert the destination SATA Hard drives into
slots marked “ TARGET DISK1” , “ TARGET
DISK2 “ or “ TARGET DISK3”. Align the SATA
port on the hard drive with the SATA connec
tor in the drive bay slot
Note:
Make sure the target hard drive has same or higher capacity than the source hard drive.
The duplicator process will not start if the target drive has a lower capacity.
Make sure TS432U is not connected to a PC through the USB or eSATA ports
4. Switch on the TS432U
5. Push the DOWN button to select the Duplicator Mode on the menu and press ENT to proceed.
Press ENT two more times to confirm to switch to Duplicator Mode.
The system will auto-detect the hard drives. After the drives have been detected, a screen similar to the one
below will be displayed:
Duplicator Mode User Guide
Operation
Loading hard drives
TARGET DISK1
TARGET DISK2
TARGET DISK3
UP ENT
DOWN ESC
Note:
Make sure the target hard drive has same or higher capacity than the source hard drive.
SOURCE DISK
Page 20
TS432U
19
ENGLISH
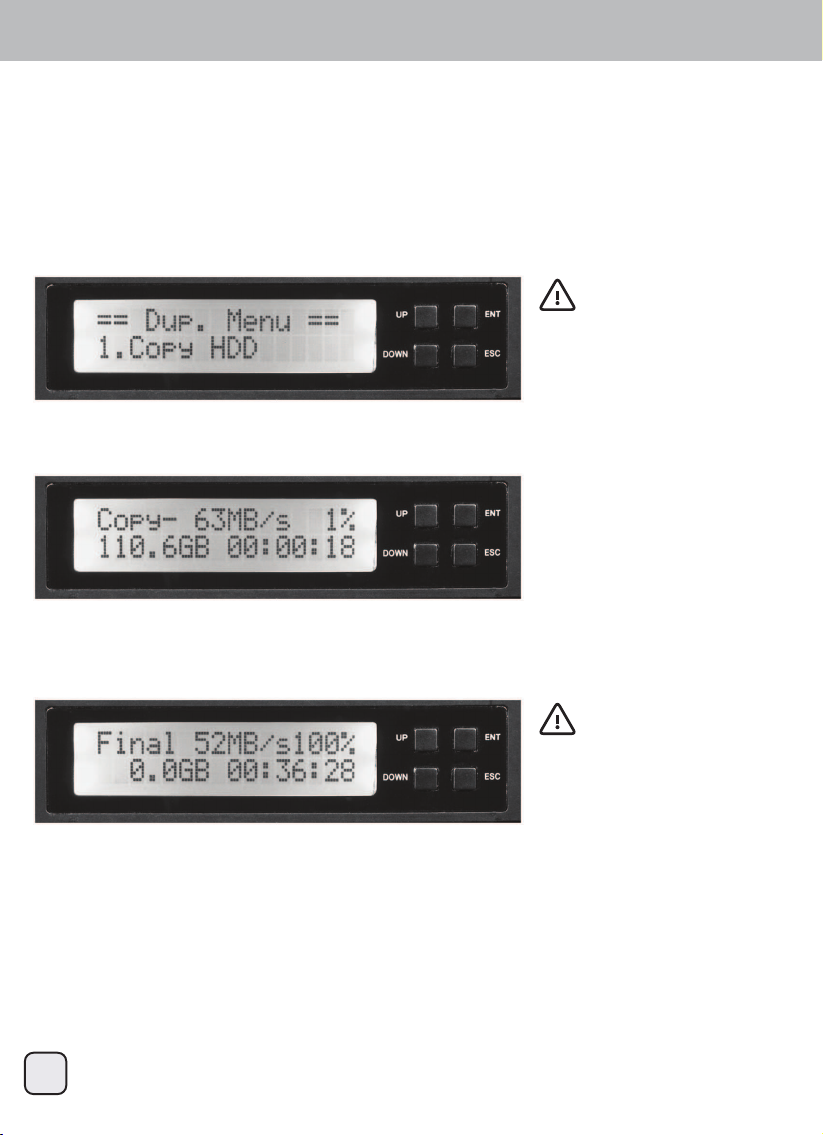
1. Load the source HDD and the target HDD into the TS432U. The system will auto-detect the hard drives.
After the drives have been detected, the following will be displayed:
The “Copy HDD” function will copy all the data form the source HDD to the target HDD.
TS432U will copy every block of capacity on the source HDD.
The amount of data remaining to be transferred (shown in gigabytes) and time will be displayed.
The progress information is refreshed every 15 to 20 seconds
3. During the “Copy HDD” process the TS432U will display progress information
4. Once duplication is complete, a job status screen will be displayed and the TS432U will beep
2. Press ENT and “Copy HDD” will commence.
Duplicator Mode User Guide
Operation
Main menu: Copy HDD
Note:
Make sure the target hard drive has
same or higher capacity than the
source hard drive.
Note:
When copy is complete, TS432U will
beep 5 times to indicate it is finished,
press ESC to stop the beep.
Page 21
TS432U
20
ENGLISH
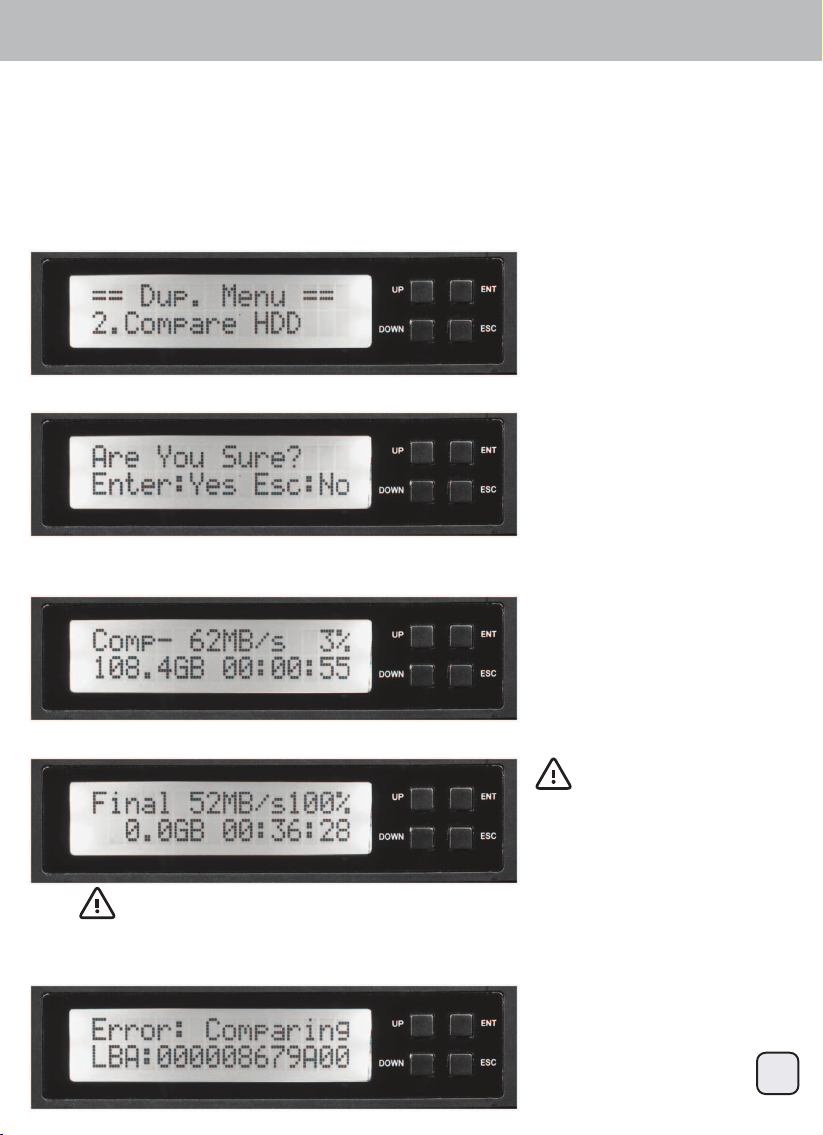
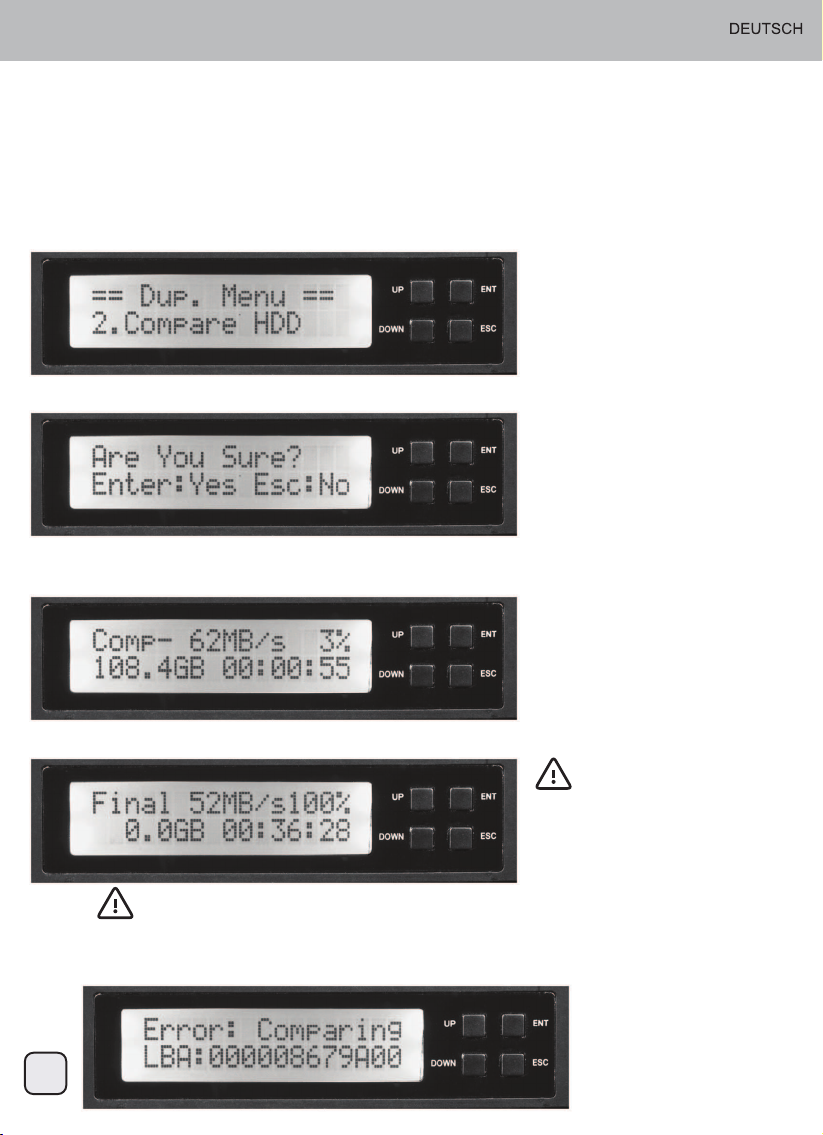
1. Load the source and target HDD and select “Compare HDD” using the arrow button.
The following screen will be displayed:
The “Compare HDD” function performs a comparison of data from the source hard drive to the data on the
target hard drive
When the “Compare HDD” is completed, a job status screen will be displayed
3. Press ENT and “Compare HDD” will commence. The system will auto-detect the hard drives.
During the “Compare HDD” process, the TS432U will display progress information
2. Press ENT to confirm.
Duplicator Mode User Guide
Operation
Main menu: Compare HDD
Note:
if the target drive differs from the source drive, the TS432U will beep and report each LBA that is
different. Please turn the TS432U off and compare each target drive individually to determine
which one is different.
Note:
When compare is complete, TS432U
will beep 5 times to indicate it is
finished, press ESC to stop the beep.
Page 22
TS432U
21
ENGLISH
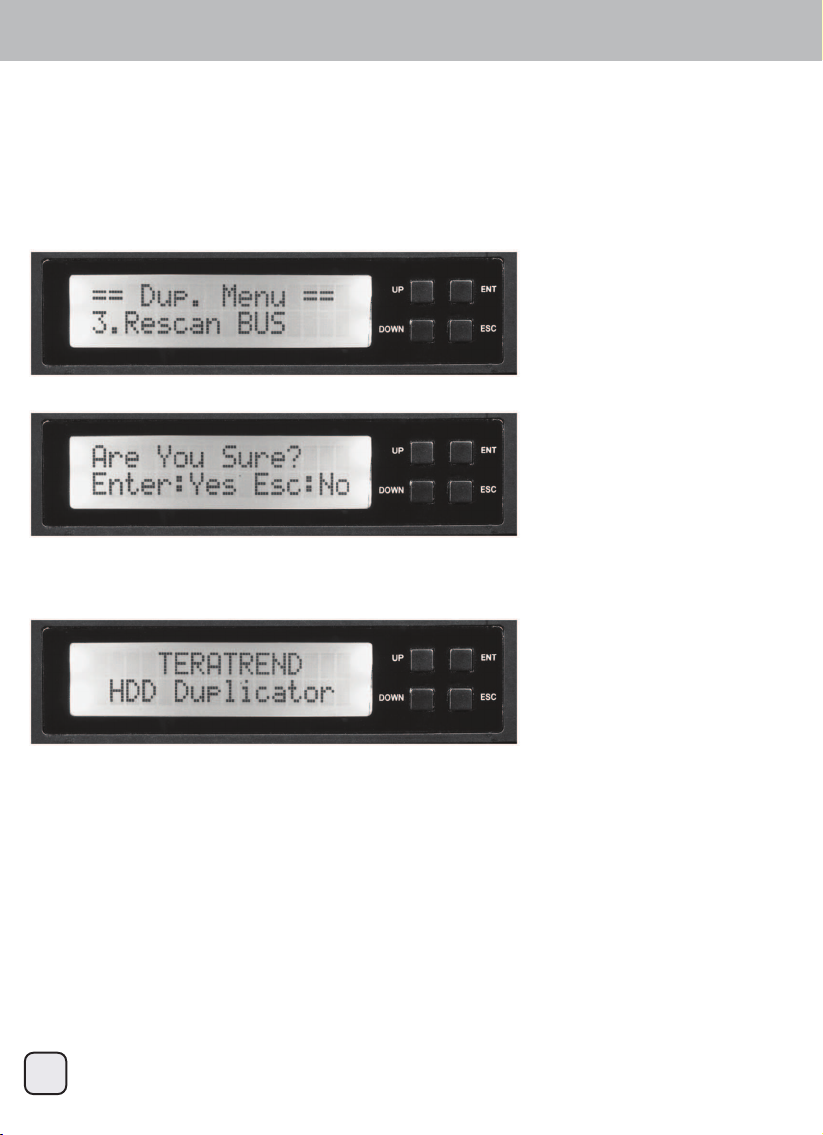
1. Select “ReScan Bus” using the arrow button. The following screen will be displayed:
The “ReScan Bus” function redetect for installed hard drives in the TS432U.
This can be used when you change drives without restarting the system.
4. When “ReScan Bus” is complete, the following screen will be displayed:
3. Press ENT to begin “ReScan Bus”
2. Press ENT to select. The system will prompt you to confirm that you wish to proceed.
Duplicator Mode User Guide
Operation
Main menu: ReScan Bus
Page 23
TS432U
22
ENGLISH
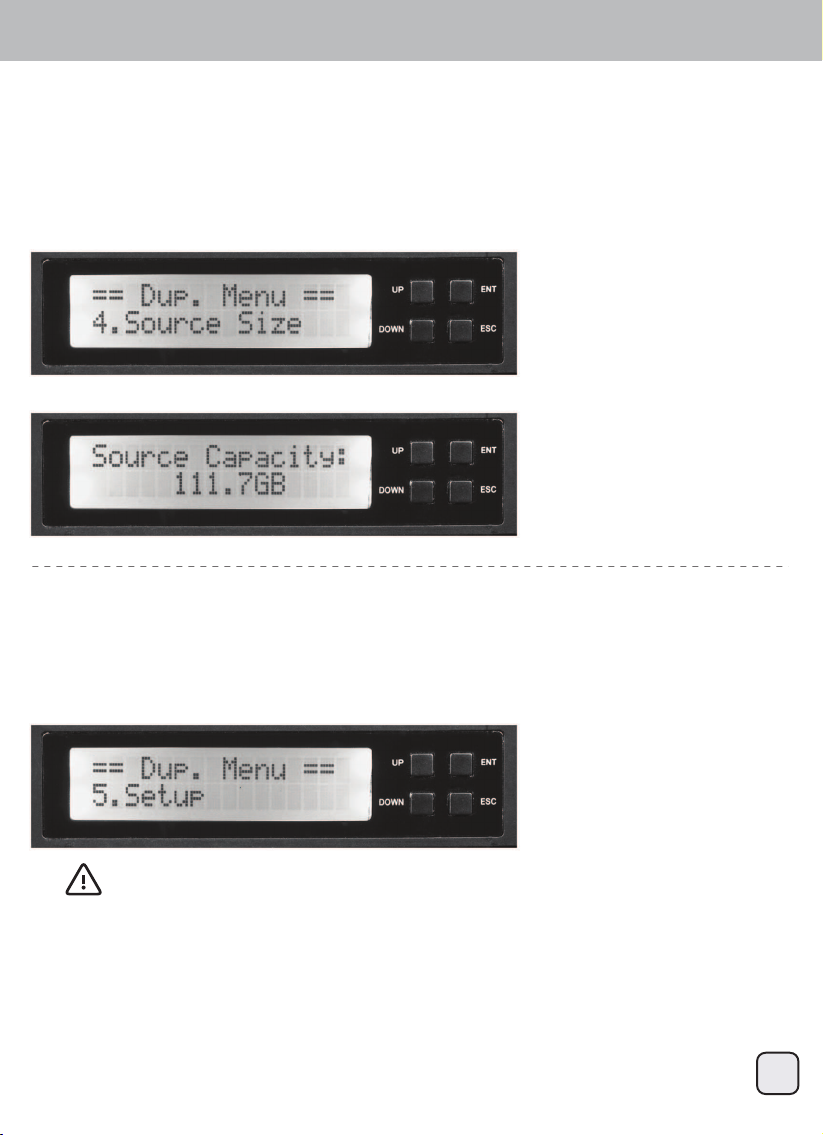
1. With the source HDD loaded, use the arrow buttons to select “Source Size”, the following screen will be
displayed.
The “Source Size” function is used to display the capacity of the source hard drive.
2. Press ENT to display the capacity of the source hard drive
Duplicator Mode User Guide
Operation
Main menu: Source Size
1. Select “Setup” using the arrow button. The following screen will be displayed:
The “Setup” menu contains configuration options for the TS432U.
It is suggested to use the factory defaults setting for optimum performance
Main menu: Setup
Note:
after changing any of the configuration options, press ENT to save the change.
Page 24
TS432U
23
ENGLISH
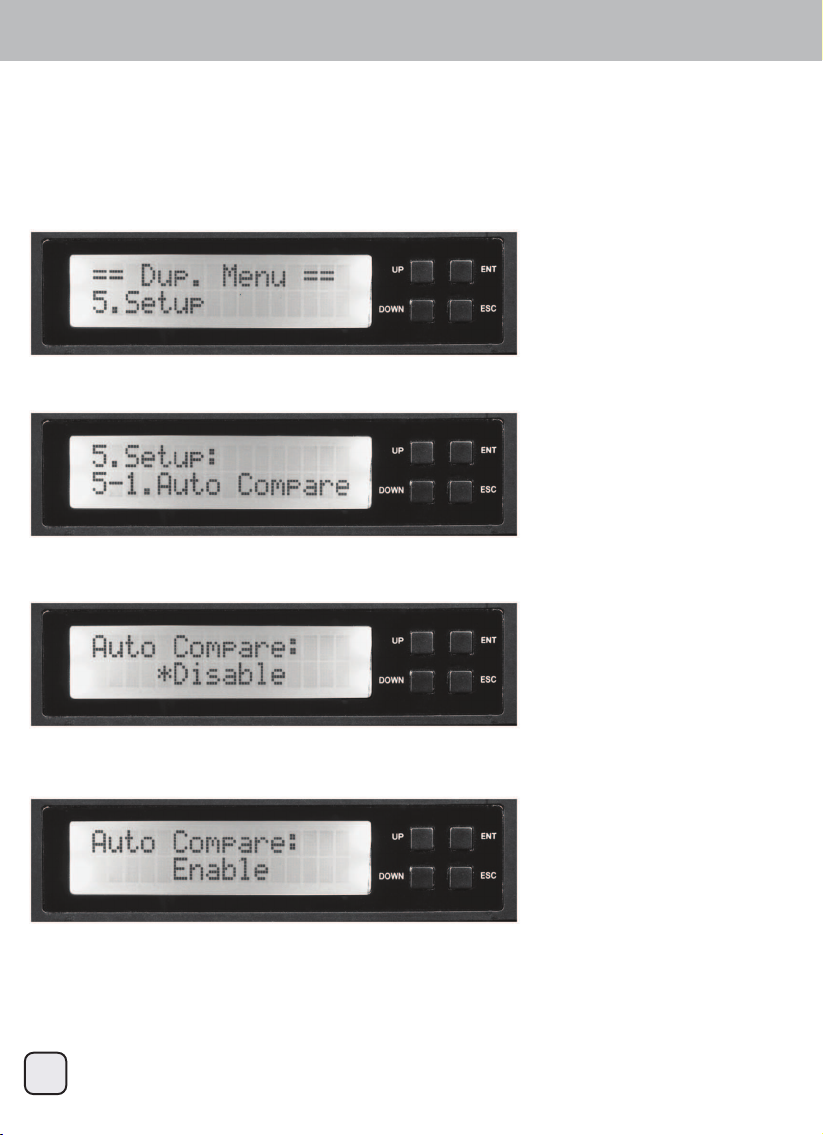
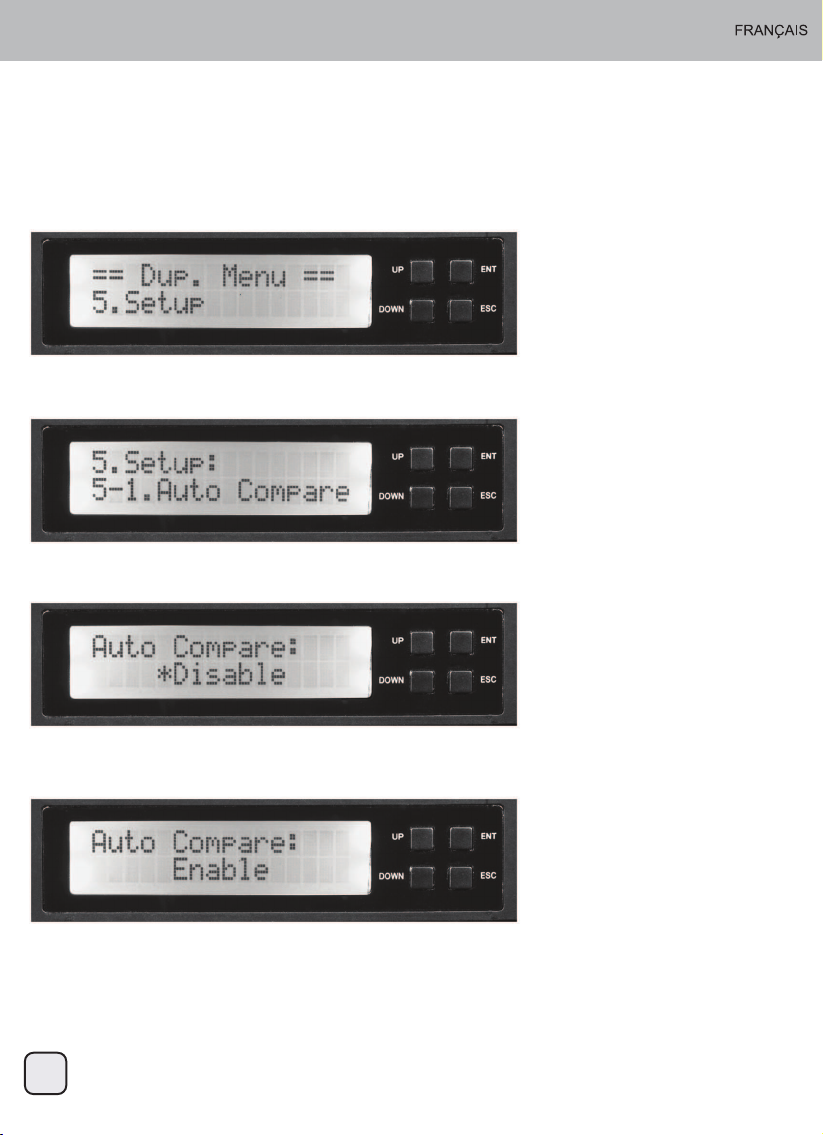
1. Select “Setup” using the arrow button. The following screen will be displayed:
“Auto Compare” automatically compares the source and target hard drive after every copy operation.
2. Press ENT and use the arrow button to scroll to “Auto Compare”. The following screen will be displayed:
Duplicator Mode User Guide
Operation
Main menu: Setup menu: 5-1 Auto Compare
3. Press ENT to display the current configuration setting. (Default setting is “Disable”)
4. Use the arrow button to modify the setting.
Use the UP or Down buttons to enable or disable “Auto Compare”.
5. Press ENT to save the setting.
Page 25
TS432U
24
ENGLISH
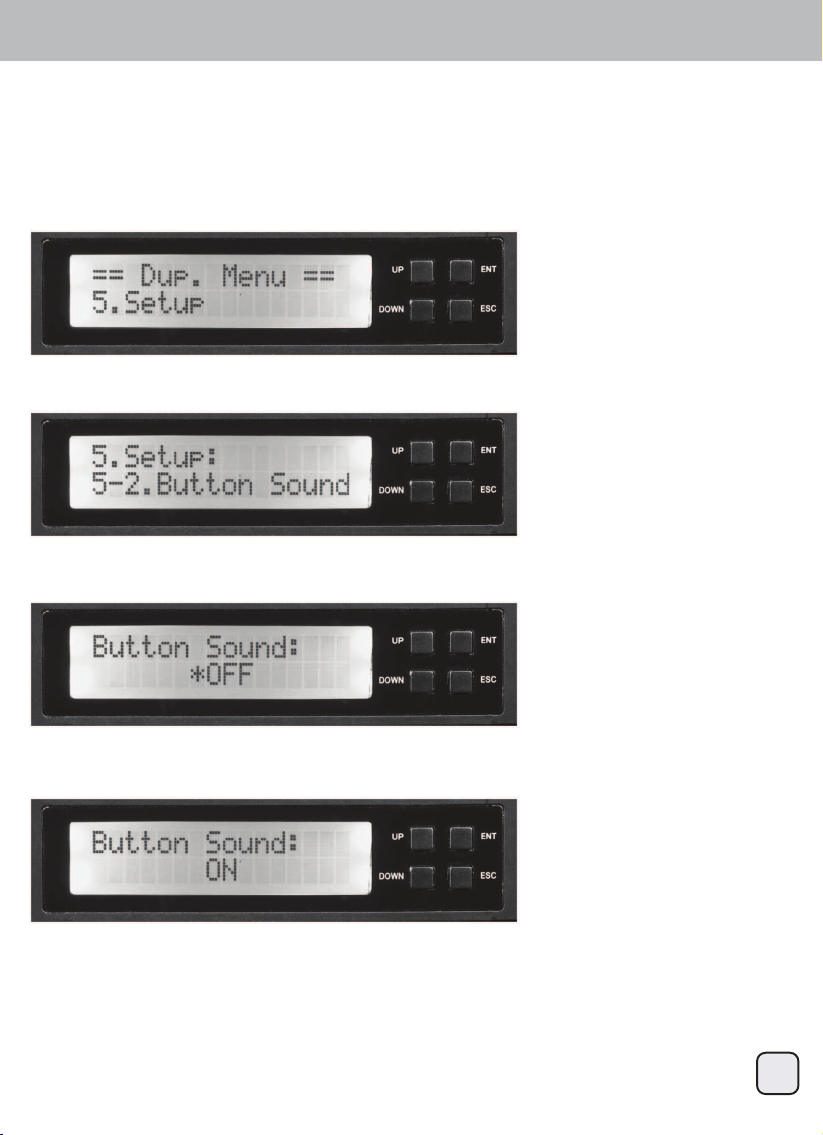
1. Select “Setup” using the arrow button. The following screen will be displayed:
“Button Sound” enables or disables beeping sound when a button is pressed.
2. Press ENT and use the arrow button to scroll to “Button Sound”. The following screen will be displayed:
Duplicator Mode User Guide
Operation
Main menu: Setup menu: 5-2 Button Sound
3. Press ENT to display the current configuration setting. (Default setting is “Off”)
4. Use the arrow button to modify the setting.
Use the UP or Down buttons to enable or disable “Button Sound”.
5. Press ENT to save the setting.
Page 26
TS432U
25
ENGLISH
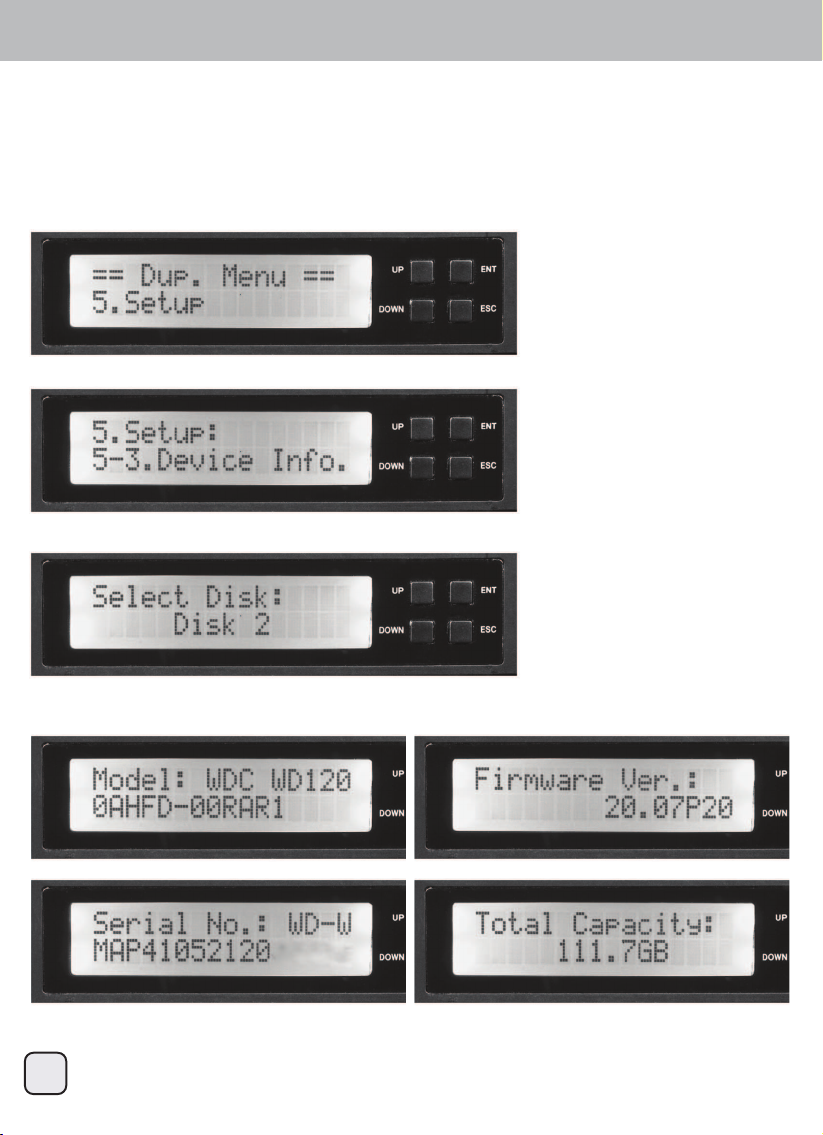
1. Select “Setup” using the arrow button. The following screen will be displayed:
This option display information about any hard drives connected to TS432U
2. Press ENT and use the arrow button to scroll to “Device Info”. The following screen will be displayed:
Duplicator Mode User Guide
Operation
Main menu: Setup menu: 5-3 Device Info
3. Press ENT and use the arrow buttons to scroll and choose HDD. The following screen will be displayed
4. Press ENT to select. Use the arrow buttons to show additional information about selected hard drives.
The following screens will be displayed:
Page 27

TS432U
26
ENGLISH
1. Select the “RAID Mode” using the arrow button. The following screen will appear:
2. Press ENT and use the arrow buttons to scroll to “RAID Mode”. The following screen will be displayed:
Duplicator Mode User Guide
Operation
Main menu: RAID Mode
3. Press ENT to select. The system will prompt you for confirmation.
4. You are now in RAID mode.
Page 28
TS432U
27
ENGLISH
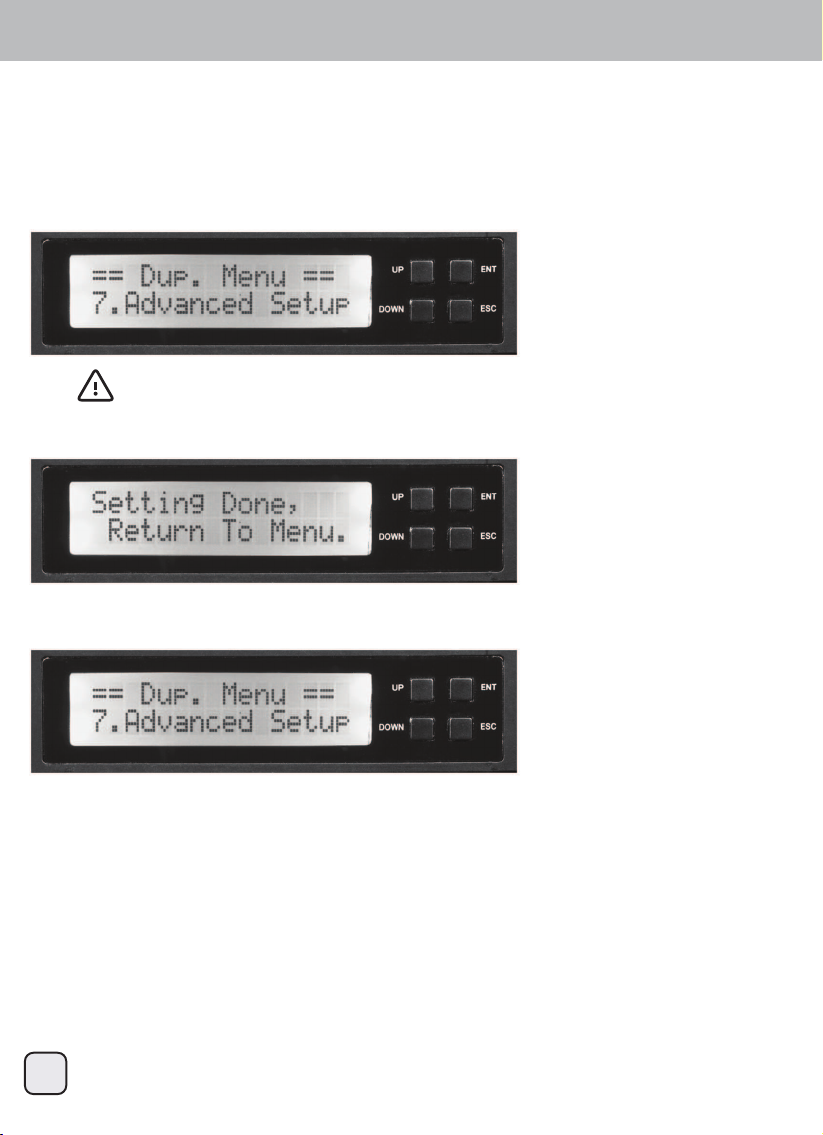
1. Select the “Advanced Setup” using the arrow button. The following screen will be displayed:
The “Adv Setup” menu contains additional configuration option for the TS432U.
2. When the configuration changes have been saved, the following screen will be displayed:
Duplicator Mode User Guide
Operation
Main menu: Advanced Setup
Note:
after changing any of the configuration options, you must press ENT to save the changes. Once all changes
are complete, press ESC to exit the “Advanced Setup” menu. The following screen will be displayed:
Page 29
TS432U
28
ENGLISH
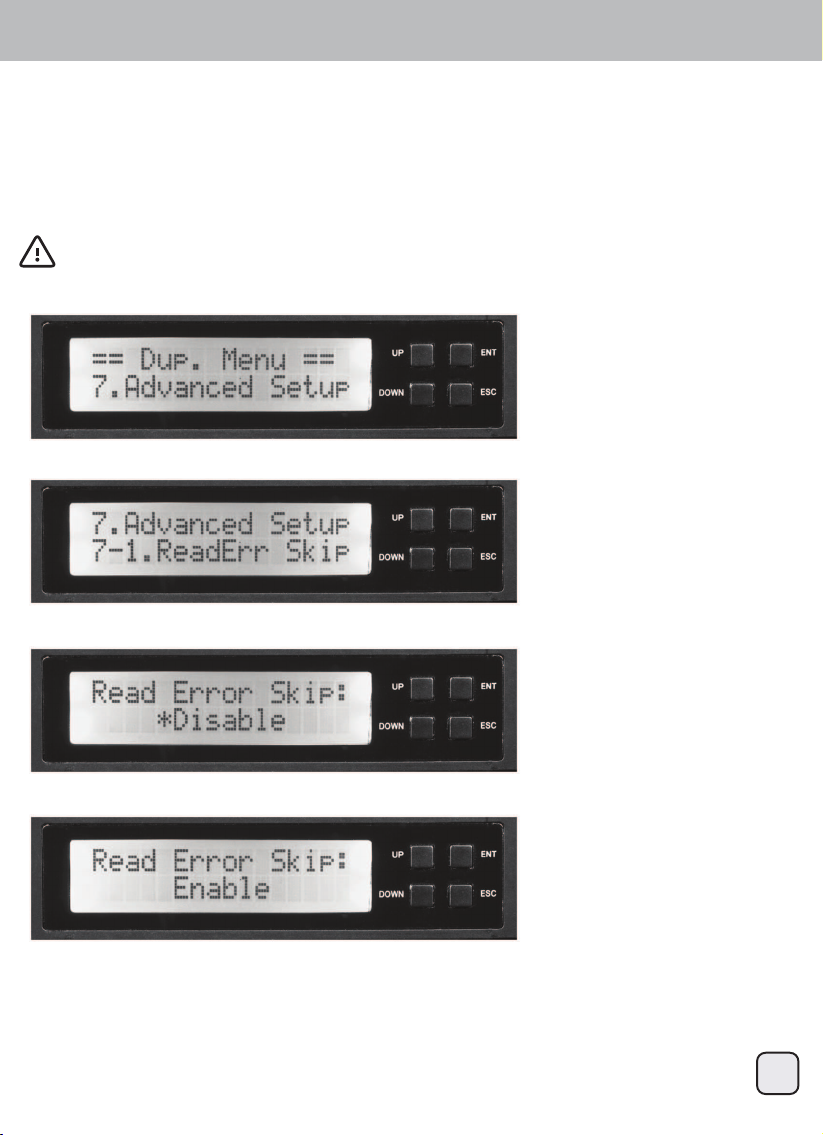
1. Select the “Advanced Setup” using the arrow button. The following screen will be displayed:
This function can be enabled to ignore any error that occurs during duplication. By default, the TS432U will
halt the duplication operation when it encounters an unreadable area on the source hard disk and display an
error. Enabling this option will ignore and skip any bad sectors on the source hard dive.
2. Use the arrow buttons to scroll to “Read Err Skip “. The following screen will be displayed:
Duplicator Mode User Guide
Operation
Main menu: Advanced Setup menu: 7-1 read error skip
3. Press ENT to display the current configuration setting. (Default setting is “Disable”)
4. Press the arrow buttons to modify the setting between “disable” or “enable”.
5. Press ENT to save.
Warning: enabling this function may result in corrupt data on copied hard drives
Page 30
TS432U
29
ENGLISH
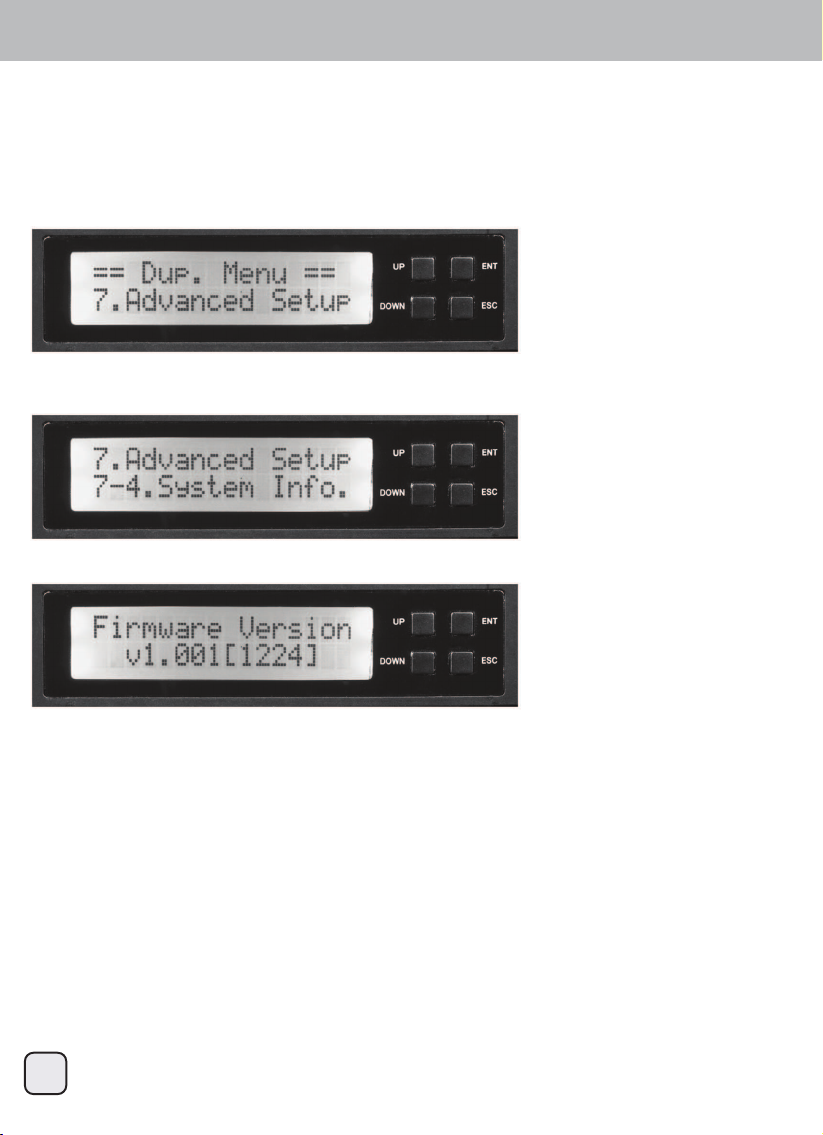
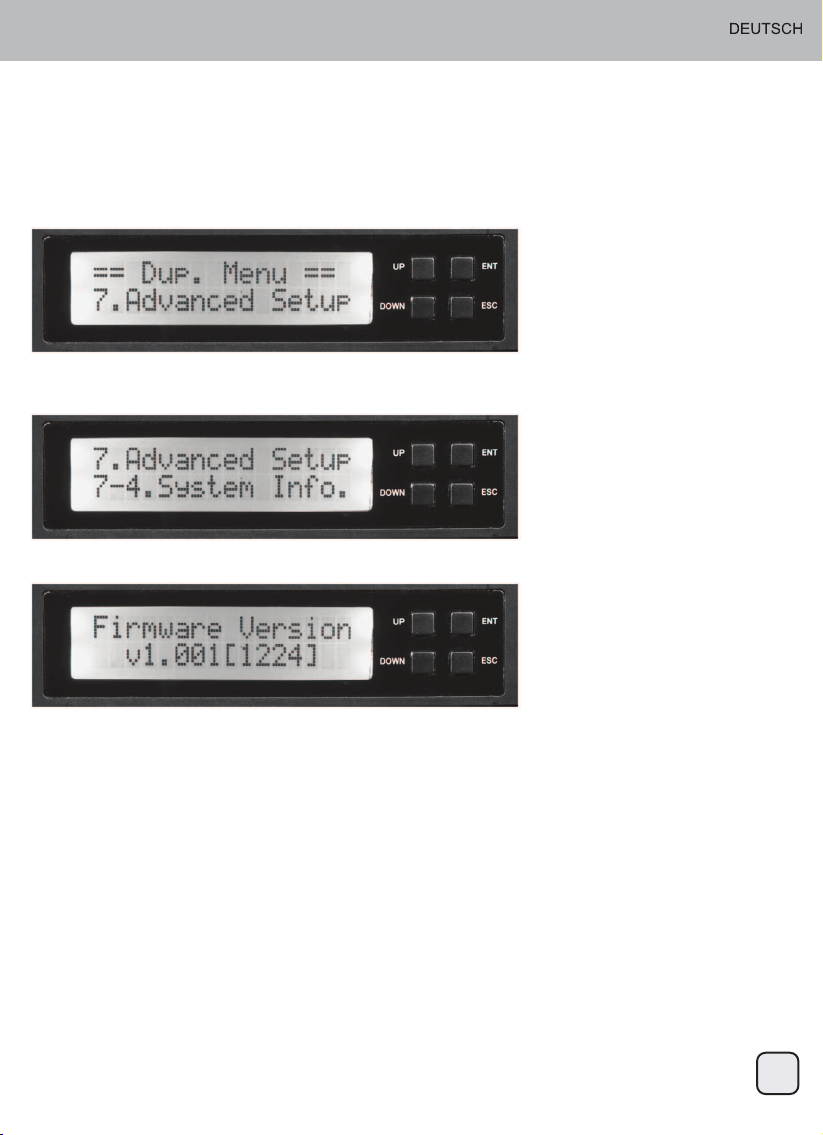
1. Select the “Advanced Setup” using the arrow button. The following screen will be displayed:
This function displayed information about the TS432U including the current firmware version
2. Use the arrow buttons to scroll to “System Info”. Press ENT to select “System Info”.
The following screen will be displayed:
Duplicator Mode User Guide
Operation
Main menu: Advanced Setup menu: 7-4. System Info
3. Press ENT to display system information.
Page 31

TS432U
Während der normalen Startsequenz werden folgende Informationen angezeigt
Duplicator Mode User Guide
Overview
Schalten Sie das Gerät ein
Changing to Duplicator Mode from RAID Mode
Drücken Sie zur Anzeige die Taste Up, Down, ESC oder ENT
Drücken Sie zum Bestätigen die ENT-Taste
Rufen Sie mit der ENT-Taste den Duplicator Mode auf
Nun befinden Sie sich im Duplicator Mode
30
Page 32

TS432U
1. Schließen Sie das Netzkabel des TS432U an
eine Steckdose an
2. Stecken Sie die SATA-Festplatte, auf die Sie
kopieren möchten, in den Steckplatz
“SOURCE DISK 4”. Richten Sie den SATA Port an der Festplatte am SATA-Anschluss im
Laufwerkseinschub aus
3. Stecken Sie die Ziel-SATA-Festplatten in die
Steckplätze “TARGET DISK1”, “TARGET
DISK2” oder “TARGET DISK3”. Richten Sie
den SATA-Port an der Festplatte am
SATA-Anschluss im Laufwerkseinschub aus
Hinweis:
Stellen Sie sicher, dass die Zielfestplatte mindestens die gleiche Kapazität wie die Quellfestplatte hat. Der
Duplikatorprozess startet nicht, falls die Zielfestplatte eine geringere Kapazität aufweist. Stellen Sie sicher,
dass der TS432U nicht per USB- oder eSATA-Ports mit einem PC verbunden ist
4. Schalten Sie den TS432U ein
5. Drücken Sie zur Auswahl des Duplicator Mode im Menü die Abwärtstaste, drücken Sie zum Fortfahren
ENT.Bestätigen Sie durch zwei weitere Betätigungen der ENT-Taste die Umschaltung in den Duplicator
Mode.
Das System erkennt die Festplatten automatisch. Nachdem die Festplatten erkannt wurden, erscheint ein
Bildschirm wie nachstehend abgebildet:
Duplicator Mode User Guide
Operation
Loading hard drives
TARGET DISK1
TARGET DISK2
TARGET DISK3
UP ENT
DOWN ESC
Hinweis:
Stellen Sie sicher, dass die Zielfestplatte mindestens die gleiche Kapazität wie die Quellfestplatte hat.
SOURCE DISK
31
Page 33

TS432U
1. Setzen Sie Quell- und Zielfestplatte in den TS432U ein. Das System erkennt die Festplatten automatisch.
Nachdem die Festplatten erkannt wurden, wird Folgendes angezeigt:
Die “ Copy HDD”-Funktion kopiert alle Daten von der Quell- auf die Zielfestplatte.
Menge der noch nicht übertragenen Daten (in Gigabyte) und Restzeit werden angezeigt. Der Fortschritt
wird alle 15 bis 20 Sekunden aktualisiert
3. Während des “ Copy HDD”-Vorgangs zeigt der TS432U den Fortschritt an
4. Sobald die Duplizierung abgeschlossen ist, erscheint der Auftragsstatus am Bildschirm
2. Drücken Sie ENT, “ Copy HDD” wird ausgeführt.
Duplicator Mode User Guide
Operation
Main menu: Copy HDD
Hinweis:
Stellen Sie sicher, dass die Zielfestplatte mindestens die gleiche Kapazität
wie die Quellfestplatte hat.
Note:
When copy is complete, TS432U will
beep 5 times to indicate it is finished,
press ESC to stop the beep.
32
Page 34
TS432U
1. Setzen Sie Quell- und Zielfestplatte ein, wählen Sie mit der Pfeiltaste “ Compare HDD”. Der folgende
Bildschirm wird angezeigt:
Die “ Compare HDD”-Funktion führt einen Vergleich der Daten von Quell- und Zielfestplatte durch
Wenn der Vorgang “ Compare HDD” abgeschlossen ist, erscheint der Auftragsstatus am Bildschirm
3. Drücken Sie ENT, “ Compare HDD” wird ausgeführt. Das System erkennt die Festplatten automatisch.
Während des “ Compare HDD”-Vorgangs zeigt der TS432U den Fortschritt an
2. Drücken Sie zum Bestätigen die ENT-Taste
Duplicator Mode User Guide
Operation
Main menu: Compare HDD
Hinweis:
Falls sich die Ziel- von der Quellfestplatte unterscheidet, gibt der TS432U einen Signalton aus und
meldet jede verschiedenartige LBA. Bitte schalten Sie den TS432U aus und bestimmen anhand
des Vergleichs einzelner Zielfestplatten, welche sich unterscheidet.
Note:
When compare is complete, TS432U
will beep 5 times to indicate it is
finished, press ESC to stop the beep.
33
Page 35

TS432U
1. Wählen Sie mit der Pfeiltaste “ReScan Bus”. Der folgende Bildschirm wird angezeigt:
Die “ReScan Bus”-Funktion dient der erneuten Erkennung der im TS432U installierten Festplatten. Sie kann
genutzt werden, wenn Sie Festplatten austauschen, ohne das System neu zu starten.
4. Wenn die “ReScan Bus”-Funktion abgeschlossen ist, erscheint der folgende Bildschirm:
3. Drücken Sie zum Starten der “ReScan Bus”-Funktion ENT
2. Drücken Sie zur Auswahl ENT. Das System fordert Sie dazu auf, die Fortsetzung zu bestätigen.
Duplicator Mode User Guide
Operation
Main menu: ReScan Bus
34
Page 36

TS432U
1. Wählen Sie bei eingesteckter Quellfestplatte mit der Pfeiltaste die Option “ Source Size”, der folgende
Bildschirm wird angezeigt.
Die “ Source Size”-Funktion dient dazu, die Kapazität der Quellfestplatte anzuzeigen.
2. Drücken Sie zum Anzeigen der Kapazität der Quellfestplatte ENT.
Duplicator Mode User Guide
Operation
Main menu: Source Size
1. Wählen Sie mit der Pfeiltaste “ Setup”. Der folgende Bildschirm wird angezeigt:
Das “ Setup”-Menü enthält Konfigurationsoptionen zum TS432U.
Zur Erzielung optimaler Leistung sollten Sie die Werkseinstellungen verwenden
Main menu: Setup
Hinweis:
Drücken Sie nach Änderung einer Konfigurationsoption zum Speichern der Änderung ENT.
35
Page 37

TS432U
1. Wählen Sie mit der Pfeiltaste “Setup”. Der folgende Bildschirm wird angezeigt:
“Auto Compare” vergleicht Quell- und Zielfestplatte automatisch nach jedem Kopiervorgang.
2. Drücken Sie ENT, wählen Sie mit der Pfeiltaste “Auto Compare”. Der folgende Bildschirm wird angezeigt:
Duplicator Mode User Guide
Operation
Main menu: Setup menu: 5-1 Auto Compare
3. Drücken Sie zur Anzeige der aktuellen Konfigurationseinstellung ENT. (Standardeinstellung ist “Disable”)
4. Modifizieren Sie die Einstellung mit der Pfeiltaste. Mit der Aufwärts- / Abwärtstaste können Sie “Auto Vergleich” de-/aktivieren.
5. Drücken Sie zum Speichern der Einstellung ENT.
36
Page 38

TS432U
1. Wählen Sie mit der Pfeiltaste “Setup”. Der folgende Bildschirm wird angezeigt:
“ Button Sound” de-/aktiviert den Signalton bei Betätigung einer Taste.
2. Drücken Sie ENT, wählen Sie mit der Pfeiltaste “Button Sound”. Der folgende Bildschirm wird angezeigt:
Duplicator Mode User Guide
Operation
Main menu: Setup menu: 5-2 Button Sound
3. Drücken Sie zur Anzeige der aktuellen Konfigurationseinstellung ENT. (Standardeinstellung ist “Off”)
4. Modifizieren Sie die Einstellung mit der Pfeiltaste. Mit der Aufwärts- / Abwärtstaste können Sie “Tasten
ton” de-/aktivieren.
5. Drücken Sie zum Speichern der Einstellung ENT.
37
Page 39

TS432U
1. Wählen Sie mit der Pfeiltaste “Setup”. Der folgende Bildschirm wird angezeigt:
Diese Option zeigt Informationen über die mit dem TS432U verbundenen Festplatten
2. Drücken Sie ENT, wählen Sie mit der Pfeiltaste “Device Info”. Der folgende Bildschirm wird angezeigt:
Duplicator Mode User Guide
Operation
Main menu: Setup menu: 5-3 Device Info
3. Drücken Sie ENT, drücken Sie zum Blättern und Auswählen der Festplatte die Pfeiltasten.
Der folgende Bildschirm wird angezeigt:
4. Drücken Sie zur Auswahl ENT. Zeigen Sie mit den Pfeiltasten zusätzliche Informationen zu den
ausgewählten Festplatten an. Die folgenden Bildschirme werden angezeigt:
38
Page 40

TS432U
1. Wählen Sie mit der Pfeiltaste “RAID Mode”. Der folgende Bildschirm wird angezeigt:
2. Drücken Sie ENT, wählen Sie mit der Pfeiltaste “ RAID Mode”. Der folgende Bildschirm wird angezeigt:
Duplicator Mode User Guide
Operation
Main menu: RAID Mode
3. Drücken Sie zur Auswahl ENT. Das System fordert Sie zur Bestätigung auf.
4. Nun befinden Sie sich im RAID-Mode.
39
Page 41

TS432U
1. Wählen Sie mit der Pfeiltaste “ Advanced Setup”. Der folgende Bildschirm wird angezeigt:
Das “ Adv Setup”-Menü enthält zusätzliche Konfigurationsoptionen zum TS432U.
2. Wenn die Konfigurationsänderungen gespeichert wurden, erscheint folgender Bildschirm:
Duplicator Mode User Guide
Operation
Main menu: Advanced Setup
Hinweis:
Drücken Sie nach Änderung einer Konfigurationsoption zum Speichern der Änderung ENT. Sobald alle
Änderungen abgeschlossen sind, verlassen Sie mit ESC das “ Advanced Setup”-Menü. Der folgende
Bildschirm wird angezeigt:
40
Page 42

TS432U
1. Wählen Sie mit der Pfeiltaste “Advanced Setup”. Der folgende Bildschirm wird angezeigt:
Durch Aktivierung dieser Funktion werden jegliche Fehler, die während der Duplizierung auftreten, ignoriert.
Standardmäßig hält der TS432U die Duplizierung an, wenn er auf der Quellfestplatte auf einen nicht
lesbaren Bereich stößt; ein Fehler wird angezeigt. Durch Aktiveirung dieser Option werden Fehler ignoriert
und defekte Sektoren auf der Quellfestplatte übersprungen.
2. Wählen Sie mit den Pfeiltasten “Read Err Skip”. Der folgende Bildschirm wird angezeigt:
Duplicator Mode User Guide
Operation
Main menu: Advanced Setup menu: 7-1 read error skip
3. Drücken Sie zur Anzeige der aktuellen Konfigurationseinstellung ENT. (Standardeinstellung ist “Disable”)
4. Ändern Sie die Einstellung mit den Pfeiltasten: “Deaktivieren” oder “Aktivieren”.
5. Drücken Sie zum Speichern der Einstellung ENT.
Warnung: Die Aktivierung dieser Funktion kann dazu führen, dass defekte Daten auf die Festplatten
kopiert werden
41
Page 43
TS432U
1. Wählen Sie mit der Pfeiltaste “ Advanced Setup”. Der folgende Bildschirm wird angezeigt:
Diese Funktion zeigt Informationen über den TS432U an, inklusive der aktuellen Firmware-Version
2. Wählen Sie mit den Pfeiltasten “System Info”. Wählen Sie mit ENT “System Info”.
Der folgende Bildschirm wird angezeigt:
Duplicator Mode User Guide
Operation
Main menu: Advanced Setup menu: 7-4. System Info
3. Drücken Sie zur Anzeige der Systeminformationen ENT.
42
Page 44

TS432U
43
Pendant la séquence normale d'allumage, les informations suivantes s'afficheront.
Duplicator Mode User Guide
Overview
Allumer l'appareil
Changing to Duplicator Mode from RAID Mode
Appuyez sur le bouton UP, DOWN, ESC ou ENT pour afficher.
Appuyez sur le bouton ENT pour confirmer.
Appuyez sur le bouton ENT pour aller au Duplicator Mode
Vous êtes maintenant en Duplicator Mode
Page 45

TS432U
44
1. Branchez le cordon d'alimentation du TS432U
sur une prise de courant.
2. Insérez le disque dur SATA que vous voulez
copier dans la fente " SOURCE DISK 4 ".
Alignez le port SATA du disque dur avec le
connecteur SATA dans la fente de baie de
disque.
3. Insérez les disques dur SATA cibles dans les
fentes " TARGET DISK1 " , "TARGET DISK2 "
ou " TARGET DISK3 ". Alignez le port SATA
du disque dur avec le connecteur SATA dans
la fente de baie de disque.
Remarque:
Assurez-vous que le disque dur cible a une taille au moins égale ou supérieure à celle du disque dur
source. L'opération de duplication ne démarrera pas si le disque cible a une taille inférieure. Assurez-vous
que le TS432U n'est pas connecté à un PC via les ports USB ou eSATA.
4. Allumer le TS432U
5. Appuyez sur le bouton BAS pour sélectionner le Duplicator Mode dans le menu et appuyez sur
ENT pour continuer.Appuyez sur ENT deux fois de plus pour confirmer le changement au Duplicator
Mode.
Le système détectera automatiquement les disques durs. Une fois que les disques durs ont été détectés, un
écran identique à celui ci-après apparaîtra :
Duplicator Mode User Guide
Operation
Loading hard drives
TARGET DISK1
TARGET DISK2
TARGET DISK3
UP ENT
DOWN ESC
Remarque :
Assurez-vous que le disque dur cible a une taille au moins égale ou supérieure à celle du disque dur source.
SOURCE DISK
Page 46

TS432U
45
1. Insérez le HDD source et le HDD cible dans le TS432U. Le système détectera automatiquement les
disques durs. Une fois que les disques durs ont été détectés, ceci apparaîtra :
La fonction " Copy HDD " copiera toutes les données du HDD source sur le HDD cible.
La quantité de données à transférer (affichée en gigaoctets) et la durée seront affichées. Les progrès du
transfert sont mis à jour toutes les 15 à 20 secondes.
3. Pendant l'opération " Copy HDD ", le TS432U affichera les progrès.
4. Une fois l'opération de duplication terminée, un écran de statut de tâche s'affichera
2. Appuyez sur ENT et l'opération " Copy HDD " commencera.
Duplicator Mode User Guide
Operation
Main menu: Copy HDD
Remarque:
Assurez-vous que le disque dur cible a
une taille au moins égale ou supérieure à celle du disque dur source.
Note:
When copy is complete, TS432U will
beep 5 times to indicate it is finished,
press ESC to stop the beep.
Page 47

TS432U
46
1. Insérez le HDD source et cible et sélectionnez " Compare HDD " avec le bouton flèche.
L’écran suivant s’affichera :
La fonction " Compare HDD " fera une comparaison des données sur le disque dur source avec les
données sur le disque dur cible.
Une fois l'opération " Compare HDD " terminée, un écran de statut de tâche s'affichera.
3. Appuyez sur ENT et l'opération " Compare HDD " commencera. Le système détectera automatiquement
les disques durs. Pendant l'opération " Compare HDD ", le TS432U affichera les informations de progrès.
2. Press ENT to confirm.
Duplicator Mode User Guide
Operation
Main menu: Compare HDD
Remarque:
si le disque cible est différent du disque source, le TS432U fera un bip et indiquera que chaque
LBA est différent. Veuillez éteindre le TS432U et comparer individuellement chaque disque cible
pour trouver celui qui est différent.
Note:
When compare is complete, TS432U
will beep 5 times to indicate it is
finished, press ESC to stop the beep.
Page 48

TS432U
47
1. Sélectionnez " ReScan Bus " avec les boutons flèches. L’écran suivant s’affichera :
La fonction " ReScan Bus " redétecte les disques durs installés dans le TS432U. Cela peut être utilisé
lorsque vous changez des disques, sans avoir besoin de redémarrer le système.
4. Une fois l'opération " ReScan Bus " terminée, le message suivant s'affichera :
3. Appuyez sur ENT pour démarrer " ReScan Bus ".
2. Appuyez sur ENT pour sélectionner. Le système vous demandera de confirmer que vous
voulez continuer.
Duplicator Mode User Guide
Operation
Main menu: ReScan Bus
Page 49

TS432U
48
1. Lorsque le HDD source a été inséré, utilisez les boutons flèches pour sélectionner " Taille de la source "
et l'écran suivant apparaîtra.
La fonction " Source Size" est utilisée pour afficher la taille du disque dur source.
2. Appuyez sur ENT pour afficher la taille du disque dur source.
Duplicator Mode User Guide
Operation
Main menu: Source Size
1. Sélectionnez " Setup" avec les boutons flèches. L’écran suivant s’affichera :
Le menu " Setup" contient les options de configuration pour le TS432U.
Il est recommandé d'utiliser les réglages par défaut d'usine pour des performances optimales.
Main menu: Setup
Remarque:
après avoir changé des options de configuration, appuyez sur ENT pour sauvegarder les modifications.
Page 50
TS432U
49
1. Sélectionnez " Setup" avec les boutons flèches. L’écran suivant s’affichera :
" Auto Compare " compare automatiquement le disque dur source et cible après chaque opération de copie.
2. Appuyez sur ENT et utilisez les boutons flèches pour aller sur " Auto Compare ".
L’écran suivant s’affichera :
Duplicator Mode User Guide
Operation
Main menu: Setup menu: 5-1 Auto Compare
3. Appuyez sur ENT pour afficher les réglages de la configuration actuelle.
(Le réglage par défaut est " Disable ")
4. Utilisez les boutons flèches pour modifier le réglage.
Utilisez les boutons UPou DOWN pour activer ou désactiver " Comparaison auto ".
5. Appuyez sur ENT pour enregistrer le nouveau réglage.
Page 51

TS432U
50
1. Sélectionnez " Setup" avec les boutons flèches. L’écran suivant s’affichera :
" Button Sound " permet d'activer ou de désactiver le son des boutons, lorsqu'un bouton est pressé.
2. Appuyez sur ENT et utilisez les boutons flèches pour aller sur " Button Sound ".
L’écran suivant s’affichera :
Duplicator Mode User Guide
Operation
Main menu: Setup menu: 5-2 Button Sound
3. Appuyez sur ENT pour afficher les réglages de la configuration actuelle. (Le réglage par défaut est " Off ")
4. Utilisez les boutons flèches pour modifier le réglage.
Utilisez les boutons UP ou DOWN pour activer ou désactiver " Son de bouton ".
5. Appuyez sur ENT pour enregistrer le nouveau réglage.
Page 52

TS432U
51
1. Sélectionnez " Setup" avec les boutons flèches. L’écran suivant s’affichera :
Cette option affiche les informations des disques durs connectés au TS432U.
2. Appuyez sur ENT et utilisez les boutons flèches pour aller sur" Device Info". L’écran suivant s’affichera :
Duplicator Mode User Guide
Operation
Main menu: Setup menu: 5-3 Device Info
3. Appuyez sur ENT et utilisez les boutons flèches pour choisir HDD. L’écran illustré ci-dessous s’affichera :
4. Appuyez sur ENT pour sélectionner. Utilisez les boutons flèche pour afficher d'autres informations sur les
disques durs sélectionnés. L’écran illustré ci-dessous s’affichera :
Page 53

TS432U
52
1. Sélectionnez " RAID Mode" avec les boutons flèches. L’écran suivant s’affichera :
2. Appuyez sur ENT et utilisez les boutons flèches pour aller sur " RAID Mode". L’écran suivant s’affichera :
Duplicator Mode User Guide
Operation
Main menu: RAID Mode
3. Appuyez sur ENT pour sélectionner. Le système vous demandera de confirmer.
4. Vous êtes maintenant en RAID mode.
Page 54

TS432U
53
1. Sélectionnez " Advanced Setup " avec les boutons flèches. L’écran suivant s’affichera :
Le menu " Adv Setup " contient des options de configuration avancées pour le TS432U.
2. Lorsque les modifications ont été sauvegardées, l'écran suivant apparaîtra :
Duplicator Mode User Guide
Operation
Main menu: Advanced Setup
Remarque:
après avoir changé des options de configuration, vous devez appuyer sur ENT pour sauvegarder les
modifications. Une fois que toutes les modifications ont été faites, appuyez sur ESC pour quitter le menu
" Configuration avancée ". L’écran suivant s’affichera :
Page 55

TS432U
54
1. Sélectionnez " Advanced Setup " avec les boutons flèches. L’écran suivant s’affichera :
Cette fonction peut être activée pour ignorer toutes les erreurs qui se produisent pendant la duplication. Par
défaut, le TS432U arrêtera l'opération de duplication si'il rencontre une erreur de lecture sur le disque dur
source et affichera un message d'erreur. Activez cette option pour ignorer et sauter les secteurs/blocs
défectueux sur le disque dur source.
2. Utilisez les flèches pour naviguer sur " Read Err Skip " L’écran suivant s’affichera :
Duplicator Mode User Guide
Operation
Main menu: Advanced Setup menu: 7-1 read error skip
3. Appuyez sur ENT pour afficher les réglages de la configuration actuelle.
(Le réglage par défaut est " Disable")
4. Appuyer sur les boutons de flèche pour changer le réglage entre " disable " et " enable ".
5. Appuyez sur ENT pour enregistrer le nouveau réglage.
Avertissement: activer cette fonction causera des données corrompues sur les disques durs cibles.
Page 56

TS432U
55
1. Sélectionnez " Advanced Setup " avec les boutons flèches. L’écran suivant s’affichera :
Cette fonction affiche des informations sur le TS432U, y compris la version du firmware.
2. Utilisez les boutons flèches pour aller sur " System Info ".
Appuyez sur ENT pour sélectionner " Info système ". L’écran suivant s’affichera :
Duplicator Mode User Guide
Operation
Main menu: Advanced Setup menu: 7-4. System Info
3. Appuyez sur ENT pour afficher les informations du système.
Page 57

TS432U
Durante la secuencia de encendido normal, se mostrará la siguiente información
Duplicator Mode User Guide
Overview
Encienda la unidad
Changing to Duplicator Mode from RAID Mode
Presione UP, DOWN, ESC ó ENT para mostrar
Presione el botón ENT para confirmar
Presione el botón ENT para entrar en Duplicator Mode
Ahora está en Duplicator Mode
56
Page 58

TS432U
1. Conecte el cable de potencia de la TS432U a
un enchufe
2. Inserte el disco duro SATA que desee copiar
en el zócalo marcado “SOURCE DISK 4”.
Alinee el puerto SATA del disco duro con el
conector SATA del zócalo para la bahía de
dispositivos
3. Inserte los discos duros SATA de destino en
los zócalos marcados “TARGET DISK 1”,
“TARGET DISK 2” ó “TARGET DISK 3”.
Alinee el puerto SATA del disco duro con el
conector SATA del zócalo de la bahía de
dispositivos.
Nota:
asegúrese de que el disco duro de destino tiene la misma ó mayor capacidad que el disco duro de origen.
El proceso duplicador no comenzará si el disco duro de destino tiene menor capacidad. Asegúrese de que
la TS432U no está conectada a un PC a través de los puertos USB ó eSATA
4. Encienda la TS432U
5. Presione el botón DOWN para seleccionar el Duplicator Mode en el menú y presione ENT para proceder
Presione ENT dos veces más para confirmar el cambio a Duplicator Mode
El sistema auto detectará los discos duros. Después de haber detectado los discos aparecerá una ventana
similar a la que se muestra a continuación:
Duplicator Mode User Guide
Operation
Loading hard drives
TARGET DISK1
TARGET DISK2
TARGET DISK3
UP ENT
DOWN ESC
Nota:
asegúrese de que el disco duro de destino tiene la misma ó mayor capacidad que el disco duro de origen
SOURCE DISK
57
Page 59

TS432U
1. Cargue el disco duro fuente y el disco duro de destino en la TS432U. El sistema auto detectará los
discos duros. Después de haber detectado los discos duros, se mostrará lo siguiente:
La función “Copy HDD” copiará todos los datos del disco duro de origen al disco duro de destino.
Se mostrará la cantidad de datos que restan para ser transferidos (mostrado en gigabytes) y el tiempo.
La información de progreso se refrescará cada 15 ó 20 segundos.
3. Durante el proceso “Copy HDD” la TS432U mostrará la información del progreso
4. Una vez el proceso de duplicación se complete, se mostrará una pantalla de información
2. Presione ENT y “Copy HDD” comenzará.
Duplicator Mode User Guide
Operation
Main menu: Copy HDD
Nota:
asegúrese de que el disco duro de
destino tiene la misma ó mayor
capacidad que el disco duro de origen.
Note:
When copy is complete, TS432U will
beep 5 times to indicate it is finished,
press ESC to stop the beep.
58
Page 60

TS432U
1. Cargue el disco duro fuente y el disco duro de destino y seleccione “Comparar disco duro” usando el
botón de flecha. Se mostrará la siguiente pantalla:
La función “Compare HDD” realiza una comparación de datos entre el disco duro de origen y los datos del
disco duro de destino
Cuando se complete “Compare HDD”, se mostrará una pantalla de información
3. Presione ENT y “Compare HDD” empezará. El sistema auto detectará los discos duros. Durante el
proceso de “Comparar discos duros”, la TS432U mostrará la información de progreso.
2. Presione el botón ENT para confirmar
Duplicator Mode User Guide
Operation
Main menu: Compare HDD
Nota:
si el disco de destino difiere del disco de origen, la TS432U pitará e informará de que cada LBA
es diferente. Por favor, encienda la TS432U y compare cada disco por separado para determinar
el que es diferente.
Note:
When compare is complete, TS432U
will beep 5 times to indicate it is
finished, press ESC to stop the beep.
59
Page 61

TS432U
1. Seleccione “ReScan Bus” usando las flechas. Se mostrará la siguiente pantalla:
La función “ReScan Bus” redetecta los discos duros instalados en la TS432U.
Se puede usar cuando se cambian discos sin reiniciar el sistema.
4. Cuando se completa “ReScan Bus”, se mostrará la siguiente pantalla:
3. Presione ENT para comenzar “ReScan Bus”
2. Presione ENT para seleccionar. El sistema le indicará que debe confirmar para continuar.
Duplicator Mode User Guide
Operation
Main menu: ReScan Bus
60
Page 62

TS432U
1. Cuando se carga el disco duro de origen, use las flechas para seleccionar “Source size”,
se mostrará la siguiente pantalla.
La función “Source size” se usa para mostrar la capacidad del disco duro de origen.
2. Presione ENT para mostrar la capacidad del disco duro de origen.
Duplicator Mode User Guide
Operation
Main menu: Source Size
1. Seleccione “Setup” usando las flechas. Se mostrará la siguiente pantalla:
El menú “Setup” contiene opciones de configuración para la TS432U.
Se sugiere que use la configuración de fábrica para un rendimiento óptimo
Main menu: Setup
Nota:
Tras cambiar cualquiera de las opciones de configuración, presione ENT para salvar los cambios
61
Page 63

TS432U
1. Seleccione “Setup” usando el botón de flecha. Se mostrará la siguiente pantalla:
“Auto Compare” compara de forma automática los discos duros de origen y destino tras cada operación
de copia.
2. Presione ENT y use el botón de flecha para avanzar hasta “Auto Compare”.
Se mostrará la siguiente pantalla:
Duplicator Mode User Guide
Operation
Main menu: Setup menu: 5-1 Auto Compare
3. Presione ENT para mostrar la configuración actual. (La configuración por defecto es “Disable”)
4. Use el botón de flecha para modificar la configuración.
Use los botones UP ó DOWN para activar ó desactivar “Auto Comparar”
5. Presione ENT para salvar la configuración.
62
Page 64

TS432U
1. Seleccione “Setup” usando el botón de flecha. Se mostrará la siguiente pantalla:
“Button Sound” activa ó desactiva el pitido cuando se presiona un botón.
2. Presione ENT y use el botón de flecha para avanzar hasta “Button Sound”.
Se mostrará la siguiente pantalla:
Duplicator Mode User Guide
Operation
Main menu: Setup menu: 5-2 Button Sound
3. Presione ENT para mostrar la configuración actual. (La configuración por defecto es “Off”)
4. Use las flechas para modificar la configuración.
Use los botones UP ó DOWN para activar ó desactivar “Sonido de Botones”
5. Presione ENT para salvar la configuración.
63
Page 65

TS432U
1. Seleccione “Setup” usando el botón de flecha. Se mostrará la siguiente pantalla:
Esta opción muestra información de cualquier disco duro conectado a la TS432U
2. Presione ENT y use el botón de flecha para avanzar hasta “Device Info”.
Se mostrará la siguiente pantalla:
Duplicator Mode User Guide
Operation
Main menu: Setup menu: 5-3 Device Info
3. Presione ENT y use las flechas para moverse y escoger disco duro. Se mostrará la siguiente pantalla.
4. Presione ENT para seleccionar. Use las flechas para mostrar información adicional sobre los discos
duros seleccionados. Se mostrarán las siguientes pantallas:
64
Page 66

TS432U
1. Seleccione “RAID Mode” usando el botón de flecha. Se mostrará la siguiente pantalla:
2. Presione ENT y use el botón de flecha para avanzar hasta “RAID Mode”.
Se mostrará la siguiente pantalla:
Duplicator Mode User Guide
Operation
Main menu: RAID Mode
3. Presione ENT para seleccionar. El sistema le pedirá confirmación.
4. Ahora está en modo RAID.
65
Page 67

TS432U
1. Seleccione “Advanced Setup” usando las flechas. Se mostrará la siguiente pantalla.
El menú “Adv Setup” contiene opciones de configuración adicional para la TS432U.
2. Cuando los cambios de configuración se han salvado, se mostrará la siguiente pantalla:
Duplicator Mode User Guide
Operation
Main menu: Advanced Setup
Nota:
tras cambiar cualquiera de las opciones de configuración, debe presionar ENT para salvar los cambios. Tras
completar todos los cambios, presione ESC para salir del menú “Advanced Setup”.
Se mostrará la siguiente pantalla.
66
Page 68

TS432U
1. Seleccione “Advanced Setup” usando la flecha. Se mostrará la siguiente pantalla.
Esta función se puede activar para ignorar cualquier error que ocurra durante la duplicación. Por defecto, la
TS432U detendrá la operación de duplicación cuando encuentre una zona que no se pueda leer en el disco
duro de origen y mostrará un error. Activar esta opción ignorará y saltará cualquier sector dañado del disco
duro de origen.
2. Use las flechas para moverse hasta “Read Err Skip”. Se mostrará la siguiente pantalla.
Duplicator Mode User Guide
Operation
Main menu: Advanced Setup menu: 7-1 read error skip
3. Presione ENT para mostrar la configuración actual. (La configuración por defecto es “Disable”)
4. Presione las flechas para modificar la configuración entre “disable” ó “enable”.
5. Presione ENT para salvar la configuración.
Aviso: activar esta función podría provocar datos corruptos en los discos duros copiados.
67
Page 69

TS432U
1. Seleccione “Advanced Setup” usando la flecha. Se mostrará la siguiente pantalla.
Esta función mostrará información sobre la TS432U incluyendo la versión actual del firmware
2. Use las flechas para avanzar hasta “System Info”. Presione ENT para seleccionar “System Info”.
Se mostrará la siguiente pantalla:
Duplicator Mode User Guide
Operation
Main menu: Advanced Setup menu: 7-4. System Info
3. Presione ENT para mostrar la información del sistema.
68
Page 70

TS432U
69
Durante la normale sequenza d’accensione, saranno visualizzate le seguenti informazioni
Duplicator Mode User Guide
Overview
Accendere l’unità
Changing to Duplicator Mode from RAID Mode
Premere a scelta il tasto UP, DOWN, ESC o ENT per visualizzare
Premere il tasto ENT per confermare
Premere il tasto ENT per accedere a Duplicator Mode (Modalità Duplicazione)
Adesso si è in Duplicator Mode (Modalità Duplicazione)
Page 71

TS432U
70
1. Collegare il cavo d'alimentazione di TS432U
ad una presa di corrente.
2. Inserire il disco rigido SATA che si vuole
copiare nell’alloggio contrassegnato con
“SOURCE DISK 4”. Allineare la porta SATA
del disco rigido con il connettore SATA
nell’alloggio
3. Inserire i dischi rigidi SATA di destinazione
negli alloggi contrassegnati con “TARGET
DISK1”, “TARGET DISK2” o “TARGET
DISK3”. Allineare la porta SATA del disco
rigido con il connettore SATA nell’alloggio
Nota:
Assicurarsi che il disco rigido di destinazione abbia una capacità uguale o superiore a quella del disco rigido
d’origine. Il processo di duplicazione non si avvia se l'unità di destinazione ha una capacità inferiore.
Assicurarsi che TS432U non sia collegato ad un PC tramite la porta USB o le porte eSATA
4. Accendere TS432U
5. Premere il tasto GIÙ per selezionare Duplicator Mode (Modalità Duplicazione) nel menu e premere il
tasto ENT per procedere. Premere il tasto ENT altre due volte per confermare e passare aDuplicator
Mode (Modalità Duplicazione).
Il sistema rileverà automaticamente i dischi rigidi. Dopo che le unità sono state rilevate, sarà visualizzata
una schermata simile a quella che segue:
Duplicator Mode User Guide
Operation
Loading hard drives
TARGET DISK1
TARGET DISK2
TARGET DISK3
UP ENT
DOWN ESC
Nota:
Assicurarsi che il disco rigido di destinazione abbia una capacità uguale o superiore a quella del disco rigido
d’origine.
SOURCE DISK
Page 72

TS432U
71
1. Caricare l’unità HDD di origine e l’unità HDD di destinazione su TS432U. Il sistema rileverà
automaticamente i dischi rigidi. Dopo che le unità sono state rilevate, sarà visualizzato quanto segue:
La funzione “Copy HDD” (Copia HDD) copierà tutti i dati dall’unità HDD di origine all’unità HDD di destinazione.
Saranno visualizzate la quantità di dati ancora da trasferire (mostrata in gigabyte) e l’ora. Le informazioni
sull’avanzamento sono aggiornate ogni 15 - 20 secondi
3. Durante il processo “Copy HDD” (Copia HDD), TS432U visualizzerà le informazioni sull’avanzamento
4. Quando la duplicazione è completata, sarà visualizzata una schermata di stato del processo
2. Premere il tasto ENT e la funzione “Copy HDD” (Copia HDD) si avvierà.
Duplicator Mode User Guide
Operation
Main menu: Copy HDD
Nota:
Assicurarsi che il disco rigido di
destinazione abbia una capacità
uguale o superiore a quella del disco
rigido d’origine.
Note:
When copy is complete, TS432U will
beep 5 times to indicate it is finished,
press ESC to stop the beep.
Page 73

TS432U
72
1. Caricare le unità HDD di origine e di destinazione e selezionare “Compare HDD” (Confronta HDD)
usando il tasto freccia. Sarà visualizzata la finestra che segue:
La funzione “Compare HDD” (Confronta HDD) esegue un confronto tra i dati del disco rigido di origine ed i
dati presenti sul disco rigido di destinazione
Quando il processo “Compare HDD” (Confronta HDD) è completata, sarà visualizzata una schermata di
stato del processo
3. Premere il tasto ENT e la funzione “Compare HDD” (Confronta HDD) si avvierà. Il sistema rileverà
automaticamente i dischi rigidi. Durante il processo “Compare HDD” (Confronta HDD), TS432U
visualizzerà le informazioni sull’avanzamento
2. Premere il tasto ENT per confermare
Duplicator Mode User Guide
Operation
Main menu: Compare HDD
Nota:
Se l'unità di destinazione è diverso dall’unità di origine, TS432U emette un segnale acustico e
segnalerà ciascun LBA che è diverso. Spegnere TS432U e confrontare singolarmente ciascuna
unità di destinazione per determinare quale è diversa.
Note:
When compare is complete, TS432U
will beep 5 times to indicate it is
finished, press ESC to stop the beep.
Page 74

TS432U
73
1. Selezionare “ReScan Bus” (Ripeti analisi Bus) usando il tasto freccia.
Sarà visualizzata la finestra che segue:
La funzione “ReScan Bus” (Ripeti analisi Bus) rileva di nuovo i dischi rigidi installati su TS432U.
Questa funzione può essere usata quando si cambiano le unità senza riavviare il sistema.
4. Quando la funzione “ReScan Bus” (Ripeti analisi Bus) è completata, sarà visualizzata la
schermata che segue:
3. Premere il tasto ENT per avviare la funzione (Ripeti analisi Bus)
2. Premere il tasto ENT per selezionare. Il sistema chiederà di confermare che si vuole procedere.
Duplicator Mode User Guide
Operation
Main menu: ReScan Bus
Page 75

TS432U
74
1. Con l’unità HDD di origine caricata, usare i tasti freccia per selezionare
“Source Size” (Dimensioni origine), sarà visualizzata la schermata che segue.
La funzione “Source Size” (Dimensioni origine) è usata per visualizzare la capacità del disco
rigido di origine.
2. Premere il tasto ENT per visualizzare la capacità del disco rigido di origine.
Duplicator Mode User Guide
Operation
Main menu: Source Size
1. Selezionare “Setup” (Configurazione) usando il tasto freccia.
Sarà visualizzata la finestra che segue:
Il menu “Setup” (Configurazione) contiene le opzioni di configurazione di TS432U.
Si suggerisce di usare le impostazioni predefinite per ottimizzare le prestazioni
Main menu: Setup
Nota:
Dopo avere modificato le opzioni di configurazione, premere il tasto ENT per salvare le modifiche.
Page 76

TS432U
75
1. Selezionare “Setup”(Configurazione) usando il tasto freccia. Sarà visualizzata la finestra che segue:
La funzione “Auto Compare” (Confronto automatico) confronta automaticamente il disco rigido di origine e di
destinazione dopo ogni operazione di copia.
2. Premere il tasto ENT ed usare il tasto freccia per scorrere fino a “Auto Compare” (Confronto automatico).
Sarà visualizzata la finestra che segue:
Duplicator Mode User Guide
Operation
Main menu: Setup menu: 5-1 Auto Compare
3. Premere il tasto ENT per visualizzare l'impostazione corrente di configurazione.
(L'impostazione predefinita è “Off” (Disattiva))
4. Usare il tasto freccia per modificare l'impostazione. Usare il tasto UP o DOWN per abilitare o disabilitare
la funzione “Auto Compare” (Confronto automatico).
5. Premere il tasto ENT per salvare l'impostazione.
Page 77

TS432U
76
1. Selezionare “Setup” (Configurazione) usando il tasto freccia. Sarà visualizzata la finestra che segue:
La funzione “Button Sound” (Suono tasti) abilita o disabilita segnale acustico emesso quando si preme un
tasto.
2. Premere il tasto ENT ed usare il tasto freccia per scorrere fino a “Button Sound” (Confronto automatico).
Sarà visualizzata la finestra che segue:
Duplicator Mode User Guide
Operation
Main menu: Setup menu: 5-2 Button Sound
3. Premere il tasto ENT per visualizzare l'impostazione corrente di configurazione. (L'impostazione
predefinita è “Off” (Permettere))
4. Usare il tasto freccia per modificare l'impostazione.
Usare il tasto UP o DOWN abilitare o disabilitare la funzione “Button Sound” (Suono tasti).
5. Premere il tasto ENT per salvare l'impostazione.
Page 78

TS432U
77
1. Selezionare “Setup” (Configurazione) usando il tasto freccia. Sarà visualizzata la finestra che segue:
Questa opzione visualizza informazioni su qualsiasi disco rigido collegato a TS432U
2. Premere il tasto ENT ed usare il tasto freccia per scorrere fino a “Device Info” (Confronto automatico).
Sarà visualizzata la finestra che segue:
Duplicator Mode User Guide
Operation
Main menu: Setup menu: 5-3 Device Info
3. Premere il tasto ENT ed usare il tasto freccia per scorrere e scegliere HDD.
Sarà visualizzata la finestra che segue
4. Premere il tasto ENT per selezionare. Usare i tasti freccia per visualizzare altre informazioni sui dischi
rigidi selezionati. Saranno visualizzate le finestra che seguono:
Page 79
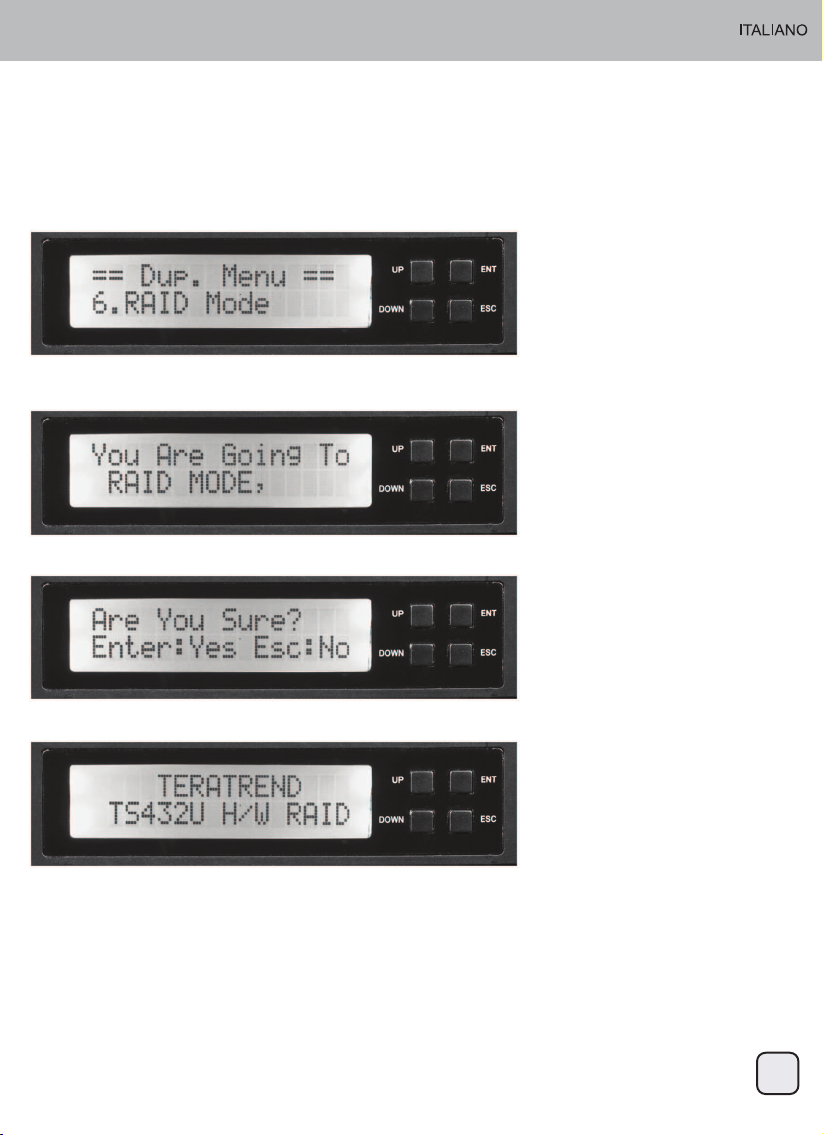
TS432U
78
1. Selezionare “RAID Mode” usando il tasto freccia. Sarà visualizzata la finestra che segue:
2. Premere il tasto ENT ed usare il tasto freccia per scorrere fino a “RAID Mode”.
Sarà visualizzata la finestra che segue:
Duplicator Mode User Guide
Operation
Main menu: RAID Mode
3. Premere il tasto ENT per selezionare. Il sistema richiederà di confermare.
4. Adesso si è in RAID mode.
Page 80

TS432U
79
1. Selezionare “Advanced Setup” (Configurazione avanzata) usando il tasto freccia.
Sarà visualizzata la finestra che segue:
Il menu “Adv Setup” (Configurazione avanzata) contiene altre opzioni di configurazione di TS432U.
2. Quando le modifiche di configurazione sono state salvate, sarà visualizzata la schermata seguente:
Duplicator Mode User Guide
Operation
Main menu: Advanced Setup
Nota:
Dopo avere modificato qualsiasi opzione di configurazione, premere il tasto ENT per salvare le modifiche.
Quando tutte le modifiche sono state completate, premere il tasto ESC per uscire dal menu “Advanced
Setup” (Configurazione avanzata). Sarà visualizzata la finestra che segue:
Page 81

TS432U
80
1. Selezionare “Advanced Setup” (Configurazione avanzata) usando il tasto freccia.
Sarà visualizzata la finestra che segue:
Questa funzione può essere abilitata per ignorare qualsiasi errore che si verifica durante la duplicazione.
Per impostazione predefinita, TS432U arresterà l'operazione di duplicazione quando incontra una zona
illeggibile sul disco rigido di origine, e visualizzerà un errore. Abilitando questa opzione, tutti i settori
danneggiati del disco rigido di origine saranno ignorati e saltati.
2. Usare i tasti freccia per scorrere fino a “Read Err Skip” (Ignora errori di lettura).
Sarà visualizzata la finestra che segue:
Duplicator Mode User Guide
Operation
Main menu: Advanced Setup menu: 7-1 read error skip
3. Premere il tasto ENT per visualizzare l'impostazione corrente di configurazione.
(L'impostazione predefinita è “Off” (Disattiva))
4. Premere i tasti freccia per modificare l'impostazione tra “Disable” (Disabilita) e “Enable” (Abilita).
5. Premere il tasto ENT per salvare l'impostazione.
Avviso: Abilitando questa funzione si può provocare la corruzione dei dati sui dischi rigidi copiati
Page 82

TS432U
81
1. Selezionare “Advanced Setup” (Configurazione avanzata) usando il tasto freccia.
Sarà visualizzata la finestra che segue:
Questa funzione visualizza informazioni su TS432U includendo la versione corrente del firmware
2. Usare i tasti freccia per scorrere fino a “System Info” (Informazioni del sistema). Premere il tasto ENT per
selezionare “System Info” (Informazioni del sistema). Sarà visualizzata la finestra che segue:
Duplicator Mode User Guide
Operation
Main menu: Advanced Setup menu: 7-4. System Info
3. Premere il tasto ENT visualizzare le informazioni del sistema.
Page 83

TS432U
Во время стандартной процедуры включения питания отображается следующая информация
Duplicator Mode User Guide
Overview
Включите питание устройства
Changing to Duplicator Mode from RAID Mode
Нажмите кнопку UP, DOWN, ESC или ENT для отображения
Нажмите кнопку ENT для подтверждения
Нажмите кнопку ENT для входа в Duplicator Mode (Режим дублирования)
Вы вошли в Duplicator Mode (Режим дублирования)
82
Page 84

TS432U
Duplicator Mode User Guide
Operation
Loading hard drives
1. Подключите вилку кабеля питания TS432U
в розетку питания
2. Установите жесткий диск SATA, если вы
хотите копировать данные через гнездо с
меткой "SOURCE DISK 4". Совместите порт
SATA на жестком диске с разъемом SATA
отсека для диска
3. Установите приемные жесткие диски SATA
в гнезда с метками "TARGET DISK1",
"TARGET DISK2" или "TARGET DISK3".
Совместите порт SATA на жестком диске с
разъемом SATA отсека для диска
Примечание:
Приемный жесткий диск должен иметь такой же или больший объем памяти по сравнению с
исходным жестким диском. Если объем памяти приемного диска меньше исходного, процесс
дублирования не запустится. Устройство TS432U не должно подключаться к ПК через порты USB или
eSATA
4. Включите устройство TS432U
5. Кнопкой ВНИЗ выберите Duplicator Mode (Режим дублирования) в меню и нажмите кнопку ENT для
продолжения.Нажмите дважды кнопку ENT для подтверждения перехода в Duplicator Mode (Режим
дублирования).
UP ENT
DOWN ESC
TARGET DISK1
TARGET DISK2
TARGET DISK3
SOURCE DISK
Система автоматически определит жесткие диски. После обнаружения жестких дисков отобразится
экран, подобный изображенному ниже:
Примечание:
Приемный жесткий диск должен иметь такой же или больший объем памяти по сравнению с исходным
жестким диском.
83
Page 85

TS432U
1. Установите исходный и приемный жесткие диски в устройство TS432U. Система автоматически
определит жесткие диски. После определения дисков отображается следующее окно:
Функция "Copy HDD (Копировать жесткий диск)" скопирует все данные исходного жесткого диска на
приемный жесткий диск.
Отображается объем остающихся данных для копирования (в гигабайтах) и время до завершения
операции. Информация о ходе копирования обновляется каждые15-20 секунд
3. В процессе операции копирования информации жесткого диска на устройстве TS432U
отображается ход операции
4. После завершения копирования отображается экран состояния задания
2. Нажмите кнопку ENT для запуска функции "Copy HDD (Копировать жесткий диск)".
Duplicator Mode User Guide
Operation
Main menu: Copy HDD
Примечание:
Приемный жесткий диск должен
иметь такой же или больший объем
памяти по сравнению с исходным
жестким диском
Note:
When copy is complete, TS432U will
beep 5 times to indicate it is finished,
press ESC to stop the beep.
84
Page 86

TS432U
1. Установите исходный и приемный диски и с помощью кнопки-стрелки выберите функцию
"Compare HDD (Сравнить диски)". Отображается следующий экран:
Функция "Compare HDD (Сравнить диски)" сравнивает данные на исходном жестком диске с данными
на приемном жестком диске
После завершения сравнения дисков отображается экран состояния задания
3. Нажмите кнопку ENT после чего запускается функция "Compare HDD (Сравнить диски)". Система
автоматически определит жесткие диски. В процессе операции сравнения дисков на устройстве
TS432U отображается ход операции
2. Нажмите кнопку ENT для подтверждения
Duplicator Mode User Guide
Operation
Main menu: Compare HDD
Примечание:
Если информация на приемном диске отличается от информации на исходном диске,
устройство TS432U подает звуковой сигнал и сообщает о каждом несовпадающем блоке
LBA. Выключите устройство TS432U и сравните отдельно каждый приемный диск для
определения несовпадающего.
Note:
When compare is complete, TS432U
will beep 5 times to indicate it is
finished, press ESC to stop the beep.
85
Page 87

TS432U
1. Стрелками выберите "ReScan Bus (Повторное сканирование шины)".
Отображается следующий экран:
Функция "ReScan Bus (Повторное сканирование шины)" заново определяет установленные в
устройстве TS432U жесткие диски. Данная функция используется при замене дисков без перезапуска
системы.
4. После завершения сканирования отображается следующий экран:
3. Нажмите кнопку ENT для запуска повторного сканирования дисков
2. Нажмите кнопку ENT для выбора. Система запросит подтверждение для продолжения.
Duplicator Mode User Guide
Operation
Main menu: ReScan Bus
86
Page 88

TS432U
1. После установки исходного жесткого диска стрелками выберите функцию "Source Size (Размер
исходного диска)", отображается следующий экран.
Функция "Source Size (Размер исходного диска)" используется для отображения объема памяти
исходного жесткого диска.
2. Нажмите кнопку ENT для отображения объема памяти исходного жесткого диска.
Duplicator Mode User Guide
Operation
Main menu: Source Size
1. Стрелками выберите "Setup (Настройка)". Отображается следующий экран:
В меню "Setup (Настройка)" приведены параметры настройки устройства TS432U. Для получения
оптимальных характеристик работы устройства рекомендуется использовать заводские параметры,
заданные по умолчанию
Main menu: Setup
Примечание:
После изменения какого-либо параметра нажмите кнопку ENT для сохранения изменения.
87
Page 89

TS432U
1. Функция "Auto Compare (Автоматическое сравнение)" автоматически сравнивает исходный и
приемный жесткие диски после каждой операции копирования.
Функция "Auto Compare (Автоматическое сравнение)" автоматически сравнивает исходный и
приемный жесткие диски после каждой операции копирования.
2. Нажмите кнопку ENT и стрелками выберите функцию "Auto Compare (Автоматическое сравнение)".
Отображается следующий экран:
Duplicator Mode User Guide
Operation
Main menu: Setup menu: 5-1 Auto Compare
3. Нажмите кнопку ENT для отображения текущих параметров настройки.
(Настройка по умолчанию "Disable")
4. Стрелками измените настройку. Для включения или отключения функции "Auto Compare
(Автоматическое сравнение)" используйте стрелки Вверх и Вниз.
5. Нажмите кнопку ENT для сохранения настройки.
88
Page 90

TS432U
1. Стрелками выберите "Setup (Настройка)". Отображается следующий экран:
Функция "Button Sound (Звук кнопки)" включает или отключает звуковой сигнал при нажатии кнопки.
2. Нажмите кнопку ENT и стрелками выберите функцию "Button Sound (Звук кнопки)".
Отображается следующий экран:
Duplicator Mode User Guide
Operation
Main menu: Setup menu: 5-2 Button Sound
3. Нажмите кнопку ENT для отображения текущих параметров настройки.
(Настройка по умолчанию "Off")
4. Стрелками измените настройку. Для включения или отключения функции "Button Sound
(Звук кнопки)" используйте стрелки UP и Down.
5. Нажмите кнопку ENT для сохранения настройки.
89
Page 91

TS432U
1. Стрелками выберите "Setup (Настройка)". Отображается следующий экран:
В данном режиме отображается информация о подключенных к устройству TS432U жестких дисках
2. Нажмите кнопку ENT и стрелками выберите функцию “Device Info”.
Отображается следующий экран:
Duplicator Mode User Guide
Operation
Main menu: Setup menu: 5-3 Device Info
3. Нажмите кнопку ENT и стрелками выберите нужный жесткий диск. Отображается следующий экран
4. Нажмите кнопку ENT для выбора. Используйте стрелки для отображения дополнительной
информации о жестких дисках. Отображаются следующие экраны:
90
Page 92

TS432U
1. Стрелками выберите "RAID Mode". Отображается следующий экран:
2. Нажмите кнопку ENT и стрелками выберите функцию "RAID Mode".
Отображается следующий экран:
Duplicator Mode User Guide
Operation
Main menu: RAID Mode
3. Нажмите кнопку ENT для выбора. Система запросит подтверждение.
4. Вы в режиме ПК.
91
Page 93

TS432U
1. Стрелками выберите "Advanced Setup (Дополнительная настройка)".
Отображается следующий экран:
В меню "Adv Setup (Дополнительная настройка)" приведены дополнительные параметры настройки
устройства TS432U.
2. После сохранения измененных параметров настройки отображается следующий экран:
Duplicator Mode User Guide
Operation
Main menu: Advanced Setup
Примечание:
После изменения какого-либо параметра нажмите кнопку ENT для сохранения изменений. После
внесения всех изменений нажмите кнопку ESC для выхода из меню дополнительных настроек.
Отображается следующий экран:
92
Page 94

TS432U
1. Стрелками выберите "Advanced Setup (Дополнительная настройка)".
Отображается следующий экран:
Данная функция может использоваться для игнорирования всех ошибок в процессе дублирования
данных. По умолчанию устройство TS432U останавливает операцию дублирования при обнаружении
нечитаемой зоны на исходном жестком диске и отображает сообщение об ошибке. При включении
данной функции сбойные сектора на исходном жестком диске игнорируются и пропускаются.
2. Стрелками выберите "Read Err Skip (Пропускать ошибки чтения)". Отображается следующий экран:
Duplicator Mode User Guide
Operation
Main menu: Advanced Setup menu: 7-1 read error skip
3. Нажмите кнопку ENT для отображения текущих параметров настройки.
(Настройка по умолчанию "Disable")
4. Стрелками выберите режим "Disable (Отключить)" или “Enable (Включить)".
5. Нажмите кнопку ENT для сохранения настройки.
Внимание!: Включение данной функции может привести к искажению данных на
приемных жестких дисках
93
Page 95

TS432U
1. Стрелками выберите "Advanced Setup (Дополнительная настройка)".
Отображается следующий экран:
Данная функция отображает информацию об устройстве TS432U, включая текущую версию
встроенного ПО
2. Стрелками выберите "System Info (Информация о системе)". Нажмите кнопку ENT для выбора
функции "System Info (Информация о системе)". Отображается следующий экран:
Duplicator Mode User Guide
Operation
Main menu: Advanced Setup menu: 7-4. System Info
3. Нажмите кнопку ENT для отображения информации о системе.
94
Page 96

TS432U
95
㏻ᖖࡢ㉳ືࢩ࣮ࢣࣥࢫ࠾࠸࡚ࠊ௨ୗࡢሗࡀ⾲♧ࡉࢀࡲࡍࠋ
Duplicator Mode User Guide
Overview
ᮏయࡢ㟁※ࢆධࢀࡲࡍࠋ
Changing to Duplicator Mode from RAID Mode
UP, DOWN, ESCࡲࡓࡣENT࣎ࢱࣥࢆᢲࡍ⾲♧ࡉࢀࡲࡍࠋ
ENT࣎ࢱࣥࢆᢲࡍࠊ☜ᐃࡉࢀࡲࡍࠋ
ENT࣎ࢱࣥࢆᢲࡍࠊDuplicator Mode(」〇࣮ࣔࢻ)ධࡾࡲࡍࠋ
ࡇࢀ࡛Duplicator Mode(」〇࣮ࣔࢻ)࡞ࡾࡲࡍࠋ
Page 97

TS432U
96
1. TS432Uࡢ㟁※ࢥ࣮ࢻࢆࢥࣥࢭࣥࢺᕪࡋࡲࡍ
2. ࢥࣆ࣮ࡋࡓ࠸SATAࣁ࣮ࢻࢻࣛࣈࢆ
ࠕSOURCE DISK 4ࠖ࠸࠺࣐࣮ࢡࡢ࠸ࡓ
ࢫࣟࢵࢺ╔ࡋࡲࡍࠋࣁ࣮ࢻࢻࣛࣈࡢ
SATA࣏࣮ࢺࢆࢻࣛࣈ࣋ࢫࣟࢵࢺࡢSATA
ࢥࢿࢡࢱྜࢃࡏࡲࡍࠋ
3. ࢱ࣮ࢤࢵࢺࡢSATAࣁ࣮ࢻࢻࣛࣈࢆ
ࠕTARGET DISK 1ࠖࠊࠕTARGET DISK 2ࠖ
ࡲࡓࡣࠕTARGET DISK 3ࠖ࠸࠺࣐࣮ࢡࡢ
࠸ࡓࢫࣟࢵࢺ╔ࡋࡲࡍࠋࣁ࣮ࢻࢻࣛࣈ
ࡢSATA࣏࣮ࢺࢆࢻࣛࣈ࣋ࢫࣟࢵࢺࡢ
SATAࢥࢿࢡࢱྜࢃࡏࡲࡍࠋ
ト:
ࢱ࣮ࢤࢵࢺࡢࣁ࣮ࢻࢻࣛࣈࡀࢯ࣮ࢫࡢࣁ࣮ࢻࢻࣛࣈྠ୍ࡲࡓࡣࡼࡾࡁ࠸ᐜ㔞ࢆ᭷ࡋ࡚࠸ࡿࡇࢆ
☜ㄆࡋ࡚ࡃࡔࡉ࠸ࠋࢱ࣮ࢤࢵࢺࡢࢻࣛࣈࡢᐜ㔞ࡀᑠࡉ࠸ሙྜࡣ」〇ࣉࣟࢭࢫࡀ㛤ጞࡉࢀࡲࡏࢇࠋTS432U
ࡀUSBࡲࡓࡣeSATA࣏࣮ࢺ⤒⏤࡛PC᥋⥆ࡉࢀ࡚࠸࡞࠸ࡇࢆ☜ㄆࡋ࡚ࡃࡔࡉ࠸ࠋ
4. TS432Uࡢ㟁※ࢆ࢜ࣥࡋࡲࡍࠋ
5. DOWN࣎ࢱࣥࢆᢲࡋ࡚ࠊ࣓ࢽ࣮ࣗࡢDuplicator Mode(」〇࣮ࣔࢻ)ࢆ㑅ᢥࡋ࡚ࡽENT ࢆᢲࡍᐇ⾜ࡉࢀ
ࡲࡍࠋENTࢆࡉࡽ㸰ᅇᢲࡍࠊDuplicator Mode(」〇࣮ࣔࢻ).ࡢษ࠼ࡀ☜ᐃࡉࢀࡲࡍࠋ
ࢩࢫࢸ࣒ࡀ⮬ືⓗࣁ࣮ࢻࢻࣛࣈࢆ᳨ฟࡋࡲࡍࠋࢻࣛࣈ᳨ฟᚋࠊୗᅗ㢮ఝࡋࡓ⏬㠃ࡀ⾲♧ࡉࢀࡲࡍ
Duplicator Mode User Guide
Operation
Loading hard drives
TARGET DISK1
TARGET DISK2
TARGET DISK3
UP ENT
DOWN ESC
ト:
ࢱ࣮ࢤࢵࢺࡢࣁ࣮ࢻࢻࣛࣈࡀࢯ࣮ࢫࡢࣁ࣮ࢻࢻࣛࣈྠ୍ࡲࡓࡣࡼࡾࡁ࠸ᐜ㔞ࢆ᭷ࡋ࡚࠸ࡿࡇࢆ☜
ㄆࡋ࡚ࡃࡔࡉ࠸ࠋ
SOURCE DISK
Page 98

TS432U
97
1. ࢯ࣮ࢫHDD࠾ࡼࡧࢱ࣮ࢤࢵࢺHDDࢆTS432U╔ࡋࡲࡍࠋࢩࢫࢸ࣒ࡀ⮬ືⓗࣁ࣮ࢻࢻࣛࣈࢆ᳨ฟ
ࡋࡲࡍࠋࢻࣛࣈ᳨ฟᚋࠊୗᅗࡀ⾲♧ࡉࢀࡲࡍࠋ
Copy HDD (HDDࡢࢥࣆ࣮)ᶵ⬟ࡼࡾࠊ࡚ࡢࢹ࣮ࢱࡣࢯ࣮ࢫHDDࡽࢱ࣮ࢤࢵࢺHDD」〇ࡉࢀࡲࡍࠋ
㌿㏦ṧࡾࢹ࣮ࢱᐜ㔞㸦ࢠ࢞ࣂࢺ༢࡛⾲♧㸧࠾ࡼࡧ㛫ࡀ⾲♧ࡉࢀࡲࡍࠋ
㐍ᤖ≧ἣࡣ15ࡽ20⛊ࡈ᭦᪂ࡉࢀࡲࡍࠋ
3. Copy HDD (HDDࡢࢥࣆ࣮)ࡢࣉࣟࢭࢫ୰ࠊTS432U㐍ᤖ≧ἣࡀ⾲♧ࡉࢀࡲࡍࠋ
4. 」〇ࡀࡍࡿࠊࢪࣙࣈ≧ἣ⏬㠃ࡀ⾲♧ࡉࢀࡲࡍࠋ
2. Press ENT ࢆᢲࡍࠊCopy HDD (HDDࡢࢥࣆ࣮)ࡀ㛤ጞࡉࢀࡲࡍࠋ
Duplicator Mode User Guide
Operation
Main menu: Copy HDD
ト:
ࢱ࣮ࢤࢵࢺࡢࣁ࣮ࢻࢻࣛࣈࡀࢯ࣮ࢫ
ࡢࣁ࣮ࢻࢻࣛࣈྠ୍ࡲࡓࡣࡼࡾ
ࡁ࠸ᐜ㔞ࢆ᭷ࡋ࡚࠸ࡿࡇࢆ☜ㄆࡋ࡚
ࡃࡔࡉ࠸ࠋ
Note:
When copy is complete, TS432U will
beep 5 times to indicate it is finished,
press ESC to stop the beep.
Page 99

TS432U
98
1. ࢯ࣮ࢫ࠾ࡼࡧࢱ࣮ࢤࢵࢺࡢHDDࢆ╔ࡋࠊ▮༳࣎ࢱ࡛ࣥCompare HDD(HDDࡢẚ㍑)ࢆ㑅ࡧࡲࡍࠋ
௨ୗࡢ⏬㠃ࡀ⾲♧ࡉࢀࡲࡍࠋ
Compare HDD(HDDࡢẚ㍑)ᶵ⬟ࡣࠊࢯ࣮ࢫࡢࣁ࣮ࢻࢹࢫࢡࢻࣛࣈࢱ࣮ࢤࢵࢺࡢࣁ࣮ࢻࢹࢫࢡࢻࣛ
ࣈࡢࢹ࣮ࢱࢆẚ㍑ࡋࡲࡍࠋ
Compare HDD (HDDࡢẚ㍑)ࡀࡍࡿࠊࢪࣙࣈ≧ἣ⏬㠃ࡀ⾲♧ࡉࢀࡲࡍࠋ
3. ENTࢆᢲࡍࠊCompare HDD (HDDࡢẚ㍑)ࡀ㛤ጞࡉࢀࡲࡍࠋࢩࢫࢸ࣒ࡀࣁ࣮ࢻࢹࢫࢡࢻࣛࣈࢆ⮬ື
᳨ฟࡋࡲࡍࠋCompare HDD (HDDࡢẚ㍑)ࣉࣟࢭࢫ୰ࠊTS432U㐍ᤖ≧ἣࡀ⾲♧ࡉࢀࡲࡍࠋ
2. ENT࣎ࢱࣥࢆᢲࡍࠊ☜ᐃࡉࢀࡲࡍࠋ
Duplicator Mode User Guide
Operation
Main menu: Compare HDD
ト:
ࢱ࣮ࢤࢵࢺࡢࢻࣛࣈࡀࢯ࣮ࢫࢻࣛࣈࡢࢹ࣮ࢱ␗࡞ࡿሙྜࠊTS432Uࡢࣈࢨ࣮ࡀ㬆ࡾࠊ ␗࡞
ࡗ࡚࠸ࡿྛLBAࡀ⾲♧ࡉࢀࡲࡍࠋTS432Uࢆ࢜ࣇࡋ࡚ࠊࡢࢻࣛࣈࡀ㐪ࡗ࡚࠸ࡿಶࠎẚ
㍑ࡋ࡚ࡃࡔࡉ࠸ࠋ
Note:
When compare is complete, TS432U
will beep 5 times to indicate it is
finished, press ESC to stop the beep.
Page 100

TS432U
99
1. ▮༳࣎ࢱ࡛ࣥReScan Bus (ࣂࢫࡢࢫ࢟ࣕࣥ)ࢆ㑅ࡧࡲࡍࠋ௨ୗࡢ⏬㠃ࡀ⾲♧ࡉࢀࡲࡍࠋ
ReScan Bus (ࣂࢫࡢࢫ࢟ࣕࣥ)ࡣࠊTS432U╔ࡉࢀࡓࣁ࣮ࢻࢹࢫࢡࢻࣛࣈࢆ᳨ฟࡋࡲࡍࠋࡇࢀ
ࡣࢩࢫࢸ࣒㉳ື࡞ࡋࢻࣛࣈࢆࡋࡓሙྜ⏝࡛ࡁࡲࡍࠋ
4. ReScan Bus (ࣂࢫࡢࢫ࢟ࣕࣥ)ࡀࡍࡿࠊ௨ୗࡢ⏬㠃ࡀ⾲♧ࡉࢀࡲࡍࠋ
3. ENT ࢆᢲࡍࠊReScan Bus (ࣂࢫࡢࢫ࢟ࣕࣥ)ࡀ㛤ጞࡉࢀࡲࡍࠋ
2. ENT ࢆᢲࡋ࡚㑅ᢥࡋࡲࡍࠋࢩࢫࢸ࣒ࡣฎ⌮ࢆ㛤ጞࡋ࡚Ⰻ࠸ᗘ☜ㄆࡋ࡚ࡁࡲࡍࠋ
Duplicator Mode User Guide
Operation
Main menu: ReScan Bus
 Loading...