

Page 1
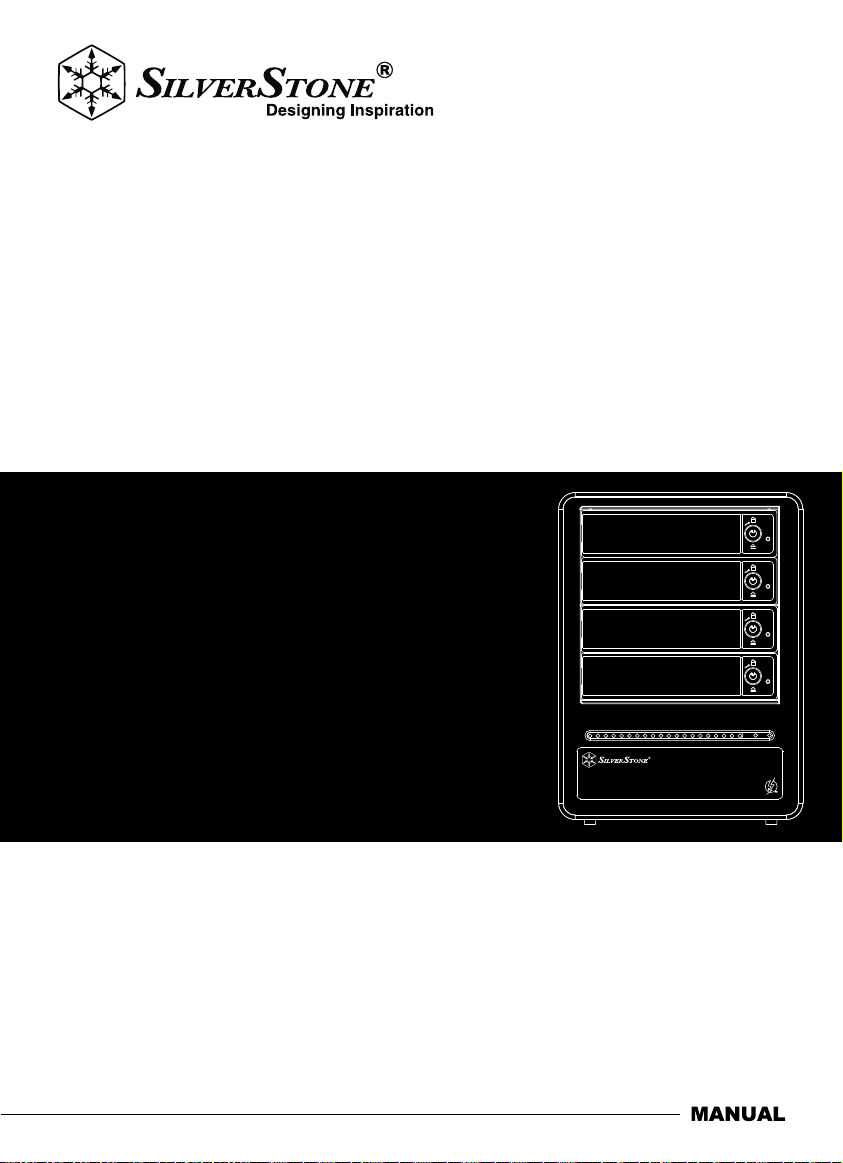
Tower Storage
4-Bay 2.5"/3.5" HDD/SSD RAID enclosure with Thunderbolt 2
TS433-TB
Page 2
Installation and system optimization guide:
The following manual and guides were carefully prepared by the SilverStone engineering team to
help you maximize the potential of your SilverStone product. Please keep this manual for future
reference when upgrading or performing maintenance on your system. A copy of this manual can also
be downloaded from our website at:
Product Overview
Special Features
Specification
Packaging contents
Front and Rear View
Hardware Requirements and Precautions
Hardware Installation
Installation of Monitoring Software
Operation of Monitoring Software
RAID Settings
Deletion of RAID
Visual Status Indicator Definitions
Frequently Asked Questions
P.1
P.1
P.1
P.2
P.6
P.7
P.9
P.12
P.23
P.25
P.32
P.37
P.39
Warranty Information
Page 3
Introduction
To accommodate PC user’s need for High-speed data storage and
graphic processing requirement, SilverStone created high-speed
external storage product called TS433-TB with two Thunderbolt 2
ports and four 3.5”/ 2.5” drive slots. For security, each drive tray also
has individual key lock and its built-in 90mm cooling fan ensures
drives run cool for extended life and reliability. For those that need
a simple and convenience way to save and manage big data, the
TS433-TB is a great choice.
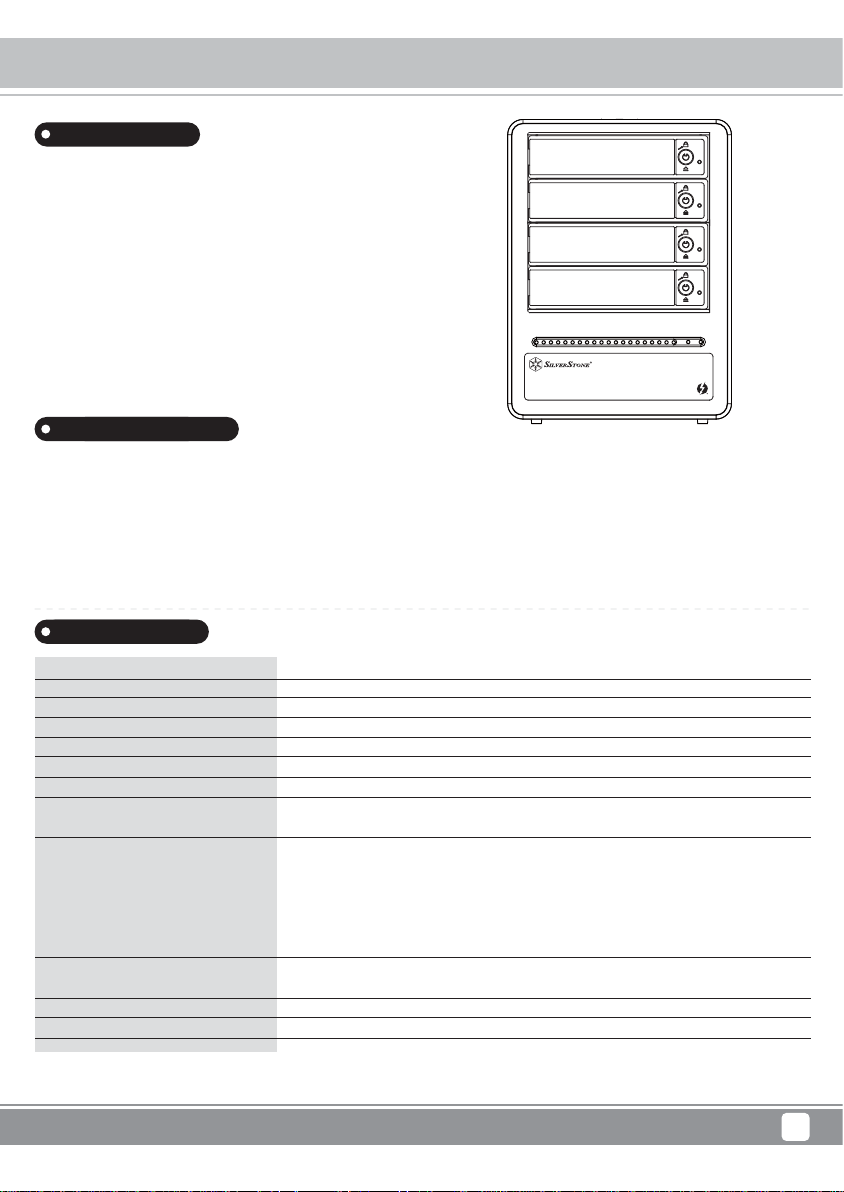
Special Features
Two Thunderbolt 2 ports for 20Gb/s transfer speed
Supports four 2.5"/3.5" SATA HDD/SSD
Includes 90mm low noise fan
Extra security with individual metal key lock for each drive
Independent drive status LED
Fully supports SATA Hot-Swap function
Tower Storage TS433-TB
Product Overview
Specifications
Model No
Color
Material
Interface
Controller
HDD size support
RAID Function
LED Indicator
Electrical and Operating Requirements
Minimum System Requirements
Cooling System
Net Weight
Dimension
* If you are using Microsoft windows to run TS433-TB, please install driver (available from SilverStone website) prior to using TS433-TB.
SST-TS433-TB
Black
Aluminum body with zinc alloy handle
Thunderbolt 2 port x 2 ( up to 20 Gbps ) (Support Daisy Chain function)
Marvell 88SE9230
3.5"/ 2.5" SATA HDD/SSD ( up to 6 Gbps )
4 x Independent ( JBOD )/RAID 0
Power LED
HDD R/W
Line Voltage : 100-240V AC
Frequency : 50Hz to 60Hz, single phase
Maximum Continuous Power : 150W
Operating Temperature : 50° ~ 95°F (10° ~ 35°C)
Storage Temperature : -4° ~ 113°F (-20° ~ 45°C)
Relative Humidity : 5% ~ 95% non-condensing
MAC OS X 10.9 or later.
Microsoft Windows 10 / 8.1 / 8 (32bit/64bit) or later with a Thunderbolt port. *
90 x 90mm Low noise fan
3.4kg
124mm (W) x 166mm (H) x 248mm (D)
Solid Blue
Blue Flash
1
Page 4
Tower Storage TS433-TB
Packaging contents
Open the package and you should find the following:
TS433-TB
TS433 -TB x 1 (With removable drive tray enclosed x 4)
Thunderbolt cable x 1
AC Power Cable x 1
Accessories Kit
Please make sure that the contents listed above are not damaged or missing. If you should find damages or missing contents, please contact
your supplier immediately.
Öffnen Sie das Paket und Sie sollten die folgenden Dinge vorfinden:
TS433-TB
TS433-TB x 1 ( Mit integriertem Wechselrahmen x 4 )
Thunderbolt-Kabel x 1
Stromkabel x 1
Zubehörset
Bitte stellen Sie sicher, dass die oben aufgelisteten Inhalte nicht beschädigt sind oder fehlen. Falls Schäden oder fehlende Inhalte festgestellt
werden, kontaktieren Sie bitte umgehend Ihren Händler.
Ouvrez l’emballage et vous devriez trouver les éléments suivant:
TS433-TB
TS433-TB x 1(avec 4 x lecteurs amovibles fermés)
Câble Thunderbolt x 1
Cordon d’alimentation x 1
Kit d’accessoires
Veuillez vous assurer que le contenu énuméré ci-dessus n’est ni endommagé ni manquant. S’il y a des éléments endommagés ou manquant,
veuillez contacter votre fournisseur immédiatement.
2
Page 5
Tower Storage TS433-TB
Packaging contents
Cuando abra el paquete encontrará los siguientes elementos:
TS433-TB
TS433-TB x 1 (junto con la bandeja desmontable de disco x 4)
Cable Thunderbolt x 1
Cable de alimentación x 1
Kit de accesorios
Asegúrese de que no falte o esté dañado ninguno de los elementos listados anteriormente. Si hubiera contenidos dañados o faltara alguno,
contacte inmediatamente con su proveedor.
Aprire la confezione e cercare quanto segue:
TS433-TB
TS433 -TB x 1 (Con cassetto unità rimovibile incluso x 4)
Cavo Thunderbolt x 1
Cavo di alimentazione CA x 1
Kit accessori
Assicurarsi che gli elementi elencati in precedenza non siano danneggiati o mancanti. In caso di elementi danneggiati o mancanti, contattare
immediatamente il proprio fornitore.
После вскрытия упаковки вы должны найти внутри следующее:
TS433-TB
TS433-TB x 1 (съемные лотки для дисков x 4)
Кабель Thunderbolt x 1
Кабель питания x 1
Комплект аксессуаров
Пожалуйста, убедитесь, что все перечисленные выше комплектующие не повреждены и не отсутствуют в комплекте. Если вы
обнаружили повреждения или недостающие детали, немедленно свяжитесь с поставщиком оборудования.
3
Page 6
Tower Storage TS433-TB
Packaging contents
打開包裝外盒後,包裝內容應包含下列組件:
TS433-TB
TS433-TB產品本體x1 ( 內含抽取盒 x 4)
Thunderbolt連接線 x 1
電源線x1
零件包
請確認相關配件與產品本身是否有受損或配件缺少,若有任何疑問請與本產品供應商聯絡。
打开包装外盒后,包装内容应包含下列组件:
TS433-TB
TS433-TB 产品本体x1 ( 内含抽取盒 x 4)
Thunderbolt 连接线 x 1
电源线x1
零件包
请确认相关配件与产品本身是否有受损或配件缺少,若有任何疑问请与本产品供货商联络。
パッケージ内は以下の内容で構成されております:
TS433-TB
TS433-TB 製品本体x1 ( x 4トレー搭載済み)
Thunderbolt ケーブル x 1
電源コード x 1
アクセサリーキット
一覧の内容に欠品等が無いかご確認ください。欠品がある場合、すぐに販売代 理店までご連絡下さい。
4
Page 7
Tower Storage TS433-TB
Packaging contents
포장을 열면 다음과 같은 내용물이 보입니다:
TS433-TB
TS433-TBx1 (이동식 드라이브 트레이 x 4개가 넣어진)
Thunderbolt 펌웨어 케이블 x 1
파워코드 x 1
부속품 키트
상기 목록 안의 부품들이 손상 또는 손실되지 않았는지 확인하십시오. 손상 또는 손실된 내용물이 있으면,
판매상에게 즉시 연락하십시오.
5
Page 8
Tower Storage TS433-TB
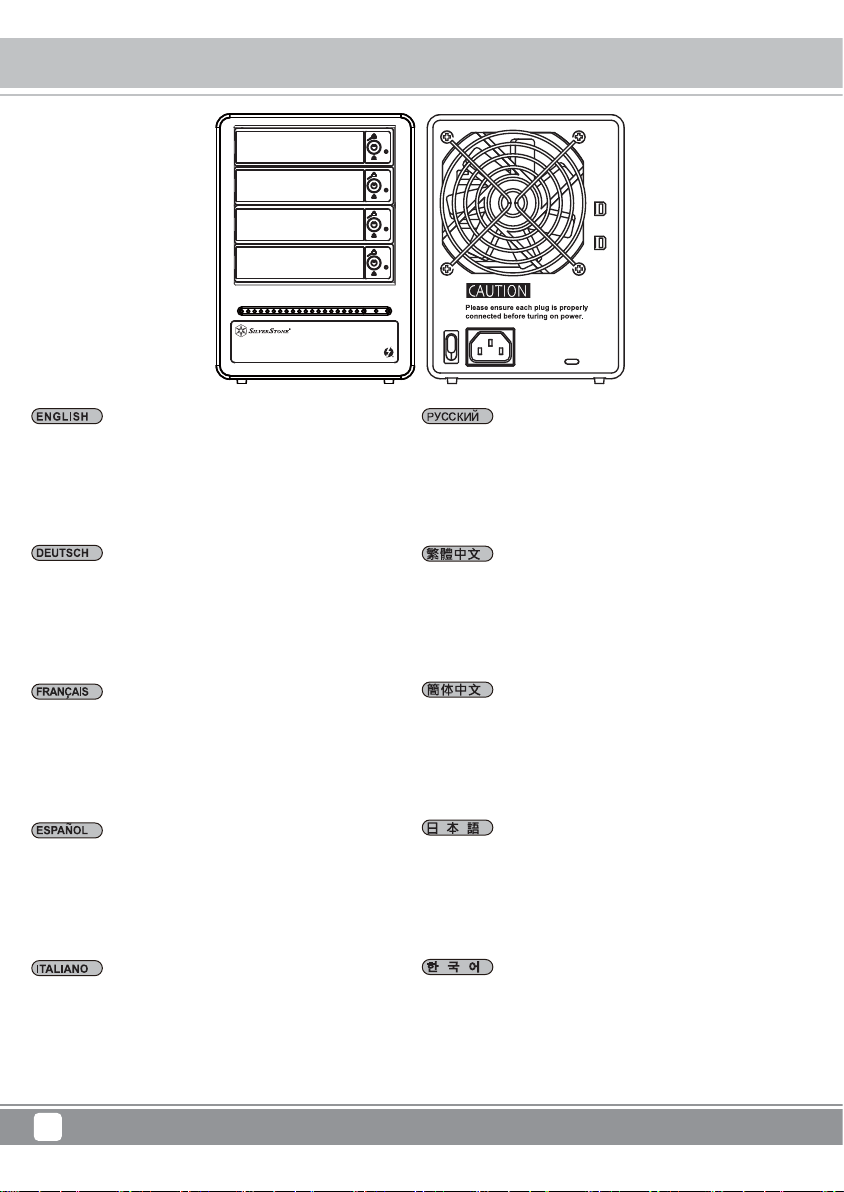
Front and Rear View
B
A
C
D
EF
G
H
A.Hard drive status indicator
B.Removable drive tray
C.Key access opening
D.Power indicator
E.Power Switch
F.Power socket
G.Thunderbolt
H.Anti-theft cord slot
A.Festplatten-Statusanzeige
B.Wechselrahmen
C.Schlüsselzugangsöffnung
D.Netzanzeige
E.Netzschalter
F.Netzbuchse
G.Thunderbolt Anschlüsse
H.SteckplatzfürKensingtonschloss
A.Indicateur du statut du disque dur
B.Baie de disque amovible
C.Serrure d’ouverture de l’accès
D.Indicateurs d’alimentation électrique
E.Interrupteur d’alimentation
F.Prise d’alimentation
G.Thunderbolt
H.Cordon antivol
A.Indicador de estado del disco duro
B.Bandeja de disco extraíble
C.Abertura de la llave de acceso
D.Indicador de encendido
E.Interruptor de encendido
F.Toma de corriente
G.Conexión de la interfaz Thunderbolt
H.Ranura del cable antirrobo
A.Indicatore di stato del disco rigido
B.Cassetto unità rimovibile
C.Apertura di accesso con chiave
D.Indicatore di alimentazione
E.Interruttore di alimentazione
F.Presa di alimentazione
G.Thunderbolt
H.Slot per cavo antifurto
A.Индикатор состояния жесткого диска
B.Съемный лоток накопителя
C.Ключ для доступа к диску
D.Индикатор питания
E.Выключатель питания
F.Розетка
G.Порт Thunderbolt
H.Слот для защиты от кражи
A.硬碟狀態指示燈
B.硬碟抽取盒
C.鑰匙孔
D.電源指示燈
E.電源開關
F.電源插座
G.Thunderbolt 連接埠
H.防竊鎖孔
A.硬盘状态指示灯
B.硬盘抽取盒
C.钥匙孔
D.电源指示灯
E.电源开关
F.电源插座
G.Thunderbolt 端口
H.防窃锁孔
A.ハードディスク状態インジケーター
B.リムーバルディスクトレイ
C.キー挿入口
D.電源インジケーターE.
E.電源スイッチ
F.電源コネクタ
G.Thunderbolt インタフェースポート
H.防犯ロックスロット
A.하드 드라이브 상태 표시등
B.휴대형 드라이브 트레이
C.키꽂이구멍
D.전원표시등
E.전원스위치
F.전원 소켓
G.Thunderbolt 인터페이스 커넥션
H.도난 방지 슬롯
6
Page 9
Tower Storage TS433-TB
Hardware Requirements and Precautions
1.Please make sure that the hard drives are free from bad blocks or defects prior to installation in order to avoid system crashes or
data loss.
2.Whenever turning off or unplugging the TS433-TB Series from your computer system becomes necessary, always remember to
safely remove it from your operating system first.
3.When the TS433-TB is connected to the computer system, it’s prohibited to remove, insert or swap the hard drive while data transfer
is being performed.
4.If you will be incorporating either software or hardware RAID functionality to operate with the TS433-TB Series, it is important to
understand the RAID level and its component that will be incorporated and the precautions to take as each RAID level and component
may function differently and contains various limitations.
5.It is highly recommended for users to back up important data contained within the drives of the TS433-TB Series on a regular basis
or whenever the user feels necessary to a remote or a separate storage device. TS433-TB will not be responsible for any lost of data
caused during the use of the TS433-TB Series or the recovery of the data lost.
1.Bitte stellen Sie sicher, dass die in den Wechselrahmen zu installierende Festplatte keine fehlerhaften oder defekten Sektoren
aufweist, um einen Systemabsturz oder Datenverlust zu vermeiden.
2.Wann immer ein Ausschalten oder Abtrennen des TS433-TB Serie von Ihrem Computersystem notwendig wird, denken Sie immer
daran, es zunächst sicher aus Ihrem Betriebssystem zu entfernen.
3.Während der Verbindung mit dem Computersystem ist ein Entfernen, Einlegen oder Austauschen der Festplatte zu vermeiden,
wenn ein Datentransfer ausgeführt wird.
4.Wenn Sie eine Software oder Hardware mit RAID Funktionalität für den Betrieb mit dem TS433-TB Serie einsetzen, ist es wichtig
die verschiedenen RAID Level und die zum Einsatz kommenden Komponenten sowie die zu ergreifenden Vorsichtsmaßnahmen zu
kennen, da jedes RAID Level und jede Komponente anders funktioniert und verschiedene Limitierungen enthalten kann.
5.Es wird dringend empfohlen, alle auf dem Laufwerk im TS433-TB Serie befindlichen Daten regelmäßig oder wenn immer es der
Benutzer für nötig hält auf einem fern gewarteten oder externem Speicherlaufwerk zu sichern. TS433-TB ist weder verantwortlich für
Datenverluste, die während der Benutzung des TS433-TB Serie Geräts entstehen, noch für die Wiederherstellung verlorener Daten.
1.Assurez-vous que le disque dur à installer dans le boîtier et opérationnel et ne contient pas de blocs défectueux afin d’éviter le
plantage du système ou la perte de données.
2.Lorsque la mise hors tension ou la déconnexion du série TS433-TB de l’ordinateur est nécessaire, pensez toujours à retirer d’abord
de manière sécurisée le périphérique au niveau du système.
3.Lors de la connexion à un système informatique, il est interdit de retirer, insérer ou échanger le disque dur pendant le transfert de
données.
4.Si vous devez ajouter des fonctionnalités de type RAID logiciel ou matériel dans l'utilisation du système série TS433-TB, il est
important de connaître le niveau du RAID et les caractéristiques qui lui seront ajoutés ainsi que les précautions à prendre car chaque
niveau de RAID avec ses caractéristiques peuvent fonctionner différemment et contenir différentes limitations.
5.Il est extrêmement recommandé aux utilisateurs de sauvegarder les données importantes contenues dans le disque du de l’série
TS433-TB sur un support de base ou, si l’utilisateur le souhaite, vers un appareil de stockage distant et distinct. TS433-TB nesera
pas tenu responsable de la perte de données survenant lors de l’utilisation de l’série TS433-TB, ni de la récupération des données
perdues.
1.Asegúrese de que el disco duro que se vaya a instalar en la unidad de la carcasa no contenga bloques defectuosos u otros defectos
para evitar fallos del sistema o pérdida de datos.
2.Cuando necesite apagar o desconectar el TS433-TB Series del sistema de su ordenador, recuerde que en primer lugar debe
extraerlo correctamente de su sistema operativo.
3.Cuando se conecte al sistema informático, no extraiga, inserte o cambie el disco duro cuando se está llevando a cabo una
transferencia de datos.
4.Si desea agregar la función RAID de un software o hardware para que funcione con el sistema TS433-TB Series, es importante
tener en cuenta el nivel RAID y los componentes agregados, así como las precauciones necesarias, ya que cada nivel RAID y sus
componentes pueden funcionar indistintamente y contener diferentes limitaciones.
5.Se recomienda encarecidamente que, regularmente o cuando se considere necesario, los usuarios realicen una copia de seguridad
de los datos más importantes guardados en la unidad TS433-TB Series a un dispositivo de almacenamiento distinto o remoto.
TS433-TB no se hará responsable ni de la pérdida de datos ocurrida durante el uso de la unidad TS433-TB Series ni de la
recuperación de los datos perdidos.
1. Assicurarsi che i dischi rigidi non presentino blocchi danneggiati o difetti prima dell'installazione per evitare l'arresto anomalo del
sistema o perdite di dati.
2. Ogni volta che è necessario spegnere e scollegare la serie TS433-TB dal computer, ricordarsi sempre di rimuoverlo prima in modo
sicuro dal sistema operativo.
3. Quando si collega il TS433-TB al computer, è proibito rimuovere, inserire o scambiare il disco rigido durante il trasferimento dei dati.
4. Se si integra funzionalità RAID software o hardware per il funzionamento con la serie TS433-TB, è importante comprendere il livello
RAID e il relativo componente da integrare e le precauzioni da intraprendere in quanto ogni livello RAID e componente potrebbe
funzionare in modo diverso e contiene varie limitazioni.
5. Si consiglia vivamente agli utenti di eseguire il backup dei dati importanti contenuti nelle unità della serie TS433-TB periodicamente
o ogni volta che l'utente richiede un dispositivo di archiviazione remoto o separato. Il TS433-TB non è responsabile della perdita di dati
causata durante l'utilizzo della serie TS433-TB o il recupero dei dati persi.
7
Page 10
Tower Storage TS433-TB
Hardware Requirements and Precautions
1. Пожалуйста, убедитесь в том, что жесткие диски не имеют поврежденных блоков и других дефектов до установки, чтобы
избежать системных сбоев или потери данных.
2. Всякий раз, когда у вас возникает необходимость выключения и отсоединения TS433-TB от компьютера, помните, что
устройство должно извлекаться в безопасном режиме.
3. Когда TS433-TB подключен к компьютеру и выполняется
4. Если вы планируете использовать программные или аппаратные функции RAID при работе с TS433-TB, то важно иметь
представление о режимах RAID-массивов и о функциях, которые будут включены. Различные настройки RAID могут
накладывать определенные ограничения на систему и по-разному функционировать.
5. Настоятельно рекомендуем пользователям производить резервное копирование важных данных
дисках TS433-TB на периодической основе или при возникновении такой необходимости. Производитель не несет
ответственности за потерянные данные при использовании TS433-TB и не предоставляет услуг по восстановлению этих
данных.
1.在安裝新硬碟到TS433-TB系列之前,請先確認硬碟是沒有壞軌而且是沒有故障的,以避免資料受損。
2.當您需要關閉或移除TS433-TB系列時,務必透過您所操作的作業系統中執行硬碟安全移除後,方可進行電源關閉的動作。
3.當系統運作時,請勿任意移除任何一顆硬碟,以免導致資料遺失。
4.如你希望將TS433-TB系列搭配軟體或硬體 RAID 功能使用時,請先瞭解並注意你所要使RAID層次及配件的特性與限制。
5.強烈建議除了使用TS433-TB系列的資料儲存功能外,請針對重要資料備份到另一個儲存裝置上或遠端備份,雙重備份您重要的資料。
若您儲存在 TS433-TB 系列的資料損毀或遺失,TS433-TB 將不負任何的責任。
1.在安装新硬盘到TS433-TB系列之前,请先确认硬盘是没有坏轨而且是没有故障的,以避免数据受损。
2.当您需要关闭或移除TS433-TB系列时,务必透过您所操作的操作系统中执行硬盘安全移除后,方可进行电源关闭的动作。
3.当系统运作时,请勿任意移除任何一颗硬盘,以免导致数据遗失。
4.如你希望将TS433-TB系列搭配软件或硬件 RAID 功能使用时,请先了解并注意你所要使RAID层次及配件的特性与限制。
5.强烈建议除了使用TS433-TB系列的数据储存功能外,请针对重要数据备份到另一个储存装置上或远程备份,双重备份您重要的数据。
若您储存在 TS433-TB 系列的数据损毁或遗失,TS433-TB 将不负任何的责任。
передача данных запрещено извлекать жесткий диск.
хранящихся на жестких
1.本製品にハードディスクを搭載する際は、システムのエラーやデータ損失を防ぐため、不良セクタや故障がないことを事前にご
確認ください。
2.本製品をコンピュータから取り外す際は、必ずオペレーティングシステム上で「ハードウェ アの安全な取り外し」を行ってから
取り外してください。
3.本製品をコンピュータ本体に接続されている状態で、データ転送中のハードディスクドラ イブの削除、追加、交換は絶対行わな
いでください。
4.TS433-TBで RAIDユーティリティを使用してRAIDを構築する場合、同じ規格、同 じ容量のディスクを使用する事を強く推奨しま
す。併せて各 RAID レベルと構成 コンポーネント、及びに制限事項を理解するのが大切です。
5.TS433-TB シリーズで運用をしている重要なデータは、 必要に応じてリモート又は別のスト レージ装置等に定期的にバックアッ
プを取ることを強くお勧めします。TS433-TB は本 製品の使用の際に生じたいかなるデータの損失およびに損失データの復旧に対
して責任を 負いかねます。
1.시스템 쇼크 또는 데이터 손실을 방지하기 위해 엔클로저에 설치하려는 하드 드라이브가 불량 블록 또는 결함이 없는지 확인하십시오.
2.컴퓨터 시스템에서 TS433-TB시리즈 의 전원을 끄거나 코드를 뽑을 때는 반드시 먼저 운영 체제에서 '하드웨어 안전 제거'를 한
후에 진행하십시오.
3.컴퓨터 시스템에 연결된 경우, 데이터가 전송되고 있을 때는 하드 드라이브를 제거, 삽입 또는 교환하면 안됩니다.
4.TS433-TB시리즈 시스템으로 운영하기 위해 소프트웨어 또는 하드웨어 RAID 기능을 통합하는 경우, 각 RAID 레벨과 컴포넌트가
서로 기능을 다르고 다양한 제한이 있는 만큼, 통합될 RAID 레벨과 해당 컴포넌트 및 사전 주의 사 항을 이해하는 것이 중요합니다.
5.TS433-TB시리즈 안의 드라이브에 포함된 중요한 기본 데이터 또는 사용 자가 필요로 하는 데이터는 반드시 원 격 또는 분리형
스토리지 장치에 백업을 해놓으십시오. TS433-TB 은 TS433-TB시리즈 의 사용 또는 손실된 데이터 복구 중에 발생한 어떠한 데이터
손실에 대해 책임을 지지 않습니다.
8
Page 11
Tower Storage TS433-TB
Hardware Installation
Please follow the instructions below to complete the hardware installation:
Step 1 Open the package and take out the product making sure that all the enclosed contents are not damaged or missing. Should
you find damages or missing contents, please contact your supplier immediately.
Step 2 Place the enclosure on a stable surface, ensure that it is well ventilated without blockage to the vent and kept away from
locations near water or where the product may become vulnerable resulting in damages.
Step 3 Use the provided key in the accessories kit and inserted into the key access opening to eject the removable drive tray latch
and extract the removable drive tray.
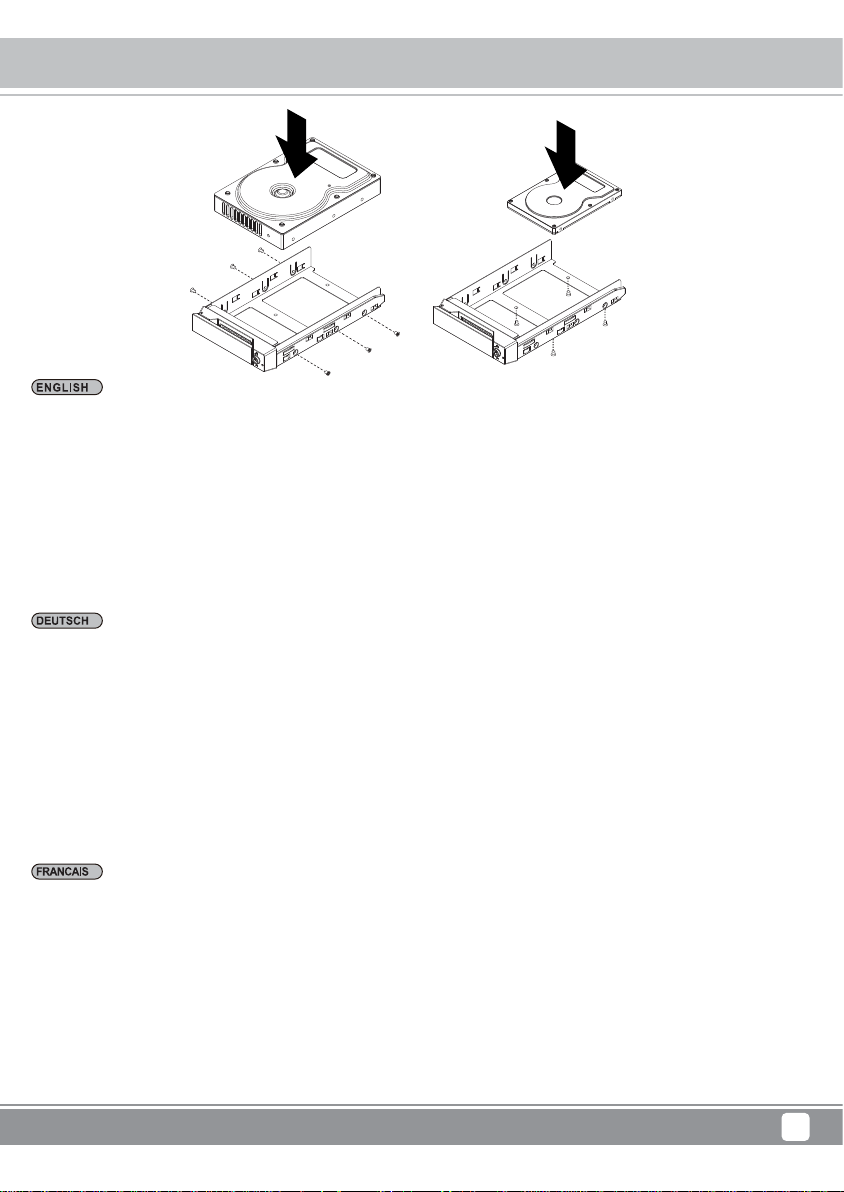
Step 4 Mount your hard drives onto the removable drive tray and secure it with the screws included in the accessory kit to avoid any
damage to the hard drive due to accidental movements.
Step 5 Choose one of the provided cables of your preference to connect the preferred interface connection on the enclosure unit to
the computer.
Step 6 Attach the AC power cable to the power socket. Once completed, you may power on the unit.
Once your computer has also booted, your operating system should recognize the drive automatically. If the hard drive installed
requires formatting, follow the formatting instructions given by the operating system to format the drive volume to your preference.
Once the formatting has been completed, the device is ready for use.
Bitte folgen Sie den unten stehenden Anweisungen, um die Hardwareinstallation durchzuführen:
Schritt 1 Öffnen Sie die Verpackung und nehmen Sie das Produkt heraus. Stellen Sie sicher, dass sämtliche Inhalte unbeschädigt
sind und nicht fehlen. Falls Sie Schäden oder fehlende Inhalte feststellen sollten, kontaktieren Sie bitte umgehend Ihren Händler.
Schritt 2 Stellen Sie das System auf eine stabile Unterlage. Stellen Sie sicher, dass es gut belüftet ist, die Öffnungen nicht blockiert
werden und von Orten in der Nähe von Wasser oder an denen das Produkt beschädigt werden könnte ferngehalten wird.
Schritt 3 Benutzen Sie den mitgelieferten Schlüssel im Zubehörset und stecken Sie ihn in die Schlüsselzugangsöffnung, um die
Wechselrahmenklappe auszuwerfen und den Wechselrahmen zu entnehmen.
Schritt 4 Entfernen Sie die Laufwerksstabilisierung vom Wechselrahmen. Legen Sie dann die Festplatte in den Wechselrahmen und
sichern Sie sie mit den Schrauben aus dem Zubehörset. Legen Sie den Wechselrahmen nach Abschluss wieder die Laufwerksposition
ein und legen Sie den Hebel um.
Schritt 5 Wählen Sie eines der mitgelieferten Kabel, um eine geeignete Verbindung des Wechselrahmens mit dem Computer herzustellen.
Schritt 6 Verbinden Sie das AC Stromkabel mit dem DC Netzadapter. Stecken Sie dann ein Ende in die Netzbuchse des Wechselrahmens
und das andere Ende in die Steckdose. Danach können Sie das Gerät einschalten.
Nach dem Start Ihres Computers sollte Ihr Betriebssystem das Laufwerk automatisch erkennen. Falls das installierte Laufwerk formatiert
werden muss, folgen Sie bitte den Anweisungen des Betriebssystems zur Formatierung der Festplatte, um das Laufwerk nach Ihren
Wünschen zu formatieren. Sobald die Formatierung abgeschlossen wurde, ist das Laufwerk zur Nutzung bereit.
Veuillez suive les instructions ci-dessous afin de réaliser l’installation du matériel:
Etape 1 Ouvrez la boîte et sortez le produit en vous assurant que tous les éléments inclus ne sont pas endommagés ni manquant. Si
vous trouviez des éléments endommagés ou manquant, veuillez contacter votre fournisseur immédiatement.
Etape 2 Placez le boîtier sur une surface stable,vérifiez la bonne aération du lieu sans blocage du vent et gardez à distance de lieux
proche d’eau ou d’endroits rendant le produit vulnérable et pouvant causer des dommages.
Etape 3 Utilisez la clé fournie dans le kit d’accessoires et insérez-là dans l’ouverture pour éjecter le cache du plateau de disque
extractible et enlever le plateau de disque extractible.
Etape 4 Enlevez les fixations du disque de la baie amovible puis monter s’y le disque dur et fixez-le avec les vis contenues dans le kit
d’accessoires. Une fois réalisée, insérez la baie de disque dans son emplacement et verrouillez.
Etape 5 Choisissez l’un des câbles fournis, suivant votre interface, pour la connexion du boîtier à l’ordinateur.
Etape 6 Attachez le câble d’alimentation AC à l’adaptateur DC puis branchez une extrémité sur la prise du boîtier et l’autre extrémité
dans la prise de courant. Une fois réalisée, vous pouvez démarrer le boîtier.
Une fois que votre ordinateur est démarré, le système d’exploitation devrait reconnaître automatiquement le disque. Si le disque dur
nécessite un formatage, suivez les instructions de formatage fourni par le système d’exploitation afin de formater le volume du disque
comme vous le souhaitez. Une fois le formatage terminé, l’appareil est prêt à l’emploi.
9
Page 12
Tower Storage TS433-TB
Hardware Installation
Siga las siguientes instrucciones para realizar la instalación del hardware:
Paso 1 Abra el paquete y saque el producto asegurándose de que no falte o esté dañado ningún elemento. En el caso de que
encontrara daños o faltara algún elemento, contacte inmediatamente con su proveedor.
Paso 2 Coloque la carcasa sobre una superficie estable. Asegúrese de que esté bien ventilado, que la entrada de aire no esté bloqueada
y que no esté situado cerca del agua o donde el producto sea vulnerable y pueda dañarse.
Paso 3 Utilice la llave proporcionada en el kit de accesorios e insértela en la abertura de la llave de acceso para expulsar el seguro
de la bandeja de disco desmontable y extraer la bandeja de disco desmontable.
Paso 4 Extraiga el estabilizador de la unidad de disco de la bandeja desmontable y monte el disco duro en la misma, asegurándolo
con los tornillos incluidos en el kit de accesorios. Una vez asegurados, inserte de nuevo la unidad de disco en su posición y coloque
el seguro en su lugar.
Paso 5 Elija uno de los cables proporcionados para conectar la conexión de interfaz que desee desde la unidad de la carcasa al
ordenador.
Paso 6 Conecte el cable de alimentación al adaptador de corriente continua. A continuación, conecte el extremo correspondiente de
éste a la entrada de fuente de alimentación de la unidad de la carcasa y el extremo restante a la toma de corriente. Una vez hecho
esto, podrá encender la unidad.
Cuando haya inicializado su ordenador, el sistema operativo deberá reconocer la unidad de disco automáticamente. Si el disco duro
que ha instalado necesita ser formateado, siga las instrucciones correspondientes proporcionadas por el sistema operativo para
formatear el volumen del disco deseado. Una vez realizado este procedimiento, el dispositivo está listo para su utilización.
Attenersi alle istruzioni di seguito per completare l'installazione dell'hardware:
Passo 1 Aprire il pacchetto ed estrarre il prodotto assicurandosi che tutti i contenuti non siano danneggiati o mancanti. In caso di
elementi danneggiati o mancanti, contattare immediatamente il proprio fornitore.
Passo 2 Posizionare l'alloggio su una superficie stabile, assicurarsi che sia ben ventilato, senza ostruzioni alla presa d'aria e tenerlo
lontano dall'acqua o da luoghi in cui il prodotto diventi vulnerabile, con conseguenti danni.
Passo 3 Utilizzare la chiave in dotazione nel kit accessori e inserirla nell'apertura di accesso chiave per espellere il fermo del cassetto
unità rimovibile, quindi estrarre il cassetto unità rimovibile.
Passo 4 Montare i dischi rigidi sul cassetto unità rimovibile e fissarlo con le viti in dotazione nel kit accessori per evitare danni al disco
rigido a causa di movimenti accidentali.
Passo 5 Selezionare uno dei cavi forniti desiderati per collegare il collegamento dell'interfaccia preferita sull'alloggio al computer.
Passo 6 Fissare il cavo di alimentazione CA alla presa di alimentazione. Al termine, è possibile alimentare l'unità.
Una volta riavviato il computer, il sistema operativo dovrebbe riconoscere automaticamente l'unità. Se il disco rigido installato richiede
la formattazione, seguire le istruzioni di formattazione fornite dal sistema operativo per formattare il volume di unità secondo le proprie
preferenze. Al termine della formattazione, il dispositivo è pronto per l'uso.
Пожалуйста, следуйте инструкциям ниже, чтобы завершить установку оборудования:
Шаг 1 Откройте упаковку и выньте устройство, убедитесь, что весь комплект поставки не поврежден и соответствует описанию.
Если вы обнаружили повреждения или недостающие элементы, пожалуйста, немедленно свяжитесь с вашим поставщиком.
Шаг 2 Расположите устройство на устойчивой твердой поверхности и убедитесь, что вентиляционные отверстия свободны
внутри циркулирует воздух. Держите устройство вдали от воды и мест, где оно может стать наиболее уязвимым.
и
Шаг 3 Используйте поставляемый в комплекте ключ для извлечения съемных лотков жестких дисков.
Шаг 4 Установите жесткие диски на съемные лотки и надежно закрепите их с помощью винтов из набора аксессуаров, чтобы
избежать повреждений жестких дисков
Шаг 5 Выберите один из предложенных кабелей и подключите к предпочтительному интерфейсу для соединения устройства
с компьютером.
Шаг 6 Подключите кабель питания к разъему. После завершения вы можете включить питание устройства.
После того, как ваш компьютер загрузился, операционная система должна автоматически распознать подключенный накопитель.
Если установленный жесткий диск
форматирование жесткого диска будет завершено, устройство станет готово к использованию.
請參照以下步驟完成硬體安裝:
步驟1 當你打開包裝後,首先請先檢查產品主體以及附件是不是有毀損或是短缺情形,如果有發生產品主體及附件短缺,請立刻與您的供
應商聯絡。
步驟2 將主機置放於平穩空間上,並確認散熱風扇沒有被擋住,且四周有適當的散熱空間。
(請避免接近水源或是其他容易造成產品損傷的環境)
步驟3 請使用零件包中所附的頂針插入鑰匙孔,開啟硬碟抽取盒把手便將抽取盒取出。
步驟4 將硬碟安裝到抽取盒上,並以零件包內附的螺絲加以固定,以避免不必要的移動對硬碟造成傷害。
步驟5 請依據您欲使用的介面,從附件包中選擇相對應的連接線,將 TS433-TB 系列背面連接埠與電腦主機相對應介面埠連接。
步驟6 AC Power 電源線與 TS433-TB 連接好,並將接頭接上電源插座後開機。
開機後,您的作業系統將會自動辨識到儲存容量;待辨識成功後,請依據您所需的儲存格式,將系統依照作業系統的指示完成格式化。
待硬盤格式化完成後,便可直接使用 TS433-TB 系統。
при передвижении и переносе устройства.
требует форматирования, следуйте инструкциям операционной системы. Как только
10
Page 13
Tower Storage TS433-TB
Hardware Installation
请参照以下步骤完成硬件安装:
步骤1 当你打开包装后,首先请先检查产品主体以及附件是不是有毁损或是短缺情形,如果有发生产品主体及附件短缺,请立刻与您的供
货商联络。
步骤2 将主机置放于平稳空间上,并确认散热风扇没有被挡住,且四周有适当的散热空间。
(请避免接近水源或是其他容易造成产品损伤的环境)
步骤3 请使用零件包中所附的顶针插入钥匙孔,开启硬盘抽取盒把手便将抽取盒取出。
步骤4 将硬盘安装到抽取盒上,并以零件包内附的螺丝加以固定,以避免不必要的移动对硬盘造成伤害。
步骤5 请依据您欲使用的接口,从附件包中选择相对应的连接线,将 TS433-TB 系列背面端口与电脑主机相对应接口端口连接。
步骤6 AC Power 电源线与 TS433-TB 连接好,并将接头接上电源插座后开机。
开机后,您的操作系统将会自动辨识到储存容量;待辨识成功后,请依据您所需的储存格式,将系统依照操作系统的指示完成格式化。
待硬盘格式化完成后,便可直接使用 TS433-TB 系统。
以下の手順に従って、ハードウェアの取り付けを完了してください:
ステップ 1 パッケージ開封後、内容物に損傷や欠品がないことをご確認後下さい。製品が損傷又は付属品が欠品をしている場合は、
すぐに弊社代理店までご連絡下さい。
ステップ 2 製品本体は平らな場所に設置し、水気のある場所や製品の損傷を引き起こす可能のある場所から離してご利用用下さい。
良好な通気を確保するためにも、本体の通気口は塞がない様に設置して下さい。
ステップ 3 アクセサリー キット付属のキーを鍵挿入口に差し込み、リムーバルトレーのハンルを引き、トレーを取り出します。
ステップ 4 リムーバルトレーにハードディスクを取り付け、アクセサリーキット付属のジ で固定します。完了したら、ドライブト
レーをドライブ位置に戻し、ハンドルを 固定します。
ステップ 5 付属のケーブルからお好みの接続に対応したものを選び、コンピュータ本体と製品を接続します。
ステップ 6 AC 電源ケーブルをコンセントに挿します。 以上が完了した後で、本体の電源を
口入れます。
コンピュータを起動すると、OS 上でドライブが自自動的に検出されますので、インストール したハードディスクのフォーマット
が必要であれば、OS上のフォーマット手順に従い、お好 みの形式でフォーマットしてください。フォーマットが終了したら、デバ
イスを使用する準 備は完了です。
아래 지침에 따라 하드웨어 설치를 완성하십시오:
단계1 포장을 열고 제품을 꺼내 동봉된 모든 내용물이 손상되거나 분실되지 않았는지 확 인하십시오. 내용 물에 손상이 있거나 분실된
경우, 즉시 공급업체에 문의하십시오.
단계2 엔클로저를 평편하고 통풍구가 막힘이 없이 통풍이 잘 되는 곳에 놓으시고, 물 근 처 또는 손상되기 쉬운 장소 근처를 피하십시오.
단계3 액세서리 키트에 있는 키를 키 꽂이 구멍에 삽입하면 이동식 드라이브 트레이 래치 가 튀어나오며 이 동식 드라이브 트레이를
꺼낼 수 있습니다.
단계4 이동식트레이에서드라이브안정기를제거하고하드드라이브를트레이에올려놓 은 다음 제공한 나사로 고정시키십시오. 작업 완료
후, 드라이브 트레이를 드라이 브 위치로 다시 삽입하고 래치를 누르십 시오.
단계5 연결하고자하는엔클로저의인터페이스커넥션과컴퓨터를연결하기위해제공된 케이블 중에서 하나를 선택하십시오.
단계6 AC 전원선을 전원 소켓에 연결하십시오. 연결을 마치면, 장치의 전원을 켜십시오.
컴퓨터가 부팅되면, 운영 체제에서 드라이브를 자동으로 인식합니다. 설치된 하드 드라이브를 포맷해야 할 경우, 원하는 드라이브
볼륨으로 포맷하기 위해 운영 체제에서 알려주는포맷 지침을 따르십시오. 포맷이 완 료되면, 기기는 사용 준비가 완료되었습니다.
11
Page 14

Tower Storage TS433-TB
Installation of Monitoring Software
Installation of Monitoring Software:
Step 1 Select "Security & Privacy" under "System Preferences".
Installation der Überwachungssoftware:
Schritt 1 Wählen Sie "Sicherheit & Datenschutz" unter
"Systemeinstellungen".
Installation du logiciel de surveillance:
Étape 1 Sélectionnez « Sécurité et confidentialité » sous «
Préférences système ».
Instalación del software de supervisión:
Paso 1 Seleccione "Seguridad y privacidad" en "Preferencias
del sistema".
Installazione del software di monitoraggio:
Passo 1 Selezionare "Sicurezza e privacy" in "Preferenze di
Sistema".
Пожалуйста, установите программное обеспечение с
Шаг 1 Выберите "Security & Privacy" в разделе "System
Preferences".
安裝監控軟體:
步骤 1 "系統偏好設定"的"安全性與隱私"選項。
安裝監控軟體:
步骤 1 "系統偏好設定"的"安全性與隱私"選項。
ユ ー ティリティの イン ストー ル 方 法 に つ い て:
ステップ1OS内の「システム環境設定」を開き、「セ キュリティとプラ
イバシー」を開きます。
모니터링 소프트웨어 설치:
단계 1 "시스템 환경 설정"의"보안과 개인 정보 보호" 옵션.
12
Page 15

Tower Storage TS433-TB
Installation of Monitoring Software
Step 2 Click on the lock icon from the bottom-left corner to
unlock settings under "General".
Schritt 2 Klicken Sie auf das Schlosssymbol unten links, um
die Einstellungen unter "Allgemein" zu entsperren.
Étape 2 Cliquez sur l'icône du cadenas dans le coin inférieur
gauche pour déverrouiller les paramètres sous « Général ».
Paso 2 Haga clic en el icono del candado situado en la esquina
inferior izquierda para desbloquear los ajustes bajo "General".
Passo 2 Fare clic sull'icona del lucchetto nell'angolo inferiore
sinistro per sbloccare le impostazioni di "Generale".
Шаг 2 Нажмите на иконку блокировки в левом нижнем углу,
чтобы разблокировать настройки в разделе "General".
步骤 2 "一般選項"下,開啟左下角的解鎖。
步骤 2 "一般选项"下,开启左下角的解锁。
ステップ2「一般」のタブを選択し、左下のロックアイコンをクリック
し、ロックを解 除しま す。
단계 2 "일반 옵션"에서 좌측 하단 코너의 잠금 해제 열기.
13
Page 16

Tower Storage TS433-TB
Installation of Monitoring Software
Step 3 Insert your "Username" & "Password" for the computer.
Schritt 3 Geben Sie Ihren "Benutzername" und Ihr "Kennwort"
für den Computer ein.
Étape 3 Insérez le « Nom d'utilisateur » et le « Mot de passe »
pour l'ordinateur.
Paso 3 Introduzca el "Nombre de usuario" y "Contraseña"
de su ordenador.
Passo 3 Inserire "Nome utente" e "Password" del computer.
Шаг 3 Введите ваше имя пользователя и пароль от
компьютера.
步骤 3 輸入電腦帳號及密碼。
步骤 3 输入计算机账号及密码。
ステップ3現在使用をしているOS上の「名前」と「パスワード」を入力
します。
단계 3 컴퓨터 계정과 암호 입력.
14
Page 17

Tower Storage TS433-TB
Installation of Monitoring Software
Step 4 Select "Allow From Anywhere" for App downloads.
Schritt 4 Wählen Sie "Überall zulässig" für App-Downloads.
Étape 4 Sélectionnez « Autoriser depuis n'importe où » pour
les téléchargements d'applications.
Paso 4 Seleccione "Permitir de cualquier sitio" para descargas
de aplicaciones.
Passo 4 Selezionare "Consenti da ovunque" per il download
delle app.
Шаг 4 Выберите пункт "Allow From Anywhere" для
разрешения загрузки приложений.
步骤 4 選擇允許從"任何來源"下載的應用程式。
步骤 4 选择允许从"任何来源"下载的应用程序。
ステップ4ダウンロードしたアプリケーションの実行許可の項目で
「すべてのアプリケーションを許可にチェックを入れます。
단계 4 "모든 소스"에서 다운로드한 응용 프로그램 허용 선택.
15
Page 18

Tower Storage TS433-TB
Installation of Monitoring Software
Step 5 Click on the lock icon from the bottom-left corner to lock
settings.
Step 6 Run MSU application to proceed installation for
"Introduction" > "License" > "Destination Select" > "Installation
Type" > "Installation" > "Summary", and please click on
"Continue" for "Introduction".
Schritt 5 Klicken Sie auf das Schlosssymbol unten links, um
die Einstellungen zu sperren.
Schritt 6 Führen Sie die Anwendung MSU zur Fortsetzung der
Installation mit "Einleitung" >
"Lizenz" > "Zielwahl" > "Installationstyp" > "Installation" >
"Zusammenfassung" aus und klicken Sie für "Einleitung" auf
"Fortsetzen".
Étape 5 Cliquez sur l'icône du cadenas dans le coin inférieur
gauche pour verrouiller les paramètres.
Étape 6 Exécutez l'application MSU pour procéder à l'installation
pour « Introduction » >« Licence » > « Sélectionner destination »
> « Type d'installation » > « Installation » >« Résumé »,
puis cliquez sur « Continuer » pour « Introduction ».
Paso 5 Haga clic en el icono del candado situado en la esquina
inferior izquierda para desbloquear los ajustes.
Paso 6 Ejecute la aplicación MSU para continuar con la
instalación en "Introducción" > "Licencia" > "Seleccionar destino"
> "Tipo de instalación" > "Instalación" > "Resumen", y haga clic
en "Continuar" en "Introducción".
Passo 5 Fare clic sull'icona del lucchetto nell'angolo inferiore
sinistro per bloccare le impostazioni.
Passo 6 Ejecute la aplicación MSU para continuar con la
instalación en "Introducción" > "Licencia" > "Seleccionar destino"
> "Tipo de instalación" > "Instalación" > "Resumen", y haga clic en
"Continuar" en "Introducción".
Шаг 5 Нажмите на иконку блокировки в левом нижнем углу,
чтобы заблокировать настройки.
Шаг 6 Запустите приложение, для продолжения установки
нажмите "Introduction" > "License"> "Destination Select" >
"Installation Type" > "Installation" > "Summary", и, пожалуйста,
нажмите "Continue" в разделе "Introduction".
步骤 5 關閉左下角的解鎖選項。
步骤 6 打開MSU應用程式進行安裝,從"簡介"→"許可證"→
"選取目標"→"安裝類型"→"安裝"→"摘要"進行安裝,點選右下角
"繼續"選項。
步骤 5 关闭左下角的解锁选项。
步骤 6 打开MSU应用程序进行安装,从"简介"→"许可证"→
"选取目标"→"安装类型"→"安装"→"摘要"进行安装,点选右下角
"继续"选项。
ステップ5再度左下のロックアイコンをクリックし、設定画面を閉じます。
ステップ6RAIDユーティリティをインストールします。付属CDをMAC
のCDドライブに入れ、中の「msu.dmg」を開きます。MSUsetup.pkg
を実行後、「続ける」をクリックします。
단계 5 좌측 하단 코너의 잠금 해제 옵션 닫기.
단계 6 MSU 응용 프로그램을 열고 설치를 시작하며,
"소개"부터 --> "라이선스" --> "대상 선택" -->"설치 유형"
--> "설치" --> "요약"에 따라 설치하고, 우측 하단 코너의"계속"
클릭.
16
Page 19

Tower Storage TS433-TB
Installation of Monitoring Software
Step 7 Please click on "Continue" for "License".
Schritt 7 Klicken Sie auf "Fortsetzen" für "Lizenz".
Étape 7 Cliquez sur « Continuer » pour « Licence ».
Paso 7 Haga clic en "Continuar" en "Licencia".
Passo 7 Fare clic su "Continua" per "Licenza".
Шаг 7 Пожалуйста, нажмите "Continue" в разделе "License".
步骤 7 點選右下角"繼續"選項。
步骤 7 点选右下角"继续"选项。
ステップ7 「続ける」をクリックしま す。
단계 7 우측 하단 코너의"계속"클릭.
17
Page 20

Tower Storage TS433-TB
Installation of Monitoring Software
Step 8 Please click on "Agree" in the popped-up dialogue
of "License" to continue.
Schritt 8 Klicken Sie im Dialogfeld "Lizenz" auf "Akzeptieren",
um den Vorgang fortzusetzen.
Étape 8 Klicken Sie im Dialogfeld "Lizenz" auf "Akzeptieren",
um den Vorgang fortzusetzen.
Paso 8 Haga clic en "Aceptar" en el cuadro de diálogo
emergente de "Licencia" para continuar.
Passo 8 Fare clic su "Accetto" nella finestra di dialogo a
comparsa di "Licenza" per continuare.
Шаг 8 Fare clic su "Accetto" nella finestra di dialogo a
comparsa di "Licenza" per continuare.
步骤 8 點選"同意"選項。
步骤 8 点选"同意"选项。
ステップ8使用許諾契約の面が表示されるので「同意する」をクリッ
クしま す 。
단계 8 "동의" 클릭.
18
Page 21

Tower Storage TS433-TB
Installation of Monitoring Software
Step 9 "Installation Type" indicates the size of space will
occupy, please click on "Install".
Schritt 9 "Installationstyp" zeigt die Größe des Speicherplatzes
an, der belegt wird; klicken Sie auf "Installieren".
Étape 9 Le « Type d'installation » indique l'espace occupé,
cliquez ensuite sur « Installer ».
Paso 9 "Tipo de instalación" indica el espacio que ocupará
en disco. Haga clic en "Instalar".
Passo 9 "Tipo de instalación" indica el espacio que ocupará
en disco. Haga clic en "Instalar".
Шаг 9 В разделе "Installation Type" показывается размер
дискового пространства, которое займет приложение,
пожалуйста, нажмите "Install".
步骤 9 顯示MSU軟體佔用電腦硬碟空間大小說明,點選右下角
"安裝"選項。
步骤 9 显示MSU软件占用计算机硬盘空间大小说明,点选右下角
"安装"选项。
ステップ9 「インストール」を クリックしま す。
단계 9 MSU 소프트웨어의 컴퓨터 하드 공간 점유 크기 설명이
표시되며, 우측 하단 코너의"설치" 옵션 클릭.
19
Page 22

Tower Storage TS433-TB
Installation of Monitoring Software
Step 10 Insert your "Username" & "Password" for the computer
then please click on "Install Software" to continue.
Schritt 10 Geben Sie Ihren "Benutzername" und Ihr "Kennwort"
für den Computer ein und klicken Sie dann zur Fortsetzung auf
"Software installieren".
Étape 10 Saisissez le « Nom d'utilisateur » et le « Mot de passe »
pour votre ordinateur, puis cliquez sur « Installer le logiciel »
pour continuer.
Paso 10 Introduzca el "Nombre de usuario" y "Contraseña" de
su ordenador y haga clic a continuación en "Instalar software"
para continuar.
Passo 10 Inserire "Nome utente" e "Password" per il computer,
quindi fare su "Installa software" per continuare.
Шаг 10 Введите имя пользователя и пароль от компьютера,
далее, пожалуйста, нажмите на кнопку "Install Software" для
продолжения.
步骤 10 輸入電腦帳號及密碼後,點選右下角的"安裝軟體選項"。
步骤 10 输入计算机账号及密码后,点选右下角的"安装软件选项"。
ステップ10OS上の「名前」、及びに「パスワード」を入力後、「ソフトウ
ェアをインストール」をクリックしま す 。
단계 10 컴퓨터 계정과 암호를 입력한 후 우측 하단
코너의"소프트웨어 설치 옵션" 클릭.
20
Page 23

Tower Storage TS433-TB
Installation of Monitoring Software
Step 11 Software installation completed, please click on
"Close" button to exit installation.
Schritt 11 Die Softwareinstallation ist abgeschlossen; klicken
Sie auf zum Beenden der Installation auf "Schließen".
Étape 11 L'installation du logiciel est terminée, cliquez sur le
bouton « Fermer » pour quitter l'installation.
Paso 11 Instalación del software completada. Haga clic en
el botón "Cerrar" para salir del asistente de instalación.
Passo 11 Installazione del software completata. Fare clic sul
tasto "Chiudi" per uscire dall'installazione.
Шаг 11 Установка программного обеспечения завершена,
пожалуйста, нажмите на кнопку "Close" для выхода из
режима установки.
步骤 11 執行安裝完成,點選右下角的"關閉"選項。
步骤 11 执行安装完成,点选右下角的"关闭"选项。
ステップ11ンストールが完了後、「閉じる 」をクリックしてインストー
ル完了です。
단계 11 설치가 완료되면 우측 하단 코너의"닫기" 클릭.
21
Page 24

Tower Storage TS433-TB
Installation of Monitoring Software
Step 12 Please launch the monitoring software after restarting the computer from software installation.
Schritt 12 Nachdem Sie den Computer aufgrund der Softwareinstallation neu gestartet haben, führen Sie die Überwachungssoftware
aus.
Étape 12 Lancez le logiciel de surveillance après avoir redémarré l'ordinateur suite à l'installation du logiciel.
Paso 12 Reinicie el ordenador desde el asistente de instalación del software y ejecute el software de supervisión.
Passo 12 Avviare il software di monitoraggio dopo aver riavviato il computer dall'installazione del software.
Шаг 12 Пожалуйста, перезагрузите ваш компьютер и запустите установленное программное обеспечение для мониторинга.
步骤 12 安裝完畢後,電腦重新開機後再開啟監控軟體。
步骤 12 安装完毕后,计算机重新启动后再开启监控软件。
ステップ12インストール終了後、パソコンを再起 動します。
단계 12 설치를 완료하면 컴퓨터를 재부팅한 후 모니터링 소프트웨어 열기.
22
Page 25

Tower Storage TS433-TB
Operation of Monitoring Software
Operation of Monitoring Software:
Before operating MSU, please verify TS433-TB has already
connected to the computer with HDD installed and powered on.
Please choose enterprise standard HDD for surveillance with
identical brand and capacity.
Step 1 "Username" and "Password" for the computer.
Bedienung der Überwachungssoftware:
Vergewissern Sie sich vor Bedienung der MSU, dass TS433-TB
bereits an den eingeschalteten Computer mit installierter
Festplatte angeschlossen ist.
Wählen Sie für die Überwachung die dem Festplatten der
Enterprise-Klasse mit identischer Marke und Kapazität.
Schritt 1 Geben Sie Ihren "Benutzername" und Ihr "Kennwort"
für den Computer ein.
Fonctionnement du logiciel de surveillance:
Avant d'utiliser le MSU, vérifiez que le TS433-TB est déjà
allumé et connecté à l'ordinateur avec un DD installé.
Choisissez un DD standard d'entreprise pour la surveillance
avec les mêmes marque et capacité.
Étape 1 Insérez le « Nom d'utilisateur » et le « Mot de passe »
pour l'ordinateur.
Funcionamiento del software de supervisión:
Antes de utilizar MSU, verifique que TS433-TB ya esté
conectado con el ordenador con disco duro instalado y
encendido.
Seleccione un disco duro estándar corporativo de la misma
marca y capacidad para la vigilancia.
Paso 1 Introduzca el "Nombre de usuario" y "Contraseña" de
su ordenador.
Funzionamento del software di monitoraggio:
Prima dell'uso di MSU, verificare che il TS433-TB sia già stato
collegato al computer con l'HDD installato e acceso.
Selezionare un HDD standard aziendale per la sorveglianza di
marca e capacità identica.
Passo 1 Inserire "Nome utente" e "Password" del computer.
Работа с программным обеспечением:
Перед началом эксплуатации программного обеспечения,
пожалуйста, убедитесь в том, что TS433-TB уже подключен
к компьютеру, жесткие диски установлены и включено питание.
Выбирайте корпоративные жесткие диски одинакового
производителя и емкости.
Шаг 1 Введите ваше имя пользователя и пароль от
компьютера для доступа к приложению.
監控軟體操作:
操作MSU之前,請先確認TS433-TB已確實與電腦連接,並已開啟電源
及硬碟。請使用企業級監控硬碟,並選擇相同廠牌及容量使用。
步骤 1 輸入電腦帳號及密碼。
监控软件操作:
操作MSU之前,请先确认TS433-TB已确实与计算机连接,并已开启电
源及硬盘。请使用企业级监控硬盘,并选择相同厂牌及容量使用。
步骤 1 输入计算机账号及密码。
モニタリングソフトウェアの操作:
MSUを操作する前に、TS433-TBがHDDインストール済みのコンピュ
ーターに接続され、電源がオンになっていることを確認してください。
監視用には、同一ブランド、同一容量の標準的なメーカー製HDDを
ご使用ください。
ステップ1コンピューター用の「ユーザー名」および「パスワード」。
모니터링 소프트웨어 조작:
MSU를 조작하기 전에 먼저 TS433-TB가 확실히 컴퓨터와
연결되었는지와 전원 및 하드 디스크를 확인하십 시오.기업용
모니터링 하드 디스크를 사용하고 동일한 브랜드 및 용량을
선택하십시오.
단계 1 컴퓨터 계정 및 암호 입력.
23
Page 26

Tower Storage TS433-TB
Operation of Monitoring Software
Step 2 3 setting options can be found on the left of managing
window as for "Marvel Storage Management", "Device" and
"Management".
Marvel Storage Management:Host Name, IP address and MSU
version.
Device:RAID configurations and information of installed HDD.
Managemen:Configurations of E-Mail notification for incidents.
Schritt 2 Links im Verwaltungsfenster befinden sich die 3
Einstellungsoptionen "Marvel Speicher-Management", "Gerät"
und "Management".
Marvel Speicher-Management:Hostname, IP-Adresse und
MSU-Version.
Gerät:RAID-Konfigurationen und Informationen zu den
installierten Festplatten. Management:Konfiguration von
E-Mail-Benachrichtigungen bei Zwischenfällen.
Étape 2 Trois options de réglage se trouvent sur la gauche de la
fenêtre de gestion,« Gestion du stockage Marvell »,
« Périphérique » et « Gestion ». Gestion du stockage.
Marvell:nom d'hôte, adresse IP et version MSU.
Matériel :les configurations RAID et informations des DD installés.
Gestion:configuration des notifications par e-mail en cas d'incidents.
Paso 2 En el margen izquierdo de la ventana de gestión puede
encontrar 3 opciones de ajuste: "Gestión de almacenamiento
Marvel", "Dispositivo" y "Gestión".
Gestión de almacenamiento Marvel:nombre de host, dirección
IP y versión de MSU. Dispositivo:configuraciones RAID e
información de disco duro instalado.
Gestión:configuraciones de notificación de correo electrónico
para incidentes.
Passo 2 Sulla sinistra della finestra di gestione si trovano 3
opzioni di impostazione: "Gestione di archivi Marvell",
"Dispositivo" e "Gestione".
Gestione di archivi Marvell:Nome host, Indirizzo IP e Versione
MSU. Dispositivo:configurazioni RAID e informazioni dell'HDD
installato.
Gestione:configurazioni dell'e-mail di notifica incidenti.
Шаг 2 Слева от основного окна находятся три главные
вкладки для настроек "Marvel Storage Management", "Device"
и "Management".
Marvel Storage Management:Host Name, IP-адрес и версия MSU.
Device:Настройка RAID и информация об установленных HDD.
Management:Настройка уведомлений по электронной почте
при возникновении инцидентов.
步骤 2 左列管理視窗,一共有Marvell Storage Management、Device
及Management三個層級。
Marvell Storage Management:使用者電腦名稱、IP位址及MSU版次。
Device:RAID設定及連接硬碟的個別資訊。
管理:E-Mail通知及通知事故的設定。
步骤 2 左列管理窗口,一共有Marvell Storage Management、Device
及Management三个层级。
Marvell Storage Management:用户计算机名称、IP地址及MSU版次。
Device:RAID设定及连接硬盘的个别信息。
管理:E-Mail通知及通知事故的设定。
ステップ2ソフトウェア左部にメイン項目が表示されます。詳細に関
しては 以下 に なります。
Marvellストレージマネジメント:ユーザ名及びにコンピュータ名、ユ
ーティリティのバージョン等を表示。
デバイス:TS433-TBに搭載済みのディスク、及びにRAIDグループ情
報等を表示。
マネジメント:E-Mai通知の設定、およびにイベント通知の設定等を
表示。
단계 2 좌측열 관리창에는 Marvell Storage Management、Device
및 Management등 3단계가 있습니다.
Marvell Storage Management:사용자 컴퓨터 명칭, IP 주소 및
MSU 버전.
Device:RAID 설정 및 연결 하드 디스크의 개별 정보.
Management:E-Mail 알림 및 사고 알림 설정.
24
Page 27

Tower Storage TS433-TB
RAID Settings
RAID Settings:
A.If installed HDD was used for RAID on other devices, please
assure that previous RAID info in HDD has been successfully
removed/erased and HDD has been reformatted.
B.Please backup all data before configuring/changing to desire
RAID mode.
C.JBOD:To use individual capacity of each installed HDD.
D.RAID-0:Only enhances the performance of data accessing,
it does not provide backup/fail- safe for stored data.
Step 1 Please select "Device" > "Adapter" > "Operation" >
"Create RAID".
RAID-Einstellungen:
A. Wurde eine installierte Festplatte auf anderen Geräten für
RAID verwendet, müssen die alten RAID-Daten auf der
Festplatte erfolgreich entfernt/gelöscht und die Festplatte neu
formatiert werden.
B.Sichern Sie alle Daten, bevor Sie den RAID-Modus
wunschgemäß konfigurieren/ändern.
C.JBOD:Nutzt die individuelle Kapazität jeder installierten
Festplatte.
D.RAID-0:Verbessert nur die Leistung für den Datenzugriff,
bietet aber keine Sicherung/ Ausfallsicherheit für die
gespeicherten Daten.
Schritt 1 Wählen Sie bitte "Gerät" > "Adapter" > "Operation" >
"RAID erstellen".
Paramètres RAID:
A. Si le DD installé a été utilisé pour le RAID sur d'autres
appareils, assurez-vous que les informations RAID précédentes
du DD ont bien été supprimées/effacées et que le DD a été
reformaté.
B.Sauvegardez toutes les données avant de configurer/modifier
le mode RAID souhaité.
C.JBOD:pour utiliser les capacités individuelles de chaque DD
installé.
D.RAID-0:augmente uniquement les performances d'accès aux
données, sans sauvegarde/ protection contre les pannes pour
les données stockées.
Étape 1 Sélectionnez « Périphérique » > « Adaptateur » >
« Opération » > « Créer RAID ».
Configuración RAID:
A. Si se ha utilizado el disco duro instalado para un sistema
RAID en otros dispositivos, asegúrese de haber eliminado/
borrado la información de RAID anterior presente en el disco
duro y de haber formateado el disco duro.
B.Realice una copia de seguridad de todos los datos antes de
configurar/cambiar al modo RAID deseado.
C.JBOD:permite aprovechar la capacidad individual de cada
disco duro instalado.
D.RAID-0:solo mejora el rendimiento del acceso a los datos, no
proporciona copia de seguridad/prevención contra fallos para
los datos almacenados.
Paso 1 Seleccione "Dispositivo" > "Adaptador" >
"Funcionamiento" > "Crear RAID".
Настройки RAID:
A.При установке жесткого диска, который был ранее использован
для RAID-массивов в других устройствах, пожалуйста, убедитесь,
что информация о предыдущем RAID жесткого диска была удалена
и диск был отформатирован.
B.Создайте резервную копию всех данных при создании или и
зменении настроек нового RAID-массива.
C.JBOD:используется потенциал каждого жесткого диска по
отдельности.
D.RAID-0:Обеспечивает более высокую скорость работы с
данными, но не повышает надёжность и безопасность хранения
данных.
Шаг 1 Выберите "Device" > "Adapter" > "Operation" > "CreateRAID".
RAID設定:
A.若使用的硬碟之前有在其他機器作過RAID,請先確認RAID已清除
並重新格式化完畢。
B.切換任何RAID模式之前,請先行確認所有資料的備份在其他硬碟上。
C.JBOD:各別使用置入的硬碟存取空間。
D.RAID-0:僅加速資料存取速度,對於資料備份不作任何保障。
步骤 1 點選"Device"→"Adapter"→"Operation"→"Create RAID"。
RAID设定:
A.若使用的硬盘之前有在其他机器作过RAID,请先确认RAID已清除
并重新格式化完毕。
B.切换任何RAID模式之前,请先行确认所有数据的备份在其他硬盘上。
C.JBOD:各别使用置入入的硬盘存取空间。
D.RAID-0:仅加速数据访问速度,对于数据备份不作任何保障。
步骤 1 点选"Device"→"Adapter"→"Operation"→"Create RAID"。
RAID設定:
A.装着したHDDが別の装置でRAID構成として使用されていた場合、
HDD内のRAID情報が正常に削除/消去され、HDDが再度フォーマッ
トされていることを確認してください。
B.希望するRAIDモードへと構成/変更する前に全データのバックアッ
プを取ってください。
C.JBOD:装着されたHDDの個別の容量を総合して使用します。
D.RAID-0:データアクセス性能を改善するだけで、保存データのバック
アップ/読み込み失敗防止機能はありません。
ステップ1「デバイス」>「アダプタ」>「操作」>「RAIDの作成」を選択し
ます。
Impostazioni RAID:
A. Se l'HDD installato è stata usato per il RAID su altri dispositivi,
assicurarsi che le precedente informazioni RAID nell'HDD siano
state rimosse/cancellate correttamente e che l'HDD sia stato
riformattato.
B. Effettuare il backup di tutti i dati prima di configurare/passare
alla modalità RAID desiderata.
C. JBOD:Per utilizzare la capacità individuale di ogni HDD
installato.
D. RAID-0:Migliora solo le prestazioni di accesso ai dati, non
fornisce backup/fail-safe per i dati memorizzati.
Passo 1 Selezionare "Dispositivo" > "Adattatore" >
"Operazione" > "Crea RAID".
RAID 설정:
A.만약 사용자의 하드 디스크에 기타 기기로 RAID를 한 적이 있다면,
먼저 RAID가 삭제되었고 다시 포맷 을 했는지 확인하십시오.
B.RAID 모드를 변환하기 전에 먼저 모든 데이터를 다른 하드 디스크에
백업했는지 확인하십시오.
C.JBOD:개별적으로 사용되는 하드 디스크 액세스 공간 배치.
D.RAID-0:데이터 백업에 대한 보장없이 데이터 액세스 속도만 가속화.
단계 1 "Device"선택→"Adapter"→"Operation"→"Create RAID".
25
Page 28

Tower Storage TS433-TB
RAID Settings
Step 2 Choose for desired RAID level.
Schritt 2 Wählen Sie den gewünschte RAID-Level.
Étape 2 Choisissez le niveau de RAID souhaité.
Paso 2 Elija el nivel deseado de RAID.
Passo 2 Selezionare il livello RAID desiderato.
Шаг 2 Выберите желаемый режим RAID.
步骤 2 選擇RAID層級。
步骤 2 选择RAID层级。
ステップ2作成をしたいRAIDモードを選択します。
단계 2 RAID 레벨 선택.
26
Page 29

Tower Storage TS433-TB
RAID Settings
Step 3 Please select desired HDD(s) for proceeding
with RAID configuration.
Schritt 3 Wählen Sie die gewünschte(n) Festplatte(n) für
die RAID-Konfiguration aus.
Étape 3 Sélectionnez le ou les DD souhaités pour la
configuration RAID.
Paso 3 Seleccione los discos duros deseados para
continuar con la configuración RAID.
Passo 3 Selezionare gli HDD desiderati per procedere
alla configurazione RAID.
Шаг 3 Выберите нужный диск(и) для продолжения
настройки конфигурации RAID.
步骤 3 勾選欲使用的硬碟數量。
步骤 3 勾选欲使用的硬盘数量。
ステップ3RAIDグループを構築するHDDを選択します。
단계 3 사용하려는 하드 디스크 수량 선택.
27
Page 30

Page 31

Tower Storage TS433-TB
RAID Settings
Step 5 Please verify selected RAID level and relevant
information are indicated correctly, and then click on
"Sumbit" to continue.
Schritt 5 Überprüfen Sie, dass der RAID-Level und die
zugehörigen Datenrichtig angezeigt werden, und klicken
Sie dann zur Fortsetzung auf "Senden".
Étape 5 Vérifiez que le niveau de RAID sélectionné et les
informations pertinentes sont indiqués correctement, puis
cliquez sur « Envoyer » pour continuer.
Paso 5 Verifique que el nivel de RAID seleccionado y la
información pertinente sean correctos, y haga clic a
continuación en "Enviar" para continuar.
Passo 5 Verificare che il livello RAID selezionato e le
relative informazioni siano indicati correttamente, quindi
fare clic su "Invia" per continuare.
Шаг 5 Пожалуйста, проверьте выбранный режим RAID и
другую сопутствующую информацию, а затем нажмите
на кнопку "Sumbit" для продолжения.
步骤 5 確認RAID層級及相關資訊後,點選"Submit"選項。
步骤 5 确认RAID层级及相关信息后,点选"Submit"选。
ステップ5RAIDグループの名前等を設定します。確認後「Submit」
をクリックします。
단계 5 RAID 레벨 및 관련 정보를 확인한 후"Submit" 클릭.
29
Page 32

Tower Storage TS433-TB
RAID Settings
Step 6 Click for confirmation in the popped-up dialogue
to proceed with selected RAID level.
Schritt 6 Klicken Sie im Dialogfeld auf die Bestätigung, um
mit dem ausgewählten RAID-Level fortzufahren.
Étape 6 Cliquez sur la confirmation dans la boîte de
dialogue contextuelle pour continuer avec le niveau de
RAID sélectionné.
Paso 6 Haga clic en el cuadro de diálogo emergente de
confirmación para continuar con el nivel de RAID
seleccionado.
Passo 6 Fare clic per la conferma nella finestra di dialogo
a comparsa per procedere con il livello RAID selezionato.
Шаг 6 Нажмите подтверждение в появившемся
диалоговом окне, чтобы продолжить настройку RAID.
步骤 6 跳出確認建立RAID視窗,按下確認鍵。
步骤 6 跳出确认建立RAID窗口,按下确认键。
ステップ6RAID構成確認ウィンドウがポップアップ表示されるので、
「OK」を押します。
단계 6 RAID 만들기 창이 나오면 확인 클릭.
30
Page 33

Tower Storage TS433-TB
RAID Settings
Step 7 RAID level completed.
The naming sequences of adapter set assigns from
"Adapter 0", "Adapter 1"… to "Adapter 5", and TS433-TB
may adopt maximum of 6 sets.
RAID:Default name is "VD_R0_1". The options in the
top-right corner may apply for "Modify" or "Restore".
HDD ID:Each set of HDDs within will be indicated as
0, 1, 2 and 3.
Schritt 7 RAID-Level festsgelegt.
Die Benennung der Adaptersets wird in der Reihenfolge
"Adapter 0", "Adapter 1"… bis "Adapter 5" vorgenommen,
wobei das TS433-TB maximal 6 Sets übernehmen kann.
RAID:Der Standardname lautet "VD_R0_1". Die Optionen
oben rechts gelten für "Modifizieren" oder "Wiederherstellen".
Festplatten-ID:Jedes enthaltene Festplattenset wird mit
0, 1, 2 und 3 angegeben.
Étape 7 Niveau RAID terminé.
Les séquences de nommage des adaptateurs vont d'
« Adaptateur 0 », « Adaptateur 1 »... à « Adaptateur 5 »,
et le TS433-TB peut accueillir jusqu'à 6 périphériques.
RAID:le nom par défaut est « VD_R0_1 ». Les options dans
le coin supérieur droit peuvent s'appliquer pour « Modifier »
et « Restaurer ».
ID HDD:chaque ensemble de DD est indiqué par 0, 1, 2 ou 3.
Paso 7 Nivel de RAID completado.
Las secuencias de nomenclatura del conjunto de adaptadores
se asigna a partir de "Adaptador 0", "Adaptador 1"… a
"Adaptador 5", y TS433-TB puede adoptar un máximo de
6 conjuntos.
RAID:el nombre predeterminado es "VD_R0_1". Las opciones
de la esquina superior derecha pueden aplicarse para
"Modificar" o "Restaurar".
ID de disco duro:cada conjunto de discos duros se indicará
como 0, 1, 2 y 3.
Passo 7 Livello RAID completato.
Le sequenze di denominazione del set di adattatori viene
assegnato da "Adattatore 0", "Adattatore 1"… a "Adattatore 5"
e il TS433-TB può adottare un massimo di 6 set.
RAID:Il nome predefinito è "VD_R0_1". Le opzioni nell'angolo
superiore destro possono essere applicate per "Modifica" o
"Ripristina".
HDD ID:Ogni set di HDD viene indicato come 0, 1, 2 e 3.
Шаг 7 Завершение настройки RAID.
Адаптерам присваиваются следующие имена - "Adapter 0",
"Adapter 1"… до "Adapter5",TS433-TB может иметь до 6
конфигураций.
RAID:По умолчанию присваивается имя "VD_R0_1". Сверху
справа имеются кнопки "Modify" и "Restore", с помощью
которых можно изменить параметры или восстановить их.
HDD ID:Каждый набор дисков будет обозначаться как
0, 1, 2 и 3.
步骤 7 RAID製作完畢。
磁碟陣列:命名方式從Adapter 0、Adapter 1…Adapter 5,
TS433-TB最多串聯六組。
RAID:原始設定名稱皆為"VD_R0_1"。可透過右上角的Modify選項
作修改或Restore選項作回復。
硬碟ID:每組磁碟皆以0、1、2、3顯示。
步骤 7 RAID制作完毕。
磁盘阵列:命名方式从Adapter 0、Adapter 1…Adapter 5,
TS433-TB最多串联六组。
RAID:原始设定名称皆为"VD_R0_1"。可透过右上角的Modify选项
作修改或Restore选项作回复。
硬盘ID:每组磁盘皆以0、1、2、3显示。
ステップ7RAIDレベルの完成。
アダプタセット割り当ての名称の順序は「Adapter0」、「Adapter1」…
から「Adapter5」で、TS433-TBは最大6セットのアダプタが採用可能
です。
RAID:デフォルト名は「VDR01」です。右上のオプションは「変更」ま
たは「リストア」に適用されます。
HDDID:HDDの各セットは0,1,2および3というように表示されます。
단계 7 RAID 만들기 완료
RAID:명명 방식은 Adapter 0、Adapter 1…Adapter 5,
TS433-TB로 최대 6세트 직렬 연결. RAID:원래 설정 명칭은
모두"VD_R0_1"입니다.
우측 상단 코너의 Modify 옵션을 통해 수정이나 Restore 옵션에서
복원할 수 있습니다. 하드 디스크 ID:세트당 하드 디스크는 모두
0、1、2、3로 표시됩니다.
31
Page 34

Tower Storage TS433-TB
Deletion of RAID
Deletion of RAID:
Please backup stored data before deleting RAID, once RAID
been deleted all data within shall be erased.
Step 1. On the left of managing window, please select the
"Virtual Disk" from a RAID set which wish to be deleted.
The option for "Delete" will appear once click the "Operation"
tab on the right of managing window.
Löschen von RAID:
Sichern bitte die gespeicherten Daten, bevor Sie RAID
löschen, denn ist RAID einmal gelöscht, sind auch die darin
enthaltenen Daten gelöscht.
Schritt 1 Links im Verwaltungsfenster wählen Sie die "Virtuelle
Festplatte" aus einem RAID- Set aus, die Sie löschen möchten.
Die Option für "Löschen" wird angezeigt, nachdem Sie auf
die Registerkarte "Operation" rechts im Verwaltungsfenster
geklickt haben.
Suppression du RAID:
Sauvegardez les données stockées avant de supprimer le RAID,
car toutes les données seront effacées lors de la suppression du
RAID.
Étape 1 Sur la gauche de la fenêtre de gestion, sélectionnez le
« Disque virtuel » depuis un ensemble RAID à supprimer.
L'option « Supprimer » s'affichera après avoir cliqué sur l'onglet
« Opération » sur la droite de la fenêtre de gestion.
Eliminación de RAID:
Realice una copia de seguridad de los datos almacenados antes
de eliminar el RAID. Al eliminar el RAID, se borrarán todos los datos.
Paso 1 En el margen izquierdo de la ventana de gestión, seleccione
"Disco virtual" de un conjunto de RAID que desee eliminar.
La opción "Eliminar" aparecerá al hacer clic en la pestaña
"Funcionamiento" del margen derecho de la ventana de gestión.
Eliminazione di RAID:
Eseguire il backup dei dati archiviati prima di eliminare RAID, una
volta che il RAID ha eliminato tutti i dati presenti.
Passo 1 Sulla sinistra della finestra di gestione, selezionare
"Disco virtuale" da un set RAID che si desidera eliminare.
L'opzione "Elimina" appare quando si fa clic sulla scheda
"Operazione" sulla destra della finestra di gestione.
Удаление RAID:
Пожалуйста, сделайте резервную копию всех данных перед
удалением RAID.
После удаления RAID все данные будут стерты.
Шаг 1 Слева от основного окна выберите "Virtual Disk" для RAID,
который должен быть удален.
Функция "Delete" появится, как только вы выберите вкладку
"Operation" справа от основного окна
RAID刪除:
刪除任何RAID模式,請先行備份硬碟內的所有資料,RAID一旦刪除亦即
代表資料刪除。
步骤 1 點選欲刪除的RAID組中的Virtual Disk。點選Operation,出現
下拉式選單中的Delete選項。
RAID删除:
删除任何RAID模式,请先行备份硬盘内的所有数据,RAID一旦删除亦即
代表数据删除。
步骤 1 点选欲删除的RAID组中的Virtual Disk。点选Operation,出现
下拉式选单中的Delete选项。
RAIDボリュームの削除方法について:
RAIDモードを削除すると、ディスク内の全てのデータが初期化をされ
ます。重要なデータがある場合は、事前にハードディスク内の全ての
デー タをバックアップすることを推奨しま す。
ステップ1左部メインメニューより「Adapter」を選択、削除したいRAID
(VirtualDisk)をクリックし、「Operation」→「Delete」を選択します。
사. RAID 삭제:
RAID 모드를 삭제할 수 있습니다. 먼저 하드 디스크내의 모든
데이터를 백업하십시오. RAID 삭제는 데이 터 삭제를 의미합니다.
단계 1 삭제하려는 RAID 그룹중의 Virtual Disk를 클릭하십시오.
Operation을 클릭하면 드롭 다운 메뉴중에 Delete 옵션이 나옵니다.
управления.
32
Page 35

Tower Storage TS433-TB
Deletion of RAID
Step 2 Confirmation dialogue will appear for deletion.
Schritt 2 Das Dialogfeld mit der Bestätigung des Löschvorgangs
wird angezeigt.
Étape 2 La fenêtre de confirmation s'affichera pour confirmer
la suppression.
Paso 2 Aparecerá el cuadro de diálogo de confirmación para
confirmar la eliminación.
Passo 2 Appare la finestra di dialogo di conferma per
l'eliminazione.
Шаг 2 Далее появится всплывающий диалог, в котором нужно
подтвердить удаление.
步骤 2 出現確認刪除提醒視窗。
步骤 2 出现确认删除提醒窗口。
ステップ2削除の確認ウィンドウが表示されるので、OKを押します。
단계 2 삭제 확인 알림 창이 나옵니다.
33
Page 36

Tower Storage TS433-TB
Deletion of RAID
Step 3 Second confirmation dialogue will appear to proceed
with delete.
Schritt 3 Zur Fortsetzung des Löschvorgangs wird ein weiteres
Dialogfeld angezeigt.
Étape 3 La deuxième fenêtre de confirmation s'affichera pour
procéder à la suppression.
Paso 3 Aparecerá el segundo cuadro de diálogo de confirmación
para continuar con la eliminación.
Passo 3 Appare la seconda finestra di dialogo di conferma per
procedere con l'eliminazione.
Шаг 3 Следующий всплывающий диалог попросит ещё раз
подтвердить удаление.
步骤 3 出現再次確認刪除提醒視窗。
步骤 3 出现再次确认删除提醒窗口。
ステップ3再度確認のウィンドウが表示されるので、OKを押します。
단계 3 삭제 확인 알림 창이 다시 나옵니다.
34
Page 37

Tower Storage TS433-TB
Deletion of RAID
Step 4 Final confirmation dialogue will appear to delete
partition information.
Schritt 4 Im letzten Dialogfeld muss das Löschen der
Partitionsdaten bestätigt werden.
Étape 4 La dernière fenêtre de confirmation s'affichera pour
supprimer les informations de partition.
Paso 4 Aparecerá el cuadro de diálogo de confirmación final
para eliminar la información de partición.
Passo 4 Appare la finestra di dialogo di conferma finale per
eliminare le informazioni di partizione.
Шаг 4 Заключительный диалог попросит подтверждение
удаления разделов диска.
步骤 4 最終刪除RAID模組視窗。
步骤 4 最终删除RAID模块窗口。
ステップ4RAIDグループ削除のウィンドウが表示され、OKを押して完
了です。
단계 4 RAID 모듈 창을.
35
Page 38

Tower Storage TS433-TB
Deletion of RAID
Step 5 After RAID has been deleted, each of the HDD will revert
to original connecting status individually.
E-Mail Notifications:
"Account Management" under "Management" on the left of
managing window allows configuring for e-mail notification by
sending "Event Logs" which generated during the operation
of TS433-TB.
Schritt 5 Nachdem RAID gelöscht wurde, kehrt jede Festplatte
wieder zu ihrem ursprünglichen Anschlussstatus zurück.
E-Mail-Benachrichtigungen:
"Konto-Management" unter "Management" links im
Verwaltungsfenster ermöglicht die Konfiguration von
E-Mail-Benachrichtigungen durch Versenden von "Ereignisprotokolle",
die während des Betriebs von TS433-TB erzeugt wurden.
Étape 5 Une fois le RAID supprimé, chacun des DD reviendra à
son état de connexion individuel d'origine.
Notification par e-mail:
« Gestion de compte » sous « Gestion » sur la gauche de la fenêtre
de gestion permet de configurer les notifications par e-mail en
envoyant les « Journaux d'événements » générés lors du
fonctionnement du TS433-TB.
Paso 5 Una vez eliminado el RAID, cada uno de los discos duros
restablecerá individualmente su estado de conexión original.
Notificaciones de correo electrónico:
"Gestión de cuenta", bajo "Gestión", en el margen izquierdo de la
ventana de gestión, permite configurar la notificación de correo
electrónico para enviar "Registros de eventos" generados durante el
funcionamiento del TS433-TB.
Passo 5 Una volta eliminato il RAID, ogni HDD ripristina lo stato
di connessione originale in modo individuale.
E-mail di notifica:
"Gestione account" di "Gestione" sulla sinistra della finestra di
gestione consente di configurare l'e-mail di notifica inviando
"Registri eventi" generati durante il funzionamento di TS433-TB.
Шаг 5 После удаления RAID каждый диск вернется в исходное
состояние и будет отображаться по отдельности.
Уведомления по электронной почте:
Пункт "Account Management" из раздела "Management" в левой
части окна управления позволяет настроить уведомления по
электронной почте, при этом отправляется журнал событий,
который
образуется во время работы TS433-TB.
步骤 5 RAID模式刪除後,即回復原始連接的硬碟數量。
事件通知管理視窗說明:
左側Management選項中的Account Management及Email Notify Setting,
可以將TS433-TB
執行時產生的事件記錄(如錯誤、異常或資訊),以Mail方式寄出一覽表。
步骤 5 RAID模式删除后,即回复原始连接的硬盘数量。
事件通知管理窗口说明:
左侧Management选项中的Account Management及Email Notify Setting,
可以将TS433-TB
执行时产生的事件记录(如错误、异常或信息),以Mail方式寄出一览表。
ステップ5RAIDが削除された後、各HDDは個々の本来の接続状態に戻
ります 。
通知管理ウィンドウについて:
左側メインメニューの「Management」より「AccountManagement」、
「EmailNotifySetting」を設定するとTS433-TB実行時に生成されたログ
(エラー、異常情報)を一一覧表にしてMailで送信する事ができます。
단계 5 RAID 모듈이 삭제되면 원래 연결 하드 디스크 수량으로
복원됩니다.
사건 알림 관리 창 설명:
좌측 Management 옵션중의 Account Management 및 Email Notify
Setting은 TS433-TB 실행 시에
생기는 사건 기록 (예, 오류, 이상 또는 정보) 일람표를 Mail로
발송합니다.
36
Page 39

Tower Storage TS433-TB
Visual Status Indicator Definitions
Status
Power on / NO HDD
Power on / HDD Idle
Power on / HDD Access
Power on / HDD Fail
Status
Strom / NO HDD
Strom / HDD Idle
Strom / Festplattenzugriff
Strom / HDD Ausfallen
Etat
Allumé/On / NO HDD
Allumé/On / Idle HDD
Allumé/On / Accès HDD
Allumé/On / HDD Fail
Power LED
Blue On
Blue On
Blue On
Blue On
Betriebsanzeige-LED
Blau, wenn eingeschaltet
Blau, wenn eingeschaltet
Blau, wenn eingeschaltet
Blau, wenn eingeschaltet
Voyant LED
Bleu pour allumé
Bleu pour allumé
Bleu pour allumé
Bleu pour allumé
HDD LED
N / A
Blue On
Blue Blinks
N / A
LED-Beleuchtung für HDD
N / A
Blau, wenn eingeschaltet
Blau blinken
N / A
DEL HDD
N / A
Bleu pour allumé
Bleu clignotant
N / A
Estado
Encendido / NO HDD
Encendido / Idle HDD
Encendido / Acceso al disco duro
Encendido / Falla de Disco duro
Stato
Accensione / NESSUN HDD
Accensione / HDD inattivo
Accensione / Accesso HDD
Accensione / Errore HDD
LED de potencia
Azul para conectado
Azul para conectado
Azul para conectado
Azul para conectado
LED di alimentazione
Blu acceso
Blu acceso
Blu acceso
Blu acceso
HDD LED
N / A
Azul para conectado
Azul intermitente
N / A
LED HDD
N/D
Blu acceso
Blu lampeggiante
N/D
37
Page 40

Tower Storage TS433-TB
Visual Status Indicator Definitions
Статус
Включен / HDD отсутсвет
Включен / HDD в простое
Включен / HDD активен
Включен / HDD неисправен
狀態
電源開啟 /無硬碟
電源開啟 / 硬碟閒置
電源開啟 / 硬碟讀取
電源開啟 / 硬碟故障
状态
电源开启 /无硬盘
电源开启 / 硬盘闲置
电源开启 / 硬盘读取
电源开启 / 硬盘故障
Индикатор питания
Горит синим
Горит синим
Горит синим
Горит синим
電源 LED燈
藍燈恆亮
藍燈恆亮
藍燈恆亮
藍燈恆亮
电源 LED灯
蓝灯恒亮
蓝灯恒亮
蓝灯恒亮
蓝灯恒亮
Индикатор состояния HDD
Отсутсвует
Горит синим
Мигает синим
Отсутствует
硬碟 LED燈
N / A
藍燈恆亮
藍燈閃爍
N / A
硬盘 LED灯
N / A
蓝灯恒亮
蓝灯闪烁
N / A
電源オン / NO HDD
電源オン / HDDのアイドル
電源オン / HDDアクセス
電源オン / HDD失敗
전원 / NO HDD
전원 / HDD의 유휴
전원/ HDD가 액세스
전원 / HDD 실패
38
状態
상태
電源LED
青く点灯
青く点灯
青く点灯
青く点灯
전원 LED
블루에
블루에
블루에
블루에
アクセス
N / A (消灯)
青く点灯
青色点滅
N / A (消灯)
하드디스크 지시 LED
N / A
블루에
파란색 깜빡거림
N / A
Page 41

Tower Storage TS433-TB
Frequently Asked Questions
1.TS433-TB will goes into sleep mode when Thunderbolt cable is not connected, while fan and LED indication of TS433-TB will not be
functioning until connecting with Thunderbolt cable.
2.When TS433-TB goes into sleep mode that fan and LED indication of TS433-TB will not be functioning, until TS433-TB has been
reactivated.
3.If HDD was used for RAID in other devices, please revert the HDD to JBOD mode using original device/software before install in
TS433-TB.
4.If monitoring software is being active for a period of time without accessing, please proceed with refreshing or restarting the software
for acquiring an updated status.
5.If an older version of Marvell monitoring software has already been installed in the computer, please remove it completely before
installing the monitoring software from product CD to avoid the occurrence of software corruptions.
1.TS433-TB schaltet in den Ruhemodus, wenn das Thunderbolt-Kabel nicht eingesteckt ist, wobei die Lüftung und die LED-Anzeige
des TS433-TB erst wieder funktionieren, wenn das Thunderbolt-Kabel eingesteckt ist.
2.TS433-TB schaltet in den Ruhemodus und die Lüftung und die LED-Anzeige des TS433-TB funktionieren erst wieder, wenn das
Gerät neu aktiviert wurde.
3.Wurde die Festplatte auf anderen Geräten für RAID verwendet, setzen Sie die Festplatte mit dem Originalgerät/der Originalsoftware
in den JBOD-Modus zurück, bevor Sie sie im TS433-TB einbauen.
4.War die Überwachungssoftware eine Zeit lang ohne Zugriff aktiviert, aktualisieren Sie ihren Status, indem Sie die Software aktualisieren
oder neu starten.
5.Ist bereits eine ältere Version der Marvel-Überwachungssoftware auf dem Computer installiert, entfernen Sie sie vollständig, bevor
Sie die Überwachungssoftware von der Produkt-CD installieren, um Schäden an der Software zu vermeiden.
1.TS433-TB entrera en mode veille lors de la déconnexion du câble Thunderbolt, le ventilateur et le témoin lumineux du TS433-TB
ne fonctionneront pas jusqu'à la connexion du câble Thunderbolt.
2.Lorsque le TS433-TB entre en mode veille, le ventilateur et le témoin lumineux du TS433-TB ne fonctionneront pas jusqu'au
rallumage du TS433-TB.
3.Si un DD a été utilisé pour le RAID sur d'autres appareils, rétablissez le DD en mode JBOD avec le logiciel/matériel d'origine avant
de l'installer dans le TS433-TB.
4.Si le logiciel de surveillance est actif pendant une certaine période sans accès, actualisez ou redémarrez le logiciel pour obtenir
l'état le plus récent.
5.Si une version antérieure du logiciel de surveillance Marvell a déjà été installée sur l'ordinateur, supprimez-la complètement avant
d'installer le logiciel de surveillance depuis le CD du produit pour éviter l'endommagement du logiciel.
1.TS433-TB entrará en modo de suspensión si el cable Thunderbolt no está conectado, mientras que el ventilador y el indicador LED
no funcionarán hasta que conecte el TS433-TB con el cable Thunderbolt.
2.Si el TS433-TB entra en modo de suspensión, el ventilador y el indicador LED del TS433-TB no funcionarán hasta que el TS433-TB
se haya reactivado.
3.Si se ha utilizado el disco duro para el RAID en otros dispositivos, restablezca el disco duro al modo JBOD utilizando el dispositivo/
software original antes de realizar la instalación en el TS433-TB.
4.Si el software de supervisión se mantiene activo durante un periodo de tiempo sin acceder, continúe con la actualización o reinicio
del software para adquirir el estado actualizado.
5.Si ya hay una versión anterior del software de supervisión Marvell instalado, elimínelo completamente antes de instalar el software
de supervisión del CD del producto para evitar que se produzcan daños en el software.
1. Il TS433-TB entra in modalità di sospensione quando il cavo Thunderbolt non è collegato, mentre la ventola e il LED del TS433-TB
non funzionano fino al collegamento con il cavo Thunderbolt.
2. Quando il TS433-TB entra in modalità di sospensione, la ventola e il LED del TS433-TB non funzionano fino alla riattivazione del
TS433-TB.
3. Se l'HDD è stato utilizzato per il RAID in altri dispositivi, riportare l'HDD alla modalità JBOD utilizzando il dispositivo/software
originale prima dell'installazione nel TS433-TB.
4. Se il software di monitoraggio è attivo per un periodo di tempo senza accesso, procedere con l'aggiornamento o il riavvio del
software per l'acquisizione di uno stato aggiornato.
5. Se una versione precedente del software di monitoraggio Marvell è già stato installato nel computer, rimuoverlo completamente
prima di installare il software di monitoraggio dal CD del prodotto per evitare il danneggiamento del software.
1. TS433-TB будет переходить в спящий режим когда кабель Thunderbolt не подключен, в то время как вентилятор и светодиодная
индикация TS433-TB не будут работать до подключения кабеля Thunderbolt.
2. При переходе TS433-TB в спящий режим вентилятор и светодиодная индикация не будут функционировать, пока работа
TS433-TB не возобновится.
3. Если жесткий диск был ранее использован в RAID-массиве в другом
JBOD с помощью оригинального устройства или программного обеспечения перед установкой в TS433-TB.
4. Если программное обеспечение для мониторинга не активно в течении определенного времени, пожалуйста, обновите или
перезапустите программу для получения обновленной информации.
5. Если старая версия программного обеспечения для мониторинга Marvell уже установлена на компьютер, пожалуйста
полностью удалите его перед установкой программного обеспечения с диска, чтобы избежать возникновения программных
конфликтов.
устройстве, пожалуйста, верните жесткий диск в режим
39
,
Page 42

Tower Storage TS433-TB
Frequently Asked Questions
1.TS433-TB在未連接Thunderbolt cable時,風扇與電源指示燈皆為停止及休眠狀態,直至連接 Thunderbolt cable至電腦才會啟動風扇及電
源指示燈。
2.電腦進入睡眠模式時,TS433-TB的風扇與電源指示燈皆為停止及休眠狀態,直至喚醒時才會啟動風扇及電源指示燈。
3.若硬碟已在其他磁碟陣列產品存取資料或設定RAID MODE過,建議還原成JBOD模式後再應用於TS433-TB,以避免產生無法讀取硬碟問題。
4.監控軟體若長駐開啟而未操作,建議在操作時重新搜尋或重新開關監控軟體,以獲得最新資訊。
5.若使用者電腦已有舊版Marvell的監控軟體,建議刪除再安裝光碟內的監控軟體,以免產生軟體排斥問題。
1.TS433-TB在未连接Thunderbolt cable时,风扇与电源指示灯皆为停止及休眠状态,直至连接 Thunderbolt cable至计算机才会启动风扇及电
源指示灯。
2.计算机进入睡眠模式时,TS433-TB的风扇与电源指示灯皆为停止及休眠状态,直至唤醒时才会启动风扇及电源指示灯。
3.若硬盘已在其他磁盘阵列产品存取数据或设定RAID MODE过,建议还原成JBOD模式后再应用于TS433-TB,以避免产生无法读取硬盘问题。
4.监控软件若长驻开启而未操作,建议在操作时重新搜寻或重新开关监控软件,以获得最新资讯。
5.若用户计算机已有旧版Marvell的监控软件,建议删除再安装光盘内的监控软件,以免产生软件排斥问题。
1.TS433-TBのThunderboltケーブルがコンピュータに接続されていない時、製品冷却ファン及びに電源LEDは全て停止および休止状態
になります。Thunderboltケーブルを再度コンピュータに接続すると、冷却ファンが回転し電源LEDが点灯します。
2.コンピュータがスリープモードに入っている時、TS433-TBのファンと電源LEDは全て停およびスリープ状態になりますが、復帰をすると、
ファンと電源LEDが点灯します。
3.搭載をするハードディスクが既に他ののRAID製品で使用したことがあったり、データを保存したりした事ががあった場合、ハードディス
クが読み取れないトラブルを避けるため、JBODモードに復元してからTS433-TBに装着することを推奨します。
4.RAIDユーティリティを起動時、長時間操作がない場合、「Rescan」をクリックするか、再度ソフトを立ち上げて最新の情報に更新すること
を推奨します。
5.ユーザのコンピュータに既に古いバージョンのMarvellRAIDユーティリティがインストールされている場合、競合を防ぐため、古いバー
ジョンの 物をアンインストールしてからC D - ROMよりソフトをインストール することを推奨します。
1. TS433-TB가 Thunderbolt cable에 연결되지 않으면, 팬과 전원 지시등이 정지되고 절전 모드로 들어가며, Thunderbolt cable이
컴퓨터에 연결되어야 팬과 전원 지시등이 작동됩니다.
2. 컴퓨터가 절전 모드에 들어가면, TS433-TB의 팬과 전원 지시등은 정지되고 수면 상태로 들어가며, 웨이크업 되어야만 팬과 전원
지시등이 작동됩니다.
3. 하드 디스크가 기타 디스크 어레이 제품에서 데이터를 액세스했거나 RAID MODE를 설정했다면, 하드 디스크를 읽 을 수 없는
문제를 방지하기 위해 JBOD모드로 복구한 후에 다시 TS433-TB에 응용하시는 것이 좋습니다.
4. 모니터링 소프트웨어를 장기간 켜두고 작동시키지 않았다면, 새로운 정보를 얻을 수 있도록 조작 시에 재탐색이나 모 니터링
소프트웨어를 재스위칭하시는 것이 좋습니다.
5. 사용자 컴퓨터에 구버전 Marvell의 모니터링 소프트웨어가 있다면, 소프트웨어 배척 문제를 방지하기 위해 삭제하시 고 CD의
모니터링 소프트웨어를 다시 설치하시는 것이.
40
Page 43

Warranty Information
This product has a limited 1 year warranty in North America and Australia.
For information on warranty periods in other regions, please contact your reseller or SilverStone
authorized distributor.
Warranty terms & conditions
1. Product component defects or damages resulted from defective production is covered under warranty.
Defects or damages with the following conditions will be fixed or replaced under SilverStone Technology’s jurisdiction.
a) Usage in accordance with instructions provided in this manual, with no misuse, overuse, or other inappropriate actions.
b) Damage not caused by natural disaster (thunder, fire, earthquake, flood, salt, wind, insect, animals, etc…)
c) Product is not disassembled, modified, or fixed. Components not disassembled or replaced.
d) Warranty mark/stickers are not removed or broken.
Loss or damages resulted from conditions other than ones listed above are not covered under warranty.
2. Under warranty, SilverStone Technology’s maximum liability is limited to the current market value for the product (depreciated value, excluding
shipping, handling, and other fees). SilverStone Technology is not responsible for other damages or loss associated with the use of product.
3. Under warranty, SilverStone Technology is obligated to repair or replace its defective products. Under no circumstances will SilverStone
Technology be liable for damages in connection with the sale, purchase, or use including but not limited to loss of data, loss of business, loss of
profits, loss of use of the product or incidental or consequential damage whether or not foreseeable and whether or not based on breach of warranty,
contract or negligence, even if SilverStone Technology has been advised of the possibility of such damages.
4. Warranty covers only the original purchaser through authorized SilverStone distributors and resellers and is not transferable to a second hand
purchaser.
5. You must provide sales receipt or invoice with clear indication of purchase date to determine warranty eligibility.
6. If a problem develops during the warranty period, please contact your retailer/reseller/SilverStone authorized distributors or SilverStone
http://www.silverstonetek.com.
Please note that: (i) You must provide proof of original purchase of the product by a dated itemized receipt; (ii) You shall bear the cost of shipping
(or otherwise transporting) the product to SilverStone authorized distributors. SilverStone authorized distributors will bear the cost of shipping
(or otherwise transporting) the product back to you after completing the warranty service; (iii) Before you send the product, you must be issued a
Return Merchandise Authorization (“RMA”) number from SilverStone. Updated warranty information will be posted on SilverStone’s official website.
Please visit http://www.silverstonetek.com for the latest updates.
Additional info & contacts
For North America (usasupport@silverstonetek.com)
SilverStone T echnology in North America may repair or replace defective product with refurbished product that is not new but has been functionally tested.
Replacement product will be warranted for remainder of the warranty period or thirty days, whichever is longer. All products should be sent
back to the place of purchase if it is within 30 days of purchase, after 30 days, customers need to initiate RMA procedure with SilverStone Technology
in USA by first downloading the “USA RMA form for end-users” form from the below link and follow its instructions.
http://silverstonetek.com/contactus.php
For Australia only (support@silverstonetek.com)
Our goods come with guarantees that cannot be excluded under the Australian Consumer Law.
You are entitled to a replacement or refund for a major failure and for compensation for any other reasonably foreseeable loss or damage.
You are also entitled to have the goods repaired or replaced if the goods fail to be of acceptable quality and the failure does not amount to a major failure.
Please refer to above “Warranty terms & conditions” for further warranty details.
SilverStone Technology Co., Ltd. 12F No. 168 Jiankang Rd., Zhonghe Dist., New Taipei City 235 Taiwan R.O.C. + 886-2-8228-1238
(standard international call charges apply)
For Europe (support.eu@silverstonetek.de)
For all other regions (support@silverstonetek.com)
Page 44

G11226730
 Loading...