

Page 1
RED
EFINE S SFFFF
COMPUTITIN
G WITH FLAIAIR
RED
EFINE S SFFFF
COMPUTITIN
G WITH FLAIAIR
RVZ03-ARGB
RE
EFI
RE
EFI
COM
COM
G WITH
G WITH
Signature RAVEN styled
front panel adorned
with addressable RGB light strip
Page 2

INTRODUCTION
SilverStone RVZ03 is a further evolution of the highly rated
RAVEN Z RVZ01-E, a slim form factor case with tremendous
capability. It has the same optimized interior that has room for a
standard ATX (PS2) power supply and support for some the
biggest consumer graphics cards on the market with superb air
cooling performance. Designed for use in either vertical or
horizontal orientation, it can be placed comfortably in any
space-constrained environment that requires a powerful PC. For
those looking to build a slim form factor PC with extra flair, the
RVZ03’s inclusion of addressable RGB lighting and control box
bring about another exciting chapter to the famed RAVEN series
of computer cases.
SPECIAL FEATURES
Signature RAVEN styled front panel adorned with addressable
RGB light strip
Mini-ITX motherboard & ATX PSU compatible for wide array of
building possibilities
Support cards up to 13 inches (330mm) to fit most high-end
GPUs for compute power far exceeding consoles
Maximum performance in slim form factor with support for AIO
liquid cooling
Positive air pressure design for excellent cooling/quietness
and dust-prevention
Fits in nearly any environment with horizontal or vertical
orientation
Page 3

SPECIFICATIONS
Model
SST-RVZ03B-ARGB (black)
Material
Reinforced plastic outer shell, steel body
Motherboard
Mini-DTX, Mini-ITX
Drive Bay
Internal
Cooling System
Top
Bottom
Expansion Slot
2
Front I/O Port
USB3.0 x 2, Audio x 1, MIC x 1
Power Supply
Optional PS2 (ATX)
Expansion Card
Compatible up to 13" (330mm) long, width restriction-5.88" (149mm)
Limitation of CPU cooler
83mm
Limitation of PSU
150mm*
Net Weight
4.05kg
Dimension
382mm (W) X 105mm (H) X 350mm (D) , 14 liters
Extra
Support Kensington lock, PCI Express riser card set x 1
ARGB light strip control PCB x 1
* Maximum length for power supply is 150mm but we recommend
140mm deep power supply due to varying connector locations
and the unique structure of RVZ03.
Due to the use of internal power cord extension, we recommend
not to exceed 800W when powering off a 110V outlet
(no limit for 220V).
2.5" x 3
1 x 120mm fan, 1500rpm, 18dBA
1 x 120mm fan, 1500rpm, 18dBA
1 x 120mm fan slot
Page 4
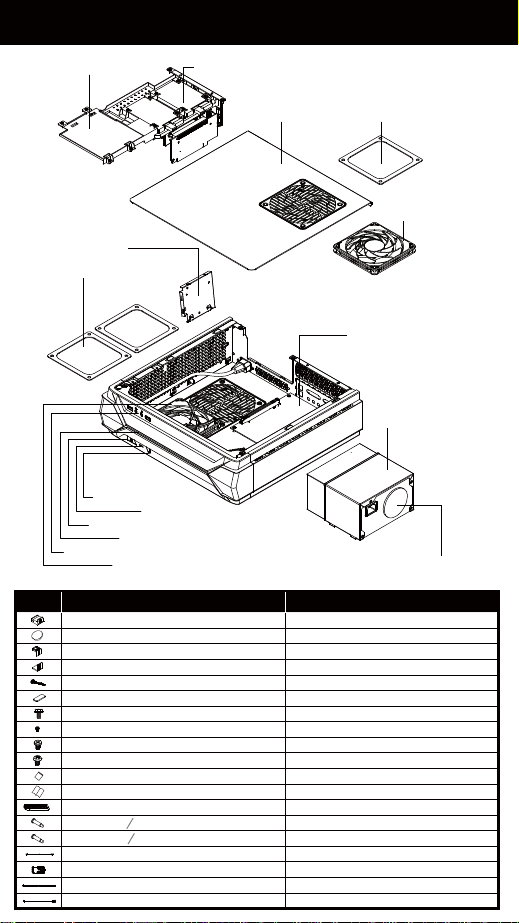
DISASSEMBLE CHART
2.5" HDD X1 2.5" HDD X2
TOP COVER
FAN FILTER X1
12015 FAN X1
ARGB CAGE
FAN FILTER X2
MINI-ITX (OPTION)
POWER CAGE
RESET BUTTON
HDD LED
POWER BUTTON
POWER LED
USB 3.0 + SPK + MIC
12015 FAN X1
ATX PSU (OPTION)
ITEM PURPOSE
RUBBER-A-FEET PAD
RUBBER-E-FEET PAD
TOP-CARD-BKT
BOTTOM-CARD-BKT
LOGO-HORIZONTAL-PAD
VGA-COMP-BELOW-RUBBER
SCREW C 632 X8
SCREW D M2 X2
SCREW E 632 X5
SCREW F M3 X4
BAG
MANUAL
PCI-EXTEND-CARD
SCREW A O4 X15-M3 X4 SECURE RADIATOR COOLING FAN
SCREW B O4 X15-632 X4
CONTROLLER CABLE
ARGB SIGNAL CONTROLLER
CONTROL PANEL CABLE
ADOPTER CABLE
FOR VERTICAL USE
FOR HORIZONTAL USE
SECURE VGA SUPPORT BRACKET
SECURE OPTICAL DRIVE
SECURE MOTHERBOARD, PSU
SECURE 2.5” SSD/HDD
SECURE RADIATOR COOLING FAN
Page 5
INSTALLATION GUIDE
Before you begin, please make sure that you
Have all components collected.
Check that all components do not have compatibility problems
with each other or with the case.
If possible, assemble the components outside the case first to
make sure they are working.
Keep the motherboard manual ready for reference during
installation.
Prepare a Philips screwdriver.
Be careful not to strike on glass side panel when removing it
from the case.
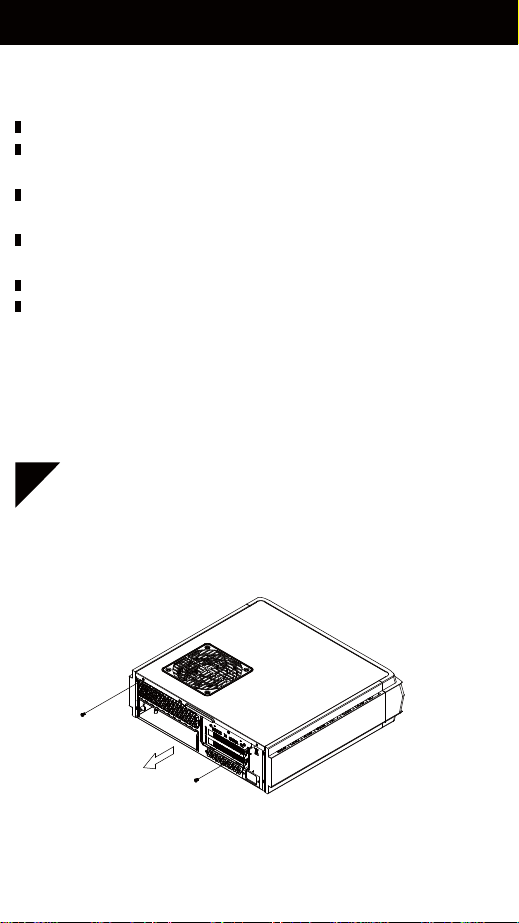
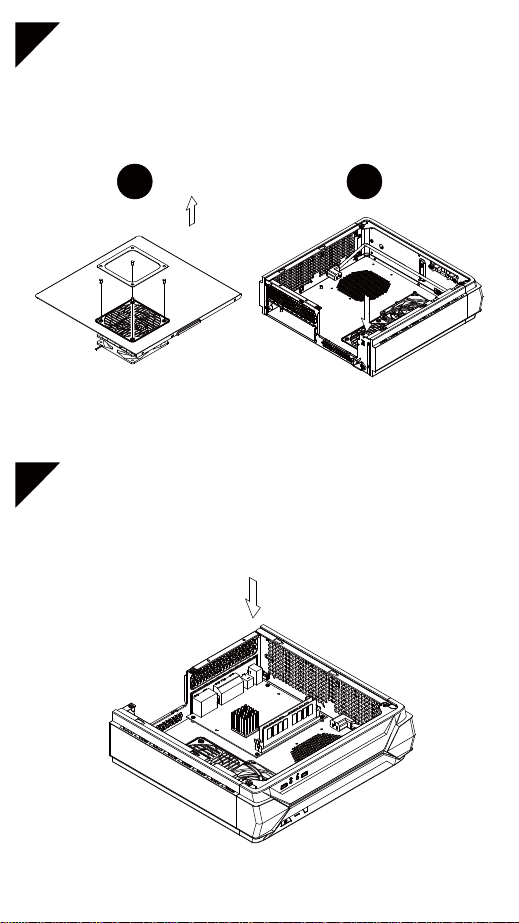
Unscrew the screws from the rear of the chassis then
1
remove the top cover
Page 6
Unscrew the screws from the graphics card support
2
bracket then remove it
Unscrew the screws from PSU bracket then remove it
3
Page 7
If you want to use SilverStone NT06-PRO or other similar
4
CPU cooler, please relocate the top panel 120mm fan to
the bottom vent near the graphics card area
1 2
Insert the I/O shield included with your motherboard then
5
install the motherboard into the chassis
Page 8
We recommend at this point connecting all the necessary
6
cables including the SATA cables to the motherboard
Secure the PSU into the PSU bracket
7
Page 9

Place the PSU bracket on top of the chassis then connect
8
the power cord to the PSU
Insert the PSU bracket into its original position and secure
9
with screws
Page 10

Remove expansion slot cover and install graphics card into
10
the graphics card support bracket
Depending on the design of your graphics cards, install
11
and adjust the graphics card holder to a proper position to
support your card. Adhere included rubber padding
according to the height of graphics card’s backside, one
(for 3mm thick backplate) or two (for no backside components)
Included Foam Pad
Page 11

Install 2.5" HDD/SSD onto the graphics card support bracket
12
Connect addressable RGB (ARGB) connector. Please refer
13
to ARGB LED connector guide in later pages for more details
Page 12

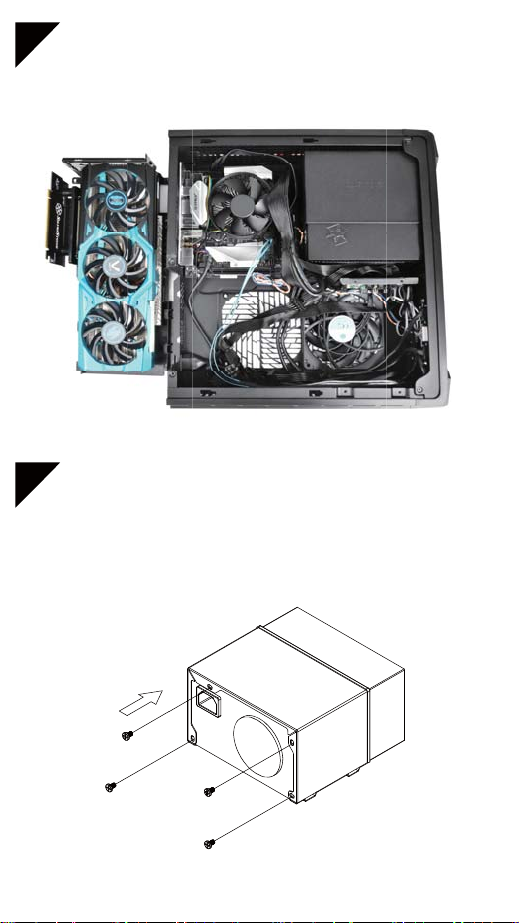
Install graphics card support bracket into the chassis and
14
connect the power cord to the graphics card if needed
Make sure all the cables are properly connected
15
Page 13

Place the top cover back onto the chassis and secure
16
with screws
Depending on requirement or preference, adhere four rubber
17
stands for horizontal use or install the rubber pads for
vertical use. Corresponding RAVEN logo for each
orientation are included for installation
Page 14

CONNECTOR DEFINITION
(1) Front Panel Connectors Guide
Power Switch Reset Switch
Power switch and reset switch installation guide
Please refer to the motherboard manuals for the motherboard’s
“Front Panel Connector” or “System Panel Connector” pin
definition Power switch and reset switch have no polarity, so they
can be connected in any orientation
LED indicators installation guide
HDD LED+
HDD LED-
Please refer to the motherboard manuals for the motherboard’s
“Front Panel Connector ” or “System Panel Connector” pin
definition; the white/black wires are negative while other colors
are positive wires
Page 15

(2) ARGB LED connector guide
RVZ03-ARGB includes custom ARGB controller. It has dual
modes that enables you to control lighting effect either via
software (provided by motherboard) or hardware.
Software control :
A. To control lighting via motherboard, make sure it supports
addressable RGB (+5V, D, G) signals on its RGB header.
B. If you have other ARGB devices such as SilverStone’s own
LS03 light strip or FG122 ARGB fan frame, you may also
connect them to RVZ03’s ARGB controller, below are
installation steps:
1. Flip the controller switch to “MB” mode
2. Connect motherboard ARGB signal cable to motherboard
3. If needed, use included extension cable
4. When connecting non-SilverStone ARGB products, make
sure pin definition and connector orientation are compatible
Hardware control:
Utilizing the case’s reset button to change lighting effects
1. Flip the controller switch to “IC” mode
2. Connect other ARGB devices to RVZ03’s ARGB controller
3. When connecting non-SilverStone ARGB products, make sure
pin definition and connector orientation are compatible
4. Connect the controller to power supply
5. Be sure not to connect case’s reset connector to motherboard
as you are going to use reset button for changing ARGB colors
and effects from now on
6. When PC is powered, press reset button on the case to change
ARGB lighting effects
Page 16

(3) Front I/O connector guide
Below are the front I/O connectors pin definition, please also
check your motherboard manual to cross reference with
motherboard’s front I/O pin headers. SilverStone’s I/O connectors
are in block type to simplify installation
USB 3.0 CONNECTOR
Pin 1
IntA_P1_SSRX-
IntA_P1_SSRX+
IntA_P1_SSTX-
IntA_P1_SSTX+
Vbus
GND
GND
IntA_P1_D-
IntA_P1_D+
Pin 10
HD CONNECTOR
AUD GND
PRESENCE
SENSE1_RETURN
SENSE2_RETURN
ID
PIN
Pin 19
Vbus
IntA_P2_SSRXIntA_P2_SSRX+
GND
IntA_P2_SSTXIntA_P2_SSTX+
GND
IntA_P2_DIntA_P2_D+
Pin 11
PORT1L
PORT1R
PORT2R
SENSE_SEND
PORT2L
PIN
Page 17

COMPONENT SIZE LIMITATIONS
(1) CPU cooler height limitation
83mm
11mm
4.2mm
A. Height limitation: The RVZ03 has 83mm height limitation for
CPU cooler
B. Upper boundary: the cooler can protrude 11mm over the
motherboard’s top edge
C. Front boundary: The clearance toward the front of the chassis
is 4.2mm
Page 18

(2) PSU limitation
RVZ03’s maximum depth for a standard PS/2 (ATX) power supply
is 150mm, but installation of a 150mm deep power supply will
require sacrificing a 2.5" drive space and no room for cable
connection after installation. So if using a 150mm deep modular
power supply, make sure to connect all cables prior to installing
it into the case. Power supplies with depth of 140mm or less
may have enough room to allow for cable connection after
installation so we recommend using 140mm deep modular power
supply with flat cables, such as SilverStone’s own ST75F-PT
Page 19

(3) Graphics card/expansion card length limitation
iii
149mm
ii
131mm
i
111mm
A. Length limitation
RVZ03 can support 13" (330mm) consumer level graphics cards.
Please contact us if you find a card that does not fit
B. Width limitation
(i) The standard width for graphics card is 4.38" (111mm)
(ii) With the graphics card holder installed, the maximum allowable
width for graphics card is 5.16" (131mm)
(iii) Without the graphics card holder, the maximum allowable
width for graphics card is up to 5.88" (149mm)
i ii iii
68mm
C. Thickness limitation
(i) Calculated from the bottom of the graphics card PCB to the
top, the total thickness limitation is 68mm
(ii) With the standard 34.8mm-thick dual slot graphics card
installed, the maximum thickness of the fans is 32mm
(iii) The thickness of the components on the back of the graphics
card is limited to 3mm in the area supported by the graphics
card holder; the thickness limitation for the rest of the
components is 10mm
34.8mm
32mm
3.23mm
Page 20

OPTIMAL THERMAL PERFORMANCE
LAYOUT
If you use graphics card with omni-direction or open air
cooler, we recommend having two case fans on the bottom vents
VERTICAL/HORIZONTAL PLACEMENT
A. Because most vents are situated on the bottom, placing the
RVZ03 vertically will result in better temperature than in
horizontal position
B. When using the case horizontally, please be sure of adhering
rubber stands to the bottom
RECOMMENDATION FOR WATER
COOLING
SilverStone TD03-SLIM is compatible with RVZ03 as an
option if an all-in-one (AIO) liquid cooler is needed
Cable routing
There is some space between the front panel and the side of the
graphics card reserved for the cable routing
Page 21

MAINTENANCE AND UPGRADE
The RVZ03’s positive air pressure design is an effective
configuration that will reduce dust buildup inside the case. Small
air particles or lint will accumulate over time on intake filters
instead of on the components inside the case. To maintain
excellent cooling performance for years to come, we recommend
cleaning all fan filters regularly every three months or half a year
(depending on your environment).
The RVZ03 includes ultra-fine magnetic filters (model: FF123)
which can be easily removed. If you accidentally loose/damage
filters or need additional ones for backup, please contact your
local SilverStone retailers or distributors for purchasing information:
https://www.silverstonetek.com/wheretobuy_all.php
https://www.silverstonetek.com/wheretobuy_all.php
Page 22

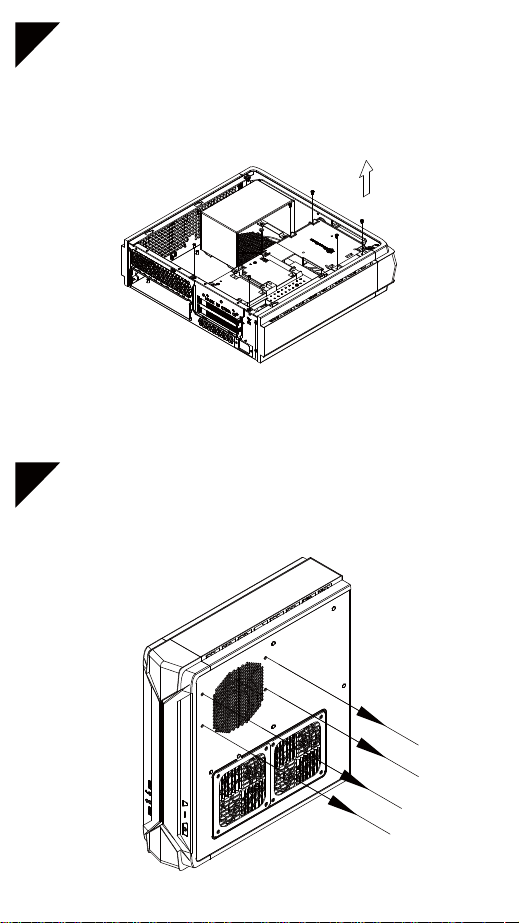
F AN REMOVAL GUIDE
The fan on the top cover can be dismounted after
1
removing the top cover
The graphics card holder needs to be removed before
2
dismounting the fans on the bottom vents We recommend
removing the filters before dismounting the fans
Page 23

PROTECT YOUR COMPUTER
Kensington Security Slot
Note: Cable security lock is not included with RVZ03
A lock and cable can be purchased on the market for use with the
Kensington security slot located on rear of RVZ03 to prevent
removal of the entire computer or top cover
Caution: Please check for compatibility before purchasing the
lock and cable for use with RVZ03’s Kensington security slot
Q&A
Q: Does RVZ03 fit in the Sugo Pack?
A: Yes, it does, with room to spare!
Q: Can the NT06-PRO be used without fan in RVZ03?
A: We do not recommend it
Q: Everything is properly installed; why does it not start up?
A: If your PSU has an AC switch, make sure the switch is at the
“ON” position
Page 24

WARRANTY
This product has a limited 1 year warranty in North America
and Australia. For information on warranty periods in other regions,
please contact your reseller or SilverStone authorized distributor.
WARRANTY TERMS & CONDITIONS
1. Product component defects or damages resulted from defective
production is covered under warranty.
Defects or damages with the following conditions will be fixed
or replaced under SilverStone Technology’s jurisdiction.
a) Usage in accordance with instructions provided in this manual,
with no misuse, overuse, or other inappropriate actions.
b) Damage not caused by natural disaster (thunder, fire, earthquake,
flood, salt, wind, insect, animals, etc…)
c) Product is not disassembled, modified, or fixed. Components
not disassembled or replaced.
d) Warranty mark/stickers are not removed or broken. Loss or
damages resulted from conditions other than ones listed above
are not covered under warranty.
2. Under warranty, SilverStone Technology’s maximum liability is
limited to the current market value for the product (depreciated
value, excluding shipping, handling, and other fees). SilverStone
Technology is not responsible for other damages or loss
associated with the use of product.
3. Under warranty, SilverStone Technology is obligated to repair
or replace its defective products. Under no circumstances will
SilverStone Technology be liable for damages in connection
with the sale, purchase, or use including but not limited to loss
of data, loss of business, loss of profits, loss of use of the product
or incidental or consequential damage whether or not foreseeable
and whether or not based on breach of warranty, contract or
negligence, even if SilverStone Technology has been advised
of the possibility of such damages.
Page 25

4. Warranty covers only the original purchaser through authorized
SilverStone distributors and resellers and is not transferable to
a second hand purchaser.
5. You must provide sales receipt or invoice with clear indication
of purchase date to determine warranty eligibility.
6. If a problem develops during the warranty period, please
contact your retailer/reseller/SilverStone authorized distributors
or SilverStone http://www.silverstonetek.com. Please note that:
(i) You must provide proof of original purchase of the product
by a dated itemized receipt
(ii) You shall bear the cost of shipping (or otherwise transporting)
the product to SilverStone authorized distributors. SilverStone
authorized distributors will bear the cost of shipping (or
otherwise transporting) the product back to you after
completing the warranty service
(iii) Before you send the product, you must be issued a Return
Merchandise Authorization (“RMA”) number from SilverStone.
Updated warranty information will be posted on SilverStone’s
official website. Please visit http://www.silverstonetek.com for
the latest updates.
Page 26

ADDITIONAL INFO & CONTACTS
For North America (usasupport@silverstonetek.com)
SilverStone Technology in North America may repair or replace
defective product with refurbished product that is not new but has
been functionally tested. Replacement product will be warranted
for remainder of the warranty period or thirty days, whichever is
longer. All products should be sent back to the place of purchase
if it is within 30 days of purchase, after 30 days, customers need
to initiate RMA procedure with SilverStone Technology in USA by
first downloading the “USA RMA form for end-users” form from
the below link and follow its instructions.
http://silverstonetek.com/contactus.php
For Australia only (support@silverstonetek.com)
Our goods come with guarantees that cannot be excluded under
the Australian Consumer Law. You are entitled to a replacement
or refund for a major failure and for compensation for any other
reasonably foreseeable loss or damage. You are also entitled to
have the goods repaired or replaced if the goods fail to be of
acceptable quality and the failure does not amount to a major
failure. Please refer to above “Warranty terms & conditions” for
further warranty details.
SilverStone Technology Co., Ltd. 12F No. 168 Jiankang Rd.,
Zhonghe Dist., New Taipei City 235 Taiwan R.O.C.
+ 886-2-8228-1238 (standard international call charges apply)
For Europe (support.eu@silverstonetek.de)
For China (support@silverstonetek.com.cn)
For all other regions (support@silverstonetek.com)
Page 27

©2018 SilverStone Technology Co., Ltd. All Rights Reserved
ALL trademarks are registered to their respective owners
 Loading...