

Page 1
Great balance of silence and performance
Unique interweaving diamond edged fins for improved performance
Exclusive arrow guides distribute airflow evenly among heat pipes
Three heat-pipes and aluminum fins for excellent heat conducting efficiency
Heat-pipe direct contact (HDC) technology
Includes compact PWM fan for excellent cooling and low noise
Anti-vibration rubber pads included for additional noise dampening
Intel Socket LGA775/115X/1366/2011 and AMD Socket AM2/AM3/FM1/FM2 compatible
Advanced heatsink with Heat-pipe Direct Contact (HDC) technology
Page 2

Installation and system optimization guide:
The following manual and guides were carefully prepared by the SilverStone engineering team to
help you maximize the potential of your SilverStone product. Please keep this manual for future
reference when upgrading or performing maintenance on your system. A copy of this manual can also
be downloaded from our website at:
Introduction
Specifications
Installation Guide
Fan Installation Guide
P.1
P.1
P.2
P.9
Warranty
Page 3
Introduction
The Argon series coolers are designed to provide the best cooling solution for your CPU. Featuring three thick copper heat pipes connected to
the base using heat-pipe direct contact (HDC) technology, this cooler retains the signature Argon series feature. To improve performance even
further, unique and exclusive heatsink fin designs such as interweaving diamond edge and arrow guides are included. Coupled with an all-new
PWM fan with exceptional airflow to noise ratio, the AR07/ AR08 can quickly and quietly push away excessive CPU heat while also cooling down
surrounding motherboard components for effective overall thermal dissipation. For users looking for a no-nonsense top performing cooler without
the premium price, the Argon AR07/AR08 is the perfect choice.
Specifications
Model No.
Material
Application
Heat Pipe Type
Cooling System
Noise
Bearing
Net Weight
Voltage Rating (V)
Start Voltage (V)
Air Flow (CFM)
Speed (R.P.M.)
Life Expectance (hrs)
Dimension
SST-AR07, SST-AR08
Copper heat pipes with aluminum fins
Intel Socket LGA775/115X/1366/2011/2011-V3
AMD Socket AM2/AM3/FM1/FM2
Ø8mm heat-pipe x 3 (AR07)
Ø6mm heat-pipe x 3 (AR08)
140mm x 140mm x 25mm fan (AR07)
92mm x 92mm x 25mm fan (AR08)
16.5 ~ 30.8dBA (AR07)
14.1-27.7dBA (AR08)
Long life sleeve
453g (without fan) (AR07)
285g (without fan) (AR08)
12V
≤6V (AR07)
≤4.7V (AR08)
31.4 ~ 93.0CFM (AR07)
26.8~49.5CFM (AR08)
800 ~ 1500RPM (AR07)
1500~2800RPM (AR08)
40,000 hours
140mm (W) x 50mm (D) x 159mm (H) (without Fan) (AR07)
92mm (W) x 50mm (D) x 134mm (H) (without Fan) (AR08)
1
Page 4
Installation Guide
Before you begin, please make sure that you
1
have all components collected
2
check that all components do not have compatibility problems with each other or with the case
3
if possible, assemble the components outside the case first to make sure they are working
4
keep the motherboard manual ready for reference during installation
prepare a Phillips screwdriver.
5
01
AM2/AM3/FM1/FM2
LGA115X
LGA775
Confirm the motherboard socket
type before installation
Перед тем как приступить к
установке, проверьте тип
разъема процессора на
материнской плате
LGA1366
Vor der Installation MotherboardSockeltyp überprüfen
安裝前請先確定主機板孔位
LGA1366
LGA115X
LGA775
LGA775
LGA115X
LGA1366
LGA1366
LGA775
LGA115X
2
Confirmer le type de fiche de la
carte mère avant installation
Confirme el tipo de zócalo de la
placa base antes de la instalación
Confermare il tipo di socket della
scheda madre prima
dell'installazione
安装前请先确定主板孔位
インストール前にマザーボー
ドの ソケットのタ イプを 確認し
てください
설치 전에 메인보드 소켓
유형을 확인합니다
Page 5
02
Place the rubber cushion
according to the socket type
onto the motherboard
Gummipolster entsprechend dem
Sockeltyp auf dem Motherboard
platzieren
Placez le coussinet en caoutchouc
en suivant le type de fiche sur la
carte mère
Sitúe la almohadilla de goma
según el tipo de zócalo de su
placa base
Collocare il cuscinetto di gomma
secondo il tipo di socket sulla
scheda madre
Выберите резиновую прокладку
в соответствии с типом разъема
процессора и установите
прокладку на материнскую
плату
將墊片圓孔對準主機板的圓孔,
並將墊片放置於主機板上
将垫片圆孔对准主板的圆孔,
并将垫片放置于主板上
ソケットのタイプに応じてマザ
ーボード上にゴム製クッション
を置きます
소켓 유형에 따라 고무 쿠션을
메인보드에 덧댑니다
3
Page 6

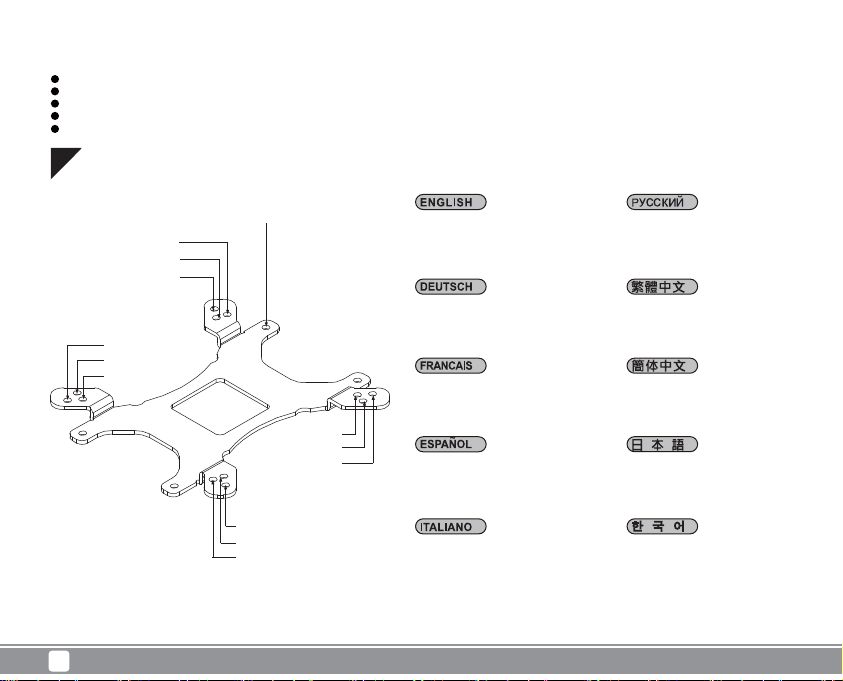
03
Install the knurled threaded screws
through the rubber cushion and
fasten the screws on the
motherboard
Gerändelte Gewindeschrauben
durch das Gummipolster
installieren, Schrauben am
Motherboard festziehen
Installez les pas de vis moletés
avec le coussinet en caoutchouc
en fixez les vis de la carte mère
Instale los tornillos de cabeza
moleteada a través de la
almohadilla de goma y fije los
tornillos a la placa base
Installare le viti a testa zigrinata
attraverso il cuscino di gomma e
serrarle sulla scheda madre
4
Заверните винты с накатанной
головкой в отверстия в
прокладке и материнской
плате
將等高柱螺絲沿著墊片圓孔與
主機板鎖固
将等高柱螺丝沿着垫片圆孔与
主板锁固
きざみ付きネジをゴム製クッ
ション に 通 し、マザーボードに
固定します
둥근 나사를 고무 쿠션을
통과하게 설치하고 나사를
조여 메인보드에 고정합니다
Page 7

04
Please clean the surface of CPU
then apply thermal grease evenly
on CPU
Reinigen Sie bitte die Oberfläche
der CPU bevor Sie die
Wärmeleitpaste gleichmäßig
auftragen
Por favor, limpie la superficie de la
CPU antes de aplicar la masilla
térmica, a continuación aplíquela
de manera uniforme
Por favor, limpie la superficie del
microprocesador antes de aplicar
la pasta termica. Una vez limpio,
apliquela de manera uniforme
sobre la CPU
Pulire la superficie della CPU prima
di applicare la pasta termica e
quindi applicare pasta termica in
modo uniforme sulla CPU
На очищенную поверхность
процессора равномерно
нанесите термапасту
塗抹導熱膏前,請先清潔CPU
表面,取出導熱膏後,並將導
熱膏均勻塗抹在CPU上
涂抹导热膏前,请先清洁CPU
表面,取出导热膏后,并将导
热膏均匀涂抹在CPU上
サーマルグリスを塗る前に、
CPUの表面を清潔にして、CPU
上にサーマルグリスを均一に
塗ります
써멀 그리스를 바르기 전에
CPU 표면을 청소한 후 써멀
그리스를 CPU에 고르게
바르십시오
5
Page 8

05
Use screws to secure bracket
onto the heatsink
Закрепите кронштейн на
радиаторе с помощью винтов
Intel AMD
Sichern Sie die Halterung mit
Schrauben am Kühlkörper
Utilisez des vis pour fixer le
crochet au dissipateur thermique
Use tornillos para asegurar el
bracket al disipador
Utilizzare le viti per fissare la
staffa sul dissipatore
6
使用螺絲將扣具鎖在散熱器上
使用螺丝将扣具锁在散热器上
ネジでブラケットをヒートシン
クに固定します
나사를 사용하여 브래킷을
방열판에 고정합니다
Page 9

06
Remove the film from the cooler
base and place it on the CPU
Folie von der Kühlerbasis
entfernen, diese an der CPU
anbringen
Retirez le film de la base de
refroidissement et placez-le sur
le CPU
Retire la película de la base de
refrigeración y sitúela en la CPU
Rimuovere la pellicola dalla base
del dispersore di calore e collocarlo
sulla CPU
Снимите пленку с основания
радиатора и установите
радиатор на процессор
將散熱器底部保護貼撕離。
將散熱器本體放置於CPU上
将散热器底部保护贴撕离。
将散热器本体放置于CPU上
クーラー ベース からフィルム を
はがし、CPUに貼ります
쿨러 받침대에서 필름을
제거하고 받침대를 CPU에
올려 놓습니다
7
Page 10

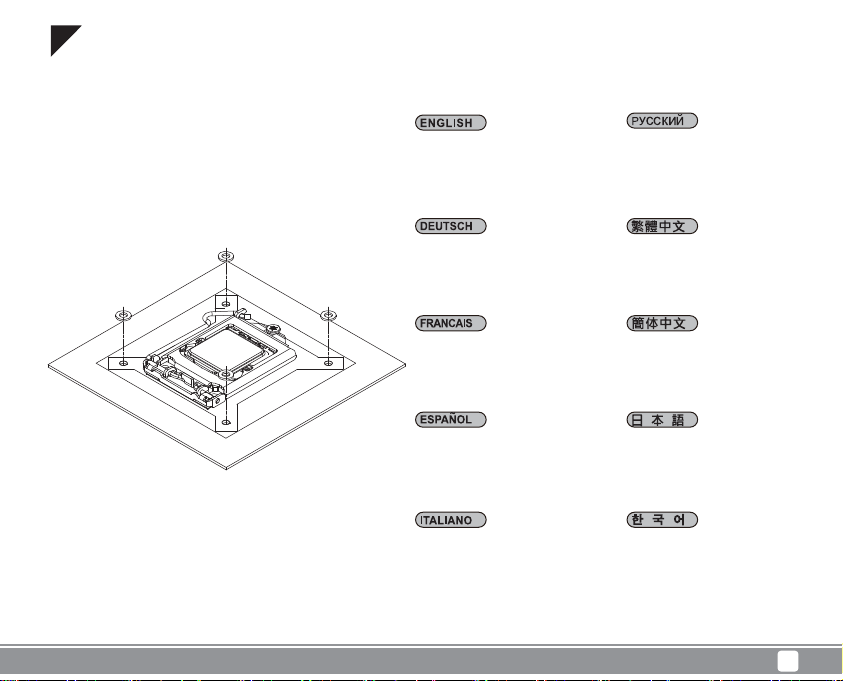
07
Install the T-nuts onto the
mounting-clip
T-Muttern an der Montageklemme
installieren
Installez les écrous en T sur le
clip de montage
Instale las tuercas en t en el clip
de montaje
Installare i dadi a T sul morsetto
di fissaggio
8
На монтажную скобу
установите носковые
гайки
將T型螺帽沿著扣具螺絲鎖緊
扣具
将T型螺帽沿着扣具螺丝锁紧
扣具
Tナットをマウントクリップに取
り付け ます
장착 클립 위에 T 너트를
설치합니다
Page 11

Fan mounting
Before you begin, please make sure that you
1
have all components collected
2
check that all components do not have compatibility problems with each other or with the case
3
if possible, assemble the components outside the case first to make sure they are working
4
keep the motherboard manual ready for reference during installation
prepare a Phillips screwdriver.
5
01
AR07
Secure the anti-vibration rubber
mounting into the heatsink’s fins
Vibrationsdämpfende
Gummifassung an den Lamellen
des Kühlkörpers befestigen
Fixez le caoutchouc de montage
anti vibrations sur les ailettes du
dissipateur
Fije la goma anti vibración a las
aletas del disipador
Fissare l’attacco gomma antivibrazione sulle alette del
dissipatore
Закрепите антивибрационное
крепление на ребрах
радиатора
將防震墊貼入散熱器對應的凹
槽內
将防震垫贴入散热器对应的凹
槽内
防振ゴムパッドをヒートシンク
のフィンに取り付けます
방열판의 핀에 장착되는 방진
고무를 고정합니다
9
Page 12
02
AR07
AR08
10
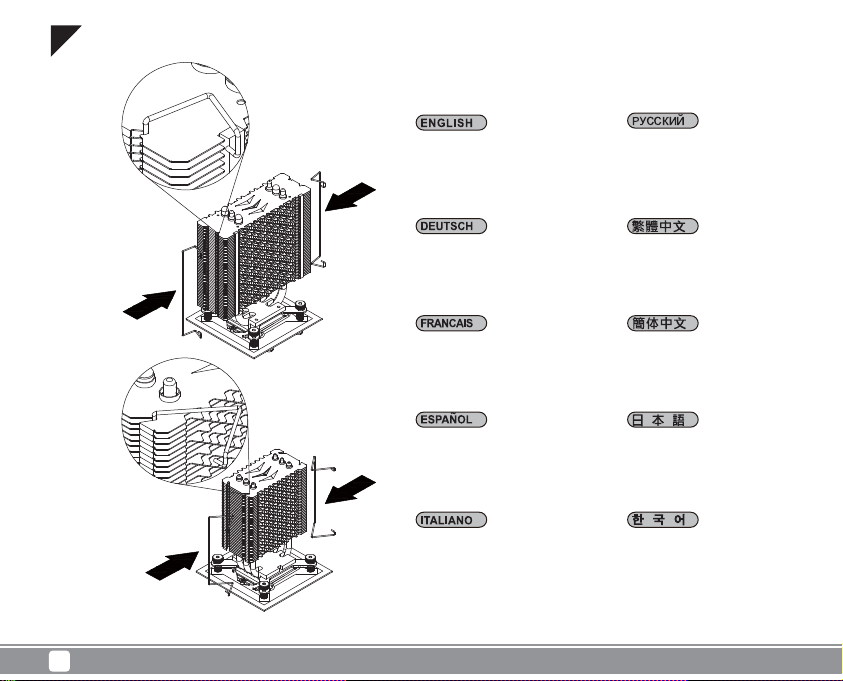
Place the metal wire clips into the
groove on the heatsink fins
Platzieren Sie die metallischen
Kabelklemmen in der Kerbe an
den Kühlkörperlamellen
Placez les embouts de câble
métalliques sur la rainure des
ailettes du dissipateur thermique
Coloque los enganches de metal
en el hueco de las aletas del
disipador
Collocare i fermagli di filo
metallico nella scanalatura sulle
alette del dissipatore
Уложите проволочные
зажимы в паз на ребрах
радиатора
將金屬絲扣放入鰭片上的溝槽
将金属丝扣放入鳍片上的沟槽
金 属 ワイ ヤクリップ を ヒートシ
ンクの溝に合わせます
금속 와이어 클립을 방열판
핀의 홈에 끼웁니다
Page 13

03
AR07
AR08
Latch the metal wire clips’ four
hooks onto the fan’s mounting
holes
Verriegeln Sie die vier Haken der
metallischen Kabelklemmen an
den Montagelöchern des Lüfters
Accrochez les quatre crochets des
embouts de câble métalliques sur
les trous de montage du ventilateur
Enganche los cuatro ganchos de
los cables de metal en los agujeros
de montaje del ventilador
Fissare i quattro ganci dei
fermagli sui fori di installazione
della ventola
Зафиксируйте четыре крючка
проволочного зажима в
крепежных отверстиях
вентилятора
將金屬絲扣的四個針腳,確實
分別勾入風扇孔內
将金属丝扣的四个针脚,确实
分别勾入风扇孔内
金属ワイヤクリップの4つのフ
ックを ファン の 取り付 け穴 に 取
り付け ます
금속 와이어 클립의 후크
4개를 팬의 장착 구멍에
래치로 잠급니다
11
Page 14

Warranty
This product has a limited 1 year warranty in North America and Australia.
For information on warranty periods in other regions, please contact your reseller or SilverStone authorized distributor.
Warranty terms & conditions
1. Product component defects or damages resulted from defective production is covered under warranty.
Defects or damages with the following conditions will be fixed or replaced under SilverStone Technology’s jurisdiction.
a) Usage in accordance with instructions provided in this manual, with no misuse, overuse, or other inappropriate actions.
b) Damage not caused by natural disaster (thunder, fire, earthquake, flood, salt, wind, insect, animals, etc…)
c) Product is not disassembled, modified, or fixed. Components not disassembled or replaced.
d) Warranty mark/stickers are not removed or broken.
Loss or damages resulted from conditions other than ones listed above are not covered under warranty.
2. Under warranty, SilverStone Technology’s maximum liability is limited to the current market value for the product (depreciated value, excluding
shipping, handling, and other fees). SilverStone Technology is not responsible for other damages or loss associated with the use of product.
3. Under warranty, SilverStone Technology is obligated to repair or replace its defective products. Under no circumstances will SilverStone
Technology be liable for damages in connection with the sale, purchase, or use including but not limited to loss of data, loss of business, loss of
profits, loss of use of the product or incidental or consequential damage whether or not foreseeable and whether or not based on breach of warranty,
contract or negligence, even if SilverStone Technology has been advised of the possibility of such damages.
4. Warranty covers only the original purchaser through authorized SilverStone distributors and resellers and is not transferable to a second hand
purchaser.
5. You must provide sales receipt or invoice with clear indication of purchase date to determine warranty eligibility.
6. If a problem develops during the warranty period, please contact your retailer/reseller/SilverStone authorized distributors or SilverStone
http://www.silverstonetek.com.
Please note that: (i) You must provide proof of original purchase of the product by a dated itemized receipt; (ii) You shall bear the cost of shipping
(or otherwise transporting) the product to SilverStone authorized distributors. SilverStone authorized distributors will bear the cost of shipping
(or otherwise transporting) the product back to you after completing the warranty service; (iii) Before you send the product, you must be issued a
Return Merchandise Authorization (“RMA”) number from SilverStone. Updated warranty information will be posted on SilverStone’s official website.
Please visit http://www.silverstonetek.com for the latest updates.
Page 15

Additional info & contacts
For North America (usasupport@silverstonetek.com)
SilverStone Technology in North America may repair or replace defective product with refurbished product that is not new but has been functionally tested.
Replacement product will be warranted for remainder of the warranty period or thirty days, whichever is longer. All products should be sent back to the place of purchase if it is within 30 days of purchase,
after 30 days, customers need to initiate RMA procedure with SilverStone T echnology in USA by first downloading the “USA RMA form for end-users” form from the below link and follow its instructions.
http://silverstonetek.com/contactus.php
For Australia only (support@silverstonetek.com)
Our goods come with guarantees that cannot be excluded under the Australian Consumer Law.
You are entitled to a replacement or refund for a major failure and for compensation for any other reasonably foreseeable loss or damage.
You are also entitled to have the goods repaired or replaced if the goods fail to be of acceptable quality and the failure does not amount to a major failure.
Please refer to above “Warranty terms & conditions” for further warranty details.
SilverStone Technology Co., Ltd. 12F No. 168 Jiankang Rd., Zhonghe Dist., New Taipei City 235 Taiwan R.O.C. + 886-2-8228-1238
(standard international call charges apply)
For Europe (support.eu@silverstonetek.de)
For all other regions (support@silverstonetek.com)
Page 16

G11225210
 Loading...