

Page 1
SUGO SERIES
SG05
Page 2

Product Overview
SG05
Specification
Model
Material
Motherboard
SST-SG05B
Plastic front panel, SECC body
Mini-DTX, Mini-ITX
External
Slim optical x 1
Drive Bay
Cooling System
Internal
Front
Sides
To p
3.5” x 1 , 2.5”x1
1 x 120mm intake fan 1200rpm
Oversized vents
Oversized vents
Specifications of Power Supply (Optional)
Max. DC Output 300W
Load Range
Max.(Amps)
Peak (Amps)
Min.(Amps)
Range (%)
Ripple(mVp-p)
20A
/
0.5A
+/-5%
70mV
+5V+3.3V
22A
/
0.5A
+/-5%
70mV
+12V1
14A
19A
1A
+/-5%
140mV
Expansion Slot
Front I/O Port
Power Supply
Expansion Card
Dimension
+12V2
16A
19A
1A
+/-5%
140mV
+5VSB
2.5A
3A
0A
+/-5%
70mV
2
USB2.0 port x 2
Audio x 1
MIC x 1
SFX 300W with 80 PLUS certification
Standard size long cards
capable (9”)*
222 mm (W) x 176 mm (H) x 276 mm (D)
-5V-12V
0.5A
-
0A
+/-10%
70mV
-
-
-
-
-
Combined +3.3, +5V
Combined +12V
Input Voltage
Input Frequency Range
PFC
Efficiency
MTBF
Operating temperature
Protection
125W
22A / 264W
90V ~ 264V (Auto Range)
47Hz ~ 63Hz
Active PFC (PF>0.95 at full load)
over 80% (20% to 100% loading)
100,000 hours at 25°C, full load
0 ~ 50°C
1
Over current protection, Over power
protection,Over voltage protection, Short circuit
Connectors
SECC
Color
Single 80mm fan
Cooling System
19 dBA minimum
Noise Level
125 mm (W) x 63.5 mm (H) x 100 mm (D)
Dimension
940g
Weight
80 PLUS
Certification
1 x 24-pin motherboard connector (300mm)
1 x 4-pin ATX12V connector (300mm)
1 x 6-pin PCI-E connector (300mm)
1 x dual SATA connector (150mm +150mm)
1 x dual 4-pin IDE (300mm + 150mm)
1 x 4-pin IDE & single floppy power connectors
(300mm + 150mm)
Page 3
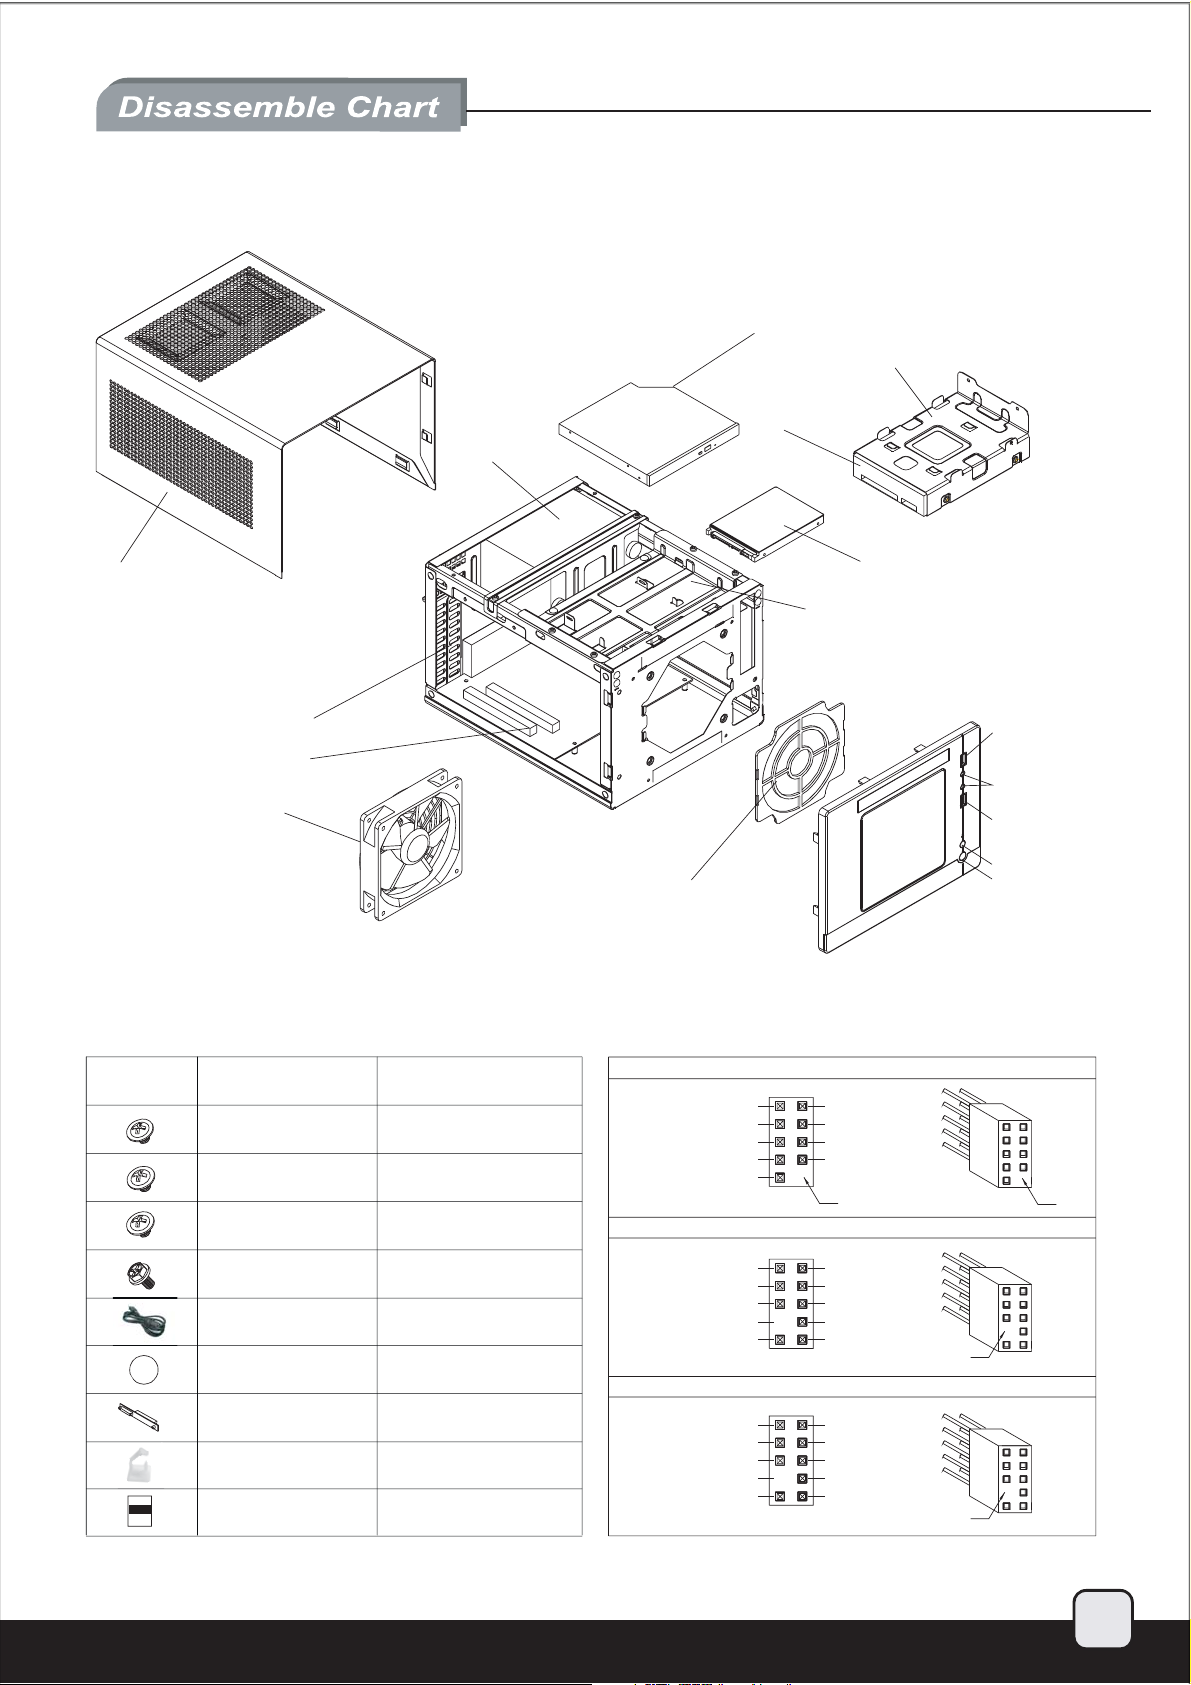
TOP COVER
PSU OPTIONAL
SLIM OPTICAL DRIVE (SOLD SEPARATELY)
3.5” HDD TRAY
3.5” HDD
(SOLD SEPARATELY)
2.5” HDD
(SOLD SEPARATELY)
SLIM OPTICAL DRIVE TRAY
EXPANSION SLOTx 2
MOTHERBOARD (OPITON)
12025 FAN
PICTURE ITEM PURPOSE
SCREW A M2*2
SCREW B M2*4
SCREW C M3*6
SCREW B M2*4
POWER-CORD
FOOT-RUBBER
SLIM OPTICAL ADAPTER
WIRE TIE
INSTALLATION GUIDE
SECURE CD ROM
SECURE 2.5” HARD DEVICE
SECURE AND MOTHERBOARD
SECURE 3.5” HARD DEVICE
-
-
FOR IDE DRIVES
-
-
FILTER BKT
USB2.0 CONNECTOR
USB+5V USB+5V
LP-
LP+
GND
NC
AC’97 CONNECTOR
MIC MIC
AUD GND MIC~BIAS
RET~R FPOUT~R
PIN +5V
RET~L
HD AUDIO CONNECTOR
AUD GND PORTIL
PRESENCE
SENSE1_RETURN
PIN
SENSE2_RETURN
LP-
LP+
GND
PIN
FPOUT~L
PORT1R
PORT2R
SENSE_SEND
PORT2R
USB2.0
3.25 Bay
MIC.EARPHONE
USB2.0
RESET BUTTON
POWER BUTTON
PIN
PIN
PIN
2
Page 4
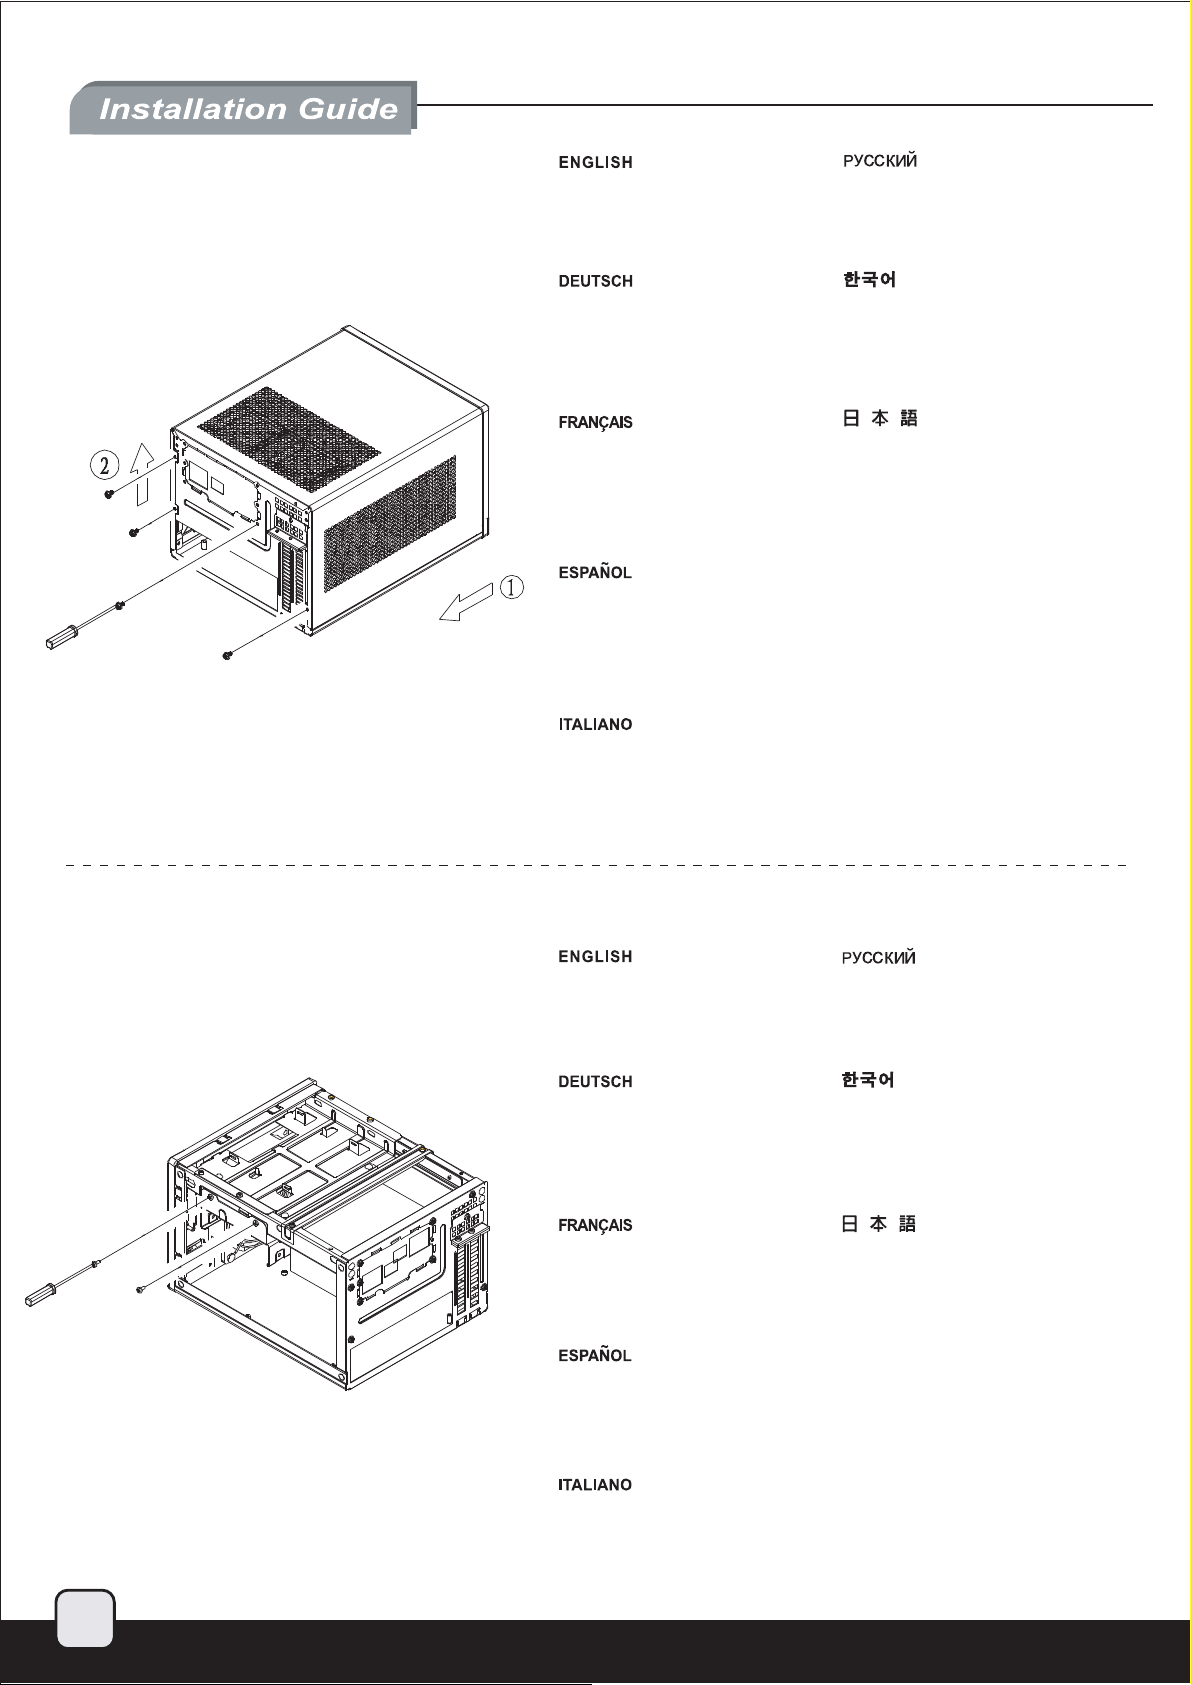
1.
ㅔԧЁ᭛
㐕ԧЁ᭛
ㅔԧЁ᭛
㐕ԧЁ᭛
Please remove the screws holding
the top cover with a screw driver,
then pull it toward the back to lift it
outward away from the chassis.
С помощью отвертки открутите
шурупы, удерживающие верхнюю
крышку, а затем снимите ее,
сдвинув назад и приподняв.
Bitte entfernen Sie die Schrauben
der oberen Abdeckung mit einem
Schraubenzieher und ziehen Sie
die Abdeckung nach hinten,
weg von dem Chassis.
Veuillez retirer les vis tenant le
panneau supérieur avec un
tournevis, puis tirez-le vers l’arrière
afin de le soulever en dehors du
boîtier.
Por favor, quite los tornillos que
sujetan la cubierta superior con
un destornillador, luego tire de
ella hacia atrás para quitarla del
chasis.
Rimuovere le viti del pannello
superiore con un cacciavite, spingerlo
verso la parte posteriore e sollevarlo
per asportarlo dal telaio.
ㇵ⺴ 䀘ⶸ⪰ Ḕ㥉䚌Ḕ 㢼⏈ ⇌㇠⪰
㏘䆠⪌ ☐⢰㢨ⶸ⪰ 㢨㟝䚨 㥐ᶤ䚐 䟸,
◘㯱㡰⦐ ☘㛨 㝠⥘, 䀴㢨㏘⦐
⺴䉤 㥐ᶤ䚝⏼␘.
Ϟ䚼ࠞࡃࠍᅮ
ߒߡࠆࡀࠫࠍ࠼ࠗࡃߢߒǃ
ࠞࡃࠍᕠᮍߦᓩߡࠤࠬ߆ࠄপ
ࠅߒ߹ߔDŽ
㐕ԧЁ᭛
䂟ҹ㶎㍆䍋ᄤᇛ䥪Ϟ㪟ⱘ㶎㍆ϟˈ
Ϻᕠᢝᕠᦤ䍋ҹ㞾″←Ёপߎ
ㅔԧЁ᭛
䇋ҹ㶎ϱ䍋ᄤᇚ䫕ϞⲪⱘ㶎ϱϟˈ
ᑊৢᢝৢᦤ䍋ҹ㞾ᴎㆅЁপߎ
2.
Remove the screws holding the hard
drive bracket with a screw driver as
shown, then remove the cage
outward from the chassis.
Entfernen Sie die Schrauben der
Festplattenhalterung mithilfe eines
Schraubenziehers wie abgebildet
und nehmen Sie die Halterung aus
dem Chassis.
Retirez les vis fixant le casier à
disques durs avec un tournevis
comme montré, puis retirez le
casier à l’extérieur du boîtier
Retire los tornillos que sujetan el
bracket del disco duro con un
destornillador como se muestra,
luego saque la carcasa del chasis.
Rimuovere le viti che fissano la gabbia
degli hard drive, quindi rimuoverla.
С помощью отвертки открутите шурупы,
удерживающие кронштейн жесткого
диска, как показано на рисунке, и выньте
из корпуса корзину жесткого диска.
䚌☐♈㏘䆠G⽀⢰䁇㡸GḔ㥉䚌ḔG㢼⏈G
⇌㇠⪰G㏘䆠⪌G☐⢰㢨ⶸ⪰G㢨㟝䚨GἬ⫰ḰG
ᵍ㢨G㥐ᶤ䚐G䟸SG䀴㢨㫴⪰G䀴㢨㏘G
ⵈᾙ㡰⦐G㥐ᶤ䚝⏼␘UG
ೇߩࠃ߁ߦࡂ࠼࠺ࠖࠬࠢ࠼ࠗࡉࡉࠤ࠶࠻
ࠍᅮߒߡࠆࡀࠫࠍ࠼ࠗࡃߢߒǃ
ࠤࠬ߆ࠄࠤࠫࠍপࠅߎߒ߹ߔDŽ
㐕ԧЁ᭛
䂟ձ೪⼎ܜҹ㶎㍆䍋ᄤᇛ䥪⹀ᶊⱘ
㶎㍆ϟˈݡᇛ⹀ᶊ㞾″←Ёপߎ
ㅔԧЁ᭛
䇋ձܜҹ㶎ϱ䍋ᄤᇚ䫕⹀Ⲭᶊⱘ
㶎ϱϟˈݡᇚ⹀Ⲭᶊ㞾ᴎㆅЁপߎ
3
Page 5
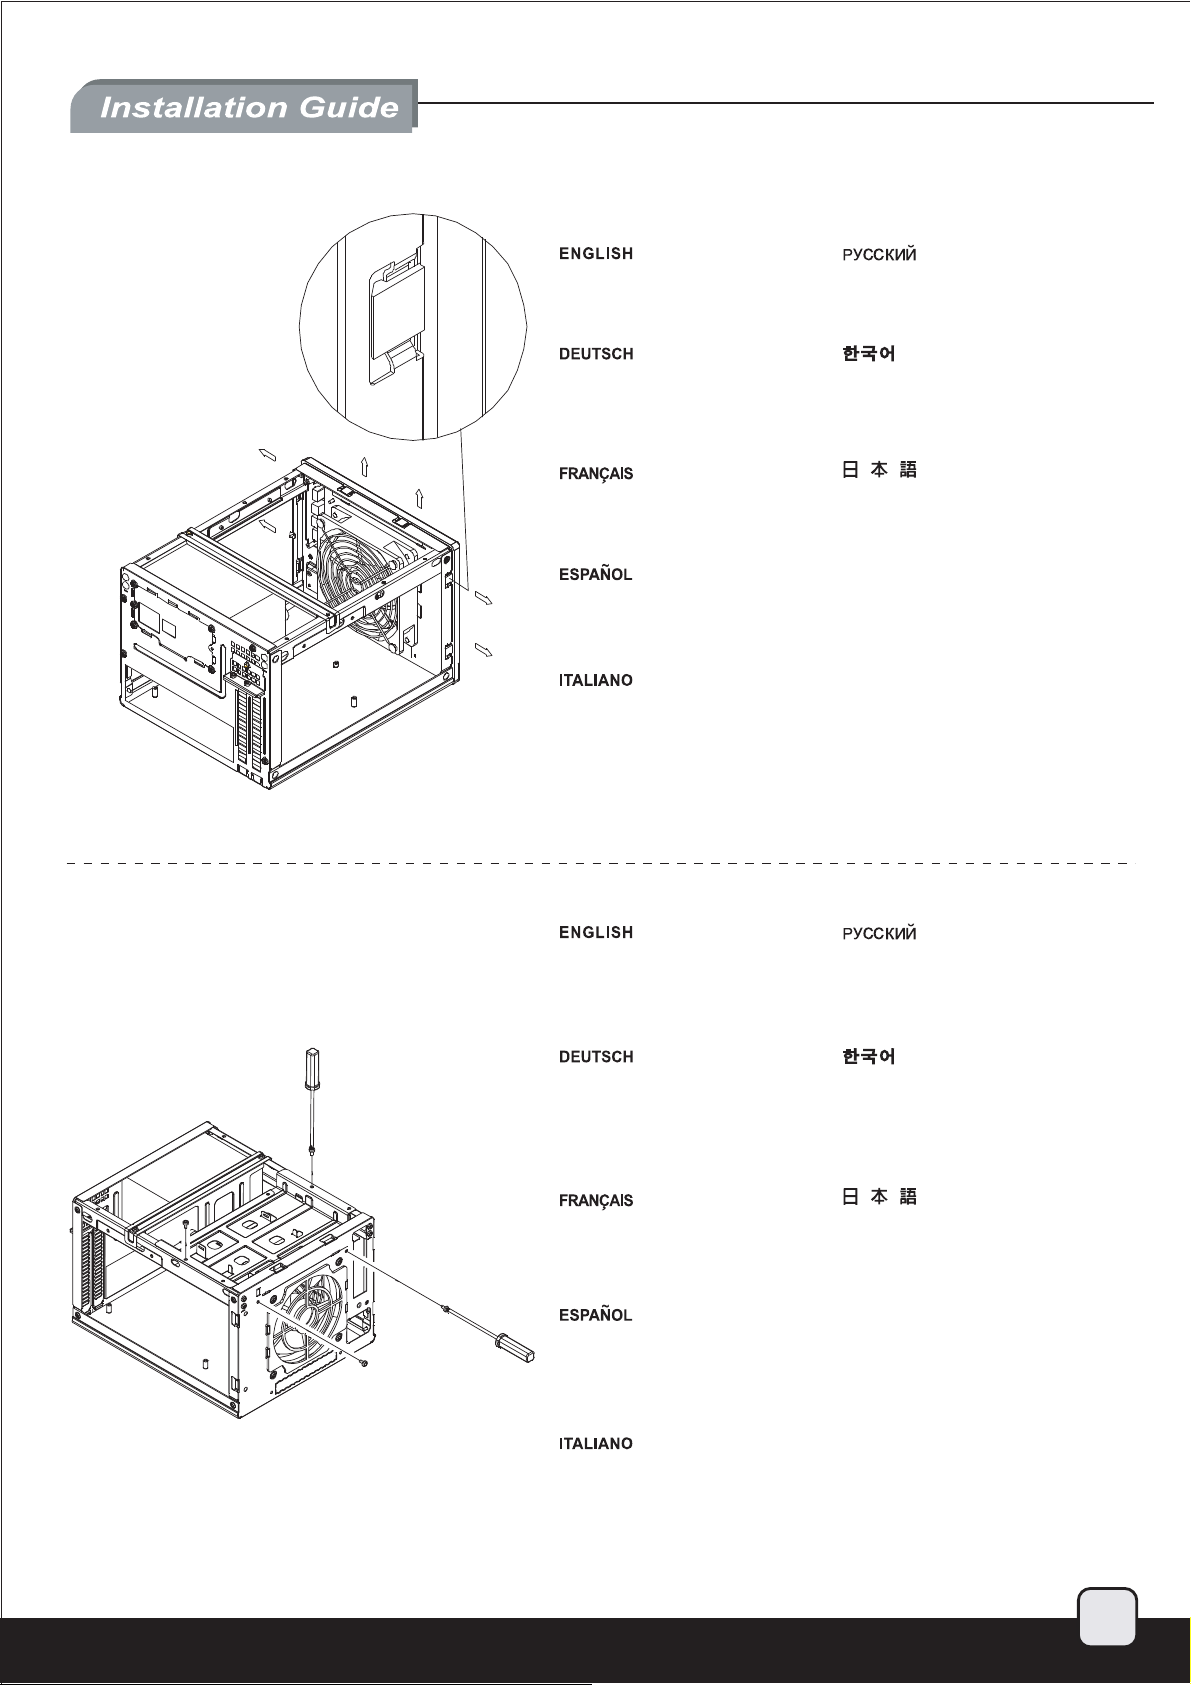
3.
ㅔԧЁ᭛
㐕ԧЁ᭛
ㅔԧЁ᭛
㐕ԧЁ᭛
Press the area as shown to release
the clips, then remove the front
panel.
Drücken Sie auf die Stelle wie
abgebildet, um die Klemmen zu
lösen und entfernen Sie die
Frontabdeckung.
Appuyez sur la zone comme montré
pour détacher les clips, puis retirez
le panneau frontal.
Presione la zona como se muestra
para soltar los enganches, luego
quite el panel frontal.
Premere nell’area indicata per
sbloccare i fermi, quindi rimuovere
il pannello frontale
Нажмите на указанные зажимы и
снимите переднюю панель.
Ἤ⫰㜄㉐㝴 ᵍ㡴 㠸㾌⪰ ⍀⤠ 䆨⫱㡸
䖴㛨㨴 䟸, 㤸⮨ 䑜≄㡸 㥐ᶤ䚝⏼␘.
ೇߦ⼎ߐࠇߚจ᠔ࠍᢐߒߡࠢ࠶ࡊࠍ
䭟ᬒߒǃࡈࡠࡦ࠻ࡄࡀ࡞ࠍপࠅߒ߹ߔDŽ
㐕ԧЁ᭛
䂟ձ೪⼎䓩ᣝҹϟࠡ䴶ᵓ
ㅔԧЁ᭛
䇋ձ⼎䕏ᣝҹϟࠡ䴶ᵓ
4.
Remove the screws holding the
optical drive bracket with a screw
driver as shown, then remove the
bracket outward from the chassis.
Entfernen Sie die Schrauben der
Halterung für optische Laufwerke
mithilfe eines Schraubenziehers wie
abgebildet und nehmen Sie die
Halterung aus dem Chassis.
Appuyez sur la zone comme montré
pour détacher les clips, puis retirez
le panneau frontal.
Quite los tornillos que sujetan el
bracket del dispositivo óptico con un
destornillador como se muestra,
luego quite el bracket del chasis.
Rimuovere le viti che fissano il
supporto dei lettori ottici, quindi
rimuovere il supporto stesso.
С помощью отвертки открутите
шурупы, удерживающие кронштейн
оптического диска, как показано на
рисунке, и выньте кронштейн из корпуса.
ṅ☐⢰㢨⽀G⽀⢰䁇㡸GḔ㥉䚌ḔG㢼⏈G
⇌㇠⪰G㏘䆠⪌G☐⢰㢨ⶸ⪰G㢨㟝䚨G
Ἤ⫰ḰGᵍ㢨G㥐ᶤG䚐䟸SG⽀⢰䁇㡸G
䀴㢨㏘Gⵈᾙ㯱㡰⦐G㥐ᶤ䚝⏼␘U
ೇߩࠃ߁ߦܝᄺ࠼ࠗࡉࡉࠤ࠶࠻ࠍ
ᅮߒߡࠆࡀࠫࠍ࠼ࠗࡃߢ
ߒǃࠤࠬ߆ࠄࡉࠤ࠶࠻ࠍপࠅߒ߹ߔDŽ
㐕ԧЁ᭛
ձ೪⼎ܜҹ㶎㍆䍋ᄤᇛ䥪ܝ″ᶊ
ⱘ㶎㍆ϟˈݡᇛܝ″ᶊ㞾″←Ёপߎ
ㅔԧЁ᭛
ձܜҹ㶎ϱ䍋ᄤᇚ䫕ܝ偅ᶊⱘ
㶎ϱϟˈݡᇚܝ偅ᶊ㞾ᴎЁপߎ
4
Page 6

5.
ㅔԧЁ᭛
㐕ԧЁ᭛
ㅔԧЁ᭛
㐕ԧЁ᭛
Remove the screws as shown to
remove the slim optical drive cover.
Entfernen Sie die Schrauben wie
abgebildet und entfernen Sie die
Abdeckung des dünnen optischen
Laufwerks.
Retirez les vis fixant le casier du
lecteur optique avec un tournevis
comme montré, puis retirez le
casier à l’extérieur du boîtier
Quite los tornillos como se muestra
para retirar la cubierta del dispositivo
óptico delgado.
Rimuovere le viti come mostrato
in figura per asportare il cover
del lettore ottico slim.
Открутите шурупы, как показано на
рисунке, и снимите крышку тонкого
оптического привода.
Ἤ⫰ḰGᵍ㢨G⇌㇠⪰G㥐ᶤ䚨G㏠⫰G
ṅ☐⢰㢨⽀G䀘ⶸ⪰G㥐ᶤ䚝⏼␘U
ೇߩࠃ߁ߦࡀࠫࠍߒǃ
ܝᄺࠬࡓ࠼ࠗࡉߩࠞࡃࠍপ
ࠅߒ߹ߔDŽ
㐕ԧЁ᭛
䂟ϟ೪⼎Ёⱘ㶎㍆ҹᇛܝ″ῑᵓ
㞾″←Ёপߎ
ㅔԧЁ᭛
䇋ϟЁⱘ㶎ϱҹᇚܝ偅ῑ᭛ӊᵓ
㞾ᴎЁপߎ
6.
Tab
Remove the tab of optical drive
bay with a screw driver.
Entfernen Sie Klappe des optischen
Laufwerkschachtes mithilfe eines
Schraubenziehers.
Retirez l’attache de la baie du
lecteur optique avec un tournevis.
Quite la presilla de la bahía del
dispositivo óptico con un
destornillador.
Rimuovere la mascherina del bay
del lettore ottico con un cacciavite.
С помощью отвертки уберите накладку
отсека для оптического привода.
㏘䆠⪌ ☐⢰㢨ⶸ⪰ 㢨㟝䚨,
ṅ☐⢰㢨⽀ ⷔ㢨㢌 䈡㡸 㥐ᶤ䚝⏼␘.
ܝᄺ࠼ࠗࡉࡌࠗߩ
࠲ࡉࠍ࠼ࠗࡃߢপࠅߒ߹ߔDŽ
㐕ԧЁ᭛
䂟ҹ㶎㍆䍋ᄤᡬᮋܝ″ῑϞⱘ⠛
ㅔԧЁ᭛
䇋ҹ㶎ϱ䍋ᄤᡬᮁܝ偅ῑϞⱘ᭛ӊ⠛
5
Page 7

7.
ㅔԧЁ᭛
㐕ԧЁ᭛
ㅔԧЁ᭛
㐕ԧЁ᭛
Install your motherboard into the
chassis as shown and secure with
included screws.
Installieren Sie Ihr Motherboard im
Chassis und befestigen Sie es mit
den beiliegenden Schrauben.
Retirez l’attache de la baie du
lecteur optique avec un tournevis.
Instale su placa base en el chasis
como se muestra y asegúrela con
los tornillos incluidos.
Posizionare la scheda madre nella
sua sede e fissarla con le viti in
dotazione.
Установите материнскую плату в
корпус и закрепите ее прилагаемыми
шурупами.
Ἤ⫰ḰGᵍ㢨G⇌㇠⪰G㥐ᶤ䚨G㏠⫰G
ṅ☐⢰㢨⽀G䀘ⶸ⪰G㥐ᶤ䚝⏼␘U
࿑ߩࠃ߁ߦࡑࠩࡏ࠼ࠍࠤࠬߦࠗࡦࠬ࠻࡞ߒޔ
ઃዻߩࡀࠫߢ࿕ቯߒ߹ߔޕ
㐕ԧЁ᭛
ᇛЏ″ᵓ㺱ܹ″←ܻϺҹܻ䰘㶎㍆䥪
ㅔԧЁ᭛
ᇚЏᴎᵓ㺙ܹᴎݙᑊҹݙ䰘㶎ϱ䫕
8.
Install your slim optical drive onto
the bracket and secure with included
screws ( if a IDE slim optical drive is
used, please install the included
adapter and secure with screws as shown)
Installieren Sie Ihr dünnes optisches
Laufwerk in der Halterung und befestigen
Sie es mit den beiliegenden Schrauben
(wenn ein IDE optisches Laufwerk
verwendet wird, installieren Sie bitte den
beiliegenden Adapter und befestigen Sie
ihn wie abgebildet mit den Schrauben).
Installez votre lecteur optique slim
sur le casier et fixez-le avec les vis
incluses (si un lecteur optique slim
IDE est utilisé, veuillez installer
l’adaptateur inclus et fixez-le avec
des vis comme montré)
Instale su dispositivo óptico delgado en
el bracket y asegúrelo con los tornillos
incluidos (si se usa un dispositivo óptico
delgado IDE, por favor instale el adaptador
incluido y asegúrelo con los tornillos como
se muestra).
Installare il lettore ottico slim nel suo
supporto e fissarlo con le viti in dotazione
( se si utilizza un lettore IDE, utilizzare
l’adattatore incluso e fissarlo come
mostrato in figura )
Установите тонкий оптический привод
в кронштейн и закрепите прилагаемыми
шурупами (если используется тонкий
оптический IDE-привод, установите
прилагаемый адаптер и закрепите его
шурупами, как показано на рисунке).
㏠⫰Gṅ☐⢰㢨⽀⪰G⽀⢰䁇㜄G㉘㾌䚐G䟸G
┍⸽═G⇌㇠⦐GḔ㥉㐐䇩⏼␘UGO⬀㚱GpklG
ⵝ㐑㢌G㏠⫰Gṅ☐⢰㢨⽀ᴴG㇠㟝╔G㟤SG
┍⸽═G㛨⑅䉤㡸Gᵍ㢨G㉘㾌䚌ḔGἬ⫰㢌G
⇌㇠⦐GḔ㥉㐐䇩⏼␘UGP
శቇࠬࡓ࠼ࠗࡉࠍࡉࠤ࠶࠻ߦข
ࠅઃߌޔઃዻߩࡀࠫߢ࿕ቯߒ߹ߔޕ
㧔+&'శቇࠬࡓ࠼ࠗࡉࠍขࠅઃ
ߌࠆߦߪޔ࿑ߩࠃ߁ߦઃዻߩࠕ࠳ࡊ࠲ࠍ
ขࠅઃߌߡ߆ࠄࡀࠫߢ࿕ቯߒߡߊߛߐޕ
㐕ԧЁ᭛
ᇛ㭘ൟܝ″㺱ܹܝ″ᶊϺҹܻ䰘㶎㍆
䥪˄བᵰԴ㽕Փ⫼,'(㭘ൟܝ″ˈ
䂟ᇛܻ䰘ⱘ䔝丁㺱ϞϺҹ㶎㍆䥪˅
ㅔԧЁ᭛
ᇚ㭘ൟܝ偅㺙ܹܝ偅ᶊᑊҹݙ䰘㶎ϱ䫕
˄བᵰԴ㽕Փ⫼,'(㭘ൟܝ偅ˈ䇋ᇚݙ䰘
ⱘ䕀༈㺙Ϟᑊҹ㶎ϱ䫕˅
6
Page 8

9.
ㅔԧЁ᭛
㐕ԧЁ᭛
ㅔԧЁ᭛
㐕ԧЁ᭛
Install your 2.5” hard drive onto the
optical drive bracket as shown and
secure with included screws.
(the maximum thickness of 2.5” hard
drive is 15mm).
Установите ваш 2,5-дюймовый жесткий
диск в кронштейн оптического привода,
как показано на рисунке, и закрепите
прилагаемыми шурупами.
(Максимальная толщина 2,5-дюймового
жесткого диска - 15 мм.)
Installieren Sie Ihre 2,5 Zoll Festplatte in
der optischen Laufwerkshalterung
wie abgebildet und befestigen Sie sie
mit den beiliegenden Schrauben.
(Die maximale Höhe der 2,5 Zoll
Festplatte ist 15mm.)
Installez votre disque dur 2.5” sur le
casier du lecteur optique comme montré
et fixez-le avec les vis incluses.
(l’épaisseur maximum du disque dur
ne doit pas excéder 15mm).
Instale su disco duro de 2,5” en el bracket
para dispositivos ópticos como se
muestra y asegúrelo con los tornillos
incluidos (el grosor máximo del disco
duro de 2,5” es de 15mm).
Installare l’hard disk da 2,5” sul supporto
del lettore ottico come mostrato e fissarlo
con le viti in dotazione. (il massimo spessore
supportato per hard disk da 2,5” è 15mm)
2.5” 䚌☐ ♈㏘䆠⪰ Ἤ⫰㜄㉐㝴 ᵍ㢨
ṅ☐⢰㢨⽀ ⽀⢰䁇㜄 ㉘㾌䚐 䟸 ⇌㇠⦐
Ḕ㥉䚝⏼␘. 2.5” 䚌☐ ☐⢰㢨⽀㢌 㺐
▄⏈ 15mm ᾀ㫴 ㉘㾌 ᴴ⏙䚝⏼␘.
ೇߩࠃ߁ߦāࡂ࠼࠺ࠖࠬࠢ࠼ࠗࡉࠍ
ܝᄺ࠼ࠗࡉࡉࠤ࠶࠻ϞߦপࠅҬߌǃ
Ҭሲߩࡀࠫߢᅮߒ߹ߔDŽ
˄āࡂ࠼࠺ࠖࠬࠢ࠼ࠗࡉߩ᳔ߐߪPP
㐕ԧЁ᭛
ձ೪⼎ᇛᙼⱘā⹀㺱ܹܝ″ᶊϞ
Ϻҹܻ䰘㶎㍆䥪
˄য়⹀ⱘ᳔ᑺ⚎PP˅
ㅔԧЁ᭛
ձᇚᙼⱘā⹀Ⲭ㺙ܹܝ偅ᶊϞᑊҹ
ݙ䰘㶎ϱ䫕˄য়⹀Ⲭⱘ᳔ᑺЎPP˅
10.
Reinstall the optical drive bracket
into the chassis and secure with
screws (step 4)
Installieren Sie die Halterung für
optische Laufwerke wieder im
Chassis und befestigen Sie sie
mit Schrauben (Schritt 4).
Réinstallez le casier du lecteur
optique dans le boîtier et fixez-le
avec des vis (étape 4)
Reinstale el bracket para dispositivos
ópticos en el chasis y asegúrelo
con tornillos (paso 4).
Reinstallare il supporto del lettore
ottico nello chassis e fissarlo con le
viti.
Установите кронштейн оптического
привода в корпус и закрепите его
шурупами (шаг 4).
ṅ☐⢰㢨⽀ ⽀⢰䁇㡸 䀴㢨㏘㜄 㣠 ㉘㾌䚐
䟸, ⇌㇠⦐ Ḕ㥉㐐䇩⏼␘. ( Step 4)
ܝᄺ࠼ࠗࡉࡉࠤ࠶࠻ࠍࠤࠬߦ᠏
ߒǃࡀࠫߢᅮߒ߹ߔDŽ˄ࠬ࠹࠶ࡊ
㐕ԧЁ᭛
ᇛܝ″ᶊ㺱ಲ″←ܻϺҹℹ倳ಯϟⱘ
㶎㍆䥪
ㅔԧЁ᭛
ᇚܝ偅ᶊ㺙ಲᴎݙᑊҹℹ偸ಯϟⱘ
㶎ϱ䫕
7
Page 9

11.
ㅔԧЁ᭛
㐕ԧЁ᭛
ㅔԧЁ᭛
㐕ԧЁ᭛
Reinstall the front panel onto the
chassis.
Installieren Sie die Frontabdeckung
wieder am Chassis.
Réinstallez le panneau frontal sur
le boîtier.
Reinstale el panel frontal en el
chasis.
Reinstallare il pannello frontale.
Снова установите переднюю панель.
㤸⮨G䑜≄㡸G䀴㢨㏘㜄G㣠G㉘㾌䚝⏼␘U
ࡈࡠࡦ࠻ࡄࡀ࡞ࠍࠤࠬߦ᠏ߒ߹ߔDŽ
㐕ԧЁ᭛
ᇛࠡ䴶ᵓ㺱ಲ″←Ϟ
ㅔԧЁ᭛
ᇚࠡ䴶ᵓ㺙ಲᴎϞ
12.
Install your 3.5” hard drive onto the
bracket as shown and secure with
screws, then reinstall the bracket
into the chassis and secure with
screws.
Installieren Sie Ihre 3,5 Zoll Festplatte
in der Halterung wie abgebildet und
befestigen Sie sie mit Schrauben.
Installieren Sie die Halterung wieder
im Chassis und befestigen Sie sie mit
Schrauben.
Installez votre disque dur 3.5” sur le
casier comme montré et fixez-le avec
des vis, puis remettez le casier dans
le boîtier et fixez le avec des vis.
Instale su disco duro de 3,5” en el
bracket como se muestra y asegúrelo
con tornillos.
Installare l’hard disk da 3,5” sul
supporto come mostrato e fissarlo con
le viti, quindi reinstallarlo nello chassis
e fissarlo con le viti.
Установите ваш 3,5-дюймовый жесткий
диск в кронштейн, как показано на
рисунке, закрепите его шурупами,
затем установите кронштейн обратно в
корпус и закрепите шурупами.
3.5” 䚌☐ ♈㏘䆠⪰ Ἤ⫰㜄㉐㝴 ᵍ㢨
⽀⢰䁇㜄 ㉘㾌䚐䟸, ⇌㇠⦐ Ḕ㥉䚝⏼␘.
㢨䟸, ⽀⢰䁇㡸 䀴㢨㏘㜄 㣠 ㉘㾌䚐 䟸,
⇌㇠⦐ Ḕ㥉㐐䇩⏼␘.
ೇߩࠃ߁ߦāࡂ࠼࠺ࠖࠬࠢ࠼ࠗࡉࠍࡉࠤ࠶࠻ߦ
পࠅҬߌǃࡀࠫߢᅮߒ߹ߔDŽ
ߘࠇ߆ࠄࡉࠤ࠶࠻ࠍࠤࠬߦ᠏ߒߡࡀࠫߢ
ᅮߒ߹ߔDŽ
㐕ԧЁ᭛
䂟ձ೪⼎ᇛᙼⱘয়⹀㺱ܹܝ″
ᶊϞϺҹܻ䰘㶎㍆䥪ˈݡᇛܝ″ᶊ
㺱ಲ″←Ϻҹܻ䰘㶎㍆䥪
ㅔԧЁ᭛
䇋ձᇚᙼⱘয়⹀Ⲭ㺙ܹܝ偅ᶊ
Ϟᑊҹݙ䰘㶎ϱ䫕ˈݡᇚܝ偅ᶊ㺙ಲ
ᴎㆅᑊҹݙ䰘㶎ϱ䫕
8
Page 10

13.
ㅔԧЁ᭛
㐕ԧЁ᭛
ㅔԧЁ᭛
㐕ԧЁ᭛
Please remove the screws holding
the expansion card slot cover, and
remove it.
Открутите шурупы на крышке слота
карты расширения и снимите крышку.
Bitte entfernen Sie die Schrauben
der Expansionssteckplatzabdeckungen
und entfernen Sie sie.
Veuillez retirer les vis fixant les
équerres des emplacements
d’extension, puis retirez-les selon
vos besoins.
Quite los tornillos que sujetan la
cubierta del zócalo de la tarjeta
de expansión y retírela.
Rimuovere le viti che che fissano
la mascherina dello slot delle
schede di espansione ed asportarlo.
䞉㣙㏠⦣ 䀘ⶸ⪰ Ḕ㥉䚌Ḕ 㢼⏈ ⇌㇠⪰
㥐ᶤ䚐 䟸 ㏠⦣ 䀘ⶸ⪰ 㥐ᶤ䚝⏼␘.
ᢵᔉࠞ࠼ࠞࡃࠍᅮ
ߒߡࠆࡀࠫࠍߒǃࠞࡃࠍপࠅߒ߹ߔDŽ
㐕ԧЁ᭛
䂟ᇛ䥪ܙῑ⠛ⱘ㶎㍆ϟˈ
ݡᇛܙῑ⠛ϟ
ㅔԧЁ᭛
䇋ᇚ䫕ᠽܙῑḷ⠛ⱘ㶎ϱϟˈ
ݡᇚᠽܙῑḷ⠛ϟ
14.
Install your graphics card or
expansion card.
Installieren Sie Ihre Grafik- oder
andere Expansionskarte.
Installez vos cartes graphiques
ou d’extensions.
Instale su tarjeta gráfica o tarjeta
de expansión.
Installare la scheda grafica o la
scheda di espansione.
Установите графическую карту или
карту расширения.
Ἤ⣌䙱㾨☐⇌ 䞉㣙 㾨☐⪰ ㉘㾌䚝⏼␘.
ࠣࡈࠖ࠶ࠢࠬࠞ࠼߹ߚߪ
ᢵᔉࠞ࠼ࠍࠗࡦࠬ࠻࡞ߒ߹ߔDŽ
㐕ԧЁ᭛
ᅝ㺱ᙼⱘ乃⼎ܙ
ㅔԧЁ᭛
ᅝ㺙ᙼⱘᰒ⼎ᠽܙ
9
Page 11

15.
ㅔԧЁ᭛
㐕ԧЁ᭛
ㅔԧЁ᭛
㐕ԧЁ᭛
Reinstall the expansion card slot
cover and secure with screws.
Installieren Sie die
Expansionssteckplatzabdeckung
wieder und befestigen Sie sie mit
Schrauben.
Réinstallez la fixation des équerres
et fixez-le avec des vis.
Reinstale la cubierta del zócalo de
la tarjeta de expansión y fíjela con
tornillos.
Reinstallare la mascherina e serrarlo
per mezzo delle viti.
Поместите на место крышку слота
карты расширения и закрепите ее
шурупами.
䞉㣙㏠⦣ 䀘ⶸ⪰ 㣠㉘㾌䚐 䟸 ⇌㇠⦐
Ḕ㥉㐐ή⏼␘.
ᢵᔉࠞ࠼ࠬࡠ࠶࠻ࠞࡃࠍ᠏
ߒǃࡀࠫߢᅮߒ߹ߔDŽ
㐕ԧЁ᭛
㺱ಲܙῑ⠛Ϻҹ㶎㍆䥪
ㅔԧЁ᭛
㺙ಲᠽܙῑḷ⠛ᑊҹ㶎ϱ䫕
16.
After all cables and wirings are
connected, reinstall the top cover
and secure it.
Nachdem alle Kabel und Drähte
verbunden sind, installieren und
befestigen Sie wieder die obere
Abdeckung.
Après avoir branché tous les câbles,
remettez le panneau supérieur et f
ixez-le.
Después de conectar todos los
cables, reinstale la cubierta superior
y fíjela.
Dopo aver conesso tutti i cavi,
reinstallare il pannello superior e
fissarlo.
Подключите все необходимые провода
и кабели, после чего поставьте на место
верхнюю крышку и закрепите ее шурупами.
⯜☔ 䀴㢨⽈Ḱ ㉔☘㢨 㜤╌㛼㡰⮨
ㇵ⺴ 䀘ⶸ⪰ 㣠 ㉘㾌䚐 䟸 ⇌㇠⦐
Ḕ㥉㐐䇩⏼␘.
ܼߡߩࠤࡉ࡞߿࠼㎮ࠍ㍮
ߒߡ߆ࠄǃϞ䚼ࠞࡃࠍܗߦ᠏ߒߡࡀࠫߢ
ᅮߒ߹ߔDŽ
㐕ԧЁ᭛
䂟⺎䁡᠔᳝㎮ᴤ䛑Ꮖℷ⺎䗷ᕠ
㺱ಲϞ㪟Ϻҹ㶎㍆䥪
ㅔԧЁ᭛
䇋⹂䅸᠔᳝㒓ᴤ䛑Ꮖℷ⹂䖲ৢ㺙
ಲϞⲪᑊҹ㶎ϱ䫕
10
Page 12

17.
ㅔԧЁ᭛
㐕ԧЁ᭛
ㅔԧЁ᭛
㐕ԧЁ᭛
Attach the rubber standoff onto the
chassis appropriately as required.
Befestigen Sie den
Gummi-Abstandhalter am Chassis
wie benötigt.
Collez les pieds en caoutchouc
convenablement sous le boîtier
comme exigé.
Enganche la base de goma en el
chasis si es necesario.
Applicare i piedini in gomma sul telaio.
Прикрепите к корпусу резиновые опоры.
Ḕⱨ ⵏ㾜㡸 䙸㟈䚐⬀䆰 䀴㢨㏘㜄
⺴㵝䚝⏼␘.
ᖙ㽕ߦᖰߓߡࠤࠬߦࠧࡓ㻑
ࠬ࠲ࡦ࠼ࠍপࠅҬߌ߹ߔDŽ
㐕ԧЁ᭛
ձ䳔∖ᇛ‵㝴㝇䘽⭊ഄ䊐䰘ᮐ″←Ϟ
ㅔԧЁ᭛
ձ䳔∖ᇚ‵㛊㛮ൿ䗖ᔧഄ䌈䰘ѢᴎㆅϞ
18.
Installation complete. Установка завершена.
Die Installation ist vollständig.
Installation terminée.
Instalación completa.
Installazione completata.
㉘㾌ᴴ 㝸⨀╌㛼㏩⏼␘.
ࠗࡦࠬ࠻࡞ᅠњDŽ
㐕ԧЁ᭛
ᅝ㺱ᅠ៤
ㅔԧЁ᭛
ᅝ㺙ᅠ៤
11
Page 13

Notice
ㅔԧЁ᭛
㐕ԧЁ᭛
ㅔԧЁ᭛
㐕ԧЁ᭛
If you need to clean the filter or replace/remove the fan, please refer to the following steps:
1.
Please remove the screws holding the
top cover with a screw driver, and then
pull it toward the back and lift it outward
away from the chassis.
Bitte entfernen Sie die Schrauben
der oberen Abdeckung mit einem
Schraubenzieher und ziehen Sie
die Abdeckung nach hinten, weg
von dem Chassis.
Veuillez retirer les vis fixant le
panneau supérieur avec un tournevis,
puis tirez-le vers l’arrière afin de le
soulever en dehors du boîtier.
Quite los tornillos que sujetan la
parte superior con un destornillador
y luego tire de ella hacia atrás y
levántela del chasis.
Rimuovere le viti che tengono il
pannello superiore con un cacciavite,
quindi spingerlo vesto la parte
posteriore e sollevarlo per asportarlo
dal telaio.
С помощью отвертки открутите
шурупы, удерживающие верхнюю
крышку, а затем снимите ее, сдвинув
назад и приподняв.
ㇵ⺴ 䀘ⶸ⪰ Ḕ㥉䚌Ḕ 㢼⏈ ⇌㇠⪰ ㏘䆠⪌
☐⢰㢨ⶸ⪰ 㢨㟝䚨 㥐ᶤ䚐 䟸, ◘㯱㡰⦐
☘㛨 㝠⥘, 䀴㢨㏘⦐ ⺴䉤 㥐ᶤ䚝⏼␘.
Ϟ䚼ࠞࡃࠍᅮߒߡࠆࡀࠫࠍ࠼ࠗࡃߢ
ߒǃࠞࡃࠍᕠᮍߦᓩߡࠤࠬ߆ࠄ
পࠅߒ߹ߔDŽ
㐕ԧЁ᭛
䂟ҹ㶎㍆䍋ᄤᇛ䥪Ϟ㪟ⱘ㶎㍆ϟˈ
Ϻᕠᢝᕠᦤ䍋ҹ㞾″←Ёপߎ
ㅔԧЁ᭛
䇋ҹ㶎ϱ䍋ᄤᇚ䫕ϞⲪⱘ㶎ϱϟˈ
ᑊৢᢝৢᦤ䍋ҹ㞾ᴎㆅЁপߎ
2.
Press the area as shown to release
the clips, then remove the front
panel.
Drücken Sie auf die Stelle wie
abgebildet, um die Klemmen zu
lösen und entfernen Sie die
Frontabdeckung.
Appuyez sur la zone comme
montré pour détacher les clips,
puis retirez le panneau frontal.
Presione la zona como se muestra
para soltar los enganches, luego
retire el panel frontal.
Premere nell’area indicata per
sbloccare i fermi, quindi rimuovere
il pannello frontale.
Нажмите на указанные зажимы и
снимите переднюю панель.
Ἤ⫰㜄㉐㝴 ᵍ㡴 㠸㾌⪰ ⍀⤠ 䆨⫱㡸
䖴㛨㨴 䟸, 㤸⮨ 䑜≄㡸 㥐ᶤ䚝⏼␘.
ೇߦ⼎ߐࠇߚจ᠔ࠍᢐߒߡࠢ࠶ࡊࠍ
䭟ᬒߒǃࡈࡠࡦ࠻ࡄࡀ࡞ࠍপࠅߒ߹ߔDŽ
㐕ԧЁ᭛
䂟ձ೪⼎䓩ᣝҹϟࠡ䴶ᵓ
ㅔԧЁ᭛
䇋ձ⼎䕏ᣝҹϟࠡ䴶ᵓ
12
Page 14

3.
ㅔԧЁ᭛
㐕ԧЁ᭛
ㅔԧЁ᭛
㐕ԧЁ᭛
Press the area as shown to remove
the filter.
Drücken Sie die Stelle wie abgebildet,
um den Filter zu entfernen.
Appuyez sur la zone comme montré
pour détacher le filtre.
Presione la zona como se muestra
para quitar el filtro.
Premere nell’area indicate per
rimuovere il filtro.
Для того чтобы убрать фильтр,
нажмите на указанную область.
Ἤ⫰㜄㉐㝴 ᵍ㡴 㠸㾌⪰ ⍀⤠ 䙸䉤⪰
㥐ᶤ䚝⏼␘.
ೇߦ⼎ߐࠇߚจ᠔ࠍᢐ
ߒߡࡈࠖ࡞࠲ࠍߒ߹ߔDŽ
㐕ԧЁ᭛
䂟ձ೪⼎䓩ᣝҹϟ◒㎆
ㅔԧЁ᭛
䇋ձ⼎䕏ᣝҹϟⒸ㔥
4.
Remove the 4 screws holding the
fan, and remove the fan from the
interior of the chassis. Then
reinstall the chassis by following the
previous steps in reverse order.
Entfernen Sie die 4
Befestigungsschrauben des Lüfters
und nehmen Sie den Lüfter aus dem
Chassis. Montieren Sie das Chassis
wieder, indem Sie die o.g. Schritte in
umgekehrter Reihenfolge durchführen.
Retirez les 4 vis fixant le ventilateur,
et retirez le ventilateur par l’intérieur
du boîtier. Puis remontez le boîtier
en suivant les étapes précédentes
dans l’ordre inverse.
Quite los 4 tornillos que sujetan el
ventilador y luego retire el ventilador
del interior del chasis. Luego
reinstale el chasis siguiendo los pasos
previos en sentido inverso.
Rimuovere le 4 viti che serrano la
ventola e rimuoverla dal suo telaio,
quindi reinstallare il telaio seguendo
i passaggi precedenti in ordine inverso.
Открутите 4 шурупа, удерживающие
вентилятор, и выньте вентилятор из
корпуса. Затем соберите корпус,
проделав предыдущие шаги в
обратном порядке.
䑠㡸 Ḕ㥉䚌Ḕ 㢼⏈ 4ᵐ㢌 ⇌㇠⪰
㥐ᶤ䚐 䟸, 䑠㡸 䀴㢨㏘ ⇨⺴⦐ ⺴䉤
㥐ᶤ䚝⏼␘. 䀴㢨㏘ 㦤⫱㡴 ⺸䚨㢌
㜡㍐㡰⦐ 䚌㐐⮨ ╝⏼␘.
ࡈࠔࡦࠍᅮߒߡࠆࡀࠫᴀ
ࠍߒǃࠤࠬߩݙو߆ࠄࡈࠔࡦࠍ
পࠅߒ߹ߔDŽߘߩᕠߪǃ䗚ߩ
䷚ߢࠤࠬࠍܗߦ᠏ߒ߹ߔDŽ
㐕ԧЁ᭛
ᇛ䥪乼ⱘಯ业㶎㍆ϟᕠˈ
㞾″←ܻপߎ乼DŽ
ݡձ✻ࠡ䗄ℹ倳ডᅝ㺱″←
ㅔԧЁ᭛
ᇚ䫕亢ⱘಯ乫㶎ϱϟৢˈ
㞾ᴎㆅݙপߎ亢DŽ
ݡձ✻ࠡ䗄ℹ偸ডᅝ㺙ᴎㆅ
13
Page 15

Page 16

 Loading...