

Page 1
Page 2
Page 3
Page 4
RS431U
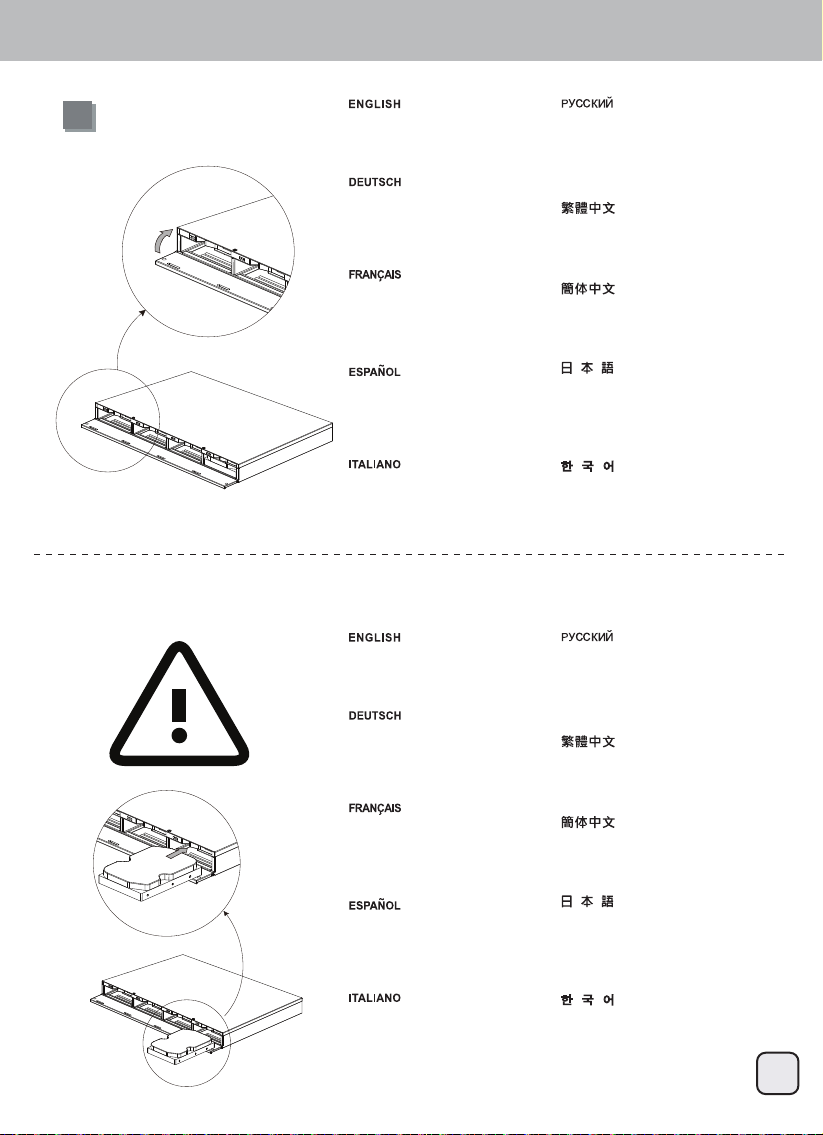
Hard drive installation
1
2
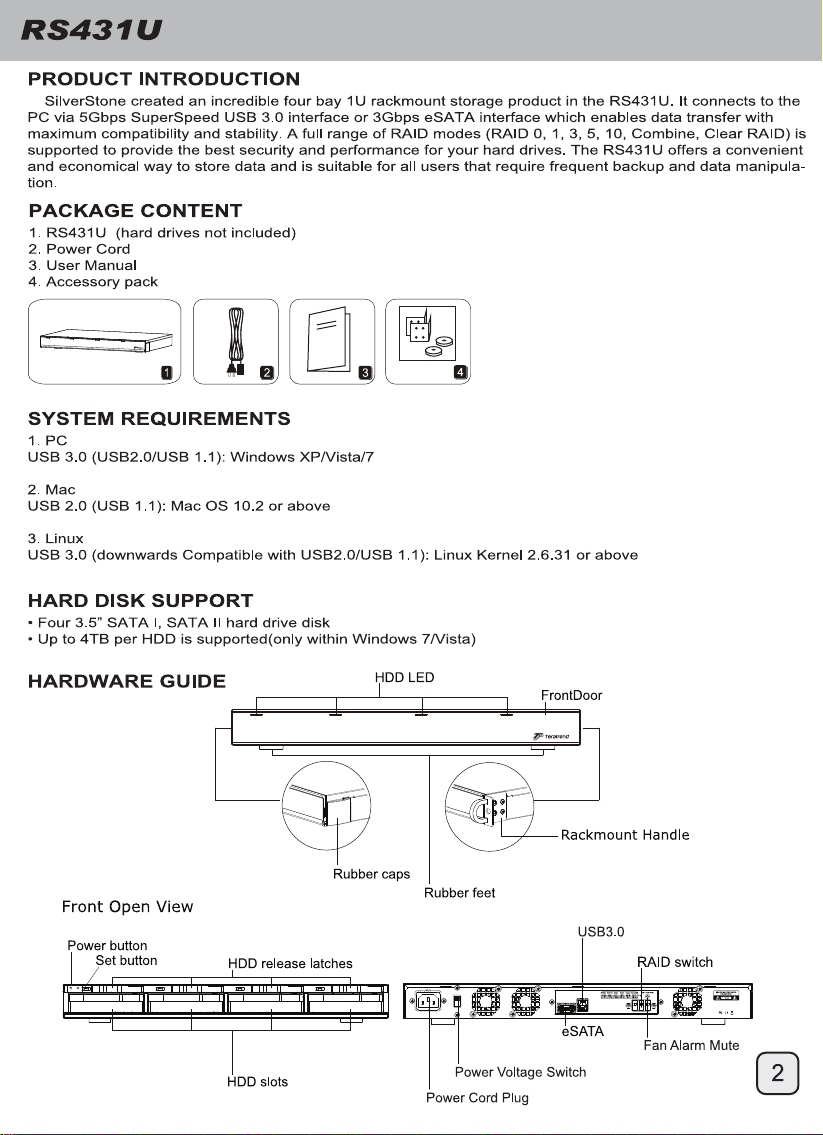
Open the front door Откройте переднюю дверцу
Öffnen Sie die Frontklappe
打開前門
Ouvrez la porte d’accès frontal
Abra la puerta frontal
Aprire il portello frontale
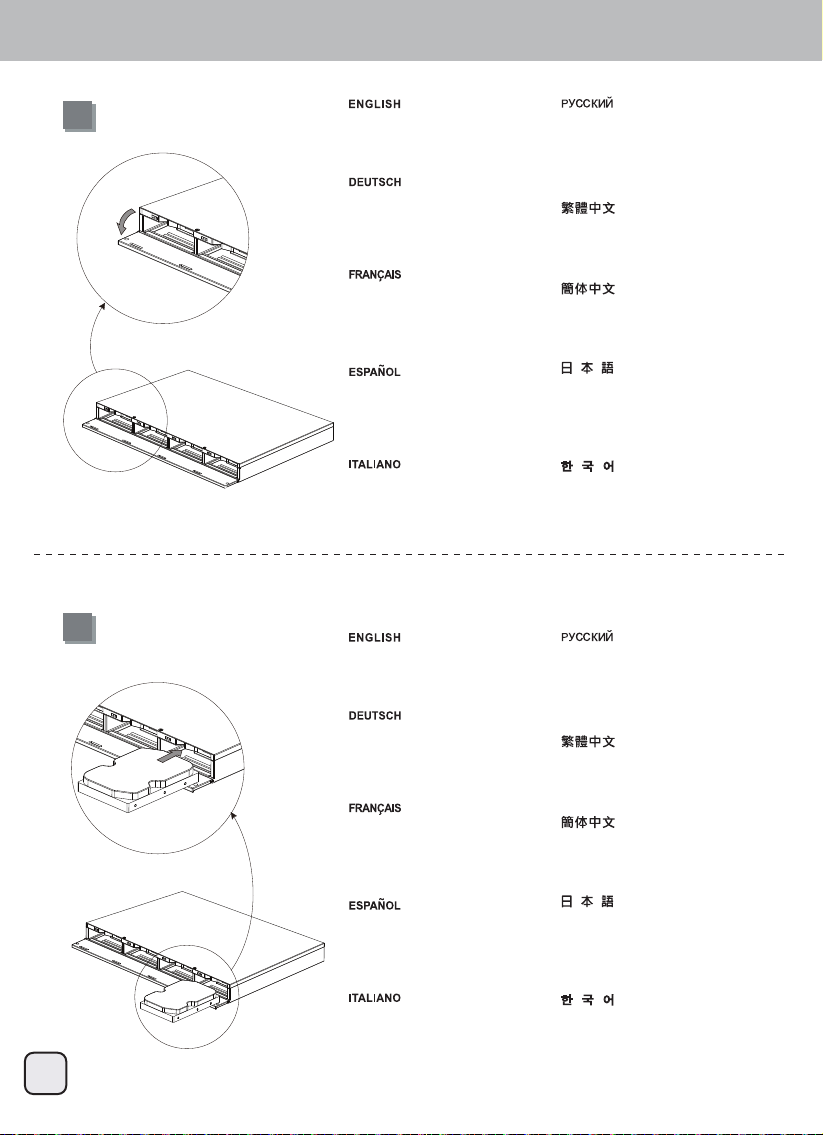
Slide the HDD in until the latch click Переместите жесткий диск
打开前门
フロントドアを開く
프론트 도어를 열고
до щелчка
Festplatte bis zum Einrasten des
Riegels hineinschieben
Faites glisser le disque dur
à l'intérieur jusqu'à ce que vous
entendiez le clic de verrouillage
Deslice el disco duro hasta que
el pestillo haga clic
Far scorrere l’unità HDD finché la
serratura scatta
將硬碟小心地放入硬碟槽,
往內推直到固定卡榫扣上
将硬盘小心地放入硬盘槽,
往内推直到固定卡榫扣上
ラッチがカチッと鳴るまでHDD
をスライドさせます
래치가 찰칵 소리를 낼 때까지 HDD
를 밀어 넣으십시오
3
Page 5
RS431U
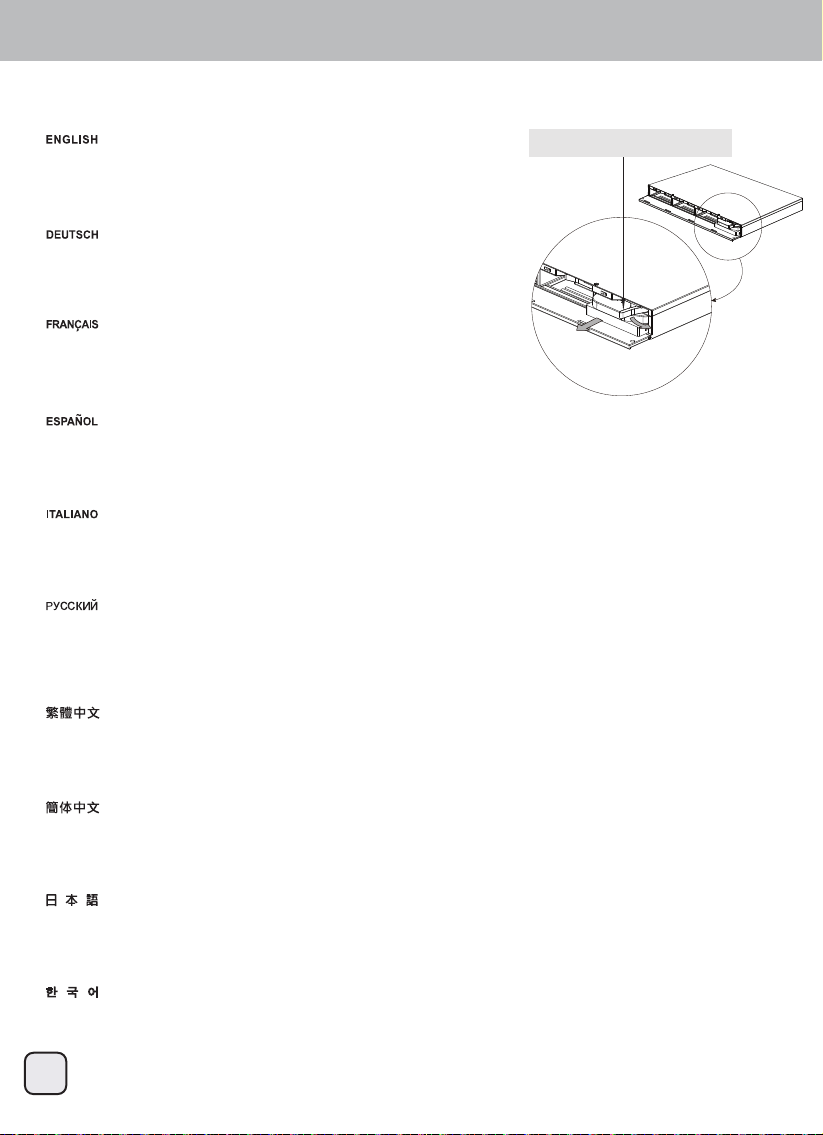
Hard drive installation
3
Caution
Close the front door близко переднюю дверцу
Schließen Sie die Frontklappe
關閉前門
Fermer la porte d’accès frontal
Cerrar la puerta frontal
Chiudere il portello frontale
The HDD might be damaged if
not installed correctly
关闭前门
フロントドアを閉める
프론트 도어를 닫습니다
Если жесткий диск не
устанавливается надлежащим
образом, возможно, он
поврежден
Bei unsachgemäßer Installation
kann die Festplatte beschädigt
werden
Le disque dur peut-être
endommagé s'il n'est pas installé
correctement
El disco duro podría resultar
dañado si no se instala
correctamente
L’unità HDD potrebbe subire
danni se non è installata
correttamente.
請注意:如果沒有正確的安裝硬碟,
硬碟將有可能會損壞。
请注意:如果没有正确的安装硬盘,
硬盘将有可能会损坏。
正しく取り付けていない場合、HDD
が損傷する可能性があります
올바로 설치하지 않을 경우 HDD가
손상될 수 있습니다
4
Page 6
RS431U
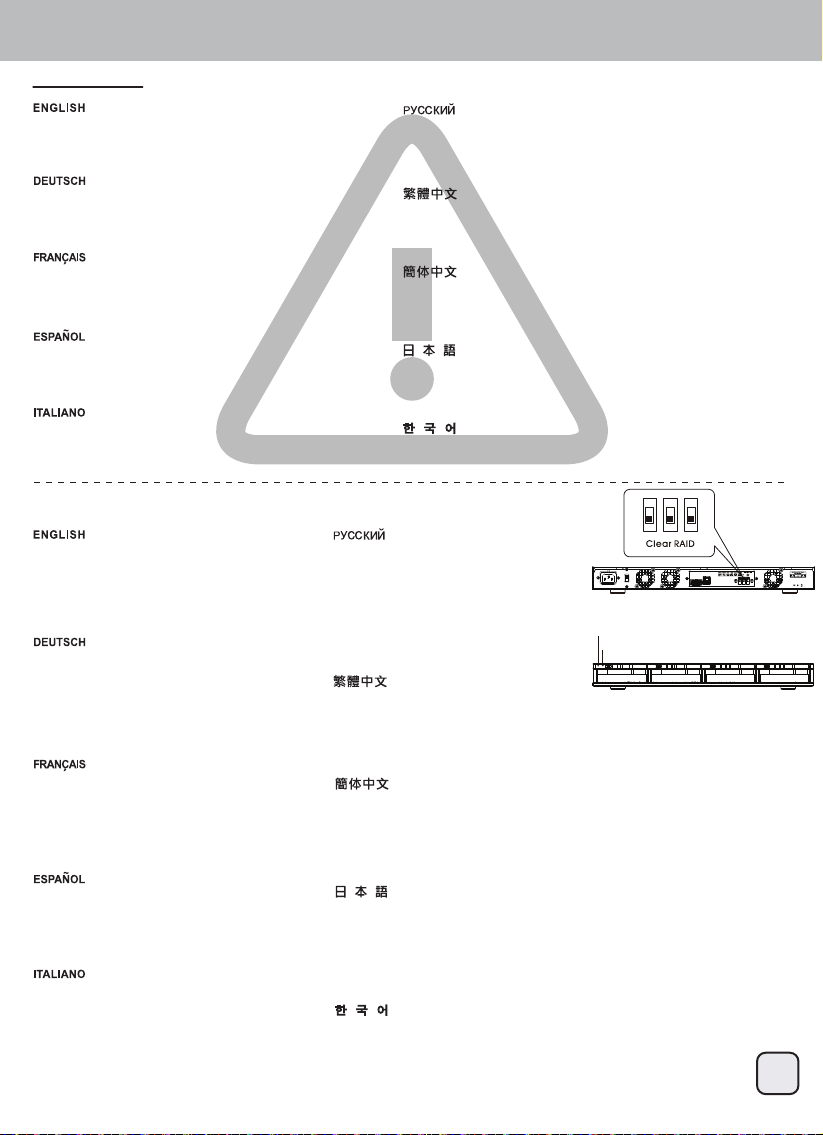
Remove the HDD
Open the door and release the latch. The HDD will pop out slightly then pull the HDD out
gently with your hands.
Öffnen Sie die Tür, geben Sie den Riegel frei. Die Festplatte springt ein Stück heraus;
ziehen Sie die Festplatte vorsichtig von Hand raus.
Ouvrez la porte et libérez le verrou. Le disque dur sera doucement éjecté puis tirez
légèrement le disque dur vers l'extérieur avec vos mains.
Abra la puerta y quite el pestillo. El disco duro saldrá ligeramente, luego tire con suavidad del disco duro con sus manos
Aprire lo sportello e sbloccare la serratura. L’unità HDD uscirà leggermente; estrarre delicatamente l’unità HDD con le mani.
Откройте крышку и освободите фиксатор. После того как жесткий диск слегка выступит, осторожно извлеките его руками.
HDD release latch
移除硬碟
打開前門,輕拉固定卡榫將硬碟退出;然後小心地取出。
移除硬盘
打开前门,轻拉固定卡榫将硬盘退出;然后小心地取出。
ドアを開き、ラッチを解除します。HDDがわずかに飛び出したら、両手でHDDをそっと引き出します。
도어를 열고 래치를 해제하십시오. HDD가 약간 튀어 나오면 손으로 HDD를 천천히 당겨 빼십시오.
5
Page 7

RS431U
Connect to PC
Connect all cables before turning on the power.
*If your computer’s eSATA port does not support SATA Port
multiplier please utilize USB 3.0 port or else install a eSATA
card that supports SATA Port multiplier.
If your computer supports SATA Port multiplier, update the
chipset driver.
Schließen Sie vor dem Einschalten alle Kabel an.
* Falls der eSATA-Port Ihres Computers keinen
SATA-Portmultiplikator unterstützt, verwenden Sie bitte in
den USB 3.0-Port oder installieren Sie eine eSATA-Karte, die
mit SATA-Portmultiplikatoren kompatibel ist.
Wenn Ihr Computer SATA-Portmultiplikatoren unterstützt,
aktualisieren Sie bitte den Chipsatztreiber
Branchez tous les câbles avant d'allumer.
*Si le port SATA de votre ordinateur ne prend pas en charge
le multiplicateur de ports SATA veuillez utiliser le port USB
3.0 ou installez la carte eSATA qui prend en charge le
multipicateur de ports SATA.
Si votre ordinateur prend en charge le multiplicateur de ports
SATA, mettez à jour le jeu de puces.
Conecte todos los cables antes de encender el dispositivo.
* Se la porta eSATA del computer non supporta il
moltiplicatore di porte SATA, usare la porta USB 3.0, oppure
installare una scheda eSATA che supporti il moltiplicatore di
porte SATA.
Se il computer supporta il moltiplicatore di porte SATA,
aggiornare il driver del chipset.
Collegare tutti i cavi prima di accendere l'alimentazione
*Si el puerto eSATA de su ordenador no acepta un puerto
SATA, por favor use un puerto USB 3.0 ó instale una tarjeta
eSATA que acepte un multiplicador de puerto SATA. Si su
ordenador acepta un multiplicador de puerto SATA,
actualice el controlador del chipset.
Перед включением питания подключите все кабели.
*Если порт eSATA вашего компьютера не поддерживает
использование разветвителя портов SATA, используйте порт USB 3.0
или установите карту eSATA с поддержкой разветвителя портов
SATA.
Если ваш компьютер поддерживает разветвитель портов SATA,
обновите драйвер данного чипсета.
確定線材全部接妥後,開啓電源。
*如果您電腦的eSATA連接埠,不支援SATA Port multiplier(SATA埠倍增
器)功能,請改用USB 3.0連接埠或重新安裝一片支援SATA Port
multiplier(SATA埠倍增器)功能的eSATA介面卡。
如果您電腦硬體確認有支援SATA Port multiplier(SATA埠倍增器)功能
,卻無法使用。請試試看將您介面卡或主機板晶片組的驅動程式更新至最
新版本。
确定线材全部接妥后,开启电源。
*如果您计算机的eSATA连接端口,不支持SATA Port multiplier(SATA端
口倍增器)功能,请改用USB 3.0连接埠或重新安装一片支持SATA Port
multiplier(SATA端口倍增器)功能的eSATA适配卡。
如果您计算机硬件确认有支持SATA Port multiplier(SATA端口倍增器)
功能,却无法使用。请试试看将您适配卡或主机板芯片组的驱动程序更新
至最新版本。
電源をオンにする前に、全てのケーブルを接続してください。
*お持ちのコンピュータのeSATAポートがSATAポートマルチプライヤに未
対応の場合、USB 3.0ポートを使用するか、またはSATAポートマルチプラ
イヤ対応のeSATAカードをインストールしてください。
コンピュータがすでにSATAポートマルチプライヤ対応の場合は、チップ
セットドライバをアップデートしてください。
전원을 켜기 전에 모든 케이블을 연결합니다.
*사용자 컴퓨터의 eSATA 포트가 SATA 포트 멀티플라이어를 지원하지
않을 경우 USB 3.0 포트를 사용하거나 SATA 포트 멀티플라이어를
지원하는 eSATA 카드를 설치하십시오.
사용자 컴퓨터가 SATA 포트 멀티플라이어를 지원할 경우 칩셋
드라이브를 업데이트하십시오.
6
Page 8

RS431U
Sleep Mode
If hard drive is not accessed for 5 minutes or it is disconnected from computer (including shutdown) the sleep mode will automatically be
activated, both the hard drive and cooling fan will cease to run. Sleep mode will be deactivated once hard drive is accessed again.
Clear RAID mode does not support Sleep Mode.
Falls 5 Minuten nicht auf die Festplatte zugegriffen oder sie vom Computer (inklusive Abschaltung) getrennt wird, wird der Ruhezustand
automatisch aktiviert; sowohl Festplatte als auch Kühler stellen den Betrieb ein. Der Ruhezustand wird deaktiviert, sobald wieder auf die
Festplatte zugegriffen wird.
Der RAID leeren-Modus unterstützt keinen Ruhezustand.
Si le disque dur n'est pas utilisé pendant 5 minutes, ou s'il a été débranché de l'ordinateur (y compris l'arrêt), le mode de veille s'activera
automatiquement, et le disque dur et le ventilateur de refroidissement s'arrêteront. Le mode de veille sera désactivé dès l’accès au disque
dur.
Le mode Effacer RAID ne supporte pas le mode de veille.
Si no se accede al disco duro durante 5 minutos o se desconecta del ordenador (se incluye apagarlo) se activará el modo suspensión,
tanto el disco duro como el ventilador dejarán de funcionar. El modo suspensión se desactivará una vez se vuelva a acceder al disco
duro.
El modo Clear RAID no acepta el modo suspensión.
Se non è eseguito l’accesso al disco rigido per 5 minuti, oppure se è scollegato dal computer (compreso l'arresto), la modalità di
sospensione è attivata automaticamente e sia il disco rigido, sia la ventola di raffreddamento cesseranno di funzionare. La modalità
sospensione sarà disattivata quando è eseguito di nuovo l’accesso al disco rigido.
La modalità Clear RAID non supporta la modalità di sospensione.
Если к диску не осуществляется доступ в течение 5 минут или диск отключается от компьютера (в том числе, при выключении
системы), автоматически активируется режим ожидания, а оба жестких диска и вентилятор охлаждения прекращают работу.
Режим ожидания отключается при первой же операции доступа к жесткому диску.
Режим Clear RAID не поддерживает режим ожидания.
如果超過5分鐘未讀寫外接盒硬碟或外接盒與電腦的連接中斷(包含電腦主機關機),外接盒將會自動進入休眠模式,硬碟與外接盒的風
扇將會停止運作。當硬碟再次被讀寫時,休眠模式將會自動關閉。
當RAID模式設定為Clear RAID時,不支援休眠模式。
如果超过5分钟未读写外接盒硬盘或外接盒与计算机的连接中断(包含计算机主机关机),外接盒将会自动进入休眠模式,硬盘与外接盒的
风扇将会停止运作。当硬盘再次被读写时,休眠模式将会自动关闭。
当RAID模式设定为Clear RAID时,不支持休眠模式。
ハードディスクドライブへのアクセスが5分間ない、またはコンピュータから切断(シャットダウンを含む)された場合、自動的にス
リープモードに入りハードディスクドライブと冷却ファンが停止します。ハードディスクへのアクセスがあると、スリープモードは解
除されます。
RAIDクリアモードはスリープモードに対応していません。
하드 드라이브에 5분 동안 액세스하지 않거나 (끄기를 포함하여) 하드 드라이브가 컴퓨터에서 연결이 끊어지면 대기 모드가
자동으로 시작되어, 하드 드라이브와 냉각 팬이 모두 실행을 중지합니다. 하드 드라이브에 다시 액세스하게 되면 대기 모드가
비활성화됩니다.
Clear RAID 모드는 대기 모드를 지원하지 않습니다.
7
Page 9
RS431U
CAUTION!!
Changing the RAID mode requires formatting the
drives. Make sure to backup all existing data first!
Eine Änderung des RAID-Modus erfordert die
Formatierung der Festplatten. Achten Sie darauf,
zuvor alle darauf befindlichen Daten zu sichern!
Le changement du mode RAID nécessite le
formatage des disques. Assurez-vous en premier
que les données ont toutes été sauvegardées !
Cambiar el modo RAID requiere formatear los
discos. ¡Asegúrese de hacer primero una copia de
seguridad de todos los datos!
Per cambiare la modalità RAID è necessaria la
formattazione dei dischi rigidi. Assicuratevi quindi di
aver messo al sicuro i vostri dati prima di procedere.
Step1. Set Clear RAID
1.Set the Raid mode on the back of RS431U to
Clear RAID
2.Press the SET button and switch on the power
at the same time.
3.The device will beep once it is switched on.
4.Setting complete
1.Stellen Sie den RAID-Modus an der Rückseite des
RS431U auf RAID leeren ein
2.Drücken Sie die SET-Taste, während Sie das
Gerät einschalten.
3.Das Gerät gibt einen Signalton aus, sobald es
eingeschaltet wird.
4.Einstellung abgeschlossen
Для изменения режима RAID требуется форматирование
жестких дисков. Предварительно убедитесь, что сохранили
все существующие данные!
變更RAID模式需要重新格式化硬碟。請務必先確認已備份所有資
料後再進行變更,以免資料遺失!
变更RAID模式需要重新格式化硬盘。请务必先确认已备份所有数
据后再进行变更,以免数据遗失!
RAIDモードを変えるには、ドライブのフォーマットが必要です。
まず、必ずすべての既存データのバックアップを取ってください!
RAID 모드를 변경하려면 드라이브를 포맷해야 합니다. 먼저
기존의 모든 데이터를 백업하십시오!
1.Установите режим
Clear RAID на задней
панели устройства RS431U
2.Нажмите кнопку SET и
одновременно включите питание.
3.После включения устройство подаст
одиночный звуковой сигнал.
4.Настройка завершена
1.將RS431U背面Raid模式開關設定為Clear RAID。
2.按住SET按鈕同時打開電源開關。
3.外接盒開機後會發出一聲「嗶」的聲響。
4.設定完畢。
Power Button
SET Button
Before set the RAID,
Please turn off the power first.
1.Réglez le mode RAID à l'arrière du RS431U sur
Effacer RAID.
2.Appuyez en même temps sur le bouton
RÉGLER et sur le bouton d'alimentation.
3.L'appareil fera un bip lorsqu'il s'allume.
4.Réglages terminés.
1.Fije el modo Raid en la parte trasera de la
RS431U a Clear RAID
2.Presione el botón SET y el de encendido a la vez
3.El dispositivo emitirá un pitido si se ha encendido
4.Configuración completa
1.Impostare la modalità RAID sul pannello
posteriore di RS431U su Clear RAID
2.Premere il tasto SET ed accendere
contemporaneamente l'alimentazione.
3.Il dispositivo emette un segnale acustico
quando è acceso.
4.Impostazione completata
1.将RS431U背面Raid模式开关设定为Clear RAID。
2.按住SET按钮同时打开电源开关。
3.外接盒开机后会发出一声「哔」的声响。
4.设定完毕。
1.RS431U後部のRAIDモードをRAIDクリアに切り替えます。
2.SETボタンと電源スイッチを同時に押します。
3.デバイスは電源オン時にピッと鳴ります。
4.設定完了。
1.RS431U의 후면에 있는 Raid 모드를 Clear RAID로 설정합니다.
2.동시에 설정 버튼을 눌러 전원을 켭니다.
3.장치의 전원이 켜지면 비프음이 울립니다.
4.설정 완료
8
Page 10
RS431U
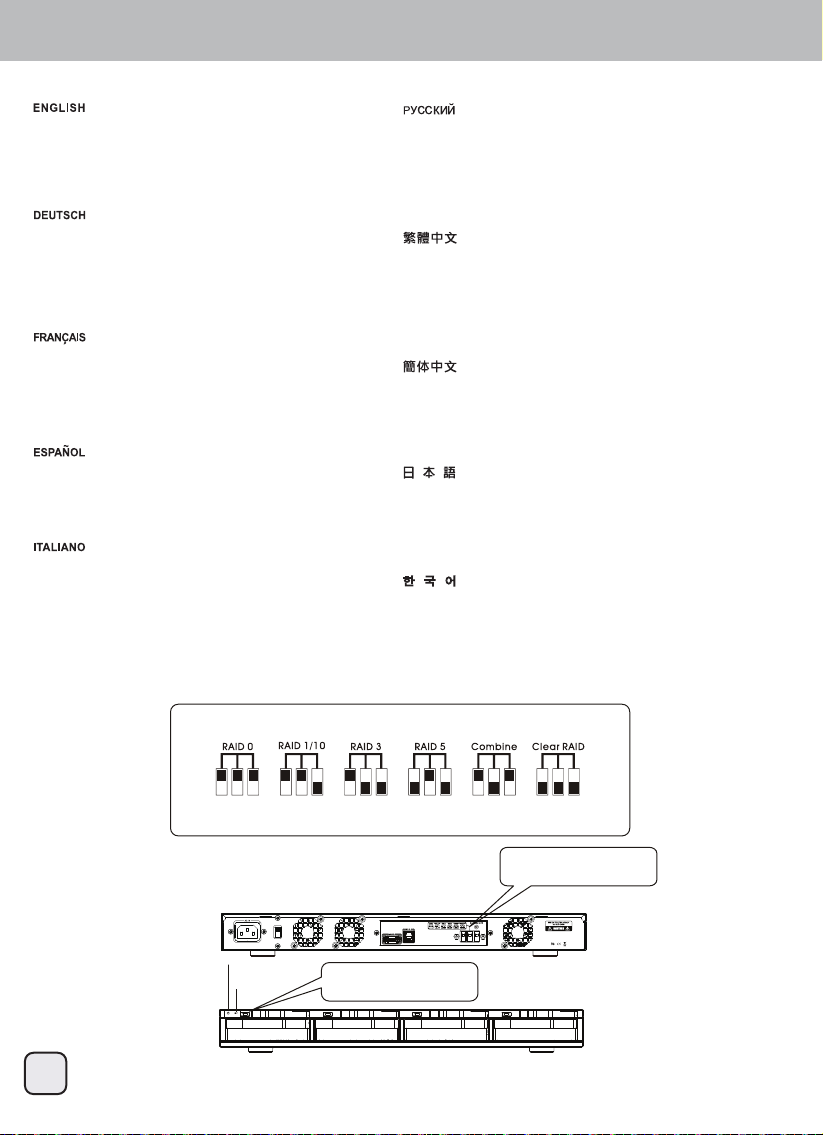
Step2. Set RAID Mode
1.Set the RAID mode on the back of RS431U to
RAID mode you require.
2.Press the SET button and switch on the power
at the same time.
3.The device will beep once it is switched on.
4.Setting complete
1.Stellen Sie den RAID-Modus an der Rückseite des
RS431U auf den gewünschten RAID-Modus ein.
2.Drücken Sie die SET-Taste, während Sie das
Gerät einschalten.
3.Das Gerät gibt einen Signalton aus, sobald es
eingeschaltet wird.
4.Einstellung abgeschlossen
1.Réglez le mode RAID à l'arrière du RS431U sur
le mode RAID désiré.
2.Appuyez en même temps sur le bouton
RÉGLER et sur le bouton d'alimentation.
3.L'appareil fera un bip lorsqu'il s'allume.
4.Réglages terminés.
1.Configure el modo RAID en la parte trasera de la
RS431U al modo RAID que precise
2.Presione el botón SET y el de encendido a la vez
3.El dispositivo emitirá un pitido si se ha encendido
4.Configuración completa
1.Impostare la modalità RAID sul pannello
posteriore di RS431U sulla modalità RAID
necessaria.
2.Premere il tasto SET ed accendere
contemporaneamente l'alimentazione.
3.Il dispositivo emette un segnale acustico
quando è acceso.
4.Impostazione completata
1.Установите нужный режим RAID на задней панели
устройства RS431U.
2.Нажмите кнопку SET и одновременно включите питание.
3.После включения устройство подаст одиночный звуковой
сигнал.
4.Настройка завершена
1.依照您想使用的RAID模式,設定RS431U背面Raid開關。
2.按住SET按鈕同時打開電源開關。
3.外接盒開機後會發出一聲「嗶」的聲響。
4.設定完畢。
1.依照您想使用的RAID模式,设定RS431U背面Raid开关。
2.按住SET按钮同时打开电源开关。
3.外接盒开机后会发出一声「哔」的声响。
4.设定完毕。
1.RS431U後部のRAIDモードを必要なRAIDモードに設定します。
2.SETボタンと電源スイッチを同時に押します。
3.デバイスは電源オン時にピッと鳴ります。
4.設定完了。
1.RS431U의 후면에 있는 RAID 모드를 필요한 RAID 모드로
설정합니다.
2.동시에 설정 버튼을 눌러 전원을 켭니다.
3.장치의 전원이 켜지면 비프음이 울립니다.
4.설정 완료
Set the RAID mode switch
meet you require.
Power Button
SET Button
Press the SET button
and switch on the power
Before set the RAID,
Please turn off the power first.
9
Page 11

RS431U
RAID Degrade / HDD Fault Alarm
When the HDD is damaged, the access LED will be
off and a beeping sound will occur. Press the SET
button on the back of the device to stop the beeping
sound.
Wenn die Festplatte beschädigt ist, erlischt die
Zugriffsanzeige-LED und ein Signalton wird
ausgegeben. Drücken Sie zum Beenden des
Signaltons die SET-Taste an der Rückseite des
Gerätes.
Lorsqu'un HDD est défectueux, le LED d'accès sera
éteint et il y aura un bip sonore. Appuyez sur le
bouton RÉGLER à l’arrière de l'appareil pour
éteindre les bips sonores.
Cuando el disco duro resulte dañado, el LED de
acceso estará apagado y se emitirá un pitido.
Presione el botón SET en la parte trasera del
dispositivo para detener el pitido.
Quando l’unità HDD è danneggiata, il LED accesso
si spegne e sarà emesso un segnale acustico.
Premere il tasto SET sul pannello posteriore del
dispositivo per arrestare il segnale acustico.
При повреждении (сбое) жесткого диска индикатор доступа к
диску гаснет и подается звуковой сигнал. Нажмите кнопку
SET на задней панели устройства для отключения сигнала.
當磁碟陣列裡有硬碟發生損毀時,故障硬碟的讀取燈號將熄滅而
且外接盒會發出「嗶」的聲響。請按下外接盒背面的SET按鈕將警
告聲響解除。
当磁盘阵列里有硬盘发生损毁时,故障硬盘的读取灯号将熄灭而
且外接盒会发出「哔」的声响。请按下外接盒背面的SET按钮将警
告声响解除。
HDDが故障した場合、アクセスLEDが消えてビープ音が鳴ります。デ
バイス後部のSETボタンを押すと、ブザーが止まります。
HDD가 손상되면 액세스 LED가 꺼지고 비프음이 울립니다.
장치의 후면에 있는 설정 버튼을 누르면 비프음이 꺼집니다.
HDD Fault at RAID 1/3/5/10 Mode / On-line Auto Rebuild
Tips:
Auto rebuild may fail if another HDD also fault during the rebuild process, please backup your files to another media
before replace the damaged HDD and start rebuild operation.
If one HDD is damaged, data can be rebuilt on
RAID 1/3/5/10. Please replace the damaged HDD
and start Rebuild operation.
Данные можно восстановить в режимах RAID 1/3/5/10.
Замените поврежденный жесткий диск и запустите операцию
восстановления (Rebuild).
Daten können bei RAID 1/3/5/10 rekonstruiert
werden. Bitte ersetzen Sie die beschädigte
Festplatte, starten Sie die Rekonstruktion.
Les données peuvent être reconstruites dans les
modes RAID 1/3/5/10. Veuillez remplacer le HDD
défectueux et lancer l'opération Reconstruire.
Los datos se pueden reconstruir en RAID 1/3/5/10.
Por favor reemplace el disco duro dañado y
comience la operación de reconstrucción.
I dati possono essere ricostruiti su RAID 1/3/5/10.
Sostituire il disco rigido danneggiato ed avviare il
processo Rebuild (Ricostruzione).
於RAID 1/3/5/10模式時,如果其中一顆硬碟發生損毀,資料將會
自動重建。請更換已損毀的硬碟,開始進行資料重建。資料重建
前,建議您先備份資料!
于RAID 1/3/5/10模式时,如果其中一颗硬盘发生损毁,数据将会
自动重建。请更换已损毁的硬盘,开始进行数据重构。数据重构
前,建议您先备份数据!
データはRAID 1/3/5/10モードでリビルド可能です。故障したHDDを
交換してからリビルド操作を開始します。
RAID 1/3/5/10에서 데이터를 재빌드할 수 있습니다. 손상된 HDD
를 교체하고 재빌드 작업을 시작합니다.
10
Page 12
RS431U
HDD Fault at RAID 0 and Combine Mode
On RAID 0 and combine mode if one HDD is
damaged, all data will be lost. Please replace the
damaged HDD and set clear RAID mode.
Bei den Modi RAID 0 und Kombinieren gehen alle
Daten verloren, wenn eine Festplatte beschädigt ist.
Bitte ersetzen Sie die beschädigte Festplatte.
En modes RAID 0 et Combiner, si un HDD est
défectueux, toutes les données seront perdues.
Veuillez remplacer le HDD défectueux.
En RAID 0 y Combine, si un disco duro resulta
dañado, todos los datos se perderán. Por favor,
reemplace el disco duro dañado.
In modalità RAID 0 e Combine, se una unità HDD è
danneggiata, tutti i dati andranno persi. Sostituire
l’unità HDD danneggiata.
HDD Fault at Clear RAID Mode
On Clear RAID mode, the data on the damaged
HDD is lost but will not influence other HDDs.
Please replace the damaged HDD.
В режимах RAID 0 и Combine при повреждении одного
жесткого диска теряются все данные. Замените
поврежденный жесткий диск.
於RAID 0 以及 Combine 模式時,如果其中一顆硬碟發生損毀,
全部資料將會遺失。請更換已損毀的硬碟,並設定Clear RAID模
式以清除原RAID設定。
于RAID 0 以及 Combine 模式时,如果其中一颗硬盘发生损毁,
全部数据将会遗失。请更换已损毁的硬盘,并设定Clear RAID模
式以清除原RAID设定。
RAID 0およびコンバインモードでは、1台のHDDが故障すると全部の
データが失われます。故障したHDDを交換してください。
RAID 0과 결합 모드에서 HDD가 하나라도 손상되면 모든
데이터를 잃게 됩니다. 손상된 HDD를 교체하십시오.
В режиме Clear RAID данные на поврежденном жестком
диске теряются, но это не сказывается на других жестких
дисках. Замените поврежденный жесткий диск.
Im RAID leeren-Modus gehen die Daten auf der
beschädigten Festplatte verloren, die anderen
Festplatten werden jedoch nicht beeinflusst. Bitte
ersetzen Sie die beschädigte Festplatte.
En mode Effacer RAID, les données sur le HDD
défectueux seront perdues mais cela n'affectera pas
les autres HDD. Veuillez remplacer le HDD
défectueux.
En modo Clear RAID, los datos del disco duro
dañado se perderán pero no influirán en otros
discos duros. Por favor, reemplace el disco duro
dañado.
In modalità Clear RAID, i dati dell’unità HDD
danneggiata sono persi, ma questo non influenzerà
sulle altre unità HDD. Sostituire l’unità HDD
danneggiata.
11
於Clear RAID 模式時,如果其中一顆硬碟發生損毀,該硬碟裡的
資料將會遺失但其它硬碟裡的資料則不受影響。請更換已損毀的
硬碟。
于Clear RAID 模式时,如果其中一颗硬盘发生损毁,该硬盘里的
数据将会遗失但其它硬盘里的数据则不受影响。请更换已损毁的
硬盘。
RAIDクリアモードでは、故障したHDD上のデータは失われますが、
他のHDDには影響しません。故障したHDDを交換してください。
Clear RAID 모드에서는 손상된 HDD에 있는 데이터가 손실되지만
다른 HDD에 영향을 미치지 않습니다. 손상된 HDD를
교체하십시오.
Page 13
RS431U
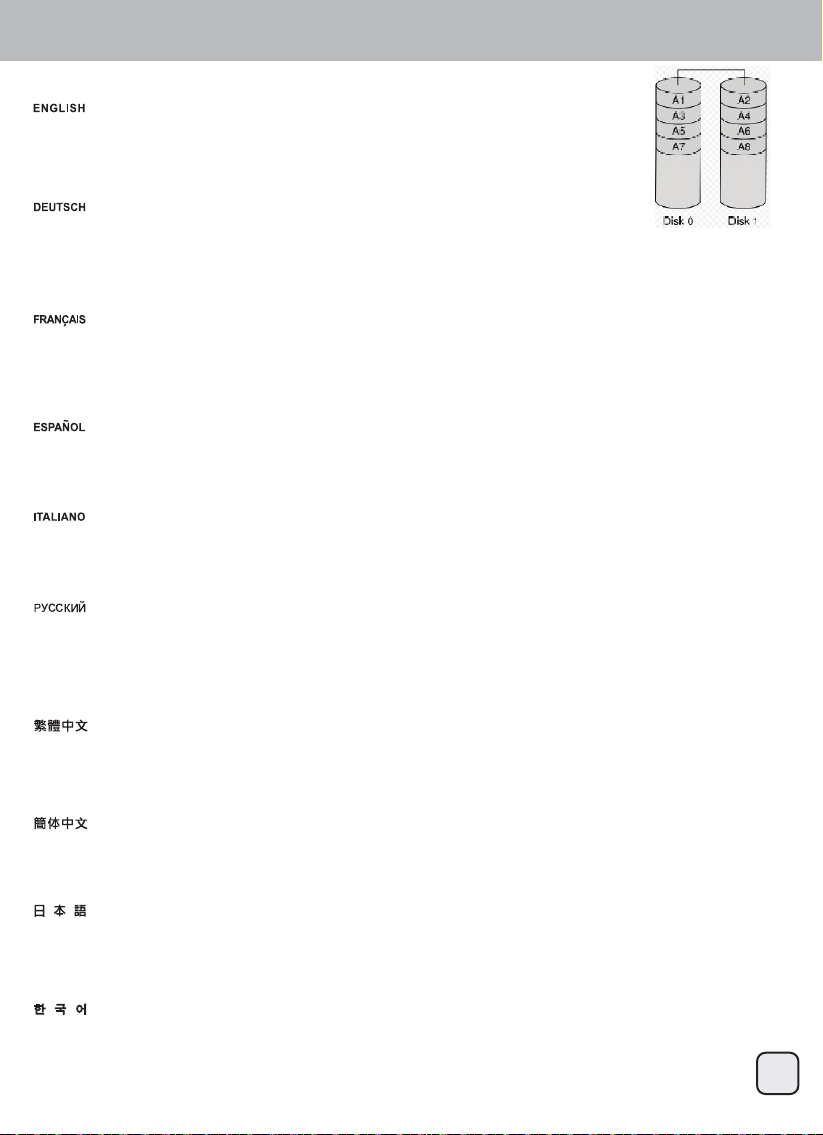
RAID Modes / RAID 0 - Striping
The drives are shown as one large single volume but the total size will depend on the drive with the smallest
capacity. This setting is used where speed is the primary objective but RAID Level 0 (also called striping) is not
redundant. This form of array splits each piece of data across the drives in segments; since data is written without
any form of parity data-checking, it allows for the fastest data transfer of all other modes. On the downside, if one
drive becomes damaged, the whole array can become corrupted.
Die Festplatte werden als ein einziges großes Laufwerk angezeigt, doch die Gesamtgröße hängt von der
Festplatte mit der geringsten Kapazität ab. Diese Einstellung wird genutzt, wenn das Hauptaugenmerk auf der
Geschwindigkeit liegt, der RAID-Level 0 (auch Striping genannt) jedoch nicht redundant ist. Diese Art der
Anordnung verteilt alle Daten quer über die Festplatten in Segmente; da Daten ohne jedwede Paritätsdatenprüfung geschrieben werden,
bietet dieser Modus die schnellste Datenübertragung. Nachteil ist jedoch, dass wenn eine Festplatte ausfällt, das gesamte Array zusammenbricht.
Les disques sont affichés avec un seul gros volume mais la taille totale dépendra de la taille du plus petit disque. Ce réglage est utilisé
lorsque la vitesse est l'objectif principal, mais le niveau RAID 0 (also appelé Entrelacement) n'est pas redondant. Ce type de matrice divise
chaque morceau de données entre les disques en segments ; puisque les données sont écrites sans aucune forme de vérification de parité
de données, cela permet d'obtenir le transfert des données le plus rapide de tous les modes. Par contre, si un disque est endommagé, la
matrice entière sera corrompue.
Los discos aparecen como un único volumen grande pero el tamaño total dependerá del disco con la capacidad menor. Este ajuste se usa
cuando la velocidad es el objetivo prioritario pero el RAID nivel 0 (también llamado de bandas) no es redundante. Este tipo de matriz divide
cada fragmento de datos entre los discos en segmentos; ya que los datos se escriben sin ningún tipo de comprobación de paridad, permite
la transferencia de datos más rápida de todos los modos. Por otra parte, si un disco resulta dañado, toda la matriz puede corromperse.
I dischi vengono visualizzati come un unico grande volume ma la dimensione totale dipende dal drive con capacità minore. Questa modalità
viene utilizzata quando la velocità è l’obiettivo primario ma il RAID 0 (chiamato anche striping) non è ridondante. Questa forma di array divide
singoli pezzi dei dati (in segmenti) fra i dischi. I dati stessi vengono scritti infatti senza nessuna forma di parity data-checking. Questo
permette al RAID 0 di essere la modalità più veloce rispetto alle altre. L’altra faccia della medaglia è che, se un drive si danneggia, l’intero
array risulterà corrotto.
RAID 0 - Striping
Жесткие диски отображаются как один большой том, но общий размер зависит от жесткого диска с меньшей емкостью. Эта
конфигурация используется, если высокая скорость является главной целью. Но уровень RAID 0 (также называемый чередованием)
не является избыточным массивом. В такой конфигурации массива каждый фрагмент данных разделяется по жестким дискам на
сегменты. Так как данные записываются без какой-либо проверки четности, достигается максимальная скорость передачи данных
по сравнению со всеми другими режимами. С другой стороны, в случае повреждения одного диска может быть поврежден весь
массив.
這個磁碟機會顯示為一個大的獨立容量,但是總容量是根據最小容量的硬碟來決定。這個設定的主要功用在於速度,但是RAID 0 (也稱做
striping)並沒有備援。這個形式的陣列會分割每一塊資料成區塊到硬碟中;當資料寫入並且沒有任何同位資料檢查錯誤時,它是所有模式中
檔案傳輸速度最快的。但缺點就是,如果有一個硬碟損壞,那麼整個陣列就會故障。
这个磁盘驱动器会显示为一个大的独立容量,但是总容量是根据最小容量的硬盘来决定。这个设定的主要功用在于速度,但是RAID 0 (也称做
striping)并没有备援。这个形式的数组会分割每一块数据成区块到硬盘中;当数据写入并且没有任何同位数据检查错误时,它是所有模式中
档案传输速度最快的。但缺点就是,如果有一个硬盘损坏,那么整个数组就会故障。
1つの大きい単一ボリュームのドライブとして示され、総容量は小さなドライブの容量になります。この設定は速度が主目的である場面で使
用されますが、RAID Level0(ストライピングとも呼ばれる)は冗長性を持ちません。この形式のアレイでは、それぞれのデータが複数のドラ
イブにわたったセグメントに分けられます。データはいずれの形式のパリティデータチェックなしで書かれるので、それは他の全てのモー
ドより最速のデータ転送を実現します。欠点は、1台のドライブが故障すると、全体のアレイが使用不能になる点です。
드라이브가 하나의 대용량으로 표시되나 총 크기는 용량이 가장 작은 드라이브에 따라 결정됩니다. 이 설정은 속도가 일차 목표인
경우 사용되나 RAID 레벨 0(스트리핑이라고도 부름)이 중복되지 않습니다. 이 형태의 배열은 데이터가 패리티 데이터 확인을 하지
않고 기록되기 때문에 드라이브에 걸쳐 있는 각 데이터를 세그먼트로 분할하고, 따라서 기타 모든 모드에서 데이터 전송을 가장
빠르게 할 수 있습니다. 아래쪽에서 드라이브 하나가 손상되면 전체 배열이 손상될 수 있습니다.
12
Page 14

RS431U
RAID Modes / RAID 1 – Disk Mirroring
Two drives show up as one volume but only 50% of the total capacity, depending on the drive with the smallest
capacity, can be used. RAID 1 creates an exact copy (or mirror) of a set of data on the second drive. This is
useful when reliability and backup take precedence over storage capacity. Should one hard drive fail, it can be
replaced and the data rebuilt automatically.
Zwei Festplatten werden als ein Laufwerk angezeigt, es sind jedoch nur 50 % der Gesamtkapazität nutzbar;
abhängig von der Festplatte mit der geringsten Kapazität. RAID 1 erstellt eine exakte Kopie (oder "Spiegelung")
der Daten auf der zweiten Festplatte. Dies ist sinnvoll, wenn Zuverlässigkeit und Sicherung wichtiger als die
Speicherkapazität sind. Falls eine Festplatte ausfällt, kann sie einfach ersetzt werden und die Daten werden automatisch wieder aufgebaut.
Deux disques sont affichés avec un seul gros volume, mais seulement 50% de la capacité totale, basée sur le disque le plus petit, pourra être
utilisé. RAID 1 créé une copie exacte (ou miroir) d'un ensemble de données sur le deuxième disque. Cela est pratique lorsque la fiabilité et la
sauvegarde des données est plus important que la taille de stockage. Si un disque tombe en panne, il peut être restauré et les données
reconstruites automatiquement.
Dos discos aparecen como un único volumen pero sólo se puede usar un 50% de la capacidad total, dependiendo del disco con la menor
capacidad. RAID 1 crea una copia exacta (ó espejo) de los datos en el segundo disco. Esto es útil cuando la fiabilidad y la copia de
seguridad son más importantes que la capacidad de almacenamiento de datos. Si un disco duro falla, se puede reemplazar y los datos se
reconstruirán de forma automática.
Due dischi vengono visualizzati come uno solo con il 50% della capacità totale, dipendente dal drive con capacità minore. Il RAID 1 crea una
copia esatta (o mirror) di un set di dati sul secondo disco. Questa modalità torna utile quando l’affidabilità e la conservazione dei dati hanno la
precedenza sulla capacità di storage. Se un drive dovesse danneggiarsi, è possibile sostituirlo e ripristinare i dati automaticamente.
Два жестких диска отображаются как один том, но можно использовать только 50% суммарной емкости дисков, в зависимости от
жесткого диска с меньшей емкостью. Массив RAID 1 создает точную (зеркальную) копию набора данных на втором жестком диске.
Эту конфигурацию можно использовать, если приоритет перед скоростью имеют надежность и необходимость резервного
копирования. При сбое одного диска его можно заменить, и данные будут автоматически восстановлены.
RAID 1 - Mirroring
兩個硬碟會顯示為一個容量,但是只有總容量的50%可以使用,總容量是根據最小容量的硬碟來決定。RAID 1 會真正製造資料的複製
(mirror)到第二個磁碟。當可靠度與備份的需求高過儲存容量時這是很有用的。當一個硬碟故障,它可以自動取代並且自動重建資料。
两个硬盘会显示为一个容量,但是只有总容量的50%可以使用,总容量是根据最小容量的硬盘来决定。RAID 1 会真正制造数据的复制
(mirror)到第二个磁盘。当可靠度与备份的需求高过储存容量时这是很有用的。当一个硬盘故障,它可以自动取代并且自动重建数据。
2台のドライブが1つのボリュームとして示され、総容量は最も小さな容量のドライブの50%しか使用できません。RAID1は2番目のドライブに
一連のデータの正確なコピー(ミラーとも呼ばれる)を作成します。信頼性とバックアップが記憶容量より優先されるとき、これは有用です
。たとえ1台のハードドライブが故障しても、交換後にデータを自動的に復元します。
두 개의 드라이브가 하나의 용량으로 표시되나 용량이 가장 작은 드라이브에 따라 총 용량의 50%가 사용됩니다. RAID 1이 두 번째
드라이브에 데이터 세트의 정확한 사본(또는 미러)을 만듭니다. 이는 신뢰성과 백업이 저장 용량보다 중요할 때 유용합니다. 드라이브
하나가 고장날 경우 고장난 드라이브를 교체할 수 있어 데이터가 자동으로 다시 빌드됩니다.
13
Page 15

RS431U
RAID Modes / RAID 10 - Stripe Of Mirrors
RAID 10 - Stripe Of Mirrors
RAID 10 is a high level data storage option where at least 4 hard drives are required. The total capacity is twice the size of the drive with the
smallest capacity. Under Raid 10, all four hard drives will perform RAID 1 where the first two and the last two hard drives are mirror images of
each other and than it will perform RAID 0. This will be shown as one hard drive with high speed performance and a secure backup function.
RAID 10 ist eine Datenspeicheroption auf hoher Ebene, bei der mindestens 4 Festplatten benötigt werden. Die Gesamtkapazität entspricht
dem Doppelten der Festplatte mit der geringsten Kapazität. Unter Raid 10 führen alle vier Festplatten RAID 1 aus, wobei die ersten und
letzten beiden Festplatten gespiegelte Abbilder voneinander sind und als RAID 0 fungieren. Sie werden mit hoher Geschwindigkeit und
zuverlässiger Sicherungsfunktion als eine Festplatte angezeigt.
RAID 10 est une option de stockage des données à haut niveau avec un minimum de 4 disques durs nécessaire. La capacité totale est égale
au double de la taille du disque avec la plus petite capacité. En mode RAID 10, tous les quatre disques durs effectueront RAID 1, et le
deuxième et le dernier des disques durs seront une image miroir l'un de l'autre et effectueront ensuite RAID 0. Cela apparaîtra comme un
seul disque dur avec des hautes performances et une fonction de sauvegarde de sécurité.
RAID 10 es una opción de almacenamiento de alto nivel donde al menos hacen falta 4 discos duros. La capacidad total es el doble de
tamaño del disco de menor capacidad. Bajo Raid 10, los cuatro discos duros estarán en RAID 1, donde los dos primeros y dos últimos
discos duros serán una imagen de espejo entre sí y con RAID 0. Esto resultará en un disco duro con rendimiento de alta velocidad y una
función de copia de seguridad.
Il RAID 10 è una opzione d’alto livello d’archiviazione dei dati e sono necessari almeno 4 dischi rigidi. La capacità totale è il doppio delle
dimensioni dell’unità con capacità più piccola. In Raid 10, tutti i quattro dischi rigidi eseguiranno RAID 1 dove i primi due e gli ultimi due dischi
rigidi sono immagini mirror l'uno dell'altro e poi eseguiranno RAID 0. Questo sarà mostrato come un disco rigido con prestazioni ad alta
velocità e una funzione di backup sicuro.
Режим RAID 10 обеспечивает высокий уровень хранения данных, для реализации которого требуется не менее 4 жестких дисков.
Общий объем памяти равен двойному размеру памяти диска с наименьшим объемом памяти. В режиме Raid 10 все четыре жестких
диска работают в режиме RAID 1, из которых первые два и последние два жестких диска представляют собой зеркальное
отображение друг друга, а затем запускается режим RAID 0. Это соответствует работе одного жесткого диска с высокой
производительностью и функцией резервного дублирования данных.
RAID10是最少需要四顆硬碟才能建立的進階模式。總容量為磁碟陣列中最小容量硬碟的兩倍,在RAID10模式下,四顆硬碟將分為兩組先進行
RAID1鏡射,然後再進行RAID0分割。磁碟陣列建立後,將被系統顯示為一個磁碟,優點是具備高的讀寫速度以及中高的可靠度。
RAID10是最少需要四颗硬盘才能建立的进阶模式。总容量为磁盘阵列中最小容量硬盘的两倍,在RAID10模式下,四颗硬盘将分为两组先进行
RAID1镜射,然后再进行RAID0分割。磁盘阵列建立后,将被系统显示为一个磁盘,优点是具备高的读写速度以及中高的可靠度。
RAID 10は最低4台のハードディスクドライブが必要とされる、高レベルのデータ保存オプションです。合計容量は容量が最小のドライブの2
倍となります。RAID 10では、4台のハードディスクドライブがRAID 1として最初の2台と後の2台の間でミラーリングを行い、その2台の中で
はRAID 0を実行します。これは見かけ上1台の高速性能のハードディスクとして機能し、セキュアなバックアップ機能も備えています。
RAID 10은 레벨이 높은 데이터 저장 옵션으로서 최소 4개의 하드 드라이브가 필요합니다. 총 용량은 용량이 가장 적은 드라이브
크기의 두 배입니다. Raid 10에서 4개의 하드 드라이브 모두 RAID 1을 수행하는데, 여기서는 처음 2개와 마지막 2개의 하드
드라이브가 서로에 대한 미러 이미지로서 RAID 0을 수행합니다. 이는 고속 성능과 안전한 백업 기능을 지닌 하드 드라이브로
표시됩니다.
14
Page 16

RS431U
RAID Modes / Combine (BIG)
Combine (BIG) Mode
Combine mode will add all existing hard drive into a single hard drive with large capacity.
Der Kombinieren-Modus fügt alle bestehenden Festplatten zu einer Festplatte mit großer Kapazität zusammen.
Le mode Combiné combinera tous les disques durs existants en un seul disque dur avec une plus grande capacité.
El modo Combine añadirá todos los discos duros en un único disco duro de gran capacidad.
La modalità Combine aggiungerà tutti i dischi rigidi in un singolo disco rigido di grande capacità.
В режиме Combine все подключенные жесткие диски объединяются в один жесткий диск с большим объемом памяти.
Combine模式將會將所有的硬碟視為一個超大容量的磁碟,但不具備任何錯誤備援機制。
Combine模式将会将所有的硬盘视为一个超大容量的磁盘,但不具备任何错误备援机制。
コンバインモードでは、全ての装着ハードディスクドライブが大容量のハードディスク1台として動作します。
결합 모드는 기존의 모든 하드 드라이브를 용량이 큰 단 하나의 하드 드라이브에 추가합니다.
15
Page 17
RS431U
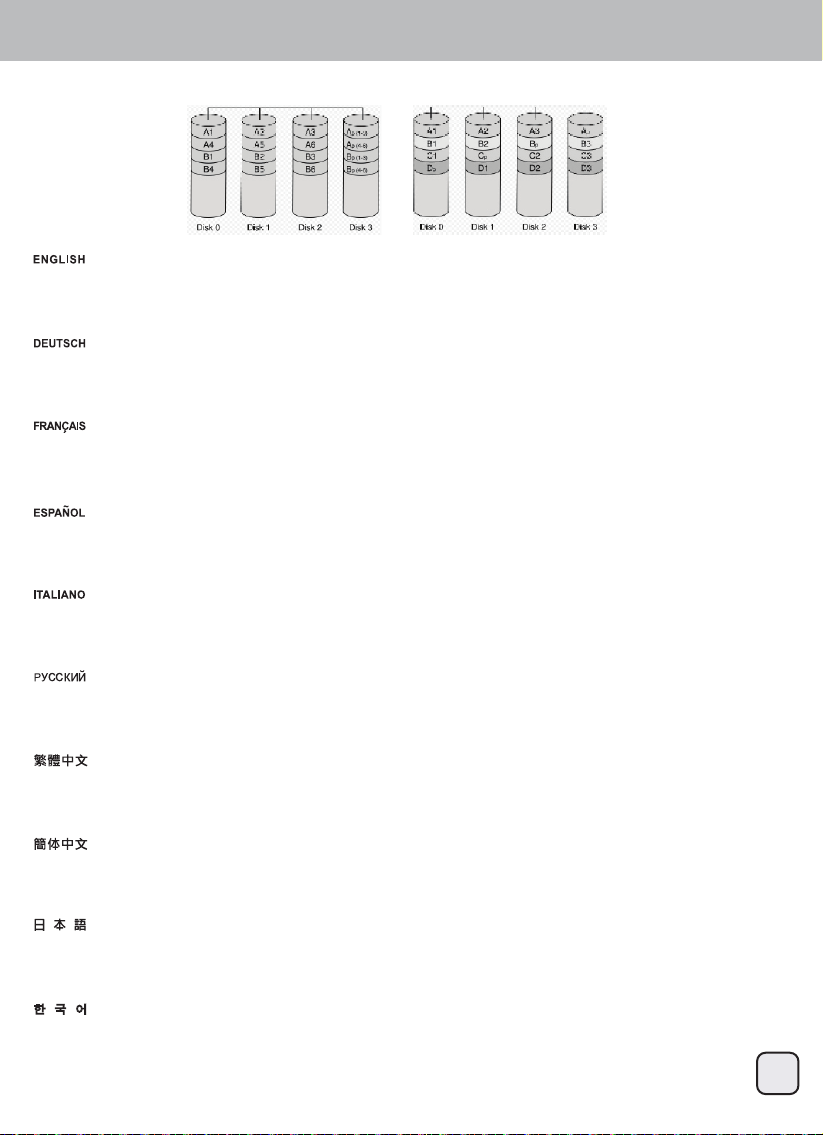
RAID Modes / RAID 3 and RAID 5
RAID 3 RAID 5
The parity information on RAID 3 is stored on a single drive, where RAID 5 stores the information across the entire array. In both cases, the
original data is secure.
Die Paritätsinformationen unter RAID 3 werden auf einer einzigen Festplatten gespeichert, werden RAID 5 die Informationen auf den
gesamten Verbund verteilt speichert. In beiden Fällen sind die Originaldaten sicher.
Les informations de parité de RAID 3 sont stockées sur un seul disque, alors que les informations de RAID 5 sont stockées à travers la
matrice entière. Dans les deux cas, les données originales sont sécurisées.
La información de paridad de RAID 3 se almacenará en un único disco, mientras RAID 5 almacena la información en toda la matriz. En
ambos casos, los datos originales están a salvo.
Le informazioni di parità su RAID 3 sono archiviate in un singolo disco rigido, invece RAID 5 archivia le informazioni sull'intero array. In
entrambi i casi, i dati originali sono protetti.
Информация четности в режиме RAID 3 хранится на одном диске, а в режиме RAID 5 эта информация хранится на всем массиве
дисков. В обоих случаях оригинальные данные защищены.
RAID3單獨將同位元檢查資料單獨儲存在一個硬碟中,RAID5則是將同位元檢查資料分別儲存於磁碟陣列中不同的硬碟中。相較於其它磁碟陣列
模式,這兩種模式的原始資料是較為安全的。
RAID3单独将同位检查数据单独储存在一个硬盘中,RAID5则是将同位检查数据分别储存于磁盘阵列中不同的硬盘中。相较于其它磁盘阵列模式
,这两种模式的原始数据是较为安全的。
パリティ情報はRAID 3では1台のドライブに保存され、RAID 5では全体のアレイにわたって保存されます。どちらの場合もオリジナルデータ
の安全性が確保されます。
RAID 3에 대한 패리티 정보가 단 하나의 드라이브에 저장되는데, 여기에서 RAID 5는 전체 배열에 걸쳐 정보를 저장합니다. 두 가지
경우 모두 원래의 데이터가 안전합니다.
16
Page 18

RS431U
SYSTEM
Windows7 Disk Manager
Support Windows XP/VISTA/7. Windows XP does not recognize hard drive in excess of 2TB. Under Windows 7/VISTA hard drives in excess
of 2TB must be converted to GPT in order to access them.
Unterstützt Windows XP/Vista/7. Windows XP erkennt Festplatten über 2 TB nicht. Unter Windows 7/Vista müssen Festplatten mit mehr als 2
TB in GPT konvertiert werden, damit auf die zugegriffen werden kann.
Supporte Windows XP/VISTA/7. Windows XP ne supporte pas normalement les disques durs de plus de 2To. Dans Windows 7/Vista, les
disques durs de plus de 2To doivent être convertis à GPT pour pouvoir les utiliser.
Acepta Windows XP/Vista/7. Windows XP no reconoce discos duros de más de 2TB. En Windows 7/Vista los discos duros de más de 2TB
se deben convertir a GPT para poder acceder a ellos.
Supporto di Windows XP/VISTA/7. Windows XP non riconosce dischi rigidi di dimensioni superiori a 2TB. In Windows 7/VISTA i dischi rigidi
che eccedono i 2TB devono essere convertiti in GPT per potervi accedere.
Поддержка в ОС Windows XP/VISTA/7. ОС Windows XP не распознает жесткие диски с объемом памяти более 2 ТБ. Для доступа к
жестким дискам с объемом памяти более 2 ТБ в ОС Windows 7/VISTA их следует перевести в формат GPT.
支援Windows XP/VISTA/7系統。但Windows XP無法辨識容量超過2TB的磁碟。在Windows VISTA/7 系統底下,如要使用容量超過2TB的磁碟,則
必須先將磁碟轉換成以GUID磁碟分割表(GPT)格式化後,才能讀取。
支持Windows XP/VISTA/7系统。但Windows XP无法辨识容量超过2TB的磁盘。在Windows VISTA/7 系统底下,如要使用容量超过2TB的磁盘,则
必须先将磁盘转换成以GUID磁盘分割表(GPT)格式化后,才能读取。
対応OSはWindows XP/VISTA/7です。Windows XPでは、2TBを超えるハードディスクドライブは認識されません。Windows 7/VISTAでは、2TBを
超えるハードディスクドライブはGPTに変換されることでアクセス可能です。
Windows XP/VISTA/7을 지원합니다. Windows XP는 2TB를 초과하는 하드 드라이브는 인식하지 못합니다. Windows 7/VISTA의 경우 2TB를
초과하는 하드 드라이브는 액세스가 가능하도록 GPT로 변환해야 합니다.
17
Page 19
RS431U
Warranty Information
This product has a limited 2 year warranty in North America, Europe, and Australia.
For information on warranty periods in other regions, please contact your reseller or SilverStone authorized distributor.
Warranty terms & conditions
1. Product component defects or damages resulted from defective production is covered under warranty.
Defects or damages with the following conditions will be fixed or replaced under SilverStone Technology’s jurisdiction.
a) Usage in accordance with instructions provided in this manual, with no misuse, overuse, or other inappropriate actions.
b) Damage not caused by natural disaster (thunder, fire, earthquake, flood, salt, wind, insect, animals, etc…)
c) Product is not disassembled, modified, or fixed. Components not disassembled or replaced.
d) Warranty mark/stickers are not removed or broken.
Loss or damages resulted from conditions other than ones listed above are not covered under warranty.
2. Under warranty, SilverStone Technology’s maximum liability is limited to the current market value for the product (depreciated value, excluding
shipping, handling, and other fees). SilverStone Technology is not responsible for other damages or loss associated with the use of product.
3. Under warranty, SilverStone Technology is obligated to repair or replace its defective products. Under no circumstances will SilverStone
Technology be liable for damages in connection with the sale, purchase, or use including but not limited to loss of data, loss of business, loss of
profits, loss of use of the product or incidental or consequential damage whether or not foreseeable and whether or not based on breach of warranty,
contract or negligence, even if SilverStone Technology has been advised of the possibility of such damages.
4. Warranty covers only the original purchaser through authorized SilverStone distributors and resellers and is not transferable to a second hand
purchaser.
5. You must provide sales receipt or invoice with clear indication of purchase date to determine warranty eligibility.
6. If a problem develops during the warranty period, please contact your retailer/reseller/SilverStone authorized distributors or SilverStone
http://www.silverstonetek.com.
Please note that: (i) You must provide proof of original purchase of the product by a dated itemized receipt; (ii) You shall bear the cost of shipping
(or otherwise transporting) the product to SilverStone authorized distributors. SilverStone authorized distributors will bear the cost of shipping
(or otherwise transporting) the product back to you after completing the warranty service; (iii) Before you send the product, you must be issued a
Return Merchandise Authorization (“RMA”) number from SilverStone. Updated warranty information will be posted on SilverStone’s official website.
Please visit http://www.silverstonetek.com for the latest updates.
Additional info & contacts
For North America (usasupport@silverstonetek.com)
SilverStone Technology in North America may repair or replace defective product with refurbished product that is not new but has been functionally tested.
Replacement product will be warranted for remainder of the warranty period or thirty days, whichever is longer. All products should be sent
back to the place of purchase if it is within 30 days of purchase, after 30 days, customers need to initiate RMA procedure with SilverStone Technology
in USA by first downloading the “USA RMA form for end-users” form from the below link and follow its instructions.
http://silverstonetek.com/contactus.php
For Australia only (support@silverstonetek.com)
Our goods come with guarantees that cannot be excluded under the Australian Consumer Law.
You are entitled to a replacement or refund for a major failure and for compensation for any other reasonably foreseeable loss or damage.
You are also entitled to have the goods repaired or replaced if the goods fail to be of acceptable quality and the failure does not amount to a major failure.
Please refer to above “Warranty terms & conditions” for further warranty details.
SilverStone Technology Co., Ltd. 12F No. 168 Jiankang Rd., Zhonghe Dist., New Taipei City 235 Taiwan R.O.C. + 886-2-8228-1238
(standard international call charges apply)
For Europe (support.eu@silverstonetek.de)
For all other regions (support@silverstonetek.com)
©2013 SilverStone Technology Co., Ltd. All Rights Reserved.
All specifications are subject to change without prior notice.
18
Page 20

 Loading...