

Page 1

RVS 02
USB 3.0 EXTERNAL 2.5’’ HDD/SSD ENCLOSURE
Page 2
RVS02
USB 3.0 EXTERNAL 2.5’’ HDD/SSD ENCLOSURE
1
Installation and system optimization guide:
Thanks you for purchasing, please read manual in detail first before operation.
Specifications subject to change without notice.
http://www.silverstonetek.com
P.3
P.7
PRODUCT OVERVIEW
ENGLISH
P.2
P.11
P.15
P.19
P.23
P.31
P.35
P.27
P.39
简体中文
简体中文
Page 3

Features
USB 3.0 EXTERNAL 2.5’’ HDD/SSD ENCLOSURE
Elegant design with in mold decoration plastic
Support 2.5” SATA I/SATA II/SATA III hard drive and SSD
Plug and play with hot-swappable connection
Maximum 5Gbit/s data transfer speed via USB 3.0 interface
Maximum compatibility with USB 2.0 (480Mbits)
Introduction
SilverStone created an incredible mobile storage product in the RAVEN RVS02 with a new high-grade feeling and screwless
design. It enables users to swap out hard drive effortlessly. Not only does it lets you replace hard drive faster than just about
any external enclosure, the RVS02 will has an optional elegant design accessories to let user build extra function by unique
dock, such as desk LED light or small fan. Equipped with USB 3.0 5Gbit/s super speed interface, the RVS02 is an excellent
choice for taking important data on the go with maximum flexibility and performance.
Model No.
Enclosure Material
Power Requirement
Drive Size Support
Drive Interface Support
Enclosure Interface
Operating System Support
Net Weight
Dimension
Minimum System Requirements
Specifications
SST-RVS02
In mold decoration Plastic
5Vdc from USB port
2.5” HDD or SSD
SATA I/SATA II/SATA III Up to 6Gbit/s
USB 3.0 (Max. 5Gbit/s) interface
Compatible with USB 2.0 and 1.1
Windows 2000, XP, Vista, Mac OS and Linux
62 g
127.9mm (W) x 75.1mm (L) x 18.5mm (H)
Windows XP, Vista and 7
Mac OS 9.x (Apple USB support 1.3.5 and greater) and Mac OS 10.x
Linux
Computer with USB 3.0 or USB 2.0/1.1 interface
RVS02
USB 3.0 EXTERNAL 2.5’’ HDD/SSD ENCLOSURE
RVS02
2
Page 4

RVS02
USB 3.0 EXTERNAL 2.5’’ HDD/SSD ENCLOSURE
3
Functions
Screw less design for quick install in 10 second
USB 3.0 Host Interface (micro type connector) up to 5Gbps
Compatible down to USB 2.0/1.1
Supports 2.5” SATA HDD and SSD (9.5 mm high)
Simple connection without power adapter
LED display for power and HDD access
System Requirements
Hardware requirement: Computer with USB 3.0 port.
Software requirement: Windows XP / Vista / 7, Mac OS 10.x, Linux.
Packing Contents
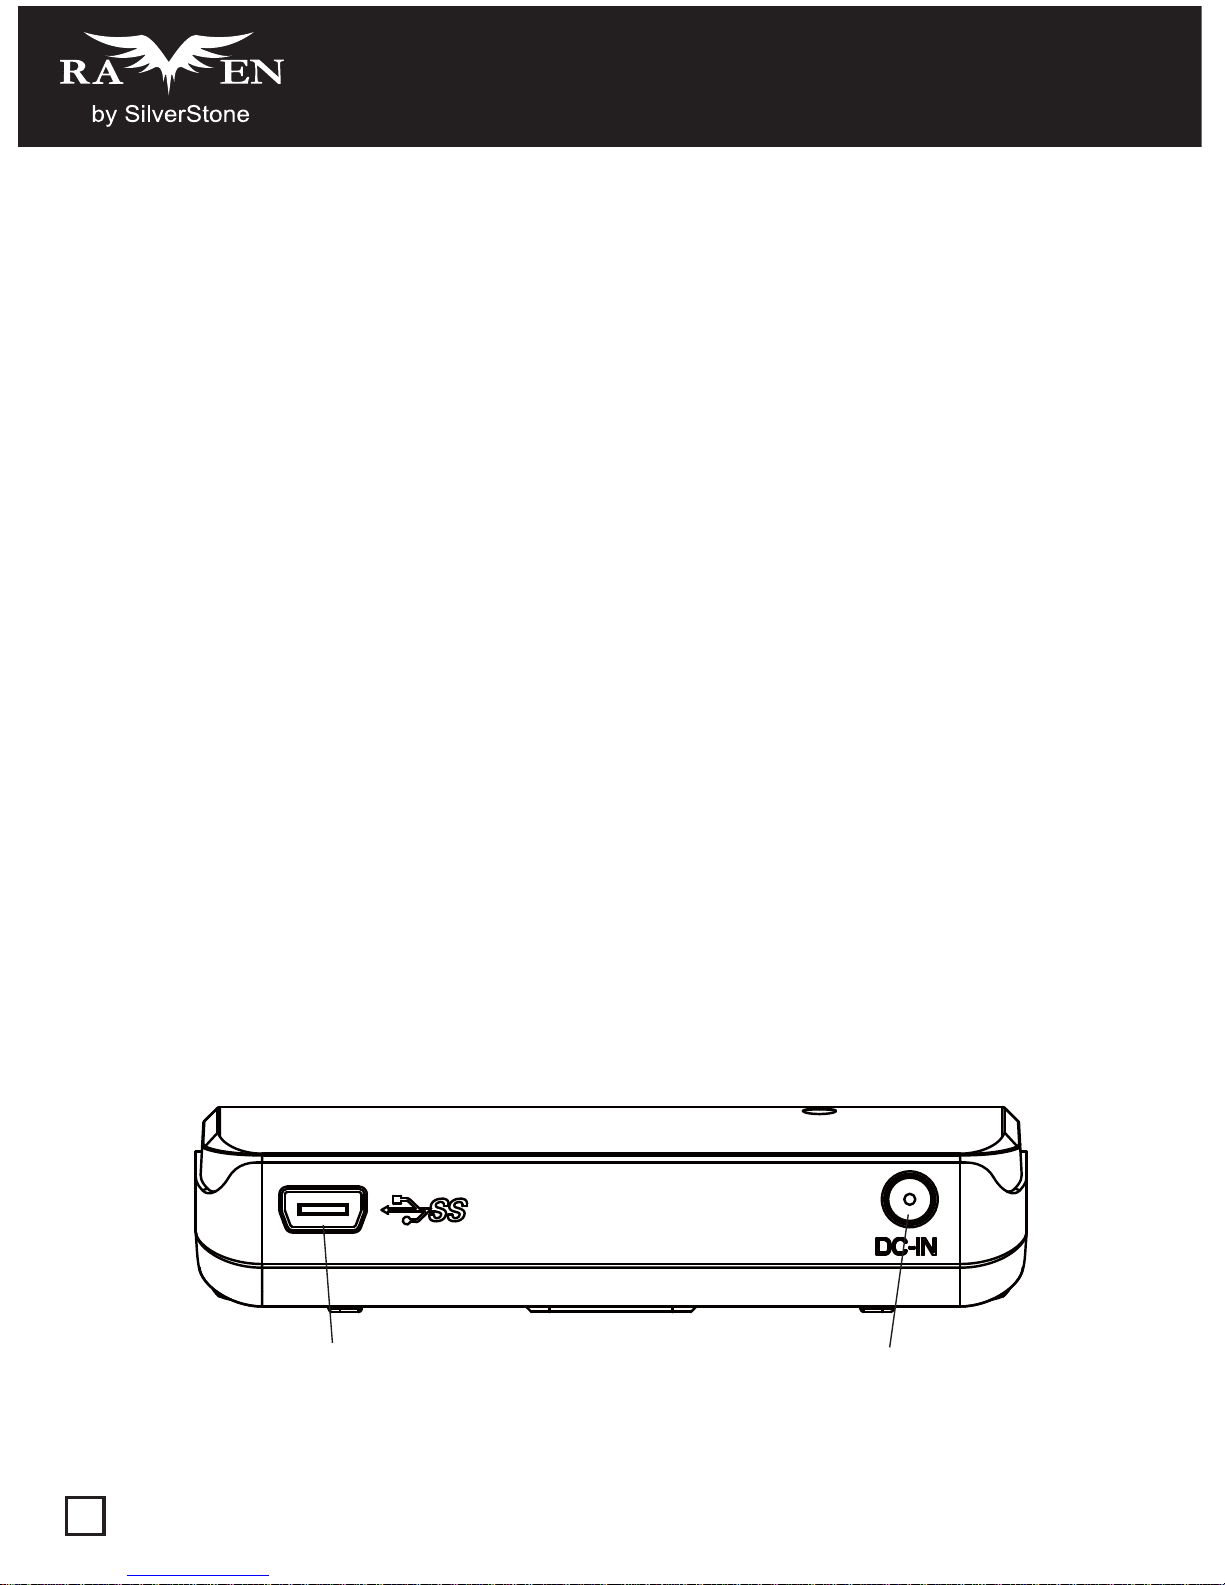
Exterior Layout
Please confirm first whether to include the following accessories in the packaging of product or not, when omit, please kindly
contact with the local distributor as quickly as possible.
Interface: USB 3.0
User’s Manual: 1 PCS
USB 3.0 Y Cable: 1 PCS
Flannel Bag: Option
USB 3.0 A port
DC-in
Page 5
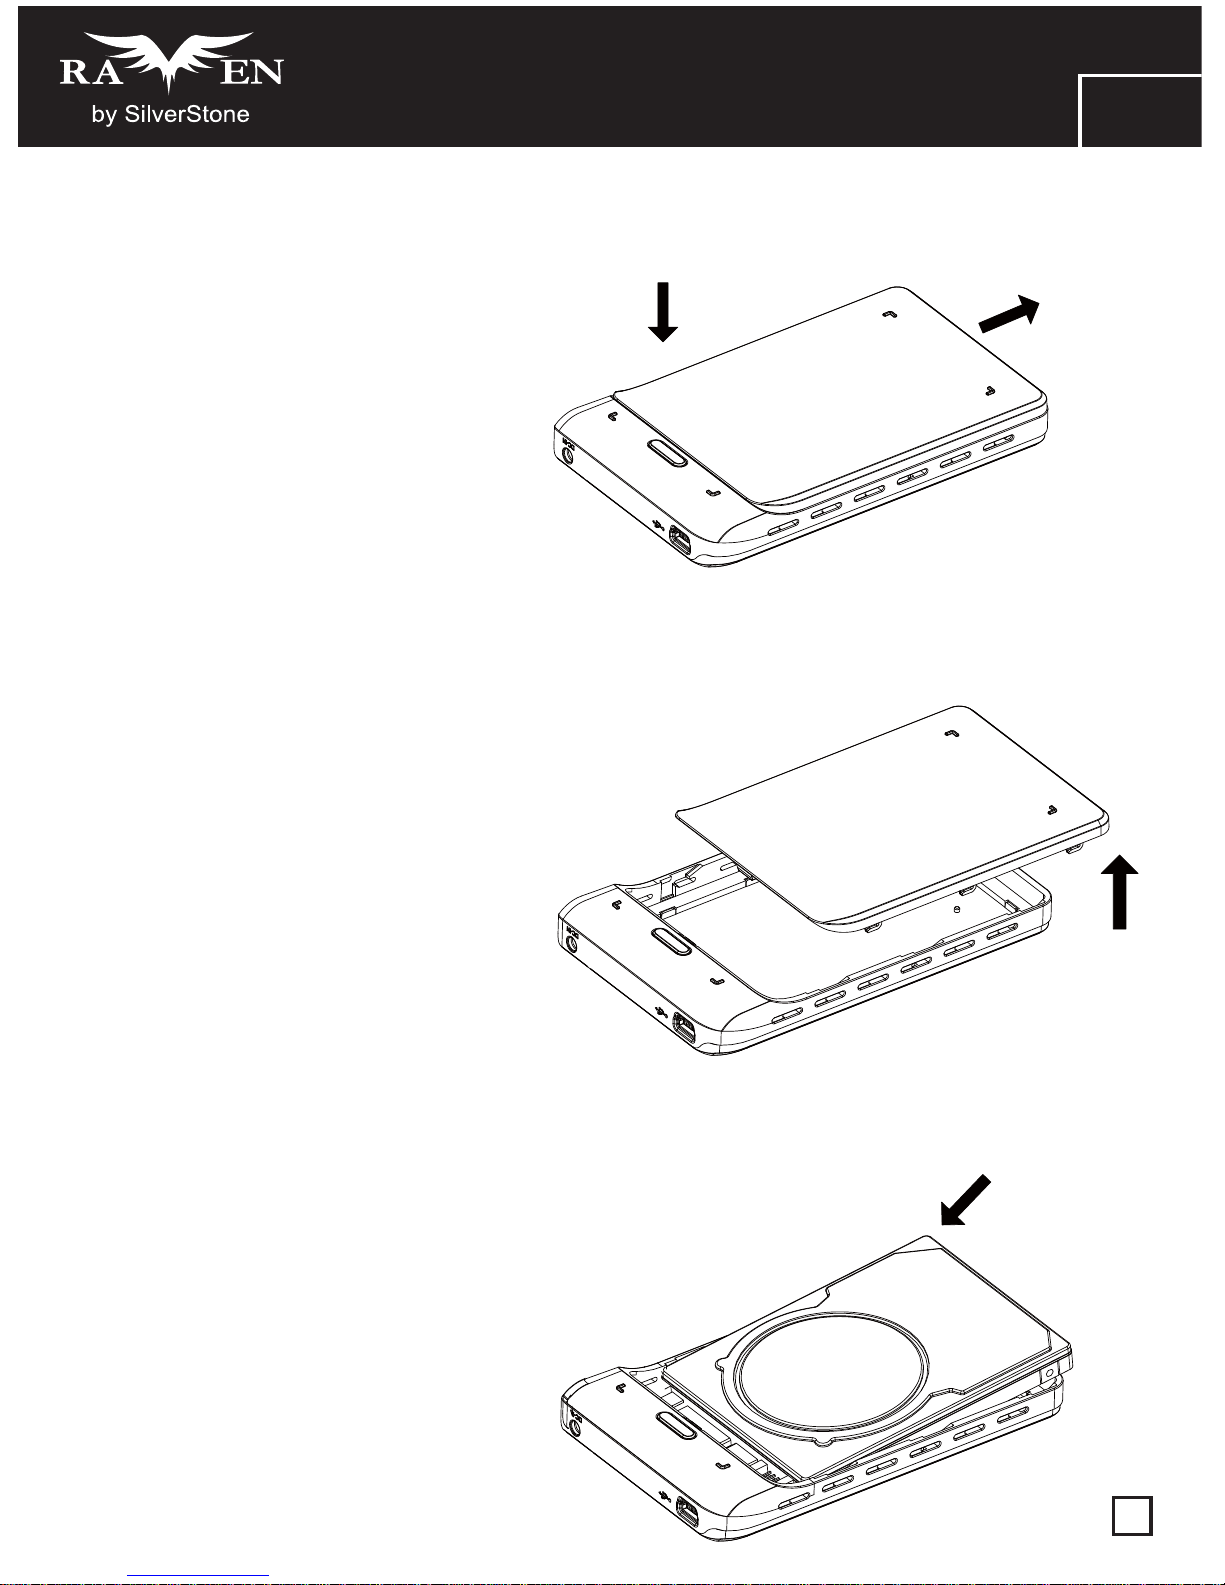
Install HDD
1.
Push the button on the bottom of case
to release button cover and then slide out.
2.
Take off bottom cover.
3.
Install SATA HDD.
Please install your HDD in the following steps. (Our products are suitable for SATA HDDs with 9.5mm height only.)
RVS02
USB 3.0 EXTERNAL 2.5’’ HDD/SSD ENCLOSURE
4
EN
Page 6
RVS02
USB 3.0 EXTERNAL 2.5’’ HDD/SSD ENCLOSURE
5
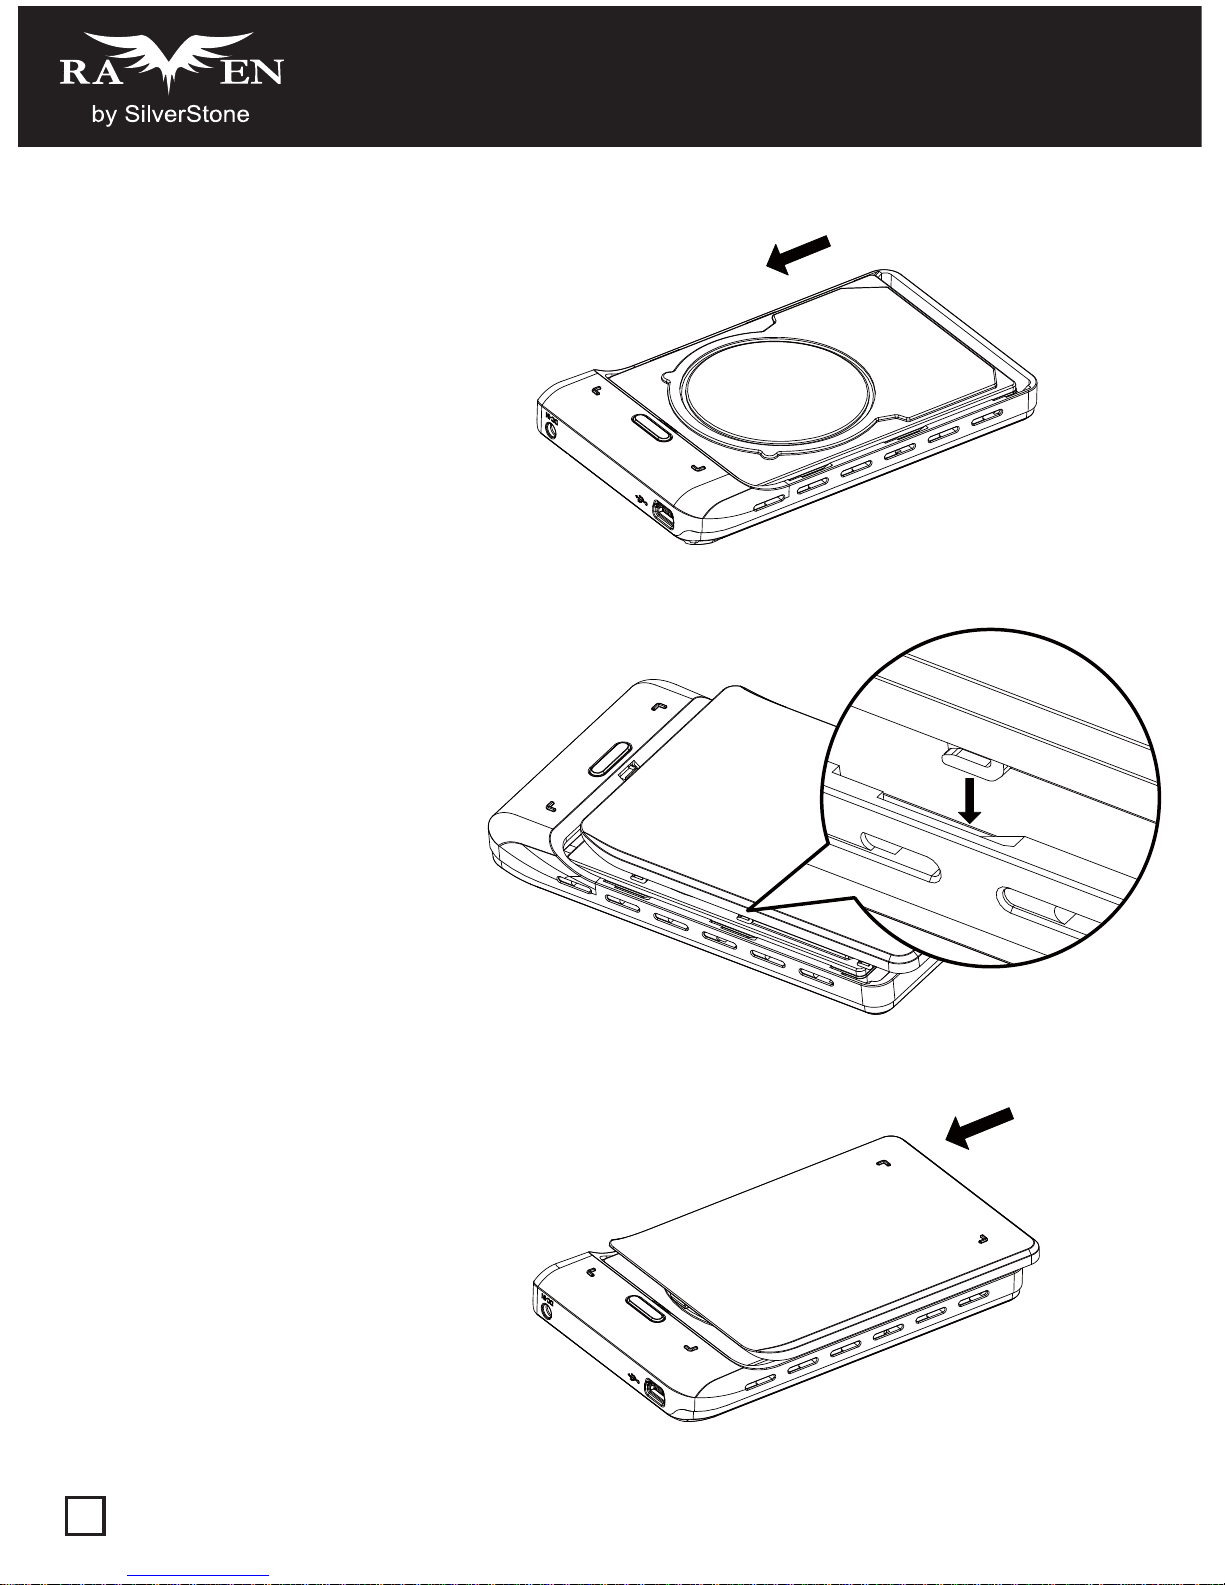
4.
Slide HDD as shown to make sure
connection is completed.
5.
Target the hook of the bottom cover
to corresponding catch on the body.
6.
Slide bottom to make sure connection
is completed. It makes a "CLICK" sound.
Page 7

Safely Remove HDD External Case
Whatever kinds of OS you are using, please follow the steps below to remove this external enclosure safely.
a. Double click rapidly on green arrow icon at right bottom corner of screen.
b. Windows or Mac will pop a window to ask if you would like to disconnect this device.
c. You can easily stop this portable enclosure by following on screen steps in few seconds.
If you use an all new HDD
Use “Disk Manage” to configure your HDD.
Troubleshooting
A. Please make sure your HDD has been installed correctly.
B. Please make sure you have installed correct driver for this enclosure.
C. Please make sure your HDD has been formatted. If no, please format you hard drive first.
* if you don't know how to install or debug, please don't disassemble it. Please contact the seller for help. *
CAUTION!!
A. If you are not sure what OS you are using, please contact your PC dealer.
B. Please don't put this external enclosure in a humid or high temperature environment.
C. If the PC or this storage is damaged by fault operation of user, we would not take the responsibility of compensation or repair.
RVS02
USB 3.0 EXTERNAL 2.5’’ HDD/SSD ENCLOSURE
6
EN
Page 8
RVS02
USB 3.0 EXTERNAL 2.5’’ HDD/SSD ENCLOSURE
7
Funktionen
Schraubenloses Design zur schnellen Installation innerhalb von 10 Sekunden
USB 3.0-Host-Schnittstelle (Mikroanschluss), bis zu 5 Gbps
Abwärtskompatibel mit USB 2.0/1.1
Unterstützt 2,5 Zoll-SATA-Festplatte und -SSD (9,5 mm hoch)
Einfache Verbindung ohne Netzteil
LED-Anzeige zum Betrieb und Festplattenzugriff
Systemanforderungen
Hardwareanforderungen: Computer mit USB 3.0-Port.
Softwareanforderungen: Windows XP / Vista / 7, Mac OS 10.x, Linux.
Lieferumfang
Äußeres Layout
Bitte prüfen Sie zuerst, ob die folgenden Zubehörkomponenten im Lieferumfang des Produktes enthalten sind;
wenden Sie sich schnellstmöglich an Ihren örtlichen Händler, falls etwas fehlen sollte.
Schnittstelle: USB 3.0
Bedienungsanleitung: 1 Stk
USB 3.0-Y-Kabel: 1 Stk
Flanneltasche: Optional
USB 3.0 A port
DC-in
Page 9

Festplatte installieren
1.
Drücken Sie zur Freigabe der unteren Abdeckung
die Taste an der Unterseite des Gehäuses; schieben
Sie sie heraus.
2.
Entfernen Sie die untere Abdeckung.
3.
Installieren Sie die SATA-Festplatte.
Bitte installieren Sie Ihre Festplatte mit Hilfe der folgenden Schritte.
(Unsere Produkte sind nur mit SATA-Festplatten mit einer Höhe von 9,5 mm kompatibel.)
RVS02
USB 3.0 EXTERNAL 2.5’’ HDD/SSD ENCLOSURE
8
DE
Page 10

RVS02
USB 3.0 EXTERNAL 2.5’’ HDD/SSD ENCLOSURE
9
4.
Schieben Sie zur Sicherstellung einer
vollständigen Verbindung die Festplatte wie
nachstehend gezeigt hinein.
5.
Richten Sie den Haken an der unteren
Abdeckung an der Einsparung des Gehäuses aus.
6.
Schließen Sie die untere Abdeckung durch
Schieben vollständig. Sie sollten ein Klickgeräusch
vernehmen.
Page 11

Externes Festplattengehäuse sicher entfernen
Bitte befolgen Sie unabhängig von Ihrem Betriebssystem die nachstehenden Schritte zum sicheren Entfernen des
externen Festplattengehäuses.
a. Doppelklicken Sie auf das grüne Häkchen in der unteren rechten Ecke des Bildschirms.
b. Windows bzw. Mac blenden ein Fenster ein, in dem Sie gefragt werden, ob dieses Gerät ausgeworfen werden soll.
c. Sie können das portable Festplattengehäuse durch die Befolgung weniger Schritte innerhalb von Sekunden stoppen.
Bei Verwendung einer ganz neuen Festplatte
Konfigurieren Sie Ihre Festplatte mit der „Datenträgerverwaltung“.
Problemlösung
A. Bitte stellen Sie sicher, dass Ihre Festplatte richtig installiert ist.
B. Achten Sie darauf, dass Sie die richtigen Treiber für dieses Gehäuse installiert haben.
C. Bitte stellen Sie sicher, dass Ihre Festplatte formatiert ist. Falls nicht, formatieren Sie die Festplatte bitte zuerst.
* Bitte demontieren Sie das Produkt nicht, falls Sie nicht sicher sind, wie Sie es installieren bzw. Probleme beheben.
Hilfe erhalten Sie bei Ihrem Händler *
Achtung!!
A. Bitte wenden Sie sich an Ihren PC-Händler, falls Sie nicht sicher sind, welches Betriebssystem Sie nutzen.
B. Bitte platzieren Sie dieses externe Gehäuse nicht in einer feuchten oder heißen Umgebung.
C. Falls der PC bzw. dieses Gehäuse aufgrund eines unsachgemäßen Betriebs durch den Benutzer beschädigt werden,
übernehmen wir keine Haftung (z. B. durch Entschädigung oder Reparatur).
RVS02
USB 3.0 EXTERNAL 2.5’’ HDD/SSD ENCLOSURE
10
DE
Page 12

RVS02
USB 3.0 EXTERNAL 2.5’’ HDD/SSD ENCLOSURE
11
Fonctions
Design sans vis pour une installation rapide en moins de 10 secondes
Interface hôte USB 3.0 (connecteur type micro) jusqu'à 5Gbps
Compatible avec USB 2.0/1.1
Supporte des DD et SSD 2,5” SATA (9,5 mm de haut)
Simple connexion sans adaptateur secteur
Affichage DEL pour l’alimentation et l’accès DD
Configuration système requise
Configuration du système: Ordinateur avec port USB 3.0.
Configuration logicielle: Windows XP / Vista / 7, Mac OS 10.x, Linux.
Contenu de la boîte
Vue extérieure
Veuillez vérifier en premier que tous les accessoires suivants ont été fournis dans la boîte ou avec le produit,
et s'ils ne sont pas tous présents, veuillez contacter votre distributeur local dès que possible.
Interface: USB 3.0
Manuel de l’utilisateur: 1 UNITÉ
Câble USB 3.0 Y: 1 UNITÉ
Sac en flanelle: Optionnel
USB 3.0 A port
DC-in
Page 13

Installation du DD
1.
Poussez le bouton en bas du boîtier pour
ouvrir le couvercle du bouton et faites glisser.
2.
Enlevez le couvercle de dessous.
3.
Installez un DD SATA.
Veuillez installer votre DD de la manière suivante.
(Nos produits sont conçus pour les DD SATA d'une hauteur de 9,5mm uniquement.)
RVS02
USB 3.0 EXTERNAL 2.5’’ HDD/SSD ENCLOSURE
12
FR
Page 14

RVS02
USB 3.0 EXTERNAL 2.5’’ HDD/SSD ENCLOSURE
13
4.
Refermez le DD comme indiqué ci-dessous
pour assurer les connexions.
5.
Visez le crochet du couvercle inférieure
pour au concave du corps.
6.
Refermez le dessous pour assurer les
connexions. Vous entendez un son "CLIC".
Page 15

Désinstaller en sécurité le boîtier de DD externe
Quelque soit le SE que vous utilisez, veuillez suivre les étapes suivantes pour désinstaller en sécurité votre boîtier externe.
a. Double-cliquez rapidement sur l'icône de flèche verte en bas à droite de l'écran.
b. Windows ou Mac affichera une fenêtre vous demandant si vous voulez déconnecter cet appareil.
c. Vous pouvez arrêter facilement ce boîtier portable avec les étapes suivantes en quelques secondes.
Si vous utilisez un nouveau DD
Utilisez “Gestion de disque” pour configurer votre DD.
Guide de dépannage
A. Veuillez vérifier si votre DD a bien été installé correctement.
B. Veuillez vérifier si vous avez bien installé le pilote de ce boîtier.
C. Veuillez vérifier si votre DD a bien été formaté. Autrement veuillez formater votre disque dur en premier.
* Si vous ne savez pas comment faire pour installer ou déboguer, ne pas le démonter.
Contactez votre distributeur pour de l'aide *
ATTENTION!!
A. Si vous n’êtes pas sûr du SE que vous utilisez, veuillez contacter le revendeur de votre PC.
B. Ne pas exposer ce boîtier externe à des hautes températures ou des endroits humides.
C. Si le PC ou cet appareil de stockage est endommagé à cause de l’utilisateur, nous n’assumerons aucune
responsabilité ou réparation.
RVS02
USB 3.0 EXTERNAL 2.5’’ HDD/SSD ENCLOSURE
14
FR
Page 16

RVS02
USB 3.0 EXTERNAL 2.5’’ HDD/SSD ENCLOSURE
15
Funciones
Diseño sin herramientas para una instalación rápida en 10 segundos
Interfaz USB 3.0 (conexión tipo micro) de hasta 5Gbit/s
Retrocompatibilidad hasta USB 2.0/1.1
Acepta discos duros SATA y SSD de 2,5” (9,5mm de alto)
Conexión sencilla sin transformador
LED para acceso al disco duro y potencia
Requisitos del sistema
Requisitos de hardware: ordenador con puerto USB 3.0.
Requisitos de software: Windows XP/Vista/7, Mac OS 10.x, Linux
Contenidos de la caja
Diseño exterior
Por favor, confirme si se incluyen los siguientes accesorios en la caja del producto y en caso contrario contacte
con su distribuidor local tan pronto como sea posible.
Interfaz: USB 3.0
Manual de usuario: 1 unidad
Cable Y USB 3.0: 1 unidad
Bolsa de franela: opcional
USB 3.0 A port
DC-in
Page 17

Instalación del disco duro
1.
Presione el botón de la parte inferior de la
carcasa para liberar la cubierta y luego deslícela.
2.
Retire la cubierta.
3.
Instale el disco duro SATA.
Por favor, instale su disco duro según los pasos siguientes
(Nuestros productos son adecuados para discos duros SATA con una altura de hasta 9,5mm)
RVS02
USB 3.0 EXTERNAL 2.5’’ HDD/SSD ENCLOSURE
16
ES
Page 18

RVS02
USB 3.0 EXTERNAL 2.5’’ HDD/SSD ENCLOSURE
17
4.
Deslice el disco duro como se muestra para
asegurarse de que se completa la conexión.
5.
Encaje el gancho de la cubierta
inferior con la parte cóncava.
6.
Deslice la cubierta para asegurarse de que se
completa la conexión. Se escuchará un sonido “Clic”.
Page 19

Retirar de forma segur a la car casa externa par a discos dur os
Sea cual sea el sistema operativo que esté usando, por favor consulte los pasos siguientes para retirar de forma
segura esta carcasa externa.
a. Haga doble clic rápidamente en el icono de la flecha verde en la esquina inferior derecha de la pantalla.
b. En Windows o Mac aparecerá una ventana para preguntarle si desea desconectar este dispositivo.
c. Puede detener este dispositivo portátil fácilmente siguiendo estos pasos en pocos segundos.
Si usa un disco duro nuevo
Use “Administrador de discos” para configurar su disco duro.
Resolución de problemas
A. Por favor, asegúrese de que su disco duro está conectado correctamente.
B. Por favor, asegúrese de que ha instalado el controlador correcto para esta carcasa.
C. Por favor, asegúrese de que su disco duro ha sido formateado. Si no, hágalo primero.
* Si no sabe cómo instalarlo ó solucionar un problema, por favor no lo desmonte, contacte con el vendedor para obtener ayuda. *
Advertencia!!
A. Si no está seguro de qué sistema operativo está usando, contacte con su distribuidor.
B. Por favor, no use esta carcasa externa en un lugar húmedo o caluroso.
C. Si el ordenador o este dispositivo resultan dañados por un comportamiento inadecuado del usuario no se aceptará
devolver su importe o reparar el dispositivo.
RVS02
USB 3.0 EXTERNAL 2.5’’ HDD/SSD ENCLOSURE
18
ES
Page 20

RVS02
USB 3.0 EXTERNAL 2.5’’ HDD/SSD ENCLOSURE
19
Functions
Design senza viti, installazione in 10 secondi.
Interfaccia USB 3.0 (connettore di tipo micro) fino a 5Gbps
Retro compatibile con USB 2.0/1.1
Supporta HDD 2.5” SATA e SSD (altezza 9.5 mm)
Connessione semplice senza alimentatore
Led di stato per alimentazione ed accesso HDD
Requisiti di sistema
Requisiti Hardware: Computer con porte USB 3.0.
Requisiti Software: Windows XP / Vista / 7, Mac OS 10.x, Linux.
Contenuto della confezione
Layout Esterno
Prima di procedere con le operazioni di montaggio controllare che i seguenti accessori siano presenti nella confezione.
Se non ne trovate contattate il vostro rivenditore di zona al più presto.
Interfaccia: USB 3.0
Manuale Utente: 1 pezzo
Cavo a Y USB 3.0: 1 pezzo
Custodia in tessuto: Opzionale
USB 3.0 A port
DC-in
Page 21

Installazione HDD
1.
Premere il pulsante situato alla base per
rilasciare il cover, quindi sfilarlo.
2.
Rimuovere il cover in basso.
3.
Installare il disco SATA.
Installate il vostro HDD seguendo i passi di seguito.
( Nel nostro prodotto possone essere installati soltanto HDD alti 9,5mm)
RVS02
USB 3.0 EXTERNAL 2.5’’ HDD/SSD ENCLOSURE
20
IT
Page 22

RVS02
USB 3.0 EXTERNAL 2.5’’ HDD/SSD ENCLOSURE
21
4.
Far scivolare l’HDD come mostrato in
figura fino alla completa connessione.
5.
Appoggiate il coperchio facendo
corrispondere i ganci sporgenti alle guide.
6.
Far scivolare il coperchio verso il frontale
assicurandovi che si incastri perfettamente.
A incastro completato sentirete un “CLICK”
Page 23

Rimozione sicura della periferica
Per rimuovere in modo sicuro la periferica, a seconda del Sistema Operativo utilizzato, seguite i passi seguenti.
a. Eseguite un doppio click sull’icona a forma di freccia verde posta nell’angolo destro, in basso, dello schermo.
b. In Windows o Mac apparirà una piccola finestra con un messaggio che vi chiederà se volete disconnettere la periferica.
c. Date pure il vostro assenso e rimuovete in sicurezza la periferica.
Se usate un disco completamente nuovo
Usare “gestione disco” per configurare il vostro HDD.
Troubleshooting
A. Assicuratevi che il vostro HDD sia stato installato correttamente.
B. Assicuratevi di aver installato, ove necessario, i driver corretti per questo prodotto.
C. Assicuratevi che il vostro HDD sia stato formattato prima di procedere all’utilizzo.
* Se non sapete come installare il prodotto o come risolvere eventuali problemi, non smontate il prodotto ma rivolgetevi
al venditore per ricevere aiuto *
Attenzione!!
A. Se non sapete quale sistema operativo state utilizzando, contattate il vostro rivenditore.
B. Non utilizzate o disponete il prodotto in ambienti umidi o con temperature elevate.
C. Se il PC o il prodotto vengono danneggiati da operazioni errate dell’utente, non ci assumiamo alcuna responsabilità.
RVS02
USB 3.0 EXTERNAL 2.5’’ HDD/SSD ENCLOSURE
22
IT
Page 24

RVS02
USB 3.0 EXTERNAL 2.5’’ HDD/SSD ENCLOSURE
23
Функции
Конструкция без винтов для быстрой установки за 10 секунд
Хост-интерфейс USB 3.0 (микро-разъем) со скоростью передачи данных до 5 Гбит/с
Обратная совместимость с интерфейсом USB 2.0 и 1.1
Поддержка 2,5-дюймовых жестких дисков и SSD-дисков с интерфейсом S ATA (толщиной 9,5 мм)
Простое подключение без блока питания
Светодиодный индикатор питания и доступа к жесткому диску
Системные требования
Требования к аппаратному обеспечению: компьютер с портом USB 3.0.
Требования к программному обеспечению: Windows XP, Vista, 7, Mac OS 10.x, Linux.
Комплект поставки
Внешний вид
Проверьте наличие в комплекте поставки перечисленных ниже предметов.
Если какие-либо предметы отсутствуют, незамедлительно обратитесь к местному дистрибутору.
Интерфейс: USB 3.0
Руководство пользователя: 1 шт
Y-образный кабель USB 3.0: 1 шт
Фланелевый чехол: дополнительно
USB 3.0 A port
DC-in
Page 25

Установка жесткого диска
1.
Нажмите кнопку в нижней части корпуса,
чтобы высвободить нижнюю крышку и затем
сдвиньте крышку.
2.
Снимите нижнюю крышку.
3.
Установите жесткий диск с интерфейсом SATA.
Установите жесткий диск согласно приведенной ниже процедуре.
(Данное изделие подходит только для жестких дисков с интерфейсом SATA толщиной 9,5 мм.)
RVS02
USB 3.0 EXTERNAL 2.5’’ HDD/SSD ENCLOSURE
24
RU
Page 26

RVS02
USB 3.0 EXTERNAL 2.5’’ HDD/SSD ENCLOSURE
25
4.
Задвиньте жесткий диск, как показано ниже,
чтобы соединить разъемы.
5.
Совместите крючок нижней крышки
с выемкой в корпусе.
6.
Сдвиньте нижнюю крышку так, чтобы
закрепить ее на корпусе. При этом должен
раздаться ЩЕЛЧОК.
Page 27

Безопасное отключение внешнего контейнера для жесткого диска
В любой операционной системе выполните указанные ниже шаги, чтобы безопасно отключить внешний
контейнер для жесткого диска.
a. Дважды щелкните значок с зеленой стрелкой в нижнем правом углу экрана.
b. В ОС Windows или Mac отобразится окно с запросом на отключение данного устройства.
c. Выполните инструкции операционной системы, чтобы отключить данный портативный контейнер для жесткого
диска.
Если используется новый жесткий диск
Настройте конфигурацию жесткого диска в «диспетчере дисков»p.
Устранение неполадок
A. Удостоверьтесь, что жесткий диск установлен правильно.
B. Удостоверьтесь, что установлен соответствующий драйвер для данного контейнера для жесткого диска.
C. Удостоверьтесь, что жесткий диск отформатирован. Если жесткий диск не отформатирован, перед использованием
его необходимо отформатировать.
* Если вы не знаете как установить устройство или устранить неполадки, не разбирайте его. Обратитесь за помощью
к
продавцу устройства.*
ВНИМАНИЕ!!
A. Если вы не знаете, какая ОС используется на вашем компьютере, обратитесь к продавцу компьютера.
B. Не допускайте воздействия на данный внешний контейнер для жесткого диска высокой температуры и влажности.
C. В случае повреждения компьютера или данного контейнера для жесткого диска вследствие несоблюдения
пользователем правил эксплуатации компания-производитель не принимает на себя
каких-либо обязательств
по компенсации или ремонту изделия.
RVS02
USB 3.0 EXTERNAL 2.5’’ HDD/SSD ENCLOSURE
26
RU
Page 28

RVS02
USB 3.0 EXTERNAL 2.5’’ HDD/SSD ENCLOSURE
27
機能
ネジ不要設計で、10秒でインストール可能
最大5GbpsのUSB 3.0ホストインタフェース(マイクロタイプコネクタ)
USB 2.0 / 1.1との下位互換性
2.5インチSATA HDDおよびSSD(高さ9.5mm)をサポート
電源アダプタなしのシンプルな接続
電源とHDDアクセスを表示するLEDディスプレイ
システム要件
ハードウェア要件: USB 3.0ポートを備えたコンピュータ。
ソフトウェア要件: Windows XP / Vista / 7、Mac OS10.x、Linux。
パッケージ内容
外部配置図
まず以下の付属品が製品のパッケージに含まれていることをご確認ください。不足している場合、
最寄りの販売店になるべく早くご連絡ください。
インタフェース: USB 3.0
ユーザーズマニュアル: 1冊
USB 3.0 Yケーブル: 1冊
フランネルバッグ: オプション
USB 3.0 A port
DC-in
Page 29

HDDのインストール
1.
ケース底部のボタンを押して、カバーを解放
してからスライドさせて取り外します。
2.
底部カバーを取り外します。
3.
SATA HDDを取り付けます。
以下のステップでHDDを取り付けます。
(当社製品は高さ9.5mmのSATAHDDにのみ適用可能です。)
RVS02
USB 3.0 EXTERNAL 2.5’’ HDD/SSD ENCLOSURE
28
JP
Page 30

RVS02
USB 3.0 EXTERNAL 2.5’’ HDD/SSD ENCLOSURE
29
4.
下図のようにHDDをスライドさせながら、
接続が確実にされていることを確かめます。
5.
ボディの凹面に底部カバーのフック
を合わせます。
6.
底部をスライドさせて確実に接続されるよう
にします。これで「カチッ」と音がします。
Page 31

HDD外部ケースの安全な取り外し
いずれの種類のOSを使っている場合でも、この外部エンクロージャーを安全に取り外すには以下のステップに従ってください 。
a. 画面右下隅の緑色の矢印アイコンを素早くダブルクリックします。
b. WindowsまたはMacでは、このデバイスの接続を中断する確認をするウィンドウがポップアップ表示されます。
c. 続く幾つかのステップに従うことによってこのポータブルエンクロージャーは数秒間で停止できます。
新しいHDDを使う場合
「ディスク管理」を使ってHDDを設定します。
トラブルシューティング
A. HDDが正しくインストールされていることを確かめます。
B. このエンクロージャー用の正しいドライバがインストール済みであることを確かめます。
C. HDDがフォーマットされていることを確かめます。もしされていないならハードドライブをまずフォーマットしてください。
* どのようにインストールするかまたはエラー処理するかが不明の場合は、分解しないで販売店にサポートをお問い合わせください *
ご注意!!
A. どのOSを使っているか不明な場合は、PC販売店にご連絡ください。
B. この外部エンクロージャーを多湿や高温の環境に置かないでください。
C. PCまたはこのストレージがユーザの誤った操作によって故障した場合、当社は補償または修理の責任を負いかねます。
RVS02
USB 3.0 EXTERNAL 2.5’’ HDD/SSD ENCLOSURE
30
JP
Page 32

RVS02
USB 3.0 EXTERNAL 2.5’’ HDD/SSD ENCLOSURE
31
功能特色
免工具10秒快速安裝
傳輸規格高達5Gbps的USB 3.0連接端子
向下相容USB 2.0及USB 1.1
支援厚度9.5mm內的SATA介面硬碟或固態硬碟
免額外電源即可運作
貼心的LED狀態指示燈
系統需求
硬體需求: USB 3.0連接埠
軟體需求: Windows XP / Vista / 7, Mac OS 10.x, Linux
包裝內容物
外部配置
請確認下列配件是否齊全, 如有缺失, 請在第一時間聯繫當地代理商或經銷商。
傳輸介面: USB 3.0
使用手冊: 1 PCS
USB 3.0 Y型線材: 1 PCS
絨布袋: 選配
USB 3.0 A port
DC-in
Page 33

安裝硬碟
1.
按下底部的釋放鈕並將背蓋向外滑出。
2.
將RVS02本體與背蓋分離取下。
3.
依箭頭方向插入硬碟。
請依下列步驟安裝硬碟至RVS02中。
請注意, 此產品僅適用厚度9.5mm以下的SATA介面硬碟。
RVS02
USB 3.0 EXTERNAL 2.5’’ HDD/SSD ENCLOSURE
32
TW
Page 34

RVS02
USB 3.0 EXTERNAL 2.5’’ HDD/SSD ENCLOSURE
33
4.
推入硬碟, 確認安裝至定位。
5.
裝回背蓋時, 須確認卡榫與溝槽吻合。
6.
將背蓋依箭頭方向推回, 若有「喀」聲響即
代表背蓋推至定位, 安裝完畢。
Page 35

安全移除外接硬碟
無論您使用何種作業系統, 請依照下列步驟安全地移除外接硬碟裝置。
a. 雙擊螢幕右下方工具列上的綠色箭頭圖示。
b. Windows或Mac OS系統將跳出視窗詢問是否中斷硬碟裝置的連線。
c. 藉由這些步驟, 使用者能在短時間內停止外接硬碟的運作。
安裝全新硬碟
請先使用「磁碟管理程式」以確保全新的硬碟能正常存取。
故障排除
A. 請確認硬碟已經正確安裝無誤。
B. 同時確認安裝的硬碟支援本產品的規格。
C. 初次使用前須注意硬碟需格式化。
* 如果您不知道如何安裝及故障排除, 切勿自行拆開產品, 請向代理商或經銷商尋求幫忙。
注意!!
A. 若您不清楚作業系統的版本, 請洽詢您的電腦主機供應商。
B. 請勿將RVS02放置於潮濕或高溫環境, 以防止內部電子元件損毀。
C. 如果因使用者操作不當而造成電腦或儲存裝置損毀, 本公司將不負責任何維修及賠償責任。
RVS02
USB 3.0 EXTERNAL 2.5’’ HDD/SSD ENCLOSURE
34
TW
Page 36

RVS02
USB 3.0 EXTERNAL 2.5’’ HDD/SSD ENCLOSURE
35
功能特色
免工具10秒快速安装
传输规格高达5Gbps的USB 3.0连接端子
向下兼容USB 2.0及USB 1.1
支持厚度9.5mm内的SATA接口硬盘或固态硬盘
免额外电源即可运作
贴心的LED状态指示灯
系统需求
硬件需求: USB 3.0连接埠
软件需求: Windows XP / Vista / 7, Mac OS 10.x, Linux.
包装内容物
外部配置
请确认下列配件是否齐全,如有缺失,请在第一时间联系当地代理商或经销商。
传输接口: USB 3.0
使用手册: 1 PCS
USB 3.0 Y型线材: 1 PCS
绒布袋: 选配
USB 3.0 A port
DC-in
Page 37

安装硬盘
1.
按下底部的释放钮并将背盖向外滑出。
2.
将RVS02本体与背盖分离取下。
3.
依箭头方向插入硬盘。
请依下列步骤安装硬盘至RVS02中。
请注意,此产品仅适用厚度9.5mm以下的SATA接口硬盘。
RVS02
USB 3.0 EXTERNAL 2.5’’ HDD/SSD ENCLOSURE
36
CN
Page 38

RVS02
USB 3.0 EXTERNAL 2.5’’ HDD/SSD ENCLOSURE
37
4.
推入硬盘, 确认安装至定位。
5.
装回背盖时, 须确认卡榫与沟槽吻合。
6.
将背盖依箭头方向推回, 若有「喀」声响即
代表背盖推至定位, 安装完毕。
Page 39

安全移除外接硬盘
无论您使用何种操作系统, 请依照下列步骤安全地移除外接硬盘装置。
a. 双击屏幕右下方工具列上的绿色箭头图示。
b. Windows或Mac OS系统将跳出窗口询问是否中断硬盘装置的联机。
c. 藉由这些步骤, 使用者能在短时间内停止外接硬盘的运作。
安装全新硬盘
请先使用「磁盘管理程序」以确保全新的硬盘能正常存取。
故障排除
A. 请确认硬盘已经正确安装无误。
B. 同时确认安装的硬盘支持本产品的规格。
C. 初次使用前须注意硬盘需格式化。
* 如果您不知道如何安装及故障排除, 切勿自行拆开产品, 请向代理商或经销商寻求帮忙。
注意!!
A. 若您不清楚操作系统的版本, 请洽询您的计算机主机供货商。
B. 请勿将RVS02放置于潮湿或高温环境, 以防止内部电子组件损毁。
C. 如果因使用者操作不当而造成计算机或储存装置损毁, 本公司将不负责任何维修及赔偿责任。
RVS02
USB 3.0 EXTERNAL 2.5’’ HDD/SSD ENCLOSURE
38
CN
Page 40

RVS02
USB 3.0 EXTERNAL 2.5’’ HDD/SSD ENCLOSURE
39
기능
기능
10초 내에 빠르게 설치할 수 있는 나사 없는 디자인
최대 5 Gbps의 USB 3.0 호스트 인터페이스(마이크로 타입 커넥터)
USB 2.0/1.1과 역호환 가능
2.5” SATA HDD 및 SSD 지원(높이 9.5 mm)
전원 어댑터가 필요 없는 간단한 연결
전원 및 HDD 액세스를 표시하는 LED 디스플레이
시스템
시스템
요구
요구
사항
사항
하드웨어 요구 사항: USB 3.0 포트가 탑재된 컴퓨터
소프트웨어 요구 사항: Windows XP / Vista / 7, Mac OS 10.x, Linux.
포장
포장
내용물
내용물
외부
외부
레이아웃
레이아웃
먼저 제품의 포장 안에 다음 액세서리가 들어 있는지 확인하고, 빠진 액세서리가 있는 경우 가능한 한 빨리
가까운 대리점에 연락하십시오.
인터페이스: USB 3.0
사용 설명서: 1권
USB 3.0 Y 케이블: 1개
플란넬 천 가방: 옵션
USB 3.0 A port
DC-in
Page 41

HDD
HDD
설치하기
설치하기
1.
케이스 하단에 있는 버튼을 눌러 버튼 커버를
해제한 다음 바깥쪽으로 밀어 냅니다.
2.
버튼 커버를 분리합니다.
3.
SATA HDD를 설치합니다.
다음 단계대로 HDD를 설치하십시오.
(본 제품은 높이가 9.5 mm인 SATA HDD에만 적합합니다.)
RVS02
USB 3.0 EXTERNAL 2.5’’ HDD/SSD ENCLOSURE
40
KR
Page 42

RVS02
USB 3.0 EXTERNAL 2.5’’ HDD/SSD ENCLOSURE
41
4.
아래와 같이 HDD를 밀어 넣고
연결이 제대로 되었는지 확인합니다.
5.
하단 커버의 후크를 본체의
오목한 부분에 겁니다.
6.
하단을 밀어 넣고 연결이 제대로 되었는지
확인합니다. "찰칵" 소리가 나야 합니다.
Page 43

HDD
HDD
외장
외장
케이스
케이스
안전하게
안전하게
제거하기
제거하기
사용 중인 OS의 종류와 관계없이 아래의 단계를 따라 외장 인클로저를 안전하게 제거하십시오.
a. 화면의 오른쪽 하단에 있는 녹색 화살표 아이콘을 빠르게 더블 클릭합니다.
b.Windows 또는 Mac이 이 장치를 분리할 것인지 묻는 창을 팝업합니다.
c.몇 단계를 따라 이 휴대형 인클로저를 몇 초 내에 쉽게 정지할 수 있습니다.
완전히
완전히
새로운
새로운
HDD
HDD를
사용할
사용할
경우
경우
“Disk Manage(디스크 관리)”를 사용하여 HDD를 구성하십시오.
문제
문제
해결
해결
A. HDD가 제대로 설치되어 있는지 확인하십시오.
B. 이 인클로저에 맞는 드라이버를 설치했는지 확인하십시오.
C. HDD가 포맷되었는지 확인하십시오. 포맷되지 않은 경우, 먼저 하드 드라이브를 포맷하십시오.
*설치하거나 디버그하는 방법을 모를 경우, 하드 드라이브를 분해하지 마십시오.
판매점에 연락하여 도움을 요청하십시오.*
주의
주의!!!!
A. 사용 중인 OS가 무엇인지 확실하게 알 수 없는 경우, PC 판매점에 문의하십시오.
B. 이 외장 인클로저를 고온 다습한 환경에 두지 마십시오.
C. PC 또는 이 저장장치가 사용자의 잘못된 사용으로 손상될 경우, 당사는 보상이나 수리에 대한 책임을 지지 않습니다.
RVS02
USB 3.0 EXTERNAL 2.5’’ HDD/SSD ENCLOSURE
42
KR
Page 44

lssue date: April, 2011
No.: G11213840
 Loading...