

Page 1
FP57 Manual
Stackable 5.25” to
3.5” hot-swap drive
bay adapter
Page 2

FP57
Stackable 5.25” to 3.5” hot-swap drive bay adapter
Manual
Features
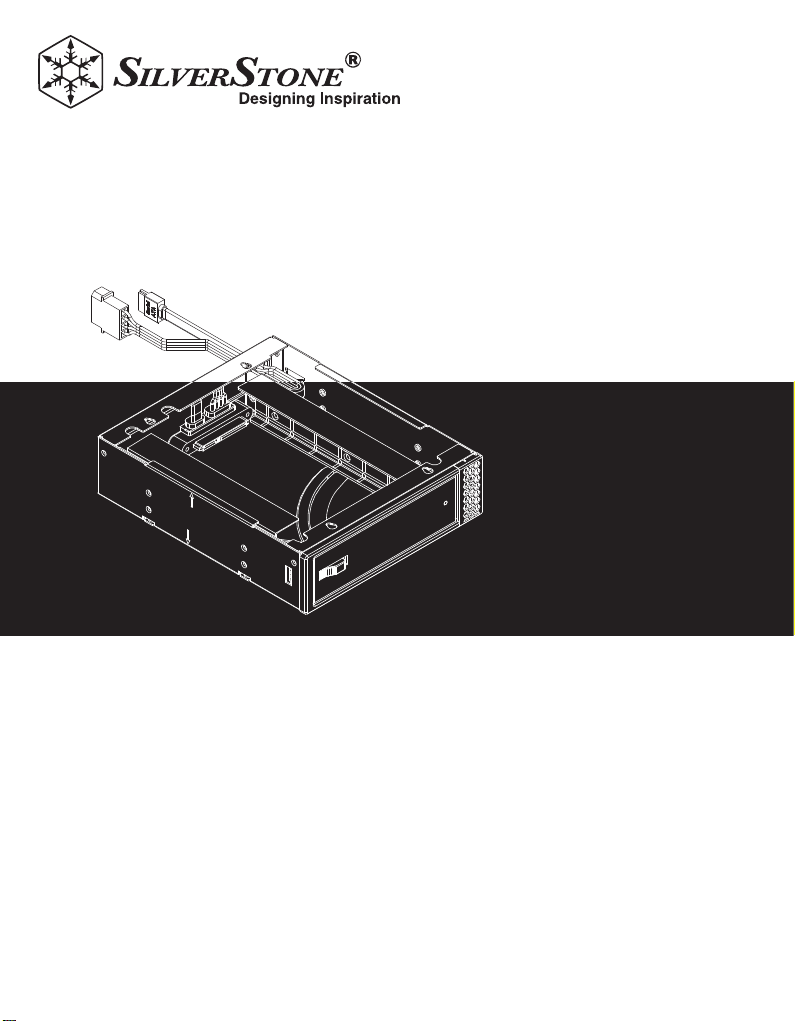
Converts one 5.25” drive bay to hot-swap 3.5” drive bay
Easy to access removable dust filter
Support for 3.5” SATA hard drives
Short depth design compatible with most cases
Multiple FP57 stacking supported for 80mm fan (two FP57) or 120mm fan (three FP57)
Specification
Model
Color
Material
Application
Capacity
Overall Dimension
SST-FP57B
Black
Plastic front panel, 0.8mm SECC body
5.25” drive bay
1 x 3.5” SATA hard drive
148mm (W) x 42.3mm (H) x 175mm (D)
ITEM LIST
ITEM NAME
SPACER-SUPPORT
SCREW-CROSS-P-M3 x 4-L30-NI
1
ITEM NAME
FAN-RUBBER-WASHER
SCREW-CROSS-PW-M3 x 6-NI
Page 3
lnstallation Guide
The FP57 has unique designs, to avoid difficulty while installing it,
please read through the entire manual before continuing.
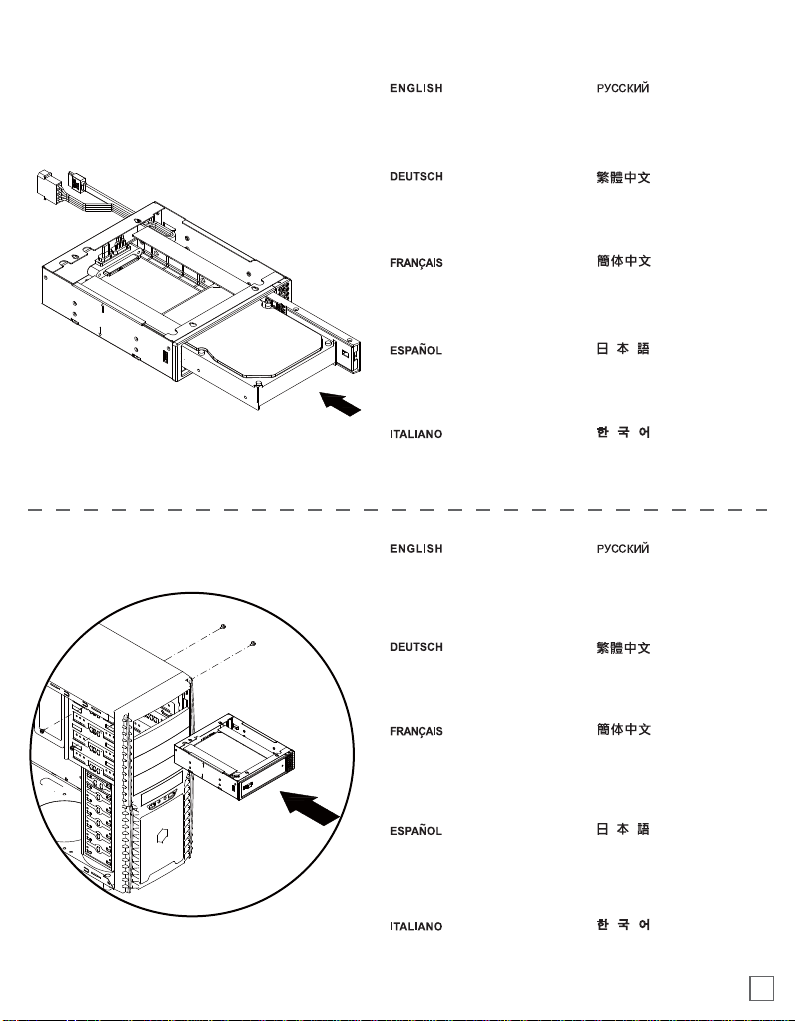
1.
Inert hard drive into the
hot-swap bay.
Вставьте жесткий диск в отсек
с возможностью «горячей» замены.
2.
Festplatte in den Hot-SwappingEinschub einstecken.
Insérez un disque dur dans
la baie hot swap.
Inserte el disco duro en la
bahía de cambio en caliente.
Inserire l’hard drive nel bay
hot swap.
Please refer to your case
manual for instruction on
how to install a 5.25” device.
Anweisungen zur Installation eines
5,25-Zoll-Gerätes entnehmen Sie
bitte der Anleitung Ihres Gehäuses.
Veuillez-vous référer au manuel
de votre boîtier pour connaître les
instructions nécessaire au montage
d'un appareil 5.25”.
安裝硬碟。
安装硬盘。
ハードディスクドライブをホ
ットスワップベイに入れます。
하드 드라이브를 핫스왑
베이에 삽입합니다.
Инструкции по установке 5,25дюймового устройства см. в
руководстве по используемому
корпусу.
請參照機殼說明書,
將FP57安裝上機殼。
请参照机壳说明书,
将FP57安装上机壳。
Install FP57 into the case.
Por favor, consulte el manual de
su carcasa para tener instrucciones
sobre cómo instalar un dispositivo
de 5,25”.
Fare riferimento al manuale del
case per le istruzioni di montaggio
di una periferica da 5,25”.
5.25”デバイスの取り付け方法
はお持ちのケースのマニュア
ルをご参照ください。
5.25” 장치를 설치 하는 방법은
여러분이 갖고 계신 케이스
매뉴얼을 참고하세요.
2
Page 4

lnstallation Guide
3.
Dust filter removal.
4.
Dust filter located on the front side
can be removed without tools.
Der Staubfilter an der Vorderseite
kann ohne Werkzeug entfernt werden.
Le filtre à poussières est situé sur
la face avant peut être démonté
sans outils.
El filtro para el polvo localizado en
la parte delantera se puede retirar
sin herramientas.
Il filtro anti polvere situato nella
parte frontale può essere rimosso
senza l’ausilio di attrezzi.
Use the included plastic catch to
assemble the FP57 together.
Verbinden Sie die FP57 mit der
mitgelieferten Kunststoffhalterung.
Пылевой фильтр расположен
на передней панели адаптера
и снимается без использования
инструментов.
可由前方將濾網拆除並清潔。
可由前方将滤网拆除并清洁。
フロント側にあるダストフィル
タは工具なしで取り外せます。
먼지 필터는 전면에 위치하여
있어 별도의 도구 없이 제거
가능합니다.
При помощи входящей в комплект
поставки пластиковой рамки
соберите адаптеры FP57 вместе.
使用內附的塑膠豆,把多台FP57
疊合,完成初步的固定。
Fan installation with multiple FP57.
3
Utilisez les clips en plastique pour
assembler les FP57 entre eux.
Use el pasador de plástico
incluido para unir los FP57.
Usare il fermo in plastica fornito
a corredo per assemblare insieme
gli FP57.
使用内附的塑料豆,把多台FP57
迭合,完成初步的固定。
同封のプラスチックキャッチで
FP57を組み合わせます。
동봉된 플라스틱 캐치를 이용해,
FP57을 결합합니다.
Page 5

lnstallation Guide
5.
120mm fan. 80mm fan.
Secure fan to the rear of an assembled FP57 set.
We recommend using 80mm fan for two FP57 and 120mm fan for three FP57.
Fan thickness should be between 25mm to 25.4mm.
Befestigen Sie den Lüfter an der Rückseite eines montierten FP57-Satzes.
Bei zwei FP57 empfehlen wir die Nutzung eines 80-mm-Lüfters, bei drei FP57 den Einsatz eines 120-mm-Lüfters.
Die Lüfterdicke sollte 25 mm bis 25,4 mm betragen.
Fixez le ventilateur à l'arrière de l'ensemble des FP57 assemblés.
Nous vous recommandons l'utilisation d'un ventilateur de 80mm pour deux FP57 et un ventilateur de 120mm pour trois FP57.
L'épaisseur du ventilateur doit être comprise entre 25mm et 25.4mm.
Fije el ventilador a la parte trasera de un juego de FP57 montado.
Le recomendamos usar un ventilador de 80mm para dos FP57 y uno de 120mm para tres FP57.
El grosor del ventilador debería estar entre 25mm y 25,4mm.
Assicurare la ventola al complesso assemblato di FP57.
Vi raccomandiamo di utilizzare una ventola da 80mm per due FP57 ed una da 120mm per tre FP57.
Lo spessore delle ventole può variare da 25mm a 25,4mm.
Закрепите вентилятор на задней панели группы адаптеров FP57.
Рекомендуется использовать 80-мм вентилятор для двух адаптеров FP57 или 120-мм вентилятор для трех адаптеров FP57.
Вентилятор должен иметь толщину от 25 до 25,4 мм.
從後方鎖上風扇,組合2台FP57時,推薦使用80mm風扇;
組合3台FP57時,則使用120mm風扇,建議風扇厚度介於25mm~25.4mm之間。
从后方锁上风扇,组合2台FP57时,推荐使用80mm风扇;
组合3台FP57时,则使用120mm风扇,建议风扇厚度介于25mm~25.4mm之间。
組み合わせたFP57セット後部にファンを固定します。
2台のFP57には80mmファン、3台のFP57には120mmファンの使用をお勧めします。
ファン厚さは25mm
FP57의 후면에 팬을 고정시킵니다.
두개의 FP57에는 80mm팬으로 3개의 FP57에는 120mm 팬 사용을 권장합니다.
팬의 두께는 25mm 에서 25.4mm 가 되어야 합니다.
から25.4mmの間であるべきです。
4
Page 6

lnstallation Guide
5.
Install FP57 into the case and secure with screws. Установите адаптер FP57 в корпус и закрепите винтами.
Installieren Sie den FP57 im Gehäuse und befestigen ihn mit Schrauben.
Installez le FP57 dans le boîtier et fixez-le avec des vis.
Instale el FP57 en la carcasa y fíjelo con tornillos.
Installare FP57 nel case ed assicurarlo alla struttura con le viti.
5
將FP57裝入機殼,利用機殼的鎖固裝置做完整固定。
将FP57装入机壳,利用机壳的锁固装置做完整固定。
FP57をケースに取り付け、ネジで固定します。
FP57을 케이스에 장착한 후 나사로 고정시킵니다.
Page 7

T
his instruction will help you to make the most out of your product.
Please read through it before installation. Also, please keep your product
receipt and this instruction in safe place for the future reference.
Page 8

Issue Date: April, 2011
NO.G11213900
 Loading...