

Page 1
ENSEMBLE
03
Unleash headphone’s full potential
EB
03EB
SERIES
manual
Page 2
Product Overview
EB
Unleash headphone’s full potential
MENU
,
INTRODUCTION
For audiophiles, getting the most out of their high-end headphones is more than just about getting
the best source or music format. High-end headphones often have higher resistance so if the equipment
connected to them are subpar, the sound quality will suffer. With the Ensemble EB03, SilverStone aims
to provide the power and quality necessary to unleash the full potential of headphones.
EB03’s excellent sound amplification is produced by its internal studio-quality IC (integrated circuit)
with premium Op-amp, current buffer, and enhanced power delivery. For discerning users, it also has an
extra bypass connection for use with an additional amplifier or receiver. Finished with classic aluminum
design that defines SilverStone’s longstanding tradition of excellent metal works, the EB03 is the perfect
companion to high quality headphones.
Besides using the EB03 on its own, users may also pair it with SilverStone’s own similarly styled
EB01-E DAC to create a great looking, and sounding computer audio system!
FEATURES
Premium amplifier designed to deliver full sound to headphones
Classic SilverStone Ensemble exterior design
Extra RCA bypass connection included for easy pairing with additional device
Studio-quality IC with THAT 1646W16-U & 1512S14-U
Independent volume control knob
03
ADAPTER
L R
RCA IN
SPECFICATION
ITEM
Model
Color
Material
Overall Dimension
Dimension w/o knob & feet
Input
Output
IC
Headphone resistance
VALUE
SST-EB03B (black)、SST-EB03S (silver)
Black or silver
Aluminum top cover, SECC steel chassis
152mm (W) x 82mm (H) x 176mm (D), 2.19 liters
152mm (W) x 55mm (H) x 156mm (D), 1.30 liters
RCA
φ6.3mm standard stereo connector, RCA connector
THAT 1646W 16-U & 1512S14-U
16-600 ohm
(for bypass)
Page 3
Product Overview
Installation steps
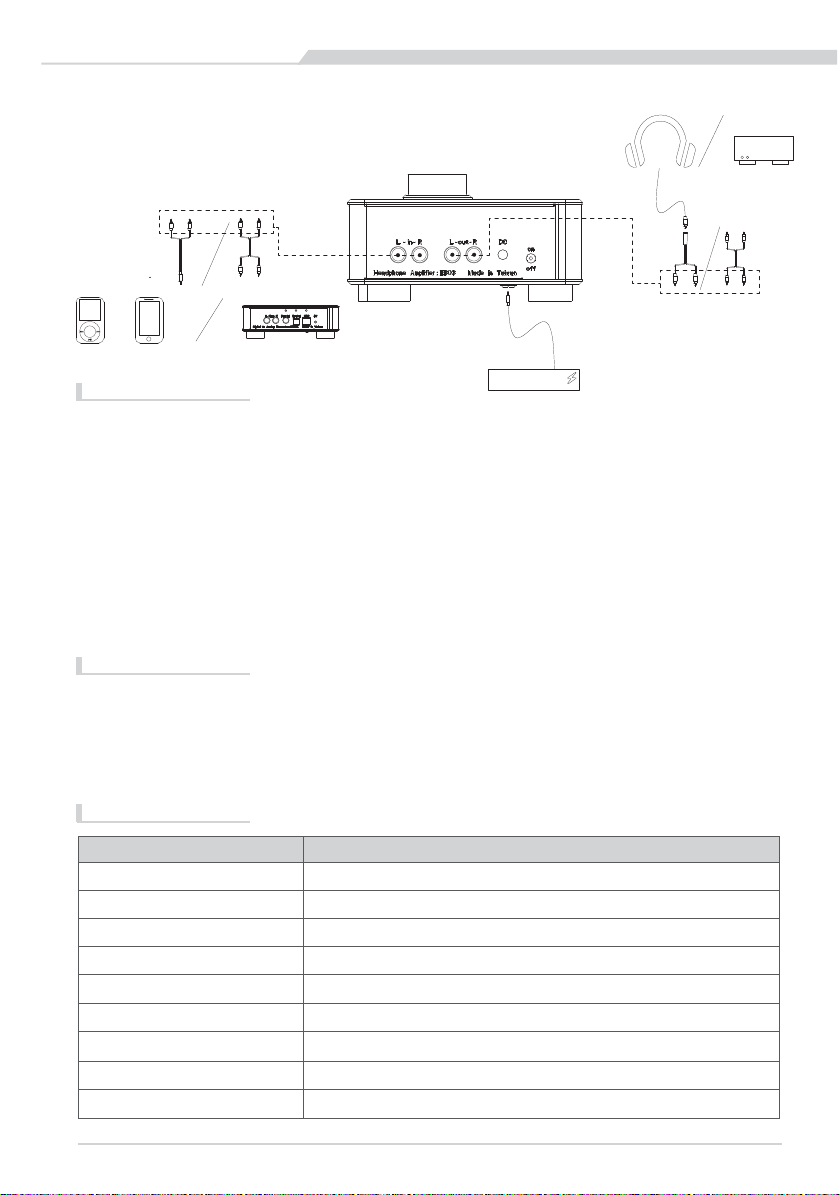
1.
Connect sound source to RCA connectors labeled “IN” on the EB03
using the included RCA cable or RCA to 3.5mm adapter.
Verbinden Sie die Audioquelle mit dem RCA-Anschluß mit der Aufschrift „IN“
am EB03 unter Nutzung von einem RCA-Kabel oder einem RCA zu 3,5mm - Adapter.
Connectez la source sonore aux connecteurs RCA de l'EB03 marqués "IN"
en utilisant le câble RCA ou l’adaptateur RCA vers 3.5mm fournis.
Conecte la fuente de sonido a los conectores RCA marcados “IN” en
el EB03 usando el cable RCA incluido ó el adaptador RCA a 3,5mm.
Collegare la fonte audio ai connettori RCA denominati “IN” sull’EB03 usando
il cavo RCA incluso o RCA a un adattatore di 3.5mm.
Подключите источник звука к меченому RCA разъему "ВХОД" на EB03 с
помощью прилагаемого кабеля RCA или RCA до 3,5 мм адаптером.
附属のRCAケーブルまたはRCA-3.5mmアダプタで、サウンドソースをEB03側の
「IN」というラベルの付いたRCAコネクタに接続します。
RCA케이블을 포함 또는 RCA를 사용하여 사운드 소스를 EB03에 “IN”
이라고 표기된 RCA 컨넥터에 연결하고3.5mm 접합기에 연결.
使用隨附RCA線或RCA 轉3.5mm 插孔轉接線,接上訊源
(後方標示為IN的RCA插座)。
使用随附RCA线或RCA 转3.5mm 插孔转接线,接上讯源
(后方标示为IN的RCA插座)。
2.
Connect the included AC adapter to EB03’s DC connector.
Verbinden Sie das im Lieferumfang enthaltene Netzteil mit der
Netzgerätebuchse des EB03.
Branchez l'adaptateur secteur fourni au connecteur CC du EB03.
Conecte el adaptador de CA incluido al conector CC del EB03.
Collegare l’adattatore incluso AC al connettore DC di EB03.
Подключите поставляемый адаптер переменного тока,
к разъему постояного тока EB03.
附属のACアダプタをEB03のDCコネクタに接続します。
포함된 AC 접합기를 EB03의 DC 컨넥터에 연결.
MENU
,
ADAPTER
將隨附的變壓器接上(後方標示為DC的插孔)。。
将随附的变压器接上(后方标示为DC的插孔)。
Page 4

Installation steps
3.
Turn the power switch to ‘ON”
Schalten Sie die Stromversorgung auf „ON“
Mettez l'interrupteur sur "ON"
Ponga el interruptor de potencia en “ON”
Accendere l’interruttore di alimentazione su “ON”
Переведите выключатель в положение "ON"
電源スイッチを「ON」にします。
전원 스위치 “ON”
開啟電源開關。
开启电源开关。
4.
ENSEMBLE
SERIES
Turn volume knob counterclockwise to its lowest position on top of EB03,
insert headphone and then adjust the volume to desired listening level.
Drehen Sie den Lautstärkeregler auf der Oberseite des EB03 entgegen dem
Uhrzeigersinn, bis in die niedrigste Position. Verbinden Sie danach die Kopfhörer mit
dem Gerät und wählen Sie anschließend die gewünschte Lautstärke ein.
Tournez le bouton du volume vers la gauche, sur la position la plus basse au-dessus
de EB03, branchez le casque, puis réglez le volume au niveau désiré.
Gire la perilla de volumen en el sentido contrario a las agujas del reloj a su posición más
baja sobre el EB03, inserte el auricular y luego ajuste el volumen al nivel de audición deseado.
Girare la manopola del volume in senso antiorario nella sua posizione più bassa in
cima a EB03, inserire le cuffie e quindi regolare il volume al livello desiderato. .
Повернуте кнопку для громкости влево, в нижнем положении выше EB03, вставьте
наушники, а затем отрегулировать громкость до нужного уровня.
EB03上面の音量ツマミを反時計回りに回して最小の位置にしてから、ヘッドホンを差し、
音量をお好みのレベルにします。
볼륨 노브는 EB03의 상단에서 가장 낮은 위치로 반 시계 방향으로 회전하고
헤드폰을 낀 다음 볼륨을 원하는 레벨로 조절.
先將上方音量控制鈕關至無聲(逆時針方向轉到底),
再插入耳機然後調整至適當的聲音大小。
先将上方音量控制钮关至无声(逆时针方向转到底),
再插入耳机然后调整至适当的声音大小。
Page 5

Product Overview
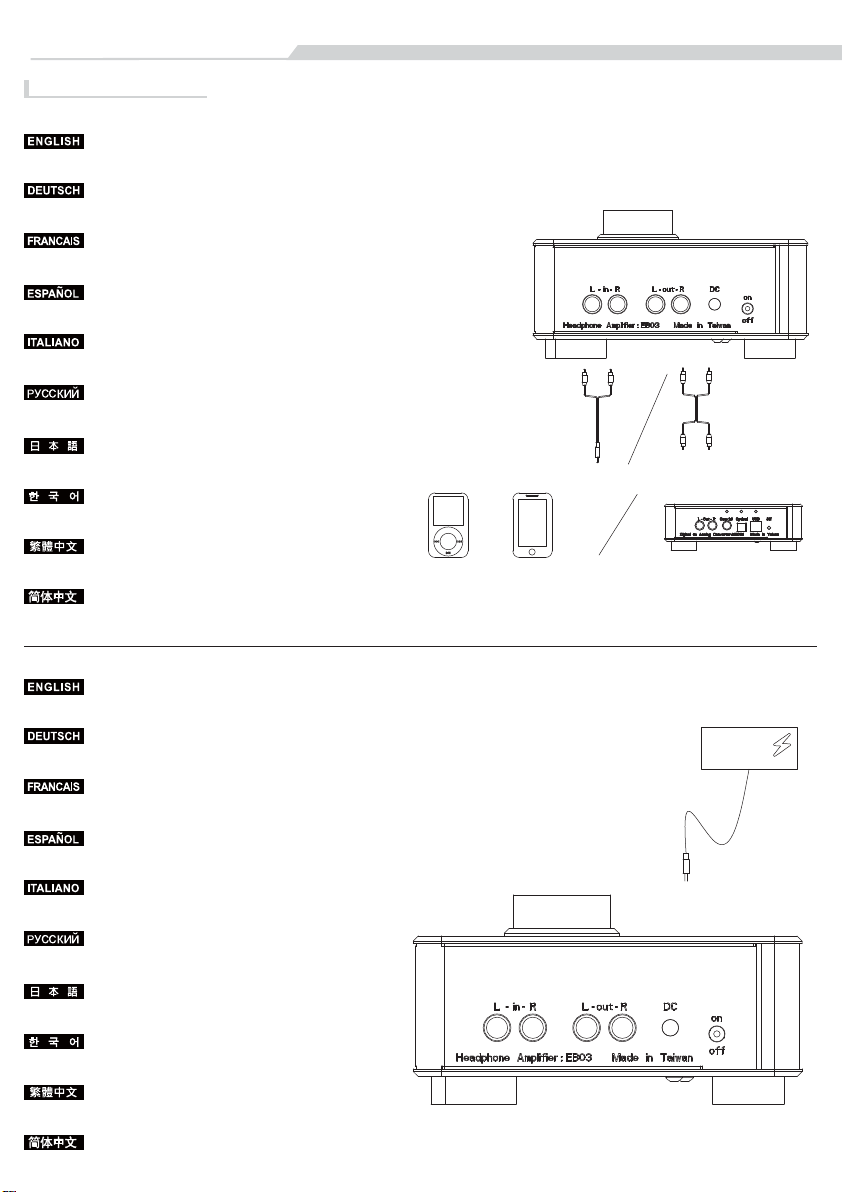
Analog bypass installation steps
1.
Connect sound source to RCA connectors labeled “IN” on the EB03
using the included RCA cable or RCA to 3.5mm adapter.
Verbinden Sie die Audioquelle mit dem RCA-Anschluß mit der Aufschrift „IN“
am EB03 unter Nutzung von einem RCA-Kabel oder einem RCA zu 3,5mm - Adapter.
Connectez la source sonore aux connecteurs RCA de l'EB03 marqués "IN"
en utilisant le câble RCA ou l’adaptateur RCA vers 3.5mm fournis.
Conecte la fuente de sonido a los conectores RCA marcados “IN” en el
EB03 usando el cable RCA incluido ó el adaptador RCA a 3,5mm.
Collegare la fonte audio ai connettori RCA denominati “IN” sul EB03 usando
il cavo RCA incluso o RCA a un adattatore di 3.5mm.
Подключите источник звука к меченому RCA разъему "ВХОД" на EB03 с
помощью прилагаемого кабеля RCA или RCA до 3,5 мм адаптером.
附属のRCAケーブルまたはRCA-3.5mmアダプタで、サウンドソースをEB03側
の「IN」というラベルの付いたRCAコネクタに接続します。
RCA케이블 포함 또는 RCA를 사용하여 사운드 소스를 EB03에 “IN”
이라고 표기된 RCA 컨넥터에 연결하고3.5mm 접합기에 연결.
使用隨附RCA線或RCA 轉3.5mm 插孔轉接線,接上訊源
(後方標示為IN的RCA插座)。
使用随附RCA线或RCA 转3.5mm 插孔转接线,接上讯源
(后方标示为IN的RCA插座)。
2.
MENU
,
Connect to desired output device to RCA connectors labeled “OUT”
on the EB03 using another set of RCA cable.
Verbinden Sie den RCA-Anschluss mit der Aufschrift „OUT“ unter Nutzung eines
weiteren RCA-Kabels mit dem gewünschten Ausgabegerät.
Connectez les connecteurs RCA de l'EB03 marqués "OUT" au périphérique de
sortie souhaité en utilisant un autre jeu de câbles RCA.
Conecte el dispositivo de salido deseado a los conectores RCA marcados
“OUT” en el EB03 usando otro juego de cables RCA.
Connettere il dispositivo di output desiderato ai connettori RCA denominati
“OUT” sul EB03 usando un altro set di cavi RCA.
Подключите требуемое выходное устройство к RCA разъемам с надписью
"ВЫХОД" на EB03 с использованием другого набора кабелей RCA.
別のRCAケーブルセットを使って、お望みの出力装置をEB03側の
「OUT」というラベルの付いたRCAコネクタに接続します。
RCA케이블의 다른 세트를 사용하여 원하는 아웃풋 장치를 EB03에 “OUT”
라고 표시 된 RCA 컨넥터와 연결.
使用額外的RCA線材,連結後方標示為OUT的RCA插座與欲搭配的其他裝置。
使用额外的RCA线材,连结后方标示为OUT的RCA插座与欲搭配的其它装置。
L R
RCA IN
Page 6

Analog bypass installation steps
3.
4.
ENSEMBLE
SERIES
Connect the included AC adapter to EB03’s DC connector.
Verbinden Sie das im Lieferumfang enthaltene Netzteil mit der
Netzgerätebuchse des EB03.
Branchez l'adaptateur secteur fourni au connecteur CC du EB03.
Conecte el adaptador de CA incluido al conector de CC del EB03.
Connettere l’adattatore AC incluso al connettore DC di EB03.
Подключите поставляемый адаптер переменного тока, к
разъему постояного тока EB03.
附属のACアダプタをEB03のDCコネクタに接続します。
포함 된 AC 접속소켓을 EB03 DC 컨넥터에 연결.
將隨附的變壓器接上(後方標示為DC的插孔)。
将随附的变压器接上(后方标示为DC的插孔)。
5.
Turn the power switch to ‘ON”
Schalten Sie die Stromversorgung auf „EIN“.
Mettez l'interrupteur sur "ON"
Ponga el interruptor de potencia en “ON”
Accendere l’interruttore di alimentazione su “ON”
Переведите выключатель в положение "ON"
電源スイッチを「ON」にします。
전원 스위치 “ON”
開啟電源開關。
开启电源开关。
Adjust volume on the output device to desired listening level
(EB03’s volume knob is non-functional when used for analog bypass).
Stellen Sie die gewünschte Lautstärke am Ausgabegerät ein.
(Der Lautstärkeregler des EB03 kann bei einem analogen Bypass nicht genutzt werden.)
Réglez le volume au niveau désiré sur le périphérique de sortie
(le bouton de volume ne fonctionne pas lorsque l'EB03 est utilisé en bypass analogique).
Ajuste el volumen en el dispositivo de salida al nivel de audición deseado
(la perilla de volumen del EB03 no funciona cuando se usa para un bypass analógico).
Regolare il volume sul dispositivo di uscita al livello di ascolto desiderato
(manopola del volume EB03 non è funzionale quando viene utilizzato per il bypass analogico.)
Отрегулируйте громкость устройства вывода на желаемом уровне
(кнопка громкости EB03 не работает, когда используется для аналогового входа).
出力装置の音量をお望みのレベルに調節します(EB03の音量ツマミはアナログバイパス使用時には機能しません)。
원하는 청취 레벨로 아웃풋 장치의 볼륨 조절. (EB03의 볼륨 노브는 아날로그 바이패스에 사용될때 비기능적입니다.)
自行調整其他裝置的音量大小(類比直通輸出時,上方音量控制鈕無作用)。
自行调整其它装置的音量大小(模拟直通输出时,上方音量控制钮无作用)。
Page 7

Warranty Information
This product has a limited 1 year warranty in North America and Australia.
For information on warranty periods in other regions, please contact your reseller or SilverStone authorized distributor.
Warranty terms & conditions
1. Product component defects or damages resulted from defective production is covered under warranty.
Defects or damages with the following conditions will be fixed or replaced under SilverStone Technology’s jurisdiction.
a) Usage in accordance with instructions provided in this manual, with no misuse, overuse, or other inappropriate actions.
b) Damage not caused by natural disaster (thunder, fire, earthquake, flood, salt, wind, insect, animals, etc…)
c) Product is not disassembled, modified, or fixed. Components not disassembled or replaced.
d) Warranty mark/stickers are not removed or broken.
Loss or damages resulted from conditions other than ones listed above are not covered under warranty.
2. Under warranty, SilverStone Technology’s maximum liability is limited to the current market value for the product (depreciated value, excluding
shipping, handling, and other fees). SilverStone Technology is not responsible for other damages or loss associated with the use of product.
3. Under warranty, SilverStone Technology is obligated to repair or replace its defective products. Under no circumstances will SilverStone
Technology be liable for damages in connection with the sale, purchase, or use including but not limited to loss of data, loss of business, loss of
profits, loss of use of the product or incidental or consequential damage whether or not foreseeable and whether or not based on breach of warranty,
contract or negligence, even if SilverStone Technology has been advised of the possibility of such damages.
4. Warranty covers only the original purchaser through authorized SilverStone distributors and resellers and is not transferable to a second hand
purchaser.
5. You must provide sales receipt or invoice with clear indication of purchase date to determine warranty eligibility.
6. If a problem develops during the warranty period, please contact your retailer/reseller/SilverStone authorized distributors or SilverStone
http://www.silverstonetek.com.
Please note that: (i) You must provide proof of original purchase of the product by a dated itemized receipt; (ii) You shall bear the cost of shipping
(or otherwise transporting) the product to SilverStone authorized distributors. SilverStone authorized distributors will bear the cost of shipping
(or otherwise transporting) the product back to you after completing the warranty service; (iii) Before you send the product, you must be issued a
Return Merchandise Authorization (“RMA”) number from SilverStone. Updated warranty information will be posted on SilverStone’s official website.
Please visit http://www.silverstonetek.com for the latest updates.
Additional info & contacts
For North America (usasupport@silverstonetek.com)
SilverStone Technology in North America may repair or replace defective product with refurbished product that is not new but has been functionally tested.
Replacement product will be warranted for remainder of the warranty period or thirty days, whichever is longer. All products should be sent
back to the place of purchase if it is within 30 days of purchase, after 30 days, customers need to initiate RMA procedure with SilverStone Technology
in USA by first downloading the “USA RMA form for end-users” form from the below link and follow its instructions.
http://silverstonetek.com/contactus.php
For Australia only (support@silverstonetek.com)
Our goods come with guarantees that cannot be excluded under the Australian Consumer Law.
You are entitled to a replacement or refund for a major failure and for compensation for any other reasonably foreseeable loss or damage.
You are also entitled to have the goods repaired or replaced if the goods fail to be of acceptable quality and the failure does not amount to a major failure.
Please refer to above “Warranty terms & conditions” for further warranty details.
SilverStone Technology Co., Ltd. 12F No. 168 Jiankang Rd., Zhonghe Dist., New Taipei City 235 Taiwan R.O.C. + 886-2-8228-1238
(standard international call charges apply)
For Europe (support.eu@silverstonetek.de)
For all other regions (support@silverstonetek.com)
Page 8

G11219780
 Loading...