

Page 1
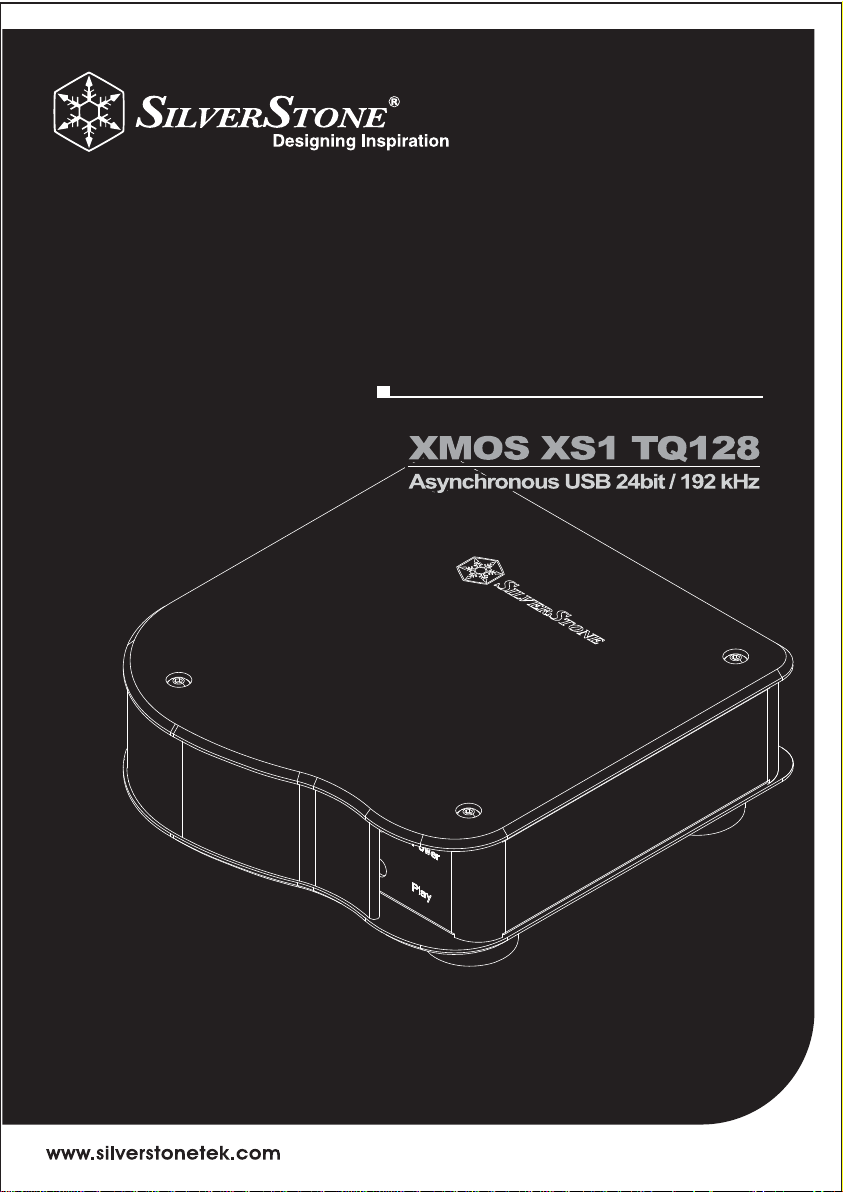
ENSEMBLE
0
The key to high quality computer audio
SERIES
EB
01-EEB
1-E
manual
Page 2
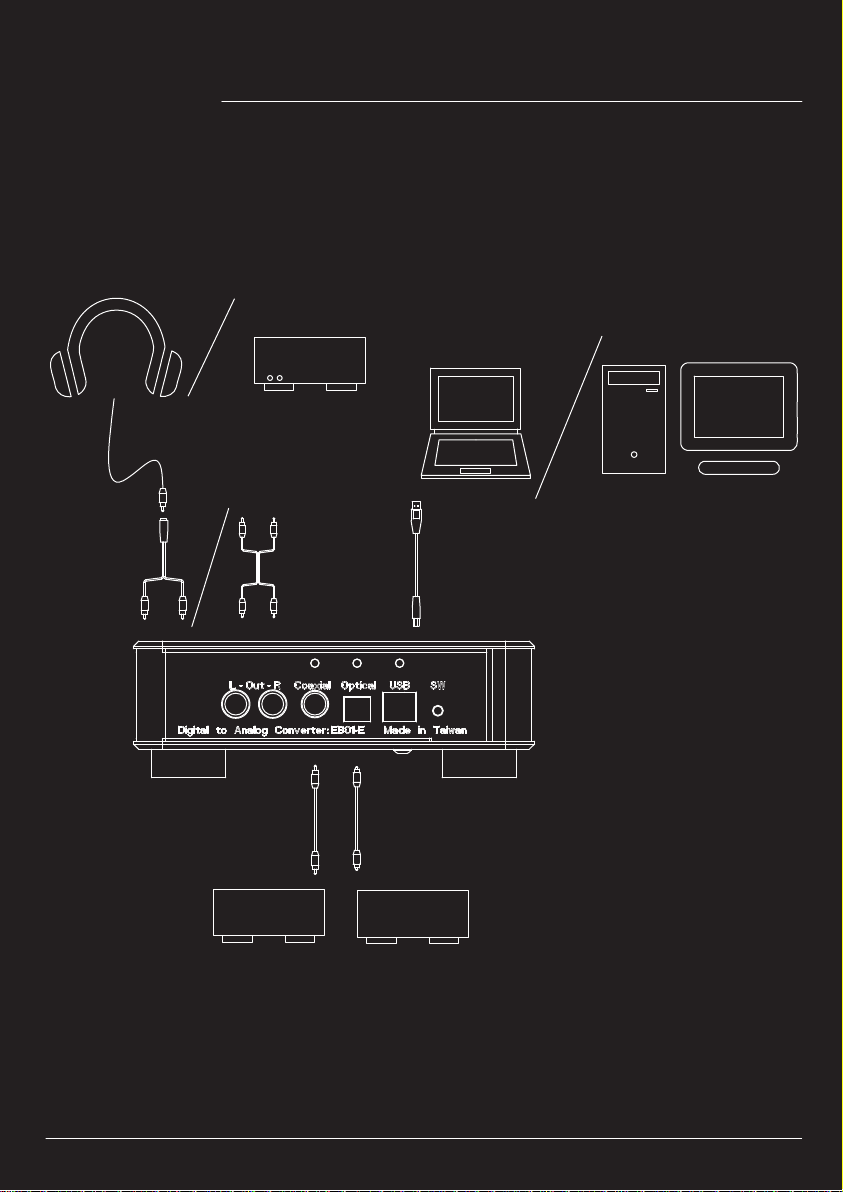
Connections
L R
RCA IN
DIGITAL OUT
(COAXIAL)
DIGITAL OUT
(OPTICAL)
Page 3
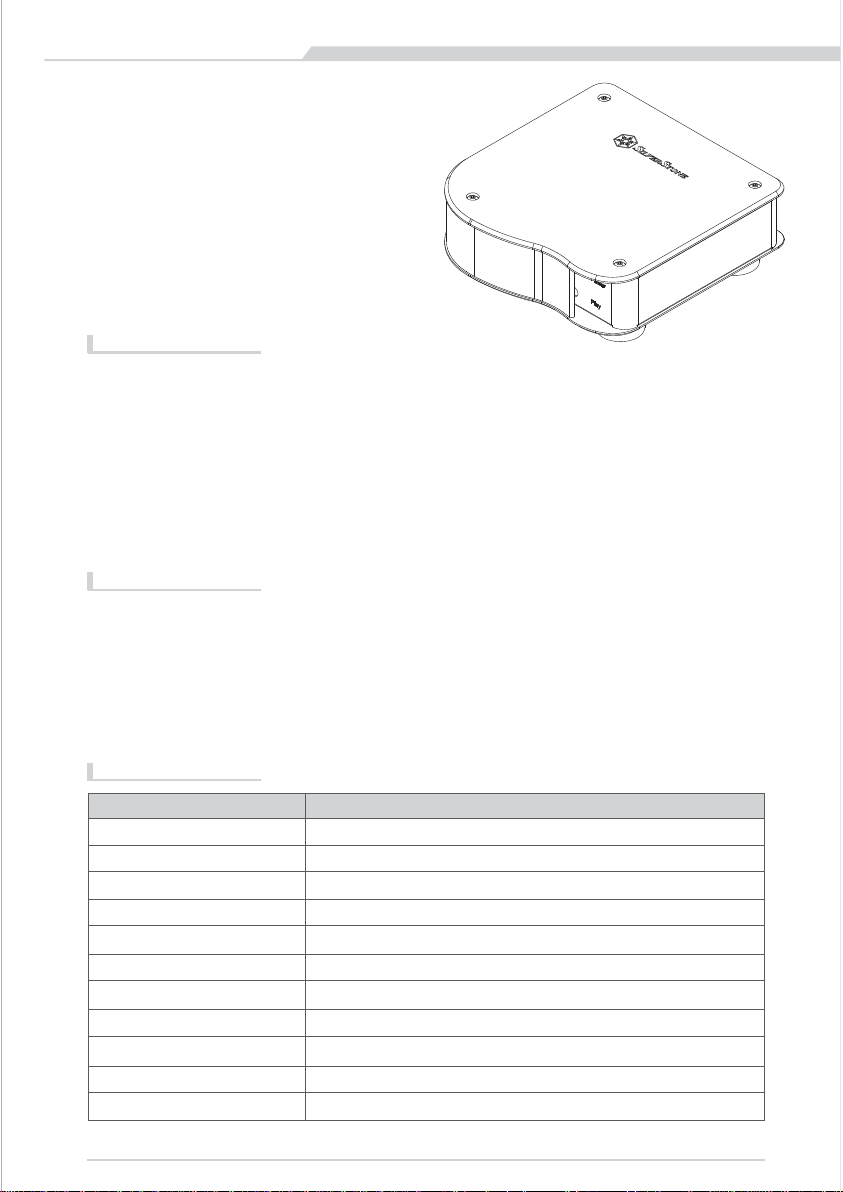
Product Overview
EB
The key to high quality computer audio
INTRODUCTION
For audiophiles with good sound system and sizable digital music collections, the need for a device that can
reproduce genuine sound is critical. After a short and successful launch of its first audio product, the Ensemble EB01
in 2006, SilverStone is back with another USB DAC that is better in every way. To fully satisfy computer users with
affinity for higher quality sounds, the EB01-E is equipped with the ability to resolve signal rates of up to 24bit/192 kHz
thanks to its inclusion of TI’s PCM1798 DAC chipset. Complementing it are XMOS XS1 TQ128 USB decoder, which
supports asynchronous throughput for accurate sound reproduction and TI’s NE5532 OP amp for connection to a
power amplifier via integrated RCA output. With three methods of digital inputs via USB, Toslink optical, or RCA
coaxial connection, the EB01-E is an excellent device for not only computer audiophiles, but also audiophiles with
standalone CD players or other digital audio sources
FEATURES
High quality DAC with improved performance
Classic SilverStone Ensemble exterior design
Easy one touch button for USB, optical or coaxial input
Support highest format of up to 24-bit/192kHz
Utilizes premium XMOS XS1 TQ128 USB decoder for accurate sound reproduction
Includes TI PCM1798 D/A converter for producing high quality analog signal
Includes TI NE5532 OP amp for optimal analog output
SPECFICATION
01-E
ITEM
Model
Color
Material
Input
Output
Sampling resolution
Sampling rate
USB Decoder
D/A Converter
OP Amp
Operating system support
VALUE
SST-EB01B-E (black)、SST-EB01S-E (silver)
Black or silver
Aluminum & steel chassis
Asynchronous USB, optical, coaxial
RCA
16~24 Bit
32~ 192 kHz
XMOS XS1 TQ128
TI PCM1798
TI NE5532
Windows XP, 7, 8, MAC OS
Page 4

Installation steps
※For connection to desktop or notebook PCs with USB
1.
Connect EB01-E to computer via USB cable
EB01-E per USB-Kabel mit Computer verbinden
Branchez votre EB01-E sur l’ordinateur à l’aide d'un câble USB
Conecte el EB01-E al ordenador mediante el cable USB
Collegare EB01-E al computer utilizzando il cavo USB
Подключите устройство EB01-E к компьютеру с помощью USB-кабеля.
USBケーブルによってEB01-Eをコンピュータに接続します。
USB 케이블을 통해 EB01-E를 컴퓨터에 연결합니다.
以USB線,將EB01-E與電腦連接。
以USB线,将EB01-E与电脑连接。
2.
Install driver and restart computer (restart not required for MAC OS)
Treiber installieren und Computer neu starten (Neustart bei Mac OS nicht erforderlich)
Installez le pilote et redémarrez l’ordinateur (redémarrage non requis pour un MAC OS)
Instale el controlador y reinicie el ordenador (el reinicio no es necesario para SO MAC)
Installare il driver e riavviare il computer (riavvio non richiesto per MAC OS)
Установите драйвер и перезагрузите компьютер (для MAC OS перезагрузка не требуется).
ドライバをインストールしてからコンピュータを再起動させます。(MAC OSでは再起動は不要)
드라이버를 설치하고 컴퓨터를 다시 시작합니다(MAC OS의 경우 다시 시작이 필요하지 않음).
安裝驅動程式後重新開機(MAC系統不需安裝驅動程式)。
安装驱动程序后重新开机(MAC系统不需安装驱动程序)。
Page 5
Installation steps
※For connection to desktop or notebook PCs with USB
3.
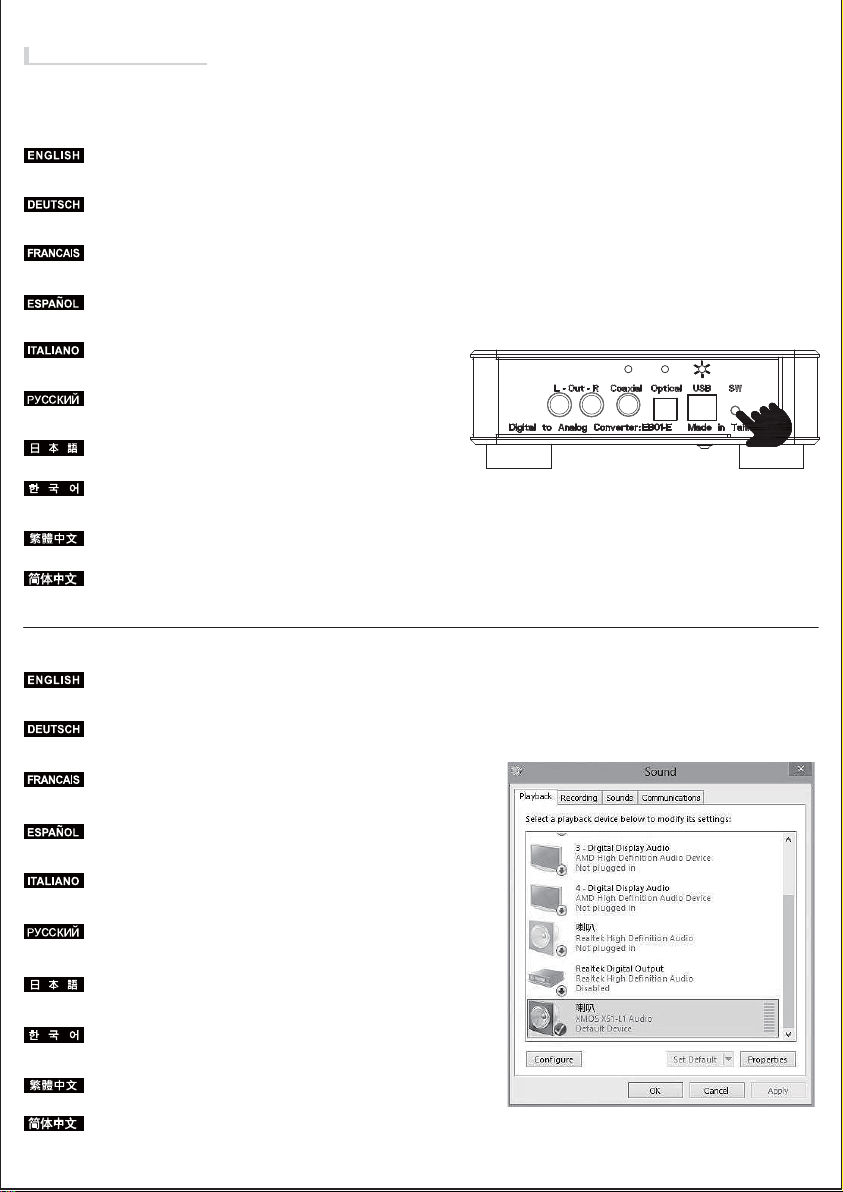
Press the select switch on the back of EB01-E to select USB input
(indicator above USB connector should be lit)
Auswahlschalter an der Rückseite des EB01-E zur Auswahl des USB-Eingangs
drücken (Indikator über dem USB-Anschluss sollte leuchten)
Utilisez le sélecteur situé à l’arrière du EB01-E pour choisir l’entrée USB
(le témoin au-dessus du connecteur USB doit s’allumer)
Presione el interruptor de selección en la parte trasera del EB01-E para seleccionar la
entrada USB (el indicador sobre el conector USB debería estar encendido)
Premere il tasto sul retro di EB01-E per selezionare l'ingresso USB
(la spia sopra il connettore USB deve essere accesa)
Нажмите переключатель с обратной стороны устройства EB01-E для выбора
входа через USB-порт (индикатор над USB-разъемом должен гореть).
EB01-E後部の選択スイッチを押してUSB入力を選択します。(USBの表示が点灯)
EB01-E의 뒷면에 있는 선택 스위치를 눌러 USB 입력을 선택합니다
(USB 커넥터 위에 있는 표시등이 켜져 있어야 함).
按壓EB01-E後方輸入選擇按鈕,切換至USB輸入(指示燈會發亮)。
按压EB01-E后方输入选择按钮,切换至USB输入(指示灯会发亮)。
4.
In the OS, go to control panel, select “Sound” and then click on
“Playback” tab. Choose device named “XMOS”
Im Betriebssystem die Systemsteuerung aufrufen, „Sound“ wählen und das
„Wiedergabe“-Register anklicken. Gerät mit dem Namen „XMOS“ wählen
Depuis votre système d’exploitation, accédez au panneau de configuration, sélectionnez
« Son », puis cliquez sur l’onglet « Lecture » Sélectionnez le périphérique « XMOS »
En el SO vaya al panel de control, seleccione “Sonido” y luego haga clic en la pestaña
de “Reproducir”. Escoja el dispositivo denominado “XMOS”.
Nel sistema operativo, andare al pannello di controllo, selezionare “Suono” quindi fare
clic sulla scheda “Riproduzione”. Scegliere il dispositivo denominato “XMOS”
В ОС откройте панель управления и выберите «Звук», затем откройте вкладку
«Воспроизведение». Выберите устройство под названием «XMOS».
OSからコントロールパネルを表示させ、「サウンド」を選び「再生」タブを選びます。
「XMOS」という項目を選びます。
OS에서 제어판으로 이동하여 “소리”를 선택한 후 “재생” 탭을 클릭합니다.
이름이 “XMOS”인 장치를 선택합니다.
至 控制台 > 聲音 (Sound) > 播放 (Playback),將播放裝置設定為”XMOS”。
至 控制台 > 声音 (Sound) > 播放 (Playback),将播放装置设定为”XMOS”。
Page 6

Installation steps
※For connection to desktop or notebook PCs with USB
5.
Connect EB01-E to comClick on “Properties” select “Supported Formats” tab
and in the “Sample Rates” field, choose 192.0kHzputer via USB cable
Auf „Eigenschaften“ klicken, das „Unterstützte Formate“-Register öffnen
und im „Abtastrate“-Feld 192,0 kHz wählen
Cliquez sur l’onglet « Propriétés », puis sur l’onglet « Formats pris en charge »,
et sélectionnez 192,0kHz sous « Taux d’échantillonnage »
Haga clic en “Propiedades” seleccione la pestaña de “Formatos soportados” y
en el campo “Tasas de muestreo” escoja 192.0kHz.
Fare clic sulla scheda “Proprietà”, selezionare la scheda “Formati supportati” e
nel campo “Frequenze di campionamento”, scegliere 192.0kHz
Нажмите кнопку «Свойства», выберите вкладку «Поддерживаемые форматы»
и в поле «Частота дискретизации» выберите значение 192,0 кГц.
「プロパティ」をクリックし、「サポートされる形式」タブを選び、
「サンプリングレート」欄から192.0kHzを指定します。
“속성”을 클릭하고 “지원되는 형식” 탭을 선택한 후 “샘플 속도”
필드에서 192.0kHz를 선택합니다.
點選 內容 (Properties) > 支援的格式 (Supported Formats),
將取樣率 (Sample Rates) 選至192.0KHz。
点选 内容 (Properties) > 支持的格式 (Supported Formats),
将取样率 (Sample Rates) 选至192.0KHz。
6.
Click on “Advanced” tab, choose “24 bit, 192000 Hz (Studio Quality)”
Auf „Erweitert“-Register klicken, „24 bit, 192000 Hz (Studioqualität)“ wählen
Cliquez sur l’onglet « Avancé », sélectionnez « 24 bits, 192000 Hz (qualité studio) »
Haga clic en la pestaña “Avanzado”, escoja “24 bit, 192000 Hz (Calidad de estudio)”
Fare clic sulla scheda “Avanzate”, scegliere “24 bit, 192000 Hz (Qualità Studio)”
Откройте вкладку «Дополнительно», выберите параметр «24 бит,
192000 Гц (Студийная запись)».
「詳細設定」タブを開き、「24 bit, 192000 Hz (スタジオ音質)」を選びます。
“고급” 탭을 클릭한 후 “24 비트, 192000 Hz(스튜디오 음질)”를 선택합니다.
點選 進階 (Advanced) > 選擇 24位元,192000Hz (錄音室品質)
24bit,192000Hz, (Studio Quality)
点选 进阶 (Advanced) > 选择 24位,192000Hz (录音室质量)
24bit,192000Hz, (Studio Quality)
Page 7

Installation steps
※For connection to desktop or notebook PCs with USB
7.
If the media player you use (e.g. iTunes) has setting for “sample rate” for sound
quality, please adjust to the same value as outlined in step 6
Falls der von Ihnen verwendete Medienplayer (z. B. iTunes) eine „Abtastrate“-Einstellung
für die Klangqualität hat, stellen Sie den Wert bitte wie in Schritt 6 ein
Si le lecteur multimédia que vous utilisez (par ex. iTunes) possède un réglage « taux
d’échantillonnage » pour la qualité audio, réglez-le sur la même valeur que celle indiquée étape 6
Si el reproductor que usa (iTunes, por ejemplo) tiene un valor de “tasa de muestreo” para la
calidad de sonido, por valor ajústelo al mismo valor que aparece en el paso 6.
Se il lettore multimediale utilizzato (iTunes, ad esempio) ha l'impostazione per la "frequenza di
campionamento" per la qualità del suono, regolarla sullo stesso valore, come indicato al punto 6
Если в используемом мультимедийном проигрывателе (например, iTunes) имеется параметр
«частоты дискретизации» для качества звука, укажите такое же значение, как в пункте 6 выше.
お使いのメディアプレーヤー(例:iTunes) が音質において「サンプリングレート」設定を有す
る場合、ステップ6に示されるのと同じ設定にします。
사용 중인 미디어 플레이어(예: iTunes)에 음질에 대한 “샘플 속도” 설정이 있을 경우
단계 6에서 설명한 값과 동일한 값으로 조정하십시오.
若您的撥放軟體(例如: iTunes)可調整取樣率 (Sample Rates)、輸出品質,
請調整至與步驟6相同的數值。
若您的拨放软件(例如: iTunes)可调整取样率 (Sample Rates)、输出质量,
请调整至与步骤6相同的数值。
8.
Connect other sound devices of your choice to the EB01-E with RCA cable
Andere Audiogeräte Ihrer Wahl per Cinch-Kabel an den EB01-E anschließen
Branchez un autre appareil de votre choix sur le EB01-E à l’aide d’un câble RCA
Conecte otros dispositivos de sonido de su elección al EB01-E con el cable RCA
Collegare altri dispositivi audio a EB01-E utilizzando il cavo RCA
Подключите другие звуковые устройства по своему выбору к изделию EB01-E
с помощью RCA-кабеля.
RCAケーブルにより、お好みのその他サウンド装置をEB01-Eに接続します。
RCA 케이블을 사용하여 EB01-E에 선택한 기타 사운드 장치를 연결합니다.
使用RCA線材將EB01-E與其他您喜愛的音響設備連接。
使用RCA线材将EB01-E与其它您喜爱的音响设备连接。
L R
RCA IN
Page 8

Installation steps
※For connection to desktop or notebook PCs with USB
9.
If you wish to use a headphone, we recommend pairing it with SilverStone’s EB03 for optimal sound quality.
You may also use the included RCA to 3.5mm adapter to connect to your headphone’s 3.5mm connector.
Falls Sie Kopfhörer nutzen möchten, sollten Sie das Gerät zur Erzielung optimaler Klangqualität
mit dem EB03 von SilverStone koppeln. Sie können auch über den mitgelieferten
Cinch-zu-3,5-mm-Adapter eine Verbindung zum 3,5-mm-Anschluss Ihres Kopfhörers herstellen.
Si vous souhaitez utiliser un câble d’écoute, nous vous recommandons de l’associer au EB03
de SilverStone pour une qualité sonore optimale. Vous pouvez également utiliser l’adaptateur
RCA vers 3,5mm fourni pour le branchement sur le connecteur 3,5mm de votre casque.
Si desea usar un auricular, le recomendamos que escoja el EB03 de SilverStone para una
calidad de sonido óptima. También podría usar el adaptador RCA a 3,5mm incluido para
usar el conector de 3,5mm de su auricular.
Se si vogliono utilizzare le cuffie, si raccomanda di eseguire l’accoppiamento con EB03
SilverStone per una qualità audio ottimale. È anche possibile utilizzare l’adattatore RCA a
3,5 mm fornito in dotazione per collegare le cuffie al connettore 3,5 mm.
Если нужно использовать наушники, рекомендуется сопряжение с изделием EB03 компании
SilverStone для оптимального качества звучания. Для подключения к разъему 3,5 мм от
наушников можно также использовать входящий в комплект переходник RCA—3,5 мм.
ヘッドホン利用の場合は、音質最適化のためにSilverStone製EB03を併用されるようお勧めします。
または附属のRCA-3.5mmアダプタによってヘッドホンの3.5mmコネクタに接続することもできます。
헤드폰을 사용하려는 경우 최적의 음질을 위해 헤드폰을 SilverStone의 EB03과 페어링할 것을 권장합니다.
또한 함께 제공된 RCA - 3.5mm 어댑터를 사용하여 헤드폰의 3.5mm 커넥터에 연결할 수 있습니다.
若您想以高階耳機聆聽,我們建議您搭配銀欣的EB03耳機擴大機以傳達最完美音質。或者,
也可使用隨附的RCA轉3.5mm 耳機插孔轉接線,單獨與3.5mm 耳機連接。
若您想以高阶耳机聆听,我们建议您搭配银欣的EB03耳放以传达最完美音质。或者,
也可使用随附的RCA转3.5毫米耳机插孔转接线,单独与3.5毫米耳机连接。
Page 9

Installation steps
※For connection to desktop or notebook PCs with optical or coaxial
1.
Connect EB01-E to computer via USB cable and optical or coaxial cable
EB01-E über USB, optisches oder Koaxialkabel mit dem Computer verbinden
Branchez votre EB01-E sur l’ordinateur à l’aide d'un câble USB et d’un câble
optique ou coaxial
Conecte el EB01-E al ordenador mediante un cable USB, óptico o coaxial.
Collegare EB01-E al computer utilizzando il cavo USB ed il cavo ottico o coassiale
Подключите устройство EB01-E к компьютеру с помощью USB-кабеля и
оптического или коаксиального кабеля.
USBケーブルおよび光学または同軸ケーブルによってEB01-Eをコンピュータに接続します。
USB 케이블 및 광학 또는 동축 케이블을 통해 EB01-E를 컴퓨터에 연결합니다.
以USB線以及光纖或同軸線,同時將EB01-E與電腦或筆記型電腦連接。
以USB线以及光纤或同轴线,同时将EB01-E与电脑或笔记型电脑连接。
2.
Install driver and restart computer (restart not required for MAC OS)
Treiber installieren und Computer neu starten (Neustart bei Mac OS nicht erforderlich)
Installez le pilote et redémarrez l’ordinateur (redémarrage non requis pour un MAC OS)
Instale el controlador y reinicie el ordenador (el reinicio no es necesario para SO MAC)
Installare il driver e riavviare il computer (riavvio non richiesto per MAC OS)
Установите драйвер и перезагрузите компьютер (для MAC OS перезагрузка не требуется).
ドライバをインストールしてからコンピュータを再起動させます。(MAC OSでは再起動は不要)
드라이버를 설치하고 컴퓨터를 다시 시작합니다(MAC OS의 경우 다시 시작이 필요하지 않음).
安裝驅動程式並重新開機(MAC系統不需安裝)。
安装驱动程序并重新开机(MAC系统不需安装)。
Page 10

Installation steps
※For connection to desktop or notebook PCs with optical or coaxial
3.
Press the select switch on the back of EB01-E to select optical or coaxial input
(with corresponding indicator lit)
Auswahlschalter an der Rückseite des EB01-E zur Auswahl des optischen oder
Koaxialeingangs drücken (der entsprechende Indikator sollte leuchten)
Utilisez le sélecteur situé à l’arrière du EB01-E pour choisir l’entrée optique
ou coaxiale (le témoin correspondant doit s’allumer)
Presione el interruptor de selección en la parte trasera del EB01-E para seleccionar
entrada óptica ó coaxial (con el indicador correspondiente encendido)
Premere il tasto sul retro di EB01-E per selezionare l'ingresso ottico o coassiale
(con la spia corrispondente accesa)
Нажмите переключатель с обратной стороны устройства EB01-E для выбора оптического
или коаксиального входа (при этом будет гореть соответствующий индикатор).
EB01-E後部の選択スイッチを押して光学または同軸入力を選択します。
(対応するインジケーターが点灯)
EB01-E의 뒷면에 있는 선택 스위치를 눌러 광학 또는 동축 입력을
선택합니다(해당 표시등이 켜짐).
按壓EB01-E後方輸入選擇按鈕,切換至光纖或同軸輸入(指示燈會發亮)。
按压EB01-E后方输入选择按钮,切换至光纤或同轴输入(指示灯会发亮)。
(Coaxial)
(OpƟcal)
4.
In the OS, go to control panel, select “Sound” and then click on “Playback” tab.
Choose optical or coaxial device.
m Betriebssystem die Systemsteuerung aufrufen, „Sound“ wählen und das
„Wiedergabe“-Register anklicken. Wählen koaxialen oder optischen Gerät
Depuis votre système d’exploitation, accédez au panneau de configuration, sélectionnez « Son »,
puis cliquez sur l’onglet « Lecture » Sélectionnez le périphérique optique ou coaxial
En el SO vaya al panel de control, seleccione “Sonido” y luego haga clic
en la pestaña de “Reproducir”. Escoja el dispositivo óptico o coaxial.
Nel sistema operativo, andare al pannello di controllo, selezionare “Suono” quindi fare
clic sulla scheda “Riproduzione”. Scegliere il dispositivo ottico o coassiale
В ОС откройте панель управления и выберите «Звук», затем откройте вкладку
«Воспроизведение». Выберите оптическое или коаксиальное устройство.
OSからコントロールパネルを表示させ、「サウンド」を選び「再生」タブを選びます。
光学または同軸デバイスを選択します。
OS에서 제어판으로 이동하여 “소리”를 선택한 후 “재생” 탭을 클릭합니다.
인 광학 또는 동축 장치를 선택합니다.
請至控制台 > 聲音 (Sound) > 播放 (Playback),選擇光纖或同軸輸出。
请至控制台 > 声音 (Sound) > 播放 (Playback),选择光纤或同轴输出。
Page 11

Installation steps
※For connection to desktop or notebook PCs with optical or coaxial
5.
Follow step 5 thru 9 from USB installation instruction
Schritt 5 bis 9 der USB-Installationsanleitung befolgen
Suivez les instructions des étapes 5 à 9 données sous l’installation USB
Siga los pasos 5 a 9 de las instrucciones de instalación del USB
Seguire le istruzioni di cui ai punti 5-9 dell’installazione USB
Выполните действия 5–9, изложенные в инструкции по установке при
помощи USB-соединения.
USBのインストール手順のステップ5から9に従います。
USB 설치 방법의 단계 5부터 단계 9까지를 따르십시오.
後續步驟,請參考USB介面安裝步驟5之後的所有設定。
后续步骤,请参考USB接口安装步骤5之后的所有设定。
Page 12

Installation steps
※For connection to non-PC devices with optical or coaxial
1.
The EB01-E requires power from its USB connection so if you do not connect it to a
computer, please purchase an USB power adapter with rating of 5V, 1A
Der EB01-E muss über seinen USB-Anschluss mit Strom versorgt werden; falls Sie ihn
also nicht an einen Computer anschließen, kaufen Sie bitte ein USB-Netzteil mit 5 V, 1 A
Votre EB01-E est alimenté via sa connexion USB ; par conséquent, si vous ne le branchez
pas sur un ordinateur, vous devez acheter un adaptateur d’alimentation USB doté d’une
tension de 5V, 1A
El EB01-E precisa de potencia en sus conexiones USB por lo que si no lo conecta a un ordenador,
por favor compre un adaptador para cable de potencia USB con 5V, 1A
EB01-E è alimentato dal collegamento USB, quindi se non è collegato ad un computer, acquistare
un adattatore di corrente USB con potenza nominale di 5V, 1A
Для устройства EB01-E требуется питание от USB-подключения, следовательно, если изделие
не будет подключаться к компьютеру, приобретите адаптер USB-питания с номинальными
характеристиками 5В, 1А.
EB01-EはUSB接続からの電力を必要とするので、 コンピュータ以外への接続には定格5V,
1AのUSB電源アダプタを別途入手します。
EB01-E는 USB 연결에서 전원을 공급 받아야 합니다. 따라서 이를 컴퓨터에 연결하지
않을 경우 정격이 5V, 1A인 USB 전원 어댑터를 구매하십시오.
因EB01-E使用USB供電,所以若未連接電腦,請自行選購輸出為“5V, 1A”
的USB變壓器。
因EB01-E使用USB供电,所以若未连接电脑,请自行选购输出为“5V, 1A”
的USB電源適配器。
2.
adapter
Connect EB01-E via USB cable to an USB adapter
Andere Audiogeräte Ihrer Wahl per Cinch-Kabel an den EB01-E anschließen
Branchez votre EB01-E sur un adaptateur USB à l’aide d'un câble USB
Conecte el EB01-E mediante cable USB a un adaptador USB
Collegare EB01-E all’adattatore USB utilizzando il cavo USB
Подключите устройство EB01-E к USB-адаптеру с помощью USB-кабеля.
USBケーブルでEB01-EをUSBアダプタに接続します。
USB 케이블을 통해 EB01-E를 USB 어댑터에 연결합니다.
以USB線,將EB01-E與變壓器連接。
以USB线,将EB01-E与適配器连接。
ADAPTER
Page 13

Installation steps
※For connection to non-PC devices with optical or coaxial
3.
After connecting an optical cable or coaxial cable to a sound source, press the select switch to select a
corresponding input method (as indicated by the indicator light above the connection) to finish installation.
Nach Anschluss an eine Audioquelle über ein optisches oder Koaxialkabel Auswahlschalter zur Auswahl
des entsprechenden Eingangs (der Indikator über dem entsprechenden Anschluss leuchtet) drücken;
damit ist die Installation abgeschlossen
Une fois le câble optique ou coaxial branché sur une source audio, utilisez le sélecteur situé pour
choisir l’entrée adaptée (le témoin correspondant doit s’allumer) et parachever l’installation.
Tras conectar un cable óptico o coaxial a una fuente de sonido, presione el interruptor de selección
al método de entrada correspondiente (como se indica según la luz indicadora sobre la conexión)
para finalizar la instalación.
Dopo aver collegato un cavo ottico o un cavo coassiale ad una sorgente sonora, premere l'interruttore
di selezione per selezionare il corrispondente metodo di ingresso (come indicato dalla spia luminosa
sopra il collegamento) per terminare l'installazione.
После подключения оптического или коаксиального кабеля к источнику звука нажмите
переключатель для выбора соответствующего метода входа (в соответствии с индикатором
над соединительным разъемом) для завершения установки.
光学ケーブルまたは同軸ケーブルをサウンドソースに接続してから、選択スイッチを押して対応す
る入力方法を選び(接続部分上部のインジケーターが点灯表示) インストール完了です。
광학 케이블 또는 동축 케이블을 사운드 소스에 연결한 후 선택 스위치를 눌러 해당 입력 방법
(연결 위에 위치한 표시등에 의해 표시됨)을 선택하여 설치를 완료합니다.
接上光纖或同軸至訊號來源並按壓EB01-E後方輸入選擇按鈕,
依需要切換至光纖或同軸輸入(指示燈會發亮),即安裝完畢。
接上光纤或同轴至讯号来源并按压EB01-E后方输入选择按钮,
依需要切换至光纤或同轴输入(指示灯会发亮),即安装完毕。
ADAPTER ADAPTER
DIGITAL OUT
(COAXIAL)
DIGITAL OUT
(OPTICAL)
Page 14

Warranty Information
This product has a limited 1 year warranty in North America and Australia.
For information on warranty periods in other regions, please contact your reseller or SilverStone authorized distributor.
Warranty terms & conditions
1. Product component defects or damages resulted from defective production is covered under warranty.
Defects or damages with the following conditions will be fixed or replaced under SilverStone Technology’s jurisdiction.
a) Usage in accordance with instructions provided in this manual, with no misuse, overuse, or other inappropriate actions.
b) Damage not caused by natural disaster (thunder, fire, earthquake, flood, salt, wind, insect, animals, etc…)
c) Product is not disassembled, modified, or fixed. Components not disassembled or replaced.
d) Warranty mark/stickers are not removed or broken.
Loss or damages resulted from conditions other than ones listed above are not covered under warranty.
2. Under warranty, SilverStone Technology’s maximum liability is limited to the current market value for the product (depreciated value, excluding
shipping, handling, and other fees). SilverStone Technology is not responsible for other damages or loss associated with the use of product.
3. Under warranty, SilverStone Technology is obligated to repair or replace its defective products. Under no circumstances will SilverStone
Technology be liable for damages in connection with the sale, purchase, or use including but not limited to loss of data, loss of business, loss of
profits, loss of use of the product or incidental or consequential damage whether or not foreseeable and whether or not based on breach of warranty,
contract or negligence, even if SilverStone Technology has been advised of the possibility of such damages.
4. Warranty covers only the original purchaser through authorized SilverStone distributors and resellers and is not transferable to a second hand
purchaser.
5. You must provide sales receipt or invoice with clear indication of purchase date to determine warranty eligibility.
6. If a problem develops during the warranty period, please contact your retailer/reseller/SilverStone authorized distributors or SilverStone
http://www.silverstonetek.com.
Please note that: (i) You must provide proof of original purchase of the product by a dated itemized receipt; (ii) You shall bear the cost of shipping
(or otherwise transporting) the product to SilverStone authorized distributors. SilverStone authorized distributors will bear the cost of shipping
(or otherwise transporting) the product back to you after completing the warranty service; (iii) Before you send the product, you must be issued a
Return Merchandise Authorization (“RMA”) number from SilverStone. Updated warranty information will be posted on SilverStone’s official website.
Please visit http://www.silverstonetek.com for the latest updates.
Additional info & contacts
For North America (usasupport@silverstonetek.com)
SilverStone Technology in North America may repair or replace defective product with refurbished product that is not new but has been functionally tested.
Replacement product will be warranted for remainder of the warranty period or thirty days, whichever is longer. All products should be sent
back to the place of purchase if it is within 30 days of purchase, after 30 days, customers need to initiate RMA procedure with SilverStone Technology
in USA by first downloading the “USA RMA form for end-users” form from the below link and follow its instructions.
http://silverstonetek.com/contactus.php
For Australia only (support@silverstonetek.com)
Our goods come with guarantees that cannot be excluded under the Australian Consumer Law.
You are entitled to a replacement or refund for a major failure and for compensation for any other reasonably foreseeable loss or damage.
You are also entitled to have the goods repaired or replaced if the goods fail to be of acceptable quality and the failure does not amount to a major failure.
Please refer to above “Warranty terms & conditions” for further warranty details.
SilverStone Technology Co., Ltd. 12F No. 168 Jiankang Rd., Zhonghe Dist., New Taipei City 235 Taiwan R.O.C. + 886-2-8228-1238
(standard international call charges apply)
For Europe (support.eu@silverstonetek.de)
For all other regions (support@silverstonetek.com)
Page 15

Page 16

G11219830
 Loading...