

Page 1
NO: G11214190
Issue date: June, 2011
DS321
Compact dual-bay HDD enclosure with RAID
Page 2
1
Installation and system optimization guide:
The following manual and guides were carefully prepared by the SilverStone engineering team to help
you maximize the potential of your SilverStone product. Please keep this manual for future reference
when upgrading or performing maintenance on your system. A copy of this manual can also be
downloaded from our website at:
http://www.silverstonetek.com
P.3
P.10
SPECIFICATIONS
ENGLISH
P.2
P.17
P.24
P.31
P.38
P.45
P.52
P.58
P.64
简体中文
简体中文
adi
ng
or
per
formin
g m
aintenance o
n y
our
sy
stem
. A
cop
y o
f this manua
from our w
ebsite at:
silverstonetek.com
Contents
Page 3
2
DATA STORAGE SERIES
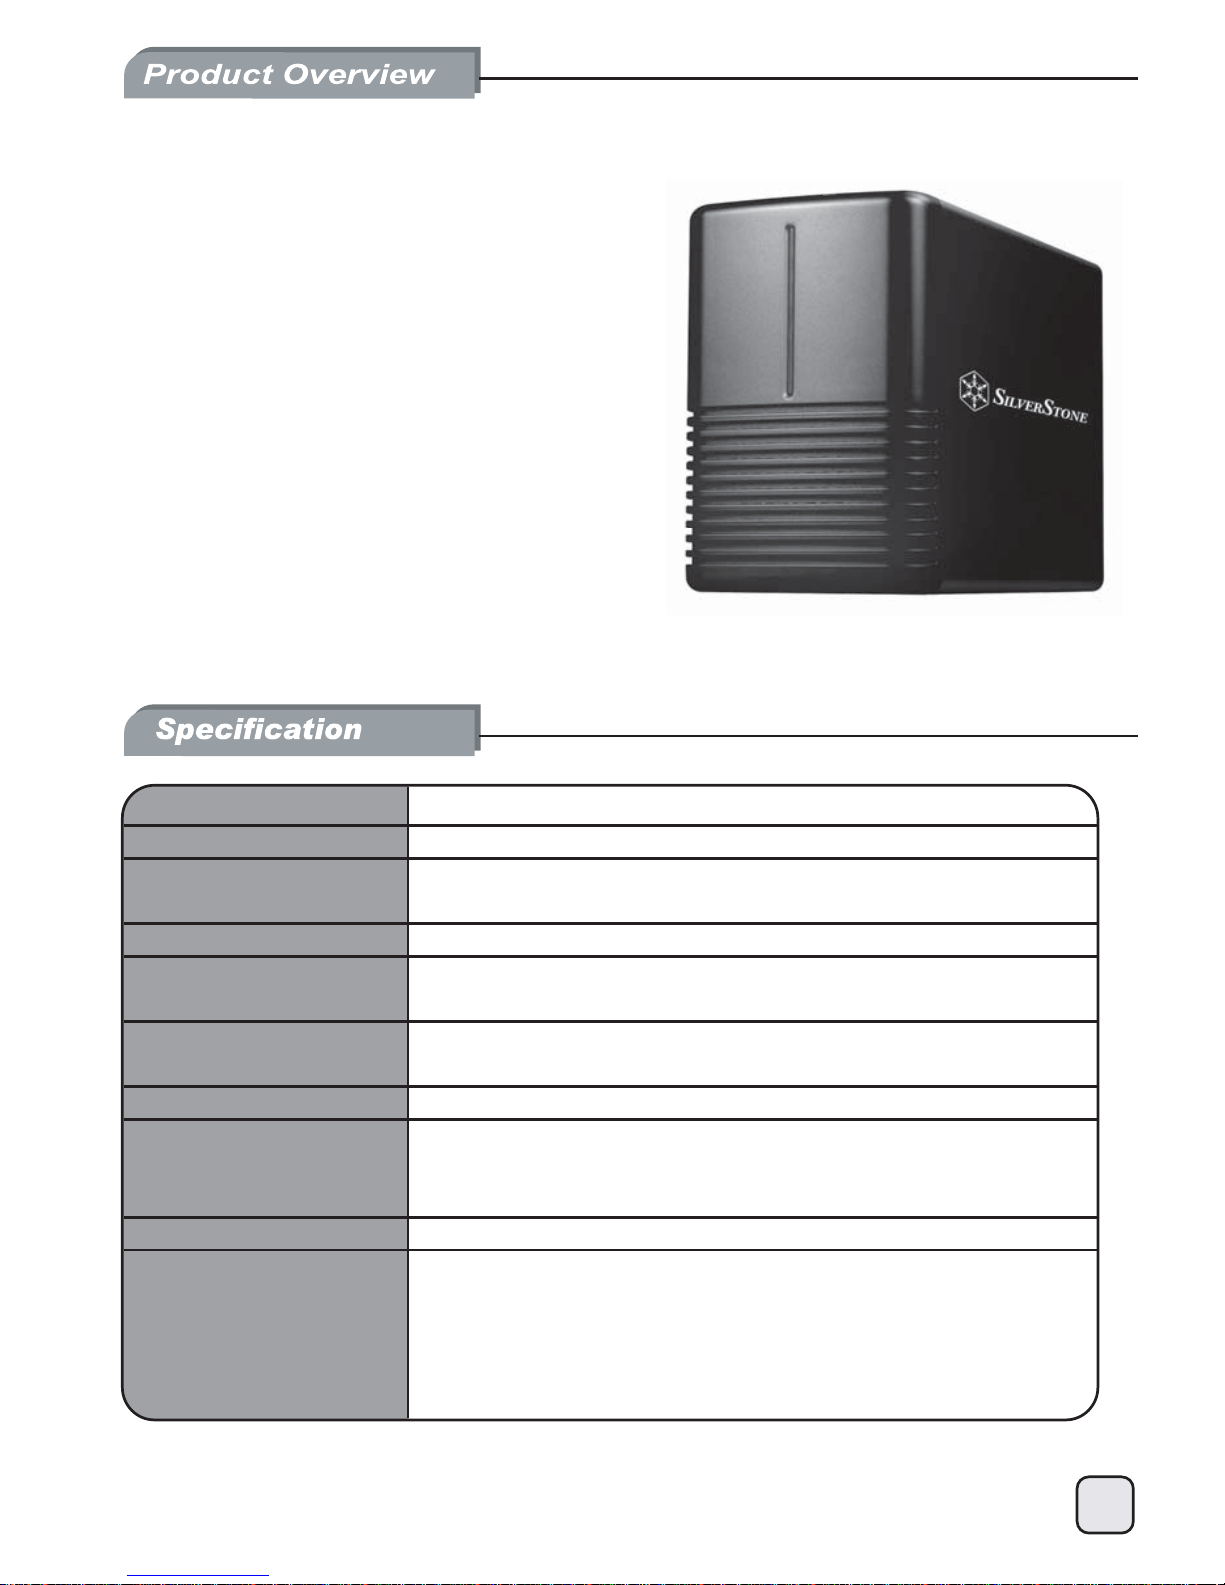
DS321
Compact dual-bay HDD enclosure with RAID
•
Configurable RAID function (Non-RAID, RAID 0, RAID 1)
•
Supports large volumes in excess of 2TB
•
USB 3.0 SuperSpeed connection
•
Backwards compatible with USB 2.0 Hi-Speed connection
•
Compact and screw-less design for easy HDD installation
•
Built-in low speed (2800RPM) fan for extra cooling
•
Security lock slot
Model No.
Enclosure material
Application
Interface/ports
Data Transfer
System Requirements(PC)
System Requirements(MAC)
Power supply
Product size
Remarks
SST-DS321
aluminum housing with plastic panel
One or two 3.5” SATA-I or SATA II HDD, 20GB – 2TB per HDD
Supports large volumes in excess of 2TB
1 x USB 3.0 SuperSpeed port (compatible with USB 2.0)
USB 3.0 up to 5Gbps
USB 2.0 up to 480Mbps
USB 3.0:Windows XP/Vista/7
USB 2.0:Windows XP/Vista/7
USB 2.0:Mac OS 10.4 or above
External Power Adapter universal auto-switching (UL, cUL, CE, TUV approved)
Input: AC 100-240V, 50-60Hz
Output: DC +12V/3A
182mm x 123mm x 81mm
In order for the computer to access volumes larger than 2TB, both hardware
and operating system need to support large volumes (e.g. Windows Vista,
Windows 7 or Mac OS 10.4 and above)
USB 3.0 is currently not available for Mac OS but the device can still be used
with the older USB 2.0 connection.
©2011 SilverStone Technology Co., Ltd. All Rights Reserved.
All specifications are subject to change without prior notice.
Page 4
3
1.1 System Requirements
1.1.1 PC Requirements
• Minimum Intel Pentium III CPU 500MHz, 128MB RAM
• Windows Vista, Windows 7
• Your hardware device must have the correct corresponding port (e.g. USB 3.0 host controller)
1.1.2 Mac Requirements
• Minimum Apple G4 processor, 128MB RAM
• Mac OS 10.4 or above
• Your hardware device must have the correct corresponding port (e.g. USB 2.0 host controller)
Note
USB 3.0 was not available for the Mac OS at the time this manual was written.
However, it is possible to use the drive with the slower USB 2.0 connection.
1.1.3 Supported Hard Drives
• One or two 3.5" SATA-I or SATA-II hard drives (1.5Gb/s or 3.0Gb/s)
• 20GB - 2TB per HDD
• Hard drives of identical capacities are recommended
• Supports large volumes in excess of 2TB
Note
In order for the computer to access volumes larger than 2TB, both the hardware and OS need
to have the capacity to support large volumes (e.g. Windows Vista or Mac OS 10.4 and above).
1.2 Package Contents
Package content may vary depending on vendor & version.
• DS321 storage enclosure (hard drives not included)
• Power supply
• Interface cable
• User manual
1.3 About this Manual
Firmware, images and descriptions may vary slightly between this manual and the actual product you have.
Functions and features may change depending on the firmware version.
Please read your warranty carefully, as this may vary between different vendors!
1.4 Trademarks
• MS-DOS, Microsoft, Windows Vista & 7 are trademarks of Microsoft Corporation.
• Apple Macintosh and Mac are trademarks of Apple Computer.
• All other third party brands and names are the property of their respective owners.
1. Introduction
ENGLISH
Page 5
4
1. Introduction
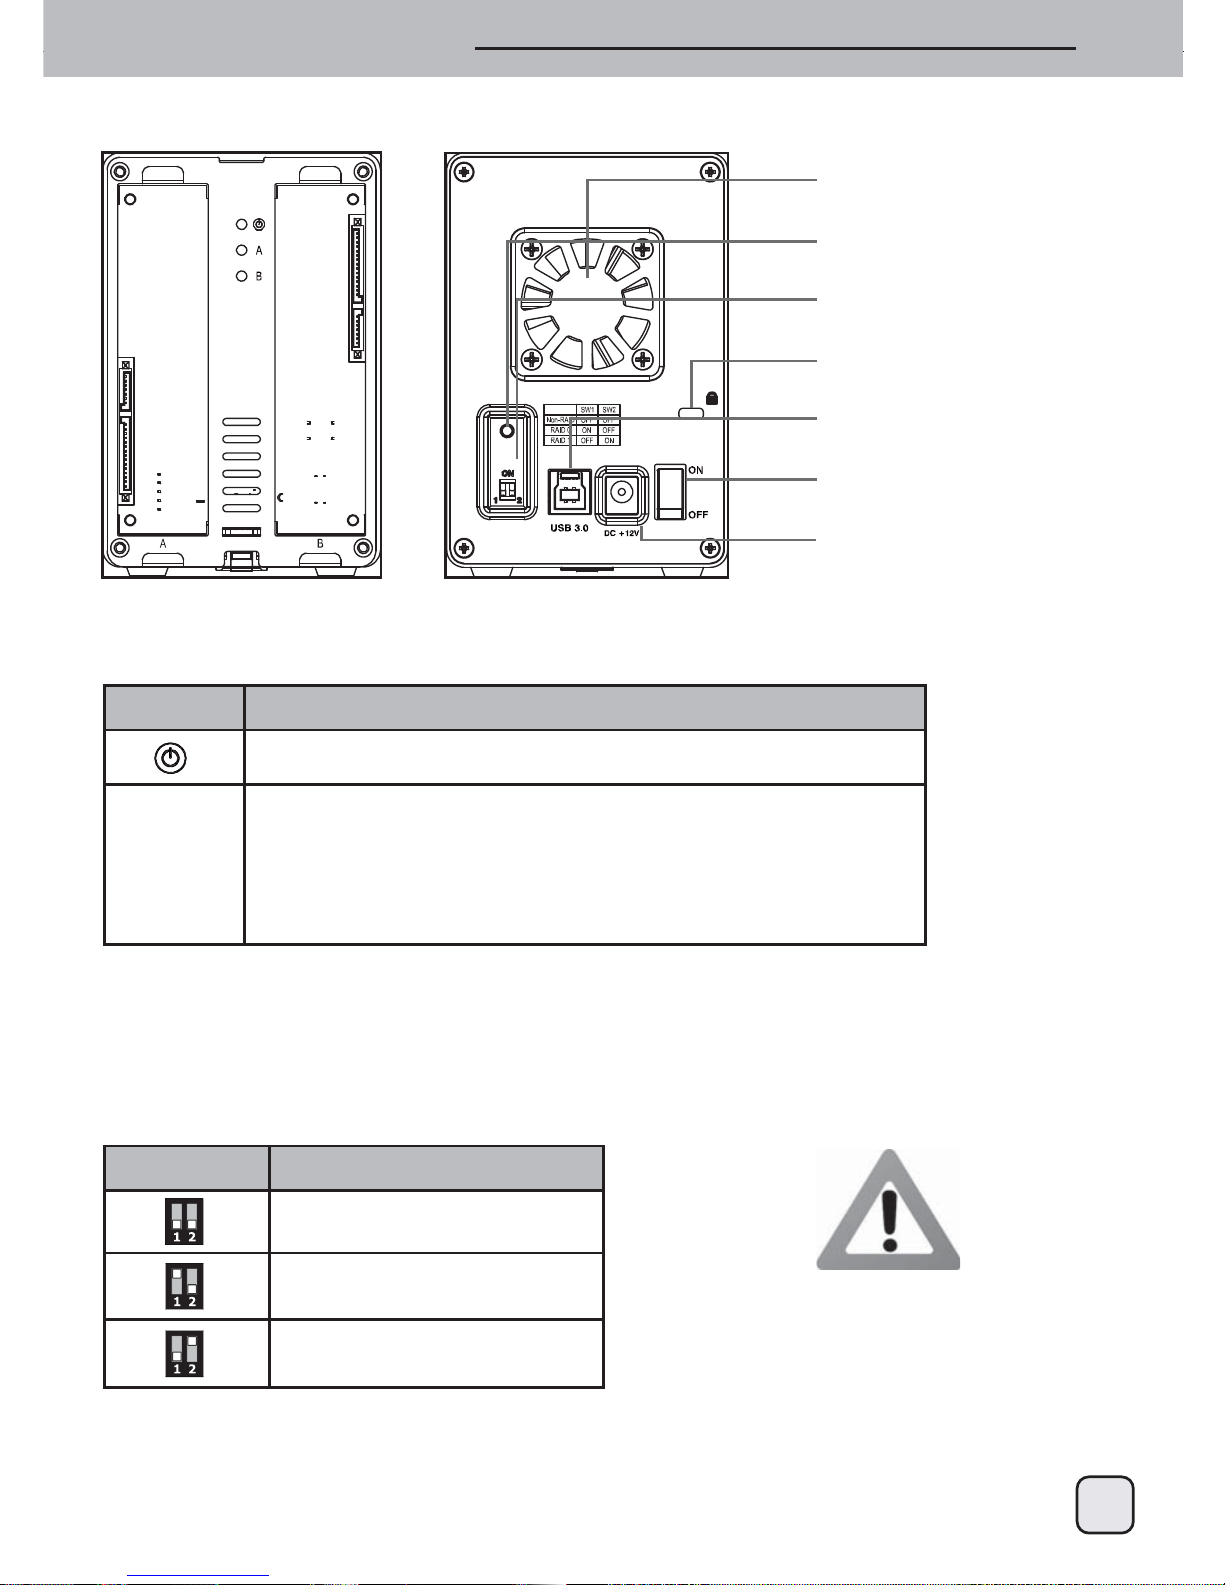
1.5 Detailed View
Front View Rear View
Fan
Confirm RAID mode
RAID switch
Kensington lock
USB port
Power switch
Power receptacle
1.5.1 LED indication
LED
HDD
A & B
Status
• Blue = Power on
• Green = Status OK, USB connection to computer is established
• OFF = Empty drive bay or USB connection is not yet established
• Flashing Green = Data access (read/write)
• Blinking slow (500ms on/off) = Drive failure (error)
• Blinking fast (125ms on/off) = Rebuilding RAID 1 array
Note
In order to determine which type of blinking the LED indicates, stop transferring files to or from the hard drives.
The slow blinking will be slower and the fast blinking will be faster than the usual flashing of the LED during
data access.
Note
Except for the Non-RAID mode, two hard drives are required.
After changing the RAID mode, press the button above the RAID switch to confirm the new setting.
1.5.2 RAID switch
DIP Switch RAID Mode
Non-RAID
Switch position: 1 OFF, 2 OFF
Changing the RAID mode requires formatting the drives.
Make sure to backup all existing data first!
RAID 0 - Striping
Switch position: 1 ON, 2 OFF
RAID 1 - Mirroring
Switch position: 1 OFF, 2 ON
ENGLISH
Page 6
5
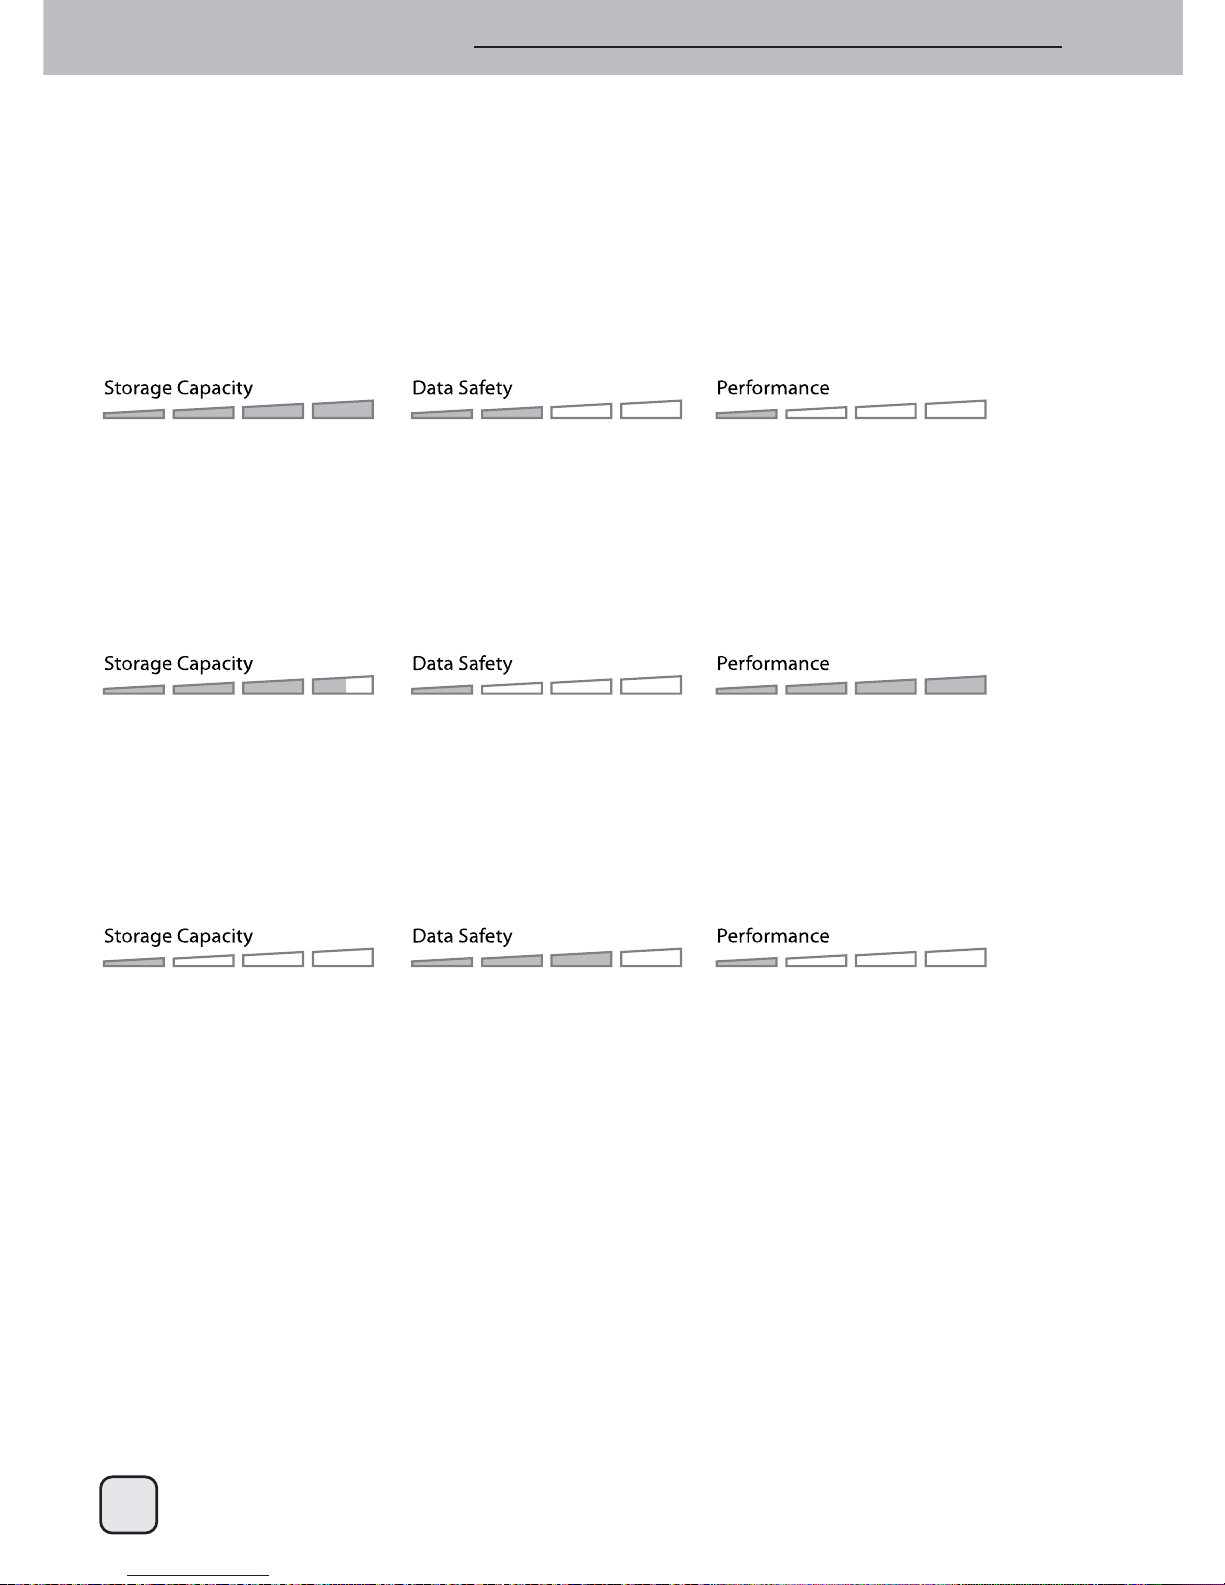
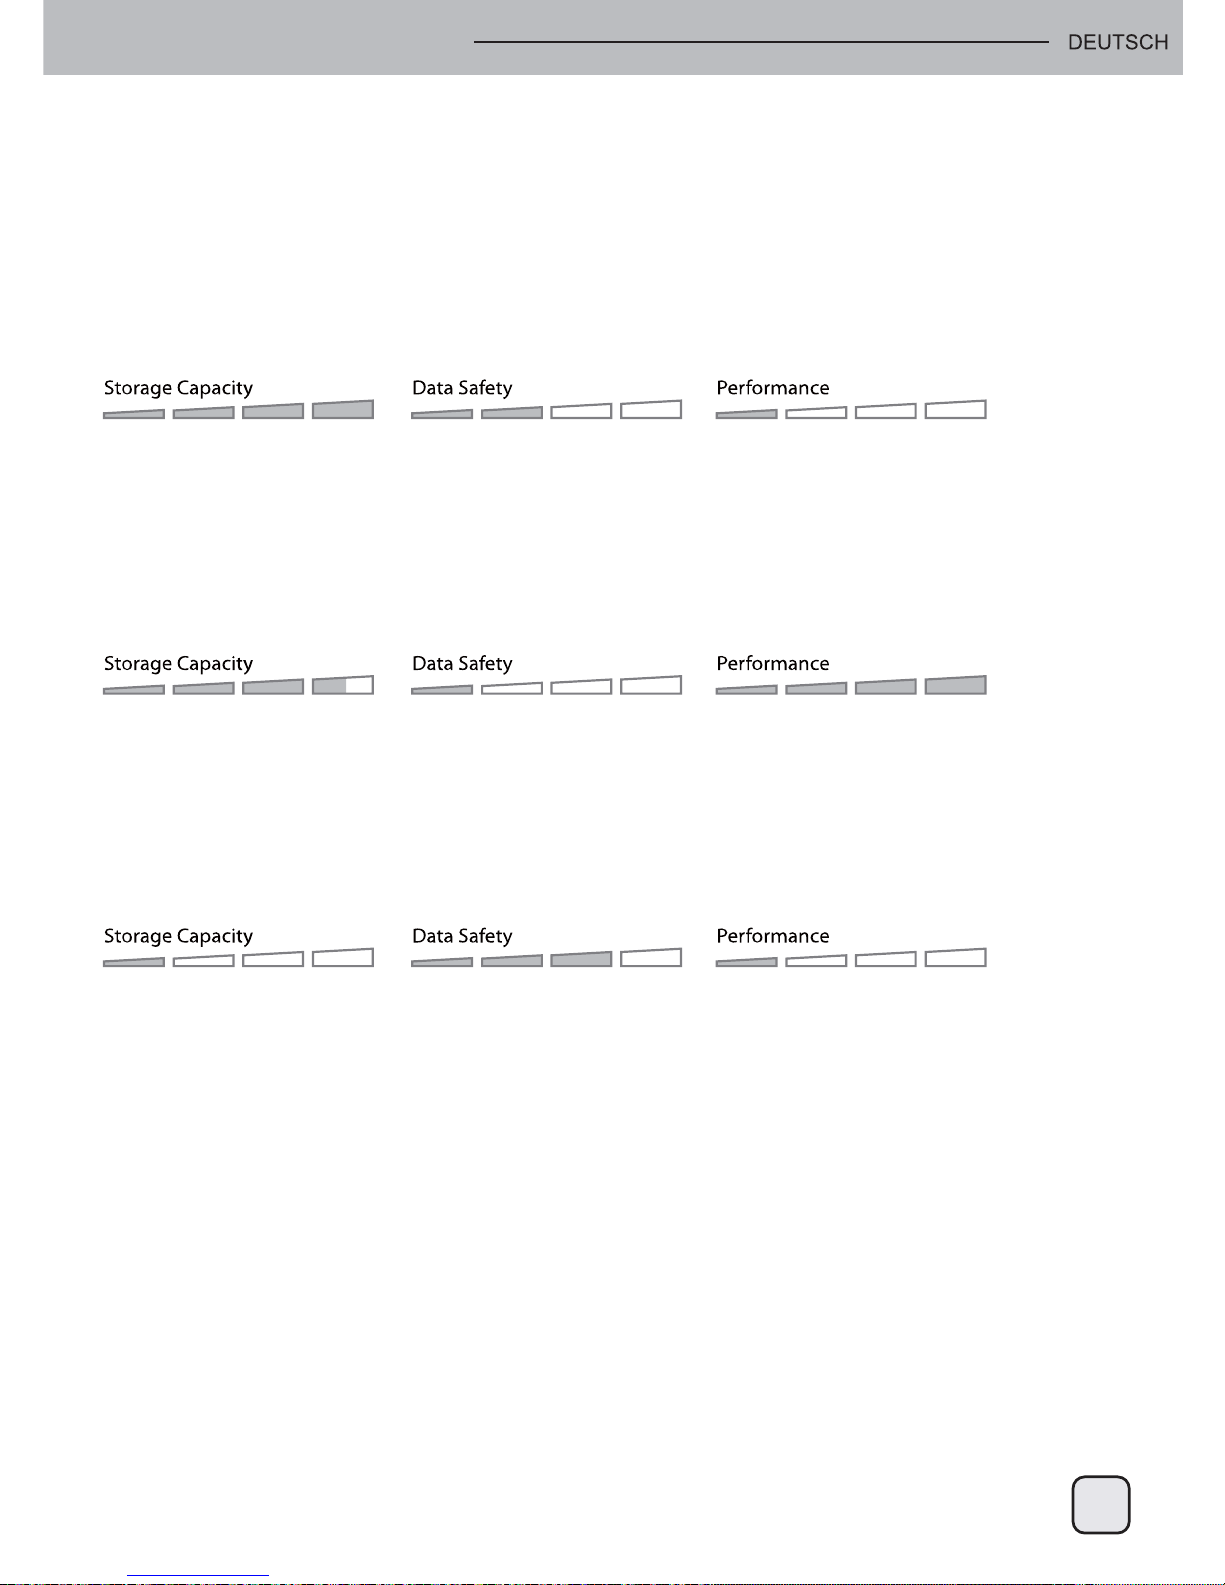
1.6 RAID Modes
For RAID 0/1, hard drives of identical capacities are recommended.
If the capacities are different, the total amount of the space that can be used will depend on the drive with
the smallest capacity.
1.6.1 Non-RAID
The drives show up as independent volumes. Each drive can be formatted and accessed separately.
If one drive fails, the other is not affected.
This setting does not provide any performance or redundancy benefits.
1 or 2 drives
1.6.2 RAID 0 - Disk Striping
The drives are shown as one large single volume but the total size will depend on the drive with the smallest capacity .
This setting is used where speed is the primary objective but RAID Level 0 (also called striping) is not redundant.
This form of array splits each piece of data across the drives in segments; since data is written without any form
of parity data-checking, it allows for the fastest data transfer of all other modes.
On the downside, if one drive becomes damaged, the whole array can become corrupted.
1.6.3 RAID 1 - Disk Mirroring
Two drives show up as one volume but only 50% of the total capacity, depending on the drive with the smallest
capacity , can be used.
RAID 1 creates an exact copy (or mirror) of a set of data on the second drive. This is useful when reliability and
backup take precedence over storage capacity .
Should one hard drive fail, it can be replaced and the data rebuilt automatically .
1.6.4 Changing the RAID Mode
The RAID mode should be set after installing and before formatting the drives.
1. Install the hard drives.
2. Turn on the power.
3. Set the RAID switch and select your preferred RAID mode.
4. Press the button above the RAID switch to confirm the current setting.
5. Format the drives.
6. Done.
Note
Changing the RAID mode requires formatting the drives. Make sure to backup all existing data first!
Note
In order for the computer to access volumes larger than 2TB, both the hardware and Operating System need to
have the capacity to support large volumes (e.g. Windows Vista or Mac OS 10.4 and above).
1. Introduction
2 drives
2 drives
ENGLISH
Page 7
6
2. System Setup
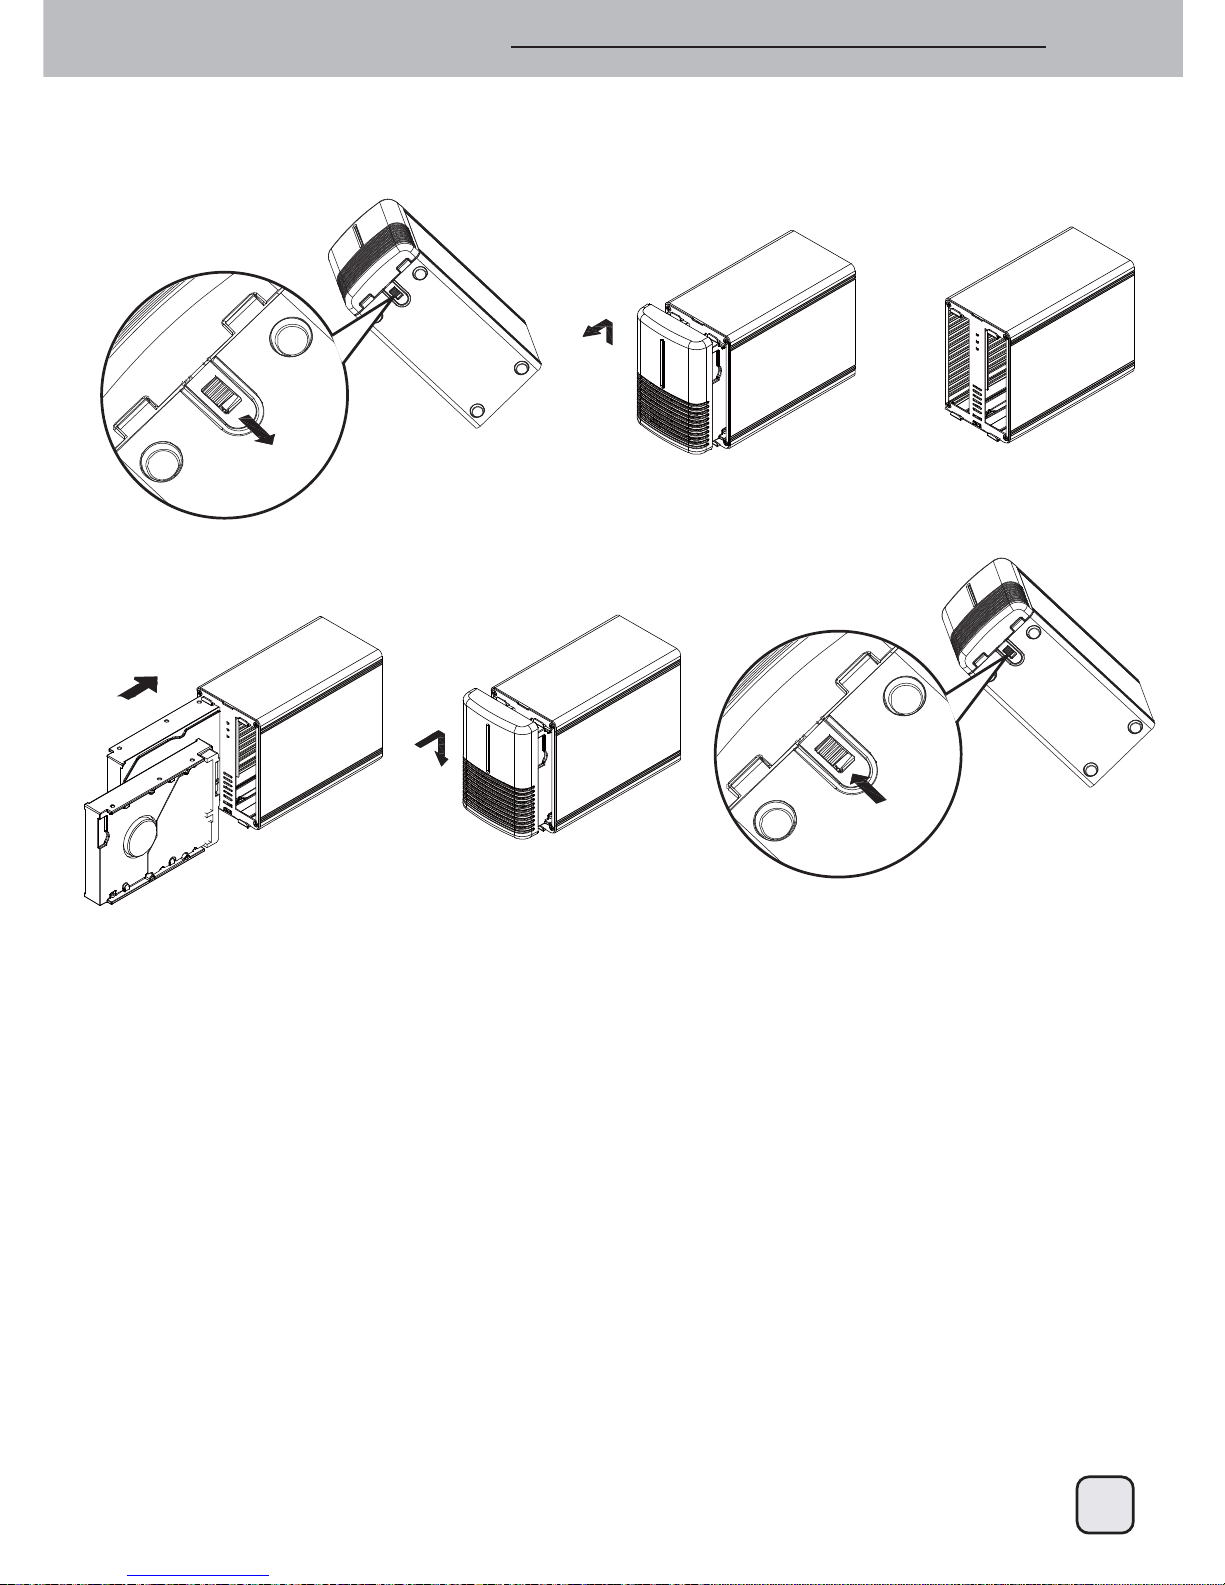
2.1 Hard Drive Assembly
The drives can be installed at any position, there is no specific order required.
Note
Be careful not to damage any components, and do not force the drives into place.
If they not easily slide into place and fit, make sure the drives have been installed correctly.
The top of the drives, where the label is located, should face each other.
2.1.1 Installing a HDD with existing data and setting up a RAID 1 array
1. Set the RAID mode to RAID 1.
2. Install the drive with the existing data into slot A and then turn on the power.
3. Press the “Confirm RAID mode” button and then make sure the computer has recognized your hard drive
and you can access the data.
4. Install the second (blank) drive in slot B and let it rebuild the RAID 1 array.
Make sure the capacity of the HDD in slot B is equal or larger than the capacity of the HDD in slot A!
1.
4. 5. 6.
2. 3.
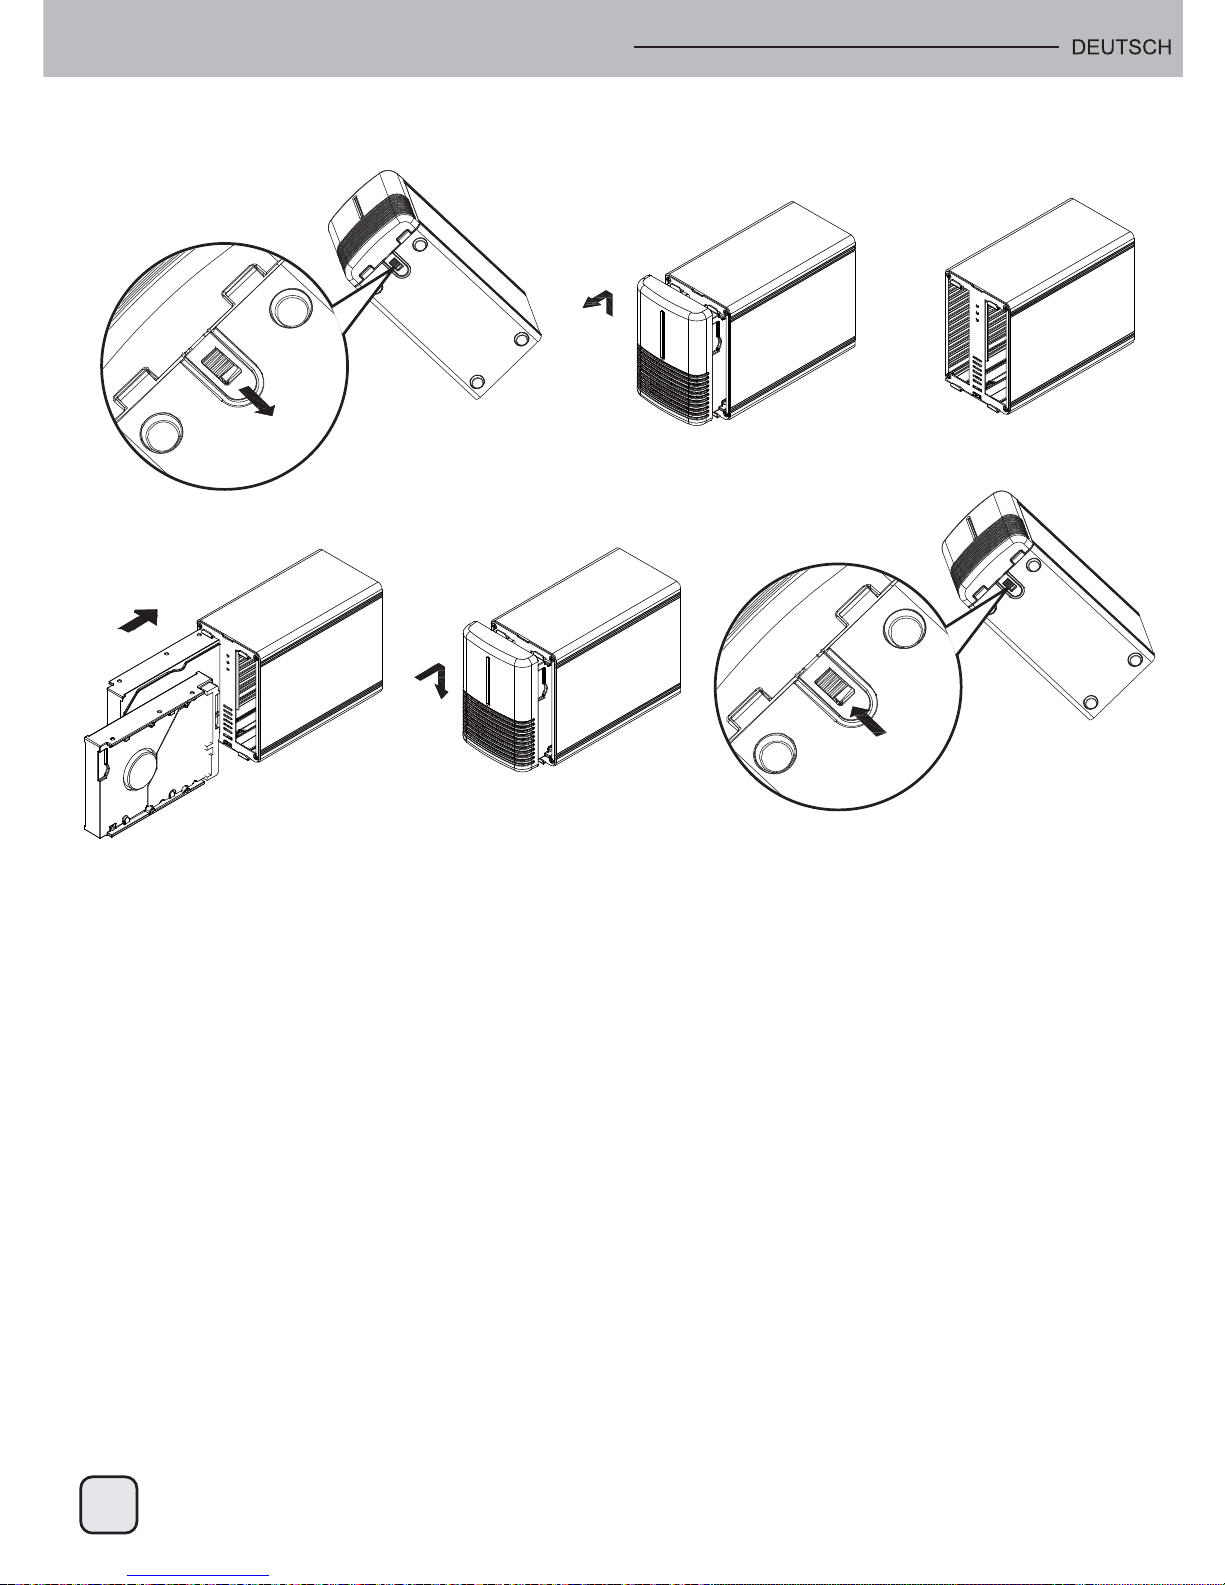
1. Unlock the switch at the bottom of the case and lift the front panel upward and away from the housing
to remove it.
2. Install the hard drives as illustrated below with the top of the drives, where the label is located, facing each other.
Push the drives lightly into place and then replace the front panel.
3. Connect the device to your computer and turn on the power.
4. Set your preferred RAID mode and confirm it by pushing the button above the RAID switch.
5. For PC users, use the disk management tool or for Mac users, use the disk utility to create a new partition
and format the drives.
6. Done! Your external drive is now ready to use.
ENGLISH
Page 8

7
2.2 Replacing Hard Drives
When a drive fails, the corresponding HDD LED (A or B) will be blinking slowly, unless the RAID mode is set
to Non-RAID, in which case the HDD will simply not be accessible anymore.
If only one drive is defective and the RAID mode is set to RAID 1, the data can still be accessed but we strongly
recommend replacing the faulty drive immediately to assure continued proper backup and data safety.
If more than one drive at the same time fails or if the RAID mode is set to RAID 0, the data will be lost and the
system can not be accessed again until the drive(s) have been replaced.
2.2.1 Non-RAID
1. Check the HDD LED. The corresponding LED for the defective drive will be blinking slowly.
2. Turn off the power and replace the faulty drive(s).
3. Turn on the power. The corresponding LED will turn a steady green again.
4. Format the new drive(s).
2.2.2 RAID 0
1. Check the HDD LED. The corresponding LED for the defective drive will be blinking slowly.
2. Turn off the power and replace the faulty drive(s).
3. Turn on the power. The corresponding LED will turn a steady green again.
4. Push the button above the RAID switch to confirm the current RAID mode.
5. Format the drive.
2.2.3 RAID 1
1. Check the HDD LED. The corresponding LED for the defective drive will be blinking slowly.
2. Turn off the power and replace the faulty drive.
3. Make sure the USB cable is plugged in and connected to your computer.
4. Turn on the power and wait for about 30 seconds for the system to start up.
5. Install the new hard drive.
6. The LED of the source drive will start to blink rapidly and the LED of the destination drive will start to blink slowly.
This indicates that it is now rebuilding the RAID array.
7. Rebuilding the RAID array will take several hours, depending on the drive capacity.
When the data has been restored, the LEDs will turn a steady green.
Note
We recommend not turning off the power during the rebuild process but if the process is interrupted,
it will continue rebuilding the data as soon as the power is turned back on.
2.3 Connection to Computer
A few precautions and notes when using your external storage drive:
• Do not expose the product to water or humid conditions.
• Do not cover the enclosure’s ventilation holes.
• Before connecting the device, install the hard drives and set your preferred RAID mode.
• For the safe removal of your drive and to assure that no data is lost, always follow the correct unplug
procedure for external hardware (e.g. Eject the drive before removal).
• In order for the computer to access volumes larger than 2TB, both the hardware and Operating System need
to have the capacity to support large volumes (e.g.: Windows Vista, Windows 7 or Mac OS 10.4 and above).
• When the computer goes into stand-by mode, the hard drives in the external enclosure will spin down as well.
2. System Setup
ENGLISH
Page 9

8
2. System Setup
2.4 Precautions
2.4.1 Power on/off precautions
It is highly recommended to switch the unit off when not in use.
When re-locating the device or when not in use for an extended period of time,
we strongly recommend unplugging the unit.
2.4.2 Location and placing precautions
Avoid positioning your device in the following places:
• Locations with direct sunlight, next to radiators, other sources of heat.
• Locations with very high temperatures (more than 38°C) or humidity (more than 90%).
• Very dusty or sandy locations.
• Locations subject to vibration, shock, or with a sloping base.
2.4.3 Electricity and power plug
Careful attention must be paid to the following points in order to prevent damage, fire, and/or injury:
• When removing the power cable from the socket, pull on the plug fixture and never on the cord.
• Do not connect and remove the power cable with wet hands.
• Keep the power cable away from heaters.
• Never try to repair the power cable yourself or to modify it in any way.
• If the unit is dropped or becomes damaged in any other way, unplug the power cable.
2.4.4 Cables
Use only the cables supplied or recommended by your vendor in order to avoid the risk of malfunction,
electric shock, and/or possible interference to the device.
2.5 About Data Backup
To protect your files and help prevent the loss of your data, we strongly recommend that you keep two
copies of your data, one copy on your DS321 and a second copy either on your internal drive or another
storage media such as CD, DVD, Tape or an additional external drive.
Any loss or corruption of data while using the DS321 is the sole responsibility of the user, and under no
circumstances will the manufacturer be held liable for compensation or the recovery of this data.
ENGLISH
Page 10

9
3.1 Specifications
3.2 FAQ
Q: Can I connect this device to a USB 2.0 host?
A: Yes, this device is backwards compatible with USB 2.0.
Q: What file system should I choose to format my drive?
A: This will depend on how you want to use the drive but in general, we recommend:
• Windows Vista/7 NTFS
• Mac OS X HFS+ (Mac OS Extended)
• To use it on both PC and Mac FAT32 (single file size is limited to 4GB)
Q: How many drives can fail before I lose my data?
A: For RAID 0, any drive failure will result in the data being lost. For RAID 1, more than one drive
failure at the same time will mean the data can not be recovered anymore. For Non-RAID, only the
data on the defective drive will be lost.
Application
Interface/Ports
Data Transfer
System Requirements
Operating Environment
Storage Environment
Power Supply
Product Size
• 3.5” SATA-I or SATA-II hard drives
• 1.5Gb/s or 3.0Gb/s
• 20GB - 2TB
• USB 3.0 SuperSpeed
• USB 3.0 up to 5Gbps (625MB/s)
• USB 2.0 up to 480Mbps (60MB/s)
• PC: Windows Vista or Windows 7
• Mac: Mac OS 10.4 or above
• Your hardware device must have the correct corresponding port
(e.g. USB 3.0, USB 2.0 or PCI card)
• Temperature: 5°C ~ 40°C
• Humidity: 20%RH ~ 80%RH
• Temperature: -20°C ~ 70°C
• Humidity: 10%RH ~ 90%RH
• Input: AC 100-240V
• Output: DC +12V/3A
• 17.7cm x 12.3cm x 8.1cm
• 7in x 4.8in x 3.2
3. Appendix
ENGLISH
Page 11

10
1.1 Systemanforderungen
1.1.1 PC-Anforderungen
• Mindestens Intel Pentium III-CPU mit 500 MHz, 128 MB RAM
• Windows Vista, Windows 7
• Ihr Hardwaregerät muss über den entsprechenden Anschluss verfügen (z. B. USB 3,0-Host-Controller)
1.1.2 Mac Requirements
• Mindestens Apple G4-Prozessor, 128 MB RAM
• Mac OS 10.4 oder höher
• Ihr Hardwaregerät muss über den entsprechenden Anschluss verfügen (z. B. USB 2.0-Host-Controller)
Hinweis
USB 3.0 war zum Zeitpunkt der Erstellung dieser Anleitung bei Mac OS nicht verfügbar.
Es ist jedoch möglich,die Festplatte mit der langsameren USB 2.0-Verbindung zu nutzen.
1.1.3 Unterstützte Festplatten
• Ein oder zwei 3,5-Zoll-SATA-I- oder SATA-II-Festplatten (1,5 GB/s oder 3,0 GB/s)
• 20 GB – 2 TB pro Festplatte
• Es werden Festplatten mit identischen Kapazitäten empfohlen
• S•Unterstützt große Laufwerke mit mehr als 2 TB
1.2 Lieferumfang
Der Lieferumfang kann je nach Verkäufer & Version variieren.
• DS321-Speichergehäuse (ohne Festplatten)
• Netzteil
• Schnittstellenkabel
• Bedienungsanleitung
1.4 Marken
• MS-DOS, Microsoft, Windows Vista & 7 sind Marken der Microsoft Corporation.
• Apple Macintosh und Mac sind Marken von Apple Computer.
• Alle anderen Marken und Namen Dritter sind Eigentum ihrer jeweiligen Inhaber.
1. Einleitung
Hinweis
Damit der Computer auf Laufwerke mit mehr als 2 TB zugreifen kann, müssen sowohl die Hardware als
auch das Betriebssystem über die Kapazität zur Unterstützung großer Laufwerke verfügen (z. B.
Windows Vista oder Mac OS 10.4 und aktueller).
1.3 Über dieses Handbuch
Firmware, Bilder und Beschreibungen in dieser Anleitung können leicht von dem tatsächlichen Produkt
abweichen. Funktionen und Merkmale können sich in Abhängigkeit an die Firmware-Version ändern. Bitte
lesen Sie sich die Garantie aufmerksam durch, da diese je nach Verkäufer variieren kann!
Page 12
11
1. Einleitung
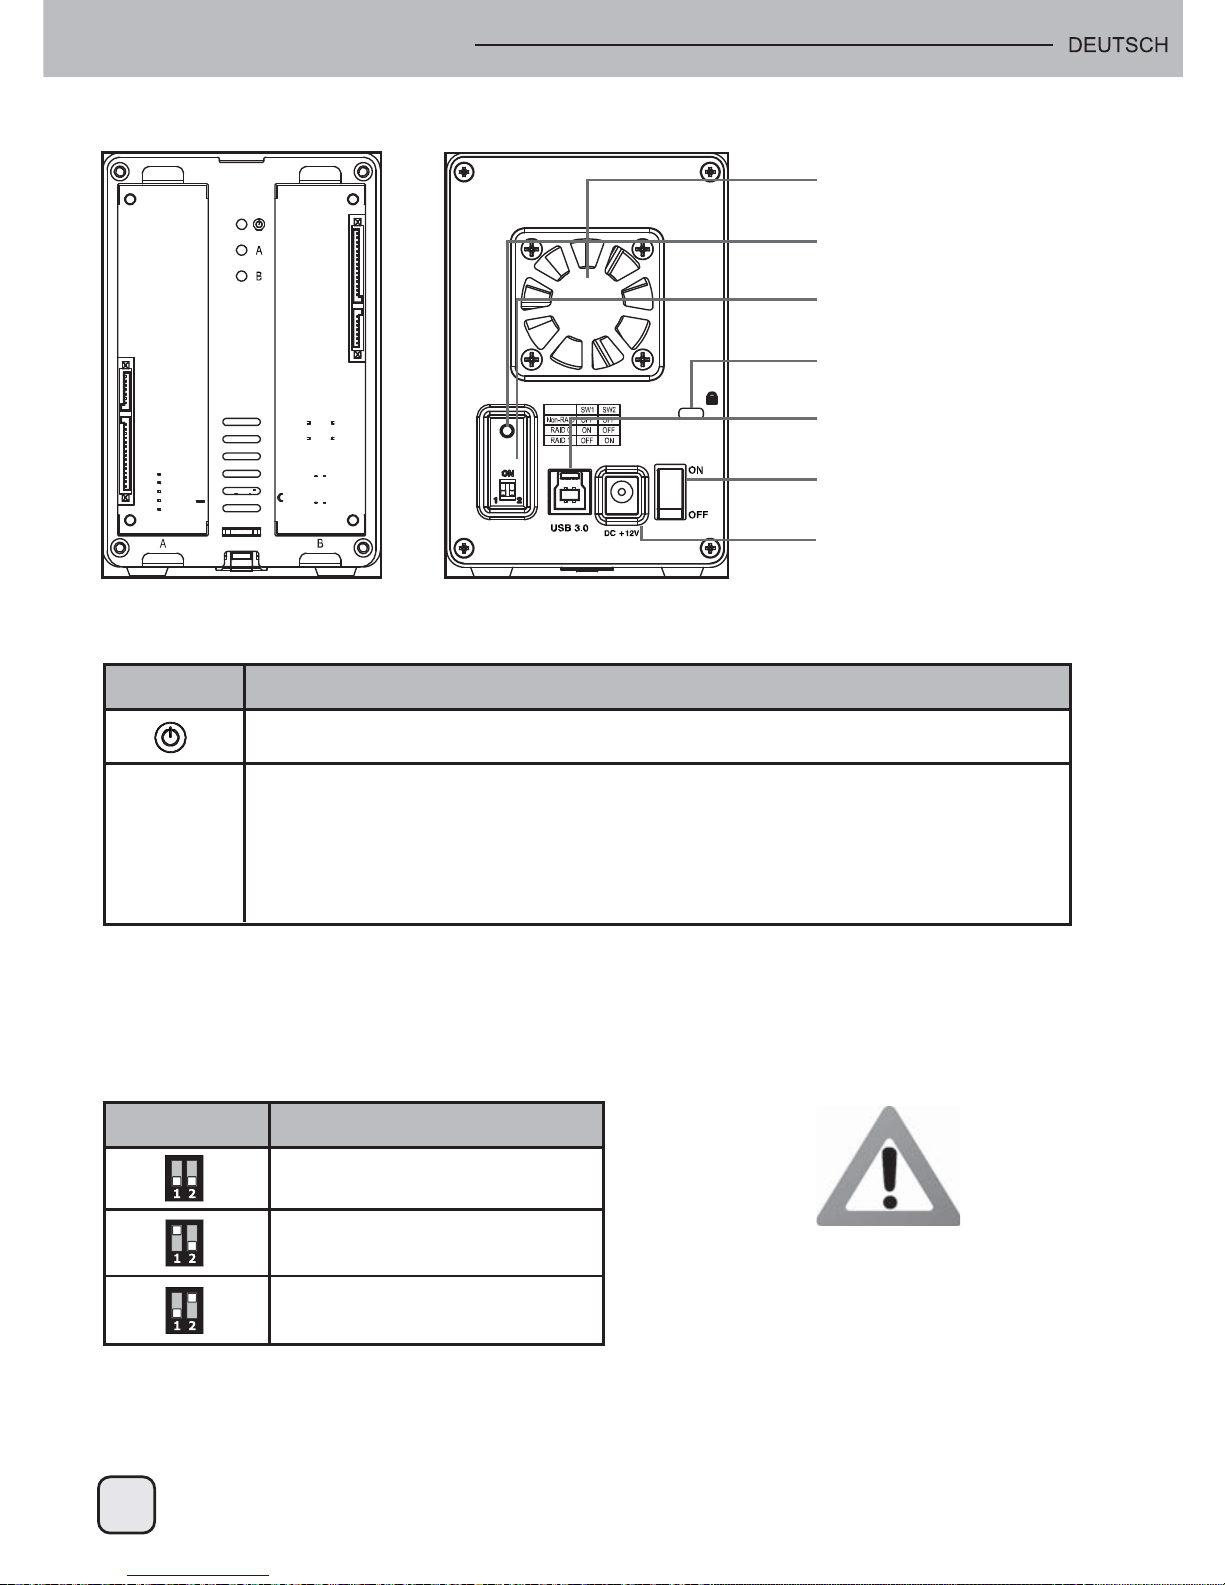
1.5 Detaillierte Übersicht
Frontansicht Rückansicht
Lüfter
RAID-Modus bestätigen
RAID-Schalter
Kensington-Schloss
USB-Port:
Netzschalter
Netzanschluss
1.5.1 LED-Anzeige
LED
HDD
A & B
Status
• Blau = Eingeschaltet
• Grün = Status okay, USB-Verbindung zum Computer hergestellt
• Aus = Leerer Laufwerksschacht oder USB-Verbindung noch nicht hergestellt
• Blinkt grün = Datenzugriff (lesen/schreiben)
• Blinkt langsam (500 ms ein/aus) = Laufwerksfehler (Fehler)
• Blinkt schnell (125 ms ein/aus) = RAID 1-Anordnung wird wiederhergestellt
1.5.2 RAID-Schalter
DIP-Schalter RAID-Modus
Non-RAID
Schalterposition: 1 aus, 2 aus
RAID 0 - Striping
Schalterposition: 1 ein, 2 aus
RAID 1 - Mirroring
Schalterposition: 1 aus, 2 ein
Hinweis
Damit Sie den Status der LED beurteilen können, beenden Sie die Dateiübertragung von oder auf die
Festplatten. Das langsame Blinken ist langsamer, das schnelle Blinken ist schneller als das übliche Blinken
der LED während des Datenzugriffs.
Hinweis
Außer im Non-RAID-Modus werden zwei Festplatten benötigt. Drücken Sie nach der Änderung des RAIDModus zur Bestätigung der neuen Einstellung die Taste oberhalb des RAID-Schalters.
Eine Änderung des RAID-Modus erfordert die Formatierung der Festplatten. Achten Sie darauf, zuvor alle darauf
befindlichen Daten zu sichern!
Page 13
12
1.6 RAID-Modi
Bei RAID 0/1 empfehlen wir Festplatten mit identischer Kapazität.
Wenn die Kapazitäten unterschiedlich sind, hängt die nutzbare Gesamtkapazität von der Festplatte
mit der geringsten Kapazität ab.
1 oder 2 Festplatten
1.6.4 Den RAID-Modus ändern
Der RAID-Modus sollte nach dem Installieren und vor dem Formatieren der Festplatten eingestellt werden.
1. Installieren Sie die Festplatten.
2. Schalten Sie das Gerät ein.
3. Stellen Sie den RAID-Schalter ein, wählen Sie Ihren gewünschten RAID-Modus.
4. Drücken Sie zum Bestätigen der aktuellen Einstellungen die Taste oberhalb des RAID-Schalters.
5. Formatieren Sie die Festplatten.
6. Fertig.
1. Einleitung
2 Festplatten
2 Festplatten
1.6.1 Non-RAID
Die Festplatten werden als unabhängige Laufwerke angezeigt. Zugriff und Formatierung jeder
Festplatte kann separat durchgeführt werden. Wenn eine Festplatte ausfällt, ist die andere davon
nicht betroffen. Diese Einstellung bietet keine Leistungs- oder Redundanzvorteile.
1.6.2 RAID 0 - Disk Striping
Die Festplatte werden als ein einziges großes Laufwerk angezeigt, doch die Gesamtgröße hängt von der
Festplatte mit der geringsten Kapazität ab. Diese Einstellung wird genutzt, wenn das Hauptaugenmerk auf
der Geschwindigkeit liegt, der RAID-Level 0 (auch Striping genannt) jedoch nicht redundant ist. Diese Art
der Anordnung verteilt alle Daten quer über die Festplatten in Segmente; da Daten ohne jedwede
Paritätsdatenprüfung geschrieben werden, bietet dieser Modus die schnellste Datenübertragung. Nachteil
ist jedoch, dass wenn eine Festplatte ausfällt, das gesamte Array zusammenbricht.
1.6.3 RAID 1 - Disk Mirroring
Zwei Festplatten werden als ein Laufwerk angezeigt, es sind jedoch nur 50 % der Gesamtkapazität nutzbar;
abhängig von der Festplatte mit der geringsten Kapazität. RAID 1 erstellt eine exakte Kopie (oder "Spiegelung") der Daten auf der zweiten Festplatte. Dies ist sinnvoll, wenn Zuverlässigkeit und Sicherung wichtiger
als die Speicherkapazität sind. Falls eine Festplatte ausfällt, kann sie einfach ersetzt werden und die Daten
werden automatisch wieder aufgebaut.
Hinweis
Damit der Computer auf Laufwerke mit mehr als 2 TB zugreifen kann, müssen sowohl die Hardware als auch
das Betriebssystem über die Kapazität zur Unterstützung großer Laufwerke verfügen (z. B.: WinVista Mac
OS 10.4 und aktueller).
Hinweis
Eine Änderung des RAID-Modus erfordert die Formatierung der Festplatten. Achten Sie darauf, zuvor alle
darauf befindlichen Daten zu sichern!
Page 14
2. Systemeinrichtung
2.1 Festplattenmontage
Die Festplatten können in jeder Position installiert werden; die Reihenfolge spielt keine Rolle.
1.
4. 5. 6.
2. 3.
1. Entsperren Sie den Schalter an der Unterseite des Gehäuses; heben Sie die vordere Blende an und
vom Gehäuse weg. Entfernen Sie sie.
2. Installieren Sie die Festplatten wie nachstehend abgebildet, wobei sich die Oberseiten (dort befinden sich die
Etiketten) der Festplatten gegenüberliegen. Richten Sie die Festplatten durch leichtes Drücken aus und bringen
dann die Frontblende wieder an.
3. Schließen Sie das Gerät am Computer an, schalten Sie das Gerät ein.
4. Stellen Sie Ihren bevorzugten RAID-Modus ein und bestätigen diesen durch Betätigung der Taste oberhalb
des RAID-Schalters.
5. Verwenden Sie zum Erstellen einer neuen Partition und Formatieren der Festplatten das Festplattenver
waltungswerkzeug (PC-Benutzer) bzw. das Festplattendienstprogramm (Mac-Benutzer).
6. Fertig! Ihre externe Festplatte ist nun betriebsbereit.
Hinweis
Achten Sie darauf, keine Komponenten zu beschädigen; schieben Sie die Festplatten nicht mit Gewalt
hinein. Wenn Sie sich nicht problemlos hineinschieben lassen, prüfen Sie, ob sie korrekt installiert sind.
Die Oberseite der Festplatten (dort befinden sich die Etiketten) müssen sich gegenüberliegen.
2.1.1 Eine Festplatte mit vorhandenen Daten installieren und eine RAID 1-Anordnung
einrichten
1. Stellen Sie den RAID-Modus auf RAID 1 ein.
2. Installieren Sie die Festplatte mit den vorhandenen Daten in Steckplatz A und schalten das Gerät ein.
3. Drücken Sie die „RAID-Modus bestätigen“-Taste und stellen sicher, dass der Computer Ihre Festplatte
erkannt hat und Sie auf die Daten zugreifen können.
4. Installieren Sie die zweite (leere) Festplatte in Steckplatz B und erstellen über diese eine RAID
1-Anordnung. Stellen Sie sicher, dass die Kapazität der Festplatte in Steckplatz B größer/gleich der
Kapazität der Festplatte in Steckplatz A ist!
13
Page 15
14
2. Systemeinrichtung
2.2 Festplatten ersetzen
Wenn eine Festplatte ausfällt, blinkt die entsprechende Festplatten-LED (A oder B) langsam, bis der RAIDModus auf Non-RAID eingestellt ist, wodurch die Festplatte einfach nicht mehr zugreifbar ist.
Wenn nur eine Festplatte defekt und der RAID-Modus auf RAID 1 eingestellt ist, können Sie immer noch auf
die Daten zugreifen; dennoch empfehlen wir zur Gewährleistung einer fortlaufenden sachgemäßen Sicherung
und Datensicherheit dringend, die defekte Festplatte umgehend zu ersetzen.
Falls mehr als eine Festplatte zur gleichen Zeit ausfällt oder der RAID-Modus auf RAID 0 eingestellt ist, gehen
die Daten verloren und Sie können bis zum Ersetzen der Festplatte(n) nicht mehr auf das System zugreifen.
2.2.1 Non-RAID
1. Prüfen Sie die Festplatten-LED. Die entsprechende LED der defekten Festplatte blinkt langsam.
2. Schalten Sie das Gerät aus und ersetzen die defekte(n) Festplatte(n).
3. Schalten Sie das Gerät ein. Die entsprechende LED sollte wieder konstant grün leuchten.
4. Formatieren Sie die neue(n) Festplatte(n).
2.2.2 RAID 0
1. Prüfen Sie die Festplatten-LED. Die entsprechende LED der defekten Festplatte blinkt langsam.
2. Schalten Sie das Gerät aus und ersetzen die defekte(n) Festplatte(n).
3. Schalten Sie das Gerät ein. Die entsprechende LED sollte wieder konstant grün leuchten.
4. Drücken Sie zum Bestätigen des aktuellen RAID-Modus die Taste oberhalb des RAID-Schalters.
5. Formatieren Sie die Festplatte.
2.2.3 RAID 1
1. Prüfen Sie die Festplatten-LED. Die entsprechende LED der defekten Festplatte blinkt langsam.
2. Schalten Sie das Gerät aus und ersetzen die defekte Festplatte.
3. Achten Sie darauf, dass das USB-Kabel eingesteckt und mit Ihrem Computer verbunden ist.
4. Schalten Sie das Gerät ein und warten etwa 30 Sekunden, bis das System hochgefahren ist.
5. Installieren Sie die neue Festplatte.
6. Die LED der Ursprungsfestplatte beginnt schnell zu blinken; die LED der Zielfestplatte beginnt langsam zu
blinken. Dies zeigt an, dass die RAID-Anordnung jetzt wiederhergestellt wird.
7. Der Neuaufbau des RAID-Array kann je nach Festplattenkapazität mehrere Stunden in Anspruch nehmen.
Wenn die Daten wiederhergestellt sind, leuchten die LEDs dauerhaft grün.
2.3 Am Computer anschließen
Achten Sie bei der Nutzung externer Speicherlaufwerke auf die Vorsichtsmaßnahmen und Hinweise:
• Setzen Sie das Gerät keinem Wasser und keiner Feuchtigkeit aus.
• Blockieren Sie die Lüftungsöffnungen des Gehäuses nicht.
• Installieren Sie vor Anschließen des Gerätes die Festplatten; stellen Sie Ihren gewünschten RAID-Modus
ein.
• Bitte befolgen Sie zum sicheren Entfernen Ihrer Festplatten und zur Verhinderung eines Datenverlusts beim
Trennen externer Hardware stets das Auswurfverfahren (z. B. Festplatte vor dem Abziehen auswerfen).
• Damit der Computer auf Laufwerke mit mehr als 2 TB zugreifen kann, müssen sowohl die Hardware als
auch das Betriebssystem über die Kapazität zur Unterstützung großer Laufwerke verfügen (z. B.: WinVista
Mac OS 10.4 und aktueller).
• Wenn der Computer den Standby-Modus aufruft, verringert sich auch die Drehzahl der Festplatten im
externen Gehäuse.
Hinweis
Wir empfehlen Ihnen, das Gerät während des Rebuild-Vorgangs nicht auszuschalten; falls der Vorgang
jedoch unterbrochen wird, setzt er beim nächsten Einschalten einfach fort.
Page 16

15
2. Systemeinrichtung
2.4 Vorsichtsmaßnahmen
2.4.1 Vorsichtsmaßnahmen beim Ein- / Ausschalten
Wir empfehlen Ihnen, das Gerät auszuschalten, wenn Sie es nicht benutzen.
Wir empfehlen Ihnen, den Netzstecker zu ziehen, wenn Sie das Gerät umstellen oder über einen längeren
Zeitraum nicht benutzen.
2.4.2 Standort und Vorsichtsmaßnahmen beim Aufstellen
Stellen Sie das Gerät nicht an folgenden Orten auf:
• Im direkten Sonnenlicht, neben Heizkörpern oder anderen Wärmequellen.
• An Orten mit hohen Temperaturen (mehr als 38 °C) oder hoher Luftfeuchtigkeit (mehr als 90 %).
• An sehr staubigen oder sandigen Orte.
• An Orten, die Erschütterungen oder Stößen ausgesetzt sind; auf schrägem Untergrund.
2.4.3 Elektrizität und Netzstecker
Achten Sie zur Vermeidung von Schäden, Brandgefahr und/oder Verletzungen auf folgende Punkte:
• Fassen Sie das Netzkabel am Stecker, nicht am Kabel, wenn Sie es aus der Steckdose ziehen.
• Verbinden oder trennen Sie das Netzkabel nicht mit feuchten oder gar nassen Händen.
• Halten Sie das Netzkabel von Heizkörpern fern.
• Versuchen Sie niemals, das Netzkabel selbst zu reparieren oder in irgendeiner Weise zu modifizieren.
• Ziehen Sie das Netzkabel, wenn das Gerät heruntergefallen ist oder anderweitig beschädigt wurde.
2.5 Über die Datensicherung
Wir empfehlen zum Schutz Ihrer Dateien und zur Verhinderung eines Datenverlustes, dass Sie zwei Kopien
Ihrer Daten aufbewahren; eine Kopie auf Ihrem DS321 und eine zweite Kopie entweder auf Ihrer internen
Festplatte oder einem anderen Speichermedium, z. B. einer CD, DVD, einem Tape oder einer zusätzlichen
externen Festplatte.
Ein Verlust oder eine Beschädigung der Daten während der Nutzung des DS321 liegen in der alleinigen
Verantwortung des Benutzers; unter keinen Umständen haftet der Hersteller für entstandene Schäden oder
trägt die Kosten für die Wiederherstellung der Daten.
2.4.4 Kabel
Verwenden Sie nur die mitgelieferten oder vom Händler empfohlenen Kabel; dadurch vermeiden Sie die
Gefahr von Fehlfunktionen, Stromschlägen und/oder mögliche Störungen mit anderen Geräten.
Page 17
16
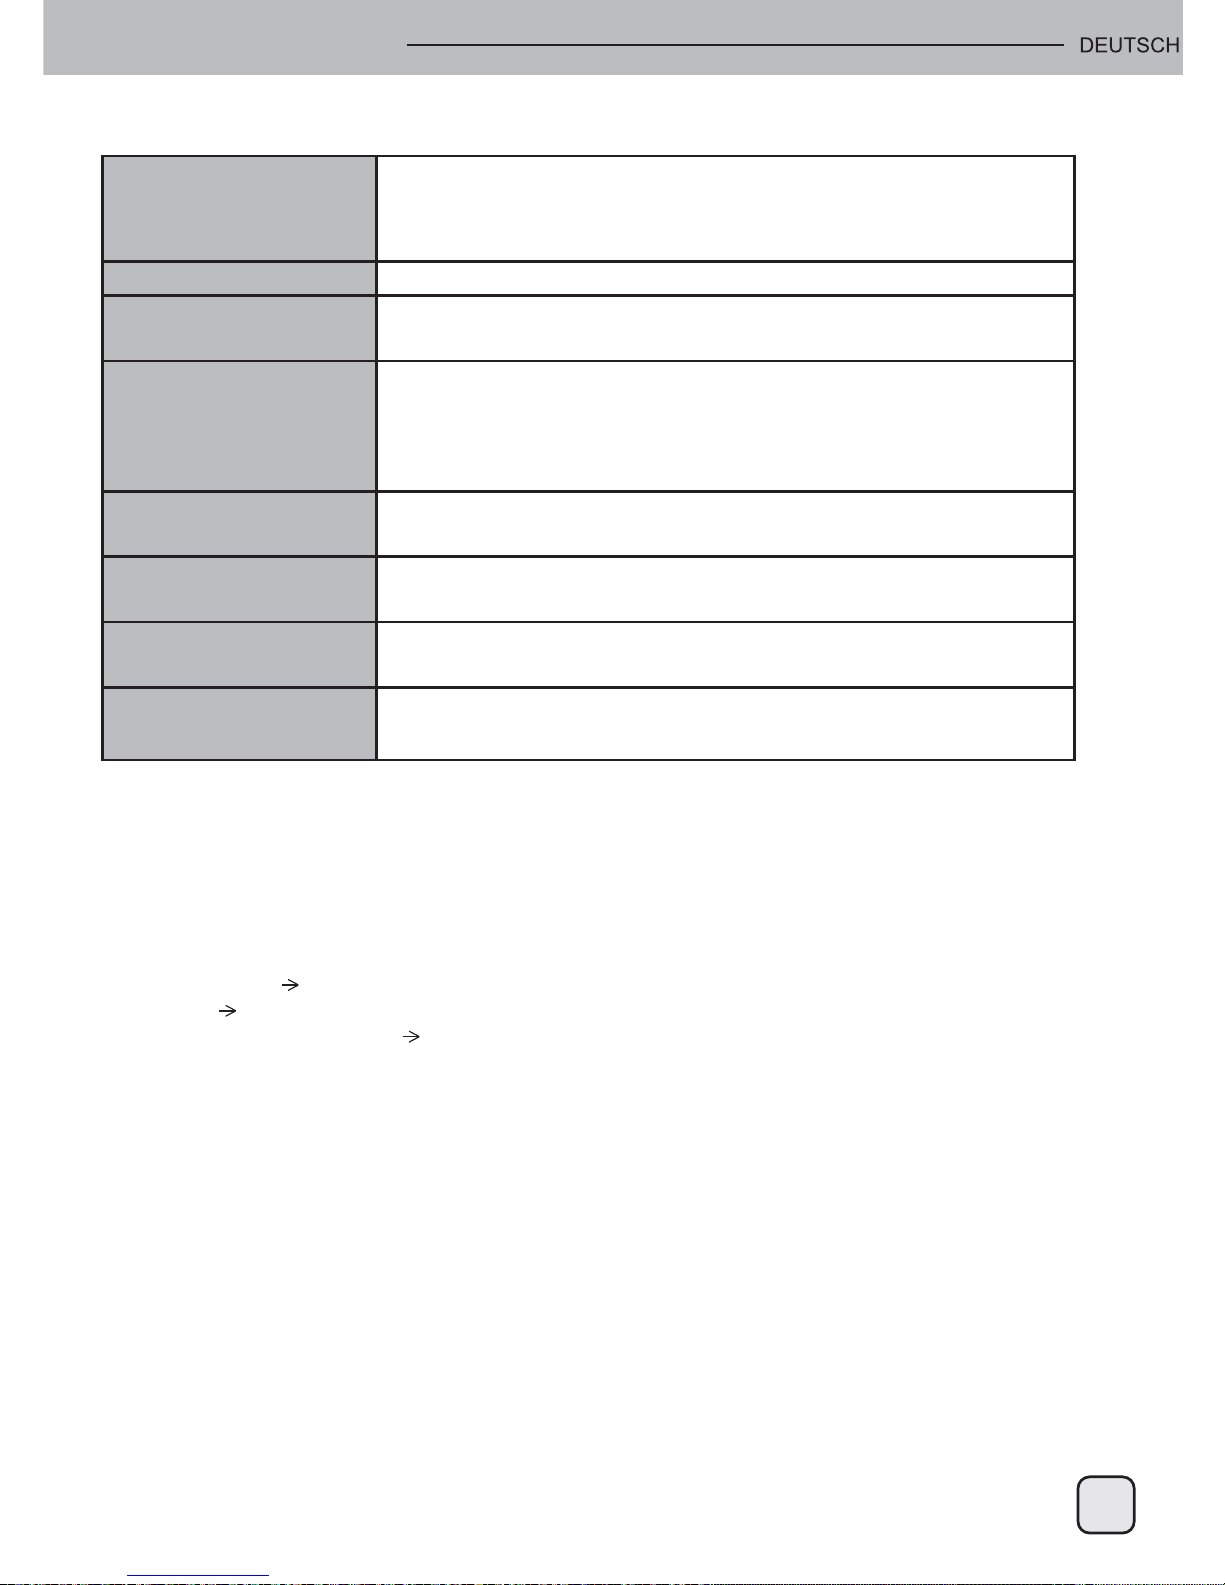
3.1 Spezifikationen
3.2 Häufig gestellte Fragen
F: Kann ich dieses Gerät an einem USB 2.0-Host anschließen?
A: Ja, dieses Gerät ist mit USB 2.0 abwärtskompatibel.
F: Welches Dateisytem soll ich zum Formatieren meiner Festplatte wählen?
A: Dies hängt davon ab, wie Sie die Festplatte nutzen möchten; im Allgemeinen empfehlen wir jedoch:
• Windows Vista/7 NTFS
• Mac OS X HFS+ (Mac OS Extended)
• Zur Nutzung auf PC und Mac FAT32 (die Dateigröße einer einzelnen Datei ist auf 4 GB beschränkt)
F: Wie viele Festplatten können ausfallen, bevor ich meine Daten verliere?
A: Bei RAID 0: Jeder Festplattenfehler führt zu Datenverlust. Bei RAID 1: Mehr als ein
Festplattenfehler zur gleichen Zeit bedeutet, dass die Daten nicht mehr wiederhergestellt werden können.
Bei Non-RAID: Nur die Daten auf der defekten Festplatte gehen verloren.
Anwendung
Schnittstelle/Ports
Datentransfer
Systemanforderungen
Betriebsumgebung
Aufbewahrungsumgebung
Netzteile
Produktgröße
• 3,5-Zoll-SATA-I- oder SATA-II-Festplatten
• 1,5 Gb/s oder 3,0 Gb/s
• 20GB - 2TB
• USB 3.0 SuperSpeed
• USB 3.0, bis zu 5 Gb/s (625 MB/s)
• USB 2.0, bis zu 480 Mb/s (60 MB/s)
• PC: Windows Vista oder Windows 7
• Mac: Mac OS 10.4 oder höher
• Ihr Hardwaregerät muss über den entsprechenden Anschluss
verfügen (z. B. USB 3.0, USB 2.0 oder PCI-Karte)
• Temperatur: 5 °C – 40 °C
• Feuchtigkeit: 20 – 80 % relative Luftfeuchtigkeit
• Temperatur: -20°C ~ 70°C
• Feuchtigkeit: 10 – 90 % relative Luftfeuchtigkeit
• Eingang: 100 – 240 V Wechselspannung
• Ausgang: +12 V Gleichspannung/3 A
• 17.7cm x 12.3cm x 8.1cm
• 7 Zoll x 4.8 Zoll x 3.2 Zoll
3. Anhang
Page 18

17
1.1 Configuration système requise
1.1.1 Configuration PC requise
• Processeur Intel Pentium III 500MHz, 128MB RAM minimum
• Windows Vista, Windows 7
• Votre périphérique doit posséder un bon port correspondant (par ex. contrôleur d'hôte USB 3.0)
1.1.2 Configuration Mac requise
• Processeur Apple G4, 128MB RAM minimum
• Mac OS 10.4 ou ultérieur
• Votre périphérique doit posséder un bon port correspondant (par ex. contrôleur d'hôte USB 2.0)
Remarque
USB 3.0 n'est pas actuellement disponible sur le SE de Mac. Cependant il est possible d'utiliser le
lecteur avec une connexion USB 2.0 qui est plus lente.
1.1.3 Disques durs supportés
• Un ou deux disques durs 3,5" SATA-I ou SATA-II (1,5Gb/s ou 3,0Gb/s)
• 20Go - 2To par DD
• Nous recommandons que les disques durs soient de la même taille.
• Support des gros volumes de plus de 2To.
1.2 Contenu de la boîte
La contenu de la boîte dépend du vendeur & de la version.
• Boîtier de stockage DS321 (disques durs pas inclus)
• Alimentation
• Câble d'interface
• Manuel de l'utilisateur
1.4 Marque commerciales
• MS-DOS, Microsoft, Windows Vista & 7 sont des marques déposées de Microsoft Corporation.
• Apple Macintosh et Mac sont des marques déposées de Apple Computer.
• Toutes les autres marques et noms sont la propriété de leurs propriétaires respectifs.
1. Introduction
Remarque
Pour que l'ordinateur puisse accéder à des volumes de plus de 2To, le matériel et le SE doivent être
capable de supporter des gros volumes (par ex. Windows Vista ou Mac 10.4 ou plus).
1.3 A propos de ce manuel
Le firmware, les images et les descriptions peuvent varier entre ce manuel et le produit actuel que vous
possédez. Les fonctions et les caractéristiques peuvent varier en fonction de la version du firmware.
Veuillez lire attentivement la garantie, car elle peut varier en fonction du vendeur !
Page 19
18
1. Introduction
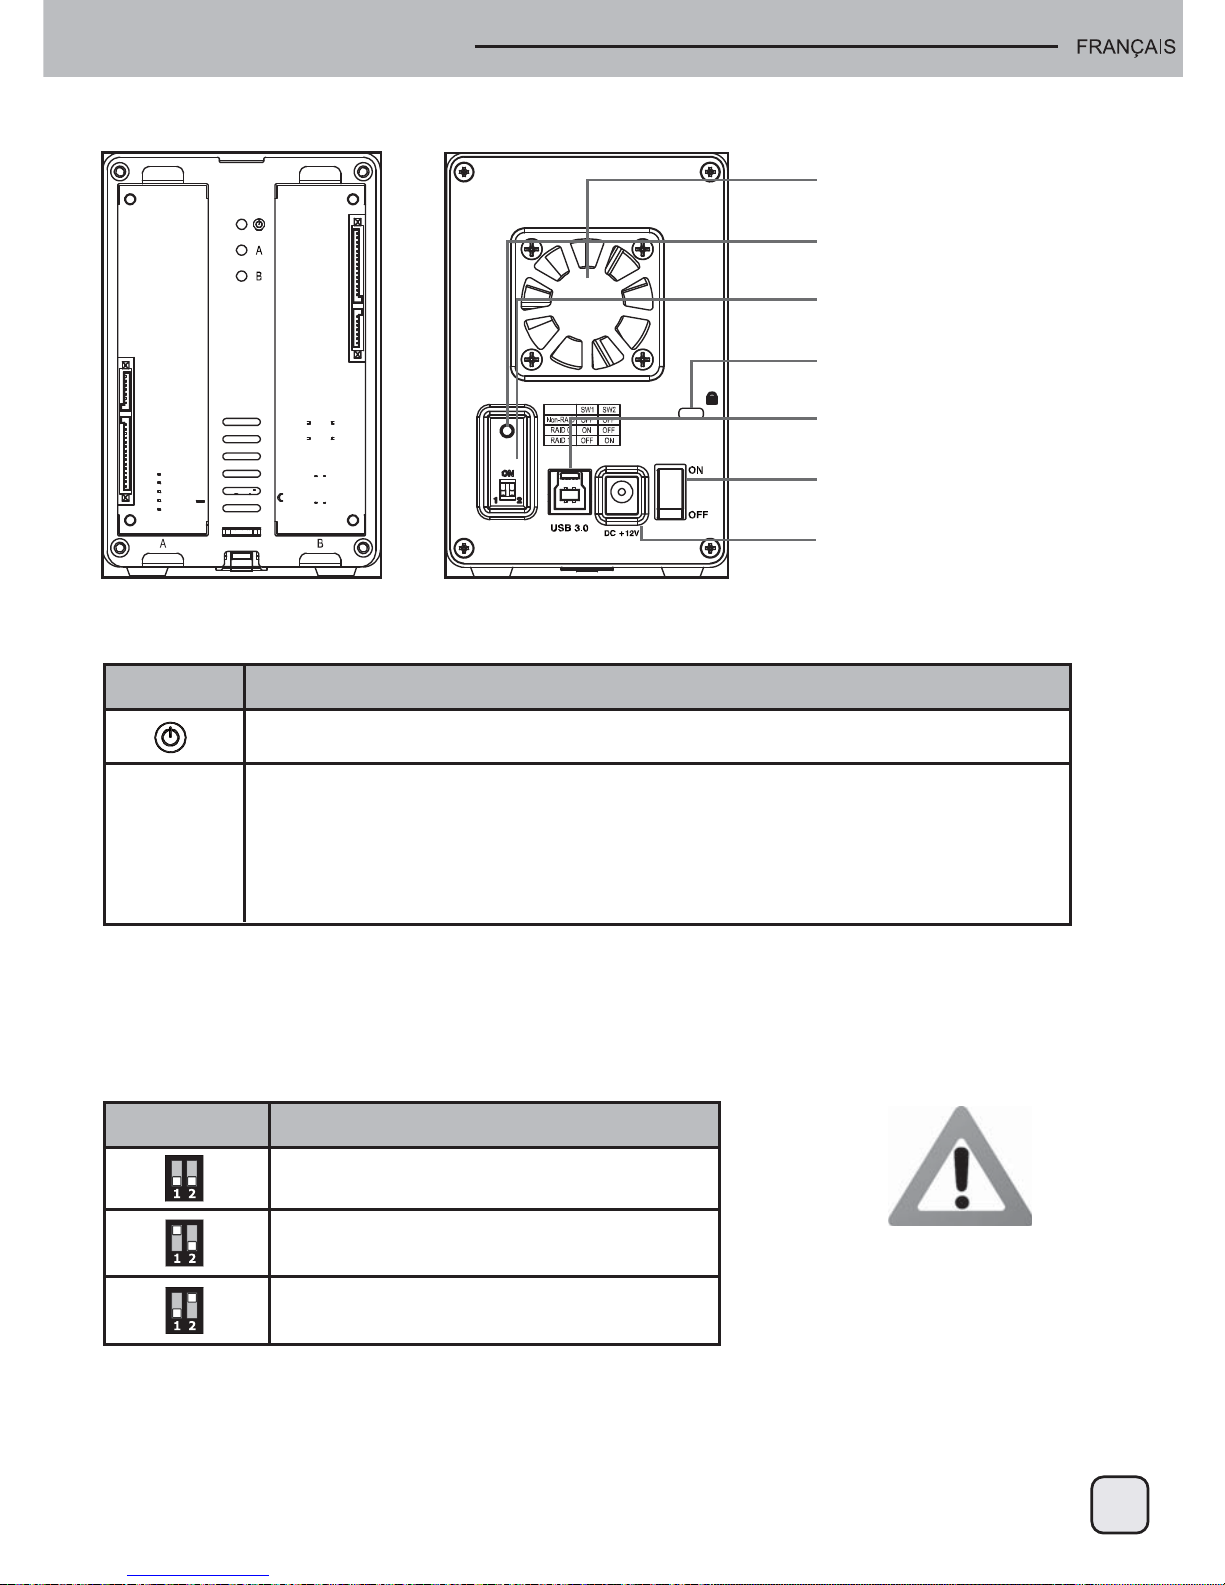
1.5 Vue détaillée
Vue de devant Vue de derrière
Ventilateur
Confirmer le mode RAID
Interrupteur RAID
Verrou Kensington
Port USB
Bouton d’alimentation
Prise d'alimentation
1.5.1 Voyant DEL
DEL
DD
A & B
État
• Bleu = Allumé
• Vert = Etat OK, connexion USB à l'ordinateur établie
• OFF = Baie de lecteur vide ou connexion USB pas encore établie
• Vert clignotant = Accès aux données (lecture/écriture)
• Clignote lentement (500ms allumé/éteint) = Panne de disque (erreur)
• Clignote rapidement (125ms allumé/éteint) = Reconstruction de matrice RAID 1
1.5.2 Interrupteur RAID
Bouton DIP Mode RAID
Non-RAID
Position du bouton : 1 ÉTEINT, 2 ÉTEINT
RAID 0 - Entrelacement
Position du bouton : 1 ALLUMÉ, 2 ÉTEINT
RAID 1 - Mirroitage
Position du bouton : 1 ÉTEINT, 2 ALLUMÉ
Remarque
Afin de déterminer le type de clignotement du DEL, arrêtez les transferts de fichiers de ou sur les disques
durs. Le clignotement lent sera plus lent et le clignotement rapide sera plus rapide que le clignotement
normal du DEL lors de l'accès aux données.
Remarque
Sauf pour le mode Non-RAID, deux disques durs sont requis. Après avoir changé le mode RAID, appuyez
sur le bouton au-dessus du bouton RAID pour confirmer le nouveau réglage.
Le changement du mode RAID
nécessite le formatage des disques.
Assurez-vous en premier que les
données ont toutes été sauvegardées !
Page 20
19
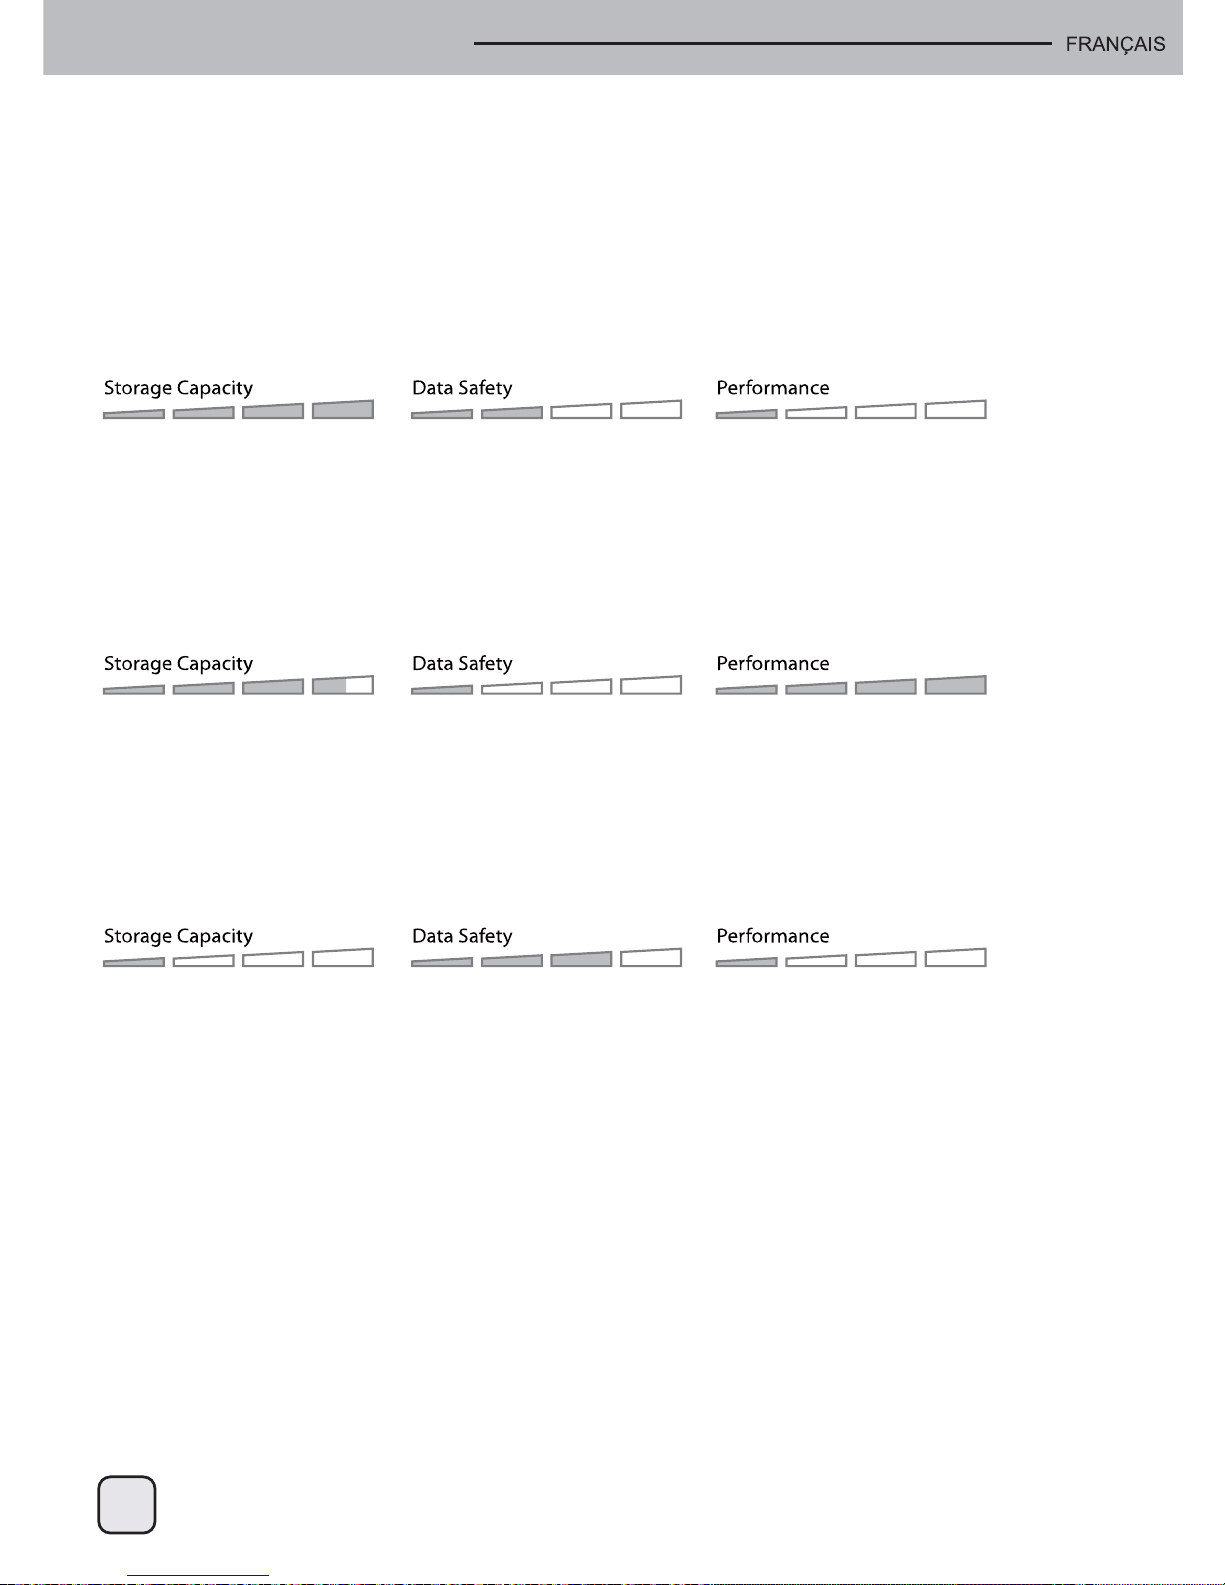
1.6 Modes RAID
Pour RAID 0/1, nous recommandons que les disques durs soient de la même taille.
Si les disques sont de différentes tailles, l'espace total pouvant être utilisé sera basé sur le plus petit disque.
1 ou 2 disques
1.6.4 Changer le mode RAID
Le mode RAID peut être réglé après avoir installé et avant d'avoir formater les disques.
1. Installez les disques durs.
2. Allumez l'alimentation.
3. Utilisez le bouton RAID pour choisir le mode RAID désiré.
4. Appuyez sur le bouton au-dessus du bouton RAID pour confirmer le réglage.
5. Formatez les disques.
6. Terminé.
1. Introduction
2 disques
2 disques
1.6.1 Non-RAID
Les disques apparaîtront comme des volumes indépendants. Chaque disque peut être formaté et
utilisé séparément. Si un disque tombe en panne, l'autre ne sera pas affecté. Ce réglage n'offre
aucun avantage avec les performances ou la redondance.
1.6.2 RAID 0 - Entrelacement de disque
Les disques sont affichés avec un seul gros volume mais la taille totale dépendra de la taille du plus petit
disque. Ce réglage est utilisé lorsque la vitesse est l'objectif principal, mais le niveau RAID 0 (also appelé
Entrelacement) n'est pas redondant. Ce type de matrice divise chaque morceau de données entre les
disques en segments ; puisque les données sont écrites sans aucune forme de vérification de parité de
données, cela permet d'obtenir le transfert des données le plus rapide de tous les modes. Par contre, si
un disque est endommagé, la matrice entière sera corrompue.
1.6.3 RAID 1 - Mirroitage de disque
Deux disques sont affichés avec un seul gros volume, mais seulement 50% de la capacité totale, basée sur
le disque le plus petit, pourra être utilisé. RAID 1 créé une copie exacte (ou miroir) d'un ensemble de données
sur le deuxième disque. Cela est pratique lorsque la fiabilité et la sauvegarde des données est plus important
que la taille de stockage. Si un disque tombe en panne, il peut être restauré et les données reconstruites
automatiquement.
Remarque
Pour que l'ordinateur puisse accéder à des volumes de plus de 2To, le matériel et le système d'exploitation
doivent être capables de supporter des gros volumes (par ex. Windows Vista ou Mac 10.4 ou plus).
Remarque
Le changement du mode RAID nécessite le formatage des disques. Assurez-vous en premier que les
données ont toutes été sauvegardées !
Page 21
2. Réglage du système
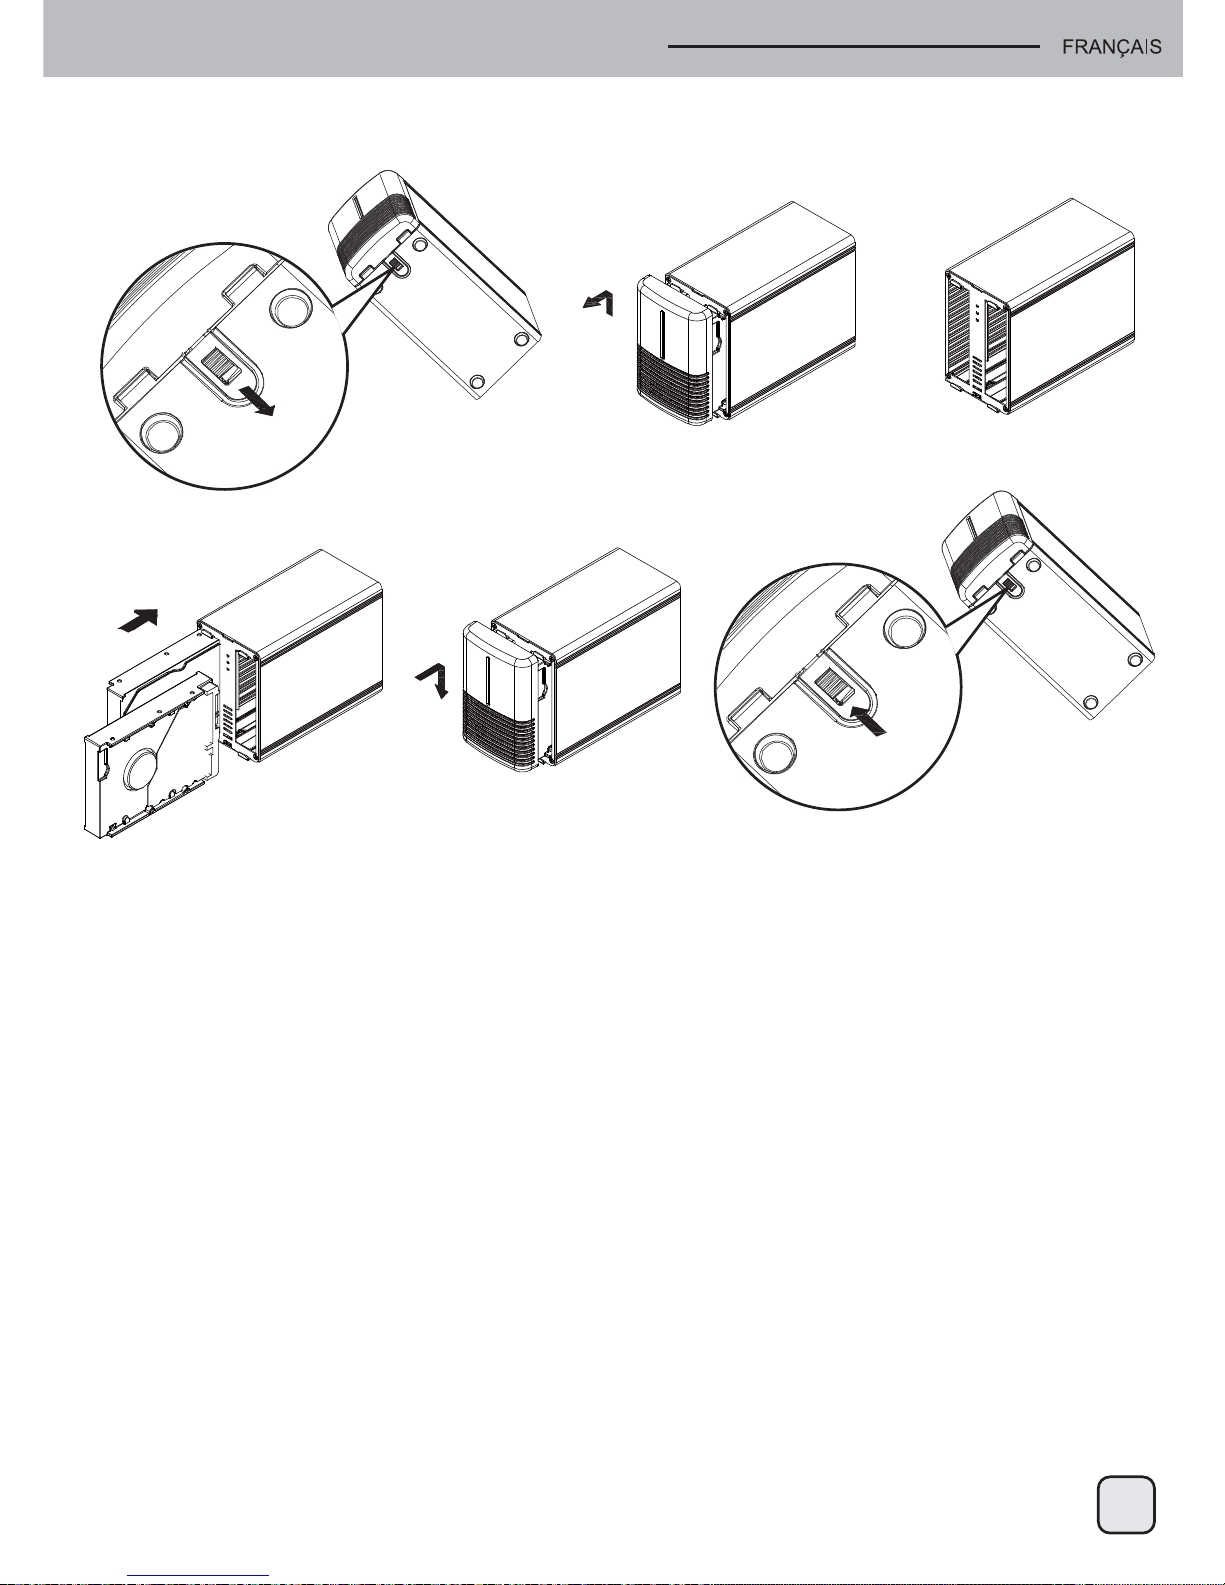
2.1 Assemblage des disques durs
Les disques peuvent être installés n'importe où, il n'y a aucun ordre spécifique.
1.
4. 5. 6.
2. 3.
1. Ouvrez le bouton en bas du boîtier et soulevez le panneau frontal vers le haut et à l'écart du boîtier pour
l'enlever.
2. Installez les disques durs comme indiqué ci-dessous avec le dessus des disques, où se trouve l'étiquette,
faisant face l'un à l'autre. Insérez les disques et refermez le panneau frontal.
3. Branchez l'appareil sur votre ordinateur et allumez l'alimentation.
4. Choisissez le mode RAID désiré et confirmez en appuyant sur le bouton au-dessus du bouton RAID.
5. Les utilisateurs de PC peuvent utiliser l'utilitaire de gestion des disques, et les utilisateurs de Mac peuvent
utiliser l'utilitaire de disque, pour créer une nouvelle partition et formater les disques.
6. Terminé ! Votre disque externe est maintenant prêt à être utilisé.
Remarque
Veuillez faire attention à ne pas endommager les composants, et ne forcez jamais les disques. S'ils ne
rentrent pas facilement dans les baies, assurez-vous que les disques ont correctement été installés. Le
dessus des disques, où se trouve l'étiquette, doivent faire face l'un à l'autre.
2.1.1 Installation d'un DD avec des données existantes et réglage d'une matrice RAID 1
1. Réglez le mode RAID sur RAID 1.
2. Installez le disque qui contient déjà des données dans la baie A et allumez l'alimentation.
3. Appuyez sur le bouton "Confirmer mode RAID" et assurez-vous que l'ordinateur a bien reconnu votre
disque dur et que vous pouvez accéder aux données.
4. Installez le deuxième disque (vierge) dans la baie B et laissez-le reconstruire la matrice RAID 1.
Assurez-vous que la taille du DD dans la baie B est égale ou supérieure à la taille du DD dans la baie A !
20
Page 22

21
2. Réglage du système
2.2 Remplacer des disques durs
Lorsqu'un disque tombe en panne, le voyant DEL de DD correspondant (A ou B) clignotera lentement,
sauf si le mode RAID a été réglé sur Non-RAID, alors le DD ne sera plus accessible.
Si un seul disque est défectueux et que le mode RAID a été réglé sur RAID 1, les données sont toujours
accessibles cependant nous recommandons fortement de remplacer le disque défectueux immédiatement
pour assurer la sauvegarde continue et la sécurité des données.
Si plus d'un disque tombe en panne en même temps ou que le mode RAID a été réglé sur RAID 0, les
données seront perdues et le système ne sera plus accessible jusqu'à ce que vous ayez remplacé le(s)
disque dur.
2.2.1 Non-RAID
1. Vérifiez le DEL de DD. Le voyant DEL correspondant au disque défectueux clignotera lentement.
2. Eteignez l'alimentation et remplacez le(s) disque défectueux.
3. Allumez l'alimentation. Le voyant DEL correspondant s’allumera vert à nouveau.
4. Formatez le(s) nouveau disque dur.
2.2.2 RAID 0
1. Vérifiez le DEL de DD. Le voyant DEL correspondant au disque défectueux clignotera lentement.
2. Eteignez l'alimentation et remplacez le(s) disque défectueux.
3. Allumez l'alimentation. Le voyant DEL correspondant s’allumera vert à nouveau.
4. Appuyez sur le bouton au-dessus du bouton RAID pour confirmer le mode RAID actuel.
5. Formatez le disque.
2.2.3 RAID 1
1. Vérifiez le DEL de DD. Le voyant DEL correspondant au disque défectueux clignotera lentement.
2. Eteignez l'alimentation et remplacez le disque défectueux.
3. Vérifiez que le câble USB est bien branché et qu'il est connecté à votre ordinateur.
4. Allumez l'alimentation et attendez environ 30 secondes pendant que le système démarre.
5. Installez le nouveau disque dur.
6. Le voyant DEL du disque source clignotera rapidement et le voyant DEL du disque cible clignotera
lentement. Cela indique que la reconstruction de la matrice RAID est en cours.
7. La reconstruction d'une matrice RAID peut prendre plusieurs heures, en fonction de la taille du disque.
Lorsque les données ont été restaurée, les voyants DEL s'allumera en vert.
2.3 Connexion à un ordinateur
Quelques précautions et remarques à propos de l'utilisation de votre disque de stockage externe :
• N'exposez pas cet appareil à la pluie ou à l'humidité.
• Ne recouvrez pas les trous de ventilation du boîtier.
• Avant de connecter l'appareil, installez les disques durs et réglez le mode RAID comme désiré.
• Pour enlever votre disque en sécurité et pour vous assurer que les données ne seront pas perdues, suivez
toujours la méthode de déconnexion recommandé pour les périphériques externes (par ex. éjecter le disque
avant de l'enlever).
• Pour que l'ordinateur puisse accéder à des volumes de plus de 2To, le matériel et le système d'exploitation
doivent être capables de supporter des gros volumes (par ex. Windows Vista, Windows 7 ou Mac 10.4 ou
plus).
• Lorsque l'ordinateur entre en mode Veille, les disques durs dans le boîtier externe entreront aussi en veille.
Remarque
Nous vous recommandons de ne pas éteindre l'alimentation pendant l'opération de reconstruction ;
si l'alimentation est interrompue, elle continuera la reconstruction des données dès que l'alimentation est
rétablie.
Page 23

22
2. Réglage du système
2.4 Précautions
2.4.1 Précautions d'allumage/d'éteignage
Il est fortemment recommandé d'éteindre l'appareil lorsque vous ne l’utilisez pas.
Lorsque vous déplacez l'appareil ou que vous n'allez pas l'utiliser pendant une longue période de temps,
nous vous recommandons de débrancher l'appareil.
2.4.2 Précautions d'emplacement et d'installation
Evitez l'installer votre appareil dans les endroits suivants :
• Des endroits directement au soleil, près de radiateurs ou d'autres sources de chaleur.
• Des endroits à haute température (plus de 38° C) ou à forte humidité (plus de 90%).
• Des endroits avec beaucoup de sâble ou de poussière.
• Des endroits sujets à des vibrations, des chocs ou non horizontal.
2.4.3 Electricité et prise d'alimentation
Faites attention aux instructions suivantes pour réduire le risque d'incendie, de dommage et/ou de blessure :
• Lorsque vous débranchez le cordon d’alimentation de la prise de courant, tenez toujours la fiche et jamais le
cordon.
• Ne touchez pas et ne débranchez pas le cordon d’alimentation avec des mains mouillées.
• Gardez le cordon d'alimentation à distance des radiateurs.
• N'essayez jamais de réparer le cordon d'alimentation, ou de le modifier vous-même.
• Si l'appareil est tombé ou qu'il a été endommagé, débranchez le cordon d'alimentation.
2.5 A propos de la sauvegarde des données
Pour protéger vos fichiers et réduire le risque de perte de données, nous vous recommandons fortemment de
garder deux copies de vos données, une copie sur le DS321 et une deuxième copie soit sur votre disque
interne, ou un support externe comme un CD, DVD, Cassette ou un autre disque externe.
Toute perte ou corruption de données lorsque vous utilisez le DS321 est votre sôle responsabilité, et en aucun
cas le fabricant ne sera responsable de dommages ou de la restauration des données.
2.4.4 Câbles
Utilisez seulement des cordons d'alimentation fournis ou recommandés par votre vendeur pour réduire le
risque de mal fonctionnement, d'électrocution et/ou d'interférences avec l'appareil.
Page 24

23
3.1 Spécifications
3.2 FAQ
Q : Puis-je connecter cet appareil à un hôte USB 2.0 ?
R : Oui, cet appareil est rétro-compatible avec les ports USB 2.0.
Q : Quel système de fichier dois-je choisir pour formater mon disque ?
R : Cela dépend de comment vous voulez utiliser le disque, mais en général nous rcommandons :
• Windows Vista/7 NTFS
• Mac OS X HFS+ (Mac OS étendu)
• Pour l'utiliser avec un PC et un Mac FAT32 (taille de fichier unique limitée à 4Go)
Q : Combien de disques peuvent tomber en panne avant que je perde mes données ?
R : Pour RAID 0, la panne d'un disque causera la perte des données. Pour RAID 1, si plus d'un
disque tombent en panne en même temps, les données ne pourront plus être restaurées.
Pour les non-RAID, seulement les données sur le disque défectueux seront perdues.
Application
Ports/Interface
Transfert de données
Configuration système
requise
Conditions d’utilisation
Conditions de stockage
Alimentation
Taille du produit
• Disques durs 3,5” SATA-I ou SATA-II
• 1,5Gb/s ou 3,0Gb/s
• 20Go - 2To
• USB 3.0 SuperSpeed
• USB 3.0 Jusqu'à 5Gbps (625Mo/s)
• USB 2.0 jusqu'à 480Mbps (60Mo/s)
• PC: Windows Vista ou Windows 7
• Mac: Mac OS 10.4 ou ultérieur
• Votre périphérique doit posséder un bon port correspondant
(par ex. USB 3.0, USB 2.0 ou carte PCI)
• Température : 5°C ~ 40°C
• Humidité : 20%RH ~ 80%RH
• Température : -20°C ~ 70°C
• Humidité : 10%RH ~ 90%RH
• Entrée : 100-240V CA
• Sortie : +12V/3A CC
• 17.7cm x 12.3cm x 8.1cm
• 7in x 4.8in x 3.2in
3. Appendice
Page 25

24
1.1 Requisitos del sistema
1.1.1 Requisitos para PC
• Mínimo CPU Intel Pentium III 500 Mhz, 128MB RAM
• Windows Vista, Windows 7
• Su dispositivo debe tener el puerto correspondiente (controlador para USB 3.0)
1.1.2 Requisitos para Mac
• Mínimo procesador Apple G4, 128MB RAM
• SO Mac 10.4 ó superior
• Su dispositivo debe tener el puerto correspondiente (controlador para USB 2.0)
Nota
USB 3.0 no estaba disponible para el SO Mac en el momento en el que este manual fue creado.
Es posible usar el dispositivo con la conexión USB 2.0 que es más lenta
1.1.3 Discos duros aceptados
• Uno ó dos discos duros SATA-I ó SATA-II de 3,5” (1,5Gb/s ó 3,0Gb/s)
• 20GB-2TB por disco duro
• Se recomiendan discos duros de la misma capacidad
• Acepta volúmenes grandes de más de 2TB
1.2 Contenidos del paquete
El contenido del paquete podría variar dependiendo del vendedor y la versión
• Carcasa de almacenamiento DS321 (discos duros no incluidos)
• Fuente de alimentación
• Cable de conexión
• Manual de usuario
1.4 Marcas registradas
• MS-DOS, Microsoft, Windows Vista y 7 son marcas registradas de la Corporación Microsoft
• Apple Macintosh y Mac son marcas registradas de Apple Computer
• Todas las marcas y nombres de terceros son propiedad de sus respectivos dueños
1. Introducción
Nota
Para que su ordenador acceda a volúmenes de más de 2TB, el hardware y el SO necesita tener la
capacidad para aceptar volúmenes grandes (Windows Vista, SO Mac 10.4 ó superior)
1.3 Sobre este manual
La versión del controlador, imágenes y descripciones podrían variar ligeramente entre este manual y el
producto real que tendrá en sus manos. Las funciones y características podrían cambiar dependiendo de la
versión del controlador. ¡Por favor, lea con cuidado su garantía, ya que podría variar entre distintos
vendedores!
Page 26

25
1. Introducción
1.5 Vista detallada
Vista frontal Vista trasera
Ventilador
Confirmación de modo RAID
Interruptor RAID
Cerradura Kensington
Puerto USB
Interruptor de potencia
Receptáculo de potencia
1.5.1 Indicador LED
LED
Disco duro
A y B
Status
• Azul = Potencia conectada
• Verde = Status OK, conexión USB al ordenador conectada
• Apagado = Bahía de dispositivos vacía ó conexión USB no conectada apropiadamente
• Verde intermitente = Acceso a datos (leer/escribir)
• Parpadeando lentamente (500ms on/off) = Fallo del dispositivo (error)
• Parpadeando rápidamente (125ms on/off) = Reconstruyendo matriz RAID 1
1.5.2 Interruptor RAID
Interruptor DIP Modo RAID
Posición de interruptor
No-RAID: 1 OFF, 2 OFF
Posición de interruptor RAID 0
Bandas: 1 ON, 2 OFF
Posición de interruptor RAID 1
Espejo: 1 OFF, 2 ON
Nota
Para poder determinar qué tipo de parpadeo indica el LED, deje de transferir archivos hacia ó desde los
discos duros. El parpadeo lento debería de ser más lento y el parpadeo rápido debería ser más rápido que el
parpadeo normal del LED durante el acceso a los datos.
Nota
Excepto por el modo No-RAID, hacen falta dos discos duros. Tras cambiar el modo RAID, presione el botón
sobre el interruptor RAID para confirmar el nuevo ajuste.
Cambiar el modo RAID requiere formatear
los dispositivos. ¡Asegúrese de hacer
primero una copia de seguridad de todos los
datos existentes!
Page 27

26
1.6 Modos RAID
Para RAID 0/1, se recomiendan discos duros de la misma capacidad.
Si las capacidades son diferentes, la cantidad total de espacio que puede usarse dependerá del disco con
la capacidad menor.
1 ó 2 discos
1.6.4 Cambiar el modo RAID
El modo RAID debería fijarse tras la instalación y antes de formatear los discos.
1. Instale los discos duros
2. Conecte la potencia
3. Fije el interruptor RAID y seleccione su modo RAID preferido
4. Presione el botón sobre el interruptor RAID para confirmar el modo actual
5. Formatee los discos
6. Terminado
1. Introducción
2 discos
2 discos
1.6.1 No-RAID
Los discos aparecen como volúmenes independientes. Cada disco se puede formatear y acceder
por separado. Si un disco falla, el otro no se verá afectado. El ajuste no proporciona ningún
beneficio en cuanto a rendimiento ó redundancia.
1.6.2 RAID 0 – Bandas
Los discos aparecen como un único volumen grande pero el tamaño total dependerá del disco con la
capacidad menor. Este ajuste se usa cuando la velocidad es el objetivo prioritario pero el RAID nivel 0
(también llamado de bandas) no es redundante. Este tipo de matriz divide cada fragmento de datos entre
los discos en segmentos; ya que los datos se escriben sin ningún tipo de comprobación de paridad,
permite la transferencia de datos más rápida de todos los modos. Por otra parte, si un disco resulta
dañado, toda la matriz puede corromperse.
1.6.3 RAID 1 – Espejo
Zwei Festplatten werden als ein Laufwerk angezeigt, es sind jedoch nur 50 % der Gesamtkapazität nutzbar;
abhängig von der Festplatte mit der geringsten Kapazität. RAID 1 erstellt eine exakte Kopie (oder "Spiegelung") der Daten auf der zweiten Festplatte. Dies ist sinnvoll, wenn Zuverlässigkeit und Sicherung wichtiger
als die Speicherkapazität sind. Falls eine Festplatte ausfällt, kann sie einfach ersetzt werden und die Daten
werden automatisch wieder aufgebaut.
Nota
Para que el ordenador pueda acceder a volúmenes con un tamaño mayor de 2TB, tanto el hardware como el
sistema operativo necesitan tener la capacidad de aceptar volúmenes grandes (Windows Vista ó SO Mac
10.4 y superior)
Nota
Cambiar el modo RAID requiere formatear los discos. ¡Asegúrese de hacer primero una copia de seguridad
de todos los datos!
Page 28

2. Configuración del sistema
2.1 Montaje de los discos duros
Los discos se pueden instalar en cualquier posición, no es necesario un orden específico
1.
4. 5. 6.
2. 3.
1. Abra el cierre del inferior de la carcasa y retire el panel frontal hacia arriba y fuera de la carcasa para
retirarla.
2. Instale los discos duros como se muestra en la ilustración con la parte superior de los discos, donde se
encuentra la pegatina, una frente a la otra. Empuje los discos con suavidad hasta colocarlos en su lugar y
luego vuelva a colocar el panel frontal.
3. Conecte el dispositivo a su ordenador y conecte la potencia.
4. Seleccione su modo RAID preferido y confírmelo empujando el botón sobre el interruptor RAID.
5. Para los usuarios de PC, use la herramienta de administración de discos y para los de Mac, use la utilidad
de discos para crear una nueva partición y formatee los discos.
6. ¡Terminado! Su dispositivo externo está listo para ser usado.
Nota
Tenga cuidado de no dañar ningún componente y no forzar los discos al meterlos. Si no se deslizan y
encajan, asegúrese de que los está instalando correctamente. La parte superior de los discos, donde
se sitúa la pegatina, debería estar una frente a la otra.
2.1.1 Instalar un disco duro cuando existen datos y configurar una matriz RAID 1
1. Configure el modo RAID a RAID 1
2. Instale el disco con los datos existentes en el zócalo A y luego conecte la potencia
3. Presione el botón “Confirmar modo RAID” y luego asegúrese de que el ordenador ha reconocido su disco
duro y que puede acceder a los datos
4. Instale el segundo disco (en blanco) en el zócalo B y deje que se reconstruya la matriz RAID 1.
¡Asegúrese de que la capacidad del disco duro en el zócalo B es igual o mayor que la capacidad del disco
duro en el zócalo A!
27
Page 29

28
2. Configuración del sistema
2.2 Reemplazar discos duros
Cuando un disco falla, el LED correspondiente al disco duro (A ó B) parpadeará lentamente, a menos que el
modo RAID esté fijado a No-RAID, en cuyo caso el disco duro ya no será accesible. Si sólo un disco es
defectuoso y el modo RAID está fijado a RAID 1, los datos aún podrán ser accesibles pero le recomendamos
encarecidamente que reemplace de inmediato el disco que falla para asegurarse de que los datos siguen
siendo seguros y se pueden hacer copias de seguridad. Si falla más de un disco a la vez o si el modo RAID
está fijado en RAID 0, los datos se perderán y no se podrá acceder de nuevo al sistema hasta que el/los
disco/s hayan sido reemplazados.
2.2.1 No-RAID
1. Compruebe el LED del disco duro. El LED correspondiente para el disco que falla parpadeará lentamente.
2. Desconecte la potencia y reemplace el disco que falle.
3. Conecte la potencia. El LED correspondiente se volverá verde fijo de nuevo.
4. Formatee el nuevo disco/s.
2.2.2 RAID 0
1. Compruebe el LED del disco duro. El LED correspondiente para el disco que falla parpadeará lentamente.
2. Desconecte la potencia y reemplace el disco que falle.
3. Conecte la potencia. El LED correspondiente se volverá verde fijo de nuevo.
4. Presione el botón sobre el interruptor RAID para confirmar el modo RAID actual.
5. Formatee el disco.
2.2.3 RAID 1
1. Compruebe el LED del disco duro. El LED correspondiente para el disco que falla parpadeará lentamente.
2. Desconecte la potencia y reemplace el disco que falle.
3. Asegúrese de que el cable USB está enchufado y conectado al ordenador.
4. Conecte la potencia y espere durante unos 30 segundos para que el sistema arranque.
5. Instale el nuevo disco duro.
6. El LED del disco fuente empezará a parpadear rápidamente y el LED del disco de destino empezará a
parpadear lentamente. Esto indica que se está reconstruyendo la matriz RAID.
7. Reconstruir la matriz RAID necesitará de varias horas, dependiendo de la capacidad de los discos. Cuando
los datos se hayan restaurado los LEDs volverán a un verde fijo.
2.3 Conexión al ordenador
Algunas precauciones y notas cuando use su dispositivo de almacenamiento externo:
• No exponga el producto al agua ó condiciones húmedas
• No cubra los agujeros de ventilación de la carcasa
• Antes de conectar el dispositivo, instale los discos duros y configure su modo RAID preferido.
• Para retirar de forma segura su disco duro y asegurarse de no perder datos, siga siempre el procedimiento
de desconexión correcto para dispositivos externos (Eyectar el dispositivo antes de retirarlo)
• Para que su ordenador acceda a volúmenes mayores de 2TB, tanto el hardware como el sistema operativo
necesita tener la capacidad para soportar volúmenes grandes (Windows Vista, Windows 7 ó SO Mac 10.4 y
superior)
• Cuando el ordenador entra en modo de espera, los discos duros en la carcasa externa también se apagarán
Nota
Le recomendamos que no desconecte la potencia durante el proceso de reconstrucción pero si el proceso se
interrumpe, tan pronto como se vuelva a conectar la potencia se continuará con la reconstrucción de los
datos.
Page 30

29
2. Configuración del sistema
2.4 Precauciones
2.4.1 Precauciones para conectar/desconectar
Le recomendamos encarecidamente que desconecte la unidad cuando no la use.
Cuando traslade el dispositivo ó cuando no lo use durante un largo periodo de tiempo,
también le recomendamos que desenchufe la unidad.
2.4.2 Precauciones sobre la colocación
Evite situar su dispositivo en los siguientes lugares:
• Lugares con luz solar directa, cerca de radiadores, otras fuentes de calor.
• Lugares con temperaturas muy altas (más de 38ºC) ó humedad (más del 90%).
• Lugares sucios ó polvorientos.
• Lugares que vibren, se muevan ó sean deslizantes
2.4.3 Electricidad y potencia
Debe tener mucho cuidado con los puntos siguientes para evitar daños, fuegos y heridas:
• Cuando saque el cable de potencia de su conexión, tire del agarre de la conexión y nunca del cable
• No conecte ó quite el cable de potencia con las manos húmedas
• Mantenga el cable de potencia lejos de calefactores
• Nunca intente reparar usted mismo el cable de potencia o modificarlo en modo alguno
• Si la unidad se cae o queda dañada de algún modo, desconecte el cable de potencia
2.5 Sobre la copia de seguridad de datos
Para proteger sus archivos y ayudar a prevenir la pérdida de sus datos, le recomendamos encarecidamente
que conserve dos copias de sus datos, una copia en su DS321 y una segunda copia bien en su disco duro
interno u otro dispositivo de datos como un CD, DVD, cinta de datos o un dispositivo externo adicional.
Cualquier pérdida o corrupción de datos mientras use el DS321 es responsabilidad exclusiva del usuario y
bajo ninguna circunstancia podrá ser responsable el fabricante por una compensación respecto a la recuperación de estos datos.
2.4.4 Cables
Use solo los cables suministrados o recomendados por su vendedor para evitar riesgo de fallos, descargas
eléctricas y/o posibles interferencias del dispositivo.
Page 31

30
3.1 Especificaciones
3.2 Preguntas frecuentes
P: ¿Puedo conectar este dispositivo a un puerto USB 2.0?
R: Sí, este dispositivo es retro compatible con USB 2.0
P: ¿Qué sistema de archivos debería escoger para formatear mi disco?
R: Esto dependerá de cómo quiera usar este dispositivo pero en general, le recomendamos:
• Windows Vista/7 NTFS
• Mac OS X HFS+ (Mac OS Extendido)
• Para usarlo en PC y Mac FAT32 (tamaño de archivo limitado a 4GB)
P: ¿Cuántos discos pueden fallar antes de perder mis datos?
R: Para RAID 0, cualquier fallo de un disco conllevará pérdida de datos. Para RAID 1, el
fallo de más de un disco a la vez significará que los datos no podrán ser recuperados.
Para No-RAID, sólo se perderán los datos del disco que falle.
Aplicación
Interfaz/Puertos
Transferencia de datos
Requisitos del sistema
Condiciones de
funcionamiento
Lugar de almacenamiento
Fuente de alimentación
Tamaño de producto
• Discos duros SATA-I o SATA-II de 3,5”
• 1.5Gb/s o 3.0Gb/s
• 20GB - 2TB
• USB 3.0 SuperSpeed
• USB 3.0 hasta 5Gbps (625MB/s)
• USB 2.0 hasta 480Mbps (60MB/s)
• PC: Windows Vista o Windows 7
• Mac: SO Mac 10.4 o superior
• Su dispositivo debe tener el puerto correspondiente
(USB 3.0, USB 2.0 o tarjeta PCI)
• Temperatura: 5°C ~ 40°C
• Humedad: 20%HR ~ 80%HR
• Temperatura: -20°C ~ 70°C
• Humedad: 10%HR ~ 90%HR
• Entrada: AC 100-240V
• Salida: DC +12V/3A
• 17.7cm x 12.3cm x 8.1cm
• 7” x 4.8” x 3.2”
3. Apéndice
Page 32

31
1.1 Requisiti di sistema
1.1.1 Requisiti PC
• Minimo Intel Pentium III CPU 500MHz, 128MB RAM
• Windows Vista, Windows 7
• Il vostro hardware deve essere in possesso della corretta porta di collegamento
(es. USB 3.0 host controller)
1.1.2 Requisiti Mac
• Minimo processore Apple G4, 128MB RAM
• Mac OS 10.4 o superiori
• Il vostro hardware deve essere in possesso della corretta porta di collegamento
(es. USB 2.0 host controller)
Note
Nel momento in cui viene redatto il presente manuale, l’USB 3.0 non è disponibile per il Mac OS.
È possibile comunque utilizzare la più lenta connessione USB 2.0.
1.1.3 Hard Drive supportati
• Uno o due hard disk 3.5" SATA-I o SATA-II (1.5Gb/s or 3.0Gb/s)
• 20GB - 2TB per HDD
• Sono raccomandati hard disk di capacità identiche.
• Supporta grandi volumi oltre i 2TB
1.2 Contenuto della confezione
Il contenuto della confezione può variare in base al distributore ed alla versione.
• DS321 storage enclosure (hard drives non inclusi)
• Alimentatore
• Cavo interfaccia
• Manuale utente
1.4 Marchi registrati
• MS-DOS, Microsoft, Windows Vista & 7 sono marchi registrati di proprietà della Microsoft Corporation.
• Apple Macintosh e Mac sono marchi registrati di proprietà della Apple Computer.
• Tutti gli altri marchi e nomi sono proprietà dei rispettivi possessori.
1. Introduzione
Note
Per fare in modo che il computer possa accedere a volume più grandi di 2TB, sia l’hardware che il
sistema operativo devono essere in grado di supportare grandi volumi (es. Windows Vista o Mac OS
10.4 o superiori).
1.3 Il manuale
Il firmware, le immagini e le descrizioni possono variare leggermente da quanto descritto in questo manuale
ed il prodotto in vostro possesso. Funzioni e caratteristiche possono variare in base alla versione del
firmware. Leggere le informazioni riguardanti la garanzia con attenzione, in quanto possono essere
differenti a seconda del distributore.
Page 33

32
1. Introduzione
1.5 Viste dettagliate
Vista Frontale Vista Posteriore
Ventola
Conferma modalità RAID
RAID switch
Kensington lock
Porta USB
Interruttore di accensione
Connettore alimentazione
1.5.1 Indicazioni dei LED
LED
HDD
A & B
Stato
• Blue = Power on
• Green = Status OK, connessione USB al computer stabilita
• OFF = Drive bay vuoto o connessione USB non ancora stabilita
• Verde lampeggiante = Accesso ai dati (lettura/scrittura)
• Lampeggio breve (500ms on/off) = Errore disco
• Lampeggio veloce (125ms on/off) = Rebuilding RAID 1 array
1.5.2 RAID switch
DIP Switch RAID Mode
Non-RAID
Posizione switch: 1 OFF, 2 OFF
RAID 0 - Striping
Posizione switch: 1 ON, 2 OFF
RAID 1 - Mirroring
Posizione switch: 1 OFF, 2 ON
Note
Al fine di determinare con certezza la tipologia di lampeggio del led, interrompere il trasferimento file ai o
dagli hard disk. Il lampeggio breve sarà più breve ed il veloce più veloce di quanto non siano quando il
trasferimento file è attivo
Note
Fatta eccezione per la modalità Non-RAID, sono necessari due hard drive. Dopo aver cambiato la modalità
RAID, premere il pulsante al di sotto dello switch RAID per confermare il nuovo settaggio.
Per cambiare la modalità RAID è
necessaria la formattazione dei dischi
rigidi. Assicuratevi quindi di aver messo
al sicuro i vostri dati prima di procedere.
Page 34

33
1.6 Modalità RAID
Per il RAID 0/1, sono raccomandati hard drive di capacità identiche.
Se le capacità sono differenti, l’ammontare dello spazio totale utilizzabile sarà determinato dall’hard drive
di capacità minore.
1 or 2 drives
1.6.4 Cambiare la modalità RAID
La modalità RAID deve essere impostata dopo aver installato i dischi e prima di formattarli.
1. Installare i dischi.
2. Accendere la periferica.
3. Selezionare la modalità RAID preferita agendo sullo switch apposito.
4. Premere il pulsante al di sotto del RAID switch per confermare il settaggio corrente.
5. Formattare i dischi.
6. Fatto!.
1. Introduzione
2 drives
2 drives
1.6.1 Non-RAID
I dischi vengono visualizzati come volumi indipendenti. Ogni disco può essere formattato e si può
accedere separatamente ai singoli drives. Se un disco si danneggia, l’altro rimane intatto. Questa
modalità non fornisce alcun beneficio in termini di prestazioni o ridondanza.
1.6.2 RAID 0 - Disk Striping
I dischi vengono visualizzati come un unico grande volume ma la dimensione totale dipende dal drive con
capacità minore. Questa modalità viene utilizzata quando la velocità è l’obiettivo primario ma il RAID 0
(chiamato anche striping) non è ridondante. Questa forma di array divide singoli pezzi dei dati (in
segmenti) fra i dischi. I dati stessi vengono scritti infatti senza nessuna forma di parity data-checking.
Questo permette al RAID 0 di essere la modalità più veloce rispetto alle altre. L’altra faccia della medaglia
è che, se un drive si danneggia, l’intero array risulterà corrotto.
1.6.3 RAID 1 - Disk Mirroring
Due dischi vengono visualizzati come uno solo con il 50% della capacità totale, dipendente dal drive con
capacità minore. Il RAID 1 crea una copia esatta (o mirror) di un set di dati sul secondo disco. Questa
modalità torna utile quando l’affidabilità e la conservazione dei dati hanno la precedenza sulla capacità di
storage. Se un drive dovesse danneggiarsi, è possibile sostituirlo e ripristinare i dati automaticamente.
Note
Per fare in modo che il computer possa accedere a volume più grandi di 2TB, sia l’hardware che il sistema
operativo devono essere in grado di supportare grandi volumi (es. Windows Vista o Mac OS 10.4 o
superiori).
Note
Per cambiare la modalità RAID è necessaria la formattazione dei dischi rigidi. Assicuratevi quindi di aver
messo al sicuro i vostri dati prima di procedere.
Page 35

2. Setup del Sistema
2.1 Assemblaggio Hard Drive
I dischi possono essere installati in qualsiasi posizione, non è richiesto uno specifico ordine.
1.
4. 5. 6.
2. 3.
1. Sbloccare il pannello anteriore agendo sul blocco posto al di sotto della periferica, quindi far scorrere il
pannello frontale verso l’alto e tirarlo verso l’esterno per rimuoverlo.
2. Installare i dischi come mostrato nell’illustrazione di seguito, facendo in modo che le facce superiori (quelle con
l’etichetta) siano rivolte verso l’interno. Spingere leggermente i dischi in sede e riposizionare il pannello frontale.
3. Connettere la periferica al computer ed accenderla.
4. Selezionare la modalità RAID preferita e confermarla premendo il pulsante al di sotto del RAID switch.
5. Per gli utenti PC utilizzare lo strumento di gestione disco, o, per gli utenti Mac, utilizzare disk utility per
creare una nuova partizione e formattare i dischi.
6. Fatto! Il vostro drive esterno è ora pronto per essere utilizzato
Note
Abbiate cura di non danneggiare componenti e non forzate i dischi durante l’installazione. Se per qualche
ragione il disco non dovesse entrare facilmente nella sua sede, controllatene il verso di inserzione. La
part superiore del disco, quella con l’etichetta, deve essere disposta verso l’interno, faccia a faccia con
quella del secondo disco.
2.1.1 Installare un HDD con dati esistenti e disporre un array RAID 1
1. Selezionare la modalità RAID su RAID 1.
2. Installare il drive che contiene dati nello slot A ed accendere la periferica.
3. Premere il bottone di conferma della modalità RAID ed assicurarsi che il computer riconosca il disco e che
sia possibile accedere ai dati.
4. Installare il secondo (vuoto) disco nello slot B e lasciare che avvenga la ricostruzione dell’array RAID 1.
Assicurarsi che la capacità del disco nello slot B sia uguale o maggiore di quella del disco situato nello slot A.
34
Page 36

35
2. Setup del Sistema
2.2 Sostituzione dei dischi rigidi
Quando un disco si danneggia, il corrispondente HDD LED (A o B) lampeggerà lentamente, a meno che la
modalità non sia impostata su Non-RAID, in questo caso il disco danneggiato risulterà semplicemente non
accessibile. Se un solo disco è danneggiato e la modalità RAID è impostata su RAID 1, è ancora possibile
accedere ai dati, ma vi raccomandiamo caldamente di sostituire subito il disco difettoso per assicurare il
continuo backup dei dati e la loro sicurezza. Se più di un disco risultasse danneggiato, specialmente con la
modalità RAID 0, i dati saranno definitivamente perduti ed il sistema non più accessibile fino alla sostituzione
dei dischi stessi.
2.2.1 Non-RAID
1. Controllare il LED HDD. Il LED corrispondente al disco difettoso lampeggerà lentamente.
2. Spegnere la periferica e sostituire il disco o i dischi danneggiati.
3. Accendere la periferica. Il LED corrispondente al disco sostituito tornerà in luce verde continua.
4. Formattare il nuovo disco o i nuovi dischi.
2.2.2 RAID 0
1. Controllare il LED HDD. Il LED corrispondente al disco difettoso lampeggerà lentamente.
2. Spegnere la periferica e sostituire il disco o i dischi danneggiati.
3. Accendere la periferica. Il LED corrispondente al disco sostituito tornerà in luce verde continua.
4. Premere il pulsante al di sotto del RAID switch per confermare la modalità RAID corrente.
5. Formattare il nuovo disco o i nuovi dischi.
2.2.3 RAID 1
1. Controllare il LED HDD. Il LED corrispondente al disco difettoso lampeggerà lentamente.
2. Spegnere la periferica e sostituire il disco o i dischi danneggiati.
3. Assicurarsi che il cavo USB sia connesso alla macchina.
4. Accendere la periferica ed attendere circa 30 secondi per la partenza del sistema.
5. Installare il nuovo disco.
6. Il LED del disco sorgente inizierà a lampeggiare rapidamente ed il led del disco di destinazione lampeggerà
lentamente. Questo indica che è in corso la ricostruzione del RAID array.
7. La ricostruzione del RAID array può richiedere diverse ore, a seconda della capacità del disco. Quando i
dati saranno completamente ripristinati sul disco di destinazione, i LED torneranno in luce verde continua.
2.3 Connessione al Computer
Alcune precauzioni prima di utilizzare il vostro storage esterno:
• Non esporre il prodotto all’acqua o a condizioni di eccessiva umidità.
• Non coprire i fori di ventilazione della periferica.
• Prima di connettere la periferica, installare i dischi rigidi ed impostare la modalità RAID preferita.
• Per una sicura rimozione dei dischi e per assicurarsi di non danneggiare in alcun modo i propri dati, seguire
sempre la corretta procedura di rimozione dell’hardware esterno.
• Per fare in modo che il computer possa accedere a volume più grandi di 2TB, sia l’hardware che il sistema
operativo devono essere in grado di supportare grandi volumi (es. Windows Vista o Mac OS 10.4 o
superiori).
• Quando il sistema va in modalità stand by, i dischi rigidi nella periferica esterna seguiranno il sistema.
Note
Vi raccomandiamo di non spegnere la periferica durante il processo di rebuild; in ogni caso la procedura
riprenderà nel momento in cui si riaccenderà la periferica.
Page 37

36
2. Setup del Sistema
2.4 Precauzioni
2.4.1 Precauzioni nell’accensione o spegnimento.
E’ altamente raccomandato spegnere la periferica quando non viene utilizzata.
Quando la periferica deve essere spostata o non utilizzate per un lungo periodo di tempo, ve ne
raccomandiamo di rimuovere i cavi di alimentazione e dati.
2.4.2 Precauzioni di posizionamento
Evitare di disporre la periferica nei seguenti luoghi:
• Luoghi con luce solare diretta, nei pressi di termosifoni o altre fonti di calore.
• Luoghi con temperature o umidità molto elevate (più di 38° C o maggiore del 90%).
• Luoghi molto polverosi o sabbiosi.
• Luoghi soggetti a vibrazioni, urti, o superfici umide.
2.4.3 Elettricità e connettore di alimentazione
Particolare attenzione va dedicata ai seguenti punti al fine di evitare danneggiamenti e rischi vari:
• Quando il cavo di alimentazione viene rimosso dalla presa, tirare sempre la spina e mai il cavo.
• Non connettere o rimuovere il cavo con le mani bagnate.
• Tenere il cavo di alimentazione lontano da fonti di calore (termosifoni).
• Non provare mai a riparare il cavo o a modificarlo in alcun modo.
• Se l’unità dovesse cadere o si danneggiasse in qualsiasi altro modo, staccare il cavo di alimentazione.
2.5 Backup dei Dati
Per proteggere i vostri files e prevenire la perdita dei dati, vi raccomandiamo di conservare una doppia copia
dei vostri dati; una nel vostro DS321 ed una seconda nel vostro disco interno o in qualsiasi altra periferica di
storage come CD, DVD, Nastri o drive esterni aggiuntivi.
Qualsiasi perdita o corruzione dei dati mentre si utilizza il DS321 è sotto la totale responsabilità
dell’utilizzatore. In nessun caso il produttore provvederà a compensazioni o recupero dei dati stessi.
2.4.4 Cavi
Utilizzare soltanto i cavi in dotazione o raccomandati dal vostro rivenditore al fine di evitare rischi di malfunzionamenti, shock elettrici e/o possibili interferenze con la periferica.
Page 38

37
3.1 Specifiche
3.2 FAQ
D: Posso connettere la periferica ad una porta USB 2.0?
A: Si, la periferica è retro compatibile con lo standard USB 2.0.
Q: Quale file system è corretto scegliere quando si formatta il disco rigido?
A: Dipende da come volete usare la periferica, ma in generale vi raccomandiamo:
• Windows Vista/7 NTFS
• Mac OS X HFS+ (Mac OS Extended)
• Per usare la periferica su PC e Mac FAT32 (la dimensione di un singolo file è limitata a 4GB)
Q: Quanti dischi possono danneggiarsi prima che perda i miei dati?
A: Per il RAID 0, qualsiasi danneggiamento dei dischi, causa la perdita dei dati. Per il RAID 1,
la perdita dei dati avviene soltanto se si danneggiano entrambi i drive contemporaneamente.
Per il Non-Raid solo i dati presenti nel drive danneggiato risulteranno persi.
Applicazione
Interfaccia/Porte
Velocità di trasferimento
dati
Requisiti di sistema
Ambiente operativo
Ambiente di storage
Alimentatore
Dimensioni del prodotto
• Dischi rigidi 3.5” SATA-I o SATA-II
• 1.5Gb/s or 3.0Gb/s
• 20GB - 2TB
• USB 3.0 SuperSpeed
• USB 3.0 fino a 5Gbps (625MB/s)
• USB 2.0 fino a 480Mbps (60MB/s)
• PC: Windows Vista or Windows 7
• Mac: Mac OS 10.4 o successivi
• Il vostro hardware deve avere la corretta porta di collegamento
(es. USB 3.0, USB 2.0 or PCI card)
• Temperatura: 5°C ~ 40°C
• Umidità: 20%RH ~ 80%RH
• Temperatura: -20°C ~ 70°C
• Umidità: 10%RH ~ 90%RH
• Input: AC 100-240V
• Output: DC +12V/3A
• 17.7cm x 12.3cm x 8.1cm
• 7in x 4.8in x 3.2in
3. Appendice
Page 39

38
1.1 Системные требования
1.1.1 Требования к ПК
• Минимум: процессор Intel Pentium III с частотой 500 МГц, ОЗУ объемом 128 Мб
• Windows Vista, Windows 7
• Компьютер должен иметь соответствующий порт (например, порт хост-контроллера
USB 3.0)
1.1.2 Требования к компьютеру Mac
• Минимум: процессор Apple G4, ОЗУ объемом 128 Мб
• MAC OS 10.4 или более поздней версии
• Компьютер должен иметь соответствующий порт (например, порт хост-контроллера
USB 2,0)
Примечание
Интерфейс USB 3.0 не поддерживался в Mac OS на момент составления настоящего
руководства. Однако данное устройство можно подключить к интерфейсу USB 2.0,
обеспечивающему меньшую скорость передачи данных.
1.1.3 Поддерживаемые жесткие диски
• Один или два 3,5-дюймовых жестких диска с интерфейсом SATA-I или SATA-II (1,5 Гбит/c
или 3,0 Гбит/с)
• Объем каждого жесткого диска 20 Гб – 2 Тб
• Рекомендуется использовать жесткие диски идентичной емкости
• Поддерживаются большие тома объемом более 2 Тб
1.2 Комплект поставки
Содержимое комплекта поставки может отличаться в зависимости от поставщика и модели прибора.
• Корпус запоминающего устройства DS321 (жесткие диски не входят в комплект поставки)
• Блок питания
• Интерфейсный кабель
• Руководство пользователя
1.4 Товарные знаки
• MS-DOS, Microsoft, Windows Vista и Windows 7 являются товарными знаками корпорации Microsoft.
• Apple Macintosh и Mac являются товарными знаками компании Apple Computer.
• Все прочие торговые марки и наименования других компаний являются собственностью
соответствующих лиц.
1. Введение
Примечание
Для доступа компьютера к томам объемом более 2 Тб аппаратное обеспечение и ОС должны
поддерживать большие тома (например, Windows Vista или Mac OS 10.4 или более поздние
версии).
1.3 Сведения о настоящем руководстве
Версия прошивки, изображения и описания, приведенные в настоящем руководстве, могут
незначительно отличаться от фактических характеристик приобретенного вами изделия. Функции и
возможности могут различаться в зависимости от версии прошивки. Внимательно прочтите гарантию
на изделие, так как ее содержание может отличаться в зависимости от поставщика.
Page 40

39
1. Введение
1.5 Внешний вид
Вид спереди Вид сзади
Вентиляторы
Кнопка Подтверждение
режима RAID
Переключатель режимов RAID
Гнездо для замка Kensington
Порт USB
Выключатель питания
Вход питания
1.5.1 Показания индикатора
Светодиодный
индикатор
Жесткие диски
A и B
Состояние
• Синий – питание вкл.
• Зеленый – исправное состояние, установлено USB-соединение с компьютером
• ВЫКЛ. – пустой отсек для жестких дисков или еще не установлено
USB-соединение
• Мигает зеленым цветом – доступ к данным (чтение или запись)
• Медленно мигает (с интервалом 500 мс) – сбой диска (ошибка)
• Быстро мигает (с интервалом 125 мс) – перестройка массива RAID 1
1.5.2 Переключатель режимов RAID
DIP-переключатель Режим RAID
Режим без RAID-массива
Положение переключателя: 1 – ВЫКЛ., 2 – ВЫКЛ.
RAID 0 – чередование
Положение переключателя: 1 – ВКЛ., 2 – ВЫКЛ.
RAID 1 – зеркалирование
Положение переключателя: 1 – ВЫКЛ., 2 – ВКЛ.
Примечание
Для определения режима мигания светодиодного индикатора прекратите передачу файлов на жесткие
диски и с жестких дисков. При этом медленное мигание замедлится, а быстрое – ускорится по
сравнению с обычным миганием светодиодного индикатора во время доступа к данным.
Примечание
За исключением режима без RAID-массива требуется два жестких диска. После изменения режима
RAID нажмите кнопку над переключателем режимов RAID для подтверждения новой настройки.
Для изменения режима RAID
требуется форматирование
жестких дисков. Предварительно
убедитесь, что сохранили все
существующи
Page 41

40
1.6 Режимы RAID
Для режимов RAID 0 и 1 рекомендуется использовать жесткие диски идентичной емкости.
При использовании дисков различной емкости общий объем доступного пространства будет
зависеть от диска с меньшей емкостью.
1 или два
жестких диска
1.6.4 Изменение режима RAID
Режим RAID необходимо устанавливать после установки и перед форматированием жестких дисков.
1. Установите жесткие диски.
2. Включите питание.
3. Установите переключатель режимов RAID, выбрав требуемый режим RAID.
4. Нажмите кнопку над переключателем режимов RAID для подтверждения текущей настройки.
5. Отформатируйте диски.
6. Готово.
1. Введение
2 жестких диска
2 жестких диска
1.6.1 Режим без RAID-массива
Жесткие диски отображаются как независимые тома. Каждый диск можно отдельно
отформатировать и использовать. Сбой одного диска не повлияет на другой диск. Эта
конфигурация не обеспечивает каких-либо преимуществ в отношении производительности или
избыточности.
1.6.2 RAID 0 – чередование дисков
Жесткие диски отображаются как один большой том, но общий размер зависит от жесткого диска с
меньшей емкостью. Эта конфигурация используется, если высокая скорость является главной
целью. Но уровень RAID 0 (также называемый чередованием) не является избыточным массивом. В
такой конфигурации массива каждый фрагмент данных разделяется по жестким дискам на
сегменты. Так как данные записыв
аются без какой-либо проверки четности, достигается
максимальная скорость передачи данных по сравнению со всеми другими режимами. С другой
стороны, в случае повреждения одного диска может быть поврежден весь массив.
1.6.3 RAID 1 – зеркалирование дисков
Два жестких диска отображаются как один том, но можно использовать только 50% суммарной
емкости дисков, в зависимости от жесткого диска с меньшей емкостью. Массив RAID 1 создает точную
(зеркальную) копию набора данных на втором жестком диске. Эту конфигурацию можно использовать,
если приоритет перед скоростью имеют надежность и необходимость резервного копирования. При
сбое одного диска ег
о можно заменить, и данные будут автоматически восстановлены.
Примечание
Для доступа компьютера к томам объемом более 2 Тб аппаратное обеспечение и операционная
система должны поддерживать большие тома (например, Windows Vista или Mac OS 10.4 или более
поздние версии).
Примечание
Для изменения режима RAID требуется форматирование жестких дисков. Предварительно убедитесь,
что сохранили все существующие данные!
Page 42

2. Подготовка системы к работе
2.1 Установка жестких дисков
Жесткие диски можно устанавливать в любой слот, соблюдать определенный порядок не требуется.
1.
4. 5. 6.
2. 3.
1. Разблокируйте фиксатор в нижней части корпуса и снимите переднюю панель, подняв ее вверх.
2. Установите жесткие диски, как показано на приведенном ниже рисунке, таким образом, чтобы
верхние части жестких дисков, на которых расположены этикетки, были направлены друг к другу.
Слегка нажмите на диски, чтобы они зафиксировались на месте, а затем
установите на место
переднюю панель.
3. Подключите устройство к компьютеру и включите питание.
4. Установите требуемый режим RAID и подтвердите его, нажав кнопку над переключателем режимов
RAID.
5. При подключении к ПК используйте средство управления жесткими дисками; при подключении к
компьютеру Mac используйте приложение дисковую утилиту для создания нового раздела и
форматирования дисков
.
6. Готово! После этого внешнее запоминающее устройство готово к работе.
Примечание
Соблюдайте осторожность во избежание повреждения компонентов и не применяйте силу при
установке дисков. Если жесткие диски без усилия не фиксируются на месте, проверьте, правильно ли
они установлены. Верхние части дисков, на которых расположены этикетки, должны быть
направлены друг к другу.
2.1.1 Установка жесткого диска с существующими данными и настройка массива
RAID 1
1. Выберите для RAID-массива режим RAID 1.
2. Установите жесткий диск с существующими данными в слот A и затем включите питание.
3. Нажмите кнопку «Подтверждение режима RAID» и убедитесь, что компьютер распознал жесткий
диск и вы можете получить доступ к данным.
4. Установите второй (пустой) жесткий диск в слот B и позвольте устройству перестроить массив
RAID 1. Убедитесь, что
емкость диска, установленного в слот B, не меньше емкости жесткого
диска, установленного в слот A!
41
Page 43

2. Подготовка системы к работе
2.2 Замена жестких дисков
При сбое одного из жестких дисков соответствующий светодиодный индикатор (A или B) будет
медленно мигать, а если для RAID-массива выбран режим без RAID массива, жесткий диск просто
будет недоступен. Если поврежден только один жесткий диск и для RAID-массива выбран режим RAID
1, данные останутся доступными, однако настоятельно рекомендуется незамедлительно заменить
неисправный жесткий диск для обеспечения непрерывного выпо
лнения резервного копирования и
сохранности данных. В случае одновременного сбоя обоих дисков или установки для RAID-массива
режима RAID 0 данные будут потеряны, и будет невозможно получить доступ к системе, пока не будут
заменены один или два жестких диска.
2.2.1 Режим без RAID-массива
1. Проверьте показания светодиодных индикаторов жестких дисков. Светодиодный индикатор,
соответствующий поврежденному жесткому диску, будет медленно мигать.
2. Выключите питание устройства и замените один или два поврежденных жестких диска.
3. Включите питание. Соответствующий светодиодный индикатор снова начнет непрерывно светиться
зеленым цветом.
4. Отформатируйте один или два новых жестких диска.
2.2.2 RAID 0
1. Проверьте показания светодиодных индикаторов жестких дисков. Светодиодный индикатор,
соответствующий поврежденному жесткому диску, будет медленно мигать.
2. Выключите питание устройства и замените один или два поврежденных жестких диска.
3. Включите питание. Соответствующий светодиодный индикатор снова начнет непрерывно светиться
зеленым цветом.
4. Нажмите кнопку над переключателем режимов RAID для подтверждения текущей настройки режима
RAID.
5. Отформа
тируйте диск.
2.2.3 RAID 1
1. Проверьте показания светодиодных индикаторов жестких дисков. Светодиодный индикатор,
соответствующий поврежденному жесткому диску, будет медленно мигать.
2. Выключите питание устройства и замените поврежденный жесткий диск.
3. Убедитесь, что USB-кабель подсоединен и подключен к компьютеру.
4. Включите питание устройства и дождитесь запуска системы, который занимает приблизительно
30 секунд.
5. Установите новый жесткий диск.
6. Светодиодный индикатор исх
одного жесткого диска начнет быстро мигать, а светодиодный
индикатор целевого диска начнет мигать медленно. Это указывает на перестроение массива RAID.
7. Перестроение массива RAID может занять несколько часов, в зависимости от емкости дисков.
После восстановления данных светодиодные индикаторы начнут непрерывно светиться зеленым
цветом.
2.3 Подключение к компьютеру
Ниже приведены меры предосторожности и примечания, касающееся использования внешнего
запоминающего устройства:
• Не подвергайте прибор воздействию воды или влаги.
• Не закрывайте вентиляционные отверстия корпуса.
• Перед подключением устройства установите жесткие диски и выберите требуемый режим RAID.
• Для безопасного отключения запоминающего устройства и обеспечения сохранности данных всегда
выполняйте должным образом процедуру отключения внешнего у
стройства (например, процедуру
извлечения устройства в ОС перед отключением).
• Для доступа компьютера к томам объемом более 2 Тб аппаратное обеспечение и операционная
система должны поддерживать большие тома (например, Windows Vista, Windows 7 или
Mac OS 10.4 или более поздние версии).
• При переходе компьютера в режим ожидания жесткие диски во внешнем запоминающем
устройстве будут также остановлены.
Примечание
Не рекомендуется выключать питание устройства во время процесса перестроения массива, но если
процесс будет прерван, он продолжится, как только питание будет включено.
42
Page 44

43
2. Подготовка системы к работе
2.4 Меры предосторожности
2.4.1 Меры предосторожности при включении и выключении питания
Настоятельно рекомендуется выключать данное устройство, если оно не используется.
При перемещении данного устройства, или если оно не используется длительное время,
настоятельно рекомендуется отключать устройство от электрической сети.
2.4.2 Меры предосторожности при выборе места установке прибора
Не устанавливайте данное устройство в следующих местах:
• под прямым солнечным светом, рядом с радиаторами отопления или другими источниками тепла;
• в местах с высокой температурой (более 38°C) или высокой влажностью (более 90%);
• во влажных или пыльных местах;
• в местах, подверженных вибрации или ударам, а также на наклонных поверхностях.
2.4.3 Электрические соединения и вилка питания
Во избежание повреждения оборудования, возгорания и причинения травмы необходимо
неукоснительно соблюдать перечисленные ниже рекомендации.
• При отсоединении кабеля питания от электрической розетки беритесь за штепсельную вилку –
не тяните за кабель.
• Не подключайте и не отключайте кабель питания мокрыми руками.
• Располагайте кабель питания вдали от источников тепла.
• Категорически запрещается самостоятельно ремонтировать или мо
дифицировать кабель питания
каким-либо образом.
• В случае падения или иного повреждения данного устройства, отсоедините кабель питания от
электрической сети.
2.5 Сведения о резервном копировании данных
Для защиты файлов и предотвращения потери данных настоятельно рекомендуется иметь две копии
данных, одну копию – на устройстве DS321, а вторую копию – на внутреннем жестком диске или на
другом носителе, например на компакт-диске, DVD-диске, ленте или дополнительном внешнем
жестком диске.
Пользователь несет полную ответственность за любую потерю или повреждение данных при
использовании у
стройства DS321, и ни при каких обстоятельствах производитель не будет нести
ответственности за компенсацию или восстановление данных.
2.4.4 Кабели
Используйте только кабели, входящие в комплект поставки или рекомендованные поставщиком во
избежание риска выхода устройства из строя, поражения электрическим током и возникновения
помех для работы устройства.
Page 45

44
3.1 Технические характеристики
3.2 Вопросы и ответы
В. Можно ли подключить данное устройство к хосту USB 2.0?
A: Да, данное устройство обратной совместимо с интерфейсом USB 2.0.
В. Какую файловую систему следует выбрать для форматирования диска?
A: Это зависит от предполагаемого способа использования диска, но обычно рекомендуется
выбрать одну из следующих файловых систем:
• Windows Vista/7 NTFS
• Mac OS X HFS+ (Mac OS Extendido)
• для использования как с ПК, так и с компьютерами Mac FAT32 (размер файла ограничен до 4 Гб).
В. Сбой ск
ольких жестких дисков приведет к потере данных?
A: В режиме RAID 0 сбой любого жесткого диска приведет к потере данных. В режиме
RAID 1 одновременный сбой обоих жестких дисков приведет к необратимой потере данных.
В режиме без RAID-массива будут потеряны данные только на поврежденном жестком диске.
Применение
Интерфейс, порты
Пере
дача данных
Системные требования
Условия эксплуатации
Условия хранения
Блок питания
Размеры изделия
• 3,5-дюймовые диски с интерфейсом SATA-I или SATA-II
• 1,5 Гбит/с или 3,0 Гбит/с
• 20 Гб – 2 Тб
• USB 3.0 SuperSpeed
• USB 3.0 до 5 Гбит/с (625 Мб/с)
• USB 2.0 до 480 Мбит/с (60 Мб/с)
• ПК: Windows Vista или Windows 7
• Mac: Mac OS 10.4 или более поздняя версия
• Компьютер должен иметь соответствующий порт
(например, USB 3.0, USB 2.0 или порт PCI-платы)
• Температура: от 5°C до 40°C
• Влажность: 20–80% о
тносительной влажности
• Температура: от -20℃ до 70℃
• Влажность: 10–90% относительной влажности
• Входное напряжение: 100–240 В переменного тока
• Выходное напряжение: +12 В, 3 А постоянного тока
• 17.7cm x 12.3cm x 8.1cm
• (7 x 4,8 x 3,2 дюйма)
3. Приложение
Page 46

45
1.1 システム要求
1.1.1 PC要件
• 最小限Intel Pentium III CPU MHz、RAM 128MB
• Windows Vista、Windows 7
• 正しく対応したポートを備えたハードウェアデバイス (例:USB3.0ホストコントローラ)
1.1.2 Mac要件
• 最小限アップルG4プロセッサ、RAM 128MB
• Mac OS10.4またはそれ以降
• 正しく対応したポートを備えたハードウェアデバイス (例:USB2.0ホストコントローラ)
注意
当マニュアル執筆時点で、USB3.0はMac OSで利用可能ではありませんでした。
しかしながら、より遅いUSB 2.0接続によるドライブ使用は可能です。
1.1.3 サポートされるハードドライブ
• 1、2台の3.5インチのSATA-IまたはSATA-IIハードドライブ(1.5Gb/sまたは3.0Gb/s)
• HDD1台につき20GB--2TB
• 同一容量のハードドライブを推奨
• 2TBを超えた大容量もサポート
1.2 パッケージ内容
パッケージ内容はベンダーおよびバージョンによって変わる可能性があります。
• DS321ストレージエンクロージャー (ハードドライブ含まず)
• 電源
• インタフェースケーブル
• ユーザーマニュアル
1.4 商標
• MS-DOS、マイクロソフト、Windows Vistaおよび7はマイクロソフト社の商標です。
• アップル・マッキントッシュとMacはアップルコンピューターの商標です。
• 他のすべてのサードパーティーブランドと名称はそれぞれの所有者に属します。
1. 紹介
注意
コンピュータが2TBを超える容量にアクセスするには、ハードウェアとOSの両方が大容量をサポート
する機能を必要とします(例:Windows VistaまたはMac OS10.4またはそれ以降)。
1.3 当マニュアルに関して
マニュアルでのファームウェア、画像、および記述はお持ちの実際の製品との間で多少異なる可能性があ
ります。ファームウェアバージョンによって、機能と特徴が変わる場合があります。これはベンダー毎に
ことなる可能性があるので保証書をよくご覧ください。
Page 47

46
1. 紹介
1.5 詳細図
正面図 背面図
ファン
RAIDモードを確認してください
RAIDスイッチ
ケンジントンロック
USBポート
電源スイッチ
電源ソケット
1.5.1 LED指示
LED
HDD
A & B
状態
• ブルー=電源オン
• グリーン=状態OK、コンピュータへのUSB接続が確立。
• OFF=空のドライブベイ、またはUSB接続が未確立。
• グリーン点滅=データアクセス中 (読み/書き)
• 遅い点滅(500msで点滅)=ドライブ故障(エラー)
• 速い点滅(125msで点滅) = RAID1アレイを再構築中
1.5.2 RAIDスイッチ
ディップスイッチ RAIDモード
非RAID
スイッチ位置: 1 オフ、2 オフ
RAID0--ストライピング
スイッチ位置: 1 オン、2 オフ
RAID1--ミラーリング
スイッチ位置: 1 オフ、2オン
注意
LEDがどのタイプの点滅表示かを判断するには、ハードドライブへのファイル読み書きを止めてください。
遅い点滅はデータアクセス中の通常のLED点滅より遅く、速い点滅はより早く点滅します。
注意
非RAIDモードを除いて、ハードドライブ2台が必要です。RAIDモードを変えた後に、
RAIDスイッチ上のボタンを押して、新しい設定を確認します。
RAIDモードを変えるには、ドライブ
のフォーマットが必要です。まず、必
ずすべての既存データのバックアップ
を取ってください!
Page 48

47
1.6 RAIDモード
RAID0/1に関しては、同容量のハードドライブをお勧めします。
容量が異なると、使用可能な容量の総量は小さい方のドライブの容量になります。
1, 2台のドライブ
1.6.4 RAIDモードの変更
RAIDモードは、インストール後でドライブをフォーマットする前に、設定される必要があります。
1. ハードドライブをインストールします。
2. 電源をオンにします。
3. RAIDスイッチを設定します、そして、必要なRAIDモードを選択します。
4. RAIDスイッチ上のボタンを押して、現在の設定を確定します。
5. ドライブをフォーマットします。
6. 完了。
1. 紹介
2台のドライブ
2台のドライブ
1.6.1 非RAID
ドライブは独立したボリュームとして表示されます。別々に各ドライブをフォーマットして、
アクセスできます。1台のドライブが故障しても、他方は影響を受けません。
この設定はいずれの容量や冗長性の利点を提供しません。
1.6.2 RAID 0 - ディスクストライピング
1つの大きい単一ボリュームのドライブとして示され、総容量は小さなドライブの容量になります。この
設定は速度が主目的である場面で使用されますが、RAID Level0(ストライピングとも呼ばれる)は冗長性
を持ちません。この形式のアレイでは、それぞれのデータが複数のドライブにわたったセグメントに分け
られます。データはいずれの形式のパリティデータチェックなしで書かれるので、それは他の全てのモー
ドより最速のデータ転送を実現します。欠点は、1台のドライブが故障すると、全体のアレイが使用不能
になる点です。
1.6.3 RAID 1 - ディスクミラーリング
2台のドライブが1つのボリュームとして示され、総容量は最も小さな容量のドライブの50%しか使用でき
ません。RAID1は2番目のドライブに一連のデータの正確なコピー(ミラーとも呼ばれる)を作成します。信
頼性とバックアップが記憶容量より優先されるとき、これは有用です。たとえ1台のハードドライブが故障
しても、交換後にデータを自動的に復元します。
注意
コンピュータが2TBを超える容量にアクセスするには、ハードウェアとOSの両方が大容量をサポートする機
能を必要とします(例:Windows VistaまたはMac OS10.4またはそれ以降)。
注意
RAIDモードを変えるには、ドライブのフォーマットが必要です。
まず、必ずすべての既存データのバックアップを取ってください!
Page 49

2. システムのセットアップ
2.1 ハードドライブの装着
ドライブはどんな位置にもインストールでき、いずれの特定の順番も必要ありません。
1.
4. 5. 6.
2. 3.
1. ケース下部のスイッチをロック解除して、フロントパネルをハウジングから上方向に持ち上げて取り外し
ます。
2. 下図のようにラベルが位置しているドライブの上面が向かい合うよう、ハードドライブをインストールしま
す。 軽くドライブを押し込んで固定させてから、フロントパネルを元に戻します。
3. 装置をコンピュータに接続して、電源をオンにします。
4. 必要なRAIDモードを設定し、RAIDスイッチ上のボタンを押すことで、それを確定します。
5. PCユーザーはディスク管理ツール、Macユーザーはディスクユーティリティを使用して、
新しいパーティションを作成してからドライブをフォーマットします。
6. 完成です! これで外付け型ドライブは現在、使用可能です。
注意
どんなコンポーネントも破損しないようにご注意ください。またドライブを力づくで押し込まないで
ください。ドライブが容易に場所に固定されないなら、ドライブが正しくインストールされているか
確認してください。ドライブの上面はラベルが位置している側で、お互いに向き合う位置にされるべ
きです。
2.1.1 既存のデータを持つHDDをインストールして、RAID1アレイを構築
1. RAIDモードをRAID1に設定します。
2. スロットAに既存のデータを持つドライブをインストールし、次に電源をオンにします。
3. 「RAIDモードを確定」のボタンを押し、次にコンピュータがデータにアクセスできていることを確認し
ます。
4. スロットBに2台目(ブランク)のドライブをインストールし、RAID1アレイを再構築させます。スロットB
のHDD容量は必ずスロットAのHDD容量に等しいかより大きくなるようにしてください!
48
Page 50

49
2. システムのセットアップ
2.2 ハードドライブの交換
ドライブが故障すると、対応するHDD LED(AまたはB)がゆっくり点滅します。RAIDモードが非RAIDに設定
されている場合、HDDは単にアクセスできなくなります。1台のドライブにのみ故障が生じ、RAIDモードが
RAID1に設定されている場合、まだデータにアクセスできますが、継続的に適切なバックアップとデータの
安全を保証するために故障したドライブを直ちに交換することを強くお勧めいたします。複数のドライブが
同時に故障するか、またはRAIDモードがRAID0に設定されると、データは失なわれ、ドライブを交換するま
ではシステムにアクセスできません。
2.2.1 非RAID
1. HDD LEDをチェックします。故障のあるドライブに対応したLEDはゆっくり点滅します。
2. 電源をオフにしてから、故障したドライブを取り替えます。
3. 電源をオンにします。対応するLEDは再びグリーンに点灯します。
4. 新しいドライブをフォーマットします。
2.2.2 RAID 0
1. HDD LEDをチェックします。故障のあるドライブに対応したLEDはゆっくり点滅します。
2. 電源をオフにしてから、故障したドライブを取り替えます。
3. 電源をオンにします。対応するLEDは再びグリーンに点灯します。
4. RAIDスイッチ上のボタンを押して、現在のRAIDモードを確定します。
5. ドライブをフォーマットします。
2.2.3 RAID 1
1. HDD LEDをチェックします。故障のあるドライブに対応したLEDはゆっくり点滅します。
2. 電源をオフにしてから、故障したドライブを取り替えます。
3. USBケーブルのプラグが挿してあり、コンピュータに接続されているのを確認します。
4. 電源をオンにして、約30秒間システムが始動するのを待ちます。
5. 新しいハードドライブをインストールします。
6. ソースドライブのLEDが早く点滅し始め、複製先ドライブのLEDがゆっくり点滅し始めます。 これは、
現在RAIDアレイを再構築中であることを示します。
7. ドライブ容量によっては、RAIDアレイの再建には数時間かかります。 データが回復したとき、
LEDはグリーンで点灯します。
2.3 コンピュータとの接続
お持ちの外付けストレージドライブのご使用には以下のいくつかの注意とメモにご留意ください。
• 水や多湿の状態に製品をさらさないでください。
• エンクロージャーの通気口を覆わないでください。
• 装置を接続する前に、ハードドライブをインストールして、必要なRAIDモードを設定します。
• ドライブを安全に取り外し、いずれのデータも消失しないよう、外付けハードウェアのための適切な手順に
いつも従ってください(例:取り外し前にドライブをイジェクトする)。
• コンピュータが2TBを超える容量にアクセスするには、ハードウェアとOSの両方が大容量をサポートする
機能を必要とします(例:Windows VistaまたはMac OS10.4またはそれ以降)。
• コンピュータがスタンバイモードに入る時、外付けエンクロージャー内のハードドライブの回転が止まりま
す。
注意
再構築の処理中は、電源を切らないようお勧めしますが、処理が中断されても電源が再度オンになると、
データ再構築が続行されます。
Page 51

50
2. システムのセットアップ
2.4 注意
2.4.1 電源オン/オフに関する注意
本体を使用しない場合は、電源をオフにするよう強くお勧めいたします。
装置を移動させるとき、長期間使用しない時、本体のプラグを抜くことを強くお勧めいたします。
2.4.2 設置位置および方法
以下の場所では装置の設置は避けてください。
• 直射日光、ラジエータ、その他熱源の付近。
• 非常に高温 (38°C以上)か多湿(90%以上)の場所。
• ホコリまたは砂の非常に多い場所。
• 振動、衝撃が与えられる場所、または坂になった台。
2.4.3 電力および電源プラグ
損傷、火災、負傷のいずれかまたは全部を予防するため、以下の点に関して慎重な注意を払う必要がありま
す。
• ソケットから電源ケーブルを取り除くときにはプラグを持ち、決してケーブルを持って引き抜かないこと。
• 濡れた手で電源ケーブルを抜き差ししないこと。
• 電源ケーブルは発熱体から遠ざけること。
• 自分で電源ケーブルを修理しない、また決して何らかの方法でケーブルを改造しないこと。
• 本体が落下、またはその他の理由で破損した場合、電源ケーブルのプラグを抜くこと。
2.5 データのバックアップに関して
お持ちのファイルを保護し、データの損失を防ぐのを助けるため、データのコピー2部を取っておくことを強
くお勧めします。、1番目のコピー1部はDS321に、2番目のコピーは内蔵型ドライブか他にCD、DVD、テー
プなどの記憶媒体、または追加の外付け型ドライブに保存できます。
DS321をご使用中のデータの損失や損傷はいずれもユーザーのみの責任ですあり、製造元はこのデータの補
償や回復に責任は負いません。
2.4.4 ケーブル
不具合、感電、そして起こりうる干渉のいずれかまたは全ての危険性を防止するため、ベンダーが供給また
は推薦したケーブルのみ使用してください。
Page 52

51
3.1 仕様
3.2 FAQ
Q:この装置はUSB 2.0ホストに接続できますか?
A: はい、この装置はUSB 2.0と下位互換性を有しています。
Q:ドライブをフォーマットする場合、どのファイルシステムを選んだらいいですか?
A:ドライブの使用目的によりますが、一般には下記のものをお勧めします。
• Windows Vista/7 NTFS
• Mac OS X HFS+ (Mac OS Extended)
• PCとMacの両方で使用する FAT32 (一つのサイズファイルは4GBに制限)
Q: 何台のドライブが故障すると、データは失われますか?
A: RAID0に関しては、1台でもドライブが故障するとデータ消失をもたらします。
RAID1に関しては、同時に複数のドライブが故障するとデータは回復できなくなります。
非RAIDに関しては、欠陥があるドライブに関するデータだけが失われます。
適用範囲
インタフェース/ポート
データ転送
システム要件
動作環境
保管環境
電源
製品サイズ
• 3.5インチのSATA-IまたはSATA-IIハードドライブ
• 1.5Gb/sまたは3.0Gb/s
• 20GB--2TB
• USB 3.0 SuperSpeed
• 最大5GbpsのUSB3.0(625MB/s)
• 最大480MbpsのUSB 2.0(60MB/s)
• PC: Windows VistaまたはWindows7
• Mac: Mac OS10.4またはそれ以降
• 正しく対応するポートを備えたハードウェアデバイス
(例:USB3.0、USB 2.0またはPCIカード)
• 温度: 5℃~40℃
• 湿度: 20%RH~80% RH
• 温度: -20℃~70℃
• 湿度: 10% RH ~90% RH
• 入力:AC 100-240V
• 出力: DC+12V/3A
• 17.7cm x12.3cm x8.1cm
• 7in x4.8in x3.2in
3. 付録
Page 53

52
1.1 系統需求
1.1.1 PC 系統需求
• 最低 Intel Pentium III CPU 500MHz, 128MB RAM 以上
• Windows Vista, Windows 7
• 您的硬體設備必須具備符合的對應裝置 (例如 USB 3.0 控制器)
1.1.2 Mac 系統需求
• 最低 Apple G4 處理器, 128MB RAM
• Mac OS 10.4 以上作業系統
• 您的硬體設備必須具備符合的對應裝置 (例如 USB 2.0 控制器)
注意
在本說明書編寫時,Mac OS 尚未正式支援USB 3.0 但是仍能以低速的 USB 2.0 相容模式連接.
1.1.3 支援的硬碟
• 一顆或是兩顆 3.5" SATA-I 或 SATA-II 硬碟 (1.5Gb/s 或 3.0Gb/s)
• 20GB - 2TB 容量的硬碟(單顆容量)
• 建議使用廠牌、容量、型號相同的硬碟
• 支援超過 2TB 容量的硬碟
1.2 包裝內容
依照供應商與版本的不同,包裝內容將有所不同
• DS321 硬碟外接盒 (不含硬碟)
• 電源供應器
• 傳輸線
• 使用手冊
1.4 商標
• MS-DOS, Microsoft, Windows Vista & 7 商標為 Microsoft Corporation 所有.
• Apple Macintosh 及 Mac 商標為 Apple Computer 所有.
• 其他協力廠商的品牌與名字為該協力廠商所有.
1. 簡介
注意
為了支援超過2TB容量的硬碟,您的電腦硬體、作業系統都必須同時支援此功能才行
(例如 Windows Vista 或是 Mac OS 10.4 以上版本的作業系統).
1.3 關於這本使用手冊
韌體、使用介面、描述說明,都有可能因為版本的不同,而與您手上的產品不同;功能會依照韌體版本不同
而有所不同,請仔細閱讀您的保固說明,這也會隨著版本不同而不同
Page 54

53
1. 簡介
1.5 詳細說明
正面 背面
風扇
陣列模式確認按鈕
陣列模式設定開關
Kensington 防盜鎖孔
USB 接孔
電源開關
電源線接孔
1.5.1 LED 狀態說明
LED
HDD
A & B
狀態
• 藍燈 = 電源開啟
• 綠燈 = 一切正常, USB 正確連接到電腦
• 熄滅 = 沒有安裝硬碟,或是USB並沒有正確連接電腦
• 閃爍的綠燈 = 資料存取中 (讀寫中)
• 慢速閃爍 (500ms) = 磁碟故障 (錯誤)
• 快速閃爍 (125ms) = RAID1陣列重建中
1.5.2 RAID 開關
DIP 開關 陣列模式
Non-RAID 非陣列模式
開關位置: 1 OFF, 2 OFF
RAID 0 - Striping 高速大容量模式
開關位置: 1 ON, 2 OFF
RAID 1 - Mirroring 鏡射資料保全模式
開關位置: 1 OFF, 2 ON
注意
為了判斷閃爍的LED到底屬於哪個模式,請停止從此系統上傳輸或是寫入任何資料與檔案,慢速的閃爍將比正
常資料存取的閃爍速度閃爍更慢,快速閃爍將比正常資料存取的閃爍速度更快.
注意
除了非陣列模式之外,其他陣列模式接需要兩顆硬碟同時運作,在切換陣列模式之後,
按下陣列切換開關上面那個確認按鈕來確認設定.
切換陣列模式將會需要重新格式化
您的硬碟,請確認備份好所有資料
後,再進行設定!
Page 55

54
1.6 RAID 模式
在RAID 0/1,建議使用一樣容量的硬碟。
如果容量不同,那麼可以使用的總容量會根據小的硬碟容量來決定。
1或2顆硬碟
1.6.4 變更RAID模式
RAID模式應該在安裝硬碟之後並在第一次格式化硬碟之前被設定。
1. 確認電源已經關閉然後安裝硬碟。
2. 設定RAID開關並選擇您想用的RAID模式。
3. 打開電源。
4. 格式化硬碟。
5. 完成。
1. 簡介
2顆硬碟
2顆硬碟
1.6.1 Non-RAID
這些硬碟會顯示為獨立的容量。每個硬碟可以分開格式化與存取。
如果一顆硬碟故障,另一顆將不會被影響。這個設定不會有任何效能或備援的效益。
1.6.2 RAID 0 - Disk Striping
這個磁碟機會顯示為一個大的獨立容量,但是總容量是根據最小容量的硬碟來決定。
這個設定的主要功用在於速度,但是RAID 0 (也稱做striping)並沒有備援。這個形式的陣列會分割每一塊資
料成區塊到硬碟中;當資料寫入並且沒有任何同位資料檢查錯誤時,它是所有模式中檔案傳輸速度最快的。
比較劣勢的一點是,如果有一個硬碟損壞,那麼整個陣列就會故障。
1.6.3 RAID 1 - Disk Mirroring
兩個硬碟會顯示為一個容量,但是只有總容量的50%可以使用,總容量是根據最小容量的硬碟來決定。
RAID 1 會真正製造資料的複製 (或mirror)到第二個磁碟。當可靠度與備份的需求高過儲存容量時這是很有用
的。當一個硬碟故障,它可以自動取代並且自動重建資料。
注意
使用容量超過2TB的硬碟時,請先確認電腦硬體及作業系統均支援大容量磁碟。
(作業系統需使用Windows Vista、Mac OS 10.4或更新版本)
注意
變更RAID模式會要您重新格式化硬碟。請確認已經備份所有存在的資料!
Page 56

2. 系統架設
2.1 硬碟組裝
硬碟可以裝在任何位置,沒有特殊的順序要求。
1.
4. 5. 6.
2. 3.
1. 解開機殼下方的開關並且向上拉起前方的面板再拉離機殼。
2. 如同下圖所示,將硬碟有貼標籤的上方互相面對。將磁碟機輕輕推進位置。
設定您想用RAID模式並將前面板裝回去。
3. 將磁碟機連接到您的電腦並打開電源。
4. 使用磁碟管理工具 (PC) 或是磁碟工具(Mac)來製造新的槽並格式化磁碟。
5. 完成!您的磁碟已經準備好來使用了。
附註
請小心不要傷害到任何元件,而且不要用力把硬碟插到插槽中。如果它們不能輕易滑入位置並且吻合,
請確認硬碟有正確的安裝,硬碟貼有標籤的上方應該跟另一顆硬碟相對。
2.1.1 安裝已存有資料的硬碟並 建立 RAID 1 陣列
1.設定 RAID 模式為 RAID 1.
2.將已存有資料的硬碟安裝在A槽然後開啟電源.
3.按下“陣列模式確認”按鈕,並確認電腦有偵測到您的裝置且可以正常讀寫資料.
4.安裝第二顆(空白)硬碟在B槽,並確認B槽的硬碟容量是等於或大於A槽硬碟的容量。
55
Page 57

56
2. 系統架設
2.2 更換硬碟
當一個硬碟故障,對應的硬碟LED (A或B) 將緩慢的閃爍 LED 燈號, RAID模式是設定成RAID 0,那麼磁碟
就再也不能存取。如果只有一顆硬碟故障並且RAID模式是設定為RAID 1,資料還是可以存取,但是我們強烈建
議要趕快更換故障的硬碟來確保持續備份與資料的安全性。如果超過一顆磁碟同時故障或是RAID模式設定為
RAID 0,資料都會流失而且系統無法存取直到硬碟被更換。
2.2.1 Non-RAID
1. 檢查HDD LED燈號,故障的硬碟將緩慢的閃爍LED燈號.
2. 關閉電源,並更換故障的硬碟.
3. 開啟電源,該硬碟的 LED 燈號將恆亮顯示.
4. 格式化新的硬碟.
2.2.2 RAID 0
1. 檢查HDD LED燈號,故障的硬碟將緩慢的閃爍LED燈號.
2. 關閉電源,並更換故障的硬碟.
3. 開啟電源,該硬碟的LED燈號將恆亮顯示.
4. 按下陣列設定開關上方的陣列確認按鈕.
5. 格式化新的硬碟.
2.2.3 RAID 1
1. 檢查HDD LED燈號,故障的硬碟將緩慢的閃爍LED燈號.
2. 關閉電源,並更換故障的硬碟.
3. 確認USB線已經插入並連接到您的電腦.
4. 開啟電源並等待大約30秒讓系統啟動.
5. 安裝新的硬碟.
6. 重建磁碟陣列時,來源端的LED燈號會快速閃爍,目的地端的LED燈號會緩慢的閃爍.
7. 重建磁碟陣列將需要幾個小時,視硬碟的容量大小而定.當磁碟陣列重建完成時,綠色LED會恆亮顯示.
2.3 連接至電腦
以下是一些使用外接儲存裝置的預防措施與注意事項:
• 不要將產品暴露在有水或潮濕的環境下。
• 不要蓋住外殼上的通風孔。
• 在連接裝置之前,裝入硬碟並設定好欲使用的RAID模式。
• 為了安全的取出磁碟並確保資料不會流失,請遵守正確的外接硬體退出程序 (例:在移除磁碟前先退出).
• 為了讓電腦能存取大於2TB的容量,硬體與作業系統必須能支援此種大容量
(例:WinVista 32bit/64bit或Mac OS 10.4及以後的版本)。
• 當電腦進入待命模式,外接盒裡的硬碟也會停止運轉。
注意
我們建議在重建程序完成之前不要關閉電源。
但是重建程序如果被中斷,它會在電源回來之後繼續重建資料。
2.4 預防措施
2.4.1 電源開啟/關閉措施
一但不使用此裝置時,我們建議把DS321關機。
若長時間不使用,建議您拔下DS321電源插座。
2.4.2 位置與放置
請避免將您的裝置放下在列地方:
• 陽光直射、暖氣,其他熱源的地方。
• 高溫 (高過38°C) 或潮濕 (超過90%)的地方。
• 灰塵多或沙多的地方。
• 搖晃、震動或傾斜基底的地方。
Page 58

57
2. 系統架設
2.4.3 電子與電源插頭
小心注意下列事項以避免損壞、火災與/或受傷:
• 當從插座上拔掉電源線的時候,請從接頭上拉起並且不要從線拉扯。
• 不要用濕的手來插或拔電源線。
• 讓電源線遠離高溫機器。
• 不要自己試著修復電源線或是任何方法修改它。
• 如果裝置摔落或是任何其他方法損壞,拔掉電源線。
2.5 關於資料備份
為了保護您的檔案,並且預防您資料的損失,我們強烈建議您保存至少兩份備份資料,
一份存放於DS321內,另外一份存放其他地方,例如內建硬碟,或是其他儲存裝置
如DVD、CD等外接儲存裝置.
當使用DS321時,任何資料的遺失與損壞是使用者的責任,而且製造商不必負責回復資料.
2.4.4 線材
使用內附或是代理商建議的線材來避免故障、電擊與/或任何裝置干擾的風險。
3.1 規格
3.2 常見問題
Q: 我能連接此裝置到USB2.0 HOST嗎?
A: 可以,此裝置可以向下相容USB 2.0。
Q:我該選用什麼檔案系統來格式化我的磁碟?
A: 這基本上由您決定想怎麼使用這個磁碟,不過通常我們建議:
• Windows Vista/7 NTFS
• Mac OS X HFS+ (Mac OS Extended)
• 要在PC與Mac上使用 FAT32 (單檔大小限制為4GB)
Application
介面/連接埠
資料傳輸
系統需求
工作環境
儲存環境
電源供應
產品尺寸
• 3.5” SATA-I 或 SATA-II 硬碟
• 1.5Gb/s 或 3.0Gb/s
• 20GB - 2TB
• USB 3.0 SuperSpeed
• USB 3.0 up to 5Gbps (625MB/s)
• USB 2.0 up to 480Mbps (60MB/s)
• PC: Windows Vista 或 Windows 7
• Mac: Mac OS 10.4 或以上
• 您的硬體設備必須具備符合的對應裝置
(例如 USB 3.0, USB 2.0 或 PCI card)
• 溫度: 5°C ~ 40°C
• 濕度: 20%RH ~ 80%RH
• 溫度: -20°C ~ 70°C
• 濕度: 10%RH ~ 90%RH
• 輸入: AC 100-240V
• 輸出: DC +12V/3A
• 17.7cm x 12.3cm x 8.1cm
Q: 在我失去資料前有多少磁碟可以損壞?
A: 在RAID模式下,任何磁碟的損壞就會造成資料流失。
在RAID 1,同時超過一顆磁碟損壞就代表資料再也不能覆
蓋回來。在Non-RAID,只有損壞的磁碟的資料會流失。
Page 59

58
1.1 系统需求
1.1.1 PC 系统需求
• 最低 Intel Pentium III CPU 500MHz, 128MB RAM 以上
• Windows Vista, Windows 7
• 您的硬体设备必须具备符合的对应装置 (例如 USB 3.0 控制器)
1.1.2 Mac 系統需求
• 最低 Apple G4 处理器, 128MB RAM
• Mac OS 10.4 以上操作系统
• 您的硬体设备必须具备符合的对应装置 (例如 USB 2.0 控制器)
注意
USB 3.0 在本说明书编写时,尚未正式支持 Mac OS 但是仍能以低速的 USB 2.0 兼容模式连接.
1.1.3 支持的硬盘
• 一顆或是兩顆 3.5" SATA-I 或 SATA-II 硬盘 (1.5Gb/s 或 3.0Gb/s)
• 20GB - 2TB 容量的硬盘(单颗容量)
• 建议使用厂牌、容量、型号相同的硬盘
• 支持超过 2TB 容量的硬盘
1.2 包裝內容
依照供货商与版本的不同,包装内容将有所不同
• DS321 硬盘外接盒 (不含硬盘)
• 电源供应器
• 传输线
• 使用手册
1.4 商标
• MS-DOS, Microsoft, Windows Vista & 7 商标为 Microsoft Corporation 所有.
• Apple Macintosh 及 Mac 商标为 Apple Computer 所有.
• 其它协力厂商的品牌与名字为该协力厂商所有.
1. 简介
注意
为了支持超过2TB容量的硬盘,您的计算机硬件、操作系统都必须同时支持此功能才行
(例如 Windows Vista 或是 Mac OS 10.4 以上版本的操作系统).
1.3 关于这本使用手册
韧体、使用接口、描述说明,都有可能因为版本的不同,而与您手上的产品不同;功能会依照韧体版本不同
而有所不同,请仔细阅读您的保固说明,这也会随着版本不同而不同.
简体中文
简体中文
Page 60

59
1. 简介
1.5 详细说明
正面 背面
风扇
数组模式确认按钮
RAID模式设定开关
Kensington 防盗锁孔
USB 接孔
电源开关
电源线接孔
1.5.1 LED 状态说明
LED
HDD
A & B
状态
• 蓝灯 = 电源开启
• 绿灯 = 一切正常, USB 正确连接到计算机
• 熄灭 = 没有安装硬盘,或是USB并没有正确连接计算机
• 闪烁的绿灯 = 数据存取中 (读写中)
• 慢速闪烁 (500ms) = 磁盘故障 (错误)
• 快速闪烁 (125ms) = RAID1数组重建中
1.5.2 RAID 开关
DIP 开关 数组模式
Non-RAID 非数组模式
开关位置: 1 OFF, 2 OFF
RAID 0 - Striping 高速大容量模式
开关位置: 1 ON, 2 OFF
RAID 1 - Mirroring 镜射数据保全模式
开关位置: 1 OFF, 2 ON
注意
为了判断闪烁的LED到底属于哪个模式,请停止从此系统上传输或是写入任何数据与档案,慢速的闪烁将比正
常数据存取的闪烁速度闪烁更慢,快速闪烁将比正常数据存取的闪烁速度更快.
注意
除了非数组模式之外,其它数组模式接需要两颗硬盘同时运作,
在切换数组模式之后,按下数组切换开关上面那个确认按钮来确认设定
切换数组模式将会需要重新格式化您的
硬盘,请确认备份好所有数据后,再进
行设定!
简体中文
简体中文
Page 61

60
1. 简介
1.6 RAID 模式
在RAID 0/1,建议使用一样容量的硬盘。
如果容量不同,那么可以使用的总容量会根据小的硬盘容量来决定。.
1或2颗硬盘
1.6.4 变更RAID模式
RAID模式应该在安装硬盘之后并在第一次格式化硬盘之前被设定。
1. 确认电源已经关闭然后安装硬盘。
2. 设定RAID开关并选择您想用的RAID模式。
3. 打开电源。
4. 格式化硬盘。
5. 完成。
2颗硬盘
2颗硬盘
1.6.1 Non-RAID
这些硬盘会显示为独立的容量。每个硬盘可以分开格式化与存取。
如果一颗硬盘故障,另一颗将不会被影响。这个设定不会有任何效能或备援的效益。
1.6.2 RAID 0 - Disk Striping
这个磁盘驱动器会显示为一个大的独立容量,但是总容量是根据最小容量的硬盘来决定。这个设定的主要功
用在于速度,但是RAID 0(也称做striping)并没有备援。这个形式的数组会分割每一块数据成区块到硬盘中
当数据写入并且没有任何同位数据检查错误时,它是所有模式中档案传输速度最快的。
比较劣势的一点是,如果有一个硬盘损坏,那么整个数组就会故障。
1.6.3 RAID 1 - Disk Mirroring
两个硬盘会显示为一个容量,但是只有总容量的50%可以使用,总容量是根据最小容量的硬盘来决定。
RAID 1 会真正制造数据的复制(或mirror)到第二个磁盘。当可靠度与备份的需求高过储存容量时这是很有用
的。当一个硬盘故障,它可以自动取代并且自动重建数据。
注意
为了支持超过2TB容量的硬盘,您的计算机硬件、操作系统都必须同时支持此功能才行
(例如 Windows Vista 或是 Mac OS 10.4 以上版本的操作系统).
注意
变更RAID模式会要您重新格式化硬盘。请确认已经备份所有存在的数据!
简体中文
简体中文
Page 62

2. 系统架设
2.1 硬盘组装
硬盘可以装在任何位置,没有特殊的顺序要求。
1.
4. 5. 6.
2. 3.
1. 解开机箱下方的开关并且向上拉起前方的面板再拉离机箱。
2. 如同下图所示,将硬盘有贴卷标的上方互相面对。将磁盘驱动器轻轻推进位置。
设定您想用RAID模式并将前面板装回去。
3. 将磁盘驱动器连接到您的计算机并打开电源。
4. 使用磁盘管理工具(PC)或是磁盘工具(Mac)来制造新的槽并格式化磁盘。
5. 完成!您的磁盘已经准备好来使用了。
附注
请小心不要伤害到任何组件,而且不要用力把硬盘插到插槽中。如果它们不能轻易滑入位置并且吻合,
请确认硬盘有正确的安装,硬盘贴有卷标的上方应该跟另一颗硬盘相对。
2.1.1 安装已存有数据的硬盘并 建立 RAID 1 数组
1.设定 RAID 模式为 RAID 1.
2.将已存有数据的硬盘安装在A槽然后开启电源.
3.按下“数组模式确认”按钮,并确认计算机有侦测到您的装置且可以正常读写数据.
4.安装第二颗(空白)硬盘在B槽,并确认B槽的硬盘容量是等于或大于A槽硬盘的容量
61
简体中文
简体中文
Page 63

62
2. 系统架设
2.2 更换硬盘
当一个硬盘故障,对应的硬盘LED (A或B) 将缓慢的闪烁 LED 灯号,RAID模式是设定成RAID 0,那么磁盘
就再也不能存取。如果只有一颗硬盘故障并且RAID模式是设定为RAID 1,资料还是可以存取,但是我们强烈建
议要赶快更换故障的硬盘来确保持续备份与数据的安全性。如果超过一颗磁盘同时故障或是RAID模式设定为
RAID 0,数据都会流失而且系统无法存取直到硬盘被更换。
2.2.1 Non-RAID
1. 检查HDD LED灯号,故障的硬盘将缓慢的闪烁LED灯号.
2. 关闭电源,并更换故障的硬盘.
3. 开启电源,该硬盘的 LED 灯号将恒亮显示.
4. 格式化新的硬盘.
2.2.2 RAID 0
1. 检查HDD LED灯号,故障的硬盘将缓慢的闪烁LED灯号.
2. 关闭电源,并更换故障的硬盘.
3. 开启电源,该硬盘的 LED 灯号将恒亮显示.
4. 按下RAID模式设定开关上方的数组确认按钮.
5. 格式化新的硬盘.
2.2.3 RAID 1
1. 检查HDD LED灯号,故障的硬盘将缓慢的闪烁LED灯号.
2. 关闭电源,并更换故障的硬盘.
3. 确认USB线已经插入并连接到您的计算机.
4. 开启电源并等待大约30秒让系统启动.
5. 安装新的硬盘.
6. 重建磁盘阵列时,来源端的LED灯号会快速闪烁,目的地端的LED灯号会缓慢的闪烁.
7. 重建磁盘阵列将需要几个小时,视硬盘的容量大小而定.当磁盘阵列重建完成时,绿色LED会恒亮显示.
2.3 连接至计算机
以下是一些使用外接储存装置的预防措施与注意事项:
• 不要将产品暴露在有水或潮湿的环境下。
• 不要盖住外壳上的通风孔。
• 在连接装置之前,装入硬盘并设定好欲使用的RAID模式。
• 为了安全的取出磁盘并确保数据不会流失,请遵守正确的外接硬件退出程序 (例:在移除磁盘前先退出).
• 为了让计算机能存取大于2TB的容量,硬件与操作系统必须能支持此种大容量
(例:WinVista 32bit/64bit或Mac OS 10.4及以后的版本)。
• 当计算机进入待命模式,外接盒里的硬盘也会停止运转。
注意
我们建议在重建程序完成之前不要关闭电源。
但是重建程序如果被中断,它会在电源回来之后继续重建数据資料。
简体中文
简体中文
2.4 预防措施
2.4.1 电源开启/关闭措施
一但不使用此装置时,我们建议把DS321关机。
若长时间不使用,建议您拔下DS321电源插座。
2.4.2 位置与放置
请避免将您的装置放下在列地方:
• 阳光直射、暖气,其它热源的地方。
• 高温 (高过38°C) 或潮湿 (超过90%)的地方。
• 灰尘多或沙多的地方。
• 摇晃、震动或倾斜基底的地方。
Page 64

63
2. 系统架设
2.4.3 电子与电源插头
小心注意下列事项以避免损坏、火灾与/或受伤:
• 当从插座上拔掉电源线的时候,请从接头上拉起并且不要从线拉扯。
• 不要用湿的手来插或拔电源线。
• 让电源线远离高温机器。
• 不要自己试着修复电源线或是任何方法修改它。
• 如果装置摔落或是任何其它方法损坏,拔掉电源线。
2.5 关于资料备份
为了保护您的档案,并且预防您数据的损失,我们强烈建议您保存至少两份备份数据,
一份存放于DS321内,另外一份存放其它地方,例如内建硬盘,或是其它储存装置如DVD、CD等外接储存装置
当使用DS321时,任何数据的遗失与损坏是使用者的责任,而且制造商不必负责回复数据.
2.4.4 线材
使用内附或是代理商建议的线材来避免故障、电击与/或任何装置干扰的风险。
3.1 规格
3.2 常见问题
Q: 我能连接此装置到USB2.0 HOST吗?
A: 可以,此装置可以向下兼容USB 2.0。
Q:我我该选用什么档案系统来格式化我的磁盘?
A: 这基本上由您决定想怎么使用这个磁盘,不过通常我们建议:
• Windows Vista/7 NTFS
• Mac OS X HFS+ (Mac OS Extended)
• 要在PC与Mac上使用 FAT32 (单档大小限制为4GB)
Application
接口/连接端口
数据传输
系统需求
工作环境
储存环境
电源供应
产品尺寸
• 3.5” SATA-I 或 SATA-II 硬盘
• 1.5Gb/s 或 3.0Gb/s
• 20GB - 2TB
• USB 3.0 SuperSpeed
• USB 3.0 up to 5Gbps (625MB/s)
• USB 2.0 up to 480Mbps (60MB/s)
• PC: Windows Vista 或 Windows 7
• Mac: Mac OS 10.4 或以上
• 您的硬设备必须具备符合的对应装置
(例如 USB 3.0, USB 2.0 或 PCI card)
• 溫度: 5°C ~ 40°C
• 湿度: 20%RH ~ 80%RH
• 溫度: -20°C ~ 70°C
• 湿度: 10%RH ~ 90%RH
• 输入: AC 100-240V
• 输出: DC +12V/3A
• 17.7cm x 12.3cm x 8.1cm
Q: 在我失去数据前有多少磁盘可以损坏?
A: 在RAID 模式下,任何磁盘的损坏就会造成数据流失。
在RAID 1,同时超过一颗磁盘损坏就代表数据再也不能覆
盖回来。在Non-RAID,只有损坏的磁盘的数据会流失。
简体中文
简体中文
Page 65

64
1.1 시스템 요구 사항
1.1.1 PC 요구 사항
• 최소 Intel Pentium III CPU 500MHz, 128MB RAM
• Windows Vista, Windows 7
• 하드웨어 장치에 올바른 해당 포트(예: USB 3.0 호스트 컨트롤러)가 있어야 합니다.
1.1.2 Mac 요구 사항
• 최소 Apple G4 프로세서, 128MB RAM
• Mac OS 10.4 이상
• 하드웨어 장치에 올바른 해당 포트(예: USB 2.0 호스트 컨트롤러)가 있어야 합니다.
참고
이 사용 설명서 작성 시점에서는USB 3.0을 사용할 수 없었습니다. 그러나 속도가 다소 느린
USB 2.0 연결의 드라이브를 사용할 수 있습니다.
1.1.3 지원되는 하드 드라이브
• 하나 또는 두 개의 3.5" SATA-I 또는 SATA-II 하드 드라이브(1.5Gb/s 또는 3.0Gb/s)
• HDD당 20GB - 2TB
• 용량이 동일한 하드 드라이브 사용을 권장합니다.
• 2TB를 초과하는 대용량을 지원합니다.
1.2 포장 내용물
포장 내용물은 판매업체 및 버전에 따라 다를 수 있습니다.
• DS321 저장장치 인클로저(하드웨어 제외)
• 전원 공급장치
• 인터페이스 케이블
• 사용 설명서
1.4 상표
• MS-DOS, Microsoft, Windows Vista 및 7은 Microsoft Corporation의 상표입니다.
• Apple Macintosh 및 Mac은 Apple Computer의 상표입니다.
• 기타 모든 타사 브랜드 및 이름은 해당 소유권자의 재산입니다.
1. 소개
참고
2TB 이상인 컴퓨터에 액세스하려면 하드웨어와 OS가 모두 대용량을 지원해야 합니다
(예: Windows Vista 또는 Mac OS 10.4 이상).
1.3 이 사용 설명서 정보
펌웨어, 그림 및 설명이 이 사용 설명서와 사용자의 실제 제품 간에 약간 다를 수 있습니다. 기능 및
특징이 펌웨어 버전에 따라 변경될 수 있습니다. 판매업체 간에 보증이 다를 수 있기 때문에 보증서를
주의해서 읽으십시오!
Page 66

65
1. 소개
1.5 상세도
정면도 후면도
팬
RAID 모드 확인
RAID 스위치
켄싱턴 락
USB 포트
전원 스위치
전원 콘센트
1.5.1 LED 표시
LED
HDD
A 및 B
상태
• 파란색 = 전원 켜짐
• 녹색 = 상태 정상, USB가 컴퓨터에 연결됨
• 꺼짐 = 드라이브 베이가 비었거나 USB가 아직 연결되지 않음
• 녹색이 깜박거림 = 데이터 액세스(읽기/쓰기)
• 느리게 깜박거리(500ms 켜짐/꺼짐) = 드라이브 이상(오류)
• 빠르게 깜박거림(125ms 켜짐/꺼짐) = RAID 1 배열 재빌드
1.5.2 RAID 스위치
DIP 스위치 RAID 모드
비-RAID
스위치 위치: 1 꺼짐, 2 꺼짐
RAID 0 - 스트리핑
스위치 위치: 1 켜짐, 2 꺼짐
RAID 1 - 미러링
스위치 위치: 1 꺼짐, 2 켜짐
참고
LED의 점멸 유형을 확인하려면 하드 드라이브로, 또는 하드 드라이브로부터의 파일 전송을
정지하십시오. 데이터 액세스 시의 일반적인 점멸에 비해 느린 점멸은 더 느려지고 빠른 점멸은 더
빨라집니다.
참고
비-RAID 모드를 제외하고, 두 개의 하드웨어가 필요합니다. RAID 모드를 변경한 다음, RAID 스위치
위의 버튼을 눌러 새 설정을 확인하십시오.
RAID 모드를 변경하려면 드라이브를
포맷해야 합니다. 먼저 기존의 모든
데이터를 백업하십시오!
Page 67

66
1.6 RAID 모드
RAID 0/1의 경우, 용량이 동일한 하드 드라이브 사용을 권장합니다.
용량이 다를 경우, 사용할 수 있는 총 공간이 용량이 가장 작은 드라이브에 따라 결정됩니다.
1개 또는 2개의
1.6.4 RAID 모드 변경하기
RAID 모드는 드라이브 포맷 전후에 설정해야 합니다.
1. 하드 드라이브를 설치합니다.
2. 전원을 켭니다.
3. RAID 스위치를 설정하고 원하는 RAID 모드를 선택합니다.
4. RAID 스위치 위에 있는 버튼을 눌러 현재 설정을 확인합니다.
5. 드라이브를 포맷합니다.
6. 완료되었습니다.
1. 소개
2개의 드라이브
2개의 드라이브
1.6.1 비-RAID
드라이브가 독립된 용량으로 표시됩니다. 각 드라이브는 따로 포맷하고 액세스할 수 있습니다.
드라이브 하나가 고장나도 나머지는 영향을 받지 않습니다. 이 설정은 성능이나 중복성에
이점을 제공하지 않습니다.
1.6.2 RAID 0 - 디스크 스트리핑
드라이브가 하나의 대용량으로 표시되나 총 크기는 용량이 가장 작은 드라이브에 따라 결정됩니다.
이 설정은 속도가 일차 목표인 경우 사용되나 RAID 레벨 0(스트리핑이라고도 부름)이 중복되지
않습니다. 이 형태의 배열은 데이터가 패리티 데이터 확인을 하지 않고 기록되기 때문에 드라이브에
걸쳐 있는 각 데이터를 세그먼트로 분할하고, 따라서 기타 모든 모드에서 데이터 전송을 가장 빠르게
할 수 있습니다. 아래쪽에서 드라이브 하나가 손상되면 전체 배열이 손상될 수 있습니다.
1.6.3 RAID 1 - 디스크 미러링
두 개의 드라이브가 하나의 용량으로 표시되나 용량이 가장 작은 드라이브에 따라 총 용량의 50%가
사용됩니다. RAID 1이 두 번째 드라이브에 데이터 세트의 정확한 사본(또는 미러)을 만듭니다. 이는
신뢰성과 백업이 저장 용량보다 중요할 때 유용합니다. 드라이브 하나가 고장날 경우 고장난
드라이브를 교체할 수 있어 데이터가 자동으로 다시 빌드됩니다.
참고
2TB 이상인 컴퓨터에 액세스하려면 하드웨어와 운영 체제가 모두 대용량을 지원해야 합니다
(예: Windows Vista 또는 Mac OS 10.4 이상).
참고
RAID 모드를 변경하려면 드라이브를 포맷해야 합니다. 먼저 기존의 모든 데이터를 백업하십시오!
Page 68

2. 시스템 설정
2.1 하드 드라이브 조립
드라이브는 아무 위치에나 설치할 수 있으며, 특정한 순서가 필요없습니다.
1.
4. 5. 6.
2. 3.
1. 케이스 바닥에 있는 스위치의 잠금을 풀어 전면판을 위로 들어올려 하우징에서 분리합니다.
2. 아래 그림과 같이 레이블이 붙어 있는 드라이브의 상단이 서로 마주보게 하여 하드 드라이브를
설치합니다. 드라이브를 가볍게 밀어 제자리에 넣고 전면판을 원래의 위치에 설치합니다.
3. 장치를 컴퓨터에 연결하고 전원을 켭니다.
4. 원하는 RAID 모드를 설정하고 RAID 스위치 위에 있는 버튼을 눌러 이를 확인합니다.
5. PC 사용자의 경우 디스크 관리 도구를 사용하고, Mac 사용자의 경우 디스크 유틸리티를 사용하여
새 파티션을 만들고 드라이브를 포맷합니다.
6. 완료되었습니다! 이제 외장 드라이브를 사욜 수 있습니다.
참고
구성품이 손상되지 않도록 주의하고, 드라이브를 무리하게 제자리에 밀어넣지 마십시오. 외장
드라이브가 수월하게 제자리에 미끄러져 들어가 맞춰지지 않으면 드라이브가 제대로 설치되었는지
확인하십시오. 레이블이 붙어 있는 드라이브의 상단이 서로 마주 보아야 합니다.
2.1.1 기존 데이터가 들어 있는 HDD의 설치 및 RAID 1 배열 설정하기
1. RAID 모드를 RAID 1로 설정합니다.
2. 기존 데이터가 들어 있는 슬롯 A에 설치한 다음 전원을 켭니다.
3. “RAID 모드 확인” 버튼을 누른 다음,컴퓨터가 하드 드라이브를 인식했고 데이터에 액세스할 수
있는지 확인합니다.
4. 두 번째(빈) 드라이브를 슬롯 B에 설치하고 RAID 1 배열을 다시 빌드하도록 합니다. 슬롯 B의 HDD
용량이 슬롯 A의 HDD 용량 이상인지 확인하십시오!
67
Page 69

68
2. 시스템 설정
2.2 하드 드라이브 교체하기
드라이브가 고장날 경우 RAID 모드가 비-RAID로 설정되지 않았으면(이 설정은 단지 HDD에 액세스하지
못하도록 함) HDD LED(A 또는 B)가 느리게 깜박거립니다. 하나의 드라이브만 고장나고 RAID 모드가
RAID 1로 설정되었으면, 데이터를 여전히 액세스할 수 있으나 고장난 드라이브를 즉시 교체하여 올바른
백업과 데이터 안전을 지속적으로 확보할 것을 권장합니다. 두 개 이상의 드라이브가 동시에 고장나거나
RAID 모드가 RAID 0으로 설정되어 있으면, 데이터가 손실되고 드라이브를 교체할 때까지 시스템에 다시
액세스할 수 없습니다.
2.2.1 비-RAID
1. HDD LED를 확인합니다. 고장난 드라이브의 해당 LED가 느리게 깜박거립니다.
2. 전원을 끄고 고장난 드라이브를 교체합니다.
3. 전원을 켭니다. 해당 LED에 다시 녹색 불이 지속적으로 켜집니다.
4. 새 드라이브를 포맷합니다.
2.2.2 RAID 0
1. HDD LED를 확인합니다. 고장난 드라이브의 해당 LED가 느리게 깜박거립니다.
2. 전원을 끄고 고장난 드라이브를 교체합니다.
3. 전원을 켭니다. 해당 LED에 다시 녹색 불이 지속적으로 켜집니다.
4. RAID 스위치 위에 있는 버튼을 눌러 현재 RAID 설정을 확인합니다.
5. 드라이브를 포맷합니다.
2.2.3 RAID 1
1. HDD LED를 확인합니다. 고장난 드라이브의 해당 LED가 느리게 깜박거립니다.
2. 전원을 끄고 고장난 드라이브를 교체합니다.
3. USB 케이블을 컴퓨터에 꽂아 연결했는지 확인합니다.
4. 전원을 켜고 시스템이 시작될 때까지 약 30초를 기다립니다.
5. 새 하드 드라이브를 설치합니다.
6. 소스 드라이브의 LED가 빠르게 깜박거리기 시작하고 대상 드라이브의 LED가 느리게 깜박거리기
시작합니다. 이는 드라이브가 현재 RAID 배열을 다시 빌드하고 있다는 것을 의미합니다.
7. 드라이브 용량에 따라 RAID 배열을 다시 빌드하는 데 몇 시간이 걸립니다. 데이터가 복원되면 LED에
녹색 불이 지속적으로 켜집니다.
2.3 컴퓨터에 연결하기
외장 저장 드라이브 사용 시 몇 가지 주의사항 및 참고사항:
• 물 또는 습기가 있는 환경에 제품을 노출시키지 마십시오.
• 인클로저의 통풍구를 막지 마십시오.
• 장치를 연결하기 전에 하드 드라이브를 설치하고 원하는 RAID 모드를 설정합니다.
• 드라이브를 안전하게 제거하고 데이터가 손실되지 않도록 하기 위해 반드시 외장 하드웨어를 올바르게
분리하는 절차를 따르십시오(예를 들어 제거하기 전에 드라이브를 꺼냄).
• 2TB 이상인 컴퓨터에 액세스하려면 하드웨어와 운영 체제가 모두 대용량을 지원해야 합니다
(예: Windows Vista, Windows 7 또는 Mac OS 10.4 이상).
• 컴퓨터가 대기 모드로 들어가면, 외장 인클로저에 들어 있는 하드 드라이브로 마찬가지로 회전을
멈춥니다.
참고
재빌드 동안 전원을 끄지 말 것을 권장하나, 프로세스가 중단되도 전원이 다시 켜지면 데이터의
재빌드가 계속됩니다.
Page 70

69
2. 시스템 설정
2.4 주의사항
2.4.1 전원 켜기/끄기 주의사항
사용하지 않을 때는 장치를 반드시 끌 것을 권장합니다.
장치의 위치를 바꿀 때나 장시간 사용하지 않을 때는 반드시 장치의 플러그를 뽑아 둘 것을 권장합니다.
2.4.2 위치 및 배치 주의사항
다음 장소에 장치를 위치시키지 마십시오:
• 직사 광선이 드는 장소나 라디에이터 및 기타 열원 근처.
• 온도가 높거나(38° C 이상) 습도가 높은(90% 이상) 장소.
• 먼지나 모래가 많은 장소.
• 진동, 충격을 받기 쉽거나 경사진 장소.
2.4.3 전기 및 전원 플러그
손상, 화재 및/또는 상해를 방지하기 위해 다음 사항에 특별한 주의를 기울여야 합니다:
• 소켓에서 전원 케이블을 분리할 때는 코드가 아닌 플러그 고정구를 잡고 당기십시오.
• 젖은 손으로 전원 케이블을 연결하거나 분리하지 마십시오.
• 전원 케이블을 히터 근처에서 멀리 하십시오.
• 전원 케이블을 직접 수리하거나 어떤 식으로든 개조하려고 시도하지 마십시오.
• 장치가 떨어지거나 어떤 식으로든 손상된 경우 전원 케이블의 플러그를 뽑으십시오.
2.5 데이터 백업 정보
파일을 보호하고 데이터의 손실을 방지하기 위해 반드시 두 개의 데이터 사본, 하나는 DS321 에 그리고
두 번째 사본은 인터넷 드라이브 또는 CD, DVD, 테이프, 추가 외장 드라이브 등과 같은 저장 매체에
유지할 것을 권장합니다.
DS321을 사용하는 동안 데이터가 손실되거나 손상되는 경우, 이는 전적으로 사용자의 책임이며 어떠한
경우에도 제조업체가 이러한 데이터의 보상이나 복구에 책임을 지지 않습니다.
2.4.4 케이블
오작동, 감전 및/또는 장치에 대해 가능한 간섭의 위험을 방지하기 위해 제공된 케이블이나
판매업체에서 권장하는 케이블만 사용하십시오.
Page 71

70
3.1 사양
3.2 FAQ
질문: 이 장치를 USB 2.0 호스트에 연결할 수 있습니까?
대답: 예, 이 장치는 USB 2.0과 역호환됩니다.
질문: 드라이브를 포맷하려면 어떤 파일 시스템을 선택해야 합니까?
대답: 이는 드라이브를 어떻게 사용할 것인가에 따라 다릅니다. 그러나 일반적으로 다음을 권장합니다.
• Windows Vista/7 NTFS
• Mac OS X HFS+ (Mac OS Extended)
• PC와 Mac 모두에서 사용하려면 FAT32 (하나의 파일 크기는4GB로 제한됨)
질문: 드라이브가 몇 개까지 고장나야 데이터가 손실됩니까?
대답: RAID 0의 경우 드라이브가 고장나면 데이터가 손실됩니다.
RAID 1의 경우 두 개 이상의 드라이브가 동시에 고장나면 데이터를 더 이상 복구할 수 없습니다.
비-RAID의 경우 고장난 드라이브에 있는 데이터만 손실됩니다.
애플리케이션
인터페이스/포트
데이터 전송
시스템 요구 사항
작동 환경
보관 환경
전원 공급장치
제품 크기
• 3.5” SATA-I 또는 SATA-II 하드 드라이브
• 5Gb/s 또는 3.0Gb/s
• 20GB - 2TB
• USB 3.0 SuperSpeed
• USB 3.0, 최대 5 Gb/s (625 MB/s)
• USB 2.0, 최대 480 Mb/s (60 MB/s)
• PC: Windows Vista or Windows 7
• Mac: Mac OS 10.4 이상
• 하드웨어 장치에 올바른 해당 포트
(예: USB 3.0, USB 2.0 또는 PCI 카드)가 있어야 합니다.
• 온도: 5 °C – 40 °C
• 습도: 20 %RH – 80 %RH
• 온도: -20°C ~ 70°C
• 습도: 10 %RH – 90 %RH
• 입력: AC 100 – 240 V
• 출력: DC +12 V/3 A
• 17.7cm x 12.3cm x 8.1cm
• 7 인치 x 4.8 인치 x 3.2 인치
3. 부록
 Loading...