

Page 1
Drive Storage
/SS
ty
orage
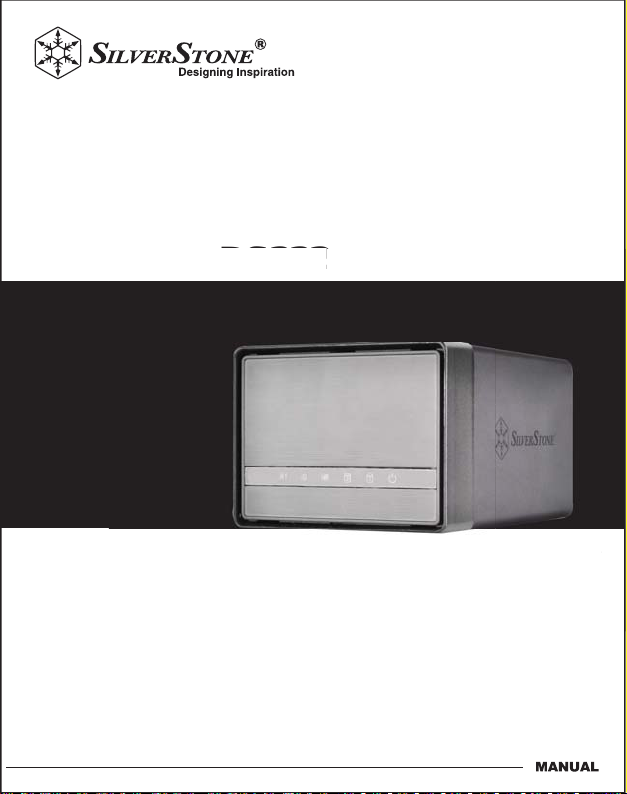
DS222
Compact dual-Bay 2.5" HDD/SSD enclosure with RAID 0/1/BIG capability
ual-Bay 2.5" HDD
D enclosure with RAID 0/1/BIG ca
bili
Page 2
Drive Storage
e
2.5” USB 3.0 RAID enclosure for those looki
o use 2.5” HDD or SSD as their stora
ge o
f choice. DS222 connects to PC via
e
i
req
orag
e sp
DS222
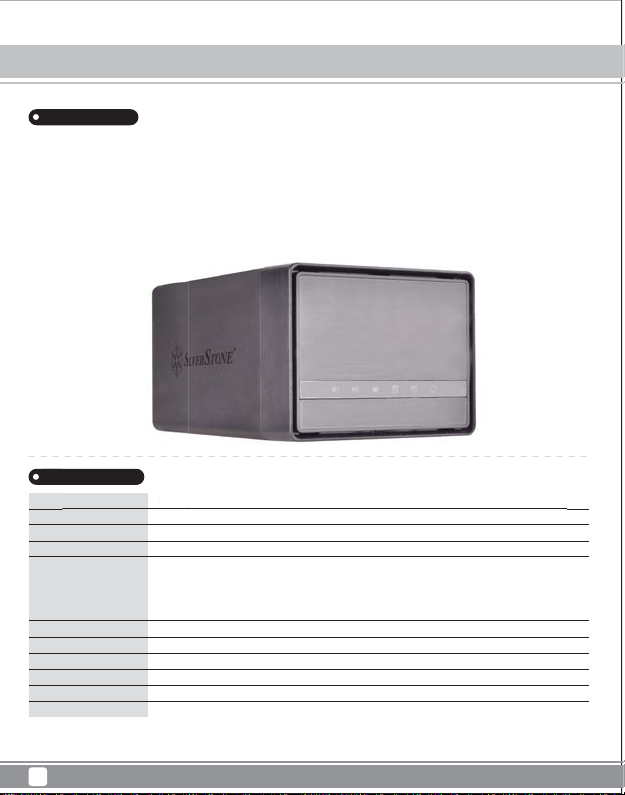
Product Overview
Introduction
With 2.5” drives closing the gap on 3.5” drives in terms of capacity and cost, they are now also viable as solution for backup and desktop
storage while maintaining significant size advantage over 3.5” drives. To capitalize on this changing of trend, SilverStone created the DS222
dual bay 2.5” USB 3.0 RAID enclosure for those looking to use 2.5” HDD or SSD as their storage of choice. DS222 connects to PC via 5Gbps
SuperSpeed USB (USB 3.0) interface for maximum compatibility and stability while its built-in hardware RAID 0/1/BIG modes enable flexible
eed USB (USB 3.0) interface for maximum compatibility and stability while its built-in hardware RAID 0/1/BIG modes enable fl
storage options for variety of usage scenarios. Completed in sturdy aluminum housing, the DS222 is also be surprisingly portable, making it
ptions for variety of usage scenarios. Completed in sturdy aluminum housing, the DS222 is also be surprisingly portable, mak
a good solution for those that need to take their data on the go but require more storage space than typical single drive enclosures.
olution for those that need to take their data on th
Specification
cification
Model
Color
Material
Controller
System Requirements
Drive Support
Enclosure Interface
RAID modes
Power Requirement(Option)
Net Weight
Dimension
SST-DS222
Black
Aluminum body, plastic covers
JMS 561
Microsoft Windows 8.1/8/7(32-bit and 64bit) or future release version
Mac OS X,
Linux
Computer with USB 3.0 or USB 2.0 interface.
2.5” SATA I/II/III HDD or SSD
USB3.0 (Max. 5Gbps) compatible with USB 2.0
RAID 0, RAID 1, BIG, Non-RAID
DC 5V
328g
78.4mm(W) X 61.5mm(H) X 117.2mm(D)
T-DS222
but
uire more st
ace than typical single drive enclosures.
1
Page 3
Drive Storage
1.1 System Requirement
1.1.1 PC
Minimum Intel Pentium III CPU 500MHz, 128MB RAM
Windows XP, Windows Vista, Windows 7, Windows 8/8.1, Linux
Corresponding port on your host device (e.g. USB 3.0/USB 2.0 port)
1.1.2 Mac
Minimum Apple G4 processor, 128MB RAM
Mac OS 10.4 or above
Corresponding port on your host device (e.g. USB 2.0 port*)
1.1.3 Supported Hard Drives
One or two 2.5" SATA-I, SATA-II or SATA-III Hard drives (1.5Gb/s or 3.0Gb/s or 6.0Gb/s) or SSD
Recommend using identical brands, models and capacities hard drives.
Support 2.2TB or above volumes hard drives
1.2 Package Contents
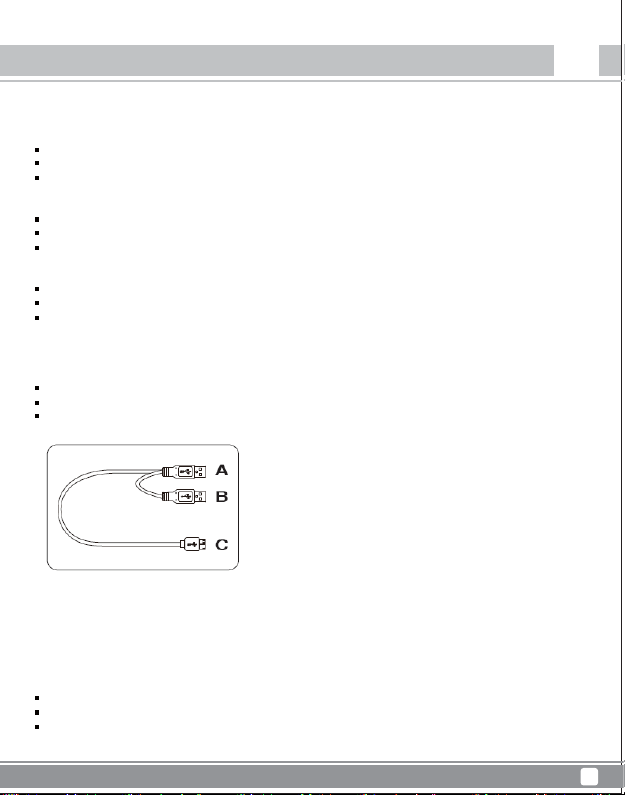
DS222 storage enclosure
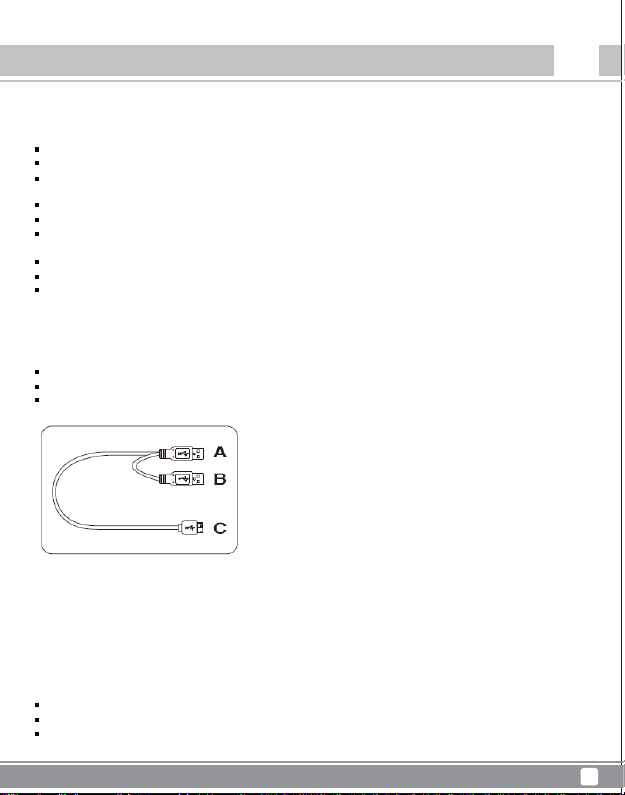
USB 3.0 Y cable
User manual
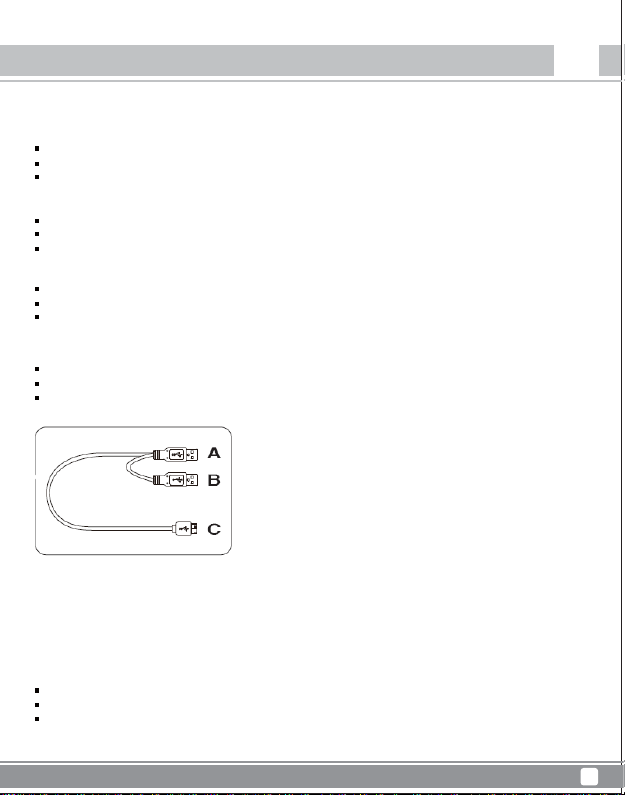
USB 3.0 Y cable:
A. USB 3.0 type A (for Host)
B. For additional power
C. USB 3.0 Micro B type for device
1.3 About this Manual
The manual content may be slightly different from the actual product. Functions and features may change depending on different
firmware versions.
DS222
ENInstruction
1.4 Trademarks
MS-DOS, Microsoft, Windows Vista, 7 & 8/8.1 are trademarks of Microsoft Corporation.
Apple Macintosh and Mac are trademarks of Apple Inc.
All other third party brands and names are the property of their respective owners
2
Page 4
Drive Storage DS222
Instruction
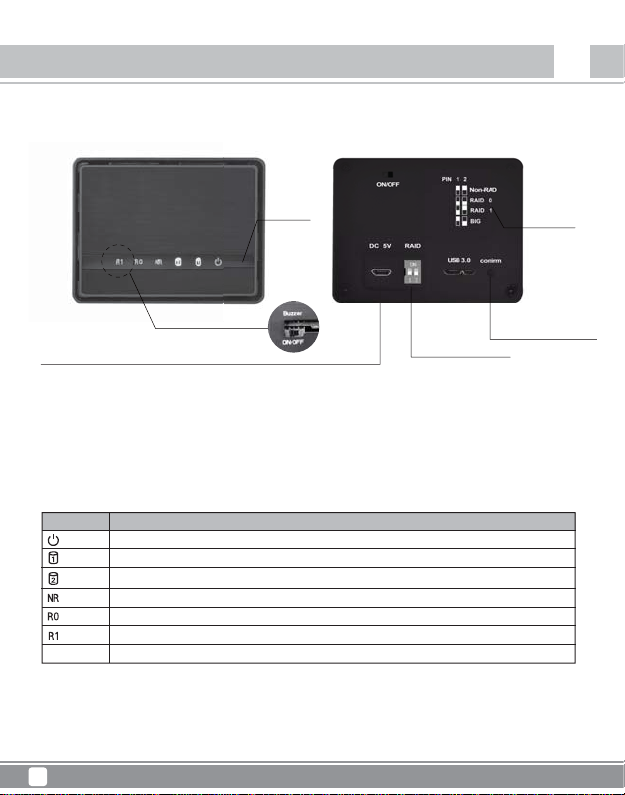
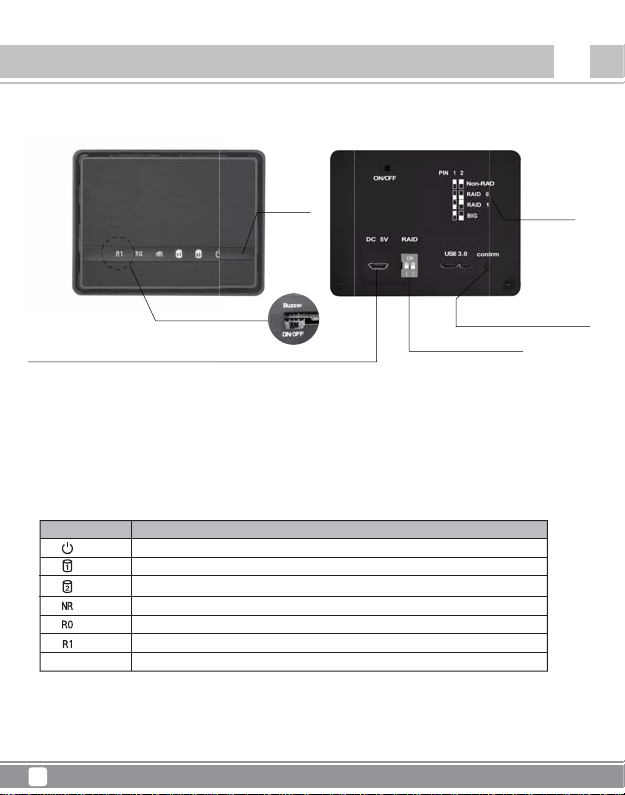
1.5 Detailed View
Front View
EN
Rear View
LED
Buzzer switch
RAID mode change
DC 5V
*If your laptop is unable to support DS222 with full power, please connect the micro-USB 5V/1A mobile phone
charging cable to provide sufficient power for the DS222.
You need to first turn DS222’s power switch off, wait for 3-5 seconds, then turn it back on to connect the
USB 3.0 Y cable and 5V/1A mobile phone charging cable to the DS222.
RAID
indication
Confirm button
for RAID mode change
1.5.1 LED indication
Status
LED
Red = Power on
Power
Blue = hard drive detected , Flashing = Data access (read/write), Off = HDD failed or empty drive bay
HDD1
Blue = hard drive detected , Flashing = Data access (read/write), Off = HDD failed or empty drive bay
HDD2
Yellow = Non-Raid activated.
Non-RAID
Yellow = Raid 0 activated.
RAID 0
Yellow = Raid 1 activated.
RAID 1
N
BIG
R, R0 and R1 = Yellow = total volume of existing one or two hard drives
Note
1. In order to determine if the correct mode is selected, please ensure the RAID switch is in the correct position.
2. If drive failed in any mode, the alarm (buzzer) will sound to warn users.
3
Page 5
Drive Storage DS222
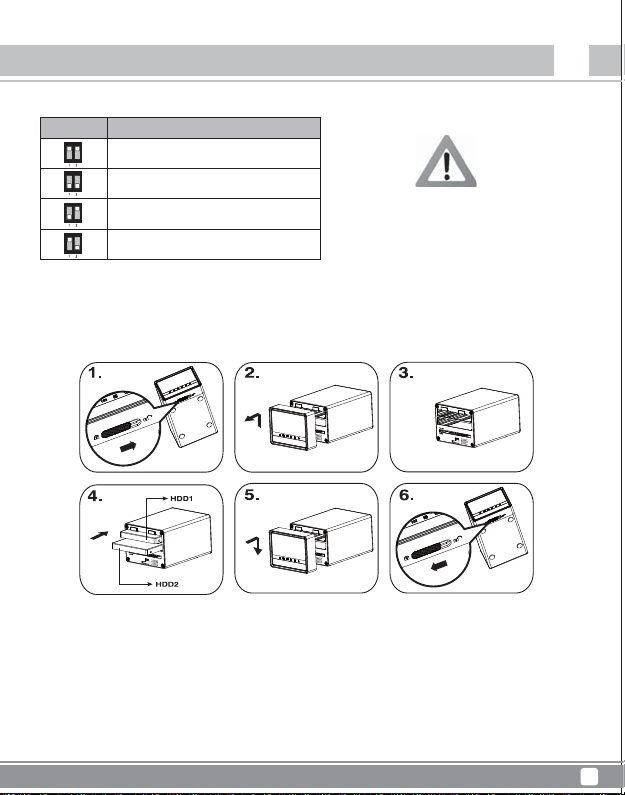
1.5.2 RAID Switch
DIP Switch
Note
Except for the Non-RAID mode, two hard drives are required.
After selecting RAID mode, press the “Confirm button” for 5 seconds to confirm the new setting.
Raid mode
Non-Raid
Switch position: 1 ON, 2 ON
Raid 0 – Striping
Switch position: 1 OFF, 2 OFF
Raid 1 - Mirroring
Switch position: 1 OFF, 2 ON
BIG Mode
Switch position: 1 ON, 2 OFF
Change RAID configuration requires formatting the
hard drives, please backup all data first to prevent
possible data lose.
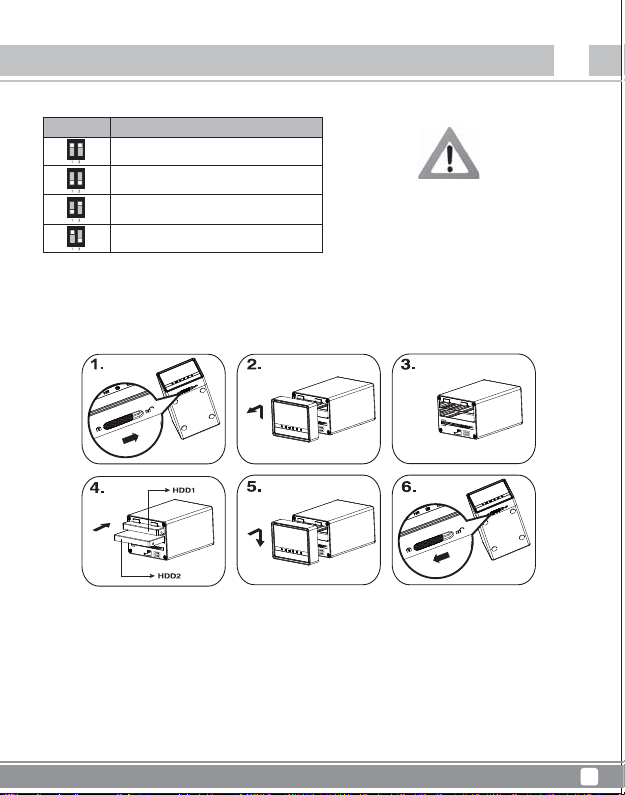
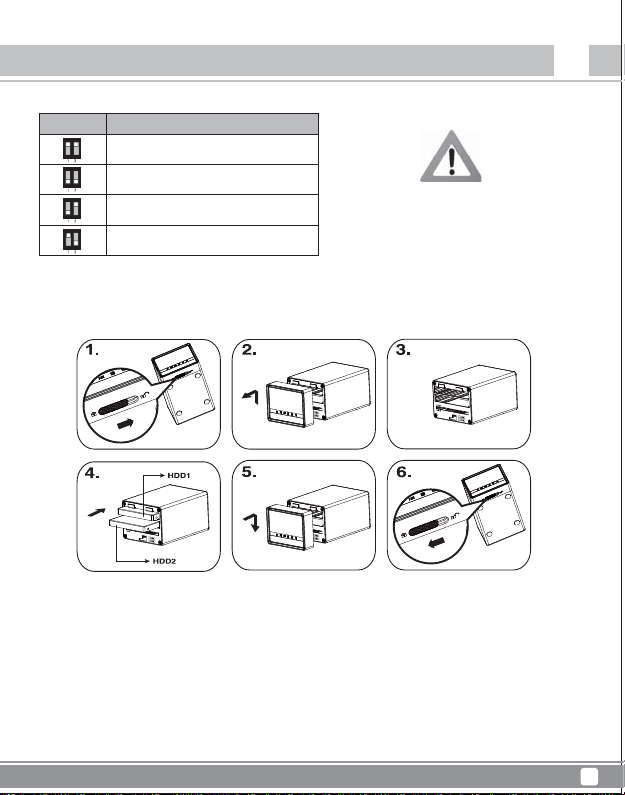
2.1 Hard Drive Assembly
The drives can be installed at any position, there is no specific order required.
1.Unlock the switch at the bottom of the case and lift the front panel upward and away from the housing to remove it.
2.Install the hard drives in the direction as illustrated. Set your preferred RAID mode and then replace the front panel.
※ The default RAID mode is Non-Raid, if you wish to change the RAID mode, please refer to 2.2
3.
Connect USB 3.0 cable to DS222, then plug it into your system.
4.For PC users, use the disk management tool or for Mac users, use the disk utility to create a new partition and format the drives.
5.Done! Your external drive is now ready to use.
※Note
Be careful not to damage any components, and do not force the drives into place.
If they not easily slide into place and fit, make sure the drives have been installed correctly.
Windows 7 or 8.1 can support hard drives in excess of 2.2TB, change the hard drive to GPT partition under disk management in order to
format the hard disk.
※Note: The hard disk with GPT partition need to be reformatted under Windows XP in order to be used.
ENSystem Setup
4
Page 6

Drive Storage DS222
System Setup
2.1.1 Installation step
Installing hard drives for the first time or hard drive fails.
1.Turn the power off and disconnect USB 3.0 cable first, then install hard drive(s) or replace faulty drives (s).
2.Set RAID mode (Non-RAID, RAID 1, RAID 0 or Big mode)。
3.Connect USB 3.0 Y cable to your computer and turn the power on, then press “confirm button” for 5 seconds to confirm the new setting.
*If your laptop is unable to support DS222 with full power, please connect the micro-USB 5V/1A mobile phone
charging cable to provide sufficient power for the DS222.
You need to first turn DS222’s power switch off, wait for 3-5 seconds, then turn it back on to connect the USB 3.0 Y cable and 5V/1A mobile
phone charging cable to the DS222.
4.Installing new hard drives
Ⅰ、For PC users, use the disk management tool
Ⅱ、For Mac users, use the disk utility to create a new partition and format the drives.
5.Installing used hard drives
Ⅰ、For PC users, use the disk management tool.
Ⅱ、For Mac users, use the disk utility to delete the old partition and format the drives.
EN
2.2 RAID Modes Setting
RAID refers to redundant array of independent disks. It is a storage technology that combines multiple disk drive components into a logical unit.
Data is distributed across the drives in one of several ways called "RAID levels", depending on the level of redundancy and performance
required.
2.2.1 Non-RAID
The two hard drives show independent volumes, each drive can be formatted and accessed separately. If one drive fails, the other is
not affected. This mode doesn’t provide any performance or redundancy benefits.
2.2.2 RAID 0 – Disk Stripping
The drives are shown as one single volume, but the size will be two times of the drive with smallest capacities (e.g. If there are two
drives, one is 1TB and the other is 2TB, then the available volume is only 2TB).
RAID 0 will bring faster transfer speed compare to other modes, however, if one hard drive fails then the array will crash.
2.2.3 RAID 1 – Disk Mirroring
The drives are shown as one single volume, but the size will depend on the drives with smallest capacities (e.g. If there are two
drives, one is 1TB and the other is 2TB, then the available volume is only 1TB).
RAID 1 will bring redundancy benefits. RAID 1 mirror one drives data to the other, so when one drive fails, you can still access data
in the other drive, or you can replace the damaged drive to rebuild RAID 1 array.
We strongly recommend replacing the faulty drive immediately to rebuild data and assure continued proper backup and data safety.
5
Page 7
Drive Storage DS222
2.2.3.1 Replace fail drive in RAID 1 Mode
1. Turn the power off and disconnect USB 3.0 Y cable.
2. Take out faulty drive and replace new drive.
* We strongly recommend using new hard drive (the capacity must be equal or larger than the original drive).
If you are using an older hard drive (the capacity must be equal or larger than the original drive), please backup its data if
needed. The rebuild process will automatically overwrite any pre-existing data.
3. Using USB 3.0 Y cable to connect your computer and turn on the power. It will rebuild data automatically.
4. When a rebuilt array is connected to your PC, LED will flash rapidly to indicate data rebuilding process. (The LED will
shows on HDD1 or HDD2, depending on where the replaced HDD/SSD is located.)
5. It will take several hours to rebuild RAID 1 array, depending on your drive capacity. Both HDD1 and HDD2’s LED will turn
steady blue after rebuild is completed.
2.2.4 BIG Mode
Two drives show up as single volume and the total capacity is equal to the combination of two hard drives capacity. If one drive fails,
then the data of two drives will be lost.
3.1 Installation
Before connecting the device, install the hard drives and set RAID mode.
Always follow the correct unplug procedure for external hardware (e.g. Eject in the OS before removal) to avoid risk of data loss.
Do not damage any components and force the drives into place. If the drive is hard to slide in, make sure the SATA connector is
in right position.
Hard drives in excess of 2.2TB require change to GPT partition under disk management in Windows 7,8,8.1 before formatting.
Hard drives with GPT partition need to be reformatted under Windows XP in order to be used.
Do not remove a connected hard drive while the drive is in use.
3.2 Power on/off
We highly recommend turning the device off when the device is not in use.
Please turn off the device when relocating it to prevent hard drives from damage.
ENCaution
3.3 Location
Avoid positioning your device in following places:
Locations with direct sunlight, next to radiators and source of heat.
High temperatures (more than 38℃) or humidity (more than 90%).
Dusty or Sandy places.
Locations subject to vibration, shock, or unstable base.
6
Page 8
Drive Storage DS222
p
f
Caution
areful attention must be paid to the following points in order to prevent damage, fire, and/or injury:
When removing the power cable from the socket, pull on the plug fixture and never on the cord.
o not connect and remove the power cable with wet hands.
eep the power cable away from heaters.
ever try to repair the power cable yourself or to modify it in any way.
the unit is dropped or becomes damaged in any other way, unplug the power cable.
EN
.5 Cables
se only the cables supplied or recommended by your vendor in order to avoid the risk of malfunction, electric shock, and/or possible
nterference to the device.
.6 Data Backu
n order to prevent risk of data lose, we strongly recommend backing up your data in another storage media or device.
Please backup hard drives data be
ore changing RAID mode.
3.7 FAQ
Q: Can I connect this device to a USB 2.0 host?
A: Yes, this device is backwards compatible with USB 2.0.
Q: What file system should I choose to format my drive?
A: This will depend on how you want to use the drive but in general, we recommend:
Windows Vista/7/8/8.1(32-bit, 64-bit)-NTFS
Mac OS X - HFS+ (Mac OS Extended)
To use it on both PC and Mac - FAT32 or exFAT
Q: How many drives can fail before I lose my data?
A: For RAID 0, any drive failure will result in the data being lost. For RAID 1, more than one drive failure at the same time will mean
the data cannot be recovered anymore. For Non-RAID, only the data on the defective drive will be lost. For BIG mode, only data in
the failure hard drive will be lost.
Q: How to access data when one drive fails in RAID 1 mode?
A: If one drive fails in RAID 1 mode, you can still access the data in backup drive directly, there is no need to change RAID mode.
Please note that before you exchange the failed drive, please do not change to other RAID mode or you will not be able to rebuild
RAID 1 array.
7
Page 9
Drive Storage
DS222
DEEinleitung
1.1 Systemanforderungen
1.1.1 PC-Anforderungen
Mindestens Intel Pentium III-CPU mit 500 MHz, 128 MB RAM
Windows XP, Windows Vista, Windows 7, Windows 8 / 8.1, Linux
Ihr Hardwaregerät muss über den entsprechenden Anschluss verfügen (z. B. USB 3,0/2.0-Host-Controller)
1.1.2 Mac-Anforderungen
Mindestens Apple G4-Prozessor, 128 MB RAM
Mac OS 10.4 oder höher
Ihr Hardwaregerät muss über den entsprechenden Anschluss verfügen (z. B. USB 2.0-Host-Controller)
1.1.3 Supported Hard Drives
Eine oder zwei 2,5-Zoll-SATA-I-(1,5 Gb/s) / SATA-II-(3,0 Gb/s) / SATA-III-(6,0 Gb/s)-Festplatten oder SSDs
Es wird empfohlen, Festplatten derselben Marke, desselben Modells und derselben Kapazität zu verwenden.Support
Unterstützt große Laufwerke mit mehr als 2.2 TB
1.2 Lieferumfang
DS222-Speichergehäuse
Schnittstellen Y-kabel(usb 3.0)
Bedienungsanleitung
USB 3.0-Y-Kabel
A. USB 3.0, Typ A (für Host)
B. Für zusätzliche Stromversorgung
C. USB 3.0-Micro-B-Typ für Geräte
1.3 Über dieses Handbuch
Der Inhalt der Anleitung kann leicht vom tatsächlichen Produkt abweichen. Funktionen und Merkmale können sich in Abhängigkeit von
verschiedenen Firmware-Versionen ändern.
1.4 Trademarks
MS-DOS, Microsoft, Windows Vista & 7 & 8 / 8.1 sind Marken der Microsoft Corporation.
Apple Macintosh und Mac sind Marken von Apple Computer.
Alle anderen Marken und Namen Dritter sind Eigentum ihrer jeweiligen Inhaber.
8
Page 10

Drive Storage DS222
Einleitung
1.5 Detaillierte Übersicht
Frontansicht Rückansicht
DE
LED
Summerschalter
DC 5V
*Falls Ihr Notebook das DS222 nicht mit ausreichend Strom versorgen kann, schließen Sie bitte das Micro-USB Mobiltelefon-Ladekabel (5 V/1 A) an.
Wenn Sie das USB 3.0-Y-Kabel und 5-V-/1-A-Mobiltelefon-Ladekabel am DS222 anschließen möchten, müssen
Sie das DS222 zunächst über den Netzschalter ausschalten, 3 bis 5 Sekunden lang warten und das Gerät dann
wieder einschalten.
RAID-Modus ändern
RAID-Indikation
Bestätigungstaste
zur RAIDModusänderung
1.5.1 LED-Anzeige
LED
Status
Rot=Eingeschaltet
Power
Blau = Festplatte erkannt Blinkt = Datenzugriff (Lesen/Schreiben), aus = leerer Laufwerkseinschub
HDD1
Blau = Festplatte erkannt Blinkt = Datenzugriff (Lesen/Schreiben), aus = leerer Laufwerkseinschub
HDD2
Gelb = Non-raid aktiviert
Non-RAID
Gelb = Raid 0 aktiviert
RAID 0
Gelb = Raid 1 aktiviert
RAID 1
NR, RO und R1 = Gelb = Gesamt-Volume der vorhandenen einen oder zwei Festplatten
BIG
Hinweis
1.Stellen Sie zur Prüfung der Modusauswahl sicher, dass sich der RAID-Schalter in der richtigen Position befindet.
2. Wenn ein Laufwerk in einem beliebigen Modus ausfällt, werden Sie über einen Summer alarmiert.
9
Page 11
Drive Storage DS222
DESystemeinrichtung
1.5.2 RAID-Schalter
DIP Switch
Hinweis
Außer im Non-RAID-Modus werden zwei Festplatten benötigt.
Halten Sie nach Auswahl des RAID-Modus zur Bestätigung der neuen Einstellung die „Bestätigungstaste“ 5 Sekunden gedrückt.
2.1 Hard Drive Assembly
Die Festplatten können in jeder Position installiert werden; die Reihenfolge spielt keine Rolle.
1. Entsperren Sie den Schalter an der Unterseite des Gehäuses; heben Sie die vordere Blende an und vom Gehäuse weg. Entfernen Sie sie.
2. Installieren Sie die Festplatten in der abgebildeten Ausrichtung.Stellen Sie Ihren gewünschten RAID-Modus ein, befestigen Sie dann wieder
die vordere Blende.
* Der Standard-RAID-Modus ist Non-RAID; falls Sie den RAID-Modus ändern möchten, halten Sie sich bitte an 2.2
3. Schließen Sie das USB-3.0-Kabel an den DS222, dann an den Computer an.
4. Verwenden Sie zum Erstellen einer neuen Partition und Formatieren der Festplatten das Festplatten ver waltungswerkzeug (PC-Benutzer)
bzw. das Festplattendienstprogramm (Mac-Benutzer).
5. Fertig! Ihre externe Festplatte ist nun betriebsbereit.
Hinweis
Achten Sie darauf, keine Komponenten zu beschädigen; schieben Sie die Festplatten nicht mit Gewalt hinein. Wenn Sie sich nicht problemlos
hineinschieben lassen, prüfen Sie, ob sie korrekt installiert sind. Windows 7 / 8.1 kann Festplatten über 2,2 TB unterstützen; ändern Sie die
Festplatte über die Festplattenverwaltung
in eine GPT-Partition, damit Sie die Festplatte formatieren können.
Non-Raid
Schalterposition: 1 ein, 2 ein
Raid 0 – Striping
Schalterposition: 1 aus, 2 aus
Raid 1 – Mirroring
Schalterposition: 1 aus, 2 ein
BIG-Modus – BIG (max. Kapazität)
Schalterposition: 1 ein, 2 aus
Raid mode
Eine Änderung des RAID-Modus erfordert die
Formatierung der Festplatten. Achten Sie darauf,
zuvor alle darauf befindlichen Daten zu sichern!
10
Page 12
Drive Storage DS222
Systemeinrichtung
Hinweis
Die Festplatte mit GPT-Partition muss unter Windows XP zur Nutzung neu formatiert werden.
2.1.1 Installation Schritt
Erstmalige Installation von Festplatten oder Festplattenfehler.
1.Schalten Sie das Gerät zunächst aus und ziehen Sie das USB 3.0-Kabel; installieren Sie dann die Festplatte(n) oder ersetzen
Sie das bzw. die defekten Laufwerke.
2.Stellen Sie den RAID-Modus ein (Non-RAID, RAID 1, RAID 0 oder Big-Modus).
3.Schließen Sie das USB 3.0-Y-Kabel an Ihrem Computer an und schalten Sie das Gerät ein; halten Sie dann zur Bestätigung
der neuen Einstellung die Bestätigungstaste 5 Sekunden lang gedrückt.
*Falls Ihr Notebook das DS222 nicht mit ausreichend Strom versorgen kann, schließen Sie bitte das Micro-USB-Mobiltelefon Ladekabel (5 V/1 A) an.
Wenn Sie das USB 3.0-Y-Kabel und 5-V-/1-A-Mobiltelefon-Ladekabel am DS222 anschließen möchten, müssen Sie das DS222
zunächst über den Netzschalter ausschalten, 3 bis 5 Sekunden lang warten und das Gerät dann wieder einschalten.
4.Neue Festplatten installieren
Ⅰ. PC-Nutzer verwenden das Datenträgerverwaltungswerkzeug
Ⅱ. Mac-Nutzer verwenden das Festplattendienstprogramm zur Erstellung einer neuen Partition und zur Formatierung der
Laufwerke
5.Bereits verwendete Festplatten installieren
Ⅰ. PC-Nutzer verwenden das Datenträgerverwaltungswerkzeug
Ⅱ. Mac-Nutzer verwenden das Festplattendienstprogramm zur Löschung der alten Partition und zur Formatierung der Laufwerke
DE
2.2 RAID-Moduseinstellungen
RAID steht für Redundant Array of Independent Disks. Es handelt sich dabei um eine Speichertechnologie, die mehrere
Festplattenkomponenten in einer logischen Einheit kombiniert. Daten werden je nach erforderlicher Redundanz und Leistung auf eine von
mehreren Weisen („RAID-Level“ genannt) zwischen den Festplatten verteilt.
2.2.1 Non-RAID
Die beiden Festplatten zeigen unabhängige Volumes, jedes Laufwerk kann separat formatiert und abgerufen werden. Wenn eine
Festplatte ausfällt, ist die andere davon nicht betroffen. Dieser Modus bietet keine Leistungs- oder Redundanzvorteile.
2.2.2 RAID 0 – Disk Stripping
Die Festplatten werden als ein einziges Volume angezeigt; die Größe entspricht dem Doppelten der Festplatte mit der geringsten
Kapazität (wenn Sie z. B. zwei Festplatten verwenden, von denen eine 1 TB und die andere 2 TB aufweist, ist das verfügbare
Volume nur 2 TB groß).
RAID 0 bietet schnellere Transfergeschwindigkeiten im Vergleich zu anderen Modi; falls jedoch eine Festplatte ausfällt, bricht das
Array zusammen.
2.2.3 RAID 1 – Disk Mirroring
Die Festplatten werden als ein einziges Volume angezeigt; die Größe ist von den Festplatten mit der geringsten Kapazität abhängig
(wenn Sie z. B. zwei Festplatten verwenden, von denen eine 1 TB und die andere 2 TB aufweist, ist das verfügbare Volume nur
1 TB groß).
RAID 1 bietet Redundanzvorteile. RAID 1 spiegelt die Daten einer Festplatte auf einer anderen; wenn also eine Festplatte ausfällt,
können Sie immer noch auf die Daten auf der anderen Festplatte zugreifen; zudem können Sie die beschädigte Festplatte zum
Wiederaufbau des RAID 1-Arrays ersetzen.
11
Page 13
Drive Storage DS222
Sie sollten das ausgefallene Laufwerk zum Wiederaufbau der Daten und zur Gewährleistung einer kontinuierlichen Sicherung so
bald wie möglich ersetzen.
2.2.3.1 Ausgefallene Festplatte im RAID1-Modus ersetzen
1.Schalten Sie das Gerät aus und ziehen Sie das USB 3.0-Y-Kabel.
2. Nehmen Sie das ausgefallene Laufwerk heraus und ersetzen Sie es durch ein neues.
* Sie sollten nach Möglichkeit eine neue Festplatte verwenden (die Kapazität muss größer oder gleich der des Originaldatenträgers
sein). Wenn Sie eine ältere Festplatte verwenden (die Kapazität muss größer oder gleich der des Originaldatenträgers sein),
sichern Sie erforderlichenfalls bitte zunächst deren Daten. Beim Wiederaufbau werden automatisch alle vorhandenen Daten
überschrieben.
3. Schließen Sie Ihren Computer über das USB 3.0-Y-Kabel an und schalten Sie das Gerät ein. Die Daten werden automatisch
wieder aufgebaut.
4. Wenn ein wiederaufgebautes Array an Ihrem PC angeschlossen wird, blinkt die LED zur Anzeige des Datenwiederaufbaus
schnell. (Die LED von HDD1 oder HDD2 leuchtet – je nachdem, wo sich die ersetzte Festplatte/SSD befindet.)
5. Der Wiederaufbau des RAID 1-Arrays dauert je nach Festplattenkapazität mehrere Stunden. Die LEDs von HDD1 und HDD2
leuchten nach Abschluss des Wiederaufbaus konstant blau.
2.2.4 BIG-Modus
Zwei Festplatten werden als einzelnes Volume angezeigt, und die Gesamtkapazität entspricht der Kombination der Kapazitäten der
beiden Festplatten. Falls eine Festplatte ausfällt, gehen die Daten beider Festplatten verloren.
3.1 Installation
Installieren Sie vor dem Anschließen des Geräts die Festplatten; stellen Sie den RAID-Modus ein.
Befolgen Sie zur Vermeidung von Datenverlust immer das richtige Auswurfverfahren für externe Hardware
(z. B. Auswerfen im Betriebssystem vor Entfernen).
Beschädigen Sie keine Komponenten, setzen Sie die Festplatten nicht mit Gewalt ein. Falls sich die Festplatte nur schwer
einschieben lässt, achten Sie darauf, dass sich der SATA-Anschluss in der richtigen Position befindet.
Festplatten mit mehr als 2,2 TB erfordern unter Windows 7 und 8 / 8.1 vor der Formatierung eine GPT-Partitionierung mittels
Festplattenverwaltung.
Festplatten mit GPT-Partition müssen zur Nutzung unter Windows XP neu formatiert werden.
Entfernen Sie eine angeschlossene Festplatte nicht, während auf sie zugegriffen wird.
3.2 Ein-/Ausschalten
Wir empfehlen dringend, das Gerät abzuschalten, wenn es nicht benutzt wird.
Bitte schalten Sie das Gerät aus, wenn Sie es an eine andere Stelle verlagern, damit die Festplatten nicht beschädigt werden.
DEAchtung
3.3 Standort und Vorsichtsmaßnahmen beim Aufstellen
Vermeiden Stellen Sie das Gerät nicht an folgenden Orten auf:
Im direkten Sonnenlicht, neben Heizkörpern oder anderen Wärmequellen.
An Orten mit hohen Temperaturen (mehr als 38 °C) oder hoher Luftfeuchtigkeit (mehr als 90 %).
An sehr staubigen oder sandigen Orte.
An Orten, die Erschütterungen oder Stößen ausgesetzt sind; auf schrägem Untergrund.
12
Page 14
Drive Storage DS222
g
g
A
Achtung
.4 Elektrizität und Netzstecker
chten Sie zur Vermeidung von Schäden, Brandgefahr und/oder Verletzungen auf folgende Punkte:
assen Sie das Netzkabel am Stecker, nicht am Kabel, wenn Sie es aus der Steckdose ziehen.
erbinden oder trennen Sie das Netzkabel nicht mit feuchten oder gar nassen Händen.
alten Sie das Netzkabel von Heizkörpern fern.
ersuchen Sie niemals, das Netzkabel selbst zu reparieren oder in ir
iehen Sie das Netzkabel, wenn das Gerät heruntergefallen ist oder anderweitig beschädigt wurde.
.5 Kabel
erwenden Sie nur die mitgelieferten oder vom Händler empfohlenen Kabel; dadurch vermeiden Sie die Gefahr von Fehlfunktionen,
tromschlägen und/oder mögliche Störungen mit anderen Geräten.
.6 Datensicherun
ur Verhinderung von Datenverlust raten wir Ihnen dringend, Ihre Daten auf einem anderen Speichermedium oder Gerät zu sichern.
itte sichern Sie Festplattendaten vor der Änderung des RAID-Modus.
3.7 Häufig gestellte Fragen
F: Kann ich dieses Gerät an einem USB 2.0-Host anschließen?
A: Ja, dieses Gerät ist mit USB 2.0 abwärtskompatibel.
F: Welches Dateisytem soll ich zum Formatieren meiner Festplatte wählen?
A: Dies hängt davon ab, wie Sie die Festplatte nutzen möchten; im Allgemeinen empfehlen wir jedoch:
Windows Vista/7/8/8.1 (32-bit, 64-bit) -NTFS
Mac OS X HFS+ (Mac OS Extended)
Zur Nutzung sowohl an PC als auch an Mac – FAT32 oder exFAT
F: Wie viele Festplatten können ausfallen, bevor ich meine Daten verliere?
A: Bei RAID 0: Jeder Festplattenfehler führt zu Datenverlust. Bei RAID 1: Mehr als ein Festplattenfehler
zur gleichen Zeit bedeutet, dass die Daten nicht mehr wiederhergestellt werden können.
Bei Non-RAID: Nur die Daten auf der defekten Festplatte gehen verloren. Beim BIG-Modus gehen nur Daten auf der defekten
Festplatte verloren.
F: Wie kann ich auf Daten zugreifen, wenn eine Festplatte im RAID 1-Modus ausfällt?
A: Falls eine Festplatte im RAID 1-Modus ausfällt, können Sie immer noch direkt auf die Daten im Sicherungslaufwerk zugreifen;
Sie müssen den RAID-Modus nicht ändern. Bitte achten Sie darauf, vor Austausch der defekten Festplatten nicht zu einem anderen
RAID-Modus zu wechseln; andernfalls können Sie das RAID 1-Array nicht wiederaufbauen.
endeiner Weise zu modifizieren.
DE
13
Page 15
Drive Storage
DS222
1.1 Requisitos del sistema
1.1.1 Requisitos para PC
Mínimo CPU Intel Pentium III 500 Mhz, 128MB RAM
Windows XP, Windows Vista, Windows 7, Windows 8 / 8.1, Linux
Su dispositivo debe tener el puerto correspondiente (controlador para USB 3.0/2.0)
1.1.2 Requisitos para Mac
Mínimo procesador Apple G4, 128MB RAM
SO Mac 10.4 ó superior
Su dispositivo debe tener el puerto correspondiente (controlador para USB 3.0/2.0)
1.1.3 Supported Hard Drives
Uno o dos discos duros o SSD SATA-I de 2,5” (1,5 Gb/s) / SATA-II (3,0 Gb/s) / SATA-III (6,0 Gb/s)
Se recomienda usar dos discos duros de idénticos fabricantes, modelos y capacidades
Support 2.2TB or above volumes hard drives
1.2 Package Contents
Carcasa de almacenamiento DS222 (discos duros no incluidos)
Cable Y de conexión(usb3.0)
Manual de usuario
USB 3.0 cable Y
A. USB 3.0 tipo A (para Host)
B. Para potencia adicional
C. USB 3.0 tipo Micro B para el dispositivo
1.3 Sobre este manual
El contenido podría ser algo diferente del producto real. Funciones y características podrían cambiar dependiendo de las diferentes
versiones de firmware.
ESIntroducción
1.4 Marcas registradas
MS-DOS, Microsoft, Windows Vista y 7&8 / 8.1 son marcas registradas de la Corporación Microsoft
Apple Macintosh y Mac son marcas registradas de Apple Computer
Todas las marcas y nombres de terceros son propiedad de sus respectivos dueños
14
Page 16
Drive Storage DS222
Introducción
1.5 Vista detallada
Vista frontal Vista trasera
ES
RAID
indication
Interruptor del zumbador
LED
Botón de confirmación para
cambio de modo RAID
Cambio de modo RAID
DC 5V
*Si su portátil es incapaz de aceptar el DS222 a plena potencia, por favor conecte el cable de carga para móvil micro-USB 5V/1A para
proporcionar suficiente potencia para el DS222.
Primero debe apagar el DS222, esperar 3-5 segundos, luego volver a encenderlo para conectar el cable Y USB 3.0 y el cable de carga para
móvil de 5V/1A al DS222.
1.5.1 Indicador LED
Para poder determinar si está seleccionado el modo correcto, por favor asegúrese de que el interruptor RAID está en la posición correcta.
LED
Status
Rojo = Potencia conectada
Power
HDD1
Azul = disco duro detectado, Parpadeante = acceso a datos (lectura/escritura), OFF = bahía de dispositivo vacía
HDD2
Azul = disco duro detectado, Parpadeante = acceso a datos (lectura/escritura), OFF = bahía de dispositivo vacía
Non-RAID
Yellow = Non-raid activated
RAID 0
Yellow = Raid 0 activated
RAID 1
Yellow = Raid 1 activated
BIG
Nota
1.Para determinar si está seleccionado el modo correcto, por favor asegúrese de que el interruptor RAID está en la posición correcta.
2. Si el dispositivo falló en cualquier modo, la alarma (zumbador) sonará para avisar al usuario.
15
NR, R0 y R1 = Amarillo = volumen total de uno o dos discos duros existentes
Page 17
Drive Storage DS222
ESConfiguración del sistema
1.5.2 RAID Switch
Interruptor DIP
Nota
Excepto por el modo No-RAID, hacen falta dos discos duros.
Tras seleccionar el modo RAID, presione el “botón de confirmación” durante 5 segundos para confirmar la nueva configuración.
Posición de interruptor
No-RAID: 1 ON, 2 ON
Posición de interruptor RAID 0
Bandas: 1 OFF, 2 OFF
Posición de interruptor RAID 1
Espejo: 1 OFF, 2 ON
Modo BIG – BIG (Máx, volumen)
Posición del interruptor: 1 ON, 2 OFF
2.1 Montaje de los discos duros
Los discos se pueden instalar en cualquier posición, no es necesario un orden específico.
1. Abra el cierre del inferior de la carcasa y retire el panel frontal hacia arriba y fuera de la carcasa para retirarla.
2. Instale los discos duros en la dirección que se muestra. Elija su modo RAID preferido y luego reemplace el panel frontal.
※El modo RAID por defecto es No-Raid, si desea cambiar el modo RAID, por favor consulte 2.2
3. Conecte un cable USB 3.0 con el DS222 que se enchufe a su sistema
4. Para los usuarios de PC, use la herramienta de administración de discos y para los de Mac, use la utilidad de discos para crear una nueva
partición y formatee los discos.
5. ¡Terminado! Su dispositivo externo está listo para ser usado.
※ Nota Tenga cuidado de no dañar ningún componente y no forzar los discos al meterlos. Si no se deslizan y encajan, asegúrese de que los
está instalando correctamente. Windows 7 / 8.1 puede aceptar discos duros de más de 2,2TB, cambie el disco duro a una partición GPT
usando el administrador de dispositivos para cambiar el formato del disco duro.
※Nota El disco duro con la partición GPT necesita ser reformateado en Windows XP para poder ser usado
Modo RAID
Cambiar el modo RAID require formatear los
dispositivos. ¡Asegúrese de hacer primero una
copia de seguridad de todos los datos existentes!
16
Page 18
Page 19
Drive Storage DS222
Le recomendamos encarecidamente que reemplace de inmediato el disco con la falla para reconstruir los datos y asegurar una
copia de seguridad adecuada y la seguridad de los datos.
2.2.3.1 Reemplazar un disco con fallos en modo RAID1
Cómo reemplazar un disco dañado y reconstruir una matriz RAID 1 si el disco HDD2 falla
1. Retire el disco duro dañado HDD2
2. Instale un nuevo disco en la posición del HDD2
3. El LED del disco fuente empezará a parpadear rápidamente y el LED del disco de destino parpadeará lentamente,
lo que muestra que el DS222 está reconstruyendo la matriz RAID 1.
4. Harán falta varias horas para reconstruir la matriz RAID 1, dependiendo de la capacidad de su disco duro.
5. Los LED HDD1 y HDD2 se volverán azul fijo tras terminar
NOTA: Por favor, asegúrese de que la capacidad del nuevo disco es igual o mayor que el disco origen.
Aún podrá usar el DS222 cuando reconstruya la matriz RAID 1
2.2.4 Modo BIG
Dos discos aparecerán como un único volumen y la capacidad total será igual a la combinación de la capacidad de los dos discos
duros. Si un disco falla, entonces los datos de los dos discos se perderán.
3.1 Instalación
Antes de conectar el dispositivo, instale los discos duros y configure el modo RAID.
Siga siempre el procedimiento de desconectado correcto para hardware externo (Expulse en el SO antes de quitarlo)
para evitar riesgo de pérdida de datos.
No dañe ningún componente o fuerce los discos a entrar. Si cuesta deslizar el disco, asegúrese de que el conector SATA está en
la posición correcta.
Los discos duros de más de 2,2TB necesitan cambiar a partición GPT en el administrador de discos en Windows 7 y 8 / 8.1 antes
de formatear.
Los discos duros con partición GPT necesitan ser reformateados en Windows XP para poder ser usados.
No retire un disco duro conectado mientras esté usando el disco.
3.2 Encendido/Apagado
Le recomendamos encarecidamente apagar el dispositivo cuando no esté en uso.
Por favor, apague el dispositivo cuando lo cambie de lugar para evitar daños a los discos duros.
ESATENCIÓN
3.3 Precauciones sobre la colocación
Evite situar su dispositivo en los siguientes lugares:
Lugares con luz solar directa, cerca de radiadores, otras fuentes de calor.
Lugares con temperaturas muy altas (más de 38ºC) ó humedad (más del 90%).
Lugares sucios ó polvorientos.
Lugares que vibren, se muevan ó sean deslizantes.
18
Page 20
Page 21

Drive Storage
DS222
FRInstruction
1.1 Configuration système requise
1.1.1 Configuration PC requise
Processeur Intel Pentium III 500MHz, 128MB RAM minimum
Windows XP, Windows Vista, Windows 7, Windows 8 / 8.1, Linux
Votre périphérique doit posséder un bon port correspondant (par ex. contrôleur d'hôte USB 3.0/2.0)
1.1.2 Configuration Mac requise
Processeur Apple G4, 128MB RAM minimum
Mac OS 10.4 ou ultérieur
Votre périphérique doit posséder un bon port correspondant (par ex. contrôleur d'hôte USB 2.0)
1.1.3 Disques durs supportés
Un (ou deux) disque(s) dur(s) ou SSD au format 2.5 pouces SATA-I (1.5 Gb/s) / SATA-II (3.0 Gb/s) / SATA-III (6.0 Gb/s)
Nous recommandons l'utilisation de marques, modèles et disques durs de capacités identiques.
Support des gros volumes de plus de 2.2 To.
1.2 Contenu de la boîte
Boîtier de stockage DS222 (disques durs pas inclus)
Et Câble d'interface(usb 3.0)
Manuel de l'utilisateur
Câble USB 3.0 Y
A. USB 3.0 type A (pour hôte)
B. Pour alimentation supplémentaire
C. USB 3.0 type Micro B pour appareil
1.3 A propos de ce manuel
Le contenu du manuel peut varier légèrement du produit à proprement dit. Les fonctions et les caractéristiques peuvent varier en fonction
des versions du firmware.
1.4 Marque commerciales
MS-DOS, Microsoft, Windows Vista & 7 & 8 / 8.1sont des marques déposées de Microsoft Corporation.
Apple Macintosh et Mac sont des marques déposées de Apple Computer.
Toutes les autres marques et noms sont la propriété de leurs propriétaires respectifs.
20
Page 22

Drive Storage DS222
Instruction
FR
1.5 Vue détaillée
DC 5V
*Si votre ordinateur portable ne peut pas prendre en charge DS222 avec la pleine puissance, veuillez connecter le câble de chargement
micro-USB 5 V/1 A pour téléphone portable afin de fournir une alimentation suffisante au DS222.Vous devez d'abord positionner l'interrupteur
d'alimentation du DS222 sur arrêt, attendre pendant 3 à 5 secondes, puis le remettre sous tension pour connecter le câble USB 3.0 Y et le
câble de chargement 5 V/1 A pour téléphone portable au DS222.
Vue de devant Vue de derrière
LED
Bouton de sonnerie
Changement de
mode RAID
Indicateur
RAID
Bouton de confirmation du
changement de mode RAID
1.5.1 Voyant DEL
Pour pouvoir déterminer si le mode correct a été choisi, veuillez vous assurer que le commutateur RAID est en position correcte.
LED
Status
Rouge = Allumé
Power
Bleu = disque dur détecté, Clignotant=accès aux données (lire/écrire),OFF=baie de pilote vide
HDD1
Bleu = disque dur détecté, Clignotant=accès aux données (lire/écrire),OFF=baie de pilote vide
HDD2
Jaune = Non-raid activé
Non-RAID
Jaune = Raid 0 activé
RAID 0
Jaune = Raid 1 activé
RAID 1
NR, R0, R1 = Jaune = volume total de un ou deux disques durs existants
BIG
Remarque
1. Afin de déterminer si le mode correct a été sélectionné, assurez-vous que le bouton RAID est dans la bonne position.
2. Si le lecteur est tombé en panne dans n'importe quel mode, l'alarme (avertisseur sonore) retentit pour alerter les utilisateurs.
21
Page 23

Drive Storage DS222
1.5.2 Interrupteur RAID
Bouton DIP
Remarque
Sauf pour le mode Non-RAID, deux disques durs sont requis.
Après avoir sélectionné le mode RAID, restez appuyé pendant cinq secondes sur le bouton “Confirm” afin de confirmer le nouveau réglage.
Non-RAID
Position du bouton: 1 ALLUME, 2 ALLUME
RAID 0 - Striping
Position du bouton: 1 ETEINT, 2 ETEINT
RAID 1 - Mirroring
Position du bouton: 1 ETEINT, 2 ALLUME
Mode BIG – BIG (max, volume)
Position du bouton : 1 ALLUMÉ, 2 ETEINT
Le changement du mode RAID necessite le formatage
des disques.Assurez-vous en premier que les donnees
ont toutes ete sauvegardees.
2.1 Assemblage des disques durs
FR Réglage du système
1. Ouvrez le bouton en bas du boîtier et soulevez le panneau frontal vers le haut et à l'écart du boîtier pour l'enlever.
2. Installez les disques durs dans la direction comme illustrée. Réglez votre mode RAID préféré puis changez le panneau frontal.
※Le mode RAID par défaut est Non-Raid, si vous souhaitez changer le mode RAID, veuillez vous reporter à 2.2
3. Connecter un câble USB 3.0 avec DS222 qui se connecte à votre système.
4. Les utilisateurs de PC peuvent utiliser l'utilitaire de gestion des disques, et les utilisateurs de Mac peuvent utiliser l'utilitaire de disque,
pour creer une nouvelle partition et formater les disques.
5. Terminé ! Votre disque externe est maintenant prêt à être utilisé.
22
Page 24

Drive Storage DS222
Réglage du système
2.1.1 Installation étape
Installer des disques durs pour la première fois ou lors d'une panne du disque dur.
1.Mettez hors tension et débranchez le câble USB 3.0 dans un premier temps, puis installez le(s) disque(s) dur(s) ou remplacez le(s)
lecteur(s) en panne.
2.Définissez le mode RAID (Non-RAID, RAID 1, RAID 0 ou mode Big).
3.Raccordez le câble USB 3.0 Y à votre ordinateur et mettez sous tension, puis appuyez sur le « bouton confirmer » pendant
5 secondes pour confirmer le nouveau paramétrage.
*Si votre ordinateur portable ne peut pas prendre en charge DS222 avec la pleine puissance, veuillez connecter le câble de
chargement micro-USB 5 V/1 A pour téléphone portable afin de fournir une alimentation suffisante au DS222.Vous devez d'abord
positionner l'interrupteur d'alimentation du DS222 sur arrêt, attendre pendant 3 à 5 secondes, puis le remettre sous tension pour
connecter le câble USB 3.0 Y et le câble de chargement 5 V/1 A pour téléphone portable au DS222.
4.Installation de disques durs neufs
Ⅰ、Les utilisateurs de PC peuvent utiliser l'utilitaire de gestion des disques
Ⅱ、Les utilisateurs de Mac peuvent utiliser l'utilitaire de disque pour créer une nouvelle partition et formater les disques.
5.Installation de disques durs usagés
Ⅰ、Les utilisateurs de PC peuvent utiliser l'utilitaire de gestion des disques.
Ⅱ、Les utilisateurs de Mac peuvent utiliser l'utilitaire de disque pour supprimer l'ancienne partition et formater les disques.
FR
2.2 Configuration des modes RAID
Le terme « RAID » se réfère à une matrice redondante de disques indépendants. C'est une technologie de stockage qui combine plusieurs
composants de disques durs dans une unité logique. Les données sont réparties en plusieurs architectures différentes s'intitulant « niveaux
de RAID », selon le niveau de redondance et de performance exigées.
2.2.1 Non-RAID
Les deux disques durs affichent des volumes indépendants, chaque disque peut être formaté et on peut y avoir accès séparément.
Si un disque tombe en panne, l'autre ne sera pas affecté. Ce mode n'offre aucun avantage de performance ni de redondance.
2.2.2 RAID 0 – Disk Stripping
Les disques sont combinés pour ne faire qu'un seul volume, mais sa taille sera deux fois plus grande que celle du disque doté de la
capacité la plus petite (par ex., s'il y a deux disques, l'un est de 1 To et l'autre est de 2 To, alors le volume disponible équivaudra
seulement à 2 To).
RAID 0 offre un débit de transfert plus rapide par rapport aux autres modes, toutefois si un disque dur tombe en panne, la matrice
entière tombe en panne.
2.2.3 RAID 1 – Disk Mirroring
Les disques sont combinés pour ne faire qu'un seul volume, mais la taille sera basée sur le disque doté de la plus petite capacité
(par ex., s'il y a deux disques, l'un est de 1 To et l'autre est de 2 To, alors le volume disponible équivaudra seulement à 1 To).
RAID 1 offre des avantages de redondance. RAID 1 est une mise en miroir des données d'un disque sur un autre, ainsi lorsqu'un
disque est défaillant, vous pouvez quand-même accéder à ses données dans l'autre disque, ou vous pouvez remplacer le disque
endommagé pour reconstruire une matrice RAID 1.
Nous conseillons vivement de remplacer immédiatement le lecteur défectueux pour reconstruire les données et assurer une
sauvegarde et une sécurité des données appropriées en continu.
23
Page 25

Drive Storage DS222
2.2.3.1 Faire passer le lecteur en échec en mode RAID1
1. Mettez hors tension et débranchez le câble USB 3.0 Y.
2. Retirez le lecteur défectueux et remplacez-le par un lecteur neuf.
* Nous conseillons vivement d'utiliser un disque dur neuf (la capacité doit être supérieure ou égale à celle du lecteur d'origine).
Si vous utilisez un ancien disque dur (la capacité doit être supérieure ou égale à celle du lecteur d'origine), veuillez sauvegarder
ses données si nécessaire. Le processus de reconstruction écrasera automatiquement toutes les données pré-existantes.
3. Utilisez un câble USB 3.0 Y pour connecter votre ordinateur et mettez sous tension. Cela reconstruira les données
automatiquement.
4. Si un ensemble reconstruit est connecté à votre PC, la DEL clignote rapidement pour indiquer le processus de reconstruction
des données. (La DEL s'affiche sur HDD1 ou HDD2, en fonction de l'emplacement du disque dur/SSD remplacé)
5. Il faudra plusieurs heures pour reconstruire la matrice RAID 1 en fonction de la capacité de votre disque. Les voyants DEL
HDD1 et HDD2 deviennent bleu fixe une fois la reconstruction terminée.
2.2.4 Mode BIG
Deux disques sont combinés pour ne faire qu'un seul volume et la capacité totale est égale à la capacité combinée des deux
disques durs. Si un disque tombe en panne, les données des deux disques seront perdues.
3.1 Installation
Avant de connecter l'appareil, installez les disques durs et réglez le mode RAID.
Il faut toujours suivre la procédure correcte de débranchement pour le matériel externe (par ex., éjecter le SE avant le retrait)
pour éviter une perte de données.
N'endommagez aucun des composants et ne forcez pas les disques en place. Si vous éprouvez des difficultés à glisser le disque
en place, assurez-vous que le connecteur SATA est placé correctement.
Les disques durs dépassant 2,2 To requièrent un changement vers une partition GPT dans la gestion des disques sous
Windows 7 et 8 / 8.1 et avant le formatage.
Les disques durs dotés de partition GPT doivent être reformatés sous Windows XP pour être utilisés.
Ne retirez pas un disque dur connecté tant que le disque dur est en cours d'utilisation.
3.2 Mise sous tension/hors tension
Nous recommandons fortement que vous éteignez l'appareil lorsque vous ne l'utilisez pas.
Éteignez l'appareil lorsque vous le replacez pour éviter d'endommager les disques durs.
FRAttention
3.3 Précautions d'emplacement et d'installation
Evitez l'installer votre appareil dans les endroits suivants :
Des endroits directement au soleil, près de radiateurs ou d'autres sources de chaleur.
Des endroits à haute température (plus de 38°C) ou à forte humidité (plus de 90%).
Des endroits avec beaucoup de sâble ou de poussière.
Des endroits sujets à des vibrations, des chocs ou non horizontal.
24
Page 26

Drive Storage DS222
Af
f
j
g
Attention
FR
.4 Electricité et prise d'alimentation
aites attention aux instructions suivantes pour réduire le risque d'incendie, de domma
orsque vous débranchez le cordon d’alimentation de la prise de courant, tenez tou
e touchez pas et ne débranchez pas le cordon d’alimentation avec des mains mouillées.
ardez le cordon d'alimentation à distance des radiateurs.
'essayez jamais de réparer le cordon d'alimentation, ou de le modifier vous-même.
i l'appareil est tombé ou qu'il a été endommagé, débranchez le cordon d'alimentation.
e et/ou de blessure :
ours la fiche et jamais le cordon.
.5 Câbles
tilisez seulement des cordons d'alimentation fournis ou recommandés par votre vendeur pour réduire le risque de mal
'électrocution et/ou d'interférences avec l'appareil.
onctionnement,
.6 Sauvegarde des données
in d'éviter de perdre des données, nous recommandons fortement que vous sauvegardiez vos données sur un autre support
u appareil de stockage.
euillez sauvegarder les données du disque dur avant de changer le mode RAID.
3.7 FAQ
Q : Puis-je connecter cet appareil à un hôte USB 2.0 ?
R : Oui, cet appareil est rétro-compatible avec les ports USB 2.0.
Q : Quel système de fichier dois-je choisir pour formater mon disque ?
R : Cela dépend de comment vous voulez utiliser le disque, mais en général nous rcommandons :
Windows Vista/7/8/8.1 (32-bit, 64-bit) -NTFS
Mac OS X- HFS+ (Mac OS étendu)
Pour l'utiliser à la fois sur PC et Mac - FAT32 ou exFAT
Q : Combien de disques peuvent tomber en panne avant que je perde mes données ?
R : Pour RAID 0, la panne d'un disque causera la perte des données. Pour RAID 1, si plus d'un
disque tombent en panne en même temps, les données ne pourront plus être restaurées.
Pour les non-RAID, seulement les données sur le disque défectueux seront perdues. Pour le mode BIG, seules les données du
disque dur en panne seront perdues.
Q : Comment accéder aux données quand un disque tombe en panne en mode RAID 1 ?
R : Si un disque tombe en panne en mode RAID 1, vous pouvez toujours avoir accès directement aux données dans le disque de
sauvegarde, il n'est pas besoin de changer le mode RAID. Veuillez noter qu'avant d'échanger le disque défaillant, veuillez ne pas
le changer sur un autre mode RAID ou bien vous ne pourrez pas reconstruire la matrice RAID 1.
25
Page 27

1.1 Requisiti di sistema
1.1.1 Requisiti PC
Minimo Intel Pentium III CPU 500MHz, 128MB RAM
Windows XP, Windows Vista, Windows 7, Windows 8 / 8.1, Linux
Il vostro hardware deve essere in possesso della corretta porta di collegamento (es. USB 3.0/2.0 host controller)
1.1.2 Requisiti Mac
Minimo processore Apple G4, 128MB RAM
Mac OS 10.4 o superiori
Il vostro hardware deve essere in possesso della corretta porta di collegamento (es. USB 3.0/2.0 host controller)
1.1.3 Hard Drive supportati
Uno o due HDD o SDD SATA-I (1,5 Gb/s) / SATA-II (3,0 Gb/s) / SATA-III (6,0 Gb/s) da 2,5"
Si raccomanda di usare dischi rigidi di marca, modello e capacità identica.
Supporta grandi volumi oltre i 2.2TB
1.2 Package Contents
DS222 storage enclosure (hard drives non inclusi)
Cavo a Y interfaccia(USB3.0)
Manuale utente
Cavo USB 3.0 Y
A. USB 3.0 di tipo A (per Host)
B. Per alimentazione aggiuntiva
C. USB 3.0 di tipo Micro B per dispositive
Drive Storage
DS222
ITIntroduzione
1.3 Il manuale
I contenuti del manuale possono essere leggermente diversi dal prodotto reale. Le funzioni e le caratteristiche possono variare in base
alle diverse versioni del firmware.
1.4 Marchi registrati
MS-DOS, Microsoft, Windows Vista & 7 & 8 / 8.1 sono marchi registrati di proprietà della Microsoft Corporation.
Apple Macintosh e Mac sono marchi registrati di proprietà della Apple Computer
Tutti gli altri marchi e nomi sono proprietà dei rispettivi possessori.
26
Page 28

Drive Storage DS222
Introduzione
IT
1.5 Detailed View
Vista Frontale Vista Posteriore
LED
Interruttore segnale acustico
Indicazione
RAID
Tasto di conferma per il
cambio di modalità RAID
Cambio modalità RAID
DC 5V
* Se il computer portatile è in grado di supportare DS222 a piena potenza, collegare il cavo di caricamento micro-USB 5V/1A del cellulare per
fornire potenza sufficiente a DS222.
Prima è necessario spegnere l'interruttore di alimentazione di DS222, attendere per 3-5 secondi, quindi riaccenderlo e collegare il cavo
USB 3.0 Y ed il cavo di caricamento 5V/1A del cellulare a DS222.
1.5.1 Indicazioni dei LED
Per determinare se si è selezionata la modalità corretta, assicurarsi che l'interruttore RAID sia nella posizione corretta.
LED
Status
Rosso = Accendere il
Power
Blu = disco rigido rilevato, lampeggiante=accesso ai dati (lettura/scrittura),OFF=alloggio unità vuoto
HDD1
Blu = disco rigido rilevato, lampeggiante=accesso ai dati (lettura/scrittura),OFF=alloggio unità vuoto
HDD2
Giallo = Non-raid attivato
Non-RAID
Giallo = Raid 0 attivato
RAID 0
Giallo = Raid 1 attivato
RAID 1
NR, R0, R1 = Giallo = volume totale di uno o due dischi rigidi esistenti
BIG
Nota
1.Per determinare se è stata selezionata la modalità corretta, assicurarsi che l'interruttore RAID sia in posizione corretta.
2. Se l'unità non riesce a funzionare in nessuna modalità, l'allarme (buzzer) suonerà per avvisare gli utenti.
27
Page 29

Drive Storage DS222
1.5.2 RAID interruttore
DIP Switch
Nota
Fatta eccezione per la modalità Non-RAID, sono necessari due hard drive.
Dopo avere selezionato la modalità RAID, premere per 5 secondi il tasto "Confirm" (Conferma) per confermare la nuova impostazione.
2.1 Assemblaggio Hard Drive
I dischi possono essere installati in qualsiasi posizione, non è richiesto uno specifico ordine.
Non-RAID
Posizione switch: 1 ON, 2 ON
RAID 0 - Striping
Posizione switch: 1 OFF, 2 OFF
RAID 1 - Mirroring
Posizione switch: 1 OFF, 2 ON
Modalità BIG – BIG (massimo, volume)
Posizione interruttore 1 ON, 2 OFF
modalità RAID
Per cambiare la modalità RAID è necessaria la
formattazione dei dischi rigidi. Assicuratevi quindi
di aver messo al sicuro i vostri dati prima di procedere.
IT Setup del Sistema
1. Sbloccare il pannello anteriore agendo sul blocco posto al di sotto della periferica,
quindi far scorrere il pannello frontale verso l’alto e tirarlo verso l’esterno per rimuoverlo.
2. Installare i dischi rigidi nella direzione illustrata.
Impostare la modalità RAID preferita, quindi sostituire il pannello anteriore
※ La modalità RAID predefinita è Non Raid. Se si desidera modificare la modalità RAID, fare riferimento a 2.2.
3. Collegare il cavo USB 3.0 ad DS222, quindi collegare al vostro sistema
4. Per gli utenti PC utilizzare lo strumento di gestione disco, o, per gli utenti Mac, utilizzare disk utility per creare una nuova partizione e
formattare i dischi.
5. Fatto! Il vostro drive esterno è ora pronto per essere utilizzato.
28
Page 30

Drive Storage DS222
Setup del Sistema
※Nota
Abbiate cura di non danneggiare componenti e non forzate i dischi durante l’installazione. Se per qualche ragione il disco non dovesse entrare
facilmente nella sua sede, controllatene il verso di inserzione.
Windows 7 / 8.1 è in grado di supportare dischi rigidi con un eccesso di 2,2 TB. Portare il disco rigido sulla partizione GPT di Gestione disco per
formattarlo.
※Nota
Il disco rigido con partizione GPT deve essere riformattato per poterlo utilizzare in Windows XP.
2.1.1 Passo di installazione
Installazione di nuovi dischi rigidi o sostituzione di dischi difettosi.
1.Per prima cosa spegnere l'alimentazione e scollegare il cavo USB 3.0, quindi installare i dischi rigidi o sostituire le unità difettose.
2.Impostare la modalità RAID (Non-RAID, RAID 1, RAID 0 o Big).
3.Collegare il cavo USB 3.0 Y al computer ed accendere l'alimentazione, quindi tenere premuto per 5 secondi il "tasto di conferma"
per confermare la nuova impostazione.
* Se il computer portatile è in grado di supportare DS222 a piena potenza, collegare il cavo di caricamento micro-USB 5V/1A del
cellulare per fornire potenza sufficiente a DS222.
Prima è necessario spegnere l'interruttore di alimentazione di DS222, attendere per 3-5 secondi, quindi riaccenderlo e collegare il
cavo USB 3.0 Y ed il cavo di caricamento 5V/1A del cellulare a DS222.
4.Installazione di nuovi dischi rigidi
Ⅰ、Utenti PC: utilizzare lo strumento di gestione del disco
Ⅱ、Utenti Mac: utilizzare l'utilità disco per creare una nuova partizione e formattare le unità.
5.Installazione di dischi rigidi usati
Ⅰ、Utenti PC: utilizzare lo strumento di gestione del disco.
Ⅱ、Utenti Mac: utilizzare l'utilità disco per eliminare la vecchia partizione e formattare le unità.
IT
2.2 Impostazione modalità RAID
RAID è l’acronimo di Redundant Array of Independent Disks. Si tratta di una tecnologia di archiviazione che combina più dischi rigidi in
un'unità logica I dati sono distribuiti tra le unità in uno dei diversi modi detti "livelli RAID" in base al livello di ridondanza e prestazioni richieste.
2.2.1 Non-RAID
Les deux disques durs affichent des volumes indépendants, chaque disque peut être formaté et on peut y avoir accès séparément.
Si un disque tombe en panne, l'autre ne sera pas affecté. Ce mode n'offre aucun avantage de performance ni de redondance.
2.2.2 RAID 0 – Disk Stripping
Le unità sono mostrate come un unico volume, ma le dimensioni saranno due volte quelle del disco con capacità minore
(ad esempio: se ci sono due dischi e uno è da 1 TB e l'altro è da 2TB, il volume disponibile è di soli 2 TB).
RAID 0 fornisce una maggiore velocità di trasferimento rispetto ad altre modalità, tuttavia se un disco rigido si guasta, tutto l’array
si arresterà in modo anomalo.
2.2.3 RAID 1 – Disk Mirroring
Le unità sono mostrate come un unico volume, ma le dimensioni dipenderanno da quelle del disco con capacità minore (ad esempio:
se ci sono due dischi e uno è da 1 TB e l'altro è da 2TB, il volume disponibile è di soli 1 TB).
RAID 1 fornisce benefici di ridondanza. RAID 1 esegue il mirroring dei dati di una unità sull'altra, così che quando un disco si guasta
è ancora possibile accedere ai dati nell’altra unità, oppure è possibile sostituire l'unità danneggiata per ricostruire l’array RAID 1.
29
Page 31

Drive Storage DS222
Si raccomanda vivamente di sostituire immediatamente l'unità difettosa per ricostruire i dati ed assicurare il backup corretto e
continuo e la sicurezza dei dati.
2.2.3.1 Sostituzione di un disco rigido difettoso in modalità RAID1
1.Spegnere l’alimentazione e scollegare il cavo USB 3.0 Y.
2.Estrarre l’unità difettosa e sostituirla con nuova unità.
* Si raccomanda vivamente di utilizzare dischi rigidi nuovi (la capacità deve essere uguale o superiore a quella del disco originale).
Se si utilizza un disco rigido usato (la capacità deve essere uguale o superiore a quella del disco originale), eseguire il backup dei
suoi dati, se necessario. Il processo di ricostruzione sovrascriverà automaticamente tutti i dati preesistenti.
3. Utilizzare il cavo USB 3.0 Y e collegarlo al computer, quindi accendere l’alimentazione. I dati saranno ricostruiti automaticamente.
4. Quando un array ricostruito è collegato al PC, il LED lampeggerà rapidamente per indicare la procedura di ricostruzione dei dati.
(Il LED si attiverà su HDD1 o HDD2, in base alla posizione dell’unità HDD/SSD sostituita.)
5. Ci vorranno diverse ore per ricostruire l’array RAID 1, in base alla capacità del disco. Al termine della ricostruzione, entrambi i
LED di HDD1 e HDD2 resteranno accessi con una luce blu.
2.2.4 Modalità BIG
Due unità appaiono come un unico volume e la capacità totale è uguale alla combinazione della capacità dei due dischi rigidi.
Se un disco si guasta, i dati delle due unità andranno persi.
3.1 Installazione
Prima di collegare il dispositivo, installare i dischi rigidi ed impostare la modalità RAID.
Seguire sempre la corretta procedura di disconnessione dell'hardware esterno (ad esempio rimozione sicura dell’hardware
tramite sistema operativo prima della rimozione) per evitare il rischio di perdita di dati.
Non danneggiare qualsiasi componente né forzare le unità in posizione. Se risulta difficile far scorrere l’unità, assicurarsi
che il connettore SATA sia nella posizione corretta.
Prima della formattazione, i dischi rigidi superiori a 2.2TB necessitano il cambiamento alla partizione GPT in Gestione disco
di Windows 7 e 8 / 8.1.
I dischi rigidi con partizione GPT devono essere riformattati sotto Windows XP per poter essere utilizzati.
Non rimuovere un disco rigido collegato mentre l'unità è in uso.
3.2 Accensione/spegnimento
Si raccomanda vivamente di spegnere il dispositivo quando non è in uso.
Spegnere il dispositivo quando è spostato per evitare eventuali danni ai dischi rigidi.
ITAttenzione
3.3 Precauzioni di posizionamento
Evitare di disporre la periferica nei seguenti luoghi:
Luoghi con luce solare diretta, nei pressi di termosifoni o altre fonti di calore.
Luoghi con temperature o umidita molto elevate (piu di 38° C o maggiore del 90%).
Luoghi molto polverosi o sabbiosi.
Luoghi soggetti a vibrazioni, urti, o superfici umide.
30
Page 32

Drive Storage DS222
f
,
Attenzione
Particolare attenzione va dedicata ai seguenti punti al fine di evitare danneggiamenti e rischi vari:
uando il cavo di alimentazione viene rimosso dalla presa, tirare sempre la spina e mai il cavo.
on connettere o rimuovere il cavo con le mani bagnate.
enere il cavo di alimentazione lontano da fonti di calore (termosifoni).
on provare mai a riparare il cavo o a modificarlo in alcun modo.
e l’unità dovesse cadere o si danneggiasse in qualsiasi altro modo, staccare il cavo di alimentazione.
IT
.5 Cavi
tilizzare soltanto i cavi in dotazione o raccomandati dal vostro rivenditore al
shock elettrici e/o possibili interferenze con la periferica.
ine di evitare rischi di malfunzionamenti
.6 Backup dei dati
er prevenire il rischio di perdita dei dati, si raccomanda vivamente di eseguire il backup dei dati su un altro supporto o
ispositivo d’archiviazione.
seguire il backup dei dati del disco rigido prima di cambiare la modalità RAID.
3.7 FAQ
D: Posso connettere la periferica ad una porta USB 2.0?
A: Si, la periferica è retro compatibile con lo standard USB 2.0.
D: Quale file system è corretto scegliere quando si formatta il disco rigido?
A: Dipende da come volete usare la periferica, ma in generale vi raccomandiamo:
Windows Vista/7/8/8.1 (32-bit, 64-bit) -NTFS
Mac OS X HFS+ (Mac OS Extended)
Per l’uso su PC e Mac - FAT32 o exFAT
D: Quanti dischi possono danneggiarsi prima che perda i miei dati?
A: Per il RAID 0, qualsiasi danneggiamento dei dischi, causa la perdita dei dati. Per il RAID 1,la perdita dei dati avviene soltanto se si
danneggiano entrambi i drive contemporaneamente.Per il Non-Raid solo i dati presenti nel drive danneggiato risulteranno persi. Per la
modalità BIG, solo i dati del disco rigido guasto andranno persi.
D: Come si accede ai dati quando una unità si guasta in modalità RAID 1?
A: Se un'unità si guasta in modalità RAID 1, è ancora possibile accedere direttamente ai dati nell’unità di backup, non è necessario
cambiare la modalità RAID. Prima di sostituire l'unità guasta, è importante non cambiare ad un’altra modalità RAID, diversamente
non sarà possibile ricostruire il RAID 1.
31
Page 33

Drive Storage
1.1 Системные требования
1.1.1 Требования к ПК
Минимум: процессор Intel Pentium III с частотой 500 МГц, ОЗУ объемом 128 Мб
Windows XP, Windows Vista, Windows 7, Windows 8 / 8.1, Linux
Компьютер должен иметь соответствующий порт
(например, порт хост-контроллера USB 3.0/2.0)
1.1.2 Требования к компьютеру Mac
Минимум: процессор Apple G4, ОЗУ объемом 128 Мб
MAC OS 10.4 или более поздней версии
Компьютер должен иметь соответствующий порт
(например, порт хост-контроллера USB 3.0/2.0)
1.1.3 Поддерживаемые жес ткие диски
Один или два 2,5-дюймовых SATA-I (1,5 Гбит/с) / SATA-II (3,0 Гбит/с) / SATA-III (6,0 Гбит/с) жестких или твердотельных диска
Рекомендуется использовать жесткие диски одного бренда, одной модели и одной емкости.
Поддерживаются большие тома объемом более 2.2 Тб
1.2 Комплект поставки
Корпус запоминающего устройства DS222 (жесткие диски не входят в комплект поставки)
Интерфейсный И кабель(USB 3.0)
Руководство пользователя
Кабель USB 3.0 Y
A. USB 3.0 тип A (для хоста)
B. Для дополнительного питания
C. USB 3.0 Micro типа B для устройства
1.3 Сведения о настоящем руководстве
Содержание данного руководства может слегка отличаться от приобретенного продукта. Функции и возможности могут
различаться в зависимости от версии встроенного ПО.
1.4 Товарные знаки
MS-DOS, Microsoft, Windows Vista и Windows 7&8 / 8.1 являются товарными знаками корпорации Microsoft.
Apple Macintosh и Mac являются товарными знаками компании Apple Computer.
Все прочие торговые марки и наименования других компаний являются собственностью соответствующих лиц.
DS222
RUВведение
32
Page 34

Drive Storage DS222
Введение
1.5 Внешний вид
Вид спереди Вид сзади
RU
Индикатор
RAID
Кнопка подтверждения
смены режима RAID
Переключатель
звукового сигнала
LED
Смена режима RAID
DC 5V
*Если ваш портативный компьютер не поддерживает DS222 с полной мощностью питания, подключите кабель зарядки мобильного
телефона micro-USB 5 В/1 A, чтобы обеспечить для DS222 достаточную мощность.
Если нужно сначала выключить питание DS222, подождите
подсоединить кабель USB 3.0 Y и кабель зарядки мобильного телефона 5 В/1 A к DS222.
в течение 3–5 секунд, затем включите питание снова, чтобы
1.5.1 Показания индикатора
LED
Status
Красный = питание вкл.
Power
Синий = обнаружен жесткий диск, Мигает = доступ к данным (чтение/запись) ВЫКЛ. = пустой дисковый отсек
HDD1
Синий = обнаружен жесткий диск, Мигает = доступ к данным (чтение/запись) ВЫКЛ. = пустой дисковый отсек
HDD2
Желтый = Non-raid активирован
Non-RAID
Желтый = Raid 0 активирован
RAID 0
Желтый = Raid 1 активирован
RAID 1
BIG
NR, R0 и R1 = Желтый – общий объем памяти одного или двух жестких дисков
Примечание
1.Для определения правильности выбранного режима проверьте правильность положения переключателя RAID.
2. Если диск не заработает ни в одном режиме, прозвучит звуковой аварийный сигнал.
33
Page 35

Drive Storage DS222
1.5.2 Переключатель режимов RAID
DIP-
переключатель
Note
За исключением режима без RAID-массива требуется два жестких диска.
Выбрав режим RAID, нажмите на кнопку "Confirm (Подтвердить)" и удерживайте ее в течение 5 секунд для подтверждения новой
настройки.
Raid mode
Режим без RAID-массива
Положение переключателя: 1 ON, 2 ON
RAID 0 - Striping
Posizione switch: 1 OFF, 2 OFF
RAID 1 – зеркалирование
Положение переключателя: 1 OFF, 2 ON
Режим BIG – BIG (макс. объем)
Положение переключателя: 1 ON, 2 OFF
Для изменения режима RAID требуется ф
орматированиежестких дисков. Предварительно
убедитесь, что сохранили все существующи
2.1 Установка жестких дисков
Жесткие диски можно устанавливать в любой слот, соблюдать определенный порядок не требуется.
RUПодготовка системы к работе
1. Разблокируйте фиксатор в нижней части корпуса и снимите переднюю панель, подняв ее вверх.
2. Установите жесткие диски в указанном на рисунке направлении. Установите предпочтительный режим RAID и установите на место
переднюю панель.
※Режим RAID по умолчанию - без RAID-массива, если
3.
Подключите кабель USB 3.0 к DS222, затем к своей системе
4. При подключении к ПК используйте средство управления жесткими дисками; при подключении
к компьютеру Mac используйте приложение дисковую утилиту для создания нового раздела и форматирования дисков.
5. Готово! После этого внешнее запоминающее устройство готово к работе.
вы хотите изменить режим RAID, см. раздел 2.2.
34
Page 36

Drive Storage DS222
Подготовка системы к работе
※Примечание
Соблюдайте осторожность во избежание повреждения компонентов и не применяйте силу при установке дисков. Если жесткие диски
без усилия не фиксируются на месте, проверьте, правильно ли они установлены. ОС Windows 7
дисков объемом памяти свыше 2,2 ТБ, для форматирования жесткого диска с помощью программы управления дисками на жестком
диске установите раздел GPT.
※Примечание
Для использования жесткого диска с разделом GPT его следует переформатировать в ОС Windows XP
2.1.1 шаг установки
Сначала установите жесткие диски, чтобы не возникала ошибка.
1.Сначала выключите питание и отсоедините кабель USB 3.0, установите жесткие диски или замените неисправные.
2.Установите режим RAID (Non-RAID, RAID 1, RAID 0 или Big).
3.Подключите кабель USB 3.0 Y к своему компьютеру и включите питание, затем нажмите "confirm button" (кнопку подтверждения)
на 5 секунд, чтобы подтвердить новую настройку.
*Если ваш портативный компьютер не поддерживает DS222 с
мобильного телефона micro-USB 5 В/1 A, чтобы обеспечить для DS222 достаточную мощность.
Если нужно сначала выключить питание DS222, подождите в течение 3–5 секунд, затем включите питание снова, чтобы
подсоединить кабель USB 3.0 Y и кабель зарядки мобильного телефона 5 В/1 A к DS222.
4.Установка новых жестких дисков
Ⅰ、Пользователи персональных компьютеров (ПК) могут использовать программы
Ⅱ、Пользователи компьютеров Mac могут работать со служебными программами управления дисками, чтобы создать новый
раздел и отформатировать диски.
5.Установка жестких дисков, бывших в употреблении
Ⅰ、Пользователи ПК могут использовать программы по управлению дисками.
Ⅱ、Пользователи компьютеров Mac могут работать со служебными программами управления дисками, чтобы удалить старый
раздел и отформатировать
диски.
полной мощностью питания, подключите кабель зарядки
обеспечивает поддержку жестких
по управлению дисками.
RU
2.2 Настройка режимов RAID
2.2.1 Non-RAID
Два диска образуют независимые тома, каждый диск может самостоятельно форматироваться и обеспечивать
самостоятельный доступ к нему. Сбой одного диска не повлияет на другой диск. Этот режим не обеспечивает каких-либо
преимуществ в производительности или избыточности.
2.2.2 RAID 0 –чередование дисков
Диски отображаются в одном томе, однако объем памяти составляет двойной объем диска с наименьшим объемом памяти
(например, в варианте двух дисков, если один диск имеет объем 1 ТБ, а другой 2 ТБ, доступный объем памяти составит
только 2 ТБ).
Режим RAID 0 обеспечивает более высокую скорость обмена данными по сравнению с другими режимами, однако, если
один диск отказывает, весь массив дисков выдает фатальный сбой.
2.2.3 RAID 1 –зеркалирование дисков
Диски отображаются в одном томе, однако объем памяти зависит от диска с наименьшим объемом памяти (например, в
варианте двух дисков, если один диск имеет объем 1 ТБ, а другой 2 ТБ, доступный объем памяти составит только 1 ТБ).
Режим RAID 1 дает преимущество по параметру избыточности. В режиме RAID 1 данные одного диска зеркально
отображаются на другом диске
заменить поврежденный диск и перестроить массив RAID 1.
35
, поэтому при сбое одного диска вы сможете получить доступ к данным на другом диске или
Page 37

Drive Storage DS222
Настоятельно рекомендуется немедленно заменять неисправные диски, чтобы перестроить данные и сделать резервные
копии для безопасности.
2.2.3.1 Замена неисправного диск в режиме RAID1
1.Выключите питание и отсоедините кабель USB 3.0 Y.
2. Извлеките неисправный диск и замените на новый.
* Настоятельно рекомендуется установить новый жесткий диск (его емкость должна быть той же самой или большей,
чем у исходного диска). Если вы пользуетесь более старыми дисками (их емкость должна быть той же самой или
большей, чем у
данные будут автоматически перезаписаны.
3. Подключите кабель USB 3.0 Y к своему компьютеру и включите питание. Данные будут перестроены автоматически.
4. Если к вашему ПК подключается перестраиваемый массив, светодиод будет быстро вспыхивать, указывая на
выполнение перестройки данных (будет вспыхивать светодиод HDD1 или HDD2 в зависимости
замененный диск HDD/SSD).
5. Перестройка массива RAID 1 займет несколько часов в зависимости от емкости дисков. После завершения перестройки
светодиоды HDD1 и HDD2 будут гореть постоянно синим светом.
2.2.4 Режим BIG
В этом режиме два диска отображаются как один том, а общий объем памяти равен объему памяти двух жестких дисков.
При отказе одного из дисков теряются данные обоих дисков.
исходного диска), сделайте резервные копии при необходимости. В процессе перестройки существующие
от того, где расположен
3.1 Установка
Перед подключением устройства установите жесткие диски и установите режим RAID.
Во избежание потери данных при отключении внешнего устройства используйте правильную процедуру отключения
(например, команду "Eject" в ОС перед извлечением диска).
Во избежание повреждения компонентов устройства не применяйте чрезмерных усилий при установке дисков на место.
Если диск не устанавливается на место, проверьте правильность
Для жестких дисков с объемом памяти превышающим 2,2 ТБ, следует установить раздел GPT в системе управления
дисками в ОС Windows 7 и 8 / 8.1 перед их форматированием.
Для использования жестких дисков с разделом GPT в ОС Windows XP их следует переформатировать в этой системе.
Не извлекайте подключенный жесткий диск во время его использования.
положения разъема SATA.
3.2 Включение/выключение питания
Мы настоятельно рекомендуем выключать питание устройства, если оно не используется.
Во избежание повреждения дисков выключайте питание устройства при его перемещении.
RUВнимание
3.3 Меры предосторожности при выборе места установке прибора
Не устанавливайте данное устройство в следующих местах:
под прямым солнечным светом, рядом с радиаторами отопления или другими источниками тепла.
в местах с высокой температурой (более 38°C) или высокой влажностью (более 90%).
во влажных или пыльных местах.
в местах, подверженных вибрации или ударам, а также на наклонных поверхностях.
36
Page 38

Drive Storage DS222
х
у
у
g
–
д
о
о
Внимание
RU
.4 Electricity and power plu
о избежание повреждения оборудования, возгорания и причинения травмы необходимо неукоснительн
облюдать перечисленные ниже рекомендации:
ри отсоединении кабеля питания от электрической розетки беритесь за штепсельную вилку
е тяните за кабель.
е подключайте и не отключайте кабель питания мокрыми руками.
Располагайте кабель питания в
Категорически запрещается самостоятельно ремонтировать или модифицировать кабель питания каким-либ
случае падения или иного повреждения данного устройства, отсоедините кабель питания от электрической сети.
али от источников тепла.
.5 Кабели
Используйте только кабели, входящие в комплект поставки или рекомендованные поставщиком во избежание риска
выхода
стройства из строя, поражения электрическим током и возникновения помех для работы устройства.
.6 Резервное копирование данны
Во избежание потери данных мы настоятельно рекомендуем создавать их резервные копии на другом носителе
данных или
стройстве.
еред изменением режима RAID создайте резервную копию жестких дисков.
3.7 Вопросы и ответы
B: Можно ли подключить данное устройство к хосту USB 2.0?
A: Да, данное устройство обратной совместимо с интерфейсом USB 2.0.
B: Какую файловую систему следует выбрать для форматирования диска?
A: Это зависит от предполагаемого способа использования диска, но обычно рекомендуется
выбрать одну из следующих файловых систем:
Windows Vista/7/8/8.1 (32-bit, 64-bit) -NTFS
Mac OS X - HFS+ (Mac OS Extendido)
Для использования как с ПК, так и с Mac - FAT32 или
B: Сбой скольких жестких дисков приведет к потере данных?
A: В режиме RAID 0 сбой любого жесткого диска приведет к потере данных. В режиме RAID 1 одновременный сбой обоих
жестких дисков приведет к необратимой потере данных. В режиме без RAID-массива будут потеряны данные только на
поврежденном жестком диске. В режиме BIG данные будут потеряны только на
В: Как получить доступ к данным в случае сбоя одного диска в режиме RAID 1?
A: При отказе одного диска в режиме RAID 1 можно получить доступ непосредственно к резервному диску, изменять режим
RAID не требуется. Перед сменой отказавшего диска не изменяйте режим RAID, иначе вы не сможете перестроить массив
RAID 1.
exFAT
отказавшем жестком диске.
37
Page 39

Drive Storage
1.1システム要求
1.1.1PC要件
最小限IntelPentiumIIICPU500MHz,128MBRAM
WindowsXP,WindowsVista,Windows7,Windows8/8.1,Linux
正しく対応したポートを備えたハードウェアデバイス(例:USB3.0/2.0ホストコントローラ)
1.1.2Mac要件
最小限アップルG4プロセッサ,128MBRAM
MacOS10.4またはそれ以降
正しく対応したポートを備えたハードウェアデバイス(例:USB3.0/2.0ホストコントローラ)
1.1.3サポートされるハードドライブ
1~2基の2.5"SATA-I(1.5Gb/s)/SATA-II(3.0Gb/s)/SATA-III(6.0Gb/s)ハードディスクドライブまたはSSD
同一ブランド、モデル、容量のハードディスクの使用を推奨.
2.2TBを超えた大容量もサポート
1.2パッケージ内容
DS222ストレージエンクロージャー(ハードドライブ含まず)
インタフェースYケーブル(USB3.0)
ユーザーマニュアル
USB3.0Yケーブル
A.USB3.0typeA(ホスト用)
B.補助電源用
C.デバイス用USB3.0MicroBtype
DS222
JP紹介
1.3当マニュアルに関して
マニュアルの内 容は 実 際の 製品と異 なる場 合 があります。機能および特徴はファームウェアのバージョンによって
変更される場合があります。
1.4商標
MS-DOS、マイクロソフト、WindowsVistaおよび7/8/8.1はマイクロソフト社の商標です。
アップル・マッキントッシュとMac はアップルコンピューター の商 標です。
他のすべてのサードパーティーブランドと名称はそれぞれの所有者に属します。
38
Page 40

Drive Storage DS222
紹介
1.5詳細図
JP
正面図 背面図
LED
ブザースイッチ
RAID表示
RAIDモード
変更確認ボタン
RAIDモード変更
DC5V
*ご使用のノートブックがDS222に対応する十分な電力を供給できない場合、micro-USB5V/1Aモバイルホン充電ケーブ
ルを接続して、DS222に十分な給電を行ってください。
まず、DS222の電源スイッチをオフにして3-5秒経ってから電源を入れ、USB3.0Yケーブルおよび5V/1Aモバイルホン充電
ケーブルをDS222に接続します。
1.5.1LED指示
註記
1.正しいモードが選択されているかは、RAIDスイッチが正しい位置にあるかどうかで確認できます。
2.ドライブがいずれか のモードでエラーになると、アラーム (ブ ザ ー) が 鳴ってユ ー ザー に 知らせま す。
39
LED
Status
レッド=電源オン
Power
青=ハードディスク検知、点滅=データアクセス(読み書き)、OFF=ドライブベイが空
HDD1
青=ハードディスク検知、点滅=データアクセス(読み書き)、OFF=ドライブベイが空
HDD2
黄色=Non-raid起動中
Non-RAID
黄色=Raid0起動中
RAID 0
黄色=Raid1起動中
RAID 1
NR、R0およびR1=黄色=装着された1ないし2基のハードディスクドライブの合計ボリューム
BIG
Page 41

1.5.2RAIDスイッチ
ディップスイッチ
注意
非RAIDモードを除いて、ハードドライブ2台が必要です。
RAIDモード選択後、「確定ボタン」を5秒間押し続けると、新たな設定が有効となります。
非RAID
スイッチ位置:1ON,2ON
RAID0-ストライピング
スイッチ位置:1OFF,2OFF
RAID1-ミラーリング
スイッチ位置:1OFF,2ON
BIGモード‒BIG(最大、ボリューム)
スイッチ位置:1ON,2OFF
RAIDモード
RAIDモードを変えるには、ドライブの
フォー マットが 必要で す。まず、必ずすべての
既存デ ータのバックアップを取ってください
2.1ハードドライブの装着
ドライブはどんな 位 置にもインストール でき、いずれの特定の順番も必要ありません。
Drive Storage DS222
JPシステムのセットアップ
1. ケース下 部のスイッチをロック解 除して、フロントパネルを ハウジングから上方 向に 持ち上 げて取り外します。
2.ハードディスクを図示の方向に装着します。
望まれるRAIDモードに設定してから、フロントパネルを戻してください。
※デフォルトRAIDモードは非RAIDです。RAIDモードを変更するには、2.2をご参照ください。
3.USB3.0ケーブルでDS222に接続してからお持ちのシステムに接続します
4.PCユーザーはディスク管理ツール、Macユーザーはディスクユーティリティを使 用して、新しいパーティションを作成
してからドライブをフォーマットしま す 。
5.完成ですこれで外付け型ドライブは現在、使用可能です。
40
Page 42

Drive Storage DS222
システム のセットアップ
※注意
どんなコンポーネントも破 損しないようにご 注意ください。またドライブを力 づくで押し込まないでください。ドライブが
容易に場所に固定されないなら、ドライブ が正しくインストール されて いるか 確 認してください。Windows7/8.1は2.2TBを
上回るハードディスクをサポートできます、ハードディスクをフォーマットするには、ディスク管理からハードディスクを
GPTパーティションに変えてください。
※注意
GPTパーティションのハードディスクをWindowsXP上で使用するには再フォーマットの 必要 があります。
2.1.1インストールの手順
初めてハードディスクを装着、または故障時の交換方法
1.電源をオフにし、USB3.0ケーブルを外してから、ハード ディスクを装 着もしくは故 障したドラ イブを 交 換します。
2.RAIDモードを設定します(非RAID,RAID1,RAID0またはBigモード)。
3.USB3.0Yケーブルをご使用のコンピューターに接続して電源を入れてから、「確定ボタン」を5秒間押して新たな
設定を有効にします。
*ご使用のノートブックがDS222に対応する十分な電力を供給できない場合、micro-USB5V/1Aモバイルホン充電
ケーブルを接続して、DS222に十分な給電を行ってください。
まず、DS222の電源スイッチをオフにして3-5秒経ってから電源を入れ、USB3.0Yケーブルおよび5V/1Aモバイルホン
充電ケーブルをDS222に接続します。
4.新しいドライブの装着方法
Ⅰ、PCユーザーであれば、ディスク管理 ツー ル を使 用します。
Ⅱ、Macユーザーであれば、ディス クユ ー ティリティを 使 って 新 た な パ ー ティション を 作 成 し、ドライブをフォーマットし
ます。
5.新品ではないドライブの装着方法
Ⅰ、PCユーザーであれば、ディスク管理 ツー ル を使 用します。
Ⅱ、Macユーザーであれば、ディスクユーティリティを使って以前のパーティションを削除し、ドライブをフォーマットし
ます。
JP
2.2RAIDモードの設定
RAIDとは独立ディスクの冗長性アレイを意味します。これは複数のドライブコンポーネントを1つの論理ユニットとして
結合する技術です。データは「RAIDレベル」と呼ば れる特 定の 方法 で、必要な冗長性および性能のレベルに応じ、ドライブ
にまたがってデータが分 配されます。
2.2.1Non-RAID
2台のハードディスクドライブは独立ボリュームと見られ 、各ドライブは 個々にフォーマットやアクセスが可能です。
1台のドライブが故障しても他方に影響することはありません。このモードでは冗長性をもたらす機能は提供され
ません。
2.2.2RAID0‒ディスクストライピング
ドライブは1つのボリュームとして見なされますが、サイズは小さい方の容量の2倍になります( 例:2 台 の ド ラ イブ が
あり、一方は1TB、他方が2TBの場合は、利用可能な容量は2TBのみとなります)。
RAID0は他のモードに比べて高速な転送速度を有しますが、1台のドライブが故障するとアレイも損なわれます。
41
Page 43

Drive Storage DS222
2.2.3RAID1‒ディスクミラーリング
ドライブは1つのボリュームとして見なされますが、サイズは小さい方の容量に依存します(例:2台のドライブがあり、
一方は1TB、他方が2TBの場合は、利用可能な容量は1TBのみとなります)。
RAID1は冗長性の利点を有します。RAID1は一方のドライブを他方にミラーリングするので、一方が故障しても他方
にアクセスでき、また故障したドライブを交換すればRAID1アレイをリビルドできます。
故障したドライブは直ちに交換し、データを再構築して継続的にバックアップを行い、データを確保してください。
2.2.3.1RAID1モードでの故障ドライブの交換
ドライブHDD2が故障した場合のドライブ交換およびRAIDアレイのリビルドの方法
1.故障したハードディスクドライブHDD2を外します。
2.HDD2の位置に新しいドライブを取り付けます。
3.ソースドライブのLEDが早く点滅し始め、転送先ドライブのLEDがゆっくり点滅 すると、DS222のRAID1アレイがリ
ビルド中であることを意味します。
4.ドライブ容量によっては、RAID1アレイのリビルドに数時間かかる場合もあります。
5.完了すると、HDD1およびHDD2両方のLEDが青く点灯します。
メモ:新しいドライブの容 量 がソー スドライブと同一か または 大き いことを確認してください。
DS222は、RAID1アレイのリビルド中でも利用できます。
2.2.4BIGモード
2台 のドライブが 1つ の ボリュームと見なされ 、合計容量は2台のドライブの容量の合計となります。一方のドライブが
故障すると、2 台の データが 失われます。
3.1 設置
装置を接続する前に、ハードディスクドライブを装着してRAIDモードを設定してください。
データ損失を防ぐため、外部ハードウェアの取外し手順にいつも従ってください(例:OSでの取外し)。
コンポーネントを損傷したり、ドライブを無理に装着しないでください。ドライブが装着しにくい場合は、SATAコ
ネクタが正しい位置かどうか確認してください。
Windows7および8/8.1ではフォーマット前に、2.2TBを超えるハードディスクドライブは、G P T パ ー ティション に
変換する必要があります。
GPTパーティションを有するハードディスクドライブは、WindowsXPで使用するには再度フォーマットする必 要
があります。
ドライブ使 用中 は 、ハードディスクドライブを取り外さないでください。
3.2電源のオン/オフ
装置を使用しない場合は、電源をオフにするようお勧めします。
装置を移動するときは、ハードディスクドライブへの損傷を防ぐため電源をオフにしてください。
JPご注意
3.3設置位置および方法
以下の場所では装置の設置は避けてください:
直射日光、ラジ エータ、その他熱源の付近。
非常に高温(38°C以上)か多湿(90%以上)の場所。
ホコリまたは砂の非常に多い場所。
振動、衝撃が与えられる場所、または坂になった台。
42
Page 44

Drive Storage DS222
プ
。
ブル
た
。
。
ご注意
損傷、火災、負傷のいずれかまたは全部を予防するため、以下の点に関して慎重な注意を払う必 要があります:
ケットから電源ケーブルを 取り除くときにはプラグを持ち、決してケーブルを持って引き抜かないこと
れた手で電源ケーブルを 抜き差ししな いこと。
源ケーブルは発熱体から遠ざけること。
分で電源ケーブルを修理しない、また決して何らかの方 法でケ ーブルを改造しないこと。
体が落下、またはその他の理由で破損した場合、電源ケーブルのプラグを抜くこと。
JP
3.5ケー
具合、感電、そして起こりうる干渉のいずれかまたは全ての危険 性を防止するため、ベンダーが供給ま
推薦したケーブルのみ使用してください
3.6データのバックアッ
ータ損傷のリスクを防止 するため 、データを別のストレージメディアまたは装置にバックアップすることを強
お勧めします
AIDモードを変更する前 にハ ードディスクドラ イブ のデータ の バックアップ を行 ってくださ い。
3.7FAQ
Q:この装置はUSB2.0ホストに接続できますか?
A:はい、この装置はUSB2.0と下位互換性を有しています。
Q:ドライブをフォーマットする場 合 、どのファイルシステムを選 んだらい いで すか ?
A:ドライブの使用目的によりますが、一般には下記のものをお勧めします。
WindowsVista/7/8/8.1(32-bit,64-bit)-NTFS
MacOSX-HFS+(MacOSExtended)
PCおよびMacでの使用-FAT32またはexFAT
Q:何台のドライブが故障すると、データは失われますか?
A:RAID0に関しては、1台でもドライブが故障するとデータ消失をもたらします。
RAID1に関しては、同時に複数のドライブが故障するとデータは回復できなくなります。非RAIDに関しては、欠陥があるド
ライブに関 するデータだけが失われます。BIGモードでは、故障したハードディスクドライブ内のデータのみ失われます。
Q:RAID1モードで1台のドライブが故障した場合、どのようにデータにアクセスできますか?
A:RAID1モードでドライブが1台故障した場合でも、バックアップドライ ブ 内 のデ ータに 直接 アクセスで きます。この際
RAIDモードの変更は不要です。故障したドライブを交換する前に、他のRAIDモードへは変更しないでください。変更す
るとR AI D 1アレ イのリビルド は 不 可 能に なります。
43
Page 45

Drive Storage
1.1 시스템 요구 사항
1.1.1 PC 요구 사항
최소 Intel Pentium III CPU 500MHz, 128MB RAM
Windows XP, Windows Vista, Windows 7, Windows 8 / 8.1, Linux
하드웨어 장치에 올바른 해당 포트 (예: USB 3.0/2.0 호스트 컨트롤러) 가 있어야 합니다
1.1.2 Mac 요구 사항
최소 Apple G4 processor, 128MB RAM
Mac OS 10.4 이상
하드웨어 장치에 올바른 해당 포트 (예: USB 3.0/2.0 호스트 컨트롤러) 가 있어야 합니다
1.1.3 지원되는 하드 드라이브
하나 또는 두 개의 2.5" SATA-I(1.5Gb/s) / SATA-II(3.0Gb/s) / SATA-III(6.0Gb/s) 하드 드라이브 또는 SSD
브랜드, 모델, 용량이 동일한 하드 드라이브를 사용할 것을 권장합니다.
2.2TB 를 초과하는 대용량을 지원합니다
1.2 포장 내용물
DS222 저장장치 인클로저(하드웨어 제외)
인터페이스 Y케이블(USB 3.0)
사용 설명서
USB 3.0 Y 케이블
A. USB 3.0 타입 A(호스트용)
B. 추가 전원용
C. 장치용 USB 3.0 Micro B 타입
DS222
KR소개
1.3 사용 설명서 정보
사용 설명서 내용은 실제 제품과 다소 다를 수 있습니다. 기능 및 특징이 펌웨어 버전에 따라 변경될 수 있습니다.
1.4 상표
MS-DOS, Microsoft, Windows Vista 및 7 / 8 / 8.1은 Microsoft Corporation 의 상표입니다
Apple Macintosh 및 Mac 은 Apple Computer 의 상표입니다
기타 모든 타사 브랜드 및 이름은 해당 소유권자의 재산입니다
44
Page 46
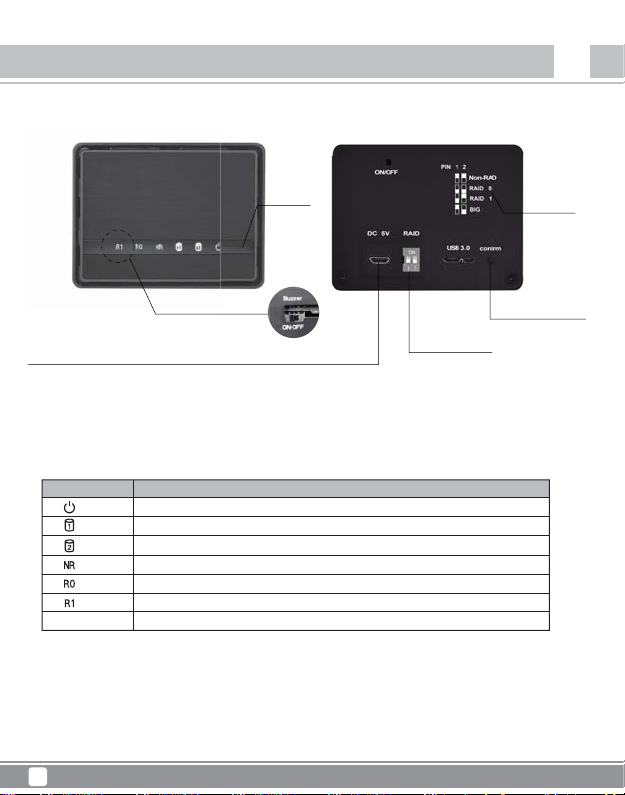
Drive Storage DS222
소개
1.5 상세도
KR
정면도 후면도
LED
버저 스위치
RAID
모드 변경
DC 5V
*랩톱이 최대 전원으로 DS222를 지원할 수 없는 경우, micro-USB 5V/1A 휴대폰 충전 케이블을 연결하여
에 충분한 전원을 공급하십시오.
먼저 DS222의 전원 스위치를 끄고 3-5초 동안 기다린 후 다시 켜서 USB 3.0 Y 케이블과 5V/1A 휴대폰 충전 케이
블을 DS222에 연결해야 합니다.
1.5.1 LED 표시
참고
1.올바른 모드가 선택되었는지 확인하려면, RAID 스위치가 올바른 위치에 있는지 확인하십시오.
2.어느 모드에서든 드라이브가 실패한 경우, 알람(부저)이 울려 사용자에게 이를 알립니다.
45
Status
LED
빨강 = 전원 켜짐
Power
파란색 = 하드 드라이브 인식, 점멸 = 데이터 액세스(읽기/쓰기),꺼짐 = 드라이브 베이가 비어 있음
HDD1
파란색 = 하드 드라이브 인식, 점멸 = 데이터 액세스(읽기/쓰기),꺼짐 = 드라이브 베이가 비어 있음
HDD2
노란색 = Non-raid 활성화됨
Non-RAID
노란색 = Raid 0 활성화됨
RAID 0
노란색 = Raid 1 활성화됨
RAID 1
NR, R0 및 R1 = 노란색 = 기존의 1개 또는 2개의 하드 드라이브의 총 볼륨
BIG
RAID 표시
RAID 모드
변경 확인 버튼
DS222
Page 47

1.5.2 RAID 스위치
DIP 스위치
Note
RAID 모드를 선택한 후 "확인 버튼"을 5초 동안 눌러 새 설정을 확인합니다.
Non-RAID
스위치 위치: 1 ON, 2 ON
RAID 0 - Striping
스위치 위치: 1 OFF, 2 OFF
RAID 1 - Mirroring
스위치 위치: 1 OFF, 2 ON
BIG 모드 – BIG(최대 볼륨)
스위치 위치: 1 ON, 2 OFF
RAID 모드
2.1 하드 드라이브 조립
드라이브는 아무 위치에나 설치할 수 있으며, 특정한 순서가 필요없습니다.
Drive Storage DS222
RAID 모드를 변경하려면 드라이브를 포맷해야
합니다.먼저 기존의 모든 데이터를 백업하십시오!
KR시스템 설정
1. 케이스 바닥에 있는 스위치의 잠금을 풀어 전면판을 위로 들어올려 하우징에서 분리합니다.
2. 그림과 같은 방향으로 하드 드라이브를 삽입하십시오.
기본 RAID 모드를 설정한 다음 전면 패널을 제자리에 설치하십시오.
※ 기본 RAID 모드는 비 Raid입니다. RAID 모드를 변경하려면 2.2를 참조하십시오.
USB 3.0 케이블을 DS222에 연결하고 플러그를시스템에 꽂습니다.
3.
4. PC사용자의 경우 디스크 관리 도구를 사용하고, Mac사용자의 경우 디스크 유틸리티를 사용하여 새 파티션을
만들고 드라이브를 포맷합니다.
5. 완료되었습니다! 이제 외장 드라이브를 사욜 수 있습니다.
46
Page 48

Drive Storage DS222
시스템 설정
※참고
구성품이 손상되지 않도록 주의하고, 드라이브를 무리하게 제자리에 밀어넣지 마십시오.외장드라이브가 수월하게
제자리에 미끄러져 들어가 맞춰지지 않으면 드라이브가 제대로 설치되었는지확인하십시오.Windows 7 / 8 / 8.1은
2.2 TB를 초과하는 하드 드라이브를 지원할 수 있습니다. 하드 디스크를 포맷하려면디스크 관리에서 하드 드라이브
를 GPT 파티션으로 변경하십시오.
※참고
GPT 파티션의 하드 디스크를 사용하려면 Windows XP에서 다시 포맷해야 합니다.
2.1.1설치단계
처음으로 하드 드라이브 설치하기 또는 하드 드라이브가 실패한 경우.
1.먼저 전원을 끄고 USB 3.0 케이블을 분리한 후 하드 드라이브를 설치하거나 결함이 있는 드라이브를 교체합니다.
2.RAID 모드를 설정합니다(Non-RAID, RAID 1, RAID 0 또는 Big 모드)。
3.USB 3.0 Y 케이블을 컴퓨터에 연결하고 전원을 켠 후, 5초 동안 “확인 버튼”을 눌러 새 설정을 확인합니다.
*랩톱이 최대 전원으로 DS222를 지원할 수 없는 경우, micro-USB 5V/1A 휴대폰 충전 케이블을 연결하여
DS222에 충분한 전원을 공급하십시오.
먼저 DS222의 전원 스위치를 끄고 3-5초 동안 기다린 후 다시 켜서 USB 3.0 Y 케이블과 5V/1A 휴대폰 충전
케이블을 DS222에 연결해야 합니다.
4.새 하드 드라이브 설치하기
Ⅰ. PC 사용자의 경우, 디스크 관리 도구를 사용하십시오.
Ⅱ. Mac 사용자의 경우, 디스크 유틸리티를 사용하여 새 파티션을 만들고 드라이브를 포맷하십시오.
5.사용한 하드 드라이브 설치하기
Ⅰ. PC 사용자의 경우, 디스크 관리 도구를 사용하십시오.
Ⅱ. Mac 사용자의 경우, 디스크 유틸리티를 사용하여 이전 파티션을 만들고 드라이브를 포맷하십시오.
KR
2.2 RAID 모드 설정
RAID는 독립 디스크의 중복 배열을 의미합니다. 이는 여러 개의 디스크 드라이브 구성요소를 하나의 논리 장치에
결합하는 저장 기술입니다. 데이터는 필요한 중복 및 성능 레벨에 따라 "RAID 레벨"이라고 부르는 여러 방법 중
하나로 드라이브에 걸쳐 분산됩니다.
2.2.1 Non-RAID
2개의 하드 드라이브는 독립 볼륨으로서 각 드라이브는 별개로 포맷하고 액세스할 수 있습니다. 드라이브 하나
가고장나도 나머지는 영향을 받지 않습니다. 이 모드는 성능이나 중복성에 이점을 제공하지 않습니다.
2.2.2 RAID 0 – Disk Stripping
드라이브는 하나의 볼륨으로 표시되나 크기는 용량이 가장 작은 드라이브의 2배가 됩니다. (예를 들어 드라이
브가 2개인 경우, 하나는 1TB이고 나머지 하나는 2TB로서 사용 가능한 볼륨은 2TB에 불과합니다.)
RAID 0의 경우 다른 모드에 비해 전송 속도가 더 빠르지만, 하나의 하드 드라이브가 고장날 경우 배열이 깨집
니다.
2.2.3 RAID 1 – Disk Mirroring
드라이브는 하나의 볼륨으로 표시되나 크기는 용량이 가장 작은 드라이브에 따라 달라집니다. (예를 들어 드라
이브가 2개인 경우, 하나는 1TB이고 나머지 하나는 2TB로서 사용 가능한 볼륨은 1TB에 불과합니다.)
RAID 1의 중복성에 의한 이점이 있습니다. RAID 1은 한 드라이브의 데이터를 나머지 드라이브에 미러링하기
때문에 하나의 드라이브가 고장나더라도 여전히 나머지 드라이브에서 데이터에 액세스할 수 있으며, 손상된
드라이브를 교체하여 RAID 1 배열을 재빌드할 수 있습니다.
47
Page 49

Drive Storage DS222
결함이 있는 드라이브를 즉시 교체하여 데이터를 재빌드하고 적절한 백업 및 데이터 안전을 지속적으로 보장할
것을 적극 권장합니다.
2.2.3.1 RAID1 모드에서 고장 난 드라이브 교체
1.전원을 끄고 USB 3.0 Y 케이블을 분리합니다.
2.결함이 있는 있는 드라이브를 꺼낸 다음 새 드라이브로 교체합니다.
* 새 하드 드라이브를 사용할 것을 적극 권장합니다(용량은 원래의 드라이브와 같거나 커야 함). 이전 하드
드라이브를 사용하는 경우(용량은 원래의 드라이브와 같거나 커야 함), 필요하면 하드 드라이브의 데이터를
백업하십시오. 재빌드 과정에서 이전 데이터를 자동으로 덮어씁니다.
3.USB 3.0 Y 케이블을 사용하여 컴퓨터를 연결하고 전원을 켭니다. 데이터가 자동으로 재빌드됩니다.
4.재빌드된 배열이 PC에 연결되면, LED가 빠르게 깜박이면서 데이터 재빌드 과정을 나타냅니다.
(교체되는HDD/SSD가 있는 위치에 따라 LED가 HDD1 또는 HDD2에 표시됩니다.)
5.드라이브 용량에 따라 RAID 1 배열을 재빌드하는 데 몇 시간이 걸립니다. 재빌드가 완료되면 HDD1 및
HDD2 LED가 둘 다 파란색으로 계속 켜져 있습니다
2.2.4 BIG 모드
2개의 드라이브가 하나의 볼륨으로 표시되며 총 용량이 2개의 하드 드라이브 조합과 동일합니다. 하나의
드라이브가 고장나면 2개의 드라이브에 있는 데이터가 손실됩니다.
3.1 설치
장치를 연결하기 전에 하드 드라이브를 설치하고 RAID 모드를 설정합니다.
항상 외부 하드웨어에 대한 올바른 연결 끊기 절차를 따라(예: 제거하기 전에 OS에서 꺼내기) 데이터 손실
위험을 방지하십시오.
구성요소를 손상시키거나 드라이브를 무리하게 제자리에 밀어넣지 마십시오. 드라이브를 밀어넣기 어려운
경우 SATA 커넥터의 위치가 올바른지 확인하십시오.
2.2TB를 초과하는 하드 드라이브는 포맷하기 전에 Windows 7 및 8 / 8.1 의 디스크 관리에서 GPT 파티션
으로 변경해야 합니다.
GPT 파티션이 있는 하드 드라이브를 사용하려면 Windows XP에서 다시 포맷해야 합니다.
드라이브가 사용 중인 경우 연결된 하드 드라이브를 제거하지 마십시오.
3.2 전원 켜기/끄기
장치를 사용하지 않을 때는 장치를 끌 것을 적극 권장합니다.
장치의 위치를 바꿀 때 하드 드라이브가 손상되지 않도록 장치를 끄십시오
KR주의
3.3 위치 및 배치 주의사항
다음 장소에 장치를 위치시키지 마십시오:
직사 광선이 드는 장소나 라디에이터 및 기타 열원 근처.
온도가 높거나(38°C이상) 습도가 높은(90%이상) 장소.
먼지나 모래가 많은 장소.
진동, 충격을 받기 쉽거나 경사진 장소.
48
Page 50

Drive Storage DS222
백업
백업할 것을 적
.
.
블
하
.
그
.
.
.
.
.
:
주의
KR
.4 전기 및 전원 플러
상, 화재 및/또는 상해를 방지하기 위해 다음 사항에 특별한 주의를 기울여야 합니다
서 전원 케이블을 분리할 때는 코드가 아닌 플러그 고정구를 잡고 당기십시오
은 손으로 전원 케이블을 연결하거나 분리하지 마십시오
케이블을 히터 근처에서 멀리 하십시오
원 케이블을 직접 수리하거나 어떤 식으로든 개조하려고 시도하지 마십시오
치가 떨어지거나 어떤 식으로든 손상된 경우 전원 케이블의 플러그를 뽑으십시오
.5 케이
작동, 감전 및/또는 장치에 대해 가능한 간섭의 위험을 방지하기 위해 제공된 케이블이나 판매업체에서 권장
케이블만 사용하십시오
.6 데이터
이터 손실 위험을 방지하려면 데이터를 다른 저장 매체 또는 장치에
AID 모드를 변경하기 전에 하드 드라이브 데이터를 백업하십시오
극 권장합니다
3.7 FAQ
질문: 이 장치를 USB 2.0 호스트에 연결할 수 있습니까?
대답: 예, 이 장치는 USB 2.0 과 역호환됩니다.
질문: 드라이브를 포맷하려면 어떤 파일 시스템을 선택해야 합니까?
대답: 이는 드라이브를 어떻게 사용할 것인가에 따라 다릅니다. 그러나 일반적으로 다음을 권장합니다.
Windows Vista/7/8/8.1 (32-bit, 64-bit) -NTFS
Mac OS X - HFS+ (Mac OS Extended)
이를 PC와 Mac 모두에서 사용할 경우 - FAT32 또는 exFAT
질문: 드라이브가 몇 개까지 고장나야 데이터가 손실됩니까?
대답: RAID 0 의 경우 드라이브가 고장나면 데이터가 손실됩니다.
RAID1 의 경우 두 개 이상의 드라이브가 동시에 고장나면 데이터를 더 이상 복구할 수 없습니다.
비-RAID 의 경우 고장난 드라이브에 있는 데이터만 손실됩니다. BIG 모드의 경우 고장난 하드 드라이브에 있는
데이터만 손실됩니다.
질문: 하나의 드라이브가 RAID 1 모드에서 고장날 경우 데이터에 액세스하는 방법?
대답: 하나의 드라이브가 RAID 1 모드에서 고장날 경우 여전히 백업 드라이브가 있는 데이터에 직접 액세스할 수
있으나,
RAID 모드를 변경할 필요는 없습니다. 고장난 드라이브를 교환하기 전에 다른 RAID 모드로 변경하거나 RAID 1
배열로 재빌드할 수 없습니다.
49
Page 51

1.1 系統需求
1.1.1 PC 系統需求
最低 Intel Pentium III CPU 500MHz, 128MB RAM
Windows XP, Windows Vista, Windows 7, Windows 8 / 8.1, Linux
您的硬體設備必須具備符合對應的USB裝置
1.1.2 Mac 系統需求
最低 Apple G4 處理器, 128MB RAM
Mac OS 10.4 以上作業系統
您的硬體設備必須具備符合對應的USB裝置
1.1.3 支援的硬碟
一或兩組 2.5” SATAI (1.5Gb/s)/SATAII (3.0Gb/s)/SATAIII (6.0Gb/s)硬碟或 SSD
建議使用相同品牌、型號及容量的硬碟。
支援超過2.2TB容量的硬碟
1.2 包裝內容
DS222 硬碟外接盒 (不含硬碟)
USB 3.0 Y型傳輸線
使用手冊
USB 3.0 Y型傳輸線:
A.USB 3.0 type A (主機用線)
B.電源供應器
C.USB 3.0 Micro B type 裝置用線
Drive Storage
DS222
TW簡介
1.3 關於這本使用手冊
本手冊內容可能與實品略有出入。功能及性能可能隨韌體版本不同而異。
1.4 商標
MS-DOS, Microsoft, Windows Vista, 7 & 8 商標為 Microsoft Corporation 所有。
Apple Macintosh 及 Mac 商標為 Apple Computer 所有。
其他協力廠商的品牌與名字為該協力廠商所有。
50
Page 52

Drive Storage DS222
簡介
TW
1.5 詳細說明
DC 5V
*如果你的筆電無法支援DS222所需的電力,請插入手機(5V/1A)的電源線,以維持運作,但是”必須”先關閉
DS222電源開關,過三至五秒後,在開啟電源及接上USB 3.0 Y型線和5V/1A的電源線。
1.5.1 LED 狀態說明
LED
Power
HDD1
HDD2
Non-RAID
RAID 0
RAID 1
BIG
注意
1.為了判斷磁碟陣列模式正確,請確認RAID開關正確切換,避免燈號重複顯示。
2.所有模式中硬碟故障時,警鳴器(Buzzer)會發出故障提示警示音
正面 背面
LED
狀態顯示
警鳴器開關
Status
紅燈亮 = 電源開啟
藍燈亮 = 偵測到硬碟恆亮,閃爍=資料存取中,恆滅 =硬碟故障或無硬碟
藍燈亮 = 偵測到硬碟恆亮,閃爍=資料存取中,恆滅 =硬碟故障或無硬碟
黃燈亮 = 非磁碟陣列設定啟動
黃燈亮 = Raid 0 陣列設定啟動
黃燈亮 = Raid 1 陣列設定啟動
NR燈亮,R0燈亮,R1燈亮 = 儲存空間最大模式
RAID模式
切換開關
RAID設定
說明圖示
RAID模式
確認按鈕
51
Page 53

Drive Storage DS222
1.5.2 RAID 開關
DIP 開關 陣列模式
註
除了非陣列模式之外,其他陣列模式皆需要兩顆硬碟同時運作。
在切換陣列模式之後,請按壓 confrim 鍵5秒確認設定。
2.1 硬碟組裝
硬碟可以裝在任何位置,沒有特殊的順序要求。
1.解下機殼下方的開關並且向上拉起前方的面板再拉離機殼。
2.如上圖所示,將硬碟依圖示4.方向插入。
※系統預設模式為Non-Raid,如欲改變RAID模式請參照章節2.2。
3.
將USB 3.0連接線(micro B 接頭)與DS222連接,再連結到電腦。
4.使用磁碟管理工具(PC)或是磁碟工具(Mac)來製造新的槽並格式化磁碟。
5.格式化完成!您的磁碟已經準備好可以使用了。
附註
請小心不要傷害到任何元件,而且不要用力把硬碟插到插槽中。如果它們不能輕易滑入位置並吻合,請確認硬碟
有正確的安裝,硬碟需依照相同方向插入。
Windows 7 或 Windows 8.1系統下,硬碟容量大於2.2TB,請在磁碟管理工具中將硬碟換成GPT磁碟,
再格式化。
附註:若硬碟轉換成GPT格式,在Windows XP系統下,必須重新格式化,方可使用。
Non-Raid 非陣列模式
開關位置: 1 ON, 2 ON
Raid 0 - Striping 高速大容量模式
開關位置: 1 OFF, 2 OFF
RAID 1 – Mirroring 鏡射資料保全模式
開關位置: 1 OFF, 2 ON
BIG Mode – BIG 最大容量模式
開關位置: 1 ON, 2 OFF
切換陣列模式將會需要重新格式化您的硬碟,
請確認備份好所有資料後,再進行設定 。
TW系統架設
52
Page 54

Drive Storage DS222
系統架設
2.1.1 安裝步驟
1.關閉電源,移除USB 3.0傳輸線,安裝硬碟。
2.設定RAID模式(NON-RAID,RAID 1,RAID 0 and Big mode)。
3.將USB3.0傳輸線連接到您的電腦後,開啟電源,按壓confirm鍵5秒切換 RAID模式。
*如果你的筆電無法支援DS222所需的電力,請插入手機(5V/1A)的電源線,以維持運作,但是”必須”先關閉
DS222電源開關,過三至五秒後,在開啟電源及接上USB 3.0 Y型線和5V/1A的電源線。
4.安裝全新硬碟時請至磁碟管理工具(PC)或是磁碟工具(Mac)中,初始化該硬碟後再格式化所有硬碟。
5.安裝使用過之硬碟請直接在磁碟管理工具(PC)或是磁碟工具(Mac)中刪除磁 碟區後格式化所有硬碟。
TW
2.2 RAID 模式
RAID 是 redundant array of independent disks(獨立磁碟備援陣列)的簡稱。這是一種將多個磁碟組合為單一邏輯
單元的技術。資料會以稱為「RAID 等級」的方式,按備援及效能需求分配至各個磁碟
2.2.1 Non-RAID
兩組硬碟顯示獨立的磁區,各磁碟可分別格式化及存取。任一組故障,都不影響另一組。此一模式沒有任何效能
或備援效益。
2.2.2 RAID 0 – Disk Stripping
磁碟會顯示為單一磁區,但容量則為最小磁碟容量的兩倍。(例如,若有兩個磁碟容量分別為 1TB 及 2TB,
則磁區容量只有 2TB)。
RAID 0 比其他模式傳輸速度更快,但任一硬碟故障將導致整個陣列損毀。
2.2.3 RAID 1 – Disk Mirroring
磁碟會顯示為單一磁區,容量則為最小磁碟的容量。(例如,若有兩個磁碟容量分別為 1TB 及 2TB,則磁區容
量只有 1TB)。
RAID 1 具備備援效益。RAID 1 將一個磁碟的資料鏡射到另一磁碟。任一磁碟故障時,仍可使用另一磁碟上的
資料,或更換受損的磁碟以重建 RAID 1 陣列。
強烈建議要趕快更新硬碟做資料重置來確保持續備份與資料的安全性。
53
Page 55

Page 56

Drive Storage DS222
。
。
風險。
。
線。
。
。
。
:
注意
.4 電子與電源插頭
心注意下列事項以避免損壞、火災或受傷
從插座上拔掉電源線的時候,請從接頭上拉起並且不要從線拉扯
要用濕的手來插或拔電源
電源線遠離高溫機器
要自己試著修復電源線或是任何方法修改它
果裝置摔落或是任何其他方法損壞,拔掉電源線
.5 線材
用內附或是代理商建議的線材來避免故障、電擊或任何裝置干擾的
.6 資料備份
防資料遺失,強烈建議將資料備份到另一儲存媒體或裝置
更 RAID 模式前,請先備份硬碟資料
3.7 常見問題
Q: 我能連接此裝置到USB 2.0 HOST嗎?
A: 可以,此裝置可以向下相容USB 2.0。
Q: 我該選用什麼檔案系統來格式化我的磁碟?
A: 這基本上由您決定想怎麼使用這個磁碟,不過通常我們建議:
Windows Vista/7/8/8.1 (32-bit, 64-bit) -NTFS
Mac OS X→ HFS+ (Mac OS Extended)
在 PC 及 Mac 上使用 → FAT32 或 exFAT
Q: 在我硬碟故障時,會造成多少資料流失?
A: 在RAID模式下,任何磁碟的損壞就會造成資料流失。
在Raid 1,同時超過一顆磁碟損壞就代表資料再也不能覆蓋回來。
在Non-Raid只有損壞的磁碟的資料會流失。
在 BIG 模式下,只有故障硬碟上的資料會遺失。
Q:RAID 1 模式下任一磁碟故障時如何存取資料?
A:RAID 1 模式下任一磁碟故障時,仍可直接存取備份磁碟上的資料,無需變更 RAID 模式。請注意,在更換
故障的磁碟前,切勿變更 RAID 模式,否則將無法重建 RAID 1 陣列。
TW
55
Page 57

1.1 系统需求
1.1.1 PC 系统需求
最低 Intel Pentium III CPU 500MHz, 128MB RAM
Windows XP, Windows Vista, Windows 7, Windows 8 / 8.1, Linux
您的硬体设备必须具备符合对应的USB装置
1.1.2 Mac 系统需求
最低 Apple G4 处理器, 128MB RAM
Mac OS 10.4 以上操作系统
您的硬设备必须具备符合对应的USB装置
1.1.3 支持的硬盘
一或两组 2.5” SATAI (1.5Gb/s)/SATAII (3.0Gb/s)/SATAIII (6.0Gb/s)硬盘或 SSD
建议使用相同品牌、型号及容量的硬盘。
支持超过2.2TB容量的硬盘
1.2 包装内容
依照供货商与版本的不同,包装内容将有所不同。
DS222 硬盘外接盒 (不含硬盘)
USB 3.0 Y型传输线
使用手册
USB 3.0 Y型传输线:
A.USB 3.0 type A (主机用线)
B.电源供应器
C.USB 3.0 Micro B type 装置用线
Drive Storage
DS222
CN简介
1.3 关于这本使用手册
本手册内容可能与实品略有出入。功能及性能可能随韧体版本不同而异。
1.4 商标
MS-DOS, Microsoft, Windows Vista, 7 & 8 商标为 Microsoft Corporation 所有。
Apple Macintosh 及 Mac 商标为 Apple Computer 所有。
其他第三方的品牌与名字为该第三方所有。
56
Page 58

Drive Storage DS222
态显
简介
CN
1.5 详细说明
DC 5V
*如果你的笔电无法支持DS222所需的电力,请插入手机(5V/1A)的电源线,以维持运作,但是”必须”先关闭DS222
电源开关,过三至五秒后,在开启电源及接上USB 3.0 Y型线和5V/1A的电源线。
1.5.1 LED 状态说明
LED
Power
HDD1
HDD2
Non-RAID
RAID 0
RAID 1
BIG
注意
1.为了判断磁盘阵列模式正确,请确认RAID开关正确切换,避免灯号重复显示。
2.所有模式中仅安装一颗磁盘或磁盘故障时,警鸣器(Buzzer)发出故障提示警示音。
正面 背面
正面 背面
LED状态显示
LED状态显示
警鸣器开关
警鸣器开关
状态
红灯亮 = 电源开启
蓝灯亮 = 侦测到硬盘恒亮,闪烁=数据存取中,恒灭 =硬盘故障或无硬盘
蓝灯亮 = 侦测到硬盘恒亮,闪烁=数据存取中,恒灭 =硬盘故障或无硬盘
黄灯亮 = 非磁盘阵列设定启动
黄灯亮 = Raid 0 数组设定启动
黄灯亮 = Raid 1 数组设定启动
NR灯亮,R0灯亮,R1灯亮 = 储存空间最大模式
RAID模式
切换开关
RAID设定
RAID设定
说明图示
说明图示
RAID模式
确认按钮
57
Page 59

Drive Storage DS222
1.5.2 RAID 开关
DIP 开关 阵列模式
注
除了非阵列模式之外,其他阵列模式皆需要两颗硬盘同时运作。
在切换阵列模式之后,请按压 confrim 键5秒确认设定。
Non-Raid 非阵列模式
开关位置: 1 ON, 2 ON
Raid 0 - Striping 高速大容量模式
开关位置: 1 OFF, 2 OFF
RAID 1 – Mirroring 镜射数据保全模式
开关位置: 1 OFF, 2 ON
BIG Mode – BIG 最大容量模式
开关位置: 1 ON, 2 OFF
切换阵列模式将会需要重新格式化您的硬盘,
请确认备份好所有数据后,再进行设定 。
2.1 硬盘组装
硬碟可以装在任何位置,没有特殊的顺序要求。
1. 解下机壳下方的开关并且向上拉起前方的面板再拉离机壳。
2. 如上图所示,将硬盘依图标4.方向插入。
※系统默认模式为Non-Raid,如欲改变RAID模式请参照章节2.2。
将USB 3.0数据线(micro B 接头)与DS222连接,再连结到计算机。
3.
4. 使用磁盘管理工具(PC)或是磁盘工具(Mac)来制造新的槽并格式化磁盘。
5. 格式化完成!您的磁盘已经准备好可以使用了。
附注
请小心不要伤害到任何组件,而且不要用力把硬盘插到插槽中。如果它们不能轻易滑入位置并吻合,请确认硬盘有正确
的安装,硬盘需依照相同方向插入。
Windows 7 或 Windows 8.1系统下,硬盘容量大于2.2TB,请在磁盘管理工具中将硬盘换成GPT磁盘,
再格式化。
附注:若硬盘转换成GPT格式,在Windows XP系统下,必须重新格式化,方可使用。
CN系统架设
58
Page 60
Drive Storage DS222
系统架设
2.1.1 安装步骤
1.关闭电源,移除USB 3.0传输线,安装硬盘。
2.设定RAID模式(NON-RAID,RAID 1,RAID 0 and Big mode)。
3.将USB3.0传输线连接到您的计算机后,开启电源,按压confirm键5秒切换 RAID模式。
*如果你的笔电无法支持DS222所需的电力,请插入手机(5V/1A)的电源线,以维持运作,但是”必须”先关闭
DS222电源开关,过三至五秒后,在开启电源及接上USB 3.0 Y型线和5V/1A的电源线。
4.安装全新硬盘时请至磁盘管理工具(PC)或是磁盘工具(Mac)中,初始化该硬盘后再格式化所有硬盘。
5.安装使用过之硬盘请直接在磁盘管理工具(PC)或是磁盘工具(Mac)中删除磁碟区后格式化所有硬盘。
CN
2.2 RAID 模式
RAID 是 redundant array of independent disks(独立磁盘备援阵列)的简称。这是一种将多个磁盘组合为单一逻
辑单元的技术。数据会以称为「RAID 等级」的方式,按备援及效能需求分配至各个磁盘
2.2.1 Non-RAID
两组硬盘显示独立的磁区,各磁盘可分别格式化及存取。任一组故障,都不影响另一组。此一模式没有任何效能
或备援效益。
2.2.2 RAID 0 – Disk Stripping
磁盘会显示为单一磁区,但容量则为最小磁盘容量的两倍。(例如,若有两个磁盘容量分别为 1TB 及 2TB,则
扇区容量只有 2TB)。
RAID 0 比其他模式传输速度更快,但任一硬盘故障将导致整个阵列损毁。
2.2.3 RAID 1 – Disk Mirroring
磁碟會顯示為單一磁區,容量則為最小磁碟的容量。(例如,若有兩個磁碟容量分別為 1TB 及 2TB,則磁區容
量只有 1TB)。
RAID 1 具備備援效益。RAID 1 將一個磁碟的資料鏡射到另一磁碟。任一磁碟故障時,仍可使用另一磁碟上的
資料,或更換受損的磁碟以重建 RAID 1 陣列。
强烈建议要赶快更新硬盘做数据重置来确保持续备份与数据的安全性。
2.2.3.1 在RAID1模式下更换故障硬盘
硬盘故障计算机无法存取时
1.关闭电源,移除USB 3.0传输线。
2.取出故障的硬盘,放入新的硬盘。
*建议使用全新硬盘(新的硬盘容量必须大于或等于另外一颗硬盘容量)。如使用旧的硬盘,其容量必须大于或
等于另外一颗硬盘容量。但要注意使用旧硬盘时如有数据存在时,请自行检视是否需要保留既有数据,如需要
保留请先将其拷贝出来。当此颗硬盘置入后,机器将会自动启动数据重置动作,原先在机器内的硬盘数据会覆
盖新的硬盘数据。
3.将USB3.0传输线连接到您的计算机后,开启电源,即自动启动数据重置动作。
4.重建磁盘阵列需连接计算机下才会自动重置数据,硬盘状态灯会闪烁(取决于在刚更换过的HDD/SSD)。
5.重建磁盘阵列将需要几个小时,视硬盘的数据容量大小而定。当磁盘阵列重建完成时, HDD1和HDD2的灯会
恒亮显示。
59
Page 61

。
线。
。
。
:
2.2.4 BIG 模式
两组磁盘显示为单一磁区,且总容量等于两部硬盘容量的总和。任一磁盘故障时,两组磁盘的数据都会遗失。
3.1 安装
连接装置前,请先安装硬盘并设定 RAID 模式。
务必按照正常程序拔除外接硬件(亦即在拔除前先从操作系统退出),以免数据遗失。
切勿破坏零组件并强推磁盘定位。磁盘如难以滑入定位,请检查 SATA接头位置是否正确。
容量超过 2.2TB 的硬盘,需先在 Windows 7/8/8.1的磁盘管理功能下变更 GPT 磁盘分区,才能进行格式化。
采用 GPT 磁盘分区的磁盘需先在 Windows XP 系统下重新格式化才能使用。
切勿在硬盘使用时移除联机硬盘。
3.2 开关机
强烈建议在装置未使用时才关机。
移动磁盘前请先关机以免磁盘受损。
3.3 位置与放置
请避免将您的装置放在下列地方:
阳光直射、暖气,其他热源的地方。
高温 (高过38°C) 或潮湿 (超过90%)的地方。
灰尘多或沙多的地方。
摇晃、震动或倾斜基底的地方。
.4 电子与电源插头
心注意下列事项以避免损坏、火灾或受伤
从插座上拔掉电源线的时候,请从接头上拉起并且不要从线拉扯
要用湿的手来插或拔电源
电源线远离高温机器
要自己试着修复电源线或是任何方法修改它
果装置摔落或是任何其他方法损坏,拔掉电源线。
Drive Storage DS222
CN注意
60
Page 62

Drive Storage DS222
。
。
。
注意
.5 线材
用内附或是代理商建议的线材来避免故障、电击或任何装置干扰的风险
.6 数据备份
防数据遗失,强烈建议将数据备份到另一储存媒体或装置
更 RAID 模式前,请先备份硬盘数据
3.7 常見問題
Q: 我能连接此装置到USB 2.0 HOST吗?
A: 可以,此装置可以向下兼容USB 2.0。
Q: 我该选用什么文件系统来格式化我的磁盘?
A: 这基本上由您决定想怎么使用这个磁盘,不过通常我们建议:
Windows Vista/7/8/8.1 (32-bit, 64-bit) -NTFS
Mac OS X→ HFS+ (Mac OS Extended)
在 PC 及 Mac 上使用 → FAT32 或 exFAT
Q: 在我硬盘故障时,会造成多少数据流失?
A: 在RAID模式下,任何磁盘的损坏就会造成数据流失。
在Raid 1,同时超过一颗磁盘损坏就代表数据再也不能覆盖回来。
在Non-Raid只有损坏的磁盘的数据会流失。
在 BIG 模式下,只有故障硬盘上的数据会遗失。
Q:RAID 1 模式下任一磁盘故障时如何存取数据?
A:RAID 1 模式下任一磁盘故障时,仍可直接存取备份磁盘上的数据,无需变更 RAID 模式。请注意,在更换故障
的磁盘前,切勿变更 RAID 模式,否则将无法重建 RAID 1阵列。
CN
61
Page 63

Warranty Information
This product has a limited 1 year warranty in North America and Australia.
For information on warranty periods in other regions, please contact your reseller or SilverStone
authorized distributor.
Warranty terms & conditions
1. Product component defects or damages resulted from defective production is covered under warranty.
Defects or damages with the following conditions will be fixed or replaced under SilverStone Technology’s jurisdiction.
a) Usage in accordance with instructions provided in this manual, with no misuse, overuse, or other inappropriate actions.
b) Damage not caused by natural disaster (thunder, fire, earthquake, flood, salt, wind, insect, animals, etc…)
c) Product is not disassembled, modified, or fixed. Components not disassembled or replaced.
d) Warranty mark/stickers are not removed or broken.
Loss or damages resulted from conditions other than ones listed above are not covered under warranty.
2. Under warranty, SilverStone Technology’s maximum liability is limited to the current market value for the product (depreciated value, excluding
shipping, handling, and other fees). SilverStone Technology is not responsible for other damages or loss associated with the use of product.
3. Under warranty, SilverStone Technology is obligated to repair or replace its defective products. Under no circumstances will SilverStone
Technology be liable for damages in connection with the sale, purchase, or use including but not limited to loss of data, loss of business, loss of
profits, loss of use of the product or incidental or consequential damage whether or not foreseeable and whether or not based on breach of warranty,
contract or negligence, even if SilverStone Technology has been advised of the possibility of such damages.
4. Warranty covers only the original purchaser through authorized SilverStone distributors and resellers and is not transferable to a second hand
purchaser.
5. You must provide sales receipt or invoice with clear indication of purchase date to determine warranty eligibility.
6. If a problem develops during the warranty period, please contact your retailer/reseller/SilverStone authorized distributors or SilverStone
http://www.silverstonetek.com.
Please note that: (i) You must provide proof of original purchase of the product by a dated itemized receipt; (ii) You shall bear the cost of shipping
(or otherwise transporting) the product to SilverStone authorized distributors. SilverStone authorized distributors will bear the cost of shipping
(or otherwise transporting) the product back to you after completing the warranty service; (iii) Before you send the product, you must be issued a
Return Merchandise Authorization (“RMA”) number from SilverStone. Updated warranty information will be posted on SilverStone’s official website.
Please visit http://www.silverstonetek.com for the latest updates.
Additional info & contacts
For North America (usasupport@silverstonetek.com)
SilverStone Technology in North America may repair or replace defective product with refurbished product that is not new but has been functionally tested.
Replacement product will be warranted for remainder of the warranty period or thirty days, whichever is longer. All products should be sent
back to the place of purchase if it is within 30 days of purchase, after 30 days, customers need to initiate RMA procedure with SilverStone T echnology
in USA by first downloading the “USA RMA form for end-users” form from the below link and follow its instructions.
http://silverstonetek.com/contactus.php
For Australia only (support@silverstonetek.com)
Our goods come with guarantees that cannot be excluded under the Australian Consumer Law.
You are entitled to a replacement or refund for a major failure and for compensation for any other reasonably foreseeable loss or damage.
You are also entitled to have the goods repaired or replaced if the goods fail to be of acceptable quality and the failure does not amount to a major failure.
Please refer to above “Warranty terms & conditions” for further warranty details.
SilverStone Technology Co., Ltd. 12F No. 168 Jiankang Rd., Zhonghe Dist., New Taipei City 235 Taiwan R.O.C. + 886-2-8228-1238
(standard international call charges apply)
For Europe (support.eu@silverstonetek.de)
For all other regions (support@silverstonetek.com)
Page 64

G11221860
 Loading...