

Page 1
Case Storage
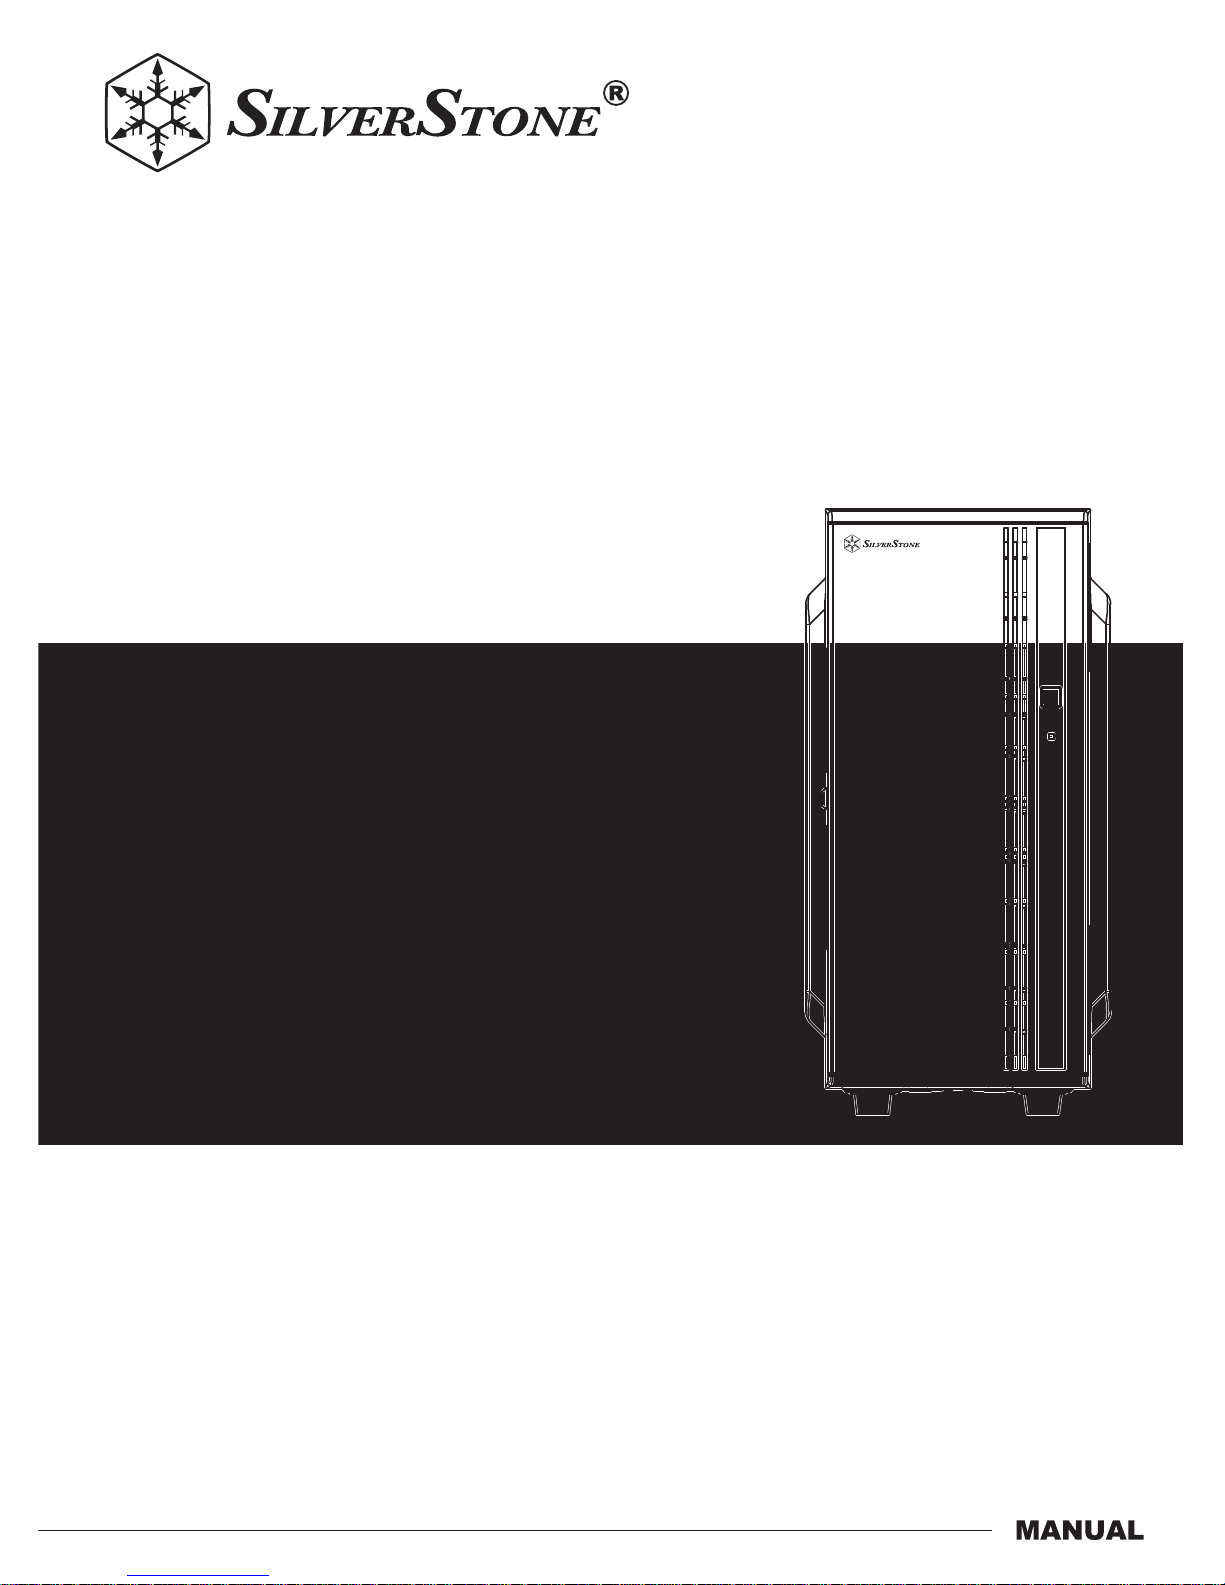
Flexible 8-bay compact NAS tower
CS380
Page 2

Page 3
The following manual and guides were carefully prepared by the SilverStone engineering team to
help you maximize the potential of your SilverStone product. Please keep this manual for future
reference when upgrading or performing maintenance on your system. A copy of this manual can also
be downloaded from our website at:
Installation and system optimization guide:
Product Overview
Special Features
Specification
Disassemble Chart
Exterior Overview
Front Panel Function Guide
Installation Guide
Connector Definition
Guide To Hard Drive Backplane
Component Size Limitations
Optimal Thermal Performance Layout
Upgrade And Maintenance
Q&A
Warranty Information
P.1
P.1
P.1
P.2
P.3
P.4
P.5
P.15
P.18
P.19
P.24
P.27
P.30
P.31
Page 4
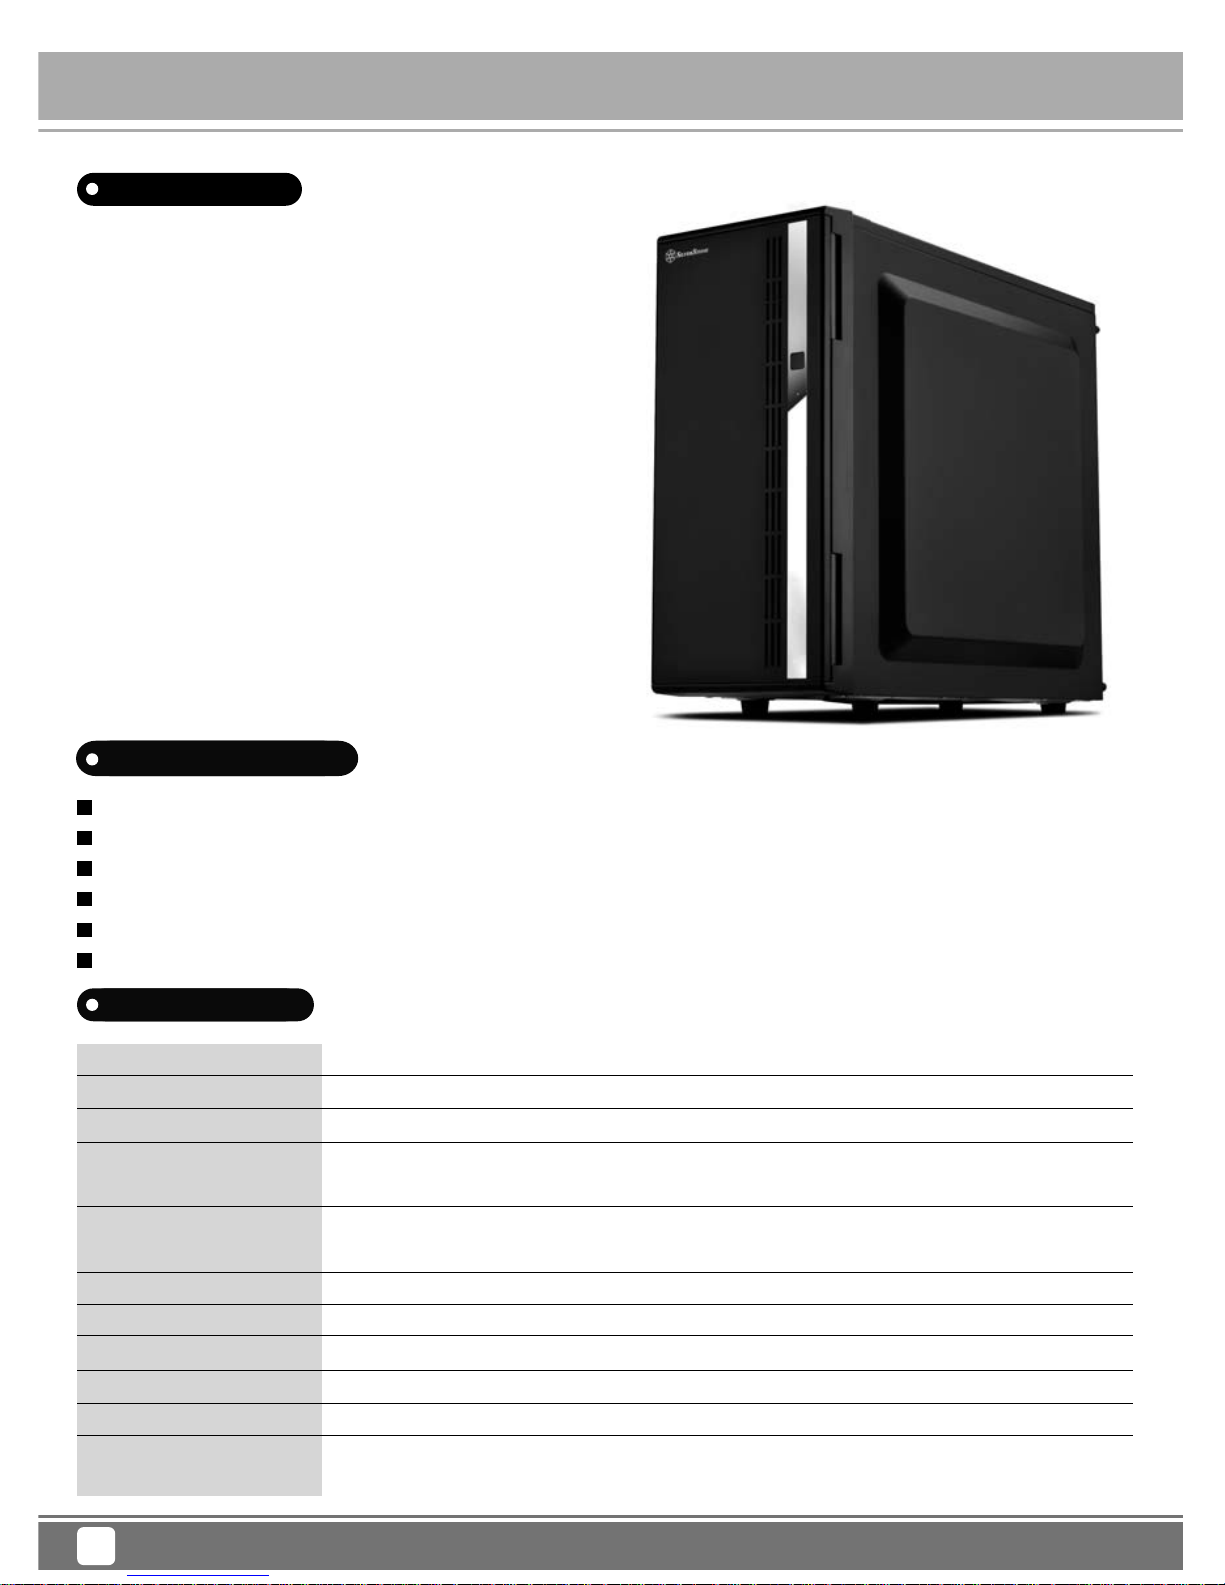
Product Overview
Specification
Model No.
Material
Motherboard
Drive bay
Cooling System
Expansion Slot
Front I/O Port
Power Supply
Expansion Card
Limitation of CPU cooler
Dimension
SST-CS380B (black)
Plastic front door, steel body
ATX, Micro-ATX, Mini-ITX
External
Internal
Rear
Side
7
USB 3.0 Type-A x 2, Audio x 1, MIC x 1
Standard PS2 (ATX)
Compatible up to 9.5" (241mm), width restriction - 5.9" (149mm)
146mm
215.3mm (W) x 426.5mm (H) x 487.5mm (D) , 44.7 Liters
8.48" (W) x 16.79" (H) x 19.19" (D) , 44.7 Liters
5.25" x 2
3.5" SAS/SATA hot-swap x 8 (2.5" compatible)
1 x 120mm fan (Compatible with 120mm fan/radiator)
Dedicated drive bracket 120mm fan x 2
Case Storage CS380
Introduction
Special Features
1
To fulfill the needs of enthusiasts looking for a compact, flexible NAS
tower chassis, SilverStone designed the CS380. With the ability to
accommodate standard components such as ATX motherboards,
standard ATX (PS2) power supplies, dual 5.25" drive bays, standard-sized
expansion cards, and even liquid coolers, the CS380 can easily meet
the demands for majority of NAS builds. Equipped with two 120mm
intake fans, a 120mm rear exhaust fan, and easily removable filters,
keeping everything cool and dust-free is as easy as in any SilverStone
premium chassis. Safety features such as lockable front door and
power button are also included.
Completing a great chassis structure is a modular, eight hot-swappable
drive cage design that support both 3.5" and 2.5" drives. It utilizes a
custom backplane supporting both SATA and SAS interfaces for increased
compatibly with nearly all modern hard drives or SSDs. With a size
that is nearly identical to most ATX mid towers, the space-saving CS380
is perfect for anyone looking to build a powerful NAS for home or office.
Compact mid-tower chassis design with space-saving footprint
Supports eight hot-swappable 3.5" or 2.5" SAS/SATA drives with built-in backplane
Classic SilverStone styling
Includes two flexible 5.25" drive bays for more storage options
Lockable front door and power button design
Includes three 120mm fans with filtered intake vents
Page 5

Disassemble Chart
Case Storage CS380
2
12025 FAN
12025 FAN X2
DRIVE TRAY x8
RESET SW
USB 3.0 X2 + SPK + MIC
POWER SW
5.25” DRIVE BAY X2
RIGHT SIDE P ANEL
LEFT SIDE P ANEL
PICTURE PURPOSEITEM
KEY
LOCK
MANUAL
ZIPPER BAG
STANDOFF-SOCKET-WRENCH
BUNCH WIRE TIES
STANDOFF
SCREW-M3
SCREW-6-32
SCREW-P/W-M3
FRONT DOOR LOCK
FRONT DOOR LOCK
CONTAINS PARTS
USER INSTALLATION GUIDE
SECURE 2.5" HDD
MOTHERBOARD STANDOFFS
STANDOFF SCREWS
CABLE MANAGEMENT
SECURE MOTHERBOARD/3.5" HDD/PSU
SECURE 5.25" DRIVE
Page 6
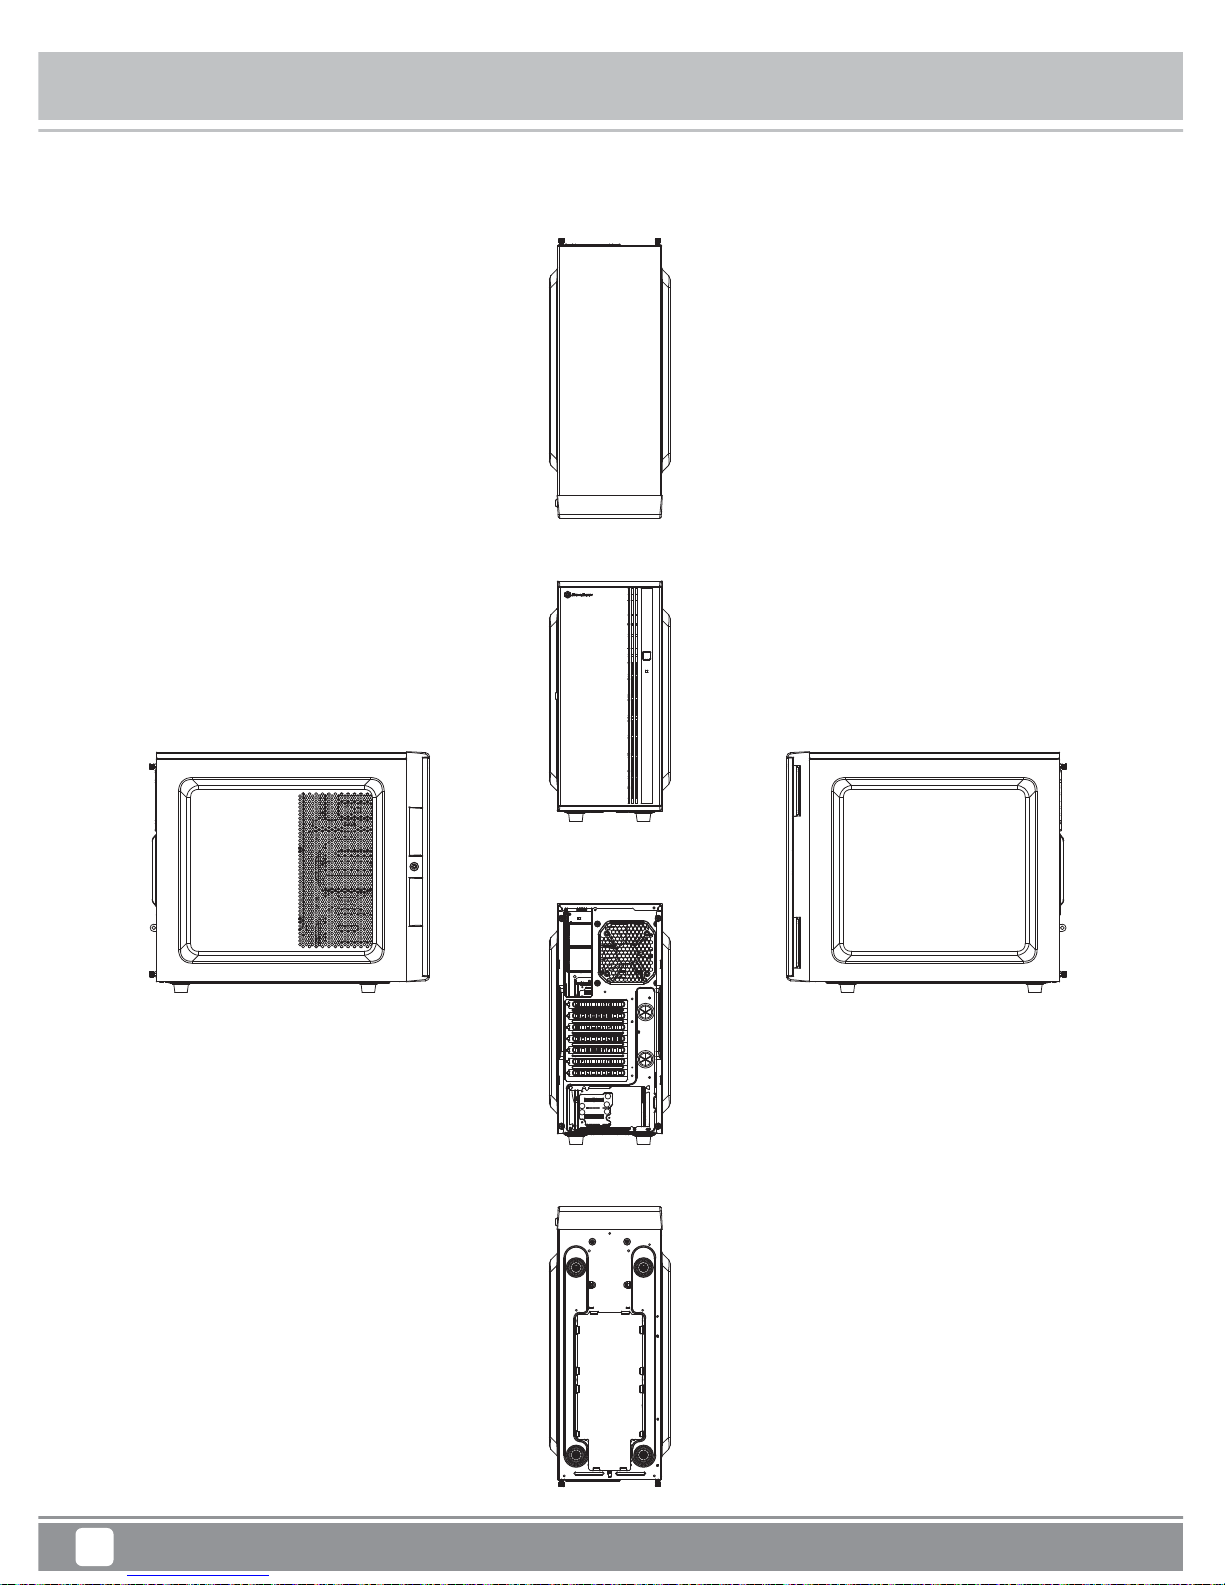
Exterior Overview
Case Storage CS380
3
TOP
BOTTOM
FRONT
BACK
RIGHT SIDELEFT SIDE
Page 7
Case Storage CS380
4
Front panel function guide
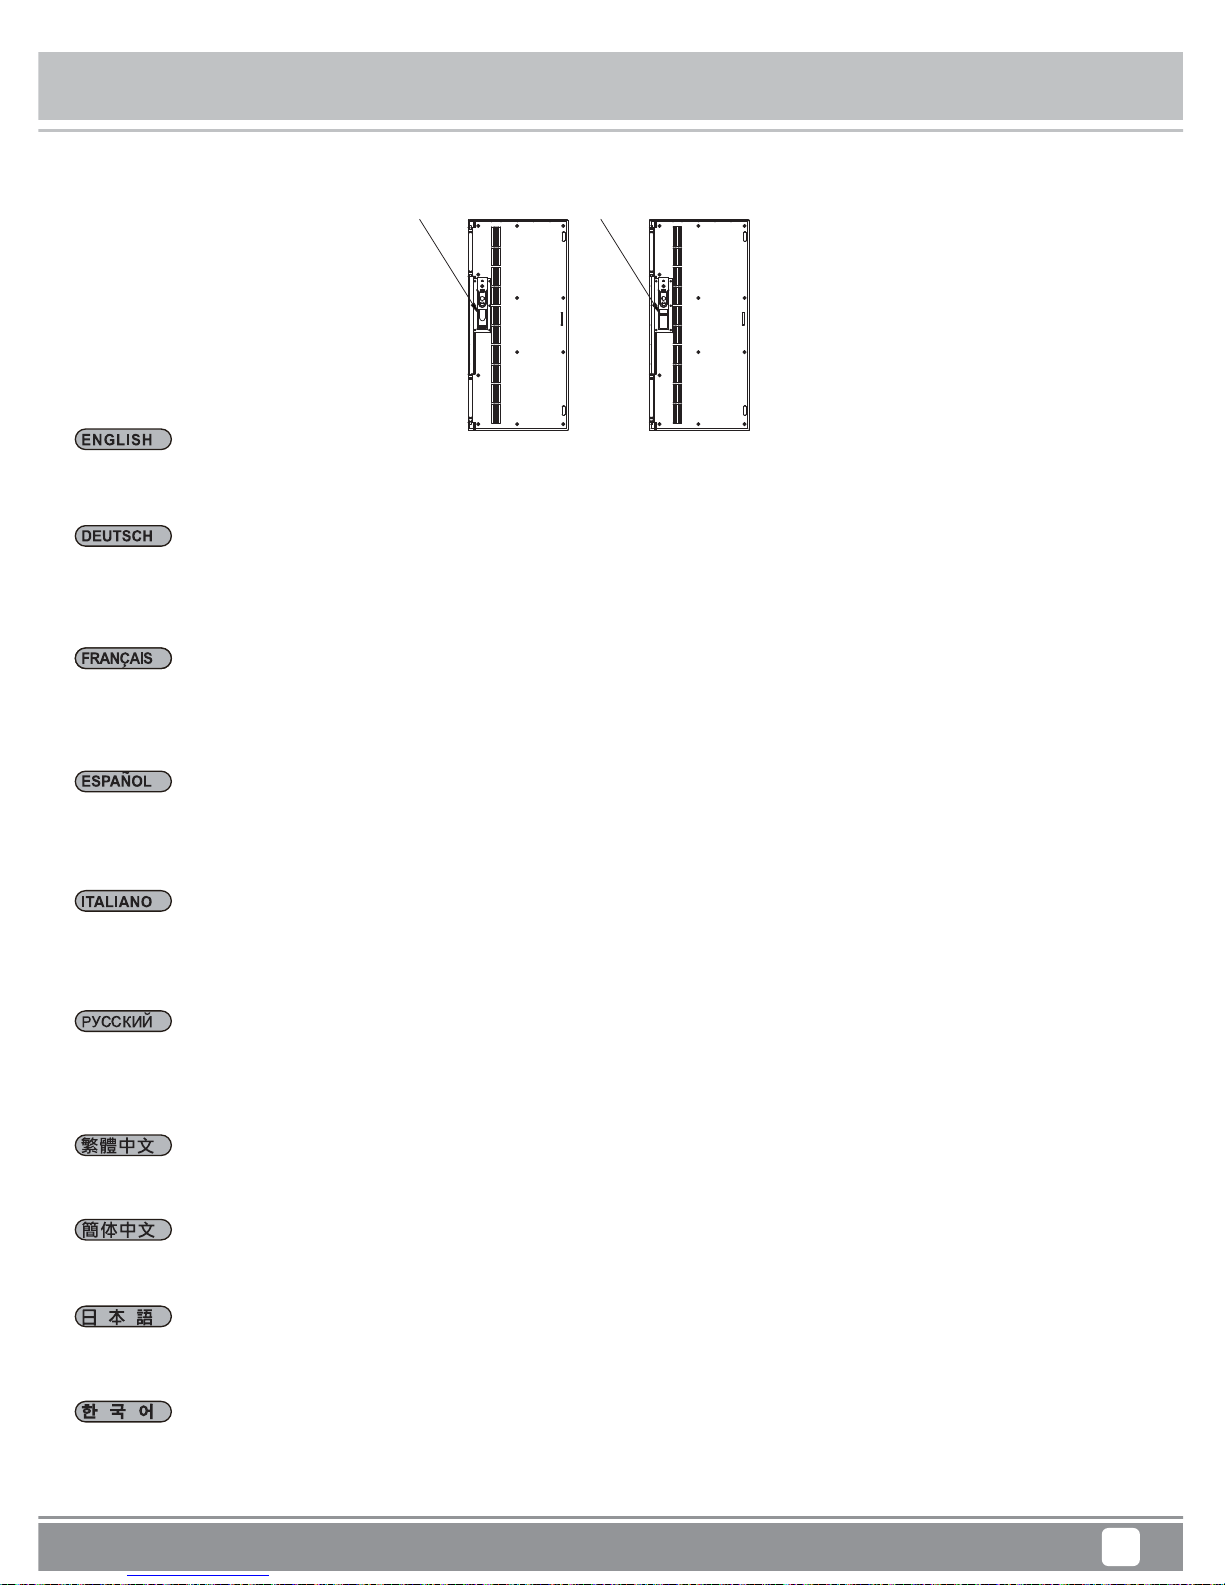
Power button lock
Open Locked
An der Fronttür gibt es eine Möglichkeit zum Sperren der Netztaste. Wenn die Netztastensperre aktiv ist, wird die Netztaste an der Fronttür außer
Kraft gesetzt. Die Netztaste kann nun nur noch betätigt werden, wenn die Fronttür erneut geöffnet wird. Nach dem Schließen der Fronttür können
Sie die Tür mit dem Schlüssel verriegeln und die Netztaste so komplett außer Kraft setzen. Auf diese Weise können Sie verhindern, dass die
Netztaste aus Versehen betätigt wird.
La puerta frontal contiene un cierre del botón de potencia. Cuando el botón de potencia esté bloqueado, se desconectará el botón de potencia de
la puerta frontal, el único modo de presionar el botón de potencia es abrir de nuevo la puerta frontal. Tras cerrar la puerta frontal podrá usar la
llave para bloquear la puerta frontal y desconectar el botón de potencia totalmente. Este diseño único es para evitar que el botón de potencia se
presione de forma accidental.
Lo sportello frontale è dotato di un di blocco del tasto d’alimentazione. Quando il blocco tasto del tasto d’alimentazione è attivato, il tasto
d’alimentazione dello sportello frontale è disabilitato, e l'unico modo per premere il tasto d’alimentazione è quello di aprire di nuovo lo sportello
frontale. Dopo aver chiuso lo sportello frontale, si può usare la chiave per bloccare lo sportello frontale e disabilitare del tutto il tasto d’alimentazione.
Questo sistema unico, è progettato per impedire la pressione accidentale del tasto d’alimentazione.
The front door contains a power button lock. When the power button lock is locked, you will disable the power button on the front door, the only way
to press the power button is by opening the front door again. After closing the front door, you can use the key to lock front door and disable the power
button completely. This unique design is to prevent the power button from being pressed accidentally.
На передней дверце расположен блокиратор кнопки питания. Когда кнопка питания заблокирована, кнопка питания на передней дверце не
действует. Чтобы нажать кнопку питания потребуется снова открыть переднюю дверцу. После закрытия передней дверцы ее можно
заблокировать при помощи ключа и полностью деактивировать кнопку питания. Эта уникальная конструкция позволяет избежать случайного
нажатия кнопки питания.
面板內部有電源開關鎖,扣上時可讓門板上的電源開關失效,只能夠打開門板後才能按下開關。關上前門板後,只要使用鑰匙鎖住門板,電源開關即
無法使用。此設計可避免不小心誤觸電源開關。
面板内部有电源开关锁,扣上时可让门板上的电源开关失效,只能够打开门板后才能按下开关。关上前门板后,只要使用钥匙锁住门板,电源开关即
无法使用。此设计可避免不小心误触电源开关。
전면 도어 안에 전원 버튼 잠금장치가 있습니다. 전원 버튼 잠금장치가 잠가진 경우 전면 도어의 전원 버튼을 사용할 수 없으며, 전원 버튼을 누를
수 있는 유일한 방법은 전면 도어를 다시 열어야 합니다. 전면 도어를 닫은 후, 키를 사용하여 전면 도어를 잠가 전원 버튼을 완전히 비활성화할 수
있습니다. 이 독특한 설계로 전원 버튼이 우발적으로 눌려지는 것을 방지할 수 있습니다.
フロントドアには電源ボタンロックが装備されています。電源ボタンロックが作動中は、フロントドアの電源ボタンは無効になります。電源ボタ
ンを押す唯一の方法は、フロントドアを再度開くことです。フロントドアを閉めてからキーでフロントドアをロックすると電源ボタンは完全に操
作できなくなります。このユニークな設計により、電源ボタンが誤って押されるのを防止できます。
Le panneau frontal contient un verrou du bouton d'alimentation. Quand le bouton d'alimentation est verrouillé, vous devez désactiver le bouton
d'alimentation du panneau frontal, le seul moyen est d'appuyer sur le panneau frontal à nouveau. Après la fermeture du panneau frontal, vous
pouvez utiliser la clé pour verrouiller le panneau frontal et désactiver complètement le bouton d'alimentation. Ce design unique sert à éviter les
appuis accidentels sur le bouton d'alimentation.
Page 8
Case Storage CS380
5
Installation Chart
have all components collected
check that all components do not have compatibility problems with each other or with the case
if possible, assemble the components outside the case first to make sure they are working
keep the motherboard manual ready for reference during installation
prepare a Philips screwdriver
1
2
3
4
5
Before you begin, please make sure that you
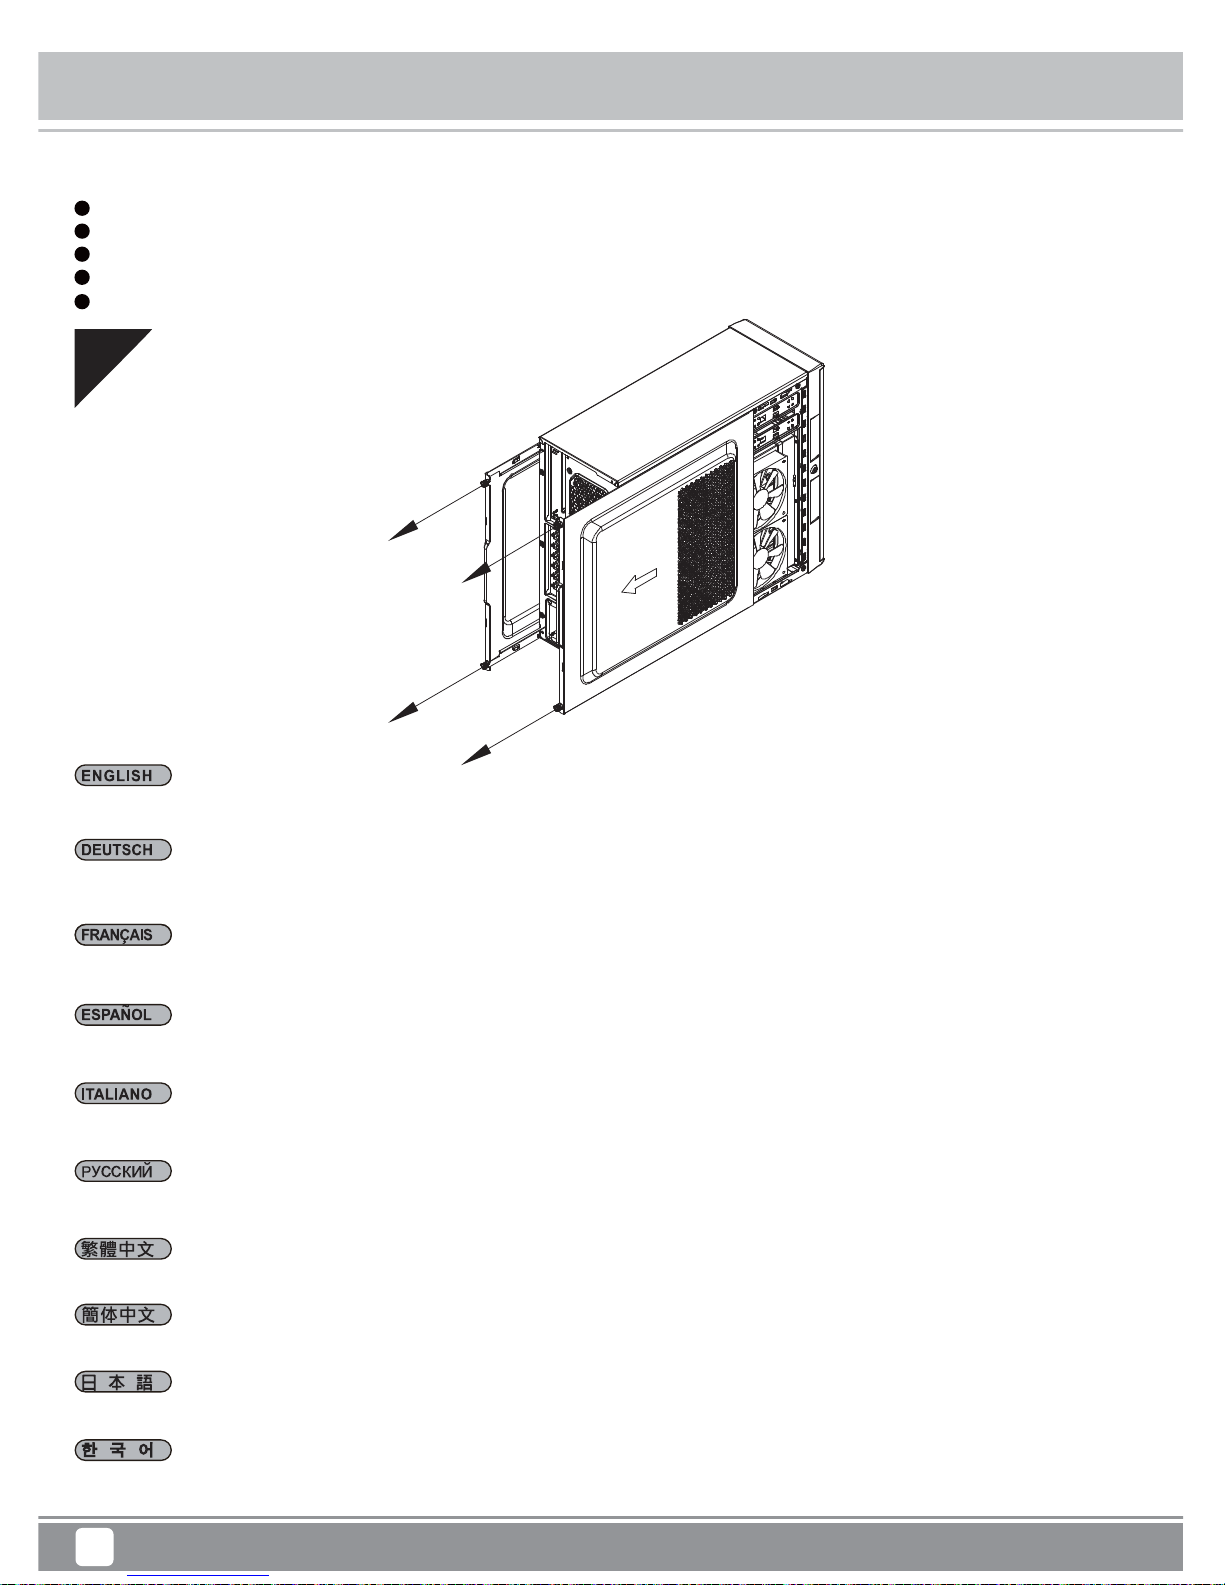
01
Lösen Sie die beiden Schrauben an den linken und rechten Seitenwänden, nehmen Sie die Seitenwände ab
Desatornille dos tornillos de los paneles izquierdo y derecho para quitarlos
Per rimuovere i pannelli laterali allentare, per entrambi, le due viti di serraggio
Loosen two screws from both left and right side panels to remove them
Отвинтите по два винта, крепящих левую и правую боковых панели, и снимите панели
鬆開左右側板的兩顆螺絲,取下側板
松开左右侧板的两颗螺丝,取下侧板
왼쪽과 오른쪽 사이드 패널에서 두 개씩 나사를 풀어 사이드 패널을 제거합니다
両方の左右パネルからネジ2本を緩めて、 取り外します
Desserrez les vis des deux panneaux latéraux pour les retirer
Page 9
Case Storage CS380
6
Installation Chart
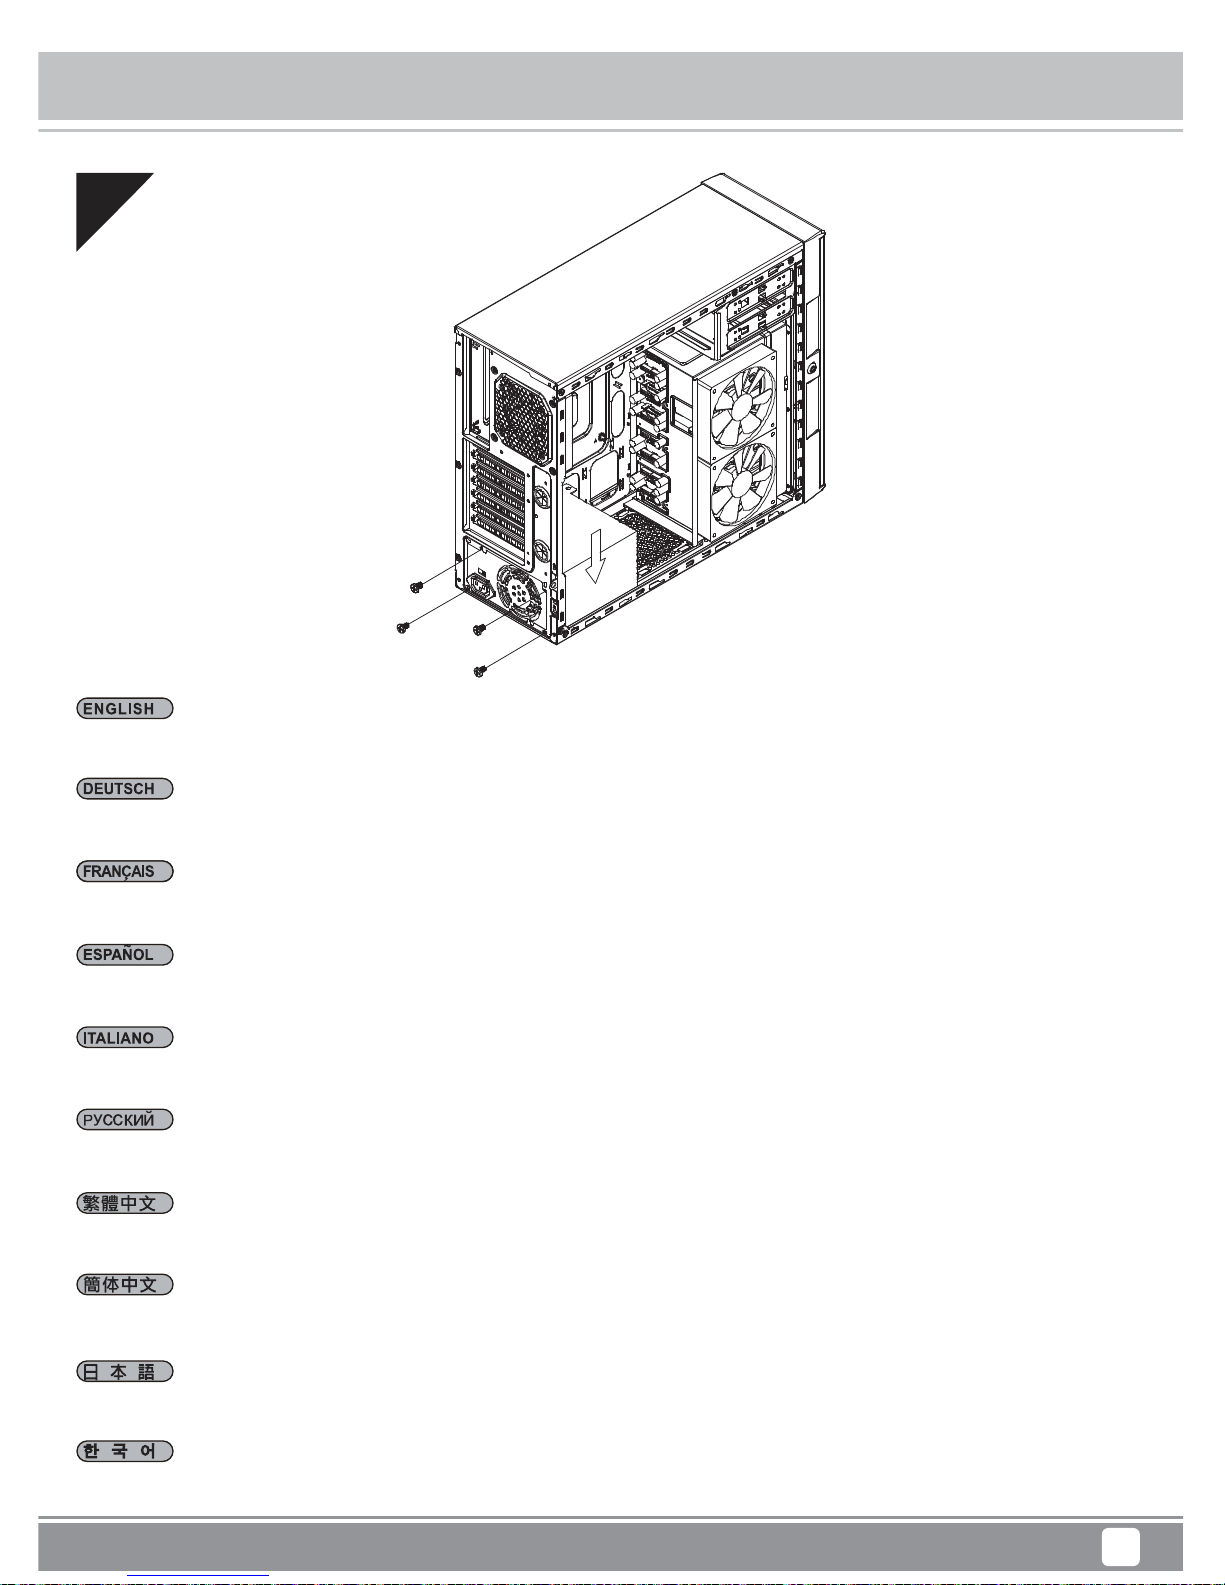
02
Bauen Sie das Netzteil ins Gehäuse ein
Instale la fuente de alimentación en la carcasa
Installazione dell’alimentatore nel case
Install power supply into the case
Установите в корпус блок питания
安裝電源供應器
安装电源供应器
전원 공급장치를 케이스에 설치합니다
電源をケースに取り付けます
Installez la source d’alimentation dans le châssis
Page 10
Case Storage CS380
7
Installation Chart
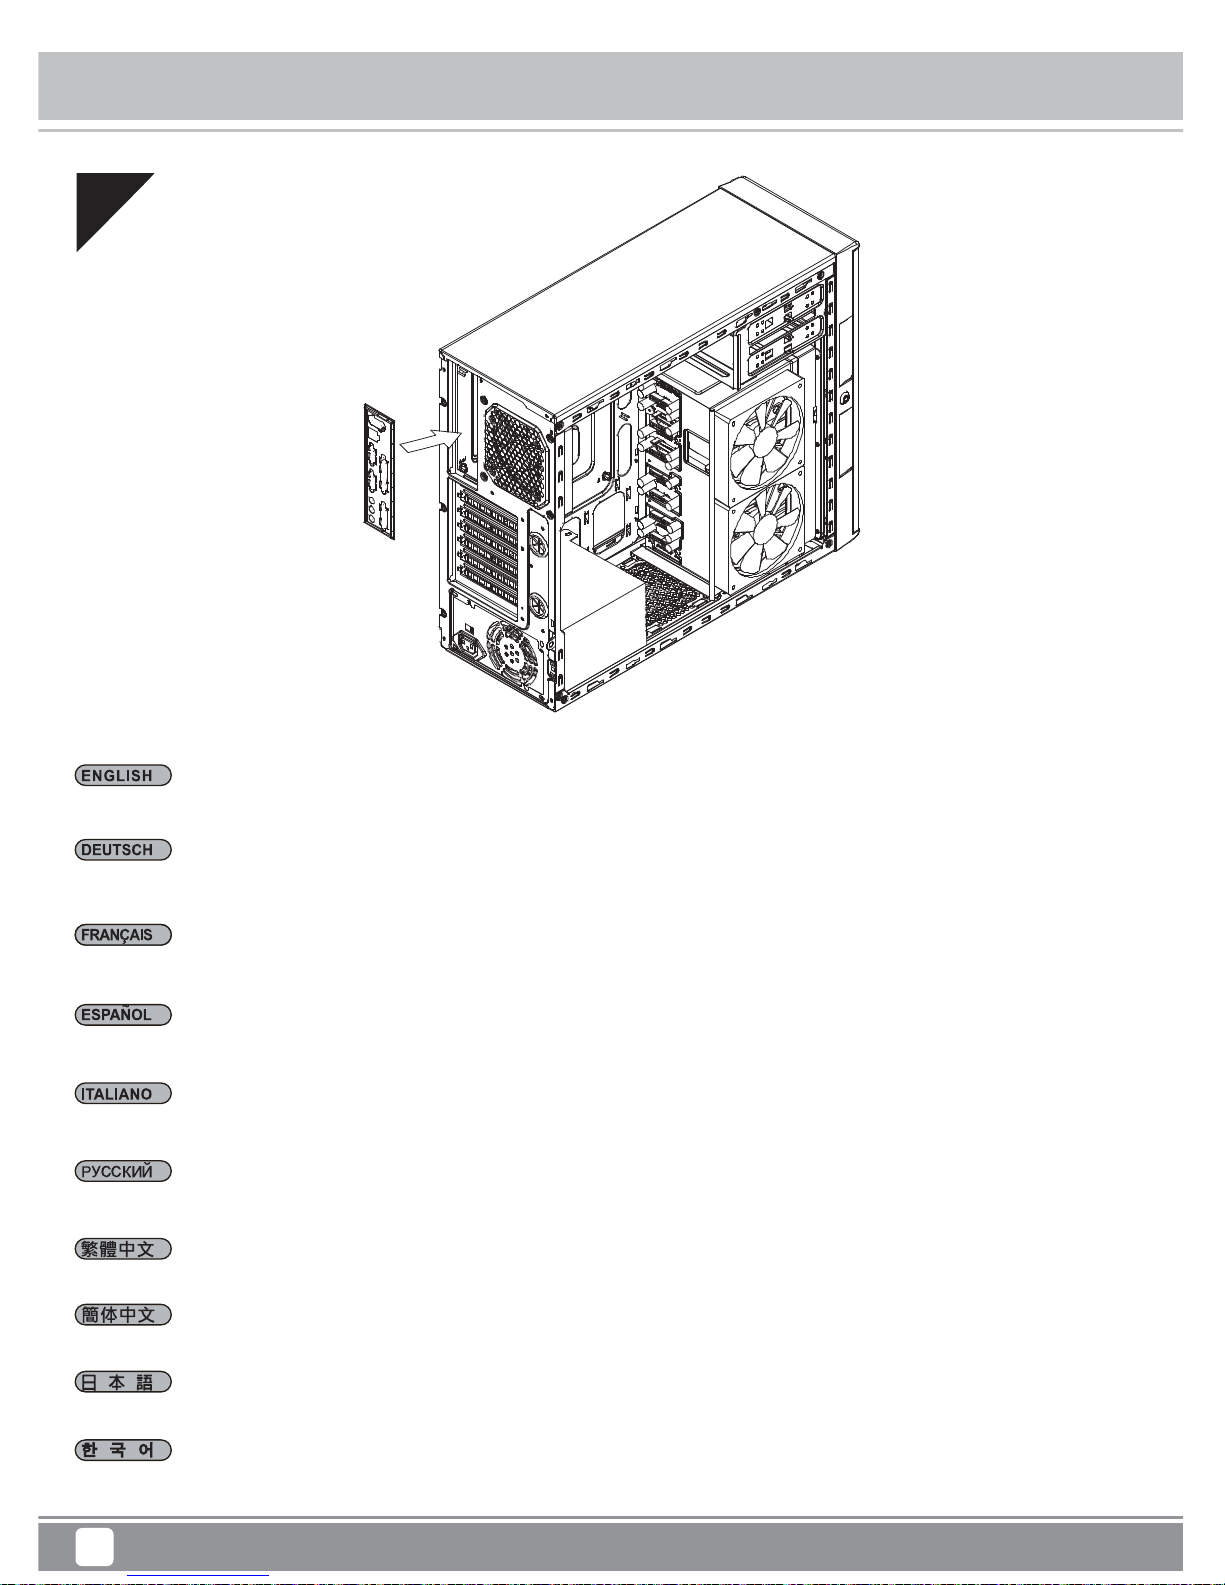
03
Installieren Sie das hintere I/O-Blech im Gehäuse
Instale la placa trasera de E/S de la placa base en la carcasa
Installare la placca I/O della scheda madre nella sede preposta
Insert the I/O shield included with your motherboard
Установите в корпус заднюю панель ввода-вывода материнской платы
將I/O彈片裝上機殼
将I/O弹片装上机箱
메인보드 후방 I/O 판을 케이스에 장착합니다
ケース内にマザーボード後部I/Oプレートをインストールします
Installez la plaque arrière de la carte mère dans le boîtier
Page 11
Case Storage CS380
8
Installation Chart
04
Stecken Sie die Abstandshalter wie für Ihr Motherboard erforderlich in die entsprechenden Befestigungsbohrungen. Installieren Sie dann das
Motherboard
Inserte los soportes según sea necesario para su placa base en los agujeros de montaje correspondientes, luego instale la placa base
Inserire nei corrispondenti fori di fissaggio i distanziatori, come richiesto dalla scheda madre, quindi installare la scheda madre
Insert standoffs as required by your motherboard in corresponding mounting holes, then install motherboard
При необходимости установите опорные стойки для системной платы в соответствующие крепежные отверстия, затем установите
системную плату
請依需求安裝主機板螺柱,安裝主機板
请依需求安装主板螺柱,安装主板
메인보드에서 필요한 경우 해당 장착 구멍에 스탠드오프를 삽입한 후 메인보드를 설치합니다
マザーボードに応じて、必要な孔にスペーサーを取り付けてからマザーボードを取り付けます
Insérez les entretoises comme requis par votre carte mère dans les trous de montage correspondant, puis installez la carte mère
Page 12

Case Storage CS380
9
Installation Chart
05
Wir empfehlen, jetzt mit dem Verlegen der Kabel zu beginnen und die 24-poligen ATX-, Front-I/O- und sämtliche weiteren Kabel von Geräten an der
Frontblende anzuschließen
Le recomendamos que empiece a gestionar el enrutado de cables ahora y conecte cables como el ATX 24 pines, los conectores frontales E/S y
cualquier otro conector de los dispositivos del panel frontal
Vi raccomandiamo di iniziare subito la sistemazione delle connessioni e collegare quindi i connettori relativi ai cavi ATX 24pin, alle connessioni I/O
frontali e qualsiasi altro collegamento delle periferiche poste frontalmente
We recommend that you start cable manage now and connect cables such as the ATX 24pin, front I/O connectors, and any other connectors from
front panel devices
На этом этапе рекомендуется начать прокладку кабелей и подсоединить кабели, например кабель ATX с 24-контактным разъемом, разъемы
ввода-вывода передней панели и любые другие разъемы от устройств на передней панели
我們建議您可以在此時開始理線,請先安插好ATX 24pin接線、前I/O接線與其他前面板裝置
我们建议您可以在此时开始理线,请先安插好ATX 24pin接线、前I/O接线与其他前面板装置
이 단계에서부터 ATX 24핀, 전면 I/O 커넥터, 그리고 전면 패널에서의 다른 커넥터 등 케이블 정리를 하시기를 권장합니다
この時点でケーブル取り回しを考えながら、ATX 24ピン、フロントI/Oコネクタ、その他フロントパネルデバイスからのコネクタ類のケーブルを接
続するようお勧めします
Nous vous recommandons de commencer à gérer l'organisation des câbles maintenant comment l'ATX 24pin, les connecteurs des ports E/S de
façade, et tout autre connecteur des appareils du panneau frontal
Page 13

Case Storage CS380
10
Installation Chart
06
Dem Sie die Abdeckung der 5,25-Zoll-Laufwerkschächte ab, installieren Sie die gewünschten 5,25-Zoll-Geräte
Quite las cubiertas para bahía de dispositivos de 5,25" para instalar los dispositivos de 5,25" necesarios
Per installare le necessarie periferiche da 5,25", rimuovere il cover del bay da 5,25"
Remove the 5.25" drive bay covers to install required 5.25" devices
Снимите крыши отсеков для 5,25-дюймовых устройств и установите необходимые 5,25-дюймовые устройства
移除5.25吋檔板,裝上5.25吋裝置
移除5.25英寸檔板,装上5.25英寸装置
5.25"드라이브 베이 커버를 제거한 후 필요한 5.25" 장치를 설치합니다
5.25インチドライブベイカバーを外して、必要な5.25インチデバイスを装着します
Retirez les caches des baies 5,25" pour installer vos appareils
Page 14

Case Storage CS380
11
Installation Chart
07
Entfernen Sie die Hot-Swapping-Einsätze und installieren Sie wie erforderlich 3,5- oder 2,5-Zoll-Laufwerke; befestigen Sie sie mit Schrauben und
installieren Sie die Einsätze wieder im Käfig
Retire las bandejas de cambio en caliente e instale los dispositivos de 3,5" o 2,5" según sea necesario, fíjelos con tornillos y luego vuelva a
reinstalarlos en la carcasa para dispositivos
Rimuovere i cassetti hot-swap da 3,5" o 2,5" se necessario, fissare le viti e reinstallare nel cage dell'unità
Remove hot-swap trays and install 3.5" or 2.5" drives as needed, secure with screws then reinstall back into the drive cage
Вытащите лотки для дисков и установите 3,5" или 2,5" накопители по мере необходимости, закрепите их винтами, затем установите лотки
обратно на своё место
移除熱插拔硬碟抽取盤,裝上3.5吋或2.5吋硬碟。用螺絲固定後,再裝回硬碟架
移除热插拔硬盘抽取盘,装上3.5英寸或2.5英寸硬盘。用螺丝固定后,再装回硬盘架
핫스왑 트레이를 제거하고 필요한 경우 3.5" 또는 2.5" 드라이브를 설치하고 나사로 고정한 후 드라이브 케이지 안에 도로 설치합니다
必要に応じて、ホットスワップ対応トレイを取り外し、3.5 インチまたは 2.5 インチドライブを取り付け、ネジで固定し、次に、ドライブケージ
を再取り付けします
Retirez les plateaux hot-swap et installez les disques 3,5" ou 2,5" selon le besoin, fixer avec des vis puis réinstallez dans la cage de disque
Page 15

Case Storage CS380
12
Installation Chart
08
Schließen Sie wie erforderlich alle Kabel für die Laufwerke an, einschließlich derer im 5,25-Zoll-Schacht und an der Backplane
Conecte todos los cables para dispositivos según sea necesario, incluidos los instalados en la bahía de 5,25" y la placa trasera
Collegare tutti i cavi delle unità se necessario, inclusi quelli installati nell'alloggio da 5,25" e nel backplane
Connect all cables for drives as needed including ones installed in 5.25" bay and the backplane
Подключите все кабели для дисков по мере необходимости, включая те, что установлены в отсеки 5,25" и на задней панели
先連接上所有磁碟要用的線材(包含5.25吋與硬碟背板)
先连接上所有磁盘要用的线材(包含5.25英寸与硬盘背板)
5.25" 베이와 후면판에 설치된 드라이브를 포함하여 필요한 경우 모든 드라이브 케이블을 연결합니다
必要に応じて、5.25 インチベイに取り付けられたケーブルを含めて、ドライブ用のすべてのケーブルおよびバックプレーンを接続します
Connectez tous les câbles pour les lecteurs selon le besoin, y compris ceux installés dans la baie 5,25" et le fond de panier
Page 16

Case Storage CS380
13
Installation Chart
09
Entfernen Sie Steckplatzabdeckungen, installieren Sie die gewünschten Erweiterungskarten. Bei nicht verwendeten Steckplätzen sollten die
Abdeckungen angebracht bleiben
Quite las cubiertas de los zócalos de expansión para instalar las tarjetas de expansión necesarias. Los zócalos no usados deberían tener
cubiertas instaladas
Rimuovere i coperchi dell'alloggio di espansione per installare le schede di espansione necessarie. Gli alloggi non utilizzati devono avere i
coperchi installati
Remove expansion slot covers to install required expansion cards. Unused slots should have covers installed
Снимите крышку слота расширения и установите необходимые платы расширения. На неиспользуемых слотах крышки должны быть
установлены
移除擴充槽檔片後安裝擴充卡,未使用的擴充槽請將檔片裝回,並以內附螺絲鎖固
移除扩展槽档片后安装扩充卡,未使用的扩展槽请将档片装回,并以内附螺丝锁固
확장슬롯 커버를 제거한 후, 필요한 확장카드를 설치 합니다. 사용되지 않은 슬롯의 슬롯 커버는 다시 설치 합니다
拡張スロットカバーを取り外して、必要な拡張カードを装着します。未使用のスロットにはカバーを取り付けたままにします
Retirez les équerres pour installer vos cartes d'extension. Les emplacements inutilisés doivent garder leur équerre
Page 17

Case Storage CS380
14
Installation Chart
10
Installieren Sie zum Abschluss der Installation die linke und rechte Seitenwand wieder
Reinstale los paneles laterales izquierdo y derecho para completar la instalación
Reinstallare entrambi i pannelli laterali per completare l’installazione
Reinstall both left and right side panel to complete installation
Для завершения установки установите на место левую и правую боковые панели
裝回左右側板,完成組裝
装回左右侧板,完成组装
왼쪽과 오른쪽 사이드 패널을 모두 재 설치해 설치를 마칩니다
両方の左右パネルを元に戻すと、インストールは完了です
Réinstallez les deux panneaux latéraux pour terminer le montage
Page 18

Case Storage CS380
15
Connector Definition
Power switch and reset switch installation guide
Please refer to the motherboard manuals for the motherboard’s “Front Panel Connector” or “System Panel Connector” pin definitio Power switch and
reset switch have no polarity, so they can be connected in any orientation.
Bitte suchen Sie in der Motherboard-Dokumentation nach der Pinbelegung der Anschlüsse des Frontbedienfeldes („Front Panel Conne oder „ System
Panel Connectors“).
Ein-/Austaste und Rücksetztaste benötigen keine bestimmte Polarität, können daher beliebig (ound - zu achten) angeschlossen werden.
Veuillez-vous référer au manuel de votre carte mère pour la description des broches "des connecteurs du panneau frontal" et des "des connecteurs
du panneau système". Les interrupteurs d'allumage et de réinitialisation ne possède pas de polarité, donc ils peuvent être branché dans les deux sens.
Por favor, consulte en los manuales de la placa base la configuración de pines del “Conector de panel frontal” ó “Conector de panel de sistema” de
su placa base. Los interruptores de encendido y reseteo no tienen polaridad, luego se pueden conectar con cualquier orientac
Fare riferimento al manuale della scheda madre nella sezione “Connettori del pannello frontale” o “Connettori del pannello di sistema”. Power switch
e reset switch non hanno polarità, posso essere pertanto connessi con qualsiasi orientamento.
Описание контактов разъемов приведены в разделах “Разъемы передней панели” или “Разъемы системной панели” руководства пользователя
материнской платы Выключатель питания и кнопка перезагрузки не имеют полярности, поэтому их можно подключать в любой ориентации
請參考主機說明書的Front Panel Connectors安裝Pin Define,將Connector插上;Power Switch 與Reset Switch並無正負極性之分,反插正插都不影
響功能性。
请参考主机说明书的Front Panel Connectors安装Pin Define,将Connector插上;Power Switch 与Reset Switch并无正负极性之分,反插正插都不影
响功能性。
메인보드 매뉴얼의 전면패널 커넥터 혹은 시스템패널 커넥터 핀을 참조하기 바랍니다. 파워 스위치와 리셋 스위치는 극 성이 없어 어떤 방향으로
설치해도 무방합니다.
マザーボードの「フロントパネルコネクタ」または「システムパネルコネクタ」のピン配列についてはマザーボードマニュアルを参照してください。 電源スイッチと
リセットスイッチに極性はないので、いずれの方向でも接続できま。
(1) Front Panel Connectors
Page 19

Case Storage CS380
16
Connector Definition
Please refer to the motherboard manuals for the motherboard’s “Front Panel Connector ” or “System Panel Connector” pin definition.; the white/black
wires are negative while other colors are positive wires. The Power LED wires are separate pins for compatibility with different motherboard pin
definition so please make sure they are connected in the right polarity by referring to your motherboard manual.
Bitte suchen Sie in der Motherboard-Dokumentation nach der Pinbelegung der Anschlüsse des Frontbedienfeldes („Front Panel Connectors“ oder „
System Panel Connectors“). Die weißen/ schwarz Adern sind negativ (-), die farbigen Adern positiv (+).Die Kabel für die Betriebsanzeige-LED sind
zur Kompatibilität mit unterschiedlichsten Motherboards einzeln, nicht als kompletter Stecker ausgeführt. Achten Sie hier bitte auf die richtige
Polarität, lesen Sie in der Dokumentation Ihres Motherboards nach.
Veuillez-vous référer au manuel de votre carte mère pour la description des broches "des connecteurs du panneau frontal" et des broches "des connecteurs
du panneau système". Les câbles colorés en blanc/noir sont négatifs alors que ceux d'une autre couleur sont positifs. Les câbles de la LED Power sont
séparés afin d'être compatible avec différentes cartes mères, donc vérifiez bien qu'ils sont branchés avec la bonne polarité en vous référant au manuel
de votre carte mère
Por favor, consulte en los manuales de la placa base la configuración de pines del “Conector de panel frontal” ó “Conector de panel de sistema” de
su placa base. Los cables de color blanco/negro son negativos mientras que los de color son positivos. Los cables LED de potencia tienen pines
separados para compatibilidad con diferentes definiciones de pines de la placa base luego por favor, asegúrese de que están conectados en la
polaridad correcta consultando el manual de su placa base.
Fare riferimento al manuale della scheda madre nella sezione “Connettori del pannello frontale” o “Connettori del pannello di sistema”. I cavi di colore
bianco/nero sono il polo negativo, mentre quelli di colore diverso il positivo.
Описание контактов разъемов приведены в разделах “Разъемы передней панели” или “Разъемы системной панели” руководства
пользователя материнской платы. Белые/черный провода - отрицательной полярности, цветные провода - положительной полярности.
Провода светодиодного индикатора питания имеют отдельные контакты для совместимости с
различными типами контактов материнских
плат, поэтому обратитесь к руководству пользователя материнской платы и убедитесь, что полярность соблюдена.
請參考主機說明書的Front Panel Connectors安裝Pin Define,將Connector插上;白/黑色線的部分為負極,彩色線的部分是正極。
Power LED為了適應各主機板的不同, 特別設計為散Pin樣式,請安心使用。
请参考说明书的Front Panel Connectors安装Pin Define,将Connector插上;白/黑色线的部份为负极,彩色线的部份为正极。
Power LED为了适应主机板的不同, 特别设计为散Pin样式,请安心使用。
메인보드 매뉴얼의 전면패널 커넥터 혹은 시스템패널 커넥터 핀을 참조하기 바랍니다. 하얀/검은선의 경우 음극이며, 다른 색의 경우 양극입니다.
파워 LED 선은 분리되어 다양한 메인보드에서 동작할 수 있도록 되어 있습니다. 그러므로 메인보드 매뉴얼을 참조하여 올바를 극성을 주의해
선택하시기 바랍니다.
マザーボードの「フロントパネルコネクタ」または「システムパネルコネクタ」ピン配列についてはマザーボードマニュアルを参照してください。白/黑色のリード線
はマイナスで、色の着いたリード線がプラスです。電源LEDリード線は種々のマザーボードピン定義と互換性を持たせるため分離されたピンとなっているので、
ご使用のマザーボードマニュアルを参照して、適切な極性に接続されるようお確かめください。
LED indicators installation guide
Page 20

Case Storage CS380
17
Connector Definition
Below are the front I/O connectors pin definition, please also check your motherboard manual to cross reference with motherboard’s front I/O pin
headers. SilverStone’s I/O connectors are in block type to simplify installation.
Nachstehend finden Sie die Pinbelegung der vorderen E/A-Anschlüsse; bitte gleichen Sie zudem das Handbuch Ihres Motherboards mit den vorderen
E/A-Pinzuweisungen ab. SilverStones E/A-Anschlüsse befinden sich zur Vereinfachung der Installation in Blockart.
Au dessous de la description des broches des ports d'E/S, veuillez aussi vérifier sur le manuel de votre carte mère de manière croisée que les broches
sont correctement placées. Les connecteurs d'E/S de SilverStone sont en bloc pour en simplifier leur installat ion.
A continuación tiene la definición de pines de los conectores frontales de E/S, también debe consultar el manual de su placa base para comprobar
la referencia de los pines para E/S frontales. Los conectores de E/S de SilverStone son de bloque para simplificar la instalación.
Di seguito lo schema delle connessioni I/O frontali, confrontare lo schema con quanto riportato sul manuale della scheda madre per effettuare una
controllo incrociato. I connettori I/O Silverstone, per semplificare l’installazione, sono del tipo “a blocco”.
Ниже приведено описание контактов передних разъемов ввода/вывода. Обратитесь также к руководству пользователя материнской платы
за описанием передних разъемов ввода/вывода типа "пин-хедер". Разъемы ввода/вывода " "SilverStone" - блочного типа, что облегчает
сборку.
下表為Front I/O Connectors的Pin Define,請參閱主機板說明書的各Front I/O Connectors Pin Define一一核對。
Front I/O Connectors完全採用集合Pin方式以簡化安裝。
下表为Front I/O Connectors的Pin Define,请参阅主机板说明书的各Front I/O Connectors Pin Define一一核对。
Front I/O Connectors完全采用集合Pin方式以简化安装。
아래는 전면 I/O 커넥터의 핀 설정이며, 메인보드 매뉴얼을 참조해 메인보드의 전면 I/O 핀 헤더와 맞추어 설치합니다. Silverstone 의 I/O
커낵터는 블록 타이브로 구성되어 설치를 간편화 했습니다.
以下はフロントI/Oコネクタピン配列ですが、お持ちのマザーボードのフロントI/Oピンヘッダは、マザーボードマニュアルをご参照ください。シルバーストーンの
I/Oコネクタは、インストールの容易なブロックタイプになっています。
(2) Front I/O connector guide
Page 21

Case Storage CS380
18
Guide to hard drive backplane
1.There are one 4pin peripheral connector and three 15pin SATA connectors,
please do not connect all of them from one single cable from the power
supply. Please connect them with at least two cables directly from the
power supply.
2.Please connect case fans from the side panel to the backplane’s fan headers.
3.The SATA/SAS connectors on the right side are the primary channel,
please connect them first.
4.The secondary SAS connectors on the left side are only needed by SAS
drives. They are not mandatory if you don’t have sufficient enough SAS
connectors from your SAS card.
1.Es gibt einen 4-poligen Peripherieanschluss und drei 15-polige
SATA-Anschlüsse. Bitte verbinden Sie sie nicht alle von einem einzigen
Kabel vom Netzteil. Verbinden Sie sie mit mindestens zwei Kabeln direkt
vom Netzteil.
2.Bitte verbinden Sie Gehäuselüfter von der Seitenblende mit den
Lüfterstiftleisten der Rückwand.
3.Die SATA/SAS-Anschlüsse auf der rechten Seite sind der primäre Kanal.
Verbinden Sie sie zuerst.
4.Die sekundären SAS-Anschlüsse auf der linken Seite werden nur von
SAS-Laufwerken benötigt. Sie sind nicht obligatorisch, falls Sie nicht
genügend SAS-Anschlüsse an Ihrer SAS-Karte haben.
1.Il y a un connecteur de périphérique 4 broches et trois connecteurs SATA
15 broches, veuillez ne pas tous les raccorder à un seul câble de l'alimentation
électrique. Veuillez les raccorder avec au moins deux câbles directement
de l'alimentation électrique.
2.Veuillez raccorder les ventilateurs de boîtier du panneau latéral aux embases
des ventilateurs du panneau arrière.
3.Les connecteurs SATA/SAS sur le côté droit sont le canal primaire, veuillez
les raccorder en premier.
4.Les connecteurs SAS secondaires sur le côté gauche ne sont utilisés
qu'avec des lecteurs SAS. Ils ne sont pas obligatoires si vous n'avez pas
suffisamment de connecteurs SAS depuis votre carte SAS.
1.Hay un conector para periféricos de 4 pines y tres conectores SATA de 15 pines, por favor no los conecte todos a un único cable de la fuente de
alimentación. Por favor, conéctelos con al menos dos cables directamente desde la fuente de alimentación
2.Por favor, conecte los ventiladores de la carcasa desde el panel lateral a los cabezales para ventilador de la placa trasera.
3.Los conectores SATA/SAS del lado derecho son el canal principal, por favor conéctelos primero.
4.Los conectores SAS secundarios del lado izquierdo son necesarios solo para los controladores SAS. No son obligatorios si no tiene suficientes
conectores SAS en su tarjeta SAS.
1.Vi sono un connettore periferico a 4 pin e tre connettori SATA a 15 pin. Non collegarli tutti con un singolo cavo dall'alimentazione. Collegarli con
almeno due cavi direttamente dall'alimentazione.
2.Collegare le ventole dal pannello laterale ai collettori ventola del backplane.
3.I connettori SATA/SAS sul lato destro sono il canale principale. Collegarli per primi.
4.I connettori SAS secondari sul lato sinistro sono necessari solo per le unità SAS. Non sono obbligatori se non si dispone di connettori SAS sufficienti
dalla scheda SAS.
1.Имеются один 4-контактный разъем для периферийных устройств и три 15-контактных разъема SATA. Запрещается подключать их все к
одному одножильному кабелю от блока питания. Подключайте их с помощью не менее чем
двух кабелей от блока питания.
2.Подсоедините разъемы корпусных вентиляторов на боковой панели к разъемам вентиляторов на соединительной панели.
3.Разъемы SATA/SAS на правой стороне являются основными, сначала подключите их.
4.Дополнительные разъемы SAS на левой необходимы только для драйверов SAS. Их использовать необязательно — только если
недостаточно разъемов SAS на плате с SAS-контроллером.
1.連接電源輸入共有一個大4Pin三個SATA 15Pin,請不要使用同一條電源線連接,這四個電源接口請至少插上兩條不同電源線。
2.請將側邊系統的風扇線材與背板風扇接頭連接。
3.右邊為主要傳輸排線位置,請將SATA/SAS排線接上。
4.左邊是只有SAS硬碟會使用到的第二通道排線位置,如SAS介面卡的插座不足,不一定需要接滿。
1.连接电源输入共有一个大4Pin三个SATA 15Pin,请不要使用同一条电源线连接,这四个电源接口请至少插上两条不同电源线。
2.请将侧边系统的风扇线材与背板风扇接头连接。
3.右边为主要传输扁平电缆位置,请将SATA/SAS扁平电缆接上。
4.左边是只有SAS硬盘会使用到的第二信道扁平电缆位置,如SAS适配卡的插座不足,不一定需要接满。
1.4핀 주변장치 커넥터 1개와 15핀 SATA 커넥터 3개가 있습니다. 하나의 케이블로 전원 공급장치에서 이 모든 커넥터를 연결하지 마십시오.
최소 2개의 케이블로 전원 공급장치에서 직접 커넥터를 연결하십시오.
2.케이스 팬은 측면 패널에서 백플레인의 팬 헤더로 연결하십시오.
3.오른쪽의 SATA/SAS 커넥터가 기본 채널입니다. 먼저 이 커넥터부터 연결하십시오.
4.왼쪽에 있는 보조 SAS 커넥터는 SAS 드라이브에만 필요합니다. SAS 카드에 SAS 커넥터 수가 충분하지 않을 경우 이는 필수 사항이 아닙니다.
1.1基の4ピン周辺機器コネクタおよび3基の15ピンSATAコネクタがありますが、電源からそれらを単一のケーブルで同時に接続しないでください。電源からは
最低2本のケーブルを使用してコネクタ接続を行ってください。
2.ケースファンは側面パネルからバックプレーンのファンヘッダに接続します。
3.右側のSATA/SASコネクタはプライマリチャンネルなので、これを先に接続します。
4.左側のSASコネクタは、SASドライブにのみ必要とされます。ご使用のSASカードからのコネクタ数が十分でなければ必須条件ではありません。
EC4 EC8
5V 12V
EC3 EC7
SAS7
JP3
SAS8 SATA8
SATA7
EC2
FAN 1
SAS6
FAN 2
EC13
SAS5 SATA5
C219_SAS
REV 2.0
2018.04.23
EC5
SATA6
Page 22

Case Storage CS380
19
Component Size Limitations
Height limitation for CPU cooler is 146mm with 5mm clearance over the motherboard’s top edge
Höhenbeschränkung für CPU-Kühler 146 mm mit einem Freiraum von 5 mm oberhalb der Motherboard-Oberkante
La limitation de hauteur des refroidisseurs de processeurs est 146mm avec un espace de 5mm au-dessus du bord supérieur de la carte mere
La limitación de altura para disipadores de CPU es de 146mm con un espacio libre de 5mm sobre el borde superior de la placa base
La limitazione dell’altezza del dissipatore di calore CPU è di 146 millimetri con uno spazio libero di 5 mm sopra il bordo superiore della scheda madre
Ограничение по высоте для системы охлаждения процессора составляет 146 мм с 5-мм зазором над верхним краем системной платы
CPU散熱器限高是146mm,散熱器外源允許超出主機板上邊界5mm
CPU散热器限高是146mm,散热器外源允许超出主板上边界5mm
높이는146mm로 제한되며, 외측은 메인보드 경계 5mm까지 초과될 수 있습니다
CPUクーラーの高さ限度は、マザーボード上側の余裕5mmを取って、146mmです
The CS380 can accommodate all standard size components and even some that are
out of spec, please refer to the following guidelines for component selection and
future upgrade considerations:
(1) CPU cooler height limitation
5mm
146mm
Page 23

Case Storage CS380
20
Component Size Limitations
A : Length limitation
The length limitation is 250mm. If redundancy is required, we recommended SilverStone’s GM500-ATXG, an ATX redundant power supply that can fit
inside the CS380.
B : Power supply cable length recommendation
Below is the recommended cable length for retail Micro-ATX motherboards. If the cables are not long enough, please purchase extension cables
A : Längenbeschränkung
Die Längenbeschränkung beträgt 250 mm. Falls Redundanz benötigt wird, empfehlen wir SilverStones GM500-ATXG, ein redundantes ATX-Netzteil,
das in das CS380 passt.
B : Längenempfehlung Netzteilkabel
Nachfolgend finden Sie die empfohlenen Kabellängen für handelsübliche Micro-ATX-Motherboards. Sind die Kabel zu kurz, kaufen Sie Verlängerungskabel
A : Limitation de longueur
La limitation de longueur est 250mm. Si la redondance est nécessaire, nous recommandons l'alimentation redondante SilverStone GM500-ATXG et ATX
qui convient à l'intérieur du CS380.
B : Recommandations pour la longueur du câble de la source d’alimentation
Ci-dessous est la longueur de câble recommandée pour les cartes mères Micro-ATX. Si les câbles ne sont pas assez long, veuillez acheter des rallonges
A : Limitación de altura
La limitación de longitud es de 250mm. Si es necesaria redundancia, le recomendamos el SilverStone GM500-ATXG, una fuente de alimentación ATX
redundante que puede encajar dentro del CS380.
B : Recomendación de la longitud del cable de la fuente de alimentación
A continuación se encuentra la longitud de cable recomendada para placas base Micro-ATX. Si los cables no son lo bastante largos, por favor compre
cables de extensión
(2) Power supply limitation
Cable type and location
EPS 8pin/ATX 4pin (from right side of PSU)
ATX 24pin (from right side of PSU)
SATA 15pin (from right side of PSU to the first 5.25" drive bay)
4pin peripheral (from backplane power connector)
PCIE 8/6pin (to first expansion slot)
Minimum length
470mm
320mm
400mm
200mm
200mm
Kabeltyp und Position
EPS (8-polig)/ATX (4-polig), von der rechten Seite des Netzteils
ATX (24-polig), von der rechten Seite des Netzteils
SATA (15-polig), von der rechten Seite des Netzteils bis zum ersten 5,25-Zoll-Laufwerkschacht
Peripherie (4-polig), vom Backplane-Stromanschluss
PCIE (8-/6-polig), zum ersten Erweiterungssteckplatz
Minimale Länge
470 mm
320 mm
400 mm
200 mm
200 mm
Type de câble et emplacement
EPS 8pin/ATX 4pin (depuis côté droit de l'alimentation)
ATX 24pin (depuis côté droit de l'alimentation)
SATA 15pin (depuis côté droit de l'alimentation vers la première baie 5,25")
4 broches périphérique (du connecteur d'alimentation de fond de panier)
PCIE 8/6pin (vers le premier slot d'extension)
Longueur minimum
470mm
320mm
400mm
200mm
200mm
Tipo de cable y localización
EPS 8pines/ATX 4pines (desde el lado derecho de la fuente de alimentación)
ATX 24pines (desde el lado derecho de la fuente de alimentación)
SATA 15pines (desde el lado derecho de la fuente de alimentación hasta la primera bahía para dispositivos de 5,25")
Periférico de 4pines (desde el conector de potencia de la placa trasera)
PCIE 8/6pines (hasta el primer zócalo de expansión)
Longitud minima
470mm
320mm
400mm
200mm
200mm
Page 24

Case Storage CS380
21
Component Size Limitations
A : Limitazione della lunghezza
l limite di lunghezza è di 250 mm. Se si richiede ridondanza, si consiglia GM500-ATXG di SilverStone, un alimentatore ridondante ATX integrabile con CS380.
B : Raccomandazioni sulla lunghezza del cavo d’alimentazione
Di seguito sono elencate le lunghezze raccomandate dei cavi d’alimentazione per le schede madre Micro-ATX vendute al dettaglio. Acquistare delle
prolunghe qualora i cavi non fossero sufficientemente lunghi
А : Ограничение по длине
Ограничение на длину составляет 250 мм. Если требуется резервирование, то мы рекомендуем SilverStone GM500-ATXG, блоки питания ATX
с дополнительным резервированием также поместятся внутри CS380.
B : Рекомендации по длине кабелей блока питания
Ниже приведены рекомендации по длине кабелей для самостоятельно приобретаемых системных плат Micro-ATX. Если длина кабелей
недостаточна, приобретите удлинительные кабели
A : 長度限制
電源含線材的長度限制是250mm。我們推薦銀欣GM500-ATXG備援電源,做為搭配您的NAS系統使用。
B : 電源線材建議長度
以下是依據一般市售Micro-ATX主機板的各線材建議長度列表。如電源線長度不足,請選購所需要的延長線
A : 长度限制
电源含线材的长度限制是250mm。我们推荐银欣GM500-ATXG备援电源,做为搭配您的NAS系统使用。
B : 电源线材建议长度
以下是依据一般市售Micro-ATX主板的各线材建议长度列表。如电源线长度不足,请选购所需要的延长线
Tipo di cavo e posizione
EPS a 8 pin/ATX a 4 pin (dal lato destro della PSU)
ATX a 24 pin (dal lato destro della PSU)
SATA a 15 pin (dal lato destro della PSU al primo alloggio unità da 5,25")
Periferica a 4 pin (dal connettore di alimentazione del backplane)
PCIE a 8/6 pin (al primo alloggio di espansione)
Lunghezza minima
470 mm
320 mm
400 mm
200 mm
200 mm
Тип кабеля и местоположение
EPS 8pin/ATX4pin (справой стороны БП)
ATX 24pin (справой стороны БП)
SATA 15pin (справой стороны БП к первому отсеку 5,25)
4pin периферийный (от разъёма питания платы)
PCIE 8/6pin (в первый слот расширения)
Минимальная длина
470 мм
320 мм
400 мм
200 мм
200 мм
線材與安裝位置
EPS 8pin/ATX 4pin 從電源右邊開始計算
ATX 24pin從電源右邊開始計算
SATA 15pin從電源右邊開始計算至第一槽光碟機
大4pin電源接頭,插入背板電源輸入端
PCIE 8/6pin 至第1槽介面卡
最小長度
470mm
320mm
400mm
200mm
200mm
线材与安装位置
EPS 8pin/ATX 4pin 从电源右边开始计算
ATX 24pin从电源右边开始计算
SATA 15pin从电源右边开始计算至第一槽光驱
大4pin电源接头,插入背板电源输入端
PCIE 8/6pin 至第1槽介面卡
最小长度
470mm
320mm
400mm
200mm
200mm
Page 25

Case Storage CS380
22
Component Size Limitations
ケーブルの種類と場所
EPS 8 ピン/ATX 4 ピン (PSU の右側から)
ATX 24 ピン (PSU の右側から)
SATA 15 ピン (PSU の右側から最初の 5.25 インチドライブベイまで)
4 ピン周辺装置 (バックプレーンの電源コネクタから)
PCIE 8/6 ピン (最初の拡張スロットまで)
最小長さ
470mm
320mm
400mm
200mm
200mm
Kabeltyp und Position
EPS (8-polig)/ATX (4-polig), von der rechten Seite des Netzteils
ATX (24-polig), von der rechten Seite des Netzteils
SATA (15-polig), von der rechten Seite des Netzteils bis zum ersten 5,25-Zoll-Laufwerkschacht
Peripherie (4-polig), vom Backplane-Stromanschluss
PCIE (8-/6-polig), zum ersten Erweiterungssteckplatz
Minimale Länge
470 mm
320 mm
400 mm
200 mm
200 mm
А : 길이 제한
제한 길이는 250mm입니다. 여분의 전원이 필요한 경우, CS380에 꼭 맞는 ATX 예비 전원공급장치인 SilverStone의 GM500-ATXG를 사용할 것을
권장합니다.
B : 권장 전원 공급장치 케이블 길이
다음은 소매 Micro-ATX 메인보드용 권장 케이블 길이입니다. 케이블이 충분히 길지 않을 경 웅연장 케이블을 구매하십시오
А : 長さ制限
長さ制限は 250mm です。 冗長性が必要な場合は、CS380 の内部に適合させることができる ATX 冗長電源である SilverStone の GM500-ATXG を推奨します。
В : 電源ケーブル推奨長さ
下図はリテールMicro-ATXマザーボード用のケーブル推奨長さです。ケーブル長が不十分の場合は、延長ケーブルをご購入ください
Page 26

Case Storage CS380
23
Component Size Limitations
(3) Graphics card / expansion card limitation
9.5" (241mm)
5.9" (149mm)
Es gilt eine Längenbeschränkung von 241,3 mm und eine Breitenbeschränkung von 149,86 mm
Hay una limitación de longitud de 9,5" (241mm) y un límite de anchura de 5,9" (149mm)
Vi è un limite di lunghezza di 9,5" (241,3 mm) e un limite di larghezza di 5,9" (149,86 mm)
There is a length limit of 9.5" (241mm) and width limit of 5.9" (149mm)
Ограничение на длину 9,5" (241 мм) и на ширину 5,9" (149 мм)
顯示卡 / 擴充卡的長度限制為9.5" (241.3mm),寬度限制為5.9" (149.8mm)
显示卡 / 扩充卡的长度限制为9.5英寸(24.13公分),宽度限制为5.9英寸(14.98公分)
241.3mm (9.5")의 제한 길이와 149.86mm (5.9")의 제한 폭이 있습니다
9.5 インチ (241.3mm) の長さ制限および 5.9 インチ (149.86mm) の幅制限があります
Il y a une limite de longueur de 9,5" (241mm) et une limite de largeur de 5,9" (149mm)
Page 27

Case Storage CS380
24
Optimal Thermal Performance Layout
(1) CPU Cooler
Falls Sie einen tower-artigen CPU-Kühler installieren, empfehlen wir, den CPU-Lüfter die Luft nach hinten blasen zu lassen, damit er
mit der gesamten Luftbewegung im CS380 zusammenarbeitet
Si está instalando un disipador de CPU para torre, le recomendamos que el ventilador de la CPU ventile hacia trasera para estar en
concordancia con el flujo de aire global de la CS380
Se scegliete un dissipatore a torre, assicuratevi che il flusso d’aria della ventola sia disposto posteriore, per seguire in modo naturale
il flusso interno di CS380
If you are installing a tower-style CPU cooler, we recommend that the CPU fan blows rearward to work with CS380’s overall airflow
Если вы устанавливаете башенный кулер ЦП, то мы рекомендуем установить его таким образом, чтобы воздушный поток вентилятора ЦП
был направлен задний и совпадал с общим направлением воздушного потока внутри корпуса CS380
如果您使用塔型散熱器,我們建議您將散熱器安裝方向為風扇往後吹的方式,以順著CS380的整體風流
如果您使用塔型散热器,我们建议您将散热器安装方向为风扇往后吹的方式,以顺着CS380的整体风流
만약 타워 스타일의 CPU 쿨러를 사용한다면, CPU 팬이 후방으로 향하도록 하여, CS380의 전체적인 공기흐름과 잘 조화되도록 합니다
タワースタイルCPUクーラーを取り付ける場合、CS380の全体の気流に合わせた動作のため、CPU のエアーが後方に送られるようにお勧めします
Si vous installez un dissipateur de processeur de type "tour", nous vous recommandons que le ventilateur du dissipateur souffle vers
l'arrière pour fonctionner dans le même sens que le flux d'air généré par le CS380 lui-même
Page 28

Case Storage CS380
25
Optimal Thermal Performance Layout
(2) GPU Cooler
Bei der Auswahl von Grafikkarten empfehlen wir Modelle, die warme Luft über eine Öffnung im hinteren Teil des Steckplatzes in die Außenwelt ableiten;
dies gewährleistet eine ungestörte und wirksame Luftzirkulation innerhalb des CS380 und sorgt für eine optimale Kühlung
Cuando escoja una tarjeta gráfica, le recomendamos modelos que tengan la salido de aire del ventilador hacia el zócalo trasero, esto le asegurará un
flujo de aire suave y eficiente dentro de la CS380 para así conseguir una capacidad de refrigeración máxima
Quando scegliete una scheda grafica, vi raccomandiamo di optare per un modello che espella l’aria al di fuori del case, questo assicurerà un più
efficiente flusso d’aria e massimizzerà le prestazioni di raffreddamento interno di CS380
When choosing a graphics card, we recommend models that have fan blowing exhaust air to the rear slot, this will ensure smooth and efficient airflow
within the CS380 for maximum cooling performance
Мы рекомендуем выбирать такие модели графических карт, у которых вентилятор гонит отработанный воздух к заднему слоту. Это
обеспечивает беспрепятственную и эффективную циркуляцию воздуха в корпусе CS380 и максимальную защиту от перегрева
如果您安裝高階顯示卡,我們建議您選購風向為朝向Slot端的產品。這樣安裝於CS380時,風扇才會朝後順著CS380的氣流配置將廢熱排出
如果您安装高阶显示卡,我们建议您选购风向为朝向Slot端的产品。这样安装于CS380时,风扇才会朝后顺着CS380的气流配置将废热排出
그래픽 카드를 선택할때, 슬롯 후면으로 팬의 바람 방향이 슬롯 후면 쪽으로 되어 있는 제품을 선택하기를 바랍니다. 이런 그래픽 카드를 선택해야,
CS380의 공기흐름에 맞추어 최대의 냉각 성능을 발휘 할 수 있습니다
グラフィックカードを選ぶ際、ファン送風が後部スロット方向に排気を行うモデルを推奨します。これはCS380の中にスムーズで効率的な気流を生
じ、最大の冷却性能を実現します
Lorsque vous choisirez une carte graphique, nous recommandons les modèles qui ont des ventilateurs qui soufflent en ext haut pour fonctionner dans
le même sens que le flux d'air généré par le CS380 lui-même raction par l'équerre arrière, ceci assurera un flux d'air régulier et efficace dans le CS380
pour des performances de refroidissement maximales
Page 29

Case Storage CS380
26
Optimal Thermal Performance Layout
(3) Tips For Cable Management
Bitte beachten Sie folgende Abbildung. 24-polige und Grafikkarten-Stromkabel sollten nicht durch die Rückseite geführt werden. Das 8-polige CPU-Kabel
kann durch die obere Öffnung geführt werden. Sie sollten zwei separate 4-polige Stromkabel für den Anschluss an die Backplane verwenden.
Por favor, consulte el siguiente diagrama. Se recomienda que los cables de potencia de 24 pines y de la tarjeta gráfica no se enruten por la parte
posterior. El cable de 8 pines de la CPU se puede enrutar a través del agujero superior. Le recomendamos usar dos cables distintos de potencia de
4 pines para conectar a la placa trasera.
Fare riferimento alla figura che segue. I cavi di alimentazione a 24 pin e della scheda video non devono essere disposti attraverso il retro. Il cavo a
8 pin della CPU deve essere disposto attraverso il foro superiore. Si consiglia di utilizzare due cavi di alimentazione separati a 4 pin per il collegamento
al backplane.
Please refer to the following diagram. The 24pin and graphics card power cables are recommended to not be routed through the back side. CPU 8pin
cable can be routed through the top hole. We recommend using two separate 4pin power cables for connecting to backplane.
Пожалуйста, обратитесь к следующей диаграмме. Кабель 24pin и кабель для видеокарты не рекомендуется прокладывать по задней стороне.
Кабель 8pin для питания процессора может быть проложен через верхнее отверстие. Мы рекомендуем использовать два отдельных кабель
4pin для подключения питания к плате.
可參考圖例做為整線規劃。24pin與顯示卡電源線不建議背面走線。CPU 8pin線可以穿過正上方的走線孔。硬碟背板的兩個電源插座建議使用兩條不同
的電源線連接。
可参考图例做为整线规划。24pin与显示卡电源线不建议背面走线。CPU 8pin线可以穿过正上方的走线孔。硬盘背板的两个电源插座建议使用两条不同
的电源线连接。
다음 다이어그램을 참조하십시오. 24핀 및 그래픽 카드 전원 케이블은 뒷면을 통과하여 배선하지 마십시오. CPU 8핀 케이블은 상부 구멍을 통해
배선할 수 있습니다. 별도의 4핀 전원 케이블 2개를 사용하여 후면판에 연결할 것을 권장합니다.
以下の図を参照してください。 24 ピンおよびグラフィックカードの電源ケーブルは、背面を通して、配線することを推奨します。 CPU 8 ピンケ
ーブルを上面穴を通して配線することができます。 バックプレーンへの接続用に 2 本の個別の 4 ピン電源ケーブルを使用することを推奨します。
S'il vous plaît se référer au schéma suivant. Il n'est pas recommandé de router le câble 24pin et le câble d'alimentation des cartes graphiques par la
face arrière. Le câble CPU 8 broches peut être acheminé à travers le trou supérieur. Nous vous recommandons d'utiliser deux câbles d'alimentation
à 4 broches séparées pour la connexion au fond de panier.
Page 30

Case Storage CS380
27
Upgrade And Maintenance
CS380’s positive air pressure design is an effective configuration that will reduce dust buildup inside the case. Small air particles or lint will
accumulate over time on intake filters instead of on the components inside the case. To maintain CS380’s excellent cooling performance for years
to come, we recommend to clean all fan filters regularly every three months or half a year (depending on your environment). Below are steps to
remove fan filters.
Das vorteilhafte Luftdruckdesign des CS380 ist eine effektive Konfiguration, die Staubablagerungen innerhalb des Gehäuses vermindert. Im Laufe
der Zeit sammeln sich kleine Partikel und Fusseln an den Luftzufuhrfiltern, anstatt an den Komponenten im Gehäuseinneren, an. Sie können eine
jahrelange optimale Kühlleistung des CS380 gewährleisten, indem Sie alle Lüfterfilter regelmäßig alle drei bis sechs Monate reinigen (je nach
Umgebungsbedingungen). Nachstehend finden Sie die Schritte zur Entfernung der Lüfterfilter.
La conception à pression d'air positive du CS380 est une configuration efficace permettant de réduire l'accumulation de la poussière dans le boîtier.
De petites particules d'air ou de peluche vont s'accumuler avec le temps sur les filtres d'aspiration, et non sur les composants à l'intérieur du boîtier.
Pour conserver les excellentes performances de refroidissement du CS380 au fil des ans, nous vous recommandons de nettoyer l'ensemble des
filtres des ventilateurs, tous les trois ou six mois (selon votre environnement). Vous trouverez ci-dessous les étapes vous expliquant comment retirer
les filtres des ventilateurs.
El diseño de presión de aire positiva de la CS380 es una configuración efectiva que reducirá la acumulación de polvo dentro de la carcasa.
Pequeñas partículas de polvo ó pelusa se irán acumularán con el transcurso del tiempo en los filtros de entrada en lugar de en los componentes
del interior de la carcasa. Para mantener la excelente capacidad de refrigeración de la CS380 en años venideros, le recomendamos que limpie
con regularidad todos los filtros de los ventiladores cada tres meses ó seis meses (dependiendo de dónde viva). A continuación están los pasos
para quitar los filtros de los ventiladores.
Il design a pressione positiva di CS380 riduce considerevolmente gli accumuli di polvere all’interno del case. Le piccole particelle si accumulano
infatti sui filtri invece che sui componenti interni. Per mantenere le eccellenti prestazioni di raffreddamento di CS380 negli anni a venire vi
raccomandiamo di procedere ad una regolare pulizia dei filtri (con cadenza trimestrale o semestrale dipendentemente dall’ambiente un cui è
disposto il sistema). Di seguito i passi per la rimozione dei filtri.
Конструкция корпуса CS380 обеспечивает избыточное давление воздуха и, таким образом, имеет эффективную конфигурацию,
препятствующую скоплению пыли внутри корпуса. Небольшие частицы и волокна, содержащиеся в воздухе, со временем будут
скапливаться на впускных фильтрах,
а не на компонентах, находящихся внутри корпуса. Для поддержания превосходного охлаждения
компонентов в корпусе CS380 в течение многих лет рекомендуется регулярно очищать все фильтры вентиляторов: раз в 3 месяца или
раз в полгода (в зависимости от условий окружающей среды). Ниже приведена процедура для удаления фильтров вентиляторов.
CS380의 양압 디자인은 케이스 내부에 먼지가 싸이는 것을 방지 하기 위한 효과적인 디자인입니다. 작은 분진이나 먼지는 케이스 내부에 있는
필터에 시간에 따라 쌓이게 됩니다. CS380의 우수한 냉각 성능을 계속 유지하기 위헤서 매 3개월 혹은 6개월(사용환경에 따라)마다 필터 청소를
권장합니다. 다음의 필터 제거 과정을 참고하세요.
CS380的正壓差搭配濾網方式是經的起時間考驗最有效的防塵方式。在使用相當長一段時間後,棉屑灰塵或其他可能妨礙散熱效能的小異物只會卡在濾
網,而不是電腦內的元件上面。我們重視的散熱效能,是在您使用電腦長達2~3年後還能維持與全新的無異。為了維持這種散熱效能您只需要定期清理濾
網,而不是電腦裡面的元件。視環境而定,我們建議您每6個月~
1年必須清理濾網,以下是濾網的拆卸步驟。
CS380的正压差搭配滤网方式是经的起时间考验最有效的防尘方式。在使用相当长一段时间后,棉屑灰尘或其它可能妨碍散热效能的小异物只会卡在
滤网,而不是计算机内的组件上面。我们重视的散热效能,是在您使用计算机长达2~3年后还能维持与全新的无异。为了维持这种散热效能您只需要定
期清理滤网,而不是计算机里面的组件。视环境而定,我们建议您每6个月~1年必须清理滤网,以下是滤网的拆卸步骤。
CS380の正圧設計は、ケース内のホコリの蓄積を減少させる有効な構造です。時と共に空気中の微粒子または糸くずはケース内のコンポーネト
上の代わりに取入れ口フィルタに溜まります。この先何年もの間CS380の素晴らしい冷却性能を維持するには、全てのファンを3ヶ月ないしは半年
(環境に依存) ごとに規則的に清掃するようお勧めします。以下は、ファンフィルタを取り外す手順です。
Page 31

Case Storage CS380
28
Upgrade And Maintenance
(1) Fan filter removal guide
Lösen Sie nach Entfernen der Seitenblende die Kunststoff-Blindnieten zum Entfernen des Filters
Tras retirar el panel lateral, afloje los remaches de plástico para retirar el filtro
Dopo aver rimosso il pannello laterale, allentare i rivetti pop in plastica per rimuovere il filtro
After removing the side panel, loosen plastic pop rivets to remove filter
После снятия боковой панели ослабьте пластиковые фиксаторы, чтобы снять фильтр
打開側板後,將塑膠拉釘抽開取下濾網
打开侧板后,将塑料拉钉抽开取下滤网
측면 패널을 제거한 후 플라스틱 팝 리벳을 풀어 필터를 제거합니다
側面パネルを取り外した後、プラスチック製ポップリベットを緩めて、フィルタを取り外します
Après avoir retiré le panneau latéral, desserrez les rivets en plastique pour enlever le filtre
Page 32

Case Storage CS380
29
Upgrade And Maintenance
Den Netzteilfilter unter der oberen Abdeckung ziehen Sie einfach vom Gehäuse ab
El filtro de la fuente de alimentación bajo el panel inferior se puede retirar tirando de él hacia fuera del chasis
Il filtro PSU sotto il pannello inferiore può essere rimosso estraendolo dal telaio
PSU filter under the bottom panel can be removed by pulling it away from the chassis
Фильтр блока питания можно снять, потянув его в сторону от корпуса
電源濾網可從機殼底部抽出
电源滤网可从机箱底部抽出
하단 패널 아래에 있는 PSU 필터는 섀시로부터 잡아당겨 제거할 수 있습니다
底面パネルの下の PSU フィルタは、シャーシから引き離すことで取り外すことができます
Le filtre PSU sous le panneau inférieur peut être retiré en le tirant hors du châssis
Page 33

Case Storage CS380
30
Q&A
F : Ich habe einen Alles-in-Einem-Flüssigkühler an CPU und Grafikkarte; wie installiere ich sie?
A : Wir empfehlen, den Kühler der CPU vorne und den Kühler der Grafikkarte hinten zu installieren
P : ¿Hay muchos condensadores en la placa posterior, ¿para qué se usan?
A : Proporcionan estabilidad adicional para la potencia en los discos duros de cambio en caliente
D : Ci sono un sacco di condensatori sul backplane, a cosa servono?
R : Forniscono supplementare stabilità d’alimentazione per la sostituzione hot-swap dei dischi rigidi
Q : There are lots of capacitors on the backplane, what are they used for?
A : They provide additional power stability for hot-swapping hard drives
B : На коммутационной панели расположено множество конденсаторов. Для чего они предназначены?
O : Они обеспечивают стабилизацию питания для жестких дисков с возможностью «горячей» замены
Q : 硬碟背板上面有大量的電容,是做甚麼用的?
A : 這是熱插拔過程中,增加穩定用的
Q : 硬盘背板上面有大量的电容,是做甚么用的?
A : 这是热插拔过程中,增加稳定用的
Q : 뒷면에 많은 축전지가 있는데 이들의 용도는 무엇입니까?
A : 이들은 하드 드라이브를 핫스왑할 때 전원의 안정성을 높여줍니다
Q : バックプレートにはたくさんコンデンサーが付いていますが、この目的は?
A : これらはホットスワップ対応ハードディスクドライブに対して、より安定した電力を供給します
Q : Il y a beaucoup de condensateurs sur le fond de panier, à quoi servent-ils?
R : Ils fournissent une stabilité d'énergie supplémentaire pour les disques durs changeables à chaud
Page 34

Case Storage CS380
31
Warranty Information
This product has a limited 1 year warranty in North America and Australia.
For information on warranty periods in other regions, please contact your reseller or SilverStone authorized distributor.
本产品自购买之日起,于中国地区(不包含澳门,香港特别行政区)享有一年有限责任保固(部分产品为二年,三年或五年)。
详细保固年限请参照官方网站 https://silverstonetek.com.cn/ 公布之产品型号为依据。
Additional info & contacts
For North America (usasupport@silverstonetek.com)
SilverStone Technology in North America may repair or replace defective product with refurbished product that is not new but has been
functionally tested.
Replacement product will be warranted for remainder of the warranty period or thirty days, whichever is longer. All products
should be sent back to the place of purchase if it is within 30 days of purchase, after 30 days, customers need to initiate RMA
procedure with SilverStone Technology in USA by first downloading the “USA RMA form for end-users” form from the below link
and follow its instructions.
http://silverstonetek.com/contactus.php
1. Product component defects or damages resulted from defective production is covered under warranty.
Defects or damages with the following conditions will be fixed or replaced under SilverStone Technology’s jurisdiction.
a) Usage in accordance with instructions provided in this manual, with no misuse, overuse, or other inappropriate actions.
b) Damage not caused by natural disaster (thunder, fire, earthquake, flood, salt, wind, insect, animals, etc…)
c) Product is not disassembled, modified, or fixed. Components not disassembled or replaced.
d) Warranty mark/stickers are not removed or broken.
Loss or damages resulted from conditions other than ones listed above are not covered under warranty.
2. Under warranty, SilverStone Technology’s maximum liability is limited to the current market value for the product (depreciated value, excluding
shipping, handling, and other fees). SilverStone Technology is not responsible for other damages or loss associated with the use of product.
3. Under warranty, SilverStone Technology is obligated to repair or replace its defective products. Under no circumstances will SilverStone
Technology be liable for damages in connection with the sale, purchase, or use including but not limited to loss of data, loss of business, loss of
profits, loss of use of the product or incidental or consequential damage whether or not foreseeable and whether or not based on breach of warranty,
contract or negligence, even if SilverStone Technology has been advised of the possibility of such damages.
4. Warranty covers only the original purchaser through authorized SilverStone distributors and resellers and is not transferable to a second hand
purchaser.
5. You must provide sales receipt or invoice with clear indication of purchase date to determine warranty eligibility.
6. If a problem develops during the warranty period, please contact your retailer/reseller/SilverStone authorized distributors or SilverStone
http://www.silverstonetek.com.
Please note that: (i) You must provide proof of original purchase of the product by a dated itemized receipt; (ii) You shall bear the cost of shipping
(or otherwise transporting) the product to SilverStone authorized distributors. SilverStone authorized distributors will bear the cost of shipping
(or otherwise transporting) the product back to you after completing the warranty service; (iii) Before you send the product, you must be issued a
Return Merchandise Authorization (“RMA”) number from SilverStone. Updated warranty information will be posted on SilverStone’s official website.
Please visit http://www.silverstonetek.com for the latest updates.
Warranty terms & conditions
For Australia only (support@silverstonetek.com)
Our goods come with guarantees that cannot be excluded under the Australian Consumer Law.
You are entitled to a replacement or refund for a major failure and for compensation for any other reasonably foreseeable loss or
damage.
You are also entitled to have the goods repaired or replaced if the goods fail to be of acceptable quality and the failure does not
amount to a major failure.
Please refer to above “Warranty terms & conditions” for further warranty details.
SilverStone Technology Co., Ltd. 12F No. 168 Jiankang Rd., Zhonghe Dist., New Taipei City 235 Taiwan R.O.C.
+ 886-2-8228-1238 (standard international call charges apply)
For Europe (support.eu@silverstonetek.de)
For all other regions (support@silverstonetek.com)
本表格依据 SJ/T 11364 的规定编制。
○ : 表示该有害物质在该部件所有均质材料中的含量均在
GB/T 26572 规定的限量要求以下。
— : 表示该有害物质至少在该部件的某一均质材料中的含量
超出 GB/T 26572 规定的限量要求。且該限用物質為排除項目
产品合格证
检验员:检01
生产日期:见产品条码
Please refer to SilverStone website
for latest specifications updates.
计算机机壳 有毒有害物质/元素及其化学含量表
部件名称
印刷电路板组件
线缆/ 连接器
金属结构件
塑料结构件
风扇
其它
包装材料
辅助材
汞
(Hg)
镉
(Cd)
六价铬
(Cr(VI))
多溴联苯
(PBB)
多溴二苯醚
(PBDE)
铅
(Pb)
○
○
○
○
○
○
○
○
○
○
○
-
○
○
○
-
○
○
○
○
○
○
○
○
○
○
○
○
○
○
○
○
○
○
○
○
○
○
○
○
○
○
○
○
○
○
○
○
Page 35

Page 36

NO:G11236570
 Loading...