


User Instruction Manual
Watch Kit Model # HC100KW
Pendant Kit Model # HC100KP

WARNING:
PLEASE NOTE
: Thr
oughout the
User
Manual, any
Congratulations on purchasing your new
SilverCareTM 7-in-1 Personal Daily-Living Assistant!
Before using this system for the first time, please read
FCC Important Safety Compliance on page 54 of User
Guide.
PLEASE READ THIS USER INSTRUCTION MANUAL
COMPLETELY AND THOROUGHLY TO ENSURE PROPER
SET-UP AND OPERATION, AND SAVE IT FOR FUTURE
REFERENCE.
text that appears in the light gray shaded box is
important to the use and care of your system,
provides information that is important to your health
and safety, and should be read with care.
If you are using a personal medical device,
please consult your personal Healthcare
Professional to ensure your personal medical
device is shielded from external RF energy
before using the SilverCareTM 7-in-1 Personal
Daily-Living system.
2

Table of Contents
SECTION 1
Getting To Know Your SilverCareTM System
Welcome Page 5
Intended Use Page 6
Getting Started Page 6
Package Contents Page 8
Base Console Layout Page 9
Watch Layout Page 11
Functions Overview Page 12
SECTION 2
Setting Up Your SilverCareTM System
Connect Battery Pack For First Use Page 11
Base Console Initial Setup Page 13
System Initial Setup Page 15
Set Date Page 15
Set Time Page 17
Set User Data Page 18
Add SilverCareTM Watch (PDLA) Page 21
Enter Priority Help Names Page 23
Enter Priority Help Numbers Page 25
Enable Home & Away Contact Page 27
Add SilverLiteTM Page 29
Medication Reminders Page 29
Event Reminders Page 32
ICE Data (In Case of Emergency) Page 35
Emergency Contact
Medical History Page 37
Allergies, Medication, Blood Type Page 38
Base Console Settings Page 40
Page 36
3

SECTION 3
Operating Your SilverCareTM System
Digital Timepiece Page 42
Emergency Calling From Watch Page 42
Emergency Calling From Base Console Page 43
Priority Help Calling Page 43
Hands-Free, Incoming Calls Page 44
Paging Your SilverCareTM Watch Page 45
Medication & Event Reminders Page 45
Home & Away Notification Page 46
Wireless Remote On/Off Switch Page 46
ICE (In Case of Emergency) Data Page 47
SECTION 4
Checking Your SilverCareTM System
Testing 911 and Priority Help Calling Page 48
Troubleshooting, Display Screen Page 49
SECTION 5
Frequently Asked Questions
Page 50
SECTION 6
Appendix
Product Specifications Page 53
FCC Important Safety Compliance Page 54
Caution and Warning Page 55
Product Warranty Page 57
4

Getting
To Know Your SilverCare
SECTION 1:
TM
WELCOME
Thank you for selecting the SilverCareTM 7-in-1 Personal
Daily-Living Assistant. Whether you have chosen the
Pendant-Watch or Wrist-Watch, you have purchased the
most sophisticated and dependable multifunction system
available. SilverCareTM empowers you to quickly access your
911 button to have an actual two-way conversation with
emergency personnel right from your Watch, but on a daily
basis you will utilize and appreciate the:
• Medication reminder
• Hands-free, incoming call answering option
• Automated Priority-Call to neighbors or family
• ICE (in case of emergency) button
Choose either the Self-Managed Monitoring option, or an
Outside Emergency Monthly Service Provider. Either way,
you have complete, dependable support from your home,
24/7.
Other exciting SilverPlus
TM
products are available separately.
Particularly popular is SilverLiteTM wireless, remote light
switch activator, which turns a light on/off remotely. Please,
visit our website @ www.gosilverplus.com or call 1-800SIL-VR01 to learn where to purchase accessories or parts.
INTENDED USE
The operating range of your SilverCareTM 7-in-1 Personal
Daily-Living Assistant depends on many factors, including
electrical interference, wall configuration, etc., but the
5

system was designed to function as a two-way
communication tool, providing coverage in an averagesized home, up to 100 feet in radius normal operating
circumstances. This range typically covers you inside your
home, garage, front and back yards. Since SilverCare is NOT
a cell phone, features like 911 will not work outside of the
operating range, but the ICE button and Reminders
continue to function while you are away from home.
Your system is quick and easy to set up, typically in 15
minutes using Base Console, or in less than 10 minutes
using the simple PC interface method, with the enclosed CD.
There is no need to register your new system. Simply setup according to the User Instruction Manual and the system
is ready to use.
GETTING STARTED
Follow these important guidelines before you use your
SilverCare system for the first time.
1. Read your User Manual carefully and thoroughly.
2. Do not plug your Base Console into AC Power until you
have connected the base antenna, battery pack and
phone line provided.
3. Check your system after you have completed Set-Up,
by calling one of your Priority Help numbers. Move
around your environment to determine the boundaries
of operation in your specific circumstance.
4. Check with local police or your Emergency Provider to
determine how to test your 911 call procedure.
5. The 911 and PRIORITY HELP buttons on your Watch
are NOT activated until INITIAL SET-UP is completed.
6

PACKAGE CONTENTS
Your SilverCareTM Package contains the following items:
User Manual
PC Set-Up
Guide
QuickStart
Guide
7

BASE CONSOLE LAYOUT & DISPLAY SCREEN
AC
Adapter Battery
Indicator
MENU OK
Volume
8
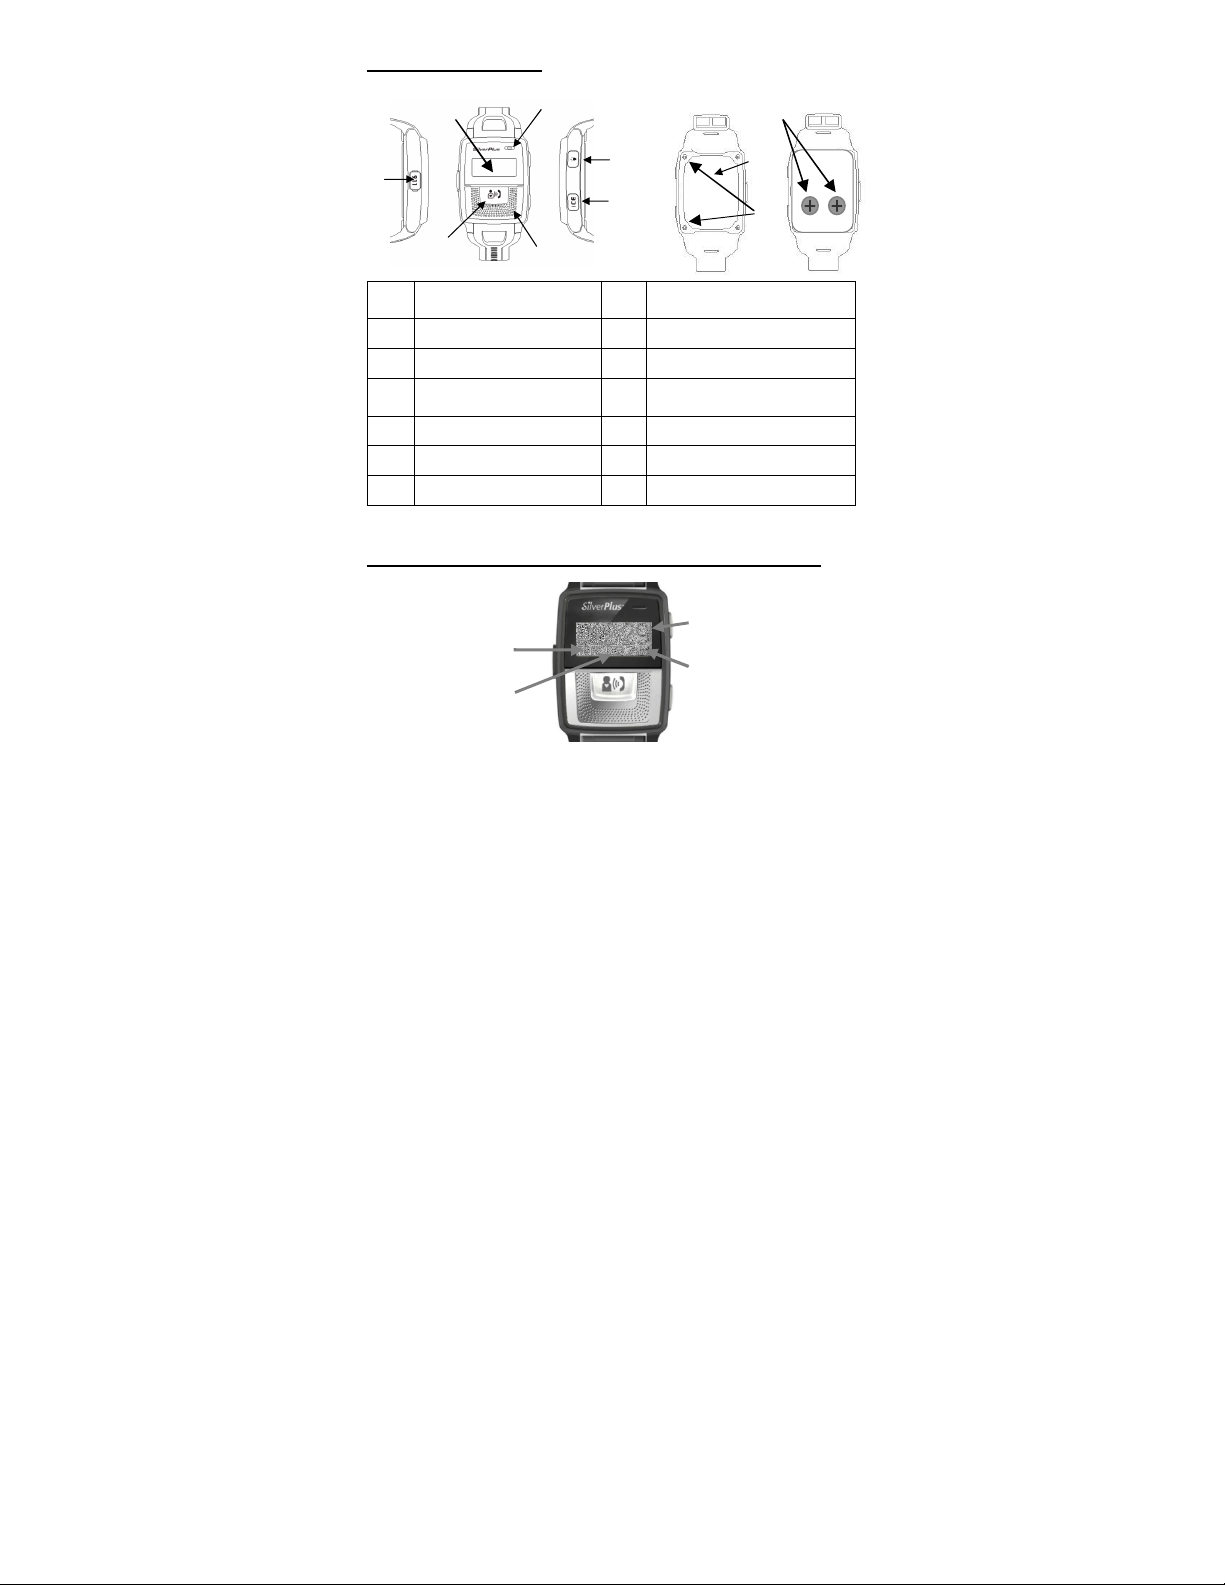
WATCH LAYOUT
6 7 8
5A & B 9
1
4
10
2
3
Description No. Description
No.
1 911 Button 6 Watch Display Screen
2 Priority Help Button (PERS) 7 Microphone
3 Speaker 8
4 ICE Button 9 Battery Back Plate
5A Wireless Lite Switch Button 10 Battery Back Plate Screws (4)
5B Radio Transmitter On/Off
Replaceable Cell Batteries
(Internal)
WATCH DISPLAY SCREEN IN ACTIVE MODE
Current Time
Radio Transmitter
On/Off AM or PM Indicator
Battery
Indicator
9

SILVERCARE
TM
7-in-1 FUNCTION SUMMARY
Digital Watch
The waterproof Wrist-Watch and Pendant-Watch
function as a stylish timepiece.
Priority Help, Voice Caller
Clear, two-way voice communication with
Emergency Operators, family or neighbors with the press of
the “Priority Help” button on Watch or Base Console
Dedicated 911
Convenient and effective in urgent
situations, like a fire, break-in, sudden
illness or fall. Reach a 911 Operator by pressing “911”
button on Watch or Base Console.
ICE (In Case of Emergency)
“ICE” button on side of Watch quickly accesses
User’s medical history, blood type, allergies, and other
critical information, for emergency personnel. Of particular
importance if User has passed out or is unable to talk.
Wireless Remote On/Off Switch
SilverLite™ wireless on/off switch is multifunction,
allowing User to remotely turn on or off a lighting fixture,
turn on/off “Radio” function, and backlight display screen.
Hands-Free, Incoming Call Answering
Pressing “Priority Help” button on Watch
activates Base Console microphone and speaker,
allowing convenient hands-free conversation from Base
Console when user receives an incoming call.
Medication and Event Reminders
Schedule Medication or Event Reminders,
available as text displays and audible reminders.
10

SECTION TWO
Setting Up Your SilverCareTM System
(Using
Base Console )
Reset
Date/
Time
CONNECT BATTERY PACK FOR FIRST USE
• Remove both screws from door of battery compartment
• Lift battery compartment door located on bottom of
Base Console, by placing finger or thumb under notch
provided
• Firmly connect NiMH battery pack wires into connectors,
paying careful attention to connecting with proper polarity
• Snap battery compartment door back into place, replace
screws, and the base is ready to set-up
Figure 1 Figure 2
Remove Battery Pack Cover Connect Battery Pack
Since the AC adapter is not yet connected the Base Console
screen will read
Power Outage
Phone Line Out
Exit
11

NOTE
: To ensure your system continues to function
Initially this User Instruction Manual may seem to be
overwhelming, but the system set-up is actually quite
simple, using primarily two buttons:
• MENU Button (left of screen) scrolls through menu
• OK Button (right of screen) accepts data and moves
back to menu
• By pressing “MENU” button instead of “OK” button
when cursor points to “EXIT,” the system will return
to previous Menu screen
properly in case of power failures, you must connect the
rechargeable battery pack. Fully charged batteries will
provide up to 36 hours of operation. Keep in mind the
backup battery pack may not have sufficient time to fully
recharge with back-to-back power outages.
BASE CONSOLE INITIAL SETUP
We recommend you position your SilverCare Base Console
in a central, easily accessible location in your home, with
convenient access to a traditional analog telephone line and
AC power outlet.
DO NOT set up your Base Console near:
• Household appliances (like microwaves and cordless
phones) which could present electrical interference.
• Large metal structures, such as steel enclosures or large
filing cabinets
• Wireless equipments such as
WiFi routers
• Where your outlet is
controlled by a wall-switch,
and could be accidentally
turned off
12

CONNECTING THE BASE CONSOLE
STEP 1
CONNECT THE ANTENNA
Screw the antenna (supplied) to the back of the Base
Console as shown above
CONNECT TELEPHONE CORD
Connect one end of telephone line cord (provided) into
telephone wall jack and other end into appropriate jack on
back of Base Console marked “LINE”
CONNECT AC ADAPTER
Connect the AC adapter to the back of the Base Console,
and then plug Power Adapter into electrical outlet
DISPLAY Screen will read:
Line Phone Antenna
SilverCare
12:00 PM
Fri Jan 1 2010
13

NOTE:
Use only the AC power adapter su
pplied
with this system. Power adapters are intended to
an under
-
the-table/cabinet outlet.
NOTE:
If the Base Console is disconnected for more
be correctly oriented in a vertical or floor mount
position, not to hold the plug in place if plugged into
IMPORTANT SET-UP OPTION:
We have provided a CD for easy and quick Set-Up of the
SilverCare system using a personal computer. If you prefer
to use the CD method instead of manually setting up your
system using the Base Console, please skip this entire Set-
Up section. Remove the USB cord and Set-up CD provided
from; insert the CD into your computer, and follow easy-touse CD instructions to continue set-up process.
After Set-Up is completed using the PC Interface, return to
User Instruction Manual, page 42 for instructions about
operating your system
To use your SilverCare Base Console to manually set up
your system, please continue.
than two days, the pre-programmed Medication
and Event Reminders, and the ICE data, will remain
in the Watch memory and operate normally.
14

INITIAL SET-UP
SYSTEM SET-UP
Press OK Button to begin set-up process
DISPLAY Screen will read:
Initial Setup
Reminder
ICE
Base Setting
STEP 2
SET DATE
Press OK Button (right side)
DISPLAY Screen will read:
Press OK Button again to set date/time
DISPLAY Screen will read:
Date/Time
User Name 1
User Name 2
User Name 3
Date
Time
Exit
15

IMPORTANT:
The two
primary
buttons
needed to
NOTE:
At any time if you need to correct or
program the system are the “MENU” button to the
left of the Base Console screen, which scrolls
through list of menu options, and the “OK” button
to the right of the Display Screen, which you press
to accept your selection, and to enter your data.
Press OK Button to enter DATE set-up mode
DISPLAY Screen will read:
Date: MM/DD/YY
01/01/01
EXIT
EXIT
Left/Right: Vol-/+
EXITEXIT
OK
OK
OKOK
Flip open keypad cover to expose
keypad by pressing and releasing on
it in the upper left corner. Using
appropriate numbers on keypad,
enter current date (no need to enter
slash marks, the system unit will advance automatically
from month to day to year). When current date has been
set, press OK button to accept your entry and move to next
screen to set time.
adjust an entry, use VOLUME Bar. The VOLUME –
moves cursor to the left, the VOLUME + Bar
moves the cursor to the right.
16

STEP 3
SET TIME
DISPLAY Screen will read:
Press OK Button to enter TIME set-up mode
DISPLAY Screen will read:
Using numbers on the keypad, enter current time (menu
will advance automatically from hour to minute mode).
Press ANY key on the keypad to move from AM to PM.
When current time has been set, press OK button to accept
your entry and move to next screen.
Press OK button to accept your entry and EXIT DATE/TIME
set-up mode to begin to enter USER data.
Date
Time
Exit
Time: HH:MM AM/PM
01:00 PM
EXIT
EXIT
Left/Right: Vol-/+
EXITEXIT
DISPLAY Screen will read:
Date
Time
Exit
OK
OK
OKOK
17

NOTE:
Press
Volume Bar to move cursor
to the
the left of the letter you want to delete.
STEP 4
SET USER DATA
Display Screen will read:
Date/Time
User Name 1
User Name 2
User Name 3
Press OK to enter USER NAME set-up mode for User #1
DISPLAY Screen will read:
User Name 1
Name Recording
Add/Remove Watch
Exit
Press OK Button to enter USER NAME #1 set-up
DISPLAY Screen will read:
Enter Name
Using the keypad, enter the number keys with the
corresponding letters of your name, pausing for each letter
until the cursor moves to the next position.
right or left. Press DELETE key on keypad to
correct any errors, after first moving the cursor to
18
Exit
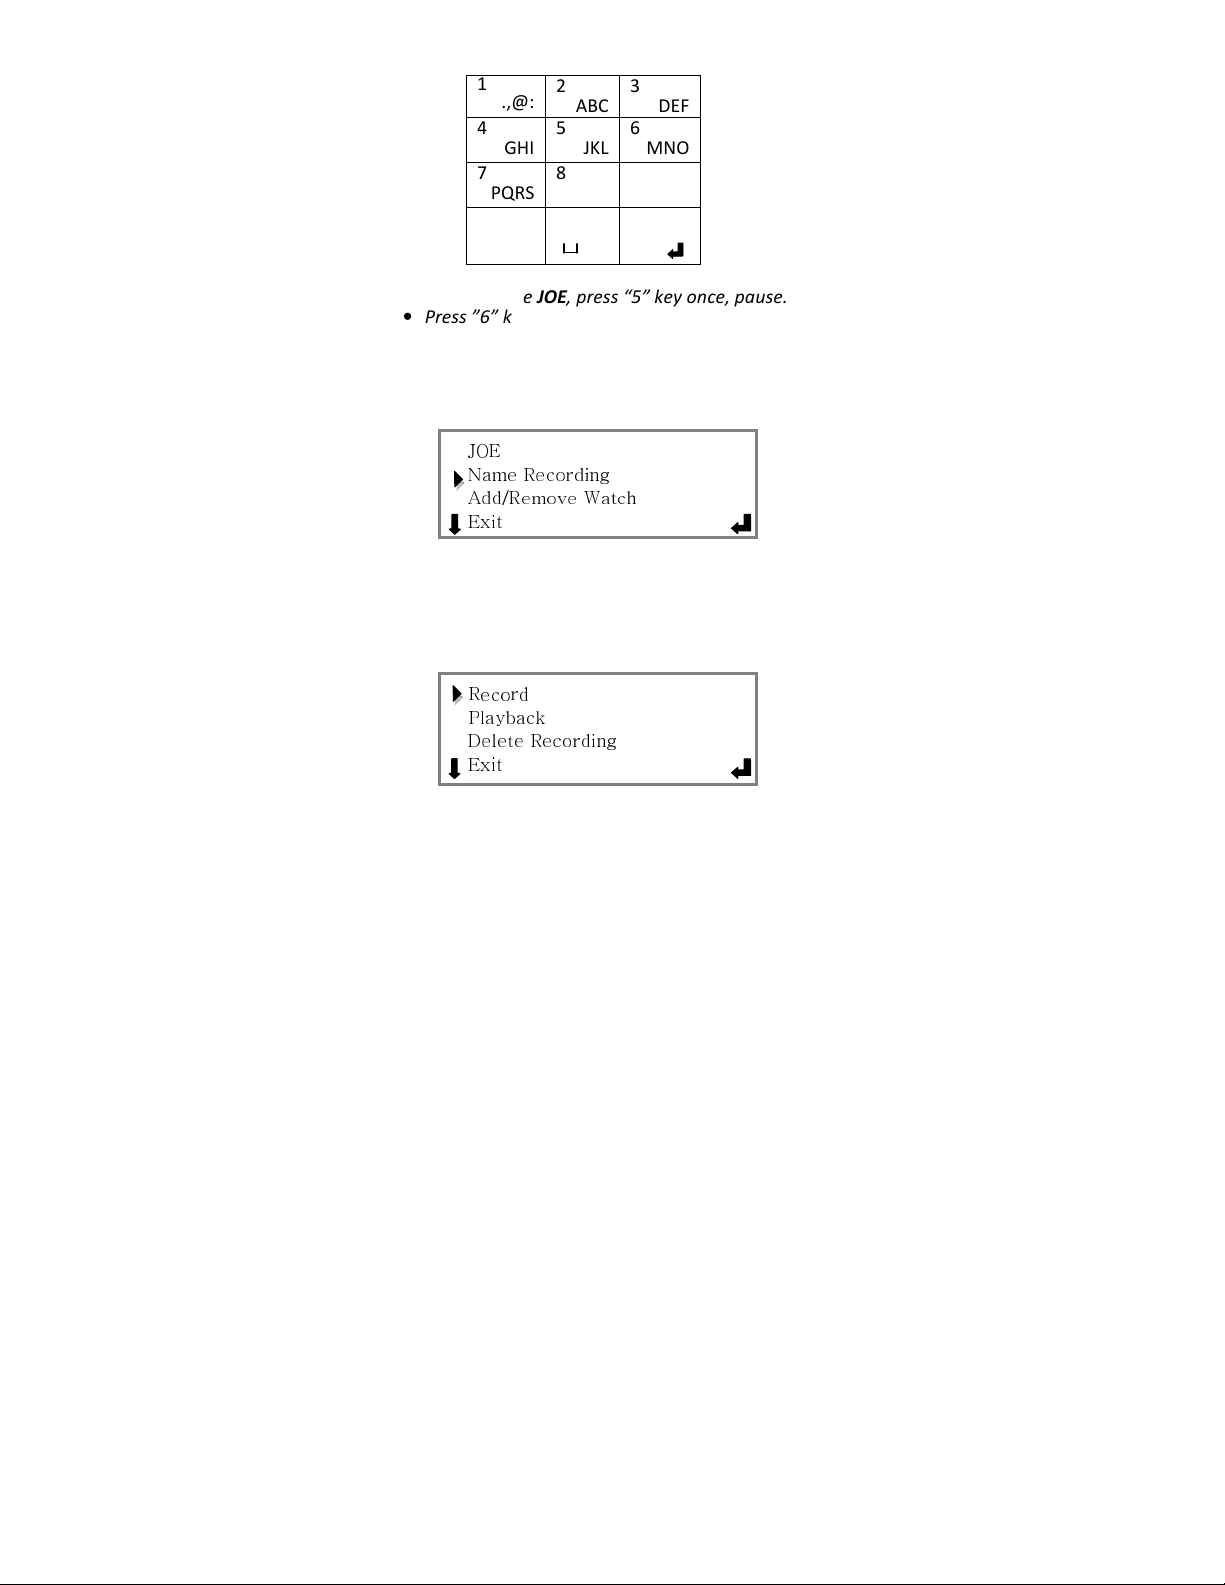
1
2
3
Keypad Layout
.,@:
4
GHI
ABC
5
JKL 6 MNO
7
PQRS 8 TUV 9 WXYZ
Del
0 #
*
DEF
Example:
• For the name JOE, press “5” key once, pause.
• Press ”6” key 3 times in rapid succession, pause.
• Press “3” key twice in rapid succession.
Press OK Button to accept your entry and exit User Name
#1 set-up mode
DISPLAY Screen will read:
JOE
Name Recording
Add/Remove Watch
Now is the time to record your personalized message for
User #1. Press OK button to record your name, which will
be provided as part of outgoing message (OGM) to the
person you call in an emergency situation.
DISPLAY Screen will read:
Record
Playback
Delete Recording
Exit
19

Press the OK button once again to enter the recording
mode.
DISPLAY Screen will read:
Record
Say your name
after pressing REC
EXIT
EXIT
EXITEXIT
REC
REC
RECREC
OK button is same as REC Button. Press it once again to
record, as indicated on DISPLAY screen. You will have 5
seconds to record, then press the OK/Record button to end
your name recording, bringing you to this screen:
Record
Name Recording
SAVED
OK
OK
OKOK
Press OK button to leave this screen.
DISPLAY Screen will read:
Record
Playback
Delete Recording
Exit
To review your recorded name, press OK button.
DISPLAY Screen will read:
Playback
Press PLAY to start
Playing
20

OK button is the same as PLAY Button. Press OK/PLAY
button to begin playback. If you are satisfied with recording
there is no need to do anything. Screen will move on to
MENU after playing recording.
DISPLAY Screen will read:
Record
Playback
Delete Recording
Exit
If you prefer to redo your recording, repeat the previous
steps for recording name.
NOTE: If no name is recorded, the outgoing message during
an emergency call will say “This is an emergency call from
“SilverCare System” rather than being personalized with
your name.
Press MENU button to move to EXIT. Press OK button to
move on to Add/Remove Watch mode.
DISPLAY Screen will read
Joe
Name Recording
Add/Remove Watch
Exit
STEP 5
ADD WATCH DAILY-LIVING ASSISTANT TO SYSTEM
You will now be instructed to add the
Wrist-Watch or Pendant-Watch to your
system. Your Watch DISPLAY screen says:
21
To add your Watch to system, press OK button.
You will see this screen:
Add to System
Exit
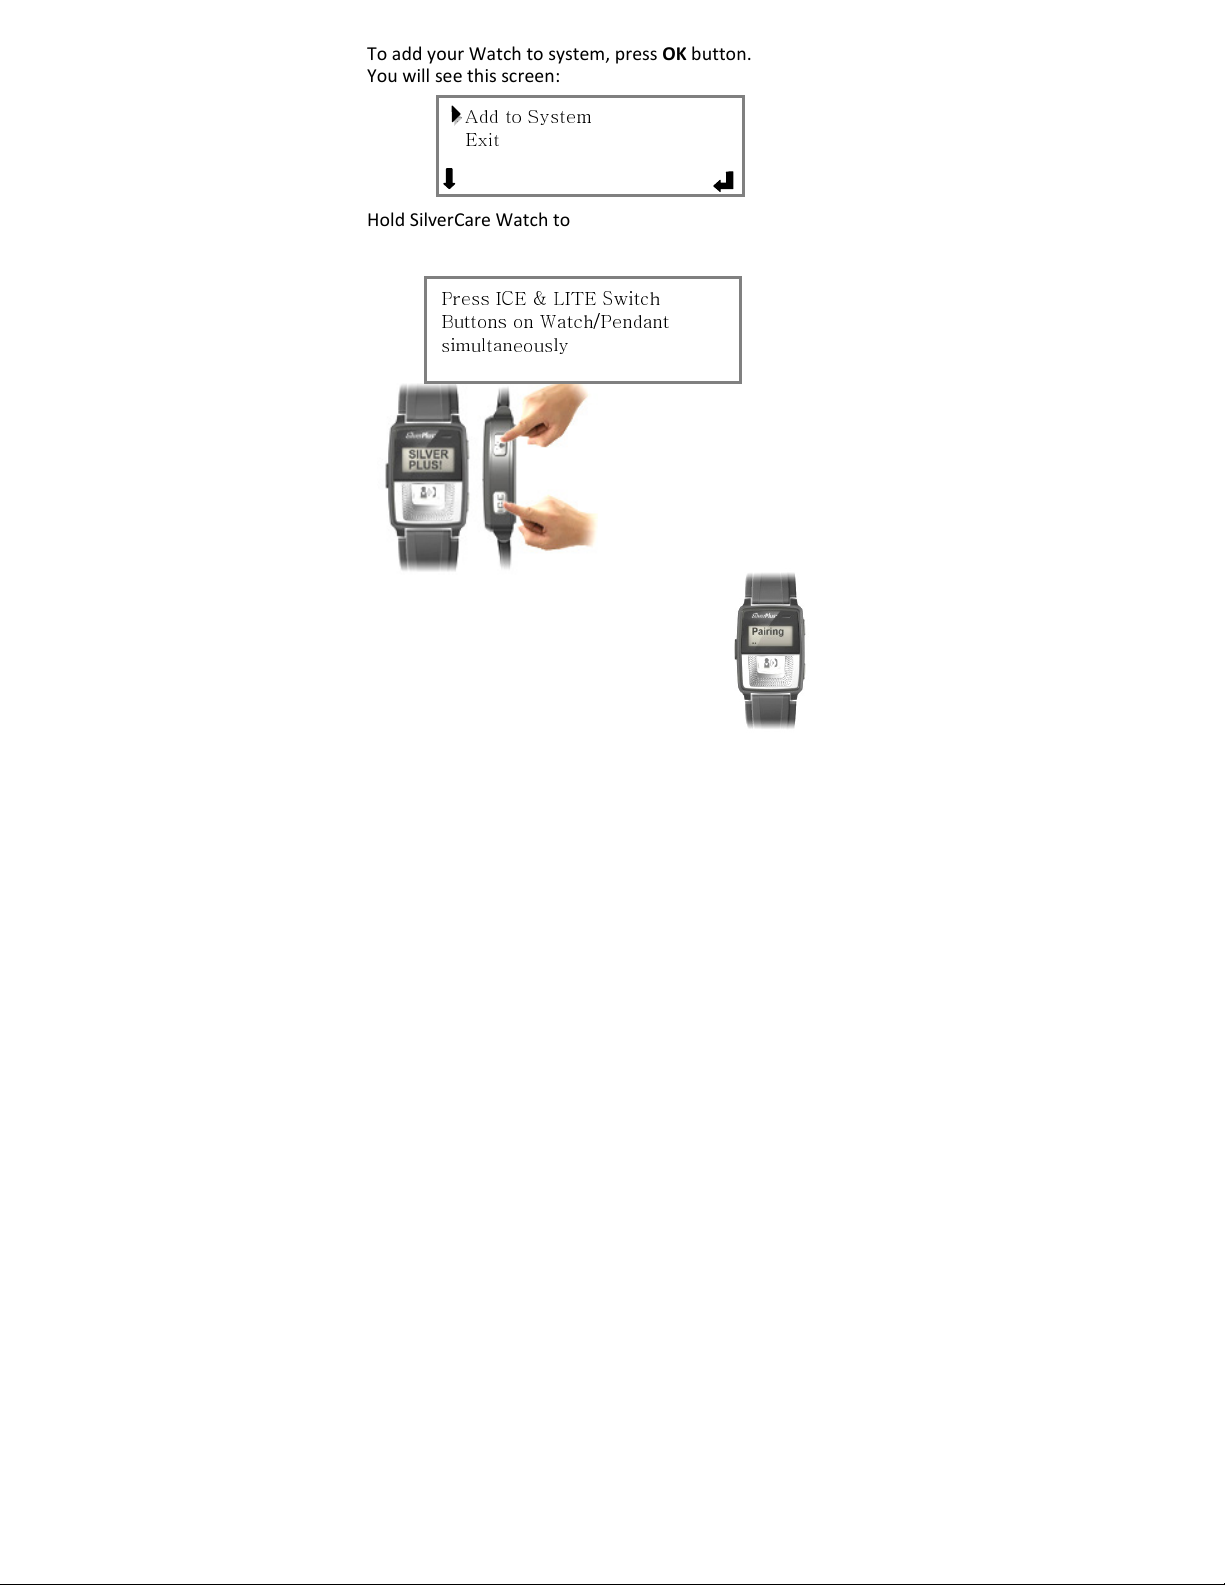
Hold SilverCare Watch to begin the activation process.
Press the OK button on Base Console once again and follow
instructions on DISPLAY Screen:
Press ICE & LITE Switch
Buttons on Watch/Pendant
simultaneously
Within a few seconds of
pressing the buttons
simultaneously the Base
Console will say: New
Watch/Pendant Added.
Your Personal Daily-Living Assistant will
flash “Pairing” on the screen, then will
say CONNECTED!
Congratulations, your system is now
paired; your Watch Daily-Living
Assistant is activated.
Press OK button to leave this screen. Press OK button once
again when arrow is pointing to EXIT.
22
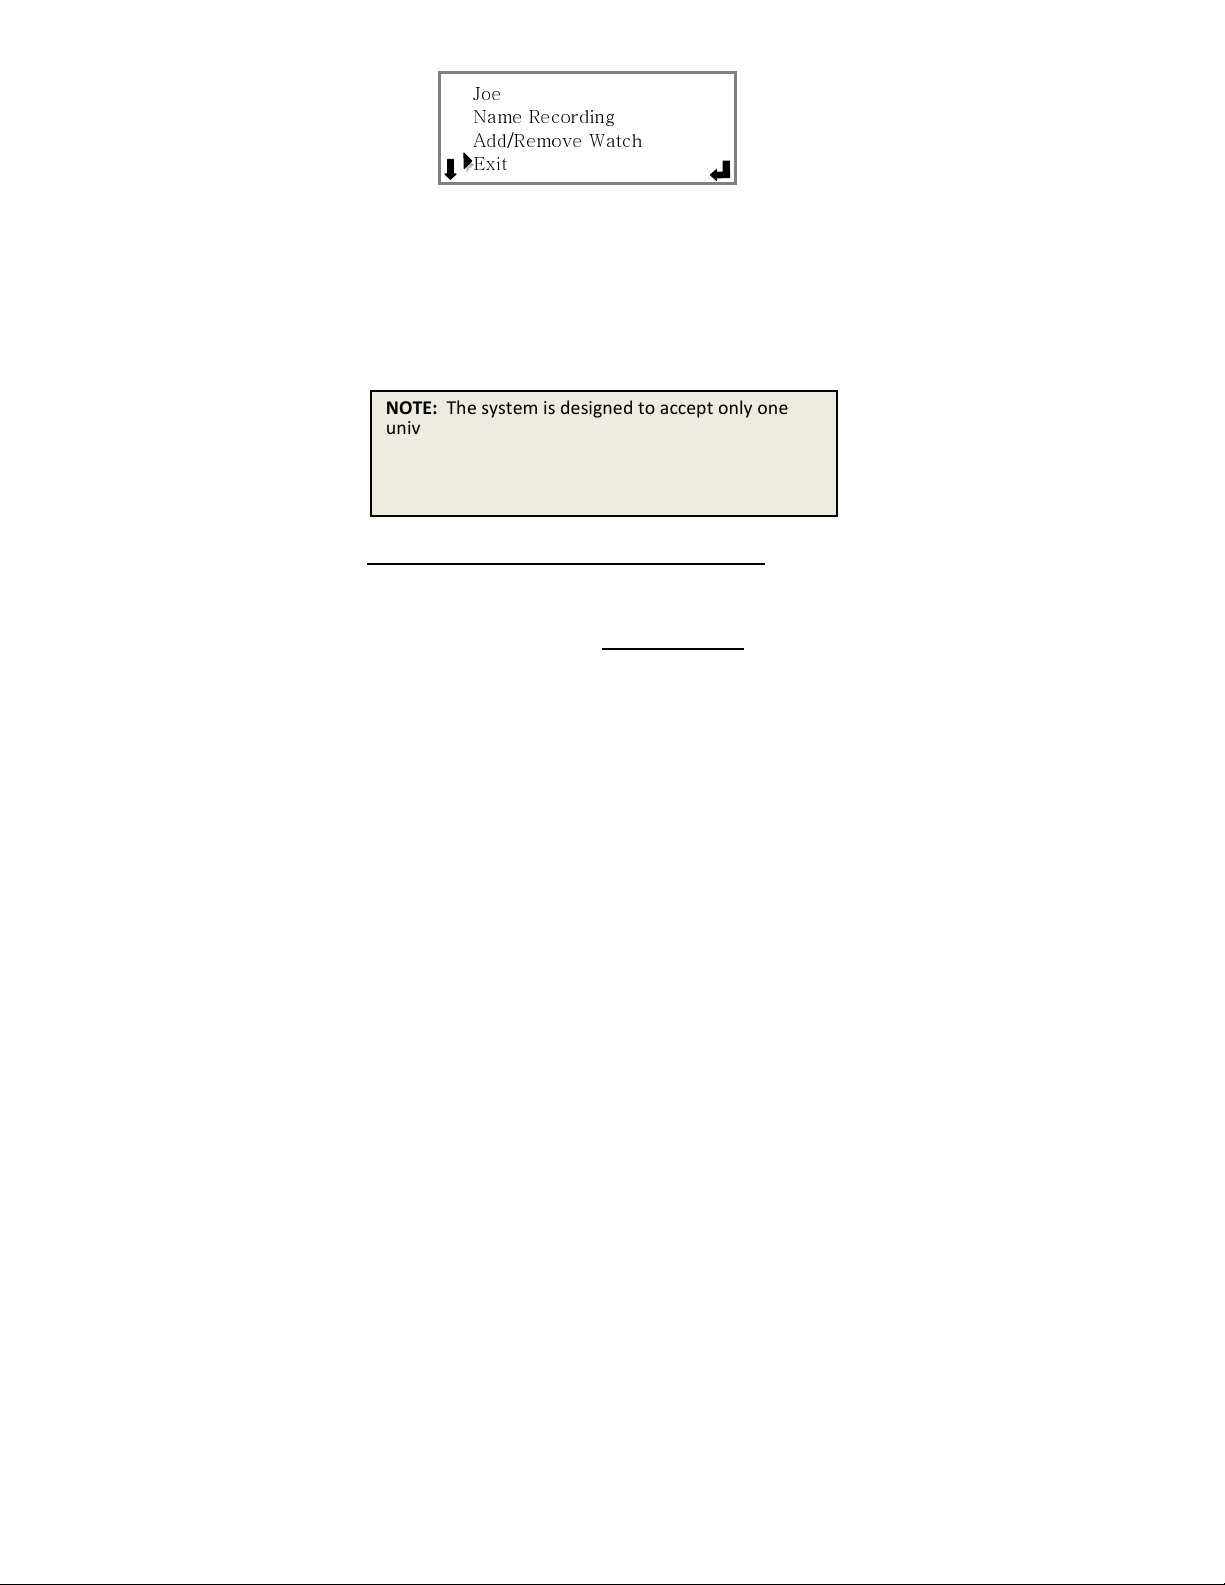
NOTE:
The system is designed to accept only one
Screen will read:
Press the OK button one more time to proceed.
Joe
Name Recording
Add/Remove Watch
Exit
NOTE: You now have the opportunity to add another User
(or Watch or Pendant) OR you may move to the next step to
set PRIORITY HELP names and numbers for your system.
To add new Users, please repeat Step 4 and Step 5, as
indicated on pages 18 – 23.You can always return to this
set-up mode at a future date to add new Users.
universal set of PRIORITY HELP numbers per Base
Console, regardless of how many Users or Watches
are added to the system, but you can change the
numbers as frequently as you wish.
SET PRIORITY HELP NAMES & NUMBERS
Your system is capable of adding up to 6 (six) Contact
names and numbers to your PRIORITY HELP list.
Please enter phone numbers in the exact order that you
prefer to the system to contact people in an urgent situation,
as SilverCare will automatically dial the numbers in that
order, until a live person is reached, when you press the
PRIORITY HELP button on Base Console or Watch.
23
Remember to consider both home and mobile numbers of
loved ones and neighbors when choosing Priority Help list.
Keep in mind that your 911 button is separate.
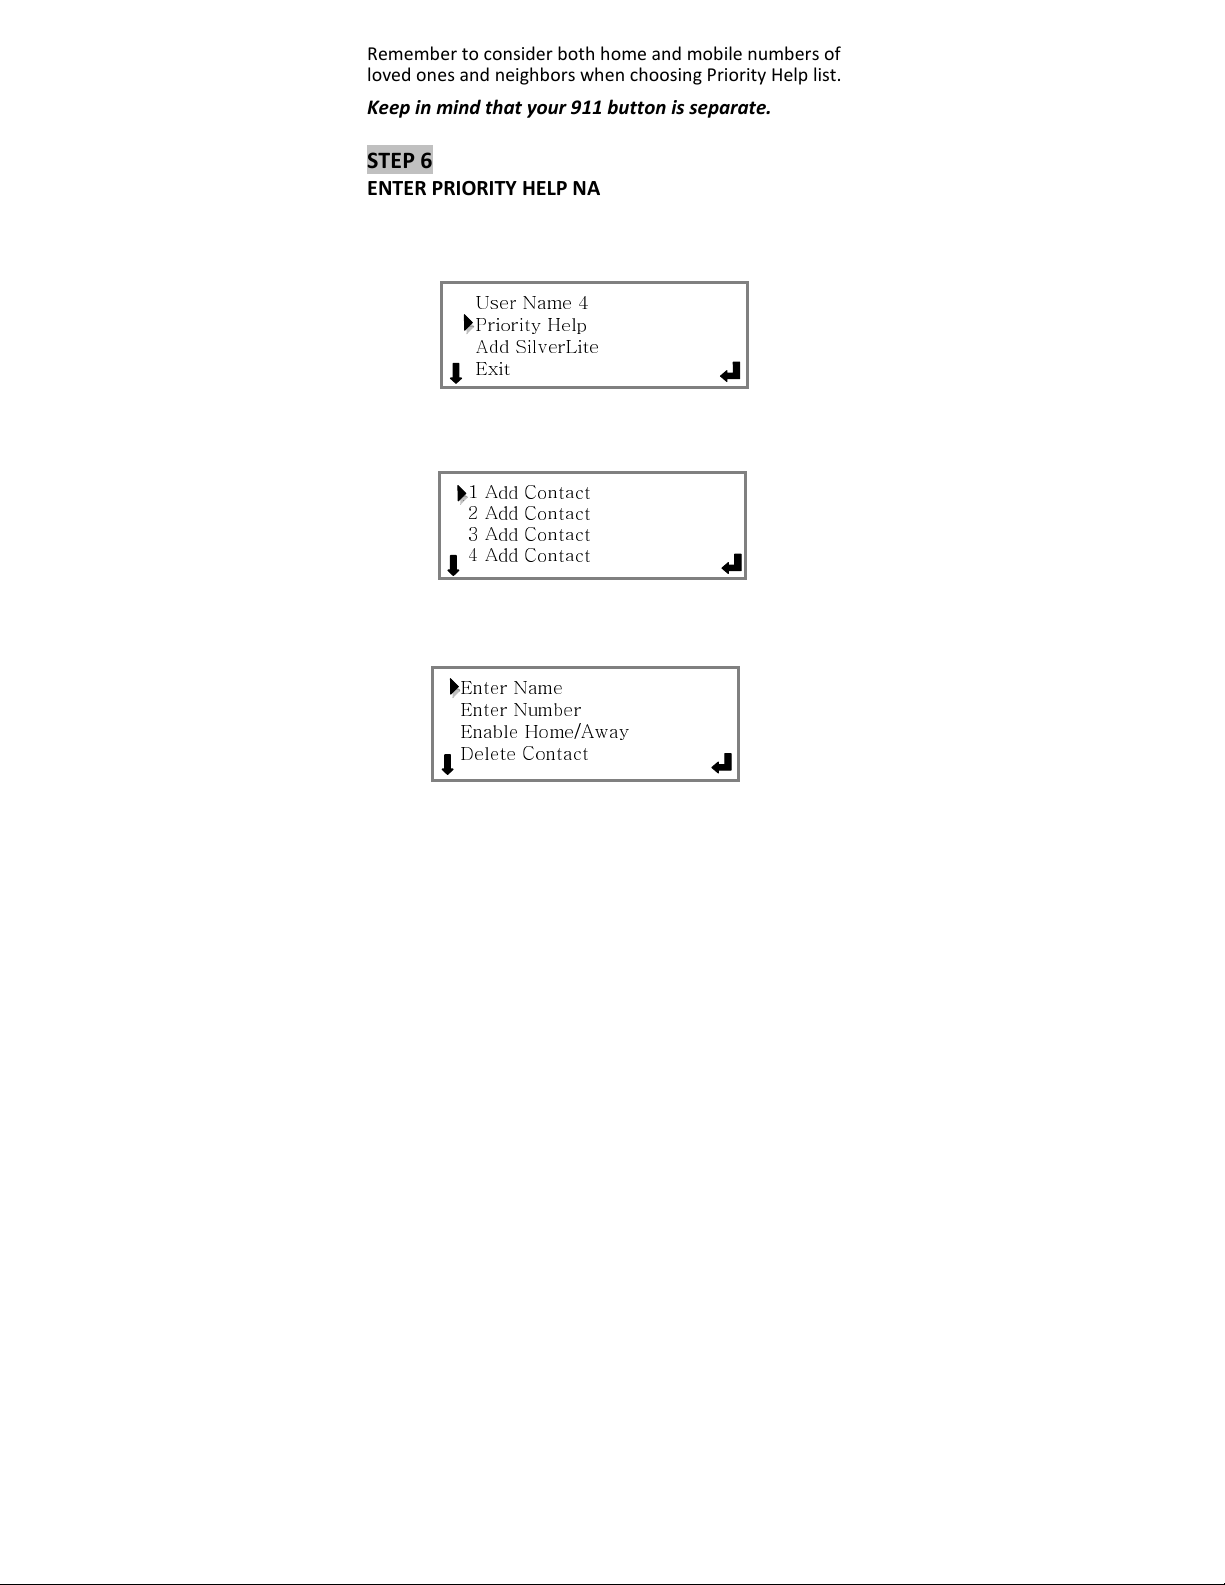
STEP 6
ENTER PRIORITY HELP NAME(S)
To begin PRIORITY HELP Set-Up, please press MENU button
and continue scrolling past User Names 2 through 4 (from
our example), until the cursor is pointed to PRIORITY HELP.
Press OK button to add your first personal PRIORITY HELP
contact number.
DISPLAY Screen will read
Press OK button to reach screen that will permit you to
enter your first name.
DISPLAY Screen will read
User Name 4
Priority Help
Add SilverLite
Exit
1 Add Contact
2 Add Contact
3 Add Contact
4 Add Contact
Enter Name
Enter Number
Enable Home/Away
Delete Contact
24
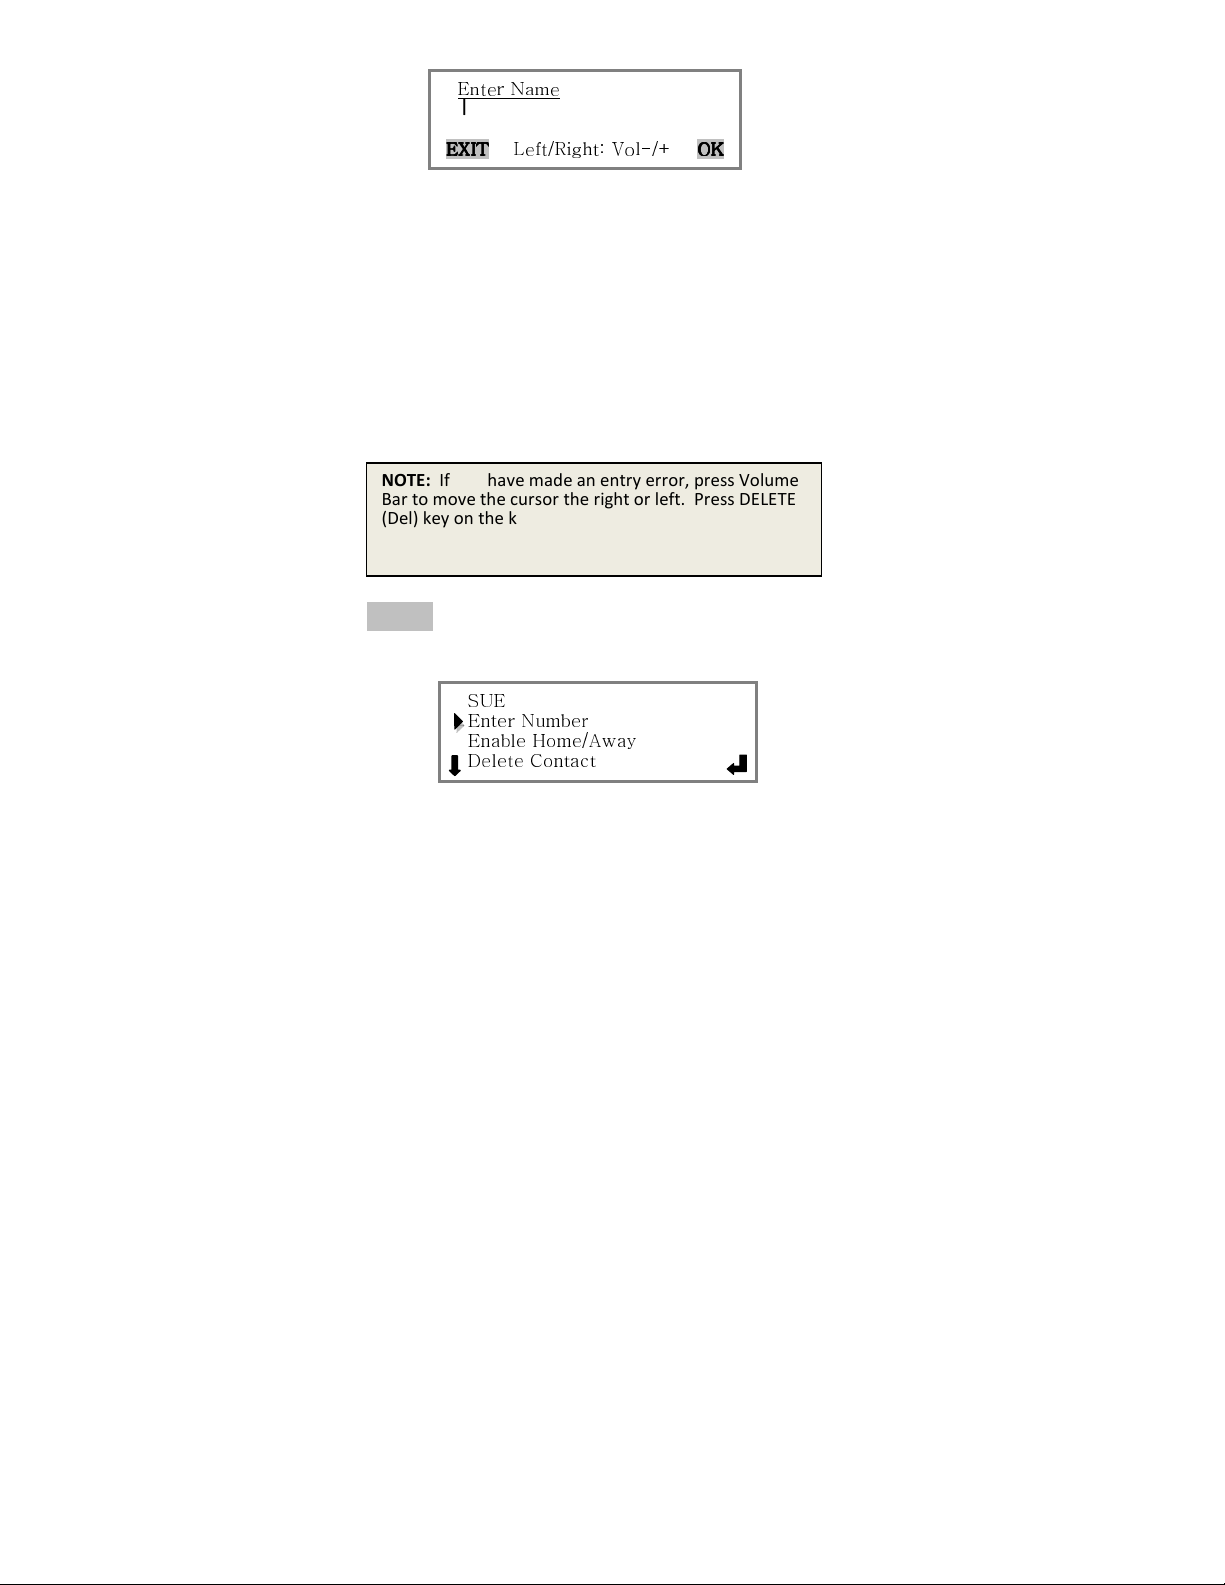
NOTE:
If you have
made an entry error, press
Volume
Press OK button to enter name.
Enter Name
l
EXIT
EXIT
Left/Right: Vol-/+
EXITEXIT
OK
OK
OKOK
Open the keypad door. Using keypad, enter number key
that corresponds with the letters of your name, pausing for
each letter, until the cursor moves to the next position.
Example:
• For the name SUE, press “7” key 4 times in rapid
succession for “S”
• Pause.
• Press ”8” key 2 times in rapid succession for “U
• Pause.
• Press “3” key twice in rapid succession for “E.”
To add space between words (like SUE CELL) press ZERO key
twice. Press OK Button to accept your entry and move on
to the next step, adding phone number.
Bar to move the cursor the right or left. Press DELETE
(Del) key on the keypad to correct any errors - after
first moving the cursor to the left of the letter you
want to delete.
STEP 7
ENTER PRIORITY HELP PHONE NUMBER(S)
DISPLAY Screen will read:
SUE
Enter Number
Enable Home/Away
Delete Contact
25

Press OK button to enter phone number using keypad:
Enter Number
l
EXIT
EXIT
(Backspace:Vol- )
EXITEXIT
OK
OK
OKOK
Enter phone number exactly as you would dial it from your
home phone (with or without “1,” or area code). No dashes
are needed. Press OK button to accept number entry.
Use the VOLUME Bar (to the right of the red 911 button) to
backspace if you have entered a number in error.
At this time, press MENU button twice, moving past Enable
Home/Away and Delete Contact, moving cursor to EXIT.
Press OK. If you have entered one PRIORITY HELP contact,
as in our example, the DISPLAY Screen will read:
SUE
2 Add Contact
3 Add Contact
4 Add Contact
As you scroll through using the MENU button, the following
screen will read:
5 Add Contact
6 Add Contact
Exit
Press OK button to add next PRIORITY HELP contact.
Repeat Step 7 (pages 26-27) until you have added all the
contacts you want in your Priority Calls list, or until you
have reached the maximum capacity of six entries. When
completed, press OK button to EXIT “Add Contact” menu.
26

Exit
Delete Contact
STEP 8
ENABLE & DISABLE HOME/AWAY CONTACTS
At this time we recommend you re-enter the PRIORITY
HELP section to assign one of your contacts as your
Home/Away contact. This number will be auto-dialed
when you press the HOME/AWAY button on your Base
Console, to notify a loved one or neighbor that you have
left or returned safely to your home.
To re-enter PRIORITY HELP, press the MENU button to
scroll past the “Add SilverLite” and “EXIT” options.
Scroll past other entries on the screens, until you once
again reach PRIORITY HELP with your cursor.
Date/Time
Joe
User Name 2
User Name 4
Priority Help
Add SilverLite
Press OK button to return to the screen with PRIORITY
HELP contact list. When cursor points to the contact you
want to assign as your Home/Away contact, press OK
button to reach a screen that looks like this:
SUE
555-5555
Enable Home/Away
27

Enable Home/Away
NOTE: You can enable only ONE contact at one time as
your HOME/AWAY CONTACT. The system will override your
previous setting automatically when you choose a new
HOME/AWAY contact.
Press MENU button to scroll to Enable Home/Away
position. Then press OK button
DISPLAY Screen will read
NO
EXIT (Use Key Pad) OK
Press any button on the keypad to toggle back and forth
from NO to YES. Press OK button to accept your entry.
Press MENU button to scroll past Delete Contact to move
cursor to Exit. Press OK button.
Press MENU button repeatedly until you reach EXIT. Press
OK button to get back to the following screen:
Press OK button to Add SilverLite.
User Name 4
Priority Help
Add SilverLite
Exit
If you did not purchase or receive SilverLite, please skip
this section and turn to Page 29 to continue set-up.
28

E
xit
STEP 9
ADD SILVERLITE
First plug SilverLite into functioning wall power outlet.
Blue LED light will flash twice.
Press OK button on DISPLAY screen to Add SilverLite.
DISPLAY Screen will read:
Press Pairing Button
on SilverLite
Pairing Button
Move back to SilverLite unit plugged in to wall outlet. Press
PAIRING button on SilverLite Wireless Switch Activator.
SilverLite will continue to flash until it is successfully added
to the system. Screen will then indicate “SilverLite Added.”
Press OK button to return to the MENU. Cursor then points
to EXIT. Press OK button to leave INITIAL SET-UP mode, and
move to REMINDER section.
SET REMINDERS
SilverCare provides entry space for six (6) different
medication and/or event reminders for EACH User.
STEP 10
ADD MEDICATION REMINDERS
DISPLAY Screen will read:
Initial Setup
Reminder
ICE
Base Setting
29

Press OK button to enter MEDICATION REMINDER mode.
Press MENU button to enter screen listing Users. Scroll
using MENU button to move cursor to appropriate User.
Begin adding reminders for that User.
For our example, we will set a medication reminder for our
User, JOE. Pressing MENU button, scroll until cursor
reaches JOE. Press OK button to reach this screen.
Med Reminder
Event Reminder
Exit
Press OK button to reach this screen:
1 Add Reminder
2 Add Reminder
3 Add Reminder
Exit
Press OK button to reach this screen:
Reminder Name
Start Date
End Date
Reminder Time 1
Press OK again. Using Keypad, on screen below, enter
name for 1st reminder. Example: Beta Blocker
Reminder Name
l
EXIT Left/Right:Vol-/+ OK
30

Reminder Time 1
Press OK button. DISPLAY screen will say:
BETA BLOCKER
Start Date
End Date
Press OK button to enter Start Date using keypad:
Date: MM/DD/YY
01/10/10
Press OK button to reach this screen
BETA BLOCKER
01/10/10
End Date
Reminder Time 1
Press OK button to enter End Date just as you did for Start
Date. When completed, press OK button again to set
reminder times.
BETA BLOCKER
01/10/10
01/12/11
Reminder Time 1
Press OK to enter reminder time(s), using keypad, and
pressing any key to toggle between AM and PM.
Time: HH:MM AM/PM
01:00 PM
EXIT
EXIT
Left/Right: Vol-/+
EXITEXIT
OK
OK
OKOK
31

NOTE:
Use same technique to enter new
MEDICATION
or delete entries at any time.
Press OK button to return to MENU.
Repeat entire process to enter additional reminder times
for this medication. Press OK button when cursor points to
EXIT to enter REMINDERS for additional medications.
REMINDERS for this User. Press MENU button to move
cursor through selections. Press OK button to accept
entries. You can re-enter REMINDER section to modify
If additional Users are programmed into this Base Console,
their names will also appear on this REMINDER screen.
Repeat entire Step 10 process for adding MEDICATION
REMINDERS for EACH User, instructions on page 30-32.
Your Watch Daily-Living Assistant will beep 8 times at the
reminder time(s) you have set. Five and ten minutes after
the initial reminder the system will beep again to reinforce
the initial reminder.
STEP 11
ADD EVENT REMINDERS
Press OK button to move to MENU screen. Press OK again
to enter EVENT REMINDER mode.
For our example, we will set an Event Reminder for Joe.
Press MENU button to scroll until cursor reaches “JOE”.
Press OK button to reach this screen.
Med Reminder
Event Reminder
Exit
32

Event Name
Press OK button to reach this screen:
1 Add Reminder
2 Add Reminder
3 Add Reminder
Exit
Press OK button to reach this screen:
Event Name
Event Date
Reminder Date
Event Time
NOTE: Reminder Time will be on next screen as you scroll
through with MENU button.
Press OK again. Using Keypad on screen below, enter name
for 1st reminder. Example: Dr Appt
l
EXIT Left/Right:Vol-/+ OK
Press OK button. DISPLAY screen will say:
DR APPT
Event Date
Reminder Date
Event Time
Press OK button to enter Event Date using keypad:
Date: MM/DD/YY
01/10/10
EXIT
EXIT
EXITEXIT
Left/Right: Vol-/+
OK
OK
OKOK
33

Press OK button to reach this screen
DR APPT
01/10/10
Reminder Date
Event Time
Press OK button to enter Reminder Date just as you did for
Event Date, and enter data. Press OK button again.
DR APPT
01/10/10
01/09/10
Event Time
Press OK to enter Event Time(s), using keypad, pressing any
key to toggle between AM and PM.
Time: HH:MM AM/PM
01:00 PM
EXIT
EXIT
Left/Right: Vol-/+
EXITEXIT
OK
OK
OKOK
Press OK button to return to MENU to add Reminder Time
for that event. Press OK to enter data. Press OK again.
Move MENU button to EXIT if you have no additional
reminders. To enter additional reminders, press OK. When
you have completed entering reminders for User 1, you
may enter reminders for additional users.
Joe
User Name
User Name
User Name
Exit
If you have no additional users, move cursor to EXIT and
press OK to move on to next section, entering ICE data.
34
EXIT
EXITEXIT
EXIT
Left/Right: Vol
-
/+
OK
OKOK
OK
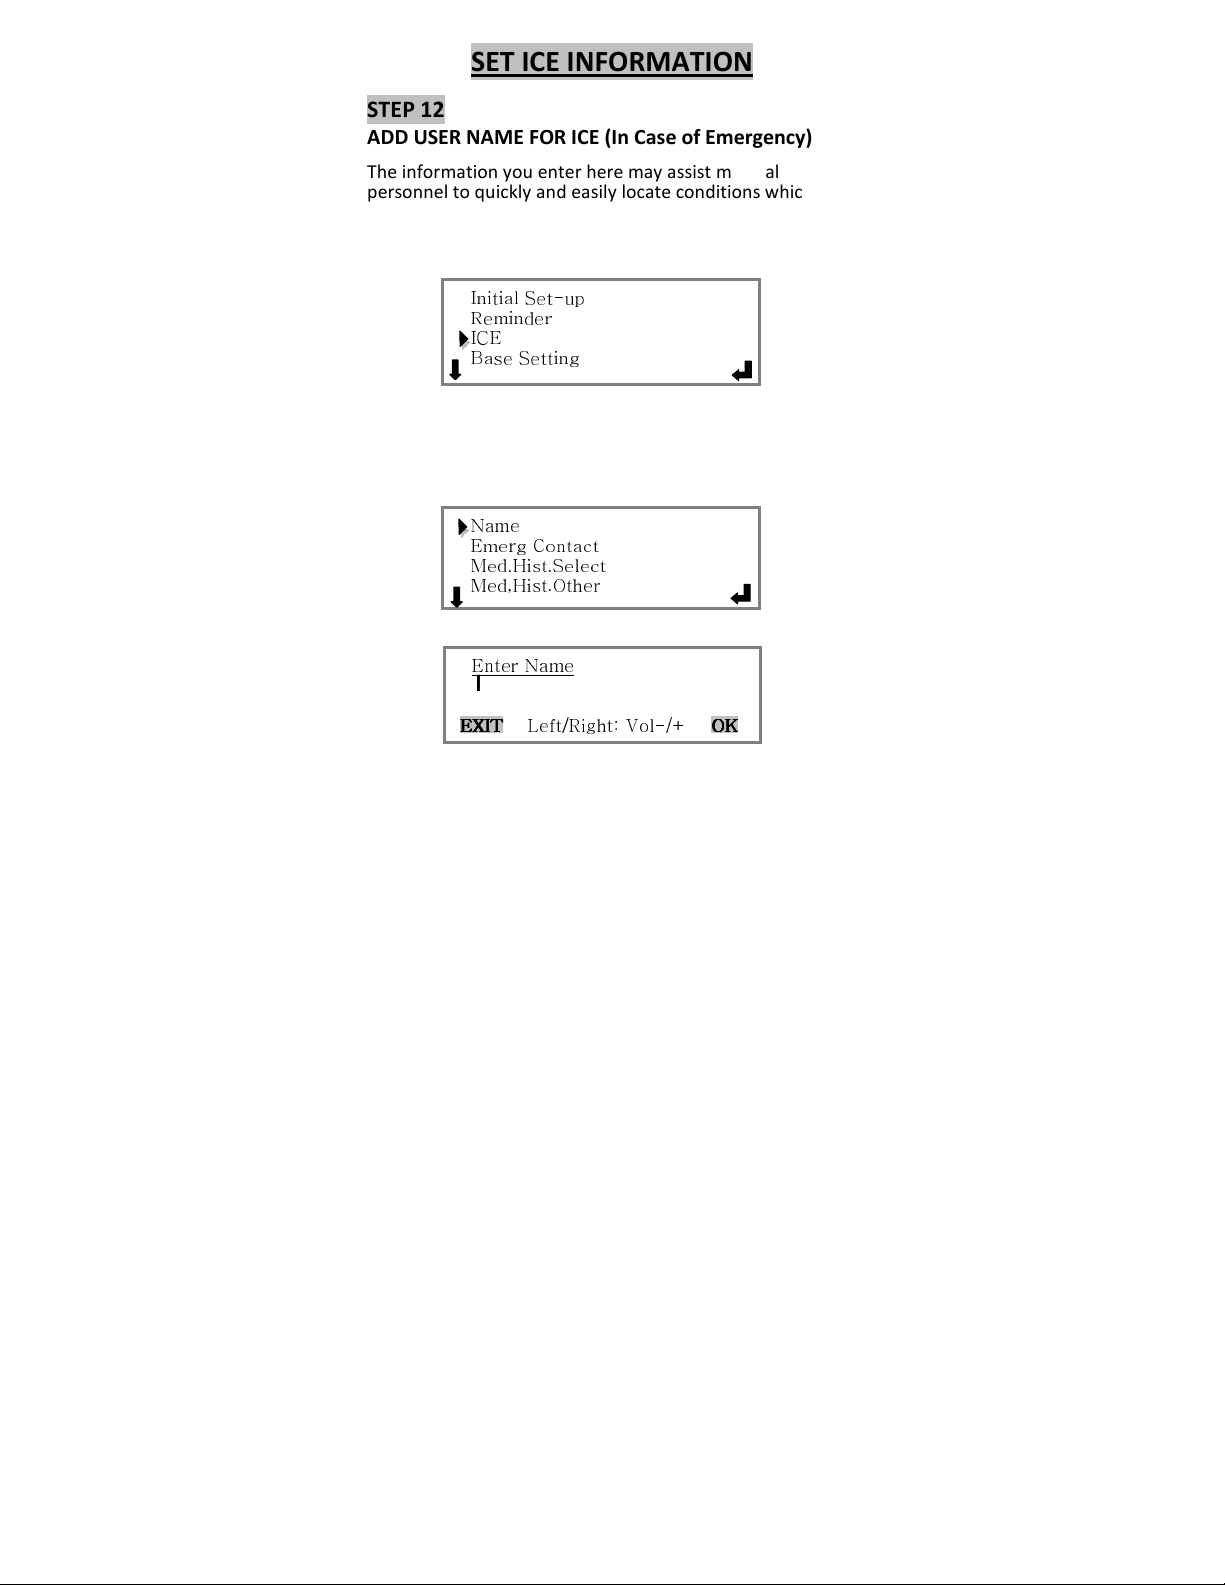
SET ICE INFORMATION
STEP 12
ADD USER NAME FOR ICE (In Case of Emergency)
The information you enter here may assist medical
personnel to quickly and easily locate conditions which may
affect your treatment plan. You will have the opportunity to
enter data for EACH User separately!
DISPLAY Screen will read:
Initial Set-up
Reminder
ICE
Base Setting
Press OK button. The list of Users will appear on screen.
Choose User by scrolling with MENU button, and Press OK
button to add User name for ICE.
Now enter your name as you would like to relay it to
emergency personnel.
Name
Emerg Contact
Med.Hist.Select
Med,Hist.Other
Press OK. DISPLAY Screen will read:
Using keypad, enter your name. Press OK.
Enter Name
l
35
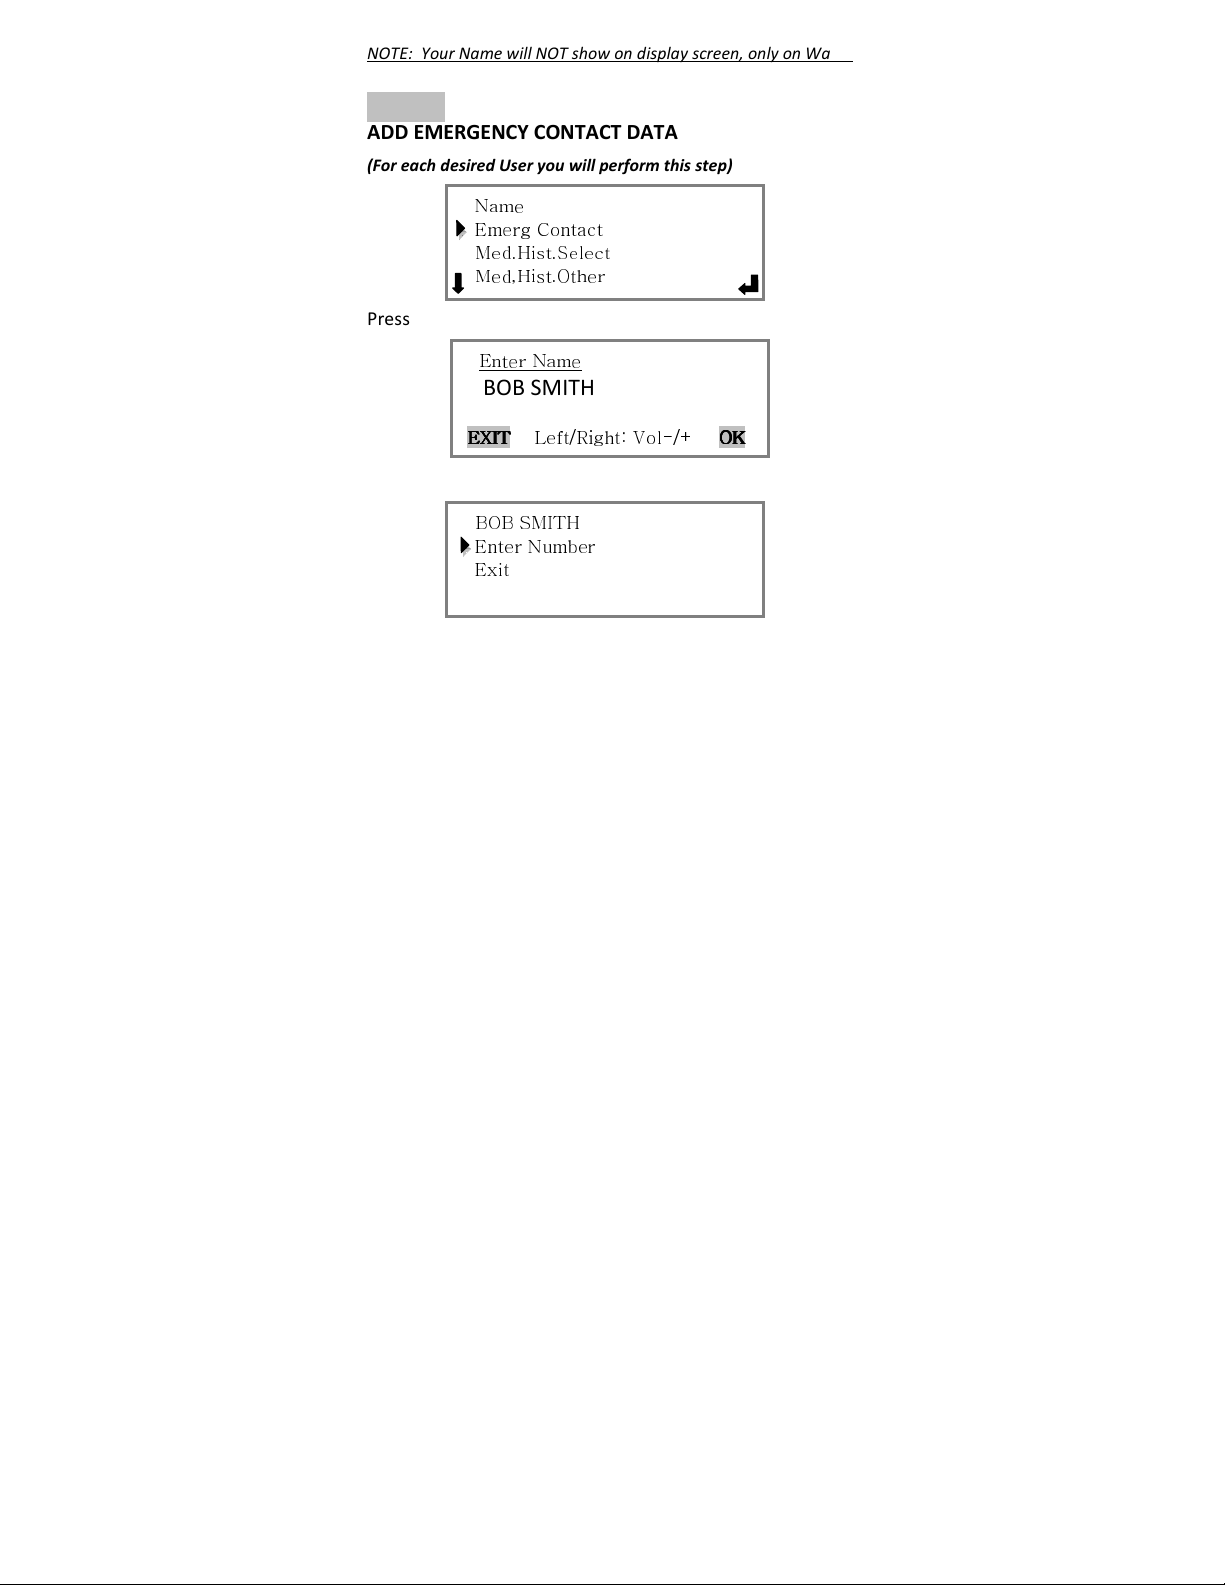
NOTE: Your Name will NOT show on display screen, only on Watch
STEP 13
ADD EMERGENCY CONTACT DATA
(For each desired User you will perform this step)
Name
Emerg Contact
Med.Hist.Select
Med,Hist.Other
Press OK twice. Use keypad to enter Emergency Contact
name.
Press OK button to return to MENU screen.
Enter Name
BOB SMITH
EXIT
EXIT
Left/Right: Vol-/+
EXITEXIT
BOB SMITH
Enter Number
Exit
OK
OK
OKOK
Press OK button to enter phone number for this contact
using keypad. Press OK button to accept your entry and
return to MENU screen. Press OK button again to EXIT and
choose Med.Hist.Select with cursor.
36
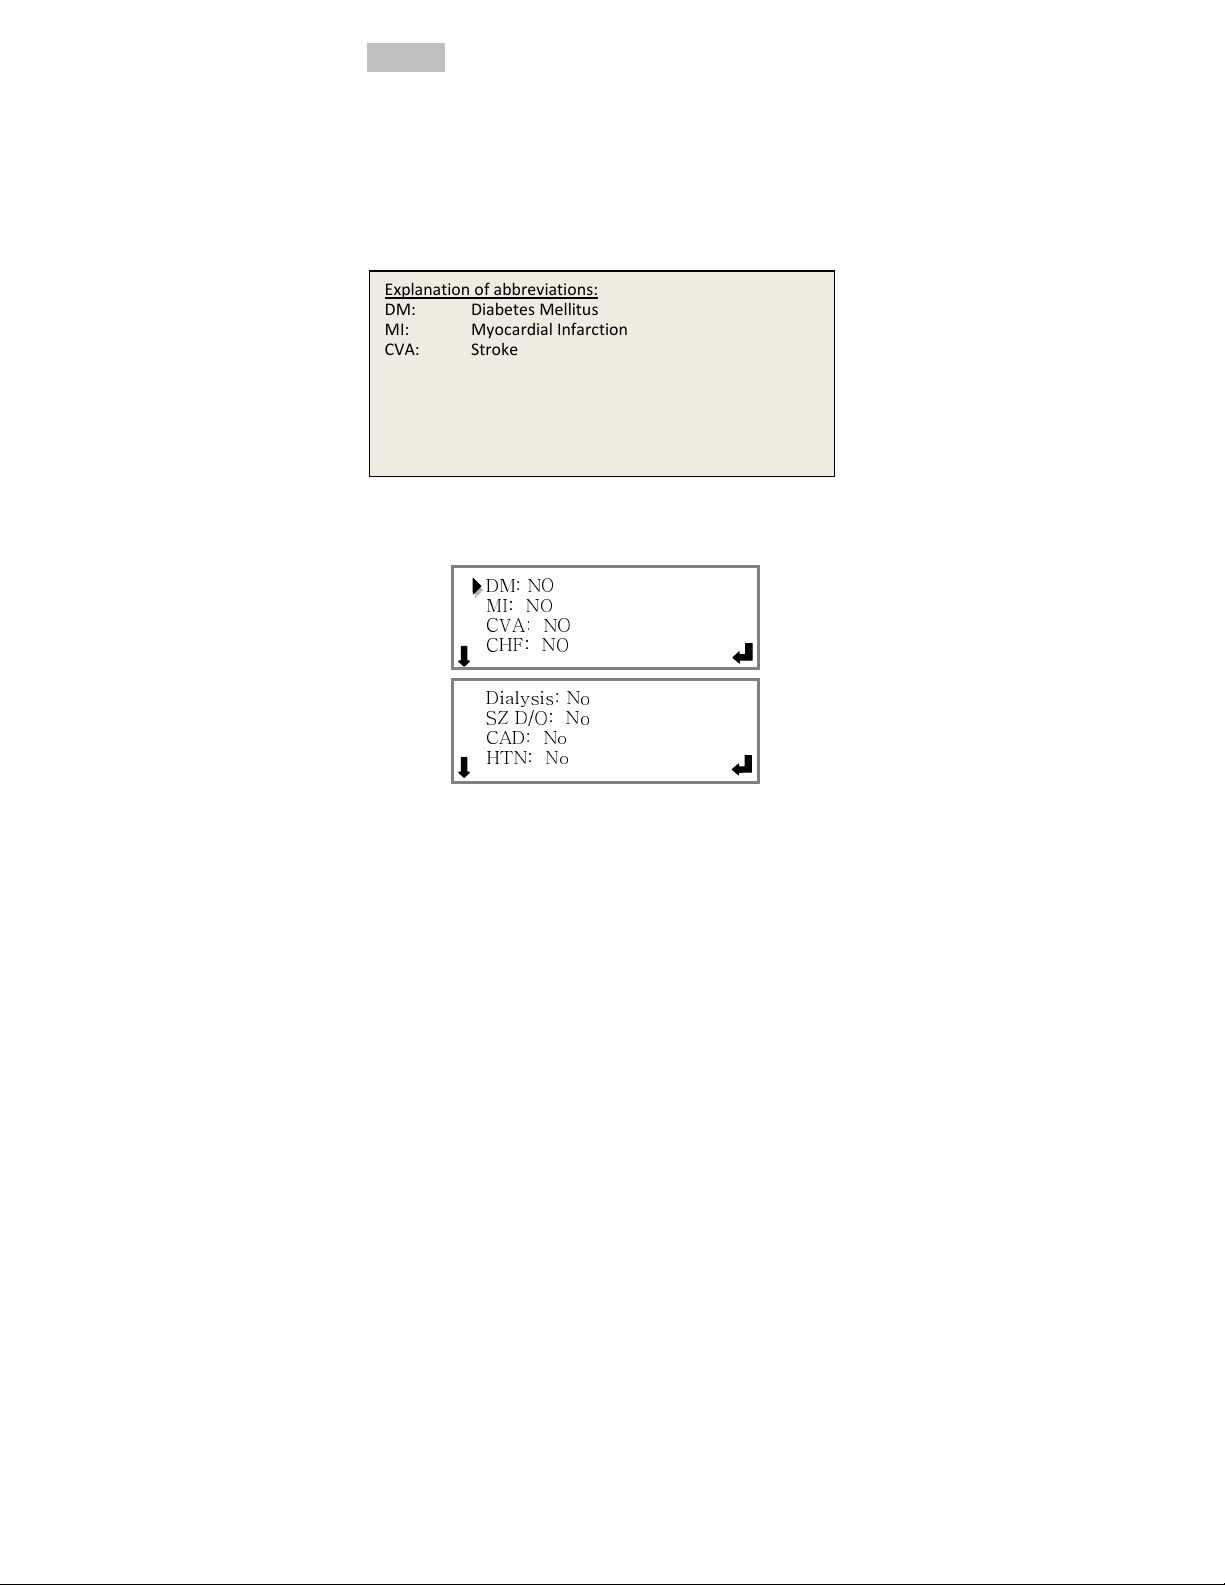
Explanation of abbreviations:
STEP 14
ADD MEDICAL HISTORY
There are two separate sections for entering your personal
Medical History information.
• 1st option has pre-programmed options
• 2nd option uses the keypad to enter personalized
Press OK button to begin pre-programmed section. (
abbreviations are traditionally accepted in medical communities.)
For conditions apply to you, Press OK button to select the
option, and toggle from pre-set NO to YES by pressing any
key on the keypad. DISPLAY Screen will read:
conditions.
These
DM: Diabetes Mellitus
MI: Myocardial Infarction
CVA: Stroke
CHF: Congestive Heart Failure
Dialysis: Kidney Dialysis Patient
SZ D/O: Seizure Disorder
CAD: Coronary Artery Disease
HTN: Hypertension
DM: NO
MI: NO
CVA: NO
CHF: NO
Dialysis: No
SZ D/O: No
CAD: No
HTN: No
37

Exit
Allergy 1
Once “Select” option is completed, move cursor to EXIT.
Press OK button to EXIT this section and begin entering
personalized Med.Hist.Other section. Press OK to reach
this screen:
Med.Hist.Other
l
EXIT
EXIT
Left/Right: Vol-/+
EXITEXIT
OK
OK
OKOK
Press OK button to accept your entry.
DISPLAY Screen will read:
Allergies
Medication
Blood Type
Press OK button. You will be permitted to enter as many as
three different allergies. Press OK button again.
STEP 15
ADD ALLERGIES, MEDICATIONS AND BLOOD TYPE
Use keypad to enter allergy information:
Press OK button to return to MENU screen. Repeat steps to
add Allergy 2 and/or Allergy 3 entries; or move the cursor to
EXIT and press OK button to return to MENU. Cursor is
currently pointing to “Medication” section.
Press OK button to begin entering each medication
l
EXIT
EXIT
Left/Right: Vol-/+
EXITEXIT
OK
OK
OKOK
38

Medication 1
EXIT
EXITEXIT
EXIT
Left/Righ
t: Vol
-
/+
OK
OKOK
OK
Medication 1
Medication 2
Medication 3
Exit
Press OK button to enter Medication 1:
l
Use keypad to enter information. Press OK button to return
to MENU screen. Repeat steps to add Medication 2 and/or
Medication 3 entries; or move the cursor to EXIT and press
OK button to return to Main MENU.
You are ready to enter your Blood Type.
Allergies
Medication
Blood Type
Exit
Press OK button to enter Blood Type using A, B and/or O
buttons on the keypad for the appropriate letter(s) and
pressing the number 1 button as many times as you need
to until you reach the appropriate plus (+) or minus (-) sign
Blood Type
l
EXIT
EXIT
Left/Right: Vol-/+
EXITEXIT
OK
OK
OKOK
Press OK button to accept entry and return to Main MENU.
Press OK button again to entering data for additional Users.
39
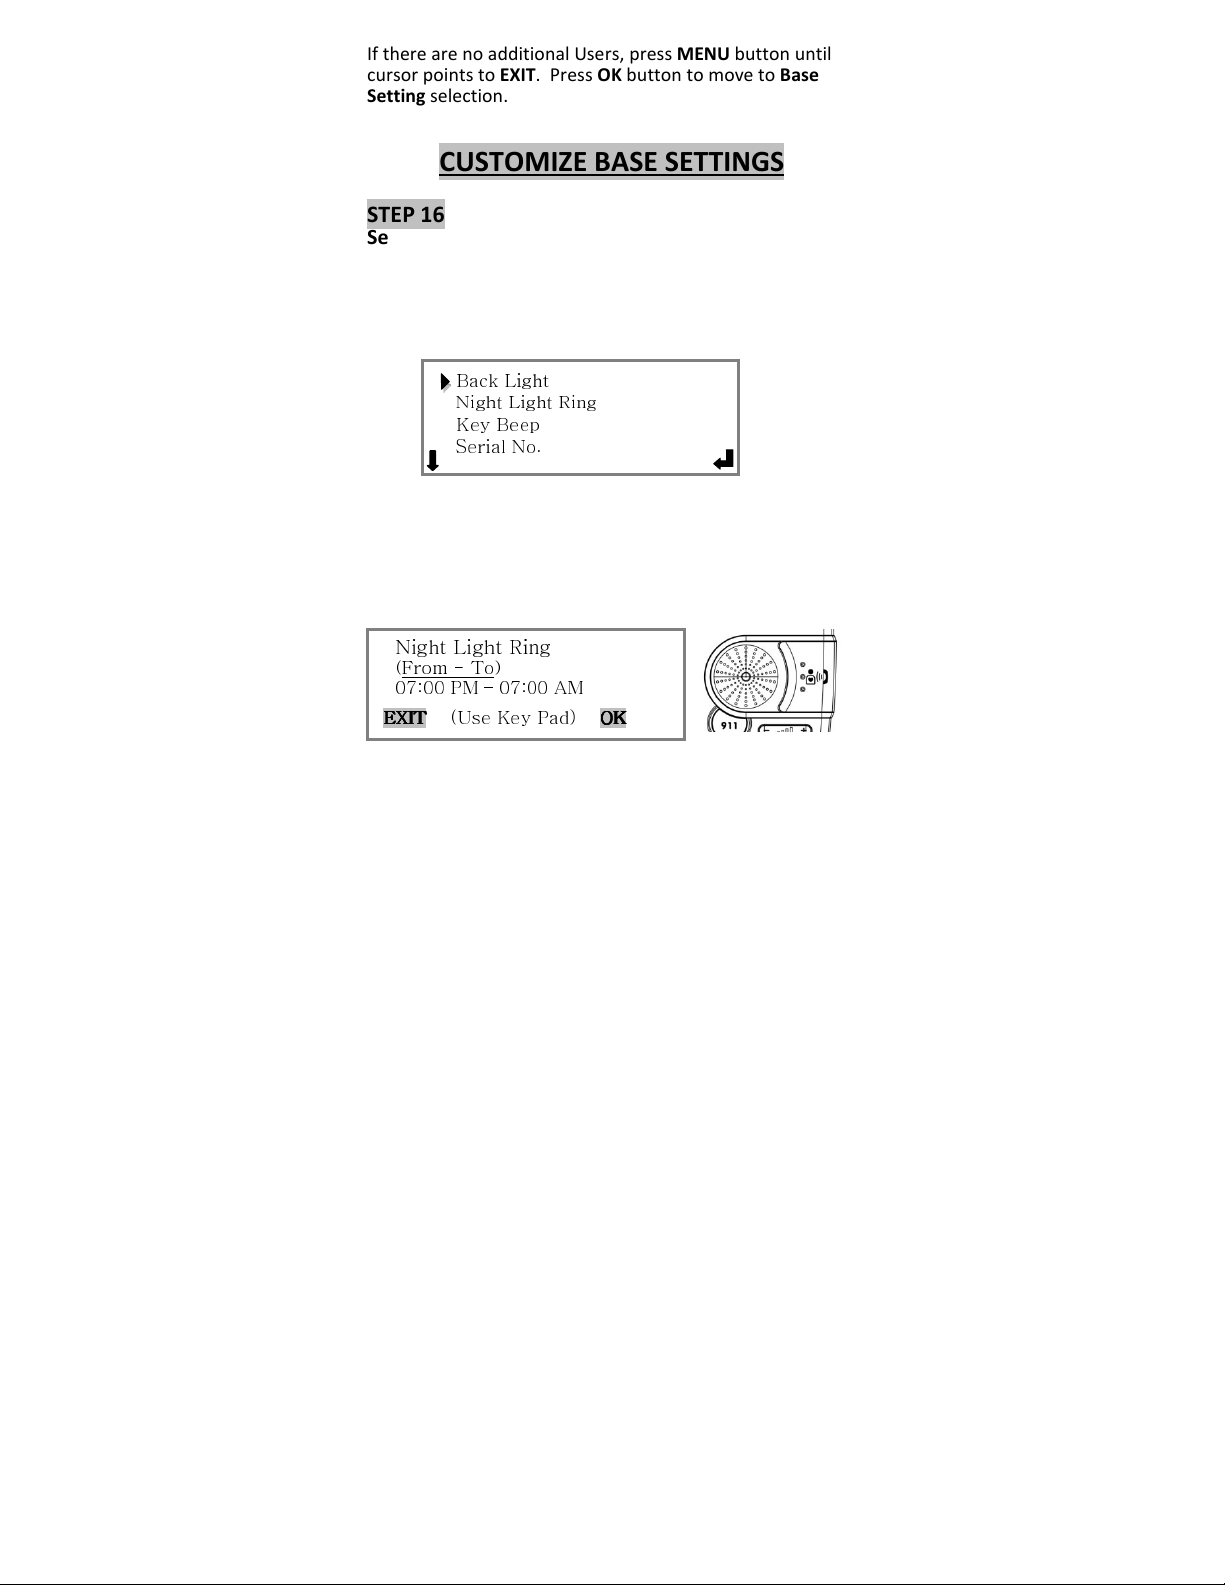
Night Light Ring
If there are no additional Users, press MENU button until
cursor points to EXIT. Press OK button to move to Base
Setting selection.
CUSTOMIZE BASE SETTINGS
STEP 16
Set Base Console Preferences
This section will allow you to modify your Base Console
features for your comfort and convenience. The same
selection will apply for all Users.
Press OK button to reach this screen:
Back Light
Night Light Ring
Key Beep
Serial No.
Press OK button to enter screen permitting changes to
ON/OFF feature for DISPLAY screen Back Light.
Toggle from ON to OFF by pressing any key on the keypad.
Press OK.
To set automatic on/off timer for Base Console Night Light
Ring, press OK to enter programming screen using keypad.
(From - To)
07:00 PM – 07:00 AM
EXIT
EXIT
(Use Key Pad)
EXITEXIT
To accept Night Light Ring settings press OK button.
OK
OK
OKOK
40

SilverCare
IMPORTANT
NOTE:
personnel’s instructions.
Base Console is set to “beep” each time you press a button.
To accept this, scroll past “KEY BEEP” to “SERIAL NUMBER”.
(If you prefer to turn Key Beep off, press OK, and press any
key on keypad to toggle to “OFF.” Then Press OK to return
to Main MENU.)
At SERIAL NUMBER, press OK button to see, and note the
Serial No. for your System on the back of this manual.
Press OK button one last time to Exit Set-Up mode and
return to Home Page.
12:00 PM
Congratulations!
Initial Set-Up Section is complete!
As you begin to review Section Three, Operating
Your SilverCare System, please keep in mind that
the system was designed for effective
communicating by one person at a time (similar to
a walkie-talkie).
In preparation for possible, eventual use of your
Priority Help or 911 calling function in an urgent
situation, we recommend you test your system
with and without different background noises, (like
the shower and the television) to ensure you know
how the system operates most effectively for you.
As always, it is important to speak clearly and
slowly. Then listen carefully to the Emergency
41

SECTION THREE
Operating Your SilverCareTM System
DIGITAL TIMEPIECE
Both the wrist and the pendant style SilverCare™
timepieces are waterproof, providing you the
comfort and security wearing it in the shower or
while bathing.
Activate Backlight by pressing Light Button on side of
Watch, for better visibility in dimly-lit areas.
EMERGENCY CALLING FROM WATCH
pendant-Watch acts as a personal two-way communicator
to allow you to reach an Emergency Operator and have a
clear, two-way conversation, by pressing the 911 button on
the side of the wristWatch or pendant-Watch.
If you have elected to use an Emergency Service Provider,
you will reach their Operator, if you have chosen SelfManaged service, you will reach your local 911 Operator.
In the event of an emergency, whether medicalrelated, a fire or break-in, your wristWatch or
• Firmly press the dedicated 911 button on your Watch
(Personal Daily-Living Assistant).
• When this button is firmly pressed it will provide an
audible beep and automatically dial 911.
• When the Emergency Operator answers, you are
connected in an instant, for a live, two-way
conversation. Speak clearly and slowly and follow
the Emergency Operator’s instructions carefully.
42

NOTE:
This feature works only when Base Console is
plugged into a
ctive analog phone line.
If you call 911 in error - or if you want to disconnect your
completed call - simply press the 911 button again until
you hear the “beep.”
EMERGENCY CALLING FROM BASE CONSOLE
When the Emergency Operator answers, you are connected
in an instant, for a live, two-way conversation. Speak
clearly and slowly and follow the Emergency Operator’s
instructions carefully.
Since the Base Console is plugged into an electrical outlet,
talk time is not limited based on battery performance –
UNLESS you are experiencing a power outage and system is
operating on back-up batteries.
Press red 911 button on Base Console to speak
to Emergency Operator, hands-free via Base
Console, within a 10 to 15 foot radius.
PRIORITY HELP CALLS FROM BASE OR WATCH
dials your pre-programmed Priority Help contact (in the
same order in which they were entered) when you press
the Priority Help button on either your SilverCare Watch or
Base Console. This permits a clear, two-way conversation,
to receive the assistance you need. When a live person is
reached with auto-dial feature, a prerecorded outgoing
message (OGM) is sent, telling recipient they are receiving
an important call from you. They will be instructed to press
When the situation calls for help
from a neighbor or family
member, rather than a 911
Emergency Operator, your system automatically
43

NOTE:
This feature works on Watch only when
plugged into active analog phone line
.
ANY NUMERIC key on their phone keypad to activate this
call. If no live person is answers the first outbound call, the
system automatically continues dialing to the second, third,
and so on, until a live person is reached. The system is NOT
fooled by an answering machine and will continue dialing to
reach live person.
To hang up the call, simply press the Priority Help button
firmly to release the connection.
Watch is in range of Base Console and Base Console
is plugged into active analog and phone line.
This feature works on Base Console when it is
HANDS- FREE, INCOMING CALLS
triggers your answering machine, you can press Priority
Help button on your Watch or Base Console to activate the
sensitive microphone and speaker in the Base Console. This
permits a convenient, hands-free conversation to take place
while you are within 10 to 15 feet from your Base Console.
You can increase or decrease the volume in the Base
Console by pressing the Volume Control Bar.
If you choose to move the incoming call to a traditional
phone handset, pick up that handset as you normally would
to connect your call, then press the appropriate Priority
Help button (on your Watch or Base Console), depending
on which button you used to answer the incoming call. This
action will deactivate the speaker on the Base Console and
transfer your call to your desired handset
When you receive an incoming call to your home
phone and are not able to safely or comfortably
answer it before the caller is likely to hang up or
44

NOTE:
This feature works only when
Watch
is in
range of Base Console and Base Console is plugged
into active analog phone line.
NOTE:
This feature works only when
Watch
is in
NOTE:
This feature f
unctions independently from
PAGING YOUR SILVERCARE WATCH
If you misplace your Wrist-Watch or PendantWatch, you can locate it quickly and easily by
pressing the Paging button on your SilverCare
Base Console. Base Console will indicate
“Paging all Watches/Pendants,” counting
down for 60 seconds, while Watch will respond within 10
seconds and “beep” continuously to help you locate it.
range of Base Console and Base Console is plugged
into active analog phone line.
MEDICATION & EVENT REMINDERS
The beep and reminder on the DISPLAY screen will repeat
twice more, at 5 minute intervals.
Base Console. Your Personal Daily-Living Assistant
(Watch) maintains this vital information after you
have programmed it - even when Base Console is NOT
within range or plugged into active analog phone line.
IMPORTANT: When Base Console is disconnected from
AC power and battery pack is removed for more than 36
Your scheduled medication and/or event
reminders are displayed on DISPLAY screen of
your Watch, accompanied by audible “beep.”
45

hours, during a move for example, it is necessary to
reset the date and time to ensure Medication and Event
Reminders are up-to-date and working properly.
HOME & AWAY NOTIFICATION
home, and the system will automatically dial the contact
you have selected and enabled, and will begin flashing to
remind you to deactivate upon your return.
Press the button again when you return home and the
system once again automatically dials your Home/Away
contact to let them know you’ve safely returned home.
If you accidentally press and trigger the Home/Away button
and it triggers an outgoing call, press again firmly and hold
for 1 second to cancel the dial.
For family member’s peace of mind, or to let
your neighbor know you are away, you should
program a Home/Away contact. Press the
button firmly, when you prepare to leave
WIRELESS LIGHT ON/OFF SWITCH &
RADIO TRANSMITTER ON/OFF SWITCH
1. Turns on and off a light remotely if pressed and released
2. Turns on DISPLAY backlight for easier viewing of
3. Deactivates the radio transmitter (which you may be
This important multi-function button on the side
of your SilverCare wristWatch or pendant-Watch:
DISPLAY screen in dimly lit areas.
required to do in some hospitals or on planes) or
reactivates the radio transmitter to reconnect it to Base
Console, if pressed and held for more than 5 seconds.
46

Radio Is Off
IMPORTANT – Since the Radio Transmitter MUST be “ON”
NOTE:
This feature functions independently from Base
for the Priority Help and Watch 911 features to work, if
you have it in the “OFF” position and attempt to make a
Priority Help or 911 call, the SilverCare System will
automatically turn the Radio back on for your convenience
and safety
NOTE: If the radio is off, the Watch
screen will read:
ICE (In Case of Emergency) DATA
access your pre-programmed medication, allergy, blood
type and other critical information; of particular importance
if User has passed out or is unable to talk.
Console. Your Personal Daily-Living Assistant (Watch)
maintains this vital information after you have
programmed it - even when Base Console is NOT within
range or plugged into active analog phone line.
Pressing the “ICE” button on side of Watch easily
and quickly allows Emergency personnel to
47

SECTION FOUR
Checking System Functions
Now that system set-up is complete, and you have
reviewed operating instructions, we recommend that
you check the system in your circumstance, to ensure
you are familiar with the operation and limitations of the
system.
1. If you plan to use an Emergency Service Provider,
Contact them soon to set up your service.
If you prefer the Self-Managed service option,
please contact your local police department to ask
for their input on testing the 911 buttons on your
Watch and Base Console.
2. Since the Priority Help and 911 calling feature
from the Watch operates similarly to a walkietalkie, please test your Priority Help feature by
pressing the button on your watch and having a
brief conversation with your Priority Help contact,
while walking around your home and yard, to
ensure you know your boundaries for maximum
performance. You may also want to test your
system with various background noises, to see
the effect such noises have on your conversations.
Speak clearly and slowly for most effective use.
48

No
Watch
/Pendant Found
Low Battery
Troubleshooting
Please call Technical Support @ 1-877-SILVR01 if you
have difficulty operating your system after carefully
reviewing User Manual.
Display Screen Symbols and Messages
CONDITION ISSUE
Blinking light on Base Console
Reset Date/Time
Power Outage
Phone line out
Watch Low Battery
Watch Screen Messages
Radio is off
Out of Range
Phone Line Out
49

Frequently Asked Questions
SECTION 5
Q: Will the Emergency Operator have my location
automatically when I call
A: YES! Just like all 911 calls, your location is
automatically displayed for the emergency operator.
Q: Do I need a separate telephone line?
A: No, you can use your main telephone line, but
depending on your usage of fax machines, multiple
phone extensions tied to one base, or other
configurations that may affect your usage, we
recommend that you consider what will work best for
you. In many cases your phone service will offer a
significantly reduced rate for a 2nd line, usually less than
$10 per month.
Q: How “waterproof” is my SilverCare Watch?
A: You can safely wear your Watch in the shower or the
bathtub.
Q: How far away from my base speaker can I talk and still
have someone hear me clearly?
A: Ten to fifteen feet is clear in most situations.
Q: How do I change my Watch batteries, and how often
should I change them?
A: You will receive a “Low Battery” signal on your Watch
display to warn you the Watch batteries are low and
should be replaced. The SilverCare Watch uses two SR44
type batteries. To change them, use the screwdriver
included to open the Watch backplate and carefully
50

change (note battery polarity. To ensure maximum
battery life, please choose the replacement brand
carefully (for example, we recommend Duracell,
Energizer or Maxcell). Be sure to not disturb the RED
water seal (gasket), to ensure the waterproof feature
when replacing Watch backplate. Also, many Jewelers
will change your Watch batteries.
Q: How much talk time do I have when I talk into my
wrist-Watch or pendant-Watch speaker before I get a low
battery?
A: With average use, the User should expect to receive
around one hour of actual talk time into the Watch. In
stand-by mode User will receive approximately one year.
If the Watch has been used for a substantial amount
time making Priority Help and/or 911 calls, the User
should weigh the amount of time they have had the
Watch overall, with the time they have spent talking into
the Watch speaker, and consider changing the batteries
sooner than their regularly recommended annual
change.
Q: How do I change the battery pack in Base Console, and
how often should I change them?
A: Your battery pack is rechargeable, and should last 36
hours when fully charged. Plan to replace in 18 to 24
months. If you send your warranty card and register
with us, we will send you a reminder card.
Q: Do I need to have traditional home phone service?
Can’t I use my cell phone?
A: YES, you need a traditional analog phone network
with RJ11 Jack for the connection of the SilverCare
system. You can not use a cellular service.
51

Q: What if my home phone service is through my internet
connection with a Voice-over-Internet Protocol?
A: Please check with your Telephone Service Provider,
but SilverCare is likely to work effectively.
Q: What if my phone service has an outage problem?
A: The SilverCare Base Console will alert you with a
blinking light above the display, and the display will say:
“Phone Line Out” to notify you of the situation.
Q: Where should I plug in my answering machine?
A: For an answering machine that is currently connected
to the RJ11 (phone jack on the wall) should be plugged
into the “phone” jack in the back of our base unit. Then
we can connect the “line” jack of the base unit to the
RJ11 phone jack on the wall.
Q: What if I have DSL service?
A: SilverCare works fine with DSL, but you may want to
consider purchasing an economical DSL filter from an
office supply store to reduce line noise.
52

NOTE:
damage to the equipment and void your Warranty.
SECTION 6
APPENDIX
Product Specifications
SilverCare Base Console Specifications
• Supply Voltage : 9V DC, 500mA
• Number of channels : 256
SilverCare Watch Specifications
• Battery : 2 pcs SR44
• Number of channels : 256
• Operating frequency: 2404 - 2479 MHz
Operating Range:
• Watch Temperature: 32°F to 122°F
• Humidity : 0% - 90 % RH
Storage Range
• Temperature: -4°F ~ 140°F
• Humidity : 0 % ~ 95 % RH
Specifications are typical for this type of device, and may
change without notice. Contact Technical Support @
1-877-SILVR01 for up-to-date information.
Your SilverCare system does not contain any Userserviceable parts. Repairs should be made only by an
authorized SilverPlus Repair Center. Unauthorized
repairs or modifications could result in permanent
53

The
SilverCare System
has been tested and found to
FCC and Safety Compliance
comply with Part15 and Part 68 of the FCC Regulations
for Class B digital devices, intended to provide
reasonable protection against harmful interference in a
residential environment. Operation of this system is
subject to the following:
Operation is subject to the following two conditions:
1. This device may not cause harmful interference, and
2. This device must accept any interference received,
including interference that may cause undesired
operation.
This equipment generates, uses, and can radiate radio
frequency energy. Therefore it may cause interference to
other radio signals, and there is no guarantee that
interference will not occur. If this equipment does cause
interference to radio or TV reception, which can be
determined by turning the equipment on and off, User is
encouraged to try to correct the interference by one or
more of the following measures:
• Relocate or reorient the Base Console antenna
• Move the Base Console to another telephone outlet,
farther away from radio or television equipment
Privacy of communication is not guaranteed while using this
system with your telephone.
SilverCare also complies with UL 60950 and NCC/BSMI
(LP0002, PSTN01, and CNS13438).
Consult your Emergency Service Provider or SilverPlus
Technical Service for further assistance.
54

Caution and Warning
1. The SilverCare 7-in-1 Personal Daily-Living Assistant is a
sophisticated communication system, when used
properly, should not cause harm or interference to User
or other devices. However, with improper operation, the
system may interfere with other devices, or malfunction.
The User is responsible for proper usage, and uses the
product at User’s own risk.
2. It is the sole responsibility of User to become familiar
with, and comply with, all local and federal regulations in
operation of the SilverCare system.
3. SilverCare Watch outgoing call feature is designed for
4. Periodically consider the life of your batteries, and
5. Unauthorized modifications and repairs may cause
6. User agrees to follow all telecommunication regulations
infrequent use in urgent situations, not to be used as
regular phone. To preserve battery do NOT use your
Priority Help button to make outgoing calls except when
you need help due to illness, falling, fire, break-in or
other emergency situation.
ensure both your Watch and Base Console batteries are
in working order.
• WE recommend that if you use SilverCare in an
emergency, that you change Watch batteries to
ensure one hour talk time.
• If you change the Watch batteries, ensure the seal
(gasket) is securely in place to guarantee
waterproof status.
permanent damage to the system. In addition, these
actions may violate FCC regulations, void your Warranty,
and affect your authority to operate the system.
to avoid penalties.
55

7. User acknowledges they may be required to turn off
their personal communication function (Radio) at certain
facilities where use of radio frequency devices is
regulated. For example: In an aircraft or a hospital.
8. Since SilverPlus has no control over how long this
NOTE:
If the Base Console is disconnected for more than two
days, the pre-programmed Medication and Event
Reminders, and the ICE data, will remain in the
Watch memory and operate normally, but the date
and time may need to be reset.
product remains on a retailers’ shelf, we have included
an extra set of Watch batteries for your safety and
convenience.
56

Product Warranty
SilverPlusTM warrants the system against any defect in
materials or workmanship for the period of One Year from
date of purchase. Should you experience a problem,
contact Customer Care @ 877-745-8701 between the hours
of 9:00 a.m. and 5:00 p.m. Pacific time. Save sales receipt as
proof of purchase, as it is needed for all warranty service.
Complete the enclosed registration card within 30 days of
purchase, and return it Postage Paid to the address shown
on card, or via fax.
Within One Year from purchase date, SilverPlus will repair
or replace your device at no cost to you, if a defect in
materials or workmanship is found. If we elect to replace
your device, we may use new or reconditioned product,
with the same or newer design. Repair or replacement
items will be warranted for a period of 90 days, or for
original time remaining on the original warranty, whichever
is longer. Warranty does not cover accidents, negligence or
breakage.
SilverPlus can not be responsible, acts of God or nature, or
failure on the part of your phone service or Service Provider,
or for damage incurred while shipping product to us.
Tampering with the product by anyone other than an
authorized SilverPlus representative will void manufacturer
warranty. SilverPlus can not be held responsible for loss of
time, inconvenience, property damage, etc. caused by the
system or any other accidental or consequential damages.
Unfortunately SilverPlus is unable to provide support, rebates or
replacement for missing parts for products purchased through
online auctions.
57

Record your SilverCare System information here:
Serial Number______________________
Place of Purchase___________________
Date of Purchase____________________
Service Provider:
Name_________________________
Phone # _______________________
SilverPlus, Inc.
18 Technology, Suite 158
Irvine, CA 92618
www.GoSilverPlus.com
1-877-745-8701
Patents Applied For
All Rights Reserved
1-877-SILVR01
Made in China
2010 SilverPlusTM
58
 Loading...