

Page 1
4 ENGLISH
CHARGING
A
B
C
CHARGE/
ON
OFF
POWER
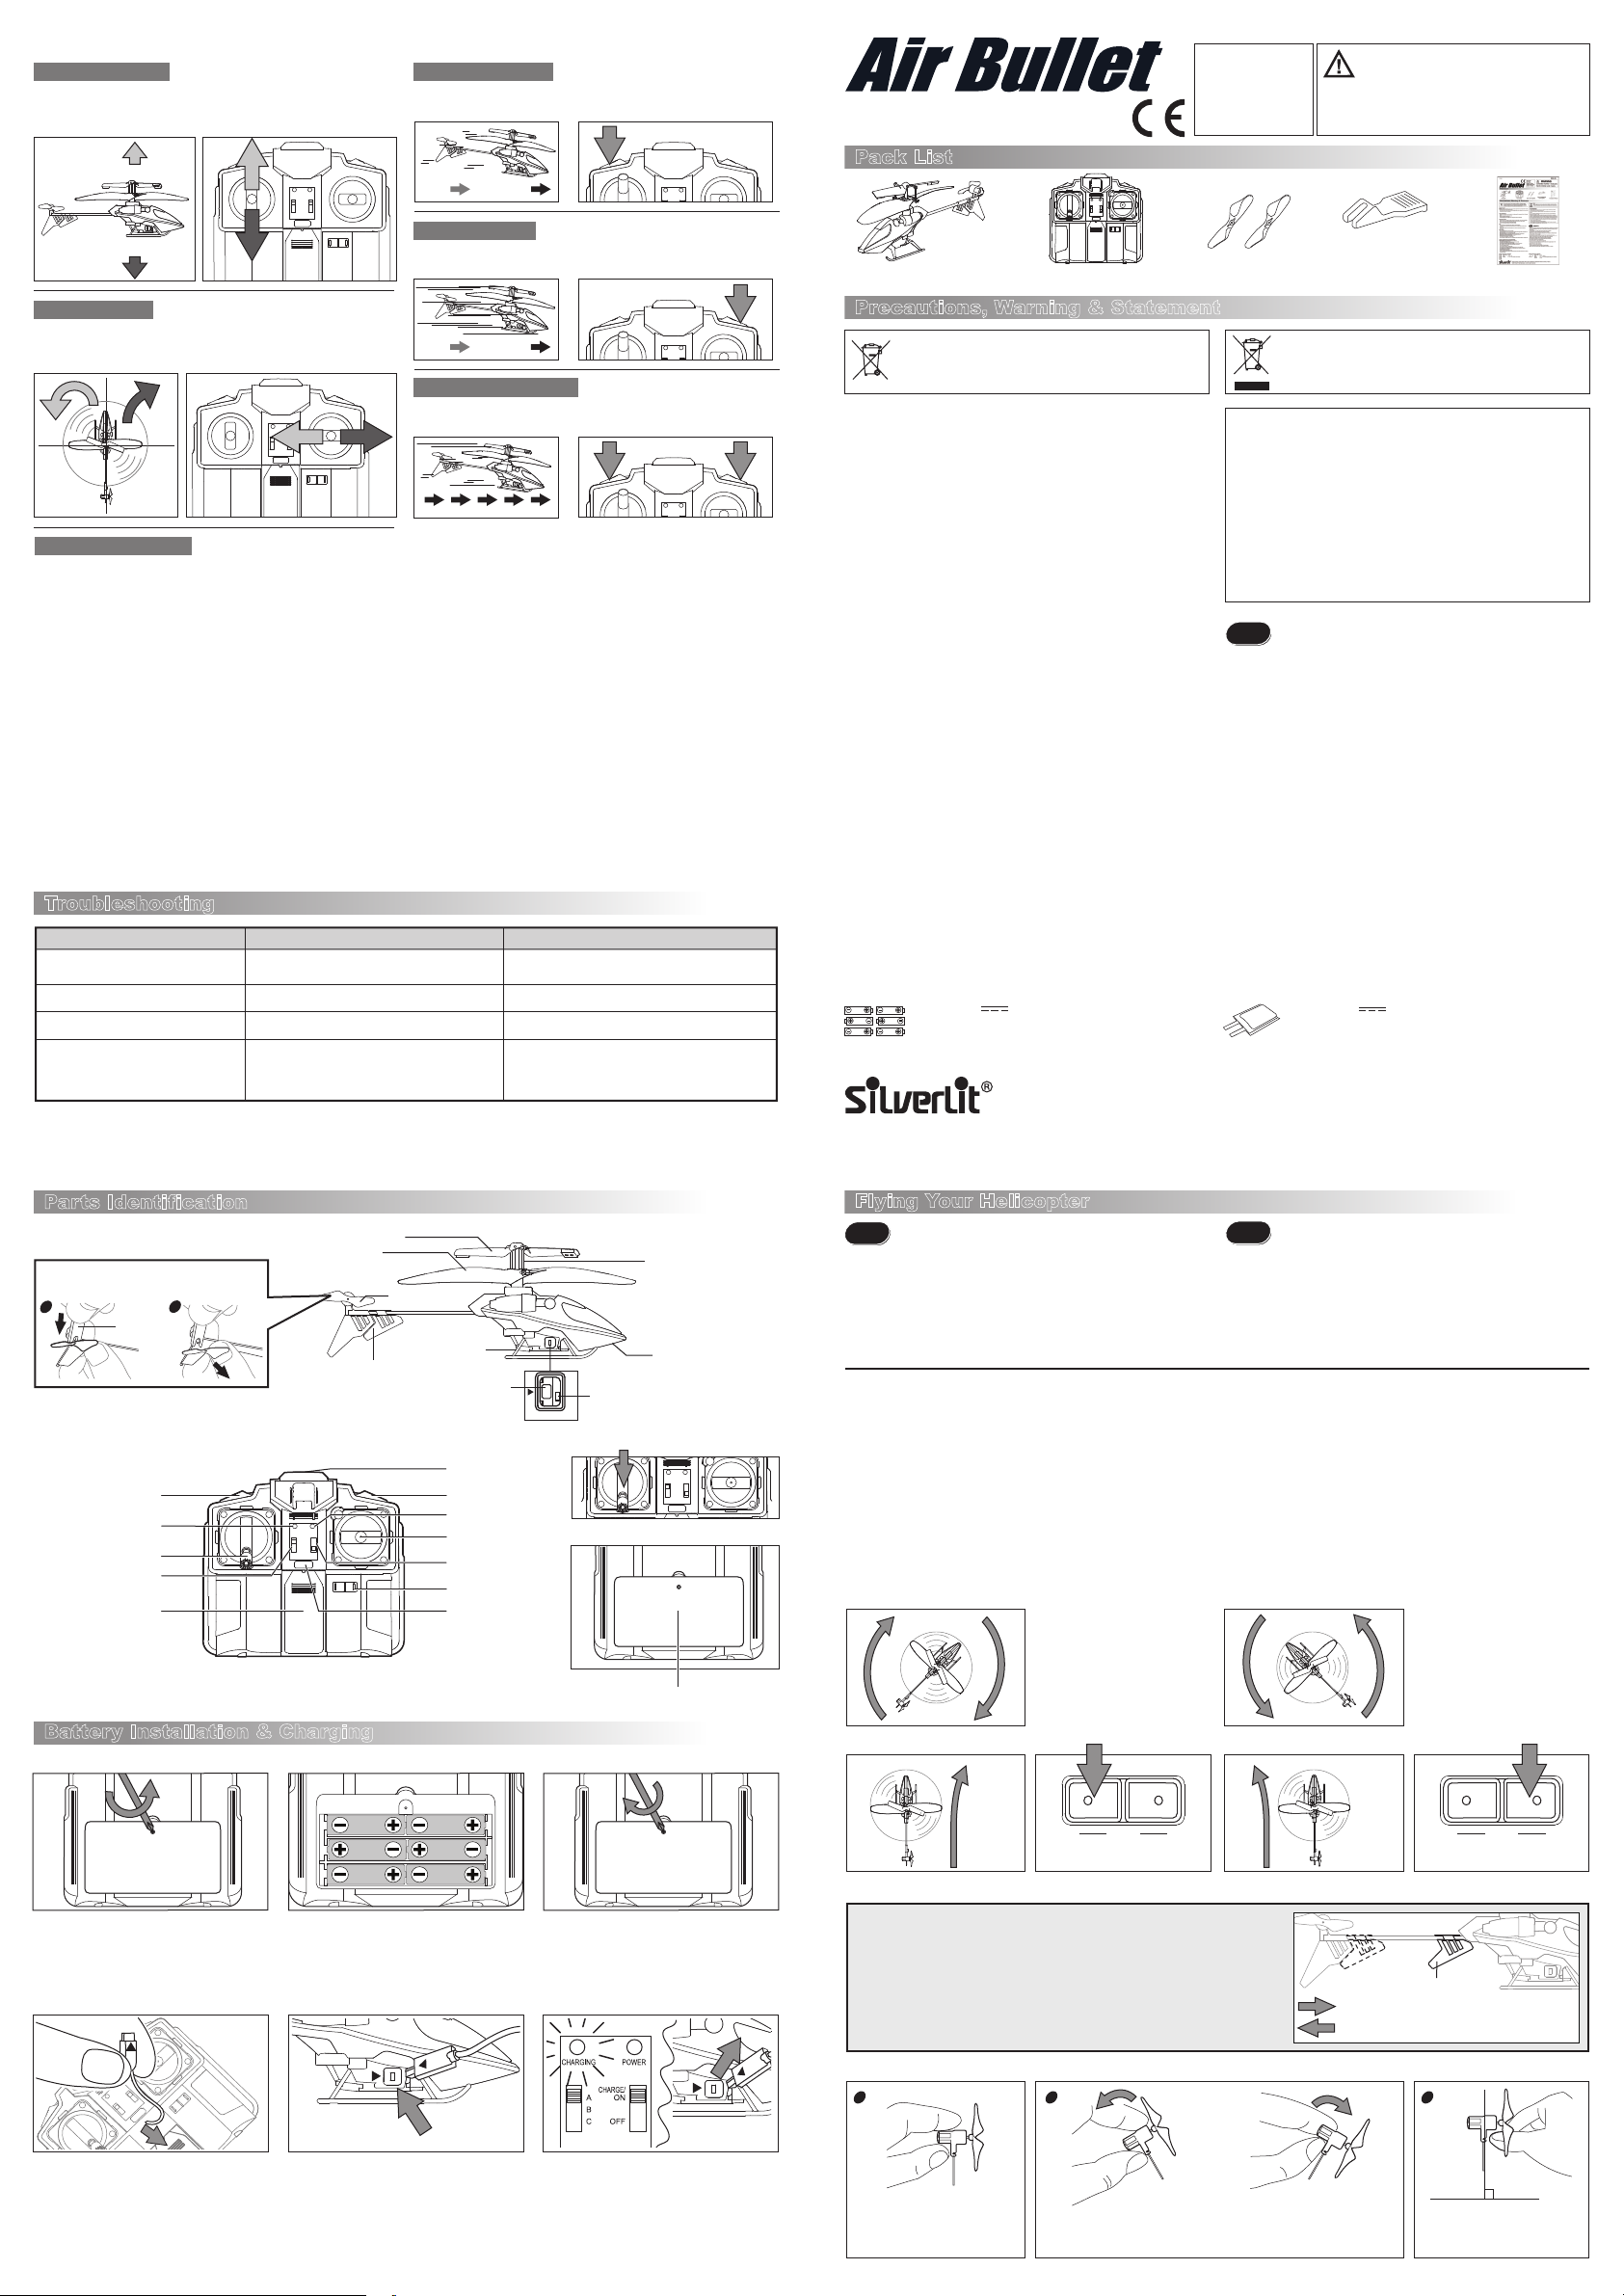
3. Flight control:
Hover up and down:
When the helicopter flies steadily, you can slowly push the throttle stick up to
make helicopter fly higher, or lower the stick a bit to make helicopter fly lower.
Only small amounts of stick position change are required for smooth flying.
Hover up
Hover down
Turn left and right:
Maintain the helicopter at a certain height. Push the direction stick toward left to
turn the helicopter anticlockwise, and push the direction stick toward right to turn
it clockwise.
Accelerates & decelerates:
If you turn the helicopter slowly anticlockwise, it will decelerate. When it is
turned clockwise, it will accelerate.
Normal forward flight:
Maintain the helicopter at a certain height. Push the normal forward button
once to make helicopter fly forward at normal speed for a while.
Fast forward flight:
Maintain the helicopter at a certain height. Push the fast forward button once
to make helicopter fly forward at fast speed for a while.
Continuous forward flight:
Maintain the helicopter at a certain height. Push both the normal and fast forward
buttons at the same time to make helicopter fly forward continuously.
4. Lift-off procedures (after Trimming procedure):
- Put the helicopter on a smooth surface. Uneven floor surface will affect its lifting off.
- Slowly increase the throttle.
- Do not look at the transmitter but focus on the helicopter.
- As soon as the helicopter leaves ground, reduce the throttle slightly. (in the worst case, helicopter will go back to the floor,
but that is better than crashing against the ceiling)
- Very gently add the throttle if the helicopter descends.
- Very gently reduce the throttle if the helicopter ascends.
- For turning, give short and small inputs to the direction stick. (most beginners will easily overcontrol the helicopter)
- For moving forward, turn the helicopter pointing to more open space before pushing the forward buttons.
5. Helicopter headlight:
Press the headlight button once to switch the LED headlight on. Press the button again to switch the LED off.
Troubleshooting
Symptom Cause Correction
The helicopter does not response. - The helicopter and/ or the transmitter is switch off ("OFF").
Suddenly stop and drop down when flying.
The helicopter does not react. - Select the correct band.- Band selection on transmitter is not correct.
Loss of control.
- The battery of the helicopter is weak.
- Another infrared control device using the same
frequency band.
- Affected by strong lighting.
- Tail rotor blade is deformed or distorted.
- Set the power switch to "ON"
- Recharge the battery of the helicopter.
- Recharge the battery of the helicopter.- The battery of the helicopter is weak.
- Avoid these if possible, or choose another place to
operate the helicopter.
- Change another environment to avoid direct lighting.
- Replace the tail rotor blade with the spare one provided.
EI-2549b
For Ages 10+
Ab 10 Jahre
Pour 10 ans et plus
Voor leeftijd 10+
Para 10+ años
Dai 10 anni in su
WARNING:
CHOKING HAZARD - Small parts.
Not for Children under 3 years.
ENGLISH 1
Pack List
Tool for Replacing
Helicopter Transmitter Instruction Manual
Spare Tail Propellers
Tail Propeller
Precautions, Warning & Statement
The crossed-out dustbin symbol indicates that batteries, rechargeable batteries,
button cells, battery packs, etc. must not be put in the household waste. Batteries
are harmful to health and the environment. Please help to protect the environment
from health risks. Tell your children to dispose of batteries properly by taking them
to the local collecting points. This way batteries are recycled safely.
Safety Precautions:
Warning:
Changes or modifications to this product not expressly approved by the party responsible for compliance
could void the user's authority to operate the product.
- The transmitter-charger is tailor-made for the LiPo rechargeable battery used in Helicopter. Do not use it to charge
any battery other than that in the Helicopter.
Care and Maintenance:
- Always remove batteries from the toy when it is not being used for a long period of time. (Transmitter
only)
- Wipe the toy gently with a clean damp cloth.
- Keep the toy away from direct heat.
- Do not submerge the toy into water that can damage the electronic assemblies.
Special Note to Adults:
- Regularly examine for damage to the plug, enclosure and other parts. In the event of any damage,
the toy must not be used with the transmitter charger until the damage has been repaired.
- This toy must only be used with the recommended charger.
- Do not try to charge other batteries with transmitter charger.
Note:
- Parental guidance is recommended when installing or replacing batteries.
- Under the environment with electrostatic discharge, the toy may malfunction and require user to
reset the toy.
- New and alkaline batteries are recommended to use in this toy to obtain best and maximum
performance.
Battery Cautions
- Non-rechargeable batteries are not to be recharged.
- Rechargeable batteries are to be removed from the transmitter before being charged. (Transmitter only)
- Rechargeable batteries are only to be charged by an adult.
- Different types of batteries or new and used batteries are not to be mixed. (Transmitter only)
- Only batteries of the same or equivalent type as recommended are to be used.
- Batteries are to be inserted with correct polarity.
- Exhausted batteries are to be removed from the transmitter.
- The supply terminals are not to be short-circuited.
- Do not mix old and new batteries. (Transmitter only)
- Do not mix alkaline, standard (carbon-zinc) or rechargeable (nickel-cadmium) batteries. (Transmitter only)
Helicopter is equipped with a LiPo rechargeable battery,
please pay attention to the following cautions for safety use:
- Do not dispose the battery in fire or heat.
- Do not use or leave the battery near a heat source such as fire or heater.
- Do not strike or throw the battery against hard surface.
- Do not immerse the battery in water, and keep the battery in a cool dry environment.
- When recharging, only use the battery charger specifically for that purpose.
- Do not over-discharge the battery.
- Do not connect the battery to an electrical outlet.
- Do not directly solder the battery and pierce the battery with a nail or other sharp object.
- Do not transport or store the battery together with metal objects such as necklaces, hairpins etc.
- Do not disassemble or alter the battery.
- Charge the battery every 6 months.
- Turn off your equipment power switch after use.
Battery requirement for Transmitter:
Power Supply :
Rating : DC 9 V , 2 W
Batteries : 6 x 1,5 V "AA"/LR6/AM3 (not included)
Silverlit SAS, Espace Green Parc, Route de Villepecle, 91280 Saint Pierre du Perray / France.
©
2011 Silverlit. All rights reserved.
WEEE
When this appliance is out of use, please remove all batteries and dispose of them
separately. Bring electrical appliances to the local collecting points for waste electrical
and electronic equipment. Other components can be disposed of in domestic refuse.
FCC Statements
This device complies with part 15 of the FCC rules. Operation is subject to the following two conditions:
1)This device may not cause harmful interference, and
2)This device must accept any interference received, including interference that may cause undesired
operation.
NOTE: This equipment has been tested and found to comply with the limits for a Class B digital device,
pursuant to Part 15 of the FCC Rules.
These limits are designed to provide reasonable protection against harmful interference in a residential
installation. This equipment generates, uses and can radiate radio frequency energy and, if not installed and
used in accordance with the instructions, may cause harmful interference to radio communications. However,
there is no guarantee that interference will not occur in a particular installation. If this equipment does cause
harmful interference to radio or television reception, which can be determined by turning the equipment off
and on, the user is encouraged to try to correct the interference by one or more of the following measures:
- Reorient or relocate the receiving antenna.
- Increase the separation between the equipment and receiver.
- Connect the equipment into an outlet on a circuit different from that to which the receiver is connected.
- Consult the dealer or an experienced radio/TV technician for help.
Tip! SAFETY
- Parents: Please read the operating instructions carefully with your children prior to the first use.
- This product is designed for indoor use only. Wind and short transmission range can lead to
loss of control.
- Fly the helicopter only in open indoor areas and keep clear of obstacles.
- Pay attention! Do not fly the helicopter near persons and animals.
- Always keep your eyes on the helicopter and prevent it from landing or crashing near your
head, your body, or on other people.
- Never take apart or attempt to modify the product. This could damage the product.
- Always keep rotating parts away from your hands, hair or face to avoid injury. Stand during
operation in order to get out of the way of the helicopter quickly if necessary.
- Always switch the helicopter and the transmitter off when not operating.
- Never allow young children to use this product without adult supervision.
- Never use this product if it has damaged parts.
- Never hold or throw any objects into the running rotors.
- Keep hands, hair and loose clothes away from the rotor when the power switch is "ON".
- Keep instructions for future reference.
- Warning! Do not touch the running rotors.
- Training by experienced adults is required for flying helicopters.
- Attention! Risk of eye injuries! Keep a safety distance of at least 1 or 2 metres.
Battery requirement for Helicopter:
Power Supply :
Rating : DC 3,7 V , 2,96 W
Batteries : 1 x 3,7 V Li-Po Rechargeable Battery Pack (included)
Capacity : 70 mAh
2 ENGLISH
Parts Identification
Helicopter
Caution:
Spare tail propeller must be replaced
by an adult.
1
Tool for
replacing tail
propeller
Transmitter
Normal Forward Button
Charging Indicator
Throttle Stick
Band Selector
Cover and charging wire
Main rotor blade
2
Stabiliser
Balance adjuster
CHARGING
POWER
CHARGE/
A
ON
B
C
OFF
L ST.TRIM R
Tail propeller
Landing gear
Charging socket
IR Diodes
Fast Forward Button
Power Indicator
Direction Stick
Power Switch
Trimmer
Headlight Button
Battery Installation & Charging
Transmitter Battery Installation (*Make sure the power switch is on “OFF” position.)
OFF/CHG
ON
Power switch
Minimum Throttle position
Battery compartment
Connecting shaft
LED headlight
Flying Your Helicopter
Tip! CONTROLLING
- For controlling the sticks on transmitter, try not to push the sticks immediately any extreme
positions. It should be like steering a bicycle rather than pressing computer game sticks.
- For the novice pilot (after the trimming procedure is completed), it is highly recommended to
focus exclusively on learning to control the throttle stick first. If the helicopter turns around by
itself there is no need to keep it straight. For the first flight, it is important to learn to keep the
helicopter at a constant altitude of around 1 meter with very gentle inputs on the throttle stick.
Once the pilot masters this, he may start learning to take control with the direction stick.
- Set the band on transmitter to the same as the helicopter's. Make sure that the transmitter is switched off.
- Switch on the helicopter, the red LED in the canopy will flash.
- Place the helicopter on the ground with the tail point towards you and the nose pointing away.
- Make sure the throttle stick is at the minimum position, then switch on the transmitter.
1. Flight Environment:
Choose the place which meets the following condition:
1. Indoor environment with calm air. Beware of the air circulation from the air-conditioner.
2. Caution: There must not be any dangerous objects (electric fan, air-conditioner, reading lamp, etc) on the flight path.
2. Trimming the helicopter:
- Gently push the throttle up to raise your helicopter about 0.5 to 1 meter high.
- When the helicopter spirals (fig.1)
or keeps turning clockwise (fig.2),
press the left side of the yaw trim
button ("L") repeatedly untill the
helicopter flies straight (fig.3).
fig. 1
Spiral clockwise
Tip! OPERATION
- After you crash your helicopter, you need to restart the helicopter by slide it’s power
switch to “OFF” and then check for damages. If there is no damage slide the power
switch to “ON” again.
- Don’t operate the helicopter under the direct bright light it will affect the control
system of your helicopter.
- Don’t cover the IR Diode of the transmitter as it will block the IR signal.
- Don’t stick any other label onto the helicopter as it will affect receiving of IR signal.
fig. 4
Spiral counter clockwise
ENGLISH 3
- When the helicopter spirals (fig.4)
or keeps turning counter
clockwise (fig.5), press the right
side of the yaw trim button ("R")
repeatedly untill the helicopter
flies straight (fig.6).
Battery compartment Battery compartment
1. Open the battery compartment by
loosening the screw.
2. Insert 6 AA batteries in the battery
compartment with correct polarity.
3. Close the battery compartment.
Note: When the power indicator on the transmitter starts blinking, replace the batteries with the aforementioned procedures.
Charging Helicopter
1. Pull out the cover and take out the
charging plug from the transmitter.
Note: 1. The helicopter can operate for about 5 - 6 minutes per every 20 - 30 minutes charging.
2. Before recharging the battery, wait 10 - 15 minutes for it to cool down.
2. Switch off the helicopter. Insert the charging
plug into the charging socket on the
helicopter.
3. Switch on the transmitter. The charging
process will begin automatically and the
green charging indicator will light up. Unplug
the charging plug after the charging indicator
turns off, charging is completed.
L RTRIM
Keep turning clockwise
fig. 2
fig. 3
Keep turning counter clockwise
fig. 5 fig. 6
Balance Adjuster
- Moving the balance adjuster to change the centre of gravity of the helicopter will
adjust the forward speed.
- Slide the balance adjuster towards the nose of the helicopter to increase the forward
speed. To decrease or cease the forward speed, slide the balance adjuster towards
the tail. Slide the balance adjuster in a small amount.
- Tail alignment adjustment. If the helicopter speeds forward/ backward by itself.
1 2 3
Hold the tail between fingers.
If the helicopter speeds forward
unintentionally, twist the tail
anticlockwise for about 30°.
If the helicopter speeds
backward unintentionally, twist
the tail clockwise for about 30°.
Move towards the nose - Increasing forward speed
Move towards the tail - decrease or stop the forward speed
L RTRIM
Balance adjuster
90º
Release the tail.
 Loading...