

Page 1
Users Manual
160A Arc Welder
Product Code 466888
© October 2006
Thank you for choosing this product.
This product is guaranteed to be free of defects in materials and workmanship for a period
of 3 years from the purchase date.
If you experience a problem, return the product direct to us, with the original receipt at :
Silverline Tools Limited
PO Box 2988
Yeovil
BA21 1WU
We do not refund carriage. This guarantee is for Great Britain only and does not affect your
statutor
y rights. As you would expect fair wear and tear ar
e not cover
ed.
Page 2
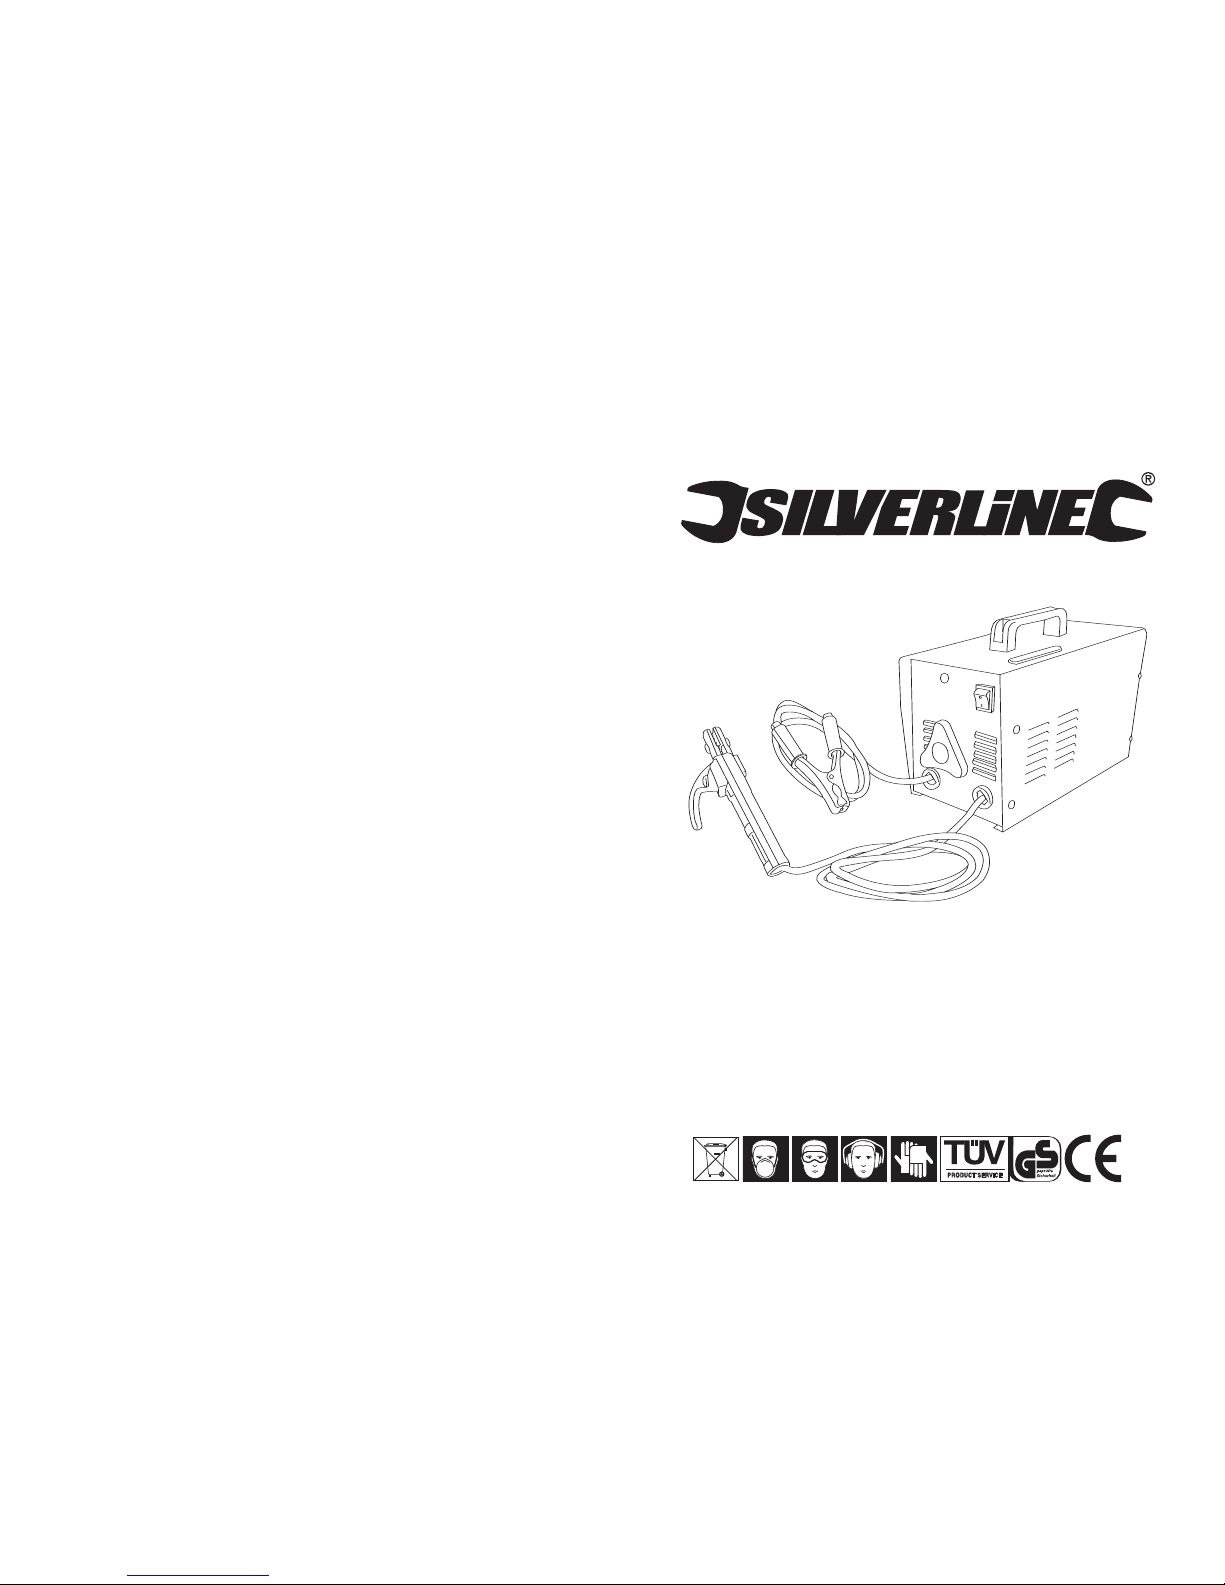
1. Temperature indicator
2.
On/off switch
3. Magnetic shunt
4.
Earth clamp
5. Electrode holder
6. Handle
7. Graduated welding amperage scale
SPECIFICATION
Voltage 230V
Frequency 50Hz
No load voltage 48V
Current range 55-160A
Input capacity 6.5kW
ADDITIONAL SAFETY INSTRUCTIONS
Do not operate the welder in a confined space.
The welder is required to operate in a good air space to aid
cooling.
Keep work area clean and provide the correct working
conditions.
• Arc welding produces sparks and high temperature fused
metal projectiles and fumes.
• Remove all flammable substances and materials from the
work surface.
• Provide adequate ventilation of facilities where welding
takes place.
• Do not weld on containers or pipes that hold or have held
flammable liquid or gaseous combustibles or on materials
cleaned with chlorinated solvents or on varnished surfaces.
•
Cluttered areas invite injuries. Make sure the area is clear of
obstacles, which could cause accidents.
Always wear protective equipment.
Personal protective clothing must be worn, use adequate
electrical insulation with regard to the electrode, the work
piece and any earthed metal parts in the vicinity
.
This is
achieved by wearing gloves, shoes, head coverings (such as
the face mask provided) and clothing designed for this
purpose and using insulating platforms and mats.
Rated duty cycle
10%
Class of insulation H
Electrode size range 2-4.0mm
Fuse 16A
Mains plug Earthed
• Before carrying out maintenance on the welder ensure that
it is disconnected from the power supply.
• You must ensure that a qualified person carries out repairs
and maintenance of electrical opponents.
• When the welder is not in use, turn it off at the mains. Live
electrodes present a hazard, as they can arc against the
earthed metal.
• Before using the welder, check every time that the cable
connections are fully tightened and that there are no broken
parts.
• Keep welding cables, the electrode holder and the earth
clamp in good condition. Poor contact through the welding
circuit caused by defective cables and clamps can be
dangerous and produces poor fields.
Introduction
Carefully read and understand this manual and any label
attached to the tool before use. Keep these instructions with the
product for future reference. Ensure all persons who use and
service this product are acquainted with this manual.
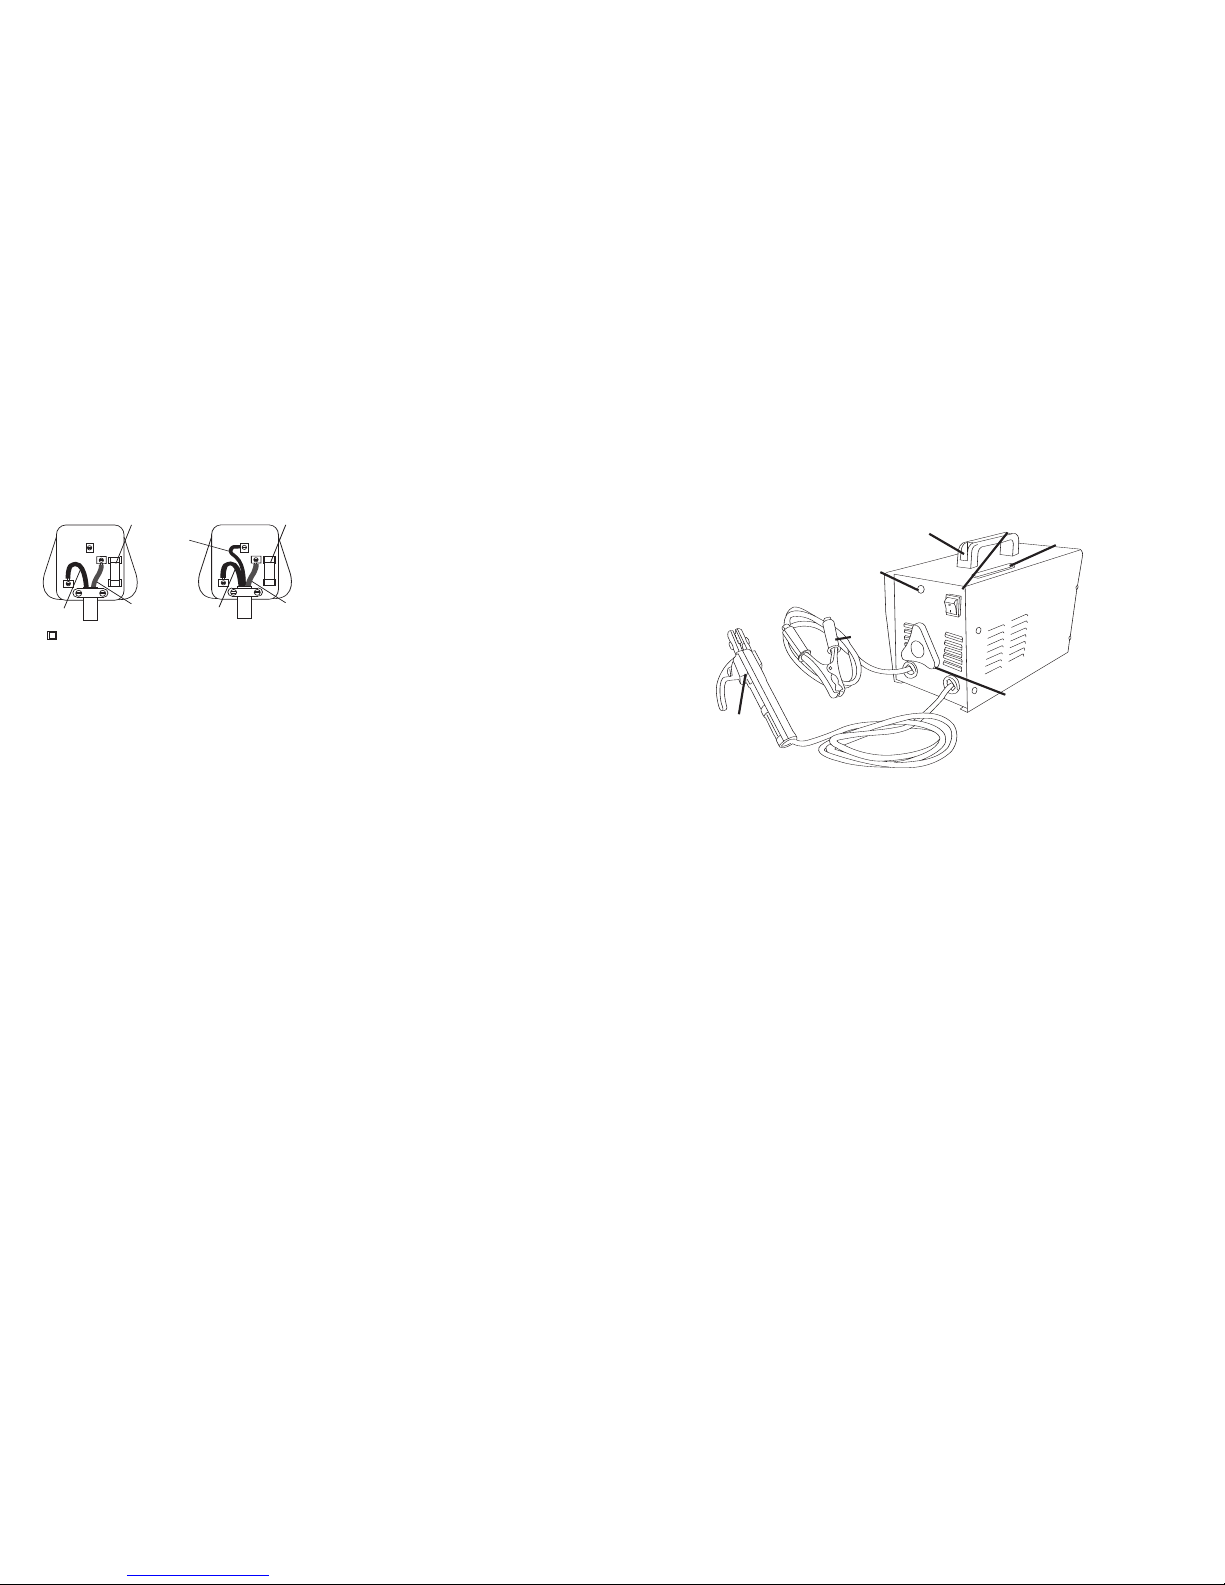
Electrical Safety Information
• The wires in this product are coloured:
Blue
Neutral (N)
Brown
Live (L)
Green & Yellow Earth (E)
• As the colours may not correspond with the coloured markings
identifying the terminals in your plug, proceed as follows.
• The wire which is coloured blue must be connected to the
terminal which is marked with the letter N or coloured black, the
wire which is coloured brown must be connected to the terminal
which is marked L or coloured red.
• This appliance must be protected by a suitable fuse.
• To prevent fire or shock hazard, do not expose this product to
rain/water or moisture. There are no user serviceable parts
inside except those referred to in this manual. Always refer
servicing to qualified service personnel. Never remove any part
of the casing unless qualified to do so; this unit contains
dangerous voltages.
• Use of a residual current device (RCD) will reduce the risk of
electric shock.
NEVER CONNECT THE BROWN OR BLUE WIRE TO THE
EARTH PIN OF THE 13 AMP PLUG. IF IN DOUBT CONSULT A
QUALIFIED ELECTRICIAN
General Safety Instructions
Even when used as prescribed it is not possible to eliminate all
residual risk factors. Use with caution.
Keep guards in position
• Always keep guards in position, in good working order, correctly
adjusted and aligned. Never attempt to use a power tool
without any guard supplied with it.
Remove adjusting keys
• Always check to see that keys and adjusting wrenches are
removed from power tool before turning on.
Clean work area
• Accidents occur where benches and work areas are cluttered or
dirty, floors must be kept clear, avoid working where the floor is
slippery.
Dangerous environment
• Do not use power tools in damp or wet conditions, or expose
them to rain. Provide adequate surrounding work space and
keep area well lit. Do not use power tools where there is a risk
of explosion or fire from combustible material, flammable
liquids, flammable gases or dust of an explosive nature. When
using power tools avoid contact with any earthed items such as
pipes, radiators, cookers, refrigerators, metal baths and taps.
Children & Pets
•
Children and pets should always be kept at a safe distance
from your work. Make your workshop child-proof. Lock tool
away where children can't get access to them. Remove
batteries from cordless tools.
Use the correct power tool
•
Don't force, or attempt to use a power tool for a purpose it was
not designed for. Do not use a small tool to do the job of a
heavy duty tool.
W
ear correct clothing and footwear.
• Don't wear loose clothing, neckties or jewellery or other items
which may get caught in moving parts. Wear non-slip footwear,
cover or tie back long hair
. Use safety footwear if necessary.
Protect your head
• Wear safety goggles at all times, every day glasses are not
suf
ficient for eye protection, as lenses are not impact resistant
and could shatter. Use an approved face or dust mask when
operation creates dust. Ensure dust extraction equipment is
functioning and correctly used. Hearing protection should be
used if the sound intensity level for the operator could exceed
85dB(A). Use a hard hat where there is a risk of falling objects
or striking your head on low level obstructions.
Protect yourself from vibration.
• Hand held power tools may produce vibration. Vibration can
cause disease. Gloves to keep the operator warm and dry and
therefore maintain good blood circulation in the fingers may
help.
This tool has not been designed for extended or industrial
operation.
Secure work
• Always secure work. Where practical use a clamp or vice, it will
allow you to use both hands to operate your power tool.
Keep your balance
• Don't over reach, keep proper footing at all times to ensure
correct balance.
Maintain your power tool
• Keep your power tool in good working order, keep tools sharp
and clean for best and safest performance. Ensure ventilation
holes are kept clean and unrestricted at all times.
Always disconnect.
• Before changing tools, always ensure they are disconnected
from the power source.
Accessories
• The use of any attachment or accessory other than those
mentioned in this manual could result in damage or injury. The
use of improper accessories could be dangerous.
Never stand on your power tool
• Standing on your power tool or its stand could cause serious
injury if the tool is tipped or if the cutting tool is accidentally
contacted. Do not store materials above or near the tool so that
it is necessary to stand on the tool or its stand to reach them.
Switch off before connecting.
• Ensure the power tool is switched off before connecting to the
power source.If the power tool stops unexpectedly turn the
power switch to off.
Do not abuse the power cord.
• Be sure your cable/extension cable is properly wired and in
good condition. Always replace a damaged cable/extension
cable or have it repaired by a qualified person before using it.
Never yank or pull the cable to disconnect it from the power
socket. Never carry your power tool by it’s cable. Keep the
cable away from damp, heat, oil, solvents, and sharp edges.
Check for damaged or missing parts.
• Before each use check if any part of the power tool is damaged
or missing, check carefully that it will operate properly and
per
form its
intended function. Check alignment of moving parts
for binding. Any guard or other part that is damaged should be
correctly repaired or replaced. Do not use if the power switch
does not turn the power on and of
f. Check any other condition
that may affect the safety of the power tool.
DO NOT USE IF
DEFECTIVE.
Direction of feed
•
Feed work into a blade or cutter against the direction of rotation
of the blade or cutter only.
Don't leave the tool running unattended
• Always wait until your power tool has come to a complete stop
before leaving it and then disconnect from power source.
Product Familiarisation
Arc Welder
5
2
3
1
6
7
4
FUSE
BROWN
(Live)
BLUE
(Neutral)
E
L
N
FUSE
GREEN/YELLOW
OR GREEN
FUSE
BROWN
(Live)
BLUE
(Neutral)
E
L
N
FUSE
Double Insulated
Earthed
Page 3

PRIOR TO USE
Important:
Use the welder only for the purpose that it was
designed.
The welder is designed for use as stated only; do not try
and adapt it for other purposes.
This apparatus is a power source for arc welding, made
specifically for alternating current (AC) MMA
welding with
coated electrodes. These welders are composed of a single
phase transformer and are suitable for welding with an
alternate current using stick electrodes with diameters from
1.6mm to the highest electrode diameter as shown on the
data table on the welder. Using the manual magnetic shunt
can infinitely adjust the welding current.
Connecting the welder
Ensure that your supply voltage corresponds to the voltage
stated on the rating plate on the welder
. The welder must be
connected to an electrical supply capable of delivering I
1
max amperage, as stated on the data table (7).
Using extension cables
DIY 13 Amp extension cables are not suitable for use with
this product. Any cables used to supply power to the welder
must meet the requirements for the delivery of the I
1
max
amperage.
CAUTION:-
Before connecting the earth clamp or electrode holder,
always ensure the plug is removed from the mains.
Connecting the electrode holder welding cable
The welding cable supplied is connected to the terminal
(5). Unscrew the cover on the electrode holder; thread the
cable through and secure by means of the screw terminal
connection. (Fig.1) Ensure a tight connection.
Connecting the welding current return cable
The welding earth cable is connected to the terminal(4).
Connect the cable by pulling the sleeve back on the earth
clamp, threading the cable through the sleeve and secure
the cable by means of the screw terminal connection in
handle. Ensure a good tight connection. (Fig.2)
The protective mask
This must always be used during welding to protect the eyes
from the light radiation produced by the arc.
The mask
allows observation of the welding being carried out.
Assemble the mask in the following way (Fig.3)
1. Mask
2. Glass
3. Filter (DIN9-10)
4. Handgrip
DANGER:-
Do not look at the welding arc. Failure to use an
appropriate welding mask will seriously damage your
eyesight.
WARNING:-
The welding glass provides eye protection from the
welding arc and sparks. The mask is not suitable for any
other purpose and does not provide impact resistance.
Inspect the glass frequently and do not use if damaged
in any way.
OPERATING INSTRUCTIONS
Creating a welding circuit
• Connect the welders earth clamp (4) to the work piece being
welded or the metal bench supporting it, ensuring a good
connection as close as possible to the join being made. A
poor earth contact is a common cause of reduced weld
quality or an open welding circuit. Choose the electrode for
the metal, which you are welding. A graduated scale (7) on
top of the welder provides a guide for the welding current
needed, when using different electrode diameters.
(see
welding procedure)
The welding current is easily changed by means of the
infinitely variable magnetic shunt (3). The set welding
current can be seen through the glass on top of the welder.
• To switch the machine on set the on/off switch (2) to I.
• To switch the machine off set the on/off switch (2) to 0.
Welding procedure
• Striking the arc can be achieved by scratching the electrode
against the work piece as if you were striking a match. As
soon as an arc is created, maintain a gap between the work
piece and the electrode, which is equivalent to the diameter
of the electrode being used. The angle of the electrode to
the work piece must be maintained at 20-30°. (Fig.4)
To maintain the arc move at a constant steady speed and
as the electrode burns away, ensure that the arc gap is kept
constant.
• After welding the electrode, the workpiece will be very hot.
Do not touch or cool down with water
. The weld, which has
been produced, will be buried beneath a protective layer
called 'slag'. This layer can now be removed by use of the
chipping hammer and wire brush.
WARNING:
Always use pliers to removed consumed electrodes or
welded pieces. Safety goggles should be worn when
removing slag.
THE WELD SEAM
Electrode selection
The gauge of the electrode can be determined by a number
of factors, such as the type of weld required or the thickness
of the work piece. The table below provides a guide and
values are provided as an indication only.
CAUTION:
The machine automatically switches off in the case of
overheating. An illuminated yellow lamp (1) on the front
of the welder indicates thermal protection. Wait until this
lamp turns off before trying to weld again.
MAINTENANCE.
Ensure all items are disconnected from the mains.
The machine does not require any special requirements;
however the user must be aware of the following:
• Regularly clean the ventilation slots.
• Keep the casing clean by using a dry cloth
• Check all cables before use.
• Check electrode holders and earth clamps before use.
• Replace worn electrode holders and earth clamps, which do
not provide a good connection.
TROUBLE SHOOTING
Fig.3
ELECTRODE DIAMETER
MATERIAL THICKNESS
inches
mm
inches
mm
1/16
1.6
5/64
2.0
3/32
2.5
1/8
3.25
5/32
4.0
3/16
5.0
3/64-1/16
1.0-1.6
1/16-3/32
1.6-2.5
3/32-5/32
2.5-4.0
5/32-15/64
4.0-6.0
15/64-5/16
6.0-8.0
5/16-25/64
8.0-10.0
FAULT
PROBABLE CAUSE
REPAIR
When switched on the
welder does not produce
an arc.
Plug is not well
connected or electric
socket is faulty.
Thermal safety has
tripped. Lamp on front
will be illuminated.
Earth connection is poor
.
W
elding leads are not
connected.
Contaminated electrode.
Disconnect from mains
Check plug, socket and
fuse.
Leave the unit to cool
down.
Provide a more secure
and clean earth as near
to the weld join as
possible.
Check and secure all
welding leads.
Ensure the electrodes
are clean and dry.
Poor welding
performance
Incorrect technique.
Poor electrical supply
Output welding current
incorrectly set
W
ork piece material is
contaminated with paint,
oils etc
See 'welding procedure'
for basic advice and use
Fig.5 for the possible
cause.
Ensure that you have an
adequate supply
,
capable of delivering the
required amperage
Adjust welding current
Remove contamination
to leave clean bare metal
1
2
3
4
20-30°
Fig.5
ADV
ANCEMENT TOO SLOW
ARC TOO SHORT
CURRENT
TOO LOW
ADV
ANCEMENT TOO FAST
ARC TOO LONG
CURRENT TOO HIGH
CURRENT CORRECT
D
D
S
S
=
Fig.2
Fig.4
Fig.1
 Loading...