

Silverline 427677 Original Instructions Manual
60/120A
Gasless Turbo Mig
427677
®
Gasless Turbo Mig
Poste à souder sans gaz Turbo MIG
Turbo-MIG-Fülldrahtschweißgerät
Soldador sin gas Turbo Mig
Turbo mig senza gas
Gaslose MIG lasmachine
A
R
U
A
G
R
A
E
Y
R
E
G
I
S
N
T
E
E
*
E
N
I
L
T
N
E
O
R
www.silverlinetools.com
1
6
5
4
3
2
7
8
12
9
1011
15
14
13
13
14
15
16
17
2
18
19
20
21
9 23 24
27
25
26
22
13
16
17/18
28 29 30 31
20
32
A B
33
343536
www.silverlinetools.com
3

4
www.silverlinetools.com
60/120A
Gasless Turbo Mig
English .................. 6
®
Français ................ 12
Deutsch ................. 18
Español ................. 24
Italiano .................. 30
Nederlands ............ 36
5

GB
Original Instructions
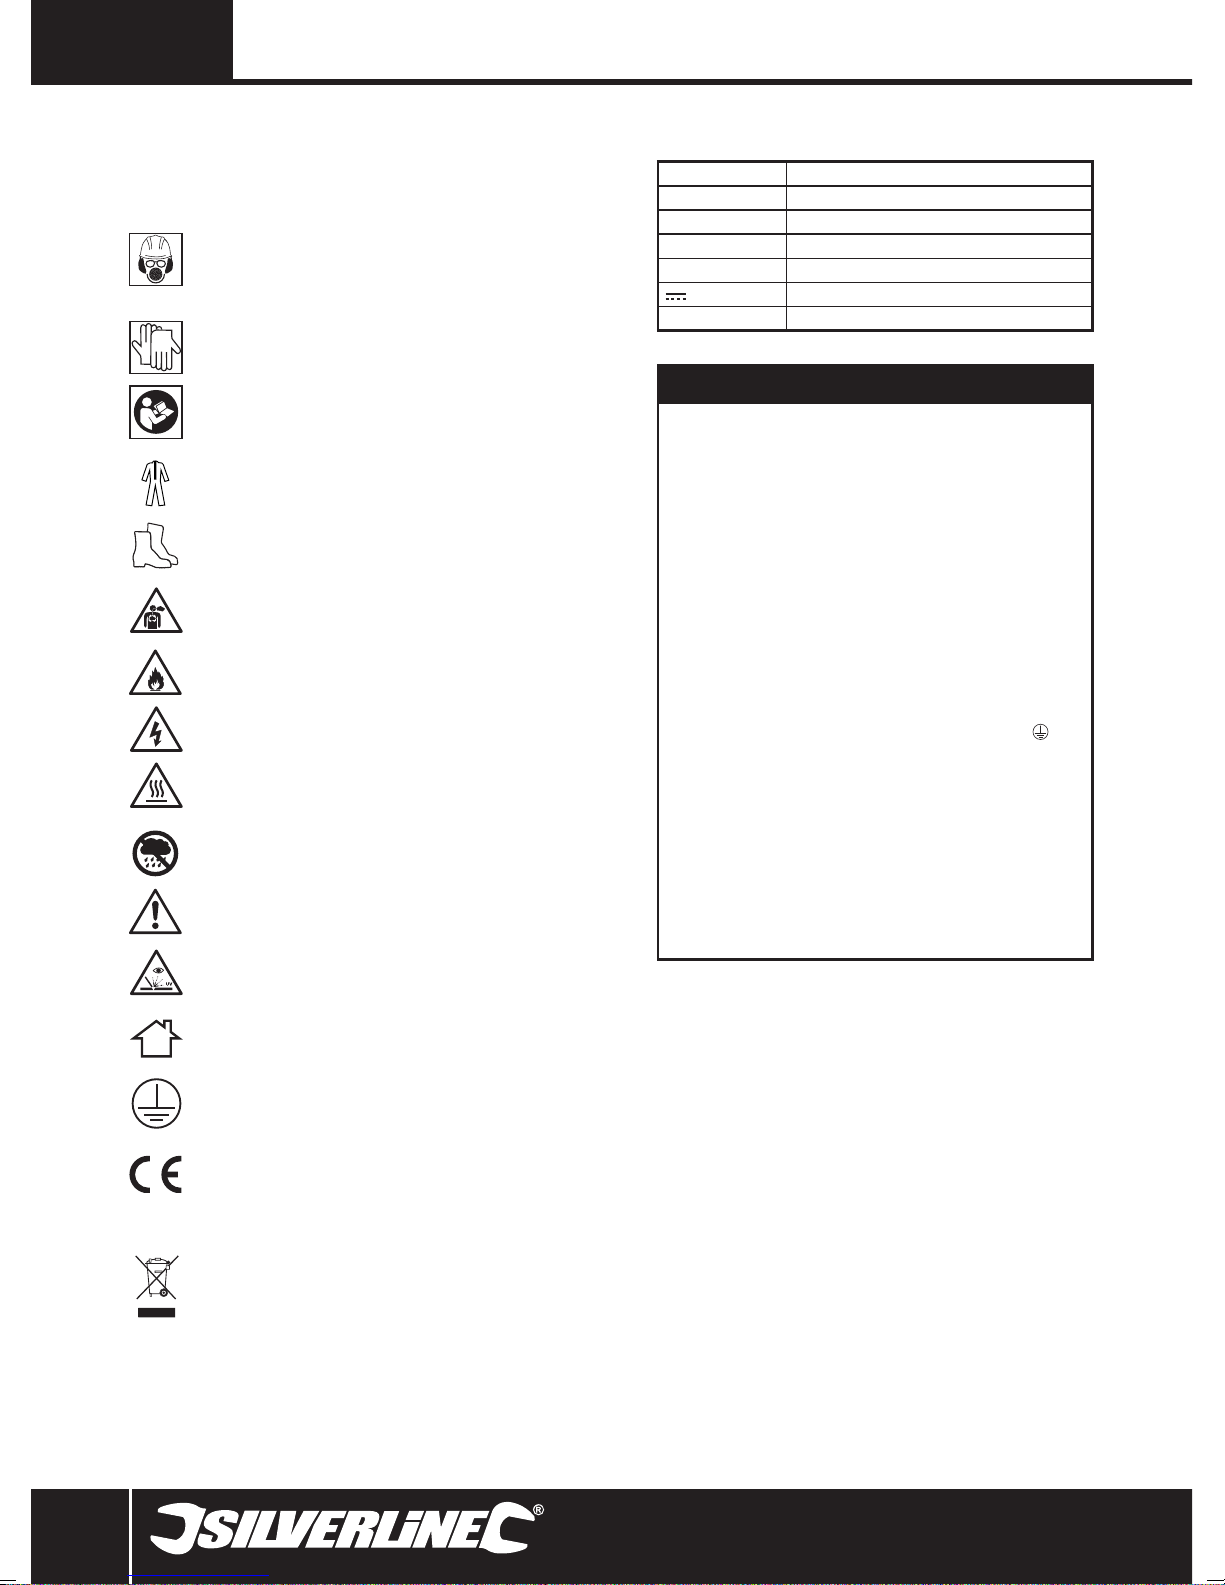
Description of Symbols
The rating plate on your tool may show symbols. These represent important
information about the product or instructions on its use.
Wear hearing protection
Wear eye protection
Wear breathing protection
Wear head protection
Wear hand protection
Read instruction Manual
Wear protective clothing
Wear protective shoes
Toxic fumes or gases!
Risk of fire!
Risk of electrocution!
Hot surfaces - DO NOT touch!
Technical Abbreviations Key
V Volts
~, AC Alternating current
A, mA Ampere, milli-Amp
Ø Diameter
Hz Hertz
, DC Direct current
W, kW Watt, kilowatt
Specification
Input voltage: ......................................................................230V~ 50Hz
Input current: .............................................18.2A (peak), 6.4A (average)
Efficiency: .......................................................................................80%
Output current range: ................................................................60/120A
Rated duty cycle: .......................................... 10% @ 120A, 60% @ 60A
No load output voltage: .................................................................... 32V
Output voltage: .................................................20.0V(120A), 17.0V(60A)
Wire reel maximum weight: .......................................................... 0.4kg
Insulation class: ...................................................................................H
Ingress protection: ........................................................................ IP21S
Wire: ............................................................ 0.8-0.9mm flux cored wire
Welding thickness range (steel): .............................................1.2 - 8mm
Protection class: ................................................................................
Torch cable length: ......................................................................... 2.0m
Earth cable length: ......................................................................... 1.5m
Power cable length: .......................................................................2.0m
Dimensions (H x L x W):..........................................295 x 340 x 180mm
Weight: ...........................................................................................16kg
DO NOT use in rain or damp environments!
Caution!
Danger of ultraviolet radiation!
Indoors use only!
Class I construction (protective earth)
Conforms to relevant legislation and safety standards
Environmental Protection
Waste electrical products should not be disposed of with
household waste. Please recycle where facilities exist.
Check with your local authority or retailer for recycling advice
As part of our ongoing product development, specifications of
Silverline products may alter without notice.
6
6

www.silverlinetools.com
Gasless Turbo Mig427677
General Safety
WARNING! When using electric power tools, basic safety precautions should
always be followed to reduce the risk of fire, electric shock and personal injury
including the following safety information. Read all these instructions before
attempting to operate this product and save these instructions for future use.
WARNING: This appliance is not intended for use by persons (including children)
with reduced, physical or mental capabilities or lack of experience or knowledge
unless they have been given supervision or instruction concerning use of the
appliance by a person responsible for their safety. Children must be supervised to
ensure that they do not play with the appliance.
CAUTION: Use the power tool, accessories and tool bits etc. in accordance with
these instructions, taking into account the working conditions and the work to be
performed. Use of the power tool for operations different from those intended could
result in a hazardous situation.
The term "power tool" in the warnings refers to your mains-operated (corded)
power tool or battery-operated (cordless) power tool.
1 - Keep work area clear - Cluttered areas and benches invite injuries
2 - Consider work area environment
- Do not expose tools to rain
- Do not use tools in damp or wet locations
- Keep work area well lit
- Do not use tools in the presence of flammable liquids or gases
3 - Guard against electric shock - Avoid body contact with earthed or grounded
surfaces (e.g. pipes, radiators, ranges, refrigerators)
4 - Keep other persons away - Do not let persons, especially children, not
involved in the work touch the tool or the extension cord and keep them away
from the work area
5 - Store idle tools - When not in use, tools should be stored in a dry locked-up
place, out of reach of children
6 - Do not force the tool - It will perform the job better and safer at the rate for
which it was intended
7 - Use the right tool - Do not force small tools to do the job of a heavy duty tool
Do not use tools for purposes for which they are not intended; for example do
not use circular saws to cut tree limbs or logs
8 - Dress appropriately
- Do not wear loose clothing or jewellery, which can be caught in moving
parts
- Suitable safety footwear is recommended when working outdoors.
- Wear protective covering to contain long hair
9 - Use protective equipment
- Use safety glasses
- Use face or dust mask if working operations create dust
WARNING: Not using protective equipment or appropriate clothing can cause
personal injury or increase the severity of an injury.
10 - Connect dust extraction equipment - If the tool is provided for the
connection of dust extraction and collecting equipment, ensure these are
connected and properly used
11 - Do not abuse the power cable - Never pull the power cable to disconnect
it from the socket. Keep the power cable away from heat, oil and sharp edges.
Damaged or entangled power cables increase the risk of electric shock
12 - Secure work - Where possible use clamps or a vice to hold the work. It is
safer than using your hands
13 - Do not overreach - Keep proper footing and balance at all times
14 - Maintain tools with care
- Keeping cutting tools sharp and clean makes the tool easier to control and
less likely to bind or lock in the workpiece
- Follow instructions for lubricating and changing accessories
- Inspect tool power cables periodically and have them repaired by an
authorised service facility if damaged
- Inspect extension cables periodically and replace if damaged
- Keep handles dry, clean and free from oil and grease
WARNING: Many accidents are caused by poorly maintained power tools.
15 - Disconnect tools - Disconnect tools from the power supply when not in use,
before servicing and when changing accessories such as blades, bits and
cutters
WARNING: The use of accessories or attachments not recommended by the
manufacturer may result in a risk of injury to persons.
16 - Remove adjusting keys and wrenches - Form the habit of checking to see
that keys and adjusting wrenches are removed from the tool before switching
it on
17 - Avoid unintentional starting - Ensure switch is in “off” position when
connecting to a mains socket, inserting a battery pack, or when picking up or
carrying the tool
WARNING: Unintended starting of a tool can cause major injuries.
18 - Use outdoor extension leads - When the tool is used outdoors, use only
extension cords intended for outdoor use and so marked. Use of an extension
cable suitable for outdoor use reduces the risk of electric shock
19 - Stay alert
- Watch what you are doing, use common sense and do not operate the tool
when you are tired
- Do not use a power tool while you are under the influence of drugs, alcohol
or medication
WARNING: A moment of inattention while operating power tools may result in
serious personal injury.
20 - Check damaged parts
- Before further use of tool, it should be carefully checked to determine that it
will operate properly and perform its intended function
- Check for alignment of moving parts, binding of moving parts, breakage of
parts, mounting and any other conditions that may affect its operation
- A guard or other part that is damaged should be properly repaired or
replaced by an authorised service centre unless otherwise indicated in this
instruction manual
- Have defective switches replaced by an authorised service centre
WARNING: Do not use the tool if the on/off switch does not switch the tool on and
off. The switch must be repaired before the tool is used.
21 - Have your tool repaired by a qualified person - This electric tool complies
with the relevant safety rules. Repairs should only be carried out by qualified
persons, otherwise this may result in considerable danger to the user
WARNING: When servicing use only identical replacement parts.
WARNING: If the power cable is damaged it must be replaced by the manufacturer
or an authorised service centre.
22 - Power tool mains plugs must match the mains socket - Never modify
the plug in any way. Do not use any adapter plugs with earthed (grounded)
power tools. Unmodified plugs and matching sockets will reduce risk of
electric shock
23 - If operating a power tool outside use a residual current device (RCD) -
Use of an RCD reduces the risk of electric shock
NOTE: The term “residual current device (RCD)” may be replaced by the term
“ground fault circuit interrupter (GFCI)” or “earth leakage circuit breaker (ELCB)”.
WARNING: Before connecting a tool to a power source (mains switch power
point receptacle, outlet, etc.) be sure that the voltage supply is the same as that
specified on the nameplate of the tool. A power source with a voltage greater than
that specified for the tool can result in serious injury to the user, and damage to the
tool. If in doubt, do not plug in the tool. Using a power source with a voltage less
than the nameplate rating is harmful to the motor.
Welding Safety
• Welding produces toxic fumes and can reduce oxygen levels in the work area.
Always work in a well-ventilated area. Avoid inhaling welding fumes, use a
suitable respirator where appropriate
• Some metal parts may have zinc, lead, cadmium or other coatings. Attempting
to weld through these coatings can produce highly toxic fumes. Always remove
all coatings before welding
• If you experience irritation to the lungs, throat or eyes whilst welding, STOP
IMMEDIATELY and seek fresh air
www.silverlinetools.com
7
7

GB
• Welding produces extremely high levels of UV light. To prevent eye damage,
ALWAYS use an approved welding face mask. Under no circumstances look
directly at the arc
• The light produced when arc welding can be attractive to look at, especially to
children. Always prevent other people from viewing the arc welding light with
unprotected eyes
• If there is a possibility of other people approaching the work area, erect
suitable screening to protect them from the light / glare
• Always replace the welder face mask glass as soon as it shows any signs of
wear or damage
• To prevent skin damage, ALWAYS wear a suitable fire-proof long sleeved
jacket, heat proof gloves, and cap. Keep covered up
• Always remove any flammable materials (e.g. cigarette lighter, matches) from
your clothing before welding
• Always keep a fire extinguisher nearby when welding
• Sparks generated while welding can ignite flammable materials easily in
the welding area, so it is important to remove flammable materials before
commencing welding
• Only weld when the work area and all workpieces are dry
• Do not weld sealed containers (e.g. fuel tanks, air tanks, oil drums). The heat
generated from welding can cause sealed containers to burst without warning
• Be aware of transferred heat. Metal parts can conduct heat away from the
work area and cause ignition of flammable materials
• Be aware that welded parts will remain hot for some time after joining. Allow
to cool completely before handling, or leaving unattended
• Never weld where flammable gases, liquids or dust are present
• Ensure that there is always a responsible person nearby to alert you to any fire,
or to call help in an emergency
• Use of welding machines will create powerful magnetic fields. This may
disturb the operation of sensitive electronic equipment. Pacemaker wearers
should consult a doctor before using a welding machine
• Do not overload power supply. Check that your mains wiring is capable of
delivering the required current safely (see specification)
Wire feed
• Caution: The tip of welding wire can be very sharp, and is fed with adequate
force to puncture skin
• Keep the welding machine switched off until you are ready to begin welding.
Never point the torch towards people or animals
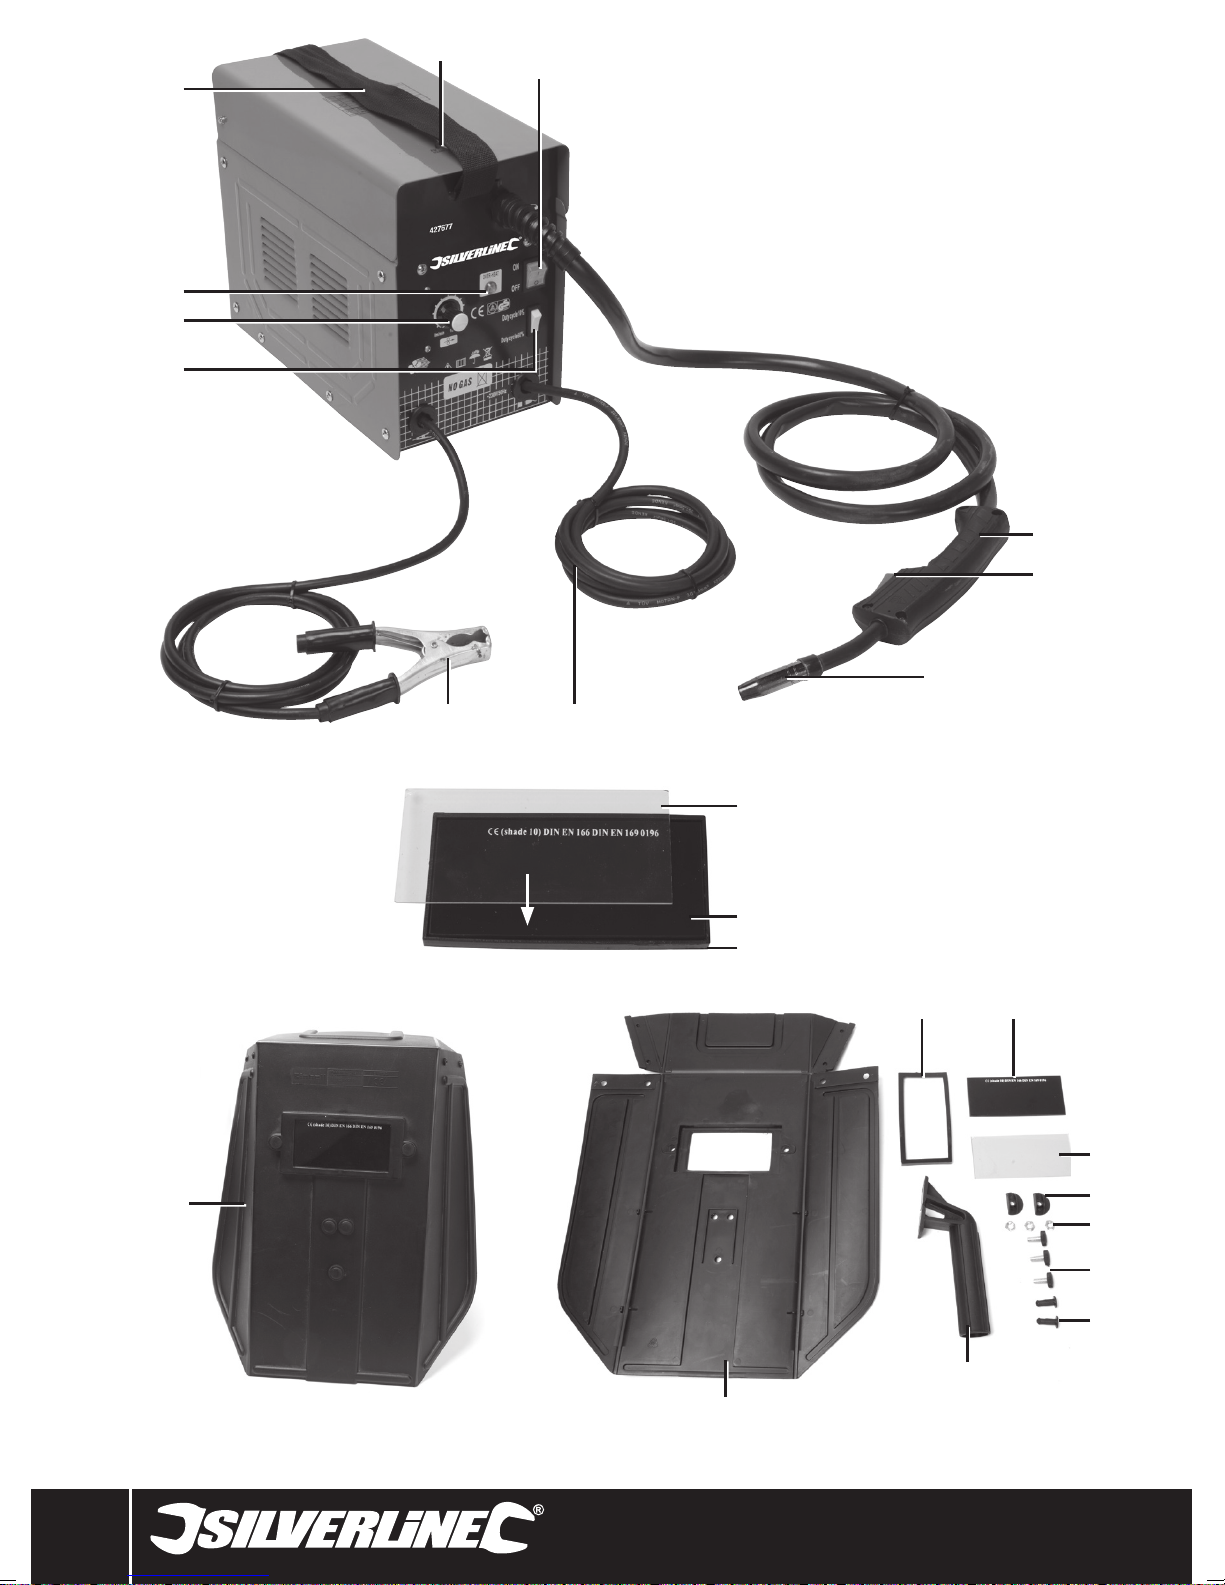
Product Familiarisation
1 Case Lid Release
2 On/Off Switch
3 120/60A Switch
4 Wire Feed Speed Dial
5 Over-Heat Indicator
6 Carrying Strap
7 Torch Handle
8 Trigger
9 Shroud
10 Mains Cable
11 Earth Clamp
12 Welding Mask (assembled)
13 Filter Frame
14 Welding Glass
15 Safety Glass
16 Frame Clips (x 2)
17 Handle Nuts (x 3)
18 Handle Bolts (x 3)
19 Frame Screws (x 2)
20 Handle
21 Welding Mask
22 Mask Clips
23 Tip
24 Wire Feed Output
25 Wire Reel
26 Reel Spindle Mechanism
27 Wire
28 Feed Mechanism Cover Screws
29 Main Liner Screws
30 Feed Roller
31 Tension Knob
32 Reel Wire Liner
33 Reel Wire Liner Screw
34 Tension Latch
35 Tension Roller
36 Liner
8
Accessories (not shown)
• Chipping Hammer
• Wire Brush

www.silverlinetools.com
Gasless Turbo Mig427677
Intended Use
Welder for light to medium-duty MIG (Metal Inert Gas) welding applications, for
use with various types of steel, using suitable flux-cored welding wires. It does not
require a gas connection as the flux-cored wire provides the shielding gas in use.
This product is not designed for commercial, trade or industrial applications.
Unpacking Your Tool
• Carefully unpack and inspect your tool. Fully familiarise yourself with all its
features and functions
• Ensure that all parts of the tool are present and in good condition. If any parts
are missing or damaged, have such parts replaced before attempting to use
this tool
Before Use
WARNING: Always unplug the welding machine from the mains supply and
allow to cool fully before attempting to fit or replace any part.
Note: This tool is earthed and must only be connected to mains with a earth
connection. Do not attempt to use it without an earth connection.
IMPORTANT: Connecting to mains
• This welder is not supplied with a mains electrical plug because at full capacity
it will draw far too much power for a normal domestic mains plug and socket.
This welder must not be fitted with a standard 13A UK plug.
• A high current mains socket or terminal must be installed by a qualified and
accredited professional electrician. A 32A socket and plug conforming to IEC
60309 is recommended
• A non-socketed mains connection also requires welder connection by
a qualified and accredited professional electrician. However, a socketed
connection is safer and more strongly recommended so the welder can be
safely isolated when necessary. If directly wired to mains, a double pole,
double throw isolator switch must be fitted
• The welder must be connected to a consumer unit with a built-in RCD, using a
circuit protected by an RCD
• Please refer to the Specification for details of the maximum current required
by this welder
• If in any doubt, do not attempt to connect or use this welder until a
professional electrician has been consulted
Assembling the mask
• Use the Mask Clips (22) to assemble the flat-packed Welding Mask (21) into
its normal shape
• Fit the Handle (20) using the Handle Nuts and Bolts (17 & 18). The Handle must
be inside the Welding Mask body to protect the operator’s hand from splatter
• Ensure the Safety Glass (15) protects the Welding Glass (14) from weld splatter.
If the Welding Glass is fitted as the external layer, it may get damaged by
splatter and allow dangerous ultra-violet light to reach the operator’s eyes
• Fit the glass assembly into the Welding Mask using the Frame Screws (19)
and Frame Clips (16)
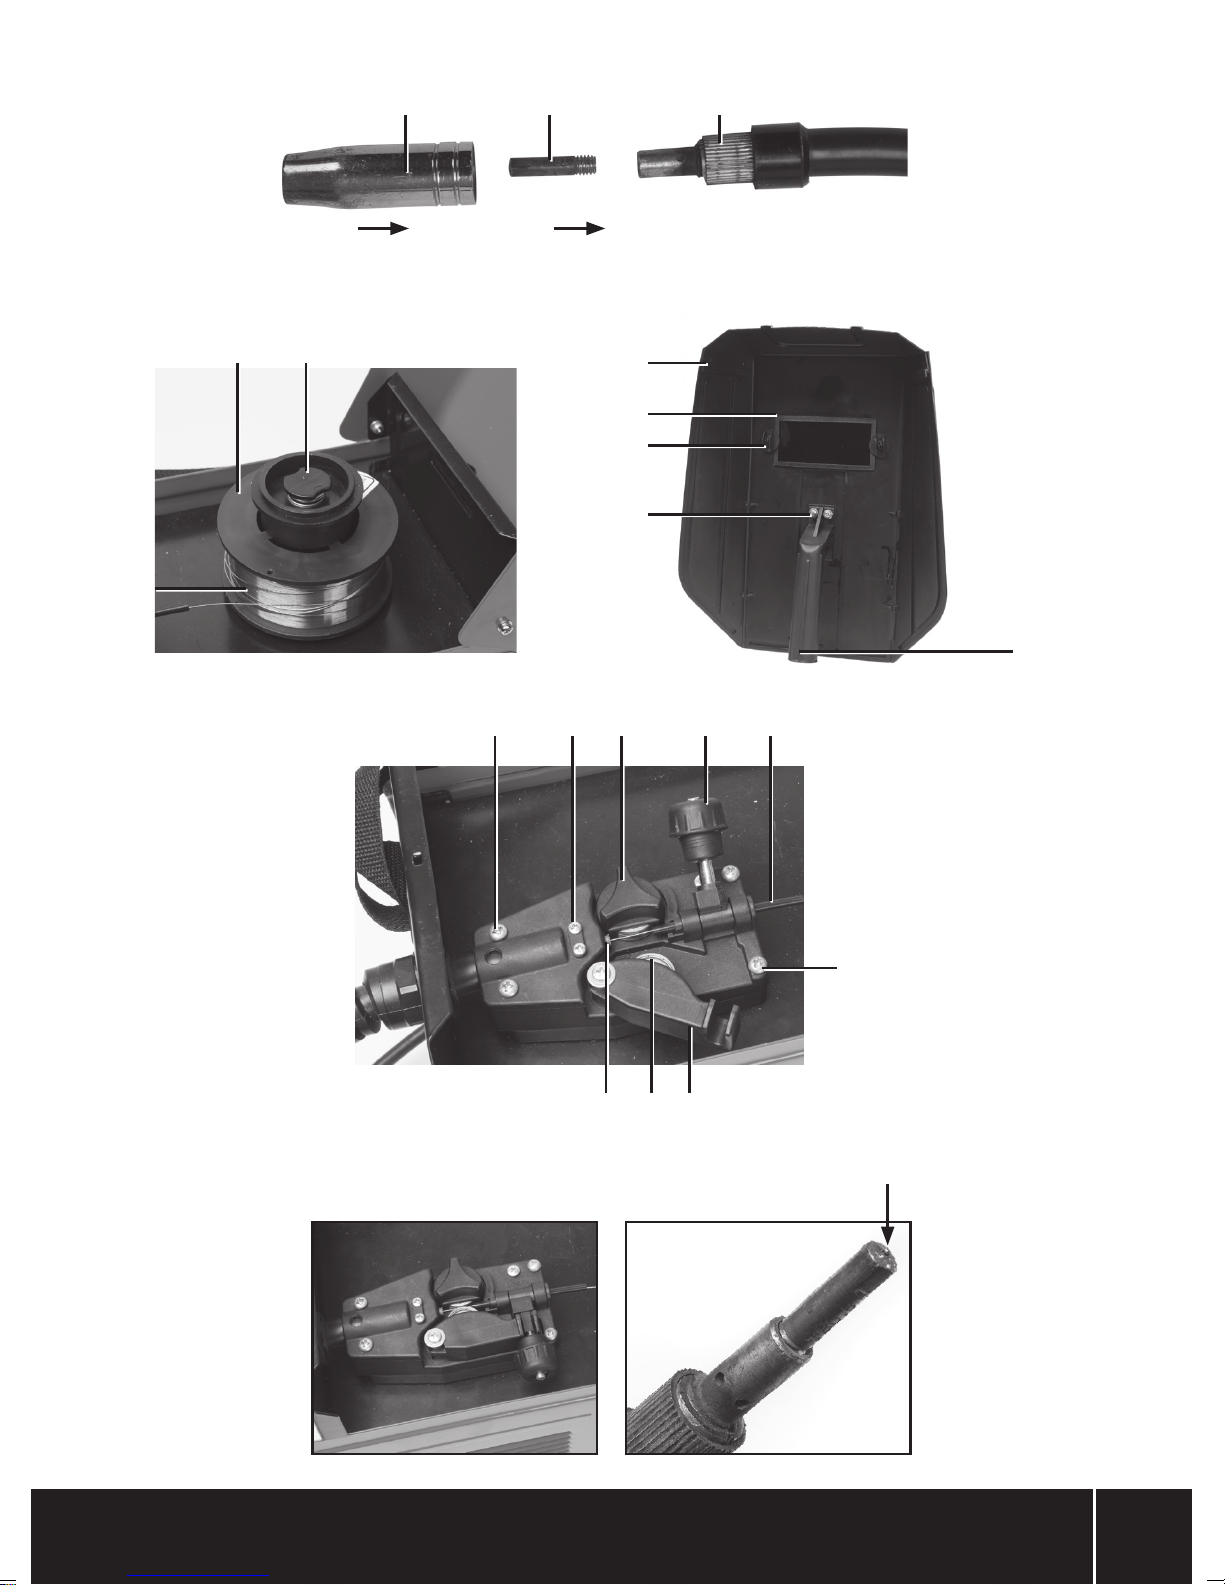
Installing wire
• This welder requires 0.8-0.9mm flux-cored wire
1. Turn the Case Lid Release (1) and lift the lid of the case
2. Turn the plastic top of the Reel Spindle Mechanism (26) anti-clockwise and
remove it carefully with the spring and top section
3. Place the supplied Wire Reel (25) over the reel holder spindle (shown already
fitted), positioning so that the Wire (27) will feed off the Wire Reel on the
nearest side as indicated by the arrow
4. Refit the top section, spring and plastic top of the Reel Spindle Mechanism.
Ensure the spring provides sufficient tension so the Wire Reel does not unravel
on its own
5. Release the Tension Knob (31) so that the Tension Latch (34) can be swung
clear as shown
6. Carefully release the end of the Wire from the spool and take care not to let the
Wire unravel. Ensure that the wire tip is straight and is cut off cleanly
7. Slowly feed the Wire into the end of the Reel Wire Liner (32) across the Feed
Roller (30) and into the Liner (36) and push a little way into the Liner carefully
8. Swing the Tension Latch back into position, ensuring that the Wire is centred in
the grooves of the Feed Roller and Tension Roller (35)
9. Reposition the Tension Latch as shown in image A. Tension can be adjusted by
rotating the Tension Knob
10. Close the lid and secure with the Case Lid Release
11. Pull off the Shroud (9) from the torch and unscrew the Tip (23) and remove
12. Connect the welder to the mains power supply, switch on, and hold the torch
13. Move the torch away from the machine, so that the torch cable is straight
14. Ensure that the torch is not touching anything, and squeeze the Trigger (8). The
wire feed mechanism should drive the Wire through to the torch. See image B
15. If the Wire is not driven through, disconnect from the mains power supply,
open the lid and tighten the Tension Knob (31). The drive rollers should be
just tight enough to drive the Wire through to the torch, but not so tight as to
prevent the drive roller from slipping if the Wire becomes blocked
16. When the Wire is propelled out of the end of the torch, switch off and
disconnect from the mains power supply
17. Refit the Tip and the Shroud, and trim the Wire so that approximately 5mm
projects from the tip
Removing wire reel and end of wire
1. Open the lid of the welder using the Case Lid Release (1)
2. Use a pair of pliers to draw the last of the old Wire Reel out through the Tip
(15) of the torch. If the old Wire Reel (25) is not empty, cut the wire at the spool
and release the Tension Knob (31) and move the Tension Latch (34) away from
the Feed Roller (30)
3. Then proceed as per instructions for ‘Installing wire’ above
Important
• Always wear appropriate personal protective equipment for the job that you
are about to do. Use of this machine requires a welding mask, gloves, heatresistant clothing and, if appropriate, a respirator
• Always ensure that you have an appropriate fire extinguisher near to the
work area
• Always inspect your machine for damage or wear. Pay particular attention to
leads and cables. If any damage is found, DO NOT USE
• Check that all casings or covers are properly closed and secured
• Position the welder in such a way that it will not move or tip in use. Ensure
that there is at least 500mm of clear space around the welder to allow proper
ventilation
Operation
WARNING: Always unplug the welding machine from the mains supply and
allow to cool fully before attempting to fit or replace any part.
Setting the machine
• To achieve a good quality weld, the Wire Feed Speed Dial (4) and 120/60A
Switch (3) must be set correctly. The 10% duty setting provides 120A current
and the 60% duty setting provides 60A current
• The wire speed should be adjusted to provide a steady arc. The correct setting
will depend on distance, current, torch speed, and other factors. Experiment
with wire speeds until you find an optimum setting
Note: The welder optimises current output depending on wire speed and
monitored current levels to improve weld quality and reduce splatter.
Duty Cycle
• This machine is not designed for continuous welding. Excessive continuous
welding would cause overheating and damage to internal components
• The duty cycle defines the number of minutes, in every ten minutes, that the
machine can weld
• For a duty cycle of 10%, the machine may be used for 1 minute, and then
must be allowed 9 minutes to cool. The 60% duty cycle allows 6 minutes in
every 10 minutes
• If the duty cycle is exceeded, the machine will automatically cut-out
• Using the machine at reduced current settings, and maintaining good
ventilation will maximise the duty cycle
Thermal cut-out
• When the thermal cut-out protection is operating, the Over-Heat Indicator (5)
will illuminate and the welder will shut down
• Allow the machine to cool. The cut-out will automatically reset once the
machine is ready to be used
Preparing to weld
• Ensure that parts to be joined are clean and free from rust, paint, or other
finishes
• All parts should be well supported, so that there is a gap of approximately
1mm where you intend to form the welded joint
9
GB
• Check that there are no flammable materials in the vicinity of the work area
• Attach the Earth Clamp (11) to a cleaned area of one of the parts, as near as
practical to where the joint will be
• Ensure that there is both a responsible person and an operable fire
extinguisher at hand
• Connect the machine to the mains power supply
Welding
WARNING: Using a welder correctly is a technical skill. A welder used incorrectly
can be highly dangerous. The information presented below is general guidance
only. If you are not entirely confident in your ability to use this tool safely, DO
NOT USE.
1. Move the On/Off Switch (2) to the ‘ON’ position
2. Hold the Torch Handle (7) in one hand and the Welding Mask (12) in the other
3. Position the torch so that the Tip (23) is approximately 10mm away from the
metal, at an angle of approximately 75˚
4. Hold the mask over your face and squeeze the Trigger (8)
5. An arc should strike between the metal and the tip. Hold the Trigger for 1-2
seconds and release
6. Allow the weld to cool slightly and move the mask away from your face. If the
settings are correct, a round 'spot' weld should form
7. If the weld has not fully penetrated the metal, increase the voltage setting. If a
hole has been made in the metal, reduce the voltage setting
• Practise making 'spot' welds until you are confident using the machine, and
selecting settings
• An alternative to spot welding suitable for a mig welder is a plug weld where
the top surface has holes drilled along a surface and a pool of the weld
material fills each hole. Spot welds are possible for thinner material with a mig
welder but the welds are more difficult and may not be as satisfactory
• To form a 'seam' weld, hold the Trigger for longer, and slowly move the torch
forward at the same time
• If the machine settings are correct, the arc should be steady, and produce a
crackling sound.
• If you hear a popping sound, or struggle to maintain the arc, adjust the wire
speed. If you feel the torch trying to 'push back', reduce the wire speed
• Creating neat, high quality welds is a skill that takes time to master. Practise
and good preparation should result in satisfactory welds
Accessories
• A range of accessories including personal protective equipment and welding
tools are available from your Silverline stockist. Spare parts can be obtained
from toolsparesonline.com
Maintenance
WARNING: Always unplug the welding machine from the mains supply and
allow to cool fully before attempting to fit or replace any part.
Replacing tips
• As the welder is used, the Tip (23) may become worn. This will make the arc
difficult to control
1. To replace the Tip, remove the Shroud (9) from the torch, and unscrew the Tip
2. Check that the new Tip is the correct size for the Wire being used
3. Thread the new Tip over the end of the Wire, and screw into the torch. Replace
the Shroud
Cleaning
Disconnect the machine from the mains supply before cleaning
• Keep your machine clean. Always clean dust or particles away and never allow
ventilation holes to become blocked
• Use a soft brush or dry cloth to clean the machine. If available, blow through
the ventilation holes with clean, dry, compressed air
Disposal
Always adhere to national regulations when disposing of electronic equipment that
is no longer functional and is not viable for repair.
• Do not dispose of power tools, or other waste electrical and electronic
equipment (WEEE), with household waste
• Contact your local waste disposal authority for information on the correct way
to dispose of electronic equipment
Troubleshooting
Problem Possible cause Solution
Feed Roller (30) does not turn
Feed Roller (30) turns but Wire
(27) does not feed
During use the welder stops
working
Poor weld Incorrect current and feed settings Adjust Wire Feed Speed Dial (4) and 120/60A Switch (3)
Wire Feed Speed Dial (4) set to minimum 0 setting Increase setting
Duty cycle exceeded and Over-Heat Indicator (5) is
10
No power Switch on welder
Incorrect roller pressure Adjust Tension Knob (31)
Liner (36) damaged Check and replace Liner
Wire welded to Tip (23) Release Wire from Tip
illuminated
Leave the welder for 20-30 minutes to cool down

www.silverlinetools.com
Gasless Turbo Mig427677
Silverline Tools Guarantee
This Silverline product comes with a 3 year guarantee
Register this product at www.silverlinetools.com within 30 days of purchase in order
to qualify for the 3 year guarantee. Guarantee period begins according to the date of
purchase on your sales receipt.
Terms & Conditions
Guarantee period becomes effective from the date of retail purchase as detailed on
your sales receipt.
PLEASE KEEP YOUR SALES RECEIPT
If this product develops a fault within 30 days of purchase, return it to the stockist
where it was purchased, with your receipt, stating details of the fault. You will
receive a replacement or refund.
If this product develops a fault after the 30 day period, return it to:
Silverline Tools Service Centre
PO Box 2988
Yeovil
BA21 1WU, UK
The guarantee claim must be submitted during the guarantee period.
You must provide the original sales receipt indicating the purchase date, your name,
address and place of purchase before any work can be
carried out.
You must provide precise details of the fault requiring correction.
Claims made within the guarantee period will be verified by Silverline Tools to
establish if the deficiencies are related to material or manufacturing of the product.
Carriage will not be refunded. Items for return must be in a suitably clean and safe
state for repair, and should be packaged carefully to prevent damage or injury
during transportation. We may reject unsuitable or
unsafe deliveries.
All work will be carried out by Silverline Tools or its authorized
repair agents.
The repair or replacement of the product will not extend the period
of guarantee
Defects recognised by us as being covered by the guarantee shall be corrected
by means of repair of the tool, free of charge (excluding carriage charges) or by
replacement with a tool in perfect working order.
Retained tools, or parts, for which a replacement has been issued, will become the
property of Silverline Tools.
Registering your purchase
Registration is made at silverlinetools.com by selecting the Guarantee Registration
button. You will need to enter:-
• Your personal details
• Details of the product and purchase information
Once this information is entered your guarantee certificate will be created in PDF
format for you to print out and keep with your purchase.
The repair or replacement of your product under guarantee provides benefits which
are additional to and do not affect your statutory rights as a consumer.
What is covered:
The repair of the product, if it can be verified to the satisfaction of Silverline Tools
that the deficiencies were due to faulty materials or workmanship within the
guarantee period.
If any part is no longer available or out of manufacture, Silverline Tools will replace it
with a functional replacement part.
Use of this product in the EU.
What is not covered:
Silverline Tools does not guarantee repairs required as a result of:
Normal wear and tear caused by use in accordance with the operating instructions
eg blades, brushes, belts, bulbs, batteries etc.
The replacement of any provided accessories drill bits, blades, sanding sheets,
cutting discs and other related items.
Accidental damage, faults caused by negligent use or care, misuse, neglect,
careless operation or handling of the product.
Use of the product for anything other than normal domestic purposes.
Change or modification of the product in any way.
Use of parts and accessories which are not genuine Silverline Tools components.
Faulty installation (except installed by Silverline Tools).
Repairs or alterations carried out by parties other than Silverline Tools or its
authorized repair agents.
Claims other than the right to correction of faults on the tool named in these
guarantee conditions are not covered by the guarantee.
Battery Guarantee
Silverline batteries are guaranteed for 30 days. If a defect occurs on a registered
battery during the term of the Battery Guarantee, due to material or manufacturing
fault, then Silverline will replace it free of charge. This guarantee does not apply to
commercial use nor does it extend to normal wear and tear or damage as a result of
accident, abuse or misuse.
CE Declaration of Conformity
The undersigned: Mr Darrell Morris
as authorised by: Silverline Tools
Declares that
Identification code: 427677
Description: Gasless Turbo Mig
Conforms to the following directives and standards:
• Low Voltage Directive 2006/95/EC
• EMC Directive 2004/108/EC
• RoHS Directive 2011/65/EU
• EN60974-1:2012
• EN60974-10:2010
Notified body: TÜV Rheinland
The technical documentation is kept by: Silverline Tools
Date: 08/04/15
Signed:
Mr Darrell Morris
Managing Director
Name and address of the manufacturer:
Powerbox International Limited, Company No. 06897059. Registered address: Central
House, Church Street, Yeovil, Somerset BA20 1HH, United Kingdom.
11
FR
Traductions des instructions originales
Description des Symboles
La plaque signalétique figurant sur votre outil peut présenter des symboles. Ces
symboles constituent des informations importantes relatives au produit ou des
instructions concernant son utilisation.
Port de protection auditive
Port de lunettes de sécurité
Port de masque respiratoire
Port du casque
Port de gants
Lire le manuel d’instructions
Port de vêtements de sécurité
Port de chaussures de sécurité
Emanation de fumée ou de gaz!
Risque d’incendie
Risque d’électrocution
Surfaces chaudes. NE PAS TOUCHER!
NE PAS utiliser sous la pluie ou un environnement humide!
Attention!
Abréviations techniques
V Volts
~, CA Courant alternatif
A, mA Ampère, milliampère
Ø Diamètre
Hz Hertz
, CC Courant continu
W, kW Watt, kilowatt
Caractéristiques techniques
Tension : .................................................................... 230 V~ 50 Hz
Intensité absorbée : ..........................18,2 A (crête), 6,4 A (moyenne)
Efficacité : ................................................................................80 %
Puissance :...........................................................................2400 W
Intensité de soudage :. ...................................................... 60-120 A
Cycle
d’utilisation nominal : ..................10 % sous 120 A, 60 % sous 60 A
Tension de sortie à vide :......... ............................. .....................32 V
Tension de sortie :......... ..................... ..20,0 V (120 A), 17,0 V (60 A)
Poids maximal du dévidoir de fil : ...........................................0,4 kg
Classe d’isolation : .........................................................................H
Indice de protection :...............................................................IP21S
Fil : ................................................................. Fil fourré 0,8-0,9 mm
Plage de soudage (acier) : .............................................. 1,2 - 8 mm
Classe de protection : ................................................................
Longueur du câble de la torche à souder : ..............................2,0 m
Longueur du câble de mise à la masse : .................................1,5 m
Longueur du câble d’alimentation : .........................................2,0 m
Dimensions (H x L x l) : ....................................295 x 340 x 180 mm
Poids : .....................................................................................16 kg
Du fait de l’évolution constante de notre développement
produits, les spécifications des produits Silverline peuvent changer
sans notification préalable.
Danger de radiations d’ultraviolets
Pour usage intérieur uniquement
Construction de classe I (mise à la terre).
Conforme à la réglementation et aux normes de sécurité
en vigueur
Protection de l’environnement
Les produits électriques usagés ne doivent pas être jetés avec
les ordures ménagères. Veuillez les recycler dans les centres
prévus à cet effet. Pour de plus amples informations, veuillez
contacter votre municipalité ou point de vente La plaque de
valeur nominale sur votre outil peut afficher des symboles.
12

www.silverlinetools.com
Poste à souder sans gaz Turbo MIG427677
Consignes générales de
sécurité relatives aux appareils
électriques
AVERTISSEMENT ! Certaines précautions fondamentales, dont les consignes
ci-dessous, doivent impérativement être respectées lors de l’emploi d’outils
électriques afin de réduire le risque d’incendie, de choc électrique et de blessures
corporelles. Veuillez lire l’intégralité de ces consignes avant de mettre en marche
ce produit et veuillez les conserver pour toute consultation ultérieure.
AVERTISSEMENT : Cet appareil n’est pas conçu pour être utilisé par des
personnes (y compris les enfants) ayant des capacités physiques ou mentales
réduites, ou n’ayant pas la connaissance ou l’expérience requise, à moins d’être
sous la supervision d’une personne responsable de leur sécurité ou d’avoir reçu
les instructions nécessaires. Les enfants ne doivent pas jouer avec cet appareil.
ATTENTION : Utiliser l’appareil électrique, les accessoires et outils à monter
conformément à ces instructions, en tenant compte des conditions de travail et de
la tâche à réaliser. Toute utilisation d’un appareil électrique autre que celle pour
laquelle il a été conçu peut entraîner des situations à risque.
L’expression « appareil électrique » employée dans les présentes consignes
recouvre aussi bien les appareils filaires à brancher sur le secteur que les
appareils sans fil fonctionnant sous batterie.
1. Maintenir une zone de travail propre. Des zones encombrées et mal
éclairées sont sources d’accidents.
2. Prendre en compte la zone de travail :
- Ne pas exposer les outils à la pluie,
- Ne pas utiliser les outils dans des endroits humides,
- Travailler dans une zone bien éclairée,
- Ne pas utiliser d’outils électriques dans des environnements explosifs, tels
qu’à proximité de liquides, de gaz ou de poussières inflammables.
3. Éviter les décharges électriques. Éviter le contact corporel avec les surfaces
mises à la terre telles que tuyaux, radiateurs, cuisinières et réfrigérateurs.
4. Éloigner les personnes aux alentours. Ne laisser aucune personne dont
la présence n’est pas nécessaire, surtout les enfants, s’approcher de la zone
de travail ou venir en contact avec l’appareil.
5. Ranger les appareils électriques inutilisés dans un endroit sûr, sec et hors
de portée des enfants.
6. Ne pas forcer sur l’appareil électrique. Un appareil électrique adapté et
employé au rythme pour lequel il a été conçu permettra de réaliser un travail
de meilleure qualité et dans de meilleures conditions de sécurité
7. Utiliser l’appareil électrique approprié au travail à effectuer. Ne pas utiliser
de petits outils pour des tâches lourdes. N’utilisez pas l’outil pour une tâche
pour laquelle il n’a pas été prévu ; par exemple n’employez pas une scie
circulaire pour couper une branche d’arbre ou fendre des bûches.
8. Porter des vêtements appropriés.
- Ne pas porter de vêtements amples ou des bijoux pendants qui peuvent être
happés par les pièces en rotation.
- Le port de chaussures antidérapantes est recommandé en extérieur.
- Attacher ou protéger les cheveux longs.
9. Porter un équipement de protection approprié.
- Porter une protection oculaire.
- Porter un masque à poussières lors de travaux créant de la poussière.
AVERTISSEMENT : Ne pas porter d’équipements de protection ou de vêtements
appropriés peut engendrer et aggraver des blessures.
10. Brancher un système d’extraction de la poussière : si l’appareil est pourvu
de dispositifs destinés au raccord d’équipements d’extraction et de
récupération de la poussière/sciure, s’assurer qu’ils soient bien fixés et utilisés
correctement.
11. Ne pas maltraiter le cordon électrique. Ne jamais utiliser le cordon
électrique pour porter, tirer ou débrancher l’appareil. Protéger le cordon
électrique de la chaleur, du contact avec l’essence, des bords tranchants et
pièces rotatives. Un cordon électrique endommagé ou entortillé accroît le
risque de décharge électrique.
12. Immobiliser votre travail. Si possible, utiliser des serre-joints ou un étau pour
maintenir la pièce de travail. Cela offre davantage de sécurité que de tenir la
pièce avec la main.
13. Ne pas essayer d’atteindre une zone hors de portée. Se tenir toujours en
position stable permettant de conserver l’équilibre.
14. Veiller à l’entretien des appareils électriques.
- Veiller à ce que les outils de coupe soient tenus affûtés et propres, ce qui
favorise leur maîtrise et leur bon fonctionnement.
- Suivre les instructions de lubrification et de changement des accessoires.
- Vérifier régulièrement les câbles et les faire réparer/remplacer par un centre
agrée.
- Vérifier également l’état des rallonges utilisées.
- Tenir les poignées de l’appareil propres (sans graisse ni huile) et sèches.
AVERTISSEMENT : de nombreux accidents sont dus à l’utilisation d’appareils
électriques mal entretenus.
15. Débrancher l’appareil électrique. Lorsque l’appareil n’est pas utilisé,
ou avant tout opération d’entretien ou de changement d’accessoires, veiller à
débrancher l’appareil de sa source d’alimentation.
AVERTISSEMENT : utiliser des accessoires non recommandés par le fabricant
peut engendrer des blessures.
16. Enlever les clés et outils de réglage. Prendre l’habitude de retirer ces outils
avant de mettre l’appareil en marche.
17. Éviter tout démarrage accidentel ou intempestif. S’assurer que
l’interrupteur marche-arrêt soit en position d’arrêt avant de brancher l’appareil
sur l’alimentation secteur ou d’installer la batterie, de prendre l’appareil ou de
le transporter.
AVERTISSEMENT : les démarrages accidentels peuvent être dangereux.
18. Usage en extérieur : lors d’une utilisation de l’appareil électrique en extérieur,
se servir d’une rallonge appropriée à une utilisation en extérieur. Cela réduit le
risque de décharge électrique.
19. Rester vigilant.
- Faire preuve de bon sens lors de la manipulation de l’appareil.
- Ne pas utiliser un appareil électrique lorsque l’on se trouve dans un état de
fatigue, ou sous l’influence de drogues, d’alcool ou de médicaments.
AVERTISSEMENT : un moment d’inattention pendant l’utilisation d’un outil
électrique peut se traduire par des blessures graves.
20. Inspecter les pièces endommagées
- Avant d’utiliser un appareil, toujours vérifier qu’il soit en bon état de marche.
- Vérifier que les éléments rotatifs soient bien alignés et non grippés. S’assurer
de l’absence de pièces cassées ou endommagées susceptibles de nuire au
bon fonctionnement de l'appareil.
- Une protection ou partie défectueuse doit être réparée ou remplacée par un
centre agrée, sauf en cas d’indication contraire dans le manuel.
- Les interrupteurs défectueux doivent être remplacés par un centre agréé.
AVERTISSEMENT : ne pas utiliser un appareil électrique dont la commande ne
s’effectue plus par l’interrupteur marche-arrêt. Il est dangereux et doit être réparé.
21. Ne faire réparer votre appareil électrique que par un réparateur qualifié.
Cet appareil est conforme aux normes de sécurité en vigueur. Toute réparation
doit être effectuée par une personne qualifiée afin de garantir la sécurité de
l’utilisateur.
AVERTISSEMENT : utiliser uniquement des pièces de rechange identiques.
AVERTISSEMENT : si le câble d’alimentation est endommagé, le faire remplacer
par un centre agréé.
22. La prise d’un appareil électrique doit être adaptée à la prise du secteur.
Ne jamais modifier la prise en aucune façon. Ne jamais utiliser d’adaptateur
sur la prise électrique d’appareils mis à la terre. Des prises non modifiées,
adaptées aux boîtiers de prise de courant, réduiront le risque de décharge
électrique.
23. En cas d’utilisation en extérieur, utiliser une alimentation protégée par un
disjoncteur différentiel. L’utilisation d’un disjoncteur différentiel réduit le
risque de décharge électrique.
13

FR
AVERTISSEMENT : Avant de brancher un appareil sur une source d’alimentation
(prise secteur, groupe électrogène, etc.) assurez-vous que la tension fournie soit
la même que celle spécifiée sur la plaque de l’appareil. Une source d’alimentation
délivrant une tension supérieure à celle indiquée sur l’appareil peut engendrer
de sérieuses blessures pour l’utilisateur et endommager l’appareil. En cas de
doute, ne branchez pas l’appareil. Une source d’alimentation délivrant une tension
inférieure à celle indiquée sur l’appareil est néfaste pour le moteur.
Consignes de sécurité relatives à
la soudure
• La soudure peut produire de la fumée toxique et réduire le taux d’oxygène
présent dans la zone de travail. Travaillez toujours dans un endroit bien
ventilé. Évitez d’inhaler la fumée émise par la soudure et portez un masque
respiratoire lorsque l’activité s’y prête.
• Certaines parties métalliques peuvent être galvanisées ou revêtues de plomb,
de cadmium ou d’autres revêtements. Souder sur ces revêtements peut
produire de la fumée hautement toxique. Décapez toujours la surface avant de
procéder au soudage.
• Si vous ressentez une irritation aux poumons, à la gorge ou aux yeux pendant
le soudage, ARRÊTEZ-VOUS IMMÉDIATEMENT et sortez à l’air pur.
• La soudure produit des taux extrêmement élevés d’ultraviolets. Pour éviter
d’altérer votre vue, portez TOUJOURS un masque à souder agréé. Ne regardez
JAMAIS directement l’arc.
• La lumière produite lors de la soudure à l’arc peut donner envie de la regarder,
surtout pour les enfants. Évitez de laisser d’autres personnes regarder la
lumière de la soudure à l’arc sans protection.
• Si d’autres personnes risquent de s’approcher de la zone de travail, installez
un écran approprié pour les protéger des ultraviolets / de la lumière
éblouissante.
• Remplacez immédiatement le verre du masque de soudeur lorsqu’il présente
des signes d’usure ou des dommages.
• Pour éviter les brûlures de la peau, portez TOUJOURS une veste ignifugée
à manches longues appropriée, des gants résistants à la chaleur et une
casquette. Restez bien couvert.
• Retirez toujours toute source de combustion (par exemple : briquet, allumettes)
de vos vêtements avant de souder.
• Gardez toujours un extincteur à proximité de la zone de soudure.
• Les étincelles générées lors de la soudure accidentelle peuvent provoquer des
incendies lorsqu’elles rentrent en contact avec des matériaux inflammables,
il est important d’enlever tous matériaux inflammables avant de commencer
à souder.
• Soudez uniquement lorsque toutes les pièces à souder et la zone de travail
sont sèches.
• Ne soudez pas de conteneurs scellés (par exemple : réservoirs à essence ou à
air, citernes à pétrole). La chaleur produite par la soudure peut faire subitement
exploser les conteneurs scellés.
• Soyez conscient de la propagation de la chaleur. Les éléments métalliques
peuvent communiquer la chaleur à tout matériel se trouvant à proximité
de votre zone de travail, ce qui peut à son tour enflammer des matériaux
combustibles.
• Sachez que les pièces soudées resteront chaudes pendant quelques temps
après leur soudure. Laissez-les refroidir complètement avant de les manipuler
ou de vous en éloigner.
• Ne soudez jamais à proximité de gaz, de liquides ou de poussières
inflammables.
• Assurez-vous toujours qu’une personne responsable se trouve à proximité afin
de vous avertir en cas d’incendie ou d’appeler de l’aide en cas d’urgence.
• L’utilisation de postes à souder créera des champs magnétiques puissants,
susceptibles de perturber le fonctionnement des équipements électroniques
sensibles. Il est recommandé que les personnes portant un stimulateur
cardiaque consultent un médecin avant d’utiliser un poste à souder.
• Ne surchargez pas l’alimentation secteur. Vérifiez que votre installation
électrique peut fournir les courants requis en toute sécurité (voir les
caractéristiques techniques).
Avancée du fil
• Attention : La pointe du fil à souder peut être très pointue et avance avec
suffisamment de puissance pour perforer la peau.
• Tenez ce poste à souder éteint tant que vous n’êtes pas totalement prêt
à commencer le soudage. Ne dirigez jamais la torche à souder vers des
personnes ou des animaux.
Présentation du produit
1 Bouton de dégagement du capot
2 Interrupteur
3 Commutateur 120 A / 60 A
4 Sélecteur de vitesse du fil
5 Indicateur de surchauffe
6 Sangle de transport
7 Poignée de la torche
8 Gâchette
9 Buse
10 Câble d’alimentation
11 Pince de mise à la masse
12 Masque de soudeur (assemblé)
13 Support de filtre
14 Verre de soudage
15 Verre de sécurité
16 Agrafes du support (x 2)
17 Écrous de la poignée (x 3)
18 Boulons de la poignée (x 3)
19 Vis du support (x 2)
20 Poignée
21 Masque de soudeur
22 Agrafes du masque
23 Pointe
24 Sortie du fil
25 Dévidoir de fil
26 Mécanisme de l’arbre du dévidoir
27 Fil
28 Vis du capot du mécanisme d’avancée
29 Vis de la gaine
30 Galet d’avancée
31 Bouton tendeur
32 Gaine de fil du dévidoir
33 Vis de la gaine de fil du dévidoir
34 Verrou du tendeur
35 Galet tendeur
36 Guide-fil
14
 Loading...