

Page 1
45/90A
Gasless Turbo Mig
282562
Gasless Turbo Mig
Poste à souder Turbo MIG sans gaz
Turbo-MIG-Fülldrahtschweißgerät
Soldador sin gas Turbo Mig
Turbo mig senza gas
Gaslose MIG lasmachine
www.silverlinetools.com
Page 2
1
6
5
4
3
2
7
8
12
9
1011
15
14
13
13
14
15
16
17
2
18
19
20
21
Page 3
9 23 24
27
25
26
22
13
16
17/18
28 29 30 31
32
A B
33
343536
www.silverlinetools.com
3
Page 4

4
Page 5
45/90A
Gasless Turbo Mig
English .................. 6
Français ................ 12
Deutsch ................. 18
Español ................. 24
Italiano .................. 30
Nederlands ............ 36
www.silverlinetools.com
5
Page 6
GB
Original Instructions
Description of Symbols
The rating plate on your tool may show symbols. These represent important information
about the product or instructions on its use.
Wear hearing protection
Wear eye protection
Wear breathing protection
Wear head protection
Wear hand protection
Wear protective clothing
Wear protective shoes
Read instruction manual
Class I construction (protective earth)
Indoors use only!
Toxic fumes or gases!
Risk of fire!
Risk of electrocution!
Technical Abbreviations Key
V Volts
~, AC Alternating current
A, mA Ampere, milli-Amp
Ø Diameter
W, kW Watt, kilowatt
Specification
Input voltage: ....................................................................230V~ 50Hz
Input current: ...........................................13.5A (peak), 4.6A (average)
Efficiency: ..................................................................................... 80%
Output current range: ...............................................................45/90A
Rated duty cycle: ..........................................10% @ 90A, 60% @ 45A
No load output voltage: ...................................................................31V
Output voltage: ............................................18.5V (90A), 16.25V (45A)
Wire reel maximum weight: .......................................................0.45kg
Insulation class: ................................................................................. H
Ingress protection: ...................................................................... IP21S
Wire: ...........................................................0.8-0.9mm flux cored wire
Welding thickness range (steel): .........................................1.2-6.5mm
Internal fuse rating: ....................................................................... 16A
Plug fuse (UK only) ........................................................................ 13A
Protection class: ............................................................................
Torch cable length: ...................................................................... 2.0m
Earth cable length:.......................................................................1.5m
Power cable length: ..................................................................... 2.0m
Dimensions (H x L x W): ........................................295 x 340 x 180mm
Weight: .........................................................................................13kg
Hot surfaces - DO NOT touch!
DO NOT use in rain or damp environments!
Caution!
Danger of ultraviolet radiation!
Environmental Protection Welding equipment should not be disposed of
with household waste. Please recycle where facilities exist. Check with your
local authority or retailer for recycling advice
Conforms to relevant legislation and safety standards.
As part of our ongoing product development, specifications of Silverline products
may alter without notice.
6
Page 7

www.silverlinetools.com
Gasless Turbo Mig282562
General Safety
WARNING! When using electric power tools, basic safety precautions should always be
followed to reduce the risk of fire, electric shock and personal injury including the following
safety information. Read all these instructions before attempting to operate this product
and save these instructions for future use.
WARNING: This appliance is not intended for use by persons (including children) with
reduced, physical or mental capabilities or lack of experience or knowledge unless they
have been given supervision or instruction concerning use of the appliance by a person
responsible for their safety. Children must be supervised to ensure that they do not play
with the appliance.
CAUTION: Use the power tool, accessories and tool bits etc. in accordance with these
instructions, taking into account the working conditions and the work to be performed. Use
of the power tool for operations different from those intended could result in a hazardous
situation.
The term "power tool" in the warnings refers to your mains-operated (corded) power tool
or battery-operated (cordless) power tool.
1 - Keep work area clear - Cluttered areas and benches invite injuries
2 - Consider work area environment
- Do not expose tools to rain
- Do not use tools in damp or wet locations
- Keep work area well lit
- Do not use tools in the presence of flammable liquids or gases
3 - Guard against electric shock - Avoid body contact with earthed or grounded
surfaces (e.g. pipes, radiators, ranges, refrigerators)
4 - Keep other persons away - Do not let persons, especially children, not
involved in the work touch the tool or the extension cord and keep them away
from the work area
5 - Store idle tools - When not in use, tools should be stored in a dry locked-up
place, out of reach of children
6 - Do not force the tool - It will perform the job better and safer at the rate for
which it was intended
7 - Use the right tool - Do not force small tools to do the job of a heavy duty tool
Do not use tools for purposes for which they are not intended; for example do
not use circular saws to cut tree limbs or logs
8 - Dress appropriately
- Do not wear loose clothing or jewellery, which can be caught in moving
parts
- Suitable safety footwear is recommended when working outdoors.
- Wear protective covering to contain long hair
9 - Use protective equipment
-Use safety glasses
-Use face or dust mask if working operations create dust
WARNING: Not using protective equipment or appropriate clothing can cause personal
injury or increase the severity of an injury.
10 - Connect dust extraction equipment - If the tool is provided for the
connection of dust extraction and collecting equipment, ensure these are
connected and properly used
11 - Do not abuse the power cable - Never pull the power cable to disconnect
it from the socket. Keep the power cable away from heat, oil and sharp edges.
Damaged or entangled power cables increase the risk of electric shock
12 - Secure work - Where possible use clamps or a vice to hold the work. It is
safer than using your hands
13 - Do not overreach - Keep proper footing and balance at all times
14 - Maintain tools with care
- Keeping cutting tools sharp and clean makes the tool easier to control and
less likely to bind or lock in the workpiece
- Follow instructions for lubricating and changing accessories
- Inspect tool power cables periodically and have them repaired by an
authorised service facility if damaged
- Inspect extension cables periodically and replace if damaged
- Keep handles dry, clean and free from oil and grease
WARNING: Many accidents are caused by poorly maintained power tools.
15 - Disconnect tools - Disconnect tools from the power supply when not in use,
before servicing and when changing accessories such as blades, bits and
cutters
WARNING: The use of accessories or attachments not recommended by the manufacturer
may result in a risk of injury to persons.
16 - Remove adjusting keys and wrenches - Form the habit of checking to see
that keys and adjusting wrenches are removed from the tool before switching
it on
17 - Avoid unintentional starting - Ensure switch is in “off” position when
connecting to a mains socket, inserting a battery pack, or when picking up or
carrying the tool
WARNING: Unintended starting of a tool can cause major injuries.
18 - Use outdoor extension leads - When the tool is used outdoors, use only
extension cords intended for outdoor use and so marked. Use of an extension
cable suitable for outdoor use reduces the risk of electric shock
19 - Stay alert
- Watch what you are doing, use common sense and do not operate the tool
when you are tired
- Do not use a power tool while you are under the influence of drugs, alcohol
or medication
WARNING: A moment of inattention while operating power tools may result in serious
personal injury.
20 - Check damaged parts
- Before further use of tool, it should be carefully checked to determine that it
will operate properly and perform its intended function
- Check for alignment of moving parts, binding of moving parts, breakage of
parts, mounting and any other conditions that may affect its operation
- A guard or other part that is damaged should be properly repaired or
replaced by an authorised service centre unless otherwise indicated in this
instruction manual
- Have defective switches replaced by an authorised service centre
WARNING: Do not use the tool if the on/off switch does not switch the tool on and off. The
switch must be repaired before the tool is used.
21 - Have your tool repaired by a qualified person - This electric tool complies
with the relevant safety rules. Repairs should only be carried out by qualified
persons, otherwise this may result in considerable danger to the user
WARNING: When servicing use only identical replacement parts.
WARNING: If the power cable is damaged it must be replaced by the manufacturer or an
authorised service centre.
22 - Power tool mains plugs must match the mains socket - Never modify
the plug in any way. Do not use any adapter plugs with earthed (grounded)
power tools. Unmodified plugs and matching sockets will reduce risk of
electric shock
23 - If operating a power tool outside use a residual current device (RCD) -
Use of an RCD reduces the risk of electric shock
NOTE: The term “residual current device (RCD)” may be replaced by the term “ground fault
circuit interrupter (GFCI)” or “earth leakage circuit breaker (ELCB)”.
WARNING: Before connecting a tool to a power source (mains switch power point
receptacle, outlet, etc.) be sure that the voltage supply is the same as that specified on
the nameplate of the tool. A power source with a voltage greater than that specified for
the tool can result in serious injury to the user, and damage to the tool. If in doubt, do not
plug in the tool. Using a power source with a voltage less than the nameplate rating is
harmful to the motor.
7
Page 8

GB
Welding Safety
• Welding produces toxic fumes and can reduce oxygen levels in the work area. Always
work in a well-ventilated area. Avoid inhaling welding fumes, use a suitable respirator
where appropriate
• Some metal parts may have zinc, lead, cadmium or other coatings. Attempting to weld
through these coatings can produce highly toxic fumes. Always remove all coatings
before welding
• If you experience irritation to the lungs, throat or eyes whilst welding, STOP
IMMEDIATELY and seek fresh air
• Welding produces extremely high levels of UV light. To prevent eye damage, ALWAYS use
an approved welding face mask. Under no circumstances look directly at the arc
• The light produced when arc welding can be attractive to look at, especially to children.
Always prevent other people from viewing the arc welding light with unprotected eyes
• If there is a possibility of other people approaching the work area, erect suitable
screening to protect them from the light / glare
• Always replace the welder face mask glass as soon as it shows any signs of wear
or damage
• To prevent skin damage, ALWAYS wear a suitable fire-proof long sleeved jacket, heat
proof gloves, and cap. Keep covered up
• Always remove any flammable materials (e.g. cigarette lighter, matches) from your
clothing before welding
• Always keep a fire extinguisher nearby when welding
• Sparks generated while welding can ignite flammable materials easily in the welding
area, so it is important to remove flammable materials before commencing welding
• Only weld when the work area and all workpieces are dry
• Do not weld sealed containers (e.g. fuel tanks, air tanks, oil drums). The heat generated
from welding can cause sealed containers to burst without warning
• Be aware of transferred heat. Metal parts can conduct heat away from the work area
and cause ignition of flammable materials
• Be aware that welded parts will remain hot for some time after joining. Allow to cool
completely before handling, or leaving unattended
• Never weld where flammable gases, liquids or dust are present
• Ensure that there is always a responsible person nearby to alert you to any fire, or to
call help in an emergency
• Use of welding machines will create powerful magnetic fields. This may disturb the
operation of sensitive electronic equipment. Pacemaker wearers should consult a doctor
before using a welding machine
• Do not overload power supply. Check that your mains wiring is capable of delivering the
required current safely (see specification)
Wire feed
• Caution: The tip of welding wire can be very sharp, and is fed with adequate force to
puncture skin
• Keep the welding machine switched off until you are ready to begin welding. Never
point the torch towards people or animals
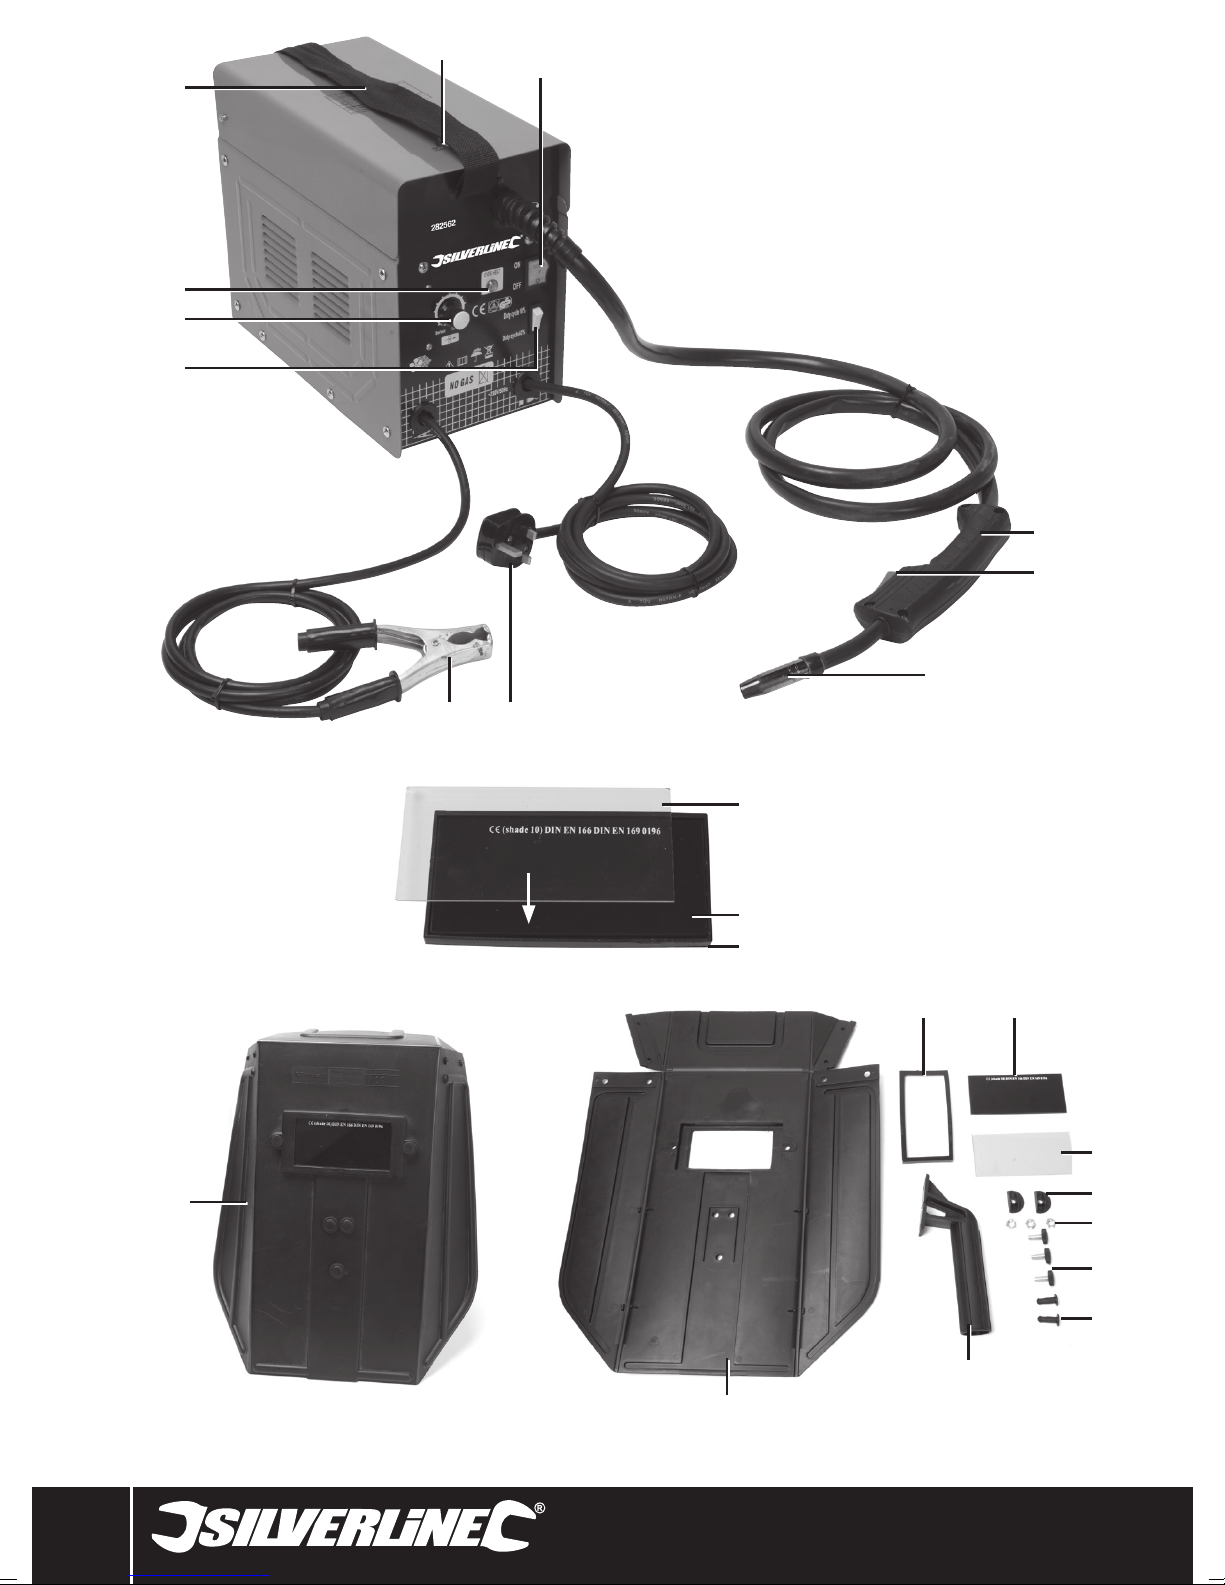
Product Familiarisation
1 Case Lid Release
2 On/Off Switch
3 90/45A Switch
4 Wire Feed Speed Dial
5 Over-Heat Indicator
6 Carrying Strap
7 Torch Handle
8 Trigger
9 Shroud
10 Mains Cable
11 Earth Clamp
12 Welding Mask (assembled)
13 Filter Frame
14 Welding Glass
15 Safety Glass
16 Frame Clips (x 2)
17 Handle Nuts (x 3)
18 Handle Bolts (x 3)
19 Frame Screws (x 2)
20 Handle
21 Welding Mask
22 Mask Clips
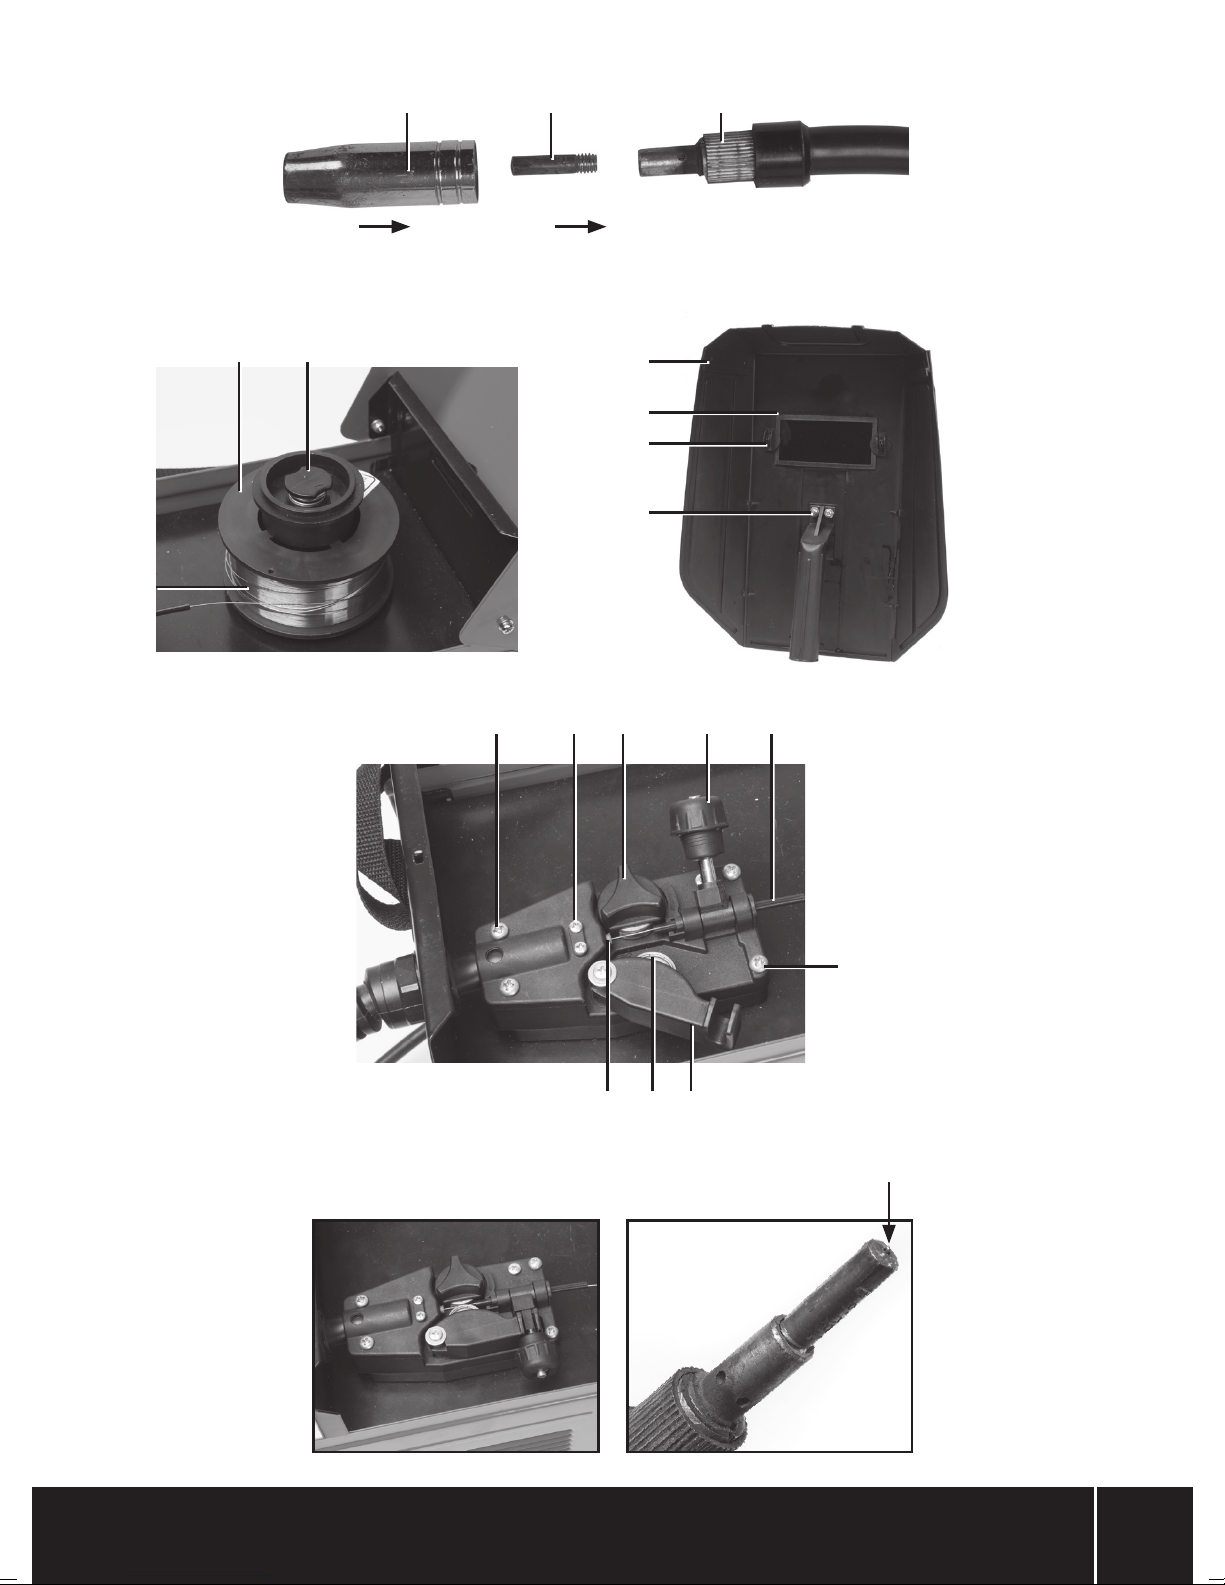
23 Tip
24 Wire Feed Output
25 Wire Reel
26 Reel Spindle Mechanism
27 Wire
28 Feed Mechanism Cover Screws
29 Main Liner Screws
30 Feed Roller
31 Tension Knob
32 Reel Wire Liner
33 Reel Wire Liner Screw
34 Tension Latch
35 Tension Roller
36 Liner
8
Accessories (not shown):
• Chipping Hammer
• Wire Brush
Page 9

www.silverlinetools.com
Gasless Turbo Mig282562
Intended Use
Welder for light to medium-duty MIG (Metal Inert Gas) welding applications, for use with
various types of steel, using suitable flux-cored welding wires. It does not require a gas
connection as the flux-cored wire provides the shielding gas in use. This product is not
designed for commercial, trade or industrial applications.
Unpacking Your Tool
• Carefully unpack and inspect your tool. Fully familiarise yourself with all its features and
functions
• Ensure that all parts of the tool are present and in good condition. If any parts are
missing or damaged, have such parts replaced before attempting to use this tool
Before Use
WARNING: Always unplug the welding machine from the mains supply and allow to
cool fully before attempting to fit or replace any part.
Note: This tool is earthed and must only be connected to mains with an earth connection.
Do not attempt to use it without an earth connection.
Assembling the mask
Assemble the mask as shown.
1. Use the Mask Clips (22) to assemble the flat-packed Welding Mask (21) into its normal
shape
2. Fit the Handle (20) using the Handle Nuts and Bolts (17 & 18). The Handle must be
inside the Welding Mask body to protect the operator’s hand from splatter
3. Ensure the Safety Glass (15) protects the Welding Glass (14) from weld splatter. If the
Welding Glass is fitted as the external layer it may get damaged by splatter and allow
dangerous ultra-violet light to reach the operator’s eyes
4. Fit the glass assembly into the Welding Mask using the Frame Screws (19) and Frame
Clips (16)
Installing wire
This welder requires 0.8-0.9mm flux cored wire
1. Turn the Case Lid Release (1) and lift the lid of the case
2. Turn the plastic top of the Reel Spindle Mechanism (26) anti-clockwise and remove it
carefully with the spring and top section
3. Place the supplied Wire Reel (25) over the reel holder spindle (shown already fitted),
positioning so that the Wire (27) will feed off the Wire Reel on the nearest side as
indicated by the arrow
4. Refit the top section, spring and plastic top of the Reel Spindle Mechanism. Ensure the
spring provides sufficient tension so the reel does not unravel on its own
5. Release the Tension Knob (31) so that the Tension Latch (34) can be swung clear as
shown
6. Carefully release the end of the wire from the spool and take care not to let the wire
unravel. Ensure that the wire tip is straight and is cut off cleanly
7. Slowly feed the Wire into the end of the Reel Wire Liner (32) across the Feed Roller
(30) and into the Liner (36) and push a little way into the Liner carefully
8. Swing the Tension Latch back into position, ensuring that the Wire is centred in the
grooves of the Feed Roller and Tension Roller (35)
9. Reposition the Tension Latch as shown in image A. Tension can be adjusted by rotating
the Tension Knob
10. Close the lid and secure with the Case Lid Release
11. Pull off the Shroud (9) from the torch and unscrew the Tip (23) and remove
12. Connect the welder to the mains power supply, switch on, and hold the torch
13. Move the torch away from the machine, so that the torch cable is straight
14. Ensure that the torch is not touching anything, and squeeze the Trigger (8). The wire
feed mechanism should drive the Wire through to the torch, image B
15. If the Wire is not driven through, disconnect from the mains power supply, open the
lid, and tighten the Tension Knob (31). The drive rollers should be just tight enough to
drive the Wire through to the torch, but not so tight as to prevent the drive roller from
slipping if the Wire becomes blocked
16. When the Wire is propelled out of the end of the torch, switch off and disconnect from
the mains power supply
17. Refit the Tip and the Shroud, and trim the Wire so that approximately 5mm projects
from the tip
Removing wire reel and end of wire
1. Open the lid of the welder using the Case Lid Release (1)
2. Use a pair of pliers to draw the last of the old Wire Reel out through the Tip (15) of the
torch. If the old Wire Reel (25) is not empty, cut the Wire at the spool and release the
Tension Knob (31) and move the Tension Latch (34) away from the Feed Roller (30)
3. Then proceed as per instructions for ‘Installing wire’ above
Important
• Always wear appropriate personal protective equipment for the job that you are about
to do. Use of this machine requires a welding mask, gloves, heat-resistant clothing
and, if appropriate, a respirator
• Always ensure that you have an appropriate fire extinguisher near to the work area
• Always inspect your machine for damage or wear. Pay particular attention to leads and
cables. If any damage is found, DO NOT USE
• Check that all casings or covers are properly closed and secured
• Position the welder in such a way that it will not move or tip in use. Ensure that there
is at least 500mm of clear space around the welder to allow proper ventilation
Operation
WARNING: Always unplug the welding machine from the mains supply and allow to
cool fully before attempting to fit or replace any part.
Setting the machine
• To achieve a good quality weld, the Wire Feed Speed Dial (4) and 90/45A Switch (3)
must be set correctly. The 10% duty setting provides 90A current and the 60% duty
setting provides 45A current
• The wire speed should be adjusted to provide a steady arc. The correct setting will
depend on distance, current, torch speed, and other factors. Experiment with wire
speeds until you find an optimum setting
Note: The welder optimises current output depending on wire speed and monitored current
levels to improve weld quality and reduce splatter.
Duty Cycle
• This machine is not designed for continuous welding. Excessive continuous
welding would cause overheating and damage to internal components
• The duty cycle defines the number of minutes, in every ten minutes, that the machine
can weld
• For a duty cycle of 10%, the machine may be used for 1 minute, and then must be
allowed 9 minutes to cool. The 60% duty cycle allows 6 minutes in every 10 minutes
• If the duty cycle is exceeded, the machine will automatically cut-out
• Using the machine at reduced current settings, and maintaining good ventilation will
maximise the duty cycle
Thermal cut-out
• When the thermal cut-out protection is operating the Over-Heat Indicator (5) will
illuminate and the welder will shut down
• Allow the machine to cool. The cut-out will automatically reset once the machine is
ready to be used
Preparing to weld
• Ensure that parts to be joined are clean and free from rust, paint, or other finishes
• All parts should be well supported, so that there is a gap of approximately 1mm where
you intend to form the welded joint
• Check that there are no flammable materials in the vicinity of the work area
• Attach the Earth Clamp (11) to a cleaned area of one of the parts, as near as practical
to where the joint will be
• Ensure that there is both a responsible person and an operable fire extinguisher at
hand
• Connect the machine to the mains power supply
Welding
WARNING: Using a welder correctly is a technical skill. A welder used incorrectly can be
highly dangerous. The information presented below is general guidance only. If you are not
entirely confident in your ability to use this tool safely DO NOT USE.
1. Move the On/Off Switch (2) to the ‘ON’ position
2. Set the Wire Feed Speed Dial (4) to the correct speed or to the mid-position if not sure
of correct setting, then adjust later if necessary
3. Hold the Torch Handle (7) in one hand and the Welding Mask (12) in the other
4. Position the torch so that the Tip (23) is approximately 10mm away from the metal, at
an angle of approximately 75˚
9
Page 10
GB
5. Hold the mask over your face and squeeze the Trigger (8)
6. An arc should strike between the metal and the tip. Hold the Trigger for 1-2 seconds
and release
7. Allow the weld to cool slightly and move the mask away from your face. If the settings
are correct, a round 'spot' weld should form
8. If the weld has not fully penetrated the metal, increase the voltage setting. If a hole
has been made in the metal, reduce the voltage setting
• Practise making welds until you are confident using the machine, and selecting
settings
• An alternative to spot welding suitable for a mig welder is a plug weld where the top
surface has holes drilled along a surface and a pool of the weld material fills each
hole. Spot welds are possible for thinner material with a mig welder but the welds are
more difficult and may not be as satisfactory
• To form a 'seam' weld, hold the Trigger for longer, and slowly move the torch forward
at the same time
• If the machine settings are correct, the arc should be steady, and produce a crackling
sound.
• If you hear a popping sound, or struggle to maintain the arc, adjust the wire speed. If
you feel the torch trying to 'push back', reduce the wire speed
• Creating neat, high quality welds is a skill that takes time to master. Practise and good
preparation should result in satisfactory welds
Accessories
• A range of accessories including personal protective equipment and welding
tools are available from your Silverline stockist. Spare parts can be obtained from
toolsparesonline.com
Troubleshooting
Maintenance
WARNING: Always unplug the welding machine from the mains supply and allow
to cool fully before attempting to fit or replace any part.
Replacing tips
• As the welder is used, the Tip (23) may become worn. This will make the arc difficult
to control
1. To replace the Tip, remove the Shroud (9) from the torch, and unscrew the Tip
2. Check that the new Tip is the correct size for the Wire being used
3. Thread the new Tip over the end of the Wire, and screw into the torch. Replace the
Shroud
Cleaning
Disconnect the machine from the mains supply before cleaning
• Keep your machine clean. Always clean dust or particles away and never allow
ventilation holes to become blocked
• Use a soft brush or dry cloth to clean the machine. If available, blow through the
ventilation holes with clean, dry, compressed air
Disposal
Always adhere to national regulations when disposing of electronic equipment that is no
longer functional and is not viable for repair.
• Do not dispose of power tools, or other waste electrical and electronic equipment
(WEEE), with household waste
• Contact your local waste disposal authority for information on the correct way to
dispose of electronic equipment
Problem Possible cause Solution
Feed Roller (30) does not turn No power Switch on welder
Wire Feed Speed Dial (4) set to minimum 0 setting Increase setting
Feed roller (30) turns but Wire (27) does not feed Incorrect roller pressure Adjust Tension Knob (31)
Liner (36) damaged Check and replace Liner
Wire welded to Tip (23) Release Wire from Tip
During use the welder stops working Duty cycle exceeded and Over-Heat Indicator (5) is illuminated Leave the welder for 20-30 minutes to cool down
Poor weld Incorrect current and feed settings Adjust Wire Feed Speed Dial (4) and 90/45A Switch (3)
10
Page 11

www.silverlinetools.com
Gasless Turbo Mig282562
Silverline Tools Guarantee
This Silverline product comes with a 3 year guarantee
Register this product at www.silverlinetools.com within 30 days of purchase in order to
qualify for the 3 year guarantee. Guarantee period begins according to the date of purchase
on your sales receipt.
Terms & Conditions
Guarantee period becomes effective from the date of retail purchase as detailed on your
sales receipt.
PLEASE KEEP YOUR SALES RECEIPT
If this product develops a fault within 30 days of purchase, return it to the stockist where it
was purchased, with your receipt, stating details of the fault. You will receive a replacement
or refund.
If this product develops a fault after the 30 day period, return it to:
Silverline Tools Service Centre
PO Box 2988
Yeovil
BA21 1WU, UK
The guarantee claim must be submitted during the guarantee period.
You must provide the original sales receipt indicating the purchase date, your name, address
and place of purchase before any work can be
carried out.
You must provide precise details of the fault requiring correction.
Claims made within the guarantee period will be verified by Silverline Tools to establish if the
deficiencies are related to material or manufacturing of the product.
Carriage will not be refunded. Items for return must be in a suitably clean and safe state for
repair, and should be packaged carefully to prevent damage or injury during transportation.
We may reject unsuitable or
unsafe deliveries.
All work will be carried out by Silverline Tools or its authorized repair agents.
The repair or replacement of the product will not extend the period of guarantee
Defects recognised by us as being covered by the guarantee shall be corrected by means of
repair of the tool, free of charge (excluding carriage charges) or by replacement with a tool
in perfect working order.
Retained tools, or parts, for which a replacement has been issued, will become the property
of Silverline Tools.
The repair or replacement of your product under guarantee provides benefits which are
additional to and do not affect your statutory rights as a consumer.
Registering your purchase
Registration is made at silverlinetools.com by selecting the Guarantee Registration button.
You will need to enter:-
• Your personal details
• Details of the product and purchase information
Once this information is entered your guarantee certificate will be created in PDF format for
you to print out and keep with your purchase.
What is covered:
The repair of the product, if it can be verified to the satisfaction of Silverline Tools that the
deficiencies were due to faulty materials or workmanship within the guarantee period.
If any part is no longer available or out of manufacture, Silverline Tools will replace it with a
functional replacement part.
Use of this product in the EU.
What is not covered:
Silverline Tools does not guarantee repairs required as a result of:
Normal wear and tear caused by use in accordance with the operating instructions eg
blades, brushes, belts, bulbs, batteries etc.
The replacement of any provided accessories drill bits, blades, sanding sheets, cutting discs
and other related items.
Accidental damage, faults caused by negligent use or care, misuse, neglect, careless
operation or handling of the product.
Use of the product for anything other than normal domestic purposes.
Change or modification of the product in any way.
Use of parts and accessories which are not genuine Silverline Tools components.
Faulty installation (except installed by Silverline Tools).
Repairs or alterations carried out by parties other than Silverline Tools or its authorized
repair agents.
Claims other than the right to correction of faults on the tool named in these guarantee
conditions are not covered by the guarantee.
Battery Guarantee
Silverline batteries are guaranteed for 30 days. If a defect occurs on a registered battery
during the term of the Battery Guarantee, due to material or manufacturing fault, then
Silverline will replace it free of charge. This guarantee does not apply to commercial use nor
does it extend to normal wear and tear or damage as a result of accident, abuse or misuse.
CE Declaration of Conformity
The undersigned: Mr Darrell Morris
as authorised by: Silverline Tools
Declares that
Identification code: 282562
Description: Gasless Turbo Mig
Conforms to the following directives and standards:
• Low Voltage Directive 2006/95/EC
• EMC Directive 2004/108/EC
• RoHS Directive 2011/65/EU
• EN60974-1:2012
• EN60974-10:2007
Notified body: TÜV Rheinland
The technical documentation is kept by: Silverline Tools
Date: 09/09/15
Signed:
Mr Darrell Morris
Managing Director
Name and address of the manufacturer:
Powerbox International Limited, Company No. 06897059. Registered address:
Central House, Church Street, Yeovil, Somerset BA20 1HH, United Kingdom.
11
Page 12
FR
La plaque signalétique figurant sur votre outil peut présenter des symboles. Ces symboles
constituent des informations importantes relatives au produit ou des instructions
concernant son utilisation.
Port de protection auditive
Port de lunettes de sécurité
Port de masques respiratoires
Port du casque
Traductions des instructions originales
Légende des abréviationsDescription des symboles
V Volts
~, CA Courant alternatif
A, mA Ampère, milliampère
Ø Diamètre
W, kW Watt, kilowatt
Port de gants
Port de vêtements de sécurité
Port de chaussures de sécurité
Lire le manuel d’instructions
Construction de classe I (Mise à la terre)
Pour usage à l’intérieur uniquement !
Émanation de vapeurs ou de gaz toxiques !
Risque d’incendie
Risque d’électrocution
Caractéristiques techniques
Tension : ..........................................................................230 V~ 50 Hz
Intensité absorbée :...............................13,5 A (crête), 4,6 A (moyenne)
Efficacité : .....................................................................................80 %
Intensité de soudage : ...............................................................45-90 A
Cycle d’utilisation nominal : ...............10 % sous 90 A, 60 % sous 45 A
Tension de sortie à vide : ............................................................... 31 V
Tension de sortie : .................................... 18,5 V (90 A), 16, 25 V (45 A)
Poids maximal du dévidoir de fil :............................................. .0,45 kg
Classe d’isolation : ..............................................................................H
Indice de protection : ...................................................................IP21S
Fil : .......................................................................Fil fourré 0,8-0,9 mm
Plage de soudage (acier) : ................................................ 1,2 - 6,5 mm
Calibre du fusible interne : .............................................................16 A
Fusible de la prise (Royaume-Uni uniquement) : ............................13 A
Classe de protection : .....................................................................
Longueur du câble de la torche à souder : ...................................2,0 m
Longueur du câble de mise à la masse : ......................................1,5 m
Longueur du câble d’alimentation : ..............................................2,0 m
Dimensions (H x L x l) : ........................................295 x 340 x 180 mm
Poids : .......................................................................................... 13 kg
Surface chaude. NE PAS TOUCHER !
NE PAS utiliser sous la pluie ou un dans environnement humide !
Attention !
Danger de radiations d’ultraviolets !
Protection de l’environnement
Les appareils de soudure ne doivent pas être jetés avec les ordures
ménagères. Veuillez les recycler dans les centres prévus à cet effet. Pour
de plus amples informations, veuillez contacter votre municipalité ou
point de vente.
Conforme à la règlementation et aux normes de sécurité pertinentes
Du fait de l’évolution constante de notre développement produit, les caractéristiques
des produits Silverline peuvent changer sans notification préalable.
12
Page 13

www.silverlinetools.com
Poste à souder Turbo MIG sans gaz282562
Consignes générales de
sécurité relatives aux appareils
électriques
AVERTISSEMENT ! Certaines précautions fondamentales, dont les consignes ci-dessous,
doivent impérativement être respectées lors de l’emploi d’outils électriques afin de réduire
le risque d’incendie, de choc électrique et de blessures corporelles. Veuillez lire l’intégralité
de ces consignes avant de mettre en marche ce produit et veuillez les conserver pour toute
consultation ultérieure
AVERTISSEMENT : Cet appareil n’est pas conçu pour être utilisé par des personnes (y
compris les enfants) ayant des capacités physiques ou mentales réduites, ou n’ayant pas la
connaissance ou l’expérience requise, à moins d’être sous la supervision d’une personne
responsable de leur sécurité ou d’avoir reçu les instructions nécessaires. Les enfants ne
doivent pas jouer avec cet appareil
ATTENTION : Utiliser l’appareil électrique, les accessoires et outils à monter conformément
à ces instructions, en tenant compte des conditions de travail et de la tâche à réaliser.
Toute utilisation d’un appareil électrique autre que celle pour laquelle il a été conçu peut
entraîner des situations à risque
L’expression « appareil électrique » employée dans les présentes consignes recouvre aussi
bien les appareils filaires à brancher sur le secteur que les appareils sans fil fonctionnant
sous batterie
1. Maintenir une zone de travail propre. Des zones encombrées et mal
éclairées sont sources d’accidents
2. Prendre en compte la zone de travail :
- Ne pas exposer les outils à la pluie
- Ne pas utiliser les outils dans des endroits humides
- Travailler dans une zone bien éclairée
- Ne pas utiliser d’outils électriques dans des environnements explosifs, tels
qu’à proximité de liquides, de gaz ou de poussières inflammables
3. Éviter les décharges électriques. Éviter le contact corporel avec les surfaces
mises à la terre telles que tuyaux, radiateurs, cuisinières et réfrigérateurs
4. Éloigner les personnes aux alentours. Ne laisser aucune personne dont la
présence n’est pas nécessaire, surtout les enfants, s’approcher de la zone de
travail ou venir en contact avec l’appareil
5. Ranger les appareils électriques inutilisés dans un endroit sûr, sec et hors
de portée des enfants
6. Ne pas forcer sur l’appareil électrique. Un appareil électrique adapté et
employé au rythme pour lequel il a été conçu permettra de réaliser un travail
de meilleure qualité et dans de meilleures conditions de sécurité
7. Utiliser l’appareil électrique approprié au travail à effectuer. Ne pas utiliser
de petits outils pour des tâches lourdes. N’utilisez pas l’outil pour une tâche
pour laquelle il n’a pas été prévu ; par exemple n’employez pas une scie
circulaire pour couper une branche d’arbre ou fendre des bûches
8. Porter des vêtements appropriés
- Ne pas porter de vêtements amples ou des bijoux pendants qui peuvent être
happés par les pièces en rotation
- Le port de chaussures antidérapantes est recommandé en extérieur
- Attacher ou protéger les cheveux longs
9. Porter un équipement de protection approprié
- Porter une protection oculaire
- Porter un masque à poussières lors de travaux créant de la poussière
AVERTISSEMENT : Ne pas porter d’équipements de protection ou de vêtements appropriés
peut engendrer et aggraver des blessures
10. Brancher un système d’extraction de la poussière : si l’appareil est pourvu
de dispositifs destinés au raccord d’équipements d’extraction et de
récupération de la poussière/sciure, s’assurer qu’ils soient bien fixés et utilisés
correctement
11. Ne pas maltraiter le cordon électrique. Ne jamais utiliser le cordon
électrique pour porter, tirer ou débrancher l’appareil. Protéger le cordon
électrique de la chaleur, du contact avec l’essence, des bords tranchants et
pièces rotatives. Un cordon électrique endommagé ou entortillé accroît le
risque de décharge électrique
12. Immobiliser votre travail. Si possible, utiliser des serre-joints ou un étau
pour maintenir la pièce de travail. Cela offre davantage de sécurité que de tenir
la pièce avec la main
13. Ne pas essayer d’atteindre une zone hors de portée. Se tenir toujours en
position stable permettant de conserver l’équilibre
14. Veiller à l’entretien des appareils électriques
- Veiller à ce que les outils de coupe soient tenus affûtés et propres, ce qui
favorise leur maîtrise et leur bon fonctionnement
- Suivre les instructions de lubrification et de changement des accessoires
- Vérifier régulièrement les câbles et les faire réparer/remplacer par un centre
agrée
- Vérifier également l’état des rallonges utilisées
- Tenir les poignées de l’appareil propres (sans graisse ni huile) et sèches
AVERTISSEMENT : de nombreux accidents sont dus à l’utilisation d’appareils électriques
mal entretenus
15. Débrancher l’appareil électrique. Lorsque l’appareil n’est pas utilisé,
ou avant tout opération d’entretien ou de changement d’accessoires, veiller à
débrancher l’appareil de sa source d’alimentation
AVERTISSEMENT : utiliser des accessoires non recommandés par le fabricant peut
engendrer des blessures
16. Enlever les clés et outils de réglage. Prendre l’habitude de retirer ces outils
avant de mettre l’appareil en marche
17. Éviter tout démarrage accidentel ou intempestif. S’assurer que
l’interrupteur marche-arrêt soit en position d’arrêt avant de brancher l’appareil
sur l’alimentation secteur ou d’installer la batterie, de prendre l’appareil ou de
le transporter
AVERTISSEMENT : les démarrages accidentels peuvent être dangereux
18. Usage en extérieur : lors d’une utilisation de l’appareil électrique en extérieur,
se servir d’une rallonge appropriée à une utilisation en extérieur. Cela réduit le
risque de décharge électrique
19. Rester vigilant
- Faire preuve de bon sens lors de la manipulation de l’appareil
- Ne pas utiliser un appareil électrique lorsque l’on se trouve dans un état de
fatigue, ou sous l’influence de drogues, d’alcool ou de médicaments
AVERTISSEMENT : un moment d’inattention pendant l’utilisation d’un outil électrique peut
se traduire par des blessures graves
20. Inspecter les pièces endommagées
- Avant d’utiliser un appareil, toujours vérifier qu’il soit en bon état de marche
- Vérifier que les éléments rotatifs soient bien alignés et non grippés. S’assurer
de l’absence de pièces cassées ou endommagées susceptibles de nuire au
bon fonctionnement de l'appareil
- Une protection ou partie défectueuse doit être réparée ou remplacée par un
centre agrée, sauf en cas d’indication contraire dans le manuel
- Les interrupteurs défectueux doivent être remplacés par un centre agréé
AVERTISSEMENT : ne pas utiliser un appareil électrique dont la commande ne s’effectue
plus par l’interrupteur marche-arrêt. Il est dangereux et doit être réparé
21. Ne faire réparer votre appareil électrique que par un réparateur qualifié.
Cet appareil est conforme aux normes de sécurité en vigueur. Toute réparation
doit être effectuée par une personne qualifiée afin de garantir la sécurité de
l’utilisateur
AVERTISSEMENT : utiliser uniquement des pièces de rechange identiques
AVERTISSEMENT : si le câble d’alimentation est endommagé, le faire remplacer par un
centre agréé
22. La prise d’un appareil électrique doit être adaptée à la prise du secteur.
Ne jamais modifier la prise en aucune façon. Ne jamais utiliser d’adaptateur
sur la prise électrique d’appareils mis à la terre. Des prises non modifiées,
adaptées aux boîtiers de prise de courant, réduiront le risque de décharge
électrique
23. En cas d’utilisation en extérieur, utiliser une alimentation protégée par un
disjoncteur différentiel. L’utilisation d’un disjoncteur différentiel réduit le
risque de décharge électrique
AVERTISSEMENT : Avant de brancher un appareil sur une source d’alimentation (prise
secteur, groupe électrogène, etc.) assurez-vous que la tension fournie soit la même que
celle spécifiée sur la plaque de l’appareil. Une source d’alimentation délivrant une tension
supérieure à celle indiquée sur l’appareil peut engendrer de sérieuses blessures pour
l’utilisateur et endommager l’appareil. En cas de doute, ne branchez pas l’appareil. Une
source d’alimentation délivrant une tension inférieure à celle indiquée sur l’appareil est
néfaste pour le moteur
13
Page 14

FR
Consignes de sécurité relatives
au soudage
• L’action de souder peut produire de la fumée toxique et réduire le taux d’oxygène
présent dans la zone de travail. Travaillez toujours dans un endroit bien ventilé. Évitez
d’inhaler la fumée émise durant le soudage et portez un masque respiratoire si
nécessaire
• Certaines parties métalliques peuvent être galvanisées ou revêtues de plomb, de
cadmium ou d’autres revêtements. Souder sur ces revêtements peut produire de la
fumée hautement toxique. Décapez toujours la surface avant de procéder au soudage
• Si vous ressentez une irritation aux poumons, à la gorge ou aux yeux pendant le
soudage, ARRÊTEZ-VOUS IMMÉDIATEMENT et sortez à l’air pur
• L’action de souder produit des taux extrêmement élevés d’ultraviolets. Pour éviter
d’altérer votre vue, portez TOUJOURS un masque à souder agréé. Ne regardez JAMAIS
directement l’arc
• La lumière produite lors du soudage à l’arc peut fasciner et donner envie de la regarder,
surtout aux enfants. Évitez de laisser d’autres personnes regarder la lumière pendant le
soudage à l’arc sans protection
• Si d’autres personnes risquent de s’approcher de la zone de travail, installez un écran
approprié pour les protéger des ultraviolets / de la lumière éblouissante
• Remplacez immédiatement le verre du masque de soudeur lorsqu’il présente des
signes d’usure ou des dommages
• Pour éviter les brûlures de la peau, portez TOUJOURS une veste ignifugée à manches
longues appropriée, des gants résistants à la chaleur et une casquette. Restez bien
couvert
• Retirez toujours toute source de combustion (par exemple : briquet, allumettes) de vos
vêtements avant de souder
• Gardez toujours un extincteur à proximité de la zone de soudage
• Les étincelles générées lors du soudage peuvent provoquer des incendies lorsqu’elles
entrent en contact avec des matériaux inflammables, il est important d’enlever tous
matériaux inflammables avant de commencer à souder
• Soudez uniquement lorsque toutes les pièces à souder et la zone de travail sont sèches
• Ne soudez pas de conteneurs scellés (par exemple : réservoirs à essence ou à air,
citernes à pétrole). La chaleur produite par le soudage peut faire subitement exploser
les conteneurs scellés
• Soyez conscient de la propagation de la chaleur. Les éléments métalliques peuvent
communiquer la chaleur à tout matériel se trouvant à proximité de votre zone de travail,
ce qui peut à son tour enflammer des matériaux combustibles
• Sachez que les pièces soudées resteront chaudes pendant quelques temps après leur
soudure. Laissez-les refroidir complètement avant de les manipuler ou de vous en
éloigner
• Ne soudez jamais à proximité de gaz, de liquides ou de poussières inflammables
• Assurez-vous toujours qu’une personne qualifiée se trouve à proximité afin de vous
assister en cas d’incendie ou d’appeler de l’aide en cas d’urgence
• L’utilisation de postes à souder créera des champs magnétiques puissants, susceptibles
de perturber le fonctionnement des équipements électroniques sensibles. Il est
recommandé que les personnes portant un stimulateur cardiaque consultent l’avis d’un
médecin avant d’utiliser un poste à souder
• Ne surchargez pas l’alimentation secteur. Vérifiez que votre installation électrique peut
fournir les courants requis en toute sécurité (voir les caractéristiques techniques)
Avancée du fil
• Attention : La pointe du fil à souder peut être très pointue et avance avec suffisamment
de puissance pour perforer la peau
• Tenez ce poste à souder éteint tant que vous n’êtes pas totalement prêt à commencer
le soudage. Ne dirigez jamais la torche à souder vers des personnes ou des animaux
Descriptif du produit
1 Bouton de dégagement du capot
2 Interrupteur
3 commutateur 90 A / 45 A
4 Sélecteur de vitesse du fil
5 Indicateur de surchauffe
6 Sangle de transport
7 Poignée de la torche
8 Gâchette
9 Buse
10 Câble d’alimentation
11 Pince de mise à la masse
12 Masque de soudeur (assemblé)
13 Support de filtre
14 Verre de soudage
15 Verre de sécurité
16 Agrafes du support (x 2)
17 Écrous de la poignée (x 3)
18 Boulons de la poignée (x 3)
19 Vis du support (x 2)
20 Poignée
21 Masque de soudeur
22 Agrafes du masque
23 Pointe
24 Sortie du fil
25 Dévidoir de fil
26 Mécanisme de l’arbre du dévidoir
27 Fil
28 Vis du capot du mécanisme d’avancée
29 Vis de la gaine
30 Galet d’avancée
31 Bouton tendeur
32 Gaine de fil du dévidoir
33 Vis de la gaine de fil du dévidoir
34 Verrou du tendeur
35 Galet tendeur
36 Guide-fil
Accessoires (non illustrés)
Marteau de soudeur
Brosse métallique
14
Page 15

www.silverlinetools.com
Poste à souder Turbo MIG sans gaz282562
Usage conforme
Poste à souder pour les travaux de soudage MIG (soudage de métaux sous gaz inerte)
légers et moyens à l’aide fils à souder fourrés adéquats. Cet appareil ne demande pas
l’apport d’un gaz séparé car les fils fourrés assurent eux-mêmes l’apport de gaz protecteur.
Ce produit n’est pas conçu pour un usage commercial, professionnel ou industriel
Déballage
• Déballez le produit avec soin. Veillez à retirer tout le matériau d’emballage et
familiarisez-vous avec toutes les caractéristiques du produit
• Si des pièces sont endommagées ou manquantes, faites-les réparer ou remplacer
avant d’utiliser l’appareil
Avant l’utilisation
AVERTISSEMENT : Débranchez toujours la machine et laissez-la refroidir avant d’y
installer ou d’en remplacer tout élément
Remarque : Cet appareil est mis à la terre et ne doit être branché sur le secteur qu’à l’aide
d’une prise mise à la terre. Ne pas employer cette machine sans mise à la terre
Assemblage du masque
Assemblez le masque selon la manière représentée sur l’illustration
1. À l’aide des agrafes du masque (22), donnez sa forme normale au masque de soudeur
(21) fraîchement déballé
2. Installez la poignée (20) au moyen des écrous et boulons de la poignée (17 et 18). La
poignée doit se situer sur l’intérieur du masque de soudeur afin de protéger la main
du soudeur des éclaboussures
3. Veillez à ce que le verre de sécurité (15) protège le verre de soudage (14) des
éclaboussures. Si le verre de soudage est monté sur l’extérieur, il risque d’être
dégradé par les éclaboussures et de laisser passer les rayons ultraviolets dangereux
pour les yeux du soudeur
4. Installez l’ensemble constitué par les verres sur le masque de soudeur au moyen des
vis du support (19) des agrafes du support (16)
Installation du fil
Cet appareil demande l’utilisation de fil fourré de 0,8 à 0,9 mm
1. Tournez le bouton de dégagement du capot (1) et soulevez le capot
2. Tournez le capot de plastique du mécanisme de l’arbre du dévidoir (26) dans le sens
inverse des aiguilles d’une montre et retirez-le prudemment, avec le ressort et la
section supérieure
3. Placez le dévidoir de fil (25) fourni sur l’arbre porte-dévidoir (illustré déjà installé),
en vous assurant que le fil (27) sortira du dévidoir du côté le plus proche, comme
l’indique la flèche
4. Réinstallez la section supérieure, le ressort et le capot en plastique du mécanisme
de l’arbre du dévidoir. Veillez que le ressort assure une tension suffisante pour que le
dévidoir ne se vide pas tout seul
5. Dévissez le bouton tendeur (31) de manière que le verrou du tendeur (34) puisse être
dégagé de la manière illustrée
6. Sortez l’extrémité du fil du dévidoir, en prenant garde de ne pas laisser le fil se défaire.
Vérifiez que l’extrémité du fil est droite et avec une coupure nette et propre
7. Amenez lentement le fil dans l’extrémité de la gaine de fil du dévidoir (32), en le
faisant passer sur le galet d’avancée (30) et jusque dans le guide-fil (36) ; forcez-le
légèrement dans le guide-fil
8. Repoussez le verrou du tendeur en position, en vous assurant que le fil soit centré
dans les rainures du galet d’avancée et du galet tendeur (35)
9. Repositionnez le verrou du tendeur de la manière illustrée sur l’image A. La tension est
réglable au moyen du bouton tendeur
10. Refermez le capot et fixez-le avec le bouton de dégagement du capot
11. Tirez sur la buse (9) pour la dégager de la torche et dévissez et retirez la pointe (23)
12. Branchez l’appareil sur le secteur, allumez-le et tenez la torche
13. Écartez la torche de la machine de manière à tendre son câble
14. Vérifiez que la torche ne touche rien et appuyez sur la gâchette (8). Le mécanisme
d’avancé du fil devrait amener le fil dans la torche, image B
15. Si ce n’est pas le cas, débranchez l’appareil, ouvrez le capot et resserrez le bouton
tendeur (31). Les galets d’entraînement doivent être suffisamment serrés pour pouvoir
entraîner le fil jusqu’à la torche mais pas trop serrés, ce qui entraînerait un arrêt de la
rotation des galets et un blocage du fil
16. Lorsque le fil est correctement expulsé par la torche, éteignez et débranchez la
machine
17. Remettez en place la pointe et la buse, coupez le fil pour qu’il ne dépasse que
d’environ 5 mm
Retrait du dévidoir de fil et du fil restant
1. Ouvrez le capot de la machine au moyen du bouton de dégagement du capot (1)
2. À l’aide d’une pince, retirez le restant de fil par la pointe (15) de la torche. Si l’ancien
dévidoir de fil (25) n’est pas vide, coupez le fil au niveau du dévidoir et dévissez le
bouton tendeur (31) et éloignez le verrou du tendeur (34) du galet d’avancée (30)
3. Procédez ensuite selon les instructions données ci-dessus pour l’installation du fil
Important
• Portez toujours l’équipement de protection approprié au travail envisagé. L’utilisation
de cet appareil demande l’usage d’un masque de soudeur, de gants, de vêtements
résistant à la chaleur et, éventuellement, d’un masque de protection respiratoire
• Gardez toujours un extincteur à proximité de la zone de soudage
• Inspectez toujours la machine, recherchez les signes de dommages et d’usure. Prêtez
une attention toute particulière aux fils électriques et câbles. En cas de dommage,
N’UTILISEZ PAS L’APPAREIL.
• Vérifiez que tous les boîtiers, carters et couvercles soient convenablement fermés
• Choisissez avec soin l’emplacement du poste à souder de manière qu’il reste bien
immobile et ne puisse se renverser pendant son utilisation. Assurez-vous de maintenir
un espace vide d’au moins 50 cm de chaque côté du poste pour garantir une bonne
ventilation de l’appareil
Consignes d’utilisation
AVERTISSEMENT : Débranchez toujours la machine et laissez-la refroidir avant d’y
installer ou d’en remplacer tout élément
Réglage de la machine
• Pour obtenir une soudure de bonne qualité, le sélecteur de vitesse du fil (4) et le
commutateur 90 A / 45 A (3) doivent être réglés sur la bonne position. Le réglage sur
10 % fournit une intensité de 90 A et le réglage sur 60 % fournit une intensité de 45 A.
• La vitesse d’amenée du fil doit être réglée pour assurer un arc stable. Le réglage
correct est fonction de la distance, de l’intensité électrique, de la vitesse de
déplacement de la torche et d’autres facteurs. Faites des essais avec différentes
vitesses de fil pour obtenir le réglage optimal
Remarque : Ce poste à souder optimise l’intensité en fonction de la vitesse du fil et des
niveaux d’intensité détectés afin d’améliorer la qualité de la soudure et de réduire les
projections
Cycle d’utilisation
• Cette machine n’est pas conçue pour un usage ininterrompu. Toute opération de
soudage excessivement prolongée entraîne une surchauffe et une détérioration des
composants internes
• Le cycle d’utilisation définit la durée maximale en minutes, sur une période de dix
minutes, pendant laquelle la machine peut fonctionner
• Dans le cas d’un cycle d’utilisation de 10 %, la machine peut être utilisée pendant 1
minute, avec une pause obligatoire de 9 minutes pour le refroidissement. Un cycle de
60 % permet une utilisation de 6 minutes sur une période de 10 minutes
• Si le cycle d’utilisation n’est pas respecté, la machine se déconnectera
automatiquement
• Pour profiter au mieux du cycle d’utilisation, utilisez une intensité plus basse et une
bonne ventilation de la zone de travail
Coupure thermique automatique
• Lorsque la protection thermique automatique se déclenche, l’indicateur de surchauffe
(5) s’allume et l’appareil s’éteint
• Laissez la machine refroidir. Le coupe-circuit thermique se réinitialisera
automatiquement dès que la machine pourra de nouveau être utilisée
Préparation au soudage
• Vérifiez que les pièces à souder soient propres, sans rouille ni peinture ou autre
revêtement
• Toutes les pièces doivent être sur un support approprié, en étant séparées d’un
millimètre à l’endroit prévu pour la soudure
• Vérifiez qu’il ne se trouve aucun matériau inflammable à proximité de la zone de
travail
• Fixez la pince de mise à la masse (11) sur une zone propre de l’une des pièces, aussi
proche que possible de la zone à souder mais sans possibilité de gêner le travail
• Vérifiez qu’une personne qualifiée se trouve à proximité afin de vous assister en cas
de besoin et qu’un extincteur soient disponible à proximité
• Branchez la machine à l’alimentation secteur
15
Page 16

FR
Soudage
AVERTISSEMENT : La bonne utilisation d’un poste à souder demande certaines
compétences techniques. Une mauvaise utilisation peut s’avérer extrêmement dangereuse.
Ce document ne décrit que le principe d’utilisation. Si vous n’êtes pas certain de votre
aptitude à utiliser cet outil sans prendre de risque, NE L’UTILISEZ PAS
1. Placez l’interrupteur (2) sur la position 'ON'
2. Réglez le Sélecteur de vitesse du fil (4) à la bonne vitesse ou, à défaut de savoir la
vitesse exacte requise, positionnez dans un premier temps sur la vitesse moyenne
puis ajuster ultérieurement si nécessaire
3. Tenez la torche d’une main par sa poignée (7) et le masque (12) de l’autre
4. Positionnez la torche de manière que la pointe (23) se trouve à environ 10 mm du
métal et à un angle de 75˚ environ
5. Placez le masque de protection devant votre visage et appuyez sur la gâchette (8)
6. Un arc doit se former entre le métal et la pointe. Maintenez la gâchette pendant 1 ou 2
secondes puis relâchez
7. Laissez la soudure refroidir un peu, puis enlevez le masque de votre visage. Si les
réglages sont corrects, il doit s’être formé un point de soudage rond
8. Si le métal n’a pas été suffisamment pénétré, passez au réglage de tension supérieur.
Si le métal a été perforé, passez au réglage de tension inférieur
• Entraînez-vous en faisant des points de soudage successifs, jusqu’à avoir la certitude
d’avoir choisi le bon réglage et de manipuler la machine sans difficulté
• Pour réaliser un cordon de soudage, maintenez la gâchette plus longtemps tout en
déplaçant lentement le bec le long de la ligne de soudage
• Si la machine est correctement paramétrée, l’arc doit être stable et produire un
crépitement
• Si vous entendez des sons d’éclatement ou si l’arc est difficile à maintenir, modifiez
la vitesse du fil. Si vous avez l’impression que la torche est repoussée, réduisez la
vitesse du fil
• La réalisation de soudures propres et de bonne qualité est une compétence qui
s’acquiert avec le temps et la pratique. Une bonne préparation et un bon entraînement
permettent d’obtenir de bons résultats
Accessoires
Une large gamme d’accessoires, parmi lesquels des équipements de protection et des
outils pour le soudage, est disponible chez votre revendeur Silverline. Des pièces de
rechange peuvent être obtenues sur toolsparesonline.com
Entretien
AVERTISSEMENT : Toujours débrancher l’appareil de l’alimentation secteur et le
laisser refroidir avant de réaliser tout travail d’entretien ou de nettoyage
Remplacement des pointes
• Avec le temps, la pointe (23) s’use. Il devient alors plus difficile de contrôler l’arc de
soudage
1. Pour remplacer la pointe, retirez la buse (9) de la torche et dévissez la pointe en place
2. Vérifiez que la nouvelle pointe soit de dimension appropriée pour le fil à utiliser
3. Passez la nouvelle pointe sur l’extrémité du fil et vissez-la en place dans la torche.
Remettez la buse (1) en place
Nettoyage
• Toujours débrancher l’appareil de l’alimentation secteur avant de réaliser tout travail
de nettoyage
• Gardez l’appareil propre. Éliminez toujours la poussière et les particules et ne laissez
jamais les orifices de ventilation se boucher
• Utilisez une brosse souple ou un chiffon sec pour le nettoyage. Si possible, nettoyez
les orifices de ventilation à l’air comprimé propre et sec
Recyclage
Lorsque l’appareil n’est plus en état de fonctionner et qu’il n’est pas réparable, recyclez
l’appareil conformément aux régulations nationales
• Ne jetez pas les outils électriques, batteries et autres déchets d’équipements
électriques ou électroniques (DEEE) avec les ordures ménagères
• Contactez les autorités locales compétentes en matière de gestion des déchets pour
vous informer de la procédure à suivre pour recycler les outils électriques
Si mon appareil ne marche pas
Problème Cause possible Solution
Le galet d’avancée (30) ne tourne pas L’appareil n’est pas sous tension Allumez l’appareil
Le sélecteur de vitesse du fil (4) est sur le réglage minimal 0 Passez à un réglage supérieur
Le galet d’avancée (30) tourne mais le fil (27)
n’avance pas
L’appareil cesse soudain de fonctionner Le cycle de service a été dépassé et l’indicateur de surchauffe (5)
Soudure de mauvaise qualité Mauvais réglages d’intensité et d’avancée du fil Réglez le sélecteur de vitesse du fil (4) et le commutateur
La tension est insuffisante sur le galet Réglez le bouton tendeur (31)
Le guide-fil (36) est endommagé Vérifiez et remplacez le guide-fil
Le fil s’est soudé à la pointe (23) Dégagez le fil de la pointe
s’est allumé
Laissez refroidir l’appareil 20 à 30 minutes
90 A / 45 A (3)
16
Page 17

www.silverlinetools.com
Poste à souder Turbo MIG sans gaz282562
Garantie Silverline Tools
Garantie Silverline
Ce produit Silverline bénéficie d’une garantie de
3 ans
Enregistrez ce produit sur le site silverlinetools.com dans les 30 jours
suivant l’achat afin de bénéficier de la garantie de 3 ans. La période de
garantie commence à partir de la date d’achat figurant sur votre facture
d’achat.
Conditions de garantie des outils Silverline
La période de garantie prend effet à compter de la date de l’achat en
magasin, comme indiqué sur votre facture d’achat.
VEUILLEZ CONSERVER VOTRE FACTURE D’ACHAT.
Si ce produit est défectueux pendant les 30 jours qui suivent l’achat, retournez-le au
magasin où vous l’avez acheté, avec votre facture, en expliquant en détail le problème. Le
produit sera remplacé ou vous serez remboursé(e).
Si ce produit est défectueux après cette période de 30 jours,
retournez-le à :
Silverline Tools Service Centre
PO Box 2988
Yeovil
BA21 1WU, Royaume Uni
Toute demande de service sous garantie doit être soumise pendant la période de garantie.
Avant toute intervention sous garantie, vous devez présenter la facture d’achat originale sur
laquelle doivent figurer la date d’achat, votre nom, votre adresse et le lieu d’achat.
Vous devez expliquer en détail la défaillance nécessitant réparation.
Les demandes de service sous garantie faites pendant la période de garantie seront vérifiées
par Silverline Tools pour établir si la défaillance du produit est liée à un vice de matériau
ou de fabrication.
Les frais de port ne seront pas remboursés. Les articles retournés doivent être
convenablement propres et sûrs pour être réparés et devraient être emballés soigneusement
pour éviter tout dommage ou toute blessure pendant le transport. Nous pouvons refuser les
livraisons qui ne sont pas convenables ou sûres.
Toute intervention sera effectuée par Silverline Tools ou ses agents de réparation agréés.
La réparation ou le remplacement du produit ne dépassera pas la période de garantie.
Les anomalies que nous reconnaissons être couvertes par la garantie seront rectifiées par
la réparation de l’outil, sans frais (hormis les frais de port) ou par son remplacement par un
outil en parfait état de fonctionnement.
Les pièces ou les outils remplacés deviendront la propriété de Silverline Tools.
La réparation ou le remplacement de votre produit sous garantie vous apporte des
avantages ; ces avantages s’ajoutent à vos droits statutaires en tant que consommateur
sans les affecter aucunement.
Enregistrement de votre achat
Visitez silverlinetools.com, sélectionnez le bouton d’enregistrement et
saisissez :
• Vos informations personnelles
• Les informations concernant le produit et l’achat
Vous recevrez le certificat de garantie en format PDF. Veuillez l’imprimer et
le conserver avec votre achat.
La présente garantie couvre:
La réparation du produit, s’il peut être vérifié, à la satisfaction de Silverline Tools, que les
défaillances du produit ont été provoquées par un vice de matériau ou de fabrication au
cours de la période de garantie.
Si une pièce n’est plus disponible ou n’est plus fabriquée, Silverline Tools la remplacera par
une pièce de rechange opérationnelle.
Utilisation de ce produit dans l’UE.
La présente garantie ne couvre pas:
Silverline Tools ne garantit pas les réparations nécessaires du produit engendrées par :
L’usure normale provoquée par l’utilisation conforme aux instructions d’utilisation, par
exemple les lames, les charbons, les courroies, les ampoules, les batteries, etc.
Le remplacement de tout accessoire fourni tel que les forêts, les lames, les feuilles
abrasives, les outils de coupes et les autres articles associés.
Les dommages et les défaillances accidentels causés par une utilisation ou un entretien
négligent, une mauvaise utilisation, un manque d’entretien ou une utilisation ou une
manipulation imprudente du produit.
L’utilisation du produit à des fins autres que son utilisation domestique normale.
Le moindre changement ou la moindre modification du produit.
L’utilisation de pièces et d’accessoires qui ne sont pas des composants véritables de
Silverline Tools.
Une installation défectueuse (sauf si l’installation a été réalisée par Silverline Tools).
Les réparations ou les modifications réalisées par des tiers autres que Silverline Tools ou ses
agents de réparation agréés.
Les demandes de service autres que le droit de rectifier les défaillances de l’outil indiquées
dans ces conditions de garantie ne sont pas couvertes par cette garantie.
Garantie batterie
Les batteries de Silverline sont garanties pour 30 jours. En cas de défaut sur une batterie
enregistrée lors de la période de garantie batterie, Silverline la remplacera gratuitement.
Cette garantie ne s’applique pas à l’utilisation commerciale et ne s’étend pas non plus à
l’usure normale ou aux dommages causés par des accidents, des mauvais traitements ou
une utilisation impropre.
Déclaration de conformité CE
Le soussigné : M. Darrell Morris
Autorisé par : Silverline Tools
Déclare que le produit :
Code d’identification : 282562
Description: Poste à souder Turbo MIG sans gaz
Est conforme aux directives suivantes :
• Directive sur les basses tensions 2006/95/CE
• Directive sur la compatibilité électromagnétique 2004/108/CE
• Directive RoHS 2011/65/UE
• EN60974-1:2012
• EN60974-10:2007
Organisme notifié : TÜV Rheinland
La documentation technique est conservée par : Silverline Tools
Date : 09/09/15
Signature :
M. Darrell Morris
Directeur général
Nom et adresse du fabricant ou de son représentant agréé :
Powerbox International Limited, numéro d’entreprise 06897059. Adresse légale : Central
House, Church Street, Yeovil, Somerset BA20 1HH, Royaume-Uni.
17
Page 18

DE
Auf dem Leistungsschild des Werkzeugs sind möglicherweise Symbole abgebildet. Sie
vermitteln wichtige Informationen über das Produkt oder dienen als Gebrauchsanweisung.
Gehörschutz tragen
Augenschutz tragen
Atemschutz tragen
Kopfschutz tragen
Übersetzung der Originalbetriebsanleitung
AbkürzungsverzeichnisBeschreibung der Symbole
V Volt
~, AC Wechselspannung
A, mA Ampere, Milli-Ampere
Ø Durchmesser
W, kW Watt, Kilowatt
Schutzhandschuhe tragen
Schutzkleidung tragen
Sicherheitsschuhe tragen
Bedienungsanleitung sorgfältig lesen
Schutzklasse I (Schutzleiter)
Nur für den Innengebrauch!
Giftige Dämpfe oder Gase!
Brandgefahr!
Stromschlaggefahr!
Gefahr durch heiße Oberflächen – NICHT berühren!
Nicht im Regen oder in feuchter Umgebung verwenden!
Technische Daten
Eingangsspannung ......................................................... 230 V~, 50 Hz
Eingangsleistung .................................................. 13,5 A (Höchstwert), 4,6
A (Durchschnittswert)
Effizienz .........................................................................................80%
Regelbereich ........................................................................... 45–90 A
Betriebsdauer ....................................................... 10 % - 90 A, 60 % - 45 A
Leerlaufspannung.......................................................................... 31 V
Ausgangsspannung .............................................. 18,5 V (90 A), 16,25 V
(45 A)
Drahtspulengewicht ................................................................. 0,45 kg
Isolationsklasse .................................................................................. H
Schutzart ...................................................................................... IP 21
Schweißdraht ....................................................... Fülldraht, Ø 0,8 – 0,9 mm
Max. Blechstärke .............................................................1,2 – 6,5 mm
Sicherung ...................................................................................... 16 A
Schutzklasse ..................................................................................
Brennerkabellänge ......................................................................... 2 m
Massekabellänge ........................................................................ 1,5 m
Netzkabellänge ............................................................................... 2 m
Abmessungen (L x H x B) ..................................... 340 x 295 x 180 mm
Gewicht: ...................................................................................... 13 kg
Aufgrund der fortlaufenden Weiterentwicklung unserer Produkte können sich die
technischen Daten von Silverline-Produkten ohne vorherige Ankündigung ändern.
Achtung, Gefahr!
Gefahr durch UV-Strahlung!
Umweltschutz
Schweißausrüstung darf nicht über den Hausmüll entsorgt werden. Bitte
über entsprechende Einrichtungen entsorgen. Lassen Sie sich bezüglich
der sachgemäßen Entsorgung von der zuständigen Behörde oder dem
Händler beraten.
Erfüllt die einschlägigen Rechtsvorschriften und Sicherheitsnormen
18
Page 19

www.silverlinetools.com
Turbo-MIG-Fülldrahtschweißgerät282562
Allgemeine Sicherheitshinweise
WARNUNG! Bei der Benutzung von Elektrowerkzeugen müssen stets grundliegende
Sicherheitsmaßnahmen einschließlich der folgenden Anweisungen getroffen werden,
um das Risiko von Bränden, Elektroschocks und Personenschäden zu vermindern.
Lesen Sie alle Anweisungen aufmerksam durch und bewahren Sie diese für zukünftiges
Nachschlagen mit dem Gerät auf.
WARNUNG! Dieses Gerät darf nicht von Personen (wie z.B. Kindern) mit eingeschränkten
körperlichen oder geistigen Fähigkeiten oder von Personen ohne Erfahrung im Umgang
mit einem solchen Gerät betrieben werden, außer wenn sie von einer für ihre persönliche
Sicherheit verantwortlichen Person in der Benutzung unterwiesen worden sind und dabei
beaufsichtigt werden. Kinder müssen beaufsichtigt werden, um sicherzustellen, dass sie
das Gerät nicht als Spielzeug verwenden.
ACHTUNG! Verwenden Sie Elektrowerkzeuge stets in Übereinstimmung mit diesen
Anweisungen und beachten Sie dabei die Arbeitsplatzbedingungen und die auszuführenden
Tätigkeiten. Eine Benutzung von Elektrowerkzeugen für Tätigkeiten, für die sie nicht
konzipiert wurden, kann zu gefährlichen Situationen führen.
Der Begriff „Elektrowerkzeug” in den folgenden Warnhinweisen bezieht sich sowohl auf
netzgebundene Geräte sowie Akkugeräte (schnurlose Geräte).
1 – Halten Sie den Arbeitsbereich sauber und aufgeräumt. – Unordnung auf
Werkbänken und Böden begünstigt Verletzungen.
2 – Beachten Sie die Arbeitsplatzbedingungen.
- Verwenden Sie Werkzeuge niemals im Regen.
- Verwenden Sie Werkzeuge niemals in feuchten oder nassen Bereichen.
- Sorgen Sie für angemessene Beleuchtung von Arbeitsbereichen.
- Verwenden Sie Werkzeuge niemals in der Nähe von brennbaren
Flüssigkeiten.
– Schützen Sie sich vor elektrischen Schlägen. – Vermeiden Sie Kontakt
mit geerdeten Objekten und Oberflächen wie z.B. Rohrleitungen, Heizkörpern,
Haushaltsgeräten usw.
4 – Halten Sie andere Personen vom Arbeitsplatz fern. – Achten Sie darauf,
dass Personen, die nicht direkt am Arbeitsvorgang beteiligt sind,
insbesondere Kinder, von Werkzeugen und Werkstücken fernbleiben,
Werkzeuge und deren Anschlussleitungen nicht berühren und sich nicht im
Arbeitsbereich aufhalten.
5 – Entfernen Sie nicht benötigte Werkzeuge aus dem Arbeitsbereich. –
Nicht verwendete Werkzeuge sollten an einem sicheren, trockenen Ort
außerhalb der Reichweite von Kindern gelagert und eingeschlossen werden.
6 – Wenden Sie bei der Benutzung von Werkzeugen keine Gewalt an.
– Werkzeuge erzeugen die besten und effektivsten Ergebnisse, wenn sie
mit der Geschwindigkeit und dem Vorschub verwendet werden, für welche
sie konzipiert wurden.
7 – Verwenden Sie für die auszuführende Aufgabe geeignete Werkzeuge.
– Kleine, leichte Werkzeuge verfügen nicht über die gleiche Leistung wie
schwere Profi-Werkzeuge.
Verwenden Sie Werkzeuge niemals zweckentfremdet; z.B. dürfen Kreissägen
nicht zum Sägen von Baumstämmen oder Ästen verwendet werden.
8 – Tragen Sie geeignete Arbeitskleidung.
- Tragen Sie weder lose Kleidung noch Schmuck, da sich diese in den
beweglichen Komponenten von Maschinen verfangen könnten.
- Tragen Sie stets geeignete Sicherheitsschuhe.
- Decken Sie lange Haare ab.
9 – Verwenden Sie geeignete persönliche Schutzausrüstung.
- Tragen Sie stets eine geeignete Schutzbrille.
- Tragen Sie bei staubigen Arbeiten stets eine Atemschutzmaske.
WARNUNG! Falls keine persönliche Schutzausrüstung getragen wird, können
schwerwiegende Verletzungen und Erkrankungen auftreten.
10 – Verwenden Sie Staubabsaugausrüstung. – Verwenden Sie Geräte mit
Staubabsauganschluss stets mit einer geeigneten Absaugvorrichtung.
11 – Verwenden Sie die Anschlussleitung nicht missbräuchlich. – Ziehen
Sie niemals am Kabel, um dieses aus der Steckdose zu entfernen. Halten
Sie Anschlussleitungen fern von Hitze, Schmiermitteln und scharfen Kanten.
Beschädigte und abgenutzte Leitungen erhöhen das Risiko von elektrischen
Schlägen.
12 – Fixieren Sie Ihre Werkstücke. – Verwenden Sie stets Schraubzwingen,
Schraubstöcke und andere Klemmvorrichtungen, um Werkstücke sicher zu
fixieren. Dies ist sicherer als das Halten von Hand.
13 – Nicht zu weit hinauslehnen. – Bleiben Sie standfest und halten Sie stets
Ihr Gleichgewicht.
14 – Führen Sie Instandhaltungsarbeiten sorgfältig durch.
- Halten Sie Schneidwerkzeuge scharf. Werkzeuge mit scharfen Schneiden
sind besser zu kontrollieren und verkanten sich weniger leicht.
- Befolgen Sie die Anweisung zur Schmierung und zum Austausch von
Zubehörteilen.
- Überprüfen Sie Anschlussleitungen in regelmäßigen Abständen und
lassen Sie diese bei Beschädigung oder Abnutzung von einem autorisierten
Servicetechniker austauschen.
- Halten Sie Griffe trocken, sauber und frei von Schmierstoffen.
WARNUNG! Viele Unfälle mit Elektrowerkzeugen sind auf unzureichende Instandhaltung
zurückzuführen.
15 - Trennen Sie Geräte nach dem Gebrauch vom Stromnetz. – Trennen
Sie Elektrowerkzeuge stets von der Spannungsversorgung, bevor Sie
Wartungsarbeiten durchführen und Zubehör abnehmen oder anbringen.
WARNUNG! Die Verwendung von Zubehör, das nicht vom Hersteller des
Elektrowerkzeugs empfohlen wird, kann zu schwerwiegenden Sach- und Personenschäden
führen.
16 – Entfernen Sie stets alle Werkzeuge vom Gerät. – Machen Sie es sich zur
Gewohnheit, vor dem Einschalten von Elektrowerkzeugen zu überprüfen,
dass alle beim Zubehörwechsel oder zur Justierung verwendeten Werkzeuge
(z.B. Innensechskant-, Maul- u. Stiftschlüssel) entfernt wurden.
17 – Vermeiden Sie unbeabsichtigtes Einschalten. – Vergewissern Sie sich,
dass sich der Betriebsschalter von Elektrowerkzeugen im ausgeschalteten
Zustand befindet, bevor Sie das Werkzeug mit dem Stromnetz verbinden bzw.
Akkus einsetzen.
WARNUNG! Ein unbeabsichtigtes Einschalten von Elektrowerkzeugen kann zu
schwerwiegenden Sach- und Personenschäden führen.
18 – Verwenden Sie geeignete Verlängerungsleitungen. – Falls das
Elektrowerkzeug in Außenbereichen verwendet wird, muss eine speziell
für Außenbereiche geeignete Verlängerungsleitung verwendet werden. Dies
vermindert das Risiko von elektrischen Schlägen.
19 – Seien Sie aufmerksam.
- Achten Sie darauf, was Sie tun, wenden Sie gutes Urteilsvermögen an und
verwenden Sie Werkzeuge niemals, wenn Sie müde sind.
- Verwenden Sie Elektrowerkzeuge niemals, wenn Sie unter dem Einfluss von
Drogen, Alkohol oder Medikamenten stehen.
WARNUNG! Ein Moment der Unachtsamkeit kann zu schweren Verletzungen führen.
20 - Überprüfen Sie den Zustand von Werkzeugen vor der Benutzung.
- Das Werkzeug muss vor jeder Verwendung auf Beschädigungen überprüft
werden. Vergewissern Sie sich, dass sich das Gerät in einem Zustand
befindet, indem es seine normale Funktion sicher erfüllen kann.
- Begutachten Sie bewegliche Teile auf feste Verbindung, korrekte
Ausrichtung, Schäden, korrekte Montage und andere Fehlerzustände, die
ihre Funktion beeinträchtigen könnten.
- Beschädigte Schutzvorrichtungen und andere fehlerhafte Komponenten
müssen von einem autorisierten Servicetechniker repariert oder
ausgetauscht werden, außer wenn in dieser Bedienungsanleitung
abweichend beschrieben.
- Defekte Schalter müssen von einem autorisierten Servicetechniker
ausgetauscht werden.
WARNUNG! Verwenden Sie das Gerät nicht, falls es sich nicht über den Ein-/Ausschalter
einschalten und auch ausschalten lässt. Der Schalter muss zur sicheren Verwendung
ausgetauscht werden.
21 – Lassen Sie das Werkzeug ausschließlich von qualifizierten Technikern
warten und reparieren. – Dieses Elektrowerkzeug entspricht den relevanten
Sicherheitsvorschriften. Reparaturen dürfen ausschließlich von autorisierten
Servicetechnikern durchgeführt werden, da unsachgemäße Reparaturen eine
ernstzunehmende Gefahr darstellen können.
WARNUNG! Verwenden Sie zur Instandhaltung ausschließlich identische Originalersatzteile.
WARNUNG! Eine beschädigte Anschlussleitung muss durch den Hersteller oder eine
autorisierte Fachwerkstatt ausgetauscht werden.
22 – Der Netzstecker des Gerätes darf ausschließlich an einer geeigneten
Steckdose verwendet werden. – Der Netzstecker des Gerätes darf
niemals modifiziert werden. Verwenden Sie keine Adapter mit geerdeten
Elektrowerkzeugen. Dies trägt zum Schutz vor elektrischen Schlägen bei.
23 – Bei der Verwendung in Außenbereichen muss das Gerät an einem
Stromkreis betrieben werden, der von einem Fehlerstromschutzschalter
abgesichert ist. Die Verwendung von FI-Schaltern vermindert die Gefahr
elektrischer Schläge.
HINWEIS: Fehlerstromschutzschalter werden auch als FI-Schalter,
FI-Schutzschalter oder RCDs bezeichnet.
19
Page 20

DE
WARNHINWEISE: Stellen Sie vor Anschluss eines Werkzeugs an eine Stromquelle
(Steckdose, Stromanschluss u.ä.) sicher, dass die Netzspannung der auf dem Typenschild
des Werkzeugs angegebenen Spannung entspricht. Eine Stromquelle mit einer höheren
Spannung als der für das Werkzeug spezifizierten Spannung kann zu schweren
Verletzungen des Bedieners sowie Beschädigung des Werkzeugs führen. Schließen Sie
das Werkzeug im Zweifelsfall nicht an. Eine niedrigere Spannung als auf dem Typenschild
angegeben schadet dem Motor.
Zusätzliche Sicherheitshinweise
für Schweißarbeiten
• Schweißen verursacht toxische Dämpfe und kann den Sauerstoffgehalt im
Arbeitsbereich reduzieren. Arbeiten Sie immer in einem gut belüfteten Bereich.
Vermeiden Sie das Einatmen von Schweißdämpfen und verwenden Sie gegebenenfalls
ein Atemschutzgerät.
• Einige Metallteile sind verzinkt oder mit Blei, Kadmium oder anderen Materialien
beschichtet. Beim Schweißen durch diese Beschichtungen können extrem toxische
Dämpfe entstehen. Vor dem Schweißen daher zunächst alle Beschichtungen entfernen.
• Bei Lungen-, Hals oder Augenreizung während des Schweißens die Schweißarbeiten
sofort einstellen und an die frische Luft gehen.
• Schweißen erzeugt extrem starkes UV-Licht. Tragen Sie zur Vermeidung von
Augenschäden immer eine zugelassene Schweißmaske. Schauen Sie unter keinen
Umständen direkt in den Lichtbogen.
• Das beim Lichtbogenschweißen erzeugte Licht wirkt optisch ansprechend,
insbesondere auf Kinder. Sorgen Sie daher dafür, dass Personen ohne entsprechenden
Augenschutz das Schweißlicht nicht betrachten.
• Wenn sich andere Personen möglicherweise dem Arbeitsbereich nähern könnten, stellen
Sie entsprechende Schutzwände auf, damit sie vor Licht/Blendung geschützt werden.
• Ersetzen Sie die Sichtscheibe der Schweißmaske, sobald sie erste Anzeichen von
Abnutzung oder andere Beschädigungen aufweist.
• Tragen Sie zur Vermeidung von Hautschäden immer eine geeignete feuerfeste,
langärmelige Jacke sowie hitzebeständige Schutzhandschuhe und Mütze. Den Körper
stets gut bedeckt halten.
• Entfernen Sie entzündliche Materialien (z.B. Feuerzeuge, Streichhölzer) immer vor dem
Schweißen aus der Kleidung.
• Halten Sie während des Schweißens immer einen Feuerlöscher griffbereit. Funken und
versehentlicher Kontakt können Brände auslösen.
• Beim Schweißen erzeugte Funken können entflammbare Stoffe im Schweißbereich
leicht entzünden. Daher müssen entzündliche Materialien unbedingt vor Aufnahme des
Schweißens entfernt werden.
• Schweißen Sie nur dann, wenn alle Werkstücke und der Arbeitsbereich trocken sind.
• Keine verschlossenen Behälter (z.B. Kraftstofftanks, Lufttanks, Ölfässer) schweißen. Die
durch die Schweißarbeit erzeugte Hitze kann dazu führen, dass verschlossene Behälter
ohne Vorwarnung bersten.
• Achten Sie auf übertragene Wärme. Metallteile können die Wärme vom Arbeitsbereich
ableiten und brennbare Materialien entzünden.
• Bedenken Sie stets, dass geschweißte Teile nach der Bearbeitung noch einige Zeit
heiß bleiben. Die Teile vor der Handhabung, oder bevor diese unbeaufsichtigt gelassen
werden, völlig abkühlen lassen.
• Niemals in Gegenwart entzündlicher Gase, Flüssigkeiten oder Staub schweißen.
• Stellen Sie immer sicher, dass eine verantwortungsbewusste Person in der Nähe ist, die
vor Feuer warnen und im Notfall Hilfe rufen kann.
• Die Verwendung von Schweißgeräten erzeugt sehr starke magnetische Felder. Diese
könnten den Betrieb empfindlicher Elektronikeinrichtungen beeinträchtigen. Träger von
Herzschrittmachern sollten sich vor Gebrauch eines Schweißgeräts von einem Arzt
beraten lassen.
• Die Stromzufuhr nicht überbelasten. Vergewissern Sie sich, dass Ihre
Netzstromversorgung die erforderliche Spannung sicher bereitstellen kann.
Drahtantrieb
• Achtung! Die Spitze des Schweißdrahts ist möglicherweise sehr scharf. Beim Zuführen
kann es leicht zu Hautverletzungen kommen.
• Lassen Sie das Schweißgerät ausgeschaltet, bis Sie bereit sind, die Schweißarbeiten
zu beginnen.
• Richten Sie die Gasdüse niemals auf Menschen oder Tiere.
Geräteübersicht
1 Deckelfreigabe
2 Ein-/Ausschalter
3 Spannungsregler 90/ 45 A
4 Drahtantriebsregler
5 Überlastungsanzeige
6 Tragegurt
7 Brennergriff
8 Auslöser
9 Kontaktschutz
10 Netzstromkabel
11 Massekabel mit Klemme
12 Schweißmaske (zusammengebaut)
13 Filterrahmen
14 Schweißerscheibe
15 Sicherheitsscheibe
16 Rahmenklammern (x 2)
17 Haltegriffmuttern (x 3)
18 Haltegriffschrauben (x 3)
19 Rahmenschrauben (x 2)
20 Haltegriff
21 Schweißmaske
22 Maskenklemmen
23 Gasdüse
24 Drahtausgang
25 Drahtspule
26 Spindelmechanismus
27 Schweißdraht
28 Antriebs-Abdeckschraube
29 Isolierungsschraube
30 Drahtantriebsrolle
31 Spannungsknopf
32 Drahtspulenisolierung
33 Drahtspulen-Isolierschraube
34 Spannungsriegel
35 Spannungsrolle
36 Isolierung
20
Zubehör (nicht abgebildet)
• Schlackenhammer
• Drahtbürste
Page 21

www.silverlinetools.com
Turbo-MIG-Fülldrahtschweißgerät282562
Bestimmungsgemäße
Verwendung
Netzbetriebenes Schweißgerät, für leichte bis mittleres Metall-Schutzgasschweißen
(MIG-Metall Inert Gas Verfahren) Schweißarbeiten verschiedener Arten von Stahl, im
Zusammenhang mit Fülldraht. Das Gerät benötigt keine externe Gaszufuhr da der Fülldraht
beim Schweißvorgang selbst ein Schutzgas freigibt. Dieses Gerät ist nicht für den
gewerblichen oder industriellen Gebrauch geeignet.
Auspacken des Gerätes
• Packen Sie Ihr Werkzeug vorsichtig aus und überprüfen Sie es. Machen Sie sich
vollständig mit all seinen Eigenschaften und Funktionen vertraut.
• Vergewissern Sie sich, dass sämtliche Teile des Werkzeugs vorhanden und in
einwandfreiem Zustand sind. Sollten Teile fehlen oder beschädigt sein, lassen Sie
diese ersetzen, bevor Sie das Werkzeug verwenden.
Vor Inbetriebnahme
WARNUNG! Trennen Sie das Schweißgerät stets vom Stromnetz und lassen Sie es
vollständig abkühlen, bevor Sie Teile montieren bzw. austauschen.
Hinweis: Dieses Gerät ist geerdet und muss an eine geerdete Stromquelle angeschlossen
werden. Versuchen Sie nicht das Gerät ohne geerdeten Anschluss zu bedienen.
Schweißschild zusammenssetzen
• Benutzen Sie die Maskenklemmen (22) um die flach-verpackte-Schweißmaske (21) in
ihre normale Form zu bringen.
• Montieren Sie den Haltegriff (20) mit Hilfe der Haltegriffschrauben und –Muttern (18
und 17). Der Haltegriff muss auf der Innenseite der Schweißmaske angebracht sein
umso die Hand des Schweißers vor Spritzern zu schützen.
• Achten Sie darauf das bei der Montage die Sicherheitsscheibe (15) vor der
Schweißscheibe (14) ist, um diese vor Schweißspritzer zu schützten. Wenn die
Schweißscheibe außerhalb der Sicherheitsscheibe montiert wird kann Sie durch
Schweißspritzer beschädigt werden und somit gefährliches Ultra-Violettes-Licht
durchdringen lassen und den Bediener gefährden.
• Befestigen Sie die Scheibenmontage in die Schweißmaske mit den Rahmenschrauben
(19) und Rahmenklammern (16).
Schweißdraht einführen
Für dieses Schweißgerät muss Fülldraht mit einem Durchmesser von 0,9 mm verwendet
werden.
1. Drehen Sie die Deckelfreigabe (1) und entfernen Sie die Abdeckung.
2. Drehen Sie den Kunststoffkopf des Spindelmechanismus (26) gegen den Uhrzeigersinn
und entfernen Sie vorsichtig den oberen Teil mit der Feder.
3. Fügen Sie nun die mitgelieferte Drahtspule (25) über die Spindelrolle (im Bild schon
installiert) so, dass der Draht (27) an der inneren Seite der Drahtspule läuft, wie es
durch den Pfeil in der Abbildung angezeigt wird.
4. Setzen Sie nun den oberen Teil des Spindelmechanismus mit Feder und Kunststoffkopf
wieder auf und achten Sie darauf, dass die Feder eine ausreichende Spannung auf die
Drahtspule ausübt, umso ein abwickeln zu verhindern.
5. Lockern Sie den Spannungsknopf (31) damit der Spannungsriegel (34), wie abgebildet,
freigegeben ist.
6. Ziehen Sie nun vorsichtig den Draht von der Spule, ohne dass sich dieser abwickelt.
Versichern Sie sich das die Drahtspitze gerade und sauber abgeschnitten ist.
7. Langsam das Drahtende durch die Drahtspulenisolierung (32) und über die
Drahtantriebsrolle (30) in die Isolierung (36) führen. Vorsichtig den Draht ein wenig in
die Isolierung drücken.
8. Stellen Sie den Spannungsriegel zurück, dabei darauf achten, dass der Draht zentriert
in den Rillen der Drahtantriebsrolle und der Spannungsrolle (35) läuft.
9. Richten Sie den Spannungsriegel so aus wie in Abbildung A gezeigt wird. Die
Spannung kann jetzt mit dem Spannungsknopf verstellt werden.
10. Nun die Abdeckung wieder anbringen und mit der Deckelfreigabe feststellen.
11. Ziehen Sie den Kontaktschutz (9) vom Brenner und schrauben Sie die Düse (23) ab.
12. Schließen Sie das Schweißgerät an das Stromnetz an, schalten Sie es ein, und halten
Sie den Brenner fest.
13. Entfernen Sie den Brenner vom Schweißgerät, sodass das Brennerkabel sich gerade
streckt.
14. Vergewissern Sie sich, dass der Brenner keinerlei Gegenstände berührt und drücken
Sie dann den Auslöser (8). Der Schweißdraht sollte nun zum Brenner transportiert
werden.
15. Falls der Draht nicht durchgeleitet wird, trennen Sie das Gerät vom Stromnetz, öffnen
die Abdeckung und ziehen Sie den Spannungsknopf (31) an. Die Antriebsrollen sollten
gerade so fest sitzen das sie den Draht durch den Brenner transportieren, aber nicht
so fest, dass die Antriebsrolle verrutscht, wenn der Draht verklemmt.
16. Schalten Sie das Gerät ab und ziehen Sie den Netzstecker aus der Steckdose, sobald
der Draht vorne am Brenner austritt.
17. Bringen Sie die Düse und den Kontaktschutz wieder an und kürzen Sie den Draht bis
auf etwa 5 mm Abstand von der Brennerdüse.
Entfernen von Drahtspule und Schweißdrahtrest
1. Lösen Sie die Deckelfreigabe (1)und entfernen Sie die Abdeckung des Gerätes.
2. Ziehen Sie mit Hilfe einer Zange den Drahtrest aus der Düse (15)des Brenners heraus.
Wenn die alte Drahtspule (25) noch nicht aufgebraucht ist, schneiden Sie den Draht an
der Spule ab und lösen den Spannungsknopf (31) und schieben den Spannungsriegel
(34) von der Drahtantriebsrolle (30) weg.
3. Gehen Sie anschließend gemäß der Anweisung unter „Schweißdraht einführen“ oben
vor.
Wichtig!
• Tragen Sie stets für die auszuführende Aufgabe geeignete persönliche
Schutzausrüstung. Für den Betrieb dieses Gerätes sind Schweißmaske,
Schutzhandschuhe, Hitzeschutzkleidung und gegebenenfalls eine Atemschutzmaske
erforderlich.
• Halten Sie während des Schweißens immer einen geeigneten Feuerlöscher griffbereit.
• Überprüfen Sie Ihr Gerät stets auf Schäden und Verschleiß. Richten Sie dabei
besondere Aufmerksamkeit auf Leitungen und Kabel. Sollten Sie Mängel feststellen,
verwenden Sie das Gerät nicht!
• Vergewissern Sie sich, dass sämtliche Gehäuseteile und Abdeckungen
ordnungsgemäß geschlossen und verriegelt sind.
• Stellen Sie das Schweißgerät so auf, dass es während des Betriebs nicht verrutschen
oder umfallen kann. Sorgen Sie dafür, dass der Raum um das Schweißgerät mit einem
Abstand von mindestens 50 cm freigehalten wird, um angemessene Belüftung zu
gewährleisten.
Betrieb
WARNUNG! Trennen Sie das Schweißgerät stets vom Stromnetz und lassen Sie es
vollständig abkühlen, bevor Sie Teile montieren bzw. austauschen.
Gerät einstellen
• Um ein hochwertiges Schweißergebnis zu erzielen, müssen der Drahtantriebsregler (4)
und der Spannungsschalter (3) richtig eingestellt sein.
• Die Drahtantriebsgeschwindigkeit sollte so eingestellt sein, dass ein konstanter
Lichtbogen erzeugt wird. Die richtige Einstellung hängt neben anderen Faktoren vom
Abstand, der Stromspannung und der Brennergeschwindigkeit ab. Probieren Sie
verschiedene Drahtantriebsgeschwindigkeiten aus, bis Sie die optimale Einstellung
gefunden haben.
Hinweis:
Der im Schweißgerät eingebaute Mikroprozessor optimiert die Ausgangsleistung, welche
abhängig von der Drahtgeschwindigkeit ist und überwacht die Stromstärke um die
Schweißqualität zu verbessern und Spritzer zu reduzieren.
Betriebsdauer
• Dieses Gerät ist nicht zum Dauerschweißen vorgesehen. Ein zu langer Schweißbetrieb
würde Überhitzung verursachen und Bauteile im Geräteinneren beschädigen.
• Die Einschaltdauer legt in zehnminütigen Abständen fest, wie viele Minuten lang mit
dem Gerät geschweißt werden kann.
• Bei einer Einschaltdauer von 10 % darf das Gerät 1 Minute lang zum Schweißen
eingesetzt werden und muss anschließend 9 Minuten lang abkühlen. Bei einer
Betriebsdauer von 60 % darf das Gerät 6 Minuten eingesetzt werden in einem 10
Minuten Zyklus.
• Bei einer Überschreitung der Einschaltdauer schaltet sich das Gerät selbsttätig ab.
• Um eine maximale Einschaltdauer zu erzielen, sollte das Gerät mit geringeren
Stromeinstellungen bei guter Belüftung eingesetzt werden.
Thermoüberlastschutz
• Dieses Gerät verfügt über einen Thermoüberlastschutz. Bei einer Überlastung oder
einem zu langen Gebrauch des Geräts erleuchtet die Überlastungsanzeige (5) und das
Gerät schaltet sich automatisch ab.
• Warten Sie, bis sich das Gerät abgekühlt hat. Die Überlastungsanzeige wird
automatisch zurückgesetzt, sobald das Gerät wieder einsatzbereit ist.
21
Page 22

DE
Schweißvorbereitung
• Sorgen Sie dafür, dass die zu schweißenden Teile sauber und frei von Rost, Lack und
anderen Oberflächenbeschichtungen sind.
• Alle Teile müssen fest abgestützt sein und es sollte eine etwa 1 mm breite Lücke an
der Stelle verlaufen, an der die Schweißnaht entstehen soll.
• Vergewissern Sie sich, dass sich keine brennbaren Materialien in der Nähe des
Arbeitsbereichs befinden.
• Befestigen Sie das Massekabel mit der Klemme (11) an einem gereinigten Bereich an
einem der zu schweißenden Teile, und zwar so nah wie möglich an der Stelle, wo die
Schweißnaht entstehen soll.
• Sorgen Sie dafür, dass sich sowohl eine verantwortungsbewusste Person als auch ein
betriebsfähiger Feuerlöscher in unmittelbarer Nähe befinden.
• Schließen Sie das Gerät an das Stromnetz an.
Schweißen
WARNUNG! Die korrekte Benutzung eines Schweißgerätes ist eine technische
Fertigkeit. Ein falsch verwendetes Schweißgerät kann äußerst gefährlich sein. Die
nachfolgenden Informationen sind lediglich als allgemeine Hinweise zu verstehen. Wenn
Sie sich in irgendeiner Weise unsicher bezüglich der sicheren Verwendung dieses Geräts
sein sollten, benutzen Sie es nicht!
1. Stellen Sie den Netzschalter (2) auf „ON“ („Ein“).
2. Halten Sie den Brenner (7) in der einen und die Schweißmaske (12) mit der anderen
Hand.
3. Halten Sie den Brenner so, dass die Düse (23) etwa 1 cm vom Metall entfernt und in
einem Winkel von etwa 75° auf das Metall gerichtet ist.
4. Halten Sie die Maske vor Ihr Gesicht und betätigen Sie den Auslöser (8).
5. Zwischen dem Metall und der Düse sollte ein Lichtbogen entstehen. Halten Sie den
Auslöser 1–2 Sekunden gedrückt und geben Sie ihn dann frei.
6. Lassen Sie die Schweißstelle etwas abkühlen und nehmen Sie die Schweißmaske
vom Gesicht. Wenn die Einstellungen richtig waren, sollte sich nun ein runder
Schweißpunkt gebildet haben.
7. Falls das Metall an der Schweißstelle nicht vollständig durchdrungen wurde,
erhöhen Sie die Spannung. Falls ein Loch im Metall entstanden ist, verringern Sie die
Spannung.
• Üben Sie weiter Punktschweißen, bis Sie im Umgang mit dem Gerät und bei der Wahl
der Einstellungen Sicherheit gewonnen haben.
• Halten Sie den Auslöser zum Herstellen einer Schweißnaht länger gedrückt und führen
Sie den Brenner dabei langsam vorwärts.
• Bei korrekten Geräteeinstellungen sollte der Lichtbogen beständig sein und ein
knisterndes Geräusch erzeugen.
• Wenn ein eher knallendes Geräusch zu hören ist oder sich das Aufrechterhalten
des Lichtbogens als schwierig erweist, muss der Drahtvorschub verändert werden.
Sollten Sie feststellen, dass der Brenner nach hinten drückt, verringern Sie den
Drahtvorschub.
• Die Herstellung sauberer, hochwertiger Schweißnähte ist eine Fertigkeit, die über
längere Zeit erlernt werden muss. Übung und gute Vorbereitung führen schließlich zu
zufriedenstellenden Schweißergebnissen.
Zubehör
• Ein umfangreiches Zubehörsortiment einschließlich persönlicher Schutzausrüstung
(PSA) und Schweißwerkzeuge ist über Ihren Silverline-Fachhändler erhältlich.
Ersatzteile können unter toolsparesonline.com bezogen werden.
Instandhaltung
WARNHINWEIS! Trennen Sie das Schweißgerät stets vom Stromnetz und lassen
Sie es vollständig abkühlen, bevor Sie Teile montieren bzw. austauschen.
Auswechseln der Düse
Die Gasdüse (23) verschleißt mit dem Gebrauch des Schweißgeräts. Dadurch lässt sich der
Lichtbogen schlechter kontrollieren.
1. Ziehen Sie zum Austauschen der Düse den Kontaktschutz (9) vom Brenner ab und
schrauben Sie die alte Düse ab.
2. Die neue Düse muss die richtige Größe für den verwendeten Draht haben.
3. Schieben Sie die neue Düse auf das Drahtende und schrauben Sie sie am Brenner an.
Bringen Sie den Kontaktschutz (1) wieder an.
Reinigung
Trennen Sie das Gerät vom Stromnetz, bevor Sie Reinigungsarbeiten vornehmen.
• Halten Sie Ihr Gerät stets sauber. Entfernen Sie regelmäßig Schmutz und Staub und
achten Sie darauf, dass die Lüftungsöffnungen nicht verstopfen.
• Reinigen Sie das Gerätegehäuse mit einer weichen Bürste oder einem trockenen Tuch.
Die Lüftungsöffnungen mit sauberer, trockener Druckluft reinigen, sofern verfügbar.
Entsorgung
Beachten Sie bei der Entsorgung von defekten und nicht mehr reparablen elektronischen
Geräten die geltenden Vorschriften und Gesetze.
• Elektrische und elektronische Altgeräte nicht über den Hausmüll entsorgen.
• Lassen Sie sich von der zuständigen Behörde bezüglich der ordnungsgemäßen
Entsorgung von elektronischen Geräten beraten.
Fehlerbehebung
Störung Mögliche Ursache Lösung
Antriebsrolle (30) dreht nicht Kein Strom Gerät anstellen
Antriebsrolle (30) dreht aber der Draht (27) wird nicht
transportiert
Das Gerät schaltet sich während des Schweißens
plötzlich aus
Schlechtes Schweißergebnis Falsche Einstellungen von Stromstärke und Drahtantrieb. Justieren Sie den Drahtantriebsregler (4) und den 90/45 A
22
Der Drahtantriebsregler (4) ist auf null eingestellt Antriebsregler höher einstellen
Falsche Rollenspannung Spannungsknopf justieren (31)
Isolation (36) beschädigt Isolation auswechseln.
Draht an die Düse (23) geschweißt Draht von der Düse entfernen.
Betriebsdauer zu lange und Überlastungsanzeige (5) leuchtet. Lassen Sie das Schweißgerät 20-30 Minuten abkühlen.
Spannungsschalter (3)
Page 23

www.silverlinetools.com
Turbo-MIG-Fülldrahtschweißgerät282562
Silverline-Tools-Garantie
Dieser Silverline-Artikel wird mit einer
3-Jahres-Garantie angeboten
Registrieren Sie diesen Artikel unter silverlinetools.com innerhalb von 30 Tagen nach
dem Kauf, um die 3-Jahres-Garantie zu aktivieren.
Der Garantiezeitraum beginnt mit dem Kaufdatum auf Ihrem Kaufbeleg.
Garantiebedingungen
Der Garantiezeitraum beginnt mit dem Kaufdatum im Einzelhandel, das auf dem
Kaufbeleg angegeben ist.
BITTE BEWAHREN SIE DEN KAUFBELEG AUF!
Falls dieser Artikel innerhalb von 30 Tagen nach dem Kauf einen Defekt aufweisen sollte,
bringen Sie es bitte mit Ihrem Kaufbeleg zu dem Fachhändler, bei dem es gekauft wurde,
und informieren Sie ihn über die Mängel. Das Gerät wird daraufhin ersetzt oder der
Kaufpreis zurückerstattet.
Falls dieser Artikel nach Ablauf von 30 Tagen nach dem Kauf einen Mangel aufweist,
senden Sie es bitte an:
Silverline Tools Service Centre
PO Box 2988
Yeovil
BA21 1WU, Großbritannien
Der Garantieanspruch muss während der Garantiezeit gestellt werden.
Sie müssen den Originalkaufbeleg mit Angabe des Kaufdatums einreichen und Ihren
Namen und Ihre Adresse sowie den Ort des Kaufs angeben, bevor etwaige Arbeiten
durchgeführt werden können.
Sie müssen genaue Angaben über den zu behebenden Defekt machen.
Alle innerhalb der Garantiefrist gemachten Forderungen werden von Silverline Tools
daraufhin überprüft werden, ob es sich bei den Mängeln um einen Material- oder
Fertigungsfehler handelt.
Versandkosten werden nicht zurückerstattet. Alle Artikel sollten sich in sauberem und
sicherem Zustand befinden und sorgfältig verpackt zur Reparatur eingeschickt werden,
um Schäden oder Verletzungen während des Transports zu vermeiden. Die Annahme
unangemessener oder unsicherer Lieferungen kann von uns verweigert werden.
Alle Arbeiten werden von Silverline Tools oder seinen autorisierten Reparaturwerkstätten
durchgeführt.
Die Reparatur oder der Ersatz des Artikels führt nicht zur Verlängerung des
Garantiezeitraums.
Mängel, bei denen unsere Prüfung ergibt, dass sie unter die Garantie fallen, werden
durch kostenlose Reparatur des Werkzeugs (ohne Versandkosten) oder Ersatz durch ein
Werkzeug in einwandfreiem Zustand behoben.
Einbehaltene Werkzeuge oder Teile, die ersetzt wurden, gehen in den Besitz von
Silverline Tools über.
Registrierung Ihres Kaufs
Gehen Sie auf silverlinetools.com, klicken Sie auf „Registrierung“’ und geben Sie
Folgendes ein:
• Ihre persönlichen Angaben
• Produktdetails und Kaufinformationen
Sobald dieser Artikel registriert worden ist, wird Ihre Garantiebescheinigung im
PDF-Format erzeugt. Bitte drucken Sie sie aus und bewahren Sie sie zusammen mit
Ihrem Produkt auf.
Die Reparatur bzw. der Ersatz Ihres Artikels unter dieser Garantie erfolgt zusätzlich zu
Ihren gesetzlichen Rechten als Verbraucher und hat keine nachteiligen Folgen auf diese.
Durch die Garantie abgedeckt ist:
Die Reparatur des Artikels, nachdem zur Zufriedenheit von Silverline Tools nachgewiesen
wurde, dass der Defekt durch fehlerhaftes Material oder mangelhafte Arbeitsausführung
bedingt ist und in den Garantiezeitraum fällt.
Wenn ein Ersatzteil nicht mehr erhältlich ist oder nicht mehr hergestellt wird, kann
Silverline Tools es gegen einen funktionellen Ersatz austauschen.
Verwendung des Artikels innerhalb der EU.
Durch die Garantie nicht abgedeckt ist:
Silverline Tools garantiert keine Reparaturen, die durch Folgendes erforderlich
geworden sind:
Normale Verschleißerscheinungen, die trotz Verwendung entsprechend der
Bedienungsanleitung entstehen, z.B. an Messern, Bürsten, Riemen, Glühbirnen,
Batterien usw.
Ersatz von mitgeliefertem Zubehör wie etwa Bohrspitzen, Klingen, Schleifblättern,
Schneidscheiben und anderen zugehörigen Teilen.
Unfallschäden und Fehler, die durch unsachgemäße Verwendung oder Wartung,
Missbrauch, Nachlässigkeit oder fahrlässige Bedienung oder Handhabung des Artikels
entstanden sind.
Verwendung des Artikels für andere als normale Haushaltszwecke.
Jegliche Veränderungen oder Modifikationen des Artikels.
Die Verwendung von Teilen oder Zubehör, die keine Originalkomponenten von
Silverline Tools sind.
Fehlerhafte Montage (außer, wenn von Silverline Tools vorgenommen).
Reparaturen oder Änderungen, die von anderen als Silverline Tools oder seinen
autorisierten Reparaturwerkstätten durchgeführt wurden.
Ansprüche, die über die Rechte zur Behebung von Mängeln an dem in diesen
Garantiebedingungen genannten Werkzeug hinausgehen.
Akku-Garantie
Die Garantie auf Silverline-Akkus beträgt 30 Tage. Falls innerhalb der Akku-Garantiefrist
aufgrund von Material- oder Verarbeitungsfehlern ein Defekt an einem registrierten Akku
auftritt, ersetzt Silverline diesen kostenlos. Diese Garantie gilt nicht bei gewerblicher
Nutzung und erstreckt sich nicht auf natürliche Abnutzung oder Schäden infolge von
Unfällen, unsachgemäßer Verwendung oder Zweckentfremdung.
CE-Konformitätserklärung
Name des Unterzeichners: Mr. Darrell Morris
Bevollmächtigt durch: Silverline Tools
Erklärt hiermit, dass das Produkt:
Ident.-Nr.: 282562
Produktbezeichnung: Turbo-MIG-Fülldrahtschweißgerät
Mit den folgenden Richtlinien und Normen übereinstimmt:
• Niederspannungsrichtlinie 2006/95/EG
• EMV-Richtlinie 2004/108/EG
• RoHS-Richtlinie 2011/65/EU
• EN60974-1:2012
• EN60974-10:2007
Benannte Stelle: TÜV Rheinland
Techn. Unterlagen bei: Silverline Tools
Datum: 09.09.2015
Unterzeichnet von:
Mr. Darrell Morris
Geschäftsführender Direktor
Name und Anschrift des Herstellers:
Powerbox International Limited, Handelsregisternummer 06897059. Eingetragene Anschrift:
Central House, Church Street, Yeovil, Somerset BA20 1HH, Großbritannien
23
Page 24

ES
Traducción del manual original
Descripción de los símbolos
Los símbolos siguientes pueden aparecer en la placa de características de su herramienta.
Éstos representan información importante sobre el producto o instrucciones relativas a
su uso.
Lleve protección auditiva
Lleve protección ocular
Lleve protección respiratoria
Lleve un casco de seguridad
Lleve guantes de seguridad
Lleve ropa de protección adecuada
Lleve calzado con protección
Lea el manual de instrucciones
Protección de clase I (protección a tierra)
Para uso solo en interiores.
¡Peligro! Gases o humo tóxico
¡Peligro de incendio!
¡Riesgo de electrocución!
Abreviaturas de términos técnicos
V Voltio/s
~, AC Corriente alterna
A, mA Amperio/s, miliamperio/s
Ø Diámetro
W, kW Vatio/s, kilovatio/s
Características técnicas
Tensión: ...................................................................................... 230 V, 50 Hz
Tensión de entrada: ......................................... 13,5 A (pico), 4,6 (ponderada)
Rendimiento .......................................................................................... 80 %
Intervalo de corriente: ........................................................................45/90 A
Ciclo de trabajo nominal: ....................................10 % @ 90 A, 60 % @ 45 A
Voltaje sin carga: .................................................................................... 31 V
Tensión de salida: .............................................. 18,5 V (90 A), 16,25 V (45 A)
Peso máximo del alambre:................................................................. 0,45 kg
Clase de aislamiento: ...................................................................................H
Grado de protección:.............................................................................IP21S
Alambre: .......................... Alambre con núcleo de fundente de 0,8 – 0,9 mm
Grosor máximo de la soldadura(acero):......................................1,2 - 6,5 mm
Fusible interno: .......................................................................................16 A
Fusible del enchufe (solo Reino Unido): ...................................................13 A
Clase de protección: ................................................................................
Longitud del cable del soldador: ..............................................................2 m
Longitud del cable de tierra: .................................................................1,5 m
Longitud del cable de alimentación:.........................................................2 m
Dimensiones (A x L x An): ............................................. 295 x 340 x 180 mm
Peso:.....................................................................................................13 kg
¡Peligro! Superficie muy caliente - NO TOCAR!
No utilizar en ambientes húmedos o bajo la lluvia
¡Peligro!
¡Peligro! Radiaciones ultravioletas
Protección medioambiental
Las herramientas para soldar no se deben tirar a la basura. Recíclelas en
puntos de reciclaje adecuados. Solicite información a su ayuntamiento o
distribuidor sobre las opciones de reciclaje.
Conforme a las normas de seguridad y la legislación correspondiente
Como parte de nuestra política de desarrollo de productos, los datos técnicos de los
productos Silverline pueden cambiar sin previo aviso.
24
Page 25

www.silverlinetools.com
Soldador sin gas Turbo Mig282562
Instrucciones de seguridad para
herramientas eléctricas
ADVERTENCIA: Lea siempre el manual de instrucciones antes de utilizar esta herramienta.
Las herramientas eléctricas pueden ser peligrosas y causar riesgo de incendio o descarga
eléctrica si no se utilizan correctamente. Guarde estas instrucciones con la herramienta
para poderlas consultar en el futuro.
ADVERTENCIA: No permita que los niños, personas discapacitadas o personas no
cualificadas utilicen esta herramienta. Mantenga esta herramienta fuera del alcance de
los niños.
PRECAUCIÓN: Utilice la herramienta eléctrica y los accesorios siguiendo siempre las
instrucciones suministradas por el fabricante. El uso de cualquier accesorio diferente a los
mencionados en este manual podría ocasionar daños o lesiones graves.
La expresión “herramienta eléctrica” se refiere a su herramienta alimentada por corriente
eléctrica (herramienta alámbrica) o una herramienta eléctrica alimentada por baterías
(herramienta inalámbrica).
1. Mantenga el área de trabajo limpia y bien iluminada. Las áreas de trabajo
desordenadas y oscuras son peligrosas y pueden provocar un accidente.
2. Entorno de trabajo adecuado.
No utilice esta herramienta bajo la lluvia.
No utilice esta herramienta en áreas húmedas o mojadas.
Mantenga el área bien iluminada.
No utilice esta herramienta en áreas con gases o líquidos inflamables.
3. Descargas eléctricas. Evite el contacto con superficies puestas a tierra tales
como tuberías, radiadores, estufas y refrigeradores.
4. Mantenga alejadas a otras personas. Mantenga alejados a los niños y
personas que se encuentren a su alrededor mientras esté trabajando con una
herramienta eléctrica.
5. Almacenaje. Guarde siempre las herramientas eléctricas en un lugar seco
fuera del alcance de los niños.
6. No fuerce la herramienta. La herramienta correcta funcionará mejor y con
más seguridad a la velocidad para la que se ha diseñado.
7. Utilice las herramientas y accesorios adecuados. No intente realizar un
trabajo con una herramienta o accesorio que no sea adecuado.
8. Vístase adecuadamente.
No lleve ropa holgada ni joyas.
Lleve calzado antideslizante
Mantenga el pelo recogido.
9. Use equipo de protección personal.
Utilice siempre protección ocular.
Use mascara de protección anti-polvo.
ADVERTENCIA: No utilizar el equipo de protección adecuado puede provocar lesiones
graves.
10. Sistema de extracción de polvo. Utilice siempre sistemas de extracción de
polvo y asegúrese de que esté colocado adecuadamente.
11. No doble el cable de alimentación. No use nunca el cable de alimentación
para transportar la herramienta eléctrica, tirar de ella o desenchufarla.
Mantenga el cable de alimentación alejado de fuentes de calor, del aceite, de
los bordes afilados o de las piezas móviles.
12. Sujete las piezas de trabajo. Utilice siempre abrazaderas o un tornillo de
banco para sujetar la pieza de trabajo.
13. No adopte posturas forzadas. Manténgase en posición firme y el equilibrio
en todo momento.
14. Mantenimiento de las herramientas.
Las herramientas de corte deben estar siempre afiladas y limpias. Las
herramientas de corte correctamente afiladas son menos propensas a
trabarse y son más fáciles de controlar.
Lubrique las piezas y accesorios necesarios.
Inspeccione el cable de alimentación periódicamente. En caso de estar
dañado, contacte con un servicio técnico autorizado para su reparación.
Inspeccione los cables de extensión regularmente y repárelos si están
dañados.
Mantenga siempre las empuñaduras limpias de grasa y aceite.
ADVERTENCIA: Muchos accidentes son causados por herramientas eléctricas que carecen
de un mantenimiento adecuado.
15. Desenchufe la herramienta. Desconecte la herramienta eléctrica antes de
instalar accesorios (brocas, fresas, disco de corte) o realizar cualquier tarea de
mantenimiento.
ADVERTENCIA: Utilice sólo accesorios y piezas recomendadas por el fabricante.
16. Retire todas las llaves de ajuste. Retire siempre todas las llaves de ajuste
antes de encender y utilizar la herramienta.
17. Encendido accidental. Asegúrese de que el interruptor esté en la posición de
apagado antes de enchufar la herramienta.
ADVERTENCIA: El encendido accidental puede causar lesiones graves.
18. Cables de extensión para exteriores. Cuando utilice una herramienta
eléctrica en el exterior, use un cable de extensión adecuado para uso en
exteriores. La utilización de un cable adecuado para exteriores reduce el
riesgo de descargas eléctricas.
19. Manténgase alerta.
Fíjese en lo que está haciendo y use el sentido común cuando esté utilizando
una herramienta eléctrica.
No use herramientas eléctricas si se encuentra cansado o bajo la influencia de
drogas, alcohol o medicamentos.
ADVERTENCIA: Un momento de distracción mientras esté utilizando una herramienta
eléctrica puede provocar lesiones graves.
20. Piezas en mal estado.
Compruebe que su herramienta funcione correctamente antes de utilizarla.
Revise que no haya piezas en movimiento mal alineadas, trabadas, piezas
rotas o cualquier otra condición que pueda afectar el funcionamiento de la
herramienta eléctrica.
Algunas de las piezas (ej. protector) deben ser reparadas solamente por un
servicio técnico autorizado.
Los enchufes dañados deben repararse únicamente por un servicio técnico
autorizado.
ADVERTENCIA: No utilice la herramienta si el botón de encendido/apagado no funciona
correctamente. Repárelo en un servicio técnico autorizado.
21. Reparación de su herramienta. Lleve siempre su herramienta eléctrica a un
servicio técnico cualificado. No seguir estas instrucciones podría provocar
lesiones graves e invalidar la garantía.
ADVERTENCIA: Utilice únicamente piezas de recambio idénticas.
ADVERTENCIA: Si el cable de alimentación está dañado, deberá repararlo en un servicio
técnico autorizado.
22. El enchufe de la herramienta eléctrica debe coincidir con la toma de
corriente. No modifique nunca el enchufe de ninguna manera. No utilice
ningún enchufe adaptador con herramientas eléctricas con tomas a tierra. Los
enchufes no modificados y las tomas de corriente adecuadas reducirán el
riesgo de descargas eléctricas.
23. Si es inevitable trabajar con una herramienta eléctrica en lugares
húmedos, use un suministro protegido por un interruptor diferencial o
disyuntor por corriente diferencial o residual (RCD). El uso de un RCD
reduce el riesgo de descargas eléctricas.
ADVERTENCIA: Antes de conectar esta herramienta a la red eléctrica, asegúrese de que
la tensión eléctrica sea la misma que el especificada en la placa de datos indicada en
esta herramienta. No conecte esta herramienta a una fuente con una tensión inadecuada,
podría dañar gravemente la herramienta y al usuario. En caso de duda, no conecte la
herramienta a la red eléctrica. Utilizar una fuente con un voltaje inferior al valor nominal
indicado en la placa de datos puede dañar el motor
Instrucciones de seguridad
relativas a la soldadura
• La soldadura produce vapores tóxicos y puede reducir el índice de oxígeno en el área
de trabajo. Trabaje siempre en un área bien ventilada. Evite la inhalación de los vapores
producidos durante la soldadura y utilice una mascarilla respiratoria adecuada cuando
sea necesario.
• Algunas piezas metálicas contienen recubrimientos de zinc, cadmio, plomo u otro metal.
Soldar estos recubrimientos puede producir vapores altamente tóxicos. Retire siempre
todos los recubrimientos antes de soldar.
• Si experimenta irritación en los pulmones, en la garganta o en los ojos mientras esta
soldando, DETENGA INMEDIATAMENTE la herramienta y respire aire fresco.
• La soldadura produce índices extremadamente altos de rayos UV. Para evitar dañar
los ojos, lleve SIEMPRE puesta una mascarilla adecuada para soldar. Bajo ninguna
circunstancia mire directamente al arco.
25
Page 26

ES
• El arco de luz producido por esta herramienta es potencialmente peligroso para la vista.
Asegúrese de que todas las personas que estén alrededor de la zona de trabajo lleven
protección ocular.
• Si existe la posibilidad de que otras personas estén cerca del área de trabajo, monte
una pantalla adecuada para protegerlas de la luz / resplandor.
• Sustituya la máscara de soldadura cuando la lente del visor esté dañada.
• Para evitar daños en la piel, vista SIEMPRE una chaqueta de manga larga a prueba de
fuego, guantes contra el calor y gorra. Manténgase bien cubierto.
• Aleje siempre los materiales inflamables (por ejemplo, mecheros y cerillas) de sus
prendas antes de comenzar a soldar.
• Asegúrese de tener un extintor cerca de la zona de trabajo. Las chispas y el contacto
accidental con algunos materiales pueden causar un incendio.
• Las chispas producidas durante la soldadura pueden encender materiales inflamables.
Asegúrese de que no existan materiales inflamables cerca de la zona de trabajo.
• Únicamente suelde cuando todas las piezas a soldar y el área de trabajo esté seca.
• No suelde contenedores sellados (por ejemplo, depósitos de combustible o aire
y bidones de aceite). El calor generado por la soldadura puede provocar que los
contenedores sellados exploten de repentinamente.
• Este atento al calor transferido. Las piezas de metal pueden conducir el calor fuera del
área de trabajo y provocar la ignición de materiales inflamables.
• Tenga cuidado con que las piezas soldadas ya que siguen calientes algún tiempo
después de la unión. Deje que se enfríen completamente antes de manipularlas o
dejarlas desatendidas.
• No suelde nunca donde existan gases, líquidos o polvos inflamables.
• Asegúrese siempre que haya una persona responsable cerca del área de trabajo para
avisarle en caso de incendio o para pedir ayuda en caso de emergencia.
• La utilización de soldadores de arco crea grandes campos magnéticos. Esto puede
perturbar el funcionamiento de los equipos electrónicos más sensibles. Las personas
con marcapasos deben consultar a su médico antes de utilizar esta herramienta.
• No sobrecargue el suministro eléctrico. Compruebe que su cableado principal es
capaz de proporcionar la corriente requerida de forma segura (véase “Características
técnicas”).
Uso del alambre
• La punta del hilo de soldadura puede estar muy afilada y puede llegar a perforar la piel.
• Mantenga la herramienta de soldar apagada hasta que esté listo para comenzar a
soldar.
• Nunca apunte con esta herramienta hacia personas o animales.
Características del producto
1 Cierre de la tapa de la carcasa
2 Interruptor de encendido/apagado
3 Interruptor 90/45 A
4 Regulador de velocidad del alambre
5 Indicador de sobrecarga térmica
6 Correa de transporte
7 Empuñadura del soldador
8 Gatillo
9 Boquilla
10 Cable de alimentación
11 Pinza de conexión a tierra
12 Máscara de soldador (montada)
13 Filtro
14 Visor
15 Lentes de protección
16 Abrazaderas para el marco (x 2)
17 Tuercas para la empuñadura (x 3)
18 Tornillos para la empuñadura (x 3)
19 Tornillos para el marco (x 2)
20 Mango
21 Máscara de soldador
22 Cierres de la máscara
23 Punta
24 Salida del alambre
25 Bobina de alambre
26 Husillo de la bobina de alambre
27 Alambre
Tornillos de la tapa del mecanismo de
28
alimentación del alambre
29 Tornillos de sujeción
30 Rodillo
31 Perilla de ajuste de tensión
32 Aislante de la bobina
33 Tornillos de sujeción del aislante de la bobina
34 Cierre del tensor
35 Rodillo tensor
36 Aislante
Accesorios (no mostrados)
• Martillo con cepillo
• Cepillo de alambre
26
Page 27

www.silverlinetools.com
Soldador sin gas Turbo Mig282562
Aplicaciones
Soldador sin gas MIG (gas de metal inerte) indicado para aplicaciones de soldadura
medianas y ligeras en acero. Compatible con alambre de núcleo fundente. Esta
herramienta no requiere el uso de gas ya que las características del alambre de núcleo
fundente proporcionan el gas de protección requerido. Este producto no está diseñado para
uso industrial o comercial.
Desembalaje
Desembale e inspeccione la herramienta con cuidado. Familiarícese con todas sus
características y funciones.
Asegúrese de que el embalaje contiene todas las partes y que están en buenas
condiciones. Si faltan piezas o están dañadas, solicite su sustitución antes de utilizar esta
herramienta.
Antes de usar
ADVERTENCIA: Desconecte siempre el soldador de la toma de corriente antes de
instalar o sustituir cualquier accesorio.
Nota: Esta herramienta dispone de conexión a tierra y debe conectarse a una toma de
corriente con toma a tierra. Nunca conecte esta herramienta a una toma de corriente sin
toma de tierra.
Instalación de la máscara para soldar
1. Utilice los cierres de la máscara (22) para instalar la máscara de soldador (21) que se
suministra plegada.
2. Cloque el mango (20) utilizando los tornillos y las tuercas (17 y 18). El mango debe
estar colocado dentro de la máscara.
3. Compruebe que la lente de protección (15) proteja adecuadamente el visor (14).
Instalar el visor incorrectamente puede dañarlo, además, la luz ultravioleta
podría provocar lesiones oculares al usuario.
4. Coloque el conjunto del visor en la máscara utilizando los tornillos (19) y las
abrazaderas (16) para el marco.
Instalación de la bobina de alambre
1. Gire el cierre de la tapa de la carcasa (1) y retírela.
2. Gire la parte superior de plástico del husillo de la bobina (26) en sentido antihorario y
retírela, incluido el muelle y la parte superior.
3. Introduzca la bobina de alambre (25) en el husillo de la bobina (se muestra montado),
colóquelo de tal forma que el alambre (27) pase a través de la guía. Introduzca el
alambre a través del lado indicado con una flecha.
4. Vuelva a colocar la parte superior, el muelle y la parte superior de plástico del husillo
del a bobina. Apriételas de tal forma que la bobina no se pueda enredar debido a su
propia tensión.
5. Afloje la perilla de ajuste de tensión (31) para que cierre del tensor (34) pueda
moverse libremente.
6. Suelte lentamente el extremo del cable de la bobina, tenga cuidado para que el cable
no se enrolle. Asegúrese de que la punta del alambre esté recta y pueda cortarse de
forma limpia.
7. Coloque lentamente el alambre dentro del extremo del aislante de la bobina (32),
a través del rodillo (30) y el aislante (36). Empuje el alambre ligeramente hacia el
aislante.
8. Mueva el cierre del tensor a su posición inicial y asegúrese de que el alambre esté
centrado en las ranuras del rodillo y el rodillo tensor (35).
9. Coloque el cierre del tensor tal como se muestra en la imagen A. Utilice la perilla de
ajuste de tensión si es necesario.
10. Coloque y cierre la tapa de la carcasa.
11. Retire la boquilla (9), desenrosque la punta (23) y retírela.
12. Conecte el soldador en la toma de corriente, encienda la herramienta y sujete el
soldador.
13. Coloque la boquilla lejos del soldador, de modo que el cable quede recto.
14. Asegúrese de que el soldador no esté tocando ninguna superficie. Ahora apriete el
gatillo (8). La herramienta debería impulsar el alambre a través del soldador (Imagen
B).
15. Si el alambre no funciona correctamente, desconecte el soldador de la toma de
corriente, abra la cubierta y apriete la perilla de ajuste de tensión (31). Los rodillos
impulsores deben estar lo suficientemente apretados para conducir el alambre a
través del soldador, no los apriete demasiado para evitar que el rodillo siga girando en
el caso de que el cable quede bloqueado.
16. Apague y desconecte la herramienta de la toma de corriente cuando el alambre salga
a través del extremo del soldador.
17. Vuelva a colocar la punta y la boquilla. Corte el alambre para que sobresalga
aproximadamente 5 mm de la punta del soldador.
Retirar la bobina de alambre y el extremo del
alambre
1. Abra la carcasa del soldador utilizando el cierre de la tapa de la carcasa (1).
2. Utilice unos alicates para sacar el alambre de la punta del soldador (23). Si la bobina
de alambre (25) no está completamente vacía, corte el alambre y mueva el cierre del
tensor (34) en el sentido opuesto al rodillo (30). Retire el conjunto del rodillo (13) fuera
del rodillo tensor (8).
3. Instale la nueva bobina de alambre siguiendo las indicaciones mostradas en la sección
“Instalación de la bobina de alambre”.
Importante
• Utilice siempre equipo de protección personal adecuado al trabajo que va a realizar.
El uso de esta herramienta requiere una máscara para soldar, guantes, vestimenta
resistente al calor y una máscara respiratoria cuando sea apropiado.
• Asegúrese de tener un extintor cerca del área de trabajo.
• Compruebe que el soldador y los accesorios no estén dañados. Preste especial
atención a las conexiones y cables. NUNCA UTILICE EL SOLDADOR si alguna de las
piezas está dañada.
• Compruebe que la carcasa esté cerrada correctamente.
• Coloque el soldador de manera que no se mueva o incline mientras lo esté utilizando.
Asegúrese de que haya al menos 500 mm de espacio libre alrededor del soldador
para que la herramienta pueda ventilarse adecuadamente.
Funcionamiento
ADVERTENCIA: Desconecte siempre el soldador de la toma de corriente antes de
instalar o sustituir cualquier accesorio.
Ajuste del soldador
• Para obtener una soldadura de buena calidad, el regulador de velocidad del alambre
(4) y el interruptor 90/45 A (3) deben estar ajustados de forma correcta. El ciclo de
trabajo del ajuste de 90 A es de 10 %. El ciclo de trabajo del ajuste de 45 A es de 60
%.
• La velocidad del alambre debe ser ajustada para producir un arco constante. El ajuste
correcto dependerá de la distancia, corriente, velocidad de la pistola y otros factores.
Experimente con velocidades de alambre hasta que encuentre un ajuste óptimo.
Nota: El soldador optimizará la corriente de salida dependiendo de la velocidad del
alambre. También monitorizará los niveles de corriente para mejorar la calidad de la
soldadura y reducir las salpicaduras.
Ciclo de trabajo
• Esta herramienta no está diseñada para soldar constantemente. Las soldaduras
continuas y excesivas pueden provocar un recalentamiento y dañar los componentes
internos.
• El ciclo de trabajo define la cantidad de minutos, cada diez minutos, durante los cuales
la herramienta puede soldar.
• Para un ciclo de trabajo del 10 %, el soldador puede utilizarse durante 1 minuto.
A continuación, la herramienta debe enfriarse durante 9 minutos. Para un ciclo de
trabajo del 60 %, el soldador puede utilizarse durante 6 minutos. A continuación, la
herramienta debe enfriarse durante 10 minutos.
• Si se excede en el ciclo de trabajo, la herramienta se detendrá automáticamente.
• Un ajuste de corriente reducida y una buena ventilación maximizarán el ciclo de
trabajo de esta herramienta.
Interruptor de protección térmica
• Esta herramienta está equipada con interruptor térmico contra sobrecargas (5). Si
sobrecarga la herramienta o la utiliza durante más tiempo de su ciclo de trabajo,
el indicador de sobrecarga térmica se encenderá y la herramienta se apagará
automáticamente.
• Deje que la herramienta se enfríe. El interruptor se reiniciará automáticamente una
vez que la herramienta esté lista para ser utilizada.
Preparación para soldar
• Asegúrese de que las piezas de trabajo estén limpias y libres de polvo, pintura o
suciedad.
• Todas las piezas de trabajo deben estar bien sujetas y tener un espacio de
aproximadamente 1 mm. En dicho espacio, se formará la junta soldada.
• Compruebe que no existan materiales inflamables cerca del área de trabajo.
27
Page 28

ES
• Coloque las pinzas de conexión a tierra (11) en una parte limpia de la pieza de trabajo,
lo más cerca posible del área donde se realizará la junta de soldadura.
• Asegúrese de que haya una persona responsable y un extintor cercano.
• Conecte la herramienta en la toma de corriente.
Soldadura
ADVERTENCIA: Utilizar correctamente un soldador requiere habilidad técnica. Si se utiliza
de forma incorrecta, puede ser peligroso. La información que se detalla a continuación es
simplemente una guía general. Si no está completamente seguro de cómo utilizar esta
herramienta de manera segura, NO LA UTILICE.
1. coloque el interruptor de encendido/apagado (2) en la posición “ON” (encendido).
2. Sujete la empuñadura soldador (7) en una mano y la máscara (12) en la otra.
3. Coloque la punta del soldador (23) a una distancia de 10 mm de la pieza de trabajo, en
un ángulo de aproximadamente 75˚.
4. Sujete la máscara sobre su rostro y apriete el gatillo (8).
5. Ahora se producirá un arco entre el metal y la punta. Apriete el gatillo durante 1 - 2
segundos y suéltelo.
6. Deje que el alambre se enfríe un poco antes de quitarse la máscara. Si los ajustes son
los correctos, se debe formar un “punto” de soldadura.
7. Si la soldadura no penetró completamente el metal, incremente el voltaje. Si observa
un agujero en el metal, disminuya el voltaje.
• Practique “puntos” de soldadura hasta encontrar el ajuste de voltaje requerido.
• Existe otra técnica de soldadura MIG denominada “soldadura de ranura”, donde los
orificios perforados de la superficie quedarán rellenos de material de soldadura. La
soldadura por puntos solo es recomendable para materiales no demasiado gruesos y
puede ser difícil de realizar utilizando un soldador MIG.
• Para formar una junta de soldadura, sostenga el gatillo durante más tiempo y mueva
el soldador lentamente hacia adelante.
• Si los ajustes del soldador son correctos, el arco debería ser constante y producir un
sonido crujiente.
• Si escucha alguna explosión o le cuesta mantener el arco, ajuste la velocidad del
alambre. Si nota que la pistola “empuja hacia atrás”, reduzca la velocidad del alambre.
• Lleva tiempo adquirir la habilidad para lograr soldaduras de alta calidad. La práctica y
la buena preparación deben dar como resultado soldaduras de calidad.
Accesorios
Existen gran variedad de accesorios, incluido equipo de protección personal para esta
herramienta disponibles en su distribuidor Silverline más cercano o a través de www.
toolsparesonline.com.
Mantenimiento
ADVERTENCIA: Desconecte siempre la herramienta de la toma eléctrica antes de
realizar cualquier tarea de mantenimiento o limpieza.
Sustitución de la punta del soldador
• Con el paso del tiempo la punta del soldador (23) se puede desgastar. Esto hará que
sea difícil controlar el arco.
1. Para reemplazar la punta, retire la boquilla (9) de la pistola y desenrosque la punta
usada.
2. Compruebe que la nueva punta sea del tamaño correcto para el alambre que vaya a
utilizar.
3. Enrosque la nueva punta sobre el extremo del alambre y enrósquela en la pistola del
soldador. Vuelva a colocar la boquilla (1).
Limpieza
Desconecte siempre la herramienta de la toma eléctrica antes de realizar cualquier tarea
de mantenimiento o limpieza.
• Mantenga la herramienta siempre limpia. Limpie siempre el polvo y las partículas y
nunca deje que los orificios de ventilación se bloqueen.
• Utilice un cepillo suave o un paño seco para limpiar la herramienta. Si dispone de un
compresor de aire comprimido, sople con aire seco y limpio para limpiar los orificios
de ventilación.
Reciclaje
Deshágase siempre de las herramientas eléctricas adecuadamente respetando las normas
de reciclaje indicadas en su país.
• No deseche las herramientas y aparatos eléctricos junto con la basura convencional.
Recíclelos siempre en puntos de reciclaje.
• Póngase en contacto con la autoridad local encargada de la gestión de residuos
para obtener más información sobre cómo reciclar este tipo de herramientas
correctamente.
Solución de problemas
Problema Causa Solución
El rodillo (30) no gira Falta de alimentación Encienda el soldador
Ajuste el regulador de velocidad del alambre (4) al mínimo Inclemente la velocidad del alambre
El rodillo (30) gira pero no se puede introducir el
alambre (27)
El soldador se detiene durante el funcionamiento Se ha superado el ciclo de trabajo. El indicador de sobrecarga
Soldadura de mala calidad Ajuste de corriente y velocidad del alambre incorrectos Ajuste el regulador de velocidad del alambre (4) y el
Rodillo destensado Ajuste la perilla de ajuste de tensión (31)
Aislante (36) dañado Sustituya el aislante
Alambre en la punta (23) Retire el alambre de la punta
térmica (5) se ha iluminado
Deje enfriar el soldador durante 20 – 30 minutos
interruptor 90/45 A
28
Page 29

www.silverlinetools.com
Soldador sin gas Turbo Mig282562
Garantía Silverline Tools
Garantía
Este producto Silverline dispone de una garantía de
3 años.
Registre el producto en www.silverlinetools.com antes de que transcurran 30 días a partir
de la fecha de compra para obtener la garantía de 3 años. El periodo de garantía comienza
desde la fecha indicada en su recibo de compra.
Condiciones
El periodo de garantía entra en vigor a partir de la fecha indicada en el recibo de compra.
GUARDE EL RECIBO DE COMPRA
En caso de que el producto se averíe antes de que transcurran 30 días desde la fecha de
compra, devuélvalo al distribuidor donde lo compró, junto con el recibo y los detalles de la
avería. Le sustituiremos el producto o le reembolsaremos el importe.
Si el producto se avería después de que transcurran 30 días desde la fecha de compra,
devuélvalo a:
Servicio Técnico Silverline Tools
PO Box 2988
Yeovil
BA21 1WU, Reino Unido.
La reclamación siempre debe presentarse durante el periodo de garantía.
Antes de poder realizar cualquier trabajo de reparación, deberá entregar el recibo de compra
original en el que se indica la fecha de compra, su nombre, dirección y el lugar donde lo
adquirió.
También deberá indicar claramente los detalles del fallo a reparar.
Las reclamaciones presentadas dentro del periodo de garantía deberán ser verificadas por
Silverline Tools para averiguar si las deficiencias son consecuencia de los materiales o de la
mano de obra del producto.
Los gastos de transporte no son reembolsables. Los productos a devolver deberán
estar limpios y en buenas condiciones para su reparación, debiendo empaquetarse
cuidadosamente con el fin de prevenir daños o lesiones durante el transporte. Nos
reservamos el derecho a rechazar envíos incorrectos o inseguros.
Todas las reparaciones serán realizadas por Silverline Tools o por un servicio técnico de
autorizado.
La reparación o sustitución del producto no prolongará el periodo de garantía.
Si los defectos están cubiertos por la garantía, la herramienta será reparada sin cargo
alguno (salvo los gastos de envío), o bien la sustituiremos por una herramienta en perfecto
estado de funcionamiento.
Las herramientas o piezas que hayan sido sustituidas serán propiedad de Silverline Tools.
La reparación o sustitución del producto bajo garantía aporta beneficios adicionales a sus
derechos legales como consumidor, sin afectarlos.
Qué está cubierto:
Silverline Tools deberá comprobar si las deficiencias se deben a materiales o mano de obra
Registro del producto
Visite: silverlinetools.com, seleccione el botón de registro e indique:
• Sus datos personales
• Detalles del producto e información de compra
El certificado de garantía le será enviado en formato PDF. Imprímalo y guárdelo con el
producto.
defectuosos dentro del periodo de garantía.
En caso de que cualquier pieza no estuviera disponible o estuviera fuera de fabricación,
Silverline Tools la sustituirá por una pieza funcional con las mismas características.
Uso del producto en la Unión Europea.
Qué no está cubierto:
Silverline Tools no garantiza las reparaciones causadas por:
Desgaste normal por uso adecuado de la herramienta, por ejemplo hojas, escobillas, correas,
bombillas, baterías, etc...
La sustitución de cualquier accesorio suministrado: brocas, hojas, papel de lija, discos de
corte y otras piezas relacionadas.
Daño accidental, averías debidas a uso o cuidado negligente, uso incorrecto, negligencia,
funcionamiento o manejo indebido del producto.
Utilizar del producto para una finalidad distinta.
Cualquier cambio o modificación del producto.
El uso de piezas y accesorios que no sean recambios originales de Silverline Tools.
Instalación incorrecta (excepto si fue realizada por Silverline Tools).
Reparaciones o alteraciones realizadas por servicios técnicos no autorizados por Silverline
Tools.
Las reclamaciones distintas a las indicadas en las presentes condiciones de garantía no
estarán cubiertas.
Garantía para baterías
Las baterías Silverline disponen de 30 días de garantía. Si durante el período de garantía
apareciera algún defecto en la batería debido a la fabricación o materiales defectuosos,
Silverline se hará cargo de la reparación o sustitución del producto de forma gratuita. Está
garantía no se aplica al uso comercial por desgaste de uso normal, daños accidentales o por
mal uso de este producto.
Declaración de conformidad CE
El abajo firmante: Mr Darrell Morris
Autorizado por: Silverline Tools
Declara que el producto:
Código de identificación: 282562
Descripción: Soldador sin gas Turbo Mig
Está en conformidad con las directivas:
• Directiva de baja tensión 2006/95/CE
• Compatibilidad electromagnética 2004/108/CE
• Directiva RoHS 2011/65/UE
• EN60974-1:2012
• EN60974-10:2007
Organismo notificado: TÜV Rheinland
La documentación técnica se conserva en: Silverline Tools
Fecha: 09/09/15
Firma:
Mr Darrell Morris
Director General
Nombre y dirección del fabricante:
Powerbox International Limited, Nº de registro: 06897059. Dirección legal:
Central House, Church Street, Yeovil, Somerset BA20 1HH, Reino Unido.
29
Page 30

IT
La targhetta identificativa del vostro elettroutensile potrebbe riportare dei simboli. Tali
simboli sono una rappresentazione grafica che mira a evidenziare importanti informazioni
sul prodotto o istruzioni per il suo utilizzo corretto e sicuro.
Indossare protezioni per l’udito
Indossare protezioni per gli occhi
Indossare una protezione per le vie respiratorie
Indossare una protezione per la testa
Traduzione delle istruzioni originali
Abbreviazioni tecniciDescrizione dei simboli
V Volt
~, AC Corrente alternata
A, mA Ampere, milli-Amp
Ø Diametro
W, kW Watt, kilowatt
Indossare protezioni per le mani
Indossare indumenti di protezione
Indossare scarpe di protezione
Leggere il manuale di istruzioni
Costruzione di Classe I (massa di protezione)
Usare solo all'interno!
¡Peligro! Gases o humo tóxico
Pericolo di incendio!
Rischio di fulminazione!
Caratteristiche tecniche
Tensione di ingresso: ........................................................230V~ 50Hz
Corrente di ingresso: ..................................13.5A (picco), 4.6A (media)
Efficienza: .....................................................................................80%
Campo corrente di uscita: .........................................................45/90A
Valore ciclo lavoro: ........................................10% @ 90A, 60% @ 45A
Nessuna tensione di uscita a vuoto: ...............................................31V
Tensione di uscita: .......................................18.5V (90A), 16.25V (45A)
Filo bobina peso massimo: ....................................................... 0.45 kg
Classe di isolamento: .........................................................................H
Grado di protezione: ....................................................................IP21S
Filo: ................................................................0.8-0.9 mm filo animato
Gamma di spessori saldatura (acciaio): ..............................1.2-6.5 mm
Fusibile interno: .............................................................................16A
Fusibile della spina (solo Regno Unito) ...........................................13A
Classe di protezione: ......................................................................
Torcia lunghezza del cavo: .......................................................... 2.0 m
Terra Lunghezza del cavo: .......................................................... 1.5 m
Lunghezza del cavo elettrico: ......................................................2.0 m
Dimensioni (H x L x W): ....................................... 295 x 340 x 180 mm
Peso: ........................................................................................... 13 kg
Superfici calde - NON toccare!
NON usare se esposti alla pioggia o in ambienti umidi!
Attenzione!
¡Peligro! Radiaciones ultravioletas
Protezione Ambientale
I rifiuti di prodotti elettrici non devono essere smaltiti con i rifiuti domestici.
Nel caso in cui esistano strutture, provvedere al riciclaggio. Verificare con le
autorità locali o il rivenditore per consigli sul riciclaggio.
Conforme alle normative pertinenti e gli standard di sicurezza.
Come parte del nostro continuo sviluppo del prodotto, le specifiche dei prodotti
Silverline possono modificare senza preavviso
30
Page 31

www.silverlinetools.com
Turbo mig senza gas282562
Avvertenze generali di sicurezza
ATTENZIONE! Quando si utilizzano utensili elettrici, le precauzioni di sicurezza di base
dovrebbero essere sempre seguite per ridurre il rischio di incendi, scosse elettriche e
lesioni personali incluse le seguenti informazioni di sicurezza. Leggere tutte le istruzioni
prima di utilizzare il prodotto e conservare queste istruzioni per un utilizzo futuro.
ATTENZIONE: Questo apparecchio non è destinato all'uso da parte di persone (inclusi
i bambini) con capacità ridotta, fisiche o mentali o con mancanza di esperienza o di
conoscenza, a meno che non siano controllati o istruiti all'uso dell'apparecchio da
una persona responsabile della loro sicurezza. I bambini devono essere sorvegliati per
assicurarsi che non giochino con l'apparecchio.
ATTENZIONE: Utilizzare lo strumento, accessori, attrezzi, ecc in conformità alle presenti
istruzioni, tenendo conto delle condizioni di lavoro e il lavoro da svolgere. L’uso di utensili
elettrici per usi diversi da quelli consentiti potrà dar luogo a situazioni di pericolo.
Il termine “elettroutensile” nelle avvertenze si riferisce ad un elettroutensile di rete fissa
(con filo) o un utensile a batteria (senza filo).
1 - Mantenere l'area di lavoro libero - Il disordine e panchine invitano gli
infortuni
2 - Considerare l'ambiente di lavoro
- Non esporre gli utensili alla pioggia
- Non utilizzare gli strumenti in luoghi umidi o bagnati
- Mantenere l'area di lavoro ben illuminata
- Non usare utensili in presenza di liquidi o gas infiammabili
3 - Protezione contro le scosse elettriche - Evitare il contatto fisico con
superfici collegate a terra (p.es. tubi, caloriferi, fornelli, frigoriferi)
4 - Tenere le altre persone lontane - Non consentire a persone, soprattutto
bambini, non coinvolti nei lavori toccare l'utensile o il cavo di prolunga e
tenerli lontani dall'area di lavoro
5 - Riporre gli elettroutensili - Quando non è in uso, gli strumenti devono
essere conservati in un luogo chiuso a chiave asciutto, fuori dalla portata dei
bambini
6 - Non forzare lo strumento - Si eseguirà il lavoro meglio e più sicuro alla
velocità per la quale è stato previsto
7 - Utilizzare lo strumento giusto - Non forzare piccoli attrezzi per fare il lavoro
di un attrezzo pesante
Non usare utensili per scopi non previsti, ad esempio non utilizzare seghe
circolari per tagliare grossi tronchi
8 - Abbigliamento adeguato
- Non indossare abiti larghi o gioielli , che possono rimanere impigliati nelle
parti in movimento
- Calzature di sicurezza adatte sono consigliate quando si lavora all'aperto .
- Indossare rivestimento di protezione per contenere i capelli lunghi
9 - Utilizzare dispositivi di protezione
- Usare occhiali di sicurezza
- Utilizzare una mascherina antipolvere , se le operazioni di lavoro creano
polvere
ATTENZIONE : Non utilizzare dispositivi di protezione o abbigliamento adeguato
che può causare lesioni personali o aumentare la gravità di un infortunio .
10 - Collegare apparecchiature di aspirazione - Se lo strumento è previsto per
il collegamento di aspirazione della polvere e di raccolta delle apparecchiature,
assicurarsi che siano collegati e utilizzati correttamente
11 - Non abusare del cavo di alimentazione - Non tirare mai il cavo di
alimentazione per scollegarlo dalla presa. Tenere il cavo di alimentazione
lontano da bordi di calore , olio e bordi taglienti . Cavi di alimentazione
danneggiati o aggrovigliati aumentano il rischio di scosse elettriche
12 - Lavoro sicuro - Dove possibile utilizzare pinze o morse per bloccare il lavoro .
E 'più sicuro che usare le mani
13 - Non sbilanciarsi - Mantenere sempre la posizione e l'equilibrio in ogni
momento
14 - Mantenere gli utensili elettrici con cura
- Mantenere gli utensili da taglio affilati e puliti rende più facile da controllare lo
strumento e meno probabilità di legarsi o bloccare il pezzo in lavorazione
- Seguire le istruzioni per la lubrificazione e la sostituzione degli accessori
- Controllare i cavi di alimentazione degli strumenti periodicamente e se
danneggiato mandarle in riparazione presso un centro di assistenza
autorizzato
- Controllare che i cavi di prolunga periodicamente e sostituirlo se danneggiato
- Mantenere le impugnature asciutte, pulite e prive di olio e grasso
ATTENZIONE: Molti incidenti sono causati da una scarsa manutenzione.
15 - Scollegare i strumenti – Scollegare lo strumento dalla rete elettrica, quando
non è in uso, prima della manutenzione e durante il cambio di accessori come
lame, punte e frese.
ATTENZIONE: L'uso di accessori o ricambi non raccomandati dal produttore può comportare
un rischio di lesioni alle persone.
16 - Rimuovere le chiavi di registro e chiavi - formare l'abitudine di controllare
per vedere che le chiavi di registro vengono rimossi dallo strumento prima di
accenderlo
17 - Evitare avviamenti accidentali - Controllare che l'interruttore sia in posizione
" off ' per il collegamento ad una presa di rete o durante l'inserimento di una
batteria, o al quando ritirando o trasportando lo strumento
ATTENZIONE : L’avviamento non intenzionale di uno strumento è in grado di causare lesioni
importanti .
18 - Utilizzare prolunghe esterne - Quando lo strumento viene utilizzato
all'aperto, utilizzare solo prolunghe per uso esterno e in modo marcato . L'uso
di un cavo di prolunga adatto per l'uso esterno riduce il rischio di scosse
elettriche
19 - Fare attenzione
- Fate attenzione a quello che state facendo , usare il buon senso e non
azionare l'utensile quando si è stanchi
- Non utilizzare uno strumento di potere , mentre si è sotto l'effetto di droghe ,
alcol o medicinali
ATTENZIONE : Un attimo di distrazione durante l'uso può causare gravi lesioni personali.
20 - Controllare le parti danneggiate
- Prima di un ulteriore utilizzo dell'utensile , esso deve essere attentamente
controllato per determinare che funzioni correttamente per svolgere la
funzione prevista
- Verificare l'allineamento di parti in movimento , legando di parti in
movimento , danni ai componenti , montaggio e altre condizioni che possono
compromettere il funzionamento
- Una guardia o altre parti danneggiate devono essere adeguatamente riparate
o sostituite da un centro di assistenza autorizzato se non diversamente
indicato nel presente manuale di istruzioni
- Gli interruttori difettosi devono essere sostituiti da un centro di assistenza
autorizzato
ATTENZIONE: Non utilizzare lo strumento se l' interruttore on / off non si accende e spegne .
L'interruttore deve essere riparata prima di utilizzare l' utensile .
21 - Far riparare da personale qualificato - Questo utensile elettrico è conforme
alle norme di sicurezza. Le riparazioni devono essere eseguite esclusivamente
da personale qualificato, altrimenti questo può comportare un notevole
pericolo per l'utente
ATTENZIONE: Per la manutenzione utilizzare solo parti di ricambio identiche.
ATTENZIONE: Se il cavo di alimentazione è danneggiato, deve essere sostituito dal
produttore o da un centro di assistenza autorizzato.
22 - La presa dello strumento deve corrispondere alla presa di corrente - Non
modificare la spina in alcun modo. Non usare adattatori per spine con utensili
elettrici messa a terra (messa a terra). Le spine non modificate e le prese
adatte allo scopo riducono il rischio di scosse elettriche
23 - In caso di funzionamento di un utensile elettrico all'esterno utilizzare
un dispositivo di corrente residua (RCD) - Utilizzo di un RCD riduce il
rischio di scosse elettriche
NB: Il termine "dispositivo di corrente residua (RCD)" può essere sostituito con il termine
"interruttore differenziale (salvavita)" o "interruttore differenziale (ELCB)".
ATTENZIONE: Prima di collegare uno strumento ad una fonte di alimentazione (interruttore
di rete, presa, ecc), assicurarsi che la tensione è la stessa di quella indicata sulla targhetta
dello strumento. Una fonte di alimentazione con tensione superiore a quella specificata per
lo strumento è in grado di causare gravi lesioni per l'utente, e danni allo strumento. In caso
di dubbio, non attaccare lo strumento. Utilizzando una fonte di alimentazione con tensione
inferiore a quella di targa è dannoso per il motore.
31
Page 32

IT
Sicurezza di saldatura
• La saldatura produce fumi tossici e può ridurre la quantità di ossigeno nell'ambiente di
lavoro. Lavorare sempre in aree ben ventilate. Evitare l'inalazione dei fumi di saldatura,
se necessario usare una maschera respiratoria appropriata
• Alcune parti metalliche potrebbero essere zincate, o contenere piombo, cadmio o altri
rivestimenti. La saldatura attraverso tali rivestimenti può produrre fumi altamente
tossici. Rimuovere sempre il rivestimento dal metallo prima di saldare
• Se durante la saldatura l'inalazione dei fumi provoca l'irritazione dei polmoni, della
gola, delle vie respiratorie o degli occhi, INTERROMPERE IMMEDIATAMENTE e recarsi
all'esterno e respirare aria fresca e pulita
• La saldatura produce alti livelli di radiazioni ultraviolette. Per evitare danni alla vista
indossare SEMPRE una maschera facciale omologata per la saldatura. Non rivolgere
mai lo sguardo nudo direttamente sull'arco
• La luce prodotta quando eseguendo la saldatura può essere bello da vedere, soprattutto
per i bambini. Evitare sempre le altre persone di visualizzare la luce del saldatore con
occhi non protetti
• Se esiste la possibilità che altre persone si avvicinino all'area di lavoro utilizzare
sistemi di schermatura adatti per proteggere le altre persone dalle radiazioni e
dall'abbagliamento
• Sostituire sempre il vetro della maschera di protezione non appena mostra segni di
usura o danni
• Per evitare danni alla pelle indossare SEMPRE un camice a maniche lunghe di materiale
ignifugo, guanti di materiale resistente al calore e un copricapo. Mantenere il corpo
coperto
• Rimuovere tutti i materiali infiammabili (accendini, fiammiferi, ecc.) dalle tasche dei
propri indumenti prima della saldatura
• Tenere sempre un estintore a portata di mano nell'area di lavoro.
• Le scintille generate durante la saldatura può incendiare materiali infiammabili
facilmente nella zona di saldatura, per cui è importante rimuovere materiali infiammabili
prima di iniziare la saldatura
• Saldare solo quando tutti i pezzi da lavorare e l'area di lavoro sono asciutti
• Non saldare contenitori sigillati (serbatoi di carburante, serbatoi di aria e gas, bidoni di
olio). Il calore prodotto durante la saldatura può provocare l'esplosione improvvisa e
inaspettata dei contenitori sigillati
• Fare attenzione al trasferimento di calore. Le parti metalliche essere ancora calde
• quando vengono spostate e possono trasferire il calore al di fuori dell'area di lavoro e
provocare l'accensione di materiali infiammabili
• Notare che le parti saldate resteranno calde per un certo tempo anche dopo la
saldatura. Dare tempo alle parti lavorate di raffreddare prima di maneggiarle o di
lasciare l'area di lavoro non presidiata
• Non iniziare mai la saldatura se sono presenti gas, liquidi o fumi infiammabili
• Accertarsi di avere sempre una persona responsabile vicina che possa avvertire in caso
di incendio o che sia pronta ad assistere in caso di emergenze
• L'uso delle saldatrici crea potenti campi magnetici che potrebbero interferire con il
funzionamento di apparecchiature elettroniche sensibili. Se si indossa un pace-maker
sarà necessario consultare un medico prima di usare una saldatrice
• Non sovraccaricare la rete di alimentazione. Controllare che il cablaggio della rete sia in
grado di erogare con sicurezza la corrente necessaria (vedi le caratteristiche tecniche)
Alimentazione filo
• Attenzione: La punta del filo di saldatura può essere molto forte, ed è alimentato con
sufficiente forza per forare la pelle
• Tenere la saldatrice spenta fino a quando si è pronti per iniziare la saldatura. Non
puntare mai la torcia verso persone o animali
Familiarizzazione del prodotto
1. Rilascio del coperchio carcassa
2. Interruttore On/Off
3. Interruttore 90/45A
4. Ghiera di velocità alimentazione filo
5. Indicatore di surriscaldamento
6. Cinghia di trasporto
7. Maniglia a torcia
8. Grilletto
9. Sindone
10. Cavo principale
11. Morsa a terra
12. Visiera (assemblata)
13. Cassetto a filtro
14. Vetro di saldatura
15. Vetro di sicurezza
16. Fermi telaio (x 2)
17. Dadi per maniglia (x 3)
18. Bulloni per maniglia (x 3)
19. Viti per telaio (x 2)
20. Maniglia
21. Mascherina anti-saldatura
22. Fermi a gancio per visiera
23. Punta
24. Uscita alimentazione filo
25. Bobina a filo
26. Meccanismo a mandrino
27. Filo
28. Viti per coperchio meccanismo mandrino
29. Viti per fodera principale
30. Rullo di alimentazione
31. Ghiera di tensione
32. Liner a bobina
33. Viti per il liner a bobina
34. Fermo di tensione
35. Rullo di tensione
36. Liner
32
Accessori (non illustrato)
• Martellino
• Spazzola metallica
Page 33

www.silverlinetools.com
Turbo mig senza gas282562
Destinazione D'Uso
Saldatore per compiti medio-leggeri MIG (Metal Inert Gas) applicazioni di saldatura, per
l'utilizzo con vari tipi di acciaio, utilizzando appositi fili per saldatura animati. Non richiede
una connessione gas siccome il filo animato fornisce il gas di protezione in uso. Questo
prodotto non è progettato per uso commerciale, artigianale o industriale.
Disimballaggio dello strumento
• Disimballare con cura e controllare il vostro strumento. Familiarizzarsi completamente
con tutte le sue caratteristiche e funzioni
• Assicurarsi che tutte le parti dello strumento sono presenti e in buone condizioni. In
caso di parti mancanti o danneggiate, sostituite tali parti prima di utilizzare questo
strumento
Prima dell'uso
AVVERTENZA: Staccare sempre la saldatrice dalla rete elettrica e lasciarla
raffreddare completamente prima di tentare di adattare o sostituire qualsiasi parte.
NB:Questo strumento è messo a terra e deve essere collegato esclusivamente alla rete con
collegamento a terra. Non tentare di usarlo senza una connessione di terra.
Assemblaggio della visiera
Assemblare la maschera come mostrato.
1. Utilizzare i fermi a gancio (22) per assemblare la mascherina di protezione (21) nella
sua forma normale
2. Inserire la maniglia (20) utilizzando i dadi e bulloni adeguati (17 e 18). La maniglia
deve essere all'interno del corpo maschera di saldatura per proteggere la mano
dell'operatore da schizzi
3. Assicurarsi che il vetro di sicurezza (15) protegge il vetro di saldatura (14) da spruzzi
di saldatura. Se la lastra di saldatura è montata in modo che lo strato sia esterno
può essere danneggiato dagli schizzi e consentire pericolosa luce ultravioletta di
raggiungere gli occhi dell'operatore
4. Inserire il gruppo vetro nella maschera da saldatore con le viti del telaio (19) e clip
tenuta telaio (16)
Installazione filo
Questo saldatore richiede filo animato 0.8-0.9mm
1. Girare il rilascio del coperchio carcassa (1) e sollevare il coperchio della custodia
2. Ruotare la parte superiore di plastica del meccanismo mandrino (26) in senso
antiorario e rimuoverlo delicatamente con la molla e sezione superiore
3. Posizionare il filo della bobina in dotazione (25) sopra il mandrino portabobina
(mostrato già presente), il posizionamento in modo che il filo (27) alimenterà largo
della bobina del filo dal lato più vicino come indicato dalla freccia
4. Rimontare la sezione, la molla e plastica superiore del meccanismo a mandrino.
Assicurarsi che la molla fornisce tensione sufficiente in modo che la bobina non si
svela da sola
5. Rilasciare la manopola di tensione (31), in modo che il fermo di tensione (34) può
essere sposato liberandolo come indicato
6. Rilasciare con cautela la fine del filo dal rocchetto e fare attenzione a non lasciare
che il filo si srotola. Assicurarsi che la punta del filo è diritta e viene interrotta in modo
pulito
7. Lentamente alimentare il filo nella parte finale del liner (32) attraverso il rullo di
alimentazione (30) e in linea (36) e spingere un po 'di strada in Liner con attenzione
8. Ruotare il fermo di tensione in posizione, assicurandosi che il filo sia centrato nelle
scanalature del rullo di alimentazione e rullo di tensione (35)
9. Riposizionare il fermo di tensione come mostrato nella immagine A. La tensione può
essere regolata ruotando la manopola di tensione
10. Chiudere il coperchio e fissarlo con la cassa del coperchio di uscita
11. Togliere il sindone (9) dalla torcia e svitare la punta (23) e rimuovere
12. Collegare il saldatore alla rete elettrica, accendere, e tenere la torcia
13. Spostare la torcia lontano dalla macchina, in modo che il cavo torcia è diritta
14. Assicurarsi che la torcia non tocchi nulla, e premere il grilletto (8). Il meccanismo di
alimentazione del filo dovrebbe guidare il filo attraverso la torcia, immagine B
15. Se il filo non è guidato attraverso, scollegarlo dalla rete elettrica, aprire il coperchio e
serrare la manopola di tensione (31). I rulli di trasmissione devono essere abbastanza
stretti per guidare il filo attraverso la torcia, ma non così stretto da impedire il rullo
motore di scivolare se il filo diventa bloccato
16. Quando il filo è spinto fuori dalla fine della torcia, spegnere e scollegare dalla rete
elettrica
17. Rimontare la punta e il sindone, e tagliare il filo in modo che sia circa cinque mm dalla
punta
Rimozione bobina di filo e alla fine del filo
1. Aprire il coperchio del saldatore con il rilascio coperchio carcassa (1)
2. Usare un paio di pinze per rimuovere l'ultimo della vecchia bobina attraverso la punta
(15) della torcia. Se la vecchia bobina (25) non è vuota, tagliare il filo al rocchetto e
rilasciare la manopola di tensione (31) e spostare il fermo di tensione (34) dal rullo di
alimentazione (30)
3. quindi procedere in base alle istruzioni per 'Installazione di filo' sopra
Importante
• Indossare sempre dispositivi di protezione adeguati per il lavoro che si sta per fare.
L'utilizzo di questa macchina richiede una maschera di saldatura, guanti, indumenti
resistenti al calore e, se del caso, un respiratore
• Assicurarsi sempre di avere un adeguato estintore vicino alla zona di lavoro
• Controllare sempre la macchina per danni o usura. Prestare particolare attenzione ai
cavi. Se si riscontrano danni, NON USARE
• Verificare che tutte involucri o rivestimenti siano chiusi e fissati
• Posizionare il saldatore in modo tale che non si muove o la punta in uso. Assicurarsi
che ci siano almeno 500 mm di spazio libero attorno al saldatore per consentire una
corretta ventilazione
Operazione
ATTENZIONE: Staccare sempre la saldatrice dalla rete elettrica e lasciarlo
raffreddare completamente prima di tentare di adattare o sostituire qualsiasi parte.
Impostazione della macchina
• Per ottenere una saldatura di buona qualità, il selettore del filo di alimentazione
velocità (4) e interruttore 90 / 45A (3) deve essere impostato correttamente.
L'impostazione di dazio del 10% fornisce la corrente 90A e l'impostazione di dovere il
60% fornisce la corrente 45A
• La velocità del filo deve essere regolato per fornire un arco costante. L'impostazione
corretta dipende dalla distanza, corrente, velocità torcia, e altri fattori. Esperimento con
filo accelera fino a trovare una regolazione ottimale
NB: L'uscita di corrente ottimizza il saldatore a seconda della velocità del filo e monitorati i
livelli attuali per migliorare la qualità della saldatura e ridurre schizzi
Ciclo di lavoro
• La macchina non è stata progettata per la saldatura continua. Eccessiva saldatura
continua causerebbe il surriscaldamento e danni ai componenti interni
• Il ciclo di lavoro definisce il numero di minuti, in ogni dieci minuti, che la macchina può
saldare
• Per un ciclo di lavoro del 10%, la macchina può essere utilizzata per 1 minuto, e quindi
deve essere consentito 9 minuti per raffreddare. Il ciclo di lavoro del 60% permette 6
minuti in ogni 10 minuti
• Se viene superato il ciclo di lavoro, la macchina automaticamente si spegne
• Utilizzare la macchina con le impostazioni correnti ridotti, e il mantenimento di una
buona ventilazione massimizzerà il ciclo di lavoro
Spegnimento termico
• Quando si avvia la protezione termica l'indicatore surriscaldamento (5) si accende e il
saldatore si spegne
• Attendere che la macchina si raffreddi. Il ritaglio resetta automaticamente una volta
che la macchina è pronta per essere utilizzata
Preparazione per saldare
• Assicurarsi che le parti da unire siano puliti e privi di ruggine, vernice o altri
rivestimenti
• Tutte le parti devono essere ben supportato, in modo che ci sia uno spazio di circa 1
mm dove si intende formare il giunto saldato
• Verificare che non vi siano materiali infiammabili nelle vicinanze della zona di lavoro
• Fissare il morsetto di massa (11) ad una superficie pulita di una delle parti, il più vicino
possibile alla quale sarà il giunto
• Assicurarsi che vi sia una persona responsabile ed un estintore funzionante a portata
di mano
• Collegare la macchina alla rete elettrica
Saldatura
AVVISO: Utilizzare un saldatore correttamente è una competenza tecnica. Un saldatore
usato in modo errato può essere molto pericoloso. Le informazioni presentate qui di seguito
è solo una guida generale. Se non si è del tutto sicuri nella vostra capacità di utilizzare
questo strumento in modo sicuro NON USARE.
33
Page 34

IT
1. Spostare l'interruttore On / Off (2) in posizione 'ON'
2. Impostare la ghiera di velocità alimentazione filo (4) per la velocità corretta o per la
posizione intermedia se non siete sicuri della impostazione corretta, quindi regolare in
seguito, se necessario.
3. Tenere la maniglia della torcia (7) in una mano e la visiera (12) nell'altra
4. Posizionare la torcia in modo che la punta (23) è circa 10 mm di distanza dal metallo,
con un angolo di circa 75˚
5. Tenere la visiera sul viso e premere il grilletto (8)
6. Un arco dovrebbe colpire tra il metallo e la punta. Tenere il grilletto per 1-2 secondi e
rilasciare
7. Lasciare che la saldatura si raffreddi leggermente e spostare la maschera dal viso. Se
le impostazioni sono corrette, un “puntino” di saldatura deve formarsi
8. Se la saldatura non ha completamente penetrato il metallo, aumentare l'impostazione
della tensione. Se un foro è stato fatto nel metallo, ridurre l'impostazione della
tensione
• Pratica fare saldature fino a quando si è sicuri di usare la macchina, e selezionare le
impostazioni
• Un'alternativa per saldatura a punti adatti per un saldatore mig è una saldatore a spina
dove la superficie superiore ha fori lungo una superficie ed una bobina di materiale
di apporto riempie ogni buco. Punti di saldatura sono possibili per materiali più
sottili con una saldatrice mig ma le saldature sono più difficili e possono non essere
soddisfacente
• Per formare una saldatura 'cucitura', tenere premuto il pulsante più a lungo, e
spostare lentamente la torcia in avanti, allo stesso tempo
• Se le impostazioni della macchina sono corrette, l'arco deve essere costante, e
produrre un suono scoppiettante.
• Se si sente un rumore di scoppio, o lotta per mantenere l'arco, regolare la velocità del
filo. Se si sente la torcia cercando di 'respingere', ridurre la velocità del filo
• Creazione di pulito, saldature di alta qualità è un'abilità che richiede tempo per
padroneggiare. Praticare e buona preparazione dovrebbe comportare saldature
soddisfacenti
Accessori
• Una gamma di accessori, tra cui attrezzature per saldatura e strumenti di protezione
personale sono disponibili presso il vostro rivenditore Silverline. Pezzi di ricambio sono
disponibili presso toolsparesonline.com
Manutenzione
ATTENZIONE: Staccare sempre la saldatrice dalla rete elettrica e lasciarlo
raffreddare completamente prima di tentare di adattare o sostituire qualsiasi parte.
Sostituzione punte
• Poiché viene utilizzato il saldatore, la punta (23) può usurarsi. Questo renderà l'arco
difficile da controllare
1. Per sostituire la punta, rimuovere il sindone (9) dalla torcia, e svitare la punta
2. Verificare che la nuova punta è la dimensione giusta per il filo in uso
3. Infilare la nuova punta oltre la fine del filo, e avvitare la torcia. Sostituire il sindone
Pulizia
Staccare la macchina dalla rete elettrica prima di pulire
• Mantenere la macchina pulita. Pulire sempre polvere o particelle di distanza e mai
permettere ai fori di ventilazione di rimanere ostruite
• Utilizzare una spazzola morbida o un panno asciutto per pulire la macchina. Se
disponibile, saltare attraverso i fori di ventilazione con aria compressa pulita e secca
Smaltimento
Rispettare sempre le normative nazionali per lo smaltimento di elettroutensili che non sono
più funzionali e non sono sostenibili per la riparazione
• Gli elettroutensili e le altre attrezzature elettriche ed elettroniche (RAEE) non possono
essere smaltite assieme ai normali rifiuti domestici e urbani.
• Contattate le autorità locali preposte allo smaltimento dei rifiuti per ottenere ulteriori
informazioni sulle corrette modalità di smaltimento delle attrezzature
Risoluzione dei problemi
Problema Possibile causa Soluzione
Rullo di alimentazione (30) non si accende Assenza di alimentazione Accendere saldatore
Ghiera di velocità alimentazione filo (4) impostato al minimo 0 Aumentare l'impostazione
Alimentazione rullo (30) gira ma filo (27) non viene
alimentata
Durante l'uso del saldatore smette di funzionare Ciclo di lavoro superato e indicatore di surriscaldamento (5) si
Saldatura povera Impostazioni correnti e di alimentazione non corretta Regolare ghiera di velocità alimentazione filo (4) e interruttore
Pressione del rullo errata Regolare la ghiera di tensione (31)
Liner (36) danneggiati Controlla e sostituisci il liner
Filo saldata a punta (23) Sostituire filo e punta
illumina
Lasciare il saldatore per 20-30 minuti per raffreddare
90 / 45A (3)
34
Page 35

www.silverlinetools.com
Turbo mig senza gas282562
Garanzia Silverline Tools
Questo prodotto Silverline è protetto da una garanzia
di 3 anni
Per attivare la garanzia di 3 anni è necessario registrare il prodotto sul sito www.
silverlinetools.com entro 30 giorni dalla data d’acquisto. La data d’inizio del periodo di
garanzia corrisponde alla data d’acquisto riportata sullo scontrino di vendita.
Termini & condizioni
Il periodo di garanzia decorre dalla data dell’acquisto presso il rivenditore indicata sulla
ricevuta d’acquisto.
SI PREGA DI CONSERVARE LA RICEVUTA D'ACQUISTO
Nel caso in cui il prodotto risultasse difettoso entro 30 giorni dalla data d’acquisto, sarà
necessario restituirlo al punto vendita presso cui è stato acquistato, presentando la ricevuta e
spiegando chiaramente la natura del difetto riscontrato. Il prodotto difettoso sarà sostituito o
sarà rimborsato l'importo d'acquisto.
Nel caso in cui il prodotto risultasse difettoso dopo 30 giorni dalla data d’acquisto, sarà
necessario inviare una richiesta di indennizzo in garanzia a:
Silverline Tools Service Centre
PO Box 2988
Yeovil
BA21 1WU, GB
Le richieste di indennizzo devono essere presentate durante il periodo della garanzia.
Affinché la richiesta sia approvata, è necessario presentare anche la ricevuta d’acquisto
originale, indicando il luogo e la data dell’acquisto del prodotto e il proprio nome e indirizzo.
Sarà necessario inoltre fornire una descrizione dettagliata del guasto riscontrato.
Le richieste effettuate durante il periodo di garanzia saranno verificate da Silverline Tools per
stabilire se il difetto del prodotto è dovuto a problemi di materiali o di lavorazione.
Le spese di spedizione non saranno rimborsate. Tutti i prodotti devono essere spediti puliti e
in condizioni tali da garantire l'esecuzione della riparazione in modo sicuro. I prodotti devono
essere imballati con cura per evitare danni o lesioni durante il trasporto. Silverline Tools si
riserva il diritto di non accettare prodotti spediti in condizioni non idonee o non sicure.
Le riparazioni saranno eseguite da Silverline Tools o da un centro di riparazione autorizzato.
La riparazione o la sostituzione del prodotto non estende o rinnova il periodo di garanzia.
Nel caso in cui determini che il prodotto e il difetto riscontrato sono coperti dalla garanzia,
Silverline Tools provvederà a riparare l'utensile
gratuitamente (esclusi i costi di spedizione) o, a propria discrezione, a sostituirlo con un
nuovo utensile.
Gli utensili o le parti trattenuti da Silverline Tools in cambio di un prodotto o componente
sostitutivo diventano proprietà di Silverline Tools.
Registrazione dell'acquisto
Accedere al sito: silverlinetools.com e selezionare il tasto Registrazione
per inserire:
• Informazioni personali
• Dettagli del prodotto e informazioni sull'acquisto
Una volta che queste informazioni sono state inserite, Il vostro certificato di garanzia sarà
inviato per posta elettronica nel formato PDF. Si prega di stampare e conservare il Certificato
insieme alla ricevuta d’acquisto.
La riparazione o la sostituzione di un prodotto in garanzia estende i diritti del consumatore
previsti per legge, senza modificarli.
Cosa copre la garanzia:
La riparazione del prodotto, nel caso in cui Silverline Tools determini che il problema sia
dovuto a difetti dei materiali o difetti di lavorazione riscontrati durante il periodo della garanzia.
Nel caso in cui un componente non sia più disponibile o fuori produzione, Silverline Tools si
riserva il diritto di sostituirlo con un componente adeguato.
Prodotti acquistati e utilizzati all’interno dell’Unione Europea.
Cosa non copre la garanzia:
La Garanzia Silverline Tools non copre le riparazioni se il difetto è stato causato da:
La normale usura dei componenti per via dell’utilizzo del prodotto come indicato nelle
istruzioni d’uso (ad esempio, lame, spazzole, cinghie, lampadine, batterie, ecc.).
La sostituzione di accessori forniti a corredo, come ad esempio punte, lame, fogli abrasivi,
dischi di taglio e altri componenti correlati.
I danni accidentali, causati dall'uso improprio, dall'abuso e dalla manipolazione, conservazione
e cura inadeguata dell'utensile da parte del proprietario.
L’uso del prodotto per fini non domestici.
La modifica o alterazione del prodotto.
Difetti causati dall’uso di parti e accessori che non siano componenti originali Silverline Tools.
Installazione difettosa (fatto salvo quando l'installazione viene eseguita da Silverline Tools).
Riparazioni o alterazioni eseguite da terze parti che non siano la Silverline Tools o i centri di
riparazione autorizzati da quest'ultima.
Richieste diversi dal diritto alla correzione degli errori con lo strumento denominato in queste
condizioni di garanzia non sono coperti dalla garanzia.
Garanzia della batteria
Le batterie Silverline sono garantite per 6 giorni Se un difetto si verifica su una batteria
registrata durante il periodo di garanzia della batteria, a causa di materiale o di difetto di
fabbricazione, Silverline sostituirà gratuitamente. Questa garanzia non si applica ad uso
commerciale né si estende alla normale usura o danni a seguito di incidenti, abuso o uso
improprio.
Dichiarazione di conformità CE
Il sottoscritto: Sig. Darrell Morris
come autorizzato di: Silverline Tools
Dichiara che il prodotto:
Codice di identificazione: 282562
Descrizione: Turbo mig senza gas
Si conforma alle seguenti direttive
• Direttiva bassa tensione 2006/95/CE
• Direttiva compatibilità elettromagnetica 2004/108/CE
• Direttiva RoHS 2011/65/UE
• EN60974-1:2012
• EN60974-10:2007
Organismo informato: TÜV Rheinland
La documentazione tecnica è mantenuta da: Silverline Tools
Data: 09/09/2015
Firma:
Signor Darrell Morris
Amministratore Delegato
Nome e indirizzo del fabbricante:
Powerbox International Limited, N°. Società 06897059. Indirizzo registrato:.
Central House, Church Street, Yeovil, Somerset BA20 1HH, Regno Unito.
35
Page 36

NL
Op het gegevensplaatje van uw gereedschap kunnen zich symbolen bevinden. Deze
symbolen belangrijke informatie over het product of instructies voor het gebruik.
Draag gehoorbescherming
Draag een veiliggheidsbril
Draag een stofmasker
Draag een veiligheidshelm
Vertaling van de originele instructies
Technische afkortingenBeschrijving symbolen
V Volt
~, AC Wisselspanning
A, mA Ampère, milliampère
Ø Diameter
W, kW Watt, kilowatt
Draag handschoenen
Draag beschermende kleding
Draag beschermende schoenen
Lees de handleiding
Beschermingsklasse I (aardgeleiding)
Enkel geschikt voor binnen gebruik!
Giftige dampen of gassen!
Brandgevaar!
Gevaarlijke elektrische spanning!
Warme oppervlakken – RAAK NIET AAN!
Specificaties
Ingangsspanning: ..................................................................230 V~, 50 Hz
Ingangsstroom:...........................................13,5 A (piek), 4,6 A (gemiddeld)
Efficiëntie: ............................................................................................80%
Bereik uitgangsstroom:....................................................................45/90 A
Nominale werkingscyclus: ..................................10% @ 90 A, 60% @ 45 A
Onbelaste uitgangsspanning: ............................................................... 31 V
Uitgangsspanning: ............................................ 18,5 V (90 A), 16,25V (45 A)
Maximum gewicht draadhaspel: ...................................................... 0,45 kg
Isolatieklasse: ............................................................................................H
Binnendringingsbescherming: ............................................................IP21S
Draad: ................................................................0,8-0,9 mm fluxkerndraad
Bereik lasdikte (staal): .............................................................. 1,2-6,5 mm
Nominale waarde interne zekering: ......................................................16 A
Stekkerzekering (enkel VK) .................................................................... 13A
Beschermingsklasse:.............................................................................
Kabellengte lastoorts: ............................................................................2 m
Kabellengte aarding: ...........................................................................1,5 m
Kabellengte voeding: .............................................................................2 m
Afmetingen (H x L x B): ...............................................295 x 340 x 180 mm
Gewicht: ............................................................................................. 13 kg
Met het oog op onze aanhoudende productontwikkeling kunnen de specificaties van
Silverline producten zonder voorafgaande kennisgeving worden gewijzigd.
Gebruik niet de regen of in vochtige omstandigheden!
Voorzichtig!
Gevaar ultraviolette straling!
Milieubescherming
Lasmaterialen mogen niet met het normale huisvuil worden weggegooid.
Indien de mogelijkheid bestaat, dient u het product te recyclen. Vraag de
plaatselijke autoriteiten of winkelier om advies betreffende recyclen.
Voldoet aan de relevante wetgeving en veiligheidsnormen
36
Page 37

www.silverlinetools.com
Gaslose MIG lasmachine282562
Algemene veiligheid
WAARSCHUWING: Bij het gebruik van elektrische machines horen basis
veiligheidsvoorzorgmaatregelingen opgevolgd te worden om de kans op brand, elektrische
schokken en persoonlijk letsel te minimaliseren. Lees de instructies voor gebruik volledig
door en bewaar deze bij de machine voor toekomstig gebruik.
WAARSCHUWING: De machine is niet geschikt voor gebruik door personen met een
verminderde mentale of fysieke bekwaamheid of een gebrek aan ervaring, tenzij de
persoon wordt begeleid of geïnstrueerd door een persoon verantwoordelijk voor de
veiligheid
LET OP: Het gebruik van de machine voor doeleinden, anders dan waarvoor de machine is
bestemd resulteert mogelijk in gevaarlijke situaties en serieus persoonlijk letsel
De term “elektrisch gereedschap” in alle hieronder vermelde waarschuwingen heeft
betrekking op uw elektrische gereedschap dat op de stroom is aangesloten (met een
snoer) of met een accu wordt gevoed (snoerloos).
1 – Veiligheid in de werkruimte - Rommelige en donkere ruimtes leiden vaak
tot ongelukken.
2 – Denk aan de werkplaatsomgeving
- Stel gereedschap niet bloot aan regen
- Gebruik gereedschap niet in vochtige of natte omstandigheden
- Houdt uw werkplaats goed verlicht
- Gebruik gereedschap niet in de nabijheid van ontvlambare vloeistoffen of
gassen
3 – Bescherm uzelf tegen elektrische schok – Voorkom het contact met
geaarde oppervlakken (als leidingen, radiatoren, koelkasten).
4 – Houd kinderen en omstanders uit de buurt – Laat mensen, vooral
kinderen, de machine en verlengsnoeren niet aanraken en houd ze op
afstand
5 – Berg gereedschap wat niet in gebruik is op – Berg gereedschap dat niet
in gebruikt is op een droge plek, buiten het bereik van kinderen op
6 – Forceer gereedschap niet – Uw machine functioneert optimaal op de
bestemde gebruikssnelheid
7 – Gebruik de juiste machine – Forceer kleine machine niet voor het uitvoeren
van grote werkzaamheden.
Gebruik gereedschap niet voor doeleinden waarvoor ze niet bestemd zijn.
8 – Draag de juiste uitrusting
- Loshangende kleding en sieraden kunnen door bewegende
onderdelen gegrepen worden
- Het dragen van niet-slippende schoenen is aangeraden voor buitenwerk
- Bedek lang haar
9 – Draag de benodigde beschermingsmiddelen
- Draag een veiligheidsbril
- Draag een stofmasker bij stof producerende werkzaamheden
WAARSCHUWING: Wanneer de beschermende uitrusting niet gedragen wordt is de kans
opeen ongeval groter en is de ernst van voorvallende ongevallen groter
10 – Sluit gereedschap op een stof-ontginningssysteem aan – Wanneer de
machine is voorzien van een stofpoort, sluit u deze op een
ontginningssysteem aan
11 – Misbruik het stroomsnoer niet – Trek nooit aan het stroomsnoer om de
stekker uit het stopcontact te halen. Houdt het stroomsnoer uit de buurt
van warmte, olie en scherpe randen. Beschadigde snoeren vergroten de kans
op elektrische schok
12 – Klem uw werk vast – Klem uw werkstuk wanneer mogelijk stevig vast
13 – Reik niet te ver - Blijf altijd stevig en in balans staan
14 – Onderhoud uw gereedschap zorgvuldig
- Het scherp en schoon houden van snijgereedschap zorgt voor een
gemakkelijkere machine controle en een kleinere kans op het buigen en
breken
- Volg smeerinstructies op
- Controleer stroomsnoeren regelmatig op beschadiging en laat deze bij een
geautoriseerd service center repareren
- Laat stroomsnoeren bij een geautoriseerd service center vervangen
- Houdt handvaten schoon, droog en vrij van olie en vet
WAARSCHUWING: Velen ongelukken worden veroorzaakt door slecht onderhouden
machines
15 – Ontkoppel machines van de stroombron – wanneer niet in gebruik, voor
onderhoud en bij het vervangen van accessoires ontkoppelt u de machine
van de stroombron
16 – Verwijder sleutels – Maak van het controleren op gereedschapssleutels
een gewoonte
17 – Voorkom onnodig starten – Zorg ervoor dat de aan-/uitschakelaar bij het
aansluiten op de stroombron, het plaatsen van een accu of het vervoeren in
de uit-positie staat
WAARSCHUWING – Het onnodig starten van de machine kan leiden tot serieuze
verwondingen
18 – Het gebruik van buiten verlengsnoeren – Wanneer gereedschap buiten
gebruikt wordt, maakt u gebruik van verlengsnoeren, geschikt voor buiten.
Dit vermindert de kans op elektrische schok
19 – Blijf alert
- Houd uw aandacht op het werk, gebruik uw gezonde verstand en gebruik
machines niet wanneer vermoeid
- Gebruik het elektrisch gereedschap niet wanneer u vermoeid bent of onder
invloed van drugs, alcohol of medicijnen
WAARSCHUWING: Onoplettendheid tijdens het bedienen van elektrisch gereedschap kan
leiden tot ernstig letsel
20 – Controleer beschadigde onderdelen
- Controleer voor verder gebruik of de machine als bestemd functioneert
- Controleer bewegende delen op uitlijning, beschadiging, montage en
andere gesteldheden die gebruik van de machine mogelijk beïnvloeden
- Een beschadigde beschermkap hoort bij een geautoriseerd service center
gerepareerd of vervangen te worden, tenzij anders vermeld in deze
handleiding
- Laat defecte schakelaars bij een geautoriseerd service center repareren
WAARSCHUWING: Gebruik de machine niet met een defecte aan-/uitschakelaar. De
schakelaar hoort voor gebruik gerepareerd te worden
21 – Laat uw machine te allen tijde door een gekwalificeerd persoon
repareren – Laat uw machine te allen tijde door een gekwalificeerd persoon
repareren om gevaarlijk gebruik te vermijden
WAARSCHUWING: Maak bij onderhoud enkel gebruik van identieke vervangende
onderdelen
WAARSCHUWING: Laat een beschadigd stroomsnoer door de verkoper of een
geautoriseerd service center vervangen
22 – Stekker horen overeen te komen met het te gebruiken stopcontact
– Stekkers mogen niet aangepast worden. Gebruik geen adapters op
geaarde machines. Overeenkomende stekkers en stopcontacten verminderen
de kans op elektrische schok
23 – Indien het onvermijdelijk is elektrisch gereedschap te gebruiken in een
vochtige omgeving, gebruik dan een energiebron met een aardlek
beveiliging (Residual Currency Device). Het gebruik van een RCD
vermindert het risico op een elektrische schok
WAARSCHUWING: Voordat u de machine op de stroombron aansluit controleert u of
het voltage van de stroombron overeenkomt met het voltage op het gegevensplaatje
op de machine. Een stroombron met een hogere spanning kan zorgen voor ernstige
verwondingen aan de gebruiker en schade aan de machine. Een stroombron met
een lagere spanning kan de motor beschadigen. Plug de stekker bij twijfel niet in de
stroombron.
37
Page 38

NL
Las veiligheid
• Lassen produceert giftige dampen en kan het zuurstofniveau in de werkruimte
verminderen. Werk altijd in een goed geventileerde ruimte. Adem de lasdampen niet in,
gebruik indien nodig een geschikt gasmasker
• Sommige metalen delen kunnen gegalvaniseerde, loden, cadmium of andersoortige
coatings hebben. Wanneer u probeert door dit soort coatings heen te lassen, kan dit
leiden tot zwaar giftige dampen. Verwijder altijd alle soorten coating voordat u gaat
lassen
• Als u merkt dat uw longen, keel of ogen geïrriteerd raken tijdens het lassen, STOP DAN
ONMIDDELLIJK en ga de frisse lucht in
• Lassen produceert extreem hoge niveaus Uv-licht. Om oogbeschadigingen te
voorkomen, dient u ALTIJD een goedgekeurd lasmasker te dragen. Kijk onder geen
beding rechtstreeks in de boog
• Het licht wat geproduceerd wordt bij het lassen kan erg aantrekkelijk zijn om naar te
kinderen, zeker voor kinderen. Voorkom het kijken in het licht van uzelf en anderen in
het werkgebied zonder het dragen van bescherming
• Als de mogelijkheid bestaat dat er anderen in het werkgebied komen, zet dan een
geschikt scherm neer om hen te beschermen tegen het verblindende licht
• Wanneer de filterglazen tekenen van beschadiging vertonen, vervangt u deze
onmiddellijk
• Om huidbeschadigingen te voorkomen, dient u ALTIJD een geschikte, brandwerende
jas met lange mouwen te dragen, evenals hittebestendige handschoenen en een
hoofddeksel. Zorg dat u bedekt blijft
• Verwijder altijd alle ontvlambare materialen (bijv. sigarettenaansteker, lucifers) uit uw
kleding voordat u gaat lassen
• Houd altijd een brandblusapparaat in de buurt wanneer u aan het lassen bent. Vonken
en toevallige contacten kunnen brand veroorzaken
• Vonken kunnen ontvlambare materialen in de werkomgeving doen ontbranden.
Verwijder alle ontvlambare materialen uit de werkomgeving voordat u met het lassen
begint
• Las alleen als alle werkstukken en de werkruimte droog zijn
• Las geen verzegelde containers (bijv. benzinetanks, luchttanks, olievaten). Verzegelde
containers kunnen onverwachts uit elkaar barsten door de hitte die door het lassen
wordt veroorzaakt
• Denk goed om overgebrachte warmte. Metalen delen kunnen de warmte van het
werkgebied wegleiden en leiden tot ontbranding van brandbare materialen
• Denk erom dat gelaste delen gedurende enige tijd na het lassen warm blijven. Laat
volledig afkoelen voordat u ermee werkt of het werkstuk onbeheerd laat staan
• Las nooit bij ontvlambare gassen, vloeistoffen of stof
• Zorg er altijd voor dat er een verantwoordelijke persoon bij u in de buurt is om u te
waarschuwen indien er brand ontstaat, of om hulp te roepen in noodsituaties.
• Het gebruik van lasmachines creëert krachtige magnetische velden. Dit kan de werking
van gevoelige elektronische apparatuur ontregelen. Dragers van pacemakers dienen
een arts te raadplegen alvorens een lasmachine te gebruiken.
• Overbelast de stroomtoevoer niet. Controleer of uw stroombedrading de vereiste stroom
veilig kan leveren (zie specificatie)
Draad voeding
• Let op: De punt van lasdraad kan behoorlijk scherp zijn en uw huid, door de
voedingssnelheid, gemakkelijk doorprikken
• Houd uw machine uitgeschakeld tot u klaar bent te beginnen met lassen. Richt de toorts
niet op mensen en dieren
Onderdelenlijst
1. Vrijgave doosdeksel
2. Aan/uitschakelaar
3. 90/45 A schakelaar
4. Instelknop draadaanvoersnelheid
5. Indicator oververhitting
6. Draagriem
7. Toortsgreep
8. Trekker
9. Kap
10. Voedingskabel
11. Aardingsklem
12. Lasmasker (geassembleerd)
13. Filterframe
14. Lasglas
15. Veiligheidsglas
16. Frameclips (x 2)
17. Hendelmoeren (x 3)
18. Hendelbouten (x 3)
19. Frameschroeven (x 2)
20. Hendel
21. Lasmasker
22. Maskerclips
23. Punt
24. Uitgang draadaanvoer
25. Draadhaspel
26. Haspel-asmechanisme
27. Draad
28. Schroeven deksel aanvoermechanisme
29. Hoofdlinerschroeven
30. Aanvoerrol
31. Spanningsknop
32. Haspeldraadliner
33. Schroef haspeldraadliner
34. Spanningsgrendel
35. Spanningsrol
36. Liner
38
Accessoires (niet afgebeeld)
• Bikhamer
• Draadborstel
Page 39

www.silverlinetools.com
Gaslose MIG lasmachine282562
Gebruiksdoel
Lasapparaat voor lichte tot gemiddelde MIG (Metal Inert Gas)-lastoepassingen, voor
gebruik met diverse types staal, maakt gebruik van geschikte fluxkernlasdraad. Het
apparaat vereist geen gasverbinding omdat de fluxkerndraad het afschermgas levert
tijdens het gebruik. Dit product is niet ontworpen voor commerciële, handels-, of industriële
toepassingen.
Het uitpakken van uw
gereedschap
• Pak uw toestel / gereedschap uit. Inspecteer het en zorg dat u met alle kenmerken en
functies vertrouwd raakt
• Controleer of alle onderdelen aanwezig zijn en in goede staat verkeren. Als er
onderdelen ontbreken of beschadigd zijn, zorg dan dat deze vervangen worden voor u
dit toestel / gereedschap gebruikt
Voor gebruik
WAARSCHUWING: Verwijder de stekker van het lasapparaat steeds uit het
stopcontact en laat het apparaat volledig afkoelen voordat u probeert welk
onderdeel dan ook aan te brengen of te vervangen.
Opmerking: Dit gereedschap is geaard en mag enkel verbonden worden met een
stopcontact dat is voorzien van een aarding. Probeer niet het apparaat te gebruiken zonder
een aarding.
Het masker assembleren
Assembleer het masker zoals aangegeven.
1. Gebruik de maskerclips (22) om het plat verpakte lasmasker (21) in zijn normale vorm
te brengen
2. Assembleer de greep (20) met behulp van de greepmoeren en -bouten (17 & 18). De
greep dient zich in het lichaam van het lasmasker te bevinden om de hand van de
lasser te beschermen tegen spatten
3. Zorg ervoor dat het veiligheidsglas (15) het lasglas (14) beschermt tegen lasspatten.
Indien het lasglas is aangebracht als externe laag, kan het beschadigd worden door
spatten, en kan het gevaarlijke ultraviolette straling doorlaten die dan de ogen van de
lasser kan bereiken
4. Breng het glasgeheel in het lasmasker aan met behulp van de frameschroeven (19) en
frameclips (16)
De lasdraad aanbrengen
Dit lasapparaat vereist een 0,8 - 0,9 mm fluxkerndraad
1. Draai de vrijgave van het doosdeksel (1) en til het deksel van de doos
2. Draai de plastic top van het haspel-asmechanisme (26) in tegenwijzerzin en verwijder
het voorzichtig, met de veer en het bovenste deel
3. Plaats de draadhaspel (25) over de as van de haspelhouder (weergegeven in de reeds
geassembleerde toestand), zodanig gepositioneerd dat de draad (27) de draadhaspel
verlaat langs de meest nabijgelegen zijde, zoals aangeduid door de pijl
4. Breng het bovenste deel, de veer, en de plastic top van het haspel-asmechanisme
opnieuw aan. Zorg ervoor dat de veer voldoende spanning levert opdat de draadhaspel
niet vanzelf afrolt
5. Los de spanningsknop (31), zodat de spanningsgrendel (34) in de vrije positie kan
gedraaid worden, zoals weergegeven
6. Maak voorzichtig het einde van de draad los van de haspel en zorg ervoor dat de draad
niet ongecontroleerd afrolt. Zorg ervoor dat de punt van de draad recht is en zuiver is
afgesneden
7. Voer de draad traag in het einde van de haspeldraadliner (32) over de aanvoerrol (30) en
in de liner (36), en duw hem voorzichtig een klein beetje in de liner
8. Draai de spanningsgrendel terug in zijn positie, waarbij er voor gezorgd dient te worden
dat de draad gecentreerd is in de groeven van de aanvoerrol en van de spanningsrol
(35)
9. Positioneer de spanningsgrendel terug in de positie die is terug te vinden in afbeelding
A. De spanning kan aangepast worden door de spanningsknop te roteren
10. Sluit het deksel en vergrendel het met de vrijgaveknop van het doosdeksel
11. Verwijder de kap (9) van de toorts en schroef de punt (23) los en verwijder deze
12. Verbind het lasapparaat met de voeding, schakel het in, en houd de toorts vast
13. Verwijder de toorts van het lasapparaat, op een zodanige wijze dat de toortskabel
gestrekt is
14. Zorg ervoor dat de toorts met niets contact maakt, en druk de trekker (8) in. Het
draadaanvoermechanisme moet de draad nu door de toorts leiden, zie afbeelding B.
15. Indien de draad niet voortgeleid wordt, koppel dan het lasapparaat los van de voeding,
open het deksel, en pas de spanningsknop (31) aan. De aandrijfrollen moeten net
voldoende aangespannen zijn om de draad door de toorts te leiden, maar niet zo strak
aangespannen dat ze voorkomen dat de aandrijfrollen slippen wanneer de draad
geblokkeerd wordt
16. Wanneer de draad uit het einde van de toorts wordt geduwd, schakel het apparaat uit en
koppel het los van de voeding
17. Breng de punt en de kap opnieuw aan, en snijdt de draad op een zodanige wijze af dat
ongeveer 5 mm uit de punt steekt
Verwijderen van de draadhaspel en van een
draadeinde
1. Open het deksel van het lasapparaat met behulp van de vrijgave voor het doosdeksel (1)
2. Gebruik een tang om de laatste draadrest door de punt (15) van de toorts te trekken.
Indien de oude draadhaspel (25) niet leeg is, snijd de draad dan af ter hoogte van de
haspel, los de spanningsknop (31), en beweeg de spanningsgrendel (34) weg van de
aanvoerrol (30).
3. Ga vervolgens verder in overeenstemming met de bovenstaande instructies voor het
"Aanbrengen van lasdraad"
Belangrijk
• Gebruik steeds geschikte persoonlijke beschermingsuitrusting die is afgestemd op het
werk dat u dient uit te voeren. Het gebruik van deze machine vereist een lasmasker,
handschoenen, hittebestendige kleding, en indien nodig een ademhalingstoestel
• Zorg ervoor dat er een in goede staat verkerende brandblusser dicht bij de werkplaats
aanwezig is
• Inspecteer uw machine steeds op eventuele schade of slijtage. Wees bijzonder
aandachtig op de kabels. Indien welke schade dan ook wordt vastgesteld, mag het
gereedschap NIET gebruikt worden
• Controleer of alle afdekkingen of deksels op correcte wijze gesloten en beveiligd zijn
• Positioneer het lasapparaat op een zodanige wijze dat het tijdens het gebruik niet
kan bewegen of kantelen. Zorg ervoor dat ten minste 500 mm vrije ruimte is rond het
lasapparaat om een goede ventilatie mogelijk te maken
Werking
WAARSCHUWING: Verwijder de stekker van het lasapparaat steeds uit het
stopcontact en laat het apparaat volledig afkoelen voordat u probeert welk onderdeel
dan ook aan te brengen of te vervangen.
Instellen van de machine
• Om een goede laskwaliteit te realiseren, dienen de knop voor het instellen van de
draadsnelheid (4) en de 90/45 A schakelaar (3) juist ingesteld te zijn. De 10% instelling
voor de werkingscyclus levert een stroom van 90 A, terwijl de 60% instelling een stroom
van 45 A levert.
• De snelheid van de draad dient zodanig aangepast te worden dat er een stabiele
vlamboog ontstaat. De correcte instelling zal afhangen van de afstand, de stroom, de
snelheid van de toorts, en van andere factoren. Experimenteer met de snelheid van de
draad tot u een optimale instelling vindt
Opmerking: Het lasapparaat optimaliseert de afgegeven stroom in functie van de
draadsnelheid en van de waargenomen stroomwaarden, teneinde de kwaliteit van de las te
verbeteren en om spatten te voorkomen.
Gebruikscyclus
• Deze machine is niet ontworpen om continu te lassen. Te lang lassen geeft aanleiding tot
een oververhitting en tot schade aan interne componenten
• De werkingscyclus bepaalt het aantal minuten, per periode van tien minuten, tijdens
dewelke de machine lassen kan uitvoeren
• Voor een werkingscyclus van 10% kan de machine gebruikt worden gedurende 1 minuut,
en dient vervolgens 9 minuten af te koelen. De werkingscyclus van 60% staat 6 minuten
werk toe per 10 minuten
• Indien de werkingscyclus wordt overschreden, zal de machine automatisch uitgeschakeld
worden
• Het gebruik van de machine met gereduceerde ingestelde stroom, en het verzekeren van
een goede ventilatie zal de werkingscyclus maximaliseren
Thermische uitschakeling
• Wanneer de thermische uitschakelbeveiliging in werking treedt, zal de
oververhittingsindicator (5) oplichten en zal het lasapparaat uitgeschakeld worden
• Laat de machine afkoelen. De uitschakeling wordt automatisch gereset zodra de machine
opnieuw kan gebruikt worden
39
Page 40

NL
Lasvoorbereidingen
• Zorg ervoor dat alle te verbinden onderdelen zuiver zijn en vrij zijn van roest, verf, of
andere afwerkingen
• Alle onderdelen moeten goed ondersteund zijn, zodat er een spleet aanwezig is van
ongeveer 1 mm op de plek waar u de lasverbinding wenst aan te brengen
• Zorg ervoor dat er geen ontvlambare materialen in de buurt van de werkplaats
aanwezig zijn
• Verbind de aardingsklem (11) op een schoongemaakte zone van één van de delen, zo
dicht mogelijk bij de plaats van de uit te voeren las
• Zorg ervoor dat er een verantwoordelijke en een in goede staat verkerende
brandblusser aanwezig zijn
• Verbind de machine met de voeding
Lassen
WAARSCHUWING: Het op correcte wijze gebruiken van een lasapparaat is een technische
vaardigheid. Een verkeerd gebruikt lasapparaat kan zeer gevaarlijk zijn. De hierna vermelde
informatie geldt enkel als algemene richtlijn. Indien u niet volledig zeker bent van uw
vermogen om dit gereedschap op veilige wijze te gebruiken, DOE DAT DAN NIET.
1. Verplaats de Aan/Uit-schakelaar (2) naar de "AAN"-positie
2. Houd de toortsgreep (7) in de ene hand en het lasmasker (12) in de andere
3. Positioneer de toorts op een zodanige wijze dat de punt (23) ongeveer 10 mm
verwijderd is van het metaal, onder een hoek van ongeveer 75°.
4. Houd het masker over uw gezicht en druk de trekker (8) in
5. Een vlamboog moet ontstaan tussen het metalen onderdeel en de punt. Houd de trekker
gedurende 1-2 seconden ingedrukt en laat hem vervolgens weer los
6. Laat de las enigszins afkoelen en verwijder het masker van uw gezicht. Indien de
instellingen correct zijn uitgevoerd, dient er een ronde puntlas gevormd te zijn
7. Indien de las het metaal niet volledig doorboord heeft, voer dan de ingestelde spanning
op. Indien er een gat is ontstaan in het metaal, verminder dan de ingestelde spanning.
• Oefen het aanbrengen van puntlassen tot u voelt dat u de machine en de geselecteerde
instellingen beheerst
• Een alternatief op puntlassen is het maken van proplassen. Het bovenste metaal deel
wordt voorzien van boorgaten en het gat word gevuld met lasmateriaal. Puntlassen zijn
meer geschikt voor dunner materiaal, maar mogelijk moeilijker en niet voldoende
• Om een "naadlas" te vormen, houdt u de trekker langer ingedrukt en beweegt u de
toorts tegelijkertijd langzaam voorwaarts
• Indien de instellingen van de machine correct zijn, dient de vlamboog stationair en kalm
te zijn en een krakend geluid af te geven.
• Indien u een ploffend geluid hoort of niet in staat bent om de vlamboog in stand te
houden, pas dan de snelheid van de draad aan. Indien u voelt dat de toorts probeert
"tegen te duwen", reduceer dan de draadsnelheid
• Het creëren van zuivere en hoogkwalitatieve lassen is een vaardigheid die men niet
zomaar onder de knie krijgt. Oefening en voorbereiding zijn noodzakelijk om correcte
lassen te vormen
Accessoires
• Verschillende accessoires en verbruiksmiddelen, waaronder lasmaskers en
lashandschoenen, zijn verkrijgbaar bij uw Silverline handelaar. Reserve onderdelen zijn
verkrijgbaar op toolsparesonline.com
Onderhoud
WAARSCHUWING: Verwijder de stekker van het lasapparaat steeds uit het
stopcontact en laat het apparaat volledig afkoelen voordat u probeert welk
onderdeel dan ook aan te brengen of te vervangen.
Vervangtips
• Tijdens het gebruik kan de punt (23) slijten. Dit zorgt ervoor dat de vlamboog moeilijk
onder controle te houden is.
1. Om de punt te vervangen, verwijdert u de kap (9) van de toorts en schroeft u de punt los
2. Controleer of de nieuwe punt de correcte afmeting bezit voor de gebruikte draad
3. Schroef de nieuwe punt over het einde van de draad, en schroef het geheel in de toorts.
Plaats de kap terug
Schoonmaak
WAARSCHUWING: Ontkoppel de machine van de stroombron voordat u de machine
schoonmaakt of enig onderhoud uitvoert
• Houd uw machine te allen tijde schoon. Verwijder stof of deeltjes, en zorg ervoor dat de
ventilatiegaten nooit geblokkeerd worden
• Gebruik een zachte borstel of een droog doek om het apparaat schoon te maken.
Indien deze beschikbaar is, maak dan gebruik van zuivere droge perslucht om de
ventilatiegaten door te blazen
Verwijdering
Bij de verwijdering van elektrische machines neemt u de nationale voorschriften in acht.
• Elektrische en elektronische apparaten en accu’s mogen niet met uw huishoudelijk afval
worden weggegooid
• Neem contact op met uw gemeente voor informatie betreffende de verwijdering van
elektrisch gereedschap
Probleemopsporing
Probleem Mogelijke oorzaak Oplossing
De aanvoerrol (30) draait niet Geen spanning Schakel het lasapparaat in
De aanvoerrol (30) draait maar de draad (27) wordt
niet aangevoerd
Tijdens het gebruik stopt het lasapparaat De werkingscyclus werd overschreden en de
Slecht uitgevoerde las Verkeerde stroom- en aanvoerinstellingen Pas de instelling van de knop (4) voor de
40
De knop (4) voor de draadaanvoersnelheid is ingesteld op de kleinste
0-instelling
Incorrecte roldruk Pas de instelling van de spanningsknop (31) aan
Liner (36) beschadigd Controleer en vervang de liner
Draad vastgelast op de punt (23) Maak de draad los van de punt
oververhittingsindicator (5) licht op
Verhoog de instelling
Laat het lasapparaat gedurende 20-30 minuten afkoelen
draadaanvoersnelheid en van de 90/45 A schakelaar (3) aan
Page 41

www.silverlinetools.com
Gaslose MIG lasmachine282562
Silverline Tools Garantie
Dit Silverline product komt met 3 jaar garantie.
Registreer dit product binnen 30 dagen van aankoop op
www.silverlinetools.com om in aanmerking te komen voor 3 jaar garantie. De
garantieperiode begint op de datum van aankoop op het ontvangstbewijs.
Voorwaarden
De garantieperiode gaat in vanaf de datum van aankoop op het ontvangstbewijs.
BEWAAR HET ONTVANGSTBEWIJS OP EEN VEILIGE
PLAATS
Als dit product binnen 30 dagen van de aankoopdatum een fout heeft, breng het dan naar
de winkelier waar u het heeft gekocht, met uw ontvangstbewijs, en met vermelding van de
details van de storing. U kunt om een nieuwe vragen of om uw geld terug.
Als dit product na de periode van 30 dagen een fout heeft, stuur het dan naar:
Silverline Tools Service Centre
PO Box 2988
Yeovil
BA21 1WU, GB
Alle claims moeten binnen de garantieperiode worden ingediend.
U moet het originele ontvangstbewijs geven met de datum van aankoop, uw naam, adres en
plaats van aankoop voordat er aan kan worden gewerkt.
U moet nauwkeurige gegevens verschaffen van de fout die verholpen moet worden.
Claims die binnen de garantieperiode worden ingediend, worden door Silverline Tools
nagelopen om te kijken of het probleem een kwestie is van de materialen of de fabricage
van het product.
De verzendkosten worden niet vergoed. De geretourneerde items moeten voor de reparatie
in een redelijk schone en veilige staat verkeren en moeten zorgvuldig worden verpakt om
schade en letsel tijdens het vervoer te voorkomen. Ongeschikte en onveilige leveringen
kunnen worden afgewezen.
Al het werk wordt uitgevoerd door Silverline Tools of een officiële reparatiedienst.
De garantieperiode wordt niet door de reparatie of vervanging van het product verlengd.
Defecten waarvan wij beschouwen dat ze onder de garantie vallen, worden verholpen door
middel van gratis reparatie van het gereedschap (exclusief verzendingskosten) of door
vervanging door een gereedschap in perfecte staat van werking.
De ingehouden gereedschappen of onderdelen die zijn vervangen, worden het eigendom van
Silverline Tools.
De reparatie of vervanging van het product onder garantie zijn voordelen die bijkomstig zijn
aan uw wettelijke rechten als consument, en hebben daar geen invloed op.
Het gekochte product registreren
Ga naar: silverlinetools.com, kies Registration (registratie) en voer het volgende in:
• Uw persoonlijke gegevens
• De gegevens van het product en de aankoop
U ontvangt het garantiebewijs in PDF-vorm. Druk het af en bewaar het
bij het product.
Wat is gedekt:
De reparatie van het product, mits naar tevredenheid van Silverline Tools kan worden
vastgesteld dat de gebreken het gevolg zijn van defecte materialen of fabrieksfouten binnen
de garantieperiode.
Onderdelen die niet meer verkrijgbaar zijn en die niet meer worden vervaardigd worden door
Silverline Tools vervangen door een functionele vervanging.
Gebruik van dit product in de EU.
Wat niet is gedekt:
Silverline Tools geeft geen garantie op reparaties als gevolg van:
Normale slijtage veroorzaakt door gebruik in overeenstemming met de bedieningsinstructies
zoals zaagbladen, borstels, riemen, gloeilampen, batterijen enz.
De vervanging van geleverde accessoires zoals boortjes, zaagbladen, schuurvellen,
snijschrijven en aanverwante producten.
Accidentele schade, storingen veroorzaakt door nalatigheid in gebruik of verzorging, misbruik,
verwaarlozing, onvoorzichtige bediening en hantering van het product.
Gebruik van het product voor andere doeleinden dan normaal huishoudelijk gebruik.
Alle soorten wijzigingen en modificaties van het product.
Gebruik van andere onderdelen en accessoires dan de originele onderdelen van Silverline
Tools.
Defecte installatie (behalve wanneer geïnstalleerd door Silverline Tools).
Reparaties of wijzigingen die zijn uitgevoerd door anderen dan Silverline Tools of diens
officiële reparatiediensten.
Behalve claims voor het recht op correctie van fouten van het gereedschap volgens de
bepalingen van deze garantie zijn geen andere claims gedekt.
Accu garantie
Silverlineaccu’s zijn voorzien van 30 dagen garantie. Wanneer er binnen de garantieperiode
een fout optreedt dankzij een materiaal- of fabrieksfout, vervangt Silverline de accu gratis.
Deze garantie heeft geen betrekking op commercieel gebruik en strekt zich niet uit tot
normale slijtage of schade ten gevolge van een ongeluk, verkeerd gebruik of misbruik.
EG-verklaring van overeenstemming
De ondergetekende: Mr. Darrell Morris
Gemachtigd door: Silverline Tools
Verklaart dat
Identificatienummer: 282562
Beschrijving: Gaslose MIG lasmachine
Voldoet aan de volgende richtlijnen:
• Richtlijn laagspanning 2006/95/EG
• Elektromagnetische verenigbaarheid 2004/108/EG
• RoHS-richtlijn 2011/65/EU
• EN60974-1:2012
• EN60974-10:2007
Keuringsinstantie: TÜV Rheinland
De technische documentatie wordt bijgehouden door: Silverline Tools
Datum: 09-09-2015
Handtekening:
Darrell Morris
Algemeen directeur
Naam en adres van fabrikant:
Powerbox International Limited, handelsregister nummer 06897059. Geregistreerd adres:
Central House, Church Street, Yeovil, Somerset BA20 1HH, Verenigd Koninkrijk
41
Page 42

3 Year Guarantee
*Register online within 30
days. Terms & Conditions apply
Garantie de 3 ans
*Enregistrez votre produit en ligne
dans les 30 jours. Sous réserve des
termes et conditions appliquées
3 Jahre Garantie
*Innerhalb von 30 Tagen online
registrieren. Es gelten die Allgemeinen
Geschäftsbedingungen
www.silverlinetools.com
3 años de garantía
*Registre su producto online durante
los primeros 30 días. Se aplican
términos y condiciones
3 anni di garanzia
*Registrare il vostro prodotto on-line entro
30 giorni. Termini e condizioni si applicano
3 jaar garantie
*Registreer uw product binnen 30
dagen online. Algemene voorwaarden
zijn van toepassing
 Loading...