

Page 1

R
E
L
I
V
N
L
I
E
S
R
E
A
G
N
237377
850W SDS Plus Hammer Drill
850W SDS Plus Hammer Drill
Marteau Perforateur SDS+ 850 W
850 W SDS+ Schlagbohrmaschine
SDS+ de Martillo Perforador 850 W
Trapano a Percussione SDS+ 850 W
850 W SDS+ Klopboor
www.silverlinetools.com
r
a
e
Y
3
R
3
E
G
I
a
r
u
a
G
n
t
e
e
*
E
N
I
L
S
N
T
O
E
R
Page 2
1
2
3
8
4
5
6
7
2
Page 3

R
E
L
I
V
N
L
I
E
S
R
E
A
G
N
850W SDS Plus Hammer Drill
English .................. 4
Français ................ 8
Deutsch ................. 12
®
Español ................. 16
Italiano .................. 20
Nederlands ............ 24
www.silverlinetools.com
3
Page 4

GB
Description of Symbols
The rating plate on your tool may show symbols. These represent important
information about the product or instructions on its use
Wear hearing protection
Wear eye protection
Wear breathing protection
Wear head protection
Wear hand protection
Read instruction manual
Double insulated for additional protection
Conforms to relevant legislation and safety standards
Environmental Protection
Waste electrical products should not be disposed of with
household waste. Please recycle where facilities exist. Check
with your local authority or retailer for recycling advice
Specification
Voltage: ................................................230V~
Frequency: ...........................................50Hz
Power: ..................................................850W
No load speed: .....................................1100min
Impact rate:..........................................0-5200BPM
Max drilling capacity:
-Concrete.............................................26mm
-Wood..................................................40mm
-Steel...................................................13mm
Weight..................................................3.4kg
Weighted vibration: ..............................15.810m/s²
Uncertainty:..........................................1.5m/s
Sound pressure: ...................................91.8dB(A)
Sound power: .......................................102.8dB(A)
Uncertainty ...........................................3dB(A)
Protection Class:...................................
The sound intensity level for the operator may exceed 85dB(A) and
sound protection measures are necessary.
As part of our ongoing product development, specifications of
Silverline products may alter without notice.
-1
2
General Safety
Carefully read and understand this manual and any label attached to
the tool before use. Keep these instructions with the product for future
reference. Ensure all persons who use this product are fully acquainted
with this manual.
Even when used as prescribed it is not possible to eliminate all residual risk
factors. Use with caution. If you are at all unsure of the correct and safe
manner in which to use this tool, do not attempt to use it.
Keep guards in position
• Where guards exist keep them in position, in good working order,
correctly adjusted and aligned. Never attempt to use a tool if any of
the supplied guards are missing. If any guards are damaged, replace
before use
Remove adjusting keys
• Where adjusting keys exist, ensure they are removed prior to using the
tool. Always check to see that keys and adjusting devices are removed
from the tool before use
Clean the work area
• Accidents can occur where benches and work areas are cluttered or
dirty. Keep floors clear and avoid working where the floor is slippery. If
working outdoors, be aware of all potential slip and trip hazards before
using this tool
Trained, competent persons
• This tool should be used by trained, competent persons only
Children and pets
• Keep children and pets at a safe distance from the work area. Lock tools
away where children cannot gain access
Use the correct tool
• Do not force or attempt to use a tool for a purpose for which it was not
designed. This tool is not intended for industrial use
Wear suitable clothing and footwear
• Do not wear loose fitting clothing, neckties, jewellery, or other
items which may become caught. Wear non-slip footwear or, where
appropriate, footwear with protective toe caps. Long hair should be
covered or tied back
Keep your balance
• Do not over-reach. Keep proper footing at all times and do not use tools
when standing on an unstable surface
Accessories
• The use of any attachment or accessory, other than those mentioned in
this manual, could be dangerous and result in damage or injury, and may
invalidate your warranty
Never stand on your tool
• Standing on your tool or its stand could cause serious injury if the tool
is tipped or collapses. Do not store materials above or close to the tool
in such a way that a person might stand on the tool to reach the stored
items
Secure work
• Where possible, always secure work. If appropriate, use a clamp or vice
so that both hands are free to operate the tool
Check for damaged or missing parts
• Before each use, check if any part of the tool is damaged or missing.
Carefully check that it will operate properly and perform its intended
function. Check alignment of moving parts for binding. Any guard or other
part that is damaged should be immediately repaired or replaced by an
authorised service centre. DO NOT USE IF DEFECTIVE
4
Page 5
850W SDS Plus Hammer Drill237377
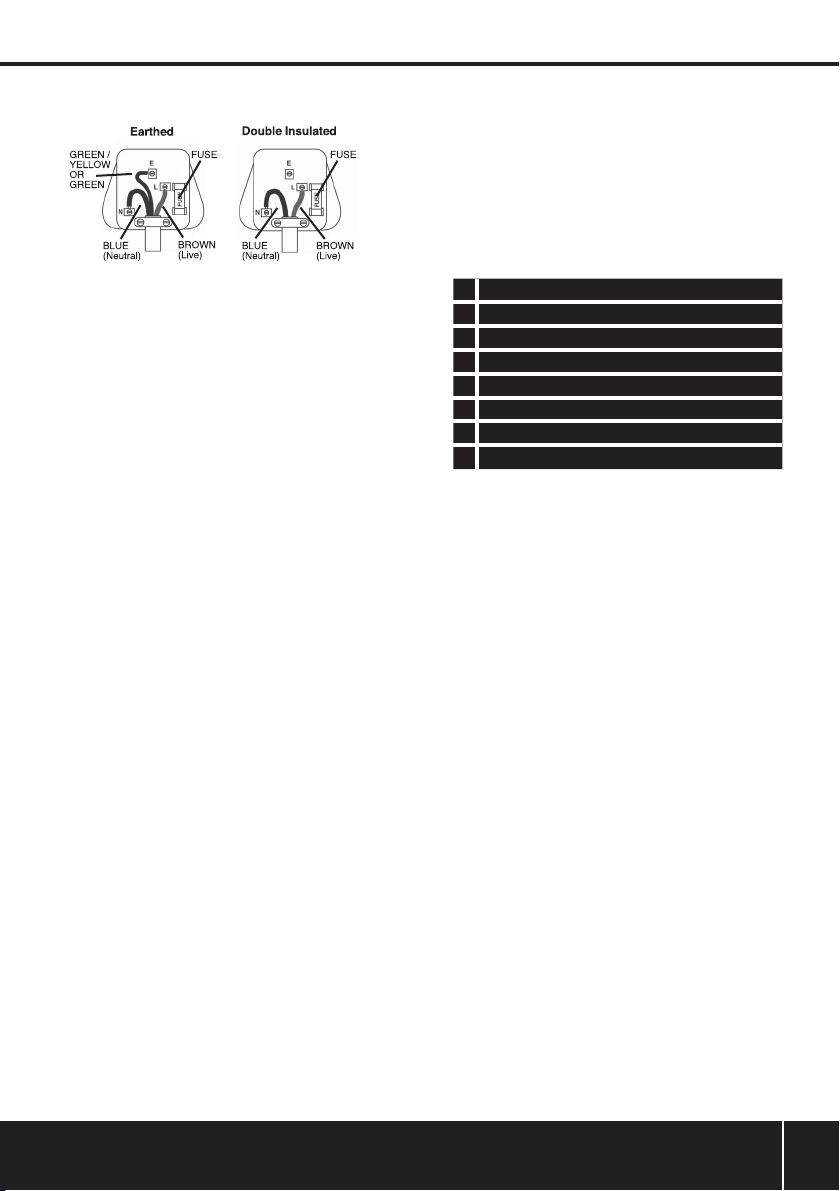
Electrical Safety
The wires in this product are coloured:
Blue Neutral
Brown Live
Green & Yellow Earth
• This appliance must be protected by a suitable fuse
• To prevent fire or shock hazard, do not expose this product to rain, water
or moisture
• There are no user-serviceable parts inside except those referred to in
this manual
• Always refer servicing to qualified service personnel. Never remove any
part of the casing unless qualified to do so; this unit contains dangerous
voltages
• Use of a residual current device will reduce the risk of electric shock
NEVER CONNECT THE BROWN OR BLUE WIRE TO THE EARTH PIN OF A 13A
PLUG. IF IN DOUBT CONSULT A QUALIFIED ELECTRICIAN
Dangerous environment
• Do not use power tools in damp or wet conditions, or expose them to
rain. Provide adequate surrounding work space and keep the area well
lit. Do not use power tools where there is a risk of explosion or fire from
combustible material, flammable liquids, flammable gases, or dust of
an explosive nature. When using power tools, avoid contact with any
earthed items such as pipes, radiators, cookers, refrigerators, metal
baths and taps
Protect yourself from vibration
• Hand-held power tools may produce vibration. Vibration can cause
disease. Gloves may help to maintain good blood circulation in the
fingers. Hand-held tools should not be used for long periods without a
break
Maintain your power tool
• Ensure all ventilation holes are kept clear at all times, otherwise
overheating and fire may occur
Always disconnect
• Before changing fittings or accessories, always disconnect the tool from
the power source
Switch off before connecting
• Ensure the power tool is switched off before connecting to the power
source. If the power tool stops unexpectedly, turn the power switch to
OFF
Do not abuse the power cable
• Be sure the cable / extension cable is in good condition. Always have
a damaged cable / extension cable replaced at an authorised service
centre before using. Never pull the cable to disconnect it from the power
socket. Never carry the tool by its cable. Keep the cable away from damp,
heat, oil, solvents, and sharp edges
Do not modify the power tool
• Do not modify the power tool in any way as this could result in serious
injury and may invalidate its guarantee
Do not leave the tool running unattended
• Always wait until the tool has completely stopped functioning and has
been unplugged before leaving it unattended
SDS Drill Safety
• Only use this tool with SDS Plus fitting drill accessories. Do not force
other types of accessory to fit. If using an adaptor chuck, DO NOT engage
hammer action. Misuse of this tool could cause permanent damage, and
may invalidate your warranty
• Be aware of the effects of vibration when using hammer action. By
nature of their design SDS type drills will produce greater vibration than
conventional hammer drills
• Be aware that both ends of drill bits may be hot after use. Wear gloves
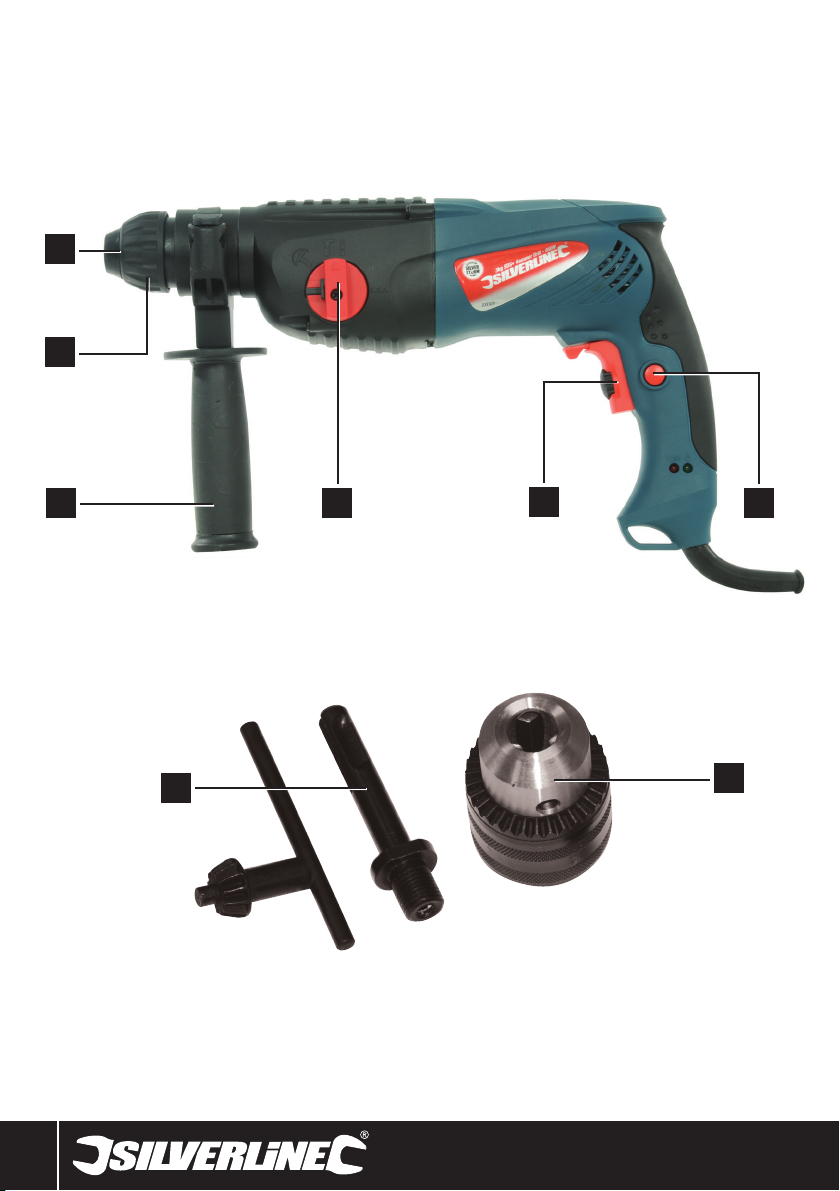
Product Familiarisation
1 Chuck
2 Chuck Collar
3 Side Handle
4 Hammer Action Selector
5 On/Off Trigger Switch
6 Lock On Button
7 3 Jaw Chuck
8 SDS Adaptor
Unpacking and Assembling Your
Drill
• Carefully unpack your drill. Ensure all packaging materials are removed
and fully familiarise yourself with all features of the product
• If any parts are damaged or missing, have these parts repaired or
replaced before use
Using Your SDS Hammer Drill
WARNING: Always disconnect the machine from the mains power supply
before making adjustments or changing accessories.
Side handle
• The Side Handle (3) should always be used when drilling
• The side handle can be adjusted to best suit the work to be performed
• To adjust the side handle, rotate anticlockwise. This will loosen the
handle assembly. Move the side handle to the required position, and
secure by rotating clockwise
Operating the chuck
• The SDS system allows the bit to move within the Chuck (1). This means
that it is unnecessary to tighten the chuck around the bit
• Always grease the tail end of SDS bits. Bits should be freshly greased,
and free from dirt and dust before use. Pull back the Chuck Collar (2),
and hold. Push and rotate the bit into the Chuck (1), as far as it will go.
Release the chuck collar
• The bit should now be locked into the machine, check by pulling the bit. If
the bit can be removed, repeat the above procedure until secure
• To remove a bit from the chuck, pull the chuck collar back, and hold. The
bit can then be removed from the machine
• Be aware that it may not be possible to drill holes to the same standards
of accuracy as with a conventional power drill. This is due to the small
amount of 'slack' required in the SDS chuck to allow tools to move easily
WARNING: Never fit any attachment with a maximum speed
lower than the no load speed of the machine.
www.silverlinetools.com
5
Page 6

GB
On/off trigger switch
• Always hold the drill firmly, using both hands
• To start the drill, squeeze the On/Off Trigger Switch (5)
• To stop the drill, release the On/Off Trigger Switch (5)
Speed control
• The speed of the drill can be varied between 0 and 1050rpm. The speed
is adjusted by the position of the On/Off Trigger Switch (5). The further the
trigger is depressed, the faster the drill will run
Lock on function
• This drill is equipped with a Lock On Button (6). This enables the trigger
switch to be locked into the fully depressed position for continuous use
• To engage the lock, fully depress the On/Off Trigger Switch (5) and press
the Lock On Button (6). The drill will now run continuously when the
trigger switch is released
• To stop the drill, squeeze and release the on/off trigger switch
Hammer selection
• This drill can be used in three different modes, for different purposes:
Rotary drill:
• Rotary drill mode is suitable for working with wood, metal and plastics
• Align the Hammer Action Selector (4) with the symbol
• Fit an appropriate drill bit into the chuck
Hammer drill:
• Hammer drill mode is suitable for working with brickwork, concrete
and other masonry
• Align the Hammer Action Selector (4) with the symbol
• Fit an appropriate masonry drill bit into the chuck
Chisel:
• Chisel mode is suitable for working with brickwork, concrete and
other masonry
• Align the Hammer Action Selector (4) with the symbol
• Fit an appropriate chisel bit into the chuck
Drilling concrete
• Using hammer drill mode, apply pressure to the rear of the drill, in line
with the drill bit
• For efficient drilling, it is advisable to use TCT (tungsten carbide tipped)
drill bits. Ensure that the bit size is within the maximum capacity of the
machine (see specifications)
• Do not apply excessive pressure. If debris blocks the drill hole, run the
drill slowly and remove the bit from the hole. Repeat until hole is cleared
Drilling wood
• Use rotary drilling mode only
• Ensure that drill bits are suitable for wood, and are within the maximum
capacity of this machine (see specifications above)
Drilling metal
• To ensure accuracy, mark the intended hole position using a hammer
and centre punch
• Use rotary drill mode only
• Ensure that drill bits are suitable for the grade of metal being drilled, and are
within the maximum capacity of the machine (see specifications above)
• To ensure efficient cutting, and prolong drill bit life, use a suitable
lubricant or cutting fluid, and drill at moderate speed
Chiselling
• Using chisel mode, apply pressure to the rear of the drill, in line with the
chisel bit
• Be aware that when chiselling there is a high risk of chips, and other
waste, being ejected from the work
Using the three jaw chuck accessory
• The drill is supplied with a 3 Jaw Chuck (7), and SDS Adaptor (8). This
allows conventional drill bits to be used with your SDS drill
• The SDS Adaptor (8) fits into the drill chuck in the same manner as an
SDS drill bit
• The 3 Jaw Chuck (7) is a screw fit onto the adaptor
• Do not attempt to use hammer mode with the 3 Jaw Chuck. This could
result in severe damage to your tool, and may invalidate your guarantee
Caution
• Applying excess pressure does not result in faster or more efficient
drilling. If the pressure applied to the drill has a noticeable effect on the
speed, reduce the pressure. Overloading the drill will reduce its service
life
• As the bit penetrates the material being drilled, it may 'catch' or 'snag'.
This can cause the machine to suddenly 'kick', to prevent any possibility
of injury always hold the drill securely, use the side handle, and use sharp
drill bits of the correct type
• Always ensure that material is secure. If appropriate use a vice or clamp
to hold the work, always keep two hands on the drill
Maintenance
WARNING: Always remove the plug from the mains power supply before
carrying out any maintenance/cleaning.
Cleaning
• Keep your machine clean at all times. Dirt and dust will cause internal
parts to wear quickly, and shorten the machine’s service life. Clean the
body of your machine with a soft brush, or dry cloth. If available, use
clean, dry, compressed air to blow through the ventilation holes
Brushes
• Over time the carbon brushes inside the motor may become worn
• Excessively worn brushes may cause loss of power, intermittent failure,
or visible sparking
• To replace the brushes, remove the brush access plugs from both sides
of the machine. The worn brushes can then be withdrawn, and replaced
with new. Replace brush access plugs. Alternatively, have the machine
serviced at an authorised service centre
Disposal
• Do not dispose of power tools, or other waste electrical and electronic
equipment, with household waste
• Contact your local waste disposal authority for information on the proper
way to dispose of tools
6
Page 7

237377 850W SDS Plus Hammer Drill
Silverline Tools Guarantee
This Silverline product comes with a 3 year
guarantee
Register this product at www.silverlinetools.com within 30 days of
purchase in order to qualify for the 3 year guarantee. Guarantee period
begins according to the date of purchase on your sales receipt.
Registering your purchase
Registration is made at silverlinetools.com by selecting the Guarantee
Registration button. You will need to enter:-
• Your personal details
• Details of the product and purchase information
Once this information is entered your guarantee certificate will be created
in PDF format for you to print out and keep with your purchase.
Terms & Conditions
Guarantee period becomes effective from the date of retail purchase as
detailed on your sales receipt.
PLEASE KEEP YOUR SALES RECEIPT
If this product develops a fault within 30 days of purchase, return it to the
stockist where it was purchased, with your receipt, stating details of the
fault. You will receive a replacement or refund.
If this product develops a fault after the 30 day period, return it to:
Silverline Tools Service Centre
PO Box 2988
Yeovil
BA21 1WU, UK
The guarantee claim must be submitted during the guarantee period.
You must provide the original sales receipt indicating the purchase date,
your name, address and place of purchase before any work can be
carried out.
You must provide precise details of the fault requiring correction.
Claims made within the guarantee period will be verified by Silverline Tools
to establish if the deficiencies are related to material or manufacturing of
the product.
Carriage will not be refunded. Items for return must be in a suitably clean
and safe state for repair, and should be packaged carefully to prevent
damage or injury during transportation. We may reject unsuitable or
unsafe deliveries.
All work will be carried out by Silverline Tools or its authorized
repair agents.
The repair or replacement of the product will not extend the period
of guarantee
Defects recognised by us as being covered by the guarantee shall be
corrected by means of repair of the tool, free of charge (excluding carriage
charges) or by replacement with a tool in perfect working order.
Retained tools, or parts, for which a replacement has been issued, will
become the property of Silverline Tools.
EC Declaration of Conformity
The undersigned: Mr Darrell Morris
as authorised by: Silverline Tools
Declares that the
Name/ model: 850W SDS+ Hammer Drill
Type/ serial no: 237377
Net installed power: 230V~ 50Hz 850W
Conforms to the following Directives:
• Machinery Directive 2006/42/EC
• Low Voltage Directive 2006/95/EC
• Electromagnetic Compatibility Directive 2004/108/EC
• ROHS Directive 2002/95/EC
• EN60745-1:2009; EN60745-2-6/A12:2009
• EN55014-1:2006; EN55014-2/A1:2001
• EN61000-3-2:2006; EN61000-3-3/A2:2005
The repair or replacement of your product under guarantee provides
benefits which are additional to and do not affect your statutory rights as
a consumer.
What is covered:
The repair of the product, if it can be verified to the satisfaction of Silverline
Tools that the deficiencies were due to faulty materials or workmanship
within the guarantee period.
If any part is no longer available or out of manufacture, Silverline Tools will
replace it with a functional replacement part.
Use of this product in the EU.
What is not covered:
Silverline Tools does not guarantee repairs required as a result of:
Normal wear and tear caused by use in accordance with the operating
instructions eg blades, brushes, belts, bulbs, batteries etc.
The replacement of any provided accessories drill bits, blades, sanding
sheets, cutting discs and other related items.
Accidental damage, faults caused by negligent use or care, misuse,
neglect, careless operation or handling of the product.
Use of the product for anything other than normal domestic purposes.
Change or modification of the product in any way.
Use of parts and accessories which are not genuine Silverline Tools
components.
Faulty installation (except installed by Silverline Tools).
Repairs or alterations carried out by parties other than Silverline Tools or its
authorized repair agents.
Claims other than the right to correction of faults on the tool named in
these guarantee conditions are not covered by the guarantee.
The technical documentation is kept by: Silverline Tools
Notified body: Jiangsu TUV Product Service
Place of declaration: Shanghai, China
Date: 05/08/11
Signed by:
Director
Name and address of Manufacturer or Authorised representative:
Silverline Tools, Boundary Way, Lufton Trading Estate, Yeovil, Somerset,
BA22 8HZ United Kingdom
www.silverlinetools.com
7
Page 8
F
Description des symboles
La plaque signalétique figurant sur votre outil peut présenter des symboles.
Ces symboles constituent des informations importantes relatives au produit
ou des instructions concernant son utilisation.
Port de protection auditive
Port de lunettes de sécurité
Port de masques respiratoires
Port du casque
Port de gants
Lire le manuel d’instructions
Double isolation pour une protection supplémentaire
Conforme à la réglementation et aux normes de sécurité
pertinentes
Protection de l’environnement
Les produits électriques usagés ne doivent pas être jetés avec
les ordures ménagères. Veuillez les recycler dans les centres
prévus à cet effet. Pour de plus amples informations, veuillez
contacter votre municipalité ou point de vente
Caractéristiques techniques
Tension: ................................................230V~
Fréquence: ...........................................50Hz
Puissance: ............................................850W
Vitesse à vide: ......................................1100min
Frappe:.................................................0-5200BPM
Capacité de perçage maximale:
-Béton..................................................26mm
-Bois.....................................................40mm
-Acier....................................................13mm
Poids.....................................................3.4kg
Vibration pondérée: ..............................15.810m/s²
Incertitude:...........................................1.5m/s
Pression sonore: ...................................91.8dB(A)
Puissance sonore: ................................102.8dB(A)
Incertitude: ...........................................3dB(A)
Classe de protection:.............................
L’intensité sonore peut dépasser 85 dB(A) et il est recommandé que
l’opérateur prenne des mesures de protection sonore.
Du fait de l’évolution constante de notre développement produits,
les spécifications des produits Silverline peuvent changer sans
notification préalable.
-1
2
Consignes générales de sûreté
Lisez attentivement ce manuel ainsi que toute étiquette apposée sur l’outil
et assurez-vous d’en comprendre le sens avant utilisation. Rangez ces
consignes avec l’outil, pour référence ultérieure. Assurez-vous que toute
personne venant à utiliser cet outil ait attentivement pris connaissance de
ce manuel.
Sachez qu’utiliser un outil conformément aux prescriptions ne garantit
pas l’élimination de tous les facteurs de risque. Procédez avec prudence.
N’utilisez pas cet outil si vous avez des doutes quant à la manière sûre et
correcte de procéder.
Gardez les éléments de protection en place
• Gardez les éléments de protection en place, en bon état de
fonctionnement, correctement ajustés et alignés. N’utilisez jamais un
outil si l’un des éléments de protection fournis est manquant. Si l’un
des éléments de protection est endommagé, remplacez-le avant toute
utilisation
Retirez les clés de réglage
• Assurez-vous que les clés et autres dispositifs de réglage aient été retirés
de l’outil avant utilisation
Nettoyez la zone de travail
• Des établis et zones de travail encombrés ou sales sont sources
d’accidents ; de même, le sol doit être dégagé et il est recommandé
d’éviter de travailler sur un sol glissant. En cas de travail à l’extérieur,
appréciez les risques de faux pas ou de chute avant d’utiliser l’outil
Personnes compétentes
• Ce produit doit être utilisé par des personnes compétentes ou ayant reçu
une formation adéquate
Enfants et animaux
• Maintenez une distance de sécurité entre les enfants ou les animaux et
votre zone de travail. Rangez les outils dans un lieu sûr fermé à clé, hors
de portée des enfants
Utilisation correcte de l’outil
• Ne tentez pas d’utiliser un outil à des fins pour lesquelles il n’est pas
conçu. Cet outil n’est pas conçu pour un usage industriel
Port de vêtements et de chaussures adaptés
• Ne portez pas de vêtements amples, cravate, bijoux ou autres
éléments susceptibles d’être happés. Au besoin, portez des chaussures
antidérapantes ou équipées d’une coque de protection des orteils. Les
cheveux longs doivent être couverts ou noués vers l’arrière
Conservez l’équilibre
• Ne tentez pas de travailler dans des endroits hors de portée, gardez un
bon appui en permanence, n’utilisez pas d’outil lorsque vous êtes sur
une surface instable
Accessoires
• L’utilisation de tout équipement ou accessoires différant de ceux
mentionnés dans ce manuel peut être dangereuse, entraîner des
dommages matériels ou des blessures et annulera votre garantie
Ne vous tenez pas sur l’outil
• En vous appuyant ou en montant sur l’outil ou sur son support, vous
encourez des blessures graves s’il venait à basculer ou à s’affaisser.
Veillez à na pas ranger de matériel au-dessus ou à proximité de l’outil
et de telle sorte qu’il faille s’appuyer sur l’outil ou sur son support pour
atteindre ce matériel
Immobilisez la pièce à travailler
• Dans la mesure du possible, immobilisez la pièce sur laquelle vous
travaillez. Si cela est possible, utilisez un étau ou un serre-joint de
manière à disposer des deux mains pour manier l’outil
Assurez-vous qu’aucune pièce ne soit endommagée ou
manquante
• Avant chaque utilisation, assurez-vous qu’aucune pièce ne
soit manquante ou endommagée ; assurez-vous également du
fonctionnement correct et de la bonne marche des fonctions voulues.
Vérifiez l’alignement des pièces mobiles et l’absence de grippage. Toute
protection et autre pièce endommagées doivent être immédiatement
réparées ou remplacées par un centre de service agréé. N’UTILISEZ
JAMAIS UN OUTIL DEFECTUEUX
8
Page 9

237377 Marteau Perforateur SDS+ 850 W
Sécurité électrique
• Cet outil doit être protégé par un fusible approprié.
• Pour prévenir tout risque d’électrocution et d’incendie, n’exposez pas cet
outil à la pluie, à l’eau ou à l’humidité
• Aucune pièce interne ne peut être réparée par l’utilisateur hormis celles
mentionnées dans ce manuel
• Confiez toutes les interventions à du personnel d’entretien qualifié. Ne
retirez aucune pièce du carter de l’appareil à moins que vous ne soyez
qualifié pour le faire : cet appareil présente des tensions électriques
dangereuses
• L’utilisation d’un dispositif de coupure différentiel réduit les risques
d’électrocution
Environnements dangereux
• N’utilisez pas d’outil électrique dans un environnement humide et
ne l’exposez pas à la pluie. Prévoyez un espace de travail adéquat et
assurez un éclairage correct de la zone. N’utilisez pas d’outil électrique
s’il existe un risque d’explosion ou d’incendie du fait de la présence de
matières combustibles, de liquides ou de gaz inflammables ou de la
poussière de nature explosive. Lors de l’utilisation d’outils électriques,
évitez tout contact avec des éléments mis à la masse, tels que tuyaux,
radiateurs, cuisinières, réfrigérateurs, robinets ou baignoires métalliques
Protégez-vous des vibrations
• Les outils électriques portatifs produisent des vibrations. Les vibrations
peuvent provoquer des maladies. En conservant la chaleur, des gants
portés par l’utilisateur peuvent lui permettre de maintenir une bonne
circulation sanguine dans les doigts. Les outils portatifs ne doivent pas
être utilisés pendant de longues périodes sans marquer une pause
Entretenez votre outil électrique
• Assurez-vous que toutes les ouïes de ventilation soient dégagées en
permanence. Dans le cas contraire, il existe un risque de surchauffe et
d’incendie
Débranchez l’outil avant tout changement
• Avant de changer raccords ou accessoires, assurez-vous que l’outil soit
débranché de la source d’alimentation
Outil éteint avant tout branchement
• Assurez-vous que l’appareil soit en position éteinte avant de le brancher
à la source d’alimentation. Si l’outil électrique s’arrête inopinément, faites
passer l’interrupteur sur la position d’arrêt
Ménagez le cordon d'alimentation
• Assurez-vous que le cordon et la rallonge éventuelle soient en bon
état. Faites remplacer le cordon et la rallonge endommagés par un
centre d’entretien agréé avant de les utiliser. Ne tirez pas sur le cordon
d’alimentation pour le débrancher de la prise secteur. Ne portez jamais
l’outil par le cordon. Veillez à ce que le cordon ne soit pas exposé à
l’humidité, la chaleur, l’huile, les solvants et les bords tranchants
Ne laissez pas l’outil fonctionner sans surveillance
• Attendez toujours que le moteur de l’outil se soit complètement arrêté et
débranchez l’outil avant de vous en éloigner
Sécurité des perceuses SDS
• Utilisez cet outil uniquement avec des accessoires de perçage SDS+.
Ne montez pas d’autres types d’accessoires en forçant. Si vous utilisez
un mandrin adaptateur, n’enclenchez PAS la frappe. Toute utilisation
incorrecte de cet outil pourrait provoquer des dégâts irréversibles et
annuler la garantie.
• Faites attention aux effets des vibrations lorsque vous utilisez la
frappe. Du fait même de leur conception, les perforateurs de type
SDS produisent des vibrations plus importantes que les perceuses à
percussion traditionnelles.
Attention : les deux extrémités des outils peuvent être brûlantes après
utilisation. Portez des gants.
Familiarisation avec le produit
1 Mandrin
2 Bague du mandrin
3 Poignée latérale
4 Sélecteur de frappe
5 Gâchette marche/arrêt
6 Bouton de verrouillage
7 Mandrin à 3 mors
8 Adaptateur SDS
Déballer et assembler votre
perforateur
• Déballez le perforateur avec soin. Veillez à retirer tout le matériau
d’emballage et familiarisez-vous complètement avec toutes les
caractéristiques du produit
• Si des pièces sont endommagées ou manquantes, faites-les réparer ou
remplacer avant d’utiliser l’appareil
Utilisation du marteau
perforateur SDS
AVERTISSEMENT : Débranchez toujours la machine de l’alimentation sur
secteur avant de procéder à des réglages ou de changer d’accessoire.
Poignée latérale
• La poignée latérale (3) doit toujours être utilisée lors du perçage
• La poignée latérale est réglable pour s’adapter au mieux au travail à
effectuer
• Pour régler la poignée latérale, tournez-la dans le sens inverse des
aiguilles d’une montre. Ceci va desserrer le montage de la poignée.
Placez la poignée latérale dans la position voulue et serrez en la tournant
dans le sens des aiguilles d’une montre
Fonctionnement du mandrin
• Le système SDS permet à l’outil de bouger à l’intérieur du mandrin (1).
Cela signifie qu’il n’est pas nécessaire de serrer l’outil dans le mandrin
• Graissez toujours la queue des outils SDS. Les outils doivent toujours être
graissés de fraîche date et exempts de crasse ou de poussière avant leur
utilisation. Tirez la bague du mandrin (2) vers l’arrière et maintenez-la.
Poussez et tournez l’outil dans le mandrin (1), aussi loin que possible.
Relâchez la bague du mandrin
• L’outil doit maintenant être verrouillé dans la machine. Vérifiez-le en
tirant dessus. Si l’outil s’enlève, répétez la procédure ci-dessus de façon
à le bloquer
• Pour déposer un outil du mandrin, tirez la bague du mandrin vers l’arrière
et maintenez-la. L’outil peut alors être déposé de la machine
• Attention : il peut ne pas être possible de percer des trous avec
les mêmes niveaux de précision qu’avec une perceuse électrique
traditionnelle. Cela est dû au léger jeu nécessaire dans le mandrin SDS
afin de permettre aux outils de bouger aisément
AVERTISSEMENT : N’adaptez jamais d’accessoire dont la
vitesse maximale est inférieure à la vitesse à vide de la
machine.
www.silverlinetools.com
9
Page 10

F
Gâchette marche/arrêt
• Tenez toujours le perforateur fermement à deux mains
• Pour démarrer le perforateur, pressez la gâchette marche/arrêt (5)
• Pour arrêter le perforateur, relâchez la gâchette marche/arrêt (5)
Commande de vitesse
• La vitesse du perforateur peut varier de 0 à 1050 tr/min. C’est la position
de la gâchette marche/arrêt (5) qui permet de régler la vitesse. Plus vous
enfoncez la gâchette, plus le perforateur tourne rapidement
Fonction de verrouillage
• Ce perforateur est équipé d’un bouton de verrouillage (6). Ce bouton
permet de verrouiller la gâchette en position entièrement enfoncée pour
une utilisation continue
• Pour engager le verrou, enfoncez la gâchette marche/arrêt (5) au
maximum et appuyez sur le bouton de verrouillage (6). Le perforateur
fonctionne maintenant de façon continue lorsque vous lâchez la gâchette
• Pour arrêter le perforateur, pressez puis relâchez la gâchette marche/
arrêt
Sélection du mode de fonctionnement
• Ce perforateur peut s’utiliser dans trois modes différents pour répondre à
des besoins différents :
Perceuse :
• Le mode perceuse permet de travailler dans le bois,
le métal et le plastique
• Alignez le sélecteur de frappe (4) sur le symbole
• Montez un foret adapté dans le mandrin
Perforateur :
• Le mode perforateur permet de travailler dans la brique, le béton et
autres ouvrages de maçonnerie
• Alignez le sélecteur de frappe (4) sur le symbole
• Montez un foret de maçonnerie adapté dans le mandrin
Burin :
• Le mode burin permet de travailler dans la brique, le béton et autres
ouvrages de maçonnerie
• Alignez le sélecteur de frappe (4) sur le symbole
• Montez un burin adapté dans le mandrin
Perçage du béton
• En utilisant le mode perforateur, exercez une pression sur l’arrière du
perforateur, dans l’alignement du foret
• Pour un perçage efficace, il est conseillé d’utiliser des forets à pointe en
carbure de tungstène. Assurez-vous que la taille du foret ne dépasse pas
la capacité maximale de la machine (voir les caractéristiques techniques
données plus haut)
• N’exercez pas une pression excessive. Si des débris bouchent le trou à
percer, faites tourner le perforateur lentement et sortez le foret du trou.
Recommencez jusqu’à ce que le trou soit dégagé
Perçage du bois
• Utilisez le mode perçage rotatif uniquement
• Assurez-vous que les forets utilisés conviennent pour le bois et
ne dépassent pas la capacité maximale de cette machine (voir les
caractéristiques techniques)
Perçage du métal
• Pour garantir la précision, marquez la position voulue du trou au moyen
d’un marteau et d’un pointeau
• Utilisez le mode perçage rotatif uniquement
• Assurez-vous que les forets utilisés conviennent au type de métal à
percer et ne dépassent pas la capacité maximale de la machine (voir les
caractéristiques techniques données plus haut)
• Pour garantir l’efficacité de la coupe et prolonger la durée de vie du foret,
utilisez un lubrifiant ou un liquide de coupe adéquat et percez à vitesse
modérée
Burinage
• En utilisant le mode burin, exercez une pression sur l’arrière du
perforateur, dans l’alignement du burin
• En burinant, tenez compte du risque important de projection d’éclats et
autres débris
Utilisation du mandrin à trois mors fourni en accessoire
• Le perforateur est fourni avec un mandrin à trois mors (7) et un
adaptateur SDS (8). Ceci permet l’utilisation de forets conventionnels
avec votre perforateur SDS
• L’adaptateur SDS (8) se monte dans le mandrin du perforateur de la
même manière qu’un outil SDS
• Le mandrin à 3 mors (7) se visse sur l’adaptateur
• Ne pas utiliser le mode marteau avec le mandrin à 3 mors. Ceci pourrait
endommager gravement l’outil et annuler la garantie
Prudence
• Exercer une pression excessive ne permet pas de percer plus vite
ou plus efficacement. Si la pression exercée sur le perforateur agit
significativement sur sa vitesse, réduisez votre effort. Surcharger la
perceuse réduit sa durée de vie
• Quand le foret pénètre le matériau à percer, il peut se bloquer ou
accrocher. Cela peut provoquer un rebond soudain de la machine. Pour
écarter tout risque de blessure, tenez toujours le perforateur fermement,
utilisez la poignée latérale et employez des forets bien affûtés et du
type adéquat
• Assurez-vous toujours que le matériau est bien immobilisé. Au besoin,
utilisez un étau ou une pince pour maintenir l’ouvrage. Gardez toujours
les deux mains sur le perforateur
Entretien
ATTENTION : Toujours débrancher l’appareil de l’alimentation secteur avant
de réaliser tout travail d’entretien ou de nettoyage.
Nettoyage
• Débranchez l’appareil de l’alimentation sur secteur avant de le nettoyer
Gardez l’appareil propre. Éliminez toujours la poussière et les particules
et ne laissez jamais les orifices de ventilation se boucher. Ne laissez pas
les déchets s’accumuler sur une partie quelconque de l’outil. Utilisez une
brosse souple ou un chiffon sec pour le nettoyage. Si possible, nettoyez
les orifices de ventilation à l’air comprimé propre et sec
Remplacement des balais
• Avec le temps, les balais de charbon du moteur s’usent. Ce processus
d’usure est accéléré si la machine est surchargée ou utilisée dans des
environnements poussiéreux
• Si les balais sont excessivement usés, le rendement du moteur peut
diminuer, la machine peut ne pas démarrer ou une quantité anormale
d’étincelles peut être observée
• Si vous soupçonnez une usure des balais, faites-les remplacer dans un
centre d’entretien agréé
Elimination
• Ne jetez pas les outils électriques et autres équipements électriques ou
électroniques avec les ordures ménagères
• Contactez les autorités locales compétentes en matière de gestion des
déchets pour vous informer de la procédure à suivre pour éliminer les
outils électriques
10
Page 11

237377 Marteau Perforateur SDS+ 850 W
Garantie Silverline Tools
Ce produit Silverline bénéficie d’une garantie
de 3 ans
Enregistrez ce produit à www.silverlinetools.com dans les 30 jours suivant
l’achat afin de bénéficier de la garantie de 3 ans. La période de garantie
commence à partir de la date d’achat figurant sur votre facture d’achat.
Enregistrement de votre achat
Visitez silverlinetools.com, sélectionnez le bouton d’enregistrement
et saisissez :
• Vosinformationspersonnelles
• Lesinformationsconcernantleproduitetl’achat
Vous recevrez le Certificat de garantie en format PDF. Veuillez l’imprimer et
le conserver avec votre achat.
Conditions de Garantie des Outils Silverline
La période de garantie prend effet à compter de la date de l’achat en
magasin, comme indiqué sur votre facture d’achat.
VEUILLEZ CONSERVER VOTRE FACTURE D’ACHAT.
Si ce produit est défectueux pendant les 30 jours qui suivent l’achat,
retournez-le au magasin où vous l’avez acheté, avec votre facture, en
expliquant en détail le problème. Le produit sera remplacé ou vous serez
remboursé(e).
Si ce produit est défectueux après cette période de 30 jours,
retournez-le à :
Silverline Tools Service Centre
PO Box 2988
Yeovil
BA21 1WU, Royaume Uni
Toute demande de service sous garantie doit être soumise pendant la
période de garantie.
Avant toute intervention sous garantie, vous devez présenter la facture
d’achat originale sur laquelle doivent figurer la date d’achat, votre nom,
votre adresse et le lieu d’achat.
Vous devez expliquer en détail la défaillance nécessitant réparation.
Les demandes de service sous garantie faites pendant la période de
garantie seront vérifiées par Silverline Tools pour établir si la défaillance du
produit est liée à un vice de matériau ou de fabrication.
Les frais de port ne seront pas remboursés. Les articles retournés doivent
être convenablement propres et sûrs pour être réparés et devraient être
emballés soigneusement pour éviter tout dommage ou toute blessure
pendant le transport. Nous pouvons refuser les livraisons qui ne sont pas
convenables ou sûres.
Toute intervention sera effectuée par Silverline Tools ou ses agents de
réparation agréés.
La réparation ou le remplacement du produit ne dépassera pas la période
de garantie.
Les anomalies que nous reconnaissons être couvertes par la garantie
seront rectifiées par la réparation de l’outil, sans frais (hormis les
frais de port) ou par son remplacement par un outil en parfait état de
fonctionnement.
Les pièces ou les outils remplacés deviendront la propriété de
Déclaration de conformité CE
Le soussigné : Mr Darrell Morris
Autorisé par : Silverline Tools
Déclare que le produit :
Nom/modèle : Marteau Perforateur SDS+ 850 W
Nº de série/Type : 237377
Puissance nette installée : 230V~ 50Hz 850W
Est conforme aux directives suivantes :
• Directive sur les machines 2006/42/CE
• Directive sur les basses tensions 2006/95/CE
• Compatibilité électromagnétique 2004/108/CE
• Directive RoHS 2002/95/CE
• EN60745-1:2009; EN60745-2-6/A12:2009
• EN55014-1:2006; EN55014-2/A1:2001
• EN61000-3-2:2006; EN61000-3-3/A2:2005
Silverline Tools.
La réparation ou le remplacement de votre produit sous garantie vous
apporte des avantages ; ces avantages s’ajoutent à vos droits statutaires
en tant que consommateur sans les affecter aucunement.
La présente garantie couvre:
La réparation du produit, s’il peut être vérifié, à la satisfaction de Silverline
Tools, que les défaillances du produit ont été provoquées par un vice de
matériau ou de fabrication au cours de la période de garantie.
Si une pièce n’est plus disponible ou n’est plus fabriquée, Silverline Tools la
remplacera par une pièce de rechange opérationnelle.
Utilisation de ce produit dans l’UE.
La présente garantie ne couvre pas:
Silverline Tools ne garantit pas les réparations nécessaires du produit
engendrées par :
L’usure normale provoquée par l’utilisation conforme aux instructions
d’utilisation, par exemple les lames, les charbons, les courroies, les
ampoules, les batteries, etc.
Le remplacement de tout accessoire fourni tel que les forêts, les lames, les
feuilles abrasives, les outils de coupes et les autres articles associés.
Les dommages et les défaillances accidentels causés par une utilisation ou
un entretien négligent, une mauvaise utilisation, un manque d’entretien ou
une utilisation ou une manipulation imprudente du produit.
L’utilisation du produit à des fins autres que son utilisation domestique
normale.
Le moindre changement ou la moindre modification du produit.
L’utilisation de pièces et d’accessoires qui ne sont pas des composants
véritables de Silverline Tools.
Une installation défectueuse (sauf si l’installation a été réalisée par
Silverline Tools).
Les réparations ou les modifications réalisées par des tiers autres que
Silverline Tools ou ses agents de réparation agréés.
Les demandes de service autres que le droit de rectifier les défaillances
de l’outil indiquées dans ces conditions de garantie ne sont pas couvertes
par cette garantie.
La documentation technique est conservée par : Silverline Tools
Organisme notifié : Jiangsu TUV Product Service
Lieu de la déclaration : Shanghai, Chine
Date : 05/08/11
Signature :
Directeur
Nom et adresse du fabricant ou de son représentant agréé :
Silverline Tools, Boundary Way, Lufton Trading Estate, Yeovil, Somerset,
BA22 8HZ Royaume-Uni
www.silverlinetools.com
11
Page 12

D
Beschreibung der Symbole
Auf dem Typenschild des Werkzeugs sehen Sie Symbole. Diese geben
wichtige Information und Anweisungen über das Produkt und dessen
Anwendung an.
Ohrenschutz tragen
Augenschutz tragen
Atemschutz tragen
Kopfschutz tragen
Handschutz tragen
Handbuch sorgfältig lesen
Für zusätzlichen Schutz doppelt isoliert
Stimmt mit den relevanten Vorschriften und
Sicherheitsnormen überein
Umweltschutz
Alte Elektrogeräte dürfen nicht im Hausmüll entsorgt
werden. Bitte entsorgen Sie sie über örtliche Sammelstellen.
Wenden Sie sich für Informationen zur Entsorgung und
Wiederverwertung an Ihre örtlichen Behörden oder Ihren
Händler
Technische Daten
Spannung: ............................................230V~
Frequenz: .............................................50Hz
Leistung: ..............................................850W
Leerlaufdrehzahl:..................................1100min
Schlagzahl:...........................................0-5200BPM
Max. Bohrbereich:
-Beton..................................................26mm
-Holz.....................................................40mm
-Stahl....................................................13mm
Gewicht.................................................3.4kg
Hand-Arm-Vibration: ............................15.810m/s²
Ungewissheit:.......................................1.5m/s
Schalldruckpegel: .................................91.8dB(A)
Schallleistung: ......................................102.8dB(A)
Ungewissheit: .......................................3dB(A)
Schutzklasse: .......................................
Der Lautstärkepegel könnte für den Bediener 85 dB(A) übersteigen
und es müssen Maßnahmen zum Schallschutz vorgenommen
Aufgrund der ständigen Weiterentwicklung unserer Produkte kann
Silverline die technischen Daten ohne Vorankündigung ändern.
werden.
-1
2
Allgemeine Sicherheitshinweise
Betreiben Sie das Gerät erst, wenn Sie diese Bedienungsanleitungen und
alle am Werkzeug angebrachten Etiketten sorgfältig gelesen und verstanden
haben. Bewahren Sie alle Anleitungen mit dem Gerät zum späteren
Nachschlagen auf. Vergewissern Sie sich, dass alle Benutzer dieses
Produkts diese Bedienungsanleitung vollständig verstanden haben.
Auch wenn dieses Gerät wie vorgeschrieben verwendet wird, ist es nicht
möglich, sämtliche Restrisiken auszuschließen. Mit Vorsicht verwenden.
Sollten Sie sich in irgendeiner Weise unsicher bezüglich der sachgemäßen
und sicheren Benutzung dieses Werkzeugs sein, verwenden Sie es nicht.
Arbeitsbereich sauber halten
• Unordnung oder Schmutz auf Werkbänken und im Arbeitsbereich
können zu Unfällen führen. Böden freihalten und Arbeiten auf rutschigem
Untergrund vermeiden. Bei Arbeiten im Freien vor der Verwendung des
Werkzeugs auf mögliche Ausrutsch- und Stolpergefahren achten
Halten Sie die Schutzvorrichtungen in Position
• Halten Sie die Schutzvorrichtungen stets in Position, in gutem
Arbeitszustand sowie sachgemäß befestigt und ausgerichtet.
Verwenden Sie ein Werkzeug niemals, wenn eine der mitgelieferten
Schutzvorrichtungen fehlt. Ersetzen Sie ggf. beschädigte
Schutzvorrichtungen vor dem Gebrauch
Alle Einstellwerkzeuge entfernen
• Vergewissern Sie sich stets, dass alle Einstellwerkzeuge und
Schraubenschlüssel vor dem Betrieb des Werkzeugs entfernt wurden
Geeignete Benutzer
• Dieses Produkt sollte nur von geschulten und kompetenten Personen
benutzt werden
Kinder und Haustiere
• Kinder und Haustiere müssen einen sicheren Abstand zum Arbeitsbereich
einhalten. Schließen Sie Werkzeuge an einem Ort ein, zu dem Kinder
keinen Zugriff haben
Nur geeignete Werkzeuge verwenden
• Überlasten und zweckentfremden Sie das Werkzeug nicht, sondern
verwenden Sie es ausschließlich für den vorgesehenen Zweck. Dieses
Werkzeug ist nicht für industriellen Gebrauch bestimmt
Geeignete Bekleidung und Schuhe tragen
• Tragen Sie keine weite Bekleidung, Krawatten, Schmuck oder
Gegenstände, die vom Werkzeug erfasst werden könnten. Tragen Sie
rutschfestes Schuhwerk oder, wenn erforderlich, Sicherheitsschuhe
mit Stahlkappe. Lange Haare sollten bedeckt oder im Nacken
zusammengebunden werden
Gleichgewicht halten
• Vermeiden Sie eine unnatürliche Körperhaltung, sorgen Sie für einen
sicheren Stand und halten Sie stets das Gleichgewicht. Verwenden Sie
keine Werkzeuge, wenn Sie auf instabilem Untergrund stehen
Zubehör
• Die Verwendung von Einsatzwerkzeug oder Zubehör, das nicht in dieser
Bedienungsanleitung erwähnt ist, kann zu Schäden oder Verletzungen
sowie zum Erlöschen Ihrer Garantie führen
Stellen Sie sich niemals auf Ihr Werkzeug
• Wenn Sie auf Ihrem Werkzeug oder dessen Stand stehen, kann dies
durch Umkippen oder Zusammenbrechen zu ernsthaften Verletzungen
führen. Bewahren Sie keine Gegenstände oberhalb oder rund um das
Werkzeug auf, um zu verhindern, dass das Werkzeug oder dessen Stand
als Trittleiter benutzt wird
Werkstück sichern
• Sofern möglich muss das Werkstück fest eingespannt werden.
Verwenden Sie gegebenenfalls Spannvorrichtungen oder einen
Schraubstock, damit beide Hände zur Bedienung des Werkzeugs frei sind
Auf Schäden oder fehlende Teile prüfen
• Prüfen Sie vor der Verwendung, ob Teile des Produkts beschädigt sind
oder fehlen. Vergewissern Sie sich sorgfältig, dass es für die vorgesehene
Arbeit geeignet ist und sachgemäß funktioniert. Kontrollieren Sie, dass
bewegliche Teile einwandfrei ausgerichtet sind und nicht klemmen.
Sämtliche beschädigte Schutzhauben oder andere beschädigte
Teile müssen sofort durch einen autorisierten Vertragskundendienst
12
Page 13

237377 850 W SDS+ Schlagbohrmaschine
repariert oder ersetzt werden. NIEMALS BESCHÄDIGTES WERKZEUG
VERWENDEN
Elektrische Sicherheit
• Dieses Gerät muss durch eine geeignete Sicherung geschützt werden
• Um Schäden durch Feuer oder durch elektrischen Schlag zu vermeiden,
setzen Sie dieses Produkt nicht dem Regen, Wasser oder der Feuchtigkeit
aus
• Außer den in dieser Anleitung genannten Teilen befinden sich im Innern
des Geräts keine vom Benutzer wartbaren Teile. Lassen Sie die Wartung
ausschließlich von qualifiziertem Fachpersonal durchführen. Gehäuseteile
dürfen Sie nur abbauen, wenn Sie entsprechend geschult sind. Dieses
Gerät steht unter gefährlicher Stromspannung
• Verwenden Sie einen Fehlstromschutzschalter (RCD), um das Risiko von
elektrischen Schlägen zu vermindern
Gefährliche Umgebung
• Verwenden Sie Elektrowerkzeuge nie in nassen oder dampfhaltigen
Umgebungen und setzen Sie sie nie dem Regen aus. Sorgen Sie für
einen geeigneten und gut beleuchteten Arbeitsbereich. Elektrische Geräte
dürfen nicht in Bereichen benutzt werden, in denen Explosions- oder
Brandgefahren durch brennbare Stoffe, entflammbare Flüssigkeiten,
entflammbare Gase oder explosiven Staub bestehen. Vermeiden Sie
bei der Verwendung von Elektrowerkzeugen den Kontakt mit geerdeten
Gegenstanden, wie etwa Rohrleitungen, Heizkörpern, Kochgeräten,
Kühlschränken, Metallbädern und Wasseranschlüsssen
Schützen Sie sich vor Vibrationen
• Tragbare Elektrowerkzeuge erzeugen starke Schwingungskräfte.
Diese Vibrationen können gesundheitsschädigend sein. Wärmende
Handschuhe können zu einer guten Durchblutung der Finger beitragen.
Tragbare Werkzeuge sollten nie über längere Zeiträume ohne Pausen
verwendet werden
Wartung Ihres Elektrowerkzeugs
• Vergewissern Sie sich, dass die Belüftungsöffnungen stets frei sind.
Andernfalls besteht Überhitzungs- und Brandgefahr
Immer den Stecker ziehen
• Bevor Sie Einsatzwerkzeuge oder Zubehör auswechseln, ziehen Sie
immer den Stecker Ihres Werkzeugs aus der Steckdose
Vor dem Anschließen ausschalten
• Vergewissern Sie sich, dass das Elektrowerkzeug ausgeschaltet ist,
bevor Sie es an das Stromnetz anschließen. Wenn das Elektrowerkzeug
unerwartet stoppt, schalten Sie den Hauptschalter aus
Zweckentfremden Sie das Stromkabel nicht
• Vergewissern Sie sich, dass sich das Netz- bzw. Verlängerungskabel
in einwandfreiem Zustand befindet. Lassen Sie ein beschädigtes Netzbzw. Verlängerungskabel umgehend bei einem Vertragskundendienst
auswechseln, bevor Sie es verwenden. Zum Trennen vom Stromnetz
niemals am Kabel ziehen oder reißen. Tragen Sie das Werkzeug
nie am Kabel. Halten Sie das Kabel fern von Dämpfen, Hitze, Ölen,
Lösungsmitteln oder scharfen Kanten
Lassen Sie das Werkzeug nicht unbeaufsichtigt laufen
• Warten Sie immer, bis das Gerät vollständig zum Stillstand kommt, und
nehmen Sie es vom Stromnetz, bevor Sie es hinlegen
Sicherheitsvorschriften
• Für dieses Werkzeug darf nur Bohrzubehör für die SDS+
Werkzeugaufnahme benutzt werden. Andere Zubehörteile dürfen
nicht mit Gewalt passend gemacht werden. Bei Verwendung eines
Adapterbohrfutters darf die Schlagfunktion NICHT eingeschaltet werden.
Ein falscher Gebrauch des Geräts kann dauerhafte Schäden hervorrufen
und macht die Garantie nichtig
• Denken Sie an die Schwingungsbelastung bei Verwendung der
Schlagbohrfunktion. Konstruktiv bedingt ist die Schwingungsbelastung
von SDS-Bohrmaschinen größer als bei herkömmlichen Schlagbohrern
• Denken Sie daran, dass beide Bohrkronenseiten nach dem Gebrauch
heiß sind. Tragen Sie Handschuhe
Abgebildete Komponenten
1 Bohrfutter
2 Spannhals
3 Seitengriff
4 Schlagbohrschalter
5 Ein-/Ausschalter
6 Arretiertaste
7 3-Backenfutter
8 SDS-Adapter
Auspacken und montage der
bohrmaschine
• Packen Sie die Bohrmaschine vorsichtig aus. Vergewissern Sie sich, dass
sämtliches Verpackungsmaterial entfernt wurde, und machen Sie sich
sorgfältig mit allen Funktionen dieses Produkts vertraut.
• Sollten Teile defekt sein oder fehlen, müssen diese vor dem Einsatz
repariert oder ersetzt werden
Verwendung der SDSSchlagbohrmaschine
WARNUNG: Trennen Sie die Maschine immer von der Stromversorgung,
bevor Sie Einstellungen ändern oder das Werkzeug wechseln.
Seitengriff
• Der Seitengriff (3) sollte zum Bohren immer verwendet werden
• Der Seitengriff kann passend auf die geeignete Arbeitsposition eingestellt
werden
• Zu Verstellen drehen Sie den Seitengriff gegen den Uhrzeigersinn. Der
Griff ist nun lose und kann verstellt werden. Stellen Sie am Seitengriff die
gewünschte Position ein, schrauben Sie ihn im Uhrzeigersinn wieder fest
Bedienen des Spannfutters
• Beim SDS-System kann sich die Bohrkrone im Spannfutter (1) bewegen.
Ein Festschrauben des Spannfutters um die Bohrkrone herum ist daher
nicht notwendig
• SDS-Bohrkronen sollten am hinteren Endstück immer gefettet werden.
Vor dem Gebrauch sollten die Bohrkronen frisch geschmiert werden und
frei von Schmutz und Staub sein. Ziehen Sie den Spannhals (2) zurück
und halten Sie ihn. Drücken und drehen Sie die Bohrkrone bis zum
Anschlag in das Spannfutter (1). Lassen Sie den Spannhals los
• Die Bohrkrone sollte nun in der Maschine fest arretiert sein, was
durch Ziehen an der Bohrkrone nachgeprüft werden kann. Wenn sich
die Bohrkrone wieder herausziehen lässt, wiederholen Sie die obigen
Schritte, bis sie fest eingespannt ist
• Um eine Bohrkrone aus dem Spannfutter zu nehmen, ziehen Sie den
Spannhals zurück und halten Sie ihn. Die Bohrkrone kann nun aus der
Maschine gezogen werden
• Wir weisen darauf hin, dass das Bohren von Löchern mit derselben
Genauigkeit wie mit herkömmlichen elektrischen Bohrmaschinen bei
dieser Ausführung nicht möglich ist. Dies ist auf das geringfügige „Spiel“
im SDS-Spannfutter zurückzuführen, welches leichte Bewegungen des
eingespannten Werkzeugs ermöglicht
WARNUNG: Setzen Sie nie Einsatzwerkzeuge ein, die
eine geringere maximale Drehzahl aufweisen als die
Leerlaufdrehzahl der Maschine.
www.silverlinetools.com
13
Page 14

D
Ein-/Ausschalter
• Halten Sie die Bohrmaschine mit beiden Händen fest
• Drücken Sie auf den Ein-/Ausschalter (5), um die Bohrmaschine zu
starten
• Wenn Sie den Ein-/Aus-Kippschalter (5) loslassen, schaltet sich die
Bohrmaschine wieder aus
Drehzahl einstellen
• Die Drehzahl der Bohrmaschine kann zwischen 0 und 1050 U/min
variabel verstellt werden. Zum Verstellen der Drehzahl wählen Sie die
gewünschte Position des Ein-/Ausschalters (5). Je weiter Sie den Schalter
herunterdrücken, umso schneller arbeitet die Bohrmaschine
Arretierfunktion
• Diese Bohrmaschine ist mit einer Arretiertaste (6) ausgestattet. Dadurch
kann der Kippschalter in niedergedrückter Stellung für den Dauerbetrieb
arretiert werden
• Zum Arretieren des Kippschalters halten Sie den Ein-/Aus-Kippschalter
(5) gedrückt und drücken danach den Arretiertaster (6) hinein. Nach
dem Loslassen des Kippschalters ist die Bohrmaschine auf Dauerbetrieb
geschaltet
• Zum Abschalten der Bohrmaschine lassen Sie den Ein-/Aus-Kippschalter
wieder los
Funktionsauswahl
• An dieser Bohrmaschinen können drei verschiedene Betriebsarten
eingestellt werden, die für unterschiedliche Aufgaben geeignet sind
Drehbohrfunktion:
• Die Drehbohrfunktion eignet sich zur Bearbeitung von Holz,
Metall und Kunststoffen
• Stellen Sie den Schlagbohrschalter (4) auf das Symbol
• Spannen Sie eine geeignete Bohrkrone ein
Schlagbohrfunktion:
• Die Schlagbohrfunktion eignet sich zur Bearbeitung von Backsteinen,
Beton und sonstigem Mauerwerk
• Stellen Sie den Schlagbohrschalter (4) auf das Symbol
• Spannen Sie eine geeignete Bohrkrone für Mauerwerk ein
Meißelfunktion:
• Die Meißelfunktion eignet sich zur Bearbeitung von Backsteinen,
Beton und sonstigem Mauerwerk
• Stellen Sie den Schlagbohrschalter (4) auf das Symbol
• Spannen Sie einen geeigneten Meißelaufsatz ein
Bohren von Beton
• Drücken Sie im Schlagbohrmodus in einer Linie mit dem Bohrer
ausgerichtet auf die Rückseite der Bohrmaschine
• Um eine effiziente Bohrleistung zu erzielen, werden Bohrer aus TCT (mit
Wolframcarbidspitzen) empfohlen. Vergewissern Sie sich, dass die Stärke
des Bohrers die Maximalkapazität der Bohrmaschine nicht überschreitet
(siehe technische Daten)
• Nicht zu starken Druck ausüben. Wenn das Bohrloch durch Mauerreste
blockiert wird, lassen Sie den Bohrer langsam in der Öffnung drehen
und ziehen Sie ihn dabei heraus. Wiederholen Sie den Vorgang, bis die
Bohrung wieder frei ist
Bohren von Holz
• Verwenden Sie nur den Drehbohrmodus.
• Vergewissern Sie sich, dass die Bohrer für Holz geeignet sind und dass
deren Stärke die Maximalkapazität der Bohrmaschine nicht übersteigen.
Bohren von Metall
• Um eine präzise Bohrung zu erzielen, markieren Sie die Bohrlochposition
mit einem Hammer und einem Körner
• Verwenden Sie nur den Drehbohrmodus
• Vergewissern Sie sich, dass die Bohrer für den Härtegrad des Metalls
geeignet sind und deren Stärke die Maximalkapazität der Bohrmaschine
nicht übersteigen (siehe technische Daten)
• Um möglichst effizient zu bohren und den Bohrer zu schonen sollten Sie
ein geeignetes Schmiermittel oder eine Schneidflüssigkeit benutzen und
mit gemäßigten Drehzahlen arbeiten
Meißeln
• Drücken Sie im Meißelbetrieb in einer Linie mit dem Bohrer ausgerichtet
auf die Rückseite der MeiBelfunktion
• Beachten Sie, dass beim Meißeln ein hohes Risiko besteht, dass Späne
oder Bruchstücke herausgeschleudert werden
Verwendung des Dreibackenfutters
• Die Bohrmaschine wird mit einem Dreibackenfutter (7) und einem SDSAdapter (8) geliefert. Damit können herkömmliche Bohrkronen in Ihrer
SDS-Bohrmaschine verwendet werden
• Der SDS-Adapter (8) wird auf gleiche Weise wie die SDS-Bohrer in das
Spannfutter eingespannt
• Das Dreibackenfutter (7) wird mit dem Adapter fest verschraubt
• Schalten Sie bei Verwendung des Dreibackenfutters nie den
Schlagbohrmodus ein. Die Maschine kann dadurch schwer beschädigt
werden und Ihr Garantieanspruch wird nichtig
Warnung
• Durch zu starken Druck wird die Bohrleistung nicht verbessert. Wenn
der auf die Bohrmaschine ausgeübte Druck eine Drehzahlverringerung
bewirkt, muss weniger Druck ausgeübt werden. Durch eine
Überbelastung der Bohrmaschine wird ihre Lebensdauer verkürzt
• Je tiefer die Bohrkrone in das Material eindringt, desto eher kann sie
„festfahren“ oder „verkanten“. Dabei kann die Maschine ruckartig
„ausschlagen“. Halten Sie deshalb zur Verhütung von Verletzungen die
Bohrmaschine stets gut fest, verwenden Sie stets den Seitengriff und
benutzen Sie scharfe Bohrer in der richtigen Ausführung
• Vergewissern Sie sich stets, dass das Werkstück gesichert ist. Verwenden
Sie bei Bedarf einen Schraubstock oder eine Spannvorrichtung und
halten Sie die Bohrmaschine stets mit beiden Händen
Wartung
ACHTUNG: Nehmen Sie das Gerät vom Stromnetz, bevor Sie mit der
Reinigung beginnen.
Reinigung
• •HaltenSieIhreMaschinesauber.AchtenSiedarauf,dasssichnirgends
auf dem Werkzeug Abfallmaterial ansammelt. Entfernen Sie stets Staub
und Partikel und achten Sie darauf, dass die Lüftungsöffnungen nie
verstopft werden. Verwenden Sie eine weiche Bürste oder ein trockenes
Tuch, um die Maschine zu reinigen. Sofern verfügbar, reinigen Sie die
Lüftungsöffnungen mit sauberer und trockener Druckluft
Bürsten
• Mit der Zeit unterliegen die Kohlebürsten des Motors dem Verschleiß
• Wenn der Verschleiß der Bürsten fortgeschritten ist, kann die
Motorleistung abnehmen, die Maschine lässt sich nicht einschalten oder
es kann übermäßige Funkenbildung beobachtet werden
• Wenn Sie den Verdacht haben, dass die Bürsten abgenutzt sind, lassen
Sie sie durch einen autorisierten Vertragskundendienst auswechseln
Entsorgung
• Entsorgen Sie keine Elektrogeräte oder andere ausgediente Elektro- oder
Elektronikaltgeräte mit dem Haushaltsmüll
• Wenden Sie sich für Informationen über die sachgemäße Entsorgung von
Werkzeugen an die örtlichen Entsorgungsbehörden
14
Page 15

237377 850 W SDS+ Schlagbohrmaschine
Silverline Tools Garantie
Dieses Silverline Produkt beinhaltet eine
3-Jahre-Garantie
Registrieren Sie dieses Produkt unter www.silverlinetools.com innerhalb
von 30 Tagen nach dem Kauf, um die 3-Jahre-Garantie zu nutzen. Die
Garantiezeit beginnt mit dem Kaufdatum auf Ihrem Kaufbeleg.
Registrieren Sie Ihren Kauf
Gehen Sie zu: silverlinetools.com, wählen Sie den Link Registrierung und
geben Sie Folgendes ein:
• IhrepersönlichenAngaben
• ProduktdetailsundKaunformationen
Das Garantiezertifikat wird Ihnen im PDF-Format zugeschickt. Bitte
drucken Sie es aus und bewahren Sie es zusammen mit Ihrem Produkt auf.
Garantiebedingungen für Silverline Tools
Die Garantiezeit beginnt mit dem Datum des auf dem Kaufbeleg
angegebenen Einzelhandelskaufs.
BITTE BEWAHREN SIE IHREN KAUFBELEG AUF
Falls dieses Produkt innerhalb von 30 Tagen nach dem Kauf einen Defekt
aufweisen sollte, bringen Sie es bitte mit Ihrem Kaufbeleg und unter
Angabe des Fehlers zu dem Fachhändler, bei dem es gekauft wurde,
zurück. Sie erhalten einen Ersatz oder eine Erstattung.
Falls dieses Produkt nach den 30 Tagen nach dem Kauf einen Defekt
aufweist, schicken Sie es zurück an:
Silverline Tools Service Centre
PO Box 2988
Yeovil
BA21 1WU, U.K.
Der Garantieanspruch muss während der Garantiezeit gestellt werden.
Sie müssen den Originalkaufbeleg mit Angabe des Kaufdatums einreichen,
Ihren Namen und Ihre Adresse sowie den Ort des Kaufs angeben, bevor
Schritte eingeleitet werden können.
Sie müssen genaue Einzelheiten des zu behebenden Defekts angeben.
Ansprüche, die während der Garantiezeit gestellt werden, werden von
Silverline Tools überprüft, um nachzuweisen, dass der Defekt durch
fehlerhaftes Material oder Herstellung des Produkts bedingt ist.
Transportkosten werden nicht erstattet. Eingereichte Produkte sollten
sich in einem zur Reparatur geeigneten sauberen und sicheren Zustand
befinden und sorgfältig verpackt werden, damit es beim Transport nicht
zu Schäden oder Verletzungen kommen kann. Wir können die Annahme
ungeeigneter oder unsicherer Lieferungen verweigern.
Alle Arbeiten werden von Silverline Tools oder den von Silverline Tools
ernannten Reparaturbeauftragten durchgeführt.
Die Reparatur oder der Ersatz des Produkts wird die Garantiezeit nicht
erweitern.
Defekte, die von uns als unter die Garantie fallend erachtet werden,
werden entweder durch kostenlose Reparatur des Werkzeugs (exklusive
Transportkosten) oder durch Ersatz durch ein Werkzeug in einwandfreiem
Zustand behoben.
Einbehaltene Werkzeuge oder Teile, für die ein Ersatz ausgegeben wurde,
werden zu Eigentum von Silverline Tools.
Die Reparatur bzw. der Ersatz Ihres Produkts unter dieser Garantie erfolgt
zusätzlich zu Ihren gesetzlichen Rechten als Verbraucher und hat keine
nachteiligen Folgen auf diese.
Was abgedeckt ist:
Die Reparatur des Produkts, nachdem zur Zufriedenheit von Silverline Tools
nachgewiesen wurde, dass der Defekt durch fehlerhaftes Material oder
mangelhafte Arbeitsausführung während der Garantiezeit bedingt ist.
Wenn ein Ersatzteil nicht mehr erhältlich ist oder nicht mehr hergestellt
wird, kann Silverline Tools es gegen einen funktionellen Ersatz
austauschen.
Gebrauch des Produkts in der EU.
Was nicht abgedeckt ist:
Silverline Tools garantiert keine Reparaturen, die erforderlich sind
aufgrund von:
Normale Verschleißerscheinungen, die durch einen der
Bedienungsanleitung entsprechenden Gebrauch entstehen, z.B. an
Messern, Bürsten, Riemen, Glühbirnen, Batterien usw.
Der Ersatz von mitgeliefertem Zubehör wie etwa Bohrspitzen, Messer,
Sandpapier, Schneidscheiben und anderen zugehörigen Artikeln.
Unfallschäden, Defekte verursacht durch: unsachgemäßen Gebrauch,
unzureichende Wartung oder nachlässige Bedienung bzw. Handhabung
des Produkts.
Verwendung des Produkts für andere als normale häusliche Zwecke.
Produktänderungen oder -modifikationen jeglicher Art.
Durch den Gebrauch von Zubehörteilen, die keine echten Silverline Tools-
Teile sind, entstandene Defekte.
Fehlerhafte Installation (außer, wenn von Silverline Tools installiert).
Reparaturen oder Änderungen, die von anderen als Silverline Tools oder
seinen autorisieren Reparaturbeauftragten durchgeführt wurden.
Forderungen anderer Art als dem Recht auf Behebung von Defekten des
Produkts im Rahmen dieser Bedingungen fallen nicht unter die Garantie.
Konformitätserklärung
Name des Unterzeichners: Mr Darrell Morris
Bevollmächtigter: Silverline Tools
Erklärt, dass das Produkt:
Name/Gerätetyp: 850 W SDS+ Schlagbohrmaschine
Bauart/Seriennummer: 237377
Installierte Nutzleistung: 230V~ 50Hz 850W
Mit den folgenden Richtlinien übereinstimmt:
• Maschinenrichtlinie 2006/42/EG
• Niederspannungsrichtlinie 2006/95/EG
• Elektromagnetische Verträglichkeit 2004/108/EG
• RoHS Richtlinie 2002/95/EG
• EN60745-1:2009; EN60745-2-6/A12:2009
• EN55014-1:2006; EN55014-2/A1:2001
• EN61000-3-2:2006; EN61000-3-3/A2:2005
Techn. Unterlagen bei: Silverline Tools
Benannte Stelle: Jiangsu TUV Product Service
Ort: Shanghai, China
Datum: 05/08/11
Unterschrift:
Direktor
Name und Anschrift des Herstellers oder seines niedergelassenen
Bevollmächtigten:
Silverline Tools, Boundary Way, Lufton Trading Estate, Yeovil, Somerset,
BA22 8HZ Großbritannien
www.silverlinetools.com
15
Page 16

ESP
Descripción de los símbolos
Los símbolos siguientes pueden aparecer en la placa de características
de su herramienta. Éstos representan información importante sobre el
producto o instrucciones relativas a su uso
Lleve protección auditiva
Lleve protección ocular
Lleve protección respiratoria
Lleve un casco de seguridad
Lleve guantes de seguridad
Lea el manual de instrucciones
Doble aislamiento para mayor protección
Conforme a las normas de seguridad y a la legislación
correspondientes
Protección medioambiental
Los productos eléctricos usados no se deben mezclar con la
basura casera. Están sujetos al principio de recogida selectiva.
Solicite información a su ayuntamiento o distribuidor sobre las
opciones de reciclaje
Características técnicas
Voltaje: .................................................230V~
Frecuencia:...........................................50Hz
Potencia: ..............................................850W
Velocidad sin carga: .............................1100min
Índice de percusión:..............................0-5200BPM
Máx. capacidad de perforación:
-Hormigón............................................26mm
-Madera................................................40mm
-Acero...................................................13mm
Peso......................................................3.4kg
Vibración ponderada:............................15.810m/s²
Incertidumbre:......................................1.5m/s
Presión acústica: ..................................91.8dB(A)
Potencia acústica: ................................102.8dB(A)
Incertidumbre: ......................................3dB(A)
Clase de la Protección:..........................
El nivel de intensidad sonora para el operador puede exceder
85 dB(A) y se recomiendan medidas de protección sonora.
Como parte de nuestro continuo programa de desarrollo de
productos, las especificaciones de los productos Silverline pueden
cambiar sin previo aviso.
-1
2
Instrucciones generales de
seguridad
Lea cuidadosamente y asegúrese de entender este manual y cualquier
etiqueta antes de usar. Guarde estas instrucciones con el producto para
poderlas consultar en el futuro. Asegúrese de que todas las personas que
utilizan este producto están completamente familiarizadas con este manual.
Incluso cuando se esté utilizando según lo prescrito, no es posible eliminar
todos los factores de riesgo residuales. Utilice con precaución. Si está
inseguro de la manera correcta y segura en la cual utilizar este producto,
no intente utilizarlo.
Mantenga las protecciones en posición
• Mantenga siempre los dispositivos de protección en posición, en un
buen orden de trabajo, correctamente alineados y ajustados. Nunca
intente utilizar una herramienta si le falta alguna de las protecciones
suministradas. Si alguna protección está dañada, reemplácela antes
de usar
Quite las llaves de ajuste
• Compruebe siempre para verificar que las llaves y los dispositivos de
ajuste se han quitado de la herramienta antes de usar
Limpie el área de trabajo
• Pueden ocurrir accidentes si los bancos y las áreas de trabajo tienen
demasiada aglomeración de utensilios o están sucios. Los pisos se
deben mantener limpios, evitando trabajar donde el piso esté resbaladizo.
Si trabaja al aire libre, cerciórese de todos los posibles peligros como
resbalarse o tropezar antes de usar esta herramienta
Usuarios competentes
• Este producto sólo debe ser utilizado por personas formadas y
competentes
Niños y animales domésticos
• Los niños y los animales domésticos deben mantenerse siempre a una
distancia de seguridad de su área de trabajo. Guarde las herramientas
con llave lejos del alcance de los niños
Use la herramienta correcta
• No fuerce ni intente utilizar una herramienta para un propósito para el
que no fue diseñado. Esta herramienta no ha sido diseñada para uso
industrial
Lleve prendas y calzado adecuados
• No lleve ropa floja, corbatas, joyas o cualquier otro objeto que pudiese
quedar atrapado. Lleve calzado antirresbaladizo o, cuando se precise,
calzado con puntera protectora. El pelo largo se debe cubrir o anudarse
en coleta atrás
Mantenga su equilibrio
• Evite posturas arriesgadas. Trabaje sobre una base firme y mantenga el
equilibrio en todo momento. No utilice herramientas cuando esté sobre
una superficie inestable
Accesorios
• El uso de cualquier acoplamiento o accesorio diferente de los
mencionados en este manual podría ocasionar daños o lesiones. El uso
de accesorios incorrectos podría ser peligroso, e invalidará su garantía
No se suba nunca al aparato
• Subirse al aparato o su plataforma puede provocar graves heridas si
el aparato bascula o se viene abajo. No almacene materiales sobre o
cerca del aparato de modo que sea necesario subirse al aparato o su
plataforma para alcanzarlos
Asegure la pieza de trabajo
• Asegure siempre la pieza de trabajo; si resulta apropiado use un tornillo
de banco o abrazadera
Compruebe si hay piezas dañadas o faltan piezas
• Antes de cada uso, compruebe si la pieza de este producto está
dañada o se ha perdido, compruebe cuidadosamente que funcionará
correctamente y que realiza su función prevista. Verifique la alineación
de las piezas móviles para asegurar que no estén agarrotadas. Repare
inmediatamente cualquier protección u otra pieza que esté dañada o
solicite a un centro de servicio autorizado que la recambie. NO UTILICE
EL APARATO SI ESTÁ DEFECTUOSO
16
Page 17

237377 SDS+ de Martillo Perforador 850 W
Seguridad eléctrica
• Esta herramienta debe estar protegida por un fusible adecuado.
• Para prevenir el peligro de incendio o de sacudida eléctrica, no exponga
este producto a la lluvia/agua o humedad.
• No hay piezas que el usuario pueda reparar en el interior de la máquina
excepto aquellas mencionadas en este manual. Encargue siempre el
trabajo de servicio a personal especializado en el servicio. No extraiga
nunca piezas de la carcasa, a menos que esté cualificado para hacerlo;
se producen en esta herramienta tensiones peligrosas
• Utilice un dispositivo de corriente residual (RCD) para reducir el riesgo de
sufrir sacudidas eléctricas
Entornos peligrosos
• No utilice herramientas eléctricas en entornos mojados o húmedos,
ni las exponga a la lluvia. Seleccione un espacio de trabajo adecuado
y manténgalo bien iluminado. No utilice herramientas eléctricas
donde haya riesgo de explosión o combustión a causa de materiales
combustibles, líquidos y gases inflamables o polvo de naturaleza
explosiva. Al utilizar herramientas eléctricas evite contacto con
elementos conectados a tierra tales como tuberías, radiadores, estufas,
refrigeradores, grifos y baños de metal
Protéjase contra las vibraciones
• Las herramientas eléctricas manuales pueden producir vibraciones. Las
vibraciones pueden causar enfermedades. Guantes, que ofrecen calor
al operador, pueden ayudar a mantener una buena circulación de la
sangre en los dedos. Las herramientas manuales no deben ser utilizadas
durante periodos de tiempo prolongados sin descansos
Mantenga su herramienta eléctrica en buenas condiciones
• Asegúrese de que los orificios de ventilación estén despejados en todo
momento, ya que de otro modo podría producirse un calentamiento
excesivo o un incendio
Desenchufe siempre la herramienta
• Antes de cambiar adaptadores o accesorios, asegúrese siempre de que
su herramienta esté desenchufada
Apague la herramienta antes de enchufarla
• Asegúrese de que la herramienta está apagada antes de enchufarla
No trate abusivamente el cable eléctrico
• Asegúrese de que el cable/cable de extensión esté en buena condición.
Si el cable/cable de extensión está dañado, asegúrese siempre de que
sea recambiado en un centro de servicio autorizado antes de utilizarlo.
No tire nunca del cable ni lo sacuda para desconectarlo de la toma
eléctrica. No lleve nunca la herramienta sujetada por su cable. Mantenga
el cable alejado de humedad, calor, aceite, disolventes y aristas vivas
No deje desatentida una herramienta encendida
• Espere siempre a que la herramienta haya parado de funcionar por
completo y desenchúfela antes de dejarla desatendida
Seguridad de las brocas SDS
• Utilice sólo esta herramienta con SDS + accesorios de instalación de
brocas. No fuerce la colocación de otros tipos de accesorios. Si utiliza
un mandril adaptador, NO utilice la acción de martillo. Un mal uso de
esta herramienta podría causar daños permanentes y puede invalidar
la garantía
• Sea consciente de los efectos de la vibración cuando utiliza la acción de
percusión. Por naturaleza de su diseño, las brocas de tipo SDS producirá
mayores vibraciones que los martillos perforadores convencionales.
• Sea consciente de que ambos extremos de las brocas pueden estar
consciente tras su uso. Lleve guantes
Presentación del producto
1 Mandril
2 Collar del mandril
3 Empuñadura lateral
4 Selector de acción del martillo
5 Interruptor de activación de encendido/apagado
6 Botón de bloqueo
7 Mandril de tres mordazas
8 Adaptador SDS
Desembalaje y Ensamblaje del
Taladro
• Desembale la taladradora con cuidado. Asegúrese de retirar todos los
materiales embalados y familiarícese con todas las características del
producto
• En caso de que falte alguna pieza o de que esté dañada, repárela o
reemplácela antes de usar el producto
Uso del Martillo Perforador SDS
ADVERTENCIA: Desconecte la máquina de la toma eléctrica antes de
realizar ajustes o cambios de accesorios.
Empuñadura lateral
• La empuñadura lateral (3) siempre debería utilizarse al taladrar
• La empuñadura lateral puede ajustarse para adecuarse al trabajo que
debe realizar
• Para ajustar la empuñadura lateral, gírela en el sentido antihorario. Esto
aflojará el conjunto de la empuñadura. Mueva la empuñadura lateral a la
posición deseada y asegúrela girándola en sentido horario
Control del mandril
• El sistema SDS permite que la broca se mueva dentro del mandril (1)
• Esto significa que no es necesario apretar el mandril alrededor de la
broca
• Engrase siempre el extremo posterior de las brocas SDS. Las brocas
deben estar recién engrasadas y libre de suciedad y polvo antes de su
uso. Tire hacia atrás del collar del mandril (2), y sujételo. Empuje y gire la
broca en el mandril (1), todo lo que pueda. Suelte el collar del mandril
• La broca debería quedar bloqueada ahora en la máquina. Compruébelo,
para ello tire de la broca. Si la broca puede retirarse, repita el
procedimiento anterior hasta que quede segura
• Para extraer una broca del mandril, tire hacia atrás del collar del mandril,
y sujételo. La broca ya puede extraerse de la máquina
• Recuerde que puede no ser posible perforar orificios con el mismo
estándar de precisión que con una taladradora eléctrica convencional.
Esto se debe a que el mandril SDS no necesita estar demasiado tenso
para que las herramientas puedan moverse con libertad
ADVERTENCIA: Nunca instale ningún acoplamiento con una
velocidad máxima inferior a la velocidad sin carga de la
máquina.
www.silverlinetools.com
17
Page 18

ESP
Interruptor de activación de encendido/apagado
• Agarre siempre con firmeza la taladradora con las dos manos
• Para encender la taladradora, apriete el interruptor de activación de
encendido/apagado (5)
• Para detener la taladradora, suelte el interruptor de activación de
encendido/apagado (5)
Control de la velocidad
• La velocidad de la taladradora puede variar entre 0 y 1050 RPM. La
velocidad se ajusta mediante la posición del interruptor de activación
de encendido / apagado (5). Cuanto más se presiona el interruptor, más
rápido funciona la máquina
Función de bloqueo
• Esta taladradora está equipada con un botón de bloqueo (6). Esto permite
que el interruptor de activación quede bloqueado en la posición de
accionamiento para uso continuo
• Para aplicar el bloqueo, presione completamente el interruptor de
activación de encendido / apagado (5) y presione el botón de bloqueo (6).
La taladradora funcionará ahora de forma continua cuando se suelte el
interruptor de activación
• Para detener la taladradora, presione y suelte el botón de activación de
encendido/apagado
Selección de martillo
• Esta taladradora puede usarse en tres modos diferentes, para diferentes
propósitos:
Perforadora a rotación:
• El modo de perforadora a rotación es adecuado para trabajar con
madera, metal y plástico
• Alinee el selector de acción del martillo (4) con el símbolo
• Acople una broca apropiada en el mandril
Martillo perforador:
• El martillo perforador es adecuado para trabajar con ladrillos,
hormigón y otros elementos de albañilería
• Alinee el selector de acción del martillo (4) con el símbolo
• Acople una broca de albañilería apropiada en el mandril
Cincel:
• El modo de Cincel es adecuado para trabajar con ladrillos, hormigón
y otros elementos de albañilería
• Alinee el selector de acción del martillo (4) con el símbolo
• Acople un cincel apropiado en el mandril
Taladrar en hormigón
• Usando el modo de martillo perforador, presione en la parte posterior del
taladro, en línea con la broca
• Para taladrar eficientemente, es aconsejable usar brocas de TCT
(puntas de carburo de tungsteno). Asegúrese de que el tamaño de la
broca está dentro de la capacidad máxima de la máquina (consulte las
especificaciones anteriores)
• No aplique una presión excesiva. Si los residuos bloquean el orificio del
taladro, maneje lentamente la taladradora y retire la broca del orificio.
Repita hasta que el orificio quede limpio
Taladrar madera
• Use únicamente el modo de perforadora a rotación
• Asegúrese de que las brocas son adecuadas para la madera y se
encuentran dentro de la capacidad máxima de esta máquina (consulte
las especificaciones anteriores)
Taladrar metal
• Para asegurarse precisión, marque la posición deseada del orificio con la
ayuda de un martillo y una perforadora
• Use únicamente el modo de perforadora a rotación
• Asegúrese de que las brocas son adecuadas para la calidad del metal
que va a taladrar y se encuentran dentro de la capacidad máxima de la
máquina (consulte las especificaciones)
• Para asegurarse de que el corte es eficiente y para prolongar la duración
de la broca, utilice un líquido lubricante/para corte y taladre a velocidad
moderada
Cincelaje
• Usando el modo de cincelado, presione en la parte posterior del taladro,
en línea con la cinel
• Recuerde que al cincelar, existe un riesgo de que salten partículas y
otros residuos
Uso del accesorio del mandril de tres mordazas
• La taladradora se suministra con un mandril de tres mordazas (7) y un
adaptador SDS (8). Esto permite usar brocas convencionales con su
taladradora SDS
• El adaptador SDS (8) puede instalarse en cualquier mandril como si se
tratase de una broca SDS
• El mandril de tres mordazas (7) se ajusta mediante rosca al adaptador
• No intente usar el modo martillo perforador con el mandril de tres
mordazas. Esto podría dar lugar a un daño grave a la herramienta y
puede invalidar la garantía de la misma
Precaución
• Presionar más no resultará en un taladrado más rápido o más eficiente.
Si la presión aplicada a la taladradora tiene un efecto notable sobre la
velocidad, reduzca la presión. Sobrecargar la taladradora reducirá su
vida útil
• A medida que la broca penetra en el material que se taladra, puede
“engancharse” o “atascarse”. Esto puede hacer que la máquina “salte”
repentinamente, para evitar cualquier posibilidad de lesión, sostenga la
taladradora con seguridad, use la empuñadura lateral así como el tipo
correcto de brocas
• Cerciórese siempre de que el material está seguro. Si resulta apropiado,
use un tornillo de banco o abrazadera. Siempre mantenga las dos manos
sobre la taladradora
Mantenimiento
ADVERTENCIA: Desconecte siempre el aparato de la red antes de proceder
a su mantenimiento o limpieza.
Limpieza
• Desconecte la máquina de la corriente antes de proceder a su limpieza.
Mantenga limpia la máquina. Limpie siempre el polvo y las partículas
y nunca deje que los orificios de ventilación se bloqueen. No deje que
se acumulen los residuos en ninguna parte de la herramienta. Use un
cepillo suave o un paño seco para limpiar la máquina o, si dispone de un
aparato de aire comprimido, sople con aire seco y limpio para limpiar los
orificios de ventilación
Escobillas de recambio
• Con el tiempo, las escobillas del motor se desgastarán. Este proceso de
desgaste se verá acelerado si la máquina se utiliza en ambientes con
mucho polvo o si se sobrecarga la máquina
• Si las escobillas se han desgastado excesivamente, el rendimiento del
motor puede disminuir, la máquina tal vez no arranque o quizás observe
una excesiva presencia de chispas
• Si cree que las escobillas pueden estar desgastadas, solicite a un centro
de servicio autorizado que las recambie
Eliminación
• No elimine sus herramientas u otro equipo eléctrico o electrónico junto
con la basura normal de la casa
• Póngase en contacto con la autoridad local encargada de la gestión de
residuos si necesita más información sobre cómo eliminar este tipo de
herramientas debidamente
18
Page 19

237377 SDS+ de Martillo Perforador 850 W
Garantía de Silverline Tools
Garantía Silverline Tools
Este producto Silverline viene con una garantía de
3 años
Registre el producto en www.silverlinetools.com antes de que transcurran
30 días a partir de la fecha de compra para poder acogerse a la garantía
de 3 años. El periodo de garantía comienza en la fecha de compra que
consta en el comprobante.
Registro de la compra
Visite: silverlinetools.com y seleccione el botón de registro, introduciendo:
• Susdatospersonales
• Detallesdelproductoeinformacióndecompra
El Certificado de Garantía le será enviado en formato PDF. Imprímalo y
guárdelo con el producto.
Condiciones
El periodo de garantía entra en vigor en la fecha de compra que consta en
el recibo de ventas.
GUARDE EL RECIBO DE VENTAS
En caso de que el producto se averíe antes de que transcurran 30 días
desde la fecha de compra, devuélvalo al distribuidor donde lo compró,
junto con el recibo y los detalles de la avería. Recibirá una sustitución o
un reembolso.
Si el producto se avería después de que transcurran 30 días desde la fecha
de compra, devuélvalo a:
Centro de Servicio de Silverline Tools
PO Box 2988
Yeovil
BA21 1WU, Reino Unido
La reclamación bajo garantía debe presentarse durante el periodo de
garantía.
Antes de poder realizar cualquier trabajo de reparación, deberá entregar
el recibo de compra original en el que se indica la fecha de compra, su
nombre, dirección y el lugar donde lo adquirió.
También deberá indicar claramente los detalles del fallo a reparar.
Las reclamaciones presentadas dentro del periodo de garantía deberán ser
verificadas por Silverline Tools con el fin de establecer si las deficiencias
son consecuencia de los materiales o de la mano de obra del producto.
Los gastos de transporte no son reembolsables. Todo producto a devolver
deberá estar en un estado limpio y seguro para su reparación, debiendo
empaquetarse cuidadosamente con el fin de prevenir daños o lesiones
durante el transporte. Nos reservamos el derecho a rechazar envíos
incorrectos o inseguros.
Todas las reparaciones serán realizadas por Silverline Tools o sus agentes
de reparación autorizados.
La reparación o sustitución del producto no prolongará el periodo de
garantía.
Los defectos reconocidos por nosotros como cubiertos por la garantía
serán corregidos reparando la herramienta, sin cargo alguno (salvo los
gastos de envío), o bien sustituyéndola por una herramienta en perfecto
estado de funcionamiento.
Las herramientas o piezas retenidas que hayan sido sustituidas serán
propiedad de Silverline Tools.
La reparación o sustitución del producto bajo garantía aporta beneficios
adicionales a sus derechos legales como consumidor, sin afectarlos.
Qué está cubierto:
La reparación del producto, si se puede comprobar a satisfacción de
Silverline Tools que las deficiencias se deben a materiales o mano de obra
defectuosos dentro del periodo de garantía.
En caso de que cualquier pieza no estuviera disponible o estuviera fuera de
fabricación, Silverline Tools la sustituirá por una pieza funcional.
Uso del producto en la Unión Europea.
Qué no está cubierto:
Silverline Tools no garantiza las reparaciones necesarias como
consecuencia de:
Desgaste normal por uso en cumplimiento de las instrucciones de por
ejemplo hojas, escobillas, correas, bombillas, baterías, etc...
La sustitución de cualquier accesorio suministrado: brocas, hojas, papel de
lija, discos de corte y otras piezas relacionadas.
Daño accidental, averías debidas a uso o cuidado negligente, uso
incorrecto, negligencia, funcionamiento o manejo indebido del producto.
El uso del producto para un fin distinto al normal doméstico.
Cualquier cambio o modificación del producto.
El uso de piezas y accesorios que no sean recambios originales de
Silverline Tools.
Instalación incorrecta (excepto si fue realizada por Silverline Tools).
Reparaciones o alteraciones realizadas por agentes distintos a Silverline
Tools o sus agentes de reparación autorizados.
Las reclamaciones distintas al derecho a corrección de fallos en la
herramienta indicados en las presentes condiciones de garantía no están
cubiertas por ella.
Declaración de conformidad CE
El abajo firmante: Mr Darrell Morris
Autorizado por: Silverline Tools
Declara que el producto:
Modelo/Nombre: SDS+ de Martillo Perforador 850 W
Tipo y N° de serie: 237377
Potencia neta instalada: 230V~ 50Hz 850W
Está en conformidad con las directivas:
• Directiva de máquinas 2004/108/CE
• Directiva de baja tensión 2006/42/CE
• Compatibilidad electromagnética 2006/95/CE
• Directiva ROHS 2002/95/CE
• EN60745-1:2009; EN60745-2-6/A12:2009
• EN55014-1:2006; EN55014-2/A1:2001
• EN61000-3-2:2006; EN61000-3-3/A2:2005
La documentación técnica se conserva en: Silverline Tools
Organismo notificado: Jiangsu TUV Product Service
Lugar de declaración: Shanghai, China
Fecha: 05/08/11
Firma:
Director
Nombre y dirección del fabricante o representante autorizado:
Silverline Tools, Boundary Way, Lufton Trading Estate, Yeovil, Somerset, BA22
8HZ Reino Unido
www.silverlinetools.com
19
Page 20

I
Descrizione dei simboli
La targhetta identificativa del vostro elettroutensile potrebbe riportare
dei simboli. Tali simboli sono una rappresentazione grafica che mira a
evidenziare importanti informazioni sul prodotto o istruzioni per il suo
utilizzo corretto e sicuro.
Indossare protezioni per l’udito
Indossare protezioni per gli occhi
Indossare una protezione per le vie respiratorie.
Indossare una protezione per la testa
Indossare protezioni per le mani
Leggere il manuale d’uso
Doppio isolamento per una protezione supplementare
Il prodotto è conforme alle vigenti normative e norme di
sicurezza applicabili
Protezione Ambientale
l simbolo del cestino barrato indica che i prodotti elettrici non
devono essere mischiati con i rifiuti domestici ma conferito
ad un centro di raccolta appropriato. Per ulteriori informazioni
sul riciclaggio si prega di contattare la Sua amministrazione
comune locale o il punto vendita
Caratteristiche tecniche
Tensione d’esercizio: ............................230V~
Frequenza: ...........................................50Hz
Potenza: ...............................................850W
Velocità a vuoto: ...................................1100min
Frequenza di impatto:...........................0-5200BPM
Capacità massima di foratura:
-Cemento.............................................26mm
-Legno..................................................40mm
-Acciaio................................................13mm
Peso.....................................................3.4kg
Vibrazione mano-braccio: .....................15.810m/s²
Incertezza:............................................1.5m/s
Pressione sonora: .................................91.8dB(A)
Potenza sonora: ....................................102.8dB(A)
Incertezza: ............................................3dB(A)
Classe di Protezione:.............................
Il livello di intensità del suono per l’operatore può superare 85dB (A)
e le misure di protezione contro il rumore sono necessarie.
Nell'ambito del nostro sviluppo continuo del prodotto, le specifiche
dei prodotti Silverline possono subire variazioni senza preavviso.
-1
2
Informazioni generali sulla
sicurezza
Prima dell’utilizzo si raccomanda di leggere attentamente e familiarizzare
con le istruzioni contenute nel presente manuale e sulle etichette riportate
sul prodotto. Il presente manuale delle istruzioni deve essere tenuto sempre
assieme al prodotto, per consentire una rapida consultazione in futuro.
Prima di utilizzare il prodotto, assicurarsi che tutto il personale addetto al
suo impiego abbia letto e familiarizzato con le informazioni contenute nel
presente manuale.
Anche quando utilizzato secondo le raccomandazioni prescritte, l’impiego
del prodotto comporta comunque dei rischi residui non eliminabili. Si
raccomanda pertanto di adottare la massima cautela durante l’utilizzo del
prodotto. Evitare di utilizzare il prodotto in caso di dubbi o incertezze sulle
corrette modalità di utilizzo.
Mantenere le protezioni installate
• Le protezioni presenti sul prodotto devono essere tenute sempre
installate, in buono stato d’uso e regolate e allineate in modo corretto.
Evitare di utilizzare qualunque tipo di attrezzatura priva delle relative
protezioni. Se le protezioni presentano segni di danneggiamento,
procedere alla loro sostituzione prima dell’utilizzo del prodotto
Rimozione delle chiavi di regolazione
• Assicurarsi sempre di aver rimosso tutte le chiavi e gli altri attrezzi di
regolazione prima di utilizzare il prodotto
Pulitura dell’area di lavoro
• La presenza di sporcizia e disordine nell’area di lavoro e sui banchi di
lavorazione può causare incidenti; si raccomanda pertanto di tenere i
pavimenti sempre puliti, evitando di effettuare lavori in aree caratterizzate
da pavimentazioni scivolose. Durante l’esecuzione di lavorazioni in
esterni, verificare sempre la presenza di potenziali rischi di scivolamento
e interruzione dell’alimentazione prima di usare l’apparecchio
Persone competenti
• Questo prodotto deve essere utilizzato solo da persone formate e
competenti
Bambini e animali
• Si raccomanda di tenere bambini ed animali a distanza di sicurezza
dall’area di lavoro. Quando inutilizzati, attrezzature e macchinari devono
essere tenuti chiusi in un’area non accessibile a bambini e animali
Corretto utilizzo dell'utensile
• Evitare di mettere sotto sforzo o utilizzare la macchina utensile per
impieghi differenti da quelli per i quali essa è stata progettata. Questo
prodotto non è stato progettato per utilizzo industriale
Indossare indumenti e scarpe di protezione di tipo idoneo
• Evitare di indossare indumenti troppo larghi, cravatte, gioielli o altri
oggetti che potrebbero restare impigliati nella macchina utensile. Se
necessario, indossare calzature con suola antiscivolo, o calzature dotate
di puntale protettivo. I capelli lunghi devono essere tenuti coperti o
raccolti dietro la testa
Mantenere una posizione che consenta un equilibrio
ottimale
• Evitare di sporgersi; tenere sempre i piedi saldamente ancorati al suolo;
evitare di utilizzare le attrezzature quando i piedi poggiano su una
superficie instabile
Accessori
• L’utilizzo di accessori o altri dispositivi differenti da quelli riportati nel
presente manuale può dare luogo al danneggiamento del prodotto o
causare il ferimento dell’operatore e/o di soggetti terzi. L’utilizzo di
accessori di tipo non compatibile o non idoneo può comportare gravi
rischi e causa l’invalidamento della garanzia
Non calpestare il prodotto
• Non salire sul dispositivo o sul suo supporto in quanto questo potrebbe
ribaltarsi o sfondarsi, causando serie lesioni. Non accumulare alcun
genere di materiale sopra o vicino al prodotto in modo da non essere
costretti a salire sul macchinario o sul suo supporto per raggiungerli
Fissare il pezzo in lavorazione
• Assicurarsi sempre che il pezzo in lavorazione sia saldamente bloccato;
se necessario utilizzare un dispositivo di bloccaggio o una morsa in modo
di poter liberare entrambe le mani per fare funzionare l'apparecchio
Verifica di componenti mancanti o danneggiati
• Prima di ogni utilizzo, ispezionare l’elettroutensile, per verificare
l’eventuale presenza di componenti mancanti o danneggiati; verificarne
inoltre con attenzione il corretto funzionamento e le prestazioni. Verificare
20
Page 21

237377 Trapano a Percussione SDS+ 850 W
il corretto allineamento di tutte le parti in movimento, per evidenziare
eventuali grippaggi o inceppamenti tra i componenti. In caso di
danneggiamento degli schermi di protezione o di altri componenti, sarà
necessario provvedere immediatamente alle opportune riparazioni e/o
sostituzioni, che devono essere effettuate presso un centro di riparazione
autorizzato. In presenza di difetti il prodotto non deve essere
assolutamente utilizzato
Sicurezza elettrica
• Questa macchina utensile deve essere protetta mediante un fusibile di
potenza adeguata
• Per evitare il rischio di incendi o scosse elettriche, evitare di esporre il
prodotto alla pioggia/acqua o all’umidità
• Fatta eccezione per le parti indicate nel presente manuale, questo
prodotto non contiene alcun componente riparabile dal cliente
• Qualunque riparazione dovrà essere effettuata solo ed esclusivamente
da personale qualificato. Evitare di rimuovere parti del guscio protettivo
esterno della macchina, a meno che tale operazione non venga eseguita
da personale specializzato; i componenti interni della unità sono soggetti
a tensioni elettriche di intensità pericolosa.
• L’utilizzo di un interruttore differenziale (RCD), consentirà di ridurre i rischi
di scosse elettriche
Utilizzo in ambienti pericolosi
• Gli elettroutensili non devono essere utilizzati in ambienti umidi o esposti
alla pioggia. Prima di procedere all’utilizzo, assicurarsi di disporre
di un’area di lavoro sufficientemente spaziosa e ben illuminata. Gli
elettroutensili non devono essere utilizzati in ambienti soggetti a rischi
di incendi e/o esplosioni causate da sostanze combustibili, liquidi
infiammabili, gas infiammabili o polveri di natura esplosiva. Durante
l’utilizzo di elettroutensili, evitare sempre il contatto con oggetti e
componenti dotati di messa a terra, come tubazioni, radiatori, cocitori,
frigoriferi, vasche metalliche e rubinetti
Protezione contro le vibrazioni
• Gli elettroutensili portatili tendono a generare vibrazioni. Le vibrazioni
possono causare malattie. L’utilizzo di guanti, per mantenere al caldo
le mani, può contribuire a far si che la circolazione sanguigna delle dita
dell’operatore si mantenga su livelli ottimali. Le attrezzature elettriche
portatili non devono essere mai utilizzate per lunghi periodi senza
interruzione
Manutenzione dell’elettroutensile
• Assicurarsi che tutte le griglie di ventilazione siano sempre libere da
ostacoli. In caso di ostruzione, si potrebbe verificare un surriscaldamento
dell’utensile, con il rischio di incendi
Scollegare l'elettroutensile dalla rete elettrica
• Prima di procedere alla sostituzione di componenti o accessori,
assicurarsi sempre di aver prima scollegato l'elettroutensile
dall'alimentazione di rete
Spegnimento dell’elettroutensile prima del collegamento
alla rete elettrica
• Assicurarsi sempre di aver spento l’elettroutensile prima di effettuare il
collegamento alla rete elettrica. In caso di improvviso e inatteso arresto
dell’elettroutensile, procedere immediatamente a premere il tasto di
spegnimento dello stesso
Evitare di danneggiare il cavo di alimentazione
• Assicurarsi sempre che il cavo/prolunga di alimentazione sia in buone
condizioni. Prima di procedere all’utilizzo di un utensile con cavi/
prolunghe di alimentazione danneggiati è necessario far sostituire tali
componenti presso un centro assistenza autorizzato. Evitare di strappare
o tirare con forza il cavo di alimentazione per scollegarlo dalla presa di
alimentazione. Evitare di trasportare l’utensile trascinandolo mediante
il cavo. Tenere il cavo lontano da umidità, fonti di calore, lubrificanti,
solventi e bordi taglienti
Non lasciare l’utensile incustodito
• Prima di lasciare l’utensile, attendere sempre l’arresto completo e
scollegarlo dalla rete di alimentazione
Raccomandazioni Sulle Sicurezza
per l’uso del Trapano SDS
• Su questo trapano, utilizzare esclusivamente accessori compatibili con
mandrini SDS+. Non tentare di inserire tipi di accessori con compatibili
con questo tipo di attacco. Se si utilizza un mandrino adattatore, NON
UTILIZZARE la funzione di trapano a percussione. Un utilizzo non corretto
di questo elettroutensile può causare danni permanenti e invalidare la
garanzia del prodotto
• Prestare sempre la massima attenzione agli effetti delle vibrazioni
durante l’utilizzo della funzione di trapano a percussione. Date le loro
caratteristiche di progettazione, i trapani con attacco SDS generano
vibrazioni maggiori rispetto ai normali trapani a percussione
• La punta del trapano può essere estremamente calda dopo l’uso.
Indossare sempre guanti protettivi
Disimballaggio e montaggio del
trapano
• Estrarre il trapano dall’imballaggio, con la massima cura. Assicurarsi
di estrarre tutti i componenti e gli accessori contenuti all’interno
dell’imballaggio e quindi iniziare a familiarizzare con le varie
caratteristiche e funzionalità del prodotto
• In caso di parti mancanti o danneggiate, sarà necessario far riparare o
sostituire tali parti prima di utilizzare il prodotto
Conoscenza del prodotto
1 Mandrino
2 Collare del mandrino
3 Impugnatura laterale
4 Selettore modalità a percussione
5 Interruttore di accensione/spegnimento
6 Tasto di blocco velocità
7 Mandrino a 3 ganasce
8 Adattatore SDS
Modalità d’uso del Trapano a
Percussione SDS
ATTENZIONE: Scollegare sempre il trapano dalla rete di alimentazione
elettrica prima di effettuare regolazioni o sostituzioni di accessori.
Impugnatura laterale
• Durante le operazioni di foratura, è sempre necessario utilizzare
l’impugnatura laterale (3)
• L’impugnatura laterale può essere regolata, per adattarla in modo
ottimale al tipo di lavoro da eseguire
• Per effettuare la regolazione, ruotare l’impugnatura in senso antiorario.
Tale operazione consente di allentare l’impugnatura. Quindi, spostare
l’impugnatura laterale nella posizione desiderata e serrarla nuovamente,
facendola ruotare in senso orario
Utilizzo del mandrino
• Il sistema SDS consente lo spostamento della punta all’interno del
mandrino (1). Ciò significa che non vi è alcuna necessità serrare il
mandrino sulla punta
• Effettuare sempre l’ingrassaggio dell’estremità inferiore delle punte SDS.
Prima dell’uso le punte devono essere sempre ingrassate, e ripulite da
eventuali tracce di sporco e polvere. Tirare indietro il collare del mandrino
(2) e mantenerlo in tale posizione. Spingere e far ruotare a fondo la punta
all’interno sul mandrino (1). Rilasciare il collare del mandrino.
• La punta dovrebbe essere ora saldamente bloccata sul mandrino
del trapano; per assicurarsi che la punta sia effettivamente bloccata,
provare a estrarla, tirandola con forza. Se la punta si sfila dal mandrino,
sarà necessario ripetere la procedura di inserimento fino a ottenere un
bloccaggio adeguato.
• Per estrarre la punta dal mandrino, tirare indietro il collare del mandrino e
mantenerlo in tale posizione. Procedere quindi all’estrazione della punta
dal mandrino del trapano.
• Si noti che con questo tipo di trapano potrebbe non essere possibile
ottenere la stessa accuratezza di foratura ottenibile con un trapano
elettrico di tipo di tradizionale. Ciò è dovuto al leggero “gioco” richiesto
dal mandrino SDS per facilitare il movimento degli utensili a esso
collegati.
ATTENZIONE: Evitare di installare accessori la cui velocità massima
operativa sia inferiore alla velocità a vuoto della macchina.
www.silverlinetools.com
21
Page 22

I
Interruttore di accensione/spegnimento
• Il trapano deve essere sempre tenuto saldamente, utilizzando entrambe
le mani
• Per avviare il trapano, spingere il pulsante di accensione/spegnimento (5)
• Per arrestare il trapano, rilasciare il pulsante di accensione/spegnimento
(5)
Regolazione della velocità di rotazione
• La velocità di rotazione del trapano può essere regolata da 0 a 1050 Giri/
Min. La regolazione della velocità di rotazione avviene modificando la
pressione sul pulsante di accensione/spegnimento (5). Incrementando la
pressione sul pulsante, si incrementa la velocità di rotazione del trapano
Funzione di blocco velocità
• Il trapano è dotato di un tasto di blocco della velocità (6). Questo tasto
consente di bloccare il pulsante a pressione in posizione completamente
premuta (massima velocità di funzionamento), per l’utilizzo prolungato del
trapano
• Per attivare la funzione di blocco velocità, premere a fondo il pulsante
di accensione/spegnimento (5), e quindi premere il tasto di blocco (6).
In questo modo, il trapano funzionerà in continuo, anche se si rilascia il
tasto di accensione/spegnimento (5)
• Per arrestare il trapano quando è attivo il tasto di blocco velocità,
premere a fondo e quindi rilasciare il tasto di accensione/spegnimento
a pressione
Modalità di funzionamento
• Questo trapano può essere utilizzato in tre differenti modalità di
funzionamento:
Funzione di trapano standard:
•La funzione di trapano standard è indicata per l’esecuzioni di
operazioni di foratura su legno, metallo e plastica
• Allineare il selettore della modalità di funzionamento (4) con il simbolo
•Inserire una punta di tipo adeguato nel mandrino
Funzione a percussione:
•La funzione di trapano a percussione è indicata per l’esecuzioni di
operazioni di foratura su mattoni, cemento e altri elementi in muratura.
• Allineare il selettore della modalità di funzionamento (4) con il simbolo
•Inserire una punta specifica per muratura nel mandrino
Funzione scalpellatrice:
•La funzione di scalpellatrice è indicata per l’esecuzioni lavori su
mattoni, cemento e altri elementi in muratura
• Allineare il selettore della modalità di funzionamento (4) con il simbolo
•Inserire una punta da scalpellatura di tipo adeguato nel mandrino
Trapanatura su cemento
• Con il trapano impostato sulla modalità a percussione, esercitare un’adeguata
pressione sul lato posteriore del trapano, in corrispondenza dell’asse ideale
che collega il punto di pressione alla punta di perforazione
• Per una maggiore efficacia nella perforazione, si raccomanda l’uso di
punte al carburo di tungsteno (TCT). Assicurarsi inoltre che la dimensione
delle punte sia compatibile con la capacità massima del trapano (vedi
sezione “specifiche tecniche”, sopra)
• Evitare di applicare una pressione eccessiva. Se il foro praticato viene
ostruito da accumuli di materiali scarto, rallentare la velocità di rotazione
del trapano e estrarre lentamente la punta dal foro. Ripetere la procedura
fino alla completa pulitura del foro
Trapanatura su legno
• Utilizzare esclusivamente la modalità di trapano standard
• Assicurarsi che le punte da trapano utilizzate siano adeguate alla
perforazione del legno, e che siano compatibili con la capacità massima
del trapano (vedi sezione “specifiche tecniche”)
Trapanatura su metallo
• Per garantire la massima accuratezza di perforazione, si raccomanda di
marcare il punto da forare con un punzone e un martello
• Utilizzare esclusivamente la modalità di trapano standard
• Assicurarsi che le punte perforanti siano adeguate al tipo di metallo da
forare, e che siano compatibili con la capacità massima del trapano (vedi
sezione “specifiche tecniche”, sopra)
• Per garantire la massima efficacia di perforazione, e per prolungare la
vita operativa delle punte, si raccomanda di utilizzare un lubrificante o un
fluido da taglio di tipo adeguato
Lavori di scalpellatura
• Con la modalità di scalpellatura selezionata, esercitare un’adeguata
pressione sul lato posteriore del trapano, in corrispondenza dell’asse
ideale che collega il punto di pressione alla punta di perforazione
• Si noti che durante la operazioni di scalpellatura, sussiste il rischio di
espulsione di schegge e altri tipi di detriti nell’area di lavoro
Utilizzo del mandrino a tre ganasce
• Il trapano è dotato di un mandrino a tre ganasce (7) e di un adattatore
SDS (8). Tale soluzione consente di utilizzare normali punte perforanti su
un trapano SDS
• L’adattatore SDS (8) va inserito sul mandrino del trapano, seguendo la
stessa procedura utilizzata per le punte SDS
• Il mandrino a 3 ganasce (7) viene fissato sull’adattatore mediante
un’apposita vite di fissaggio
• Non tentare di utilizzare il trapano nella modalità a percussione quando
su di esso è presente un mandrino a 3 ganasce. Ciò potrebbe causare
gravi danni all’elettroutensile, con il conseguente invalidamento della
garanzia
Cautela
• L’applicazione di una pressione eccessiva sul trapano non offre alcun
vantaggio in termini di rapidità o maggiore efficienza di perforazione.
Se si riscontra una significativa riduzione delle prestazioni del trapano
a causa della pressione esercitata su di esso, sarà necessario ridurre
la pressione. Sottoporre il trapano a sovraccarichi ne ridurrà la durata
operativa
• Mano a mano che la punta penetra nel materiale da perforare, essa tenderà
a “rallentare” o a “bloccarsi”. Tali fenomeni possono causare improvvisi
“contraccolpi” del trapano. Per impedire qualunque rischio di infortunio,
si raccomanda di tenere sempre il trapano saldamente, utilizzando
l’impugnatura laterale e utilizzando punte perforanti ben affilate e del
tipo corretto
• Assicurarsi sempre che il pezzo in lavorazione sia saldamente bloccato.
Se necessario, utilizzare un dispositivo di bloccaggio o una morsa per
fissare il pezzo in lavorazione, e tenere sempre entrambe le mani sul
trapano durante il suo utilizzo
Manutenzione
AVVERTENZA: Prima di procedere alla pulitura, scollegare la levigatrice
dall’alimentazione di rete.
Pulitura
• Tenere la levigatrice sempre pulita. Rimuovere sempre gli accumuli
di polvere e particelle metalliche, ed evitare che i fori di ventilazione
vengano ostruiti. Evitare l’accumulo di residui sui vari componenti
dell’elettroutensile. Per la pulitura della levigatrice, utilizzare una spazzola
a setole morbide o un panno asciutto; quando possibile, insufflare aria
compressa pulita e asciutta attraverso le griglie di ventilazione
Sostituzione delle spazzole
• Con l’andare del tempo, le spazzole in carbone del motore elettrico
tendono ad usurarsi. Tale processo di deterioramento diviene più rapido
quando la macchina viene utilizzata in ambienti polverosi, o quando essa
viene sottoposta a carichi di lavoro eccessivi
• In caso di eccessiva usura delle spazzole si riscontrerà un calo delle
prestazioni del motore elettrico, con difficoltà di avviamento o con una
eccessiva generazione di scintille
• Quando le spazzole sono usurate è necessario procedere alla loro
sostituzione in un centro di riparazione autorizzata
Smaltimento
• Gli elettroutensili e le altre attrezzature elettriche ed elettroniche non
possono essere smaltite assieme ai normali rifiuti domestici e urbani
• Prendere contatto con le autorità locali preposte allo smaltimento
dei rifiuti per ottenere ulteriori informazioni sulle corrette modalità di
smaltimento delle attrezzature
22
Page 23

237377 Trapano a Percussione SDS+ 850 W
Garanzia Silverline Tools
Questo prodotto Silverline è protetto da una
garanzia di 3 anni
Per attivare la garanzia di 3 anni è necessario registrate il prodotto sul
sito www.silverlinetools.com entro 30 giorni dalla data d'acquisto. La data
d'inizio del periodo di garanzia corrisponde alla data d'acquisto riportata
sullo scontrino di vendita.
Registrazione dell'acquisto
Accedere al sito: silverlinetools.com e selezionare il tasto Registrazione
per inserire:
• Informazionipersonali
• Dettaglidelprodottoeinformazionisull'acquisto
Il Certificato di Garanzia sarà inviato per posta elettronica nel formato
PDF. Si prega di stampare e conservare il Certificato insieme alla ricevuta
d'acquisto.
Condizioni Della Garanzia
Il periodo di garanzia decorre dalla data dell’acquisto presso il rivenditore
indicata sulla ricevuta d’acquisto.
SI PREGA DI CONSERVARE LA RICEVUTA D'ACQUISTO
Nel caso in cui il prodotto risultasse difettoso entro 30 giorni dalla data
d’acquisto, sarà necessario restituirlo al punto vendita presso cui è stato
acquistato, presentando la ricevuta e spiegando chiaramente la natura del
difetto riscontrato. Il prodotto difettoso sarà sostituito o sarà rimborsato
l'importo d'acquisto.
Nel caso in cui il prodotto risultasse difettoso dopo 30 giorni dalla data
d’acquisto, sarà necessario inviare una richiesta di indennizzo in garanzia
a:
Silverline Tools Service Centre
PO Box 2988
Yeovil
BA21 1WU, GB
Le richieste di indennizzo devono essere presentate durante il periodo
della garanzia.
Affinché la richiesta sia approvata, è necessario presentare anche la
ricevuta d’acquisto originale, indicante il luogo e la data dell’acquisto del
prodotto e il proprio nome e indirizzo.
Sarà necessario inoltre fornire una descrizione dettagliata del guasto
riscontrato.
Le richieste effettuate durante il periodo di garanzia saranno verificate da
Silverline Tools per stabilire se il difetto del prodotto è dovuto a problemi di
materiali o di lavorazione.
Le spese di spedizione non saranno rimborsate. Tutti i prodotti devono
essere spediti puliti e in condizioni tali da garantire l'esecuzione della
riparazione in modo sicuro. I prodotti devono essere imballati con cura
per evitare danni o lesioni durante il trasporto. Silverline Tools si riserva
il diritto di non accettare prodotti spediti in condizioni non idonee o non
sicure.
Le riparazioni saranno eseguite da Silverline Tools o da un centro di
riparazione autorizzato.
La riparazione o la sostituzione del prodotto non estende o rinnova il
periodo di garanzia.
Nel caso in cui determini che il prodotto e il difetto riscontrato sono coperti
dalla garanzia, Silverline Tools provvederà a riparare l'utensile
Dichiarazione di Conformità CE
Il sottoscritto: Mr Darrell Morris
come autorizzato di: Silverline Tools
Dichiara che il prodotto:
Nome/Modello: Trapano a Percussione SDS+ 850 W
Tipo/Numero di serie: 237377
Potenza netta installata: 230V~ 50Hz 850W
Si conforma ai seguenti direttivi:
• Direttiva macchina 2006/42/CE
• Direttiva sulla bassa tensione 2006/95/CE
• Direttiva sulla compatibilità elettromagnetica 2004/108/CE
• Direttiva ROHS 2002/95/CE
gratuitamente (esclusi i costi di spedizione) o, a propria discrezione, a
sostituirlo con un nuovo utensile.
Gli utensili o le parti trattenuti da Silverline Tools in cambio di un prodotto o
componente sostitutivo diventano proprietà di Silverline Tools.
La riparazione o la sostituzione di un prodotto in garanzia estende i diritti
del consumatore previsti per legge, senza modificarli.
Cosa copre la garanzia:
La riparazione del prodotto, nel caso in cui Silverline Tools determini che il
problema sia dovuto a difetti dei materiali o difetti di lavorazione riscontrati
durante il periodo della garanzia.
Nel caso in cui un componente non sia più disponibile o fuori produzione,
Silverline Tools si riserva il diritto di sostituirlo con un componente
adeguato.
Prodotti acquistati e utilizzati all’interno dell’Unione Europea.
Cosa non copre la garanzia:
La Garanzia Silverline Tools non copre le riparazioni se il difetto è stato
causato da:
La normale usura dei componenti per via dell’utilizzo del prodotto come
indicato nelle istruzioni d’uso (ad esempio, lame, spazzole, cinghie,
lampadine, batterie, ecc.).
La sostituzione di accessori forniti a corredo, come ad esempio punte,
lame, fogli abrasivi, dischi di taglio e altri componenti correlati.
I danni accidentali, causati dall'uso improprio, dall'abuso e dalla
manipolazione, conservazione e cura inadeguata dell'utensile da parte del
proprietario.
L’uso del prodotto per fini non domestici.
La modifica o alterazione del prodotto.
Difetti causati dall’uso di parti e accessori che non siano componenti
originali Silverline Tools.
Installazione difettosa (fatto salvo quando l'installazione viene eseguita da
Silverline Tools).
Riparazioni o alterazioni eseguite da terze parti che non siano la Silverline
Tools o i centri di riparazione autorizzati da quest'ultima.
Silverline Tools non fornisce alcuna garanzia per le richieste formulate per
la correzione dei difetti dell'utensile oggetto della garanzia fatto salvo per
quanto previsto nelle condizioni di cui sopra.
La documentazione tecnica è mantenuta da: Silverline Tools
Organismo informato: Jiangsu TUV Product Service
Posto di dichiarazione: Shanghai, Cina
Data: 05/08/11
Firma:
Direttore
Nome e indirizzo del fabbricante oppure persona autorizzata:
Silverline Tools, Boundary Way, Lufton Trading Estate, Yeovil, Somerset, BA22
8HZ, Regno Unito
www.silverlinetools.com
23
Page 24

NL
Beschrijving symbolen
Op het gegevensplaatje van uw gereedschap kunnen zich symbolen
bevinden. Deze symbolen belangrijke informatie over het product of
instructies voor het gebruik.
Draag gehoorbescherming
Draag een veiligheidsbril
Draag een stofmasker
Draag een veiligheidshelm
Draag handschoenen
Lees de handleiding
Dubbel geïsoleerd voor extra bescherming
Voldoet aan de relevante wetgeving en veiligheidsnormen
Milieubescherming
Elektrische producten mogen niet worden afgevoerd met
het normale huisvuil. Indien de mogelijkheid bestaat, dient u
het product te recyclen. Vraag uw gemeente of winkelier om
advies betreffende recyclen
Specificaties
Voltage: ................................................230V~
Frequentie: ...........................................50Hz
Opgenomen vermogen: ........................850W
Onbelast toerental: ...............................1100min
Slagfrequentie:......................................0-5200BPM
Max. boorcapaciteit:
-Beton...................................................26mm
-Hout.....................................................40mm
-Staal....................................................13mm
Gewicht:................................................3.4kg
Trillingsamplitude: .................................15.810m/s²
Onzekerheid:.........................................1.5m/s
Geluidsdruk: ..........................................91.8dB(A)
Geluidsvermogen: .................................102.8dB(A)
Onzekerheid: .........................................3dB(A)
De Klasse van de Bescherming:.............
De geluidsintensiteit voor de bediener kan 85 db(A) overschrijden en
de gehoorbescherming is noodzakelijk.
Met het oog op onze aanhoudende productontwikkeling kunnen
de specificaties van Silverline-producten zonder voorafgaande
kennisgeving worden gewijzigd.
-1
2
Algemene Veiligheid
Lees voor gebruik deze handleiding en alle etiketten op het gereedschap
zorgvuldig na. Bewaar deze handleiding bij het product voor toekomstig
gebruik. Zorg ervoor dat iedereen die dit product gebruikt, de handleiding
heeft doorgenomen.
Zelfs indien het gereedschap wordt gebruikt volgens de aanwijzingen, is
het onmogelijk om alle risicofactoren te elimineren. Wees dus voorzichtig.
Gebruik dit gereedschap niet als u twijfelt aan de juiste en veilige
gebruikswijze.
Laat de beschermkappen zitten
• Houd de beschermkappen altijd in goede staat, juist afgesteld,
uitgebalanceerd en op hun plaats. Gebruik nooit gereedschap
zonder de meegeleverde beschermkap(pen). Vervang beschadigde
beschermkappen voor gebruik
Verwijder instelsleutels
• Controleer voor gebruik dat sleutels en instelgereedschap van de
machine zijn verwijderd
Houd de werkomgeving schoon
• Een rommelige of vuile werkomgeving of werkbank kan tot ongevallen
leiden. Houd de vloer vrij en werk niet op een glibberige vloer. Zorg
er bij het verrichten van buitenwerk voor dat u alle mogelijke slip- en
struikelgevaren kent voordat u dit gereedschap gebruikt
Bekwaam gebruik
• Dit gereedschap mag enkel door bekwame, geschoolde personen
gebruikt worden
Kinderen en huisdieren
• Houd kinderen en huisdieren op een veilige afstand van uw werkruimte.
Bewaar gereedschappen achter slot en grendel buiten het bereik van
kinderen. Laat kinderen of onervaren personen dit gereedschap niet
gebruiken
Gebruik volgens bestemming
• Forceer of gebruik het gereedschap niet bij werkzaamheden waarvoor
het niet is bestemd
Draag gepaste kleding en schoeisel
• Draag geen loshangende kleding, stropdassen, sieraden of andere
voorwerpen die door de machine kunnen worden gegrepen. Draag
slipvaste schoenen of schoenen met een versterkt teenstuk waar nodig.
Lang haar moet worden bedekt of opgebonden
Houd uw evenwicht
• Reik niet te ver, zorg dat u altijd stevig staat en gebruik het gereedschap
niet als u op een onstabiele ondergrond staat
Toebehoren
• Het gebruik van hulpstukken of toebehoren die niet in deze handleiding
worden vermeld, kan schade of letsel tot gevolg hebben en uw garantie
ongeldig maken
Sta nooit up uw gereedschap
• Er is kans op ernstig letsel als het gereedschap omvalt of in elkaar zakt
wanneer u op uw gereedschap of de steun staat. Plaats materialen niet
zodanig dat iemand op het gereedschap zou kunnen gaan staan om bij
de opgebergde materialen te komen
Zet het werkstuk vast
• Zet het werkstuk indien mogelijk altijd vast. Maak zoveel mogelijk
gebruik van een klem of een bankschroef, zodat u beide handen kunt
gebruiken om het gereedschap te bedienen
Controleer op beschadigde of ontbrekende onderdelen
• Controleer voor elk gebruik of er beschadigde of ontbrekende onderdelen
zijn. Controleer of het apparaat goed zal functioneren en geschikt is voor
het beoogde doel. Controleer of de bewegende delen uitgebalanceerd
zijn en niet klemmen. Laat beschadigde onderdelen of beschermkappen
onmiddellijk repareren of vervangen door een erkend servicecentrum.
GEBRUIK DIT GEREEDSCHAP NIET ALS HET GEBREKEN VERTOONT
24
Page 25

237377 850 W SDS+ Klopboor
Elektrische Veiligheid
• Dit toestel moet met een geschikte zekering beschermd worden
• Stel dit toestel niet aan regen, water of vocht bloot, om brand of een
elektrische schok te voorkomen
• Dit apparaat bevat geen door de gebruiker te onderhouden onderdelen,
behalve de onderdelen die in deze handleiding worden vermeld
• Laat het onderhoud altijd over aan bevoegd onderhoudspersoneel.
Verwijder nooit (een deel van) de behuizing, tenzij u daartoe bevoegd
bent. Dit toestel staat onder gevaarlijke elektrische spanning
• Het gebruik van een aardlekschakelaar vermindert de kans op een
elektrische schok
Gevaarlijke omgeving
• Gebruik elektrische gereedschappen niet in een vochtige of natte
omgeving en stel ze niet bloot aan regen. Zorg voor voldoende
werkruimte en goede verlichting. Gebruik geen elektrische
gereedschappen op plaatsen met explosie- of brandgevaar omwille
van brandbare materialen, ontvlambare vloeistoffen, brandbare gassen
of ontplofbare stofdeeltjes. Vermijd tijdens het gebruik van elektrische
gereedschappen contact met geaarde voorwerpen zoals buizen,
radiatoren, fornuizen, koelkasten, metalen badkuipen en kranen
Bescherm uzelf tegen trillingen
• Elektrisch handgereedschap kan trillingen veroorzaken. Trillingen
kunnen ziektes veroorzaken. Handschoenen die de handen van de
bediener warmhouden kunnen een goede circulatie van het bloed in de
vingers bevorderen. Gebruik handgereedschap niet langdurig zonder
onderbreking
Onderhoud uw elektrisch gereedschap
• Zorg ervoor dat de luchtgaten altijd vrij zijn, anders bestaat de kans op
oververhitting en brand
Trek de stekker altijd uit het stopcontact
• Controleer altijd of de kabel uit het stopcontact is gehaald voor u
hulpstukken of toebehoren wisselt
Schakel het toestel uit alvorens de stekker in te steken
• Zorg ervoor dat het elektrisch gereedschap is uitgeschakeld alvorens het
op de netvoeding aan te sluiten
Beschadig het stroomsnoer niet
• Zorg ervoor dat de (verleng)kabel in goede staat is. Laat een beschadigde
(verleng)kabel altijd vervangen in een erkend servicecentrum. Ruk of trek
nooit aan de kabel om de stekker uit het stopcontact te trekken. Draag
het gereedschap nooit aan de kabel. Houd de kabel uit de buurt van
vocht, warmte, olie, oplosmiddelen en scherpe randen
Laat het gereedschap nooit onbemand aan staan
• Wacht altijd totdat het gereedschap volledig tot stilstand is gekomen en
trek de stekker uit het stopcontact voordat u het achterlaat
Veiligheidsvoorschriften Voor
SDS-Boor
• Gebruik dit gereedschap uitsluitend met SDS+ booraccessoires.
Forceer geen andere accessoires op de boor. Bij gebruik van een
spankop met adapter MAG de klopboorfunctie niet worden gebruikt.
Het onoordeelkundige gebruik van dit gereedschap kan permanente
beschadiging veroorzaken en kan uw garantie doen vervallen
• Pas op voor trillingen bij gebruik van de klopboorfunctie. Door hun
ontwerp zullen SDS-boren meer vibratie produceren dan traditionele
klopboren
• Beide uiteinden van de boorkronen kunnen heet zijn na het gebruik.
Draag handschoenen
Productbeschrijving
1 Spankop
2 Spankop kraag
3 Zijhandgreep
4 Keuzeknop klopboorfunctie
5 Aan/uit drukschakelaar
6 Blokkeerknop
7 3-klauw spankop
8 SDS-adapter
Uitpakken en Monteren van Boor
• De boor voorzichtig uitpakken. Verwijder alle verpakkingsmaterialen en
maak uzelf vertrouwd met alle functies van het product
• Beschadigde of ontbrekende onderdelen voor het gebruik eerst laten
repareren of vervangen
Gebruik van SDS-Klopboor
WAARSCHUWING: Haal altijd de stekker van de machine uit het
stopcontact voor het omstellen of vervangen van accessoires.
Zijhandgreep
• De zijhandgreep (3) moet altijd tijdens het boren worden gebruikt
• De zijhandgreep kan versteld worden afhankelijk van de uit te voeren
werkzaamheden
• Draai de zijhandgreep naar links om deze te verstellen. Hierdoor wordt de
handgreep losgezet. Verplaats de zijhandgreep naar de gewenste stand
en draai deze naar rechts om de handgreep vast te zetten
Bediening van spankop
• Het SDS-systeem stelt de boorkroon in staat om binnen de spankop (1)
te bewegen. Dit betekent dat het onnodig is om de spankop vaster te
zetten rond de boorkroon
• Altijd het staarteinde van SDS-boorkronen invetten. De boorkronen
moeten voor het gebruik met nieuw vet zijn ingevet en vrij zijn van vuil en
stof. Trek de kraag van de spankop (2) naar achteren en houd deze vast.
Duw en roteer de boorkroon zo ver mogelijk in de spankop (1). Laat de
kraag van de spankop los
• De boorkroon moet nu in de machine vastzitten. Controleer dit door aan
de boorkroon te trekken. Als de boorkroon verwijderd kan worden, moet
de procedure hierboven herhaald worden totdat de boorkroon stevig
vastzit
• Trek de kraag van de spankop naar achteren en houd deze vast om de
boorkroon uit de spankop te verwijderen. De boorkroon kan hierna uit de
machine worden verwijderd
• Wij wijzen erop dat het boren van gaten met dezelfde nauwkeurigheid als
een traditionele elektrische boor wellicht niet mogelijk is. Dit komt door
de kleine hoeveelheid “speling” die nodig is in de SDS-spankop om het
gereedschap gemakkelijk te kunnen verplaatsen
WAARSCHUWING: - Nooit hulpstukken met een
maximumsnelheid lager dan het onbelaste toerental van de
machine gebruiken.
www.silverlinetools.com
25
Page 26

NL
Aan/uit Drukschakelaar
• Houd de boor altijd stevig met beide handen vast
• Druk op de aan/uit drukschakelaar (5) om de boor aan te zetten
• Laat de aan/uit drukschakelaar (5) los om de boor uit te zetten
Snelheidsregeling
• De snelheid van de boor kan tussen 0 en 1050 omw./min. worden
ingesteld. De snelheid wordt geregeld door de stand van de aan/uit
drukschakelaar (5). Hoe verder de drukschakelaar wordt ingedrukt, hoe
sneller de boor gaat draaien
Blokkeerfunctie
• Deze boor is uitgerust met een blokkeerknop (6). Hiermee kan de
drukschakelaar in de volledig ingedrukte stand voor continu gebruik
worden vergrendeld
• Druk de aan/uit drukschakelaar (5) volledig naar beneden en druk op
de blokkeerknop (6) om de schakelaar te blokkeren. De boor draait nu
continu wanneer de drukschakelaar wordt losgelaten
• Druk op de aan/uit drukschakelaar en laat deze los om de boor uit te
zetten
Klopboorfuncties
• Deze boor kan in drie verschillende standen voor verschillende
doeleinden worden gebruikt:
Boorfunctie
• De boorfunctie is geschikt voor het werken met hout, metaal en plastic
• Richt de keuzeknop van de klophamerfunctie (4) uit met het
symbool.
• Plaats de geschikte boorkroon in de spankop
Klopboorfunctie
• De klopboorfunctie is geschikt voor het werken met metselwerk,
beton en ander metselwerk
• Richt de keuzeknop van de klopboorfunctie (4) uit met het
symbool
• Plaats het geschikte steenboortje in de spankop
Beitelfunctie
• De beitelfunctie is geschikt voor het werken met metselwerk, beton
en ander metselwerk
• Richt de keuzeknop van de klopboorfunctie (4) uit met het
symbool
• Plaats de geschikte beitelpunt in de spankop
In beton boren
• Gebruik de klopboor en oefen druk uit op de achterkant van de boor in
lijn met de boorkroon
• Om efficiënt te kunnen boren, is het raadzaam om hardmetalen
boorkronen te gebruiken. Zorg ervoor dat de afmetingen van de
boorkroon binnen de maximale capaciteit van de machine zijn (zie de
specificaties hierboven)
• Oefen geen overmatige druk uit. Als het boorgat met gruis is gevuld,
gebruik de boor dan op lage snelheid en verwijder de boorkroon uit het
gat. Herhaal dit totdat het gat schoon is
Boren in hout
• Gebruik uitsluitend de boorfunctie
• Zorg ervoor dat de boorkronen geschikt zijn voor hout en binnen
de maximale capaciteit van deze machine zijn (zie de specificaties
hierboven)
Boren in metaal
• Teken de gewenste plaats van het gat af met een hamer en centerpons
voor een optimale nauwkeurigheid
• Gebruik uitsluitend de boorfunctie
• Zorg ervoor dat de boorkronen geschikt zijn voor het soort metaal waarin
wordt geboord en binnen de maximale capaciteit van deze machine zijn
(zie de specificaties)
• Gebruik een geschikt smeermiddel of snijvloeistof en boor met een
middelmatige snelheid om efficiënt te snijden en de levensduur van de
boorkroon te verlengen
Beitelen
• Gebruik de beitelfunctie en oefen druk uit op de achterkant van de boor
in lijn met de beitelfuncte
• Tijdens het beitelen bestaat er een groot risico dat spanen en ander afval
van het werkstuk afspringen
Gebruik van 3-klauw spankop
• De boor is uitgerust met een 3-klauw spankop (7) en een SDS-adapter
(8). Hierdoor kunt u ook traditionele boorkronen in uw SDS-boor
gebruiken
• De SDS-adapter (8) past op dezelfde manier in de spankop als een
SDS-boorkroon
• De 3-klauw spankop (7) is een schroefpassing op de adapter
• Probeer niet om de klopboorfunctie met de 3-klauw spankop te
gebruiken. Dit kan ernstige beschadiging van het gereedschap
veroorzaken en uw garantie doen vervallen
Let op
• Het uitoefenen van overmatige druk zorgt niet voor het sneller of meer
efficiënt boren. Als de op de boor uitgeoefende druk een merkbaar
effect heeft op de snelheid, dan moet de druk worden verminderd.
Overbelasting van de boor verkort de levensduur
• Wanneer de boorkroon doordringt in het te boren materialen, kan dit
“vasthaken” of “blijven hangen”. Het gevolg hiervan kan een plotselinge
“terugslag” van de boor zijn. Om letsel te vermijden moet de boor
altijd stevig aan de zijhandgreep worden vastgehouden en moeten er
geschikte scherpe boorkronen worden gebruikt
• Zorg er altijd voor dat het materiaal is vastgezet. Gebruik indien nodig
een bankschroef of spanklem om het werkstuk vast te zetten en houd de
boor altijd met twee handen vast
Onderhoud
WAARSCHUWING: Haal de stekker uit het stopcontact voor u de machine
schoonmaakt of onderhoud uitvoert.
Schoonmaken
• Houd uw machine schoon. Zorg ervoor dat afval zich niet ophoopt op de
onderdelen het gereedschap. Verwijder altijd stof en vuil en zorg ervoor
dat de luchtgaten nooit verstopt raken. Gebruik een zachte borstel of
een droge doek om de machine te reinigen. Gebruik zo mogelijk zuivere,
droge perslucht om door de luchtgaten te blazen
Borstels
• Na verloop van tijd zullen de koolborstels in de motor verslijten
• Bij overmatige slijtage van de borstels kan de motor minder goed
presteren, niet meer starten, of overmatig vonken
• Indien u vermoedt dat de borstels versleten zijn, laat ze dan bij een
erkend servicecentrum vervangen
Verwijdering
• Elektrische en elektronische apparaten mogen niet met uw huishoudelijk
afval worden weggegooid
• Neem contact op met uw gemeente voor informatie betreffende de
verwijdering van elektrisch gereedschap=
26
Page 27

237377 850 W SDS+ Klopboor
Silverline Tools Garantie
Dit Silverline product komt met 3 jaar garantie.
Registreer dit product binnen 30 dagen van aankoop op
www.silverlinetools.com om in aanmerking te komen voor 3 jaar
garantie. De garantieperiode begint op de datum van aankoop op het
ontvangstbewijs.
Het gekochte product registreren
Ga naar: silverlinetools.com, kies Registration (registratie) en voer het
volgende in:
• Uwpersoonlijkegegevens
• Degegevensvanhetproductendeaankoop
U ontvangt het garantiebewijs in PDF-vorm. Druk het af en bewaar het bij
het product.
Voorwaarden
De garantieperiode gaat in vanaf de datum van aankoop op het
ontvangstbewijs.
BEWAAR HET ONTVANGSTBEWIJS OP EEN VEILIGE PLAATS
Als dit product binnen 30 dagen van de aankoopdatum een fout heeft,
breng het dan naar de winkelier waar u het heeft gekocht, met uw
ontvangstbewijs, en met vermelding van de details van de storing. U kunt
om een nieuwe vragen of om uw geld terug.
Als dit product na de periode van 30 dagen een fout heeft, stuur het dan
naar:
Silverline Tools Service Centre
PO Box 2988
Yeovil
BA21 1WU, GB
Alle claims moeten binnen de garantieperiode worden ingediend.
U moet het originele ontvangstbewijs geven met de datum van aankoop,
uw naam, adres en plaats van aankoop voordat er aan kan worden
gewerkt.
U moet nauwkeurige gegevens verschaffen van de fout die verholpen
moet worden.
Claims die binnen de garantieperiode worden ingediend, worden door
Silverline Tools nagelopen om te kijken of het probleem een kwestie is van
de materialen of de fabricage van het product.
De verzendkosten worden niet vergoed. De geretourneerde items moeten
voor de reparatie in een redelijk schone en veilige staat verkeren en
moeten zorgvuldig worden verpakt om schade en letsel tijdens het vervoer
te voorkomen. Ongeschikte en onveilige leveringen kunnen worden
afgewezen.
Al het werk wordt uitgevoerd door Silverline Tools of een officiële
reparatiedienst.
De garantieperiode wordt niet door de reparatie of vervanging van het
product verlengd.
Defecten waarvan wij beschouwen dat ze onder de garantie vallen, worden
verholpen door middel van gratis reparatie van het gereedschap (exclusief
verzendingskosten) of door vervanging door een gereedschap in perfecte
staat van werking.
EG-Verklaring van Overeenstemming
De ondergetekende: Mr Darrell Morris
Gemachtigd door: Silverline Tools
Verklaart dat
Naam/model: 850 W SDS+ Klopboor
Type/ serie nr: 237377
Maximaal vermogen: 230V~ 50Hz 850W
Voldoet aan de volgende richtlijnen:
• Machinerichtlijn 2006/42/EG
• Richtlijn laagspanning 2006/95/EG
• Elektromagnetische verenigbaarheid 2004/108/EG
• Richtlijn ROHS 2002/95/EG
• EN60745-1:2009; EN60745-2-6/A12:2009
• EN55014-1:2006; EN55014-2/A1:2001
• EN61000-3-2:2006; EN61000-3-3/A2:2005
De ingehouden gereedschappen of onderdelen die zijn vervangen, worden
het eigendom van Silverline Tools.
De reparatie of vervanging van het product onder garantie zijn voordelen
die bijkomstig zijn aan uw wettelijke rechten als consument, en hebben
daar geen invloed op.
Wat is gedekt:
De reparatie van het product, mits naar tevredenheid van Silverline Tools
kan worden vastgesteld dat de gebreken het gevolg zijn van defecte
materialen of fabrieksfouten binnen de garantieperiode.
Onderdelen die niet meer verkrijgbaar zijn en die niet meer worden
vervaardigd worden door Silverline Tools vervangen door een functionele
vervanging.
Gebruik van dit product in de EU.
Wat niet is gedekt:
Silverline Tools geeft geen garantie op reparaties als gevolg van:
Normale slijtage veroorzaakt door gebruik in overeenstemming met de
bedieningsinstructies zoals zaagbladen, borstels, riemen, gloeilampen,
batterijen enz.
De vervanging van geleverde accessoires zoals boortjes, zaagbladen,
schuurvellen, snijschrijven en aanverwante producten.
Accidentele schade, storingen veroorzaakt door nalatigheid in gebruik of
verzorging, misbruik, verwaarlozing, onvoorzichtige bediening en hantering
van het product.
Gebruik van het product voor andere doeleinden dan normaal huishoudelijk
gebruik.
Alle soorten wijzigingen en modificaties van het product.
Gebruik van andere onderdelen en accessoires dan de originele onderdelen
van Silverline Tools.
Defecte installatie (behalve wanneer geïnstalleerd door Silverline Tools).
Reparaties of wijzigingen die zijn uitgevoerd door anderen dan Silverline
Tools of diens officiële reparatiediensten.
Behalve claims voor het recht op correctie van fouten van het gereedschap
volgens de bepalingen van deze garantie zijn geen andere claims gedekt.
De technische documentatie wordt bijgehouden door: Silverline Tools
Keuringsinstantie: Jiangsu TUV Product Service
Plaats van afgifte: Shanghai, China
Datum: 05/08/11
Handtekening:
Directeur
Naam en adres van fabrikant of gemachtigde:
Silverline Tools, Boundary Way, Lufton Trading Estate, Yeovil, Somerset,
BA22 8HZ Verenigd Koninkrijk
www.silverlinetools.com
27
Page 28

a
r
u
a
G
n
r
a
e
Y
t
e
e
3
R
E
G
3
I
S
T
E
R
*
E
N
I
L
N
O
3 Year Guarantee
Register online within 30 days*
Terms & conditions apply
Garantie de 3 ans
Enregistrement sur le site dans les
30 jours* Les conditions s’appliquent
3 Jahre Garantie
Registrieren Sie sich online innerhalb
von 30 Tagen* Es gelten die allgemeinen
Geschäftsbedingungen
3 años de garantía
Regístrese online dentro de 30 días*
Se aplican los términos y condiciones
3 anni di garanzia
Registrarsi on-line entro 30 giorni*
Termini e Condizioni si applicano
3 Jaar Garantie
Registreer online binnen 30 dagen*
Algemene voorwaarden van toepassing
www.silverlinetools.com
 Loading...