

Page 1
234578
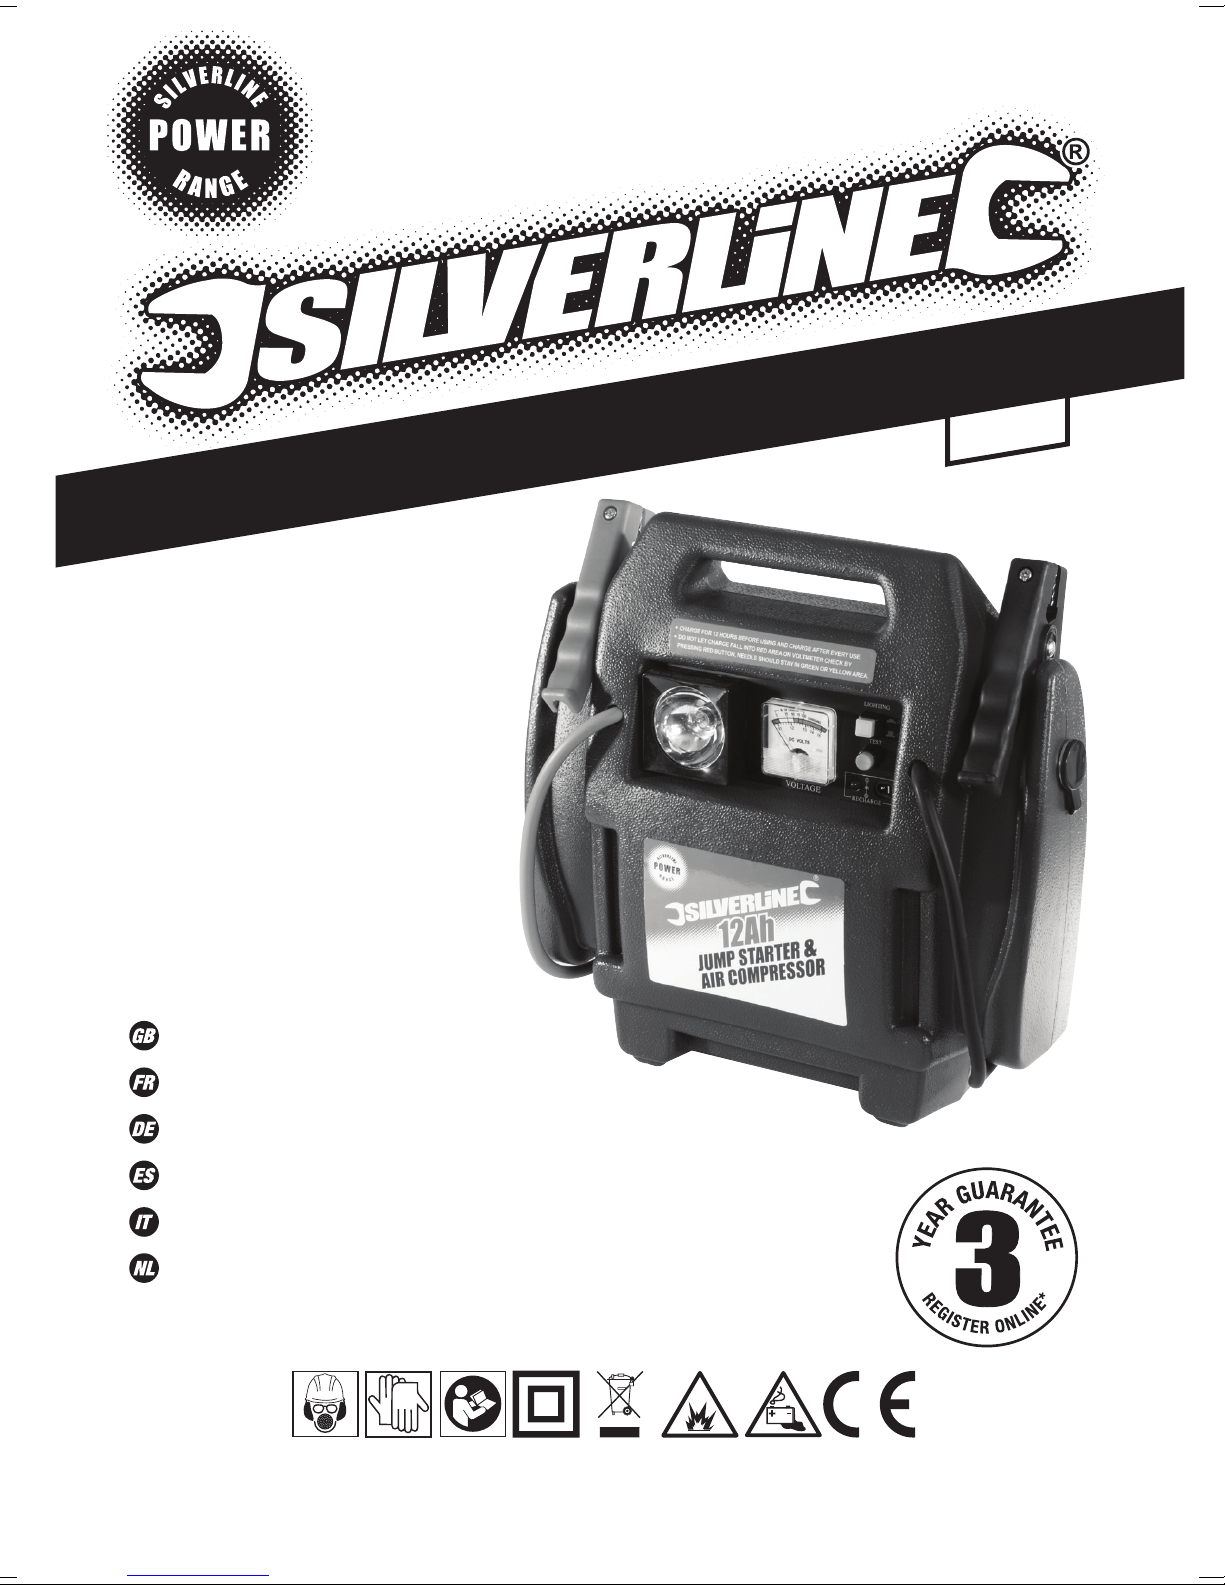
12Ah
Jump Starter
Air Compressor
&
Jump Starter & Air Compressor
Démarreur et compresseur d'air
Starthilfegerät und Druckluftkompressor
Arrancador de emergencia y compresor de aire
Avviatore e compressore d’aria
Jumpstarter met luchtcompressor
www.silverlinetools.com
Page 2
3
4
2
1
5
6
7
13
11
12
2
10
8
9
Page 3
Jump Starter
12Ah
English .................. 4
Français ................ 8
Deutsch ................. 12
Español ................. 16
Air Compressor
&
Italiano .................. 20
Nederlands ............ 24
www.silverlinetools.com
3
Page 4
GB
Original Instructions
Description of Symbols
The rating plate on your tool may show symbols. These represent important
information about the product or instructions on its use.
Wear hearing protection
Wear eye protection
Wear breathing protection
Wear head protection
Wear hand protection
Read instruction manual
Double insulated for additional protection
DANGER – Risk of explosion
WARNING: Contains Lead Acid Battery
Conforms to relevant legislation and safety standards
Environmental Protection
Waste electrical products should not be disposed of with household
waste. Please recycle where facilities exist. Check with your local
authority or retailer for recycling advice
Specification
Voltage .......................................................................................12V DC
Nominal current.............................................................................400A
Peak current ..................................................................................900A
Compressor max pressure ......................................................... 260psi
Battery capacity ............................................................................ 12Ah
Battery type ................................................................................... VRLA
Jump starter protection class .........................................................
AC charger Input ......................................................... 230V~ 50Hz 6W
AC charger Output ......................................................... 12V DC 500mA
AC charger Protection class ...........................................................
12V DC socket Max Current ...........................................................10A
As part of our ongoing product development, specifications of Silverline
products may alter without notice.
General Safety Warnings
WARNING Read all safety warnings and all instructions. Failure to follow the
warnings and instructions may result in electric shock, fire and/or serious injury.
Save all warnings and instructions for future reference.
1) Work area safety
a) Keep work area clean and well lit. Cluttered or dark areas invite accidents.
2) Electrical safety
a) Mains plugs must match the outlet. Never modify the plug in any way. Do
not use any adapter plugs with earthed (grounded) devices. Unmodified
plugs and matching outlets will reduce risk of electric shock.
b) Avoid body contact with earthed or grounded surfaces, such as pipes,
radiators, ranges and refrigerators. There is an increased risk of electric
shock if your body is earthed or grounded.
c) Do not expose to rain or wet conditions. Water entering a device will
increase the risk of electric shock.
3) Personal safety
a) Stay alert, watch what you are doing and use common sense when
operating a device. Do not use while you are tired or under the influence
of drugs, alcohol or medication. A moment of inattention while operating
may result in serious personal injury.
b) Use personal protective equipment. Always wear eye protection.
Protective equipment such as dust mask, non-skid safety shoes, hard hat,
or hearing protection used for appropriate conditions will reduce personal
injuries.
WARNING: This appliance is not intended for use by persons (including
children) with reduced, physical or mental capabilities or lack of experience
or knowledge unless they have been given supervision or instruction
concerning use of the appliance by a person responsible for their safety.
Children must be supervised to ensure that they do not play with the
appliance.
4) Service
a) Have your device serviced by a qualified repair person using only
identical replacement parts. This will ensure that the safety of the device is
maintained.
4
Page 5

www.silverlinetools.com
Jump Starter & Air Compressor 234578
Jump Starter Safety
• Do not allow any metal items to come into contact with the battery terminals,
short circuits can start fires and cause explosions
• Do not allow positive and negative lead clamps to touch. Live clamps touching
could melt the leads, and start a fire
• Always handle battery terminal connectors at arms length
• Do not attempt to jump start any battery that is leaking, cracked, or otherwise
damaged
• Do not attempt to charge a frozen battery
• Unless the battery is of the 'maintenance free' type, always check that the
electrolyte level is correct before attempting to jump start
• Only use this starter with conventional lead-acid wet cell batteries. Attempting
to charge other types of battery is dangerous, and may invalidate your
guarantee
• Be aware that lead-acid batteries emit flammable gases during charging. Do
not charge batteries near to any kind of ignition, or heat, source. Do not smoke.
Ensure that batteries are well ventilated
• Always wear protective gloves and goggles when handling lead acid batteries
• Always remove all metal jewellery before handling lead acid batteries
• Be aware that loose clothing / long hair etc could get caught in moving engine
parts when using this product, tie up hair and secure loose clothing
• Wash thoroughly with soap and water if battery acid contacts skin or clothing.
If battery acid contacts eyes, wash thoroughly with clean water and seek
medical help
• Only use this jump starter in completely dry conditions
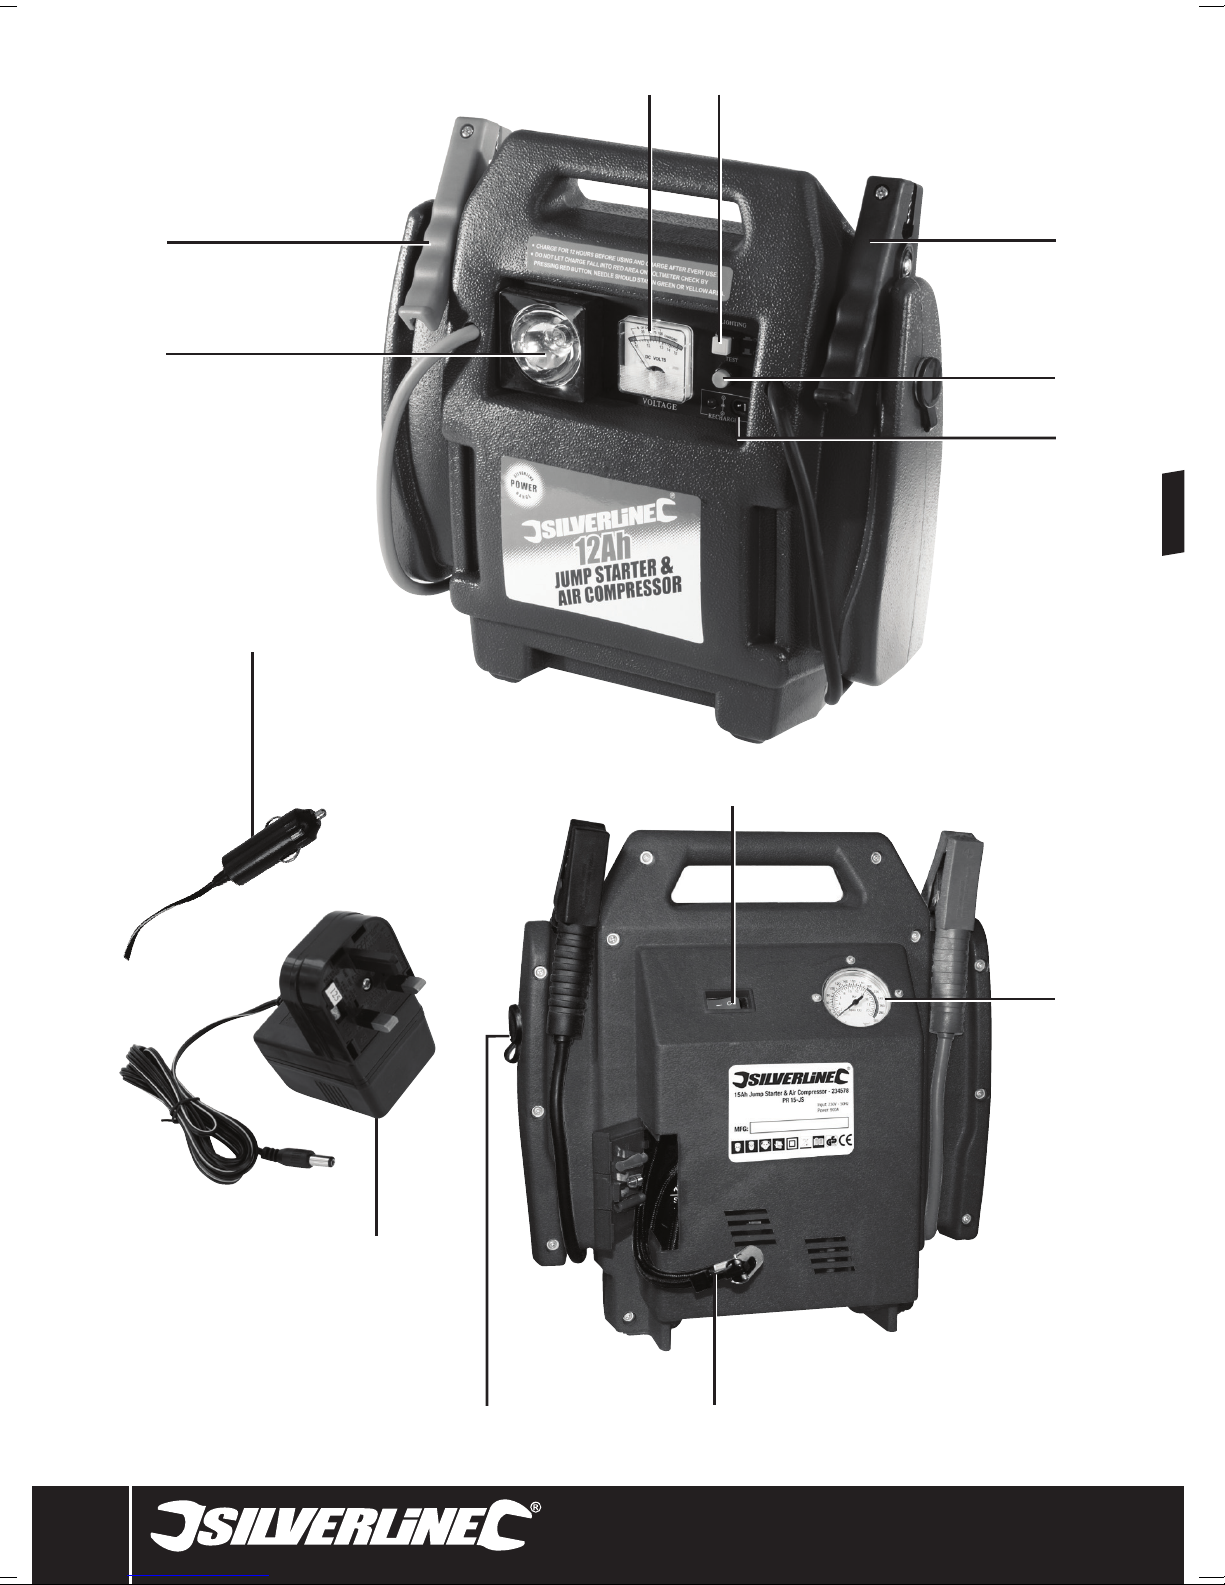
Product Familiarisation
1 Work Light
2 Positive Clamp
3 Volt-Meter
4 Work Light Switch
5 Negative Clamp
6 Battery Test Button
7 Charging Socket
8 Pressure Gauge
9 Compressed Air Line
10 12V Cigarette Lighter Socket
11 Compressor Switch
12 230V Charger
13 12V Charging Lead
Unpacking Your Tool
• Carefully unpack and inspect your tool. Fully familiarise yourself with all its
features and functions
• Ensure that all parts of the tool are present and in good condition. If any
parts are missing or damaged, have such parts replaced before attempting
to use this tool
Operating Instructions
WARNING: This product features a captive sealed VRLA (valve-regulated lead acid)
battery. It is important that the battery is kept at full charge to ensure maximum
lifespan. Charge immediately on receipt of this product; immediately after use; and
every 1-2 months when not in use.
WARNING: While charging this jump starter it is important that it is not used or
connected to any other device or cable except for either the 230V AC Charger (12)
or 12V Charging Lead (13).
WARNING: This product is not a battery charger. Never connect the 230V AC
charger to the jump starter while the jump starter is connected to a vehicle’s
battery. The jump starter must only be used with the charging cables disconnected
Charging the battery
WARNING: Over-charging could produce flammable gases
• To check the battery condition press the Battery Test Button (6), ensuring
no external cables are attached to the unit. The battery condition is shown
by the Volt-meter (3). The volt-meter will display an approximate indication
of charge with the green area indicating a sufficient charge. A fully charged
battery should indicate 12.6V or more. A more accurate test can be performed
with a multi-meter using the 20V DC voltage setting or the nearest to it above
that range.
• The battery should be charged at 20°C (room temperature)
• Ensure there are no naked flames or other ignition sources near to the
charging area
Charging from 230V supply
1. Insert the small plug of the 230V AC Charger (12) into the Charging Socket (7)
2. Insert the 230V AC charger into a mains socket, check that the socket is
switched on
• For the initial charge, allow up to 40 hours but regularly check the battery
charge indicator. For a normal top-up charge allow up to 10 hours
• Ensure the charging area is well ventilated with no open flames or high
temperature surfaces, such as a hob, in the vicinity
Charging from a 12V car cigarette lighter socket
Charging from the cigarette lighter socket of your vehicle while in motion is
a convenient way of topping up the charge of your jump starter. However the
jump starter must be positioned in the rear of the vehicle while charging and
the car must be well ventilated. If this isn’t possible, only use the AC charging
method. When charging in the car, regularly check the charge level to prevent
over-charging.
1. Plug the 12V Charging Lead (13) into the Charging Socket (7)
2. Insert the cigarette lighter plug of the 12V charging lead into a suitable car
cigarette lighter socket
3. A 12V car cigarette socket extension lead may be required if there is no
socket in the rear of the car and need to extend the cable from the cigarette
lighter socket in the dashboard
4. Only charge until the the Volt-meter (3) indicates a sufficient charge. Check
the meter every 45 minutes to 1hr to prevent over-charging. Initial charge may
take up to 12hrs and top up charges may take as little as 1hr after being used
Notes:
• Some cars provide a cigarette lighter socket on the dashboard and in the
boot/rear of the car. It is important that the cigarette lighter socket is disabled
when the ignition is switched off otherwise the jump starter can drain the
main battery when parked
• If you choose to charge the jump starter with a cigarette socket in the rear of
the vehicle, it is important to remember not to leave the battery permanently
charging and only charge until a sufficient charge is indicated on the voltmeter. This is more critical with a 12V charging connection as the charge level
is higher than with the AC charger
• If the jump starter has just been used to start a vehicle, allow 15 minutes
before charging the jump starter in a vehicle, to allow the battery to stabilise
and any flammable vapours to disperse
IMPORTANT: Failure to follow the correct procedure when charging the jump
starter will result in permanent damage.
Jump starting
Notes:
• Always refer to vehicle handbook before using this product. If the
manufacturer specifies a particular sequence for jump starting, follow the
manufacturer’s advice
• Follow normal starting procedures with regard to pre-charging glow plugs etc,
• Do not attempt to use this product on anything other than 12V negative earth
vehicle electrical system
5
Page 6

GB
• Do not use on vehicles with a 24V battery and electrical system
• The jump starter works in parallel with the fitted battery to provide increased
current capacity
• If the cables of the jump starter are not long enough to reach the positive
connector on the battery, and a suitable negative connection point, the
negative cable can be extended using a cable from a standard jump cable set.
Do not extend the length of the positive cable from the jump starter
• This jump starter will only be effective when the vehicle’s engine and related
systems are functioning normally and the vehicle’s battery is in a serviceable
but partly discharged state
• It is not possible to jump start a car by connecting the jump starter to a car
cigarette lighter socket in the car. The cable provided cannot be used for
that purpose
• Once the jump starter has been used to start a vehicle, it may be necessary to
charge the jump starter while driving, to ensure the jump starter is available to
start the vehicle again should any further battery issues occur
• Ensure your battery and charging system is checked if starting is a regular
problem
• The size of vehicle the jump starter can start varies depending on the existing
charge in the vehicle’s battery. A very low charge will limit the size of vehicle
the jump starter can start. As an approximate guide the product should
support petrol engines up to 2200cc and diesel engines up to 1900cc
1. Ensure that all vehicle accessory systems (headlights, radio, etc) are switched
off
2. Ensure the vehicle is in neutral and the parking brake is applied
3. Establish which vehicle battery connector is positive and which is negative.
The vehicle’s own battery will show ‘+’ and ‘-‘ along side the corresponding
battery terminal. The cable attached to the positive terminal may be coloured
red, or could have a red marking to indicate it is positive If in doubt of the
polarity, consult a vehicle technician
4. If the positive battery terminal connector in the vehicle is corroded or dirty,
clean it with a suitable wire brush to ensure good contact with the jump
starter clamp
5. First attach the (red) Positive Clamp (2) to the positive connector attached to
the positive battery terminal of the vehicle’s battery, making sure it is secure
and cannot short against any other metal part in the vehicle
6. Attach the (black) Negative Clamp (5) to an unpainted and unmoving part of
the chassis or engine block - not the negative terminal of the battery. If you
attach to the negative terminal there is a small risk of explosive gases from
the battery being ignited so a suitable negative earthing point away from the
battery is required. Do not connect the clamp to any part of the vehicle’s fuel
system as any leaked fuel could be ignited by a spark
7. Check the clamps are securely attached, and that they will not come loose
when the vehicle is started
8. Allow 1-2 minutes for the battery charge to stabilise between the jump starter
and vehicle battery
9. The jump starter should now be ready to start the engine. Run the starter
motor in short bursts (not more than 5 seconds). If the engine does not start,
allow approximately 2 minutes for the batteries to recover, then repeat
10. Once the engine is running wait 2 minutes then first remove the Negative
Clamp (5) and then the Positive Clamp (2) taking care to avoid contact with
any moving or hot engine parts. The clamps are permanently live so it is
important to return the clamps to their normal storage positions at the side of
the jump starter after use
1. To use the compressor, withdraw the Compressed Air Line (9) from the
compartment in the rear of the jump starter
2. Fit the valve connector of the compressed air line over the valve of the tyre
and move the lever of the valve connector to secure in position
3. Turn on the compressor with the Compressor Switch (11)
4. Monitor the Air Pressure Gauge (8) as the tyre inflates. Control the compressor
as required using the compressor switch
5. Turn off the compressor switch after use
6. Return the compressed air line to the rear compartment of the jump starter to
protect from damage
Notes:
• Do not allow the compressor to operate unattended
• Do not run the compressor continuously for more than 5 minutes at a time.
Allow 5 minutes’ cooling time in between applications
• Two supplied adaptors are stored in the rear compartment. These allow
inflation of footballs, air beds and other items
• Use the Pressure Gauge (8) as an approximate guide to pressure level. If a
specific pressure level is required, use a calibrated pressure gauge
Maintenance
Cleaning
• Keep your jump starter clean. Always clean dust / particles away, and never
allow ventilation holes to become blocked. Use a soft brush, or dry cloth to
clean the machine, if available blow through the ventilation holes with clean,
dry, compressed air.
• Make sure that the positive and negative lead clamps are kept clean. Dirty
electrical contacts will severely impair the performance of this product.
Disposal
Warning: This product incorporates a sealed VRLA (Valve Regulated Lead Acid)
battery. Before disposal, remove the battery from the product and take to a facility
in your region that disposes of lead acid batteries. Do not dispose of the product
with the battery still fitted
To remove the battery for disposal or replacement remove the 8 screws from
the back panel and gently pull apart the rear panel from the main body. Move
the rear panel to the side carefully so as not to pull on the cables. Remove the
negative connector from the battery followed by the positive connector. Make sure
the connectors are not in contact with the battery and remove the battery. Only
replace the battery with a battery of the exact same specification and dimensions
so that it fits correctly in the jump starter and is compatible with the charging
circuitry.
• Do not dispose of power tools, or other waste electrical and electronic
equipment, with household waste.
• Contact your local waste disposal authority for information on the proper way
to dispose of tools.
Other Features
12V Cigarette Lighter Socket
• Devices with 12V cables fitted with cigarette lighter type plugs can be
connected to the 12V Cigarette Lighter Socket (10)
• Lift the plastic cover and push the plug of the device’s cable into the socket
• After use remove the plug and re-fit the plastic cover
Work light
• This jump starter is equipped with a Work Light (1)
• To switch the work light on, press the Work Light Switch (4). Press the switch
again to turn off
Air compressor
• This jump starter is equipped with an on-board air compressor that is
suitable for inflating tyres and other items. Always refer to the manufacturers
recommended inflation pressures, and do not over-inflate.
6
Page 7

www.silverlinetools.com
Jump Starter & Air Compressor 234578
Silverline Tools Guarantee
This Silverline product comes with a 3 year guarantee
Register this product at www.silverlinetools.com within 30 days of purchase in order
to qualify for the 3 year guarantee. Guarantee period begins according to the date of
purchase on your sales receipt.
Terms & Conditions
Guarantee period becomes effective from the date of retail purchase as detailed on
your sales receipt.
PLEASE KEEP YOUR SALES RECEIPT
If this product develops a fault within 30 days of purchase, return it to the stockist
where it was purchased, with your receipt, stating details of the fault. You will
receive a replacement or refund.
If this product develops a fault after the 30 day period, return it to:
Silverline Tools Service Centre
PO Box 2988
Yeovil
BA21 1WU, UK
The guarantee claim must be submitted during the guarantee period.
You must provide the original sales receipt indicating the purchase date, your name,
address and place of purchase before any work can be
carried out.
You must provide precise details of the fault requiring correction.
Claims made within the guarantee period will be verified by Silverline Tools to
establish if the deficiencies are related to material or manufacturing of the product.
Carriage will not be refunded. Items for return must be in a suitably clean and safe
state for repair, and should be packaged carefully to prevent damage or injury
during transportation. We may reject unsuitable or
unsafe deliveries.
All work will be carried out by Silverline Tools or its authorized
repair agents.
The repair or replacement of the product will not extend the period
of guarantee
Defects recognised by us as being covered by the guarantee shall be corrected
by means of repair of the tool, free of charge (excluding carriage charges) or by
replacement with a tool in perfect working order.
Retained tools, or parts, for which a replacement has been issued, will become the
property of Silverline Tools.
Registering your purchase
Registration is made at silverlinetools.com by selecting the Guarantee Registration
button. You will need to enter:-
• Your personal details
• Details of the product and purchase information
Once this information is entered your guarantee certificate will be created in PDF
format for you to print out and keep with your purchase.
The repair or replacement of your product under guarantee provides benefits which
are additional to and do not affect your statutory rights as a consumer.
What is covered:
The repair of the product, if it can be verified to the satisfaction of Silverline Tools
that the deficiencies were due to faulty materials or workmanship within the
guarantee period.
If any part is no longer available or out of manufacture, Silverline Tools will replace it
with a functional replacement part.
Use of this product in the EU.
What is not covered:
Silverline Tools does not guarantee repairs required as a result of:
Normal wear and tear caused by use in accordance with the operating instructions
eg blades, brushes, belts, bulbs, batteries etc.
The replacement of any provided accessories drill bits, blades, sanding sheets,
cutting discs and other related items.
Accidental damage, faults caused by negligent use or care, misuse, neglect,
careless operation or handling of the product.
Use of the product for anything other than normal domestic purposes.
Change or modification of the product in any way.
Use of parts and accessories which are not genuine Silverline Tools components.
Faulty installation (except installed by Silverline Tools).
Repairs or alterations carried out by parties other than Silverline Tools or its
authorized repair agents.
Claims other than the right to correction of faults on the tool named in these
guarantee conditions are not covered by the guarantee.
Battery Guarantee
Silverline batteries are guaranteed for 30 days. If a defect occurs on a registered
battery during the term of the Battery Guarantee, due to material or manufacturing
fault, then Silverline will replace it free of charge. This guarantee does not apply to
commercial use nor does it extend to normal wear and tear or damage as a result of
accident, abuse or misuse.
CE Declaration of Conformity
The undersigned: Mr Darrell Morris
as authorised by: Silverline Tools
Declares that
Identification code: 234578
Description: Jump Starter & Air Compressor
Conforms to the following directives and standards:
• Low Voltage Directive 2006/95/EC
• EMC Directive 2004/108/EC
• RoHS Directive 2011/65/EU
• EN55022:2010
• EN55024:2010
• EN61000-3-2:2006+A2:2009
• EN61000-3-3:2008
• EN61558-2-6:2009
• EN60950-1:2006+A12:2011
Notified body: Telab B.V. Compliance Laboratory Co., Ltd.
The technical documentation is kept by: Silverline Tools
Date: 13/07/15
Signed:
Mr Darrell Morris
Managing Director
Name and address of the manufacturer:
Powerbox International Limited, Company No. 06897059. Registered address: Central
House, Church Street, Yeovil, Somerset BA20 1HH, United Kingdom.
7
Page 8
FR
Traductions des instructions originales
Description des symboles
La plaque signalétique figurant sur votre outil peut présenter des symboles. Ces
symboles constituent des informations importantes relatives au produit ou des
instructions concernant son utilisation.
Port de protection auditive
Port de lunettes de sécurité
Port de masques respiratoires
Port du casque
Port de gants
Lire le manuel d’instructions
Double isolation pour une protection supplémentaire
Risque d’explosion : N'utilisez pas d’appareil à essence lorsqu'il
existe un risque d'explosion ou d'incendie provenant de matière
combustible, de liquides ou de gaz inflammables, ou de poussière
de nature explosive
Batteries au plomb : risque de fuite. Peut produire des gaz explosifs
Conforme à la réglementation et aux normes de sécurité pertinentes
Protection de l’environnement
Les produits électriques usagés ne doivent pas être jetés avec les
ordures ménagères. Veuillez les recycler dans les centres prévus à
cet effet. Pour de plus amples informations, veuillez contacter votre
municipalité ou point de vente
Charactéristiques techniques
Tension : ................................................................................ 12 V DC
Intensité nominale : ...................................................................400 A
Pic d’intensité : ......................................................................... 900 A
Pression max. du compresseur : ............................................. 260 psi
Capacité de la batterie : .............................................................12 Ah
Type de batterie : ................. à recombinaison de gaz (batterie VRLA)
Classe de protection du démarreur : ............................................
Entrée CA du chargeur : ........................................ 230 V~ 50 Hz 6 W
Sortie CA du chargeur : .............................................12 V CC 500 mA
Classe de protection du chargeur : ...............................................
Intensité max de prise 12 V CC : ..................................................10 A
Du fait de l’évolution constante de notre développement produits,
les caractéristiques techniques des produits Silverline peuvent changer
sans notification préalable.
Consignes générales de sûreté
AVERTISSEMENT Veuillez lire l’intégralité des consignes de sécurité et des
instructions. Le non-respect de ces consignes et instructions peut entraîner un
risque de choc électrique, d’incendie et/ou se traduire par des blessures graves.
Veuillez conserver ces instructions et consignes de sécurité pour référence
ultérieure.
L’expression « appareil électrique » employée dans les présentes consignes
recouvre aussi bien les appareils filaires à brancher sur le secteur que les
appareils sans fils fonctionnant sous batterie.
1) Sécurité sur la zone de travail
a) Maintenir une zone de travail propre et bien éclairée. Des zones
encombrées et mal éclairées sont sources d’accidents.
2) Sécurité électrique
a) La prise d’un appareil électrique doit être adaptée à la prise du
secteur. Ne jamais modifier la prise en aucune façon. Ne jamais utiliser
d’adaptateur sur la prise électrique d’appareil mis à la terre. Des prises
non modifiées, adaptées aux boîtiers de prise de courant, réduiront le risque
de décharge électrique.
b) Eviter le contact corporel avec les surfaces mises à la terre telles que
tuyaux, radiateurs, cuisinières et réfrigérateurs. Le risque de décharge
électrique est plus important si le corps est mis à la terre.
c) Ne pas exposer l’appareil électrique à la pluie ou à l’humidité. L’infiltration
d’eau dans un appareil électrique accroît le risque de décharge électrique.
3) Sécurité des personnes
a) Rester vigilent et faire preuve de bon sens lors de la manipulation de
l’appareil. Ne pas utiliser lorsque l’on se trouve dans un état de fatigue,
ou sous l’influence de drogues, d’alcool ou de médicaments. Un moment
d’inattention pendant l’utilisation d’un outil électrique peut se traduire par des
blessures graves.
b) Porter un équipement de protection approprié. Toujours porter une
protection oculaire. Le port de masque à poussières, chaussures de sécurité
antidérapantes, casque de sécurité et protections antibruit adaptés aux
différentes conditions de travail réduit le risque de blessures corporelles.
Attention : Cet appareil n’est pas conçu pour être utilisé par des personnes
(enfants compris) ayant des capacités physiques ou mentales réduites, ou n’ayant
pas la connaissance ou l’expérience requise, à moins d’être sous la supervision
d’une personne responsable de leur sécurité ou d’avoir reçu les instructions
nécessaires. Les enfants ne doivent pas s’approcher et jouer avec cet appareil.
4) Révision
a) Ne faire réparer votre appareil électrique que par un réparateur qualifié
utilisant uniquement des pièces de rechange identiques. Cela permet de
maintenir la sécurité d’utilisation de l’appareil électrique
8
Page 9

www.silverlinetools.com
Démarreur et compresseur d'air234578
Consignes de sécurité relatives
au démarreur
• Ne jamais mettre en contact les pinces crocodiles des câbles positif et négatif.
En contact et sous tension, elles peuvent fondre et provoquer un incendie.
• Ne pas démarrer une batterie qui fuit, fêlée ou présentant d’autres dommages.
• Ne pas tenter de charger une batterie gelée. Faire extrêmement attention si
une telle batterie est amenée à l’intérieur, car elle risque de fuir en revenant à
température normale.
• A moins que la batterie ne soit du type ‘’sans maintenance’’, vérifier toujours
que le niveau d’électrolyte soit correct avant de démarrer un véhicule.
• Sachez que les batteries au plomb émettent des gaz inflammables et
explosifs, particulièrement lors de tentatives de démarrage d’un véhicule.
NE PAS FUMER, ni exposer le chargeur à des sources de chaleur ou des
flammes. Les batteries au plomb des véhicules sont la principale source de
gaz inflammables, mais il y a aussi un léger risque avec les batteries VRLA
intégrés lors de surcharge et démarrage.
• Portez toujours des gants de protection et des lunettes lors de la manipulation
de batteries au plomb
• Enlevez toujours vos bijoux en métal avant de manipuler des batteries au
plomb.
• Il est à noter que des vêtements amples, des cheveux longs etc, peuvent être
pris dans les pièces du moteur lors de l’utilisation de ce produit. Attachez vos
cheveux et ne laissez aucun vêtement lâche.
• Si l’acide de la batterie entrait en contact avec la peau ou les vêtements, lavez
à grande eau et avec du savon. -Si l’acide de la batterie entrait en contact
avec les yeux, lavez à grande eau et appelez le médecin ou les urgences.
• Utiliser uniquement ce démarreur dans un environnement complètement sec.
Se familiariser avec le produit
1 Éclairage de travail
2 Pince positive
3 Voltmètre
4 Interrupteur d’éclairage de travail
5 Pince négative
6 Bouton de test de la batterie
7 Prise de charge
8 Manomètre
9 Tuyau du compresseur
10 Prise de l’allume –cigare
11 Interrupteur du compresseur
12 Chargeur 230 V
13 Prise du chargeur 12 V
Déballage
• Déballez le produit avec soin. Veillez à retirer tout le matériau d’emballage et
familiarisez-vous avec toutes les caractéristiques du produit.
• Si des pièces sont endommagées ou manquantes, faites-les réparer ou
remplacer avant d’utiliser l’appareil.
Instructions d’utilisation
Attention : Ce produit contient une batterie VRLA (batterie au plomb et à
recombinaison de gaz). Il est important de maintenir la charge pleine pour
garantir une longue durée de vie. Chargez dès réception de l’appareil, après toute
utilisation, et 1 à 2 fois par mois s’il n’est pas utilisé.
Attention : Lorsque le démarreur est en charge, il est important qu’il ne soit pas
utilisé ou branché sur d’autres appareils, à part bien sûr, le chargeur 230 V (12) ou
le câble du chargeur 12 V (13).
Attention : Ce produit n’est pas un chargeur de batterie. Ne jamais brancher le
chargeur 230 V CA si le démarreur est connecté sur la batterie. Le démarreur ne
doit être utilisé uniquement si les câbles de charge sont débranchés.
Charger la batterie
• Pour vérifier l’état de charge, mettez l’interrupteur d’alimentation sur ‘ON’, et
assurez-vous qu’aucun câble externe ne soit pas branché. L’état de charge
est indiqué par l’indicateur de charge de la batterie (4). L’état de la charge est
approximatif : la lumière LED verte indique une charge importante, la lumière
orange une charge moyenne et la rouge une charge faible, ce qui requière
une charge immédiate. Pour obtenir une mesure précise lorsque la lumière
LED verte est allumée, utilisez un multimètre pour des tensions de 20 V CC.
Une batterie entièrement chargée doit être à 12,6 V ou plus.
• La batterie doit être chargée à température ambiante (20° C)
• Vérifiez qu’il n’y a pas de flammes nues ou autres sources d’ignition dans la
zone de charge
Charger depuis une prise 230 V
1. Insérez la petite prise du chargeur 230 V (12) dans la prise de charge (7).
2. Insérez la prise du chargeur 230 V CA dans la prise principale pour la première
charge, 48 heures sont nécessaires mais vérifiez régulièrement l’état de la
charge. Pour un appoint, comptez environ jusqu’à 10 heures.
• Assurez-vous que la zone de charge soit bien ventilée et qu’il n’y ait pas de
source d’ignition à proximité (flammes nues, surfaces à haute température,
etc).
Charger depuis la prise 12 V de l’allume-cigare
• Charger depuis la prise 12 V de l’allume-cigare de votre véhicule est
un moyen pratique de charger la batterie du démarreur tout en roulant.
Cependant, le démarreur doit être placé à l’arrière du véhicule et le véhicule
doit être bien ventilé. Si cela n’est pas possible, chargez uniquement depuis
une prise CA. Lors de la charge dans un véhicule, vérifiez régulièrement l’état
de charge pour éviter une surcharge.
1. Insérez le câble de l’allume-cigare V (12) dans la prise de charge (7).
2. Insérez la prise de l’allume-cigare dans une prise adéquate
3. L’utilisation d’une rallonge pour les prises d’allume –cigare 12 V peut être
nécessaire s’il n’y a pas de prise à l’arrière du véhicule
4. Ne chargez uniquement jusqu’à ce que le voltmètre (3) indique une charge
suffisante. Vérifiez l’état de la charge environ toutes les 45 minutes pour éviter
les surcharges. Le première charge peut prendre jusqu’à 12 heures, et une
petite heure pour les charges d’appoint après une utilisation.
• Certaines voitures ont une prise allume-cigare à l’avant et à l’arrière /coffre
de la voiture. Il est important que la prise de l’allume –cigare ne soit pas
en marche lorsque la voiture n’est pas en contact car le démarreur peut
décharger la batterie principale s’il est toujours branché. Vérifiez donc toujours
si le démarreur est en train de charger ou pas.
• Si vous choisissez de charger le démarreur avec la prise allume-cigare
située à l’arrière, il est important de ne pas laisser la batterie en charge
constamment. Ne chargez uniquement jusqu’à le voltmètre indique un
état de charge important. Le niveau de charge est plus important avec un
branchement 12 V qu’avec un chargeur CA, donc il y a plus de risque de
surcharge.
• Si le démarreur a été utilisé sur un véhicule, attendre environ 15 min avant de
le mettre en charge, pour permettre aux gaz émis de se dissiper.
Le démarreur
Remarques :
• Référez-vous toujours au manuel d’instruction de votre véhicule avant
toute utilisation. Si le fabriquant indique une procédure spécifique pour le
démarrage, suivez-la.
• Suivez les procédures normales en ce qui concerne les bougies d’allumage
etc.
• N’essayez pas d’utiliser ce produit sur d’autre véhicule n’ayant pas de
système électrique de 12 V avec un pôle négatif à la masse.
• N’utilisez pas cet appareil sur des véhicules avec des batteries et circuit
électrique de 24 V.
9
Page 10

FR
• Le démarreur est branché en parallèle avec la batterie intégrée pour améliorer
la capacité du courant.
• Si le câble du démarreur n’est pas assez long pour atteindre la connexion
positive de la batterie ainsi qu’un branchement à la masse convenable, le
câble négatif peut être rallongé en utilisant un autre câble de démarrage
standard. Ne mettez jamais de rallonge sur le câble positif avec le démarreur.
• Ce démarreur n’est efficace que si les circuits et le moteur du véhicule
sont en conditions de marche et que le seul défaut de la batterie soit d’être
partiellement à plat.
• Le démarreur ne peut pas démarrer une voiture en la branchant sur l’allumecigare. Le câble de charge n’est pas prévu à cet effet.
• Une fois le démarrage d’un véhicule effectué, il peut être conseillé de
recharger aussitôt le démarreur avec l’allume-cigare en conduisant, au cas
d’un autre problème de batterie.
• Vérifiez votre batterie et le système de charge si le problème devient
récurrent.
• Le démarreur peut être utilisé sur différentes taille de véhicule, selon l’état de
charge de leur batterie. Une batterie faible sur le véhicule limitera l’efficacité
du démarreur. A titre d’indications, ce produit est compatible avec les moteurs
à essence jusqu’à 2200 CV et les moteurs diesel jusqu’à 1900 CV.
1. Vérifiez que tous les accessoires du véhicule (phares, autoradio, etc.) soient
éteints
2. Vérifiez que la voiture soit au point mort, et le frein à main mis.
3. Repérez la polarité de la batterie en repérant le signe ‘+’ ou le signe ‘– ‘ sur
les bornes ou en repérant un câble rouge qui correspond au positif et un
câble noir au négatif. En cas de doute sur la polarité, demandez l’avis d’un
technicien.
4. Si la borne positive est rouillée ou sale, nettoyez-la avec une brosse
métallique pour assurer un bon contact avec les pinces crocos du câble du
démarreur.
5. Branchez dans un premier temps la pince positive (2) sur la borne positive de
la batterie du véhicule et assurez-vous qu’il n’y a aucun contact avec d’autres
parties métalliques du véhicule.
6. Branchez la pince négative (5) sur une partie métallique non peinte et
immobile du châssis ou sur le bloc moteur. Si vous la branchez sur la borne
négative de la batterie cela peut engendrer un léger risque d’émanation de
gaz inflammable, par conséquent branchement à la terre loin de la batterie
est recommandé. Ne branchez jamais les pinces sur le circuit d’essence du
véhicule pour éviter des fuites ne s’enflamme par une étincelle.
7. Vérifiez toujours que les pinces soient branchées en toute sécurité et qu’elles
tiennent correctement lors du démarrage.
8. Laissez 1 à 2 minutes pour que la charge de la batterie se stabilise entre le
démarreur et la batterie du véhicule.
9. Le démarreur est prêt à l’usage. Démarrer le moteur par à-coup (5 secondes
max.). Si le moteur ne démarre pas, attendez environ 2 minutes avant de
recommencer.
10. Une fois le moteur démarré, attendez environ deux minutes avant de
débrancher la pince négative (5) puis la pince positive (2), en faisant attention
de ne rentrer en contact avec les parties rotatives du moteur ou avec les
surfaces chaudes. Il est important de replacer les pinces sur le démarreur sur
l’emplacement prévu à cet effet, car elles sont toujours sous tension.
1. Pour utiliser le compresseur, retirez le tuyau d’air comprimé (17) se trouvant
dans le compartiment arrière du démarreur.
2. Branchez le tuyau sur la valve du pneu et relevez le levier pour sécuriser le
branchement.
3. Tournez l’interrupteur du compresseur (11).
4. Vérifiez la pression avec le manomètre (8). Contrôlez la pression avec
l’interrupteur.
5. Eteindre les 2 interrupteurs après usage
6. Replacez le tuyau dans le compartiment.
Remarque :
• N’utilisez pas le compresseur sans surveillance
• N’utilisez pas le compresseur sur des périodes supérieure à 5 minutes.
Laissez reposer le compresseur pendant 5 minutes entre chaque utilisation.
• Deux adaptateurs sont rangés dans le compartiment arrière, pour pouvoir
s’adapter sur des ballons de football, matelas pneumatiques ou autres.
• Utilisez le manomètre (8) pour obtenir une approximation du niveau de
gonflage. Pour des mesures précises, utilisez un manomètre gradué et calibré.
Entretien et recyclage
Nettoyage
• Gardez l’appareil propre. Éliminez toujours la poussière et les particules et
ne laissez jamais les orifices de ventilation se boucher. Ne laissez pas les
déchets s’accumuler sur une partie quelconque de l’outil. Utilisez une brosse
souple ou un chiffon sec pour le nettoyage. Si possible, nettoyez les orifices de
ventilation à l’air comprimé propre et sec.
• Assurez-vous que les pinces positives et négatives soient propres. Des
connexions électriques sales diminuent l’efficacité du produit.
Recyclage
ATTENTION : Ce produit comporte une batterie au plomb (VRLA) intégré. Avant de
recycler le produit, retirez la batterie et recyclez-la dans un centre de recyclage
prenant en charge ce genre de batterie. Ne pas rejetez ce produit avec la batterie
toujours intégrée.
• Pour retirer la batterie, enlevez les pinces situées de chaque côté de l’appareil.
Enlevez les 8 vis du bloc arrière, et tirez avec précaution les deux parties
du boitier afin d’accéder à la batterie sans tirer sur les câbles. Retirez la
connexion négative de la batterie, puis la connexion positive. Faites attention
de ne pas mettre en contact les connexions avec la batterie. Remplacer
la batterie avec une respectent exactement les mêmes caractéristiques
techniques.
• Ne jetez pas vos appareils ni autres équipements électriques et électroniques
usagés avec les ordures ménagères.
• Contactez la collectivité chargée de la collecte des déchets pour de plus
amples informations concernant le recyclage de ce type de déchet.
Autres fonctionnalités
Prises de l’allume-cigare
• Les appareils avec les câbles 12 V pour l’allume-cigare peuvent se brancher
sur la prise de l’allume-cigare (10).
• Soulevez le cache anti-poussière en plastique et branchez le câble de
l’appareil sur la prise.
Éclairage de travail
• Ce démarreur est équipé d’un éclairage d’appoint (1).
• Pour mettre l’éclairage d’appoint en marche, appuyez sur l’interrupteur
d’éclairage d’appoint (4). Appuyez de nouveau sur l’interrupteur pour éteindre
l’éclairage.
Le compresseur
Le démarreur est équipé d’un compresseur intégré pour gonfler des pneus
ou autres. Référez-vous toujours aux instructions du fabricant concernant les
pressions recommandées, et évitez les sur-gonflages.
10
Page 11

www.silverlinetools.com
Démarreur et compresseur d'air234578
Garantie Silverline
Ce produit Silverline bénéficie d’une garantie de
3 ans
Enregistrez ce produit sur le site silverlinetools.com dans les 30 jours suivant
l’achat afin de bénéficier de la garantie de 3 ans. La période de garantie
commence à partir de la date d’achat figurant sur votre facture d’achat.
Conditions de garantie des outils Silverline
La période de garantie prend effet à compter de la date de l’achat en
magasin, comme indiqué sur votre facture d’achat.
VEUILLEZ CONSERVER VOTRE FACTURE D’ACHAT.
Si ce produit est défectueux pendant les 30 jours qui suivent l’achat, retournez-le
au magasin où vous l’avez acheté, avec votre facture, en expliquant en détail le
problème. Le produit sera remplacé ou vous serez remboursé(e).
Si ce produit est défectueux après cette période de 30 jours,
retournez-le à :
Silverline Tools Service Centre
PO Box 2988
Yeovil
BA21 1WU, Royaume Uni
Toute demande de service sous garantie doit être soumise pendant la période de
garantie.
Avant toute intervention sous garantie, vous devez présenter la facture d’achat
originale sur laquelle doivent figurer la date d’achat, votre nom, votre adresse et
le lieu d’achat.
Vous devez expliquer en détail la défaillance nécessitant réparation.
Les demandes de service sous garantie faites pendant la période de garantie seront
vérifiées par Silverline Tools pour établir si la défaillance du produit est liée à un vice
de matériau ou de fabrication.
Les frais de port ne seront pas remboursés. Les articles retournés doivent être
convenablement propres et sûrs pour être réparés et devraient être emballés
soigneusement pour éviter tout dommage ou toute blessure pendant le transport.
Nous pouvons refuser les livraisons qui ne sont pas convenables ou sûres.
Toute intervention sera effectuée par Silverline Tools ou ses agents de réparation
agréés.
La réparation ou le remplacement du produit ne dépassera pas la période de
garantie.
Les anomalies que nous reconnaissons être couvertes par la garantie seront
rectifiées par la réparation de l’outil, sans frais (hormis les frais de port) ou par son
remplacement par un outil en parfait état de fonctionnement.
Les pièces ou les outils remplacés deviendront la propriété de Silverline Tools.
La réparation ou le remplacement de votre produit sous garantie vous apporte
des avantages ; ces avantages s’ajoutent à vos droits statutaires en tant que
consommateur sans les affecter aucunement.
Enregistrement de votre achat
Visitez silverlinetools.com, sélectionnez le bouton d’enregistrement et saisissez :
• Vos informations personnelles
• Les informations concernant le produit et l’achat
Vous recevrez le certificat de garantie en format PDF. Veuillez l’imprimer et le
conserver avec votre achat.
La présente garantie couvre:
La réparation du produit, s’il peut être vérifié, à la satisfaction de Silverline Tools,
que les défaillances du produit ont été provoquées par un vice de matériau ou de
fabrication au cours de la période de garantie.
Si une pièce n’est plus disponible ou n’est plus fabriquée, Silverline Tools la
remplacera par une pièce de rechange opérationnelle.
Utilisation de ce produit dans l’UE.
La présente garantie ne couvre pas:
Silverline Tools ne garantit pas les réparations nécessaires du produit engendrées
par :
L’usure normale provoquée par l’utilisation conforme aux instructions d’utilisation,
par exemple les lames, les charbons, les courroies, les ampoules, les batteries, etc.
Le remplacement de tout accessoire fourni tel que les forêts, les lames, les feuilles
abrasives, les outils de coupes et les autres articles associés.
Les dommages et les défaillances accidentels causés par une utilisation ou un
entretien négligent, une mauvaise utilisation, un manque d’entretien ou une
utilisation ou une manipulation imprudente du produit.
L’utilisation du produit à des fins autres que son utilisation domestique normale.
Le moindre changement ou la moindre modification du produit.
L’utilisation de pièces et d’accessoires qui ne sont pas des composants véritables
de Silverline Tools.
Une installation défectueuse (sauf si l’installation a été réalisée par Silverline Tools).
Les réparations ou les modifications réalisées par des tiers autres que Silverline
Tools ou ses agents de réparation agréés.
Les demandes de service autres que le droit de rectifier les défaillances de l’outil
indiquées dans ces conditions de garantie ne sont pas couvertes par cette garantie.
Garantie batterie
Les batteries de Silverline sont garanties pour 30 jours. En cas de défaut sur une
batterie enregistrée lors de la période de garantie batterie, Silverline la remplacera
gratuitement. Cette garantie ne s’applique pas à l’utilisation commerciale et ne
s’étend pas non plus à l’usure normale ou aux dommages causés par des accidents,
des mauvais traitements ou une utilisation impropre.
Déclaration de conformité CE
Le soussigné : Mr Darrell Morris
Autorisé par : Silverline Tools
Déclare que le produit :
Code d’identification : 234578
Description: Démarreur et compresseur d'air
Est conforme aux directives suivantes :
• Directive sur les basses tensions 2006/95/CE
• Directive sur la compatibilité électromagnétique 2004/108/CE
• Directive RoHS 2011/65/UE
• EN55022:2010
• EN55024:2010
• EN61000-3-2:2006+A2:2009
• EN61000-3-3:2008
• EN61558-2-6:2009
• EN60950-1:2006+A12:2011
Organisme notifié : Telab B.V. Compliance Laboratory Co., Ltd.
La documentation technique est conservée par : Silverline Tools
Date : 13/07/15
Signature :
Mr Darrell Morris
Directeur général
Nom et adresse du fabricant ou de son représentant agréé :
Powerbox International Limited, numéro d’entreprise 06897059. Adresse légale :
Central House, Church Street, Yeovil, Somerset BA20 1HH, Royaume-Uni.
11
Page 12

DE
Übersetzung der Originalbetriebsanleitung
Beschreibung der Symbole
Auf dem Leistungsschild des Werkzeugs sind möglicherweise Symbole abgebildet.
Sie vermitteln wichtige Informationen über das Produkt oder dienen als
Gebrauchsanweisung
Gehörschutz tragen
Augenschutz tragen
Atemschutz tragen
Kopfschutz tragen
Handschutz tragen
Bedienungsanleitung sorgfältig lesen
Für zusätzlichen Schutz doppelt isoliert
Explosionsgefahr
WARNUNG: Enthält Blei-Säure-Akkumulator
Erfüllt die entsprechenden rechtlichen Vorschriften und
Sicherheitsnormen
Umweltschutz
Elektroaltgeräte dürfen nicht über den Haushaltsmüll entsorgt
werden. Nach Möglichkeit bitte über entsprechende Einrichtungen
entsorgen. Lassen Sie sich bezüglich der sachgemäßen Entsorgung
von Elektrowerkzeugen von der zuständigen Behörde oder dem
Händler beraten
Technische Daten
Spannung ................................................................................ 12 V, DC
Startstrom ....................................................................................400 A
Max. Startstrom ...........................................................................900 A
Maximaldruck ............................................................................ 260psi
Kapazität ...................................................................................... 12 Ah
Typ ..........................................geschlossener Blei-Säure-Akkumulator
Schutzklasse Starthilfegerät ..........................................................
Netzspannung .........................................................230 V~, 50 Hz, 6 W
Ausgang ....................................................................12 V, DC, 500 mA
Schutzklasse Ladegerät ................................................................
Max. zulässige Belastung
der 12-V-Steckdose ...................................................................... 10 A
Aufgrund der fortlaufenden Weiterentwicklung unserer Produkte können
sich die technischen Daten von Silverline-Produkten ohne vorherige
Ankündigung ändern.
Allgemeine Sicherheitshinweise
WARNUNG! Lesen Sie alle Sicherheitshinweise und Anweisungen.
Versäumnisse bei der Einhaltung der Sicherheitshinweise und Anweisungen
können elektrischen Schlag, Brand und/oder schwere Verletzungen verursachen.
Bewahren Sie alle Sicherheitshinweise und Anweisungen für die Zukunft auf.
1) Arbeitsplatzsicherheit
a) Halten Sie Ihren Arbeitsbereich sauber und gut beleuchtet. Unordnung
oder unbeleuchtete Arbeitsbereiche können zu Unfällen führen.
2) Elektrische Sicherheit
a) Der des Gerätes muss in die Steckdose passen. Der Stecker darf in
keiner Weise verändert werden. Verwenden Sie keine Adapterstecker
gemeinsam mit schutzgeerdeten Geräten. Unveränderte Stecker und
passende Steckdosen verringern das Risiko eines elektrischen Schlages.
b) Vermeiden Sie Körperkontakt mit geerdeten Oberflächen wie von
Rohren, Heizungen, Herden und Kühlschränken. Es besteht ein erhöhtes
Risiko durch elektrischen Schlag, wenn Ihr Körper geerdet ist.
c) Halten Sie Geräte von Regen oder Nässe fern. Das Eindringen von Wasser
erhöht das Risiko eines elektrischen Schlages.
3) Sicherheit von Personen
a) Seien Sie aufmerksam, achten Sie darauf, was Sie tun, und gehen Sie
mit Vernunft an die Arbeit mit Werkzeugen. Benutzen Sie kein Werkzeug,
wenn Sie müde sind oder unter dem Einfluss von Drogen, Alkohol oder
Medikamenten stehen. Ein Moment der Unachtsamkeit beim Gebrauch des
Werkzeuges kann zu ernsthaften Verletzungen führen.
b) Tragen Sie persönliche Schutzausrüstung und immer eine Schutzbrille.
Das Tragen persönlicher Schutzausrüstung, wie Staubmaske, rutschfeste
Sicherheitsschuhe, Schutzhelm oder Gehörschutz, je nach Art und Einsatz des
Elektrowerkzeuges, verringert das Risiko von Verletzungen.
WARNUNG: Dieses Gerät darf nicht von Personen (wie z.B. Kindern) mit reduzierter
physischer oder mentaler Kapazität, oder von Personen ohne Erfahrung im
Umgang mit einem solchen Gerät betrieben werden, außer wenn sie von einer für
ihre persönliche Sicherheit verantwortlichen Person in der Benutzung unterwiesen
worden sind und dabei beaufsichtigt werden. Kinder müssen beaufsichtigt werden,
um sicherzustellen, dass Sie das Gerät nicht als Spielzeug verwenden.
4) Service
a) Lassen Sie Ihr Gerät nur von qualifiziertem Fachpersonal und nur
mit Original-Ersatzteilen reparieren. Damit wird sichergestellt, dass die
Sicherheit des Gerätes erhalten bleibt.
12
Page 13

www.silverlinetools.com
Starthilfegerät und Druckluftkompressor234578
Sicherheitshinweise für
Starthilfegeräte
• Achten Sie darauf, dass sich die Plus- und die Minusklemme nicht berühren.
Wenn sich spannungsführende Klemmen miteinander in Kontakt kommen,
können die Leitungen schmelzen und einen Brand verursachen.
• Versuchen Sie niemals einem KFZ Starthilfe zu geben, dessen Batterie eine
Leckage aufweist oder anderweitig beschädigt ist.
• Versuchen Sie niemals einem KFZ mit eingefrorener Batterie Starthilfe zu
geben. Lassen Sie außerdem Vorsicht walten wenn Sie eine eingefrorene
Batterie in ein Gebäude bringen, da es während des Auftauens zu Leckagen
kommen kann.
• Überprüfen Sie vor dem Anschluss des Starthilfegerätes stets den
Elektrolytstand, falls es sich nicht um eine wartungsfreie Batterie handelt.
• Blei-Säure-Akkus geben zündfähige brennbare Gase ab. Rauchen Sie daher
nicht, und bringen Sie das Ladegerät niemals in die Nähe offener Flammen
oder heißer Oberflächen. In einem KFZ geht die größte Gefahr der Emission
brennbarer Gase zwar von der Starterbatterie aus, allerdings besteht auch
bei dem in diesem Starthilfegerät installierten geschlossenen Blei-Akku eine
geringe Gefahr der Bildung brennbarer Gase, besonders wenn das Gerät
überlastet wird.
• Beim Umgang mit Blei-Säure-Akkumulatoren müssen stets
Schutzhandschuhe und Schutzbrille getragen werden.
• Legen Sie stets sämtlichen Metall-Schmuck ab, bevor Sie Blei-SäureAkkumulatoren handhaben.
• Denken Sie daran, dass sich lose Kleidung/lange Haare etc. während der
Benutzung dieses Produktes in beweglichen Motorteilen verfangen können.
Binden Sie Ihre Haare zusammen und sichern Sie lose Kleidungsstücke.
• Wenn Batteriesäure mit der Haut oder Kleidung in Berührung kommt, waschen
Sie die betroffenen Stellen sofort mit Seife und Wasser gründlich ab. Wenn
Batteriesäure mit den Augen in Kontakt kommt, waschen Sie die Augen
gründlich mit sauberem Wasser aus und suchen Sie einen Arzt auf!
• Benutzen Sie dieses Starthilfegerät nur in völlig trockenen Bedingungen.
Geräteübersicht
1 Arbeitsleuchte
2 Plusklemme
3 Voltmeter
4 Arbeitsleuchtenschalter
5 Minusklemme
6 Batterietest-Taste
7 Ladebuchse
8 Manometer
9 Druckluftschlauch
10 12-V-Steckdose
11 Kompressorschalter
12 230-V-Ladegerät
13 12-V-Ladegerät
Gerät auspacken
• Packen Sie Ihr Werkzeug vorsichtig aus und überprüfen Sie es. Machen Sie
sich vollständig mit all seinen Eigenschaften und Funktionen vertraut.
• Vergewissern Sie sich, dass sämtliche Teile des Werkzeugs vorhanden und in
einem guten Zustand sind. Sollten Teile fehlen oder beschädigt sein, lassen
Sie diese ersetzen, bevor Sie das Werkzeug verwenden.
Bedienungsanleitung
WARNUNG: Dieses Gerät enthält einen geschlossenen Blei-Akku. Es ist wichtig, den
Akku stets vollständig geladen aufzubewahren, um die längst mögliche Lebensdauer
zu gewährleisten. Laden Sie das Gerät sofort nach dem Kauf vollständig auf. Selbst
bei Nichtgebrauch muss der Akku alle 1-2 Monate nachgeladen werden.
WARNUNG: Verbinden Sie das Starthilfegerät während des Ladens niemals mit
anderen Geräten oder Leitungen außer dem 12-V-Ladekabel (19) oder dem
230-V-Wechselspannungsladegerät (18).
WARNUNG: Dieses Gerät ist KEIN Akkuladegerät! Verbinden Sie das
230-V-Wechselspannungsladegerät NIEMALS mit dem Gerät, wenn dieses mit einer
externen KFZ-Batterie verbunden ist! Das Starthilfegerät darf AUSSCHLIESSLICH mit
entferntem Ladegerät verwendet werden!
WARNUNG: Ein Überladen kann zur Bildung explosiver Gase führen.
Aufladen des internen Akkus
• Drücken Sie die Batterietest-Taste (6) um den Ladezustand zu überprüfen.
Stellen Sie sicher, dass keine externen Leitungen mit dem Gerät verbunden sind.
Das Voltmeter (3) zeigt den ungefähren Ladestand an. Eine ausreichende Ladung
liegt vor, wenn sich der Zeiger im grünen Bereich einpendelt. Bei vollständig
geladenem Akku sollten mindestens 12,6 V angezeigt werden, allerdings kann
mit Hilfe eines Multimeters im Messbereich bis 20 V (bzw. der nächsthöheren
Einstellung) die genaue Akkuspannung ermittelt werden.
• Die Batterie sollte bei 20°C (Zimmertemperatur) geladen werden.
• Sorgen Sie dafür, dass im unmittelbaren Umfeld keine offenen Flammen oder
Zündquellen vorhanden sind.
Aufladen an einer 230-V-Spannungsversorgung
1. Stecken Sie den kleinen Stecker des 230-V-Ladegeräts (12) in die Ladebuchse
(7).
2. Stecken Sie den großen Stecker des 230-V-Ladegeräts in eine
spannungsführende Netzsteckdose.
• Die Erstaufladung kann auf diesem Wege bis zu 40 Stunden in Anspruch
nehmen. Überprüfen Sie den Ladestand allerdings regelmäßig anhand der
Ladestandanzeige am Gerät. Ein Nachladen oder eine Erhaltungsladung kann bis
zu 10 Stunden dauern.
• Stellen Sie sicher, dass das Gerät ausschließlich in gut belüfteten Bereichen ohne
offene Flammen oder andere Hitzequellen geladen wird.
Aufladen an einer 12-V-Steckdose
Das Aufladen des Starthilfegerätes über den Zigarettenanzünder Ihres Fahrzeuges
während der Fahrt ist eine bequeme Art die Ladung Ihres Starthilfegerätes zu
erhalten. Beachten Sie dabei jedoch, dass sich das Gerät im Gepäckraum des KFZ
befinden und der Bereich gut belüftet sein muss. Verwenden Sie ausschließlich das
ebenfalls im Lieferumfang enthaltene 230-V-Wechselspannungsladergerät, sollte
dies nicht gewährleistet sein. Überprüfen Sie während des Ladens im Fahrzeug
regelmäßig den Ladestand, um ein Überladen des internen Akkus zu vermeiden.
1. Stecken Sie das 12-V-Ladekabel (13) in die Ladebuchse (7) ein.
2. Stecken Sie das Ladekabel in die 12-V-Steckdose ein.
3. Falls Ihr Fahrzeug k eine 12-V-Steckdose im Gepäckraum aufweist, kann
es nötig sein eine Verlängerungsleitung zum Zigarettenanzünder vorne im
Armaturenbrett zu verwenden.
4. Unterbrechen Sie die Ladung sobald das Voltmeter (3) einen zufriedenstellenden
Ladestand anzeigt. Überprüfen Sie die Ladestandanzeige alle 45 min bis 1 h,
um ein Überladen zu vermeiden. Die Erstaufladung kann bis zu 12 Stunden in
Anspruch nehmen, ein Nachladen oder eine Erhaltungsladung kann allerdings
bereits nach nur einer Stunde abgeschlossen sein.
Hinweise:
• Manche Fahrzeuge verfügen sowohl über einen Zigarettenanzünder am
Armaturenbrett, als auch eine 12-V-Steckdose im Gepäckraum. Überprüfen Sie,
ob die Stromversorgung mit dem Entfernen des Zündschlüssels ausgeschaltet
wird, denn falls dies nicht der Fall ist besteht die Gefahr, dass die Starterbatterie
sich bei geparktem Fahrzeug über das Starthilfegerät entlädt.
• Es ist wichtig den Ladestand während des Aufladens regelmäßig zu
kontrollieren, und dies nicht zu vergessen, wenn das Gerät im Gepäckraum eines
Fahrzeuges oder über einen Zigarettenanzünder geladen wird. Der interne Akku
darf nur geladen werden, bis das Gerät einen zufriedenstellenden Ladezustand
anzeigt. Dies ist insbesondere beim Laden über eine 12-V-Verbindung
wichtig, da dabei ein höherer Ladestrom auftritt als beim Laden mit dem
230-V-Wechselspannungsladegerät.
• Nachdem das Starthilfegerät zum Starten eines Fahrzeuges verwendet wurde
muss es für 15 Minuten ruhen, bevor es innerhalb eines Fahrzeuges aufgeladen
werden darf. Dies gibt eventuell entstandenen brennbaren Gasen die Gelegenheit
sich zu verflüchtigen.
WICHTIG: Es kann zu permanenten Schäden am Starthilfegerät kommen, falls die
korrekte Ladeprozedur nicht eingehalten wird!
13
Page 14

DE
Starthilfe geben
Hinweise:
• Konsultieren Sie das Handbuch des Fahrzeugherstellers bevor Sie dieses
Starthilfegerät verwenden. Folgen Sie den Anweisungen des Fahrzeugherstellers,
wenn dieser eine spezielle Starthilfe-Prozedur vorgibt.
• Führen Sie die normale Startprozedur des Fahrzeuges durch, inkl. Vorglühen bei
Dieselmotoren usw.
• Verwenden Sie dieses Produkt ausschließlich an 12-V-Fahrzeugsystemen mit
negativer Erdung.
• Das Gerät darf niemals mit Fahrzeugen verwendet werden, die über ein
24-V-System verfügen.
• Das Starthilfegerät wird parallel zur Fahrzeugbatterie angeschlossen, was deren
Kapazität.
• Falls die Leitungen des Starthilfegerätes zu kurz sind um die Batterie- und
Masseverbindung zu erreichen, kann der Minuspol (schwarze Batterieklemme)
mit Hilfe eines regulären Starthilfekabels verlängert werden. Verlängern Sie
keinesfalls den Pluspol des Gerätes (rote Batterieklemme).
• Dieses Starthilfegerät kann nur vorschriftsmäßig funktionieren wenn der
Fahrzeugmotor und das elektrische System des Fahrzeuges einwandfrei
funktionieren, und sich die Fahrzeugbatterie in einem funktionstüchtigen,
lediglich teilentladenen Zustand befindet.
• Starthilfe kann nicht durch Einstecken des Zigarettenanzünder-Adapters
geschehen. Die im Lieferumfang des Gerätes enthalten 12-V-Anschlußleitung ist
dazu nicht geeignet.
• Nachdem das Starthilfegerät zum Anlassen eines Fahrzeuges verwendet
wurde kann es nötig sein das Gerät im Fahrzeug nachzuladen, damit es wieder
betriebsbereit ist, sollte das Fahrzeug erneut eine Starthilfe benötigen.
• Lassen Sie Fahrzeugbatterie und Ladesystem überprüfen, falls wiederkehrende
Startprobleme auftreten.
• Die Größe des Fahrzeugs das mit Hilfe des Starthilfegerätes angelassen
werden kann hängt vom Ladezustand der jeweiligen Fahrzeugbatterie ab. Bei
tiefentladenen Fahrzeugbatterien ist die Größe des Fahrzeuges zur Starthilfe
begrenzt. Als Richtwert können Sie davon ausgehen, dass Benzinmotoren mit
Hubräumen bis zu 2,2 Liter sowie Dieselmotoren bis ca. 1,9 Liter gestartet
werden können.
1. Vergewissern Sie sich, dass alle elektrischen Verbraucher im Fahrzeug
(Scheinwerfer, Radio usw.) ausgeschaltet sind.
2. Vergewissern Sie sich, dass sich das Fahrzeuggetriebe im Leerlauf (Automatik
„P“) befindet und dass die Handbremse angezogen ist.
3. Suchen Sie die positive und die negative Verbindung zur Fahrzeugbatterie. Die
Batteriekontakte sollten mit „+“ und „-“ gekennzeichnet sein. Das Kabel zum
Plus-Pol sollte rot gefärbt sein, das zum Minus-Pol schwarz. Konsultieren Sie
einen Fahrzeugspezialisten, falls Sie sich bei der Polung unsicher sind.
4. Sollte der Plus-Pol der Fahrzeugbatterie verschmutzt oder korrodiert sein, muss
dieser vor Verwendung des Starthilfegerätes mit einer geeigneten Drahtbürste
o.ä. gesäubert werden, um einen guten Kontakt mit der Batterieklemme des
Gerätes zu gewährleisten.
5. Verbinden Sie zuerst die (rote) Plusklemme (2) des Starthilfegerätes mit dem
Plus-Pol der Fahrzeugbatterie, und vergewissern Sie sich, dass die Klemme
sicher angeschlossen ist und dass es nicht zu Kurzschlüssen mit anderen
Fahrzeugteilen kommen kann.
6. Verbinden Sie anschließend die (schwarze) Minusklemme (5) mit einem
unbeweglichen blanken und unlackierten Teil der Fahrzeugkarosserie oder dem
Motorblock, und NICHT mit dem Minuspol der Fahrzeugbatterie. Ein Verbinden
mit dem Minus-Pol der Batterie birgt ein kleines Risiko des Entzündens
brennbarer Gase und daher soll in Massekontakt gewählt werden, der so weit
wie möglich von der Batterie entfernt liegt. Verbinden Sie das Gerät keinesfalls
mit kraftstoffführenden Teilen, da sich Kraftstoff durch Funkenbildung entzünden
könnte.
7. Überprüfen Sie den festen Sitz der Batterieklemmen und stellen Sie sicher, dass
sie sich beim Anlassen des Fahrzeuges nicht lösen können.
8. Warten Sie 1 – 2 Minuten damit sich die Batteriespannung zwischen
Starthilfegerät und Fahrzeugbatterie stabilisieren kann.
9. Das Starthilfegerät sollte nun bereit sein den Motor des Fahrzeuges zu starten.
Betätigen Sie den Anlasser des Fahrzeuges in kurzen Stößen (von nicht länger
als 5 Sekunden). Wenn der Motor nicht startet, warten Sie für ca. 2 Minuten
bevor Sie einen erneuten Anlassversuch unternehmen.
10. Sobald der Motor läuft nehmen Sie zuerst die Minusklemme (5) vom Fahrzeug
ab, dann die Plusklemme (2). Seien Sie dabei vorsichtig keine beweglichen oder
heißen Motorenteile zu berühren. Es ist wichtig, die Batterieklemmen nach der
Verwendung wieder an den Halterungen des Starthilfegerätes zu befestigen.
Weitere Produktmerkmale
12-V-Steckdose
• Geräte die mit einem 12-V-Stecker ausgestattet sind der sich von der Bauart
her in einen Zigarettenanzünder einstecken lässt, können an den 12-V-Steckdose
(10) des Starthilfegerätes betrieben werden.
• Heben Sie die Gummi-Staubschutzkappen an und stecken Sie den Stecker des
zu betreibenden Gerätes in die 12-V-Steckdose.
• Ziehen Sie das 12-V-Gerät nach der Verwendung aus der 12-V-Steckdose heraus,
und verschließen Sie diese mit der Schutzkappe.
Arbeitsleuchte
• Dieses Starthilfegerät ist mit einer Arbeitsleuchte (1) ausgestattet.
• Drücken Sie den Arbeitsleuchtenschalter (4), um die Arbeitsleuchte einzuschalten.
Um sie auszuschalten, betätigen Sie den Schalter erneut.
Druckluftkompressor
• Dieses Starthilfegerät ist mit einem integrierten Druckluftkompressor ausgestattet,
der zum Auffüllen von Reifen und anderen Objekten geeignet ist. Beachten Sie beim
Aufblasen stets die Herstellerangaben des jeweiligen Objektes, verwenden Sie stets
den empfohlenen Luftdruck und überschreiten Sie diesen niemals.
1. Entnehmen Sie zur Verwendung des Druckluftkompressors den Druckluftschlauch
(9) aus dem Stauraum auf der Rückseite des Starthilfegerätes.
2. Schließen Sie den Druckluftschlauch am Reifenventil bzw. am aufzublasenden
Objekt an und legen Sie den Hebel am Verbinder um. Die Verbindung zum
Druckluftkompressor ist damit hergestellt.
3. Schalten Sie den Kompressor am Kompressorschalter (11) ein.
4. Überwachen Sie das Manometer (8) während des Aufpumpvorganges. Schalten
Sie den Kompressor bei Bedarf ein und aus.
5. Schalten Sie den Kompressor nach der Verwendung aus.
6. Verstauen Sie den Druckluftschlauch nach erfolgter Benutzung wieder im
Stauraum an der Geräterückseite.
Hinweise:
• Der Druckluft-Kompressor darf nicht unbeaufsichtigt verwendet werden.
• Der Kompressor darf niemals für länger als 5 Minuten im Dauerbetrieb verwendet
werden. Lassen Sie das Gerät zwischen Einschaltintervallen für mindestens 5
Minuten abkühlen.
• Zwei Aufblasadapter zur Benutzung mit Bällen, Luftmatratzen usw. sind im
Lieferumfang des Starthilfegerätes enthalten und befinden sich im Stauraum
an der Geräterückseite.
• Verwenden Sie das Manometer (8) lediglich als ungefähre Druckanzeige.
Verwenden Sie ein kalibriertes externes Manometer, um den genauen Luftdruck
zu bestimmen.
Wartung
Reinigung
• Halten Sie Ihr Starthilfegerät stets sauber. Reinigen Sie es regelmäßig von Staub
und Schmutzpartikeln damit die Belüftungsöffnungen nicht verstopfen. Verwenden
Sie zur Reinigung eine weiche Bürste oder ein trockenes Tuch, und blasen Sie falls
verfügbar die Belüftungsschlitze mit sauberer trockener Druckluft aus.
• Stellen Sie sicher, dass die beiden Batterieklemmen stets sauber und frei von
Korrosion gehalten werden. Verschmutzte Kontakte wirken sich äußerst negativ
auf die Funktion des Gerätes aus.
Entsorgung
Warnung: Dieses Gerät enthält einen geschlossenen Blei-Akku. Dieser muss vor der
Entsorgung des Gerätes entnommen und einer geeigneten Recycling-Einrichtung
übergeben werden. Entsorgen Sie das Gerät keinesfalls ohne zuvor die Batterie
entnommen zu haben!
• Um die Batterie auszubauen lösen Sie die 8 Schrauben der hinteren
Geräteabdeckung und entfernen Sie diese anschließend vorsichtig, um sich Zugriff
auf die interne Batterie zu verschaffen. Achten Sie darauf, Kabel die vom Gerät zum
in der Abdeckung befindlichen Schalter führen nicht zu beschädigen. Entfernen Sie
anschließend die Negative Polklemme von der Batterie, dann die positive Klemme.
Entnehmen Sie die Batterie vorsichtig, und stellen Sie sicher, dass die Polklemmen
diese nicht mehr berühren.
• Falls Sie die Batterie austauschen darf dies ausschließlich gegen eine Batterie
identischen Typs erfolgen, damit diese mit den Schaltkreisen des Gerätes und
dem Ladegerät kompatibel ist.
• Elektrowerkzeuge und andere elektrische und elektronische Altgeräte nicht über
den Hausmüll entsorgen.
• Lassen Sie sich von der zuständigen Behörde bezüglich der ordnungsgemäßen
Entsorgung von Elektrowerkzeugen beraten.
14
Page 15

www.silverlinetools.com
Starthilfegerät und Druckluftkompressor234578
Silverline-Tools-Garantie
Dieser Silverline-Artikel wird mit einer
3-Jahres-Garantie angeboten
Registrieren Sie diesen Artikel unter silverlinetools.com innerhalb von 30 Tagen nach
dem Kauf, um die 3-Jahres-Garantie zu aktivieren.
Der Garantiezeitraum beginnt mit dem Kaufdatum auf Ihrem Kaufbeleg.
Garantiebedingungen
Der Garantiezeitraum beginnt mit dem Kaufdatum im Einzelhandel, das auf dem
Kaufbeleg angegeben ist.
BITTE BEWAHREN SIE DEN KAUFBELEG AUF!
Falls dieser Artikel innerhalb von 30 Tagen nach dem Kauf einen Defekt aufweisen
sollte, bringen Sie es bitte mit Ihrem Kaufbeleg zu dem Fachhändler, bei dem es
gekauft wurde, und informieren Sie ihn über die Mängel. Das Gerät wird daraufhin
ersetzt oder der Kaufpreis zurückerstattet.
Falls dieser Artikel nach Ablauf von 30 Tagen nach dem Kauf einen Mangel aufweist,
senden Sie es bitte an:
Silverline Tools Service Centre
PO Box 2988
Yeovil
BA21 1WU, Großbritannien
Der Garantieanspruch muss während der Garantiezeit gestellt werden.
Sie müssen den Originalkaufbeleg mit Angabe des Kaufdatums einreichen und Ihren
Namen und Ihre Adresse sowie den Ort des Kaufs angeben, bevor etwaige Arbeiten
durchgeführt werden können.
Sie müssen genaue Angaben über den zu behebenden Defekt machen.
Alle innerhalb der Garantiefrist gemachten Forderungen werden von Silverline Tools
daraufhin überprüft werden, ob es sich bei den Mängeln um einen Material- oder
Fertigungsfehler handelt.
Versandkosten werden nicht zurückerstattet. Alle Artikel sollten sich in sauberem
und sicherem Zustand befinden und sorgfältig verpackt zur Reparatur eingeschickt
werden, um Schäden oder Verletzungen während des Transports zu vermeiden. Die
Annahme unangemessener oder unsicherer Lieferungen kann von uns verweigert
werden.
Alle Arbeiten werden von Silverline Tools oder seinen autorisierten
Reparaturwerkstätten durchgeführt.
Die Reparatur oder der Ersatz des Artikels führt nicht zur Verlängerung des
Garantiezeitraums.
Mängel, bei denen unsere Prüfung ergibt, dass sie unter die Garantie fallen, werden
durch kostenlose Reparatur des Werkzeugs (ohne Versandkosten) oder Ersatz durch
ein Werkzeug in einwandfreiem Zustand behoben.
Einbehaltene Werkzeuge oder Teile, die ersetzt wurden, gehen in den Besitz von
Silverline Tools über.
Registrierung Ihres Kaufs
Gehen Sie auf silverlinetools.com, klicken Sie auf „Registrierung“’ und geben Sie
Folgendes ein:
• Ihre persönlichen Angaben
• Produktdetails und Kaufinformationen
Sobald dieser Artikel registriert worden ist, wird Ihre Garantiebescheinigung im
PDF-Format erzeugt. Bitte drucken Sie sie aus und bewahren Sie sie zusammen mit
Ihrem Produkt auf.
Die Reparatur bzw. der Ersatz Ihres Artikels unter dieser Garantie erfolgt zusätzlich
zu Ihren gesetzlichen Rechten als Verbraucher und hat keine nachteiligen Folgen
auf diese.
Durch die Garantie abgedeckt ist:
Die Reparatur des Artikels, nachdem zur Zufriedenheit von Silverline Tools
nachgewiesen wurde, dass der Defekt durch fehlerhaftes Material oder mangelhafte
Arbeitsausführung bedingt ist und in den Garantiezeitraum fällt.
Wenn ein Ersatzteil nicht mehr erhältlich ist oder nicht mehr hergestellt wird, kann
Silverline Tools es gegen einen funktionellen Ersatz austauschen.
Verwendung des Artikels innerhalb der EU.
Durch die Garantie nicht abgedeckt ist:
Silverline Tools garantiert keine Reparaturen, die durch Folgendes erforderlich
geworden sind:
Normale Verschleißerscheinungen, die trotz Verwendung entsprechend der
Bedienungsanleitung entstehen, z.B. an Messern, Bürsten, Riemen, Glühbirnen,
Batterien usw.
Ersatz von mitgeliefertem Zubehör wie etwa Bohrspitzen, Klingen, Schleifblättern,
Schneidscheiben und anderen zugehörigen Teilen.
Unfallschäden und Fehler, die durch unsachgemäße Verwendung oder Wartung,
Missbrauch, Nachlässigkeit oder fahrlässige Bedienung oder Handhabung des
Artikels entstanden sind.
Verwendung des Artikels für andere als normale Haushaltszwecke.
Jegliche Veränderungen oder Modifikationen des Artikels.
Die Verwendung von Teilen oder Zubehör, die keine Originalkomponenten von
Silverline Tools sind.
Fehlerhafte Montage (außer, wenn von Silverline Tools vorgenommen).
Reparaturen oder Änderungen, die von anderen als Silverline Tools oder seinen
autorisierten Reparaturwerkstätten durchgeführt wurden.
Ansprüche, die über die Rechte zur Behebung von Mängeln an dem in diesen
Garantiebedingungen genannten Werkzeug hinausgehen.
Akku-Garantie
Die Garantie auf Silverline-Akkus beträgt 30 Tage. Falls innerhalb der AkkuGarantiefrist aufgrund von Material- oder Verarbeitungsfehlern ein Defekt an einem
registrierten Akku auftritt, ersetzt Silverline diesen kostenlos. Diese Garantie gilt nicht
bei gewerblicher Nutzung und erstreckt sich nicht auf natürliche Abnutzung oder
Schäden infolge von Unfällen, unsachgemäßer Verwendung oder Zweckentfremdung.
CE-Konformitätserklärung
Name des Unterzeichners: Mr. Darrell Morris
Bevollmächtigt durch: Silverline Tools
Erklärt hiermit, dass das Produkt:
Ident.-Nr.: 234578
Produktbezeichnung: Starthilfegerät und Druckluftkompressor
Mit den folgenden Richtlinien und Normen übereinstimmt:
• Niederspannungsrichtlinie 2006/95/EG
• EMV-Richtlinie 2004/108/EG
• RoHS-Richtlinie 2011/65/EU
• EN55022:2010
• EN55024:2010
• EN61000-3-2:2006+A2:2009
• EN61000-3-3:2008
• EN61558-2-6:2009
• EN60950-1:2006+A12:2011
Benannte Stelle: Telab B.V. Compliance Laboratory Co., Ltd.
Techn. Unterlagen bei: Silverline Tools
Datum: 13.07.2015
Unterzeichnet von:
Mr. Darrell Morris
Geschäftsführender Direktor
Name und Anschrift des Herstellers:
Powerbox International Limited, Handelsregisternummer 06897059. Eingetragene
Anschrift: Central House, Church Street, Yeovil, Somerset BA20 1HH, Großbritannien
15
Page 16

ES
Traducción del manual original
Descripción de los símbolos
Los símbolos siguientes pueden aparecer en la placa de características de su
herramienta. Éstos representan información importante sobre el producto o
instrucciones relativas a su uso.
Lleve protección auditiva
Lleve protección ocular
Lleve protección respiratoria
Lleve un casco de seguridad
Lleve guantes de seguridad
Lea el manual de instrucciones
Doble aislamiento para mayor protección
Peligro de explosión
PRECAUCIÓN: Batería con plomo ácido
Conforme a las normas de seguridad y a la legislación
correspondientes
Protección medioambiental
Los productos eléctricos usados no se deben mezclar con la basura
casera. Están sujetos al principio de recogida selectiva. Solicite
información a su ayuntamiento o distribuidor sobre las opciones
de reciclaje
Características técnicas
Tensión .................................................................................. 12 V DC
Corriente nominal ......................................................................400 A
Corriente máxima ......................................................................900 A
Presión máxima del compresor................................................260psi
Capacidad de la batería .............................................................12 Ah
Tipo de batería ............................................................................VRLA
Clase de protección ...................................................................
Potencia de entrada ...............................................230 V 50 Hz / 6W
Potencia de salida ...................................................12 V CC / 500 mA
Clase de la protección................................................................
Corriente máxima de las tomas de 12 V ......................................10 A
En el marco de nuestro continuo programa de desarrollo de
productos, los datos técnicos de los productos Silverline pueden
cambiar sin previo aviso.
Instrucciones de seguridad
ADVERTENCIA: Lea todas las advertencias de seguridad e instrucciones.
No respetar estas advertencias e instrucciones puede causar descargas eléctricas,
incendios y/o lesiones graves.
Conserve estas instrucciones para futuras referencias.
1) Seguridad en el área de trabajo
a) Mantenga el área de trabajo limpia y bien iluminada. Las áreas
desordenadas y oscuras invitan a que se produzcan accidentes.
2) Seguridad eléctrica
a) El enchufe de la herramienta eléctrica debe coincidir con la toma
de corriente. No modifique nunca el enchufe de ninguna manera. No
utilice ningún adaptador de enchufe sin toma de tierra. Los enchufes si
modificar y el uso de tomas de corrientes adecuadas reducirán el riesgo de
descargas eléctricas.
b) Evite el contacto con materiales conductores tales como tuberías,
radiadores, estufas y refrigeradores. El riesgo de descarga eléctrica se
incrementa si su cuerpo está expuesto a materiales conductores.
c) No exponga la herramienta a la lluvia o la humedad. El contacto de agua
en una herramienta eléctrica aumentará el riesgo de descargas eléctricas.
3) Seguridad personal
a) Manténgase alerta, fíjese en lo que está haciendo y use el sentido
común cuando esté utilizando esta herramienta. No use una herramienta
eléctrica si se encuentra cansado o bajo la influencia de drogas, alcohol
o medicamentos. Un momento de distracción mientras esté utilizando una
herramienta eléctrica puede provocar lesiones corporales graves.
b) Use equipo de protección personal. Use siempre protección ocular. El
uso de equipamientos de seguridad tales como máscara antipolvo, calzado
de seguridad antideslizante, casco duro y protecciones auditivas adecuadas
reducirá el riesgo de lesiones corporales.
ADVERIENCIA: No permita que los niños, personas discapacitadas o personas
no cualificadas utilicen esta herramienta. Mantenga esta herramienta fuera del
alcance de los niños.
4) Mantenimiento y reparación
a) Lleve siempre su herramienta a un servicio técnico cualificado y
utilice únicamente piezas de recambio idénticas. Esto garantizará un
funcionamiento óptimo y seguro de su herramienta eléctrica.
16
Page 17

www.silverlinetools.com
Arrancador de emergencia y compresor de aire234578
Instrucciones de seguridad para
arrancadores de emergencia
• No permita que elementos de metal entren en contacto con los bornes de
la batería, ya que los cortocircuitos pueden originar incendios y causar
explosiones.
• Maneje siempre los conectores de los bornes de la batería a una distancia
discreta.
• No permita que entren en contacto las abrazaderas de los conductores
positivo y negativo. Cuando las abrazaderas con corriente entran contacto
pueden derretir los conductores y originar un incendio.
• No intente nunca arrancar una batería que muestre fugas, grietas u otros
desperfectos.
• No intente nunca cargar una batería congelada. Tenga precaución
especialmente cuando deposite una batería en espacios interiores ya que
puede producirse fugas al volver a su temperatura normal. En este caso
deberá sustituirla por una nueva.
• A menos que la batería sea de tipo “libre de mantenimiento”, asegure siempre
que el nivel del electrólito sea correcto antes de intentar su arranque en
puente.
• Tenga en cuenta que las baterías de plomo- ácido emiten gases inflamables
mientras son cargadas. No efectúe la carga de baterías cerca de cualquier
tipo de fuente de ignición o calor. NO FUME. Asegure que las baterías estén
bien ventiladas. El ácido de la batería del vehículo es la fuente de gas
inflamable más peligrosa, aun así existe un mínimo riesgo de que la batería
VRLA pueda sobrecargarse.
• Lleve siempre gafas y guantes protectores al manejar baterías de plomoácido.
• Retire siempre todas las joyas de metal antes de manejar baterías de
plomo-ácido.
• Tenga en cuenta que la ropa suelta / pelo largo, etc. pueden engancharse en
las piezas móviles del motor; antes de utilizar esta herramienta, recójase el
pelo y sujétese la ropa suelta.
• Si el ácido de la batería entra en contacto con la piel o la vestimenta, proceda
a lavarlos minuciosamente con agua y jabón. Si el ácido de la batería entra en
contacto con los ojos, proceda a lavarlos minuciosamente con agua limpia y
solicite ayuda médica.
• Este arrancador de emergencia sólo debe utilizarse en condiciones
completamente secas.
Características del producto
1 Luz de trabajo
2 Pinza positiva
3 Voltímetro
4 Interruptor de la luz de trabajo
5 Pinza negativa
6 Botón de prueba de batería
7 Toma de carga
8 Manómetro
9 Manguera de aire comprimido
10 Toma del encendedor de cigarrillos 12 V
11 Interruptor del compresor
12 Cargador de 230 V
13 Cargador de 12 V
Desembalaje
• Asegúrese de que el embalaje contiene todas las partes y que están en
buenas condiciones. Si faltan piezas o están dañadas, solicite su sustitución
antes de intentar utilizar esta herramienta.
Antes del Uso
ADVERTENCIA: Esta herramienta incorpora una batería VRLA (batería de
plomo ácido sellada con válvula reguladora). Es importante que la batería esté
siempre completamente cargada para alargar su vida útil. Cargue la batería
inmediatamente después de cada uso y cada 1- 2 meses cuando no la utilice.
ADVERTENCIA: Cuando cargue el arrancador deberá asegurarse de no tener
conectado ningún otro aparato o cable excepto el cable del cargador de 12 V (12)
o el cargador de 230 V (13).
ADVERTENCIA: Esta herramienta no es un cargador de batería. Nunca conecte
el cargador de 230 V en el arrancador cuando esté conectado a la batería de un
vehículo. El arrancador de emergencia sólo debe ser utilizado con los cables de
cargas desconectados.
ADVERTENCIA: Sobrecargar la batería puede producir gases inflamables.
Carga de la batería
• Para comprobar el estado de la batería, presione botón de prueba de la batería
(6). Asegúrese de que no existan cables conectados en el arrancador. El
estado de carga de la batería se mostrará a través del voltímetro (3). El nivel
de batería se mostrará mediante el indicador del voltímetro, el color verde
indicará que la batería está prácticamente cargada. Para comprobar el nivel
de carga de forma alternativa, utilice un voltímetro ajustado en 20 V CC o a
un voltaje superior. Una batería completamente cargada debería de indicar un
voltaje de 12,6 V o superior.
• La batería se debe cargar a 20° C (temperatura ambiente).
• Asegúrese de que no hay llamas, u otras fuentes de ignición, cerca de la
zona de carga.
Carga desde una toma de 230 V
1. Conecte el cargador de 230 V (12) en la toma de carga (7).
2. Inserte el cargador de 230 V en la toma de corriente.
• La carga inicial le permitirá hasta 40 horas de funcionamiento continuo, de
todas formas compruebe el nivel de carga regularmente. Una carga normal le
permitirá hasta 10 horas de funcionamiento.
• Asegúrese de que el área esté bien ventilada, que no existan fuentes de calor
con llama.
Carga desde una toma de 12 V (encendedor cigarrillos)
• Se recomienda realizar la carga de la batería en la toma de 12 V cuando el
vehículo esté en movimiento. Asegúrese de colocar el arrancador en la parte
posterior del vehículo y de tener el vehículo ventilado. Si por algún motivo
no es posible, cargue la batería conectándola a una toma de corriente CC.
Cuando realice la carga en el vehículo, compruebe regularmente el estado de
la batería para no sobrecargarla.
1. Conecte el cable del cargador de 12 V (13) en la toma de carga (7).
2. Inserte el cable del cargador de 12 V en la toma del encendedor de cigarrillos.
3. Puede que necesite un cable alargador de 12 V para poder colocar el
arrancador en la parte exterior del vehículo.
4. Cargue sólo la batería hasta que el voltímetro (3) indique suficiente carga.
Compruebe el indicador de carga cada 45 minutos o cada hora para evitar
sobrecargarla. La carga inicial puede durar hasta 12 horas, las cargas
posteriores durarán aproximadamente 1 hora.
Notas:
• Algunos vehículos disponen de encendedor de cigarrillos en el salpicadero y
en la parte posterior del vehículo. Asegúrese de no conectar el cargador hasta
que el vehículo esté en funcionamiento para evitar que el arrancador pueda
descargar la batería.
• Si decide cargar el arrancador desde la parte posterior del vehículo,
deberá asegurarse de no dejar la batería cargándose permanentemente
y de comprobar el estado de carga regularmente. Esto es especialmente
importante cuando las conexión de 12 V sea superior a la del cargador de
corriente continua.
• Si ha utilizado el arrancador para arrancar un vehículo, espere 15 minutos
para estabilizar la batería antes de proceder a la carga de la misma.
IMPORTANTE: No seguir las instrucciones correctamente podría dañar
permanentemente el arrancador.
Arrancador de emergencia
Notas:
• Consulte siempre el manual de instrucciones del vehículo antes de usar
este producto. Si el fabricante especifica una secuencia determinada para el
arranque de emergencia, siga siempre el consejo del fabricante.
• Siga los procedimientos adecuados respecto a la carga de las bujías, etc.
• No intente usar este producto en cualquier otro sistema de carga para
vehículos que no sea uno de 12 V con negativo a tierra.
17
Page 18

ES
• No intente usar este producto en cualquier otro sistema de carga o baterías
para vehículos de 24 V.
• El arrancador funcionará en paralelo junto a la batería integrada para
incrementar la capacidad de corriente.
• Si los cables no son lo suficientemente largos para conectarlos al polo positivo
y negativo de la batería, puede utilizar un cable con pizas convencional para
prolongar el cable de conexión negativo. Nunca prolongue el cable positivo
del arrancador.
• Este arrancador sólo funcionará cuando el motor del vehículo funcione
correctamente y la batería se encuentre en buenas condiciones aunque esté
descargada.
• No intente arrancar el vehículo conectando el arrancador directamente al
encendedor de cigarrillos. El cable suministrado no podrá utilizarse para este
propósito.
• Una vez arrancado el vehículo, necesitará recargar el arrancador mientras
esté conduciendo. De esta forma el arrancador estará listo para ser usado
la próxima vez
Compruebe el estado de su batería si la batería no arranca
normalmente.
• El arrancador puede responder de forma diferente dependiendo del tamaño
de la batería del vehículo. Una carga baja limitará el arranque del vehículo.
Esta herramienta es capaz de arrancar vehículos diésel de hasta 2.200 cc y
diésel hasta 2.900 cc.
1. Asegure que estén desconectados todos los sistemas auxiliares del vehículo
(faros, radio, etc.).
2. Asegúrese de que colocar el freno de mano en el vehículo.
3. Identifique los bornes positivo y negativo de la batería. Normalmente las
baterías llevan las marcas “+” cerca del borne positivo y “–” adyacente al
borne negativo. Si no está completamente seguro referente a la polaridad
de los bornes, solicite consejo profesional antes de utilizar el arrancador de
emergencia.
4. Si los bornes de la batería muestran corrosión o suciedad, proceda a
limpiarlos con un cepillo de alambre adecuado.
5. Sujete la pinza positiva (roja) (2) en el borne positivo de la batería. Asegúrese
de que esté lo suficientemente alejada de cualquier parte metálica del
vehículo.
6. Sujete la pinza negativa (negra) (5) en una parte limpia del chasis del vehículo
o en cualquier otra pieza metálica sólida. No sujete la pinza en ninguna parte
del sistema de combustible del vehículo, podría ocurrir chispas y provocar un
incendio.
7. Asegúrese de que las pinzas estén firmemente sujetas para que no se aflojen
cuando arranque el vehículo.
8. Espere 1-2 minutos a que se estabilice la carga de la batería.
9. La batería deberá estar ahora lista para arrancar el motor. Proceda a arrancar
el motor en intentos cortos (no más de 5 segundos). Si el motor no arranca,
espere otros 2 minutos a que se cargue la batería y luego repita el proceso.
10. Una vez que el motor está en marcha, retire las pinzas negativa (5) y positiva
(2) de los bornes de la batería, teniendo cuidado de que no entren en contacto
con ninguna de las piezas móviles o calientes del motor. Una vez finalizada la
tarea, vuelva a colocar las pinzas en su compartimento, tenga precaución ya
que las pinzas están continuamente bajo tensión.
Tomas de encendedor de cigarrillos 12 V
• Los dispositivos de 12 V provistos de enchufes tipo encendedor de cigarrillos
pueden ser conectados a las tomas de corriente del encendedor de cigarrillos
12 V (10).
• Levante la tapa de plástico e inserte el enchufe en la toma de corriente.
• Después de utilizar, retire el enchufe y vuelva a colocar la tapa de plástico.
• Luz de trabajo
• Este arrancador de emergencia incorpora una luz de trabajo (1).
• Para encender o apagar la luz de trabajo, utilice el botón de la luz de trabajo
(4).
Compresor de aire
Este arrancador de puente está provisto de un compresor de aire a bordo
adecuado para el inflado de neumáticos de coche y otros fines similares. Consulte
siempre las presiones de inflado recomendadas por el fabricante y no infle los
neumáticos de manera excesiva.
1. Para utilizar el compresor, retire la manguera de aire comprimido (9) de su
alojamiento en la parte posterior del arrancador de puente.
2. Alce la palanca situada en la punta de la manguera e inserte la punta
firmemente en la válvula del neumático.
3. Pulse el interruptor del compresor (11) para encender el compresor.
4. Observe siempre el voltímetro (8) al utilizar el compresor. Controle el
compresor mediante el interruptor del compresor.
5. Apague el compresor después de cada uso.
6. Vuelva a colocar la manguera de aire comprimido en el compartimento
posterior del arrancador.
Notas:
• No permita que el compresor esté desatendido cuando esté en
funcionamiento.
• No utilice el compresor constantemente durante más de 5 minutos. Deje que
se enfríe durante 5 minutos entre una aplicación y otra.
• Los adaptadores suministrados se encuentran almacenados en la parte
posterior de la herramienta. El compresor le permitirá inflar objetos pequeños
tales como balones, colchones inflables, etc.
• Utilice el voltímetro (8) para visualizar la presión de inflado. Utilice siempre un
manómetro calibrado cuando necesite un tipo de presión específica.
Mantenimiento
Limpieza
• Mantenga limpio la herramienta. Limpie siempre el polvo / partículas y
nunca permita que los orificios de ventilación se bloqueen. Use un cepillo
suave o un paño seco para limpiar la máquina o, si dispone de un aparato
de aire comprimido, sople con aire seco y limpio para limpiar los orificios de
ventilación.
• Asegure que las pinzas positiva y negativa estén especialmente limpias.
Si los contactos eléctricos están sucios se perjudicará gravemente el
funcionamiento de esta herramienta.
Eliminación
ADVERTENCIA: Esta herramienta incorpora una batería VRLA (batería sellada
con válvula reguladora) con plomo-ácido. Asegúrese siempre de retirar la batería
antes de eliminar esta herramienta. Nunca elimine esta herramienta con la batería
dentro.
• Para retirar la batería, retire los 8 tornillos del panel posterior y saque la parte
frontal y posterior carcasa con precaución. Saque con cuidado el panel para
no dañar ningún cable. Retire primero la pinza negativa y después la pinza
positiva. Asegúrese de que las pinzas no estén en contacto con la batería.
Sustituya siempre la batería por una de las mismas características.
• No elimine sus herramientas u otro equipo eléctrico o electrónico junto con la
basura convencional.
• Póngase en contacto con la autoridad local encargada de la gestión de
residuos si necesita más información sobre cómo eliminar este tipo de
herramientas debidamente.
18
Page 19

www.silverlinetools.com
Arrancador de emergencia y compresor de aire234578
Garantía Silverline Tools
Garantía
Este producto Silverline dispone de una garantía de 3 años.
Para obtener la garantía de 3 años, deberá registrar el producto en www.
silverlinetools.com antes de que transcurran 30 días. El periodo de garantía será
válido desde la fecha indicada en su recibo de compra.
Condiciones
El periodo de garantía entra en vigor a partir de la fecha indicada en el recibo de
compra.
GUARDE EL RECIBO DE COMPRA
Si el producto se ha averiado antes de que transcurran 30 días desde la fecha
de compra, deberá devolverlo a su lugar de compra, junto con el recibo de
compra y los detalles de la avería. En este caso, le sustituiremos el producto o le
reembolsaremos el importe.
Si el producto se ha averiado después de que transcurran 30 días desde la fecha de
compra, devuélvalo a:
Servicio Técnico Silverline Tools
PO Box 2988
Yeovil
BA21 1WU, Reino Unido.
La reclamación siempre debe presentarse durante el periodo de garantía.
Antes de poder realizar cualquier trabajo de reparación, deberá entregar el recibo
de compra original en el que se indica la fecha de compra, su nombre, dirección y
el lugar donde lo adquirió.
También deberá indicar claramente los detalles del fallo a reparar.
Las reclamaciones presentadas dentro del periodo de garantía deberán ser
verificadas por Silverline Tools para averiguar si las deficiencias son consecuencia
de los materiales o de la mano de obra del producto.
Los gastos de transporte no son reembolsables. Los productos enviados deben
estar limpios y en buenas condiciones para su reparación, deberán empaquetarse
cuidadosamente con el fin de evitar que se produzcan daños durante el transporte.
Silverline Tools se reserva el derecho a rechazar envíos incorrectos o inseguros.
Todas las reparaciones serán realizadas por Silverline Tools o por un servicio técnico
autorizado.
La reparación o sustitución del producto no prolongará el periodo de garantía.
Si la avería está cubierta por la garantía, la herramienta será reparada sin cargo
alguno (salvo los gastos de envío), o bien la sustituiremos por una herramienta en
perfecto estado de funcionamiento.
Las herramientas o piezas que hayan sido sustituidas serán propiedad de Silverline
Tools.
Registro del producto
Visite: silverlinetools.com, seleccione el botón de registro e introduzca:
• Sus datos personales
• Detalles del producto e información de compra
El certificado de garantía le será enviado en formato PDF. Imprímalo y guárdelo
con el producto.
La reparación o sustitución del producto bajo garantía aporta beneficios adicionales
a sus derechos legales como consumidor, sin afectarlos.
Qué está cubierto:
Silverline Tools deberá comprobar si las deficiencias se deben a materiales o mano
de obra defectuosos dentro del periodo de garantía.
En caso de que cualquier pieza no estuviera disponible o estuviera fuera de
fabricación, Silverline Tools la sustituirá por una pieza funcional con las mismas
características.
Uso del producto en la Unión Europea.
Qué no está cubierto:
Silverline Tools no garantiza las reparaciones causadas por:
Desgaste normal por uso adecuado de la herramienta, por ejemplo hojas, escobillas,
correas, bombillas, baterías, etc...
La sustitución de cualquier accesorio suministrado: brocas, hojas, papel de lija,
discos de corte y otras piezas relacionadas.
Daño accidental, averías debidas a uso o cuidado negligente, uso incorrecto,
negligencia, funcionamiento o manejo indebido del producto.
Utilizar del producto para una finalidad distinta.
Cualquier cambio o modificación del producto.
El uso de piezas y accesorios que no sean recambios originales de Silverline Tools.
Instalación incorrecta (excepto si fue realizada por Silverline Tools).
Reparaciones o alteraciones realizadas por servicios técnicos no autorizados por
Silverline Tools.
Las reclamaciones distintas a las indicadas en las presentes condiciones de
garantía no estarán cubiertas.
Garantía para baterías
Las baterías Silverline disponen de 30 días de garantía. Si durante el período de
garantía apareciera algún defecto en la batería debido a la fabricación o materiales
defectuosos, Silverline se hará cargo de la reparación o sustitución del producto
de forma gratuita. Está garantía no se aplica al uso comercial por desgaste de uso
normal, daños accidentales o por mal uso de este producto.
Declaración de conformidad CE
El abajo firmante: Mr Darrell Morris
Autorizado por: Silverline Tools
Declara que el producto:
Código de identificación: 234578
Descripción: Arrancador de emergencia y compresor de aire
Está en conformidad con las directivas:
• Directiva de baja tensión 2006/42/CE
• Compatibilidad electromagnética 2006/95/CE
• Directiva RoHS 2004/95/UE
• EN55022:2010
• EN55024:2010
• EN61000-3-2:2006+A2:2009
• EN61000-3-3:2008
• EN61558-2-6:2009
• EN60950-1:2006+A12:2011
Organismo notificado: Telab B.V. Compliance Laboratory Co., Ltd.
La documentación técnica se conserva en: Silverline Tools
Fecha: 13/07/15
Firma:
Mr Darrell Morris
Director General
Nombre y dirección del fabricante:
Powerbox International Limited, Nº de registro: 06897059. Dirección legal:
Central House, Church Street, Yeovil, Somerset BA20 1HH, Reino Unido.
19
Page 20

IT
Traduzione delle istruzioni originali
Descrizione dei simboli
La targhetta identificativa del vostro elettroutensile potrebbe riportare dei simboli.
Tali simboli sono una rappresentazione grafica che mira a evidenziare importanti
informazioni sul prodotto o istruzioni per il suo utilizzo corretto e sicuro.
Indossare cuffie di protezione
Indossare occhiali di protezione
Indossare protezione delle vie respiratorie
Indossare una protezione per la testa
Indossare la protezione delle mani
Leggi il manuale di istruzioni
Doppio isolamento per una protezione aggiuntiva
Pericolo di incendio
ATTENZIONE: Contiene batteria al piombo-acido
Il prodotto è conforme alle vigenti normative e norme di sicurezza
applicabili
Protezione Ambientale
l simbolo del cestino barrato indica che i prodotti elettrici non devono
essere mischiati con i rifiuti domestici ma conferito ad un centro
di raccolta appropriato. Per ulteriori informazioni sul riciclaggio
si prega di contattare la Sua amministrazione comune locale o il
punto vendita
Specifiche Tecniche
Tensione .................................................................................12V DC
Corrente Nominale .......................................................................400°
Picco di corrente .........................................................................900°
Pressione massima del compressore........................................260psi
Capacità batteria........................................................................ 12Ah
Tipo batteria ................................................................................VRLA
Classe di Protezione del avviatore ................................................
Caricatore CA di ingresso .........................................230V ~ 50Hz 6W
Uscita CA del caricatore ..............................................12V DC 500mA
Caricatore AC Classe di protezione .............................................
Presa 12V DC corrente massima .................................................. 10A
Nell'ambito del nostro sviluppo continuo del prodotto, le specifiche
dei prodotti Silverline possono subire variazioni senza preavviso.
Norme generali di sicurezza
AVVERTENZA: Leggere ed assimilare tutte le istruzioni. La non osservanza delle
seguenti istruzioni può causare scosse elettriche, incendi e/o lesioni gravi.
Conservare tutte le avvertenze di pericolo e le istruzioni operative per ogni
esigenza futura.
1) Area di lavoro.
a) Mantenere l’area di lavoro pulita e adeguatamente illuminata. Il disordine
e le zone di lavoro non illuminate possono essere fonte di incidenti.
2) Sicurezza elettrica
a) La spina di rete deve corrispondere alla presa. Non modificare la spina in
alcun modo. Non utilizzare adattatori con messa a terra (messa a terra). Le
spine non modificate e le prese adatte allo scopo riducono il rischio di scosse
elettriche.
b) Evitare il contatto fisico con superfici messi a terra, come tubi, radiatori,
cucine e frigoriferi. C’è un aumento del rischio di scosse elettriche se il tuo
corpo è messo a massa.
c) Non esporre gli utensili elettrici alla pioggia o all'umidità. Infiltrazione di acqua
in un dispositivo di utensile elettrico va ad aumentare il rischio di scosse
elettriche
3) Sicurezza personale
a) È importante concentrarsi su ciò che si sta facendo e usare il buon senso
quando si utilizza uno strumento elettrico. Non usare se si è stanchi o sotto
l'effetto di droghe, alcol o medicinali. Un momento di disattenzione durante il
funzionamento può provocare gravi lesioni personali.
b) Utilizzare i dispositivi di protezione. Indossare sempre protezioni per gli occhi.
Dispositivi di protezione come la maschera antipolvere, scarpe di sicurezza
antiscivolo, casco oppure protezione acustica per le condizioni appropriate
potrà ridurre il rischio di ferite.
ATTENZIONE: Questo apparecchio non è destinato all'uso da parte di persone
(inclusi i bambini) con capacità ridotta, fisiche o mentali o con mancanza di
esperienza o di conoscenza, a meno che non siano controllati o istruiti all'uso
dell'apparecchio da una persona responsabile della loro sicurezza. I bambini
devono essere sorvegliati per assicurarsi che non giochino con l'apparecchio.
4) Servizi
a) Far controllare il dispositivo da personale specializzato utilizzando solo pezzi di
ricambio originali. Ciò farà sì che la sicurezza del dispositivo è mantenuto.
20
Page 21

www.silverlinetools.com
Avviatore e compressore d’aria234578
Sicurezza Dell’avviatore a Scarica
• Evitare il contatto di oggetti metallici con i terminali della batteria, un
corto circuito potrebbe dare origine ad una incendio e causare esplosioni
• Non far toccare i morsetti dei cavi negativo e positivo. Se i morsetti sotto
tensione si toccano, i cavi potrebbero squaliarsi e causare un incendio
• Tenere sempre i connettori dei terminali della batteria a distanza
• Non cercare di avviare la batteria se questa presenta perdite, fessure o altri
danni
• Non tentare mai di caricare una batteria congelata
• A meno che la batteria sia del tipo senza manutenzione, verificare sempre che
il livello dell’elettrolito sia ottimale prima di tentare di avviare il motore
• Utilizzare questo avviatore soltanto con batterie di accumulatori al piombo
in bagno elettrolitico. E’ pericoloso tentare di caricare altri tipi di batterie e
potrebbe invalidare la garanzia
• Prestare attenzione all’emissione di gas infiammabili durante la ricarica di
batterie ad accumulatori al piombo. Non caricare la batteria vicino a qualsiasi
sorgente di fiamma o calore. Non fumare. Accertarsi che le batterie siano
ben ventilate
• Quando si adoperano batterie di accumulatori al piombo indossare sempre i
guanti e gli occhiali protettivi
• Togliere sempre qualsiasi gioiello metallico prima di lavorare con batterie ad
accumulatori al piombo
• Fare attenzione a non indossare abbigliamento largo /capelli lunghi, ecc. che
possano restare impigliati nelle parti in movimento del motore; quando si usa
questo prodotto, legare i capelli e fermare gli abiti larghi
• Lavare bene con sapone e acqua se l’acido della batteria entra in contatto
con la pelle o i vestiti. Se l’acido della batteria entra in contatto con gli occhi,
lavare bene con acqua pulita e chiedere l’assistenza di un medico
• Utilizzare questo avviatore solo in condizioni asciutte
Conoscenza del prodotto
1 Luce di lavoro
2 Morsa positiva
3 Voltimetro
4 Interruttore della luce di lavoro
5 Morsa negativo
6 Pulsante di test della batteria
7 Presa per ricarica
8 Manometro
9 Linea d'aria compressa
10 Presa accendisigari12V
11 Interruttore del compressore
12 Caricabatteria 230V
13 Cavo di ricarica 12V
Prima dell'uso
• Togliere con cura l’utensile dallo scatolo. Verificare di averlo disimballato
completamente. Acquisire la necessaria familiarità con tutte le parti/
funzionalità dell’utensile
• In caso di parti mancanti o danneggiate, sarà necessario far riparare o
sostituire tali parti prima di utilizzare il prodotto
Istruzioni per l'uso
AVVERTENZA: questo prodotto è dotato di una batteria chiusa VRLA (regolabile
con valvola al piombo). È importante che la batteria è mantenuta a pieno carico
per garantire la massima durata. Caricare immediatamente al ricevimento del
prodotto, subito dopo l'uso, e ogni 1-2 mesi, quando non in uso.
ATTENZIONE: Durante la carica dell'avviatore è importante che non viene utilizzato
o collegato a qualsiasi altro dispositivo o cavo ad eccezione sia per il caricatore
230V AC (12) o cavo di ricarica 12V (13).
ATTENZIONE: Questo prodotto non è un carica batterie. Non collegare il caricatore
a 230V AC all’avviatore quando l'avviatore è collegato alla batteria di un veicolo.
L'avviatore deve essere utilizzato solo con i cavi di carica scollegati
ATTENZIONE: eccessiva ricarica può produrre gas infiammabili
Carica della batteria
• Per controllare lo stato della batteria premere il pulsante Test della batteria (6),
assicurando che nessun dei cavi esterni sono collegati all'unità. La condizione
della batteria è indicata dal voltmetro (3). Il voltmetro mostrerà un'indicazione
approssimativa di carica con l'area verde che indica una carica sufficiente.
Una batteria completamente carica dovrebbe indicare 12,6 V o più. Un test più
accurato può essere effettuato con un multimetro utilizzando l'impostazione di
tensione 20V DC o il più vicino ad essa al di sopra di tale intervallo.
• La batteria deve essere caricata a 20 ° C (temperatura ambiente)
• Assicurarsi che non ci siano fiamme libere o altre fonti di accensione vicino
alla zona di ricarica
Carica da alimentazione a 230V
1. Inserite lo spinotto del caricabatterie AC 230V (12) nella presa di ricarica (7)
2. Inserire il caricabatteria 230V AC in una presa di corrente, verificare che la
presa è accesa
• Per la carica iniziale, consentire fino a 40 ore, ma controllare regolarmente
l'indicatore di carica della batteria. Per una normale ricarica di carica permette
fino a 10 ore
• Assicurarsi che la zona di ricarica è ben ventilata, senza fiamme libere o
superfici ad alta temperatura, come ad esempio un piano di cottura, in
prossimità
Carica da una presa 12V accendisigari.
Carica dalla presa accendisigari del vostro veicolo in movimento è un modo
conveniente di aumentare la carica dell'avviatore. Tuttavia l'avviatore deve essere
posizionato nella parte posteriore del veicolo durante la carica e la macchina
deve essere ventilata. Se questo non è possibile, utilizzare solo il metodo di carica
AC. Quando si carica in macchina, controllare regolarmente il livello di carica per
evitare sovraccarico.
1. Collegare il circuito di carica 12V (13) nella presa di ricarica (7)
2. Inserire la spina accendisigari del cavo 12V di ricarica in una presa di corrente
adeguata accendisigari
3. Una presa di estensione 12V accendisigari può essere necessaria se non c'è
alcuna presa nella parte posteriore della macchina e la necessità di estendere
il cavo dalla presa accendisigari nel cruscotto
4. Carica solo fino a quando il voltimetro (3) indica una carica sufficiente.
Controllare l'indicatore ogni 45 minuti a 1 ora per evitare sovraccarico. Carica
iniziale può richiedere fino a 12 ore e ricariche fino ad un minimo di 1 ora
dopo l'uso
Note:
• Alcune auto forniscono una presa accendisigari sul cruscotto e nel bagagliaio
/ posteriore della vettura. E 'importante che la presa accendisigari è disattivato
quando il motore è spento altrimenti il motorino di avviamento può scaricare
la batteria principale quando parcheggiata
• Se si sceglie di caricare il motorino di avviamento con una presa di sigaretta
nella parte posteriore del veicolo, è importante ricordarsi di non lasciare la
batteria sempre carica e carica solo fino a una carica sufficiente è indicata sul
voltimetro. Questo è più critica con una connessione 12V siccome il livello di
carica è superiore al caricabatterie AC
• Se l'avviatore è appena stato utilizzato per avviare un veicolo, attendere 15
minuti prima di caricare l'avviatore in un veicolo, per consentire alla batteria di
stabilizzarsi ed per eventuali vapori infiammabili a disperdersi
IMPORTANTE: la mancata osservanza della procedura corretta quando si carica
l'avviatore si tradurrà in danni permanenti.
Avviamento
Note:
• Fare sempre riferimento al manuale del veicolo prima di utilizzare questo
prodotto. Se la casa produttrice richiede una particolare sequenza di
avviamento seguire il consiglio del produttore
21
Page 22

IT
• Seguire le normali procedure di partenza per quanto riguarda la pre-carica
ecc candelette,
• Non tentare di utilizzare il prodotto su qualcosa di diverso sistema di messa a
terra negativa 12V del veicolo elettrico
• Non utilizzare su veicoli con una batteria a 24V e il sistema elettrico
• Il sistema di avviamento lavora in parallelo con la batteria montata per fornire
una maggiore capacità di corrente
• Se i cavi del sistema di avviamento non sono abbastanza lunghe per
raggiungere il connettore positivo della batteria, e un buon punto di
collegamento negativo, il cavo negativo può essere prolungato con un cavo
da un set di cavi standard Non estendere la lunghezza del cavo positivo dal
sistema di avviamento
• Questo sistema di avviamento sarà efficace solo quando il motore del veicolo
e dei relativi sistemi funzionano normalmente e la batteria del veicolo è in uno
stato funzionale, ma in parte scaricata
• Non è possibile accelerare l'avvio di un auto collegando il sistema di
avviamento ad una presa accendisigari in macchina. Il cavo fornito non può
essere utilizzato per questo scopo
• Una volta che l'avviatore è stato utilizzato per avviare un veicolo, può essere
necessario per caricare l'avviatore durante la guida, per garantire che il
sistema di avviamento è disponibile per avviare nuovamente il veicolo in caso
si verificano ulteriori problemi batteria
• Assicurarsi che la batteria e il sistema di ricarica è contrassegnata se la
partenza è un problema regolare
• La dimensione del veicolo di avviamento può iniziare varia a seconda della
carica esistente nella batteria del veicolo. Una carica molto bassa limiterà
la dimensione del veicolo di avviamento può iniziare. In linea di massima il
prodotto dovrebbe sostenere motori a benzina fino a motori di 2200cc e diesel
fino a 1900CC
1. Assicurarsi che tutti i sistemi di accessori del veicolo (fari, radio, ecc) sono
spenti
2. Verificare che il veicolo sia a folle e che il freno di stazionamento è inserito
3. Stabilire quale connettore batteria del veicolo è positivo e quale è negativo.
La batteria del veicolo mostrerà '+' e '-' a fianco del terminale della batteria
corrispondente. Il cavo collegato al polo positivo può essere di colore rosso, o
potrebbe avere un contrassegno rosso per indicare che è positivo. In caso di
dubbio sulla polarità, consultare un tecnico del veicolo
4. Se il connettore positivo della batteria nel veicolo è corroso o sporco, pulirlo
con una spazzola di ferro adatto ad assicurare un buon contatto con la pinza
del sistema di avviamento
5. Prima collegare il (rosso) morsetto positivo (2) al connettore positivo collegato
al polo positivo della batteria, alla batteria del veicolo facendo in modo che
sia sicuro e non può eseguire un corto circuito vicino qualsiasi altra parte
metallica del veicolo
6. Fissare il (nero) morsetto negativo (5) ad una parte non verniciata e immobile
del blocco telaio o motore - non al terminale negativo della batteria. Se
si collega al terminale negativo esiste un piccolo rischio di gas esplosivi
dalla batteria che può venire acceso quindi un punto di terra negativo dalla
batteria è richiesta. Non collegare il morsetto a qualsiasi parte del sistema di
alimentazione del veicolo, siccome fuoriuscite del carburante potrebbe essere
acceso da una scintilla
7. Controllare i morsetti siano saldamente fissate, e che non si allentino quando
il veicolo viene avviato
8. Lasciare 1-2 minuti per la carica della batteria di stabilizzarsi tra l'avviatore e
batteria del veicolo
9. L’avviatore dovrebbe essere pronto per avviare il motore. Eseguire il motorino
di avviamento a brevi sequenze (non più di 5 secondi). Se il motore non si
avvia, attendere circa 2 minuti per il recupero delle batterie, poi ripetere
10. Fissare il (nero) morsetto negativo (5) ad una parte non verniciata e immobile
del blocco telaio o motore - non al terminale negativo della batteria. Se
si collega al terminale negativo esiste un piccolo rischio di gas esplosivi
dalla batteria che può venire acceso quindi un punto di terra negativo dalla
batteria è richiesta. Non collegare il morsetto a qualsiasi parte del sistema di
alimentazione del veicolo, siccome fuoriuscite del carburante potrebbe essere
acceso da una scintilla
11. Controllare i morsetti siano saldamente fissate, e che non si allentino quando
il veicolo viene avviato
12. Lasciare 1-2 minuti per la carica della batteria di stabilizzarsi tra l'avviatore e
la batteria del veicolo
13. L'avviatore dovrebbe essere pronto per avviare il motore. Eseguire il motorino
di avviamento a brevi sequenze(non più di 5 secondi). Se il motore non si
avvia, attendere circa 2 minuti per il recupero delle batterie, poi ripetere
14. Una volta che il motore è in funzione aspettare 2 minuti e poi rimuovere il
morsetto negativo (5) e poi il morsetto positivo (2) avendo cura di evitare
il contatto con le parti del motore in movimento o calde. I morsetti sono
permanentemente sotto tensione quindi è importante riportare i morsetti alle
loro posizioni normali di conservazione al lato dell'avviatore dopo l'uso
Altre caratteristiche
12V presa accendisigari
• I dispositivi con cavi 12V dotati di spine di tipo accendisigari può essere
collegato alla presa accendisigari a 12V (10)
• Sollevare il coperchio di plastica e inserire la spina del cavo del dispositivo
nella presa
• Dopo l'uso togliere il tappo e rimontare il coperchio di plastica
Faro di lavoro
• Questo sistema di avviamento è dotato di una luce di lavoro (1)
• Per accendere la luce di lavoro, premere l'interruttore della luce di lavoro (4).
Premere di nuovo l'interruttore per spegnere
Compressore d'aria
• Questo sistema di avviamento è dotato di un compressore d'aria che è adatto
per il gonfiaggio di pneumatici e altri oggetti. Consultare sempre raccomandati
dai produttori pressioni di gonfiaggio, e non gonfiare eccessivamente.
1. Per utilizzare il compressore, estrarre la linea di aria compressa (9) dal vano
nella parte posteriore del motorino di avviamento
2. Montare il connettore della valvola della linea aria compressa sulla valvola del
pneumatico e spostare la leva del connettore valvola per fissare in posizione
3. Accendere il compressore con l'interruttore del compressore (11)
4. Monitorare il manometro (8) mentre si gonfiano i pneumatici. Controllare il
compressore come richiesto utilizzando l'interruttore del compressore
5. Spegnere l'interruttore del compressore dopo l'uso
6. Riportare la linea di aria compressa alla parte posteriore del motorino di
avviamento per proteggere da eventuali danni
Note:
• Non lasciare che il compressore funzioni senza sorveglianza
• Non far funzionare il compressore continuamente per più di 5 minuti alla volta.
Lasciare il tempo di raffreddamento di 5 minuti tra le applicazioni
• Due adattatori in dotazione sono memorizzati nel vano posteriore. Questi
permettono l'inflazione di palloni da calcio, materassini e altri oggetti
• Utilizzare il manometro (8) come una guida approssimativa di livello pressione.
Se un livello di pressione specifica è richiesta, utilizzare un manometro
calibrato
Manutenzione
Pulizia
• Tenere il sistema di avviamento pulito. Pulire sempre la polvere / particelle
via, e non permettere mai che i fori di ventilazione divengano ostruite.
Utilizzare una spazzola morbida o un panno asciutto per pulire la macchina,
se disponibile soffia dell’aria compressa pulita e asciutta attraverso i fori di
ventilazione.
• Assicurarsi che i morsetti di piombo positivo e negativo sono tenute pulite.
Contatti elettrici sporchi potranno compromettere gravemente le prestazioni
di questo prodotto.
Smaltimento
Attenzione: Questo prodotto comprende una batteria sigillata VRLA (Regolata con
valvola, a piombo). Prima dello smaltimento, rimuovere la batteria dal prodotto e
portare presso una infrastruttura nella vostra regione che dispone di batterie al
piombo. Non smaltire il prodotto con la batteria ancora montata
Per rimuovere la batteria per lo smaltimento o la sostituzione. rimuovere le 8 viti
dal pannello posteriore e tirare delicatamente a parte il pannello posteriore dal
corpo principale. Spostare il pannello posteriore da un lato con attenzione in modo
da non tirare i cavi. Rimuovere il connettore negativo della batteria, seguita dal
connettore positivo. Assicurarsi che i connettori non sono in contatto con la batteria
e rimuovere la batteria. Sostituire la batteria solo con una batteria della specifica e
dimensioni esattamente uguali in modo che si adatti correttamente nel sistema di
avviamento ed è compatibile con il circuito di ricarica.
• Non gettare le apparecchiature elettriche, o altri rifiuti di apparecchiature
elettriche ed elettroniche, con i rifiuti domestici.
• Rivolgersi alle autorità locali preposte allo smaltimento dei rifiuti per
informazioni sul modo corretto di smaltire le apparecchiature.
22
Page 23

www.silverlinetools.com
Avviatore e compressore d’aria234578
Garanzia Silverline Tools
Garanzia Silverline Tools
Questo prodotto Silverline è protetto da una garanzia di 3
anni
Per attivare la garanzia di 3 anni è necessario registrare il prodotto sul sito www.
silverlinetools.com entro 30 giorni dalla data d’acquisto. La data d’inizio del periodo
di garanzia corrisponde alla data d’acquisto riportata sullo scontrino di vendita.
Termini & condizioni
Il periodo di garanzia decorre dalla data dell’acquisto presso il rivenditore indicata
sulla ricevuta d’acquisto.
SI PREGA DI CONSERVARE LA RICEVUTA D'ACQUISTO
Nel caso in cui il prodotto risultasse difettoso entro 30 giorni dalla data d’acquisto,
sarà necessario restituirlo al punto vendita presso cui è stato acquistato, presentando
la ricevuta e spiegando chiaramente la natura del difetto riscontrato. Il prodotto
difettoso sarà sostituito o sarà rimborsato l'importo d'acquisto.
Nel caso in cui il prodotto risultasse difettoso dopo 30 giorni dalla data d’acquisto,
sarà necessario inviare una richiesta di indennizzo in garanzia a:
Silverline Tools Service Centre
PO Box 2988
Yeovil
BA21 1WU, GB
Le richieste di indennizzo devono essere presentate durante il periodo della garanzia.
Affinché la richiesta sia approvata, è necessario presentare anche la ricevuta
d’acquisto originale, indicando il luogo e la data dell’acquisto del prodotto e il proprio
nome e indirizzo.
Sarà necessario inoltre fornire una descrizione dettagliata del guasto riscontrato.
Le richieste effettuate durante il periodo di garanzia saranno verificate da Silverline
Tools per stabilire se il difetto del prodotto è dovuto a problemi di materiali o di
lavorazione.
Le spese di spedizione non saranno rimborsate. Tutti i prodotti devono essere spediti
puliti e in condizioni tali da garantire l'esecuzione della riparazione in modo sicuro.
I prodotti devono essere imballati con cura per evitare danni o lesioni durante il
trasporto. Silverline Tools si riserva il diritto di non accettare prodotti spediti in
condizioni non idonee o non sicure.
Le riparazioni saranno eseguite da Silverline Tools o da un centro di riparazione
autorizzato.
La riparazione o la sostituzione del prodotto non estende o rinnova il periodo di
garanzia.
Nel caso in cui determini che il prodotto e il difetto riscontrato sono coperti dalla
garanzia, Silverline Tools provvederà a riparare l'utensile
gratuitamente (esclusi i costi di spedizione) o, a propria discrezione, a sostituirlo con
un nuovo utensile.
Gli utensili o le parti trattenuti da Silverline Tools in cambio di un prodotto o
componente sostitutivo diventano proprietà di Silverline Tools.
Registrazione dell'acquisto
Accedere al sito: silverlinetools.com e selezionare il tasto Registrazione
per inserire:
• Informazioni personali
• Dettagli del prodotto e informazioni sull'acquisto
Una volta che queste informazioni sono state inserite, Il vostro certificato di
garanzia sarà inviato per posta elettronica nel formato PDF. Si prega di stampare e
conservare il Certificato insieme alla ricevuta d’acquisto.
La riparazione o la sostituzione di un prodotto in garanzia estende i diritti del
consumatore previsti per legge, senza modificarli.
Cosa copre la garanzia:
La riparazione del prodotto, nel caso in cui Silverline Tools determini che il problema
sia dovuto a difetti dei materiali o difetti di lavorazione riscontrati durante il periodo
della garanzia.
Nel caso in cui un componente non sia più disponibile o fuori produzione, Silverline
Tools si riserva il diritto di sostituirlo con un componente adeguato.
Prodotti acquistati e utilizzati all’interno dell’Unione Europea.
Cosa non copre la garanzia:
La Garanzia Silverline Tools non copre le riparazioni se il difetto è stato causato da:
La normale usura dei componenti per via dell’utilizzo del prodotto come indicato nelle
istruzioni d’uso (ad esempio, lame, spazzole, cinghie, lampadine, batterie, ecc.).
La sostituzione di accessori forniti a corredo, come ad esempio punte, lame, fogli
abrasivi, dischi di taglio e altri componenti correlati.
I danni accidentali, causati dall'uso improprio, dall'abuso e dalla manipolazione,
conservazione e cura inadeguata dell'utensile da parte del proprietario.
L’uso del prodotto per fini non domestici.
La modifica o alterazione del prodotto.
Difetti causati dall’uso di parti e accessori che non siano componenti originali
Silverline Tools.
Installazione difettosa (fatto salvo quando l'installazione viene eseguita da Silverline
Tools).
Riparazioni o alterazioni eseguite da terze parti che non siano la Silverline Tools o i
centri di riparazione autorizzati da quest'ultima.
Richieste diversi dal diritto alla correzione degli errori con lo strumento denominato in
queste condizioni di garanzia non sono coperti dalla garanzia.
Garanzia della batteria
Le batterie Silverline sono garantite per 6 giorni Se un difetto si verifica su una
batteria registrata durante il periodo di garanzia della batteria, a causa di materiale
o di difetto di fabbricazione, Silverline sostituirà gratuitamente. Questa garanzia non
si applica ad uso commerciale né si estende alla normale usura o danni a seguito di
incidenti, abuso o uso improprio.
Dichiarazione di conformità CE
Il sottoscritto: Sig. Darrell Morris
come autorizzato di: Silverline Tools
Dichiara che il prodotto:
Codice di identificazione: 234578
Descrizione: Avviatore e compressore d’aria
Si conforma alle seguenti direttive
• Direttiva bassa tensione 2006/95/CE
• Direttiva compatibilità elettromagnetica 2004/108/CE
• Direttiva RoHS 2011/65/UE
• EN55022:2010
• EN55024:2010
• EN61000-3-2:2006+A2:2009
• EN61000-3-3:2008
• EN61558-2-6:2009
• EN60950-1:2006+A12:2011
Organismo informato: Telab B.V. Compliance Laboratory Co., Ltd.
La documentazione tecnica è mantenuta da: Silverline Tools
Data: 13/07/2015
Firma:
Signor Darrell Morris
Amministratore Delegato
Nome e indirizzo del fabbricante:
Powerbox International Limited, N°. Società 06897059. Indirizzo registrato:.
Central House, Church Street, Yeovil, Somerset BA20 1HH, Regno Unito.
23
Page 24

NL
Vertaling van de originele instructies
Beschrijving symbolen
Op het gegevensplaatje van uw gereedschap kunnen zich symbolen bevinden.
Deze vertegenwoordigen belangrijke productinformatie en gebruiksinstructies.
Draag gehoorbescherming
Draag een veiliggheidsbril
Draag een stofmasker
Draag een veiligheidshelm
Draag handschoenen
Lees de handleiding
Dubbel geïsoleerd voor extra bescherming
Explosiegevaar
WAARSCHUWING: bevat lood accu
Voldoet aan de relevante wetgeving en veiligheidsnormen
Milieubescherming
Elektrische producten mogen niet worden afgevoerd met het
normale huisvuil. Indien de mogelijkheid bestaat, dient u het product
te recyclen. Vraag uw gemeente of winkelier om advies betreffende
recyclen
Specificaties
Spanning ................................................................................ 12 V DC
Nominale stroomsterkte .............................................................400 A
Maximale stroomsterkte .............................................................900 A
Compressor maximale druk ..................................................... 260psi
Accu capaciteit ...........................................................................12 Ah
Accu type ....................................................................................VRLA
Jumpstarter beschermingsklasse................................................
AC oplader input ..................................................... 230 V~ 50 Hz 6 W
AC oplader output ......................................................12 V DC 500 mA
AC oplader beschermingsklasse..................................................
12 V DC contact maximale stroomsterkte .....................................10 A
Met het oog op onze aanhoudende productontwikkeling kunnen
de specificaties van Silverline producten zonder voorafgaande
kennisgeving worden gewijzigd.
Algemene Veiligheid
WAARSCHUWING: Lees alle bediening- en veiligheidsvoorschriften. Het niet
opvolgen van alle voorschriften die hieronder vermeld staan, kan resulteren in een
elektrische schok, brand en/of ernstig letsel.
Bewaar deze voorschriften voor toekomstig gebruik.
1) Veiligheid in de werkruimte
a) Houd de werkruimte schoon en zorg voor een goede verlichting.
Rommelige en donkere ruimtes leiden vaak tot ongelukken.
2) Elektrische veiligheid
a) Stekkers moeten passen bij het stopcontact. Pas de stekker niet aan.
Gebruik geen adapterstekkers bij geaard elektrisch gereedschap. Het
gebruik van ongewijzigde stekkers en passende stopcontacten vermindert het
risico op een elektrische schok.
b) Vermijd lichamelijk contact met geaarde oppervlakken zoals pijpen,
radiatoren, fornuizen en koelkasten. Het risico op een elektrische schok
neemt toe als uw lichaam geaard wordt.
c) Laat gereedschap niet nat worden. Wanneer gereedschap nat wordt, neemt
het risico op een elektrische schok toe.
3) Persoonlijke veiligheid
a) Blijf alert en gebruik uw gezonde verstand wanneer u gereedschap
bedient. Gebruik het elektrisch gereedschap niet wanneer u vermoeid
bent of onder invloed van drugs, alcohol of medicijnen. Onoplettendheid
tijdens het bedienen van gereedschap kan leiden tot ernstig letsel.
b) Maak gebruik van persoonlijke bescherming. Draag altijd een
veiligheidsbril. Passende bescherming voor de omstandigheden,
zoals een stofmasker, niet-slippende veiligheidsschoenen een helm of
gehoorbescherming, vermindert het risico op persoonlijk letsel.
WAARSCHUWING: De lader is niet geschikt voor gebruik door personen met een
verminderde mentale of fysieke bekwaamheid of een gebrek aan ervaring, tenzij
de persoon wordt begeleid of geïnstrueerd door een persoon verantwoordelijk
voor de veiligheid
4) Onderhoud
a) Laat uw elektrische gereedschap onderhouden door een gekwalificeerde
vakman en gebruik alleen identieke vervangstukken. Zo bent u er zeker
van dat de veiligheid van het elektrische gereedschap gewaarborgd blijft.
24
Page 25

www.silverlinetools.com
Jumpstarter met luchtcompressor234578
Jumpstarter veiligheid
• Gebruik de jumpstarter alleen in volledig droge omstandigheden
• Metalen voorwerpen mogen niet in contact komen met de accu contacten.
Kortsluitingen leiden mogelijk tot brand en ontploffingen
• De positieve en negatieve klemmen mogen elkaar niet raken. Contact tussen
klemmen onder stroom kan de kabels smelten en leiden tot brand
• Hanteer accucontacten op arm lengte
• Jumpstart geen lekkende, gebarsten of anders beschadigde accu’s
• Probeer geen bevroren accu’s op te laden
• Tenzij de accu’s een onderhoudsvrij model is, controleert u het elektrolytniveau
voordat u jumpstart
• Gebruik de starter allen met natte-cel accu’s. een poging tot opladen van
andere accu’s is erg gevaarlijk en ontkracht mogelijk uw garantie
• Loodaccu’s produceren tijdens het opladen ontvlambare gassen. Laad accu’s
niet op in ruimtes met ontstekings- en of hittebronnen. Rook niet en zorg
ervoor dat de accu goed is geventileerd
• Draag bij het hanteren van loodaccu’s beschermende handschoenen en een
veiligheidsbril
• Voordat u loodaccu’s hanteert doet u alle metalen sieraden af
LET OP: losse kleding, lang haar etc. kunnen in bewegende motoronderdelen
vastgegrepen worden. Bind haar op en voorkom het dragen van losse kleding
• Wanneer loodaccuzuur in contact komt met de huid en/of, wast u de huid en
kleding grondig met zeepwater. Wanneer het zuur in de ogen komt, wast u de
ogen grondig met water uit en tracht u onmiddellijk medische hulp
Productbeschrijving
1 Werkverlichting
2 Positieve klem
3 Spanningsmeter
4 Schakelaar werkverlichting
5 Negatieve klem
6 Test knop accu
7 Oplaadcontact
8 Drukmeter
9 Compressor luchtlijn
10 12 V sigarettenaansteker contact
11 Compressorschakelaar
12 230 V oplader
13 12 V laadkabel
Het uitpakken van uw
gereedschap
• Pak uw toestel / gereedschap uit. Inspecteer het en zorg dat u met alle
kenmerken en functies vertrouwd raakt
• Controleer of alle onderdelen aanwezig zijn en in goede staat verkeren.
Als er onderdelen ontbreken of beschadigd zijn, zorg dan dat deze
vervangen worden voor u dit toestel / gereedschap gebruikt
Gebruiksinstructies
WAARSCHWUING: De machine is voorzien van een VRLA accu. Het is belangrijk
deze accu in volledig opgeladen conditie te houden voor een maximale prestatie
van de machine. Laad de accu na gebruik onmiddellijk op. Wanneer de machine
niet gebruikt wordt hoort de accu elke 1-2 maanden opgeladen te worden.
WAARSCHUWING: Wanneer de jumpstarter wordt opgeladen mag deze, buiten de
12 V laadkabel (13) of 230 V AC oplader (12), niet aangesloten zijn op een enkel
apparaat of kabel.
WAARSCHUWING: Het overladen van de jumpstarter produceert mogelijk
ontvlambare gassen
Het opladen van de accu
• Om het laadniveau van de accu te controleren drukt u op de test knop (6),
waarbij u ervoor zorgt dat externe kabels niet op de eenheid zijn aangesloten.
Het laadniveau wordt door de spanningsmeter (3) weergegeven. De meter
geeft een approximale waarde weer. Een volledig opgeladen accu geeft 12,6 V
of hoger weer. Een nauwkeurigere meeting wordt gedaan met behulp van een
multimeter en de 20 V DC volt waarde (of een waarde lichtelijk hoger).
• De accu hoort op kamertemperatuur (±20°C) opgeladen te worden
• Gebruik de jumpstarter uit de buurt van naakte vlammen en warmtebronnen
Het laden vanuit een 230 V bron
1. Plug de kleine 230V AC lader plug (12) in het laadcontact (7)
2. Plug de 230 V AC lader in een stroombron
• Tijdens de eerste laadprocedure van 40 uur controleert u de indicator
regelmatig. Een normale bijvulprocedure duurt maximaal 10 uur
• Zorg ervoor dat de werkomgeving voorzien is van een goede ventilatie zonder
open vlammen en hete oppervlakken als een kookplaat
Het opladen vanuit een 12 V sigaretaansteker contact
• Het opladen via de sigaret aansteker contact van de auto wanneer in
beweging is een handige manier van het opladen van de jumpstarter accu. De
jumpstarter hoort achter in het voertuig geplaatst te worden en het voertuig
hoort goed geventileerd te zijn. Wanneer dit niet mogelijk is, gebruikt u alleen
de AC laadmethode. Bij het opladen in een voertuig controleert u regelmatig
het laadniveau om overlading van de accu te voorkomen.
1. Plug de 12 V laadkabel (13) in het laadcontact (7)
2. Plaats de plug van de 12 V laadkabel in een geschikt contact
3. Een 12 V sigaret aansteker contact verlengsnoer is mogelijk vereist wanneer
het contact voorin het voertuig geplaatst is.
4. Laad de accu tot de groene spanningsmeter (3) een voldoende laadniveau
weergeeft. Controleer de meter elke 45 min/1 uur om overlading te
voorkomen. De eerste laadprocedure vereist mogelijk tot 12 uur en bijvul
procedures vereisen mogelijk 1 uur
5. Plaats de 12 V laadkabel na gebruik terug in het compartiment van de
jumpstarter
Opmerkingen:
• Sommige auto’s zijn voorzien van een aansteker contact op het dashboard en
in de kofferbak. Het is belangrijk het contact uit schakelen wanneer de motor
van de auto is afgezet. Wanneer het contact niet wordt uitgeschakeld kan de
accu van het voertuig door de jumpstarter worden leeg getrokken.
• Vergeet en laadt de accu niet permanent op bij het opladen met behulp van
het contact in de kofferbak van de auto en laadt de accu tot de indicator een
hoog laadniveau weergeeft. Dit is belangrijker voor een 12 V oplader waar
deze een hoger laadniveau produceren.
• Wanneer de jumpstarter is gebruikt voor het straten van een voertuig, geeft
u deze 15 minuten rust voor het opladen in een voertuig. De accu krijgt zo de
tijd te stabiliseren en gassen krijgen de tijd te verdwijnen
BELANGRIJK: De onjuiste uitvoering van de oplaadprocedure resulteert in
permanente schade aan de jumpstarter
25
Page 26

NL
Jumpstarten
Opmerkingen:
• Verwijs naar het handboek van het voertuig voor het gebruik van de
jumpstarter. Wanneer het handboek een specifieke jumpstart procedure
noemt, volgt u deze op
• Volg de normale startprocedure op met betrekking tot het voorladen van
gloeibougies etc.
• Gebruik de eenheid enkel op 12 V negatieve, geaarde elektrische
voertuigsystemen
• Gebruik de eenheid niet op voertuigen met een 24 V accu en elektrisch
systeem
• Door de parallelwerking met de voorziene accu voorziet de jumpstarter een
hogere stroomcapaciteit
• Wanneer de kabels van de jumpstarter niet lang genoeg zijn voor het bereiken
van de accu en een negatief aansluitingspunt, kan de negatieve kabel met
gebruik van de kabel van een standaard jumpkabel set verlengd worden.
Verleng de lengte van de positie kabel niet
• De jumpstarter is enkel effectief wanneer de motor en de samenhangende
systemen normaal functioneren en de accu van het voertuig in een bruikbare
en gedeeltelijk ontladen toestand verkeerd
• Het is niet mogelijk een auto te jumpstarten door de jumpstarter op het
aansteker contact aan te sluiten. De voorziene kabel kan niet voor dat
doeleinde gebruikt worden
• Wanneer de jumpstarter is gebruikt voor het jumpstarten van een voertuig
is opladen tijden het rijden mogelijk vereist in het geval van verdere
accuproblemen.
• Controleer de accu en het laadsysteem van het voertuig wanneer het starten
een regelmatig probleem is
• De grootte van het voertuig wat de jumpstarter kan starten hangt van het
laadniveau van de accu. Een laag laadniveau zal de mogelijk te starten
voertuig grootte limiteren. Als richtlijn is de jumpstarter te gebruiken op
benzinemotors tot 2200 cc en diesel motors tot 1900 cc
1. Zorg ervoor dat alle systemen (koplampen, radio, etc.) zijn uitgeschakeld
2. Zorg ervoor dat het voertuig in zijn vrij staat en de handrem is ingeschakeld
3. Stel de negatie en positieve accupolen vast. De accu van het voertuig beeld
een + en een – af. De kabel, aangesloten op de positieve pool, is mogelijk
rood of heeft een mogelijke rode markeren als positie klemaanduiding. Neem
bij enige twijfel contact op met een elektricien
4. Wanneer de positieve accu pool roestig of vuil is, maakt u deze met een
geschikte staalborstel schoon voor een goede aansluiting met de klem
5. Sluit eerst de positieve klem (2) (rood) op het positieve aansluitpunt van de
positieve pool aan. Zorg ervoor dat de klem goed is aangesloten en niet kan
zorgen voor kortsluiting door de aanraking met andere onderdelen van de
motor
6. Sluit de negatieve klem (5) (zwart) op een niet-geverfd en niet-bewegend
deel van het chassis of de motor – niet de negatieve pool van de accu. Bij het
aansluiten op de negatieve pool ontstaat er een ontbrandingsrisico van de
gassen. Sluit de klem niet op een onderdeel van het brandstofsysteem aan.
Lekkend brandstof kan ontsteken door een vonk van de klem
7. Controleer of de klemmen juist zijn bevestigd en niet laten wanneer de motor
gestart wordt.
8. Laat de acculading voor 1-2 minuten stabiliseren
9. De jumpstarter hoort nu klaar te zijn voor het starten van de motor. Activeer de
startmotor in korte periodes van maximaal 5 seconden. Wanneer de motor niet
start geeft u de accu’s ongeveer 2 minuten de tijd om te herstellen
10. Wanneer de motor start wacht u 2 minuten waarna u de negatieve klem (9)
eerst verwijdert volgend door de positieve klem (8). Voorkom contact met
bewegende en/of hete motoronderdelen. Plaats de klemmen na gebruik terug
in opbergpositie aan de zijkant van de eenheid.
12 V sigaretaansteker contact
• Apparaten met 12 V kabels, voorzien van de juiste pluggen, kunnen op het 12
V sigarettenaansteker contact (10) aangesloten worden
• Til de plastic stofdeksel omhoog en steek de plug in het contact
• Haal de plug uit het contact en herplaats de stofdeksel
Werklicht
• De jumpstarter is voorzien van een werklicht (1)
• Om het licht in te schakelen drukt u op de werkverlichting uitschakelaar (4).
Druk nogmaals om het licht uit te schakelen
Luchtcompressor
• De jumpstarter is voorzien van een aan-boord luchtcompressor, geschikt voor
het oppompen van banden en andere voorwerpen. Verwijs naar de aanbevolen
druk van de fabrikant.
1. Om de luchtcompressor te gebruiken, haalt u de persluchtleiding (9) uit het
compartiment aan de achterzijde van de eenheid
2. Plaats de ventielaansluiting van de leiding op het ventiel van de band en
vergrendel de hendel van de aansluiting zodat deze goed vast zit
3. Schakel de compressor met behulp van de compressorschakelaar (11) in
4. Let tijdens het oppompen op de drukmeter (11). Regel de compressor met
behulp van de schakelaar
5. Schakel de compressor na gebruik uit
6. Plaats de persluchtleiding terug in het compartiment om deze te beschermen
tegen beschadiging
Opmerkingen:
• Laat de compressor tijdens gebruik niet onbeheerd achter
• Gebruik de compressor niet in periodes langer dan 5 minuten. Laat de eenheid
tussen applicaties voor 5 minuten afkoelen
• Twee adapters zijn opgeborgen in het compartiment. Deze adapters maken
het oppompen van voetballen, bedden en andere kleinere voorwerpen
mogelijk
• Gebruik de drukmeter (8) als richtlijn. Voor nauwkeurige drukniveaus gebruikt
u een geijkte drukmeter
Onderhoud
Schoonmaak
• Houd uw machine te allen tijde schoon. Verwijder stof en vuil en voorkom de
blokkering van de ventilatiegaten. Gebruik een zachte borstel of een droge
doek om de machine te reinigen. Gebruik zuivere, droge perslucht om door de
luchtgaten te blazen
• Houdt de positieve en negatieve poolklemmen schoon. Vuile elektrische
aansluitingen hebben een negatieve invloed op de werking van de machine
Verwijdering
Waarschuwing: De machine is voorzien van een VRLA accu. Voordat de machine
wordt weggegooid hoort deze accu verwijderd te worden. De lood accu hoort door
de juiste persoon afgebroken te worden.
Om de accu te verwijderen verwijdert u de 8 schroeven van het paneel aan de
achterzijde van de eenheid en trekt u de voor en achter helft voorzichtig van
elkaar. Haal de negatieve aansluiting van de accu, gevolgd door de positieve
aansluiting. Zorg ervoor dat de accu niet door de connectoren aangeraakt wordt
zodat de accu verwijderd kan worden. Vervang de accu met een accu met dezelfde
specificaties en afmetingen zodat deze in de jumpstarter past en compatibel is
met het laadcircuit.
• Elektrische en elektronische apparaten mogen niet met uw huishoudelijk afval
worden weggegooid.
• Neem contact op met uw gemeente voor informatie betreffende de
verwijdering van elektrisch gereedschap
26
Page 27

www.silverlinetools.com
Jumpstarter met luchtcompressor234578
Silverline Tools Garantie
Dit Silverline product komt met 3 jaar garantie.
Registreer dit product binnen 30 dagen van aankoop op
www.silverlinetools.com om in aanmerking te komen voor 3 jaar garantie. De
garantieperiode begint op de datum van aankoop op het ontvangstbewijs.
Voorwaarden
De garantieperiode gaat in vanaf de datum van aankoop op het ontvangstbewijs.
BEWAAR HET ONTVANGSTBEWIJS OP EEN VEILIGE PLAATS
Als dit product binnen 30 dagen van de aankoopdatum een fout heeft, breng het
dan naar de winkelier waar u het heeft gekocht, met uw ontvangstbewijs, en met
vermelding van de details van de storing. U kunt om een nieuwe vragen of om uw
geld terug.
Als dit product na de periode van 30 dagen een fout heeft, stuur het dan naar:
Silverline Tools Service Centre
PO Box 2988
Yeovil
BA21 1WU, GB
Alle claims moeten binnen de garantieperiode worden ingediend.
U moet het originele ontvangstbewijs geven met de datum van aankoop, uw naam,
adres en plaats van aankoop voordat er aan kan worden gewerkt.
U moet nauwkeurige gegevens verschaffen van de fout die verholpen moet worden.
Claims die binnen de garantieperiode worden ingediend, worden door Silverline
Tools nagelopen om te kijken of het probleem een kwestie is van de materialen of
de fabricage van het product.
De verzendkosten worden niet vergoed. De geretourneerde items moeten voor de
reparatie in een redelijk schone en veilige staat verkeren en moeten zorgvuldig
worden verpakt om schade en letsel tijdens het vervoer te voorkomen. Ongeschikte
en onveilige leveringen kunnen worden afgewezen.
Al het werk wordt uitgevoerd door Silverline Tools of een officiële reparatiedienst.
De garantieperiode wordt niet door de reparatie of vervanging van het product
verlengd.
Defecten waarvan wij beschouwen dat ze onder de garantie vallen, worden
verholpen door middel van gratis reparatie van het gereedschap (exclusief
verzendingskosten) of door vervanging door een gereedschap in perfecte staat
van werking.
De ingehouden gereedschappen of onderdelen die zijn vervangen, worden het
eigendom van Silverline Tools.
De reparatie of vervanging van het product onder garantie zijn voordelen die
bijkomstig zijn aan uw wettelijke rechten als consument, en hebben daar geen
Het gekochte product registreren
Ga naar: silverlinetools.com, kies Registration (registratie) en voer het volgende in:
• Uw persoonlijke gegevens
• De gegevens van het product en de aankoop
U ontvangt het garantiebewijs in PDF-vorm. Druk het af en bewaar het
bij het product.
invloed op.
Wat is gedekt:
De reparatie van het product, mits naar tevredenheid van Silverline Tools kan
worden vastgesteld dat de gebreken het gevolg zijn van defecte materialen of
fabrieksfouten binnen de garantieperiode.
Onderdelen die niet meer verkrijgbaar zijn en die niet meer worden vervaardigd
worden door Silverline Tools vervangen door een functionele vervanging.
Gebruik van dit product in de EU.
Wat niet is gedekt:
Silverline Tools geeft geen garantie op reparaties als gevolg van:
Normale slijtage veroorzaakt door gebruik in overeenstemming met de
bedieningsinstructies zoals zaagbladen, borstels, riemen, gloeilampen, batterijen
enz.
De vervanging van geleverde accessoires zoals boortjes, zaagbladen, schuurvellen,
snijschrijven en aanverwante producten.
Accidentele schade, storingen veroorzaakt door nalatigheid in gebruik of verzorging,
misbruik, verwaarlozing, onvoorzichtige bediening en hantering van het product.
Gebruik van het product voor andere doeleinden dan normaal huishoudelijk gebruik.
Alle soorten wijzigingen en modificaties van het product.
Gebruik van andere onderdelen en accessoires dan de originele onderdelen van
Silverline Tools.
Defecte installatie (behalve wanneer geïnstalleerd door Silverline Tools).
Reparaties of wijzigingen die zijn uitgevoerd door anderen dan Silverline Tools of
diens officiële reparatiediensten.
Behalve claims voor het recht op correctie van fouten van het gereedschap volgens
de bepalingen van deze garantie zijn geen andere claims gedekt.
Accu garantie
Silverlineaccu’s zijn voorzien van 30 dagen garantie. Wanneer er binnen de
garantieperiode een fout optreedt dankzij een materiaal- of fabrieksfout, vervangt
Silverline de accu gratis. Deze garantie heeft geen betrekking op commercieel
gebruik en strekt zich niet uit tot normale slijtage of schade ten gevolge van een
ongeluk, verkeerd gebruik of misbruik.
EG-verklaring van overeenstemming
De ondergetekende: Mr. Darrell Morris
Gemachtigd door: Silverline Tools
Verklaart dat
Identificatienummer: 234578
Beschrijving: Jumpstarter met luchtcompressor
Voldoet aan de volgende richtlijnen:
• Richtlijn laagspanning 2006/95/EG
• Elektromagnetische verenigbaarheid 2004/108/EG
• RoHS-richtlijn 2002/95/EG
• EN55022:2010
• EN55024:2010
• EN61000-3-2:2006+A2:2009
• EN61000-3-3:2008
• EN61558-2-6:2009
• EN60950-1:2006+A12:2011
Keuringsinstantie: Telab B.V. Compliance Laboratory Co., Ltd.
De technische documentatie wordt bijgehouden door: Silverline Tools
Datum: 13-07-2015
Handtekening:
Darrell Morris
Algemeen directeur
Naam en adres van fabrikant:
Powerbox International Limited, handelsregister nummer 06897059. Geregistreerd
adres: Central House, Church Street, Yeovil, Somerset BA20 1HH, Verenigd Koninkrijk
27
Page 28

3 Year Guarantee
*Register online within 30
days. Terms & Conditions apply
Garantie de 3 ans
*Enregistrez votre produit en ligne
dans les 30 jours. Sous réserve des
termes et conditions appliqués
3 Jahre Garantie
*Innerhalb von 30 Tagen online
registrieren. Es gelten die Allgemeinen
Geschäftsbedingungen
www.silverlinetools.com
3 años de garantía
*Registre su producto online durante
los primeros 30 días. Se aplican
términos y condiciones
3 anni di garanzia
*Registrare il vostro prodotto on-line entro
30 giorni. Termini e condizioni si applicano
3 jaar garantie
*Registreer uw product binnen 30
dagen online. Algemene voorwaarden
zijn van toepassing
 Loading...