

Page 1
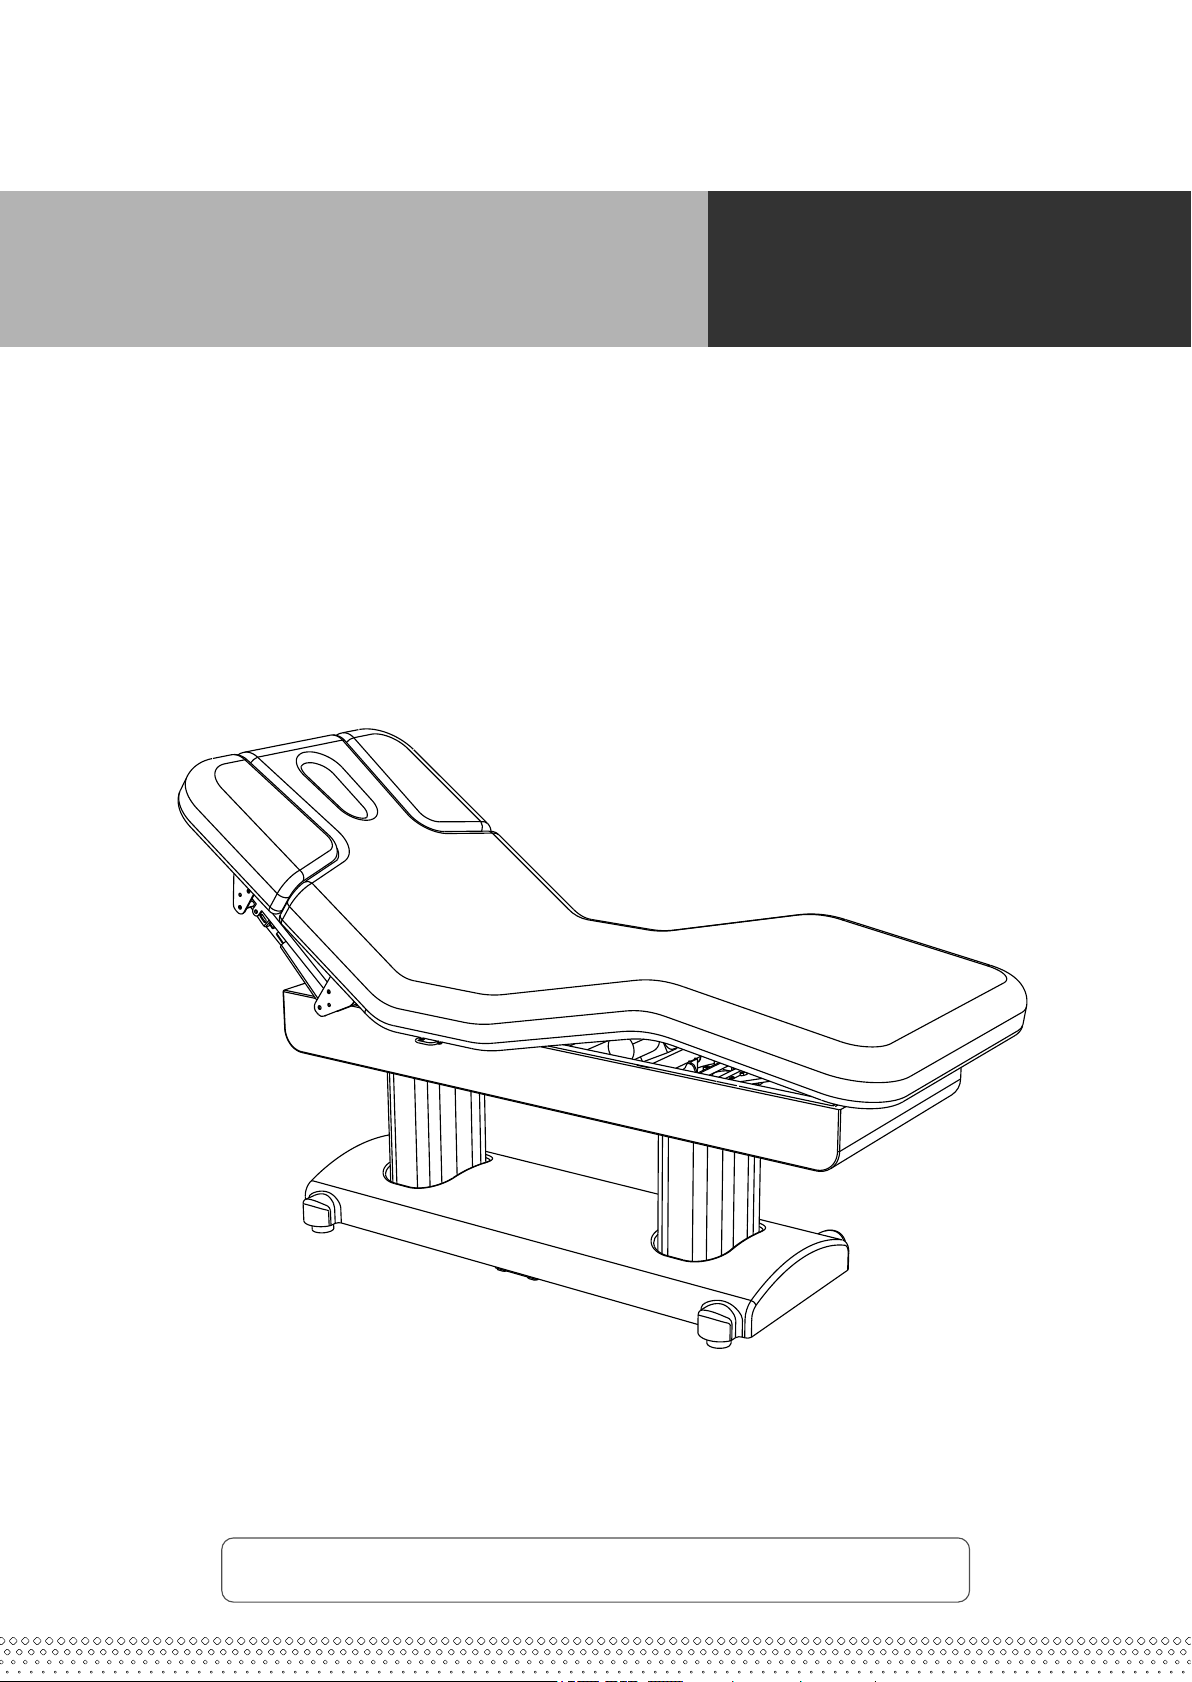
2249-Electric Beauty Bed
User Manual
Welcome to use our 2249 Beauty bed,
Before use the bed, please read the user manual carefully, thanks. A0
Page 2

2249
1.About This Manual
This manual shall only be us ed for the reference of operat ion of this particular model. If the
manual is used for other purposes, Silv erFox will not undertake any according consequences and
responsibility. All information of this manual shall be prot ected by copyright and sha ll not be
copied, copied and translated in any par t of this specification wit hout the written consent of our
company SILVERFOX.
2.Warning
Power supply must be cut off when changing electrical components or maintaining and cleaning
machines.
The plug must be p lugge d into an outl et that is pro perly installed and grounded, to prevent the risk
of fire and electric shock.
Do not stand on this equipment.
Do not allow c hildr en to pl ay with and place the equipment in a place where childre n can av oid
touching; Please adjust the backrest back to the highest position when you lea ve.
Please do no t place the equipment in damp places s uch as bathroom to avoid electric shock or
other failure; The remote control should also avoid contact with water.
Please do not place th e equipment in places where pa intin g/coating or oxygen providi ng during
operation.
Unless being monitored or instructed by personnel who can be responsible for their personal
safety, the people who have physical obstacles, tactile disorders, mental disorders, lacking of
experience, common sense or children, are not allow to use the equipment.
Please contact distributor, service center or related personal with appropriate skill and
experience for repairing if the plug is damaged, in case of any dangerous.
Please make sure there is no accessible thing within the stroke during any operation of t he beds .
Maintenance should be processed by trained professionals.
3. Precautions
Read this manual carefully before installation, operation and adjustment. And pl ease ke ep it well.
This Electric beauty bed is equipped with a three-wire power cord. The power cord must be
plugged into an three-hole o utlet which is properly installed and grounded. This is not only to
prevent the risk of electric shock, but also ensure bed work properly.
When adjusting the backrest, seat cushion, footrest or lifting of the whole bed by manual
controller or foot control switch, please keep your hands, feet and head away from the
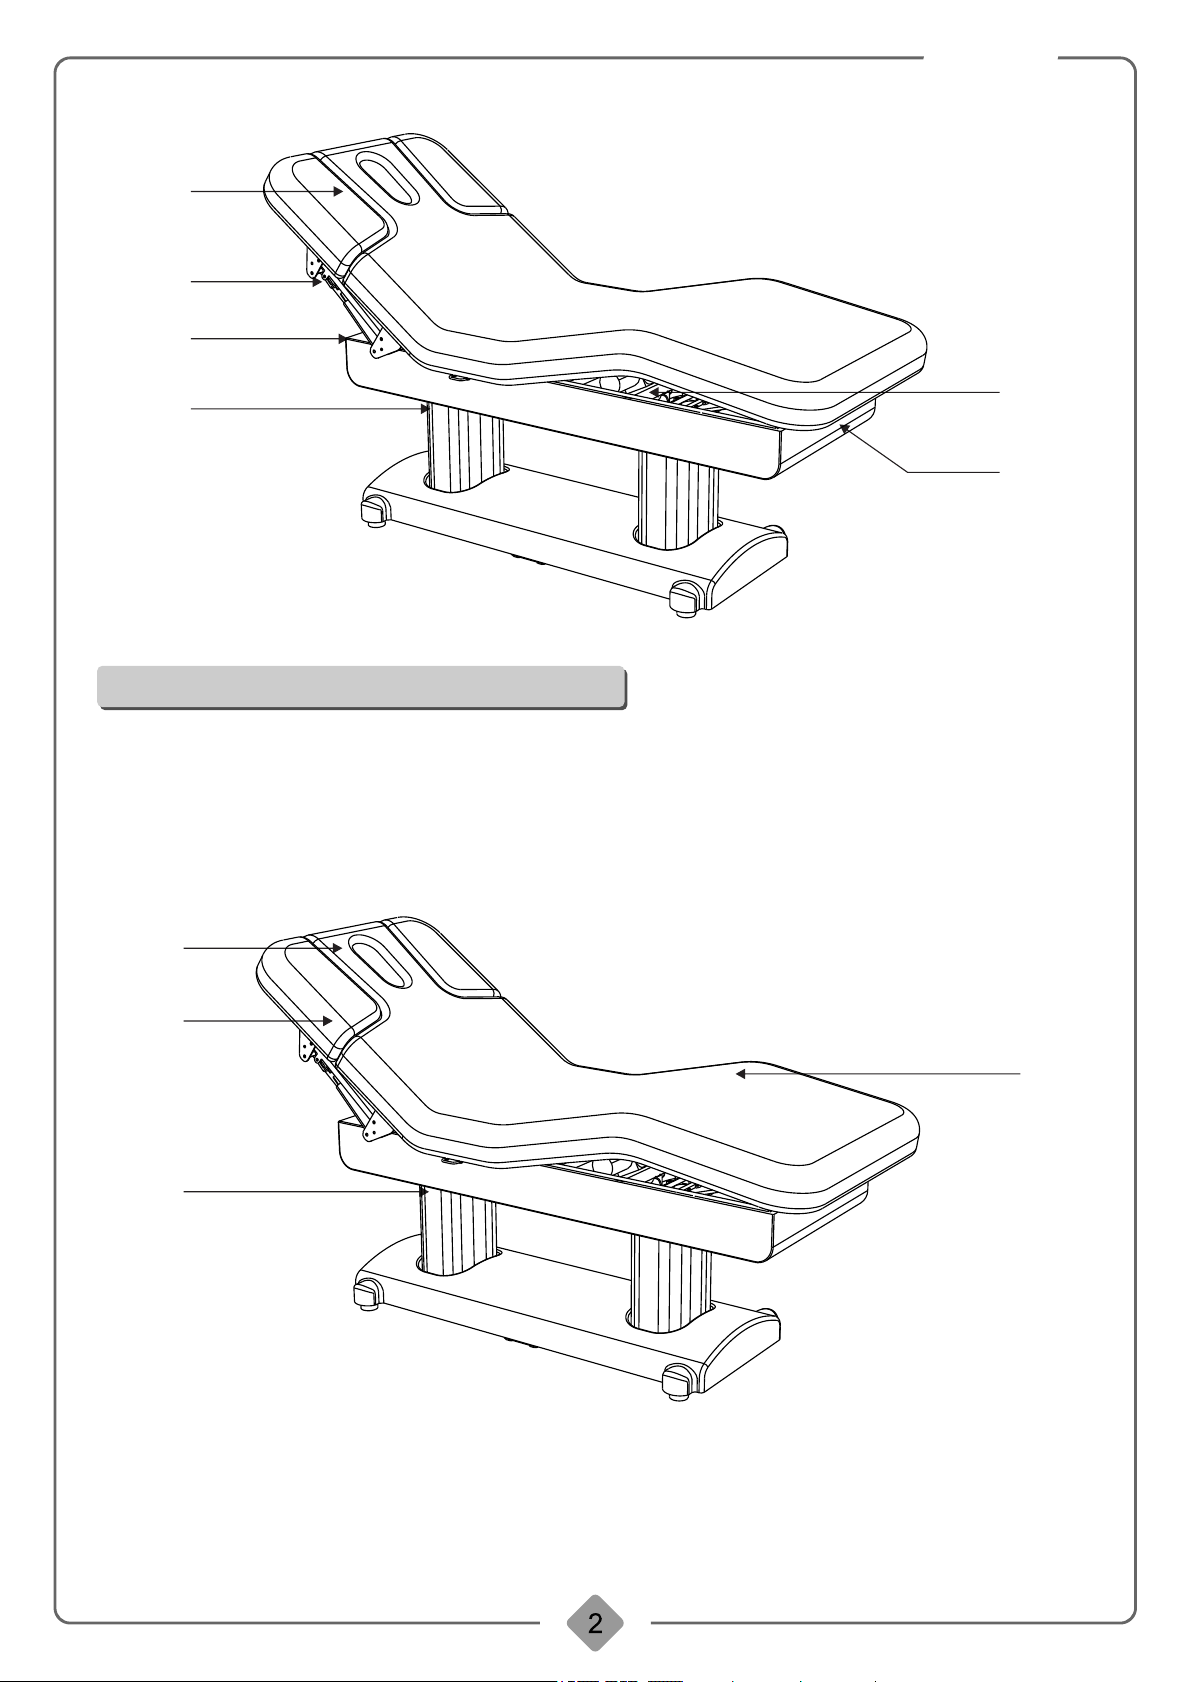
position1.2.3.4.5.6 showed on below photo to avoid getting jammed.
While controlling the lifting of the whole bed, the button must be pressed continuously until the
bed be in a suitable position.
Please pay attention that the input frequency should be Ms × 6min/h when operati ng the mo tor.
Maintenance should be processed by trained professionals.
After each treatment, ple ase use neutral reagent to clear the dus t, stains on leather or on pl astic
cover.
Page 3
2249
1
2
3
4
5
6
4.Structure of electric beauty bed
This be auty bed consists o f controller box, motor, hardware, plastic parts and leather. Among
them, the controller box is controlling the operation of four motors and the han d contr oller.
This beauty bed inc ludes angel adjustment of the backrest, lifting adjustment of the armrest,
lifting adjustment of the whole bed and angel adjustment of the footrest, which is an ov erall and
integral structure. (Details as shown below)
1
2
3
1.Angel adjustment of the backrest
3.Lifting adjustment of the whole bed
4
2.Lifting adjustment of the armrest
4.Angel adjustment of the footrest
Page 4
2249
5.Serviceable range
This electric beauty bed is suitable for beauty and massage treatment.
6.Installation
1. Put the bed t o a proper location, according to t he overall layout, t he daylighting or ar tificial
lightings and oper ation condition of the salon's or the home. And keep it in the clean, dry and
cool operating environment.
2. O pen the Packing Carton to Check Open the packing carton, ch eck if the bed is i ntact and
whether the accessories or spares are complete. Please c ontact d istributor or us if there’s any
problem.
3. Installation
Place the bed to the proper position. Please note that it is unnecessary to install extra screw on
the floor to fasten the bed, be cause the original design has take the stability performance into
consideration. But please ensure the be d is placed on a firm and flat ground, so as t o prevent
any accident. If t he bed rotates or slant due to rough ground, you could adjust the four pieces o f
plastic feet (M10×30) and nuts (M10) by hexagon open-end wrench, which are fasten on the
bottom panel, so as to ensure the bed is stable.
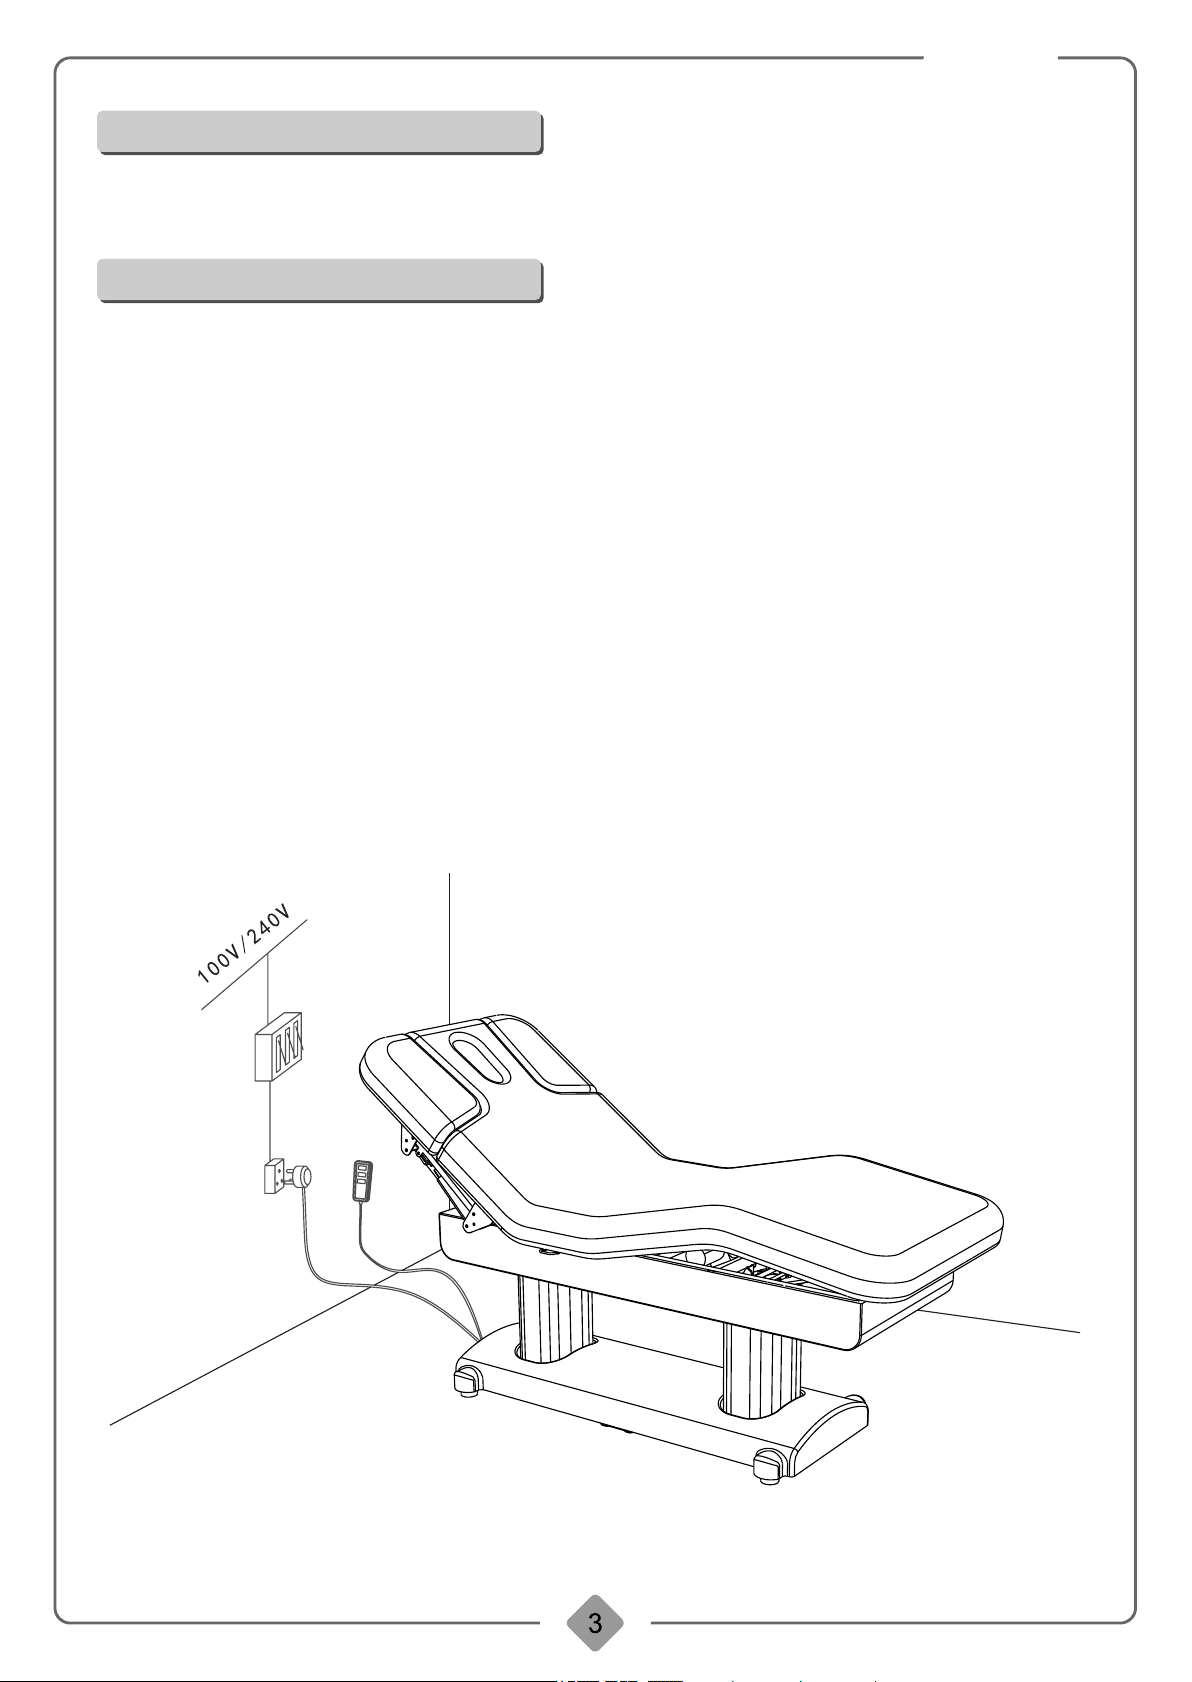
4. Power Input:
Voltage and frequency input shall be AC 100-130, 50/60Hz or 220-240V, 50/60Hz. Plug the bed
on the power supply properly. (Details as shown below)
AirSwitch
Connectio n Box
Page 5
7.Operation Instruction
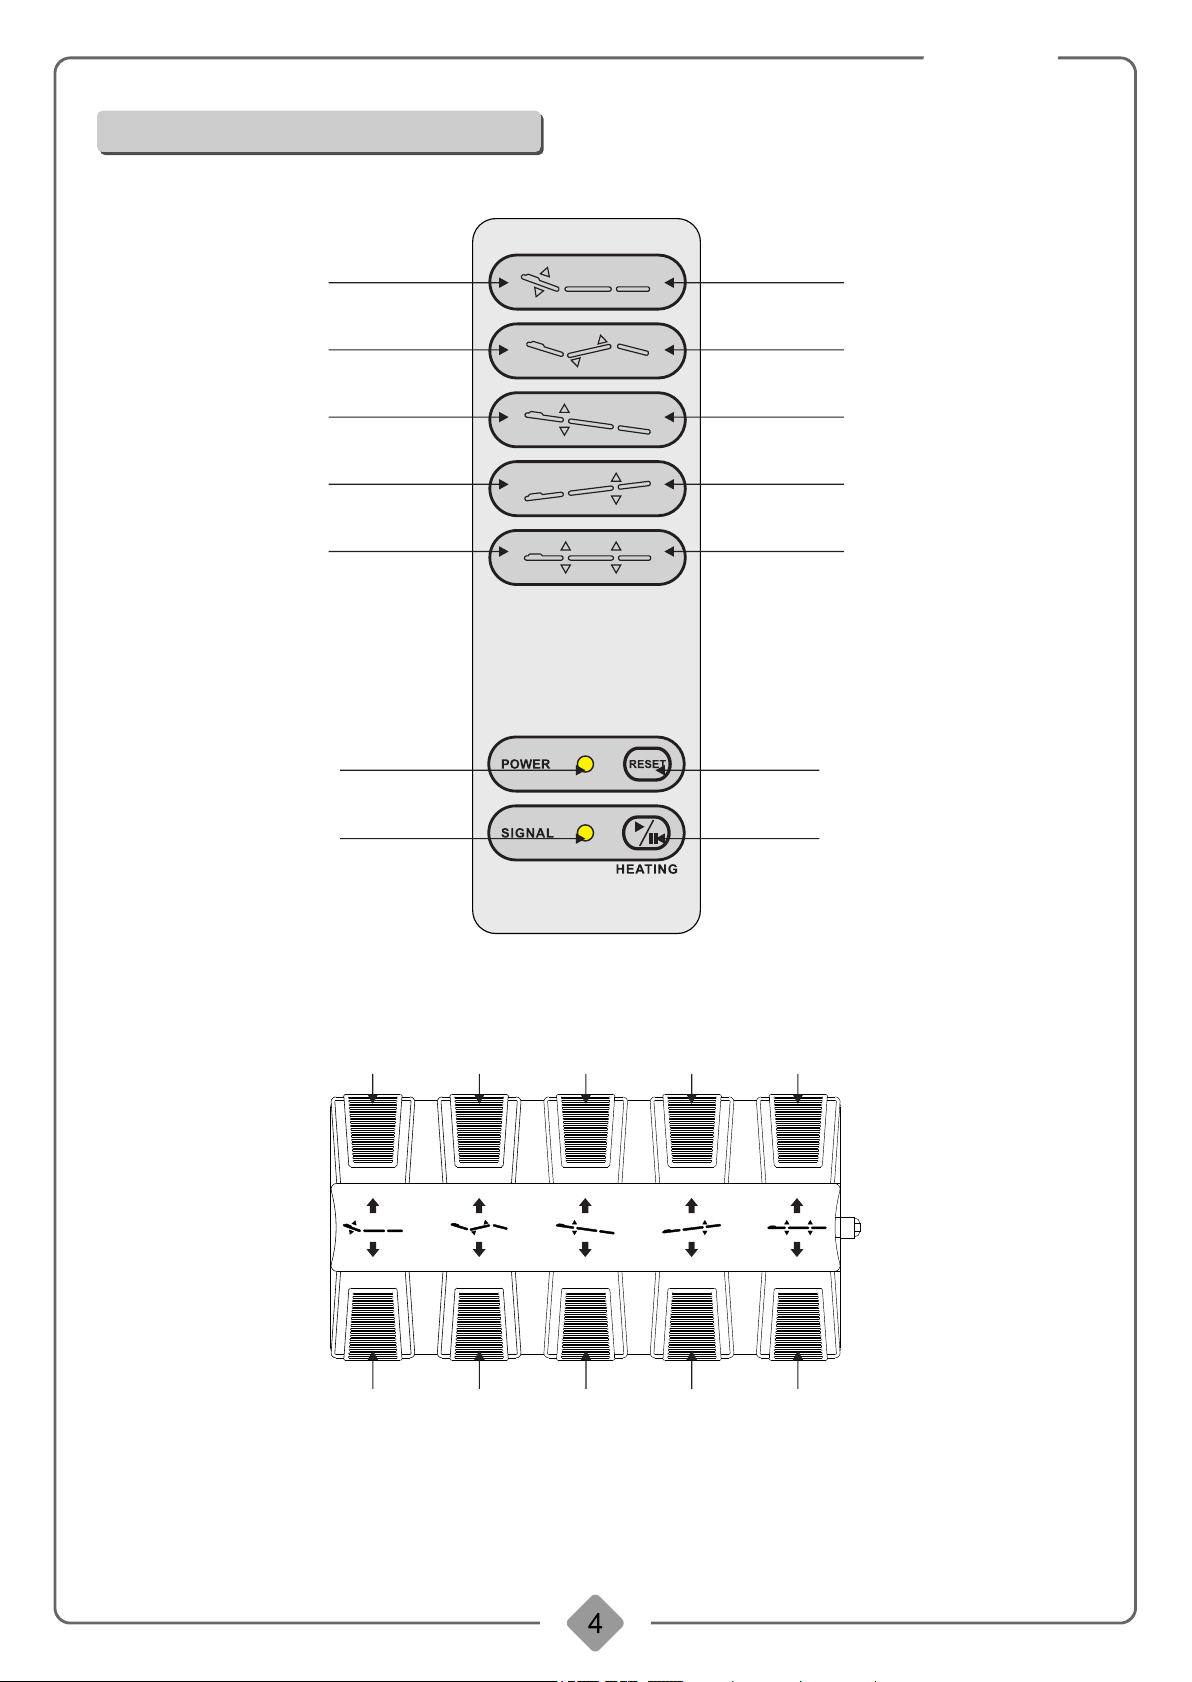
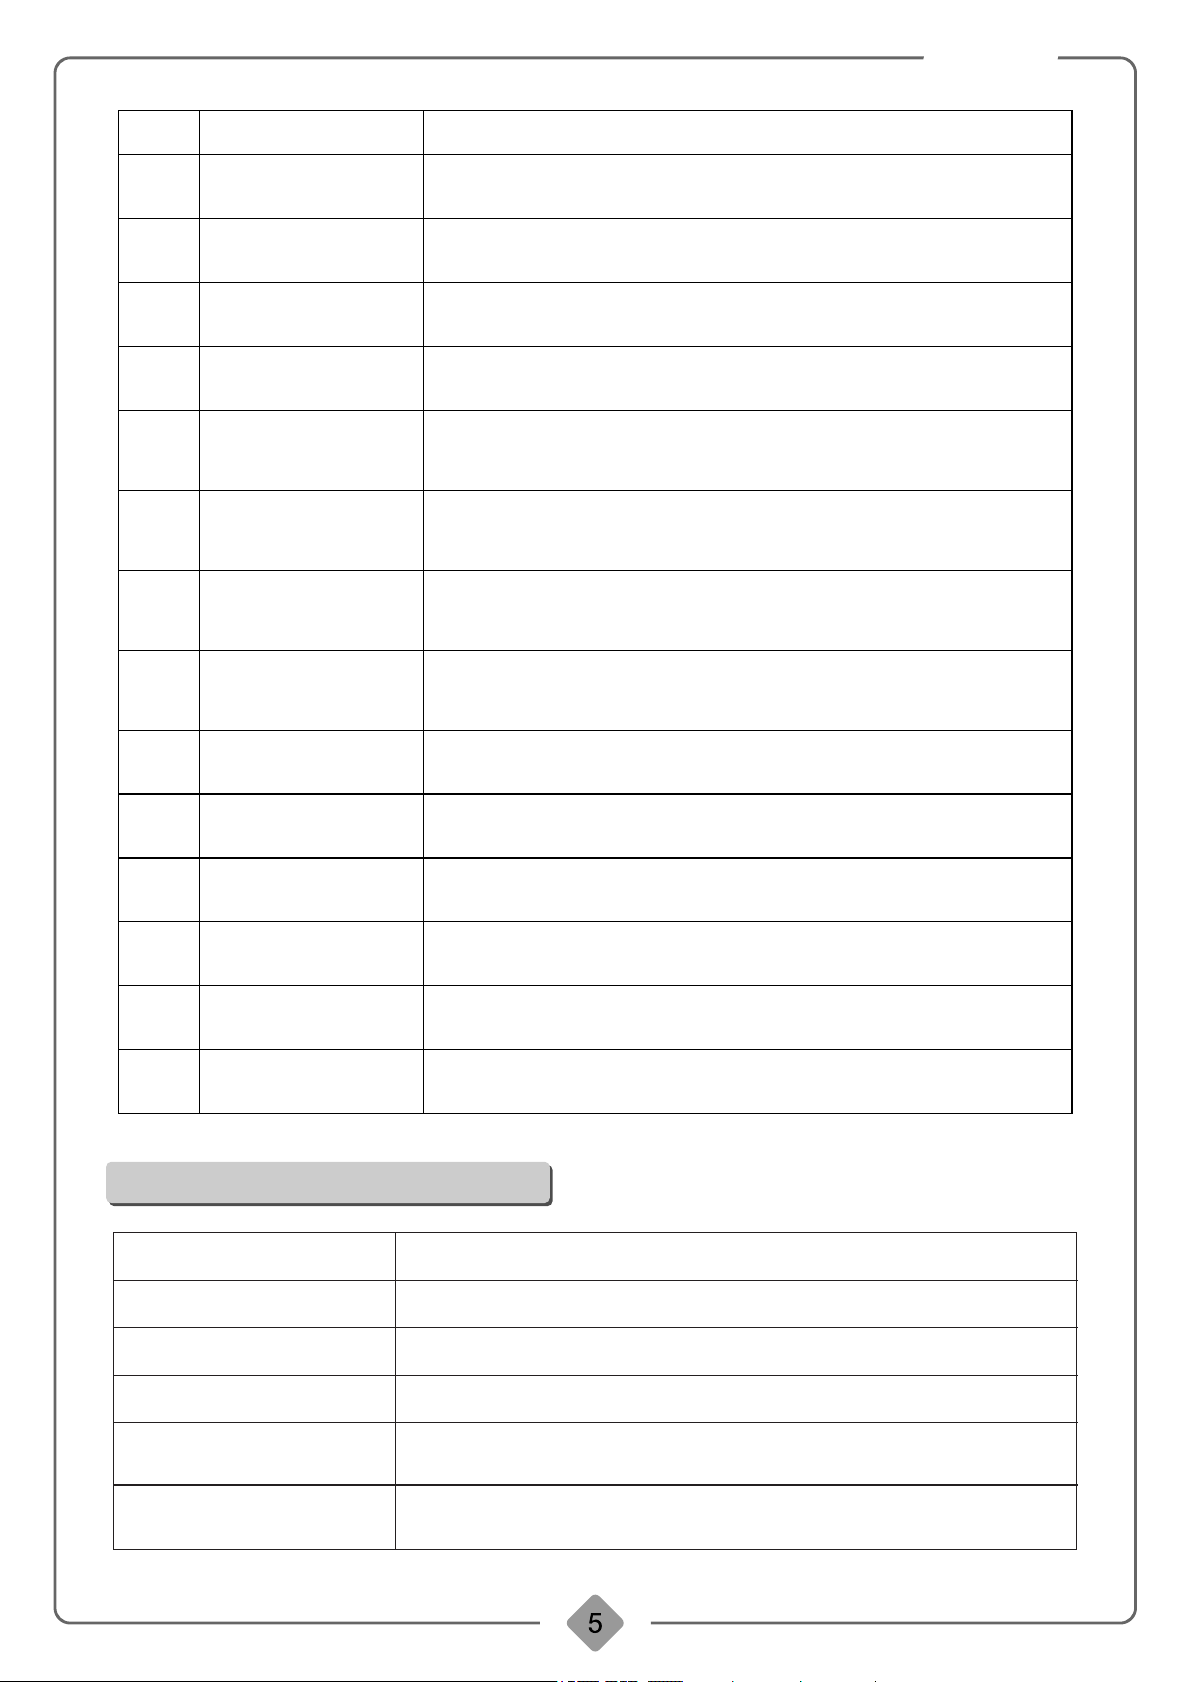
1. S tandard configuration (Hand Controller)
2249
1
3
5
7
9
Lamp A
Lamp B
2
4
6
8
10
Reset
Heating
2. Optional configuration (Foot Controller)
1 3
2
4
5
7 9
6 8 10
Page 6
2249
Description
Back rest motor
1
goes u p
Back rest motor
2
goes d own
Foot m at angle
3
moto r goes up
Foot m at angle
4
moto r goes down
Moto r for th e positive
ange l of the wh ole bed
5
goes u p
Moto r for th e positive
ange l of the wh ole bed
6
goes d own
Moto r for the negati ve
ange l of the wh ole bed
7
goes u p
Moto r for the negati ve
ange l of the wh ole bed
8
goes d own
Operation
Back rest goes up smooth ly by pressing the bu tton.
Back rest goes down smoo thly by pressing th e button.
Afte r pressing the butt on by foot, the angle o f foot mat
incr eases smoothly.
Afte r pressing the butt on by foot, the angle o f footrest
decr eases smoothly.
Incl ined angle of the whole bed increases smoothly in positive
dire ction by pressing t he button.
Incl ined angle of the whol e bed dec reases smooth ly in pos itive
dire ction by pressing t he button.
Incl ined angle of t he whole bed increases smo othly in nega tive
dire ction by pressing t he button.
Incl ined angle of the whole bed decr eases smoo thly in negative
dire ction by pressing t he button.
Up&d own motor
9
goes u p
10
Lamp A
Lamp B
Rese t
Heat ing
Up&d own motor
goes d own
Powe r indicator
Heat ing function
indi cation (optiona l)
Moto r reset
Heat ing (optional)
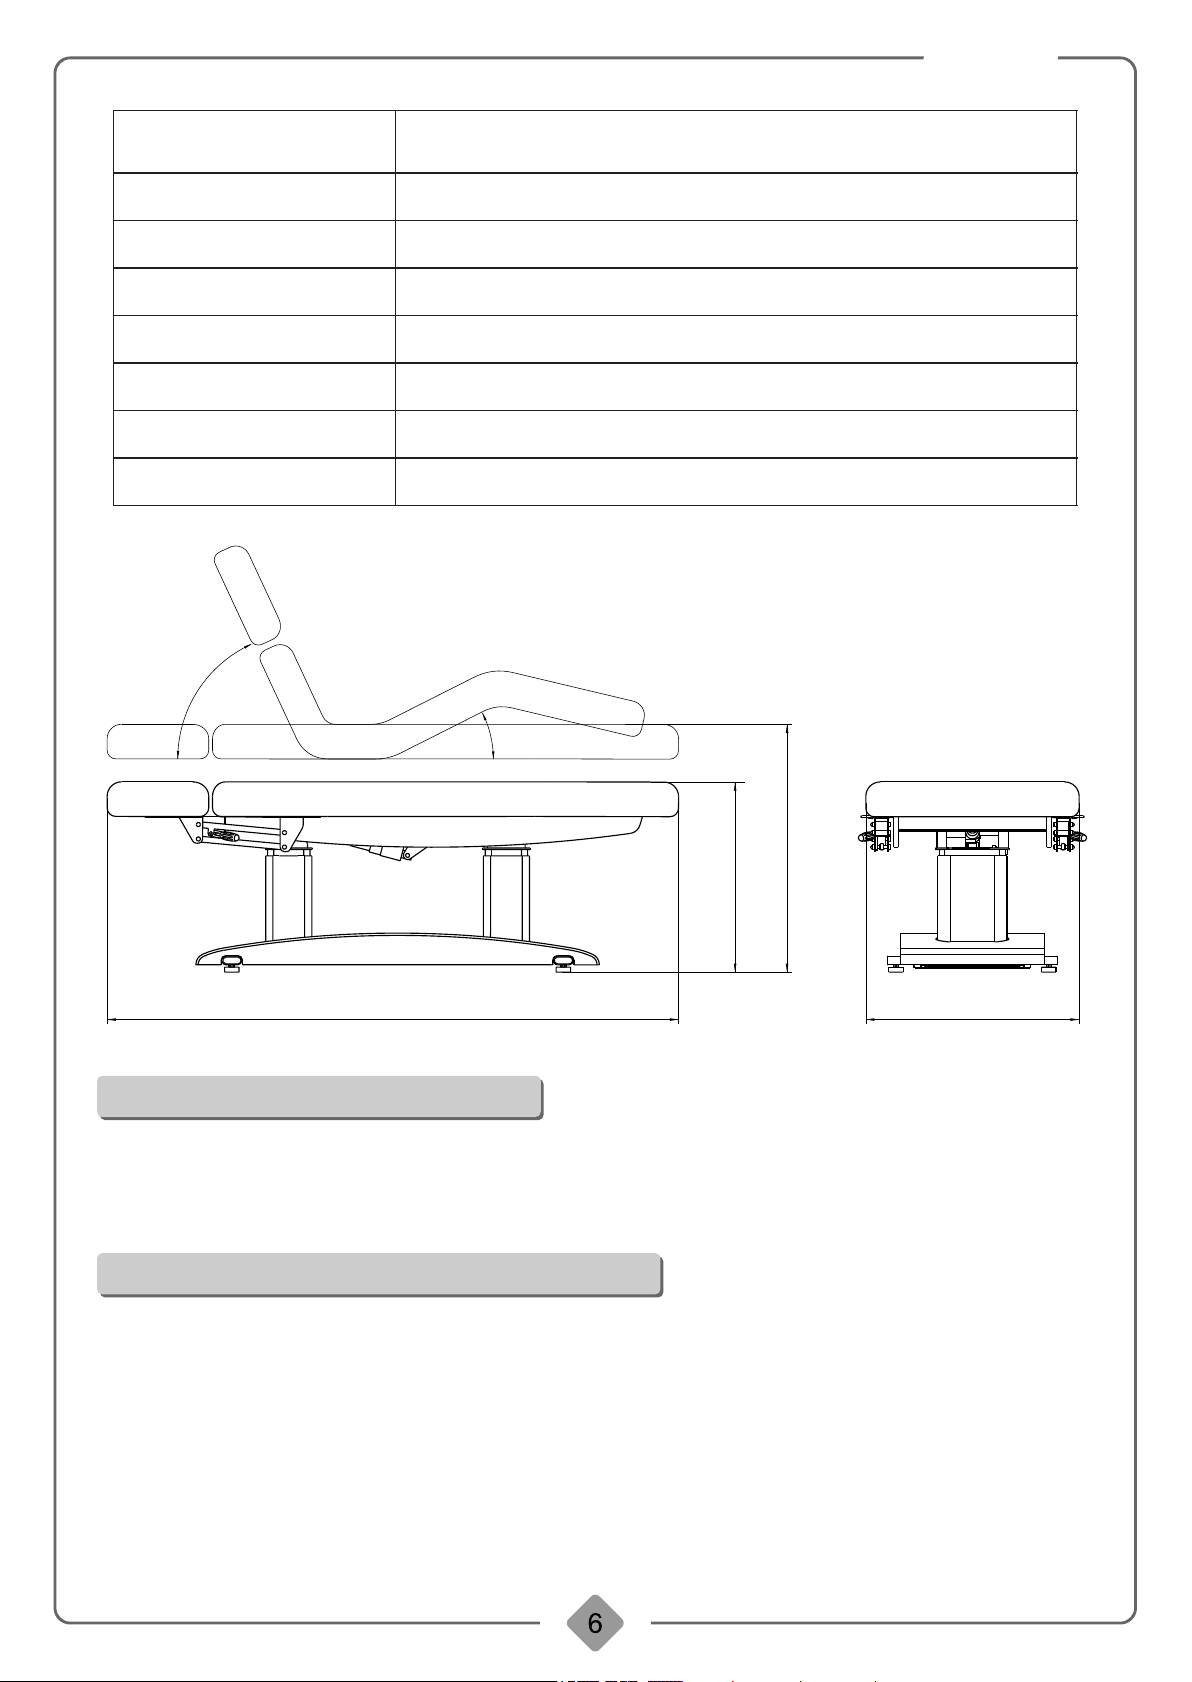
8.Technical Parameters
Product size
Package size
Whol e bed goes up smoothl y by pressing the b ut ton.
Whol e bed goes down smoot hly by pressing t he b utton.
Hand controller are conn ected wit h power s upply prope rly, indicator
ligh t s on. Otherwise, it d oes not light.
Pres sing the button, t he heati ng functio n works; p ress the button
agin , the heating funct ion stops.
Pres sing the bu tt on, the ang le of backr est and foo trest unchan ged;
the wh ole bed goes down smo othly to the lowe st l evel.
Pres sing the button, t he heati ng functio n works; p ress the button
agin , the heating funct ion stops.
1985( L) ×74 0(W) ×670( 870) ( H) mm ( ±10mm)
2040×810×720mm( ±10m m)
The highest position
The lowest position
Angle adjustment of the
backrest
Angle adjustment of the
footrest
870±10mm
670±10mm
0°~+65°±2%
0°~+25°±2%
Page 7
2249
Angle adjustment of the
whole bed
Net weight
Gross weight
Power
Maximum power
Environment temperature
Relative humidity
Lifting rated load
2%
5°±
6
-10 °~ 10° ±10%
92. 75 kg
111.75kg
AC 100~120V , 5 0Hz/60Hz OR AC 220~240V,50Hz/ 60Hz
300W
0℃~+4 0 ℃
30%~90%
175 kg
2
5
°±2
%
860±10mm
660±10mm
1985±10mm
740mm
9.Maintenance
After every treatment, please use neutral reagent to clear the dust, stains on leather or the plastic
cover. This is to prevent premature aging of the leather and plastic cover.
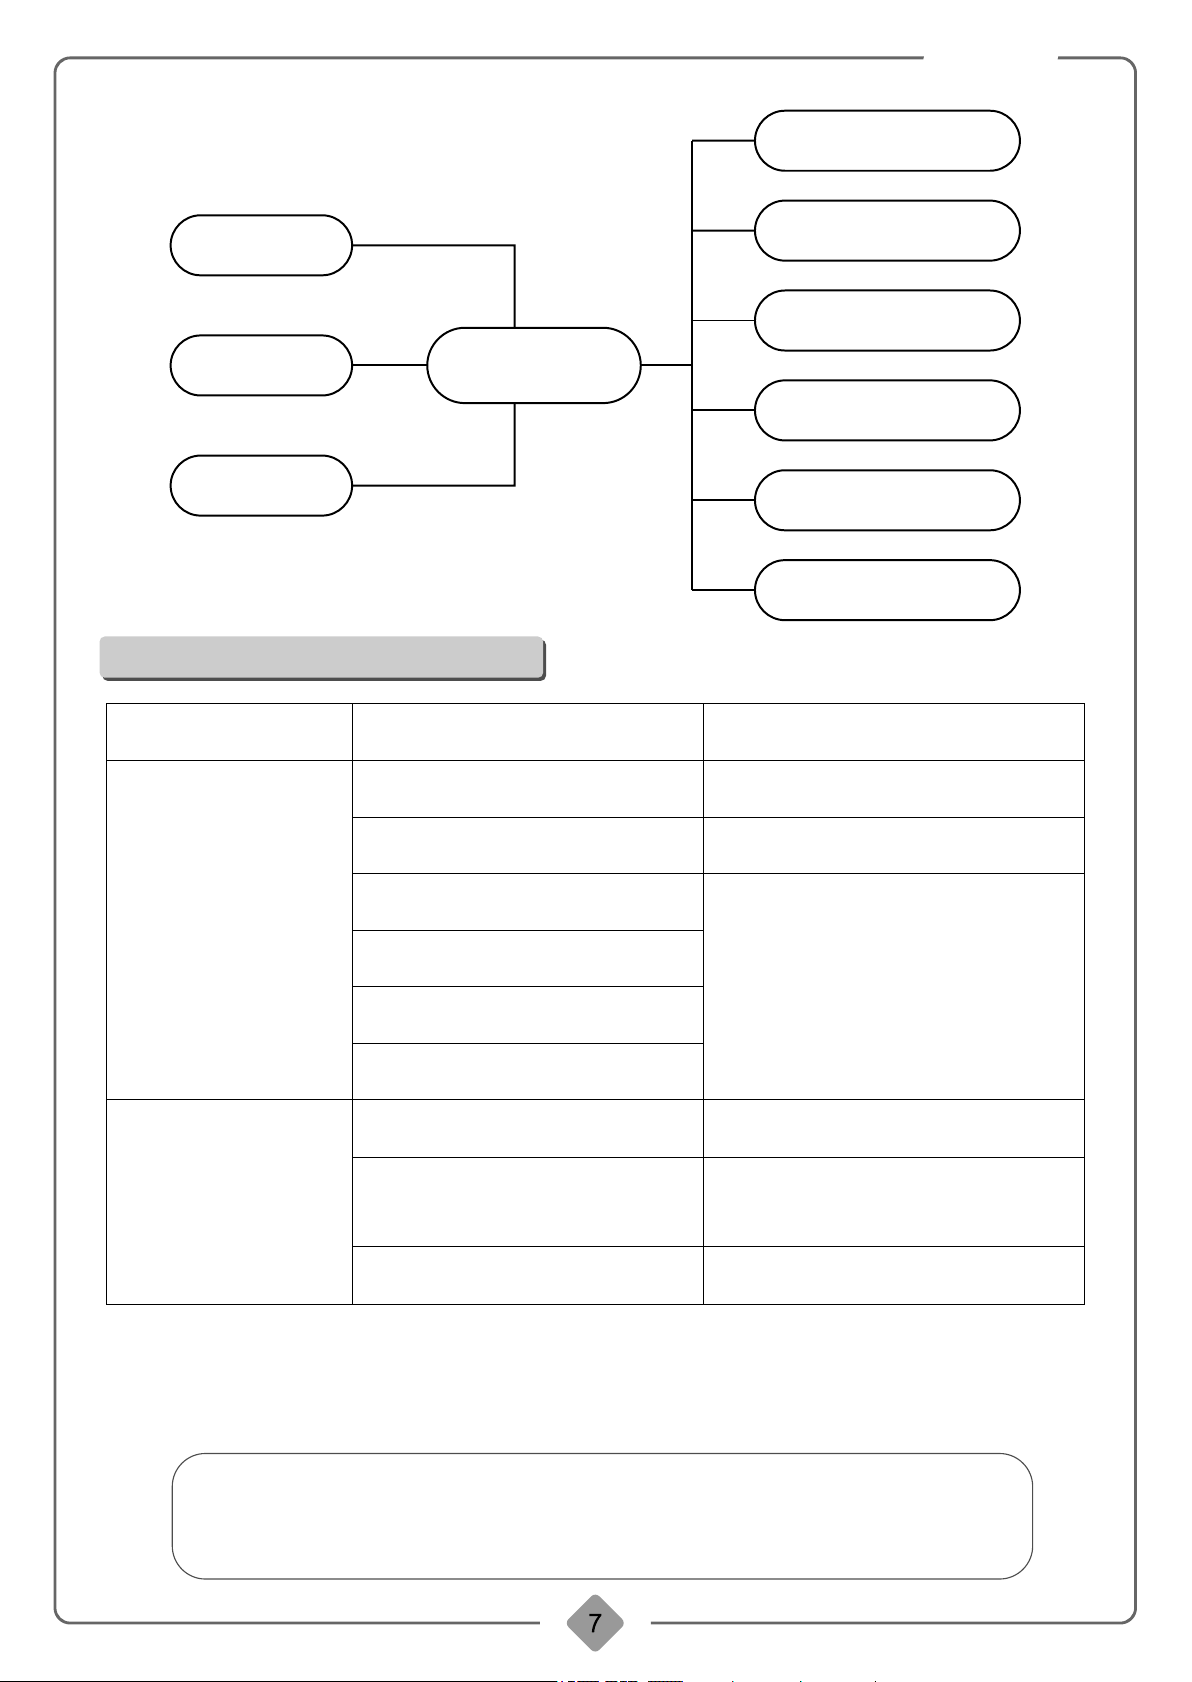
10.Circuit system connection diagram
AC 100~120V , 5 0Hz/60Hz OR AC 220~240V,50Hz/ 60Hz
Page 8
2249
Back angle motor
Power
Hand controller
Foot controller
(optional)
11.Troubleshooting
The fault phenomenon
1.The power cord is unconnected
or not plugged well
2. Poor quality of the manual
controller
3. Poor quality of the foot control
Can't go up or
down normally
switch
4. Poor quality of the controller
box
5. Rupture of motor tail
6. Motor detonation
Fourcontrol
programcontroller
Reason
Leg pad angle motor
Whole bed positive
angle motor
Whole bed negative
angle motor
Whole bed lifting motor
Heating system
(optional)
Solution
1. Connect the power cord or plug
it well
2. Replace the manual control panel
3, If problem is still not solved after
replacing the manual controller or
foot control switch, please contact
maintenance center or supplier to
clear the trouble.
Abnormal sound
1. The rotating parts lack of
lubricating oil
2, Rotating position (such as
hinge, P, O, M sets) Lack of
lubricating oil
3. Motor quality problems
1. Add lubricating oil
2. Add lubricating oil
3. Replace the motor
Please check and verify products specifications before use and this
manual is only used for reference. The product specifications will be
subject to change or update without further notice.
 Loading...