

Page 1
Wave
IMPORTANT: KEEP THESE INSTRUCTIONS
FOR FUTURE REFERENCE
Wave Instructions 2016-AUSTRALIAN.indd 1 19/09/2017 16:50
Page 2
2
AUS
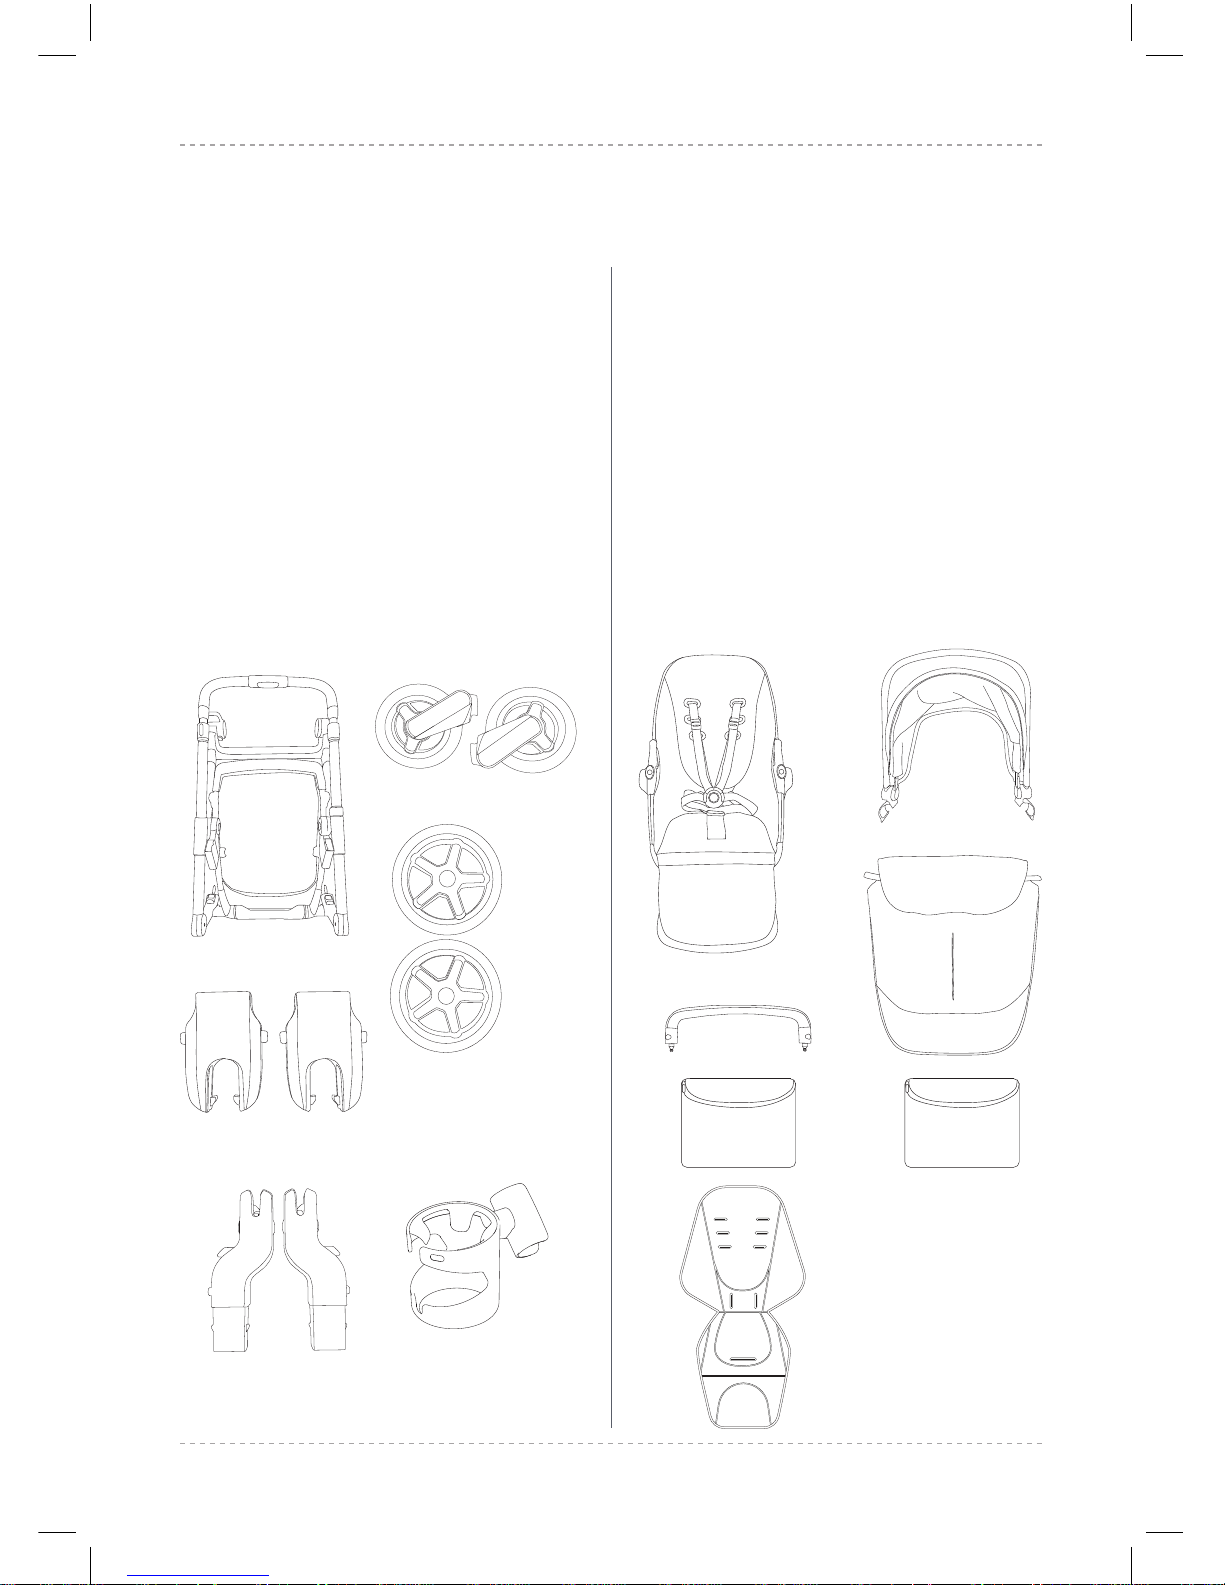
1.1 1.2
1.3
1.4
2.1
2.5
2.7
2.6
1.6
1.5
2.2
2.3
2.4
Contents
Check all parts have been supplied. The Wave travel system includes:
CHASSIS BOX 1 OF 2
1.1 Chassis
1.2 Front Wheels
1.3 Rear Wheels
1.4 Tandem Connectors
1.5 Car Seat Adaptors
1.6 Cup Holder
PUSHCHAIR SEAT BOX 2 OF 2
2.1 Pushchair Seat
2.2 Pushchair Seat Hood
2.3 Pushchair Seat Apron
2.4 Bumper Bar
2.5 Pushchair / Tandem
Seat Raincover
2.6 Pushchair / Tandem
Seat Bug Net
2.7 Seat Liner
Wave Instructions 2016-AUSTRALIAN.indd 2 19/09/2017 16:50
Page 3
3
silvercross.com.au
AUS
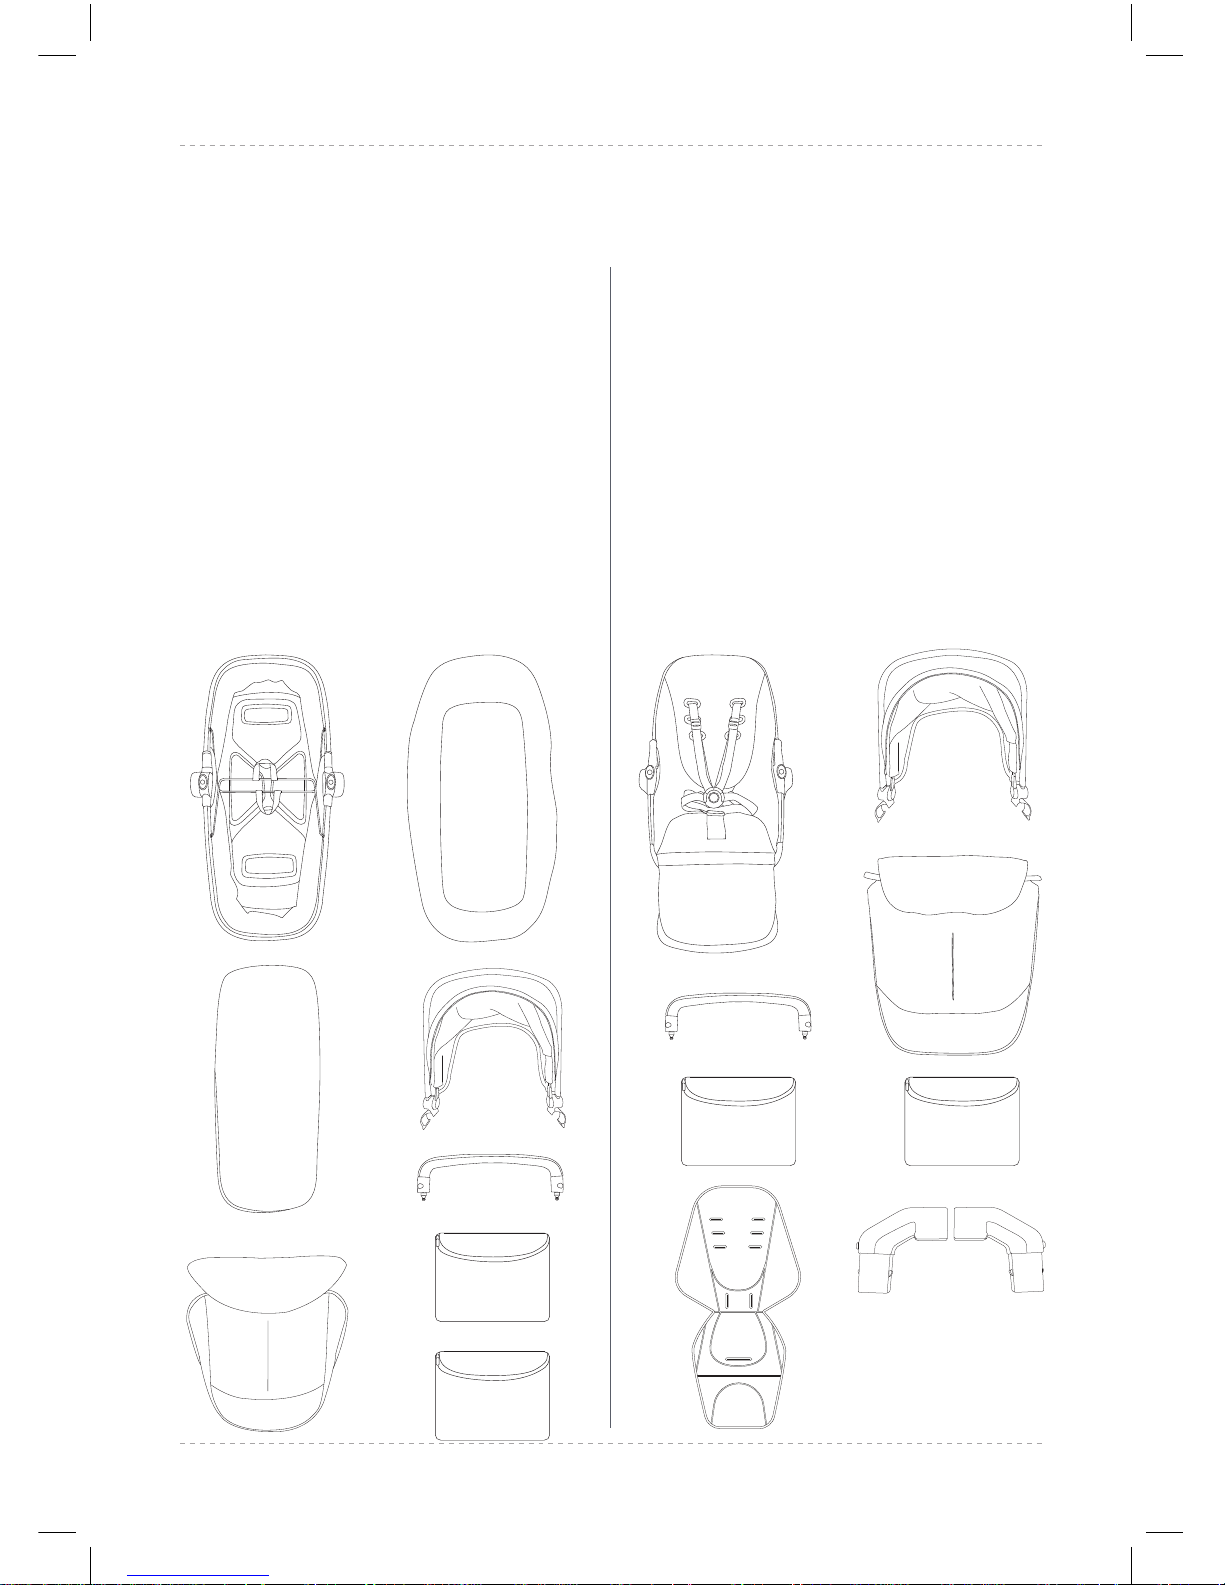
4.13.1
3.3
3.5
3.4
4.5
4.7 4.8
4.6
3.2
4.2
4.3
4.4
3.6
CARRYCOT BOX 2 OF 2
3.1 Carrycot Outer
3.2 Carrycot Liner
3.3 Carrycot Mattress
3.4 Carrycot Hood
3.5 Carrycot Apron
3.6 Bumper Bar
3.7 Carrycot Raincover
3.8 Carrycot Bug Net
TANDEM SEAT
- Available separately
4.1 Tandem Seat
4.2 Tandem Seat Hood
4.3 Tandem Seat Apron
4.4 Bumper Bar
4.5 Pushchair / Tandem
Seat Raincover
4.6 Pushchair / Tandem
Seat Seat Bug Net
4.7 Seat Liner
4.8 Carrycot Adaptors
3.7
3.8
Wave Instructions 2016-AUSTRALIAN.indd 3 19/09/2017 16:50
Page 4
4
AUS
These instructions are important.
Read these instructions before
use and keep them for future
reference. Your child’s safety may
be aected if you do not follow
these instructions.
Your Wave travel system is a high
quality Silver Cross product.
It meets current safety standards
and care and regular light
maintenance will ensure its
long service.
Check pushchair for wear and
tear including locking devices,
brakes and lubricate moving parts
regularly.
In single conguration, this travel
system is suitable from birth up
to 9kg with the carrycot and from
6 months up to 25kg with the
pushchair seat.
In tandem conguration, this
travel system is suitable from
birth up to 9kg with the carrycot,
from 6 months up to 15kg with the
pushchair seat and from 6 months
up to 15kg with the tandem seat.
If somebody unfamiliar is using
your Wave travel system, always
ensure that they read these
instructions carefully so that they
understand how the product
works best.
The Wave travel system is designed
and tested to be used with the
Wave crrycot, Wave pushchair
seat, Wave tandem seat (sold
separately) and a range of car
seats. For a list of compatible car
seats, please visit our website:
silvercross.com.au
WARNING
THE SAFETY OF YOUR CHILD IS
YOUR RESPONSIBILITY.
WARNING
ALWAYS APPLY THE PARKING
BRAKE WHEN YOU ARE
STANDING STILL.
WARNING
ALWAYS APPLY THE PARKING
BRAKE WHEN PLACING AND
REMOVING THE CHILD.
Wave Instructions 2016-AUSTRALIAN.indd 4 19/09/2017 16:50
Page 5
5
silvercross.com.au
AUS
Preparation for use
Remove all packaging material
from the chassis and dispose of
carefully.
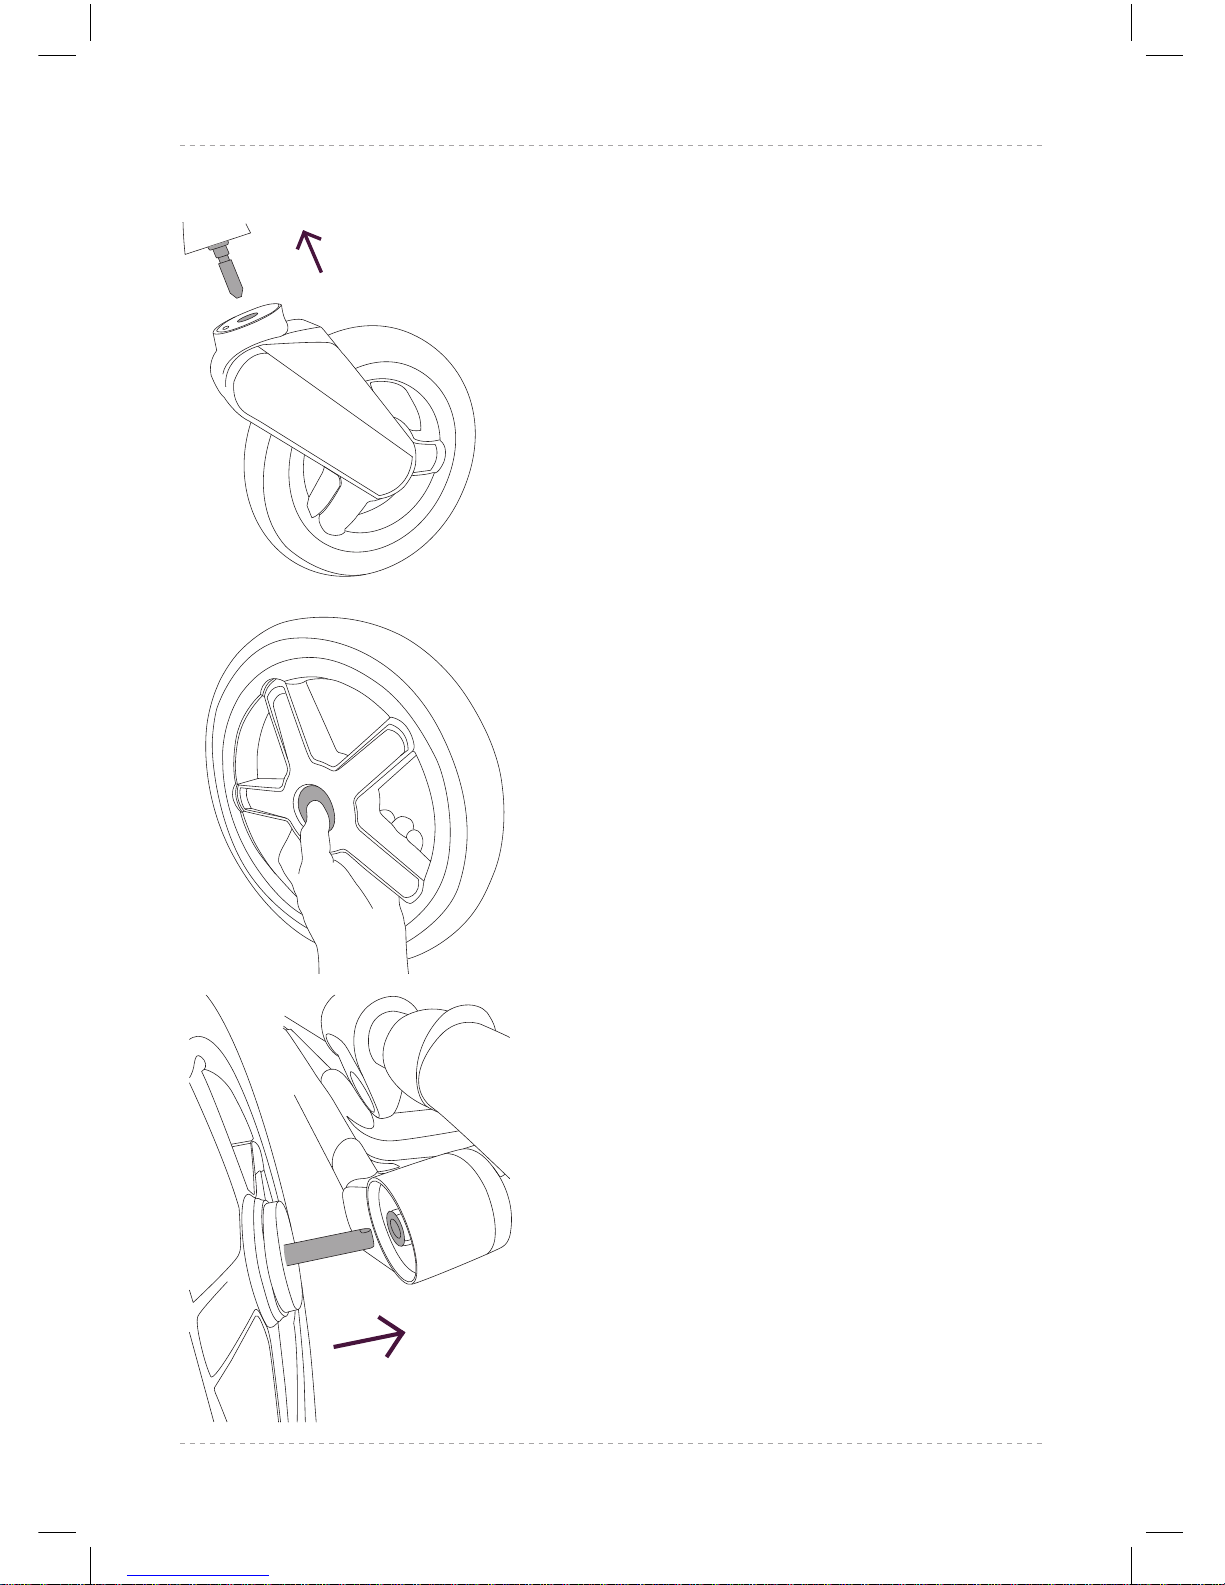
5.1 Attach the front wheels by
inserting the wheels onto the
swivel pins on the chassis
until they ‘click’ into position.
5.2 Attach the rear wheels by
pressing the central release
button on the wheel and
inserting the axle into the
rear wheel connection hole.
Release the button once
the axle is fully inserted into
the slot.
CHECK THE WHEELS ARE
SECURE BY GENTLY PULLING
THE WHEELS AWAY FROM THE
CHASSIS.
5.1
5.2
Wave Instructions 2016-AUSTRALIAN.indd 5 19/09/2017 16:50
Page 6
6
AUS
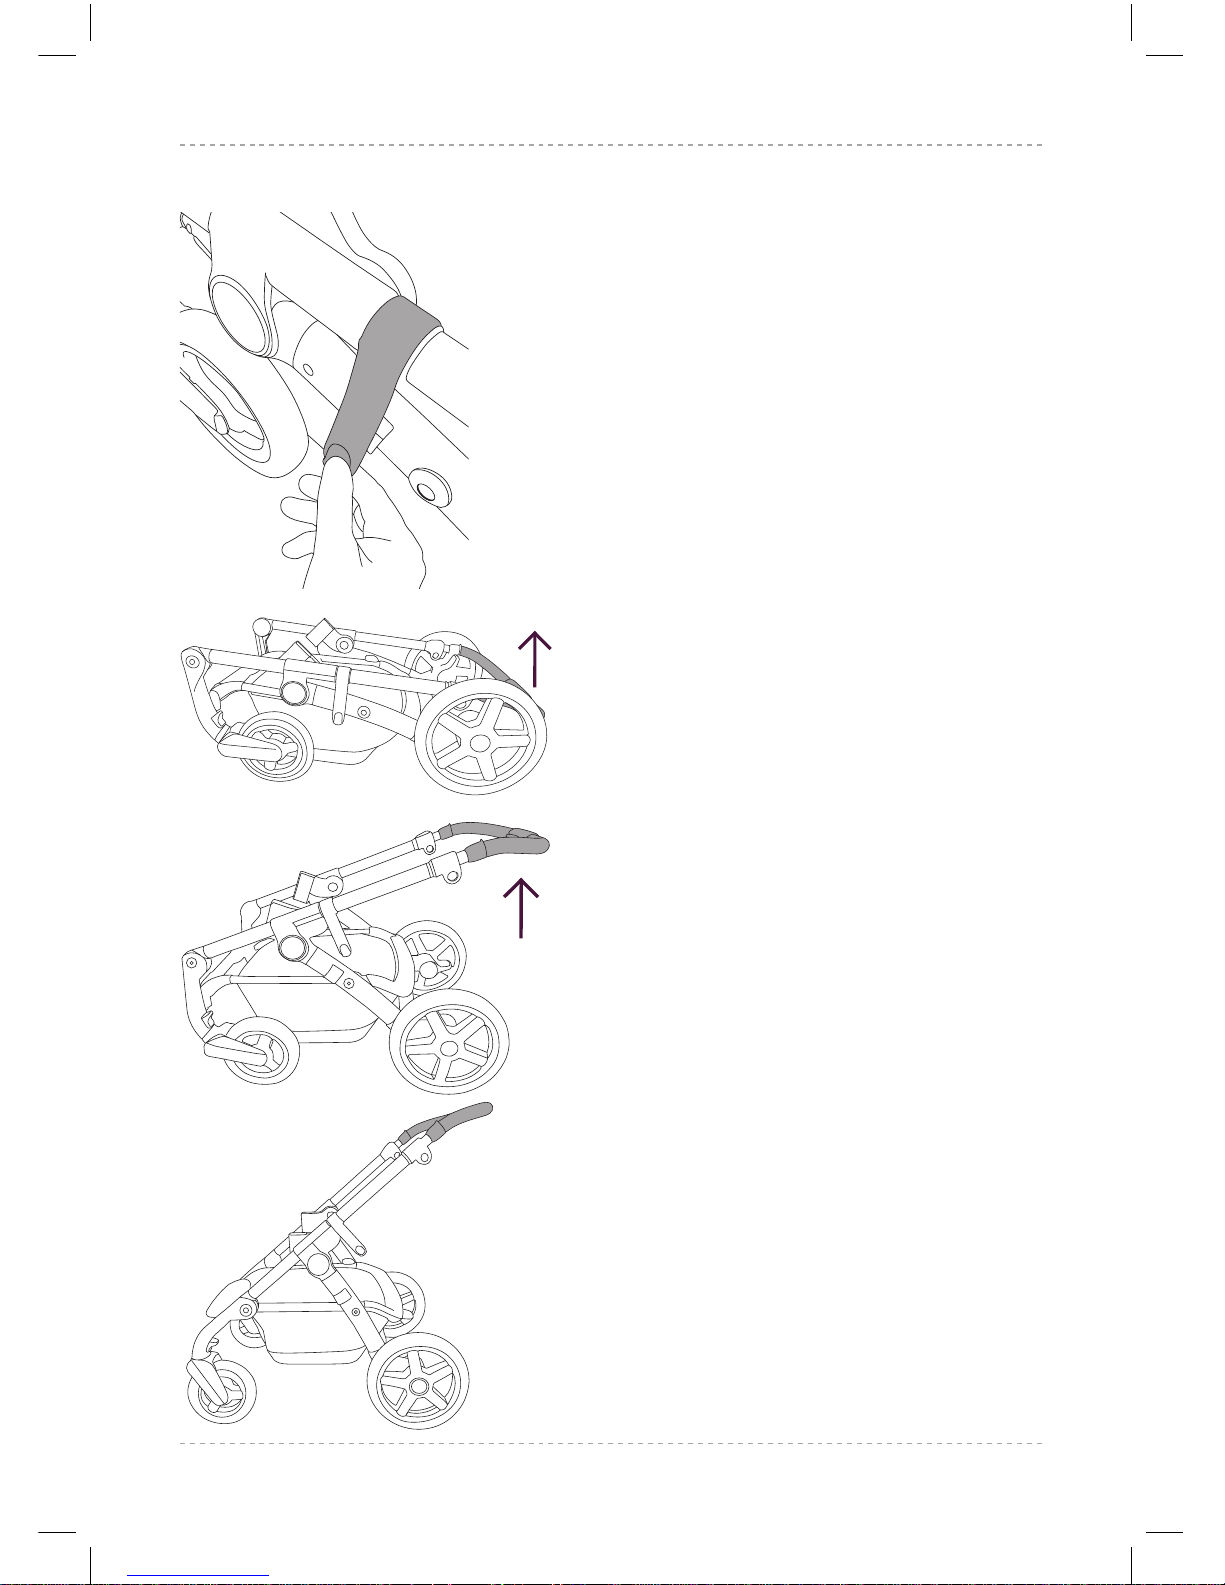
5.3 Release the folding lock and
lift the handle upwards.
5.4 Continue to lift the handle
upwards until the chassis
‘clicks’ and locks into position.
Check that the chassis is
secure by gently pushing
downwards on the handle.
5.3
5.4
Wave Instructions 2016-AUSTRALIAN.indd 6 19/09/2017 16:50
Page 7
7
silvercross.com.au
AUS
Using the parking brake
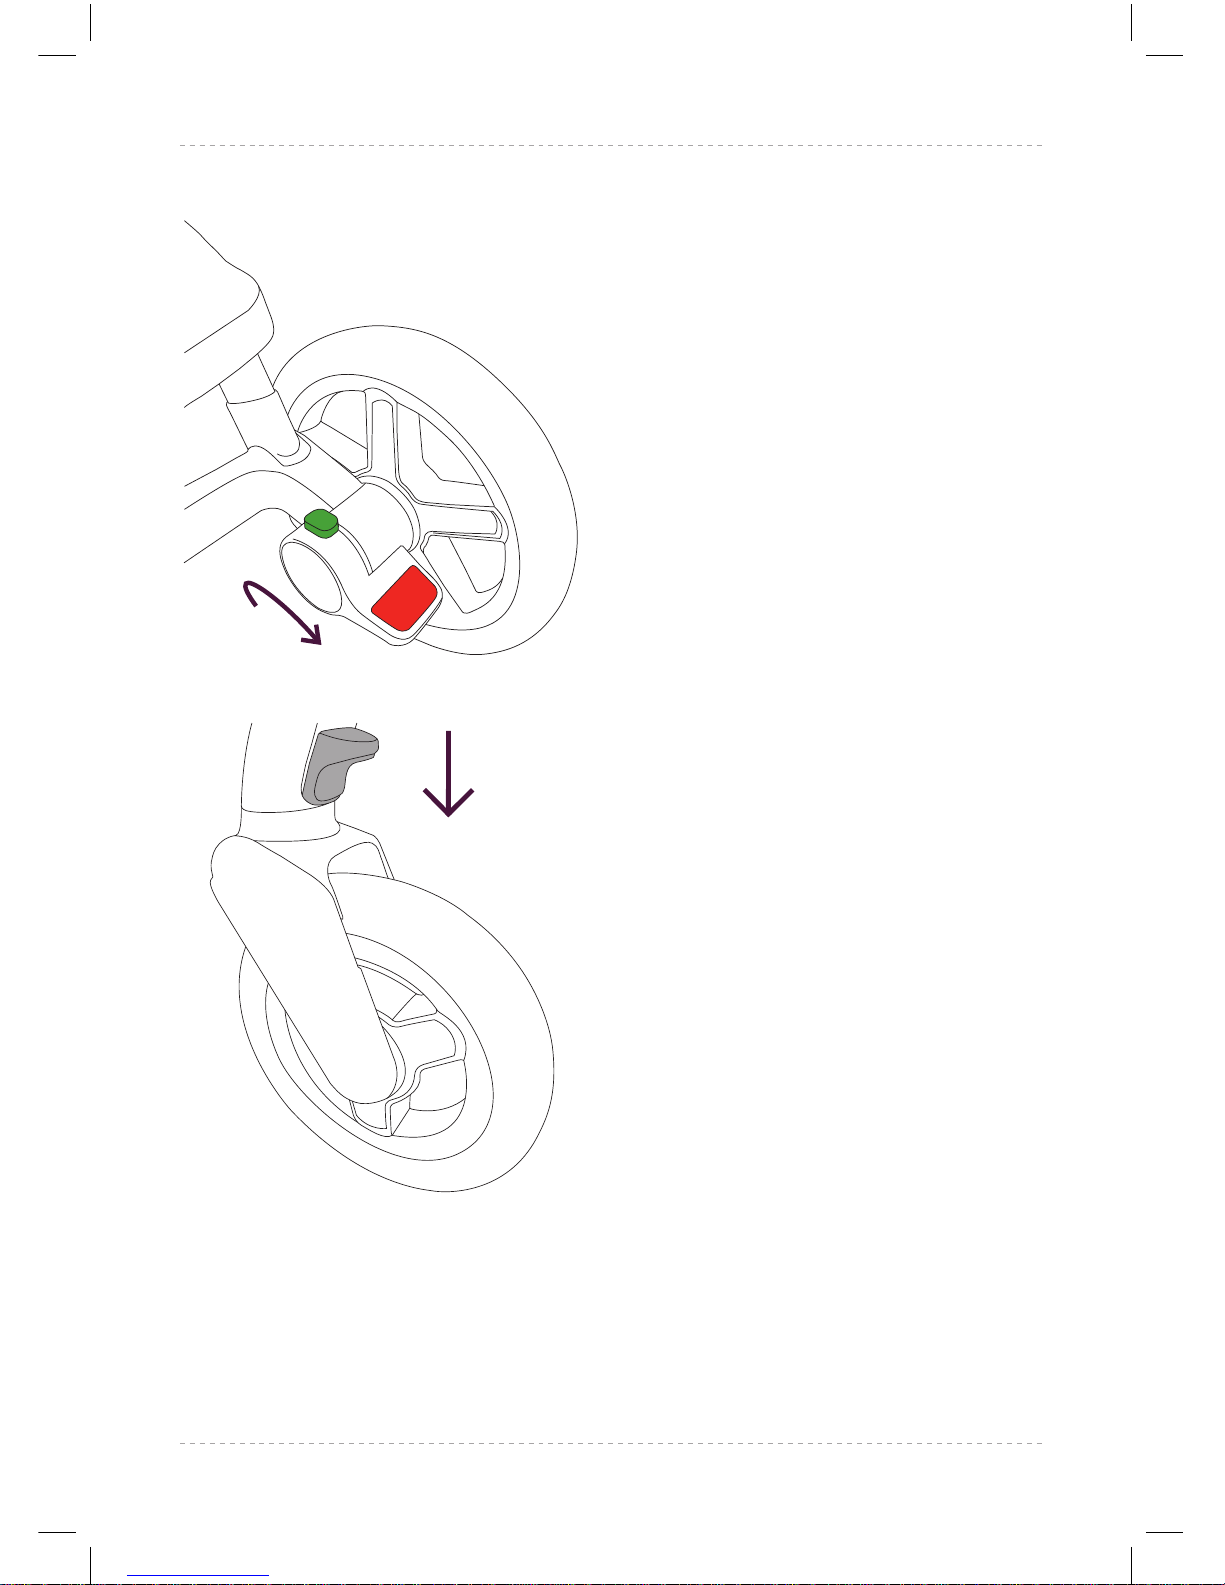
6.1 To apply the brake, press
down on the red brake pedal.
Listen for the ‘click’. The green
button will raise.
ALWAYS CHECK THAT THE
PARKING BRAKE IS FULLY
ENGAGED BY GENTLY MOVING
THE CHASSIS BACKWARDS &
FORWARDS.
To disengage the brake, press
down on the green brake
release button. Move the chassis
backwards slightly before moving
forward.
Operating the swivel wheels
The chassis has lockable front
swivel wheels.
7.1 Push the swivel wheel lock
button downwards to lock the
wheels into the xed position.
The wheel will lock once it
has aligned with the forward
direction of travel.
6.1
7.1
Wave Instructions 2016-AUSTRALIAN.indd 7 19/09/2017 16:50
Page 8
8
AUS
2
1
3
4
5
Operating the height adjustable
handle
WARNING
BEFORE MAKING ANY
ADJUSTMENTS TO THE CHASSIS,
ENSURE THE PARKING BRAKE IS
ENGAGED.
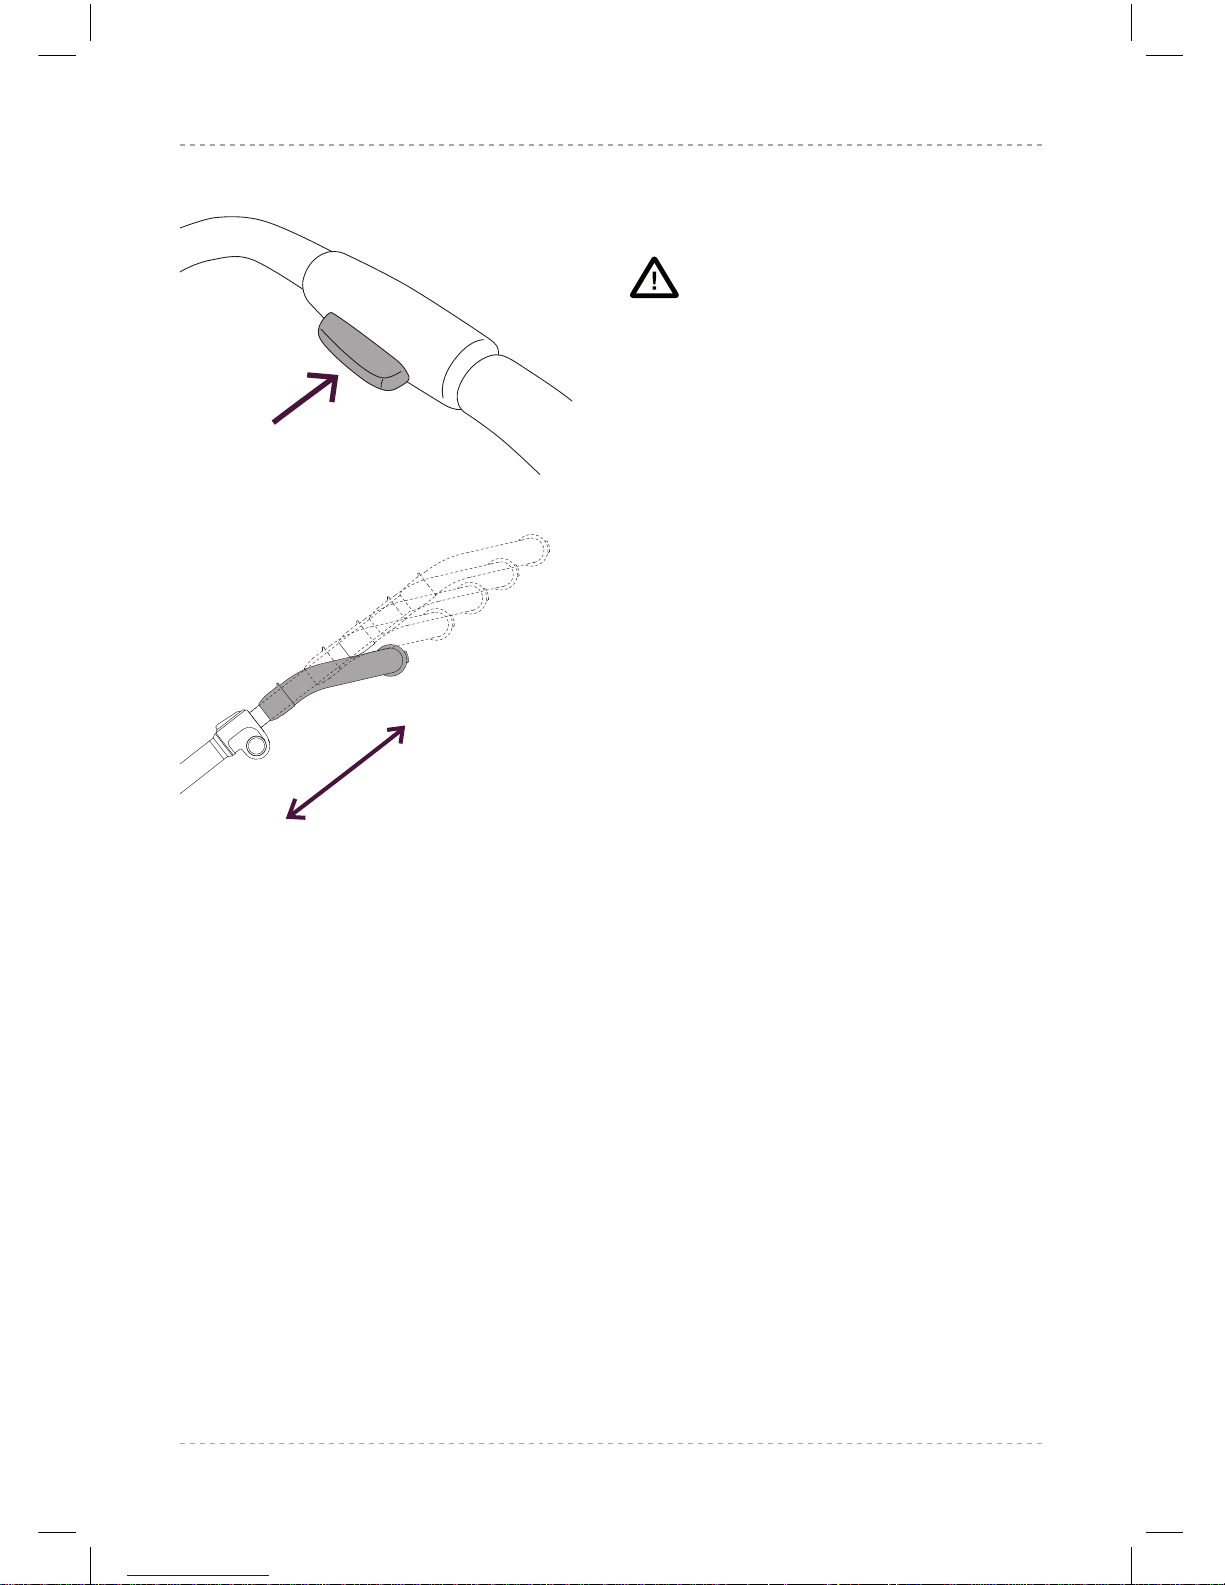
The chassis has 5 handle height
positions.
8.1 Press and hold the handle
height adjustment button.
8.2 Slide the handle up or down
to required height and release
the adjustment button. Slide
further up or down as desired
until the handle locks and
‘clicks’ into place.
8.1
8.2
Wave Instructions 2016-AUSTRALIAN.indd 8 19/09/2017 16:50
Page 9
9
silvercross.com.au
AUS
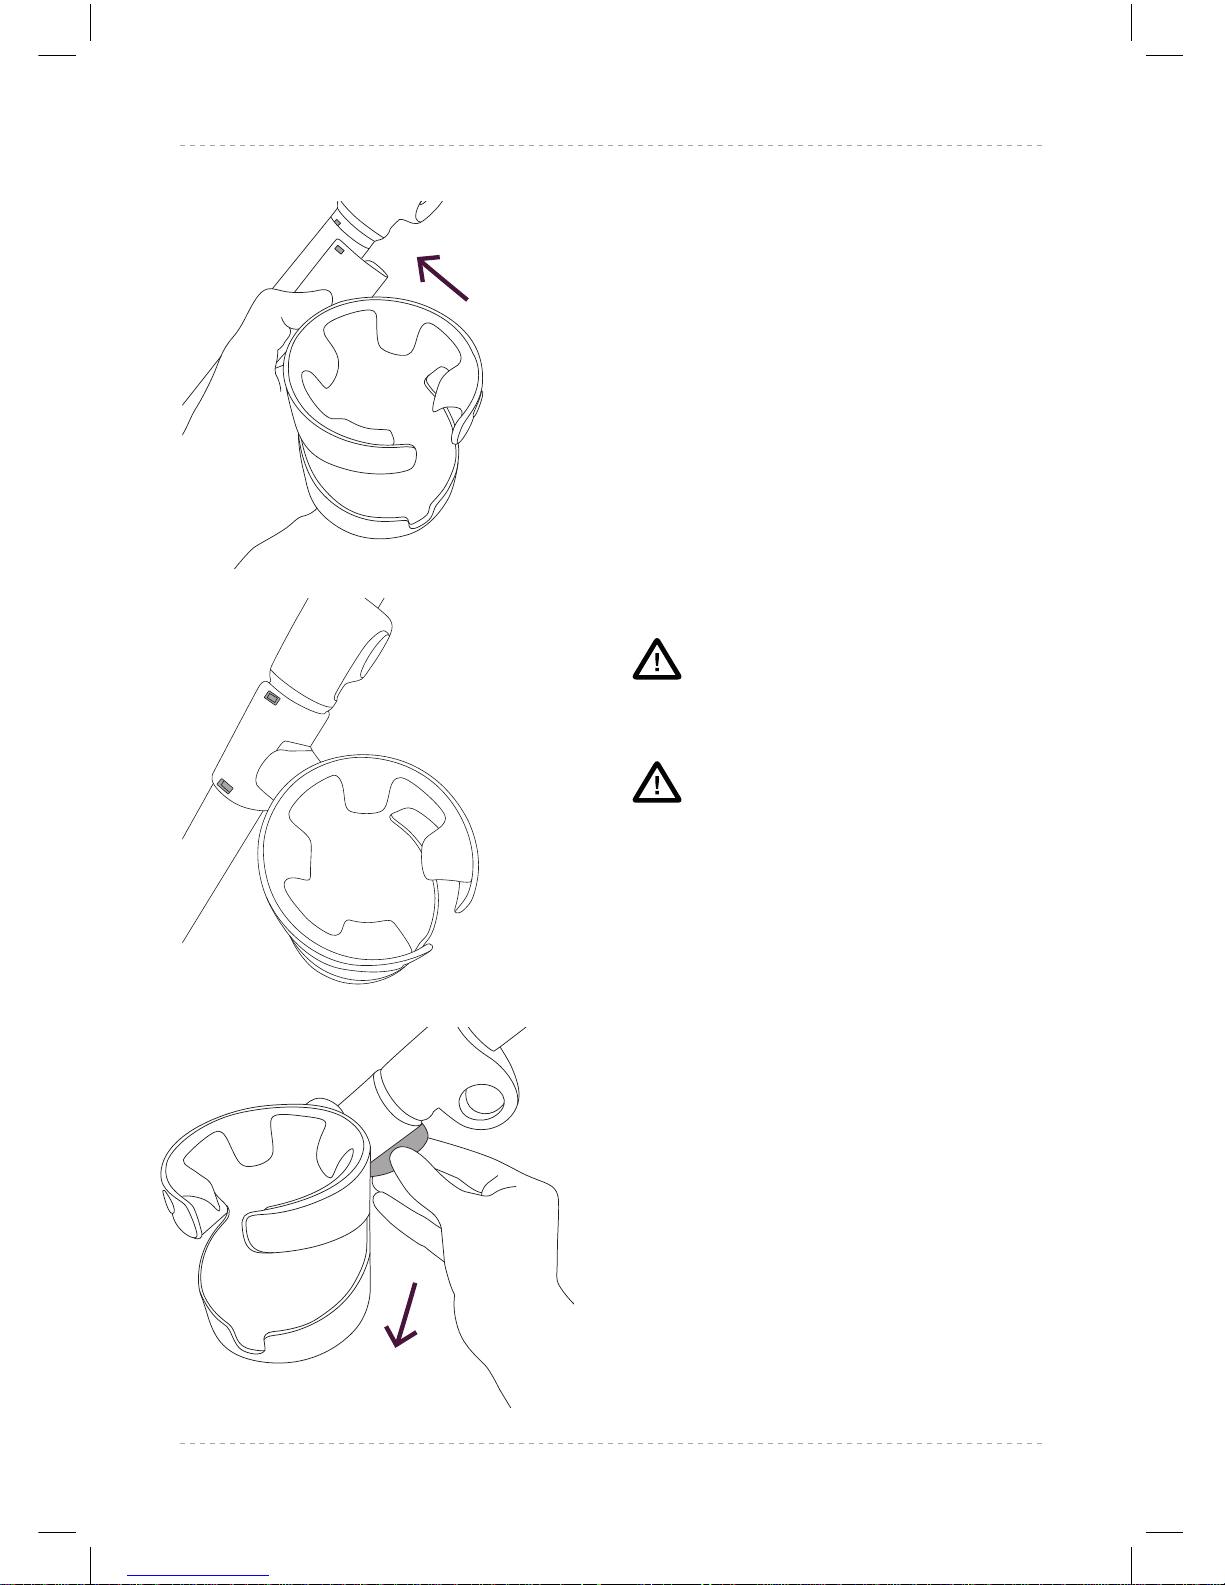
Using the cup holder
9.1 The cup holder can be
attached to either side of
the chassis handle. Attach
the cup holder by clipping
the cup holder clamp to the
chassis on the lower part of
the handle, ensuring the cup
holder is the correct way up.
9.2 Ensure the cup holder is
fastened correctly and the
clip is correctly engaged with
the locating pin.
9.3 To remove the cup holder,
unclip the cup holder clamp
from the chassis handle.
WARNING
DO NOT USE CUP HOLDER WITH
HOT LIQUIDS.
WARNING
THE CUP HOLDER IS CAPABLE OF
HOLDING A MAXIMUM WEIGHT
OF 340g.
9.1
9.2
9.3
Wave Instructions 2016-AUSTRALIAN.indd 9 19/09/2017 16:50
Page 10
10
AUS
USING WAVE FROM BIRTH
WITH THE CARRYCOT
Preparing the carrycot for use
Remove all packaging material
from the carrycot and dispose of
carefully.
ALWAYS ENSURE THE BUMPER
BAR IS ATTACHED WHEN YOUR
CHILD IS IN THE CARRYCOT.
WARNING
THIS PRODUCT IS SUITABLE FOR
A CHILD WHO CANNOT SIT UP
OR ROLL OVER BY ITSELF AND
CANNOT PUSH ITSELF UP ON ITS
HANDS AND KNEES.
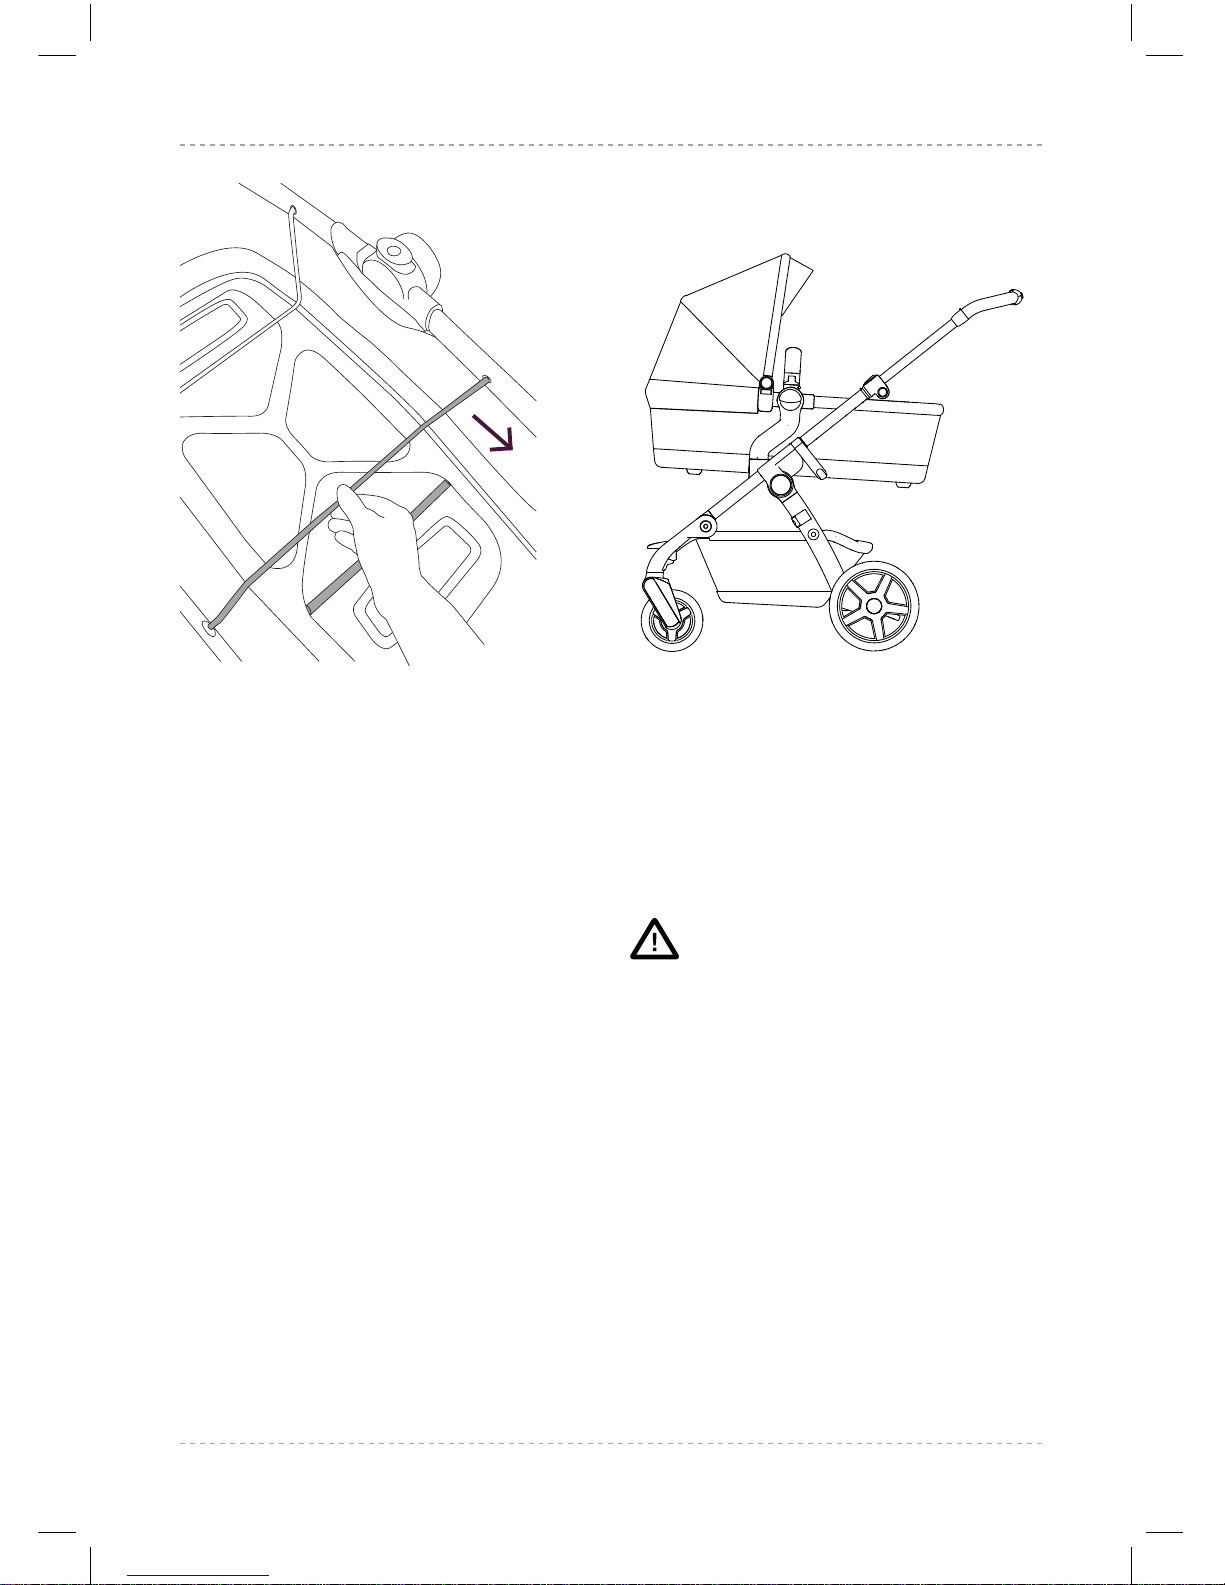
10.1 To erect the carrycot outer,
lay the carrycot outer down
with the frame uppermost.
Pull both metal bars into the
locating grooves on internal
base of carrycot to hold the
frame up in position. Check
the bars are rmly and evenly
located in the grooves. Insert
the carrycot liner into the
outer. The warning label is at
the toe end of the carrycot.
10.1
Wave Instructions 2016-AUSTRALIAN.indd 10 19/09/2017 16:50
Page 11
11
silvercross.com.au
AUS
10.2
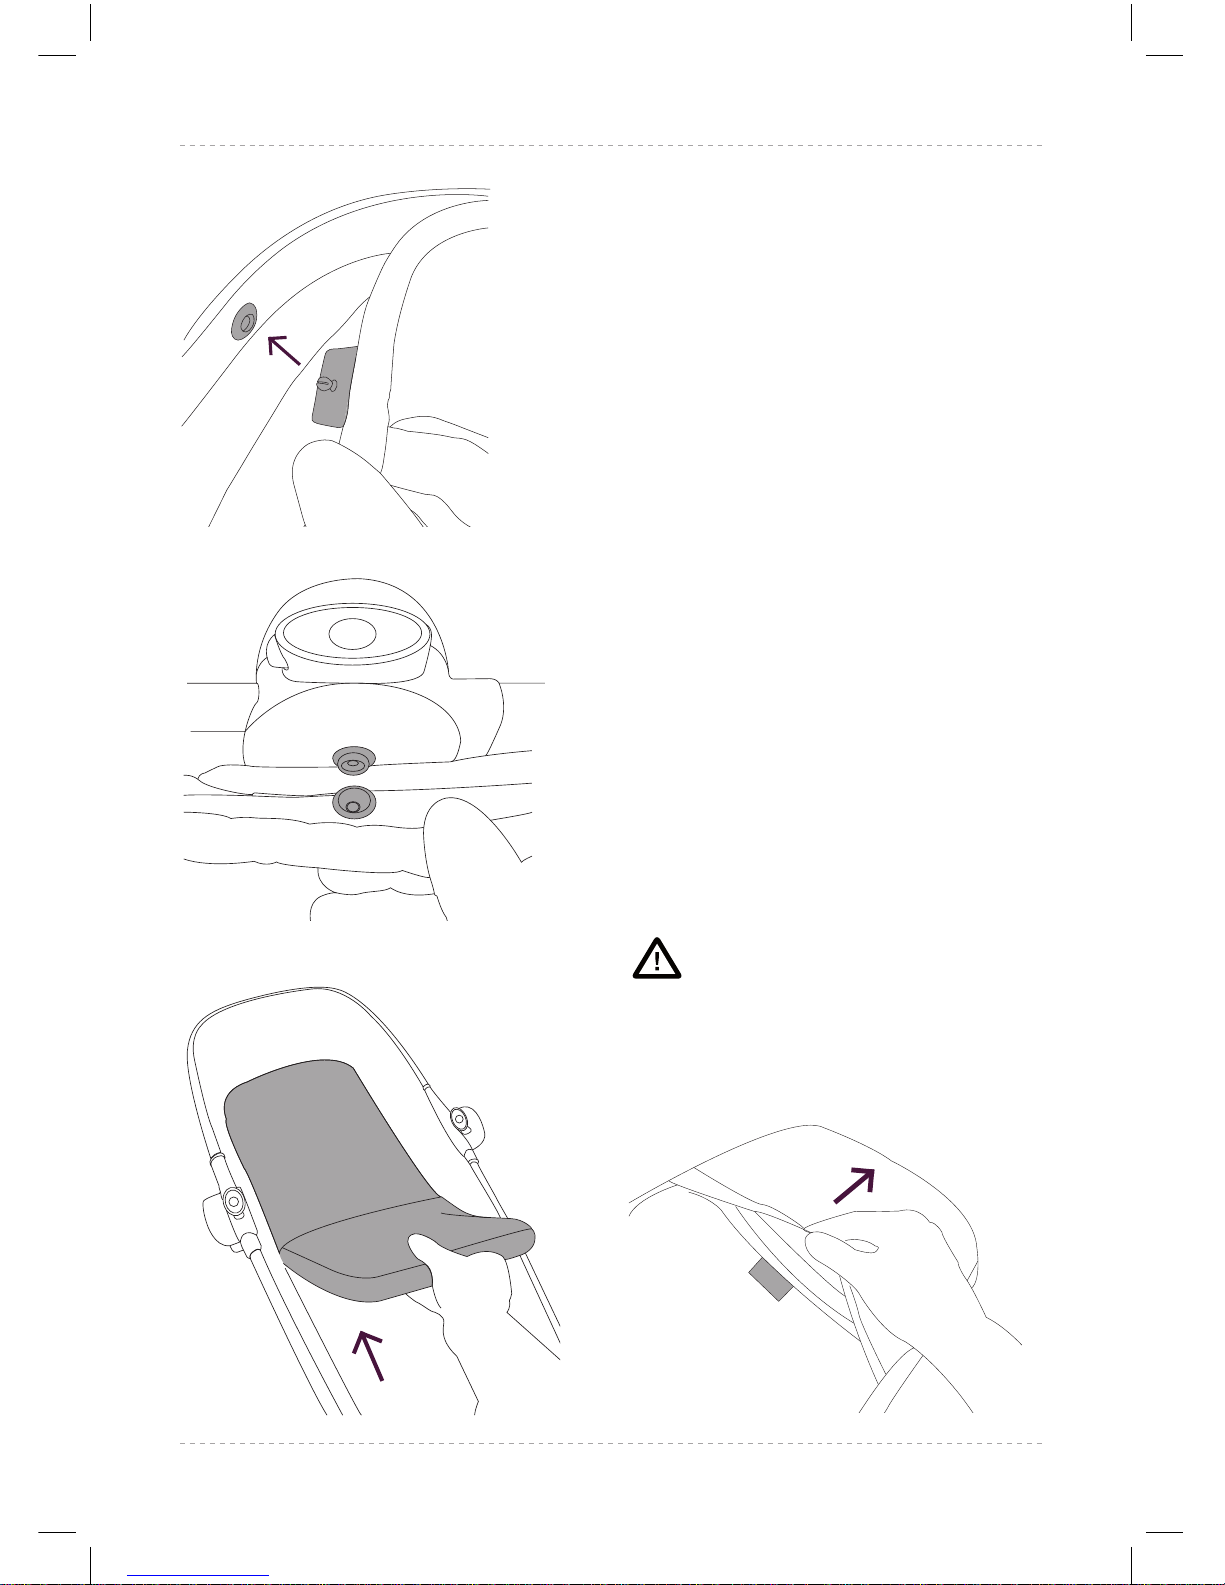
10.2 Attach the carrycot liner to
the carrycot outer using the
press-t fastenings on the
outside of the liner pushed
into the holes around the
inside of the carrycot frame.
Secure the liner in the centre
of the carrycot outer using
the press stud and Velcro
fastenings on each side.
10.3 Place the mattress into the
base of the liner with the
mattress cover opening ap
downwards.
10.4 The mattress cover can be
hand washed. Remove the
foam mattress insert prior to
washing by opening the ap
on the back of the mattress
cover and removing the foam
mattress.
10.5 To remove the liner, gently
but rmly pull the press-t
fastenings on the outside
of the liner from the frame,
and the press stud and Velcro
fastenings in the centre of
the carrycot outer.
WARNING
DO NOT ADD A MATTRESS
OTHER THAN THE ONE
PROVIDED.
10.3
10.4
Wave Instructions 2016-AUSTRALIAN.indd 11 19/09/2017 16:50
Page 12
12
AUS
Attaching the carrycot apron
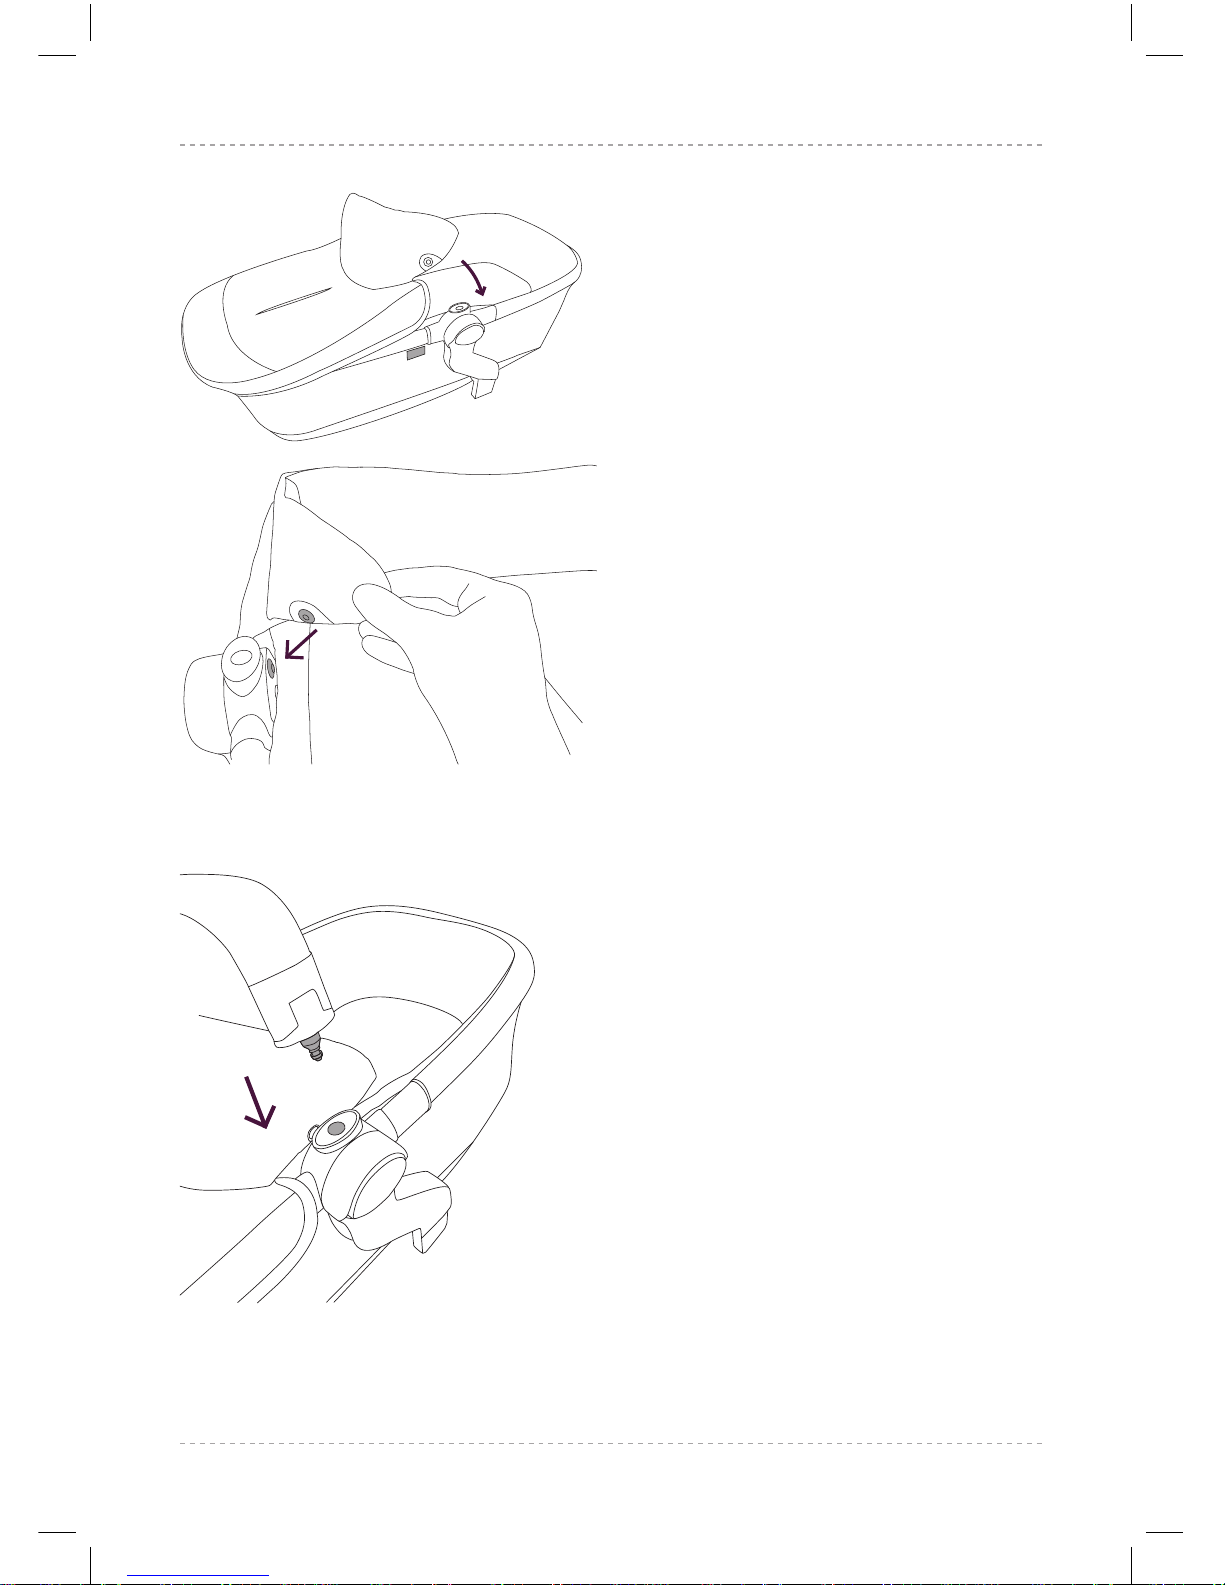
11.1 Place the apron over the top
of the carrycot and secure in
place using the Velcro tabs.
11.2 Attach the magnetic
fastenings to the inside of
the carrycot.
Attaching the bumper bar
12.1 Attach the bumper bar
by pressing the ends of
the bumper bar into the
attachment points on the
carrycot or pushchair seat
frame until they ‘click’ into
place. Pull apart gently to
ensure the bumper bar is
secured in place.
11.1
11.2
12.1
Wave Instructions 2016-AUSTRALIAN.indd 12 19/09/2017 16:50
Page 13
13
silvercross.com.au
AUS
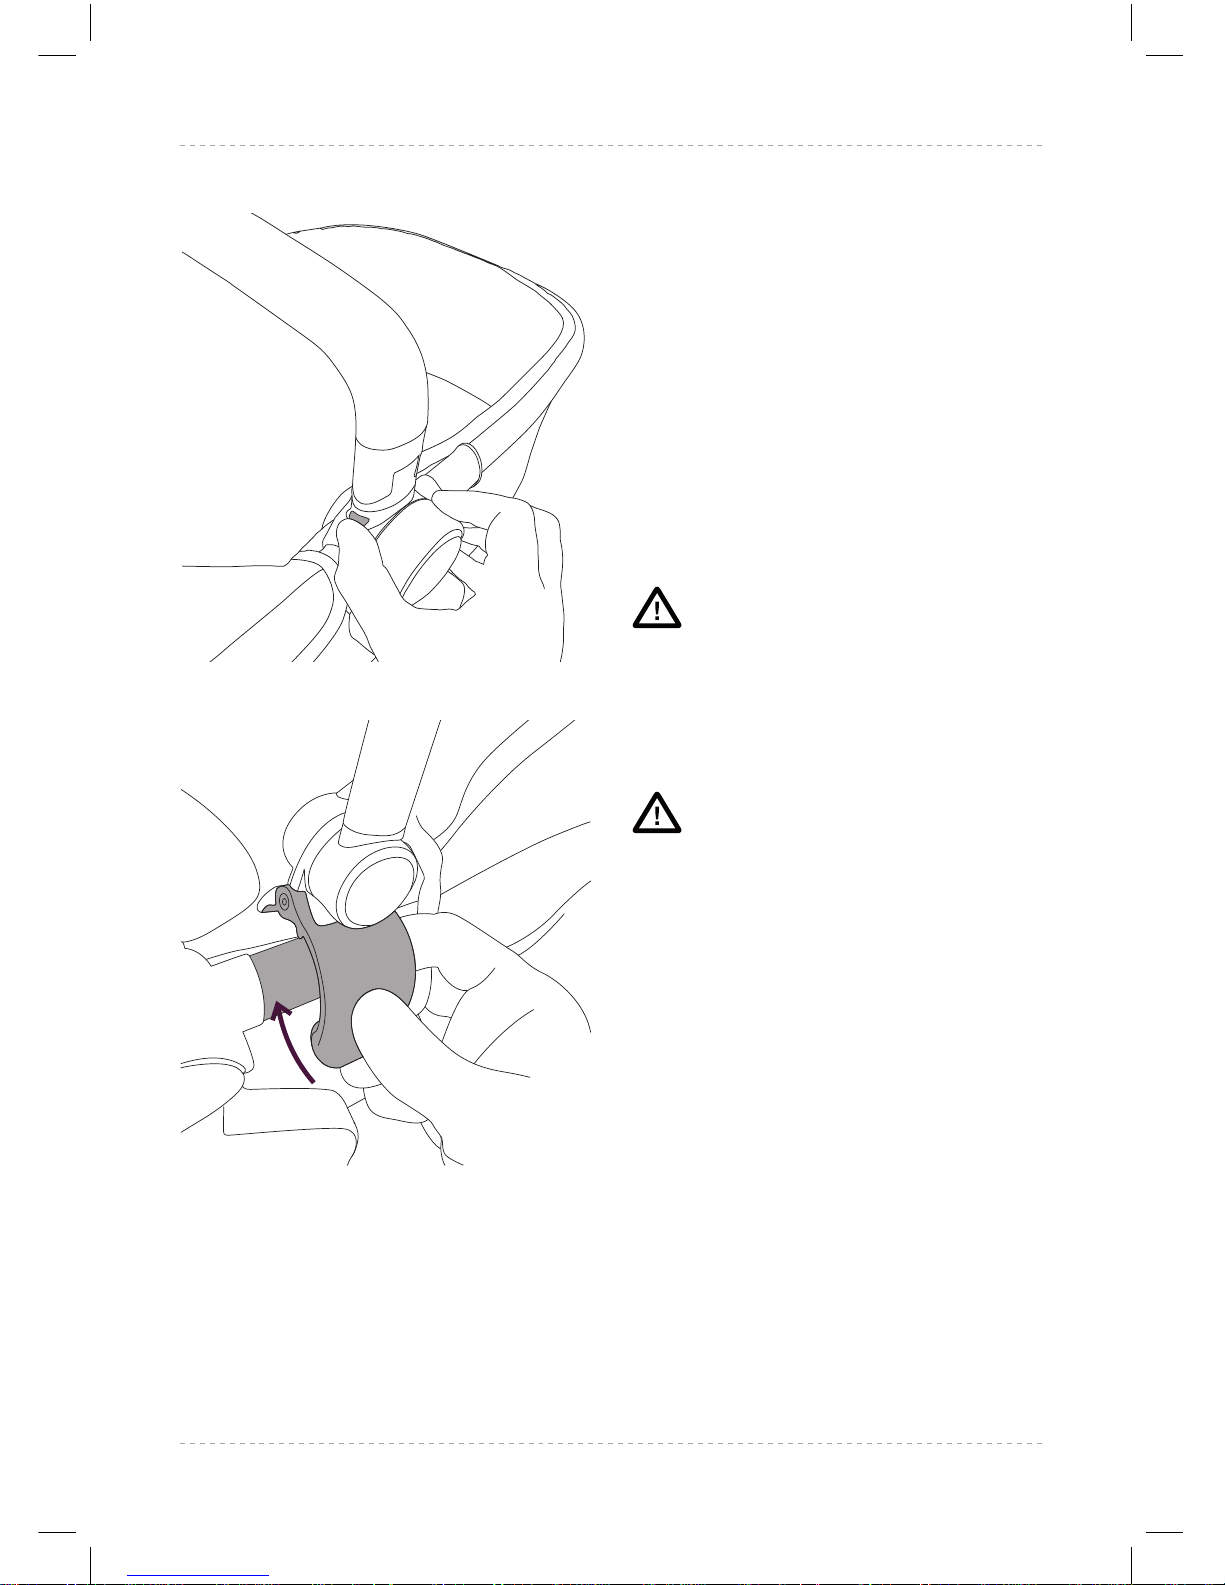
12.2 To open the bumper bar,
press the bumper bar release
button on the carrycot
or pushchair seat frame
with one hand and pull the
bumper bar away from the
attachment point with the
other hand. The bumper bar
will rotate. With one side of
the bumper bar removed the
carrycot or pushchair seat is
easily accessible.
To remove the bumper bar
completely, release the
attachment at both sides.
WARNING
THE BUMPER BAR MUST BE
SECURELY CONNECTED AT BOTH
SIDES AT ALL TIMES WHEN IN
USE. THE SAFETY OF YOUR CHILD
IS YOUR RESPONSIBILITY.
WARNING
DO NOT LIFT A SEAT OR
CARRYCOT VIA THE BUMPER BAR
WHILST A CHILD IS IN PLACE.
THE BUMPER BAR IS NOT A
CARRY HANDLE.
Attaching the hood to the
carrycot
13.1 Attach the carrycot hood
to the carrycot frame by
pressing down on the hood
attachment clips on each
side of frame. Slide the back
of the carrycot hood fabric
over the rear edge of the
carrycot and secure using the
Velcro patches.
12.2
13.1
Wave Instructions 2016-AUSTRALIAN.indd 13 19/09/2017 16:50
Page 14
14
AUS
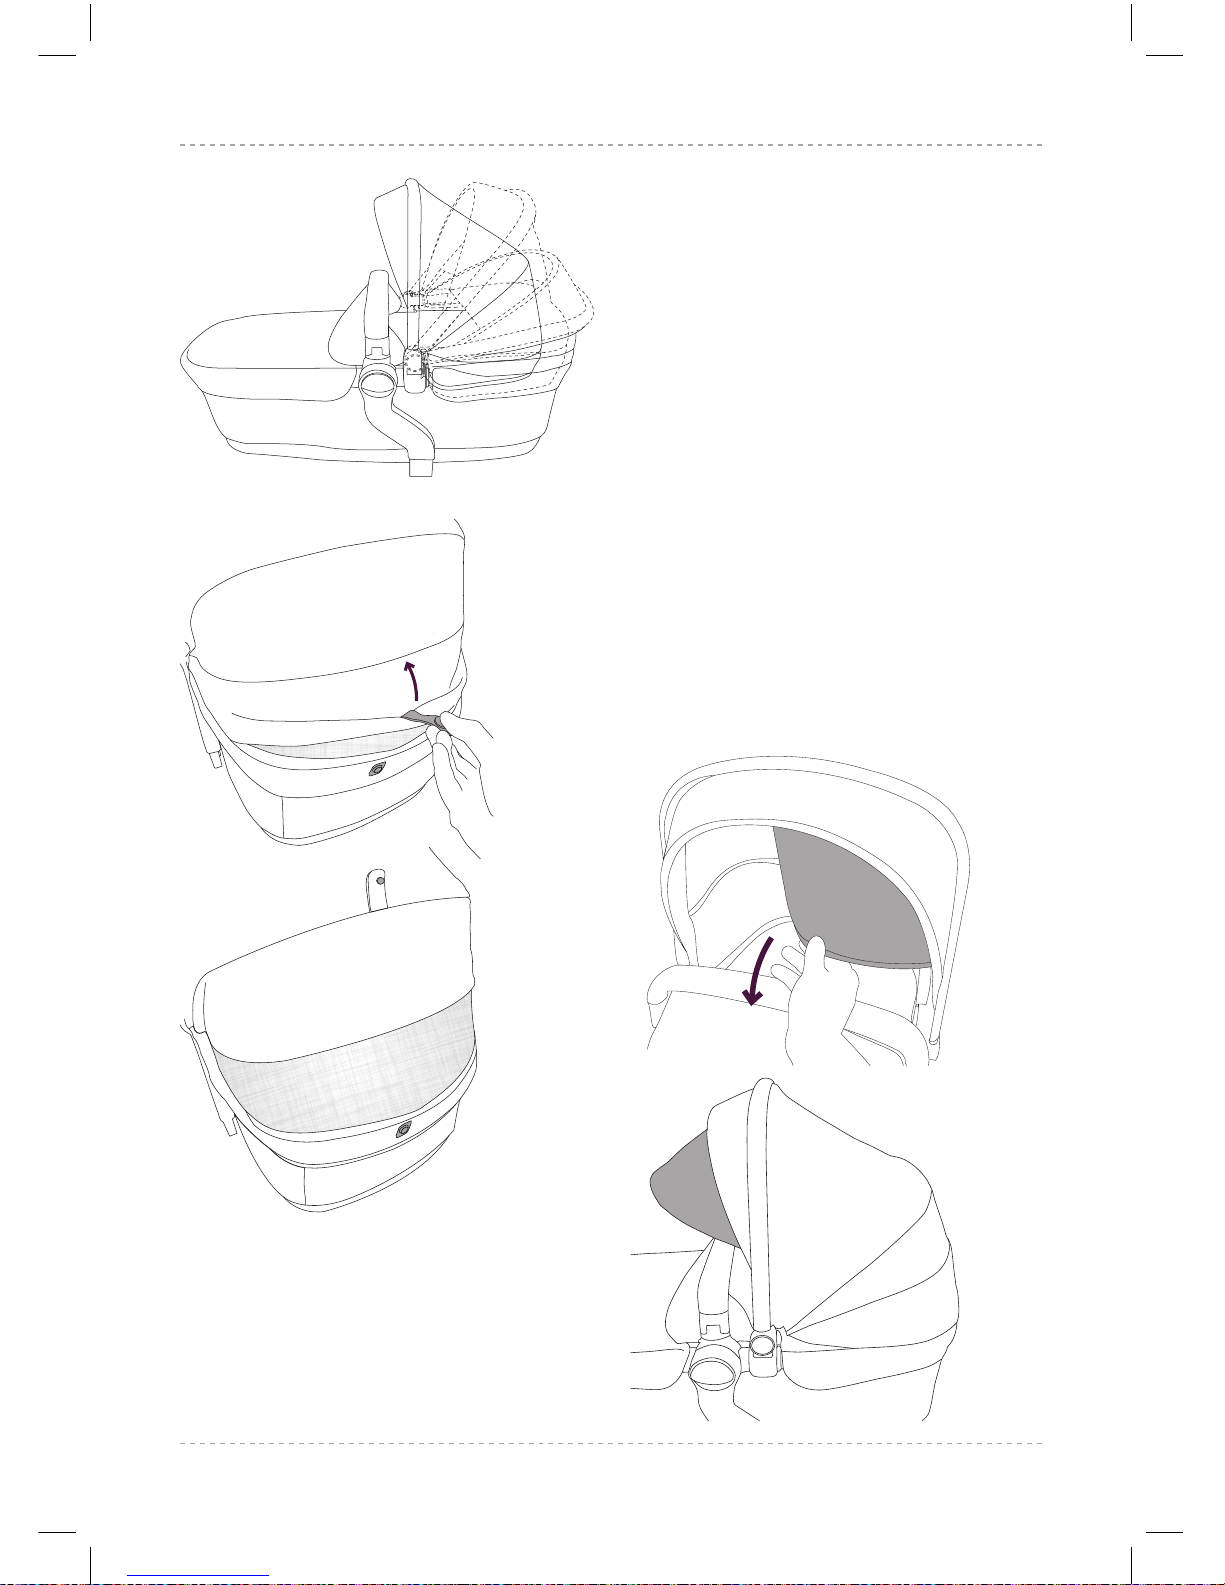
Using the carrycot hood
14.1 The carrycot hood can be
used in 3 positions. Fully
open, semi-open and
fully folded.
14.2 The carrycot hood features
a ventilation panel. To open
the ventilation panel, release
the magnet attachment and
lift the ap over the central
panel of the hood.
14.3 The carrycot hood features a
pop-out sun visor. To use the
sun visor, pull out from the
inside of the hood. To store,
push the sun visor back inside
the hood.
14.1
14.2
14.3
Wave Instructions 2016-AUSTRALIAN.indd 14 19/09/2017 16:51
Page 15
15
silvercross.com.au
AUS
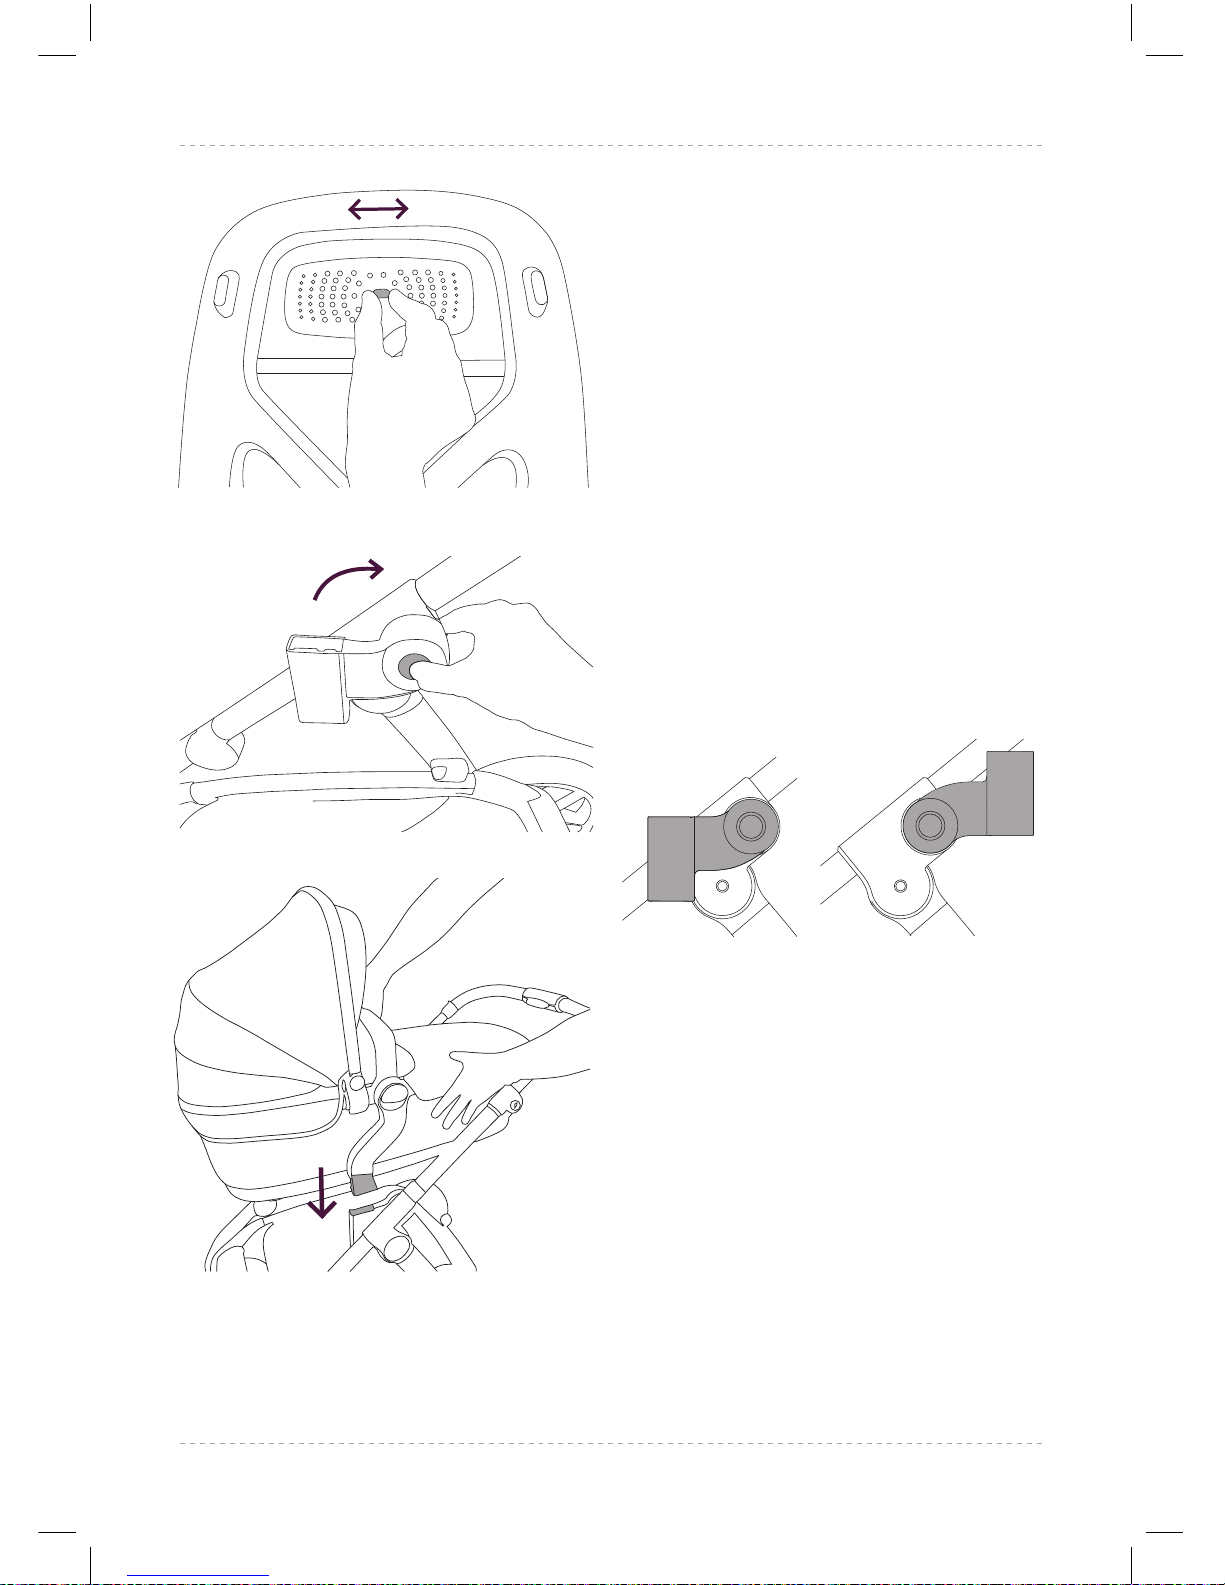
Using the carrycot
ventilation system
The carrycot has an adjustable
ventilation system at the head
and foot end of the base of the
carrycot outer.
15.1 To open and close the
ventilation, slide the
adjustment button until the
shutter ‘clicks’ in the open or
closed position.
Attaching the carrycot to the
Wave connector
The carrycot can be attached to
the Wave connector in either the
primary or the secondary position.
Primary position Secondary position
Press the circular button on each
Wave connector and rotate until it
‘clicks’ into place.
16.1 Hold the carrycot above the
chassis. Locate the carrycot
connector posts into the
Wave connector slots.
Ensure that the carrycot
‘clicks’ into place.
The carrycot should be
tted rearward facing.
Lift the carrycot gently to
check the carrycot has locked
into place.
15.1
16.1
Wave Instructions 2016-AUSTRALIAN.indd 15 19/09/2017 16:51
Page 16
16
AUS
WARNING
NEVER USE THE CARRYCOT ON A
STAND.
WARNING
THE HEAD OF THE CHILD IN THE
CARRYCOT SHOULD NEVER BE
LOWER THAN THE BODY OF THE
CHILD.
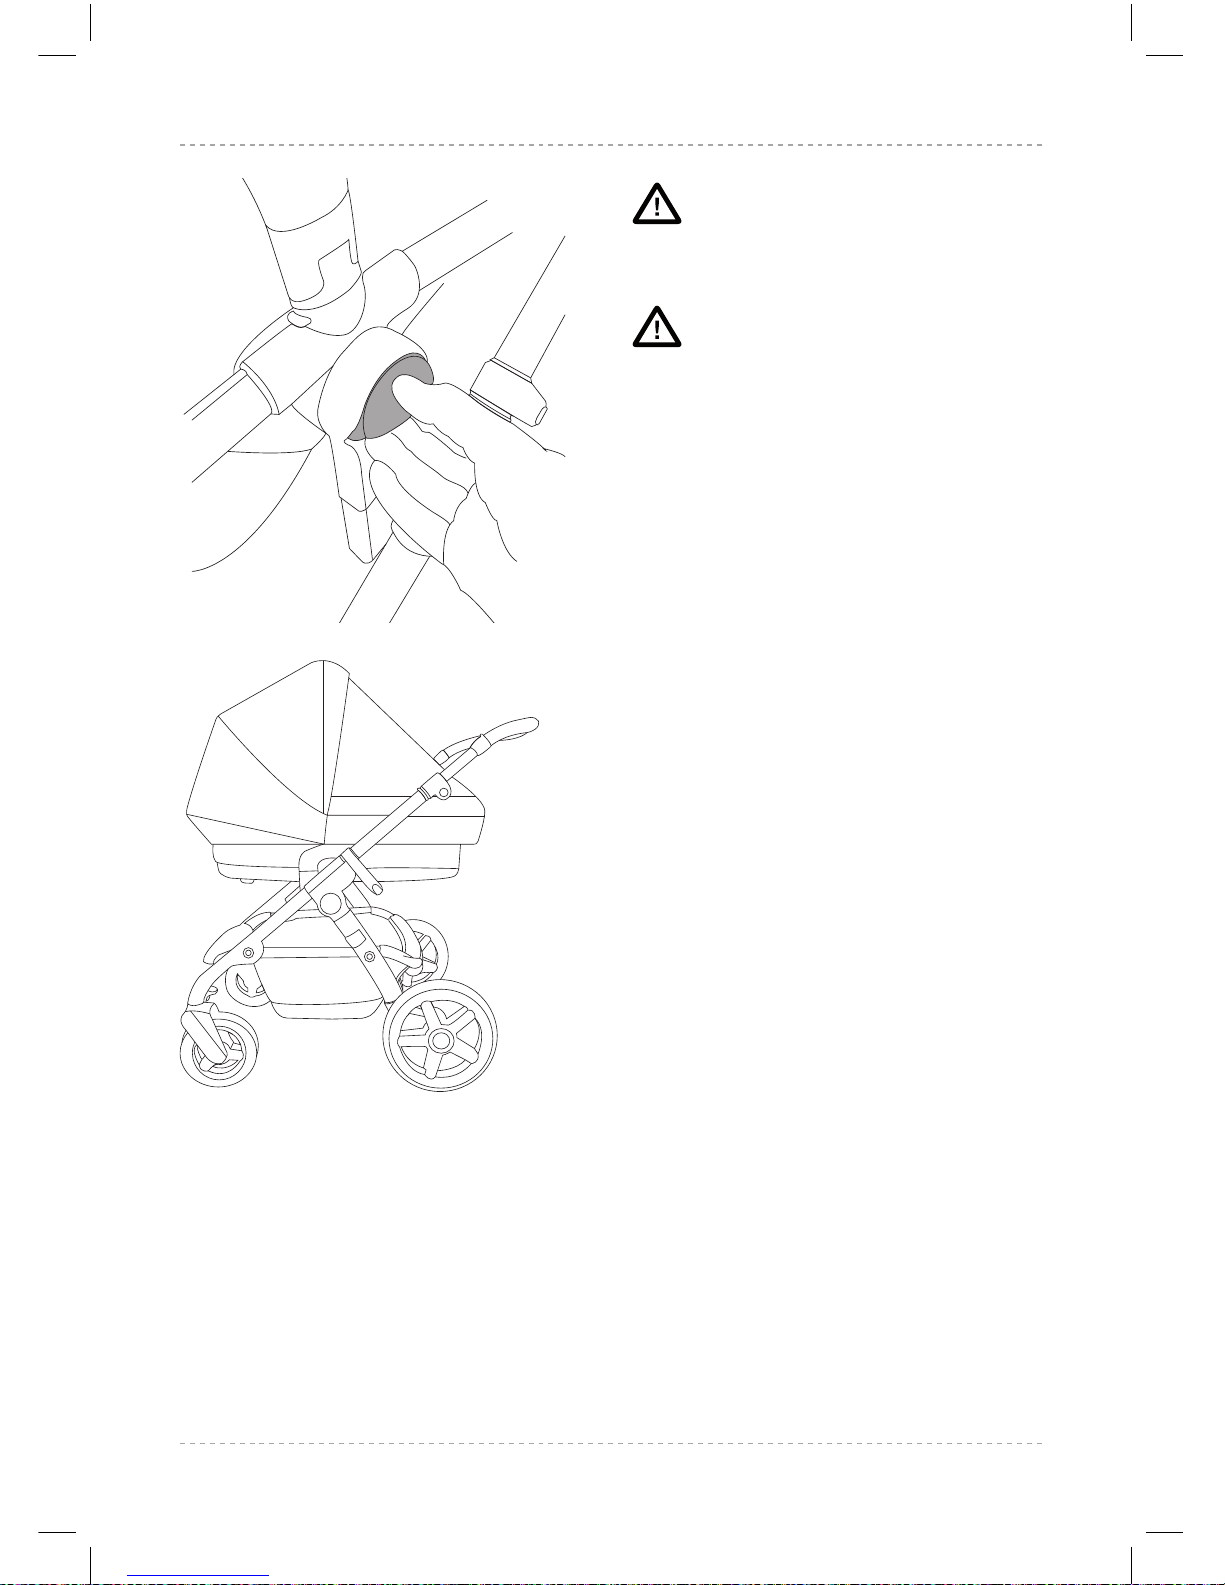
Detaching the carrycot from
the Wave connector
17.1 Pull both carrycot release
handles outwards and lift the
carrycot clear of the chassis.
DO NOT LIFT THE CARRYCOT
FROM THE BUMPER BAR.
Using the carrycot raincover
with the carrycot
18.1 The carrycot raincover should
be used when the hood is
attached to the carrycot.
Slide the raincover over the
hood and down towards the
foot end of the carrycot.
A zip gives easy access to
your child.
Using the carrycot bug net with
the carrycot
19.1 The carrycot bug net should
be used when the hood is
attached to the carrycot.
Slide the bug net over the
hood and down towards the
foot end of the carrycot.
17.1
18.1
Wave Instructions 2016-AUSTRALIAN.indd 16 19/09/2017 16:51
Page 17
17
silvercross.com.au
AUS
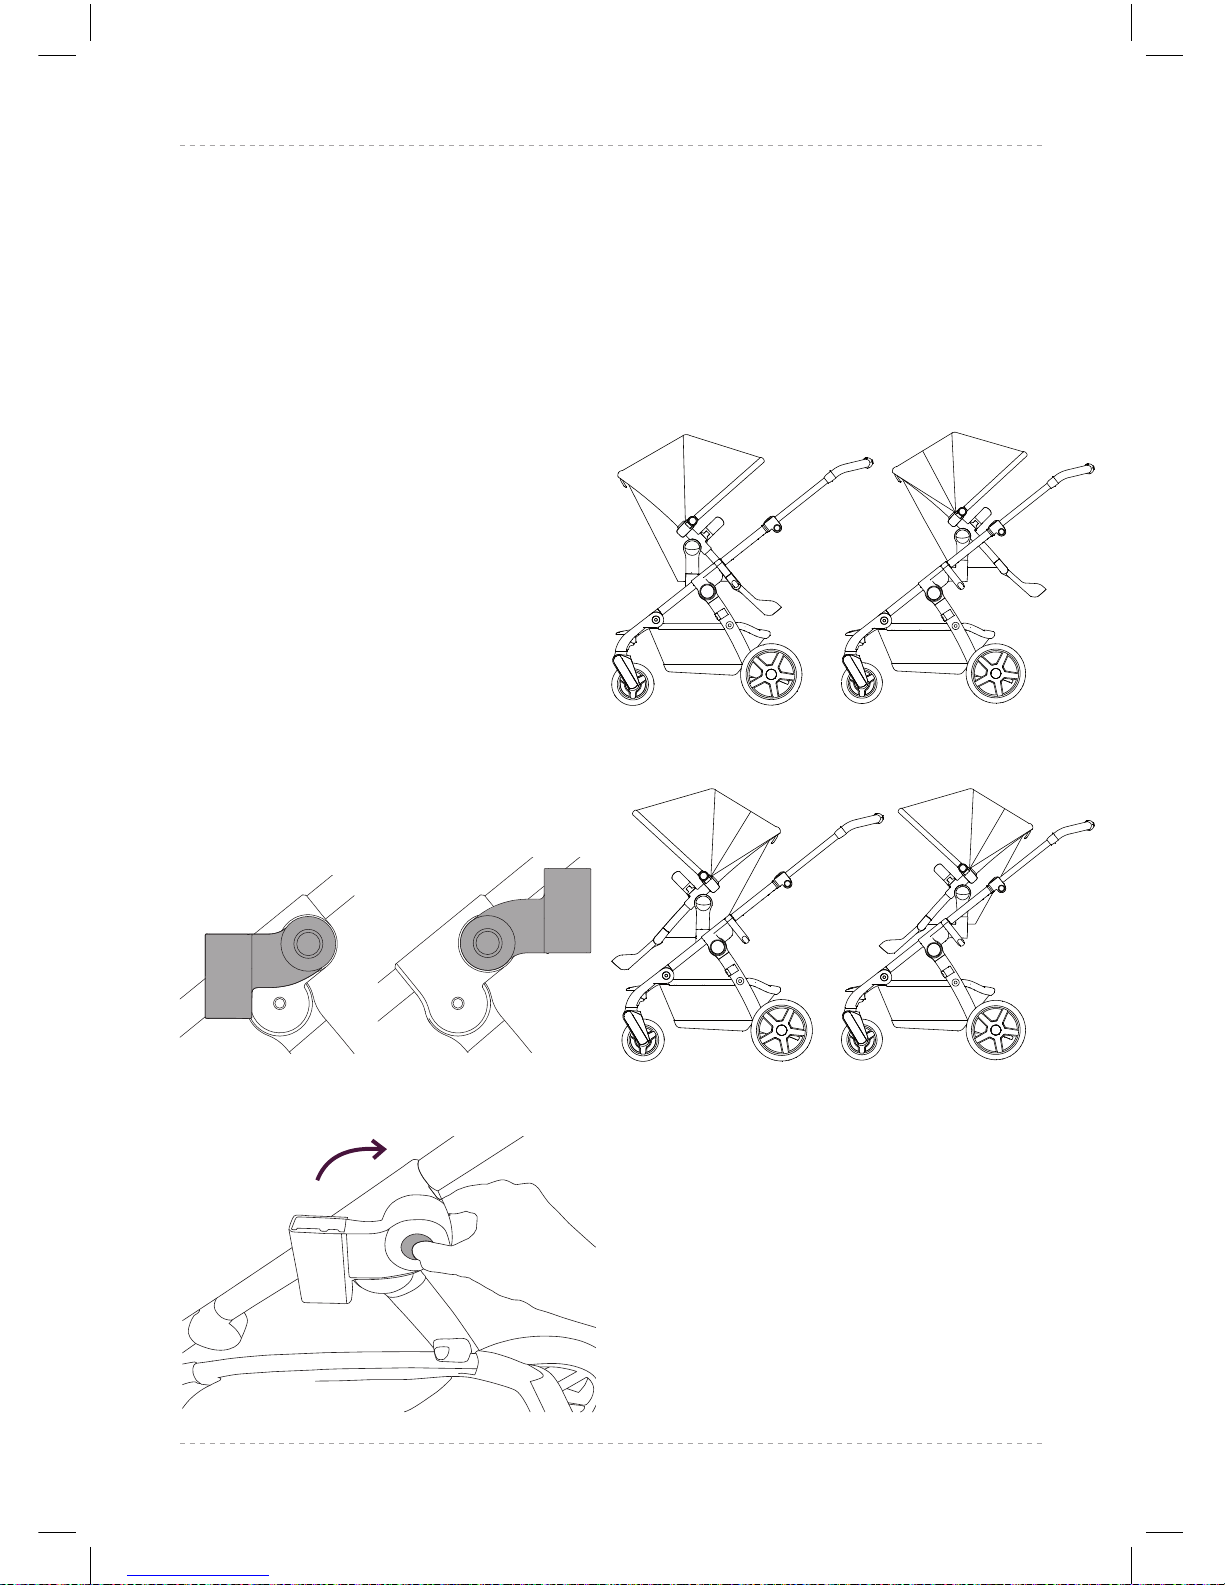
USING WAVE AS A
PUSHCHAIR
The pushchair seat can be tted
to the chassis in either rearwardfacing (infant facing you) or
forward-facing (infant facing
away from you).
Attaching the pushchair seat to
the Wave connector
The pushchair seat can be
attached to the Wave connector
in either the primary or the
secondary position.
Press the circular button on each
Wave connector and rotate until it
‘clicks’ into place.
Rearward-facing
Forward-facing
Primary position Secondary position
Wave Instructions 2016-AUSTRALIAN.indd 17 19/09/2017 16:51
Page 18
18
AUS
WARNING
ENSURE ALL LOCKING DEVICES
ARE ENGAGED BEFORE USE.
Please refer to 12.1-12.2 to attach
and release the bumper bar
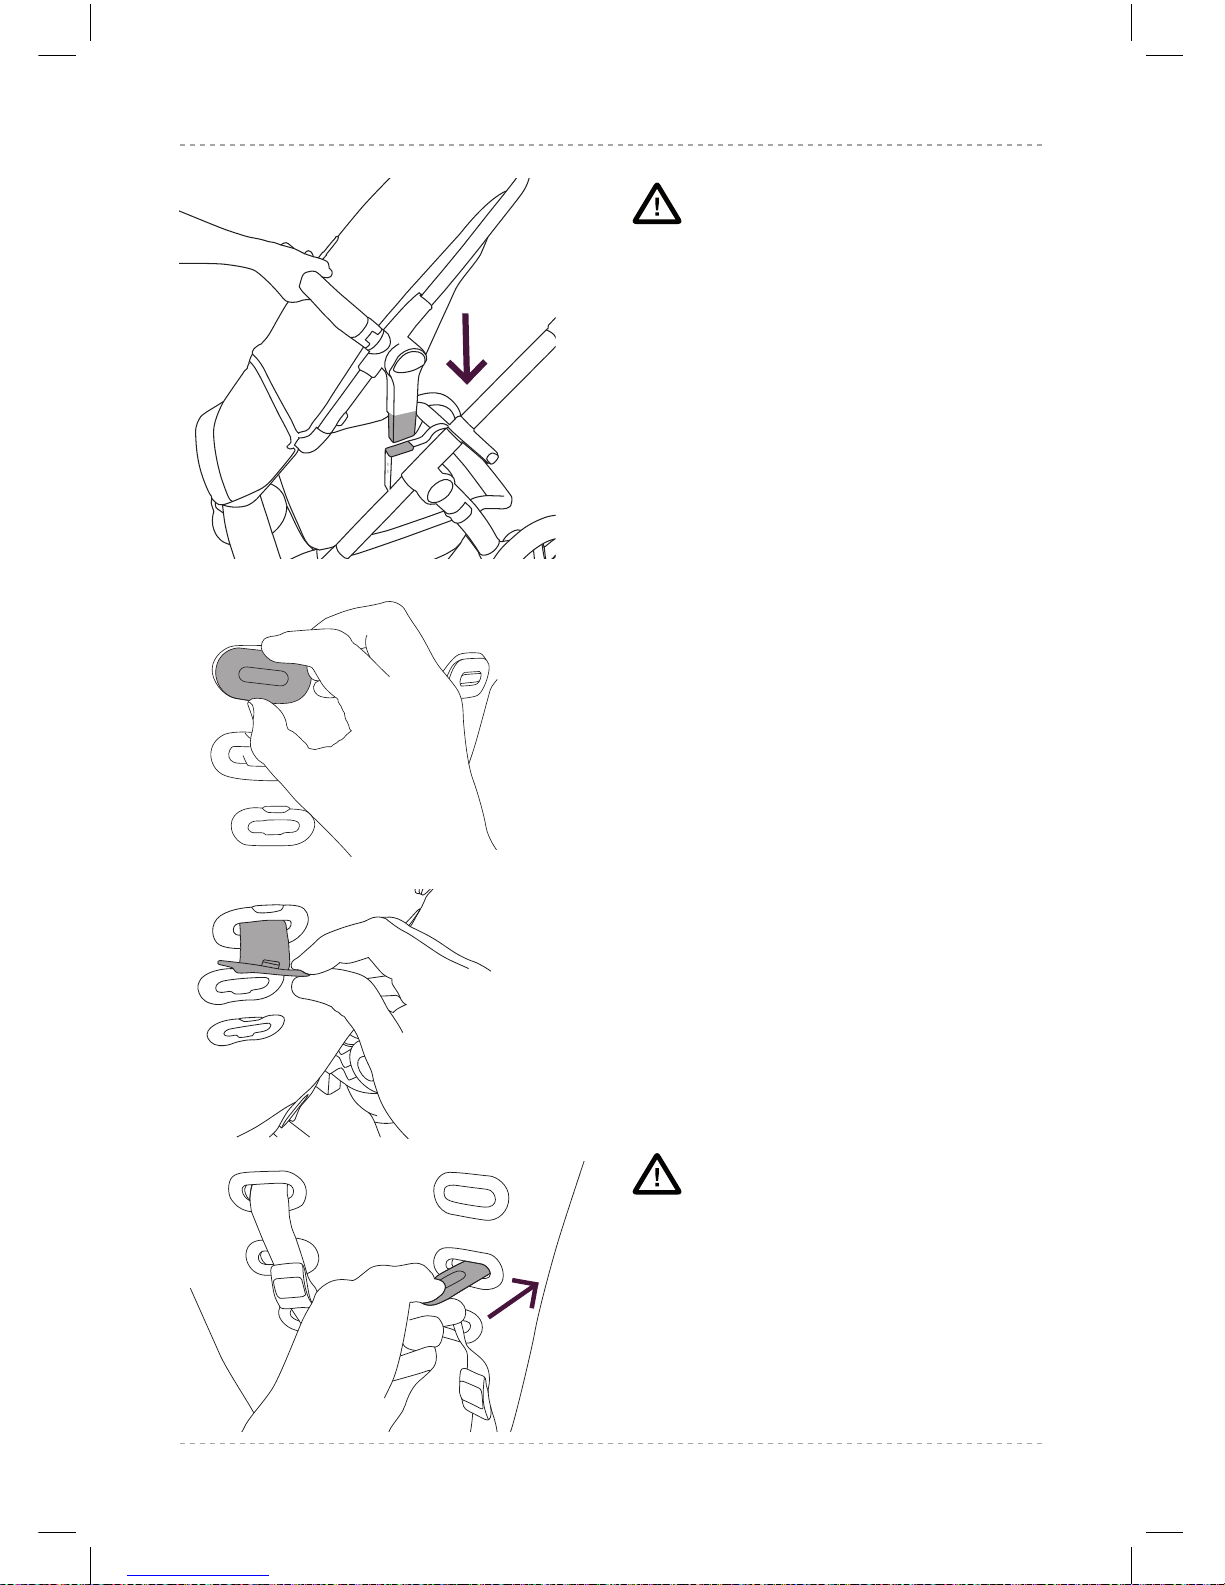
20.1 Hold the pushchair seat
above the chassis. Locate
the pushchair seat connector
posts into the Wave
connector slots. Ensure that
the pushchair seat ‘clicks’
into place.
Preparing the harness
The harness is a ve point system,
consisting of shoulder straps, waist
straps and crotch straps.
21.1 The shoulder straps have 3
height positions. To adjust,
rst lift the ap on the back
of the seat. Pull to release the
shoulder strap attachment
clip from the harness slot and
thread the shoulder strap
back through the harness
slot.
21.2 From the front of the seat,
thread the shoulder strap
back through the desired
harness slot unit relative to
the size of your child and
secure the attachment clip to
the harness slot.
WARNING
ALWAYS USE THE CROTCH STRAP
IN COMBINATION WITH THE
WAIST STRAP.
20.1
21.1
21.2
Wave Instructions 2016-AUSTRALIAN.indd 18 19/09/2017 16:51
Page 19
19
silvercross.com.au
AUS
A
A
A
A A
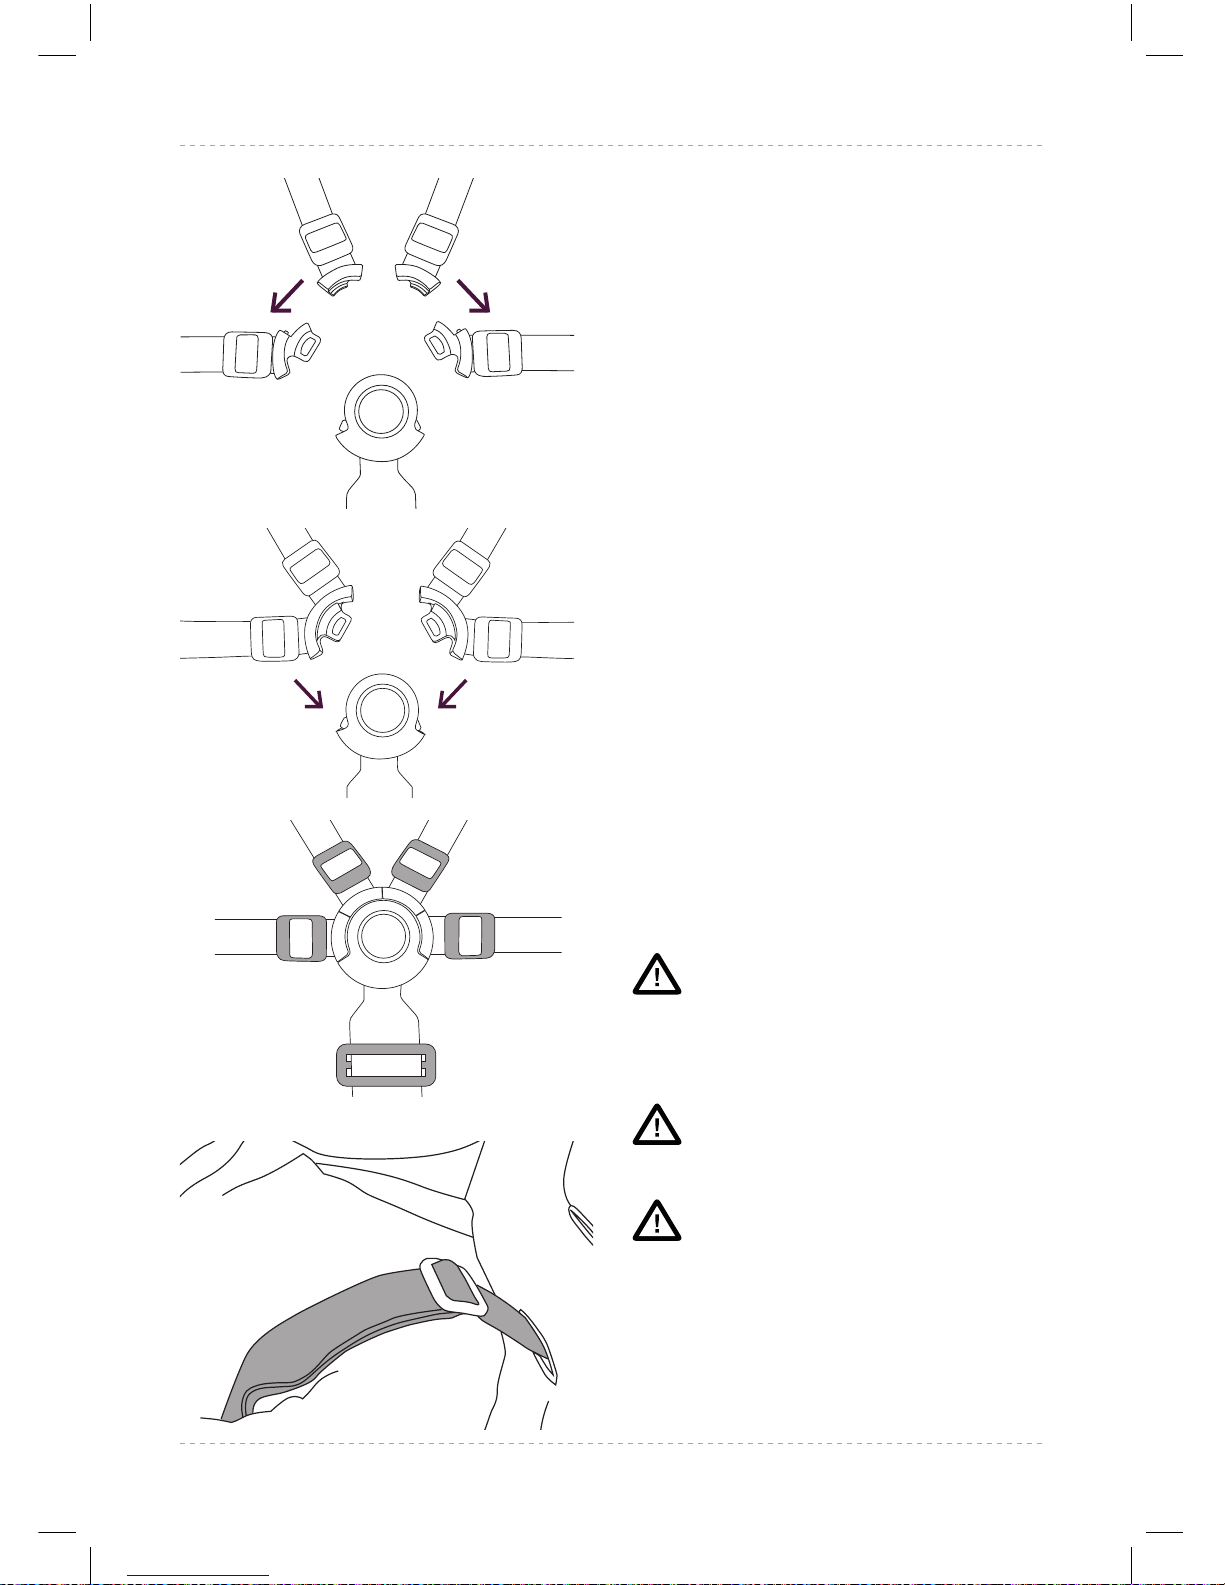
Using the harness
Attach and release the buckle as
necessary to facilitate harness
adjustment and checking the harness
tightness.
22.1 Start by connecting shoulder
clips to waist clips.
22.2 To fasten the harness, insert the
pairs of clips into each side of the
buckle. Listen for the ‘click’.
22.3 The harness is fully adjustable by
moving the sliders (A), to make
tting easy.
22.4 It is very important that you
make sure the shoulder straps
are the correct height for your
child. The shoulder straps should
be level or just below your child’s
shoulders.
In a safe and secure
environment, place your child in
the pushchair with the backrest
upright and assess which of
the three shoulder strap height
positions is most suitable for your
child.
WARNING
WINTER / SUMMER CLOTHING CAN
MAKE A DIFFERENCE TO THE SIZE OF
YOUR CHILD.
WARNING
USE THIS HARNESS AT ALL TIMES
WARNING
NEVER LEAVE THE HARNESS
BUCKLED WHEN NOT FITTED TO
A CHILD IN THE PRAM/STROLLER
BECAUSE THE HARNESS CAN
FORM LOOPS WHICH MAY POSE A
STRANGULATION HAZARD
22.1
22.2
22.3
22.4
Wave Instructions 2016-AUSTRALIAN.indd 19 19/09/2017 16:51
Page 20
20
AUS
Harness tightness
It is important to ensure that your
child is securely fastened into the
harness by assessing the tightness
of the straps.
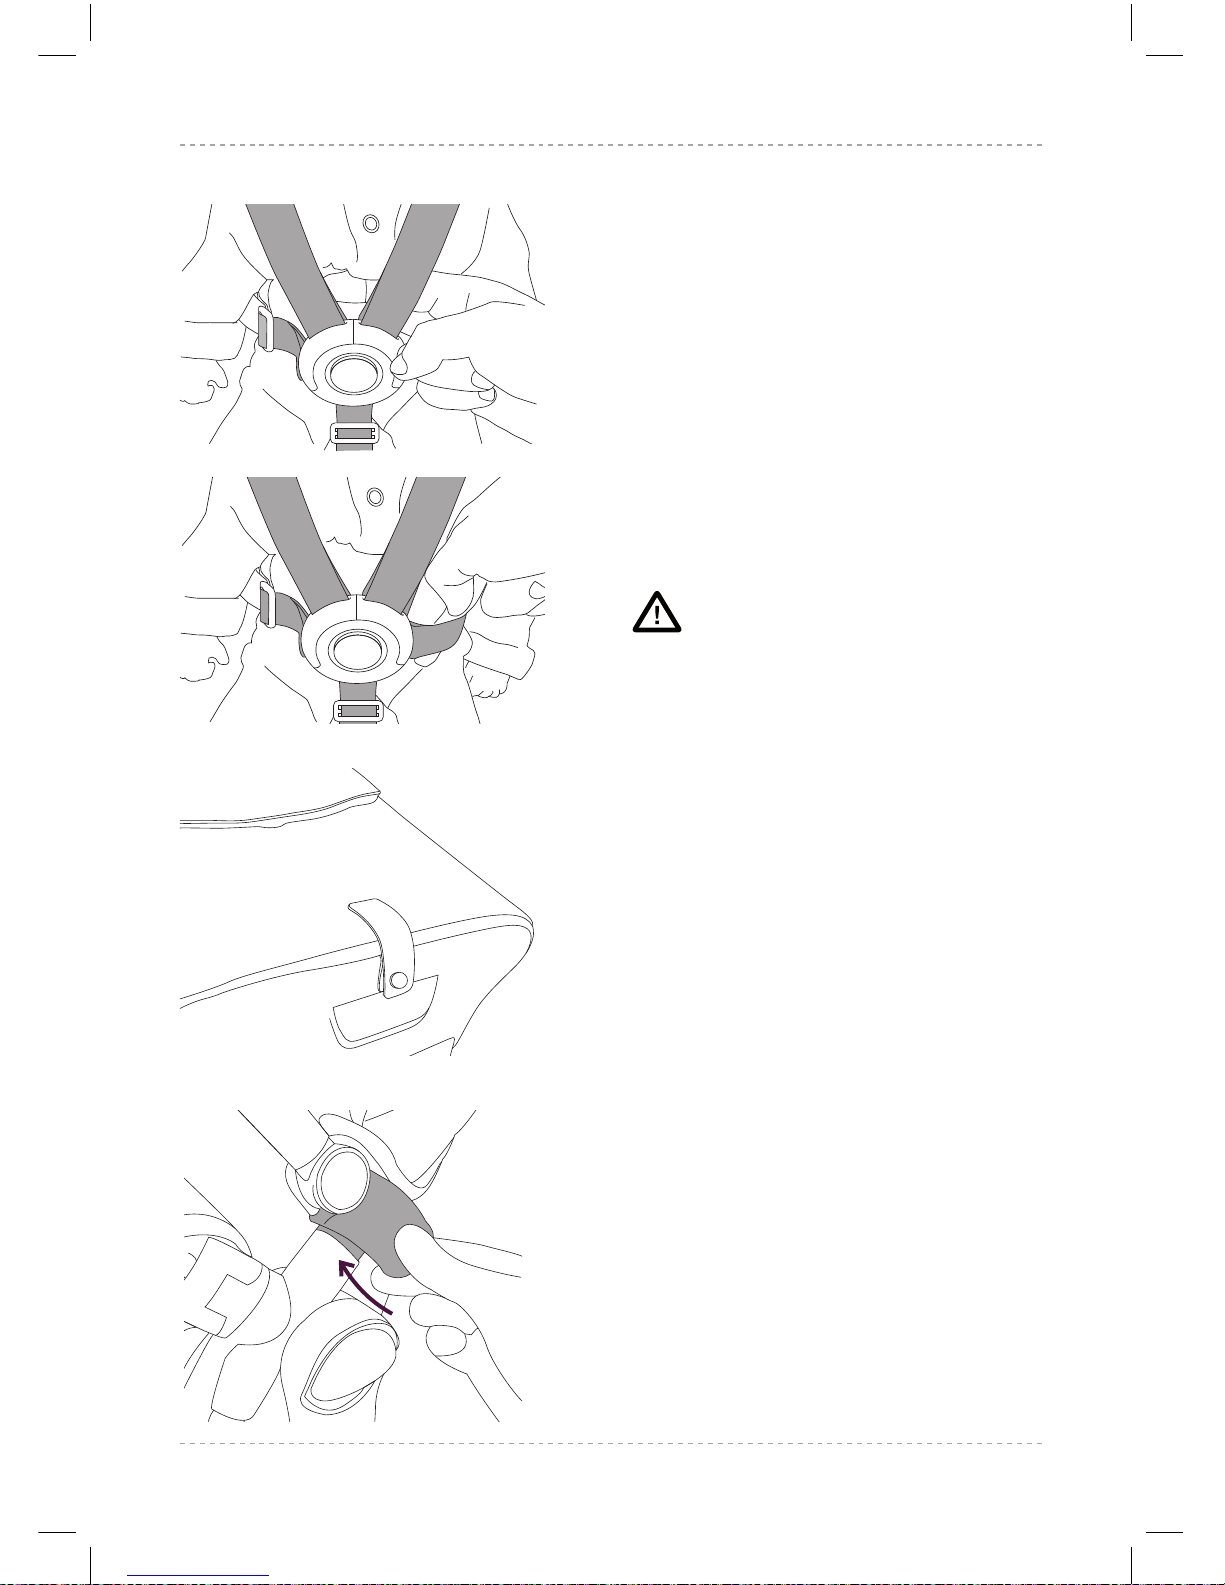
22.5 You should only be able to
insert 2 ngers between the
shoulder straps and the waist
straps.
22.6 To release the harness, press
the centre buckle button and
pull apart. The shoulder clips
can be detached from the
waist clips if required.
WARNING
BEFORE YOU USE THE
PUSHCHAIR SEAT, THE HARNESS
MUST BE ADJUSTED TO SUIT THE
SIZE OF YOUR CHILD. ALWAYS
USE THE HARNESS.
Attaching the hood to the
pushchair seat
23.1 Slide the back of the
hood over the back of the
pushchair seat. Locate the
slot in the fabric at the back
of the hood and slide over the
seat recline adjustment lever.
23.2 Attach the hood to the
pushchair seat frame by
pressing down on the hood
attachment clips on each
side of frame.
23.1
22.5
23.2
Wave Instructions 2016-AUSTRALIAN.indd 20 19/09/2017 16:51
Page 21
21
silvercross.com.au
AUS
Using the pushchair seat hood
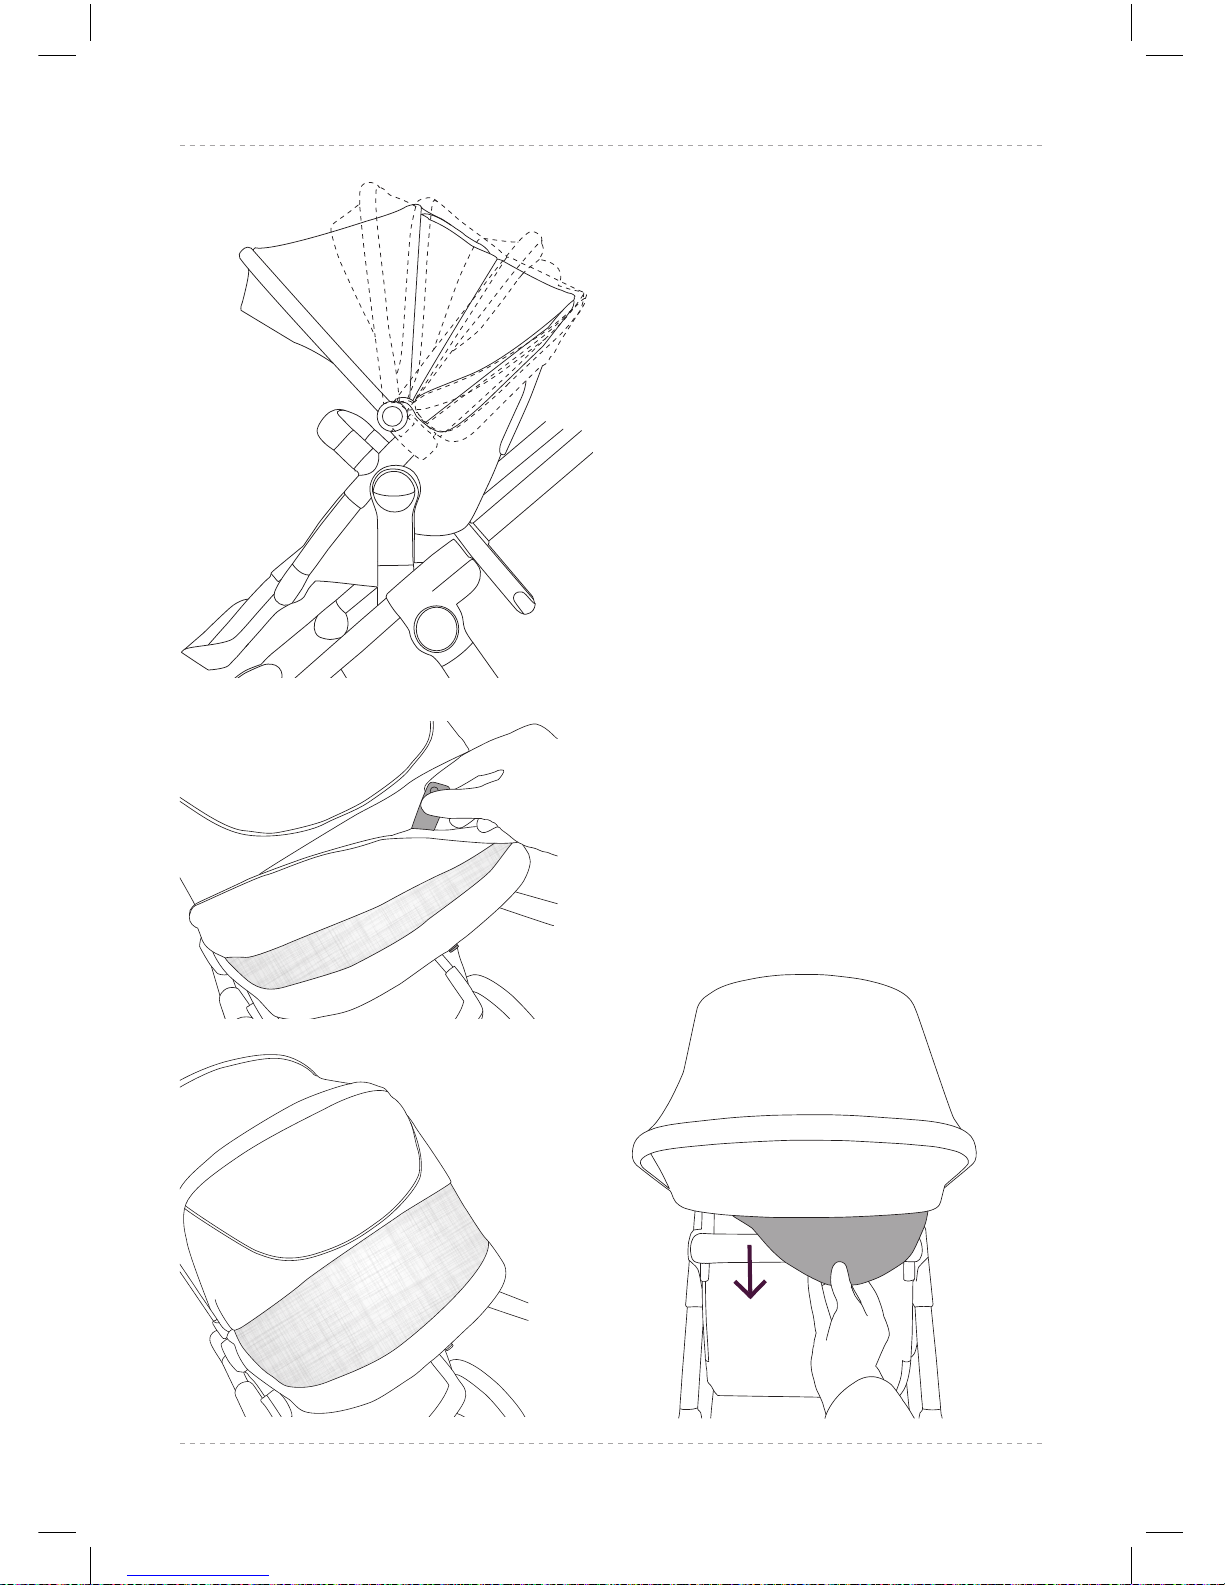
24.1 The pushchair seat hood can
be used in 3 positions. Fully
open, semi-open and fully
folded.
24.2 The pushchair seat hood
features a ventilation panel.
To open the ventilation
panel, release the magnet
attachment and lift the ap,
securing it underneath the
viewing window ap using
the magnet at the bottom of
the viewing window ap.
24.3 The pushchair seat hood
features a pop-out sun visor.
To use the sun visor, pull out
from the inside of the hood.
To store, push the sun visor
back inside the hood.
24.1
24.2
24.3
Wave Instructions 2016-AUSTRALIAN.indd 21 19/09/2017 16:51
Page 22
22
AUS
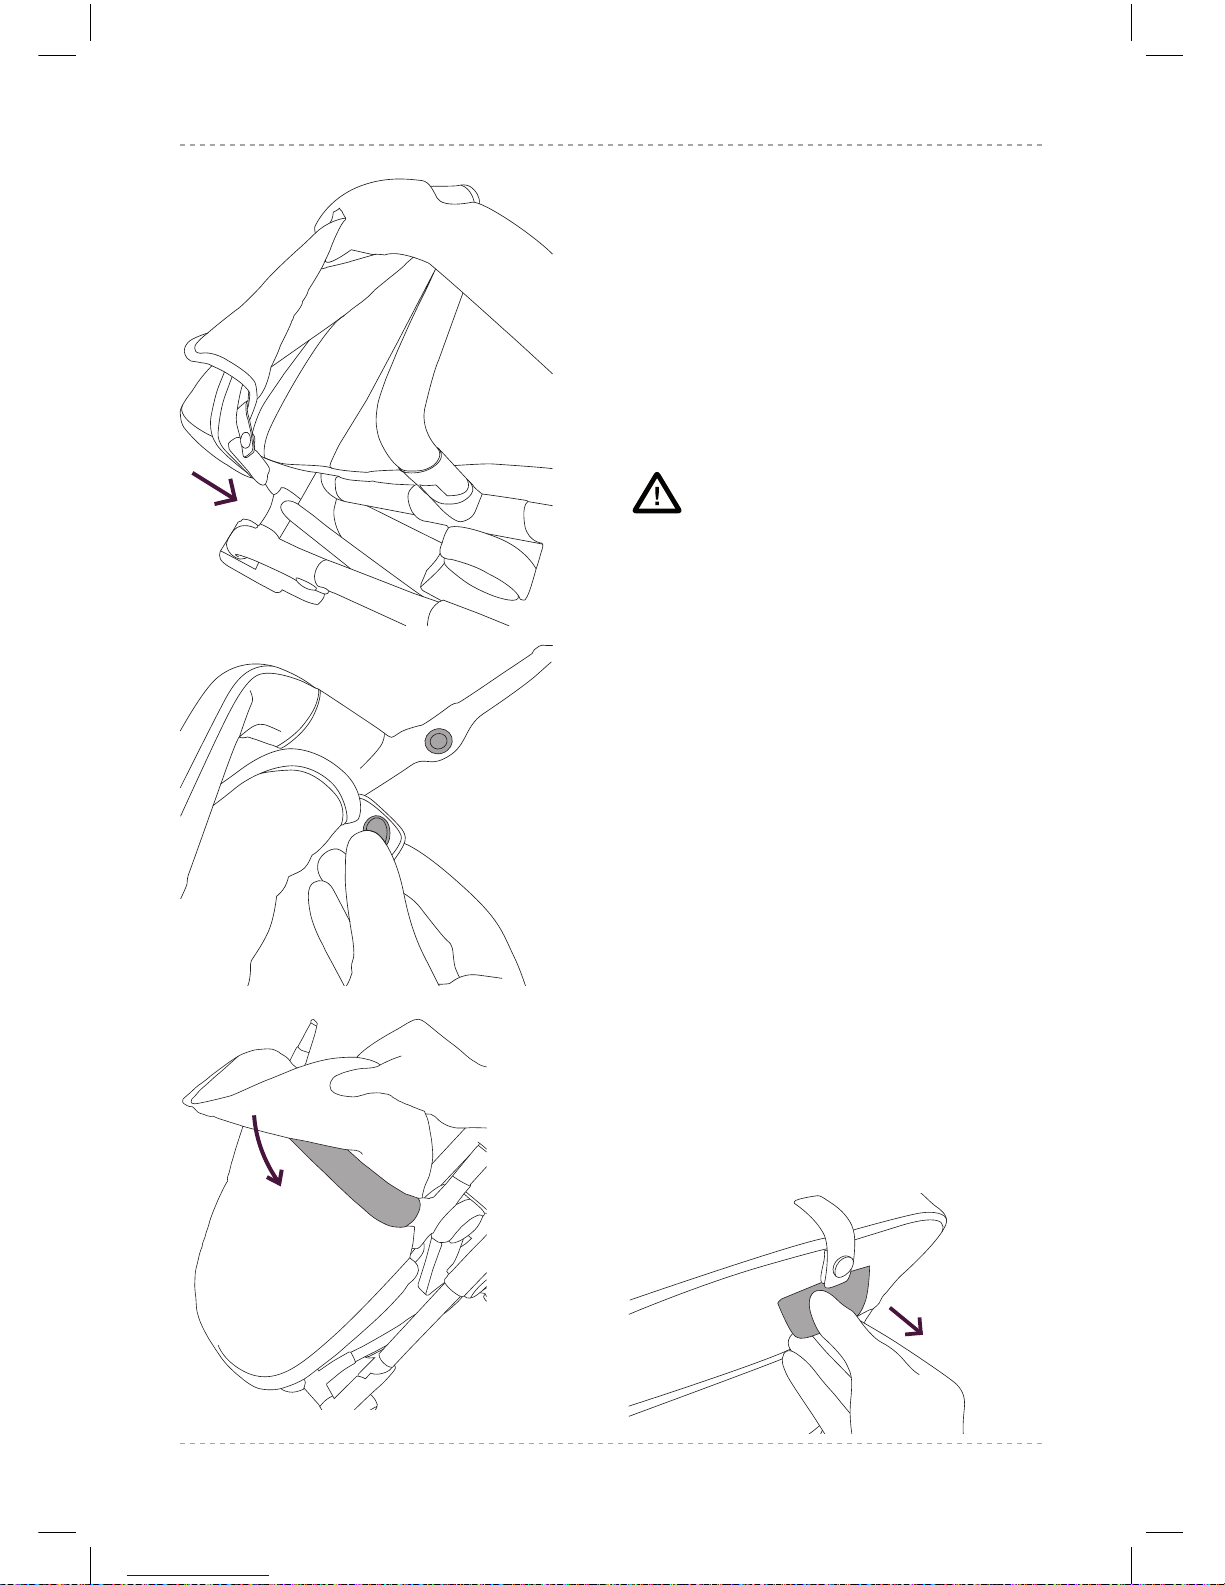
Attaching the apron to the
pushchair seat
25.1 Slide the apron over the
pushchair seat footrest.
25.2 Attach the magnetic
fastenings to the inside of the
pushchair seat frame.
25.3 Fold the apron ap over the
bumper bar.
WARNING
ALWAYS ENSURE THE BUMPER
BAR IS ATTACHED WHEN YOUR
CHILD IS IN THE PUSHCHAIR
SEAT.
Adjusting the seat recline
The pushchair seat has up to 3
forward-facing and 3 rearwardfacing recline angles, depending
upon congurations.
26.1 To adjust the seat angle,
lift and hold the seat recline
adjustment lever on the
back of the pushchair seat.
Rotate the pushchair seat
upwards or downwards to
upright, semi-recline or full
recline. Release the recline
adjustment lever and wait to
hear a ‘click’ for each position
to lock into place.
25.1
25.2
25.3
26.1
Wave Instructions 2016-AUSTRALIAN.indd 22 19/09/2017 16:51
Page 23
23
silvercross.com.au
AUS
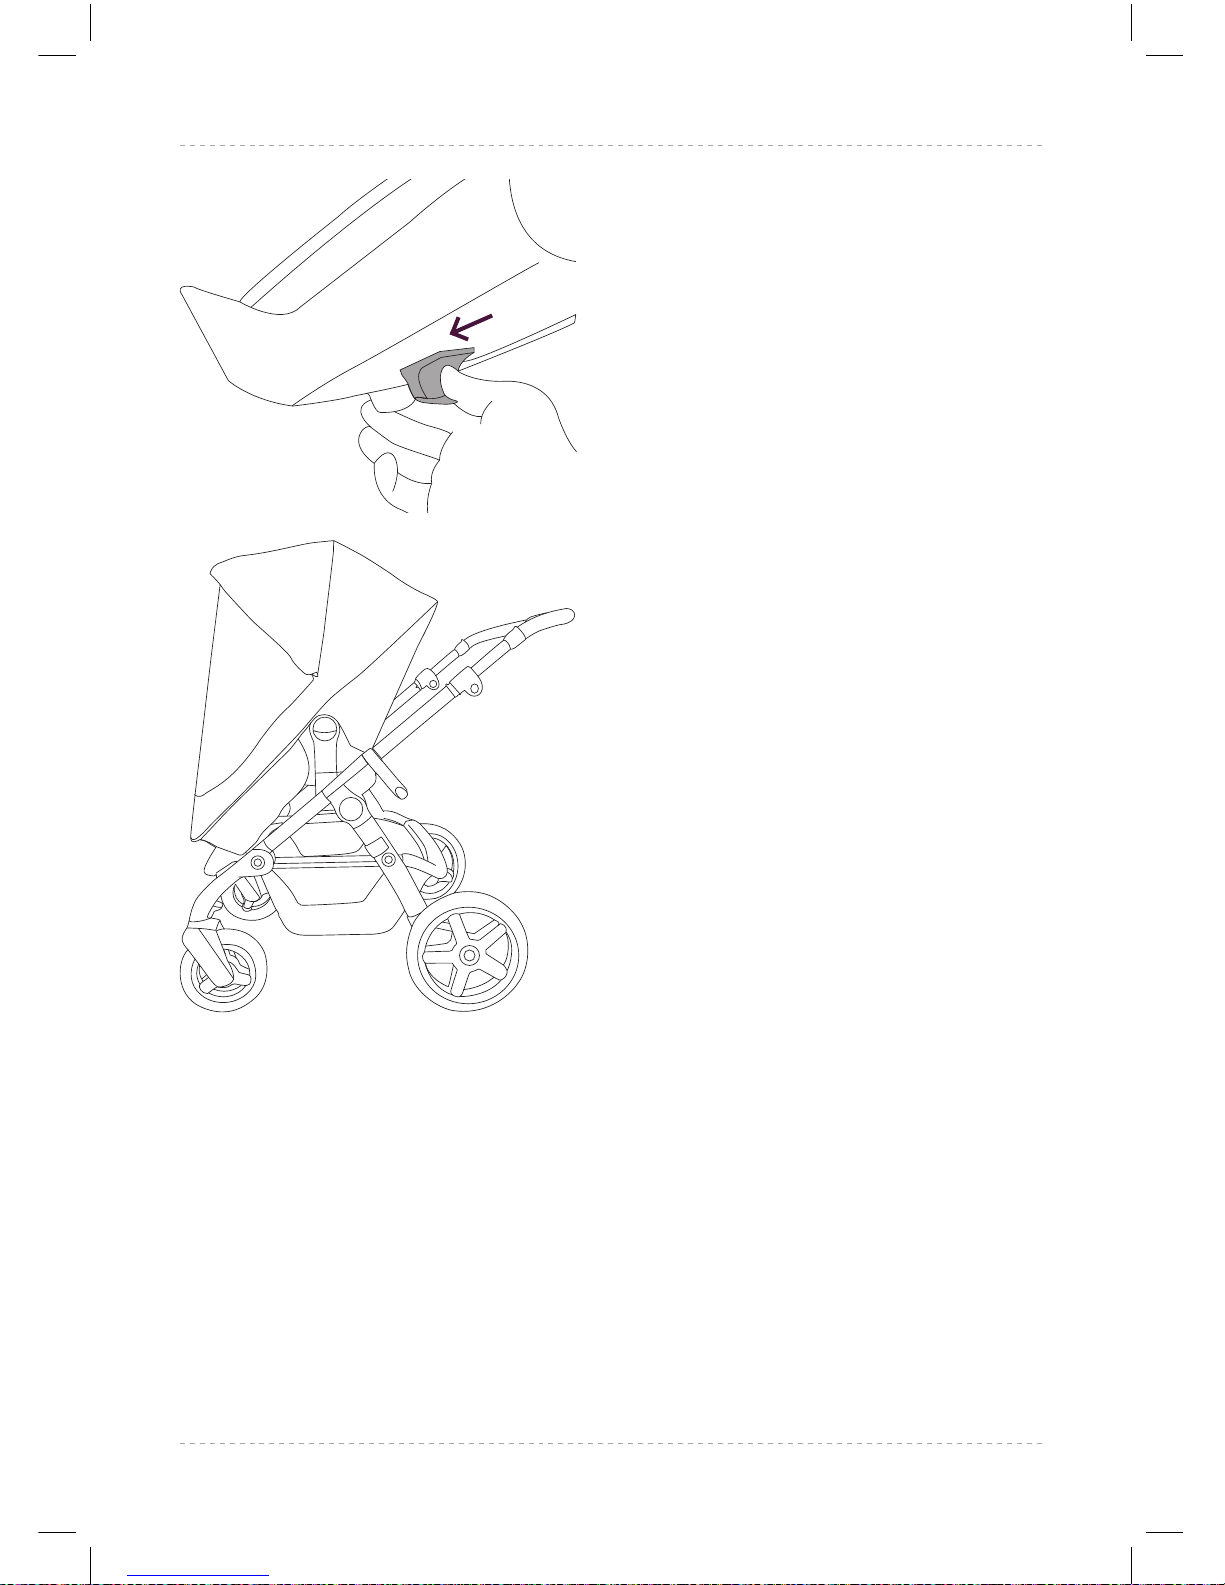
Adjusting the footrest
The pushchair seat has an
adjustable multi-position footrest.
26.2 To adjust the footrest, push
the adjustment lever on the
underside of the footrest
and lower the footrest into
the desired position. To raise
the footrest, gently lift the
footrest up until it ‘clicks’ into
the desired position.
Using the pushchair/tandem
seat raincover with the
pushchair seat or tandem seat
27.1 The pushchair/tandem seat
raincover should be used
when the hood is attached to
the pushchair seat or tandem
seat. Slide the raincover over
the hood and down towards
the toe of the pushchair seat
or tandem seat. A zip gives
easy access to your child.
Using the pushchair / tandem
seat bug net with the pushchair
seat or tandem seat
28.1 The pushchair / tandem seat
bug net should be used when
the hood is attached to the
pushchair seat or tandem
seat. Slide the bug net over
the hood and down towards
the toe of the pushchair seat
or tandem seat.
26.2
27.1
Wave Instructions 2016-AUSTRALIAN.indd 23 19/09/2017 16:51
Page 24
24
AUS
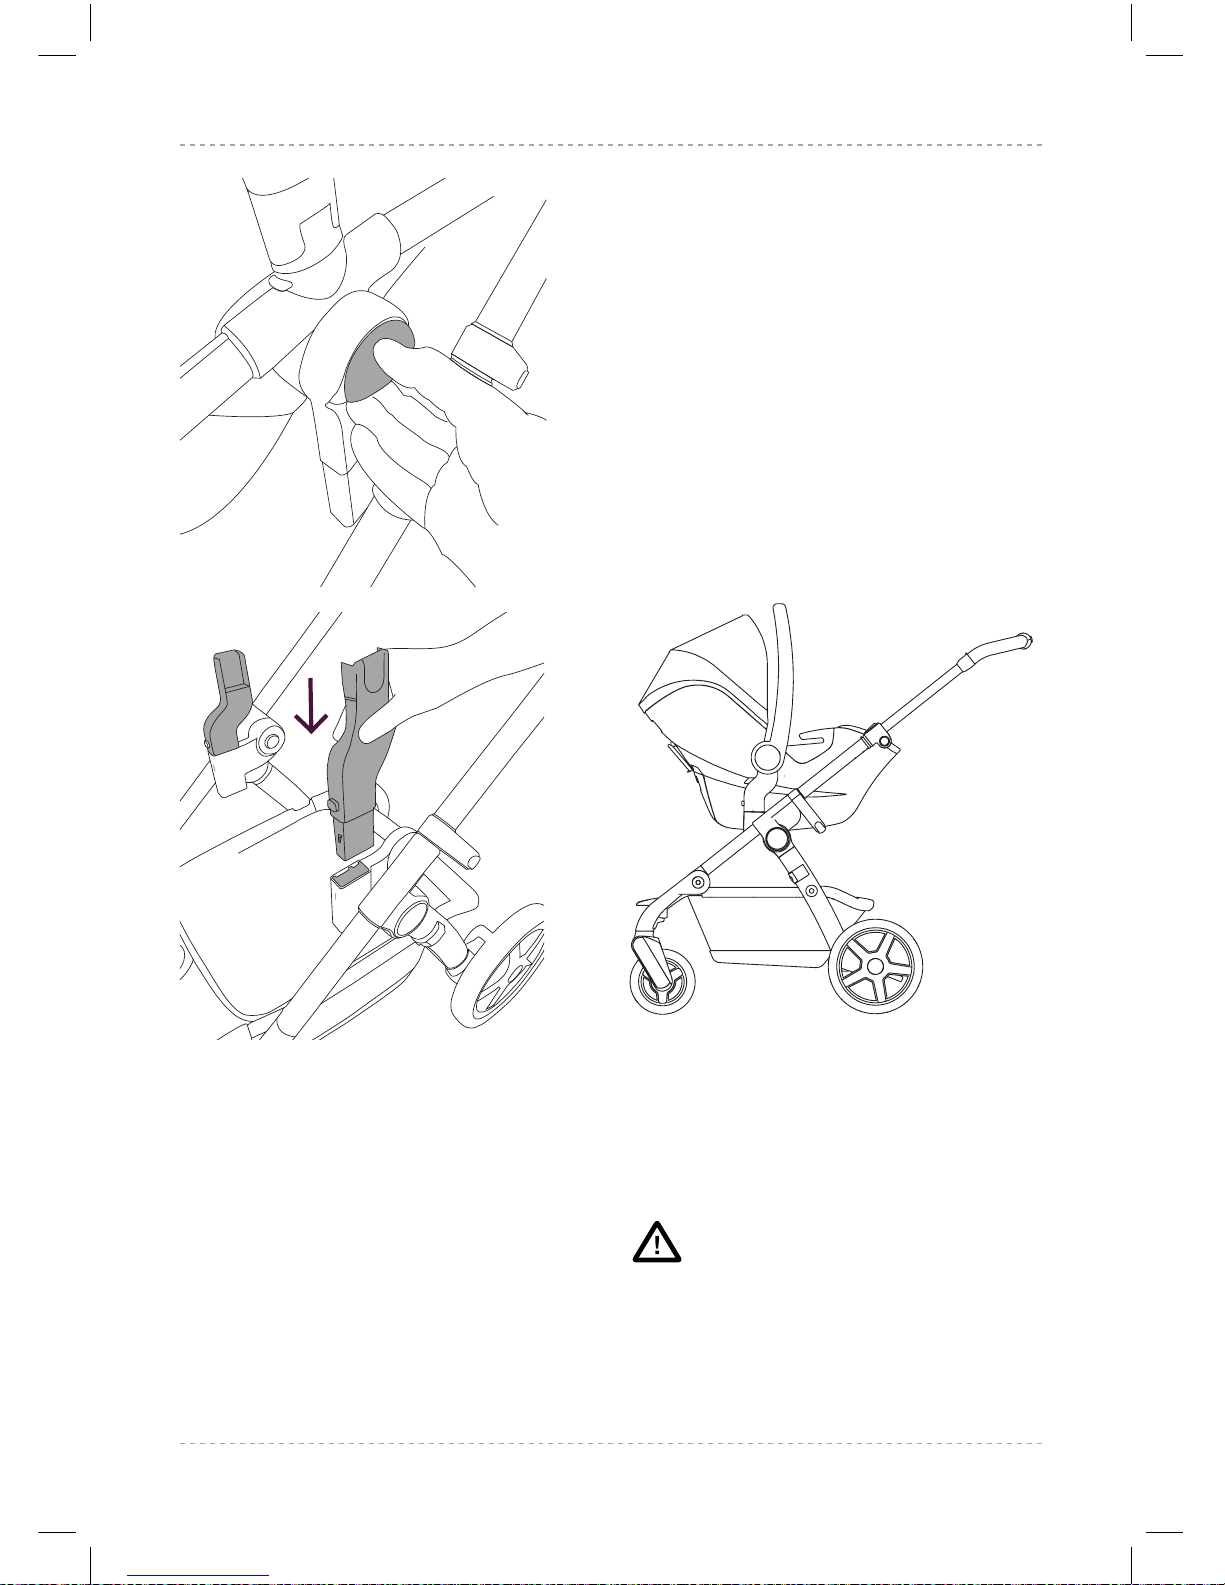
Detaching the pushchair seat
from the Wave connector
29.1 Pull both seat release handles
outwards and lift the pushchair
seat clear of the chassis.
IMPORTANT: REMOVE THE
CHILD FROM THE PUSHCHAIR
SEAT BEFORE DETACHING THE
PUSHCHAIR SEAT FROM THE
CHASSIS.
USING WAVE WITH THE CAR
SEAT
Attaching the Car Seat adaptors
to the Wave connectors
30.1 Locate the adaptors into the
Wave connector slots on both
sides. Ensure the adaptors
‘click’ into place.
WARNING
THE CAR SEAT MUST ALWAYS BE
REARWARD FACING.
30.1
29.1
Wave Instructions 2016-AUSTRALIAN.indd 24 19/09/2017 16:51
Page 25
25
silvercross.com.au
AUS
Attaching the Car Seat to the
adaptors
FOR A LIST OF COMPATIBLE
CAR SEATS, PLEASE VISIT OUR
WEBSITE.
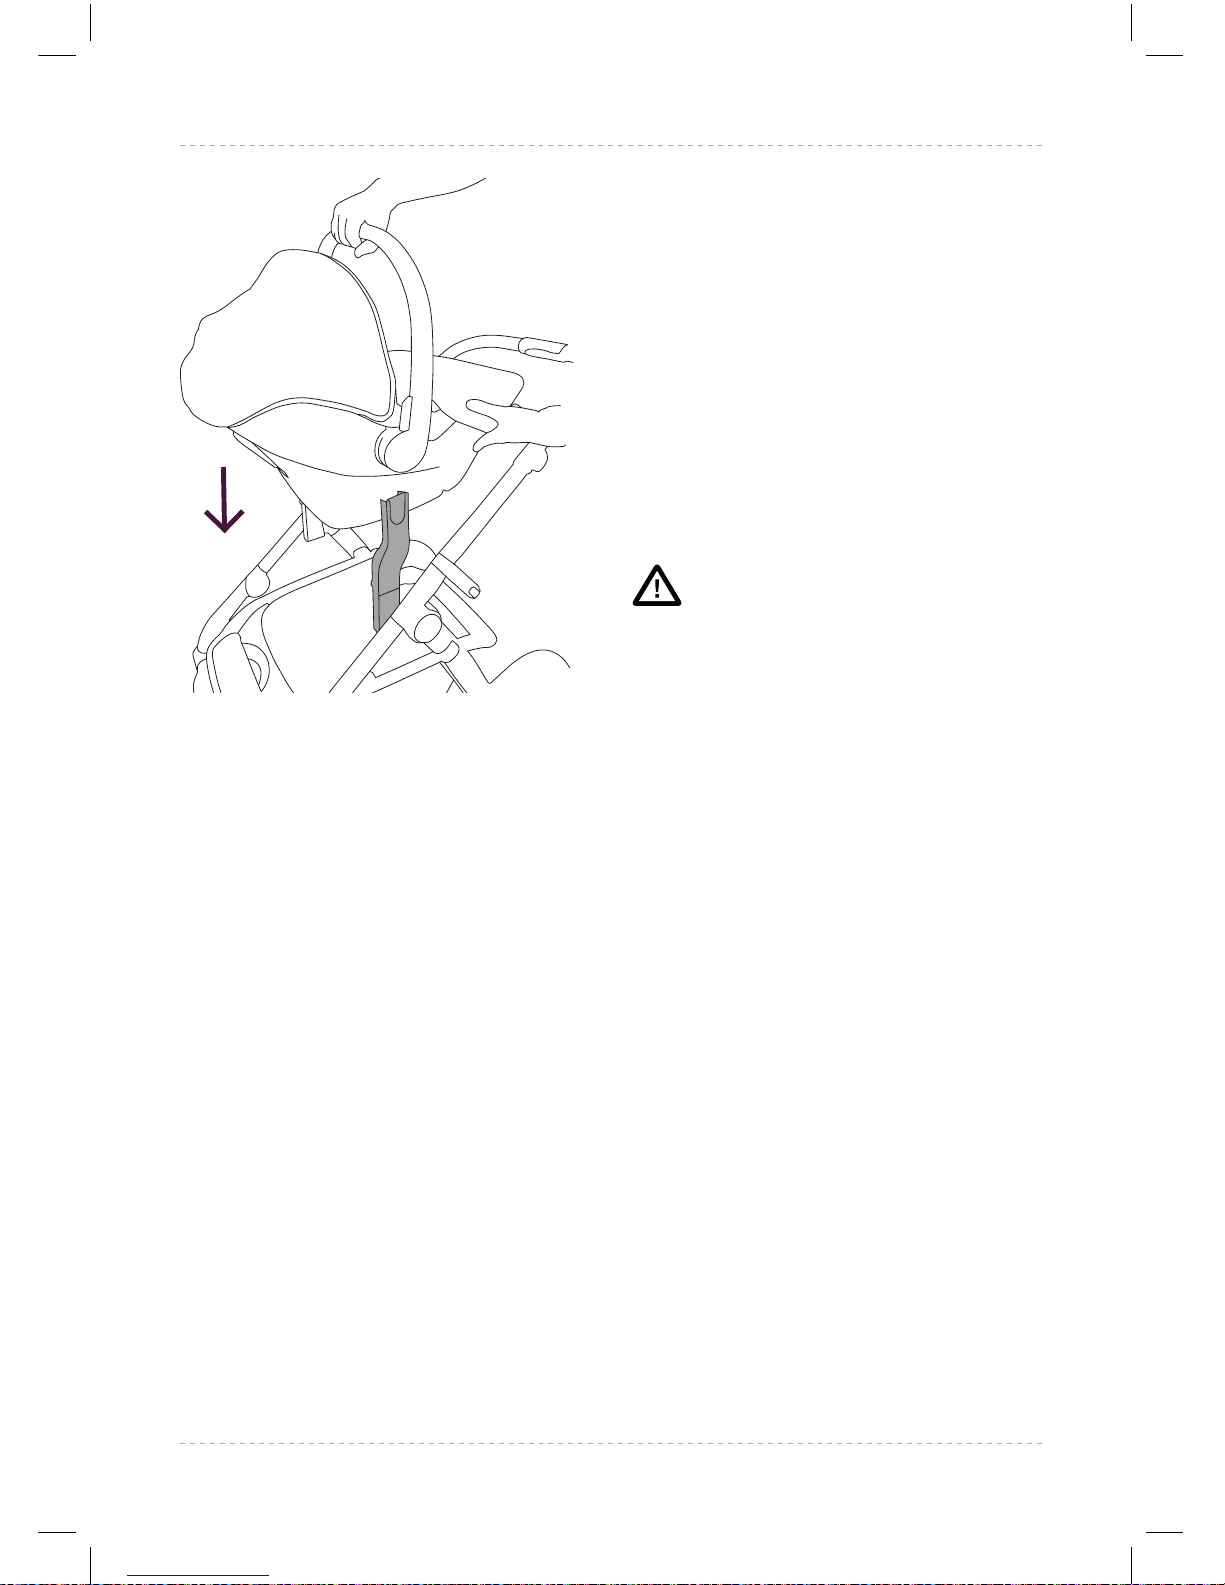
31.1 Ensure that the Car Seat
carry handle is in the vertical
position. Place the Car Seat
onto the adaptors. Ensure the
Car Seat ‘clicks’ into place.
Lift the Car Seat gently by the
carry handle to check the Car
Seat has secured into place.
WARNING
CHECK THAT THE CAR SEAT IS
CORRECTLY SECURED
BEFORE USE.
Detaching the Car Seat from
the Car Seat adapters
32.1 Please refer to the car seat
manufacturer instructions.
31.1
Wave Instructions 2016-AUSTRALIAN.indd 25 19/09/2017 16:51
Page 26
26
AUS
Detaching the Car Seat
adaptors from the Wave
connectors
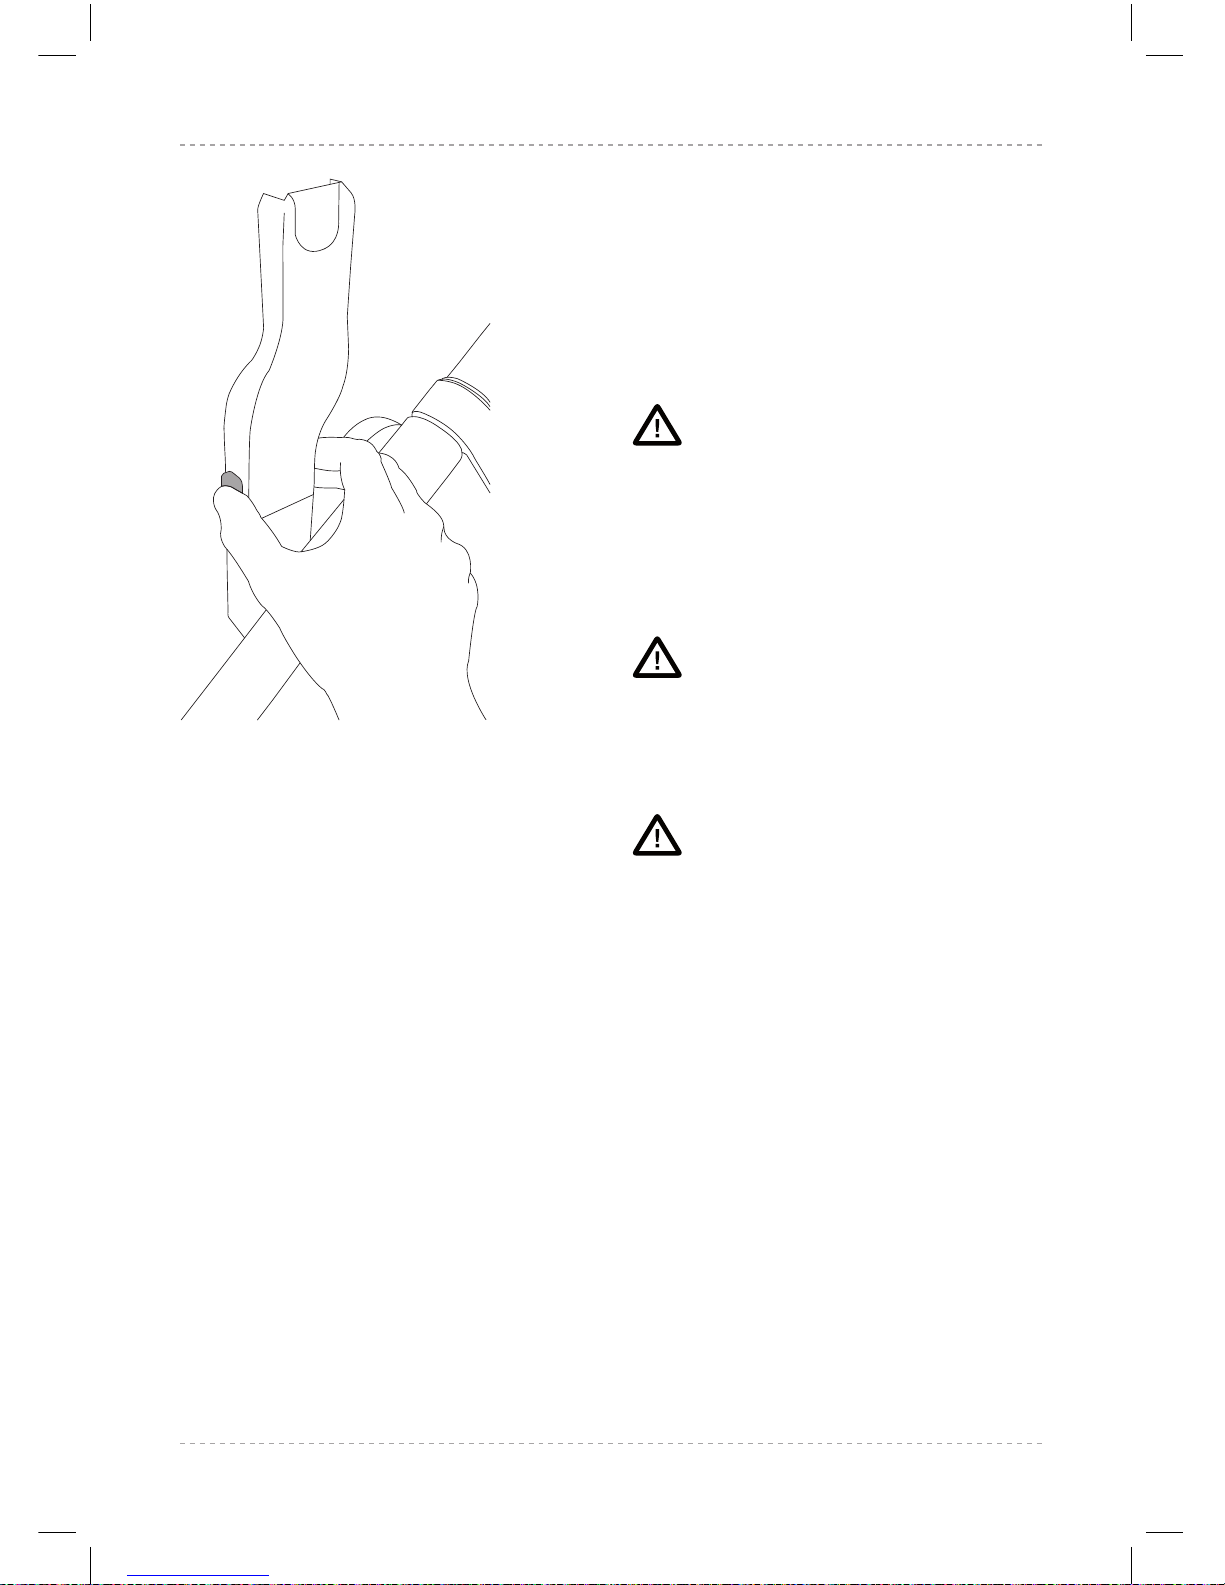
33.1 Press the silver button on the
side of each adaptor and pull
adaptor upwards to release
from Wave connection slots.
WARNING
THIS CAR SEAT DOES NOT
REPLACE A COT OR BED.
SHOULD YOUR CHILD NEED TO
SLEEP, THEY SHOULD BE
PLACED IN A SUITABLE PRAM
BODY OR COT.
WARNING
ONLY PLACE THE CAR SEAT ON
A FIRM, HORIZONTAL AND DRY
SURFACE IF NOT BEING USED
WITH THE WAVE CHASSIS.
WARNING
THE HANDLE AND THE BOTTOM
SHOULD BE INSPECTED
REGULARLY FOR SIGNS OF
DAMAGE AND WEAR.
33.1
Wave Instructions 2016-AUSTRALIAN.indd 26 19/09/2017 16:51
Page 27
27
silvercross.com.au
AUS
PREPARING WAVE
FOR USE IN TANDEM
CONFIGURATIONS
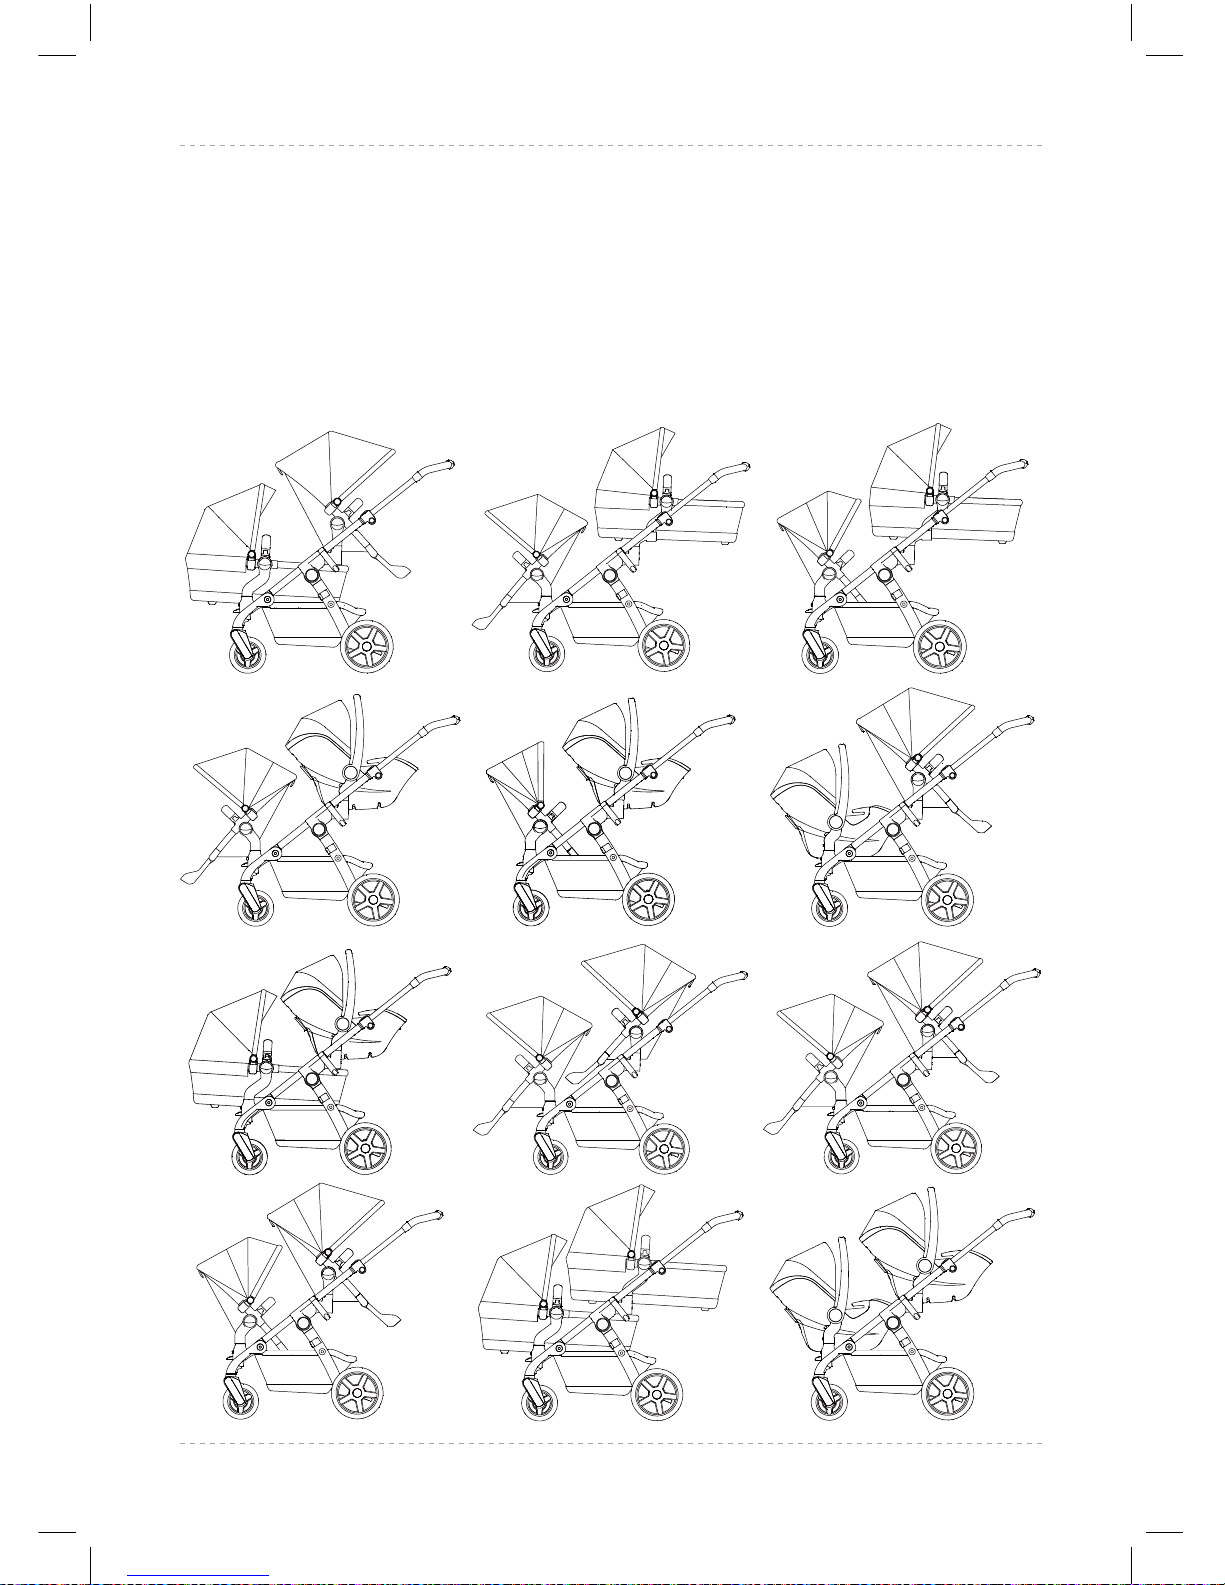
The chassis can be converted for
use in tandem congurations.
Please see images below for
possible congurations.
Table A
Wave Instructions 2016-AUSTRALIAN.indd 27 19/09/2017 16:51
Page 28
28
AUS
WARNING
BEFORE CONVERTING THE
WAVE FOR USE IN TANDEM
CONFIGURATION, APPLY THE
PARKING BRAKE AND REMOVE
ANY CAR SEAT OR CARRYCOT.
Attaching the tandem
connectors
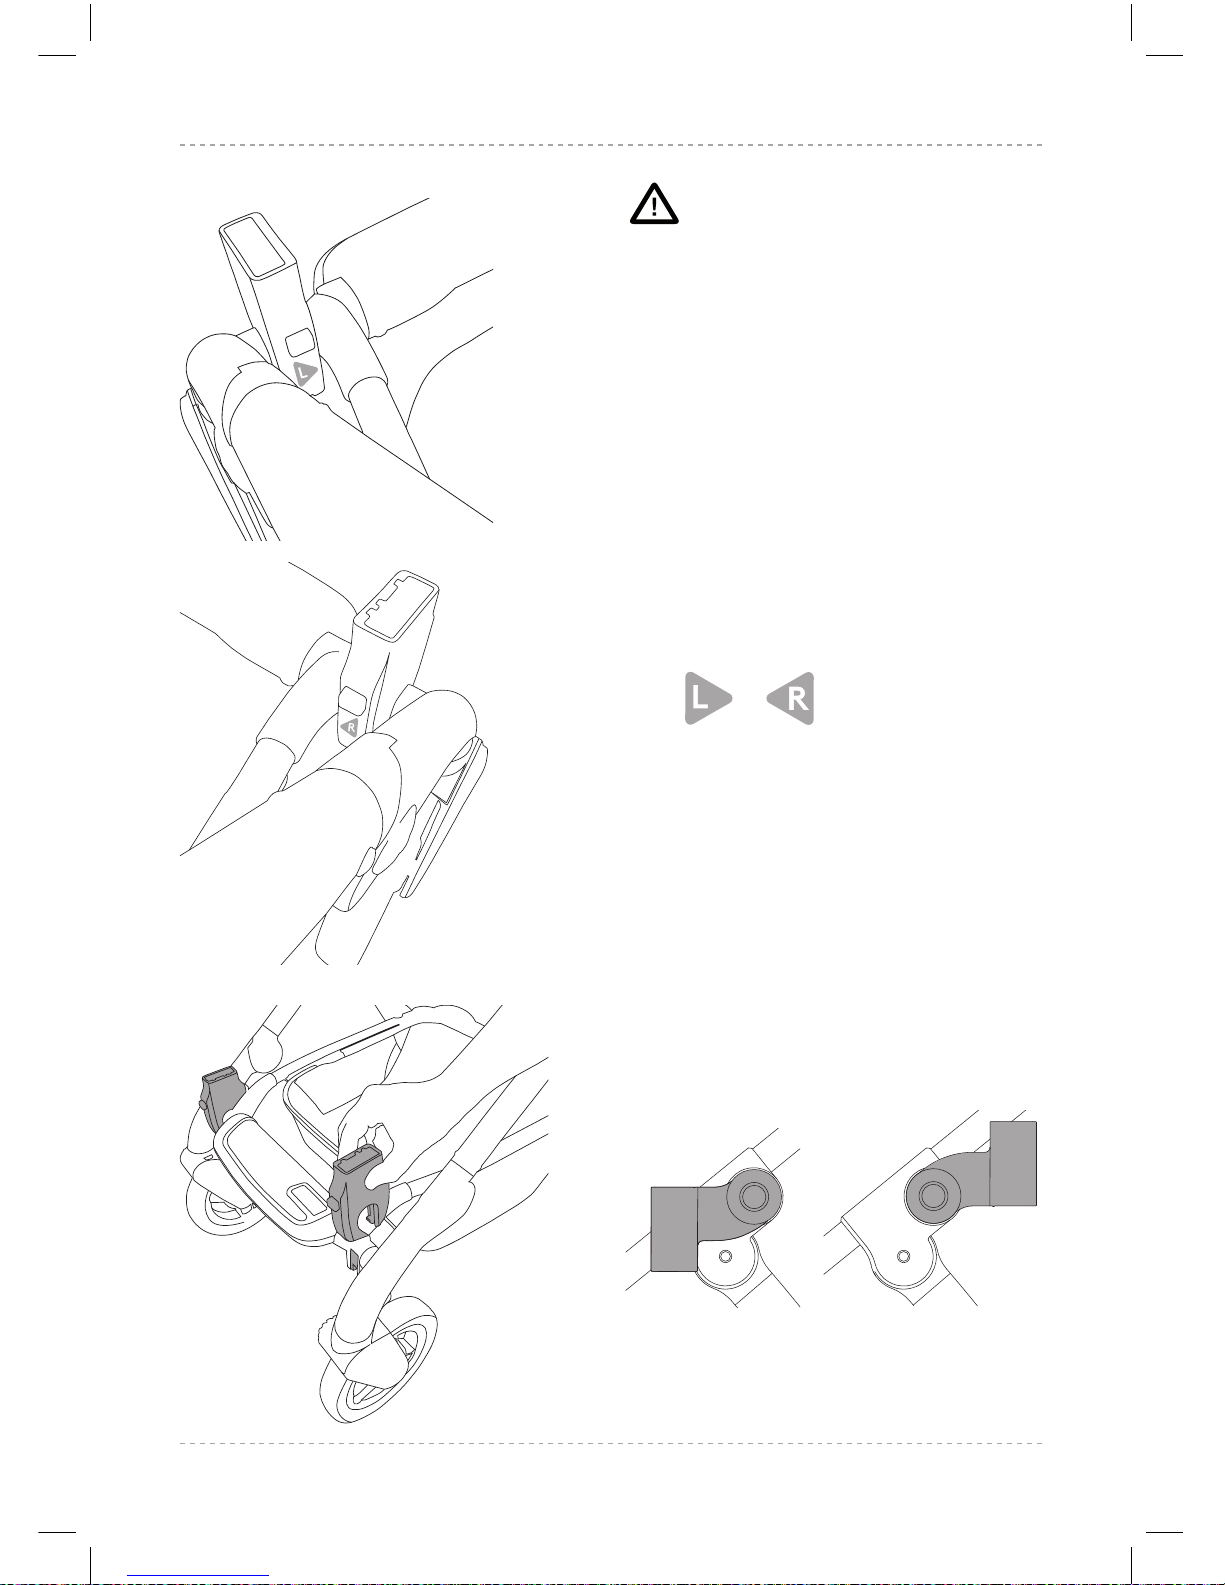
34.1 When standing behind the
chassis, please refer to the
markings on the tandem
connectors to ensure that
they are tted correctly.
The logos should face you,
with the arrows pointing
inwards.
34.2 Attach the tandem
connectors to the location
points on the front of the
chassis until they ‘click’
into place. Lift the tandem
connectors gently to ensure
that they are correctly
attached.
CHECK THE ORIENTATION OF
THE CONNECTORS. DO NOT
FORCE THE CONNECTORS ONTO
THE CHASSIS OR DAMAGE MAY
OCCUR.
Primary position Secondary position
34.2
34.1
Wave Instructions 2016-AUSTRALIAN.indd 28 19/09/2017 16:51
Page 29
29
silvercross.com.au
AUS
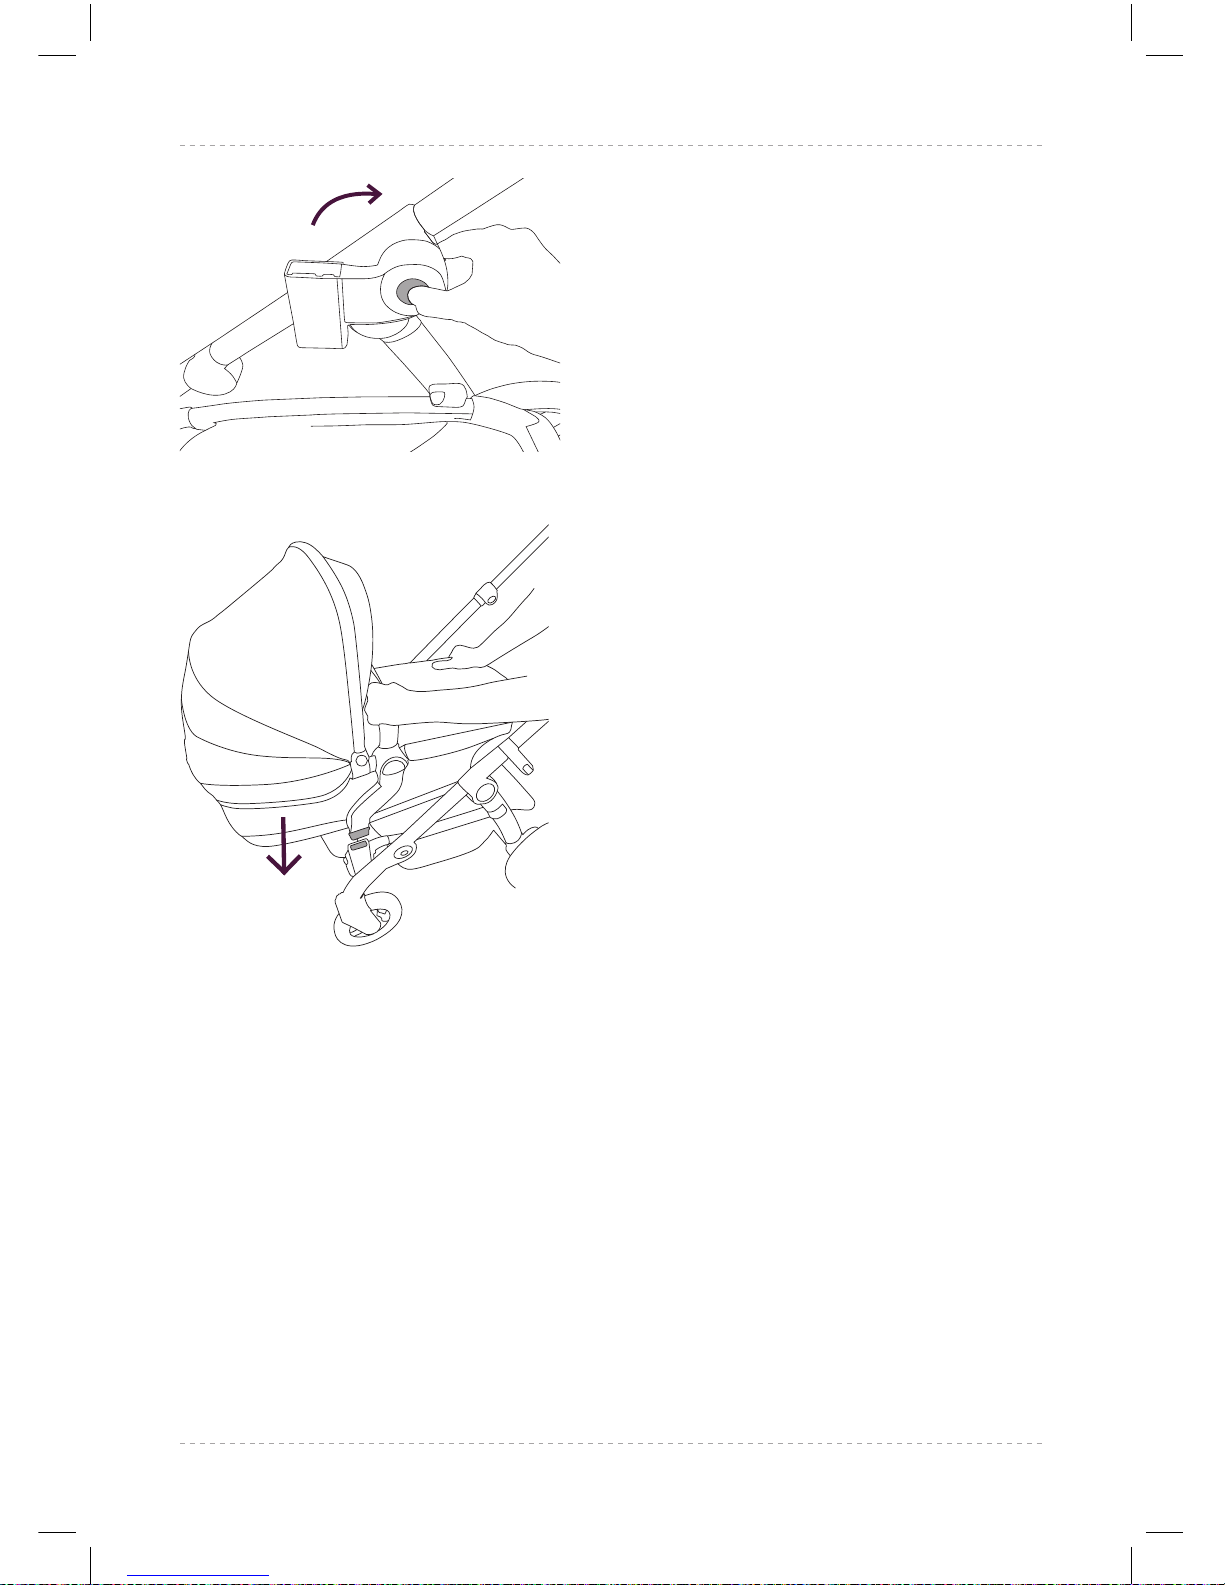
The Wave connector must be
rotated from the primary position
into the secondary position for
tandem use.
Press the circular button on each
Wave connector, and rotate until it
‘clicks’ into place.
USING THE CARRYCOT IN
TANDEM CONFIGURATION
A second carrycot (available
separately) can be attached to the
chassis in tandem conguration.
Please refer to table A for suitable
congurations on page 27.
To set up and use the carrycot,
please refer to 10.1-15.1
Attaching the carrycot to the
tandem connectors
35.1 Locate the carrycot connector
posts into the tandem
connectors on the chassis.
Ensure that the carrycot
‘clicks’ into place. Lift the
carrycot gently to check
the carrycot has locked into
place.
35.1
Wave Instructions 2016-AUSTRALIAN.indd 29 19/09/2017 16:51
Page 30
30
AUS
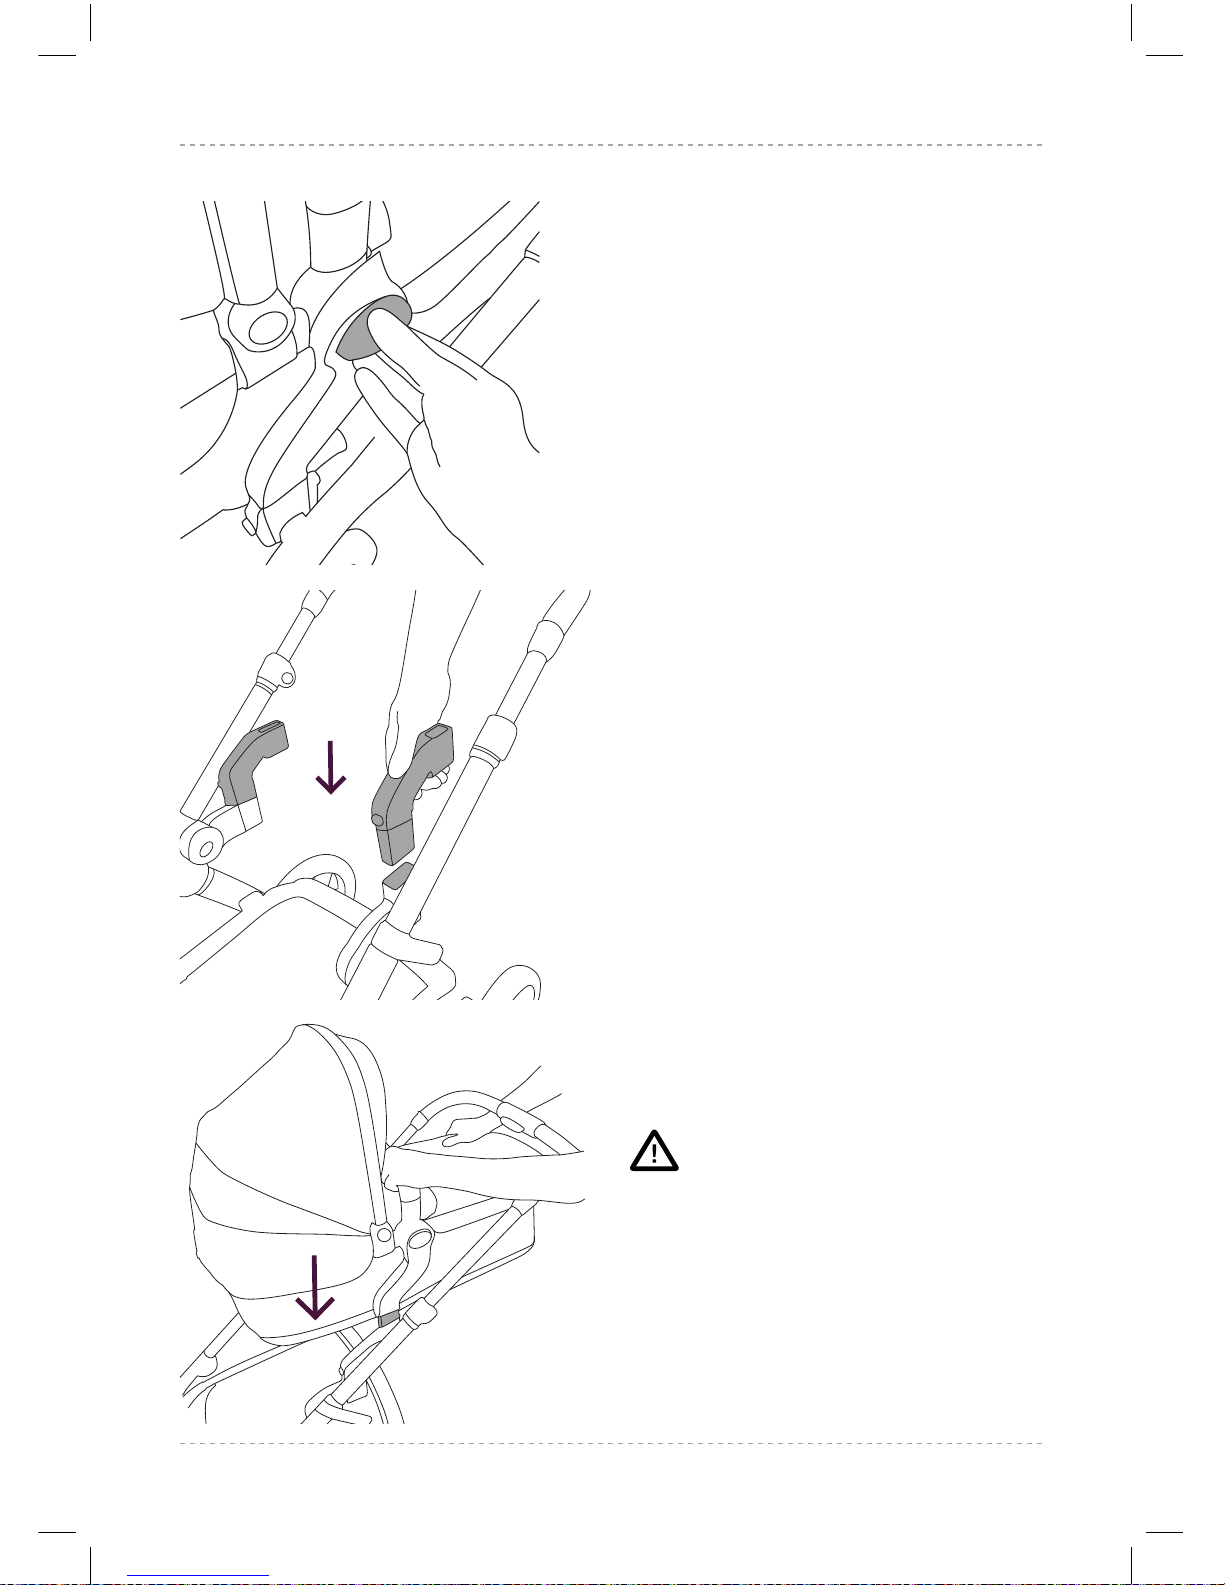
Detaching the carrycot from
the tandem connectors
36.1 Pull both carrycot release
handles outwards and lift the
carrycot clear of the tandem
connectors.
NOTE: THE CARRYCOT CAN FIT IN
BOTH THE WAVE CONNECTORS
AND THE TANDEM CONNECTORS
REARWARD FACING ONLY.
Attaching the carrycot
adaptors
37.1 Carrycot adaptors are
available separately. Locate
the carrycot adaptors into
the Wave connectors on both
sides. Ensure the adaptors
‘click’ into place.
Attaching the carrycot to the
carrycot adaptors
38.1 Hold the carrycot above the
chassis. Locate the carrycot
connector posts into the
attachment slots on the
carrycot adaptors. Ensure
that the carrycot ‘clicks’ into
place. Lift the carrycot gently
to check the carrycot has
locked into place.
WARNING
THE CARRYCOT ADAPTORS
ARE ONLY TO BE USED WITH A
TANDEM SEAT OR CARRYCOT IN
THE TANDEM POSITION.
36.1
37.1
38.1
Wave Instructions 2016-AUSTRALIAN.indd 30 19/09/2017 16:51
Page 31
31
silvercross.com.au
AUS
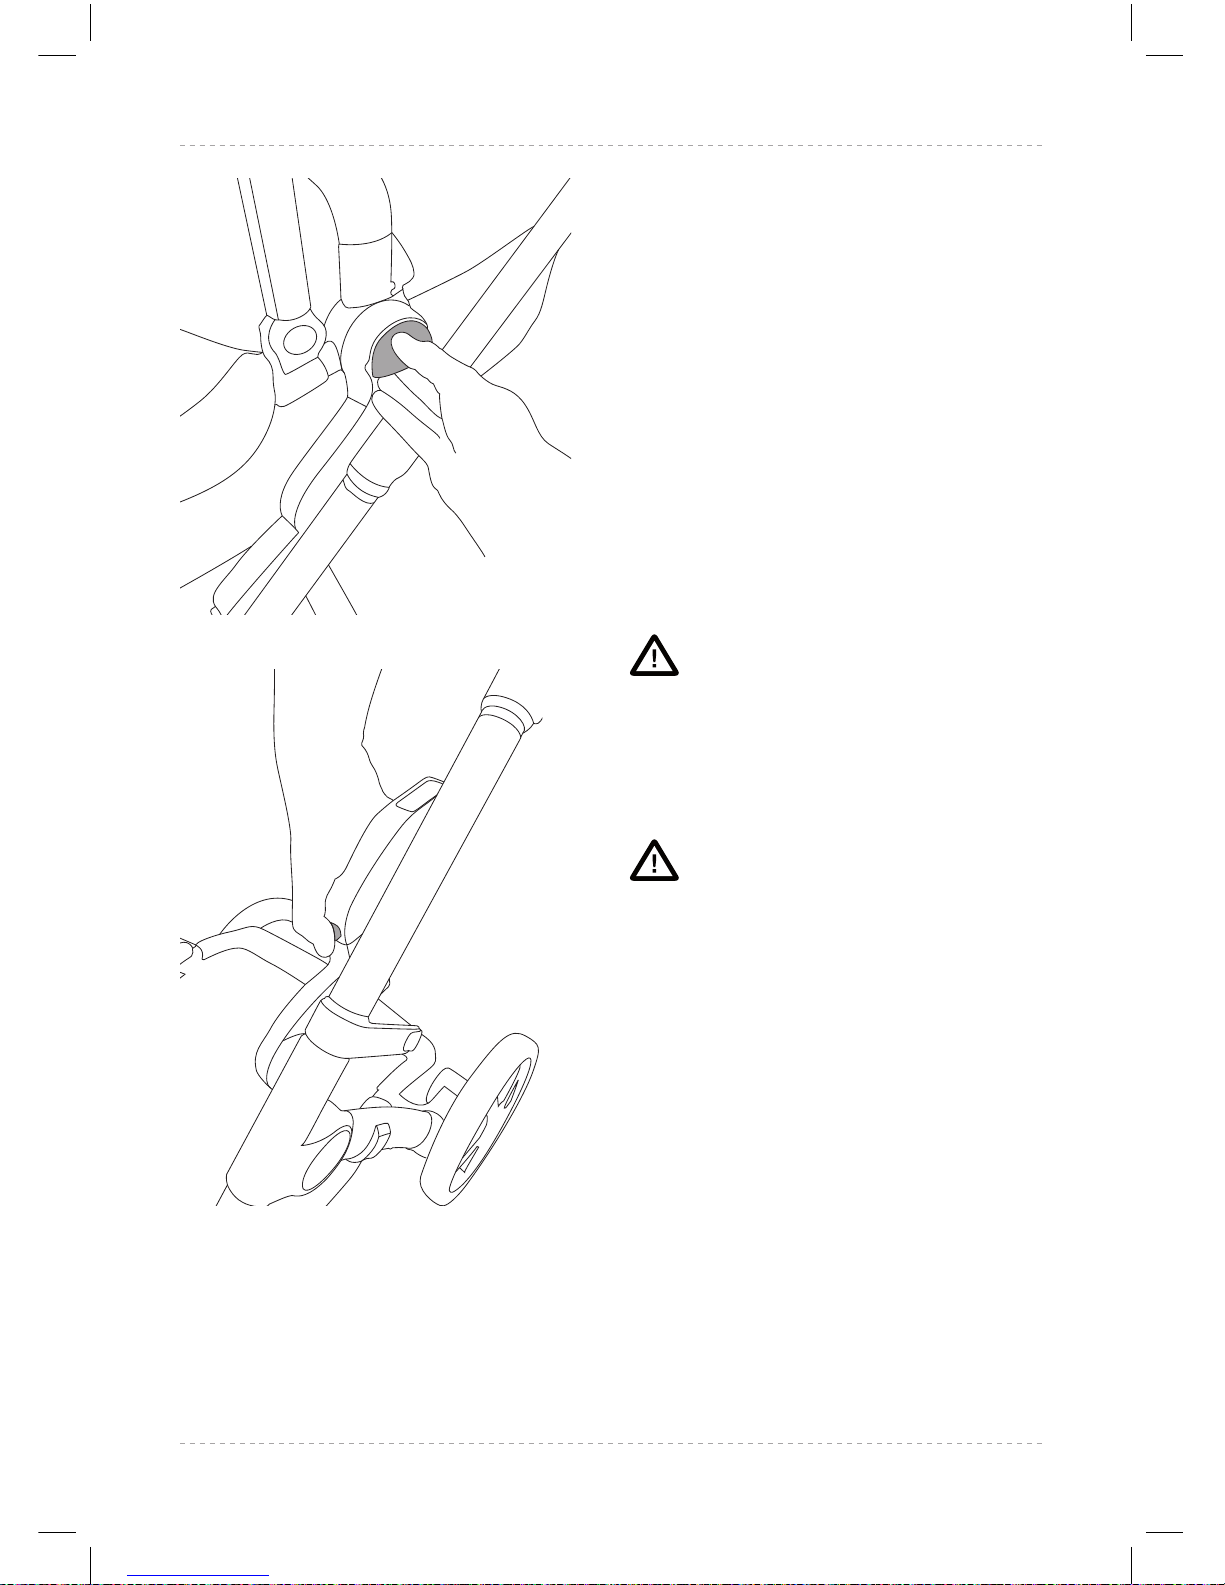
Detaching the carrycot from
the carrycot adaptors
39.1 Pull both carrycot release
handles outwards and lift the
carrycot clear of the carrycot
adaptors.
Detaching the carrycot
adaptors from the Wave
connectors
40.1 Press the silver button on the
side of each adaptor and pull
adaptor upwards to release
from Wave connection slots.
WARNING
THE CARRYCOT ADAPTORS MUST
BE REMOVED FROM THE CHASSIS
BEFORE RETURNING THE WAVE
CHASSIS BACK TO A SINGLE
CONFIGURATION.
WARNING
THE CARRYCOT ADAPTORS
CAN ONLY BE USED WITH
THE CARRYCOT AND MUST BE
REMOVED BEFORE FITTING THE
PUSHCHAIR SEAT.
39.1
40.1
Wave Instructions 2016-AUSTRALIAN.indd 31 19/09/2017 16:51
Page 32
32
AUS
USING THE TANDEM
SEAT IN TANDEM
CONFIGURATION
The tandem seat (available
separately) can be attached to the
chassis in tandem conguration.
Please refer to table A for suitable
congurations on page 27.
To set up and use the tandem seat,
please refer to 20.1 - 28.1.
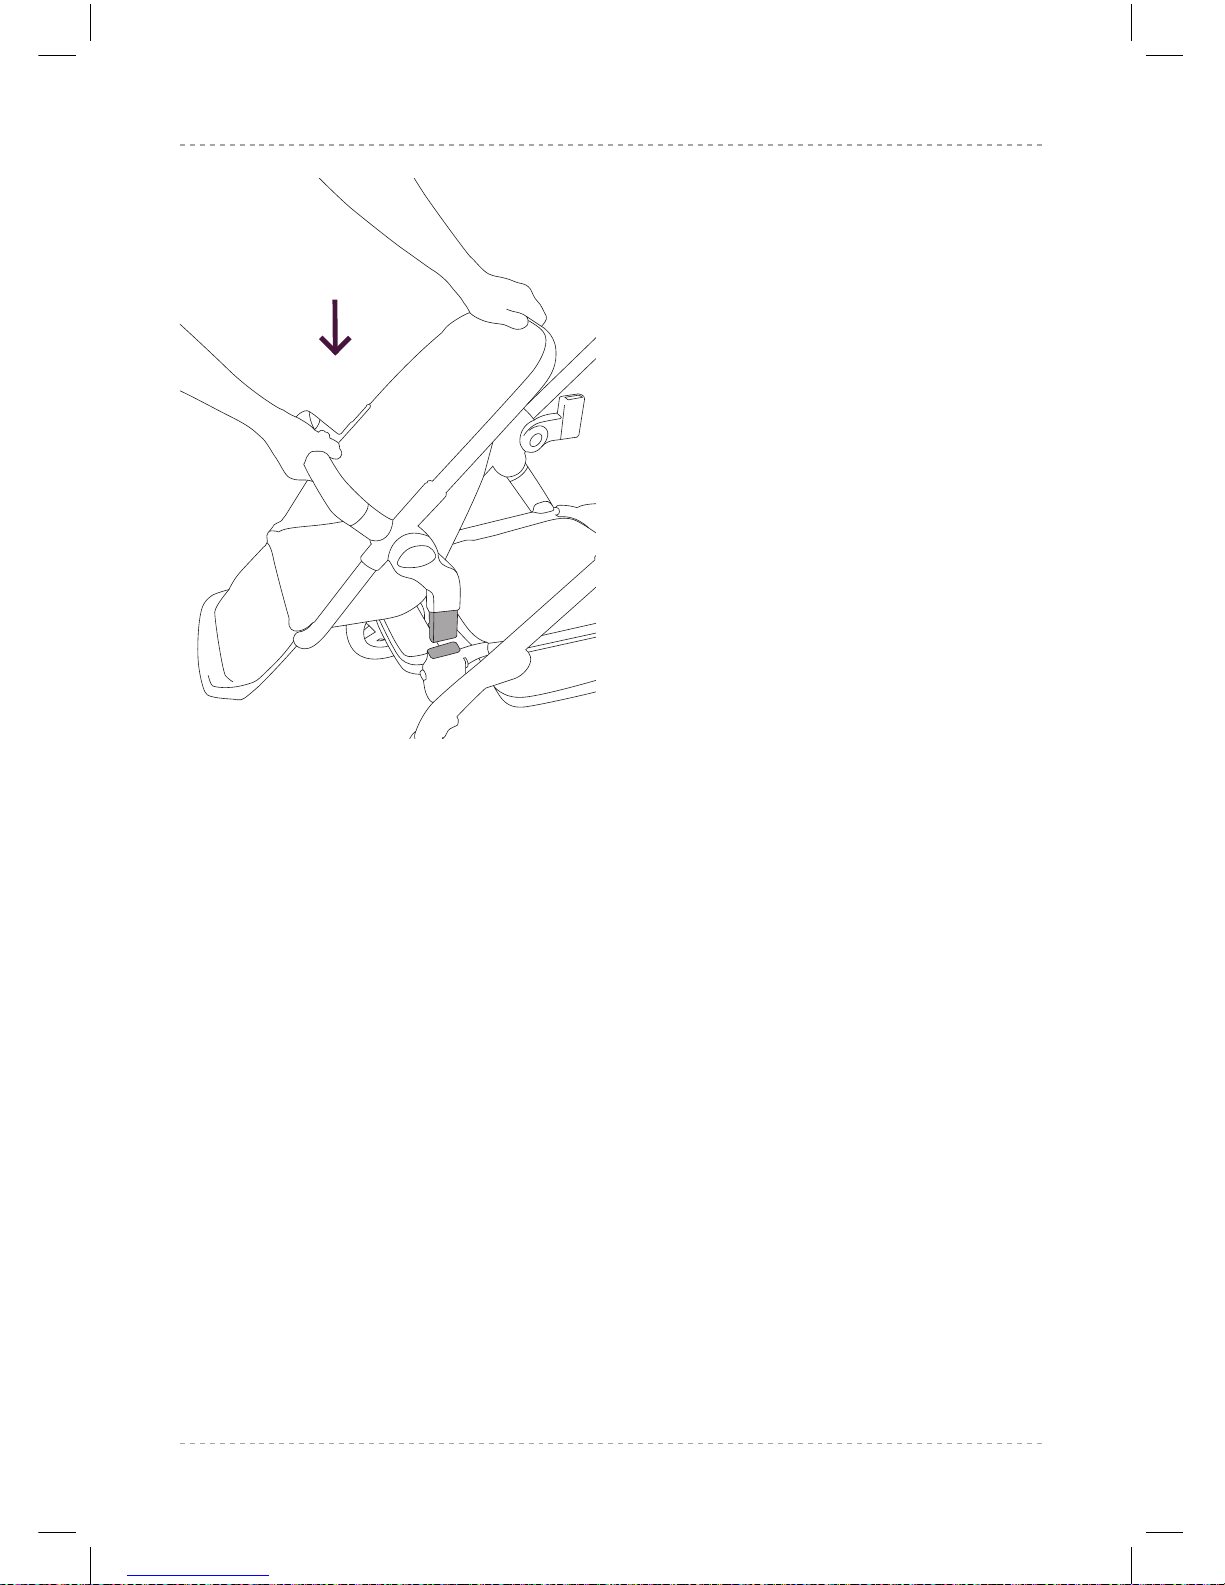
Attaching the tandem seat to
the tandem connectors
NOTE: THE TANDEM SEAT
CAN BE FITTED FORWARD
OR REARWARD FACING
DEPENDING ON THE DESIRED
CONFIGURATION.
41.1 Hold the tandem seat above
the chassis. Locate the
tandem seat connector posts
into the slots on the tandem
connectors. Ensure that the
tandem seat ‘clicks’ into
place. Lift the tandem seat
gently to check the tandem
seat has locked into place.
NOTE: THE TANDEM SEAT CAN
ONLY FIT ONTO THE TANDEM
CONNECTORS.
41.1
Wave Instructions 2016-AUSTRALIAN.indd 32 19/09/2017 16:51
Page 33
33
silvercross.com.au
AUS
Detaching the tandem seat from
the tandem connectors
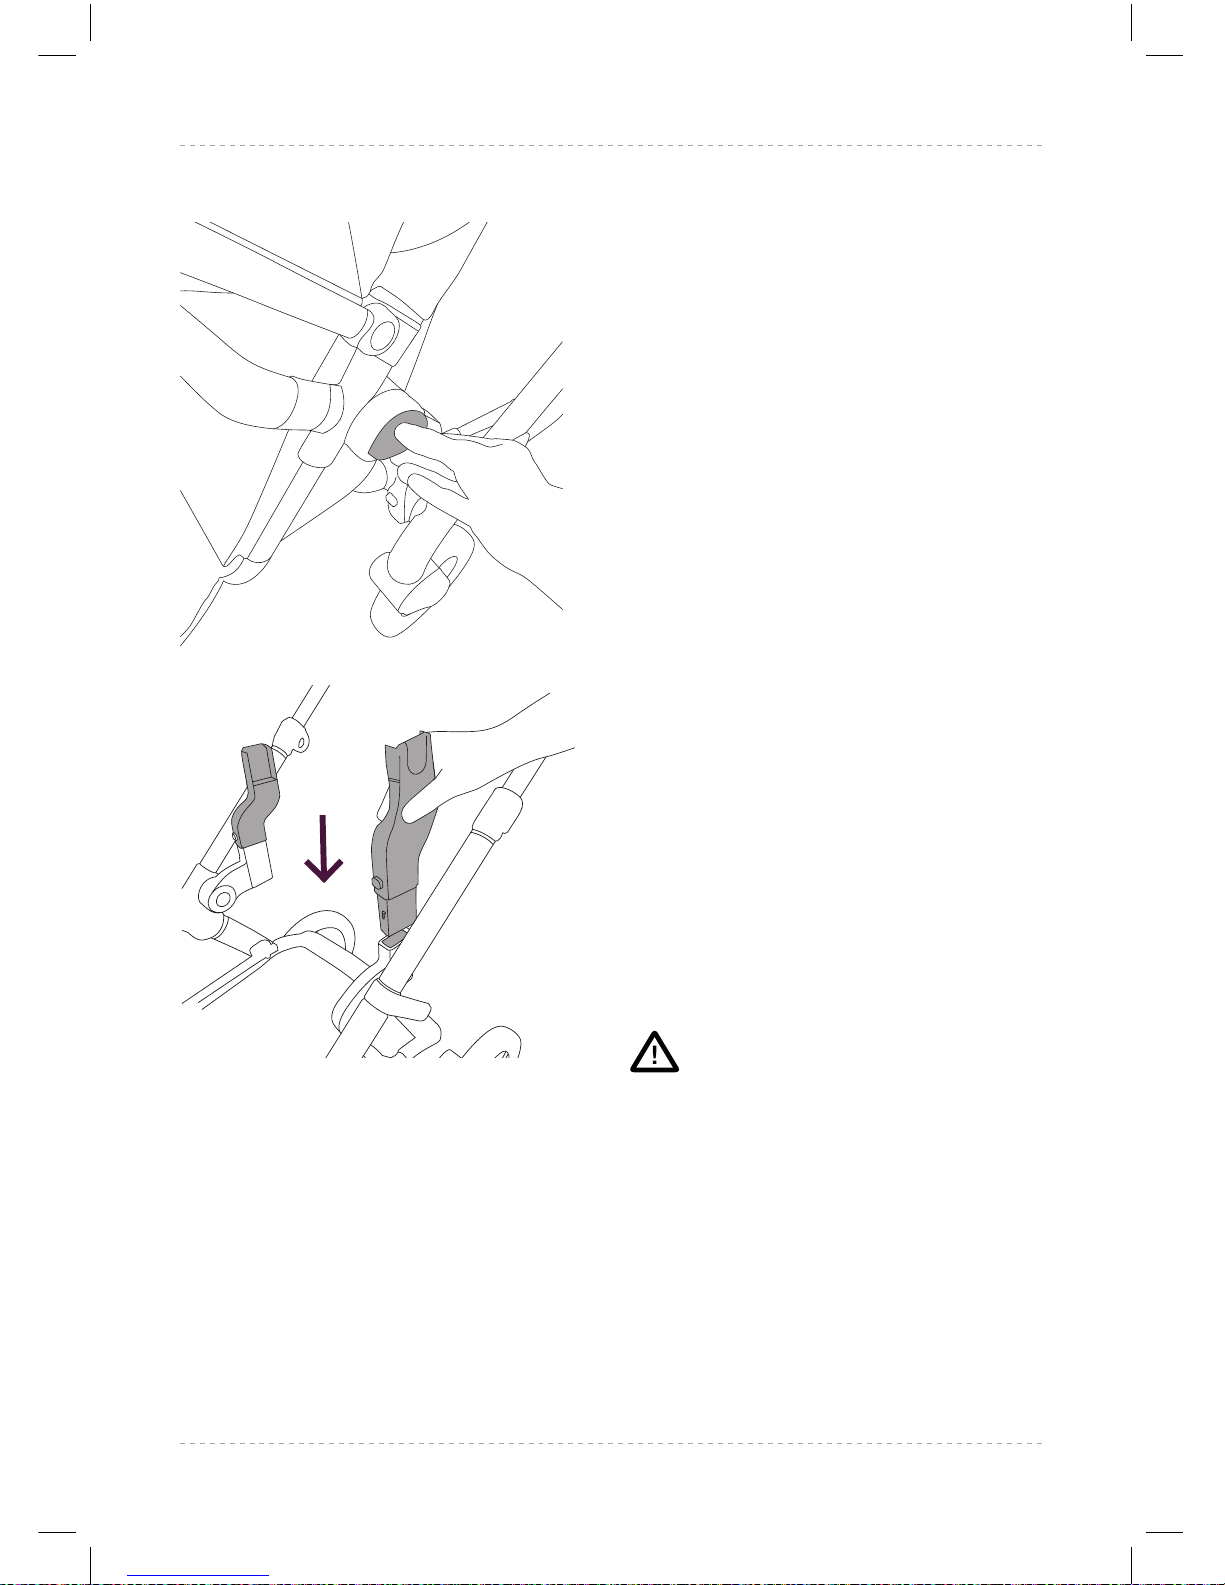
42.1 Pull both seat release handles
outwards and lift the tandem
seat clear of the tandem
connectors.
NOT ALL TANDEM SEAT POSITIONS
MAY BE AVAILABLE IN ALL
CONFIGURATIONS. DO NOT
FORCE THE TANDEM SEAT INTO
AN UNSUITABLE POSITION OR
DAMAGE MAY OCCUR.
USING THE CAR SEAT IN
TANDEM CONFIGURATION
A second Car Seat (available
separately) can be attached to the
chassis in tandem conguration.
Please refer to table A for suitable
congurations on page 27.
Attaching the Car Seat adaptors
to the Wave connectors
43.1 To attach the Car Seat
adaptors, locate the adaptors
into the attachment slots on
the Wave connectors.
WARNING
THE CAR SEAT ADAPTORS
WILL ONLY FIT INTO THE WAVE
CONNECTORS.
42.1
43.1
Wave Instructions 2016-AUSTRALIAN.indd 33 19/09/2017 16:51
Page 34
34
AUS
Attaching the Car Seat to the
Car Seat adaptors
FOR A LIST OF COMPATIBLE
CAR SEATS, PLEASE VISIT OUR
WEBSITE.
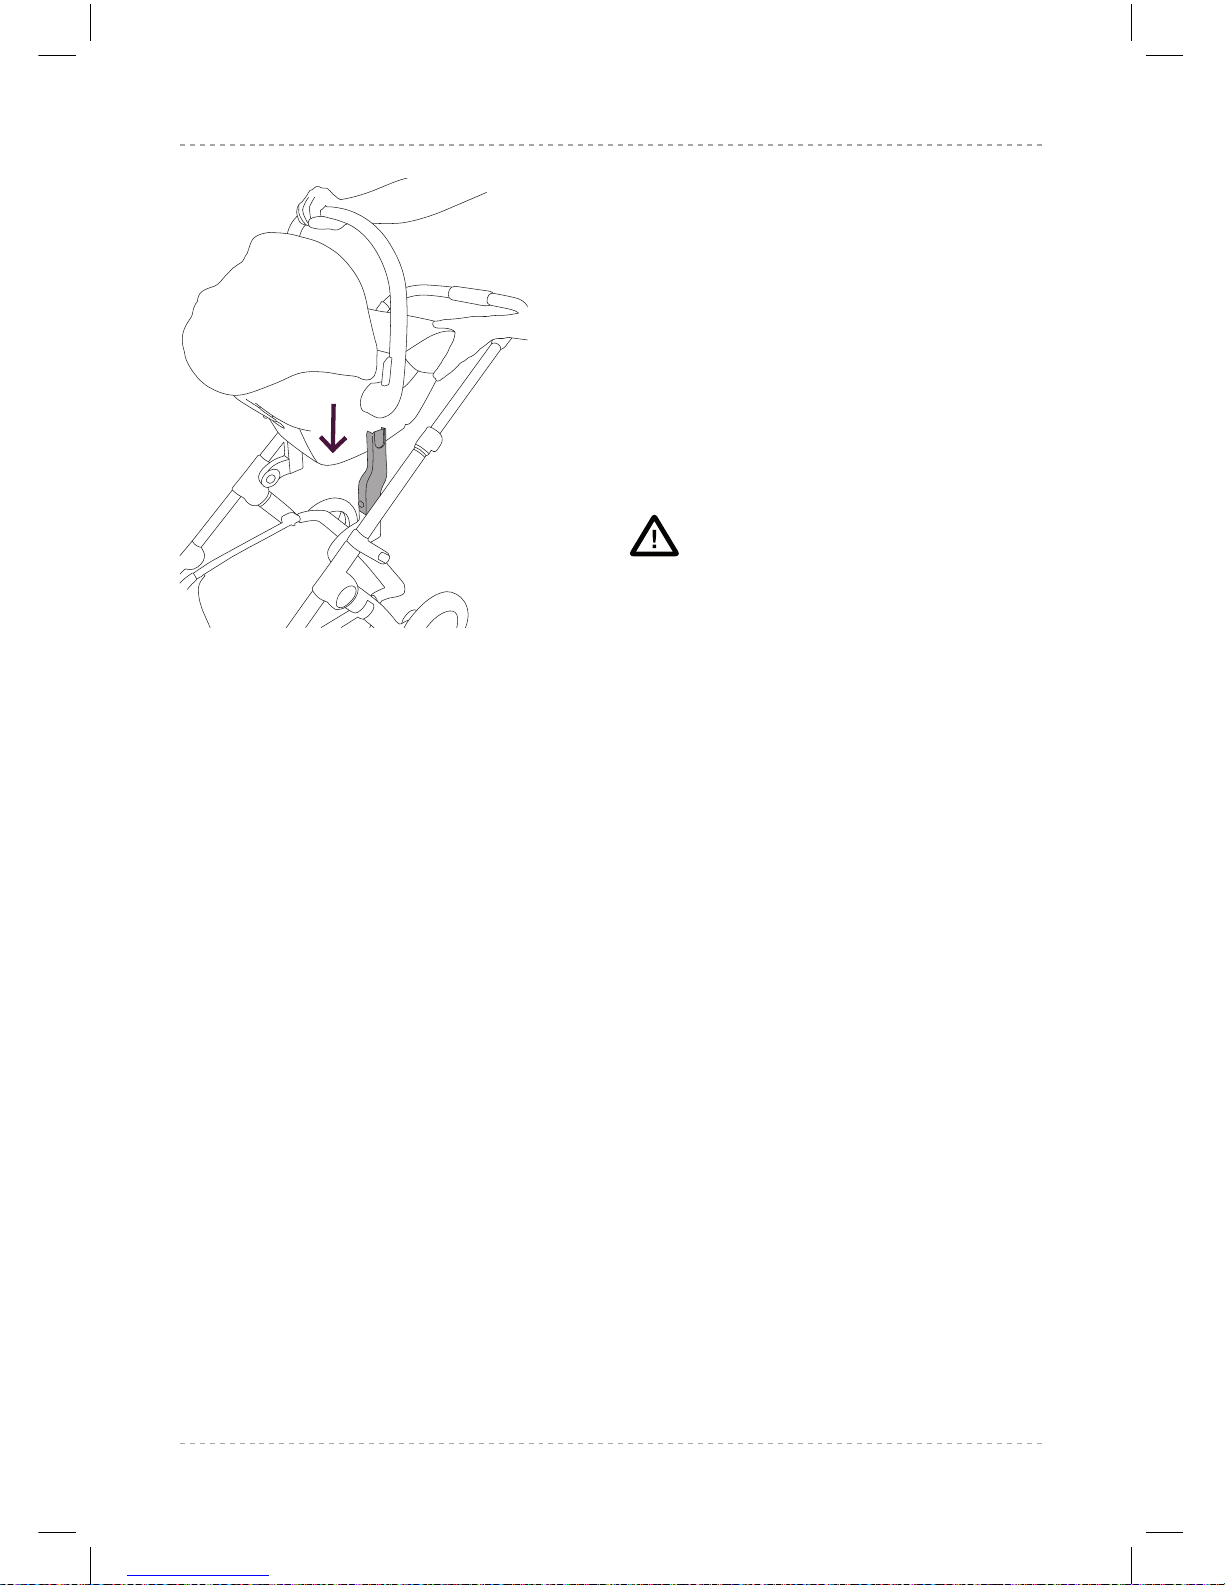
44.1 Place the Car Seat onto the
adaptors. Ensure the Car Seat
‘clicks’ into place. Lift the
Car Seat gently by the carry
handle to check the Car Seat
has locked into place.
WARNING
CHECK THAT THE CAR SEAT IS
CORRECTLY ENGAGED
BEFORE USE.
Detaching the Car Seat from
the Car Seat adapters
45.1 Please refer to the car seat
manufacturer instructions.
44.1
Wave Instructions 2016-AUSTRALIAN.indd 34 19/09/2017 16:51
Page 35
35
silvercross.com.au
AUS
Detaching the Car Seat
adaptors from the Wave
connectors
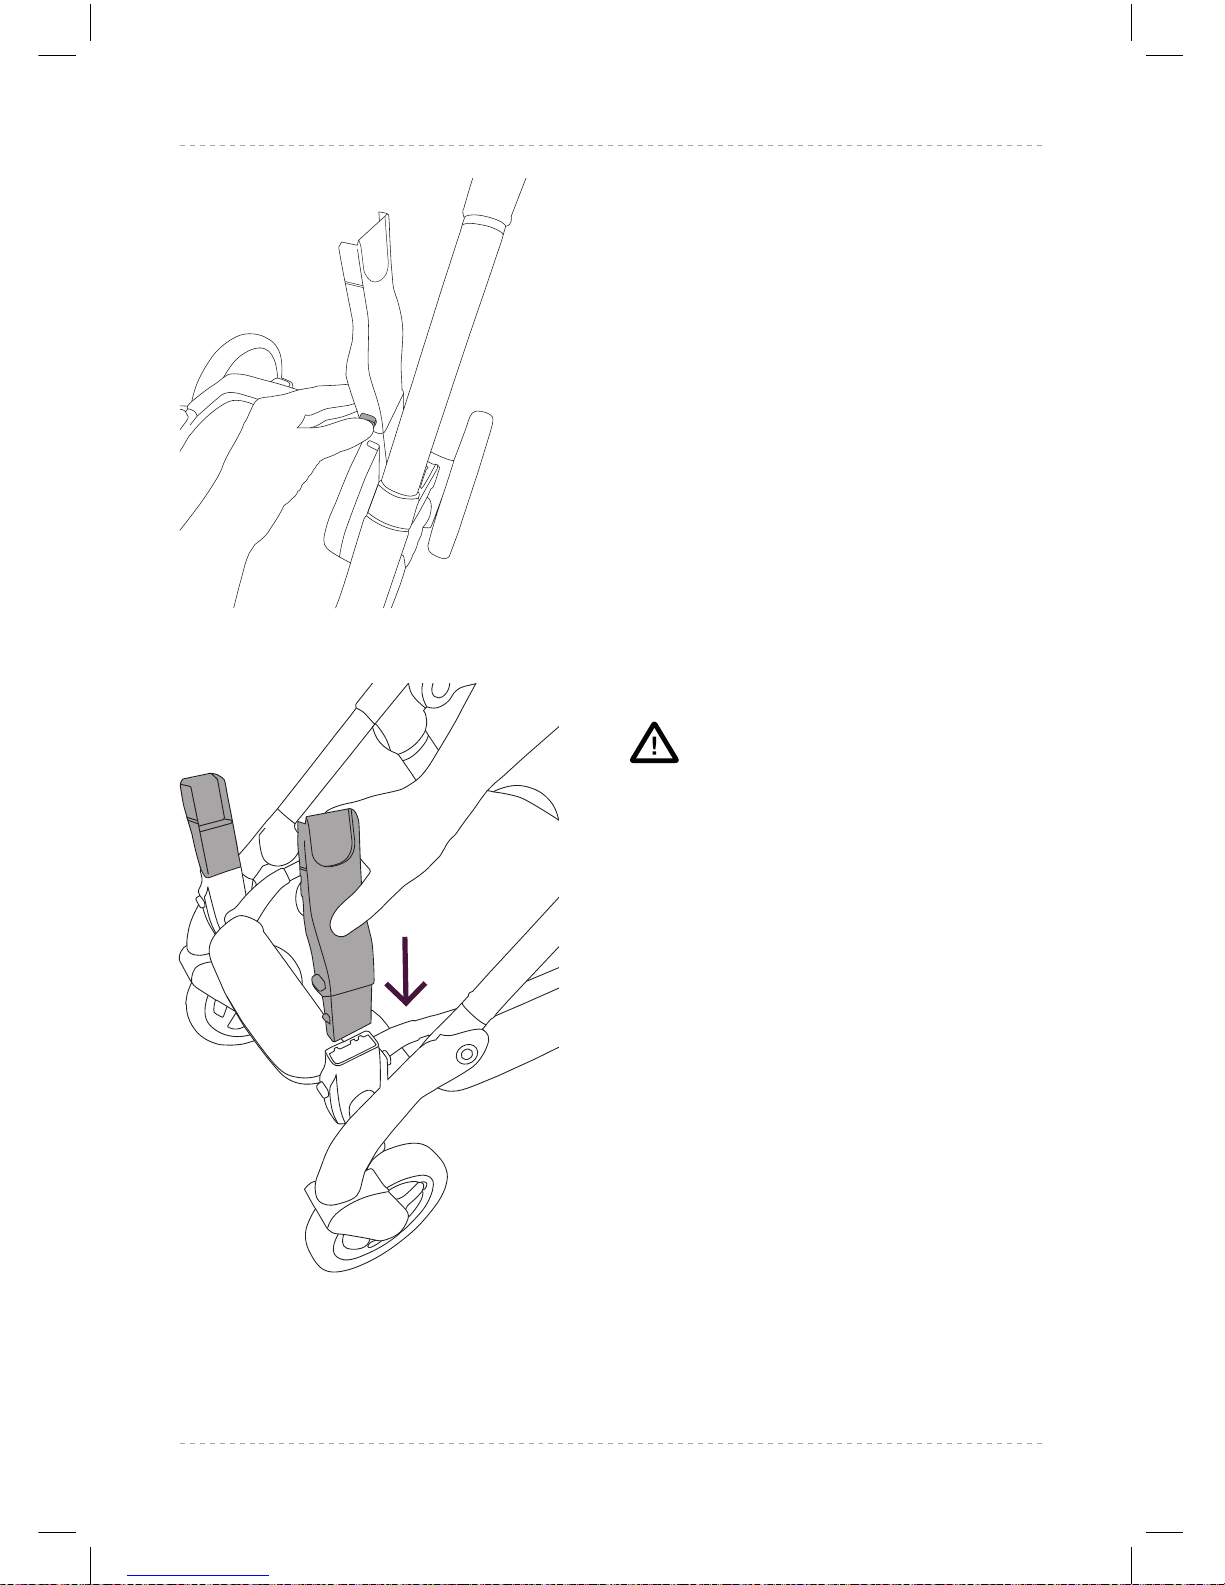
46.1 Press the silver button on the
side of each adaptor and pull
adaptor upwards to release
from the Wave connectors.
Attaching the Car Seat tandem
adaptors to the tandem
connectors
47.1 Car Seat tandem adaptors
are available separately. To
attach the Car Seat tandem
adaptors, locate the adaptors
into the attachment slots on
the tandem connectors.
WARNING
THE CAR SEAT TANDEM
ADAPTORS WILL ONLY FIT INTO
THE TANDEM CONNECTORS.
46.1
47.1
Wave Instructions 2016-AUSTRALIAN.indd 35 19/09/2017 16:51
Page 36
36
AUS
Attaching the Car Seat to the
Car Seat tandem adaptors
FOR A LIST OF COMPATIBLE
CAR SEATS, PLEASE VISIT OUR
WEBSITE.
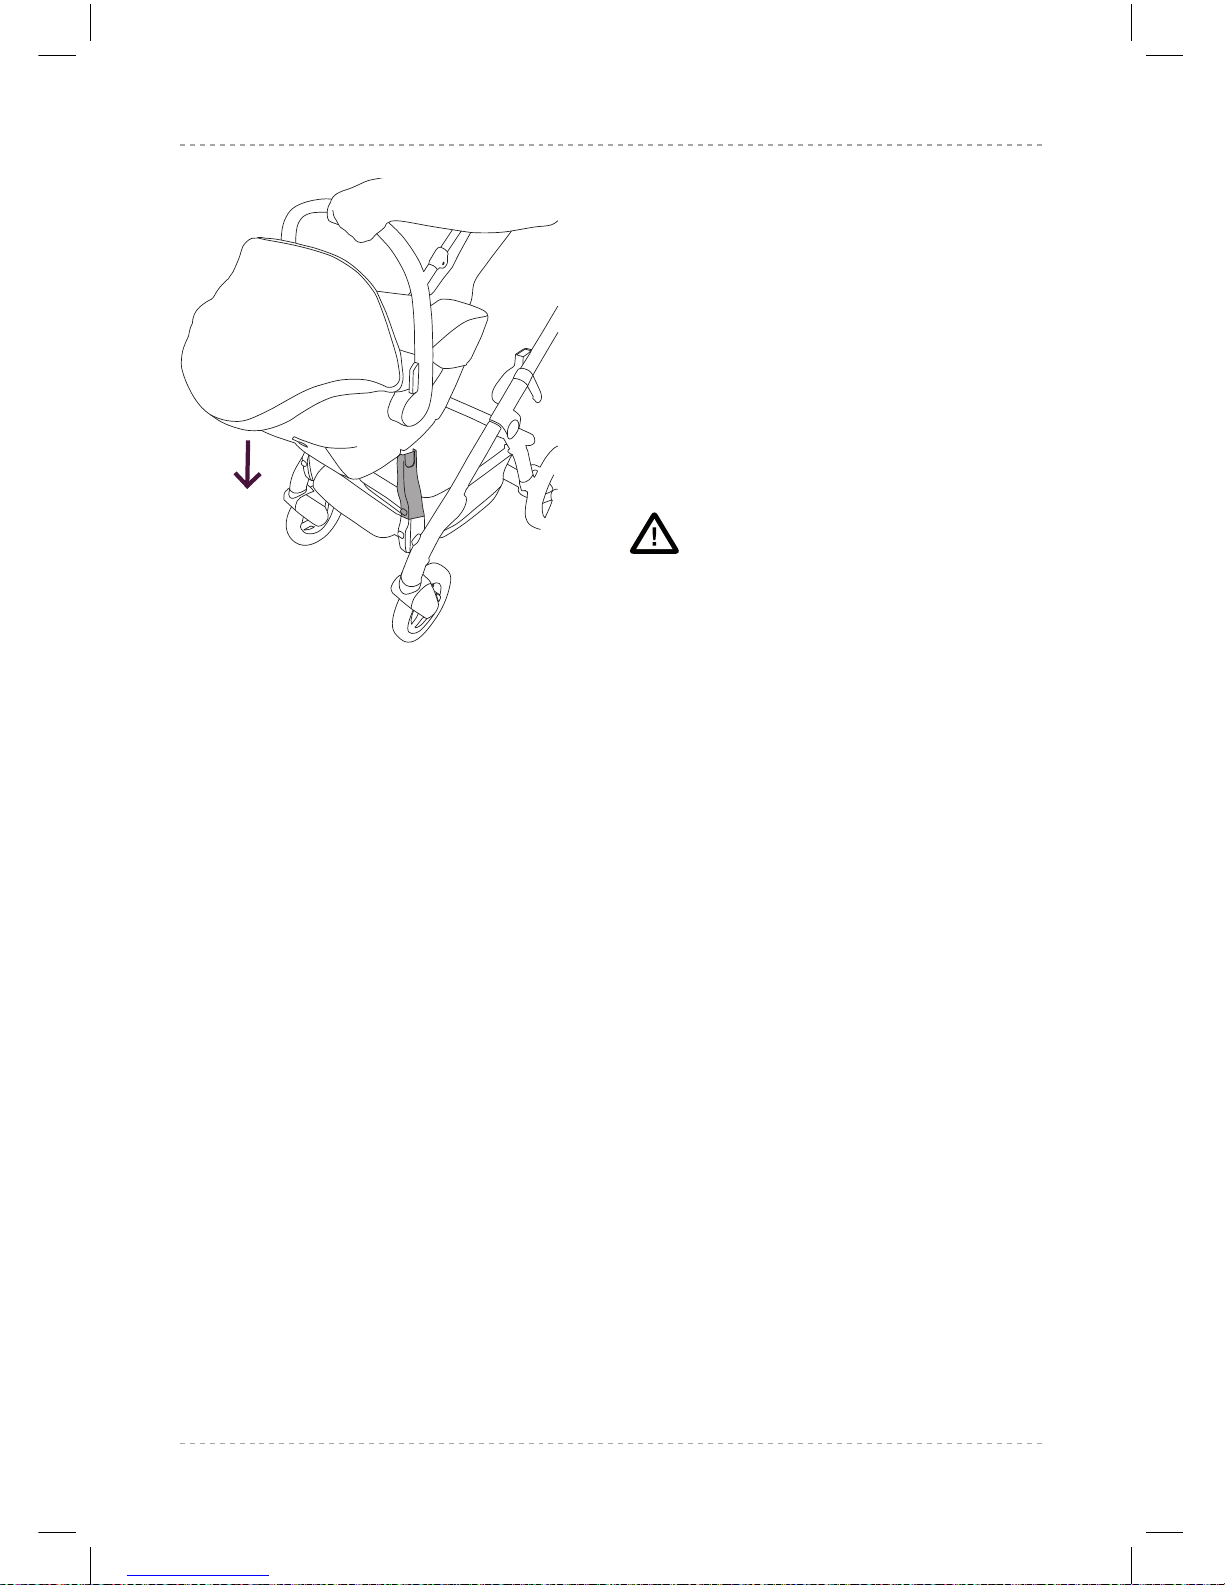
48.1 Place the Car Seat onto the
adaptors. Ensure the Car Seat
‘clicks’ into place. Lift the
Car Seat gently by the carry
handle to check the Car Seat
has locked into place.
WARNING
CHECK THAT THE CAR SEAT
ATTACHMENT DEVICES ARE
CORRECTLY ENGAGED
BEFORE USE.
Detaching the Car Seat from
the tandem adapters
49.1 Please refer to the car seat
manufacturer instructions.
48.1
Wave Instructions 2016-AUSTRALIAN.indd 36 19/09/2017 16:51
Page 37
37
silvercross.com.au
AUS
Removing the Car Seat tandem
adaptors from the tandem
connectors
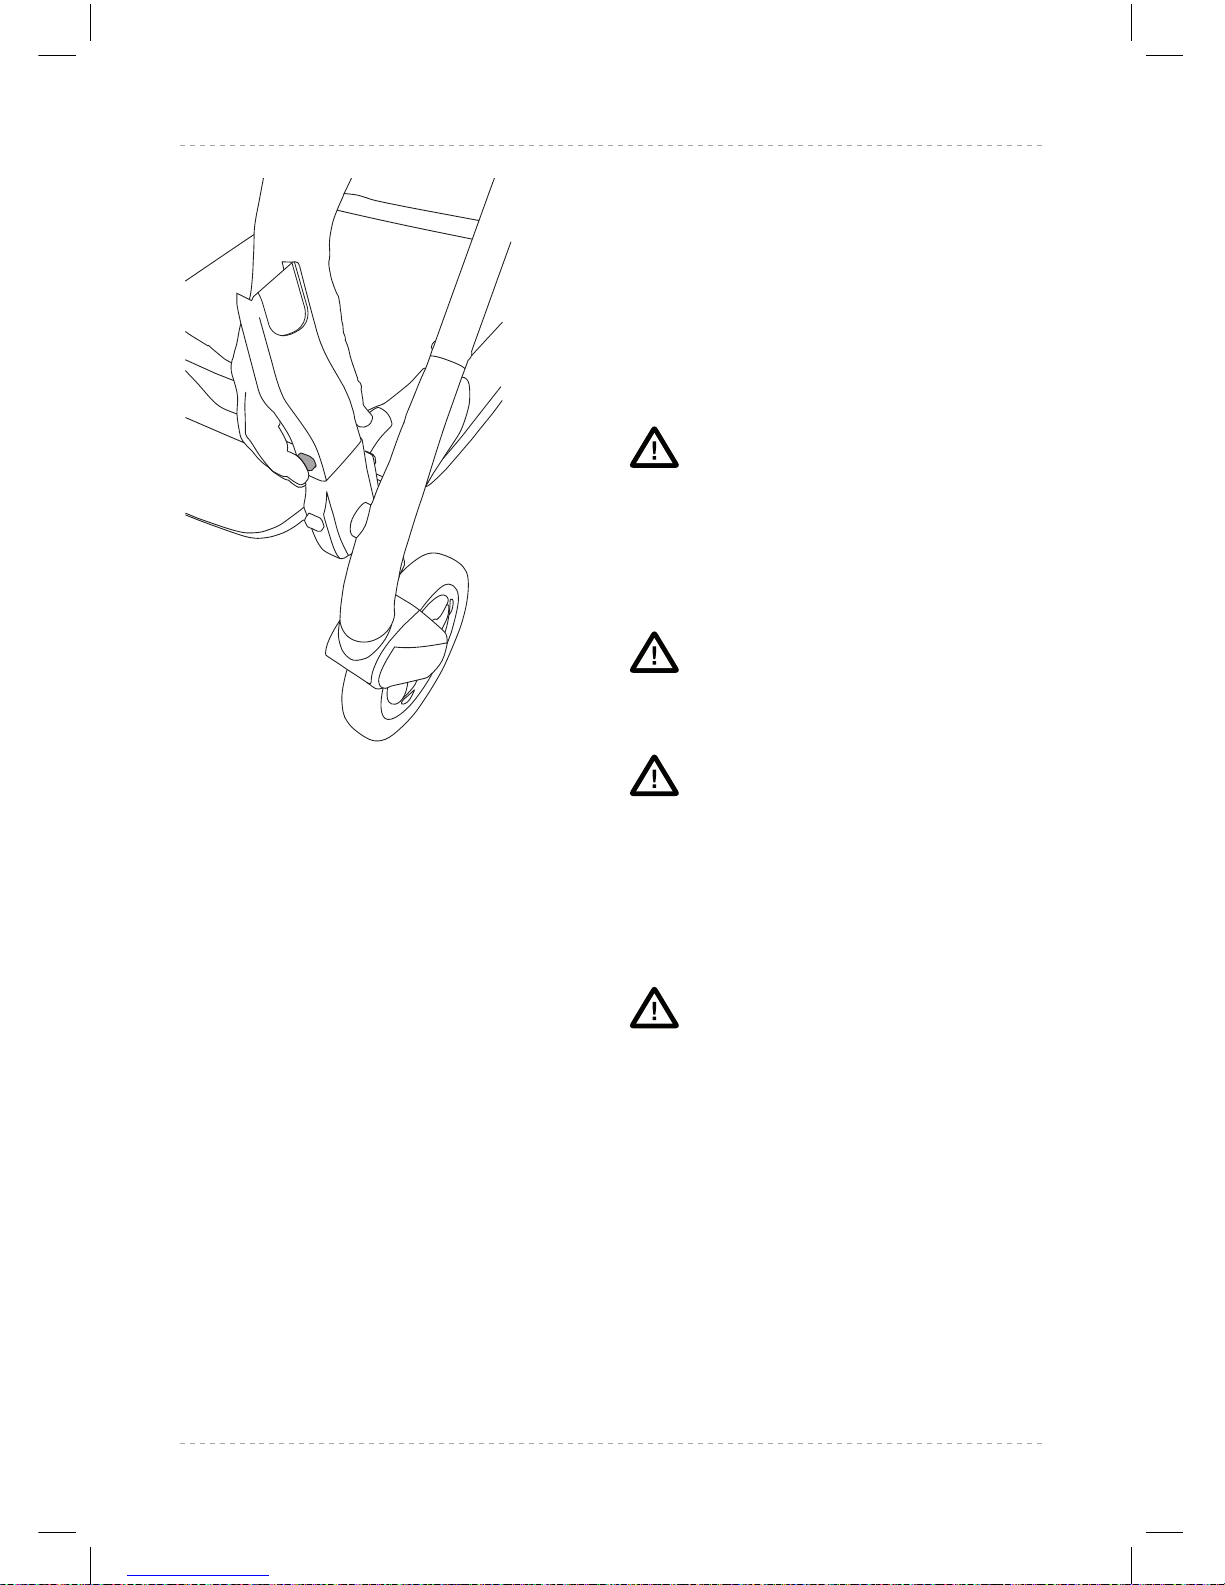
50.1 For both adaptors, press the
silver button on the side of
the adaptor and pull adaptor
upwards to release from
tandem connectors.
WARNING
BEFORE FOLDING THE WAVE
PUSHCHAIR, THE CAR SEAT
TANDEM ADAPTORS MUST BE
REMOVED, OTHERWISE DAMAGE
WILL BE CAUSED.
WARNING
THE CAR SEAT SHOULD ALWAYS
BE REARWARD FACING.
WARNING
THIS CAR SEAT DOES NOT
REPLACE A COT OR BED. SHOULD
YOUR CHILD NEED
TO SLEEP, THEY SHOULD BE
PLACED IN A SUITABLE PRAM
BODY OR COT.
WARNING
ONLY PLACE CAR SEAT ON A
FIRM, HORIZONTAL AND DRY
SURFACE IF NOT BEING USED
WITH THE WAVE CHASSIS.
50.1
Wave Instructions 2016-AUSTRALIAN.indd 37 19/09/2017 16:51
Page 38
38
AUS
Removing the Wave tandem
connectors
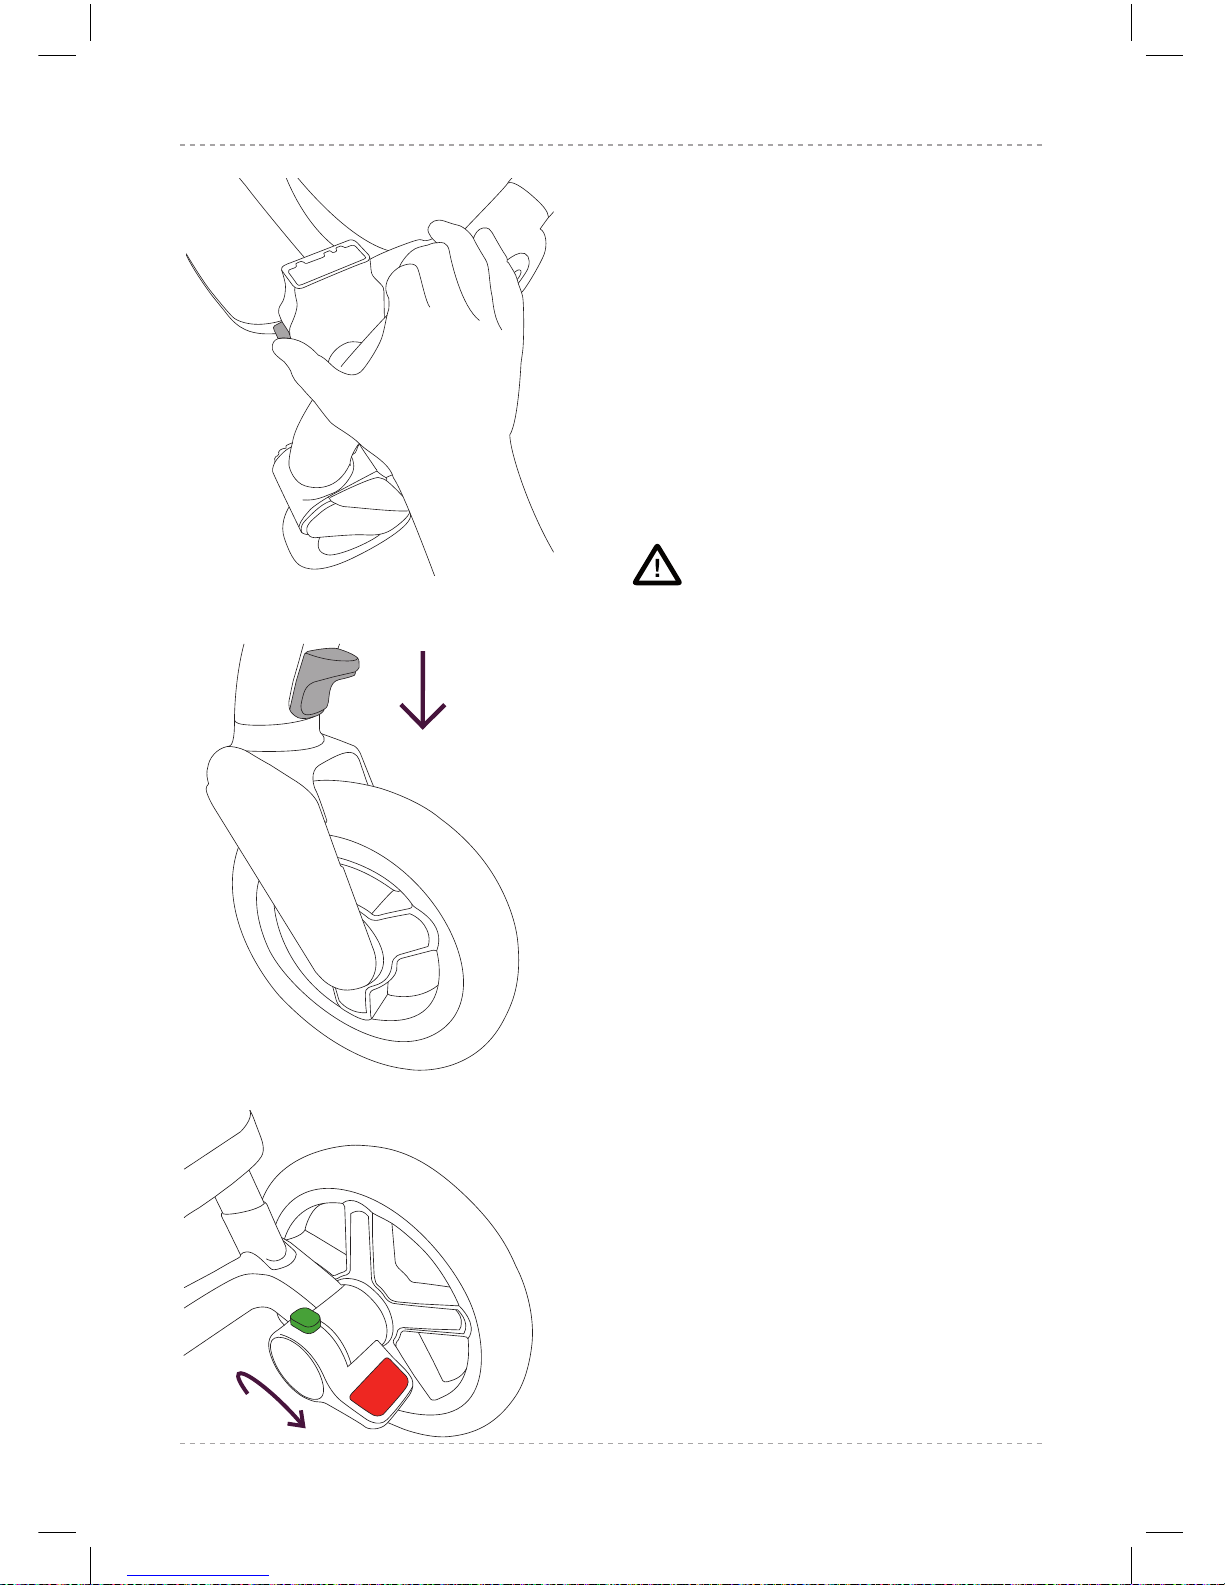
51.1 Press the silver button to
allow tandem connector to be
removed from the chassis.
NOTE: THE TANDEM CONNECTORS
CAN ONLY BE REMOVED FROM THE
CHASSIS ONCE THE TANDEM SEAT,
CARRYCOT OR CAR SEAT ADAPTOR
HAS BEEN REMOVED.
Folding the chassis
WARNING
DUE CARE SHOULD BE TAKEN
WHEN FOLDING AND UNFOLDING
THE CHASSIS.
PLEASE ENSURE FOLDING
MECHANISMS ARE KEPT CLEAR
TO AVOID POSSIBLE FINGER
ENTRAPMENTS OR INJURIES TO
PARTS OF THE BODY.
To ensure the Wave chassis folds
correctly remove all items from the
shopping basket before attempting
to fold.
If using with a car seat or a carrycot,
please ensure each has been
removed before folding.
Although the cup holder can remain
attached when folding the chassis,
we recommend that the cup holder
is removed before folding the chassis
so that it doesn’t get damaged
during transporting or storage.
52.2
52.1
51.1
Wave Instructions 2016-AUSTRALIAN.indd 38 19/09/2017 16:51
Page 39
39
silvercross.com.au
AUS
WARNING
BEFORE FOLDING THE WAVE
CHASSIS, THE CAR SEAT
ADAPTORS MUST BE REMOVED,
OTHERWISE DAMAGE WILL BE
CAUSED.
The chassis can be folded with a
pushchair seat attached and in
forward- facing, upright position.
The pushchair will not fold in in any
other seat positions. Doing so may
cause damage.
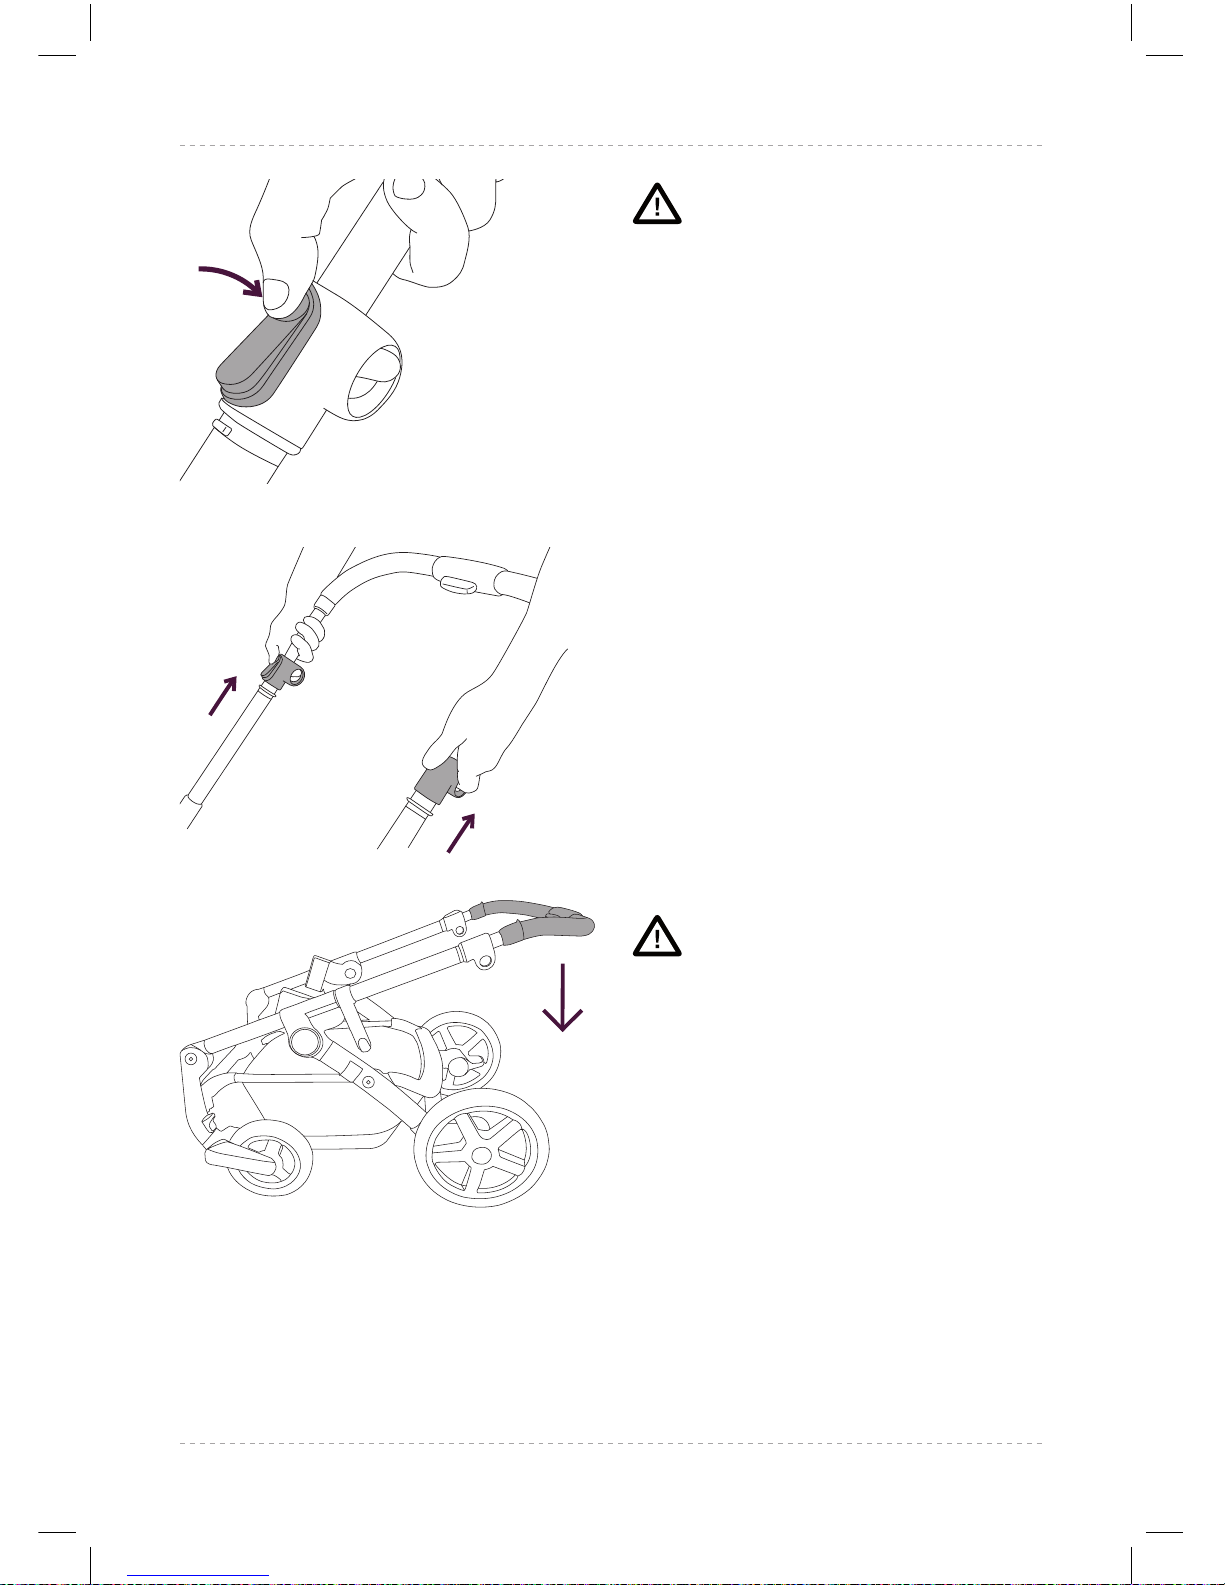
52.1 Ensure the swivel wheels are
locked (see 7.1).
52.2 Ensure the brake is applied
(see 6.1).
52.3 Press and hold the fold release
button. Pull the fold release
triggers towards you. Push the
handle downwards gently and
lower the handle downwards
until the fold lock engages. Lift
the handle upwards gently to
ensure that the fold lock has
engaged.
WARNING
TO AVOID POSSIBLE INJURY OR
DAMAGE, ALWAYS ENSURE THE
FOLD LOCK HAS BEEN ENGAGED
BEFORE LIFTING AND CARRYING
THE CHASSIS.
CARRY THE FOLDED CHASSIS
USING THE MAIN HANDLE.
52.3
Wave Instructions 2016-AUSTRALIAN.indd 39 19/09/2017 16:51
Page 40
40
AUS
Safety Notes
The Wave travel system is a high
quality Silver Cross product.
It complies with AS/NZS
2088:2013 and with correct use
and maintenance will give good
service. If, however, you should
have any problems with the
pushchair, please contact your
Silver Cross retailer who will take
appropriate action.
The Wave carrycot complies with
BS EN 1466:2014.
A tether strap has been provided
WARNING
USE THIS STRAP TO STOP THE
PRAM / STROLLER ROLLING AWAY
WARNING
CARE SHOULD BE TAKEN IF THE
PRAM/STROLLER IS USED ON
STAIRS OR ESCALATORS
WARNING
DO NOT USE THE TANDEM SEAT
OR PUSHCHAIR SEAT WITH ANY
OTHER PRAM/STROLLER
WARNING
TO AVOID INJURY OR DEATH
ALWAYS APPLY THE BRAKES
WHENEVER THE PRAM/
STROLLER IS STATIONARY.
• DO NOT LEAVE CHILDREN
UNATTENDED
• SECURE THE CHILD IN
HARNESS AT ALL TIMES – NOT
APPLICABLE FOR CARRYCOT
MODE
• DO NOT CARRY EXTRA
CHILDREN OR BAGS ON THIS
PRAM/STROLLER
• MAKE SURE CHILDREN ARE
CLEAR OF ANY MOVING PARTS
IF YOU ADJUST THE PRAM/
STROLLER
WARNING
NEVER LEAVE YOUR CHILD
UNATTENDED.
WARNING
ENSURE THAT ALL THE
LOCKING DEVICES ARE
ENGAGED BEFORE USE.
WARNING
TO AVOID INJURY, ENSURE
THAT YOUR CHILD IS KEPT
AWAY WHEN FOLDING AND
UNFOLDING THIS PRODUCT.
WARNING
DO NOT LET YOUR CHILD PLAY
WITH THIS PRODUCT.
WARNING
THE PUSHCHAIR SEAT AND
TANDEM SEAT ARE NOT
RECOMMENDED FOR CHILDREN
UNDER 6 MONTHS.
WARNING
ALWAYS USE THE
RESTRAINT SYSTEM.
WARNING
DO NOT CARRY MORE THAN
TWO CHILDREN IN THIS
PUSHCHAIR.
Wave Instructions 2016-AUSTRALIAN.indd 40 19/09/2017 16:51
Page 41
41
silvercross.com.au
AUS
WARNING
CHECK THAT THE PRAM BODY,
SEAT UNIT OR CAR SEAT
ATTACHMENT DEVICES ARE
CORRECTLY ENGAGED
BEFORE USE.
WARNING
THIS PRODUCT IS NOT SUITABLE
FOR RUNNING OR SKATING.
CARRYCOT WARNINGS:
WARNING
THIS PRODUCT IS ONLY SUITABLE
FOR A CHILD WHO CANNOT SIT
UP UNAIDED.
WARNING
ONLY USE ON A FIRM
HORIZONTAL , LEVEL AND
DRY SURFACE.
WARNING
DO NOT LET OTHER CHILDREN
PLAY UNATTENDED NEAR THE
CARRYCOT.
WARNING
DO NOT USE IF ANY PART OF
THE CARRYCOT IS BROKEN,
TORN OR MISSING.
WARNING
NEVER USE ON A STAND.
WARNING
DO NOT LET OTHER CHILDREN
PLAY UNATTENDED NEAR THE
CARRYCOT.
WARNING
BE AWARE OF THE RISK OF OPEN
FIRES, GAS FIRES ETC. IN THE NEAR
VICINITY OF THE CARRYCOT / PRAM
/ STROLLER.
WARNING
THE HANDLES AND THE BOTTOM
OF THE CARRY COT SHOULD BE
CHECKED REGULARLY FOR SIGNS
OF DAMAGE AND WEAR.
WARNING
THIS VEHICLE IS DESIGNED
FOR USE ON FLAT OR GENTLY
SLOPING SURFACES AND MAY BE
UNSTABLE ON HIGHER SLOPING
SURFACES. USER SHOULD BE
AWARE OF THE POSSIBILITY OF
THE VEHICLE TIPPING OVER.
ANY LOAD ATTACHED TO THE
HANDLE AND/OR BACKREST
AND/OR SIDES OF THE VEHICLE
WILL AFFECT THE STABILITY OF
THE VEHICLE. A CHILDS SAFETY IS
YOUR RESPONSIBILITY. ANY LOAD
ATTACHED TO THE HANDLE AND/
OR BACKREST AND/OR SIDES OF
THE VEHICLE WILL AFFECT STABILITY
OF THE VEHICLE. A BABY’S SAFETY
IS YOUR RESPONSIBILITY.
WARNING
ONLY REPLACEMENT PARTS AND
ACCESSORIES APPROVED BY SILVER
CROSS SHOULD BE USED.
MAXIMUM CAPACITY FOR BASKET:
5KG.
MAXIMUM CAPACITY FOR CUP
HOLDER: 340G.
MAXIMUM CAPACITY FOR
CHANGING BAG: 1KG.
Wave Instructions 2016-AUSTRALIAN.indd 41 19/09/2017 16:51
Page 42

42
AUS
Notes
Wave Instructions 2016-AUSTRALIAN.indd 42 19/09/2017 16:51
Page 43

43
silvercross.com.au
AUS
Notes
Wave Instructions 2016-AUSTRALIAN.indd 43 19/09/2017 16:51
Page 44

Premium Brands Pty Ltd, 10 Capital Court, Braeside Victoria 3195, Australia
silvercross.com.au
SXWAVE1116AUS
Wave Instructions 2016-AUSTRALIAN.indd 44 19/09/2017 16:51
 Loading...