

Page 1
4
IAN 75467 IAN 75467
KOMPERNASS GMBH
Burgstraße 21
D-44867 Bochum
www.kompernass.com
Last Information Update · Stav informací · Stand der Informationen:
07 / 2012 · Ident.-No.: SIKP3400A1042012-2
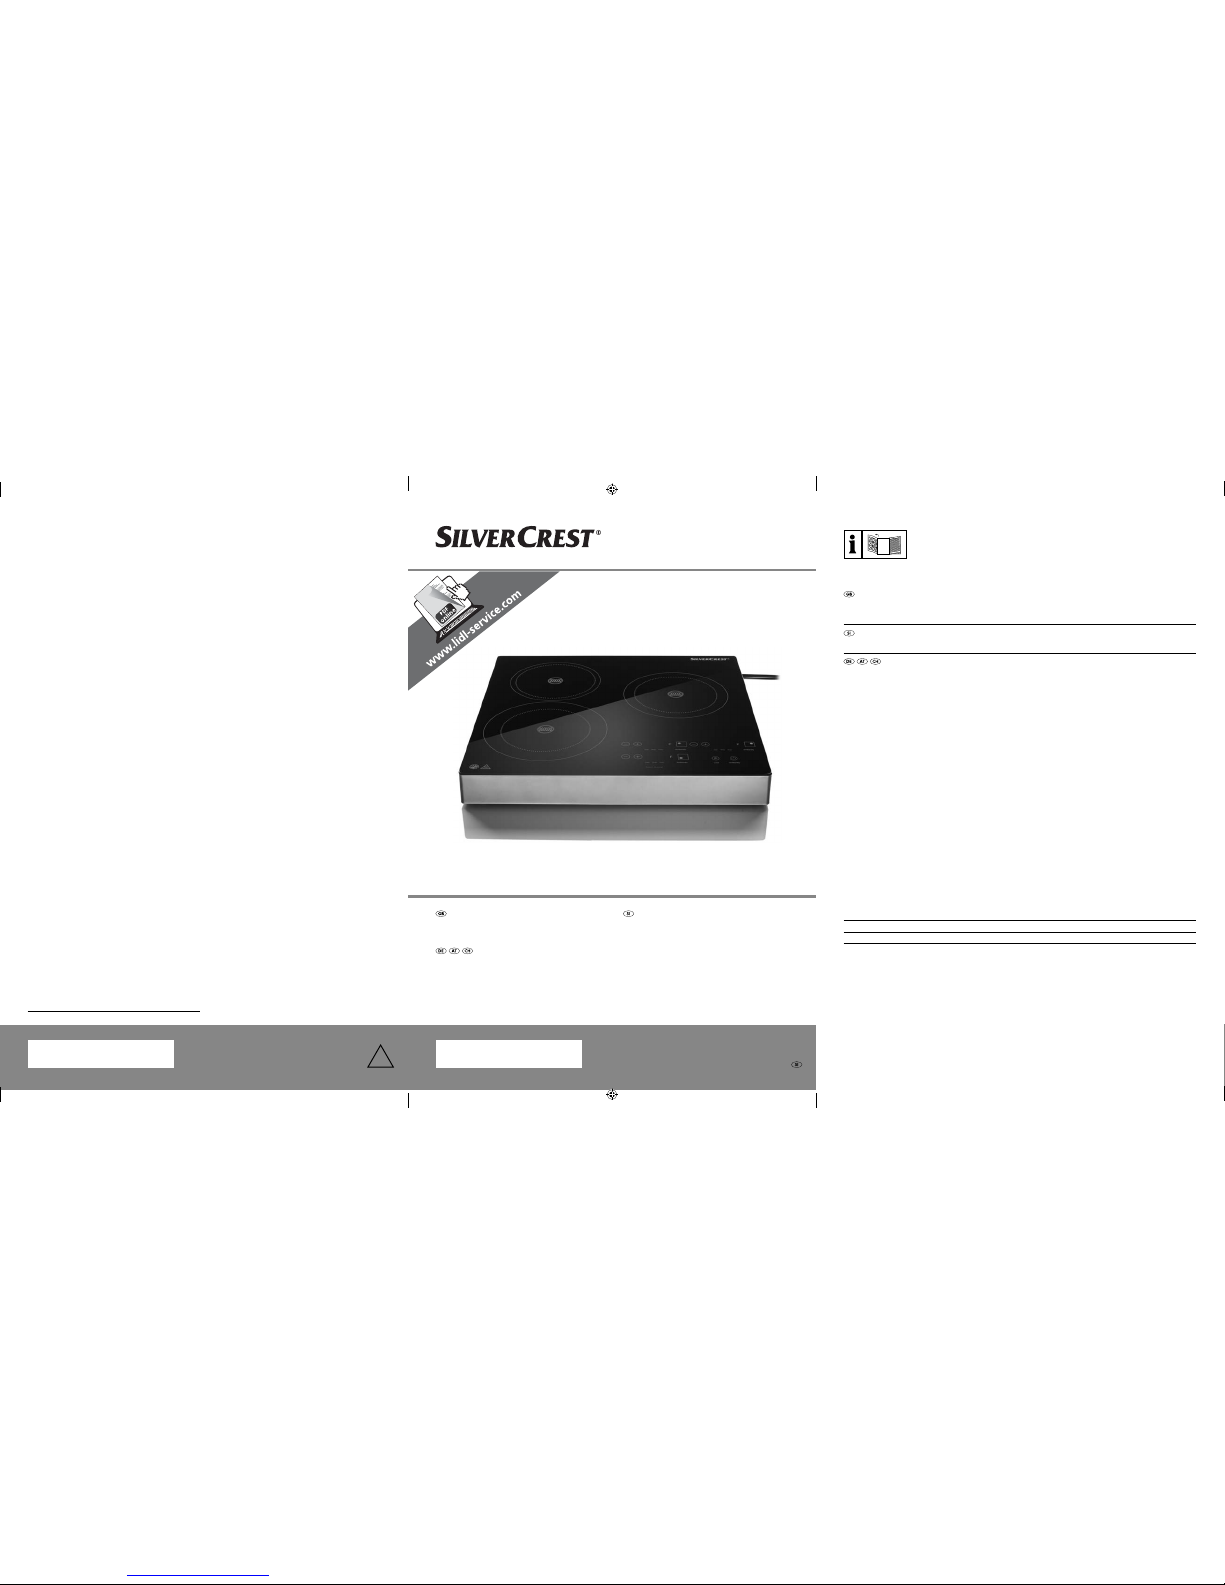
INDUCTION HOB SIKP 3400 A1
INDUCTION HOB
Operating instructions
INDUKCIJSKA KUHALNA PLOŠČA
Navodila za uporabo
GB Operating instructions Page 1
SI Navodila za uporabo Stran 21
DE / AT / CH Bedienungsanleitung Seite 41
Before reading, unfold the page containing the illustrations and familiarise yourself with all functions of
the device.
Pred branjem odprite stran s slikami in se nato seznanite z vsemi funkcijami naprave.
Klappen Sie vor dem Lesen die Seite mit den Abbildungen aus und machen Sie sich anschließend mit allen
Funktionen des Gerätes vertraut.
INDUKTIONSKOCHPLATTE
Bedienungsanleitung
CV_75467_SIKP3400A1_LB4.indd 1-3CV_75467_SIKP3400A1_LB4.indd 1-3 13.07.12 10:5513.07.12 10:55
Page 2
A
B
CV_75467_SIKP3400A1_LB4.indd 4-6CV_75467_SIKP3400A1_LB4.indd 4-6 13.07.12 10:5513.07.12 10:55
Page 3
Index
Introduction . . . . . . . . . . . . . . . . . . . . . . . . . . . . . . . . . . . . . . . . . . . . . . . . . . . 2
Intended use . . . . . . . . . . . . . . . . . . . . . . . . . . . . . . . . . . . . . . . . . . . . . . . . . . 2
Items supplied . . . . . . . . . . . . . . . . . . . . . . . . . . . . . . . . . . . . . . . . . . . . . . . . . 3
Disposal of the packaging . . . . . . . . . . . . . . . . . . . . . . . . . . . . . . . . . . . . . . . . . . . . . . . . . . 3
Description of appliance / attachments . . . . . . . . . . . . . . . . . . . . . . . . . . . . . 4
Technical data . . . . . . . . . . . . . . . . . . . . . . . . . . . . . . . . . . . . . . . . . . . . . . . . . 4
Safety instructions . . . . . . . . . . . . . . . . . . . . . . . . . . . . . . . . . . . . . . . . . . . . . 5
Manner of operation . . . . . . . . . . . . . . . . . . . . . . . . . . . . . . . . . . . . . . . . . . . 9
Suitable cookware . . . . . . . . . . . . . . . . . . . . . . . . . . . . . . . . . . . . . . . . . . . . . 9
Setup . . . . . . . . . . . . . . . . . . . . . . . . . . . . . . . . . . . . . . . . . . . . . . . . . . . . . . . 10
Electrical connection . . . . . . . . . . . . . . . . . . . . . . . . . . . . . . . . . . . . . . . . . . . 10
GB
Operation . . . . . . . . . . . . . . . . . . . . . . . . . . . . . . . . . . . . . . . . . . . . . . . . . . .11
The induction cooking areas . . . . . . . . . . . . . . . . . . . . . . . . . . . . . . . . . . . . . . . . . . . . . . . 11
Operation . . . . . . . . . . . . . . . . . . . . . . . . . . . . . . . . . . . . . . . . . . . . . . . . . . . . . . . . . . . . . 12
Safety switch off . . . . . . . . . . . . . . . . . . . . . . . . . . . . . . . . . . . . . . . . . . . . . . . . . . . . . . . . 13
Timer . . . . . . . . . . . . . . . . . . . . . . . . . . . . . . . . . . . . . . . . . . . . . . . . . . . . . . . . . . . . . . . . . 14
Child protection system . . . . . . . . . . . . . . . . . . . . . . . . . . . . . . . . . . . . . . . . . . . . . . . . . . . 15
Cleaning . . . . . . . . . . . . . . . . . . . . . . . . . . . . . . . . . . . . . . . . . . . . . . . . . . . . . 16
Troubleshooting . . . . . . . . . . . . . . . . . . . . . . . . . . . . . . . . . . . . . . . . . . . . . . 17
Disposal of the appliance . . . . . . . . . . . . . . . . . . . . . . . . . . . . . . . . . . . . . . .18
Notes on the EC Declaration of Conformity . . . . . . . . . . . . . . . . . . . . . . . . 18
Importer . . . . . . . . . . . . . . . . . . . . . . . . . . . . . . . . . . . . . . . . . . . . . . . . . . . . . 19
Warranty . . . . . . . . . . . . . . . . . . . . . . . . . . . . . . . . . . . . . . . . . . . . . . . . . . . . 19
Service . . . . . . . . . . . . . . . . . . . . . . . . . . . . . . . . . . . . . . . . . . . . . . . . . . . . . . 19
SIKP 3400 A1
1
Page 4

GB
Introduction
Congratulations on the purchase of your new appliance!
You have clearly decided in favour of a modern and high quality product. These
operating instructions are a component of this product. They contain important
information about the safety, operation and disposal of the appliance. Before
using this product familiarise yourself with all of these operating and safety instructions. Use this appliance only as described and only for the specifi ed areas
of application. Also, pass them on to whoever might acquire the appliance at a
future date.
Intended use
This appliance is intended exclusively for the heating up and keeping warm of
foods. This appliance is intended exclusively for use in domestic households.
Do not use it for commercial purposes.
Use the appliance only in dry rooms and NEVER use it outdoors.
WARNING
Risks from unintended use!
Risks can be engendered by the appliance if it is used for purposes not
intended for it and / or for other types of use.
► Use the appliance exclusively for its intended purposes.
► Observe the procedures described in these operating instructions.
NOTICE
► Risks can be engendered by the appliance if it is used for purposes not
intended for it and / or for other types of use. Use the appliance exclusively
for its intended purposes. Observ
ating instructions. Claims of any kind for damage resulting from unintended
use, incompetent repairs, unauthorised modifi cation or the use of unauthorised spare parts will not be accepted. The operator alone bears liability.
e the procedures described in these oper-
2
SIKP 3400 A1
Page 5
Items supplied
The appliance is delivered with the following components as standard:
▯ Induction Hob
▯ Magnet
▯ Operating Instructions
1) Remove all parts of the appliance and the operating instructions from the
carton.
2) Remove all packing material.
NOTICE
► Check the contents to make sure everything is there and for visible damage.
► If the delivery is not complete, or is damaged due to defective packaging or
through tr
Disposal of the packaging
The packaging protects the appliance from transport damage. The packaging
materials are selected from the point of view of their environmental friendliness
and disposal technology and are therefore recyclable.
ansportation, contact the Service Hotline (see chapter Service).
GB
The recirculation of packaging into the material circuit saves on raw material
and reduces generated waste. Dispose of packaging material that is no longer
needed according to the regionally established regulations.
NOTICE
► If possible, preserve the appliance's original packaging during the warranty
period so that, in the e
appliance ideally for its return.
vent of a warranty claim, you can repackage the
SIKP 3400 A1
3
Page 6
GB
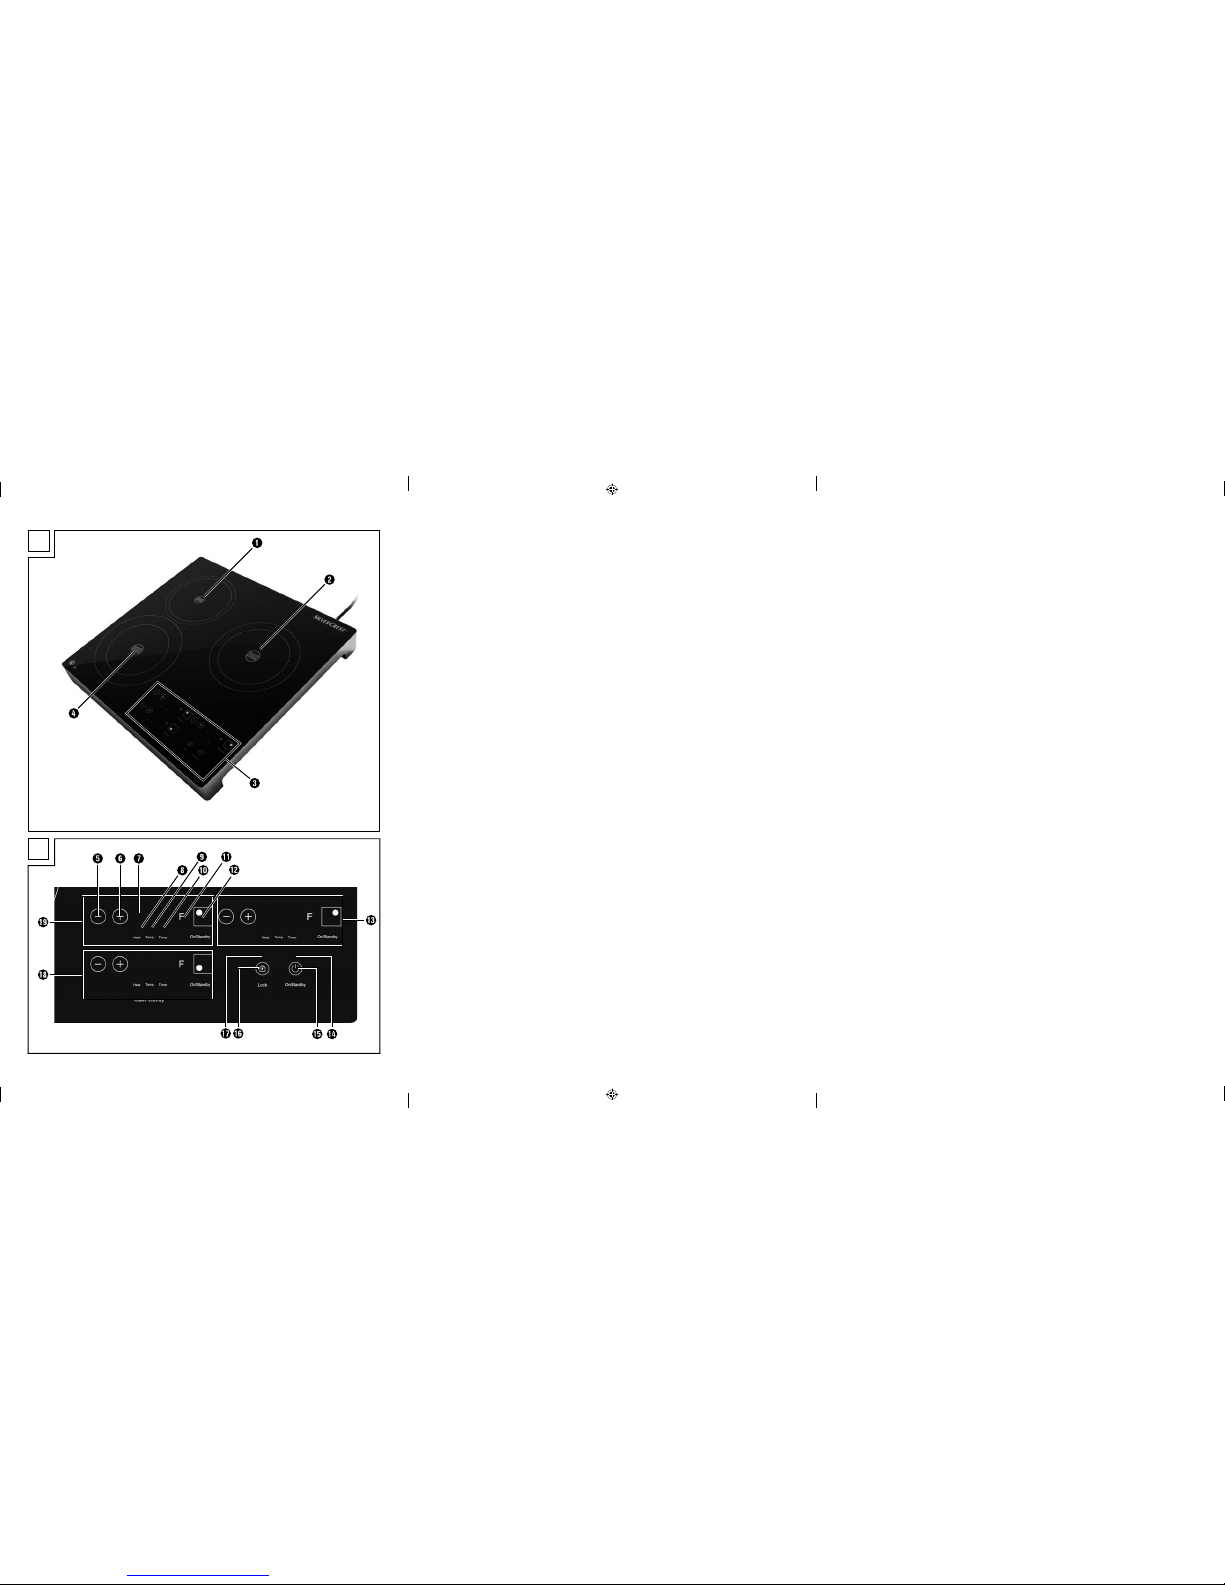
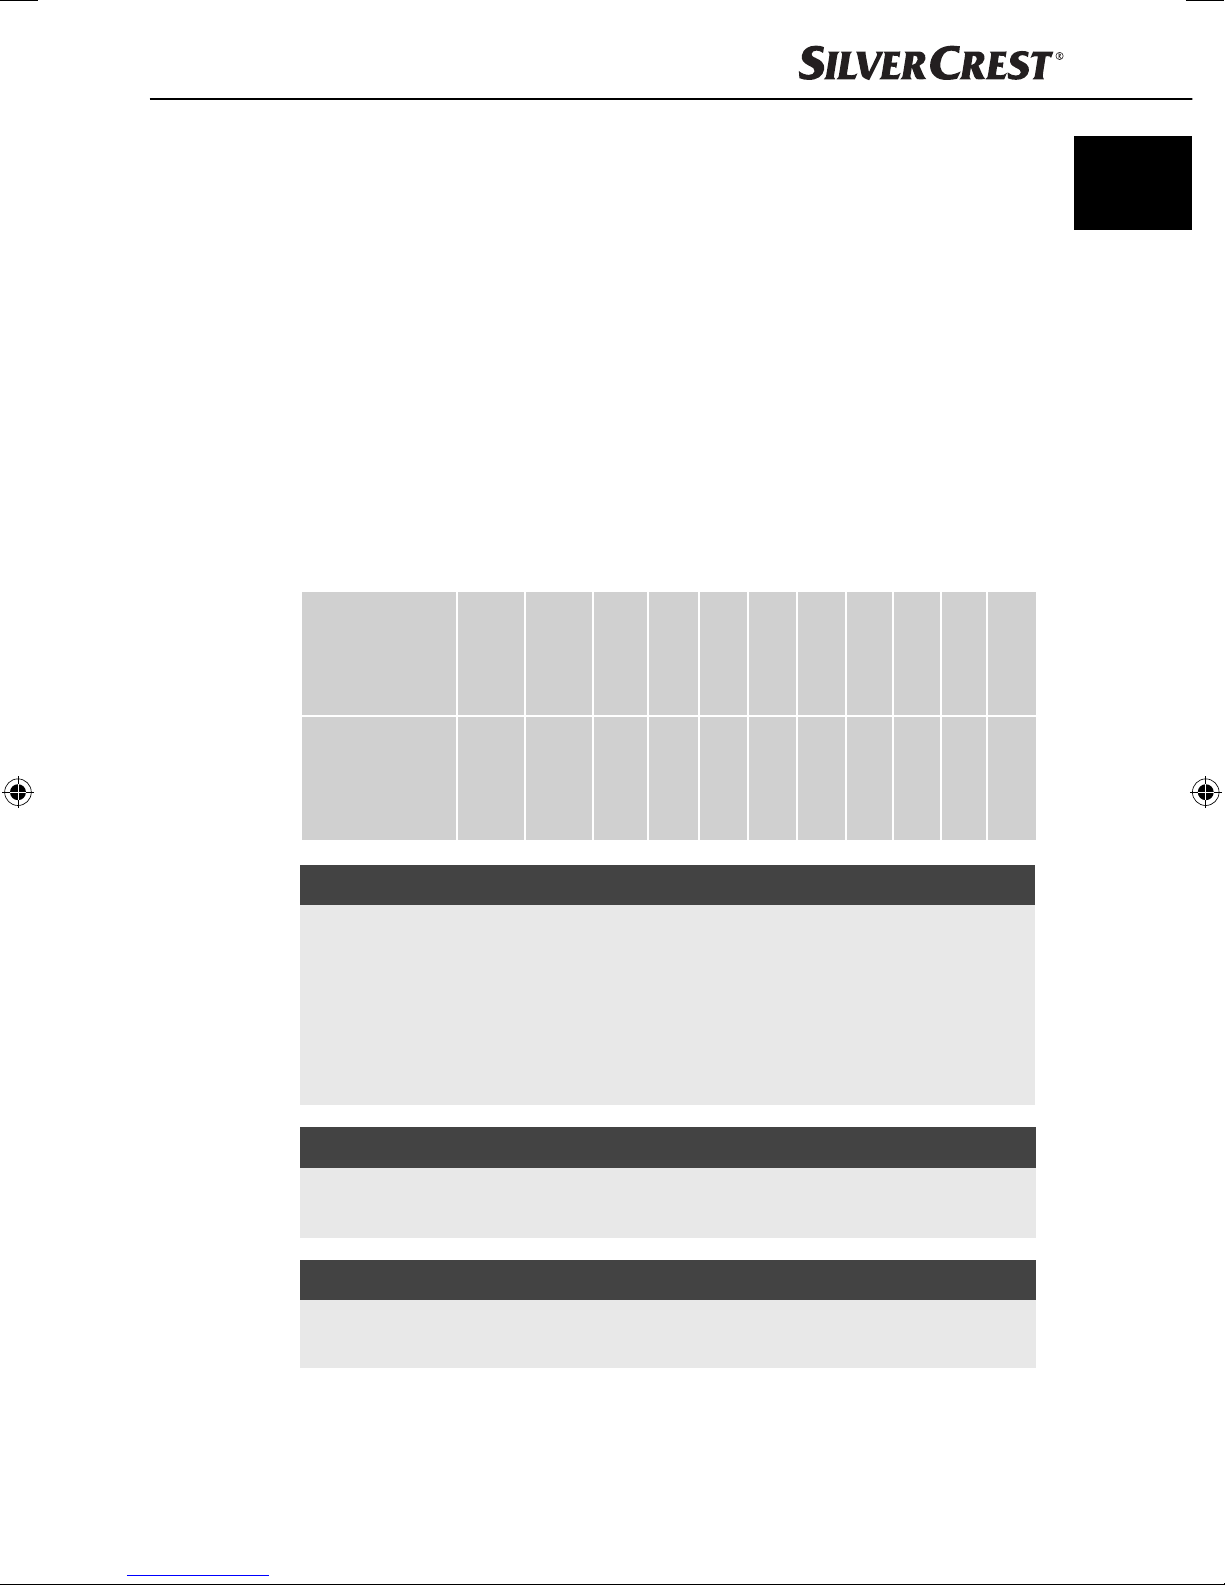
Description of appliance / attachments
Illustration A:
1 Cooking area, rear (1000 W)
2 Cooking area, right (1400 W)
3 Control panel
4 Cooking area, front (2000 W)
Illustration B:
5 Button “-”
6 Button “+”
7 Display
8 Control lamp power mode (“Heat”)
9 Control lamp temperature mode (“Temp.”)
0 Control Lamp Timer
q Button “F” (English: “FUNCTION”)
w Button “On / Standby” with cooking plate marking
e Operating elements for the right cooking area
r Control lamp On / Standby
t Button “On / Standby”
z Button “Lock” (child safety)
u Control lamp child safety
i Operating elements for the front cooking area
o Operating elements for the rear cooking area
Technical data
Voltage 220 - 240 V ~, 50 / 60 Hz
Nominal power 3200 - 3400 W
Protection class
Noise emission level < 70 dB (A)
II
4
SIKP 3400 A1
Page 7

Safety instructions
RISK OF ELECTRIC SHOCK
► Ensure that the power cable can never become
wet or damp during operation. Lay the cable such
that it cannot be pinched or otherwise damaged.
► Should the cable or the electric plug become
damaged, arrange for it to be replaced by
Customer Services before you continue to use
the appliance.
► After use, always disconnect the plug from the
mains power socket.
► Switching the appliance off is not suffi cient, be-
GB
cause the appliance receives power for as long as
the plug is connected to the mains power socket.
► Protect the cooking plate from damages: Do not
burden it irregularly and do not allow objects to
fall onto it. The appliance may not be taken into
use if either the cooking plate or the housing is
damaged. In this case, immediately remove the
plug from the mains power socket and arrange
for the appliance to be repaired.
► To avoid risks, arrange for defective plugs and / or
cables to be replaced at once by qualifi ed technicians or our Customer Services Department.
► Should the surface of the cooking plate be
cracked, disconnect the plug from the mains
power socket to avoid receiving an electric shock.
SIKP 3400 A1
5
Page 8
GB
RISK OF ELECTRIC SHOCK
Ensure that the appliance, the cable and the
plug are NEVER submersed in water or other
fl uids.
WARNING! RISK OF INJURY!
► Do not touch the area on which hot cookware
has just been standing. Directly after cooking,
this area could be very hot.
► This appliance may be used by children of at
least 8 years of age and persons with reduced
physical, sensory or mental capabilities or lack of
experience and / or knowledge if they are super-
vised by a person responsible for their safety or
receive from this person instruction in how the appliance is to be used, and they have understood
the potential risks.
► Children should not play with the appliance.
► Cleaning and user maintenance should not be
performed by children, unless they are older than
8 years of age and are supervised.
Children younger than 8 years of age are to be
kept away from the appliance and the power
cable.
► Do not heat sealed tins or other sealed containers.
6
SIKP 3400 A1
Page 9
WARNING! RISK OF INJURY!
Caution! Hot surfaces!
This symbol warns you not to touch the cooking
area directly after use.
Risk of Burns!
WARNING! RISK OF FIRE!
► Overheated foodstuff s could begin to burn! Never
let the appliance be in use without supervision.
► Additionally, NEVER position the appliance be-
low infl ammable objects, especially not below
curtains or drapes.
GB
► NEVER heat up a securely closed container.
Through heat expansion it could quickly cause
an explosion.
► NEVER heat up an empty container. This would
very quickly overheat - presenting both the risk of
fi re and of serious damage to the cooking areas.
► Do not place any metallic objects on the cooking
area, such as kitchen utensils or items of cutlery.
They can become very hot in the energy area.
► Be careful when heating small amounts of oil - do
not set a high performance or temperature level.
If you do, the oil could ignite and catch fi re!
SIKP 3400 A1
7
Page 10
GB
WARNING! RISK OF FIRE!
► NEVER operate the appliance on a metal table
or other metallic surface. This may heat up and
thus cause a fi re. Or, the appliance could become irreparably damaged.
► Do not operate the appliance via an external
time-switch or a separate remote control system.
To avoid the risks and dangers
presented by electromagnetic fi elds:
► Maintain a minimum distance of 1 meter to appli-
ances that are sensitive to electromagnetic fi elds
(e.g. computer screens, clocks, magnetic storage
media, electronic devices etc.).
► Medical-technical devices such as heart pace-
makers, hearing aids and other appliances may
possibly need to be kept at a greater distance.
If in doubt, consult the manufacturer of the appliance!
8
SIKP 3400 A1
Page 11

Manner of operation
Whilst standard hotplates become warm themselves, in an induction cooker the
heat is created in the base of the cookware. The cooking area itself does not
heat up - it becomes hot itself only insofor as, when a pan is heated up on it,
then some heat radiates back onto the cooking area. (Reverse heating).
For this, an energy fi eld generates heat which can only be created in magnetically conductible materials, for example, pans made of ferric materials. In other
materials, for example porcelain, glass or ceramic, the energy fi eld cannot create
any heating eff ect.
Suitable cookware
Use only cookware that is suitable for induction cookers:
■ Suitable are pots and pans with a base made of steel or cast iron. These
are recognisable either through the markings on the pan or if the supplied
magnet clings to the base of the pan.
■ Unsuitable are all types of cookware made of metals to which a magnet
does not cling, for example aluminium, copper and stainless steel, as well as
non-metallic cookware made of porcelain, glass, ceramics and plastics etc.
GB
■ Thin pan bottoms are better suited for induction cookers than thick sandwich
bottoms. The very short reaction times to setting adjustments (short pre-warm
time; fast metered roasting) are not possible with thick pan bases.
Only use cookware that is suitable for the size of the respective cooking area
1 2 4. Only then can the induction cooker function perfectly. The base of the
pan may not be uneven, rather, it must sit fl at.
For the rear cooking area 1:
– The diameter must not be less than 16 cm, so that the energy fi eld has
an eff ect. We recommend a pan with a maximum diameter of 18 cm,
so as to optimally use the power of the cooking area.
For the right 2 and rear cooking areas 4:
– The diameter must be no larger than 26 cm, so that the pan does not
overextend, and not less than 16 cm, so that the energy fi eld can have
an eff ect.
SIKP 3400 A1
9
Page 12
GB
Setup
So as not to overheat, the appliance requires unrestricted ventilation. Therefore,
position the appliance such that ...
– there is an all-round free space of minimum 10 cm, e.g. to the nearest
all,
w
– a free space directly above of minimum 60 cm, e.g. to a suspended wall
cabinet.
■ For cooling, the appliance draws in air through openings on the underside.
Do not place it on fabrics or plush surfaces, such as table cloths. Operate it
only on smooth surfaces.
■ Do not place it adjacent to curtains, drapes or other textiles which, due to
the airfl ow, could press themselves against the appliance.
■ Do not place it on surfaces which may contain ferric or steel materials under-
neath. These may become very hot.
■ Maintain a minimum distance of 1 meter to appliances that are sensitive
to electromagnetic fi elds (e.g. computer screens, clocks, magnetic storage
media, electronic devices etc.).
Electrical connection
When you have unpacked and set up the appliance as described, connect the
plug into a mains power socket.
■ Before you connect the appliance, ensure that the connection data (voltage
and frequency) given on the data plate tallies with your mains power supply.
■ The mains power socket must be protected by a 16A fuse.
■ Do not use an extension cable when connecting the appliance. In the event
of an emergency, the plug must be quickly accessible.
■ Do not route the power cable over the appliance or over hot and / or sharp
surfaces.
■ Ensure that the power cable cannot be trapped.
The electrical safety of the appliance is only assured when it is connected to a
correctly installed protective conductor system. Operation on a mains power
socket without a protective conductor is prohibited. If in doubt, arrange for the
house wiring to be checked by a qualifi ed electrician.
The manufacturer is not liable for damage caused by a missing or interrupted
protective conductor.
10
SIKP 3400 A1
Page 13
Operation
The induction cooking areas
■ The front 4 and the right cooking areas 2 each have 10 power levels. The
right 2 cooking area runs independently of the other cooking areas, i.e. you
can always set an output power level up of to level 10.
■ The rear cooking area 1 has 5 power levels.
■ The front 4 and the rear 1 cooking areas function with so-called “power
sharing”. Which means that an overall power level of up to 10 (2000 W) can
be set. If, for example, the front cooking area 4 is set at the power level 6, the
rear cooking area 1 can be set to a maximum of power level of 4. Thereby,
a total wattage of 2000 W is not exceeded. If you want to use the front 4
and the rear 1 cooking areas simultaneously, then orientate yourself on the
following table:
Power levels
of the front
cooking
areas 4
Power levels
of the rear
cooking
areas 1
10 9 8 8 7 6 5 4 3 2 1
Off Off 123455555
GB
NOTICE
► On the rear cooking area 1 (1000 W), the maximum pow
can be set is 5.
► On the front cooking area 4 (2000 W), the maximum pow
can be set is 10 (in dependence of the rear cooking area 1).
► On the right cooking area 2 (1400 W), the maximum pow
can be set is 10.
NOTICE
► The front cooking area 4 is the most pow
1 2 4 because it has the highest rated power (2000 W)
NOTICE
► In temperature mode every cooking area can also be simultaneously set to
its maximum temperatur
e (240°C).
erful of the three cooking areas
er level that
er level that
er level that
SIKP 3400 A1
11
Page 14
GB
Operation
The operation of the individual cooking areas 1 2 4 is explained here by
using the rear cooking area 1 as the example. The buttons and control lamps
for the rear cooking area 1 are numbered on the fold-out page. However, the
operation of all 3 cooking areas is identical with the respective operating elements e i o.
1) Place the cookware with contents in the middle of the rear cooking area 1.
WARNING - PROPERTY DAMAGE!
► In total, the cookware which is placed on the 3 cooking areas may not
weigh mor
ance could be damaged.
e than 10 kg (together with the contents). Otherwise, the appli-
2) Press the button “On / Standby” t. The control lamp On
blinks.
NOTICE
► If you do not activate a cooking area 1 2 4 within 30 seconds, the
appliance switches back to standby
INFORMATION
You may select between cooking with power levelsor cooking with tempera-
e settings:
tur
► When you are cooking in the temperature mode, the appliance heats the
cookwar
pliance heats it up again. The temperature is maintained.
► With setting of the "Power level", the cookware is heated at diff erent speeds.
The higher the selected pow
3) Select the rear cooking area 1 by pr
In the display 7 appears the always preset power level 5 and the cooking
process begins.
You can now use the button “F” q to select which operating mode you want
to use:
The power mode (power level 5) is the default setting.
If you want to change to the temperature mode, press the button “F” q repeatedly until the control lamp Temperature Mode 9 glows. “120” appears
in the display 7, indicating that there is a default temperature setting of
120°C.
e to the set temperature. If the set temperature should fall, the ap-
er level, the faster the cookware is heated.
-mode.
essing the button “On / Standby” w.
/ Standby r
4) When you have selected the desired operating mode, use the buttons “-” 5
and “+” 6 to select the desired power level or temperature. The temperature level can be adjusted in 20°C increments.
12
SIKP 3400 A1
Page 15
5) To switch the cooking area 1 off , press the button “On / Standby” w.
To switch all cooking areas 1 2 4 off at the same time, press the button
“On / Standby” t
NOTICE
► When all 3 cooking areas 1 2 4 are off , after usage or adjustment,
you must fi
NOTICE
► After switching on or off , an "- L" or a "- H -." appears in the display.
This heat indicator means:
–"- L -" = "Low" - Temperature of the cooking areas 1 2 4 < 60°C
or
–"- H -" = "High" - Temperature the cooking areas 1 2 4 > 60°C
NOTICE
► After switching off , in the standby mode the fans of the appliance continue
to run on for some time, so as to dissipate the heat.
rst press the button "On / Standby" t to carry out new settings.
.
GB
NOTICE
► The appliance switches itself into the standby mode automatically after
120 minutes.
Safety switch off
■ For safety reasons, the cookware identifi cation automatically switches the
appliance off (in standby mode) when you ...
– remove the cookware from the cooking areas 1 2 4 for longer than
15 seconds, or do not place anything there..
– Although the energy fi eld is immediately switched off with short-term
cookware removals - the selected function remains, however, active.
Around every 3 seconds a signal tone issues a reminder that, in roughly
15 seconds, the appliance will switch itself off automatically. If you
replace the cookware back onto the cooking areas 1 2 4 within
15 seconds, the selected function will continue on the same settings.
NOTICE
► As soon as you take the cookware from the cooking area, "- - -" blinks in the
display.
SIKP 3400 A1
13
Page 16
GB
NOTICE
► The appliance switches itself into the standby mode automatically after
120 minutes.
Timer
You can pre-select a time period from 0 - 180 mins., after the expiry of which the
respective cooking area 1 2 4 should switch itself off . If you press the button
“+” 6, the time is increased by 5 minutes. If you press the button “-” 5 the time
is decreased by 1 minute.
The operation of the timers of the cooking areas 1 2 4 is explained here by
using the rear cooking area 1 as the example. The buttons and control lamps
for the rear cooking area 1 are numbered on the fold-out page. However, the
operation of all 3 cooking areas is identical with the respective operating elements e i o.
Timer in the Power Mode
1) First, start the heating in the power mode as previously described.
2) Then press the button “F” q repeatedly until the control lamp Power Mode 8
and the control lamp Timer 0 glow simultaneously.
3) Use the buttons “-” 5 and “+” 6 to set the required time, at the lapse of
which the cooking area 1 should switch itself off .
The display 7 now indicates alternately the set power level and the time remaining
until switch off .
After the expiration of the time, the cooking area 1 switches off automatically.
NOTICE
► If, while the timer is already running, you use the button "F" q to select the
temperatur
a temperature, the timer setting remains active and the appliance switches
only from the power mode to the temperature mode.
e setting (control lamp "Temperature Mode" 9 glows) and set
14
SIKP 3400 A1
Page 17
Timer in the Temperature Mode
1) First, start the heating in the temperature mode as previously described..
2) Then press the button “F” q repeatedly until the control lamp Temperature
Mode 9 and the control lamp Timer 0 glow simultaneously.
3) Use the buttons “-” 5 and “+” 6 to set the required time, at the lapse of
which the cooking area 1 should switch itself off .
The display 7 now indicates alternately the set temperature level and the time
remaining until switch off .
After the expiration of the time, the cooking area 1 switches off automatically.
NOTICE
► If, while the timer is already running, you use the button "F" q to select the
power setting (control lamp Power Mode 8 glows) and set a power level,
the timer setting remains active and the appliance switches only from the
temperature mode to the power mode.
Child protection system
To prevent unauthorised switching on or a changing of the settings, by children
for example, this appliance is fi tted with a childproof lock.
GB
■ Press and hold the button “Lock” z until a signal tone sounds and the
control lamp Child Safety u lights up. Now all of the buttons, except the
buttons “Lock” z and “On / Standby” t, are blocked.
■ To release the child safety block, once again press and hold the button
“Lock” z until a signal tone is heard and the control lamp Child Safety u
extinguishes. The buttons are now released.
NOTICE
► Should the child safety block be enabled during operation, the button
"On / Standby" t for switching off
activated.
NOTICE
► Use the child safety feature also as a wiping safety function: before you
wipe ov
This helps avoid an inadvertent actuation of buttons.
er the buttons with a damp cloth, activate the child safety feature.
and the button "Lock" z can still be
SIKP 3400 A1
15
Page 18
GB
Cleaning
WARNING - RISK OF ELECTRIC SHOCK!
WARNING - RISK OF INJURY!
WARNING - PROPERTY DAMAGE!
► Always remove the plug from the mains power socket before you clean the
appliance.
UNDER NO CIRCUMSTANCES may the appliance or parts of it be
►
submersed in liquids! This could result in you receiving a fatal electric shock
and the appliance being damaged.
► NEVER open the appliance housing. You could receive a potentially fatal
electric shock.
► Let the appliance cool down before cleaning it. Risk of Burns!
► Do not use solvents or abrasive cleaners. These could damage the cooking
1 2 4 of the appliance.
areas
► Do not use abrasive, aggressive or chemical cleaning agents! They could
irrepar
■ Clean all outer surfaces and the power cable only with a lightly moistened
cloth.
■ In all cases, dry the appliance well before using it again.
■ Burnt-on soiling on the cooking area 1 2 4 can be removed with a scraper
suitable for glass hobs, available in most household equipment shops.
■ Should soiling be visible in the area of the ventilation slots, you can attempt
to remove this from outside with a vacuum cleaner.
ably damage the upper surfaces!
16
SIKP 3400 A1
Page 19
Troubleshooting
PROBLEM POSSIBLE CAUSE
GB
POSSIBLE
SOLUTIONS
The appliance does not
function. The control lamp
On / Standby r does not
glow
.
The appliance does not
start the cooking process.
E01 appears in one of the
displays.
E02 appears in one of the
displays.
The plug is not connected.
The appliance is damaged.
There is no cookware on
the respective cooking area
1 2 4.
The cookware is not suitable
for induction cooking areas.
The appliance is not being
supplied with enough voltage
(< 160 V).
The appliance is being
supplied with too much
voltage (> 270 V).
Connect the appliance to
a mains power socket.
In this case, contact
Customer Services.
Place suitable cookware on
the cooking area 1 2 4.
Use suitable cookware
(see chapter "Suitable
Cookware").
Check to ensure that the
appliance is connected to
a properly installed mains
power socket supplying
220 - 240 V ~, 50 Hz.
Check to ensure that the
appliance is connected to
a properly installed mains
power socket supplying
220 - 240 V ~, 50 Hz.
E03 appears in one of the
displays.
E05 appears in one of the
displays.
E06 appears in one of the
displays.
E07 appears in one of the
displays.
There is a short circuit inside
the appliance!
The appliance is too hot
(in power levels mode)!
The temperature sensor underneath the cooking area 1 2
4 is defective or there is a
short circuit..
The appliance is too hot
(in Temperature-Mode)!
Immediately disconnect the
plug from the mains power
socket and contact the Customer Services department!
Disconnect the plug from
the mains power socket
and wait until the appliance
has cooled down.
Disconnect the plug from
the mains power socket
and contact the Customer
Services department.
Disconnect the plug from
the mains power socket
and wait until the appliance
has cooled down.
SIKP 3400 A1
17
Page 20

GB
E08 appears in one of the
displays.
The temperature sensor is
defective.
Disconnect the plug from
the mains power socket
and contact the Customer
Services department.
There is no cookware on
the respective cooking area
1 2 4.
- - - appears in one of the
displays.
There is unsuitable cookware
on the cooking area 1 2 4.
The cookware is not
centred on the cooking area
1 2 4.
Disposal of the appliance
Do not dispose of this appliance in your normal domestic waste.
This product is subject to the provisions of European Directive
2002/96/EC.
Dispose of the appliance through an approved disposal centre or at your com-
munity waste facility. Pay heed to the currently applicable regulations. In case of
doubt, please contact your waste disposal centre.
Place suitable cookware on
the cooking area
1 2 4.
Place suitable cookware on
the cooking area
1 2 4.
Place the cookware
centrally on the cooking
area 1 2 4.
Notes on the EC Declaration of Conformity
With regard to compliance with essential requirements and
other relevant provisions, this appliance complies with the
European Electromagnetic Compatibility Directive
2004/108/EC, the Low Voltage Directive 2006/95/EC
as well as the ErP Directive 2009/125/EC, Regulation
1275/2008 Annex 1, No. 1.
The complete original Declaration of Conformity can be
obtained from the importer.
18
SIKP 3400 A1
Page 21

Importer
KOMPERNASS GMBH
BURGSTRASSE 21
44867 BOCHUM, GERMANY
www.kompernass.com
Warranty
With this appliance you receive a warranty of 3 years from the date of purchase.
This appliance has been manufactured with care and meticulously examined
before delivery.
Please retain your receipt as proof of purchase. In the case of a warranty claim
please make contact by telephone with our Customer Service department. Only
in this way can a post-free despatch for your goods be assured.
NOTICE
► The warranty is valid for material or manufacturing faults only, not for trans-
port damage, par
GB
ts subject to wear or damage to fragile parts.
Service
This product is for domestic use only and is not intended for commercial applications. In the ev
not carried out by our authorized service branch, the warranty will become void.
Your statutory rights are not restricted in any way by this warranty.
The warranty period is not extended by repairs made under the warranty.
This applies also to replaced and repaired parts.
Damages and defects extant at the time of purchase must be reported immediately after unpacking, resp. no later than two days after the date of purchase.
Repairs carried out after lapse of the warranty period are subject to charge.
Service Great Britain
Tel.: 0871 5000 720 (£ 0.10/Min.)
E-Mail: kompernass@lidl.co.uk
IAN 75467
Service Ireland
Tel.: 1890 930 034
(0,08 EUR/Min., (peak))
(0,06 EUR/Min., (off peak))
E-Mail: kompernass@lidl.ie
ent of misuse and improper handling, use of force and interference
IAN 75467
SIKP 3400 A1
19
Page 22

20
SIKP 3400 A1
Page 23

Kazalo
Uvod . . . . . . . . . . . . . . . . . . . . . . . . . . . . . . . . . . . . . . . . . . . . . . . . . . . . . . . . 22
Predvidena uporaba . . . . . . . . . . . . . . . . . . . . . . . . . . . . . . . . . . . . . . . . . . 22
Vsebina kompleta . . . . . . . . . . . . . . . . . . . . . . . . . . . . . . . . . . . . . . . . . . . . . 23
Odstranitev embalaže . . . . . . . . . . . . . . . . . . . . . . . . . . . . . . . . . . . . . . . . . . . . . . . . . . . . 23
Opis naprave/pribor . . . . . . . . . . . . . . . . . . . . . . . . . . . . . . . . . . . . . . . . . . 24
Tehnični podatki . . . . . . . . . . . . . . . . . . . . . . . . . . . . . . . . . . . . . . . . . . . . . . 24
Varnostni napotki . . . . . . . . . . . . . . . . . . . . . . . . . . . . . . . . . . . . . . . . . . . . .25
Način delovanja . . . . . . . . . . . . . . . . . . . . . . . . . . . . . . . . . . . . . . . . . . . . . . 29
Primerna posoda za pripravo hrane . . . . . . . . . . . . . . . . . . . . . . . . . . . . . 29
Postavitev . . . . . . . . . . . . . . . . . . . . . . . . . . . . . . . . . . . . . . . . . . . . . . . . . . . 30
Priklop na elektriko . . . . . . . . . . . . . . . . . . . . . . . . . . . . . . . . . . . . . . . . . . . 30
Uporaba . . . . . . . . . . . . . . . . . . . . . . . . . . . . . . . . . . . . . . . . . . . . . . . . . . . . 31
Indukcijske kuhalne plošče . . . . . . . . . . . . . . . . . . . . . . . . . . . . . . . . . . . . . . . . . . . . . . . . . 31
Nastavljanje. . . . . . . . . . . . . . . . . . . . . . . . . . . . . . . . . . . . . . . . . . . . . . . . . . . . . . . . . . . . 32
Varnostni izklop . . . . . . . . . . . . . . . . . . . . . . . . . . . . . . . . . . . . . . . . . . . . . . . . . . . . . . . . . 33
Časovnik (timer) . . . . . . . . . . . . . . . . . . . . . . . . . . . . . . . . . . . . . . . . . . . . . . . . . . . . . . . . . 34
Zaščita za otroke . . . . . . . . . . . . . . . . . . . . . . . . . . . . . . . . . . . . . . . . . . . . . . . . . . . . . . . . 35
SI
Čiščenje . . . . . . . . . . . . . . . . . . . . . . . . . . . . . . . . . . . . . . . . . . . . . . . . . . . . .36
Odprava napak . . . . . . . . . . . . . . . . . . . . . . . . . . . . . . . . . . . . . . . . . . . . . . 37
Odstranitev naprave . . . . . . . . . . . . . . . . . . . . . . . . . . . . . . . . . . . . . . . . . . 38
Opombe glede izjave o skladnosti s predpisi EC . . . . . . . . . . . . . . . . . . . . 38
Proizvajalec . . . . . . . . . . . . . . . . . . . . . . . . . . . . . . . . . . . . . . . . . . . . . . . . . . 39
Garancijski list . . . . . . . . . . . . . . . . . . . . . . . . . . . . . . . . . . . . . . . . . . . . . . . . 39
Servis . . . . . . . . . . . . . . . . . . . . . . . . . . . . . . . . . . . . . . . . . . . . . . . . . . . . . . . 39
SIKP 3400 A1
21
Page 24

SI
Uvod
Iskrene čestitke ob nakupu vaše nove naprave!
Odločili ste se za sodoben in zelo kakovosten izdelek. Navodila za uporabo so
sestavni del tega izdelka. Vsebujejo pomembne napotke za varnost, uporabo in
odstranitev izdelka. Preden začnete izdelek uporabljati, se seznanite z vsemi napotki za njegovo uporabo in varnost. Izdelek uporabljajte le tako, kot je opisano
v navodilih, in samo za navedene namene uporabe. Ob predaji naprave tretji
osebi zraven priložite tudi vso dokumentacijo.
Predvidena uporaba
Naprava je namenjena izključno za segrevanje in dogrevanje živil. Naprava je
namenjena izključno za uporabo v zasebnih gospodinjstvih. Naprave ne uporabljajte v poslovne namene.
Napravo uporabljajte le v suhih prostorih in nikoli na prostem.
OPOZORILO
Nevarnost zaradi nepredvidene uporabe!
V primeru nepredvidene uporabe in/ali drugačne vrste uporabe naprava
lahko predstavlja vir nevarnosti.
► Napravo uporabljajte izključno za predvidene namene.
► Upoštevajte načine ravnanja, opisane v teh navodilih za uporabo.
NAPOTEK
► V primeru nepredvidene uporabe in/ali drugačne vrste uporabe naprava
lahko pr
videne namene. Upoštevajte načine ravnanja, opisane v teh navodilih za
uporabo. Uveljavljanje kakršnih koli zahtevkov zaradi škode, nastale zaradi
nepredvidene uporabe, nestrokovno opravljenih popravil, nedovoljenih izvedenih sprememb ali uporabe nedovoljenih nadomestnih delov, je izključeno.
Tveganje prevzame izključno uporabnik.
edstavlja vir nevarnosti. Napravo uporabljajte izključno za pred-
22
SIKP 3400 A1
Page 25

Vsebina kompleta
Naprava se standardno dobavi z naslednjimi komponentami:
▯ Indukcijska kuhalna plošča
▯ Magnet
▯ Navodila za uporabo
1) Sestavne dele naprave in navodila za uporabo vzemite iz škatle.
2) Odstranite ves embalažni material.
NAPOTEK
► Preverite, ali komplet vsebuje vse dele in ali ni vidnih poškodb.
► V primeru nepopolnega kompleta ali poškodb zaradi pomanjkljive embalaže
ali pri transpor
Servis).
tu se obrnite na telefonsko servisno službo (glejte poglavje
Odstranitev embalaže
Embalaža napravo zaščiti pred poškodbami med transportom. Embalažni
materiali so izbrani v skladu z njihovo okoljsko primernostjo in tehničnimi vidiki
njihovega odstranjevanja, zato jih je moč reciklirati.
Povratek embalaže v krogotok materialov pomeni prihranek surovin in zmanjšano nastajanje odpadkov. Embalažne materiale, ki jih ne potrebujete več,
odstranite v skladu z lokalno veljavnimi predpisi.
SI
NAPOTEK
► Embalažo med garancijsko dobo naprave po možnosti hranite, da boste
naprav
o lahko pravilno zapakirali v primeru uveljavljanja garancije.
SIKP 3400 A1
23
Page 26

Opis naprave/pribor
Slika A:
1 zadnja kuhalna plošča (1000 W)
SI
2 desna kuhalna plošča (1400 W)
3 upravljalno polje
4 prednja kuhalna plošča (2000 W)
Slika B:
5 tipka “-“
6 tipka “+“
7 zaslon
8 kontrolna lučka nastavitve moči (“Heat“)
9 kontrolna lučka nastavitve temperature (“Temp.“)
0 kontrolna lučka časovnika
q funkcijska tipka “F“
w tipka za vklop/pripravljenost (“On/Standby“) z oznako kuhalnih plošč
e elementi upravljanja desne kuhalne plošče
r kontrolna lučka za vklop/pripravljenost (On/Standby)
t tipka za vklop/pripravljenost (“On/Standby“)
z tipka za zaklepanje otroškega varovala (“Lock“)
u kontrolna lučka otroškega varovala
i elementi upravljanja prednje kuhalne plošče
o elementi upravljanja zadnje kuhalne plošče
Tehnični podatki
Električna napetost 220–240V ~, 50/60Hz
Nazivna moč 3200 – 3400 W
Razred zaščite
Raven emisije hrupa < 70dB(A)
II
24
SIKP 3400 A1
Page 27

Varnostni napotki
NEVARNOST ELEKTRIČNEGA UDARA
► Pazite, da se električni kabel med uporabo nikoli
ne zmoči ali navlaži. Kabel speljite tako, da ne bo
nikjer ukleščen in da ga ne bo mogoče drugače
poškodovati.
► Če bi se električni kabel ali električni vtič poškodoval,
naj vam ga najprej zamenja servisna služba (služba
za stranke), preden napravo uporabite naslednjič.
► Po uporabi električni vtič vedno izvlecite iz elek-
trične vtičnice.
► Izklop sam ne zadostuje, ker je naprava pod
električno napetostjo, dokler je električni vtič
priklopljen v vtičnico.
SI
► Kuhalno ploščo zavarujte pred poškodbami: Ne
obremenjujte je neenakomerno in poskrbite, da
nanjo ne bodo padali nobeni predmeti. Če sta
kuhalna plošča ali ohišje poškodovana, se naprava ne sme več uporabljati. V tem primeru električni vtič takoj potegnite iz vtičnice in napravo
najprej dajte popraviti.
► Poškodovane električne vtiče ali električne kable naj
vam takoj zamenja pooblaščeno strokovno osebje
ali servisna služba, da se izognete nevarnosti.
► Če je površina kuhalne plošče opraskana, elek-
trični vtič potegnite iz električne vtičnice, da
preprečite morebiten udar električnega toka.
SIKP 3400 A1
25
Page 28

NEVARNOST ELEKTRIČNEGA UDARA
Preprečite, da bi kakor koli prišlo do potopi-
SI
tve naprave, električnega kabla ali električnega vtiča v vodo ali druge tekočine.
OPOZORILO! NEVARNOST POŠKODB!
► Ne dotikajte se površine, na kateri je pred tem bila
vroča posoda za pripravo hrane. Neposredno po
premestitvi posode je lahko takšna površina zelo
vroča.
► To napravo lahko uporabljajo otroci od starosti
8 let naprej ter osebe z omejenimi fi zičnimi,
zaznavnimi ali duševnimi sposobnostmi ali s
pomanjkljivimi izkušnjami in/ali znanjem, če jih
pri tem nekdo nadzoruje ali jih je poučil o varni
uporabi naprave in so doumele nevarnosti, ki
izhajajo iz uporabe naprave.
► Otroci se ne smejo igrati z napravo.
► Otroci naprave ne smejo čistiti ali izvajati upo-
rabniškega vzdrževanja, razen če so starejši
od 8 let in dela izvajajo pod nadzorom.
Otrokom, ki so mlajši od 8 let, približevanje
napravi in priključni napeljavi ni dovoljeno.
► Ne segrevajte nobenih zaprtih pločevink ali
drugih zaprtih posod.
26
SIKP 3400 A1
Page 29

OPOZORILO! NEVARNOST POŠKODB!
Pozor! Vroča površina!
Ta simbol svari pred dotikanjem kuhalne
plošče neposredno po uporabi naprave.
Nevarnost opeklin!
OPOZORILO! NEVARNOST POŽARA!
► Preveč segreta živila lahko začnejo goreti! Na-
prave nikoli ne pustite delovati brez nadzora.
► Naprave tudi nikoli ne postavljajte pod vnetljive
predmete, še posebej ne pod zastore ali zavese.
► Nikoli ne segrevajte trdno zaprte posode. Širjenje
toplote oz. pare lahko hitro povzroči eksplozijo.
► Nikoli tudi ne segrevajte prazne posode. Taka
SI
posoda bi se prehitro segrela in zaradi tega lahko povzročila tako opekline kot tudi poškodovala
kuhalno ploščo.
► Na indukcijsko ploščo tudi ne polagajte nobenih
kovinskih predmetov, na primer kuhinjskih potrebščin ali delov pribora. Ti bi se lahko na indukcijski
plošči zelo segreli.
► Pri segrevanju majhnih količin olja bodite previdni -
ne nastavljajte velike moči ali visoke temperature.
V nasprotnem primeru se olje lahko vname in
začne goreti!
SIKP 3400 A1
27
Page 30

OPOZORILO! NEVARNOST POŽARA!
► Naprave nikoli ne smete uporabljati na kovinski
SI
mizi ali na drugi kovinski podlagi. Taka podlaga se
lahko hitro segreje in tako povzroči požar. Lahko
pa se nepopravljivo poškoduje tudi naprava.
► Naprave ne uporabljajte z dodatno stikalno uro
ali ločenim daljinskim sistemom za upravljanje.
Da preprečite nevarnosti zaradi
elektromagnetnih polj:
► poskrbite za najmanj 1m razdalje do naprav,
ki so občutljive na elektromagnetna polja (npr.
zasloni, ure, magnetni pomnilniški mediji, elektronske naprave, itd.),
► po potrebi je treba varnostno razdaljo povečati,
če gre za medicinske naprave, kot so npr. srčni
spodbujevalniki, slušni aparati ali drugi pripomočki. O tem se pozanimajte pri proizvajalcu
medicinskega izdelka!
28
SIKP 3400 A1
Page 31

Način delovanja
Medtem ko se običajne kuhalne plošče segrevajo same, toplota pri indukcijskih
kuhalnih ploščah nastaja na dnu posode za pripravo hrane. Sama kuhalna
plošča se ne segreva - segreje se le zaradi segrevanja jedi v posodi na plošči,
ko toplota v loncu greje kuhalno ploščo (povratno segrevanje).
Za to skrbi energijsko polje, ki toploto ustvarja le v materialih z magnetno prevodnostjo, npr. v železnih posodah. To energijsko polje nima nobenega toplotnega
učinka v drugih materialih iz npr. porcelana, stekla ali keramike.
Primerna posoda za pripravo hrane
Za pripravo hrane uporabljajte le tisto posodo, ki je primerna za indukcijske
kuhalne plošče:
■ Za to so primerni lonci in ponve z dnom iz jekla ali litega železa. Take posode
prepoznate po oznakah na njih ali s preizkusom, ali se priložen magnet
oprime dna lonca.
■ Neprimerne za uporabo so vse kovine, na katere se magnet ne prime, npr.
aluminij, baker, legirano jeklo, pa tudi nekovinska posoda, npr. iz porcelana,
stekla, keramike, plastike, itd.
SI
■ Za indukcijsko pripravo hrane so bolj primerne posode s tankim dnom kot
posode z debelim, dvojnim dnom. Pri posodah z debelim dnom ni hitrega
odziva na spremembe nastavitev (kratko predgrevanje, hitro odmerjeno
opekanje).
Uporabljajte le kuhinjsko posodo, ki je primerna velikosti posamezne kuhalne
plošče 1 2 4. Le tako bo lahko indukcijska kuhalna plošča brezhibno delovala.
Dno posode ne sme biti neenakomerno, temveč mora biti ravno, da se prilega
plošči.
Za zadnjo kuhalno ploščo 1:
– premer ne sme biti manjši od 16 cm, sicer energijsko polje ne bo delo-
valo. Za optimalno izrabo moči kuhalne plošče priporočamo uporabo
posode s premerom največ 18 cm.
Za desno 2 in prednjo kuhalno ploščo 4:
– premer posode ne sme biti večji od 26 cm, da posoda ne bo segala
čez kuhalno ploščo, in ne manjši od 16 cm, sicer energijsko polje ne
bo delovalo.
SIKP 3400 A1
29
Page 32

Postavitev
Do naprave je potrebno zagotoviti prost dotok zraka, da se ne bo pregrela.
Zaradi tega jo namestite tako, da:
SI
– bo okrog nje, npr. do najbližje stene, prosto najmanj 10cm,
– bo nad njo, npr. do kuhinjske viseče omarice, prosto najmanj 60cm.
■ Naprava se hladi s sesanjem zraka skozi odprtine na spodnji strani. Ne po-
stavljajte je na površine iz blaga ali na mehke površine, na primer namizne
prte. Uporabljajte jo le na gladkih površinah.
■ Naprave ne postavljajte v bližino zaves, zastorov ali drugih predmetov iz
blaga, ki bi jih zračni tok lahko pritisnil ob napravo.
■ Naprave ne postavljajte na kovinske podlage, na primer s sestavnimi deli iz
železa ali jekla. Take podlage bi se lahko zelo segrele.
■ Poskrbite za najmanj 1m razdalje do naprav, ki so občutljive na elektro-
magnetna polja (npr. zasloni, ure, magnetni pomnilniški mediji, elektronske
naprave, itd.).
Priklop na elektriko
Ko napravo po navodilih razpakirate in namestite, jo priklopite v električno
vtičnico.
■ Pred priklopom naprave preverite, ali se podatki za priklop (električna
napetost in frekvenca električnega toka) na tipski tablici naprave ujemajo
s podatki za vaše električno omrežje.
■ Električna vtičnica mora biti zaščitena s 16 A varnostnim zaščitnim stikalom.
■ Za priklop naprave ne uporabljajte nobenih kabelskih podaljškov. V sili mora
biti električni vtič hitro dostopen.
■ Električnega kabla ne polagajte čez napravo, čez vroče površine in/ali
površine z ostrimi robovi.
■ Pazite, da električni kabel ne bo ukleščen.
Električna varnost naprave je zagotovljena le v primeru, če je naprava priklopljena na po predpisih instaliran sistem z varnostnimi vodniki. Priklop v električno
vtičnico brez zaščitnega vodnika in uporaba sta prepovedana. Če niste prepričani glede instalacije v stanovanju, prosite električarja za pregled električne
instalacije.
Izdelovalec ne krije škode, ki bi nastala zaradi neobstoječega ali prekinjenega
zaščitnega vodnika.
30
SIKP 3400 A1
Page 33

Uporaba
Indukcijske kuhalne plošče
■ Prednja 4 in desna kuhalna plošča 2 imata vsaka po 10 nastavitev moči.
Desna 2 kuhalna plošča deluje neodvisno od preostalih kuhalnih plošč, to
omeni, da lahko moč kadarkoli nastavite do 10.
■ Zadnja kuhalna plošča 1 ima 5 nastavitev moči.
■ Prednja 4 in zadnja 1 kuhalna plošča si delita energijo (t.i. “powersharing“).
To pomeni, da je skupno mogoče nastaviti moč 10 (2000 W). Če je na
primer moč za prednjo kuhalno ploščo 4 nastavljena na 6, je za zadnjo
kuhalno ploščo 1 mogoče nastaviti največ 4. stopnjo moči. Na ta način
se ne preseže skupno število vatov - 2000 W. Če želite hkrati uporabljati
prednjo 4 in zadnjo 1 kuhalno ploščo, si pomagajte z naslednjo tabelo:
Nastavitve
moči prednje
kuhalne
plošče 4
Nastavitve
moči zadnje
kuhalne
plošče 1
10 9 887654321
IZ-
KLOP
IZ-
KLOP
123455555
SI
NAPOTEK
► Pri zadnji kuhalni plošči 1 (1000 W) je mogoče nastaviti najv
moči 5.
► Pri prednji kuhalni plošči 4 (2000 W) je mogoče nastaviti najv
pnjo moči 10 (odvisno od zadnje kuhalne plošče 1).
► Pri desni kuhalni plošči 2 (1400 W) je mogoče nastaviti najv
moči 10.
NAPOTEK
► Prednja kuhalna plošča 4 je najmočnejša med tremi ploščami 1 2 4
ker ima največjo nazivno moč (2000 W).
NAPOTEK
► Temperaturno nastavitev je mogoče za vsako kuhalno ploščo tudi obenem
nastaviti na največjo temper
aturo (240 °C).
ečjo stopnjo
ečjo sto-
ečjo stopnjo
,
SIKP 3400 A1
31
Page 34

SI
Nastavljanje
Nastavljanje kuhalnih plošč 1 2 4 je pojasnjeno na primeru zadnje kuhalne
plošče 1. Tipke in kontrolne lučke so na zloženi strani za zadnjo kuhalno ploščo
1 označene s številkami. Uporaba pa je - z ustreznimi elementi za upravljanje
e i o - enaka za vse 3 kuhalne plošče.
1) Posodo z živilom postavite na sredino zadnje kuhalne plošče 1.
POZOR – MATERIALNA ŠKODA!
► Teža vseh posod (z živili vred) na 3 kuhalnih ploščah ne sme biti večja od
10 kg. V naspr
2) Pritisnite tipko za vklop/pripravljenost (“On/Standby“) t. Utripati začne
kontr
NAPOTEK
otnem primeru se naprava poškoduje.
olna lučka za vklop/pripravljenost (On/Standby) r.
► Če v 30 sekundah ne vklopite nobene kuhalne plošče 1 2 4, se naprav
spet preklopi v pripravljenost.
NAPOTKI
Izbirate lahko med pripravo jedi z nastavitvami moči ali nastavitvami tempe-
ature:
r
► Če jedi pripravljate z nastavljanjem temperature, naprava posodo za pri-
o hrane segreje na nastavljeno temperaturo. Če nastavljena tempera-
prav
tura ni dosežena, naprava segreva naprej. Temperatura se tako ohranja.
► Pri pripravi jedi z nastavljanjem moči se posoda za pripravo hrane segreva
različno hitr
posoda za pripravo hrane segrevala.
3) Izberite zadnjo kuhalno ploščo 1, tako da pritisnete tipko za vklop/pripravljenost (“On/Standby“) w. Na zaslonu 7 se prikaže vedno prednastavljena nastavitev moči 5 in priprava hrane oziroma kuhanje se začne.
S tipko “F“ q zdaj lahko nastavite želen način delovanja:
Vnaprej je nastavljena priprava z nastavljanjem moči (stopnja moči 5).
Če želite preklopiti na nastavljanje temperature, pritiskajte tipko "F" q,
dokler ne zasveti kontrolna lučka nastavitve temperature 9. Na zaslonu 7
se izpiše “120“, kar pomeni, da je prednastavljena temperatura 120 °C
o. Čim večja je nastavljena moč segrevanja, tem hitreje se bo
a
4) Ko nastavite želen način delovanja, s tipkama “-” 5 in ”+” 6 nastavite
želeno moč oziroma temperaturo. Temperaturo lahko nastavljate na 20°C
natančno.
32
SIKP 3400 A1
Page 35

5) Za izklop kuhalne plošče 1 pritisnite tipko za vklop/pripravljenost (“On/
Standby“) w. Za hkratni izklop vseh kuhalnih plošč 1 2 4 pritisnite tipko
za vklop/pripravljenost (“On/Standb
NAPOTEK
► Ko so po uporabi ali nastavljanju izklopljene vse 3 kuhalne plošče 1 2
4, morate za ponovno nastavljanje najprej pritisniti tipko za vklop/pripravljenost t.
NAPOTEK
► Na zaslonu se po vklopu in izklopu izpiše “- L-” ali “-H -“. Ta prikaz toplote
pomeni:
–“- L -“ = “Low“ – temperatura kuhalne plošče 1 2 4 <60°C
ali
–“- H -“ = “High“ - temperatura kuhalne plošče 1 2 4 > 60 °C
NAPOTEK
► Po izklopu oziroma preklopu v pripravljenost ventilatorji naprave še nekaj
časa delujejo, da od naprav
e odvedejo toploto.
y“) t.
SI
NAPOTEK
► Naprava se po 120 minutah samodejno preklopi v pripravljenost.
Varnostni izklop
■ Sistem za zaznavanje posod za pripravo jedi zaradi varnosti napravo
samodejno izklopi (preklopi v pripravljenost) v naslednjih primerih:
– če posodo za pripravo hrane s kuhalne plošče 1 2 4 vzamete za
dlje kot pribl. 15sekund ali je sploh ne položite nanjo,
– če posode na kuhalni plošči ni manj časa, se energijsko polje izklopi
takoj, vendar izbrana funkcija ostane nastavljena. Zvočni signal približno
vsake 3 sekunde opozarja, da se bo naprava po približno 15 sekundah
samodejno izklopila. Če v 15 sekundah posodo za pripravo hrane
ponovno postavite na kuhalno ploščo 1 2 4, se bo izbrana funkcija
izvajala naprej z enakimi nastavitvami.
NAPOTEK
► Ko posodo za pripravo hrane vzamete s kuhalne plošče, na zaslonu začne
utripati “- - -“.
SIKP 3400 A1
33
Page 36

NAPOTEK
► Naprava se po 120 minutah samodejno preklopi v pripravljenost.
SI
Časovnik (timer)
Prednastavite lahko čas od 0 do 180 minut, po poteku katerega se naj posamezna
kuhalna plošča 1 2 4 izklopi. Z vsakim pritiskom na tipko “+“ 6 se nastavljen
as podaljša za 5 minut. Z vsakim pritiskom na tipko “-“ 5 pa se nastavljen čas
č
skrajša za 1 minuto.
Uporaba časovnika (timerja) za kuhalne plošče 1 2 4 je pojasnjena na
primeru zadnje kuhalne plošče 1. Tipke in kontrolne lučke so na zloženi strani za
zadnjo kuhalno ploščo 1 označene s številkami. Uporaba pa je - z ustreznimi
elementi za upravljanje e i o - enaka za vse 3 kuhalne plošče.
Časovnik in nastavljanje moči
1) Najprej vklopite segrevanje z nastavitvijo moči, kot je predhodno opisano.
2) Nato večkrat pritisnite tipko “F“ q, dokler hkrati ne zasv
lučki, kontrolna lučka nastavljanja moči 8 in kontrolna lučka časovnika 0.
3) S tipkama “-“ 5 in “+“ 6 nastavite želen čas, po k
plošča 1 izklopi.
Na zaslonu 7 se bosta izmenično prikazovala nastavljena stopnja moči in
preostali čas do izklopa.
etita obe kontrolni
aterem se naj kuhalna
Po poteku časa se bo kuhalna plošča 1 samodejno izklopila.
NAPOTEK
► Če medtem, ko časovnik že odšteva čas, s tipko “F“ q izberete nastavlja-
nje s temper
nastavite želeno temperaturo, se nastavitev časovnika ohrani, naprava pa
delovanje preklopi z nastavljanja moči na nastavljanje temperature.
aturo (da zasveti kontrolna lučka nastavitve temperature 9) in
34
SIKP 3400 A1
Page 37

Časovnik in nastavljanje temperature
1) Najprej vklopite segrevanje z nastavitvijo temperature, kot je predhodno
opisano.
2) Nato večkrat pritisnite tipko “F“ q, dokler hkrati ne zasv
nastavljanja temperature 9 in kontrolna lučka časovnika 0.
3) S tipkama “-“ 5 in “+“ 6 nastavite želen čas, po k
plošča 1 izklopi.
Na zaslonu 7 se bosta izmenično prikazovala nastavljena temperatura in
preostali čas do izklopa.
Po poteku časa se bo kuhalna plošča 1 samodejno izklopila.
NAPOTEK
► Če medtem, ko časovnik že odšteva čas, s tipko “F“ q izberete nastavlja-
nje po moči (da zasv
želeno stopnjo moči, se nastavitev časovnika ohrani, naprava pa delovanje
preklopi z nastavljanja temperature na nastavljanje moči.
Zaščita za otroke
Da na primer otroci ne bi nedovoljeno vklopili naprave ali spreminjali njene
nastavitve, je ta opremljena z zaščito za otroke.
■ Tipko “Lock“ z držite pritisnjeno tako dolgo, dokler ne zazveni zvočni si-
gnal in ne zasv
vse tipke, razen tipke za zaklepanje “Lock“ z in tipke za vklop/pripravljenost
(“On/Standby“) t.
etita kontrolna lučka
aterem se naj kuhalna
eti kontrolna lučka nastavitve moči 8) in nastavite
eti kontrolna lučka otroškega varovala u. Zdaj so zaklenjene
SI
■ Za izklop otroškega varovala znova pritisnite in držite pritisnjeno tipko za
zaklepanje “Lock“ z, dokler ne zazveni zv
lučka otroškega varovala u. Tipke so sedaj ponovno aktivirane.
NAPOTEK
► Če otroško varovalo zaklenete (blokirate) med delovanjem, še naprej de-
lujeta tipki za vklop/pripravljenost
avo, in tipka za zaklepanje “Lock“ z.
napr
NAPOTEK
► Funkcijo zaklepanja z otroškim varovalom uporabljajte tudi kot pomoč med
čiščenjem: pr
ne boste nenamerno pritisnili tipk.
eden z vlažno krpo obrišete tipke, vklopite zaklepanje. Tako
(“On/Standby“) t, da lahko izklopite
očni signal in ne ugasne kontrolna
SIKP 3400 A1
35
Page 38

SI
Čiščenje
OPOZORILO – NEVARNOST ELEKTRIČNEGA UDARA!
OPOZORILO – NEVARNOST POŠKODB!
POZOR – MATERIALNA ŠKODA!
► Pred čiščenjem naprave vedno prej potegnite električni vtič iz vtičnice.
Naprave ali njenih delov v nobenem primeru ni dovoljeno polagati
►
v kakršne koli tekočine! Tako ravnanje lahko povzroči smrtno nevarnost
zaradi električnega udara ter privede do poškodb naprave.
► Ohišja naprave nikoli ne odpirajte. V nasprotnem primeru lahko pride do
smrtno ne
► Pred čiščenjem naj se naprava najprej ohladi.
Nev
► Pri čiščenju ne uporabljajte razredčil, topil ali ostrih predmetov. Omenjene
snovi lahk
varnega električnega udara.
arnost opeklin!
o poškodujejo kuhalne plošče 1 2 4 naprave.
► Za čiščenje ne uporabljajte nobenih ostrih, agresivnih ali kemičnih sredstev.
Ta lahk
■ Vse površine in električni kabel čistite le z rahlo navlaženo krpo za pomivanje
posode.
■ Napravo v vsakem primeru dobro osušite, preden jo ponovno uporabite.
■ Sprijeto umazanijo lahko s kuhalnih plošč 1 2 4 odstranite s posebnim
strgalom, namenjenim za čiščenje steklenih kuhalnih plošč, ki ga je mogoče
kupiti v trgovinah z gospodinjskimi pripomočki.
■ Če je umazanija vidna v zračnih režah pod napravo, jo lahko poskusite od
zunaj izsesati oziroma posesati s sesalnikom za prah.
o površine naprave nepopravljivo poškodujejo!
36
SIKP 3400 A1
Page 39

Odprava napak
PROBLEM MOŽNI VZROK MOŽNE REŠITVE
Naprava ne deluje.
Kontrolna lučka za vklop/
pripravljenost r ne sveti.
Naprava ne začne segrevati kuhalnih plošč.
Na enem od zaslonov je
izpisano E01.
Na enem od zaslonov je
izpisano E02.
Električni vtič ni priklopljen
v električno vtičnico.
Naprava je poškodovana.
Na kuhalni plošči 1 2 4
ni posode za pripravo hrane.
Posoda ni primerna za
indukcijske kuhalne plošče.
Naprava se napaja s premajhno napetostjo (< 160V).
Naprava se napaja s previsoko napetostjo (< 270V).
Napravo priklopite
v električno vtičnico.
Obrnite se na servisno
službo.
Na kuhalno ploščo 1 2
4 postavite primerno
posodo za pripravo hrane.
Uporabite primerno
posodo (glejte poglavje Primerna posoda za pripravo
hrane).
Poskrbite, da bo naprava
priklopljena v po predpisih
instalirano električno vtičnico z napetostjo
220 - 240 V ~, 50 Hz.
Poskrbite, da bo naprava
priklopljena v po predpisih
instalirano električno vtičnico z napetostjo
220 - 240 V ~, 50 Hz.
SI
Na enem od zaslonov je
izpisano E03.
Na enem od zaslonov je
izpisano E05.
Na enem od zaslonov je
izpisano E06.
Na enem od zaslonov je
izpisano E07.
Na enem od zaslonov je
izpisano E08.
V napravi je prišlo do kratkega
stika!
Naprava je pregreta (v načinu
nastavljanja moči)!
Temperaturni senzor pod
kuhalno ploščo 1 2 4 je
okvarjen ali pa je prišlo do
kratkega stika.
Naprava je pregreta (v načinu
nastavljanja temperature)!
Temperaturni senzor je
okvarjen.
Takoj izvlecite električni vtič
iz električne vtičnice in se
obrnite na servis!
Električni vtič izvlecite
iz električne vtičnice in
počakajte, da se naprava
ohladi.
Električni vtič izvlecite iz
električne vtičnice in se
obrnite na servis.
Električni vtič izvlecite
iz električne vtičnice in
počakajte, da se naprava
ohladi.
Električni vtič izvlecite iz
električne vtičnice in se
obrnite na servis.
SIKP 3400 A1
37
Page 40

Na kuhalni plošči 1 2 4 ni
posode za pripravo hrane.
Na kuhalno ploščo 1 2
4 postavite posodo za
pripravo hrane.
SI
Na enem od zaslonov je
izpisano "- - -".
Na kuhalni plošči 1 2 4 je
neprimerna posoda za pripravo
hrane.
Posoda za pripravo hrane ni
na sredini kuhalne plošče 1
2 4.
Na kuhalno ploščo 1
2 4 postavite primerno
posodo za pripravo hrane.
Posodo za pripravo hrane
položite na sredino kuhalne
plošče 1 2 4.
Odstranitev naprave
Naprave nikakor ne odvrzite med običajne gospodinjske
odpadke. Za ta izdelek velja evropska direktiva 2002/96/EC.
Napravo oddajte pri podjetju, registriranem za predelavo odpadkov, ali pri
svojem komunalnem podjetju za predelavo odpadkov. Upoštevajte trenutno
veljavne predpise. V primeru dvoma se obrnite na svoje podjetje za predelavo
odpadkov.
Opombe glede izjave o skladnosti s predpisi EC
Naprava glede skladnosti z osnovnimi zahtevami in drugimi
ustreznimi predpisi ustreza evropski direktivi o elektromagnetni združljivosti 2004/108/EC, direktivi o nizkonapetostnih
napravah 2006/95/EC, direktivi ErP 2009/125/EC in št. 1
dodatka 1 nemške Uredbe 1275/2008.
Celotna izvirna izjava o skladnosti je na voljo pri uvozniku.
38
SIKP 3400 A1
Page 41

Proizvajalec
KOMPERNASS GMBH
BURGSTRASSE 21
44867 BOCHUM, GERMANY
www.kompernass.com
Garancijski list
1. S tem garancijskim listom jamčimo Kompernass GmbH, da bo izdelek v garancijskem roku ob normalni in pravilni uporabi brezhibno deloval in se zavezujemo, da bomo ob izpolnjenih spodaj navedenih pogojih odpravili morebitne
pomanjkljivosti in okvare zaradi napak v materialu ali izdelavi oz. po svoji
presoji izdelek zamenjali ali vrnili kupnino.
2. Garancijski rok za proizvod je 3 leta od dneva nabave.
3. Kupec je dolžan okvaro javiti pooblaščenemu servisu oz. se informirati o nadaljnih postopkih na zgoraj navedeni telefonski številki. Svetujemo vam, da pred
tem natančno preberete navodila o sestavi in uporabi izdelka.
4. Kupec je dolžan pooblaščenemu servisu predložiti garancijski list in račun, kot
potrdilo in dokazilo o nakupu.
5. V primeru, da proizvod popravlja nepooblaščeni servis ali oseba, kupec ne
more uveljavljati zahtevkov iz te garancije.
SI
Servis
6. Vzroki za okvaro oz. nedelovanje izdelka morajo biti lastnosti stvari same, in ne
vzroki, ki so zunaj proizvajalčeve oz. prodajalčeve sfere. Kupec ne more uveljavljati zahtevkov iz te garancije, če se ni držal priloženih navodil za sestavo in
uporabo izdelka ali, če je izdelek kakorkoli spremenjen ali nepravilno vzdrževan.
7. Jamčimo servisiranje in rezervne dele za dobo, ki je minimalno zahtevana s
strani zakonodaje.
8. Obrabni deli oz. potrošni material so izvzeti iz garancije.
9. Vsi potrebni podatki za uveljaljanje garancije se nahajajo na dveh ločenih
dokumentih (garancijski list, račun).
Prodajalec:
Lidl d.o.o.k.d., Žeje pri Komendi 100, SI-1218 Komenda
Servis Slovenija
Tel.: 080080917
E-Mail: kompernass@lidl.si
IAN 75467
SIKP 3400 A1
39
Page 42

40
SIKP 3400 A1
Page 43

Inhaltsverzeichnis
Einleitung . . . . . . . . . . . . . . . . . . . . . . . . . . . . . . . . . . . . . . . . . . . . . . . . . . . . 42
Bestimmungsgemäße Verwendung . . . . . . . . . . . . . . . . . . . . . . . . . . . . . . 42
Lieferumfang . . . . . . . . . . . . . . . . . . . . . . . . . . . . . . . . . . . . . . . . . . . . . . . . .43
Entsorgung der Verpackung . . . . . . . . . . . . . . . . . . . . . . . . . . . . . . . . . . . . . . . . . . . . . . . 43
Gerätebeschreibung / Zubehör . . . . . . . . . . . . . . . . . . . . . . . . . . . . . . . . . . 44
Technische Daten . . . . . . . . . . . . . . . . . . . . . . . . . . . . . . . . . . . . . . . . . . . . . . 44
Sicherheitshinweise . . . . . . . . . . . . . . . . . . . . . . . . . . . . . . . . . . . . . . . . . . . 45
Funktionsweise . . . . . . . . . . . . . . . . . . . . . . . . . . . . . . . . . . . . . . . . . . . . . . .49
Geeignetes Kochgeschirr . . . . . . . . . . . . . . . . . . . . . . . . . . . . . . . . . . . . . . . 49
Aufstellen . . . . . . . . . . . . . . . . . . . . . . . . . . . . . . . . . . . . . . . . . . . . . . . . . . . . 50
Elektrischer Anschluss . . . . . . . . . . . . . . . . . . . . . . . . . . . . . . . . . . . . . . . . . . 50
Betrieb . . . . . . . . . . . . . . . . . . . . . . . . . . . . . . . . . . . . . . . . . . . . . . . . . . . . . . 51
Die Induktionskochfelder . . . . . . . . . . . . . . . . . . . . . . . . . . . . . . . . . . . . . . . . . . . . . . . . . . 51
Bedienen . . . . . . . . . . . . . . . . . . . . . . . . . . . . . . . . . . . . . . . . . . . . . . . . . . . . . . . . . . . . . . 52
Sicherheitsabschaltung . . . . . . . . . . . . . . . . . . . . . . . . . . . . . . . . . . . . . . . . . . . . . . . . . . . 53
Timer . . . . . . . . . . . . . . . . . . . . . . . . . . . . . . . . . . . . . . . . . . . . . . . . . . . . . . . . . . . . . . . . . 54
Kindersicherung . . . . . . . . . . . . . . . . . . . . . . . . . . . . . . . . . . . . . . . . . . . . . . . . . . . . . . . . . 55
DE
AT
CH
Reinigen . . . . . . . . . . . . . . . . . . . . . . . . . . . . . . . . . . . . . . . . . . . . . . . . . . . . . 56
Fehlerbehebung . . . . . . . . . . . . . . . . . . . . . . . . . . . . . . . . . . . . . . . . . . . . . . 57
Gerät entsorgen . . . . . . . . . . . . . . . . . . . . . . . . . . . . . . . . . . . . . . . . . . . . . . 58
Hinweise zur EG-Konformitätserklärung . . . . . . . . . . . . . . . . . . . . . . . . . . 58
Importeur . . . . . . . . . . . . . . . . . . . . . . . . . . . . . . . . . . . . . . . . . . . . . . . . . . . 59
Garantie. . . . . . . . . . . . . . . . . . . . . . . . . . . . . . . . . . . . . . . . . . . . . . . . . . . . . 59
Service . . . . . . . . . . . . . . . . . . . . . . . . . . . . . . . . . . . . . . . . . . . . . . . . . . . . . . 60
SIKP 3400 A1
41
Page 44

DE
AT
CH
Einleitung
Herzlichen Glückwunsch zum Kauf Ihres neuen Gerätes!
Sie haben sich damit für ein modernes und hochwertiges Produkt entschieden.
Die Bedienungsanleitung ist Bestandteil dieses Produktes. Sie enthält wichtige
Hinweise für Sicherheit, Gebrauch und Entsorgung. Machen Sie sich vor der
Benutzung des Produkts mit allen Bedien- und Sicherheitshinweisen vertraut.
Benutzen Sie dieses Produkt nur wie beschrieben und für die angegebenen
Einsatzbereiche. Händigen Sie alle Unterlagen bei Weitergabe des Produkts an
Dritte mit aus.
Bestimmungsgemäße Verwendung
Dieses Gerät ist ausschließlich für das Erhitzen und Warmhalten von Lebensmitteln bestimmt. Dieses Gerät ist ausschließlich für die Benutzung in privaten
Haushalten bestimmt. Benutzen Sie es nicht gewerblich.
Benutzen Sie das Gerät nur in trockenen Räumen und verwenden Sie es niemals
im Freien.
WARNUNG
Gefahr durch nicht bestimmungsgemäße Verwendung!
Von dem Gerät können bei nicht bestimmungsgemäßer Verwendung und / oder
andersartiger Nutzung Gefahren ausgehen.
► Das Gerät ausschließlich bestimmungsgemäß verwenden.
► Die in dieser Bedienungsanleitung beschriebenen Vorgehensweisen
einhalten.
HINWEIS
► Von dem Gerät können bei nicht bestimmungsgemäßer Verwendung und /
oder andersar
rät ausschließlich bestimmungsgemäß. Die in dieser Bedienungsanleitung
beschriebenen Vorgehensweisen einhalten. Ansprüche jeglicher Art wegen
Schäden aus nicht bestimmungsgemäßer Verwendung, unsachgemäßen
Reparaturen, unerlaubt vorgenommenen Veränderungen oder Verwendung
nicht zugelassener Ersatzteile sind ausgeschlossen. Das Risiko trägt allein
der Benutzer.
tiger Nutzung Gefahren ausgehen. Verwenden Sie das Ge-
42
SIKP 3400 A1
Page 45

Lieferumfang
Das Gerät wird standardmäßig mit folgenden Komponenten geliefert:
▯ Induktionskochplatte
▯ Magnet
▯ Bedienungsanleitung
1) Entnehmen Sie alle Teile des Gerätes und die Bedienungsanleitung aus dem
Karton.
2) Entfernen Sie sämtliches Verpackungsmaterial.
HINWEIS
► Prüfen Sie die Lieferung auf Vollständigkeit und auf sichtbare Schäden.
► Bei einer unvollständigen Lieferung oder Schäden infolge mangelhafter
Verpack
(siehe Kapitel Service).
Entsorgung der Verpackung
Die Verpackung schützt das Gerät vor Transportschäden. Die Verpackungsmaterialien sind nach umweltverträglichen und entsorgungstechnischen Gesichtspunkten ausgewählt und deshalb recyclebar.
ung oder durch Transport wenden Sie sich an die Service-Hotline
DE
AT
CH
Die Rückführung der Verpackung in den Materialkreislauf spart Rohstoff e und
verringert das Abfallaufkommen. Entsorgen Sie nicht mehr benötigte Verpackungsmaterialien gemäß den örtlich geltenden Vorschriften.
HINWEIS
► Heben Sie wenn möglich die Verpackung während der Garantiezeit des
Gerätes auf, um das Ger
können.
ät im Garantiefall ordnungsgemäß verpacken zu
SIKP 3400 A1
43
Page 46

DE
AT
CH
Gerätebeschreibung / Zubehör
Abbildung A:
1 Kochfeld hinten (1000 W)
2 Kochfeld rechts (1400 W)
3 Bedienfeld
4 Kochfeld vorne (2000 W)
Abbildung B:
5 Taste „-“
6 Taste „+“
7 Display
8 Kontrollleuchte Leistungsmodus („Heat“)
9 Kontrollleuchte Temperaturmodus („Temp.“)
0 Kontrollleuchte Timer
q Taste „F“ (englisch: „FUNCTION“)
w Taste „On / Standby“ mit Kochplattenmarkierung
e Bedienelemente für die r
r Kontrollleuchte On / Standby
t Taste
z T
u Kontrollleuchte Kindersicherung
i Bedienelemente für die vordere Kochplatte
o Bedienelemente für die hintere Kochplatte
„On / Standby“
aste „Lock“ (Kindersicherung)
echte Kochplatte
Technische Daten
Netzspannung 220 - 240 V ~, 50 / 60 Hz
Nennleistung 3200 - 3400 W
Schutzklasse
Geräuschemissionspegel < 70 dB(A)
II
44
SIKP 3400 A1
Page 47

Sicherheitshinweise
STROMSCHLAGGEFAHR
► Achten Sie darauf, dass im Betrieb das Netzka-
bel niemals nass oder feucht wird. Führen Sie es
so, dass es nicht eingeklemmt oder anderweitig
beschädigt werden kann.
► Sollte das Netzkabel oder der Netzstecker be-
schädigt sein, lassen Sie diese erst durch den
Service (Kundendienst) ersetzen, bevor Sie das
Gerät weiter verwenden.
► Ziehen Sie nach Gebrauch immer den Netzste-
cker aus der Netzsteckdose.
DE
AT
CH
► Ausschalten alleine genügt nicht, weil noch im-
mer Netzspannung im Gerät anliegt, solange der
Netzstecker in der Netzsteckdose steckt.
► Schützen Sie das Kochfeld vor Beschädigungen:
Belasten Sie es nicht ungleichmäßig und lassen
Sie keine Gegenstände darauf fallen. Das Gerät
darf nicht weiter verwendet werden, wenn das
Kochfeld oder Gehäuse beschädigt ist. Ziehen
Sie dann sofort den Netzstecker und lassen Sie
das Gerät erst instandsetzen.
► Lassen Sie beschädigte Netzstecker oder Netz-
kabel sofort von autorisiertem Fachpersonal oder
dem Kundenservice austauschen, um Gefährdungen zu vermeiden.
► Ist die Oberfl äche der Kochplatte gerissen, ist der
Netzstecker aus der Netzsteckdose zu ziehen, um
einen möglichen elektrischen Schlag zu vermeiden.
SIKP 3400 A1
45
Page 48

STROMSCHLAGGEFAHR
Stellen Sie sicher, dass das Gerät, das Netzkabel oder der Netzstecker niemals in Was-
DE
AT
CH
ser oder andere Flüssigkeiten getaucht wird.
WARNUNG! VERLETZUNGSGEFAHR!
► Berühren Sie nicht die Fläche, auf der zuvor ein
heißes Kochgefäß gestanden hat. Direkt danach
kann die Fläche sehr heiß sein.
► Dieses Gerät kann von Kindern ab 8 Jahren
sowie von Personen mit reduzierten physischen,
sensorischen oder mentalen Fähigkeiten oder
Mangel an Erfahrung und / oder Wissen benutzt
werden, wenn sie beaufsichtigt oder bezüglich
des sicheren Gebrauchs des Gerätes
unterwiesen wurden und die daraus
resultierenden Gefahren verstanden haben.
► Kinder dürfen nicht mit dem Gerät spielen.
► Reinigung und Benutzer-Wartung dürfen nicht
durch Kinder durchgeführt werden, es sei denn,
sie sind älter als 8 Jahre und beaufsichtigt.
Kinder jünger als 8 Jahre sind vom Gerät und
der Anschlussleitung fernzuhalten.
► Erhitzen Sie keine verschlossenen Dosen oder
andere verschlossenen Behälter.
46
SIKP 3400 A1
Page 49

WARNUNG! VERLETZUNGSGEFAHR!
Achtung! Heiße Oberfl äche!
Dieses Symbol warnt Sie davor, direkt nach
dem Gebrauch das Kochfeld zu berühren.
Verbrennungsgefahr!
WARNUNG! BRANDGEFAHR!
► Überhitzte Speisen können zu brennen beginnen!
Lassen Sie das Gerät nie unbeaufsichtigt arbeiten.
► Stellen Sie es deshalb auch niemals unter brenn-
bare Gegenstände, insbesondere nicht unter
Gardinen oder Vorhänge.
DE
AT
CH
► Erhitzen Sie niemals einen dicht verschlossenen
Behälter. Durch die Hitzeausdehnung kann es
schnell zu einer Explosion kommen.
► Erhitzen Sie niemals einen leeren Behälter. Dieser
würde schnell überhitzen und dadurch sowohl
Verbrennungsgefahr hervorrufen, als auch das
Kochfeld beschädigen.
► Legen Sie keine metallischen Gegenstände auf
dem Kochfeld ab, wie z.B. Küchenutensilien oder
Besteckteile. Diese können in dem Induktionsfeld
sehr heiß werden.
► Seien Sie vorsichtig beim Erhitzen geringer Men-
gen Öl - stellen Sie keine hohe Leistungsstufe
oder Temperatur ein. Andernfalls könnte das Öl
brennen und Feuer fangen!
SIKP 3400 A1
47
Page 50

WARNUNG! BRANDGEFAHR!
► Betreiben Sie das Gerät niemals auf einem me-
tallischen Tisch oder einer anderen metallischen
DE
AT
CH
Unterlage. Diese kann sich erhitzen und so zu
einem Brand führen. Oder das Gerät kann irreparabel beschädigt werden.
► Betreiben Sie das Gerät nicht mit einer externen
Zeitschaltuhr oder einem separaten Fernwirksystem.
Um Gefahren durch elektromagneti-
sche Felder zu vermeiden:
► Halten Sie mindestens 1 m Abstand zu Geräten
ein, die empfi ndlich gegenüber elektromagnetischen Feldern sind (z.B. Bildschirme, Uhren,
magnetische Speichermedien, elektronische
Geräte usw.).
► Medizintechnische Geräte wie z.B. Herzschritt-
macher, Hörgeräte oder andere Vorrichtungen
können evtl. größere Abstände erforderlich
machen. Befragen Sie dazu den MedizinproduktHersteller!
48
SIKP 3400 A1
Page 51

Funktionsweise
Während normale Kochplatten selber heiß werden, entsteht die Hitze bei einer
Induktionskochplatte im Boden des Kochgeschirrs. Das Kochfeld selber wird nicht
erhitzt - es erhitzt sich, wenn Etwas in einem Topf darauf erhitzt wird und die
Hitze im Topf auf das Kochfeld zurückstrahlt. (Rückerwärmung).
Hierfür sorgt ein Energiefeld, das nur in magnetisch leitfähigen Materialien Hitze
erzeugt, z.B. Töpfe aus Eisen. In anderen Materialen, wie z.B. Porzellan, Glas,
oder Keramik, kann das Energiefeld keine Hitzewirkung erzeugen.
Geeignetes Kochgeschirr
Verwenden Sie nur Kochgeschirr, das für Induktionskochfelder geeignet ist:
■ Geeignet sind Töpfe und Pfannen mit einem Boden aus Stahl oder Gussei-
sen. Dies erkennen Sie entweder durch eine Kennzeichnung am Topf, oder
wenn der mitgelieferte Magnet am Topfboden haften bleibt.
■ Ungeeignet sind alle Metalle, an denen kein Magnet haften bleibt, z.B.
Aluminium, Kupfer, Edelstahl, ebenso nicht-metallische Gefäße, z.B. aus
Porzellan, Glas, Keramik, Kunststoff e usw..
■ Dünne Topfböden sind für das Induktionskochen besser geeignet als dicke
Sandwichböden. Die sehr kurzen Reaktionszeiten auf Einstelländerungen
(kurze Vorwärmzeit; schnelles dosierbares Anbraten) sind bei dicken Topfböden nicht möglich.
Verwenden Sie nur Kochgeschirr, das für die Größe des jeweiligen Kochfeldes
1 2 4 passend ist. Nur dann kann das Induktionskochfeld einwandfrei funktionieren. Der Topfboden darf nicht uneben sein, sondern muss fl ach aufl iegen.
DE
AT
CH
Für das hintere Kochfeld 1:
– Der Durchmesser darf nicht kleiner als 16 cm sein, damit das Energiefeld
wirkt. Wir empfehlen einen Topf, dessen Durchmesser maximal 18 cm
beträgt, um die Leistung der Kochplatte optimal zu nutzen.
Für das rechte 2 und das vordere Kochfeld 4:
– Der Durchmesser darf nicht größer als 26 cm sein, damit das Gefäß
nicht übersteht, und nicht kleiner als 16 cm, damit das Energiefeld
überhaupt wirkt.
SIKP 3400 A1
49
Page 52

DE
AT
CH
Aufstellen
Das Gerät benötigt freie Luftzufuhr, um nicht zu überhitzen. Stellen Sie das Gerät
deshalb so auf, dass ...
– min. 10 cm Abstand rundum frei bleibt, z.B. zur nächsten Wand,
– min. 60 cm Abstand nach oben frei bleibt, z.B. zu einem Hängeschrank.
■ Das Gerät saugt zur Kühlung über die Öff nungen an der Unterseite Luft an.
Stellen Sie es nicht auf textilen oder fl auschigen Oberfl ächen auf, wie z.B.
Tischdecken. Betreiben Sie es nur auf glatten Oberfl ächen.
■ Stellen Sie es nicht in der Nähe von Vorhängen, Gardinen oder anderen
Textilien auf, die sich im Luftstrom an das Gerät schmiegen könnten.
■ Stellen Sie es nicht auf metallische Untergründe, wie zum Beispiel eisen- oder
stahlhaltige Unterlagen. Diese können sich stark erhitzen.
■ Halten Sie mindestens 1 m Abstand zu Geräten ein, die empfi ndlich gegen-
über elektromagnetischen Feldern sind (z.B. Bildschirme, Uhren, magnetische
Speichermedien, elektronische Geräte usw.).
Elektrischer Anschluss
Wenn Sie das Gerät wie beschrieben ausgepackt und aufgestellt haben, verbinden Sie es mit einer Netzsteckdose.
■ Vergleichen Sie vor dem Anschließen des Gerätes die Anschlussdaten (Span-
nung und Frequenz) auf dem Typenschild mit denen Ihres Stromnetzes.
■ Die Netzsteckdose muss über einen 16A-Sicherungsschutzschalter abgesi-
chert sein.
■ Benutzen Sie kein Verlängerungskabel um das Gerät anzuschließen. Der
Netzstecker muss im Notfall schnell zu erreichen sein.
■ Verlegen Sie das Netzkabel nicht über das Gerät oder über heiße und / oder
schar
fk
antige Flächen.
■ Achten Sie darauf, dass das Netzkabel nicht eingeklemmt wird.
Die elektrische Sicherheit des Gerätes ist nur dann gewährleistet, wenn es an ein
vorschriftsmäßig installiertes Schutzleitersystem angeschlossen wird. Der Betrieb
an einer Netzsteckdose ohne Schutzleiter ist verboten. Lassen Sie im Zweifelsfall
die Hausinstallation durch eine Elektro-Fachkraft überprüfen.
Der Hersteller haftet nicht für Schäden, die durch einen fehlenden oder unterbrochenen Schutzleiter verursacht werden.
50
SIKP 3400 A1
Page 53

Betrieb
Die Induktionskochfelder
■ Das vordere 4 und das rechte Kochfeld 2 verfügen über je 10 Leistungs-
stufen. Das rechte 2 Kochfeld läuft unabhängig von den übrigen Kochfeldern, d.h. Sie können jederzeit eine Leistungsstufe bis zu Leistungsstufe 10
einstellen.
■ Das hintere Kochfeld 1 verfügt über 5 Leistungsstufen.
■ Das vordere 4 und das hintere 1 Kochfeld arbeiten mit dem sogenanntem
„Powersharing“. Das heißt, dass insgesamt bis zu Leistungsstufe 10
(2000 W) eingestellt werden kann. Wenn zum Beispiel beim vorderen
Kochfeld 4 die Leistungsstufe 6 eingestellt ist, kann beim hinteren Kochfeld
1 maximal die Leistungsstufe 4 eingestellt werden. Dadurch wird eine
Gesamtwattzahl von 2000 W nicht überschritten. Wenn Sie das vordere 4
und das hintere 1 Kochfeld gleichzeitig benutzen wollen, orientieren Sie
sich an nachfolgender Tabelle:
Leistungsstufen
des vorderen
Kochfeldes 4
10 9 8 8 7 6 5 4 3 2 1
DE
AT
CH
Leistungsstufen
des hinteren
Kochfeldes 1
HINWEIS
► Beim hinteren Kochfeld 1 (1000 W) kann maximal die Leistungsstufe 5
eingestellt w
► Beim vorderen Kochfeld 4 (2000 W) kann maximal die Leistungsstufe 10
eingestellt w
► Beim rechten Kochfeld 2 (1400 W) kann maximal die Leistungsstufe 10
eingestellt w
HINWEIS
► Das vordere Kochfeld 4 ist das leistungsstärkste der dr
2 4, da es die höchste Nennleistung (2000 W) hat.
HINWEIS
► Im Temperaturmodus kann jedes Kochfeld auch gleichzeitig auf die maxi-
male Temper
aus aus 1 2 3 4 5 5 5 5 5
erden.
erden (in Abhängigkeit des hinteren Kochfeldes 1).
erden.
ei Kochfelder 1
atur (240°C) gestellt werden.
SIKP 3400 A1
51
Page 54

Bedienen
Die Bedienung der Kochfelder 1 2 4 wird hier exemplarisch für das hintere
Kochfeld 1 erklärt. Die Tasten und Kontrollleuchten sind auf der Ausklappseite
für die hintere Kochplatte 1 durchnummeriert. Die Bedienung ist jedoch bei
allen 3 Kochfeldern mit Hilfe der jeweiligen Bedienelemente e i o identisch.
DE
AT
CH
1) Stellen Sie mittig auf das hintere Kochfeld 1 das Kochgefäß mit Inhalt auf.
ACHTUNG - SACHSCHADEN!
► Insgesamt dürfen alle Töpfe, die auf die 3 Kochfelder gestellt werden,
zusammen nicht mehr als 10 kg wiegen (zusammen mit dem Inhalt). Ansonsten wir
2) Drücken Sie die Taste „On / Standby“ t. Die Kontr
r blinkt.
HINWEIS
► Wenn Sie innerhalb von 30 Sekunden kein Kochfeld 1 2 4 aktivieren,
schaltet sich das Ger
HINWEISE
Sie können zwischen dem Kochen mit Leistungsstufen oder dem Kochen mit
emperatureinstellungen wählen:
T
► Wenn Sie im Temperaturmodus kochen, erhitzt das Gerät das Kochgefäß
auf die eingestellte Temper
ten wird, heizt das Gerät wieder auf. Die Temperatur wird gehalten.
d das Gerät beschädigt.
ollleuchte On / Standby
ät wieder in den Standby-Modus.
atur. Falls die eingestellte Temperatur unterschrit-
► Bei der Einstellung der „Leistungsstufe“ wird das Kochgefäß unterschiedlich
schnell erhitzt. Je höher die eingestellte Leistungsstufe, umso schneller wird
ochgefäß erhitzt.
das K
3) Wählen Sie das hintere Kochfeld 1 aus, indem Sie die Taste „On /
by“ w drücken. Im Display 7 erscheint die immer voreingestellte Leistungsstufe 5 und der Kochvorgang beginnt.
Sie können nun mit Hilfe der Taste „F“ q auswählen, welchen Betriebsmodus Sie benutzen wollen:
Der Leistungsmodus (Leistungsstufe 5) ist vorab eingestellt.
Drücken Sie die Taste „F“ q so oft, bis die Kontrollleuchte Temperaturmodus
9 leuchtet, wenn Sie in den Temperaturmodus wechseln wollen. „120“ erscheint im Display 7 und zeigt damit an, dass eine Temperatur von 120°C
voreingestellt ist.
4) Wenn Sie den gewünschten Betriebsmodus eingestellt haben, wählen Sie
mit Hilfe der Tasten „-“ 5 und „+“ 6 die gewünschte Leistungsstufe bzw.
Temperatur. Die Temperatur lässt sich in 20°C-Schritten einstellen.
Stand-
52
SIKP 3400 A1
Page 55

5) Um das Kochfeld 1 auszuschalten, drücken Sie die Taste „On / Standby“ w.
Um alle Kochfelder 1 2 4 gleichzeitig auszuschalten, drücken Sie die
Taste „On /
HINWEIS
► Wenn alle 3 Kochfelder 1 2 4 nach einer Benutzung oder Einstellung
ausgeschaltet sind, müssen Sie erst die T
um erneute Einstellungen vornehmen zu können.
HINWEIS
► In den Displays erscheint nach dem Ein- Ausschalten ein „- L-“ oder ein
„- H -“. Diese Hitzeanz
–„- L -“ = „Low“ - Temperatur des Kochfeldes 1 2 4 < 60°C
oder
–„- H -“ = „High“ - Temperatur des Kochfeldes 1 2 4 > 60°C
HINWEIS
► Nach dem Ausschalten in den Standby-Modus laufen die Lüfter des Gerä-
tes noch eine Zeit lang weiter
Standby“ t.
aste „On / Standby“ t drücken,
eige bedeutet:
, um die Hitze abzuführen.
DE
AT
CH
HINWEIS
► Das Gerät schaltet sich nach 120 Minuten automatisch in den Standby-
Modus.
Sicherheitsabschaltung
■ Die Kochtopf-Erkennung schaltet zur Sicherheit das Gerät automatisch aus
(in den Standby-Modus), wenn Sie ...
– das Kochgefäß länger als ca. 15 Sek. vom Kochfeld 1 2 4 nehmen,
oder erst gar keines darauf stellen.
– Bei kürzerem Herunternehmen wird zwar das Energiefeld sofort abge-
schaltet - die gewählte Funktion jedoch bleibt erhalten. Ungefähr alle
3 Sek. erinnert dann ein Signalton daran, dass sich das Gerät nach
ungefähr 15 Sekunden automatisch ausschaltet. Wenn Sie innerhalb von
15 Sekunden das Kochgefäß wieder auf das Kochfeld 1 2 4 stellen,
läuft die gewählte Funktion mit den gleichen Einstellungen weiter.
HINWEIS
► Sobald Sie das Kochgefäß vom Kochfeld herunter nehmen, blinkt „- - -“ im
Display.
SIKP 3400 A1
53
Page 56

Timer
HINWEIS
► Das Gerät schaltet sich nach 120 Minuten automatisch in den Standby-
Modus.
DE
AT
CH
Sie können eine Zeit von 0 - 180 Min. vorwählen, nach deren Ablauf sich das jeweilige Kochfeld 1 2 4 ausschalten soll. Wenn Sie die Taste „+“ 6 drücken,
erhöht sich die Zeit um jeweils 5 Minuten. Wenn Sie die Taste „-“ 5 drücken,
verringert sich die Zeit um jeweils 1 Minute.
Die Bedienung des Timers der Kochfelder 1 2 4 wird hier exemplarisch für
das hintere Kochfeld 1 erklärt. Die Tasten und Kontrollleuchten sind auf der
Ausklappseite für die hintere Kochplatte 1 durchnummeriert. Die Bedienung ist
jedoch bei allen 3 Kochfeldern mit Hilfe der jeweiligen Bedienelemente e i
o identisch.
Timer im Leistungsmodus
1) Starten Sie erst das Erhitzen im Leistungsmodus wie zuvor beschrieben.
2) Drücken Sie dann die Taste „F“ q so oft, bis die Kontrollleuchte Leistungsmodus 8 und die Kontrollleuchte Timer 0 gleichzeitig leuchten.
3) Stellen Sie mit Hilfe der Tasten „-“ 5 und „+“ 6 die gewünschte Zeit ein,
nach deren Ablauf sich das Kochfeld 1 ausschalten soll.
Das Display 7 zeigt nun abwechselnd die eingestellte Leistungsstufe und die
noch verbleibende Zeit bis zum Abschalten an.
Nach dem Ablaufen der Zeit schaltet sich das Kochfeld 1 automatisch aus.
HINWEIS
► Wenn Sie, während der Timer schon läuft, mit Hilfe der Taste „F“ q die
Temper
leuchtet) und eine Temperatur einstellen, bleibt die Timereinstellung bestehen und das Gerät wechselt nur vom Leistungsmodus in den Temperaturmodus.
atureinstellung wählen (Kontrollleuchte „Temperaturmodus“ 9
54
SIKP 3400 A1
Page 57

Timer im Temperaturmodus
1) Starten Sie erst das Erhitzen im Temperaturmodus wie zuvor beschrieben.
2) Drücken Sie dann die Taste „F“ q so oft, bis die Kontrollleuchte Temperaturmodus 9 und die Kontrollleuchte Timer 0 gleichzeitig leuchten.
3) Stellen Sie mit Hilfe der Tasten „-“ 5 und „+“ 6 die gewünschte Zeit ein,
nach deren Ablauf sich das Kochfeld 1 ausschalten soll.
Das Display 7 zeigt nun abwechselnd die eingestellte Temperatur und die noch
verbleibende Zeit bis zum Abschalten an.
Nach dem Ablaufen der Zeit schaltet sich das Kochfeld 1 automatisch aus.
HINWEIS
► Wenn Sie, während der Timer schon läuft, mit Hilfe der Taste „F“ q die
Leistungsstufeneinstellung wählen (K
tet) und eine Leistungsstufe einstellen, bleibt die Timereinstellung bestehen
und das Gerät wechselt nur vom Temperaturmodus in den Leistungsmodus.
Kindersicherung
Um unbefugtes Anschalten oder Ändern der Einstellungen, zum Beispiel durch
Kinder, zu verhindern, ist dieses Gerät mit einer Kindersicherung ausgestattet.
DE
AT
CH
ontrollleuchte Leistungsmodus 8 leuch-
■ Drücken Sie die Taste „Lock“ z so lange, bis ein Signalton erklingt und die
Kontrollleuchte Kindersicherung u leuchtet. Nun sind alle Tasten, bis auf die
Taste „Lock“ z und die Taste „On / Standby“ t gesperrt.
■ Um die Kindersicherung aufzuheben, drücken und halten Sie erneut die Taste
„Lock“ z, bis ein Signalton erklingt und die Kontrollleuchte Kindersicherung
u erlischt. Die Tasten sind nun wieder freigegeben.
HINWEIS
► Wenn im Betrieb die Kindersicherung aktiviert wird, kann weiterhin die
„On / Standby“ t zum Ausschalten und die Taste „Lock“ z betätigt
Taste
werden.
HINWEIS
► Benutzen Sie die Kindersicherung auch als Wischschutzfunktion: aktivieren
Sie, bev
sicherung. So vermeiden Sie unbeabsichtigtes Betätigen der Tasten.
or Sie mit einem feuchten Tuch über die Tasten wischen, die Kinder-
SIKP 3400 A1
55
Page 58

Reinigen
WARNUNG - STROMSCHLAGGEFAHR!
► Bevor Sie das Gerät reinigen, ziehen Sie immer den Netzstecker aus der
Netzsteckdose.
DE
AT
CH
Auf keinen Fall darf das Gerät oder Teile davon in Flüssigkeiten
►
getaucht werden! Hierdurch kann Lebensgefahr durch elektrischen Schlag
entstehen und das Gerät beschädigt werden.
► Öff nen Sie niemals das Gehäuse des Gerätes. Andernfalls besteht Lebens-
gefahr durch elektrischen Schlag.
WARNUNG - VERLETZUNGSGEFAHR!
► Lassen Sie das Gerät vor der Reinigung erst abkühlen.
ennungsgefahr!
Verbr
ACHTUNG - SACHSCHADEN!
► Verwenden Sie keine Lösungs- oder Scheuermittel. Diese können die Koch-
felder 1 2 4 des Gerätes beschädigen.
► Benutzen Sie keine aggressiven, chemischen oder scheuernden Reinigungs-
mittel! Diese können die Oberfl
■ Reinigen Sie alle Flächen und das Netzkabel nur mit einem leicht angefeuch-
teten Spültuch.
■ Trocknen Sie das Gerät auf jeden Fall gut ab, bevor Sie es erneut verwenden.
äche irreparabel angreifen!
■ Festgebackene Verschmutzungen auf den Kochfeldern 1 2 4 können Sie
mit einem speziell für Glaskochfelder geeigneten Schaber aus dem Haushaltswarenhandel entfernen.
■ Wenn Verschmutzungen im Bereich der Luftschlitze unter dem Gerät sichtbar
sind, können Sie versuchen, diese von außen mit einem Staubsauger heraus
zu saugen.
56
SIKP 3400 A1
Page 59

Fehlerbehebung
PROBLEM MÖGLICHE URSACHE
Das Gerät funktioniert
nicht. Die Kontrollleuchte
On / Standby r leuchtet
nicht.
Das Gerät startet den
Kochvorgang nicht.
In einem der Displays wird
E01 angezeigt.
Der Netzstecker ist nicht angeschlossen.
Das Gerät ist beschädigt.
Es steht kein Gefäß auf dem
jeweiligen Kochfeld 1 2 4.
Das Gefäß ist nicht für Induktionskochfelder geeignet.
Das Gerät wird mit zu wenig
Spannung versorgt (< 160 V).
MÖGLICHE
LÖSUNGEN
Schließen Sie das Gerät an
eine Netzsteckdose an.
Wenden Sie sich an den
Service.
Stellen Sie ein geeignetes
Gefäß auf das jeweilige
Kochfeld 1 2 4.
Benutzen Sie einen geeignetes Gefäß (siehe Kapitel
„Geeignetes Kochgeschirr“).
Stellen Sie sicher, dass
das Gerät an eine vorschriftsmäßig installierte
Netzsteckdose mit
220 - 240 V ~, 50 Hz
angschlossen ist.
DE
AT
CH
In einem der Displays wird
E02 angezeigt.
In einem der Displays wird
E03 angezeigt.
In einem der Displays wird
E05 angezeigt.
In einem der Displays wird
E06 angezeigt.
Das Gerät wird mit zu hoher
Spannung versorgt (> 270 V).
Es liegt ein Kurzschluss im
Inneren des Gerätes vor!
Das Gerät ist überhitzt (im
Leistungsstufen-Modus)!
Der Temperatursensor unter
dem Kochfeld 1 2 4 ist
defekt oder es liegt ein Kurzschluss vor.
Stellen Sie sicher, dass
das Gerät an eine vorschriftsmäßig installierte
Netzsteckdose mit
220 - 240 V ~, 50 Hz
angschlossen ist.
Ziehen Sie sofort den Netzstecker aus der Netzsteckdose und wenden Sie sich
an den Service!
Ziehen Sie den Netzstecker
aus der Netzsteckdose und
warten Sie, bis sich das
Gerät abgekühlt hat.
Ziehen Sie den Netzstecker
aus der Netzsteckdose und
wenden Sie sich an den
Service.
SIKP 3400 A1
57
Page 60

DE
AT
CH
In einem der Displays wird
E07 angezeigt.
In einem der Displays wird
E08 angezeigt.
Das Gerät ist überhitzt (im
Temperatur-Modus)!
Der Temperatursensor ist
defekt.
Es steht kein Kochgefäß
auf dem jeweiligen Kochfeld
1 2 4.
Ziehen Sie den Netzstecker
aus der Netzsteckdose und
warten Sie, bis sich das
Gerät abgekühlt hat.
Ziehen Sie den Netzstecker
aus der Netzsteckdose und
wenden Sie sich an den
Service.
Stellen Sie ein Kochgefäß
auf das Kochfeld 1 2 4.
In einem der Displays wird
- - - angezeigt.
Es steht ein ungeeignetes
Kochgefäß auf dem jeweiligen
Kochfeld 1 2 4.
Das Kochgefäß steht nicht
mittig auf dem jeweiligen
Kochfeld 1 2 4.
Stellen Sie ein geeignetes
Kochgefäß auf das Kochfeld 1 2 4.
Stellen Sie ein Kochgefäß
mittig das Kochfeld 1 2
4.
Gerät entsorgen
Werfen Sie das Gerät keinesfalls in den normalen Hausmüll.
Dieses Produkt unterliegt der europäischen Richtlinie 2002/96/EC.
Entsorgen Sie das Gerät über einen zugelassenen Entsorgungsbetrieb oder über
Ihre kommunale Entsorgungseinrichtung. Beachten Sie die aktuell geltenden
Vorschriften. Setzen Sie sich im Zweifelsfall mit Ihrer Entsorgungseinrichtung in
Verbindung.
Hinweise zur EG-Konformitätserklärung
Dieses Gerät entspricht hinsichtlich Übereinstimmung mit den
grundlegenden Anforderungen und den anderen relevanten
Vorschriften der europäischen Richtlinie für elektromagnetische Verträglichkeit 2004/108/EC, der Niederspannungsrichtlinie 2006/95/EC, sowie der ErP-Richtlinie
2009/125/EC, Verordnung 1275/2008 Anhang 1, Nr.1.
Die vollständige Original-Konformitätserklärung ist beim
Importeur erhältlich.
58
SIKP 3400 A1
Page 61

Importeur
KOMPERNASS GMBH
BURGSTRASSE 21
44867 BOCHUM, GERMANY
www.kompernass.com
Garantie
Sie erhalten auf dieses Gerät 3 Jahre Garantie ab Kaufdatum. Das Gerät wurde
sorgfältig produziert und vor Anlieferung gewissenhaft geprüft.
Bitte bewahren Sie den Kassenbon als Nachweis für den Kauf auf. Bitte setzen
Sie sich im Garantiefall mit Ihrer Servicestelle telefonisch in Verbindung. Nur so
kann eine kostenlose Einsendung Ihrer Ware gewährleistet werden.
HINWEIS
► Die Garantieleistung gilt nur für Material- oder Fabrikationsfehler, nicht
aber für Tr
zerbrechlichen Teilen, z. B. Schalter.
DE
AT
CH
ansportschäden, Verschleißteile oder für Beschädigungen an
Das Produkt ist lediglich für den privaten und nicht für den gewerblichen
Gebrauch bestimmt. Bei missbr
Gewaltanwendung und bei Eingriff en, die nicht von unserer autorisierten ServiceNiederlassung vorgenommen wurden, erlischt die Garantie.
Ihre gesetzlichen Rechte werden durch diese Garantie nicht eingeschränkt.
Die Garantiezeit wird durch die Gewährleistung nicht verlängert. Dies gilt auch
für ersetzte und reparierte Teile.
Eventuell schon beim Kauf vorhandene Schäden und Mängel müssen sofort nach
dem Auspacken gemeldet werden, spätestens aber zwei Tage nach Kaufdatum.
Nach Ablauf der Garantiezeit anfallende Reparaturen sind kostenpfl ichtig.
äuchlicher und unsachgemäßer Behandlung,
SIKP 3400 A1
59
Page 62

DE
AT
CH
Service
Service Deutschland
Tel.: 01805 772 033 (0,14 EUR/Min. aus dem dt. Festnetz,
Mobilfunk max. 0,42 EUR/Min.)
E-Mail: kompernass@lidl.de
IAN 75467
Service Österreich
Tel.: 0820 201 222 (0,15 EUR/Min.)
E-Mail: kompernass@lidl.at
IAN 75467
Service Schweiz
Tel.: 0842 665566 (0,08 CHF/Min., Mobilfunk max. 0,40 CHF/Min.)
E-Mail: kompernass@lidl.ch
IAN 75467
60
SIKP 3400 A1
 Loading...