

Page 1

IAN 281064
PROFESSIONAL FOOD PROCESSOR
Operating instructions
ROBOT DE BUCĂTĂRIE PROFESIONAL
Instrucţiuni de utilizare
PROFI-KÜCHENMASCHINE
Bedienungsanleitung
PROFESSIONAL FOOD PROCESSOR SKV 1200 A1
Page 2
GB / CY Operating instructions Page 1
RO Instrucţiuni de utilizare Pagina 19
DE / AT / CH Bedienungsanleitung Seite 37
Before reading, unfold the page containing the illustrations and familiarise yourself with all functions of
the device.
Înainte de a citi instrucţiunile, priviţi imaginile şi familiarizaţi-vă cu toate funcţiile aparatului.
Klappen Sie vor dem Lesen die Seite mit den Abbildungen aus und machen Sie sich anschließend mit allen
Funktionen des Gerätes vertraut.
Page 3
A
B
Page 4

C
Page 5

GB│CY │ 1 ■
SKV 1200 A1
Contents
Introduction ...........................................................2
Intended use ...........................................................2
Package contents .......................................................2
Appliance description ...................................................2
Safety information ......................................................3
Preparations ...........................................................6
Speed settings .........................................................6
Working with kneading hook, whisk and beater ............................6
After you have finished using your appliance .............................................7
Working with the blender ................................................8
Adding more ingredients .............................................................9
After you have finished using your appliance .............................................9
Working with special accessories ..........................................9
After you have finished using your appliance ................................9
Cleaning and care .....................................................10
Cleaning the appliance .............................................................10
Cleaning the accessories ............................................................10
Cleaning the blender ...............................................................10
Storage ..............................................................11
Troubleshooting .......................................................12
Technical data .........................................................12
Disposal .............................................................12
Kompernass Handels GmbH warranty ....................................12
Service ..........................................................................13
Importer .........................................................................13
Recipes ..............................................................14
Carrot soup ......................................................................14
Tuna spread ......................................................................14
Traditional pancakes ...............................................................14
Sponge mixture ...................................................................15
Shortcrust pastry ..................................................................15
Cake mixture .....................................................................16
Yeast dough ......................................................................16
Waffles .........................................................................16
Banana-vanilla shake ...............................................................17
Banana-kiwi smoothie ..............................................................17
Page 6

■ 2 │ GB
│
CY
SKV 1200 A1
Introduction
Congratulations on the purchase of your new
appliance.
You have selected a high-quality product. The
operating instructions are part of this product. They
contain important information about safety, usage
and disposal. Before using the product, please
familiarise yourself with all operating and safety
instructions. Use the product only as described and
for the range of applications specified. Please also
pass these operating instructions on to any future
owner.
Intended use
This appliance is intended exclusively for processing foodstuffs in normal household quantities.
This appliance is intended solely for use in private
households. It is not suitable for commercial use!
This appliance is intended only for private use in
enclosed, dry spaces. It must not be used outdoors.
Use the appliance only with the original accessories.
Package contents
Professional Food Processor
Mixing bowl with lid
Blender with lid and measuring cup
Kneading hook
Whisk
Beater
Blender tool
Operating instructions
Quick guide
NOTE
► Check contents for completeness and damage
immediately after unpacking. Contact Customer
Services if necessary.
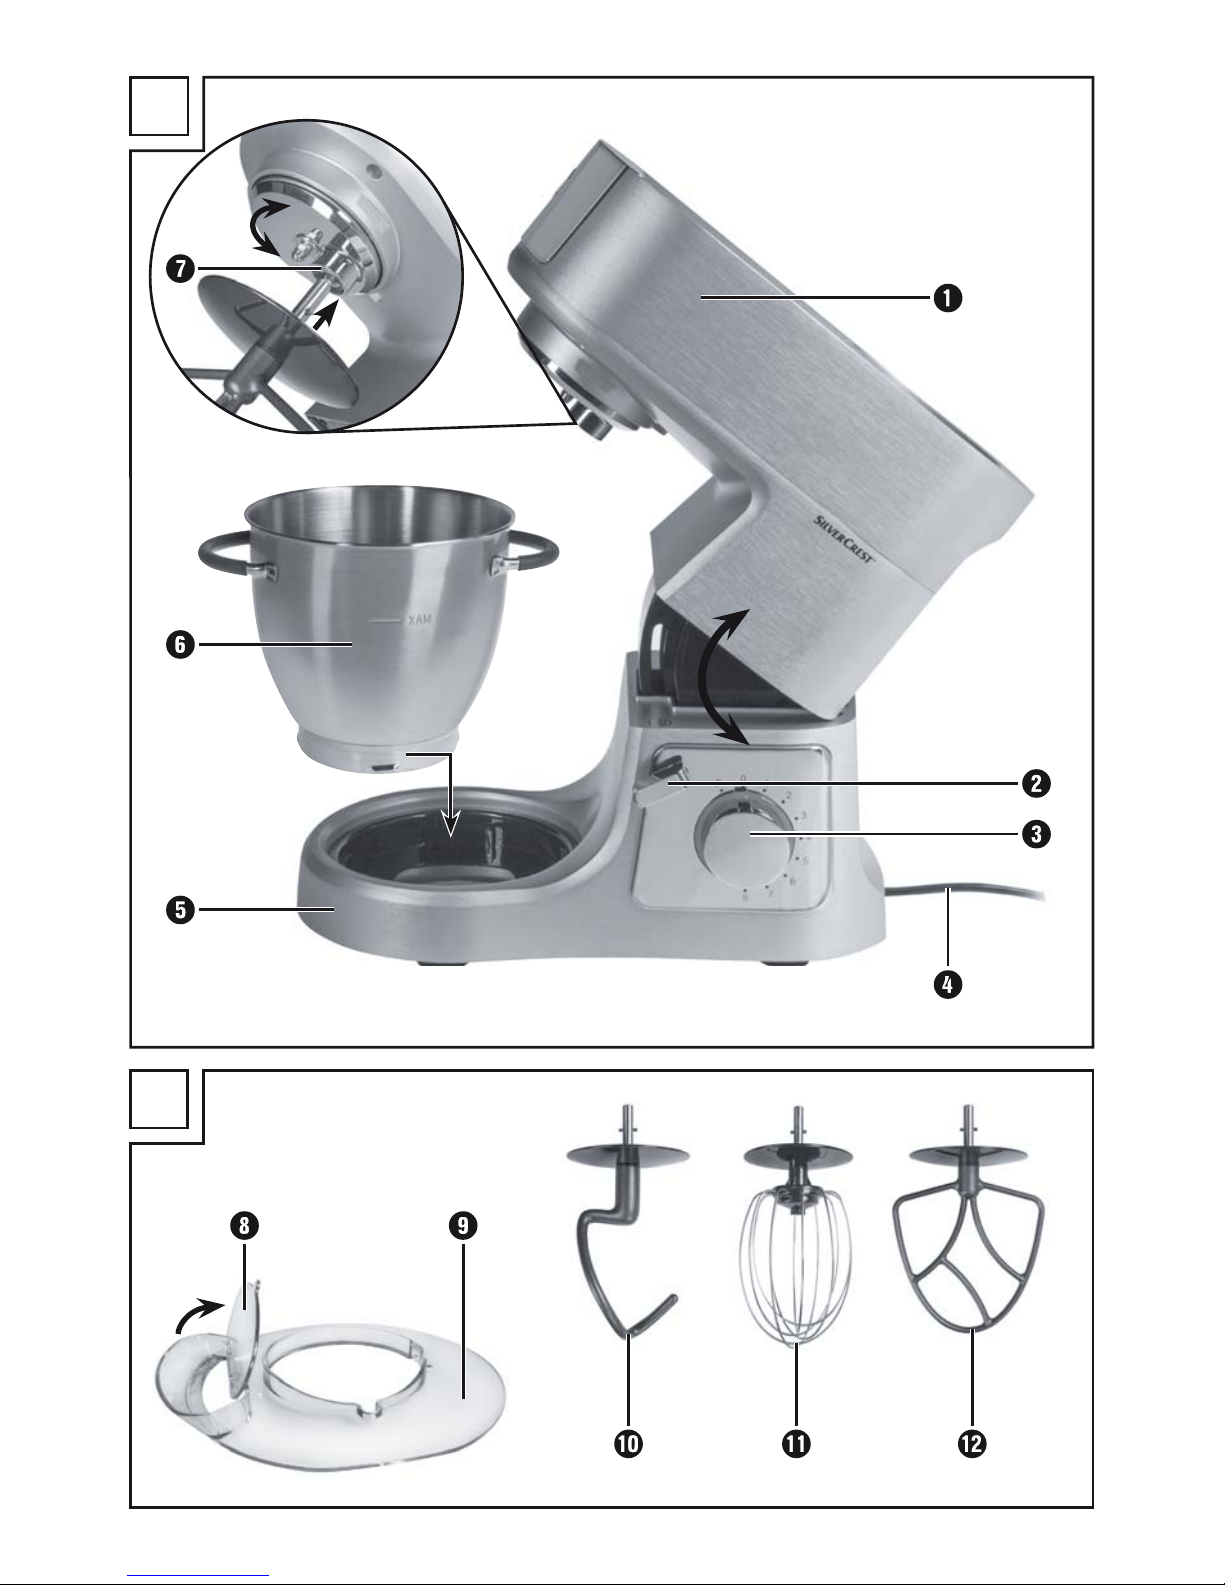
Appliance description
Fold out the flaps on the front and rear covers of
this operating manual.
Front fold-out page
Figure A:
Swivel arm
Release lever
Rotary switch (speed levels)
Power cable
Base
Mixing bowl
Socket for attachment tools
Figure B:
Cover for the filling opening
Lid
Kneading hook
- Whisk
3 Beater
Rear fold-out page:
Figure C:
! Small measuring cup (incl. scale)
. Blender lid
0 Blender (incl. scale)
6 Blades
1 Drive protection cover
% Blender drive
+ Cover over drive for special accessories
, Blender tool
Page 7

GB│CY │ 3 ■
SKV 1200 A1
Safety information
DANGER – RISK OF ELECTRIC SHOCK!
► The appliance should only be connected to a correctly installed and
earthed mains power socket. Ensure that the rating for your local
power supply corresponds with the details on the rating plate of the
appliance.
► Ensure that the power cable does not become wet or moist during use.
Route the cable in such a way that it cannot be crushed or damaged.
► Keep the power cable away from hot surfaces.
► Do not perform any repairs on the appliance. All repairs must be
performed by our Customer Service Unit or by a qualified specialist
technician.
► Remove the plug from the mains power socket when the appliance is
being cleaned or in the event of a fault. Just switching off the appliance is not sufficient, as the appliance is subject to mains voltage as
long as the plug is connected to the mains power socket.
► Always remove the plug from the mains power socket when the appli-
ance is not in use.
► Arrange for defective power plugs and / or cables to be replaced
as soon as possible by a qualified technician or by our Customer
Service Department to avoid the risk of injury.
► The appliance and its connecting cable must be kept away from
children.
Never immerse the appliance in water or other liquids.
Page 8

■ 4 │ GB
│
CY
SKV 1200 A1
WARNING! RISK OF INJURY!
► The appliance should always be disconnected from the mains when
unattended and before assembly, disassembly or cleaning.
► This appliance should not be used by children.
► Use only the original accessory parts for this appliance. Accessory
parts from other manufacturers may not be suitable, and this may
lead to risks!
► This appliance may be used by persons with limited physical, sensory
or mental capabilities or lack of experience and knowledge, provided
that they are under supervision or have been told how to use the
appliance safely and are aware of the potential risks.
► Do not allow children to use the appliance as a plaything.
► Caution: The blade is extremely sharp!
► Be careful when cleaning the blade!
Page 9

GB│CY │ 5 ■
SKV 1200 A1
WARNING! RISK OF INJURY!
► Caution: The blade is extremely sharp! Be careful when removing the
blender jug.
► Never use the appliance for purposes other than those described in
these instructions. Otherwise there is a risk of serious injury!
► Never leave the appliance unattended!
► Before changing any accessories or attachments that move during
operation, the appliance must be switched off and disconnected from
mains power.
► While the appliance is in operation, do not put anything other than
the ingredients to be processed into the mixing bowl or blender.
► To avoid injuries or damage to the appliance, do not put your hands
or any foreign objects into the filling opening or the blender.
ATTENTION! PROPERTY DAMAGE!
► Do not operate the appliance without ingredients. Risk of overheating!
► Never fill the appliance with hot ingredients!
Page 10
■ 6 │ GB
│
CY
SKV 1200 A1
Preparations
1) Take all the parts out of the box and remove
the packaging material and any protective
wrapping or stickers.
2) Clean all com
ponents as described in the section “Cleaning and care”. Ensure that all parts
are completely dry.
3) Place the appliance on a clean and level
surface and attach it firmly in place with the 5
suction cups.
4) Insert the power plug into the socket.
Speed settings
Level Use suitable for...
1 - 2
all
- Starting position for
all mixing and stirring
processes
- Adding ingredients
Kneading
hook
Beater 3
- Kneading and mixing
of firm dough or
firmer ingredients
2 - 4
Beater 3
- Mixing thick cake
mixture
- Mixing butter and
flour
- Mixing yeast dough
Kneading
hook
- Kneading yeast
dough
- Kneading thick cake
mixture
4 - 6
Beater 3
- Cake batter
- Whisking butter with
sugar
- Biscuit dough
6 - 8
Whisk -
- Whipped cream
- Egg white
- Mayonnaise
- Whisking butter until
fluffy
P
Blender 0
- Mixing and chopping
soft or liquid ingredients
- Crushing ice
Working with kneading hook,
whisk and beater
WARNING! RISK OF INJURY!
► Never place your hands or fingers in the
mixing bowl during operation! Danger
of injury due to rotating parts!
► Do not change accessories unless the drive is
at a complete standstill! After being switched
off, the drive unit will continue to run for a
short time.
► In cases of malfunction, switch the appliance
off and remove the plug from the wall socket
to prevent the appliance from being switched
back on unintentionally.
ATTENTION! PROPERTY DAMAGE!
► When working with the kneading hook ,
whisk - or beater 3 we recommend al-
lowing the appliance to cool down after
10 minutes of operation.
NOTE
► When you work with the kneading hook ,
whisk - or beater 3, you should use the
lid of the appliance to prevent the unwanted
leaking of ingredients.
Please proceed as follows to prepare the appliance for operation with the kneading hook ,
whisk - or beater 3:
1) Press down the release lever . The swivel
arm moves upwards automatically. If necessary, move the swivel arm to the highest
position.
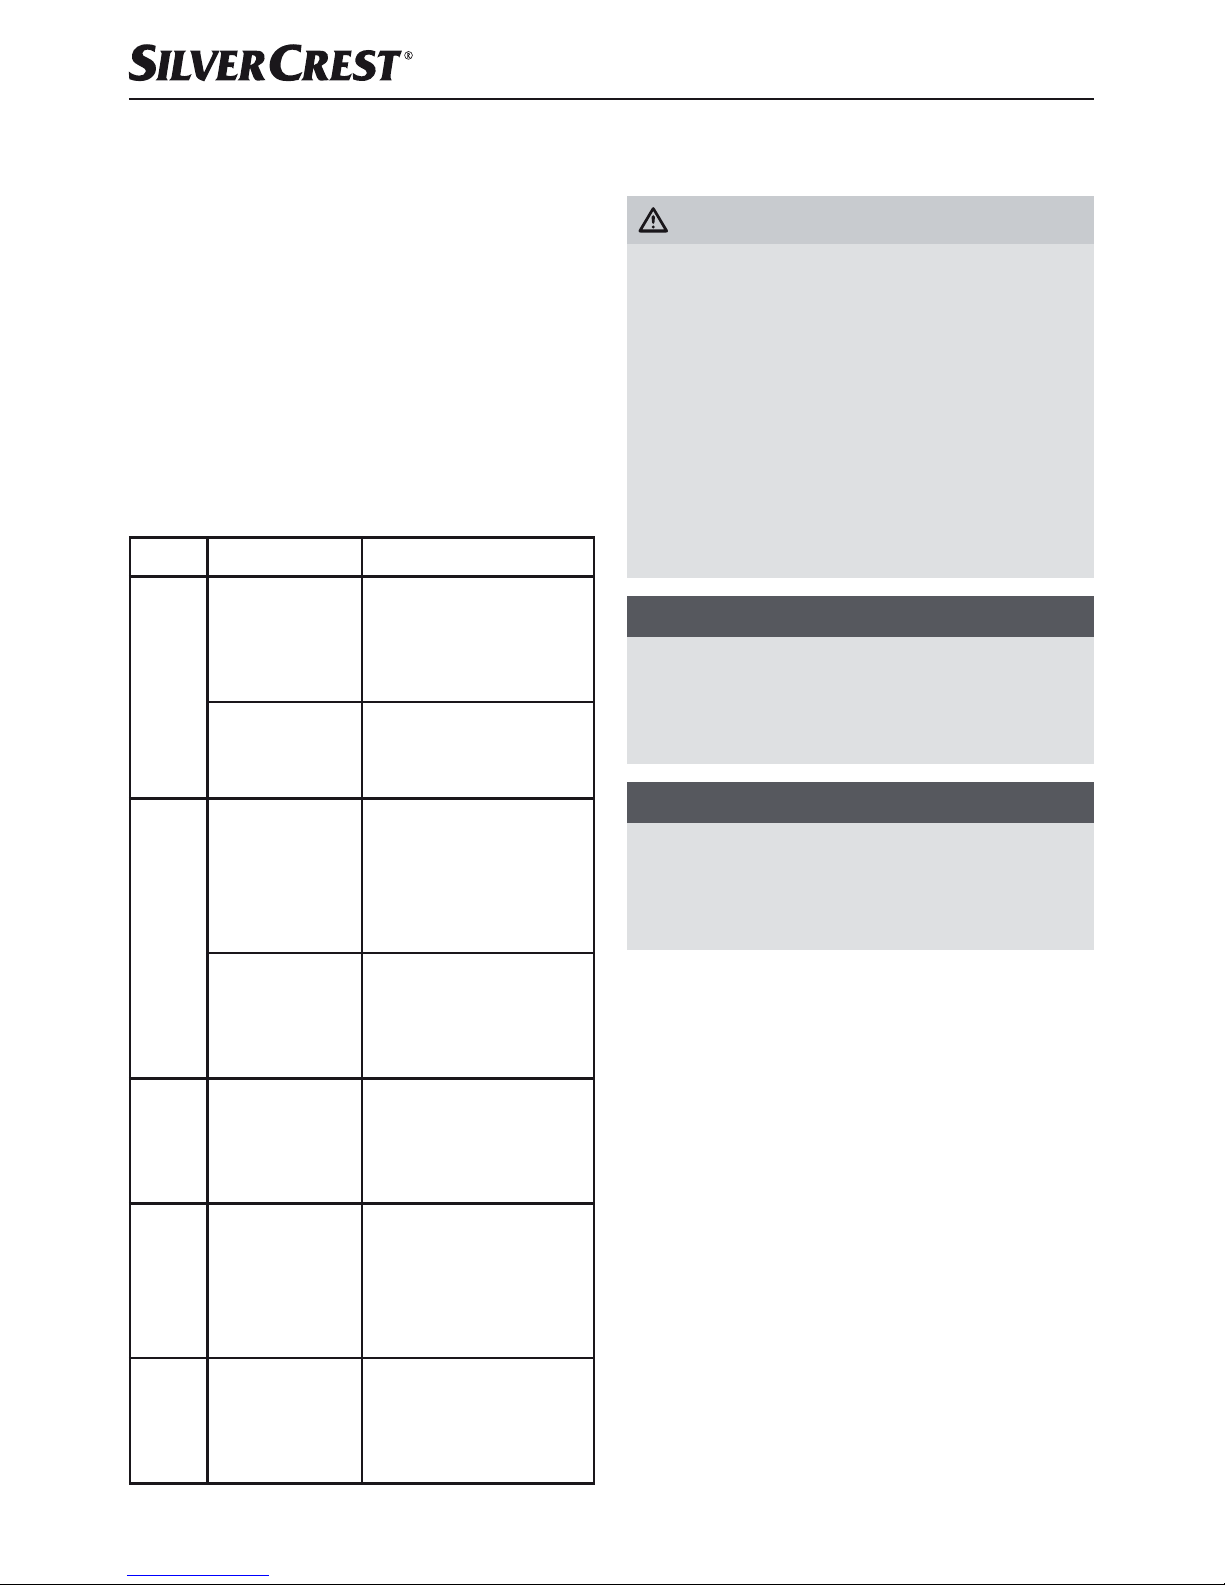
2) Insert the mixing bowl in such a way that
the locking tabs on the mixing bowl grip
into the recesses in the base . To do this, one
of the handles must be pointing in the direction
of the rotary switch . Turn the mixing bowl
clockwise so that it is locked and firmly held in
place.
Page 11
GB│CY │ 7 ■
SKV 1200 A1
3) To use the lid , place it on the part of the
housing which surrounds the attachment tool
socket in such a way that the filling opening
is facing you. On the attachment tool socket
there is a locking device for the lid :
ATTENTION! PROPERTY DAMAGE!
► Never apply any pressure to the lid when
attaching and removing it in order to ensure
that it is not damaged.
4) Depending on what you want to do, fit the
kneading hook , whisk - or beater 3 into
the attachment tool socket :
– Insert the kneading hook , whisk - or
beater 3into the socket so that the two
metal pins on the axle of the attachment
- 3 lock into the recesses of the attachment tool socket .
– Press the attachment - 3 as far as it
will go into the socket and then turn it
anticlockwise as far as it will go (in the
direction of the arrow
).
– Let go of the attachment - 3. This is now
firmly held in the attachment tool socket .
5) Add the ingredients you wish to process into
the mixing bowl .
NOTE
► Please note that during the kneading or stirring
process, the dough in the mixing bowl
increases in volume or is pressed upward
slightly as a result of the movement. You
should therefore never fill the mixing bowl
right up to the top!
Warning! Danger of crushing! Make sure
that no parts of the body are located
under the swivel arm when you push it
downwards.
6) Press down the release lever and press the
swivel arm with the attachment mounted
downwards into the working position until the
swivel arm locks in place.
NOTE
► If you wish, you can open the filling opening
on the lid so that you can also fill in
ingredients during operation.
7) Turn the rotary switch to the required level
(see the section “Speed settings”).
After you have finished using your
appliance
1) Turn the appliance off using the rotary switch
(Position “0”).
2) Press down the release lever and move the
swivel arm to the highest position.
3) Remove the attachment - 3 from the
socket by pressing the attachment - 3
lightly against the socket and turning it
clockwise at the same time (in the direction
of the arrow
). Then you can remove the
attachment - 3.
4) If fitted: remove the lid .
5) Remove the mixing bowl by turning it anticlockwise and then pulling it upwards.
6) Clean the appliance (see section “Cleaning
and care”).
Page 12
■ 8 │ GB
│
CY
SKV 1200 A1
Working with the blender
WARNING! RISK OF INJURY!
► Always allow hot fluids to cool down to a
lukewarm temperature (approx. 30–40°C)
before adding them into the blender 0.
WARNING! RISK OF INJURY FROM
SHARP BLADES/ROTATING DRIVE
UNIT!
► Never put your hand into the attached
blender 0!
► Do not remove the blender 0 unless the
blades 6 are stationary.
► Operate the blender 0 only when the blender
lid . with the measuring cup ! are attached.
► In cases of malfunction, switch the appliance
off and remove the plug from the wall socket
to prevent the appliance from being switched
back on unintentionally.
ATTENTION! PROPERTY DAMAGE!
► Never use the mixing bowl and blender 0
at the same time! This will overload the motor!
► When working with the blender 0 we recom-
mend allowing the appliance to cool down
after 3 minutes of operation.
Proceed as follows to prepare the blender for
operation 0. Use figure C on the rear fold-out
page as a guide.
1) Press down the release lever and press the
swivel arm downwards into the working
position.
2) Turn the drive protection cover 1 clockwise so
that the arrow on the drive protection cover 1
is pointing to the
symbol on the appliance.
Remove the drive protection cover 1 and
place it to one side.
WARNING! RISK OF INJURY!
► Ensure that the rotary switch is turned to
"0" before you place the blender 0 on the
blender drive %. Otherwise the appliance will
start immediately as soon as the blender 0
has locked into place.
3) Place the blender 0 on the blender drive unit
% so that the lock tabs on the underside of
the blender 0 lock into the recesses on the
blender drive unit %. The
symbol on the
blender 0 must be pointing to the
symbol
on the appliance. Turn the blender 0 anti-
clockwise as far as it will go. The symbol
on the blender 0 must then be pointing to the
symbol on the appliance.
4) Add the ingredients.
5) Place the blender lid . with measuring cup !
in position so that the lips of the blender lid .
also seal the spout.
6) Turn the rotary switch to the desired setting.
NOTE
► The ideal speed depends on the consistency
of the items being mixed. The more liquid the
contents are, the faster you can mix them.
► For short, powerful pulsed operation, turn
the rotary switch anticlockwise to level P.
Level P does not lock into place so as not
to overload the motor. You should therefore
keep the rotary switch in this position only
for a short time.
CRUSHING ICE
► In order to produce crushed ice, place ice
cubes in the blender 0, close it and turn the
rotary switch approx. 7 times to level P
for 5 seconds. You may need to adapt the
above instructions depending on the quantity
and size of the ice cubes.
Page 13

GB│CY │ 9 ■
SKV 1200 A1
Adding more ingredients
1) Turn the appliance off using the rotary switch .
2) Remove the blender lid . and add the ingredients
or
3) Turn the measuring cup ! in the blender lid .
clockwise as far as it will go and then take it
out. Add the ingredients gradually through the
opening in the blender lid ..
After you have finished using your
appliance
1) Turn the appliance off using the rotary switch
(Position “0”).
2) Turn the blender 0 clockwise so that the
symbol on the blender 0 is pointing to the
symbol on the appliance and remove it.
NOTE
► Ideally, you should clean the blender 0 im-
mediately after use (see the section "Cleaning
and care"). This makes food residues easier
to remove.
3) Place the drive protection cover 1 back on
the blender drive % so that the
symbol on
the drive protection cover 1 is pointing to the
symbol on the appliance. Turn the drive
protection cover 1 anticlockwise so that the
symbol on the drive protection cover 1 is
pointing to the
symbol on the appliance.
Working with special accessories
NOTE
► The special accessories, such as a meat
grinder attachment, a noodle attachment and
vegetable grater, can be ordered online at
www.kompernass.com.
ATTENTION! PROPERTY DAMAGE!
► The drive unit for special accessories +
should only be used for accessories which
are specifically approved for use with this
appliance by the manufacturer.
1) Turn the appliance off using the rotary switch
(Position “0”).
2) Push the cover over the drive unit for special
accessories + upwards and remove it from
the appliance.
3) Attach the special accessory to the appliance
in accordance with its operating instructions.
ATTENTION! PROPERTY DAMAGE!
► Never use special accessories at the same
time as the mixing bowl or blender 0!
This will overload the motor!
After you have finished using
your appliance
1) Turn the appliance off using the rotary switch
(Position “0”).
2) Disconnect the special accessory from the appliance as stated in its operating instructions.
3) Clean all components as described in the
section “Cleaning and care”.
4) Place the cover for the drive unit for special
accessories + back in position.
Page 14
■ 10 │ GB
│
CY
SKV 1200 A1
Cleaning and care
DANGER – RISK OF ELECTRIC SHOCK!
►
Before cleaning the appliance, disconnect
the power plug from the mains power socket!
There is a risk of electric shock!
Never immerse the appliance in water or
any other liquid!
ATTENTION! PROPERTY DAMAGE!
► Do not use abrasive or aggressive cleaning
materials. These may damage the surfaces.
NOTES
► We recommend cleaning the appliance
directly after use. This makes food residues
easier to remove.
► Processing foods that contain strong pig-
ments, such as carrots, may lead to staining
of the plastic parts. These stains can be
removed using a little cooking oil.
Cleaning the appliance
■ Wipe the appliance with a damp cloth. For
stubborn soiling use a mild detergent on the
cloth. Wipe off any detergent residue using a
cloth moistened with clean water. Then dry the
appliance carefully.
Cleaning the accessories
■ Clean the mixing bowl , the lid , the cover
of the filling opening , the blender lid . with
measuring cup !, the drive protection cover 1,
the blender tool ,and the attachments -3
in warm water with a little detergent. Any residues
can be removed with a washing-up brush. Rinse
all parts with warm clean water and make sure
that all parts are dry before re-using them.
NOTE
► The attachments -3, the lid and the
mixing bowl are also suitable for cleaning
in the dishwasher.
► If you clean components in the dishwasher,
please ensure that no plastic parts can get
jammed or caught anywhere. This may cause
them to become deformed.
► If possible, place all plastic parts in the top
basket of the dishwasher.
Cleaning the blender
WARNING! RISK OF INJURY!
► Do not touch the blades 6 with your bare
hands.
■ Clean the blender 0 and the blender lid .
with measuring cup !in warm water and add
a mild detergent (washing-up liquid). Then rinse
all parts with clean water so that no detergent
residues remain.
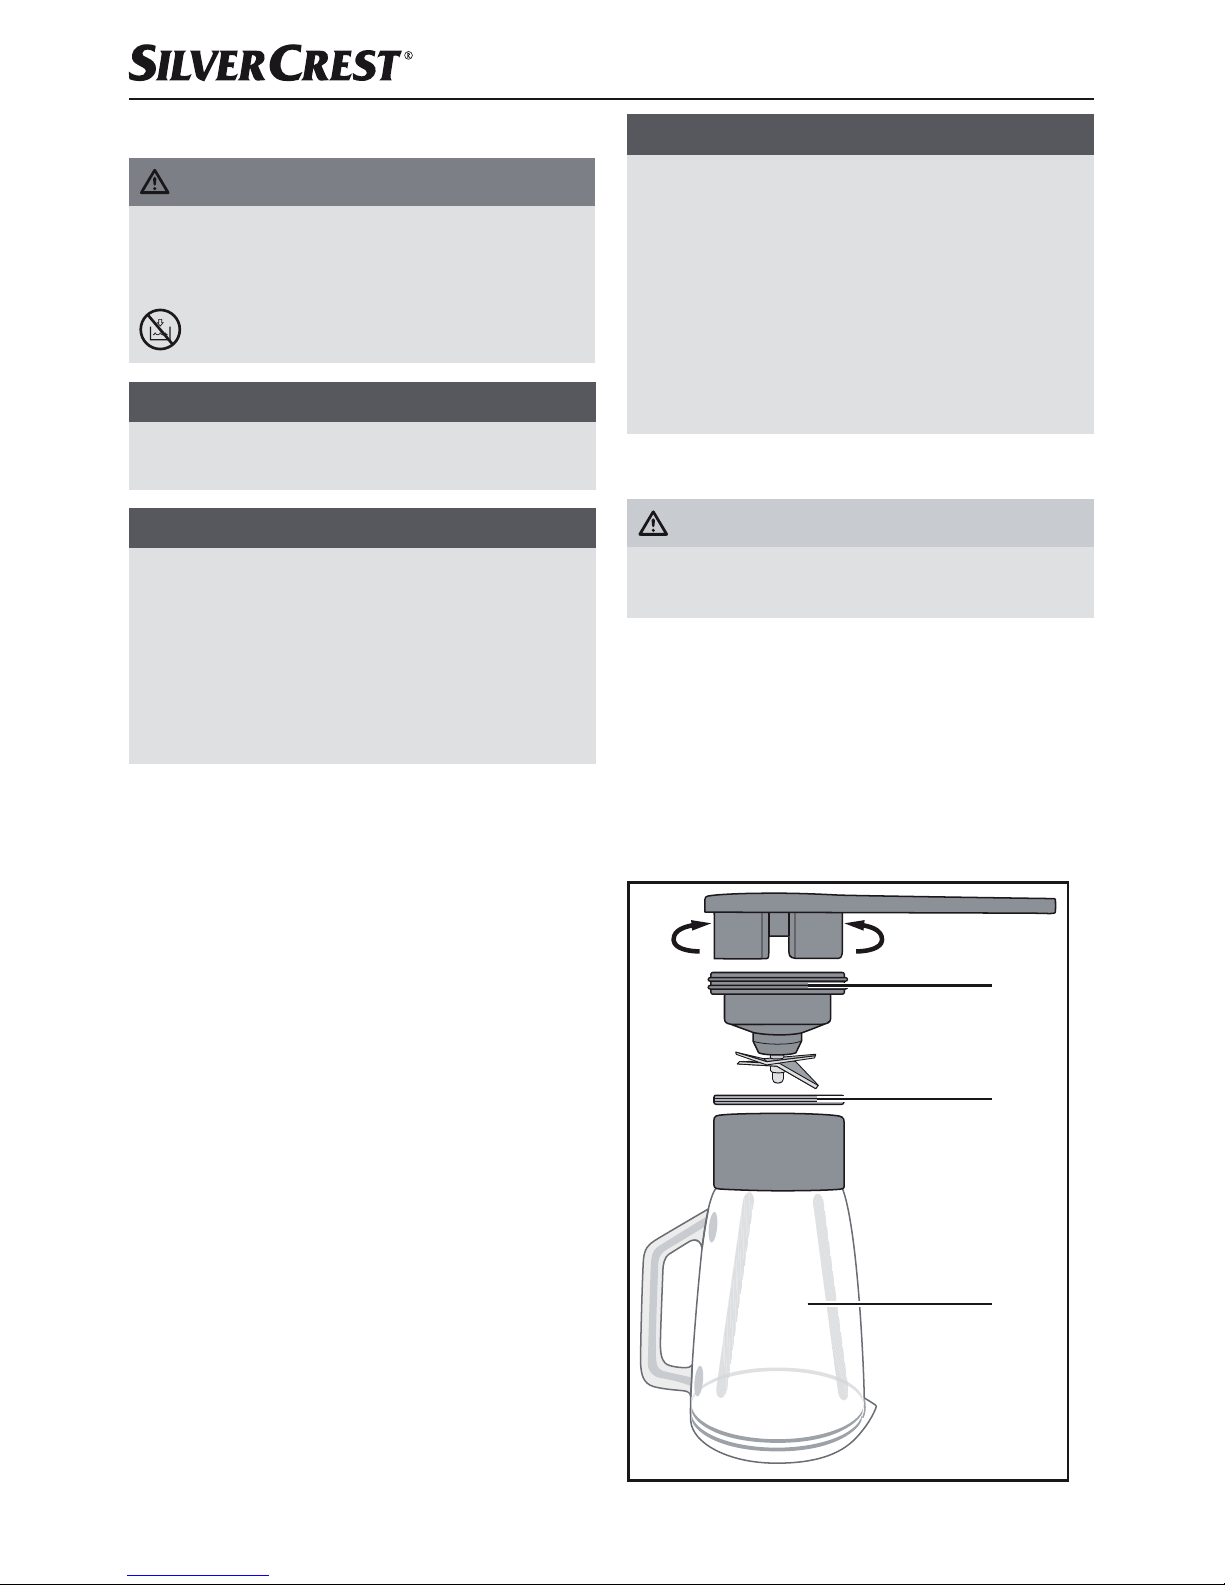
■ If this cleaning is not sufficient, you can unscrew
the blade holder with the blade 6 from the
blender jug using the blender tool ,:
Page 15

GB│CY │ 11 ■
SKV 1200 A1
Blade holder
Sealing ring
Blender jug
– Turn the blender 0 over.
– Insert the blender tool , into the underside
of the blender 0/ the blade holder so
that the two catches on the underside of the
blender 0/ the blade holder grip into
the recesses in the blender tool ,.
– Turn the blender tool , towards
(anticlockwise) until the blade holder with the
blade 6 can be lifted out of the blender 0.
– Pull the sealing ring from the blade
holder with the blade 6.
■ Now you can clean all the parts (blender jug ,
blade holder the blade 6 and sealing ring )
in warm water with a little washing up liquid
using a washing up brush. Afterwards, rinse all
the parts with clean water so that no detergent
residues remain.
NOTE
► The blender jug , the blade holder with
the blade 6 and the sealing ring are all
dishwasher-safe.
If you clean components in the dishwasher,
please ensure that no plastic parts can get
jammed or caught anywhere. This may cause
them to become deformed. We recommend
using the top rack of the dishwasher and a
washing programme with max. 45°C.
► The blender lid .with the measuring cup !
is not dishwasher-safe.
■ After cleaning, reassemble the blender:
– Push the sealing ring back into the recess
on the blade holder with the blade 6.
– Place the blade holder with the blade 6
back into the blender jug so that the
blade 6 protrudes into the blender jug .
– Insert the blender tool , into the underside
of the blender 0/ the blade holder so
that the two catches on the underside of the
blender 0/ the blade holder grip into
the recesses in the blender tool ,.
– Turn the blender tool , towards
(clockwise), so that the blade holder with the
blade 6 sits hand-tight on the blender jug .
In most cases, you can achieve sufficiently hygienic
cleaning of the blender 0 immediately after use in
the following way:
1) Put some water containing a little detergent
into the fully assembled blender 0.
2) Place the blender lid . with measuring cup !
in position so that the lips of the blender lid .
also seal the spout.
3) Switch on the blender 0 for a few seconds.
4) Pour out the washing water. Any residues can
be removed with a washing-up brush.
5) Then rinse out the blender 0 with plenty of
clean water so that all detergent residues are
removed.
Storage
■ Store the cleaned appliance in a clean, dust-free
and dry location.
Page 16

■ 12 │ GB
│
CY
SKV 1200 A1
Troubleshooting
If the appliance suddenly stops working:
■ The appliance has overheated and triggered the
automatic safety cut-out.
– Turn the rotary switch to 0.
– Remove the plug from the wall socket.
– Allow the appliance to cool for 15 minutes.
– If the appliance has not yet cooled off com-
pletely after 15 minutes, it will not start.
– Wait a further 15 minutes and try switching
on again.
If the appliance cannot be switched on:
– Check that the plug is correctly connected
to a wall socket.
– Check whether the swivel arm is in the
wcorrect position.
Technical data
Supply voltage: 220 - 240 V
~
50/60 Hz
Power consumption: 1200 W
CO times: Food processor 10 min.
Blender 3 min.
Max. capacity
Mixing bowl : approx. 6.0 l
Blender 0: approx. 1.5 l
All parts of this appliance that come into
contact with food are food-safe.
We recommend the following operating times:
When working with the kneading hook , whisk -
or beater 3, allow the appliance to cool down
after 10 minutes of operation.
When working with the blender 0, allow the appliance to cool down after 3 minutes of operation.
If you exceed these operating times, the appliance
can overheat and be damaged!
Disposal
Never dispose of the appli-
ance in your normal domestic
waste. This product is subject
to the provisions of European
Directive 2012/19/EU.
Dispose of the appliance via an approved disposal
company or your municipal waste facility. Please
comply with all applicable regulations. Please
contact your waste disposal centre if you are in
any doubt.
The packaging is made from environ-
mentally friendly material and can be
disposed of at your local recycling plant.
Kompernass Handels GmbH
warranty
Dear Customer,
This appliance has a 3-year warranty valid from
the date of purchase. If this product has any faults,
you, the buyer, have certain statutory rights. Your
statutory rights are not restricted in any way by the
warranty described below.
Warranty conditions
The validity period of the warranty starts from the
date of purchase. Please keep your original receipt
in a safe place. This document will be required as
proof of purchase.
If any material or production fault occurs within
three years of the date of purchase of the product,
we will either repair or replace the product for you
at our discretion. This warranty service is dependent on you presenting the defective appliance and
the proof of purchase (receipt) and a short written
description of the fault and its time of occurrence.
If the defect is covered by the warranty, your product
will either be repaired or replaced by us. The repair
or replacement of a product does not signify the
beginning of a new warranty period.
Page 17
GB│CY │ 13 ■
SKV 1200 A1
Warranty period and statutory claims for
defects
The warranty period is not prolonged by repairs
effected under the warranty. This also applies to
replaced and repaired components. Any damage
and defects present at the time of purchase must
be reported immediately after unpacking. Repairs
carried out after expiry of the warranty period shall
be subject to a fee.
Scope of the warranty
This appliance has been manufactured in accordance
with strict quality guidelines and inspected meticulously prior to delivery.
The warranty covers material faults or production
faults. The warranty does not extend to product parts
subject to normal wear and tear or fragile parts such
as switches, batteries, baking moulds or parts made
of glass.
The warranty does not apply if the product has been
damaged, improperly used or improperly maintained.
The directions in the operating instructions for the
product regarding proper use of the product are
to be strictly followed. Uses and actions that are
discouraged in the operating instructions or which
are warned against must be avoided.
This product is intended solely for private use and
not for commercial purposes. The warranty shall be
deemed void in cases of misuse or improper handling,
use of force and modifications/repairs which have
not been carried out by one of our authorised
Service centres.
Warranty claim procedure
To ensure quick processing of your case, please
observe the following instructions:
■ Please have the till receipt and the item number
(e.g. IAN 12345) available as proof of purchase.
■ You will find the item number on the type plate,
an engraving on the front page of the instructions
(bottom left), or as a sticker on the rear or bottom of the appliance.
■ If functional or other defects occur, please
contact the service department listed either by
telephone or by e-mail.
■ You can return a defective product to us free of
charge to the service address that will be provided
to you. Ensure that you enclose the proof of purchase (till receipt) and information about what
the defect is and when it occurred.
You can download these instructions
along with many other manuals,
product videos and software on
www.lidl-service.com.
Service
Service Great Britain
Tel.: 0871 5000 720 (£ 0.10/Min.)
E-Mail: kompernass@lidl.co.uk
CY
Service Cyprus
Tel.: 8009 4409
E-Mail: kompernass@lidl.com.cy
IAN 281064
Importer
Please note that the following address is not the
service address. Please use the service address
provided in the operating instructions.
KOMPERNASS HANDELS GMBH
BURGSTRASSE 21
44867 BOCHUM
GERMANY
www.kompernass.com
Page 18

■ 14 │ GB
│
CY
SKV 1200 A1
Recipes
Carrot soup
Ingredients:
■ 500 g carrots
■ 250 ml water
■ 500 ml meat stock (jar)
■ 125 ml cream
■ 125 ml white wine
■ Salt
■ Pepper
■ 50 g cold butter
■ Fresh chervil
Preparation:
1) Wash and peel the carrots.
2) Chop them so that they fit easily into the
blender 0.
3) Transfer 250 ml of water to a pot and cook the
carrots in it for 20 minutes. Then puree all the
ingredients in the blender 0 until there are no
large pieces left.
4) Then return the pureed carrots to the pot.
5) Now pour in the meat stock, cream and white
wine.
6) Heat the soup and flavour it to taste.
7) Stir the butter into the soup in small pieces and
add the chervil to taste.
Tuna spread
Ingredients:
■ 1 can of tuna in sauce with vegetables
■ 3 tbsp. yoghurt
■ 1 tsp. lemon juice, freshly pressed
■ 1 pinch salt
■ Freshly ground pepper
■ 2 hard-boiled eggs, diced
To serve:
■ Sliced wholemeal bread
■ Butter for buttering the bread
■ 1 hard-boiled egg, diced
■ Chives, chopped
Preparation:
1) Mix all of the ingredients in the blender 0 until
the desired consistency is reached (approx.
15 seconds) and season to taste.
2) Spread the butter and the tuna mixture onto
the bread and sprinkle with chopped egg and
chives.
Traditional pancakes
Ingredients:
■ 2–3 eggs
■ 375 ml milk
■ 1 pinch salt
■ 250 g flour
■ Fat for frying
Preparation:
1) Mix the eggs, milk and salt with the beater 3.
2) Sift the flour and then add it to the mixture. Mix
everything with the beater 3 until a smooth
dough is produced.
3) Allow the batter to rise for 20 minutes.
Page 19

GB│CY │ 15 ■
SKV 1200 A1
4) Heat the fat and use a small ladle to add some
batter in the pan. (Only as much as is needed
to thinly cover the pan bottom.)
5) Fry the pancakes until golden brown on both
sides and serve hot.
Sponge mixture
Ingredients:
■ 3 eggs
■ 3–4 tablespoons of hot water
■ 150 g sugar
■ 1 packet of vanilla sugar
■ 100 g flour, type 405
■ 100 g corn starch
■ 2–3 level tsp. baking powder
Preparation:
1) Spread baking paper out on the bottom of a
spring-form cake pan (diameter: 28 cm). Do
not grease the edge, as otherwise the surface
is not uniformly smooth and browned.
2) Beat the whole eggs in the mixing bowl and
add hot water.
3) Then beat all the ingredients together for about
1 minute at the highest level with the beater 3
until frothy.
4) Stir in the sugar and vanilla sugar and beat
everything for 2 minutes on the highest level.
5) Mix the flour, corn starch and baking powder
and sieve half of it on to the egg mixture, stirring everything briefly at level 4.
6) Then stir in the rest of the flour in the same way
and fill the dough into the prepared springform cake pan.
7) Bake everything immediately in the preheated
oven with top and bottom heat at 175–200°C
for approx. 20–30 minutes.
Shortcrust pastry
Ingredients:
■ 250 g wheat flour
■ 1/2 level tsp. baking powder
■ 100–125 g sugar
■ 1 packet of vanilla sugar
■ 1 pinch salt
■ 1 egg
■ 125 g butter
Preparation:
1) Mix the flour and baking powder in the
mixing bowl and then add all of the other
ingredients.
2) Knead everything with the kneading hook
for approx. 1 minute initially at level 2, and
then for approx. 3 minutes at level 2–4.
3) Do not knead the dough for too long, as otherwise the dough might become too soft.
4) Leave the dough to stand in the refrigerator for
half an hour and then work it into a flan base
or a small pastry.
5) To make a flan base, roll out two-thirds of the
dough and place it in a greased spring-form
cake pan.
6) Roll the remaining dough into a roll.
7) Place this roll as an edge on the dough and
press it against the edge using two fingers so
that an approx. 3 cm-high edge is created.
8) Prick the flan base with a fork several times.
9) Preheat the oven for approx. 5 minutes and
bake the shortcrust pastry for approx. 15–
20 minutes with top and bottom heat at
200–225°C.
Page 20

■ 16 │ GB
│
CY
SKV 1200 A1
Cake mixture
Ingredients:
■ 250 g soft butter or margarine
■ 250 g sugar
■ 1 packet of vanilla sugar
■ 1 pinch salt
■ 4 eggs
■ 500 g wheat flour
■ 1 pack baking powder
■ Approx. 125 ml milk
Preparation:
1) Place all the ingredients in the mixing bowl
and stir everything with the beater 3 for half a
minute at level 1, then for 30 seconds at level
2 and approx. 5 minutes at level 4.
2) Grease the baking tin or line it with baking
paper.
3) Fill the baking tin and bake the mixture for approx. 50–60 minutes with top and bottom heat
at 175–200°C.
4) Before you take the cake out of the oven, you
should carry out a taste test: To do this, use a
wooden skewer to prick the middle of the cake.
If none of the mixture sticks to it, the cake is
ready.
5) Then turn the cake out onto a cake rack and
allow it to cool down.
Yeast dough
Ingredients:
■ 500 g wheat flour
■ 25 g fresh yeast or 1 pack dried yeast
■ Approx. 1/4 l lukewarm milk
■ 80 g butter or margarine (room temperature)
■ 80 g sugar
■ 1 egg
Preparation:
1) Place the flour, dry yeast or crumbled yeast
and all other ingredients (not directly onto the
yeast) into the mixing bowl .
2) Mix everything together slowly with the
kneading hook at level 1, and then for 3–4
minutes at level 3.
3) Cover the bowl with a dishcloth, place it somewhere warm and let the mixture rise until it has
visibly increased in size.
4) Then knead the mixture thoroughly once more.
5) After that, the dough is finished and can be
further processed.
Waffles
Ingredients:
■ 200 g sugar
■ 500 g flour
■ 5 g baking powder
■ 5 eggs
■ 400 ml milk
■ 250 g butter (room temperature)
■ 2 packs of vanilla sugar
Page 21

GB│CY │ 17 ■
SKV 1200 A1
Preparation:
1) Add the eggs, sugar and butter to the mixing
bowl and stir everything with the whisk into a smooth mixture.
2) Add the flour, the vanilla sugar and baking
powder.
3) Stir in the milk gradually until the mixture has
a smooth and soft consistency.
4) Bake the waffles in a waffle iron.
Banana-vanilla shake
Ingredients:
■ 3 bananas
■ 500 ml milk
■ 2 packs of vanilla sugar
■ 1 tablespoon vanilla ice cream
Preparation:
1) Peel the bananas.
2) Add the peeled bananas, milk, vanilla ice
cream and vanilla sugar to the blender 0.
3) Mix everything at level 8.
Banana-kiwi smoothie
Ingredients:
■ 200 ml orange juice (freshly pressed)
■ 1 kiwi
■ 1/2 banana
Preparation:
1) Remove the skin from the kiwi.
2) Peel the banana.
3) Add the kiwi, banana and orange juice in the
blender 0.
4) Mix everything at level 8.
Page 22

■ 18 │ GB
│
CY
SKV 1200 A1
Page 23

RO │ 19 ■
SKV 1200 A1
Cuprins
Introducere ...........................................................20
Utilizarea conform destinaţiei. . . . . . . . . . . . . . . . . . . . . . . . . . . . . . . . . . . . . . . . . . . .20
Furnitura .............................................................20
Descrierea aparatului ..................................................20
Indicaţii de siguranţă ...................................................21
Pregătiri .............................................................24
Trepte de viteză .......................................................24
Modul de lucru cu cârligul pentru frământat, telul şi paleta de amestecare ......24
După lucru .......................................................................25
Modul de lucru cu mixerul ...............................................26
Completarea cu ingrediente .........................................................27
După lucru .......................................................................27
Modul de lucru cu accesoriile speciale .....................................27
După lucru ...........................................................27
Curăţarea şi îngrijirea ..................................................28
Curăţarea aparatului ...............................................................28
Curăţarea accesoriilor ..............................................................28
Curăţarea mixerului ................................................................28
Depozitarea ..........................................................29
Remedierea defecţiunilor ...............................................30
Date tehnice ..........................................................30
Eliminarea ............................................................30
Garanţia Kompernass Handels GmbH .....................................30
Service-ul ........................................................................31
Importator .......................................................................31
Reţete ...............................................................32
Supă de morcovi ..................................................................32
Salată tartinabilă de ton ............................................................32
Clătite tradiţionale .................................................................32
Pandişpan .......................................................................33
Aluat fraged ......................................................................33
Aluat ...........................................................................34
Aluat dospit ......................................................................34
Vafe ............................................................................34
Shake de banane şi vanilie ..........................................................35
Smoothie de banane şi kiwi ..........................................................35
Page 24

■ 20 │ RO
SKV 1200 A1
Introducere
Felicitări pentru cumpărarea noului dvs. aparat.
Aţi decis să alegeţi un produs de calitate superioară.
Instrucţiunile de utilizare fac parte integrantă din
acest produs. Acestea cuprind informaţii importante
privind siguranţa, utilizarea şi eliminarea. Înainte
de utilizarea produsului, familiarizaţi-vă cu toate
indicaţiile privind utilizarea şi siguranţa. Utilizaţi
produsul numai în modul descris şi numai în scopurile menţionate. În cazul transmiterii produsului unei
alte persoane, predaţi-i toate documentele aferente
acestuia.
Utilizarea conform destinaţiei
Acest aparat este destinat exclusiv prelucrării alimentelor în cantităţi mici. Acest aparat este destinat
exclusiv uzului casnic. A nu se utiliza în scopuri
comerciale!
Acest aparat este destinat numai uzului privat, în
încăperi închise, protejate de ploaie. Nu utilizaţi
aparatul în aer liber!
Acest aparat trebuie utilizat numai cu accesorii
originale.
Furnitura
Robot de bucătărie profesional
Vas de amestecare cu capac
Mixer cu capac şi pahar gradat
Cârlig pentru frământat
Tel
Paletă de amestecare
Aparat-mixer
Instrucţiuni de utilizare
Scurte instrucţiuni
INDICAŢIE
► Imediat după dezambalare verificaţi dacă
furnitura este completă şi nu prezintă deteriorări. Dacă este cazul, adresaţi-vă centrului
de service.
Descrierea aparatului
Desfaceţi paginile pliate din coperta din faţă şi
din spate ale acestor instrucţiuni de utilizare:
pagina pliată din faţă
Figura A:
Braţ pivotant
Manetă de deblocare
Comutator rotativ (trepte de viteză)
Cablu de alimentare
Suport
Vas de amestecare
Sistem de prindere a accesoriului
Figura B:
Capacul orificiului de umplere
Capac
Cârlig pentru frământat
- Tel
3 Paletă de amestecare
pagina pliată din spate:
Figura C:
! Pahar gradat mic (incl. scală)
. Capacul mixerului
0 Mixer (incl. scală)
6 Cuţit
1 Capac de protecţie a mecanismului
de antrenare
% Mecanism de antrenare mixer
+ Capac aşezat pe mecanismul de
antrenare a accesoriilor speciale
, Aparat-mixer
Page 25

RO │ 21 ■
SKV 1200 A1
Indicaţii de siguranţă
PERICOL DE ELECTROCUTARE!
► Conectaţi aparatul numai la o priză instalată regulamentar şi împă-
mântată. Tensiunea reţelei trebuie să corespundă indicaţiilor de pe
plăcuţa de fabricaţie a aparatului.
► Evitaţi contactul cablului de alimentare cu lichide sau umezirea aces-
tuia în timpul funcţionării aparatului. Ghidaţi cablul astfel încât să nu
poată fi deteriorat sau blocat de alte obiecte din jur.
► Ţineţi cablul de alimentare departe de suprafeţele fierbinţi.
► Nu efectuaţi niciun fel de reparaţii la acest aparat. Orice fel de repa-
raţii trebuie efectuate de către serviciul clienţi sau de către specialişti
calificaţi.
► Pentru curăţarea aparatului sau în caz de defecţiune, scoateţi ştecărul
din priză. Simpla oprire nu este suficientă, deoarece în aparat mai
există încă tensiune, atât timp cât ştecărul este în priză.
► Scoateţi ştecărul din priză dacă aparatul nu este utilizat!
► Pentru a evita pericolele, solicitaţi imediat înlocuirea de către specialişti
autorizaţi sau de către serviciul clienţi a ştecărelor sau a cablurilor de
alimentare deteriorate.
► Aparatul şi cablul de conexiune nu se vor lăsa la îndemâna copiilor.
Nu este permisă introducerea aparatului în apă sau în alte lichide.
Page 26

■ 22 │ RO
SKV 1200 A1
AVERTIZARE! PERICOL DE RĂNIRE!
► Atunci când nu este posibilă supravegherea şi înaintea asamblării,
dezasamblării sau curăţării, aparatul trebuie scos întotdeauna din
priză.
► Acest aparat nu trebuie utilizat de către copii.
► Utilizaţi numai accesoriile originale ale acestui aparat. Este posibil
ca accesoriile provenite de la alţi producători să nu fie adecvate şi
să provoace daune!
► Acest aparat poate fi utilizat de persoane cu abilităţi fizice, senzo-
riale sau mentale reduse sau fără experienţă şi/sau fără cunoştinţe
necesare, dacă sunt supravegheaţi sau dacă au fost instruiţi cu privire
la utilizarea sigură a acestui aparat şi au înţeles pericolele cu privire
la acesta.
► Copiilor le este interzis să se joace cu aparatul.
► Precauţie: cuţitul este foarte ascuţit!
► Acţionaţi cu atenţie în timpul curăţării cuţitului!
Page 27

RO │ 23 ■
SKV 1200 A1
AVERTIZARE! PERICOL DE RĂNIRE!
► Precauţie: cuţitul este foarte ascuţit! De aceea detaşaţi recipientul
de amestecare cu atenţie.
► Nu utilizaţi aparatul în alte scopuri decât cele descrise în prezentele
instrucţiuni de utilizare. Altfel există pericol de rănire!
► Nu lăsaţi niciodată aparatul să funcţioneze nesupravegheat.
► Înainte de înlocuirea accesoriilor sau componentelor care se mişcă
în timpul funcţionării, aparatul trebuie să fie oprit şi scos din priză.
► În timpul funcţionării aparatului, puneţi în vasul de amestecare sau
în mixer doar ingredientele care trebuie prelucrate.
► Nu introduceţi niciodată mâinile sau obiecte în accesoriul de umplere
sau în mixer, pentru a evita rănirile şi deteriorarea aparatului.
ATENŢIE! PAGUBE MATERIALE!
► Nu utilizaţi niciodată aparatul fără ingrediente! Pericol de supraîncălzire!
► Nu introduceţi niciodată ingrediente fierbinţi în aparat!
Page 28

■ 24 │ RO
SKV 1200 A1
Pregătiri
1) Scoateţi toate componentele din cutie şi îndepărtaţi ambalajul, eventualele folii de protecţie
şi autocolantele.
2) Curăţaţi toate componentele conform descrierii
din capitolul „Curăţarea şi îngrijirea”.
Asiguraţi-vă că toate componentele sunt
complet uscate.
3) Amplasaţi aparatul pe o suprafaţă netedă
şi curată şi fixaţi-l cu cele 5 ventuze.
4) Introduceţi ştecărul în priză.
Trepte de viteză
Treapta Utilizare adecvat pentru...
1 - 2
tot
- Poziţia de pornire
la toate procedurile
de mixare şi de
amestecare
- La adăugarea
ingredientelor
Cârlig pentru
frământat
Paletă de
amestecare 3
- Frământarea şi
amestecarea aluatului consistent sau
a ingredientelor
solide
2 - 4
Paletă de
amestecare 3
- Amestecarea
aluatului gros
- Amestecarea
untului şi a făinii
- Amestecarea
aluatului dospit
Cârlig pentru
frământat
- Frământarea
aluatului dospit
- Frământarea
aluatului gros
4 - 6
Paletă de
amestecare 3
- Aluat de prăjituri
- Amestecarea untului cu zahărul
- Aluat pentru
fursecuri
6 - 8
Tel -
- Frişcă
- Albuş
- Maioneză
- Baterea spumă
a untului
Treapta Utilizare adecvat pentru...
P
Mixer 0
- Mixarea şi mărunţirea ingredientelor
moi sau lichide
- Zdrobirea gheţii
Modul de lucru cu cârligul
pentru frământat, telul şi
paleta de amestecare
AVERTIZARE! PERICOL DE RĂNIRE!
► Nu introduceţi niciodată mâna în vasul de
amestecare pe durata funcţionării! Pericol
de rănire din cauza componentelor rotative!
► Înlocuiţi accesoriile numai cu mecanismul de
antrenare oprit! După oprire, mecanismul de
antrenare mai funcţionează scurt timp.
► În caz de defecţiune deconectaţi aparatul şi
scoateţi ştecărul din priză pentru a preveni
pornirea neintenţionată a aparatului.
ATENŢIE! PAGUBE MATERIALE!
► La lucrul cu cârligul pentru frământat , telul -
sau paleta de amestecare 3 vă recoman-
dăm să lăsaţi aparatul să se răcească după
10 minute de funcţionare.
INDICAŢIE
► Atunci când lucraţi cu cârligul pentru frămân-
tat , telul - şi paleta de amestecare 3,
capacul trebuie să fie fixat pe aparat,
pentru a evita ieşirea nedorită a ingredientelor.
Pentru a pregăti aparatul în vederea utilizării cu
cârligul pentru frământat , telul - şi paleta de
amestecare 3, procedaţi după cum urmează:
1) Apăsaţi în jos maneta de deblocare . Braţul
pivotant se mişcă independent în sus. Dacă
este cazul, aduceţi braţul pivotant în cea
mai înaltă poziţie.
2) Poziţionaţi vasul de amestecare astfel încât
piedicile de la vasul de amestecare să intre
în decupajele de pe suport . În acest scop,
unul dintre mânere trebuie să fie orientat în
direcţia comutatorului rotativ . Rotiţi vasul de
amestecare în sens orar, astfel încât acesta
să fie blocat şi să stea fix.
Page 29

RO │ 25 ■
SKV 1200 A1
3) La utilizarea capacului , aşezaţi-l pe componenta carcasei care înconjoară sistemul de
prindere a accesoriului , astfel încât orificiul
de umplere să fie orientat spre dvs. Pe sistemul
de prindere a accesoriului există o piedică
pentru capac :
ATENŢIE! PAGUBE MATERIALE!
► La ataşarea şi scoaterea capacului nu
exercitaţi niciodată presiune asupra acestuia
pentru a preveni deteriorarea sa.
4) Montaţi în funcţie de cerinţă cârligul pentru
frământat , telul - sau paleta de amestecare
3 în sistemul de prindere a accesoriului :
– Introduceţi cârligul pentru frământat , telul
- sau paleta de amestecare 3în aşa fel în
sistemul de prindere a accesoriului , încât
cele două ştifturi metalice de pe axa accesoriului - 3 să intre în decupajele de pe
sistemul de prindere a accesoriului .
– Apăsaţi accesoriul - 3 până la limită
în sistemul de prindere a accesoriului şi
rotiţi-l apoi până la limită în sens antiorar
(în direcţia săgeţii
).
– Eliberaţi accesoriul - 3. Acum acesta
este poziţionat fix în sistemul de prindere a
accesoriului .
5) Introduceţi ingredientele de prelucrat în vasul
de amestecare .
INDICAŢIE
► Se va avea în vedere faptul că în timpul pro-
cesului de frământare, respectiv de amestecare, aluatul din vasul de amestecare creşte
în volum sau este împins uşor în sus din cauza
mişcării. Din acest motiv, nu umpleţi niciodată
vasul de amestecare până la margine!
Atenţie! Pericol de strivire! Aveţi grijă ca ni-
cio parte a corpului să nu se afle sub braţul
pivotant atunci când îl apăsaţi în jos.
6) Apăsaţi în jos maneta de deblocare şi braţul
pivotant cu accesoriul montat în jos, în
poziţia de lucru, până când se fixează braţul
pivotant .
INDICAŢIE
► Dacă doriţi, puteţi deschide accesoriul de
umplere de pe capac pentru a putea
adăuga ingrediente şi în timpul funcţionării.
7) Rotiţi comutatorul rotativ pe treapta dorită
(a se vedea capitolul „Trepte de viteză”).
După lucru
1) Deconectaţi aparatul de la comutatorul rotativ
(poziţia „0”).
2) Apăsaţi în jos maneta de deblocare şi aduceţi braţul pivotant în poziţia cea mai înaltă.
3) Scoateţi accesoriul - 3 din sistemul de
prindere a accesoriului prin apăsarea
accesoriului - 3 uşor în direcţia opusă
sistemului de prindere şi rotirea concomi-
tentă în sens orar (direcţia săgeţii
). Puteţi
scoate apoi accesoriul - 3.
4) În cazul în care este montat: scoateţi capacul .
5) Îndepărtaţi vasul de amestecare prin rotirea
acestuia în sens antiorar şi prin scoaterea lui
ulterioară în sus.
6) Curăţaţi toate componentele (a se vedea
capitolul „Curăţarea şi îngrijirea”).
Page 30

■ 26 │ RO
SKV 1200 A1
Modul de lucru cu mixerul
AVERTIZARE! PERICOL DE RĂNIRE!
► Lăsaţi întotdeauna lichidele fierbinţi să se
răcească la temperatura corpului (cca 3040 °C) înainte de a le introduce în mixer 0.
AVERTIZARE! PERICOL DE RĂNIRE
DIN CAUZA CUŢITELOR ASCUŢITE/
MECANISMULUI DE ANTRENARE
ÎN ROTAŢIE!
► Nu introduceţi niciodată mâinile în mixerul 0
montat!
► Detaşaţi mixerul 0 numai după oprirea
cuţitelor 6.
► Utilizaţi mixerul 0 numai cu capacul mixeru-
lui .cu paharul gradat ! montat.
► În caz de defecţiune deconectaţi aparatul şi
scoateţi ştecărul din priză pentru a preveni
pornirea neintenţionată a aparatului.
ATENŢIE! PAGUBE MATERIALE!
► Nu folosiţi niciodată vasul de amestecare
şi mixerul 0 concomitent! Acest lucru duce
la suprasolicitarea motorului!
► Când lucraţi cu mixerul 0 vă recomandăm
ca după 3 minute de funcţionare să lăsaţi
aparatul să se răcească.
Pentru a pregăti aparatul pentru lucrul cu mixerul 0
procedaţi după cum urmează. Pentru ajutor consultaţi figura C de pe pagina pliată din spate.
1) Apăsaţi în jos maneta de deblocare şi braţul
pivotant în jos, în poziţia de lucru.
2) Rotiţi capacul de protecţie a mecanismului de
antrenare 1 în sens orar, astfel încât săgeata
de pe capacul de protecţie a mecanismului de
antrenare 1 să fie orientată spre simbolul
de pe aparat. Scoateţi capacul de protecţie
a mecanismului de antrenare 1 şi puneţi-l
deoparte.
AVERTIZARE! PERICOL DE RĂNIRE!
► Asiguraţi-vă că este poziţionat pe „0” comuta-
torul rotativ înaintea fixării mixerului 0 pe
mecanismul de antrenare a acestuia %. Altfel,
aparatul va porni imediat după ce mixerul 0
s-a fixat.
3) Aşezaţi mixerul 0 pe mecanismul său de
antrenare % astfel încât piedicile de pe partea
inferioară a mixerului 0 să intre în decupajele
de pe mecanismul de antrenare a mixerului %.
Simbolul
de pe mixer 0 trebuie să fie
orientat spre simbolul
de pe aparat. Rotiţi
mixerul 0 până la limită, în sens antiorar. Sim-
bolul
de pe mixer 0 trebuie să fie orientat
apoi spre simbolul
de pe aparat.
4) Introduceţi ingredientele.
5) Aşezaţi capacul mixerului . cu pahar gradat !,
astfel încât buzele de pe capacul mixerului .
să acopere şi ciocul de turnare.
6) Rotiţi comutatorul rotativ pe treapta dorită.
INDICAŢIE
► Viteza ideală depinde de consistenţa
produsului de mixat. Cu cât este mai lichid
conţinutul, cu atât mai repede puteţi mixa.
►
Pentru o funcţionare cu impulsuri scurtă,
puternică, rotiţi comutatorul rotativ în sens
antiorar, pe treapta P.
► Treapta P nu se fixează pentru a nu supraso-
licita motorul. Prin urmare, ţineţi comutatorul
de viteză acţionat în această poziţie
numai pentru scurt timp.
ZDROBIREA GHEŢII
► Pentru a produce „gheaţă zdrobită” introdu-
ceţi cuburile de gheaţă în mixer 0, închideţi-l
şi aduceţi comutatorul rotativ de cca 7
ori timp de 5 secunde pe treapta P. În funcţie
de cantitatea şi de dimensiunea cuburilor de
gheaţă, această specificaţie poate varia.
Page 31

RO │ 27 ■
SKV 1200 A1
Completarea cu ingrediente
1) Deconectaţi aparatul de la comutatorul rotativ .
2) Scoateţi capacul mixerului . şi introduceţi
ingredientele
sau
3) Rotiţi paharul gradat ! care se află în capa-
cul mixerului . până la limită în sens orar şi
scoateţi-l. Introduceţi ingredientele treptat prin
orificiul de umplere din capacul mixerului ..
După lucru
1) Deconectaţi aparatul de la comutatorul rotativ
(poziţia „0”).
2) Rotiţi mixerul 0 în sens orar, astfel încât
simbolul
de pe mixer 0 să fie orientat spre
simbolul
de pe aparat şi scoateţi-l.
INDICAŢIE
► Curăţaţi mixerul 0 cel mai bine imediat după
utilizare (a se vedea capitolul „Curăţarea şi
îngrijirea”). Astfel, resturile de alimente pot fi
îndepărtate mai uşor.
3) Poziţionaţi capacul de protecţie a mecanismului de antrenare 1 din nou pe mecanismul de
antrenare a mixerului %, astfel încât simbolul
de pe capacul de protecţie a mecanismului
de antrenare 1 să fie orientat spre simbolul
de pe aparat. Rotiţi capacul de protecţie a
mecanismului de antrenare 1 în sens antiorar,
astfel încât simbolul
de pe capacul de
protecţie a mecanismului de antrenare 1 să
fie orientat spre simbolul
de pe aparat.
Modul de lucru cu accesoriile
speciale
INDICAŢIE
► Accesoriile speciale precum o unitate de tocat,
un accesoriu pentru paste şi o răzătoare de
legume pot fi comandate online la adresa
www.kompernass.com.
ATENŢIE! PAGUBE MATERIALE!
► La mecanismul de antrenare a accesoriilor
speciale + utilizaţi exclusiv accesoriul care
este special aprobat de către producător
pentru a fi utilizat cu acest aparat.
1) Deconectaţi aparatul de la comutatorul rotativ
(poziţia „0”).
2) Împingeţi în sus capacul peste mecanismul de
antrenare a accesoriilor speciale + şi scoateţi-l
din aparat.
3) Fixaţi accesoriul special la aparat, conform
instrucţiunilor acestuia de utilizare.
ATENŢIE! PAGUBE MATERIALE!
► Nu utilizaţi niciodată simultan accesorii
speciale şi vasul de amestecare sau
mixerul 0! Acest lucru duce la suprasolicitarea motorului!
După lucru
1) Deconectaţi aparatul de la comutatorul rotativ
(poziţia „0”).
2) Separaţi accesoriul special, conform instrucţiunilor de utilizare de pe aparat.
3) Curăţaţi toate componentele conform informaţiilor
din capitolul „Curăţarea şi îngrijirea”.
4) Aşezaţi la loc capacul pentru mecanismul de
antrenare a accesoriilor speciale +.
Page 32

■ 28 │ RO
SKV 1200 A1
Curăţarea şi îngrijirea
PERICOL DE ELECTROCUTARE!
►
Înainte de fiecare curăţare scoateţi ştecărul
din priză! Pericol de electrocutare!
Nu introduceţi niciodată aparatul în apă
sau în alte lichide!
ATENŢIE! PAGUBE MATERIALE!
► Nu utilizaţi substanţe de curăţare abrazive sau
agresive. Acestea pot deteriora suprafeţele!
INDICAŢII
► Se recomandă curăţarea aparatului imediat
după utilizare. Apoi, resturile de alimente pot
fi îndepărtate mai uşor.
► În cazul prelucrării alimentelor foarte pig-
mentate, precum morcovii, piesele din plastic
se pot colora. Această colorare poate fi
îndepărtată cu puţin ulei alimentar.
Curăţarea aparatului
■ Ştergeţi aparatul cu o lavetă umedă. În cazul
unor impurităţi persistente adăugaţi pe lavetă un
detergent delicat. Ştergeţi resturile de detergent
cu ajutorul unei lavete umezite în apă curată.
Uscaţi apoi complet aparatul.
Curăţarea accesoriilor
■ Curăţaţi vasul de amestecare , capacul ,
capacul orificiului de umplere , capacul
mixerului . cu pahar gradat !, capacul de
protecţie a mecanismului de antrenare 1, aparat-
mixer ,şi accesoriile -3 în apă caldă cu
puţin detergent. Îndepărtaţi eventualele resturi cu
ajutorul unei perii. Clătiţi toate componentele cu
apă curată, caldă şi înainte de o nouă utilizare
asiguraţi-vă că acestea sunt uscate.
INDICAŢIE
► Accesoriile -3, capacul şi vasul
de amestecare sunt adecvate şi pentru
curăţarea în maşina de spălat vase.
► În cazul curăţării în maşina de spălat vase
asiguraţi-vă că piesele din plastic nu sunt blocate. În caz contrar, acestea se pot deforma!
► Dacă este posibil, introduceţi piesele din plastic
în coşul superior al maşinii de spălat vase.
Curăţarea mixerului
AVERTIZARE! PERICOL DE RĂNIRE!
► Nu atingeţi cuţitul 6 cu mâinile goale.
■ Curăţaţi mixerul 0 şi capacul mixerului . cu
pahar gradat !în apă caldă şi adăugaţi un
detergent delicat. Clătiţi apoi totul cu apă curată
pentru a îndepărta toate resturile de detergent.
■ În cazul în care această curăţare nu este suficientă,
cu ajutorul aparatului-mixer , puteţi să desfaceţi
suportul de cuţite cu cuţitul 6 din recipientul
de mixare :
Page 33

RO │ 29 ■
SKV 1200 A1
Suport de cuţite
Inel de etanşare
Recipient de mixare
– Rotiţi mixerul 0.
– Aşezaţi aparatul-mixer , în aşa fel în
partea de jos a mixerului 0/ suportului de
cuţite , încât cele două sisteme de blocare
să se prindă în partea de jos a mixerului 0/
suportului de cuţite în orificiile aparatuluimixer ,.
– Rotiţi aparatul-mixer , în direcţia
(în sens
antiorar) până când suportul de cuţite
împreună cu cuţitul 6 poate fi detaşat din
mixer 0.
– Trageţi inelul de etanşare din suportul de
cuţite cu cuţitul 6.
■ Acum puteţi curăţa toate piesele (recipient de
mixare , suport de cuţite cuţit 6şi inel de
etanşare ) cu o perie înmuiată în apă caldă cu
puţin detergent. Clătiţi apoi totul cu apă curată
pentru a îndepărta toate resturile de detergent.
INDICAŢIE
► Recipientul de mixare , suportul de cuţite
cu cuţitul 6 şi inelul de etanşare pot fi
curăţate în maşina de spălat vase. În cazul
curăţării în maşina de spălat vase, asiguraţivă că piesele din plastic nu sunt blocate.
În caz contrar, acestea se pot deforma!
Recomandăm folosirea coşului de sus al
maşinii de spălat vase şi a unui program de
spălare la maximum 45 °C.
► Capacul mixerului . cu pahar gradat ! nu
este adecvat pentru curăţarea în maşina de
spălat vase.
■
După curăţare asamblaţi din nou mixerul:
– Apăsaţi inelul de etanşare înapoi în adân-
citura suportului de cuţite cu cuţitul 6.
– Puneţi suportul de cuţite cu cuţitul 6
înapoi în recipientul de mixare , în aşa fel
încât cuţitul 6să se fixeze în recipientul de
mixare .
– Aşezaţi aparatul-mixer , în aşa fel în
partea de jos a mixerului 0/ suportului de
cuţite , încât cele două sisteme de blocare
să se prindă în partea de jos a mixerului 0/
suportului de cuţite în orificiile aparatuluimixer ,.
– Rotiţi aparatul-mixer , în direcţia necesară
(în sens orar) până când suportul de cuţite
cu cuţitul 6 este fixat pe recipientul de
mixare .
În majoritatea cazurilor, curăţarea mixerului 0
poate fi realizată imediat după utilizare în condiţii
suficiente de igienă prin următoarea metodă
alternativă:
1) Puneţi apă cu puţin detergent în mixerul 0
montat.
2) Aşezaţi capacul mixerului . cu pahar gradat !,
astfel încât buzele de pe capacul mixerului .
să acopere şi ciocul de turnare.
3) Porniţi mixerul 0 timp de câteva secunde.
4) Vărsaţi apa de spălare. Îndepărtaţi eventualele
resturi cu ajutorul unei perii.
5) Clătiţi apoi mixerul 0 cu apă curată din
abundenţă pentru a îndepărta toate resturile
de detergent.
Depozitarea
■ Păstraţi aparatul curăţat într-un loc curat, lipsit
de praf şi uscat.
Page 34

■ 30 │ RO
SKV 1200 A1
Remedierea defecţiunilor
Când aparatul se opreşte brusc:
■ Aparatul este supraîncălzit şi se activează
oprirea automată de siguranţă.
– Aduceţi comutatorul rotativ pe 0.
– Scoateţi ştecărul din priză.
– Lăsaţi aparatul să se răcească timp de
15 minute.
– Dacă aparatul nu s-a răcit complet după
15 minute, acesta nu va porni.
– Aşteptaţi încă 15 minute şi reporniţi-l.
Dacă aparatul nu poate fi pornit:
– Verificaţi dacă aţi introdus ştecărul în priză.
– Verificaţi dacă braţul pivotant se află în
poziţia corectă.
Date tehnice
Tensiunea de reţea: 220 - 240 V
~
50/60 Hz
Consum: 1200 W
Timpi de
operare continuă: Robot de bucătărie
10 min.
Mixer 3 min.
capacitatea max.
Vas de amestecare : cca 6,0 l
Mixer 0: cca 1,5 l
Toate componentele acestui aparat care
intră în contact cu alimentele sunt adecvate
pentru uz alimentar.
Vă recomandăm următoarele perioade de funcţionare:
La lucrul cu cârligul pentru frământat , telul sau cu paleta de amestecare 3 lăsaţi aparatul să
se răcească după 10 minute de funcţionare.
La lucrul cu mixerul 0 lăsaţi aparatul să se răceas-
că după 3 minute de funcţionare.
Dacă aceste perioade sunt depăşite, aparatul se
poate deteriora prin supraîncălzire.
Eliminarea
În niciun caz nu aruncaţi
aparatul în gunoiul menajer
obişnuit. Acest produs face
obiectul Directivei europene
2012/19/EU.
Eliminaţi aparatul prin intermediul unei firme autorizate sau prin intermediul serviciului local de eliminare a deşeurilor. Respectaţi prevederile actuale în
vigoare. Dacă aveţi nelămuriri, contactaţi serviciul
local de eliminare a deşeurilor.
Ambalajul este format din materiale
ecologice pe care le puteţi elimina prin
intermediul centrelor locale de reciclare.
Garanţia
Kompernass Handels GmbH
Stimate client,
Pentru acest aparat se acordă o garanţie de 3 ani
de la data cumpărării. În cazul în care produsul
prezintă defecte, beneficiaţi de drepturi legale faţă
de vânzătorul produsului. Aceste drepturi legale
nu sunt limitate prin garanţia noastră prezentată în
cele ce urmează.
Condiţii de garanţie
Perioada de garanţie începe de la data cumpărării. Păstraţi cu grijă bonul fiscal original. Acesta este
necesar pentru a dovedi cumpărarea.
Dacă în decurs de trei ani de la data cumpărării
acestui produs apare un defect de material sau de
fabricaţie, produsul va fi reparat sau înlocuit de către
noi – la alegerea noastră – în mod gratuit. Garanţia presupune ca în timpul perioadei de trei ani să
se prezinte aparatul defect şi dovada cumpărării
(bonul fiscal), precum şi o scurtă descriere în scris, în
care să se specifice în ce constă defectul şi când a
apărut acesta.
Dacă defectul este acoperit de garanţia noastră, veţi
primi înapoi produsul reparat sau unul nou. Odată
cu reparaţia sau înlocuirea produsului nu începe o
nouă perioadă de garanţie.
Page 35

RO │ 31 ■
SKV 1200 A1
Perioada de garanţie şi pretenţiile legale
privind defectele
Perioada de garanţie nu este prelungită după
efectuarea reparaţiilor realizate în perioada de
garanţie. Acest lucru este valabil şi pentru piesele
înlocuite şi reparate.
Eventualele deteriorări şi deficienţe prezente deja
la cumpărare trebuie semnalate imediat după dezambalarea produsului. Reparaţiile necesare după
expirarea perioadei de garanţie se efectuează
contra cost.
Domeniul de aplicare a garanţiei
Aparatul a fost produs cu grijă, în conformitate cu
orientările stricte privind calitatea şi verificat cu
rigurozitate înaintea livrării.
Garanţia se acordă în caz de defecte de material
sau de fabricaţie. Această garanţie nu se extinde
asupra componentelor produsului care sunt expuse
uzurii normale şi care, prin urmare, pot fi considerate
piese de uzură sau asupra deteriorărilor apărute
la componentele fragile, de exemplu comutatoare, acumulatori, forme de copt sau componente
realizate din sticlă.
Această garanţie se pierde în cazul în care produsul a fost deteriorat, a fost utilizat sau întreţinut în
mod necorespunzător. Pentru utilizarea corespunzătoare a produsului trebuie respectate cu stricteţe
toate indicaţiile prezentate în instrucţiunile de utilizare. Trebuie evitate în mod obligatoriu utilizările şi
acţiunile nerecomandate sau care fac obiectul unor
avertizări în cadrul instrucţiunilor de utilizare.
Aparatul este destinat numai uzului privat şi nu
utilizărilor comerciale. În cazul manevrării abuzive
sau necorespunzătoare, al uzului de forţă şi al intervenţiilor care nu au fost realizate de către filiala
noastră autorizată de service, garanţia îşi pierde
valabilitatea.
Procedura de acordare a garanţiei
Pentru a se asigura prelucrarea rapidă a solicitării
dvs., urmaţi instrucţiunile de mai jos:
■ Pentru toate solicitările păstraţi la îndemână
bonul fiscal şi numărul articolului (de exemplu
IAN 12345) ca dovadă a cumpărării.
■ Numărul articolului poate fi consultat pe plăcuţa
de caracteristici, pe o gravură, pe coperta
instrucţiunilor (în partea stângă, jos) sau pe
autocolantul de pe partea din spate sau de jos.
■ În cazul în care apar defecte funcţionale sau
alte defecţiuni, contactaţi mai întâi telefonic
sau prin e-mail departamentul de service
menţionat în continuare.
■ Apoi puteţi expedia produsul înregistrat ca fiind
defect la adresa de service care v-a fost comunicată, fără a plăti taxe poştale, anexând dovada
cumpărării (bonul fiscal) şi indicând în ce constă
defectul şi când a apărut acesta.
Acest manual, precum şi multe
altele, videoclipuri cu produsele şi
software-uri pot fi descărcate de pe
www.lidl-service.com.
Service-ul
R
Service România
Tel.: 0800896637
E-Mail: kompernass@lidl.ro
IAN 281064
Importator
Vă rugăm să aveţi în vedere faptul că următoarea
adresă nu reprezintă o adresă pentru service.
Contactaţi mai întâi centrul de service indicat.
KOMPERNASS HANDELS GMBH
BURGSTRASSE 21
44867 BOCHUM
GERMANY
www.kompernass.com
Page 36

■ 32 │ RO
SKV 1200 A1
Reţete
Supă de morcovi
Ingrediente:
■ 500 g morcovi
■ 250 ml apă
■ 500 ml fond de carne (pahar)
■ 125 ml smântână
■ 125 ml vin alb
■ sare
■ piper
■ 50 g unt rece
■ asmăţui proaspăt
Prepararea:
1) Spălaţi şi curăţaţi morcovii.
2) Tăiaţi-i mărunt, astfel încât să fie adecvaţi
pentru mixer 0.
3) Turnaţi 250 ml apă într-o oală şi fierbeţi morcovii timp de 20 de minute, apoi pasaţi totul în
mixer 0 până nu mai rămân bucăţi mari.
4) Turnaţi morcovii pasaţi înapoi în oală.
5) Adăugaţi fondul de carne, smântâna şi vinul
alb.
6) Încălziţi supa şi condimentaţi-o după gust.
7) Amestecaţi untul tăiat în bucăţi mici în supă
şi asezonaţi-o cu asmăţui.
Salată tartinabilă de ton
Ingrediente:
■ 1 cutie de ton în sos cu legume
■ 3 linguri iaurt
■ 1 linguriţă suc de lămâie, stors proaspăt
■ 1 priză de sare
■ piper proaspăt măcinat
■ 2 ouă fierte tari, tăiate cuburi
Pentru asezonare:
■ pâine integrală tăiată felii
■ unt pentru uns
■ 1 ou fiert tare, tăiat cuburi
■ arpagic tăiat
Prepararea:
1) Amestecaţi toate ingredientele în mixer 0 până
obţineţi consistenţa dorită (cca 15 secunde) şi
condimentaţi după gust.
2) Ungeţi pâinea cu unt şi pastă de ton şi presăraţi deasupra oul tăiat şi arpagicul.
Clătite tradiţionale
Ingrediente:
■ 2-3 ouă
■ 375 ml lapte
■ 1 priză de sare
■ 250 g făină
■ grăsime pentru copt
Prepararea:
1) Amestecaţi ouăle, laptele şi sarea cu paleta de
amestecare 3.
2) Cerneţi făina şi adăugaţi-o. Amestecaţi totul cu
paleta de amestecare 3 până rezultă un aluat
omogen.
3) Lăsaţi aluatul să dospească cca 20 de minute.
Page 37

RO │ 33 ■
SKV 1200 A1
4) Încălziţi grăsimea şi adăugaţi peste aceasta
aluat cu ajutorul unui polonic mic. (Numai cât
să se acopere cu un strat subţire fundul tigăii.)
5) Coaceţi clătitele pe ambele părţi până se
rumenesc şi serviţi-le fierbinţi.
Pandişpan
Ingrediente:
■ 3 ouă
■ 3-4 linguri apă fierbinte
■ 150 g zahăr
■ 1 pliculeţ de zahăr vanilinat
■ 100 g făină, tip 405
■ 100 g amidon
■ 2-3 linguriţe rase de praf de copt
Prepararea:
1) Tapetaţi cu hârtie de copt fundul unei forme
de copt cu pereţi detaşabili (diametru: 28 cm).
Nu ungeţi cu grăsime marginea, deoarece
altfel suprafaţa nu va fi complet uniformă şi se
va arde.
2) Bateţi ouăle întregi în vasul de amestecare
şi adăugaţi apă fierbinte.
3) Bateţi apoi spumă compoziţia timp de cca
1 minut la cea mai ridicată treaptă cu ajutorul
paletei de amestecare 3.
4) Adăugaţi zahărul şi zahărul vanilinat şi bateţi
apoi totul timp de 2 minute la cea mai ridicată
treaptă.
5) Amestecaţi făina, amidonul şi praful de copt
şi cerneţi jumătate din amestec peste crema
de ou, apoi mixaţi totul pentru scurt timp la
treapta 4.
6) Amestecaţi restul de făină în acelaşi mod şi
turnaţi aluatul în forma de copt cu pereţi detaşabili pregătită.
7) Coaceţi aluatul imediat la 175-200 °C în
cuptorul preîncălzit , cu căldură de sus şi de
jos, timp de cca 20-30 de minute.
Aluat fraged
Ingrediente:
■ 250 g făină de grâu
■ 1/2 linguriţă rasă de praf de copt
■ 100-125 g zahăr
■ 1 pliculeţ de zahăr vanilinat
■ 1 priză de sare
■ 1 ou
■ 125 g unt
Prepararea:
1) Amestecaţi făina şi praful de copt în vasul de
amestecare şi adăugaţi apoi toate celelalte
ingrediente.
2) Frământaţi totul cu cârligul pentru frământat ,
mai întâi cca 1 minut la treapta 2, apoi pentru
cca 3 minute la treptele 2-4.
3) Nu frământaţi aluatul prea mult timp, în caz
contrar acesta poate deveni prea moale.
4) Lăsaţi aluatul în frigider pentru o jumătate de
oră şi apoi prelucraţi-l pentru a obţine un blat
de tort sau biscuiţi.
5) Pentru blatul de tort rulaţi 2/3 din aluat şi
introduceţi-l într-o formă de copt cu pereţi
detaşabili unsă.
6) Rulaţi restul de aluat obţinând o rolă.
7) Întindeţi această rolă ca margine peste aluat şi
apăsaţi cu două degete, astfel încât să rezulte
o margine cu o înălţime de cca 3 cm.
8) Înţepaţi de mai multe ori blatul de tort cu o
furculiţă.
9) Preîncălziţi cuptorul cca 5 minute şi coaceţi
aluatul fraged cca 15-20 minute, cu căldură
de sus şi de jos, la 200-225 °C.
Page 38

■ 34 │ RO
SKV 1200 A1
Aluat
Ingrediente:
■ 250 g unt moale sau margarină
■ 250 g zahăr
■ 1 pliculeţ de zahăr vanilinat
■ 1 priză de sare
■ 4 ouă
■ 500 g făină de grâu
■ 1 pliculeţ de praf de copt
■ Cca 125 ml lapte
Prepararea:
1) Introduceţi toate ingredientele în vasul de
amestecare şi amestecaţi totul cu paleta de
amestecare 3 timp de o jumătate de minut la
treapta 1, apoi pentru 30 de secunde la treapta
2 şi apoi pentru cca 5 minute la treapta 4.
2) Ungeţi forma de copt sau tapetaţi-o cu hârtie
de copt.
3) Umpleţi forma de copt şi coaceţi aluatul cca
50-60 minute, cu căldură de sus şi de jos,
la 175-200 °C.
4) Înainte să scoateţi prăjitura din cuptor, ar trebui
să o încercaţi: Pentru aceasta înţepaţi cu un
beţişor ascuţit din lemn în partea din mijloc
a prăjiturii. Dacă pe acesta nu rămâne deloc
aluat, prăjitura este gata.
5) Răsturnaţi prăjitura pe un grătar pentru prăjituri
şi lăsaţi-o să se răcească.
Aluat dospit
Ingrediente:
■ 500 g făină de grâu
■ 25 g drojdie proaspătă sau 1 pliculeţ de drojdie
uscată
■ cca 1/4 l lapte călduţ
■ 80 g unt sau margarină (la temperatura came-
rei)
■ 80 g zahăr
■ 1 ou
Prepararea:
1) Adăugaţi făina, drojdia uscată sau drojdia mărunţită şi toate celelalte ingrediente (nu direct
peste drojdie) în vasul de amestecare .
2) Amestecaţi încet totul cu cârligul pentru frământat la treapta 1, apoi pentru 3-4 minute la
treapta 3.
3) Acoperiţi vasul cu un prosop de bucătărie, aşezaţi-l într-un loc cald şi lăsaţi aluatul să crească
până devine în mod vizibil mai mare.
4) Frământaţi încă o dată aluatul.
5) Aluatul este gata şi îl puteţi prelucra mai
departe.
Vafe
Ingrediente:
■ 200 g zahăr
■ 500 g făină
■ 5 g praf de copt
■ 5 ouă
■ 400 ml lapte
■ 250 g unt (la temperatura camerei)
■ 2 pliculeţe de zahăr vanilat
Page 39

RO │ 35 ■
SKV 1200 A1
Prepararea:
1) Adăugaţi ouăle, zahărul şi untul în vasul de
amestecare şi amestecaţi totul cu telul până ce obţineţi un aluat omogen.
2) Adăugaţi făina, zahărul vanilat şi praful de
copt.
3) Adăugaţi treptat laptele şi amestecaţi până
când aluatul devine omogen şi moale.
4) Coaceţi vafele într-o gaufrieră.
Shake de banane şi vanilie
Ingrediente:
■ 3 banane
■ 500 ml lapte
■ 2 pliculeţe de zahăr vanilat
■ 1 lingură de îngheţată de vanilie
Prepararea:
1) Curăţaţi bananele.
2) Adăugaţi bananele curăţate, laptele, îngheţata
de vanilie şi zahărul vanilat în mixer 0.
3) Amestecaţi totul la treapta 8.
Smoothie de banane şi kiwi
Ingrediente:
■ 200 ml suc de portocale (proaspăt stors)
■ 1 kiwi
■ 1/2 banană
Prepararea:
1) Curăţaţi kiwi.
2) Curăţaţi banana.
3) Adăugaţi kiwi, banana şi sucul de portocale
în mixer 0.
4) Amestecaţi totul la treapta 8.
Page 40

■ 36 │ RO
SKV 1200 A1
Page 41

DE│AT│CH
│
37 ■
SKV 1200 A1
Inhaltsverzeichnis
Einleitung ............................................................38
Bestimmungsgemäßer Gebrauch .........................................38
Lieferumfang .........................................................38
Gerätebeschreibung ...................................................38
Sicherheitshinweise ....................................................39
Vorbereitungen .......................................................42
Geschwindigkeitsstufen ................................................42
Arbeiten mit Knethaken, Schnee- und Rührbesen ...........................42
Nach der Arbeit ..................................................................43
Arbeiten mit dem Mixer ................................................44
Zutaten nachfüllen .................................................................45
Nach der Arbeit ..................................................................45
Arbeiten mit Sonderzubehör. . . . . . . . . . . . . . . . . . . . . . . . . . . . . . . . . . . . . . . . . . . . .45
Nach der Arbeit .......................................................45
Reinigen und Pflegen ...................................................46
Gerät reinigen ....................................................................46
Zubehör reinigen ..................................................................46
Mixer reinigen ....................................................................46
Aufbewahrung ........................................................47
Fehler beheben ........................................................48
Technische Daten ......................................................48
Entsorgung ...........................................................48
Garantie der Kompernaß Handels GmbH ..................................48
Service ..........................................................................49
Importeur ........................................................................50
Rezepte ..............................................................50
Möhrensuppe ....................................................................50
Thunfisch-Aufstrich .................................................................51
Traditionelle Pfannkuchen ...........................................................51
Biskuitteig ........................................................................51
Mürbeteig .......................................................................52
Rührteig .........................................................................52
Hefeteig .........................................................................53
Waffeln .........................................................................53
Bananen-Vanille-Shake .............................................................53
Bananen-Kiwi-Smoothie .............................................................54
Page 42

■ 38 │ DE
│AT│
CH
SKV 1200 A1
Einleitung
Herzlichen Glückwunsch zum Kauf Ihres neuen
Gerätes.
Sie haben sich damit für ein hochwertiges Produkt
entschieden. Die Bedienungsanleitung ist Bestandteil dieses Produkts. Sie enthält wichtige Hinweise
für Sicherheit, Gebrauch und Entsorgung. Machen
Sie sich vor der Benutzung des Produkts mit allen
Bedien- und Sicherheitshinweisen vertraut. Benutzen Sie das Produkt nur wie beschrieben und für
die angegebenen Einsatzbereiche. Händigen Sie
alle Unterlagen bei Weitergabe des Produkts an
Dritte mit aus.
Bestimmungsgemäßer
Gebrauch
Dieses Gerät dient ausschließlich dem Verarbeiten
von Lebensmitteln in haushaltsüblichen Mengen.
Dieses Gerät ist ausschließlich für die Benutzung in
privaten Haushalten bestimmt. Benutzen Sie es nicht
gewerblich!
Dieses Gerät ist nur für den privaten Gebrauch in
geschlossenen, regengeschützten Räumen vorgesehen. Benutzen Sie es nicht im Freien!
Das Gerät darf nur mit Originalzubehör benutzt
werden.
Lieferumfang
Profi-Küchenmaschine
Rührschüssel mit Deckel
Mixer mit Deckel und Messbecher
Knethaken
Schneebesen
Rührbesen
Mixer-Werkzeug
Bedienungsanleitung
Kurzanleitung
HINWEIS
► Kontrollieren Sie den Lieferumfang direkt
nach dem Auspacken auf Vollständigkeit und
Beschädigungen. Wenden Sie sich, wenn
nötig, an den Service.
Gerätebeschreibung
Klappen Sie die Ausklappseiten im vorderen und
hinteren Umschlag dieser Bedienungsanleitung aus:
vordere Ausklappseite
Abbildung A:
Schwenkarm
Entriegelungshebel
Drehschalter (Geschwindigkeitsstufen)
Netzkabel
Sockel
Rührschüssel
Aufnahme für Werkzeugeinsatz
Abbildung B:
Abdeckung der Einfüllöffnung
Deckel
Knethaken
- Schneebesen
3 Rührbesen
hintere Ausklappseite:
Abbildung C:
! kleiner Messbecher (inkl. Skala)
. Mixer-Deckel
0 Mixer (inkl. Skala)
6 Messer
1 Antriebsschutzdeckel
% Mixerantrieb
+ Abdeckung über Antrieb für
Sonderzubehör
, Mixer-Werkzeug
Page 43

DE│AT│CH
│
39 ■
SKV 1200 A1
Sicherheitshinweise
GEFAHR - ELEKTRISCHER SCHLAG!
► Schließen Sie das Gerät nur an eine vorschriftsmäßig installierte und
geerdete Netzsteckdose an. Die Netzspannung muss mit den Angaben auf dem Typenschild des Gerätes übereinstimmen.
► Achten Sie darauf, dass im Betrieb das Netzkabel nicht nass oder
feucht wird. Führen Sie es so, dass es nicht eingeklemmt oder beschädigt werden kann.
► Halten Sie das Netzkabel von heißen Oberflächen fern.
► Führen Sie keine Reparaturarbeiten am Gerät durch. Jegliche Repara-
turen müssen durch den Kundendienst oder von qualifiziertem Fachpersonal durchgeführt werden.
► Ziehen Sie den Netzstecker aus der Netzsteckdose, wenn das Gerät
gereinigt wird oder im Fehlerfall. Ausschalten alleine genügt nicht,
weil noch immer Netzspannung im Gerät anliegt, solange der Netzstecker in der Netzsteckdose steckt.
► Ziehen Sie den Netzstecker aus der Netzsteckdose, wenn das Gerät
nicht benutzt wird!
► Lassen Sie beschädigte Netzstecker oder Netzkabel sofort von au-
torisiertem Fachpersonal oder dem Kundenservice austauschen, um
Gefährdungen zu vermeiden.
► Das Gerät und seine Anschlussleitung sind von Kindern fernzuhalten.
Sie dürfen das Gerät keinesfalls in Wasser oder andere Flüssigkeiten tauchen.
Page 44

■ 40 │ DE
│AT│
CH
SKV 1200 A1
WARNUNG! VERLETZUNGSGEFAHR!
► Das Gerät ist bei nicht vorhandener Aufsicht und vor dem Zusammenbau,
dem Auseinandernehmen oder Reinigen stets vom Netz zu trennen.
► Dieses Gerät darf nicht von Kindern benutzt werden.
► Verwenden Sie nur die Original-Zubehörteile zu diesem Gerät. Zube-
hörteile anderer Hersteller sind dafür möglicherweise nicht geeignet
und führen zu Gefährdungen!
► Dieses Gerät kann von Personen mit reduzierten physischen, senso-
rischen oder mentalen Fähigkeiten oder Mangel an Erfahrung und/
oder Wissen benutzt werden, wenn sie beaufsichtigt oder bezüglich
des sicheren Gebrauchs des Gerätes unterwiesen wurden und die
daraus resultierenden Gefahren verstanden haben.
► Kinder dürfen nicht mit dem Gerät spielen.
► Vorsicht: Das Messer ist sehr scharf!
► Seien Sie vorsichtig bei der Reinigung des Messers!
Page 45

DE│AT│CH
│
41 ■
SKV 1200 A1
WARNUNG! VERLETZUNGSGEFAHR!
► Vorsicht: Das Messer ist sehr scharf! Gehen Sie daher vorsichtig beim
Abnehmen des Mixbehälters vor.
► Missbrauchen Sie das Gerät nicht für andere Zwecke, als in dieser
Bedienungsanleitung beschrieben. Ansonsten besteht Verletzungsgefahr!
► Lassen Sie das Gerät niemals unbeaufsichtigt.
► Vor dem Auswechseln von Zubehör oder Zusatzteilen, die im Betrieb
bewegt werden, muss das Gerät ausgeschaltet und vom Netz getrennt werden.
► Geben Sie während das Gerät läuft, ausschließlich die zu verarbei-
tenden Zutaten in die Rührschüssel oder in den Mixer.
► Stecken Sie niemals Hände oder Fremdgegenstände in die Einfüllhilfe
oder in den Mixer, um Verletzungen und Beschädigungen des Gerätes
zu vermeiden.
ACHTUNG! SACHSCHÄDEN!
► Betreiben Sie das Gerät nie ohne Zutaten! Überhitzungsgefahr!
► Füllen Sie niemals heiße Zutaten in das Gerät!
Page 46

■ 42 │ DE
│AT│
CH
SKV 1200 A1
Vorbereitungen
1) Entnehmen Sie alle Teile aus dem Karton und
entfernen Sie das Verpackungsmaterial und
eventuelle Schutzfolien und Aufkleber.
2) R
einigen Sie alle Teile, wie im Kapitel „Reinigen und Pflegen“ beschrieben. Stellen Sie
sicher, dass alle Teile vollständig getrocknet sind.
3) Stellen Sie das Gerät auf einen glatten und
sauberen Untergrund und befestigen Sie es mit
den 5 Saugnäpfen.
4) Stecken Sie den Netzstecker in die Steckdose.
Geschwindigkeitsstufen
Stufe Einsatz geeignet für...
1 - 2
alle
- Startstellung bei
allen Mix- und
Rührvorgängen
- Bei der Zugabe von
Zutaten
Knethaken
Rührbesen 3
- Kneten und Mischen
von festem Teig oder
festeren Zutaten
2 - 4
Rührbesen 3
- Mischen von dickem
Rührteig
- Mischen von Butter
und Mehl
- Mischen von Hefeteig
Knethaken
- Kneten von Hefeteig
- Kneten von dickem
Rührteig
4 - 6
Rührbesen 3
- Kuchenteig
- Aufschlagen von
Butter mit Zucker
- Plätzchenteig
6 - 8
Schneebesen -
- Schlagsahne
- Eiweiß
- Majonnaise
- schaumig schlagen
von Butter
P
Mixer 0
- Mixen und zerkleinern
weicher oder flüssiger
Zutaten
- Chrushen von Eis
Arbeiten mit Knethaken,
Schnee- und Rührbesen
WARNUNG! VERLETZUNGSGEFAHR!
► Greifen Sie während des Betriebes niemals in
die Rührschüssel ! Verletzungsgefahr durch
rotierende Teile!
► Wechseln Sie Zubehör nur bei Stillstand des
Antriebs! Nach dem Ausschalten läuft der
Antrieb kurze Zeit nach.
► Schalten Sie im Fehlerfall das Gerät aus und
ziehen Sie den Netzstecker, um ein unbeabsichtigtes Einschalten des Gerätes zu vermeiden.
ACHTUNG! SACHSCHADEN!
► Bei Arbeiten mit Knethaken , Schnee- -
oder Rührbesen 3 empfehlen wir nach 10
Minuten Betrieb das Gerät abkühlen zu
lassen.
HINWEIS
► Wenn Sie mit Knethaken , Schnee- -
und Rührbesen 3arbeiten, sollten Sie den
Deckel am Gerät verwenden, um ein
unerwünschtes Austreten von Zutaten zu
verhindern.
Um das Gerät für den Betrieb mit Knethaken ,
Schnee- - und Rührbesen 3 vorzubereiten,
gehen Sie wie folgt vor:
1) Drücken Sie den Entriegelungshebel nach
unten. Der Schwenkarm bewegt sich
selbstständig nch oben. Ggf. bringen Sie den
Schwenkarm in die höchste Position.
2) Setzen Sie die Rührschüssel so ein, dass die
Arretierungen an der Rührschüssel in die
Aussparung am Sockel greifen. Dabei muss
einer der Griffe in Richtung des Drehschalters
zeigen. Drehen Sie die Rührschüssel im
Uhrzeigersinn, so dass diese verriegelt ist und
fest sitzt.
Page 47

DE│AT│CH
│
43 ■
SKV 1200 A1
3) Zur Verwendung des Deckels setzen Sie
diesen so auf den Gehäuseteil der die Aufnahme für den Werkzeugeinsatz umgibt,
dass die Einfüllöffnung zu Ihnen zeigt. An der
Aufnahme für den Werkzeugeinsatz ist eine
Arretierung für den Deckel vorhanden:
ACHTUNG! SACHSCHADEN!
► Üben Sie beim Anbringen und Abnehmen
des Deckels niemals Druck auf diesen aus,
um dessen Beschädigung zu vermeiden.
4) Montieren Sie je nach Aufgabe Knethaken ,
Schnee- - oder Rührbesen 3 in der Aufnahme für den Werkzeugeinsatz :
– Stecken Sie den Knethaken , Schnee- -
oder Rührbesen 3so in die Aufnahme für
den Werkzeugeinsatz , dass die beiden
Metallstifte an der Achse des Einsatzes
- 3 in die Aussparungen an der Aufnahme für den Werkzeugeinsatz greifen.
– Drücken Sie den Einsatz - 3 bis zum
Anschlag in die Aufnahme für den Werkzeugeinsatz und drehen Sie ihn dann bis
zum Anschlag gegen den Uhrzeigersinn (in
Pfeilrichtung
).
– Lassen Sie den Einsatz - 3 los. Dieser
sitzt nun fest in der Aufnahme für den Werkzeugeinsatz .
5) Füllen Sie die zu verarbeitenden Zutaten in die
Rührschüssel .
HINWEIS
► Beachten Sie, dass während des Knet-, bzw.
Rührvorgangs der Teig in der Rührschüssel
an Volumen zunimmt oder durch die Bewegung
etwas nach oben gedrückt wird. Füllen Sie
daher niemals die Rührschüssel bis zum
Rand voll!
Achtung Quetschgefahr! Achten Sie darauf, dass sich keine Körperteile unter dem
Schwenkarm befinden, wenn Sie diesen
nach unten drücken.
6) Drücken Sie den Entriegelungshebel nach
unten und drücken Sie den Schwenkarm mit
dem montierten Einsatz nach unten in die Arbeitsposition, bis der Schwenkarm einrastet.
HINWEIS
► Falls gewünscht, können Sie die Einfüllhilfe
am Deckel öffnen, um dann auch
während des Betriebes Zutaten einfüllen zu
können.
7) Stellen Sie den Drehschalter auf die
gewünschte Stufe (siehe Kapitel „Geschwindigkeitsstufen“).
Nach der Arbeit
1) Schalten Sie das Gerät am Drehschalter aus
(Position „0“).
2) Drücken Sie den Entriegelungshebel nach
unten und bringen Sie den Schwenkarm in
die höchste Position.
3) Nehmen Sie den Einsatz - 3 aus der
Aufnahme für den Werkzeugeinsatz , indem
Sie den Einsatz - 3 leicht gegen die
Aufnahme drücken und gleichzeitig im Uhr-
zeigersinn drehen (in Pfeilrichtung
). Dann
können Sie den Einsatz - 3 entnehmen.
4) Falls montiert: Nehmen Sie den Deckel ab.
5) Entnehmen Sie die Rührschüssel , indem Sie
diese gegen den Uhrzeigersinn dehen und
dann nach oben abnehmen.
6) Reinigen Sie alle Teile (siehe Kapitel „Reinigen
und Pflegen“).
Page 48

■ 44 │ DE
│AT│
CH
SKV 1200 A1
Arbeiten mit dem Mixer
WARNUNG! VERLETZUNGSGEFAHR!
► Lassen Sie heiße Flüssigkeiten immer auf
eine handwarme Temperatur (ca. 30-40°C)
abkühlen, bevor Sie diese in den Mixer 0
einfüllen.
WARNUNG! VERLETZUNGSGEFAHR
DURCH SCHARFE MESSER /
ROTIERENDEN ANTRIEB!
► Greifen Sie niemals in den aufgesetzten
Mixer 0!
► Nehmen Sie den Mixer 0 nur bei Stillstand
der Messer 6 ab.
► Betreiben Sie den Mixer 0 nur mit aufgesetz-
tem Mixer-Deckel .mit Messbecher !.
► Schalten Sie im Fehlerfall das Gerät aus
und ziehen Sie den Netzstecker, um ein
unbeabsichtigtes Einschalten des Gerätes zu
vermeiden.
ACHTUNG! SACHSCHADEN!
► Benutzen Sie niemals die Rührschüssel und
den Mixer 0 gleichzeitig! Dies führt zu einer
Überlastung des Motors!
► Bei Arbeiten mit dem Mixer 0 empfehlen wir
nach 3 Minuten Betrieb das Gerät abkühlen
zu lassen.
Um das Gerät für den Betrieb mit dem Mixer 0
vorzubereiten, gehen Sie wie folgt vor. Nehmen
Sie die Abbildung C auf der hinteren Ausklappseite
zur Hilfe.
1) Drücken Sie den Entriegelungshebel nach
unten und drücken Sie den Schwenkarm
nach unten in die Arbeitsposition.
2) Drehen Sie den Antriebsschutzdeckel 1 im
Uhrzeigersinn, sodass der Pfeil auf dem An-
triebsschutzdeckel 1 auf das Symbol
am
Gerät zeigt. Nehmen Sie den Antriebsschutzdeckel 1 ab und legen ihn zur Seite.
WARNUNG! VERLETZUNGSGEFAHR!
► Stellen Sie sicher, dass der Drehschalter
auf „0“ steht, bevor Sie den Mixer 0 auf
den Mixerantrieb % stellen. Ansonsten startet
das Gerät unvermittelt sobald der Mixer 0
eingerastet ist.
3) Setzen Sie den Mixer 0 so auf den Mixerantrieb %, so dass die Arretierungen an der
Unterseite des Mixers 0 in die Aussparungen
am Mixerantrieb % greifen. Das Symbol
am Mixer 0 muss dabei auf das Symbol
am Gerät weisen. Drehen Sie den Mixer 0
bis zum Anschlag gegen den Uhrzeigersinn.
Das Symbol
am Mixer 0 muss dann
auf das Symbol
am Gerät weisen.
4) Füllen Sie die Zutaten ein.
5) Setzen Sie den Mixer-Deckel . mit Messbe-
cher ! auf, so dass die Lippen am Mixer-
Deckel . auch den Ausgießer verschließen.
6) Stellen Sie den Drehschalter auf die ge-
wünschte Stufe.
HINWEIS
► Die ideale Geschwindigkeit hängt von der
Konsistenz des Mixgutes ab. Je flüssiger der
Inhalt ist, um so schneller können Sie mixen.
► Für kurzen, kraftvollen Impulsbetrieb,
drehen Sie den Drehschalter gegen den
Uhrzeigersinn auf Stufe P. Die Stufe P rastet
nicht ein, um den Motor nicht zu überlasten.
Halten Sie den Drehschalter deshalb nur
kurz in dieser Stellung.
EIS CHRUSHEN
► Um „chrushed Ice“ herzustellen, geben Sie
Eiswürfel in den Mixer 0, verschließen Sie
diesen und stellen Sie den Drehschalter
ca. 7 x für 5 Sekunden auf die Stufe P.
Je nach Menge und Größe der Eiswürfel
kann diese Angabe etwas abweichen.
Page 49

DE│AT│CH
│
45 ■
SKV 1200 A1
Zutaten nachfüllen
1) Schalten Sie das Gerät am Drehschalter aus.
2) Nehmen Sie den Mixer-Deckel . ab und füllen
Sie die Zutaten ein
oder
3) Drehen Sie den Messbecher !, der sich im
Mixer-Deckel . befindet, bis zum Anschlag
im Uhrzeigersinn und nehmen Sie ihn heraus.
Füllen Sie die Zutaten nach und nach durch die
Nachfüllöffnung im Mixer-Deckel . ein.
Nach der Arbeit
1) Schalten Sie das Gerät am Drehschalter aus
(Position „0“).
2) Drehen Sie den Mixer 0 im Uhrzeigersinn,
so dass das Symbol
am Mixer 0 auf das
Symbol
am Gerät weist und nehmen Sie
ihn ab.
HINWEIS
► Reinigen Sie den Mixer 0 am besten sofort
nach dem Gebrauch (siehe Kapitel „Reinigen
und Pflegen“). So lassen sich Lebensmittelreste
leichter entfernen.
3) Setzen Sie den Antriebsschutzdeckel 1 so
wieder auf den Mixerantrieb %, dass das
Symbol
auf dem Antriebsschutzdeckel 1
auf das Symbol am Gerät zeigt. Drehen
Sie den Antriebsschutzdeckel 1 gegen den
Uhrzeigersinn, so dass das Symbol
auf
dem Antriebsschutzdeckel 1 auf das Symbol
am Gerät zeigt.
Arbeiten mit Sonderzubehör
HINWEIS
► Das Sonderzubehör wie einen Fleischwolfvor-
satz, einen Nudelvorsatz und eine Gemüseraspel können Sie online unter
www.kompernass.com bestellen.
ACHTUNG! SACHSCHADEN!
► Verwenden Sie am Antrieb für Sonderzube-
hör + ausschließlich Zubehör, das speziell
für die Verwendung mit diesem Gerät vom
Hersteller zugelassen ist.
1) Schalten Sie das Gerät am Drehschalter
aus (Position „0“).
2) Schieben Sie die Abdeckung über dem Antrieb
für Sonderzubehör + nach oben und nehmen
Sie sie vom Gerät ab.
3) Befestigen Sie das Sonderzubehör gemäß
dessen Bedienungsanleitung am Gerät.
ACHTUNG! SACHSCHADEN!
► Benutzen Sie niemals Sonderzubehör und
gleichzeitig die Rührschüssel oder den
Mixer 0! Dies führt zu einer Überlastung des
Motors!
Nach der Arbeit
1) Schalten Sie das Gerät am Drehschalter
aus (Position „0“).
2) Trennen Sie das Sonderzubehör gemäß dessen Bedienungsanleitung vom Gerät.
3) Reinigen Sie alle Teile entsprechend der Informationen im Kapitel „Reinigen und Pflegen“.
4) Setzen Sie die Abdeckung für den Antrieb für
Sonderzubehör + wieder auf.
Page 50

■ 46 │ DE
│AT│
CH
SKV 1200 A1
Reinigen und Pflegen
GEFAHR - ELEKTRISCHER SCHLAG!
►
Ziehen Sie vor jeder Reinigung den Netzstecker aus der Netzsteckdose! Es besteht die
Gefahr eines elektrischen Schlages!
Tauchen Sie das Gerät niemals in Wasser
oder andere Flüssigkeiten!
ACHTUNG! SACHSCHADEN!
► Verwenden Sie keine scheuernden oder
aggressiven Reinigungsmittel. Diese können
die Oberflächen beschädigen!
HINWEISE
► Reinigen Sie das Gerät am besten sofort
nach der Benutzung. Dann lassen sich
Lebensmittelreste leichter entfernen.
► Bei der Verarbeitung von farbstoffreichen
Lebensmitteln, wie zum Beispiel Karotten,
können sich die Kunststoffteile verfärben.
Diese Verfärbungen können Sie mit ein wenig
Speiseöl entfernen.
Gerät reinigen
■ Wischen Sie das Gerät mit einem feuchten
Tuch ab. Bei hartnäckigeren Verschmutzungen,
geben Sie ein mildes Spülmittel auf das Tuch.
Wischen Sie Spülmittelreste mit einem mit klarem
Wasser befeuchteten Tuch ab. Trocknen Sie das
Gerät danach gut ab.
Zubehör reinigen
■ Reinigen Sie die Rührschüssel , den Deckel ,
die Abdeckung der Einfüllöffnung , den
Mixer-Deckel . mit Messbecher !, den Antriebsschutzdeckel 1, das Mixer-Werkzeug ,
und die Einsätze -3 im warmen Wasser
mit etwas Spülmittel. Entfernen Sie eventuelle
Rückstände mit einer Spülbürste. Spülen Sie alle
Teile mit klarem, warmem Wasser ab und stellen
Sie sicher, dass alle Teile vor einer erneuten
Benutzung trocken sind.
HINWEIS
► Die Einsätze -3, der Deckel und
die Rührschüssel sind auch für die Reinigung in der Spülmaschine geeignet.
► Achten Sie bei der Reinigung in der Spülma-
schine darauf, dass die Kunststoffteile nicht
eingeklemmt werden. Ansonsten können sich
diese verformen!
► Legen Sie die Kunststoffteile, wenn möglich, in
den oberen Korb der Spülmaschine.
Mixer reinigen
WARNUNG! VERLETZUNGSGEFAHR!
► Messer 6 nicht mit bloßen Händen berühren.
■ Reinigen Sie den Mixer 0 und den Mixer-De-
ckel . mit Messbecher !in warmem Wasser
und geben Sie ein mildes Spülmittel hinzu.
Spülen Sie alles danach mit klarem Wasser ab,
so dass keine Spülmittelreste mehr daran haften.
■ Sollte diese Reinigung nicht ausreichend sein,
können Sie mit Hilfe des Mixer-Werkzeuges ,
die Messerhalterung mit dem Messer 6 von
der Mixerkanne lösen:
Page 51

DE│AT│CH
│
47 ■
SKV 1200 A1
Messerhalterung
Dichtungsring
Mixerkanne
– Drehen Sie den Mixer 0 um.
– Setzen Sie das Mixer-Werkzeug , so in die
Unterseite des Mixers 0/ der Messerhalterung , dass die beiden Arretierungen an
der Unterseite des Mixers 0/ der Messerhalterung in die Aussparungen des
Mixer-Werkzeuges , greifen.
– Drehen Sie das Mixer-Werkzeug , in Rich-
tung
(gegen den Uhrzeigersinn), bis sich
die Messerhalterung mit dem Messer 6
aus dem Mixer 0 herausheben lässt.
– Ziehen Sie den Dichtungsring von der
Messerhalterung mit dem Messer 6.
■ Sie können nun alle Teile (Mixerkanne , Messer-
halterung dem Messer 6 und Dichtungsring
) in warmem Wasser und etwas Spülmittel
mit einer Spülbürste reinigen. Spülen Sie alles
danach mit klarem Wasser ab, so dass keine
Spülmittelreste mehr daran haften.
HINWEIS
► Die Mixerkanne , die Messerhalterung mit
dem Messer 6 und der Dichtungsring sind
zur Reinigung in der Spülmaschine geeignet.
Achten Sie bei der Reinigung in der Spülmaschine darauf, dass die Kunststoffteile nicht
eingeklemmt werden. Ansonsten können sich
diese verformen! Wir empfehlen den oberen
Korb der Spülmaschine zu benutzen und ein
Spülprogramm mit max. 45°C einzustellen.
► Der Mixer-Deckel . mit dem Messbecher !
ist nicht für die Reinigung in der Spülmaschine
geeignet.
■ Bauen Sie nach der Reinigung den Mixer wie-
der zusammen:
– Drücken Sie den Dichtungsring wieder in
die Vertiefung an der Messerhalterung
mit dem Messer 6.
– Legen Sie die Messerhalterung mit dem
Messer 6 wieder so in die Mixerkanne ,
dass das Messer 6 in die Mixerkanne
hineinragt.
– Setzen Sie das Mixer-Werkzeug , so in die
Unterseite des Mixers 0/ der Messerhalterung , dass die beiden Arretierungen an
der Unterseite des Mixers 0/ der Messerhalterung in die Aussparungen des
Mixer-Werkzeuges , greifen.
– Drehen Sie das Mixer-Werkzeug , in
Richtung
(im Uhrzeigersinn), so dass die
Messerhalterung mit Messer 6 handfest
auf der Mixerkanne sitzt.
In den meisten Fällen kann eine ausreichend
hygienische Reinigung des Mixers 0 direkt nach
der Benutzung durch folgende Alternative erreicht
werden:
1) Geben Sie Wasser mit etwas Spülmittel in den
aufgesetzten Mixer 0.
2) Setzen Sie den Mixer-Deckel . mit Messbe-
cher ! auf, so dass die Lippen am Mixer-
Deckel . auch den Ausgießer verschließen.
3) Schalten Sie den Mixer 0 für einige Sekunden
ein.
4) Schütten Sie das Spülwasser aus. Entfernen Sie
eventuelle Rückstände mit einer Spülbürste.
5) Spülen Sie danach den Mixer 0 mit viel klarem
Wasser ab, so dass alle Spülmittelreste beseitigt
sind.
Aufbewahrung
■ Bewahren Sie das gereinigte Gerät an einem
sauberen, staubfreien und trockenen Ort auf.
Page 52

■ 48 │ DE
│AT│
CH
SKV 1200 A1
Fehler beheben
Wenn das Gerät plötzlich stehen bleibt:
■ Das Gerät ist überhitzt und die automatische
Sicherheitsabschaltung ist aktiviert.
– Drehschalter auf 0 stellen.
– Netzstecker aus der Steckdose ziehen.
– Das Gerät 15 Minuten abkühlen lassen.
– Ist das Gerät nach den 15 Minuten noch
nicht vollständig abgekühlt, wird es nicht
angehen.
– Weitere 15 Minuten warten und erneut
einschalten.
Wenn das Gerät sich nicht einschalten lässt:
– Überprüfen Sie, ob sich der Netzstecker in
der Steckdose befindet.
– Überprüfen Sie, ob sich der Schwenkarm
in der korrekten Position befindet.
Technische Daten
Netzspannung: 220 - 240 V ~
50/60 Hz
Leistungsaufnahme: 1200 W
KB-Zeiten: Küchenmaschine 10 Min.
Mixer 3 Min.
max. Fassungsvermögen
Rührschüssel : ca. 6,0 l
Mixer 0: ca. 1,5 l
Alle Teile dieses Gerätes, die mit
Lebensmitteln in Berührung kommen,
sind lebensmittelecht.
Wir empfehlen folgende Betriebszeiten:
Lassen Sie das Gerät bei Arbeiten mit Knethaken ,
Schnee- - oder Rührbesen 3 nach 10 Minuten
Betrieb abkühlen.
Lassen Sie das Gerät bei Arbeiten mit dem Mixer 0
nach 3 Minuten Betrieb abkühlen.
Wenn diese Betriebszeiten überschritten werden,
kann es durch Überhitzung zu Schäden am Gerät
führen.
Entsorgung
Werfen Sie das Gerät kei-
nesfalls in den normalen
Hausmüll. Dieses Produkt
unterliegt der europäischen
Richtlinie 2012/19/EU.
Entsorgen Sie das Gerät über einen zugelassenen
Entsorgungsbetrieb oder über Ihre kommunale
Entsorgungseinrichtung. Beachten Sie die aktuell
geltenden Vorschriften. Setzen Sie sich im Zweifelsfall mit Ihrer Entsorgungseinrichtung in Verbindung.
Die Verpackung besteht aus umwelt-
freundlichen Materialien, die Sie über
die örtlichen Recyclingstellen entsorgen
können.
Garantie der
Kompernaß Handels GmbH
Sehr geehrte Kundin, sehr geehrter Kunde,
Sie erhalten auf dieses Gerät 3 Jahre Garantie ab
Kaufdatum. Im Falle von Mängeln dieses Produkts
stehen Ihnen gegen den Verkäufer des Produkts
gesetzliche Rechte zu. Diese gesetzlichen Rechte
werden durch unsere im Folgenden dargestellte
Garantie nicht eingeschränkt.
Garantiebedingungen
Die Garantiefrist beginnt mit dem Kaufdatum. Bitte
bewahren Sie den Original-Kassenbon gut auf.
Diese Unterlage wird als Nachweis für den Kauf
benötigt.
Tritt innerhalb von drei Jahren ab dem Kaufdatum
dieses Produkts ein Material- oder Fabrikationsfehler auf, wird das Produkt von uns – nach unserer
Wahl – für Sie kostenlos repariert oder ersetzt.
Diese Garantieleistung setzt voraus, dass innerhalb
der Drei-Jahres-Frist das defekte Gerät und der
Kaufbeleg (Kassenbon) vorgelegt und schriftlich
kurz beschrieben wird, worin der Mangel besteht
und wann er aufgetreten ist.
Wenn der Defekt von unserer Garantie gedeckt ist,
erhalten Sie das reparierte oder ein neues Produkt
zurück. Mit Reparatur oder Austausch des Produkts
beginnt kein neuer Garantiezeitraum.
Page 53

DE│AT│CH
│
49 ■
SKV 1200 A1
Garantiezeit und gesetzliche
Mängelansprüche
Die Garantiezeit wird durch die Gewährleistung
nicht verlängert. Dies gilt auch für ersetzte und
reparierte Teile. Eventuell schon beim Kauf vorhandene Schäden und Mängel müssen sofort nach
dem Auspacken gemeldet werden. Nach Ablauf
der Garantiezeit anfallende Reparaturen sind
kostenpflichtig.
Garantieumfang
Das Gerät wurde nach strengen Qualitätsrichtlinien
sorgfältig produziert und vor Auslieferung gewissenhaft geprüft.
Die Garantieleistung gilt für Material- oder Fabrikationsfehler. Diese Garantie erstreckt sich nicht auf
Produktteile, die normaler Abnutzung ausgesetzt
sind und daher als Verschleißteile angesehen werden
können oder für Beschädigungen an zerbrechlichen
Teilen, z. B. Schalter, Akkus, Backformen oder Teile
die aus Glas gefertigt sind.
Diese Garantie verfällt, wenn das Produkt beschädigt, nicht sachgemäß benutzt oder gewartet wurde.
Für eine sachgemäße Benutzung des Produkts sind
alle in der Bedienungsanleitung aufgeführten Anweisungen genau einzuhalten. Verwendungszwecke
und Handlungen, von denen in der Bedienungsanleitung abgeraten oder vor denen gewarnt wird,
sind unbedingt zu vermeiden.
Das Produkt ist nur für den privaten und nicht für den
gewerblichen Gebrauch bestimmt. Bei missbräuchlicher und unsachgemäßer Behandlung, Gewaltanwendung und bei Eingriffen, die nicht von unserer
autorisierten Service-Niederlassung vorgenommen
wurden, erlischt die Garantie.
Abwicklung im Garantiefall
Um eine schnelle Bearbeitung ihres Anliegens
zu gewährleisten, folgen Sie bitte den folgenden
Hinweisen:
■ Bitte halten Sie für alle Anfragen den Kassenbon
und die Artikelnummer (z. B. IAN 12345) als
Nachweis für den Kauf bereit.
■ Die Artikelnummer entnehmen Sie bitte dem
Typenschild, einer Gravur, auf dem Titelblatt
ihrer Anleitung (unten links) oder als Aufkleber
auf der Rück- oder Unterseite.
■ Sollten Funktionsfehler oder sonstige Mängel
auftreten, kontaktieren Sie zunächst die nachfolgend benannte Serviceabteilung telefonisch
oder per E-Mail.
■ Ein als defekt erfasstes Produkt können Sie dann
unter Beifügung des Kaufbelegs (Kassenbon)
und der Angabe, worin der Mangel besteht und
wann er aufgetreten ist, für Sie portofrei an die
Ihnen mitgeteilte Service-Anschrift übersenden.
Auf www.lidl-service.com können Sie
diese und viele weitere Handbücher,
Produktvideos und Software herunterladen.
Service
Service Deutschland
Tel.: 0800 5435 111 (Kostenfrei aus dem
dt. Festnetz/Mobilfunknetz)
E-Mail: kompernass@lidl.de
Service Österreich
Tel.: 0820 201 222 (0,15 EUR/Min.)
E-Mail: kompernass@lidl.at
Service Schweiz
Tel.: 0842 665566 (0,08 CHF/Min.,
Mobilfunk max. 0,40 CHF/Min.)
E-Mail: kompernass@lidl.ch
IAN 281064
Page 54

■ 50 │ DE
│AT│
CH
SKV 1200 A1
Importeur
Bitte beachten Sie, dass die folgende Anschrift
keine Serviceanschrift ist. Kontaktieren Sie zunächst
die benannte Servicestelle.
KOMPERNASS HANDELS GMBH
BURGSTRASSE 21
44867 BOCHUM
GERMANY
www.kompernass.com
Rezepte
Möhrensuppe
Zutaten:
■ 500 g Karotten
■ 250 ml Wasser
■ 500 ml Fleischfond (Glas)
■ 125 ml Sahne
■ 125 ml Weißwein
■ Salz
■ Pfeffer
■ 50 g kalte Butter
■ Frischer Kerbel
Zubereitung:
1) Waschen und schälen Sie die Möhren.
2) Schneiden Sie sie so klein, dass Sie gut in den
Mixer 0 passen.
3) Geben Sie 250 ml Wasser in einen Topf
und kochen Sie die Möhren für 20 Minuten
darin. Anschließend pürieren Sie das Ganze
im Mixer 0, bis keine größeren Stücke mehr
übrig sind.
4) Geben Sie die pürierten Möhren danach
zurück in den Topf.
5) Gießen Sie nun Fleischfond, Sahne und Weißwein hinzu.
6) Erhitzen Sie die Suppe und schmecken Sie sie
ab.
7) Rühren Sie die Butter in kleinen Stückchen unter
die Suppe und richten Sie danach mit dem
Kerbel an.
Page 55

DE│AT│CH
│
51 ■
SKV 1200 A1
Thunfisch-Aufstrich
Zutaten:
■ 1 Dose Thunfisch in Sauce mit Gemüseeinlage
■ 3 EL Joghurt
■ 1 TL Zitronensaft, frisch gepresst
■ 1 Prise Salz
■ Pfeffer aus der Mühle
■ 2 hartgekochte Eier, gewürfelt
Zum Anrichten:
■ Vollkornbrot in Scheiben
■ Butter zum Bestreichen
■ 1 hartgekochtes Ei, gewürfelt
■ Schnittlauch, geschnitten
Zubereitung:
1) Mischen Sie alle Zutaten im Mixer 0 bis die
gewünschte Konsistenz erreicht ist (ca. 15
Sekunden) und schmecken Sie danach ab.
2) Bestreichen Sie das Brot mit Butter und
Thunfisch-Creme und bestreuen Sie das Ganze
mit dem gehackten Ei und dem Schnittlauch.
Traditionelle Pfannkuchen
Zutaten:
■ 2-3 Eier
■ 375 ml Milch
■ 1 Prise Salz
■ 250 g Mehl
■ Fett zum Backen
Zubereitung:
1) Mischen Sie die Eier, die Milch und das Salz
mit dem Rührbesen 3.
2) Sieben Sie das Mehl durch und geben Sie es
dazu. Mischen Sie alles mit dem Rührbesen 3,
bis ein glatter Teig entsteht.
3) Lassen Sie den Teig für ca. 20 Minuten
quellen.
4) Erhitzen Sie das Fett und geben Sie mit einer
kleinen Kelle Teig hinein. (Immer nur so viel,
dass der Pfannenboden dünn bedeckt ist.)
5) Backen Sie die Pfannkuchen von beiden Seiten
goldbraun und servieren Sie sie heiß.
Biskuitteig
Zutaten:
■ 3 Eier
■ 3 - 4 EL Wasser, heiß
■ 150 g Zucker
■ 1 Päckchen Vanillinzucker
■ 100 g Mehl, Type 405
■ 100 g Speisestärke
■ 2-3 gestr. TL Backpulver
Zubereitung:
1) Legen Sie den Boden einer Springform (Durchmesser: 28 cm) mit Backpapier aus. Fetten Sie
nicht den Rand, da sonst die Oberfläche nicht
gleichmäßig glatt und gebräunt wird.
2) Schlagen Sie die ganzen Eier in der Rührschüssel und geben Sie heißes Wasser dazu.
3) Schlagen Sie das Ganze dann für ca. 1
Minute auf höchster Stufe mit dem Rührbesen 3
schaumig.
4) Rühren Sie Zucker und Vanillinzucker unter und
schlagen Sie alles für 2 Minuten auf höchster
Stufe weiter.
5) Mischen Sie Mehl, Speisestärke und Backpulver und sieben Sie die Hälfte davon auf die
Eiercreme und rühren Sie alles kurz auf Stufe
4 unter.
6) Rühren Sie dann das restliche Mehl auf dieselbe Weise unter und füllen Sie den Teig in die
vorbereitete Springform.
7) Backen Sie das Ganze sofort im vorgeheizten
Backofen bei Ober- und Unterhitze 175 200°C für ca. 20 - 30 Minuten.
Page 56

■ 52 │ DE
│AT│
CH
SKV 1200 A1
Mürbeteig
Zutaten:
■ 250 g Weizenmehl
■ 1/2 gestr. TL Backpulver
■ 100-125 g Zucker
■ 1 Päckchen Vanillinzucker
■ 1 Prise Salz
■ 1 Ei
■ 125 g Butter
Zubereitung:
1) Mischen Sie Mehl und Backpulver in der Rührschüssel und geben Sie anschließend alle
übrigen Zutaten hinzu.
2) Kneten Sie alles mit dem Knethaken zuerst
für ca. 1 Minute auf Stufe 2, dann für ca. 3
Minuten auf Stufe 2-4.
3) Kneten Sie den Teig nicht zu lange, der Teig
könnte sonst zu weich werden.
4) Lassen Sie den Teig im Kühlschrank für 1/2
Stunde ruhen und verarbeiten Sie ihn danach
zu einem Tortenboden oder zu Kleingebäck.
5) Für einen Tortenboden rollen Sie 2/3 des
Teiges aus und legen ihn in eine gefettete
Springform.
6) Rollen Sie den restlichen Teig zu einer Rolle.
7) Legen Sie diese Rolle als Rand auf den Teig
und drücken Sie ihn mit zwei Fingern so an den
Rand, dass ein ca. 3 cm hoher Rand entsteht.
8) Stechen Sie den Tortenboden mit einer Gabel
mehrfach ein.
9) Heizen Sie den Backofen ca. 5 Minuten vor
und backen Sie den Mürbeteig ca. 15 - 20
Minuten bei Ober- und Unterhitze und 200 225 °C.
Rührteig
Zutaten:
■ 250 g weiche Butter oder Margarine
■ 250 g Zucker
■ 1 Päckchen Vanillinzucker
■ 1 Prise Salz
■ 4 Eier
■ 500 g Weizenmehl
■ 1 Päckchen Backpulver
■ Ca. 125 ml Milch
Zubereitung:
1) Geben Sie alle Zutaten in die Rührschüssel
und rühren Sie alles mit dem Rührbesen 3 für
1/2 Minute auf Stufe 1, dann für 30 Sekunden
auf Stufe 2 und danach für ca. 5 Minuten auf
Stufe 4.
2) Fetten Sie die Backform oder legen Sie sie mit
Backpapier aus.
3) Befüllen Sie die Backform und backen Sie
den Teig ca. 50 - 60 Minuten bei Ober- und
Unterhitze und 175 - 200 °C.
4) Bevor Sie den Kuchen aus dem Ofen nehmen,
sollten Sie eine Garprobe machen: Stechen
Sie dazu mit einem spitzen Holzstäbchen in
die Mitte des Kuchens. Wenn kein Teig dran
hängen bleibt, ist der Kuchen gar.
5) Stürzen Sie dann den Kuchen auf einen Kuchenrost und lassen Sie ihn abkühlen.
Page 57

DE│AT│CH
│
53 ■
SKV 1200 A1
Hefeteig
Zutaten:
■ 500 g Weizenmehl
■ 25 g frische Hefe oder 1 Pck. Trockenhefe
■ ca. 1/4 l lauwarme Milch
■ 80 g Butter oder Margarine (Raumtemperatur)
■ 80 g Zucker
■ 1 Ei
Zubereitung:
1) Geben Sie Mehl, Trockenhefe oder zerbröselte
Hefe und alle anderen Zutaten (nicht direkt auf
die Hefe) in die Rührschüssel .
2) Vermengen Sie alles langsam mit dem Knethaken auf Stufe 1, danach für 3-4 Minuten
auf Stufe 3.
3) Decken Sie die Schüssel mit einem Geschirrtuch ab, stellen Sie sie an einen warmen Ort
und lassen Sie den Teig gehen, bis er sich
sichtbar vergrößert hat.
4) Kneten Sie den Teig dann noch einmal durch.
5) Danach ist der Teig fertig und Sie können ihn
weiterverarbeiten.
Waffeln
Zutaten:
■ 200 g Zucker
■ 500 g Mehl
■ 5 g Backpulver
■ 5 Eier
■ 400 ml Milch
■ 250 g Butter (Raumtemperatur)
■ 2 Päckchen Vanillezucker
Zubereitung:
1) Geben Sie die Eier, den Zucker und die Butter
in die Rührschüssel und verrühren Sie alles
mit dem Schneebesen - zu einem glatten Teig.
2) Fügen Sie das Mehl, den Vanillezucker und
das Backpulver hinzu.
3) Rühren Sie die Milch nach und nach unter, bis
der Teig eine glatte und weiche Konsistenz hat.
4) Backen Sie die Waffeln in einem Waffeleisen
aus.
Bananen-Vanille-Shake
Zutaten:
■ 3 Bananen
■ 500 ml Milch
■ 2 Päckchen Vanillezucker
■ 1 EL Vanilleeis
Zubereitung:
1) Schälen Sie die Bananen.
2) Geben Sie die geschälten Bananen, die Milch,
das Vanilleeis und den Vanillezucker in den
Mixer 0.
3) Mixen Sie alles auf Stufe 8.
Page 58

■ 54 │ DE
│AT│
CH
SKV 1200 A1
Bananen-Kiwi-Smoothie
Zutaten:
■ 200 ml Orangensaft (frisch gepresst)
■ 1 Kiwi
■ 1/2 Banane
Zubereitung:
1) Enthäuten Sie die Kiwi.
2) Schälen Sie die Banane.
3) Geben Sie die Kiwi, die Banane und den
Orangensaft in den Mixer 0.
4) Mixen Sie alles auf Stufe 8.
Page 59

IAN 281064
KOMPERNASS HANDELS GMBH
BURGSTRASSE 21
44867 BOCHUM
DEUTSCHLAND / GERMANY
www.kompernass.com
Last Information Update · Versiunea informaţiilor
Stand der Informationen:
10
/ 2016 · Ident.-No.: SKV1200A1-072016-3
 Loading...