

Page 1
PROFESSIONAL FOOD PROCESSOR SKMP 1300 B3
IAN 276995/276996/277709
PROFESSIONAL FOOD PROCESSOR
Operating instructions
KÖKSMASKIN
Bruksanvisning
PROFI -KÜCHENMASCHINE
Bedienungsanleitung
PROFESIONALUS
VIRTUVINIS KOMBAINAS
Naudojimo instrukcija
PROFESJONALNY ROBOT
KUCHENNY
Instrukcja obsługi
Page 2
GB / IE Operating instructions Page 1
SE Bruksanvisning Sidan 17
PL Instrukcja obsługi Strona 33
LT Naudojimo instrukcija Puslapis 49
DE / AT / CH Bedienungsanleitung Seite 65
Before reading, unfold the page containing the illustrations and familiarise yourself with all functions of
the device.
Vik ut bildsidan och ha den till hands när du läser igenom anvisningarna och gör dig bekant med
apparatens / maskinens funktioner.
Przed przeczytaniem proszę rozłożyć stronę z ilustracjami, a następnie proszę zapoznać się z wszystkimi
funkcjami urządzenia.
Prieš skaitydami atsiverskite lapą su paveikslėliais ir susipažinkite su visomis prietaiso funkcijomis.
Klappen Sie vor dem Lesen die Seite mit den Abbildungen aus und machen Sie sich anschließend mit allen
Funktionen des Gerätes vertraut.
Page 3
B
A
Page 4
C
Page 5

GB│IE
│
1 ■
SKMP 1300 B3
Contents
Introduction ...........................................................2
Intended use ...........................................................2
Package contents .......................................................2
Description of the appliance ..............................................2
Safety instructions ......................................................3
Preparation ...........................................................6
Speed levels ...........................................................6
Working with the kneading hook, beater and whisk .........................7
After you have finished using your appliance .............................................8
Working with the blender ................................................8
Adding more ingredients .............................................................9
After you have finished using your appliance .............................................9
Cleaning and care ......................................................9
Cleaning the appliance .............................................................10
Cleaning accessories ...............................................................10
Cleaning the blender ...............................................................10
Storage ..............................................................10
Troubleshooting .......................................................11
Technical data .........................................................11
Warranty and service ..................................................11
Disposal .............................................................12
Importer .............................................................12
Recipes ..............................................................12
Carrot soup ......................................................................12
Tuna spread ......................................................................13
Traditional pancakes ...............................................................13
Sponge pastry ....................................................................13
Shortcrust pastry ..................................................................14
Sponge batter ....................................................................14
Yeast dough ......................................................................15
Waffles .........................................................................15
Banana vanilla shake ..............................................................15
Banana-kiwi smoothie ..............................................................16
Page 6

■ 2 │ GB
│
IE
SKMP 1300 B3
Introduction
Congratulations on the purchase of your new
appliance.
You have selected a high-quality product.
The operating instructions are part of this product.
They contain important information on safety, usage
and disposal. Before using the product, familiarise
yourself with all handling and safety guidelines.
Use the product only as described and for the range
of applications specified. Please also pass these
operating instructions on to any future owner(s).
Intended use
This appliance is intended exclusively for processing
foodstuffs in normal household quantities. This
appliance is intended solely for use in private
households. It is not suitable for commercial use!
This appliance is intended only for private use in
enclosed, dry spaces. It must not be used outdoors.
The appliance may only be used with original
accessories.
Package contents
Professional Food Processor
Mixing bowl with lid
Blender with lid and measuring cup
Kneading hook
Whisk
Beater
Operating instructions
Quick guide
NOTE
► Check contents for completeness and dam-
age immediately after unpacking. Contact
Customer Services if necessary.
Description of the appliance
Fold out the flaps on the front and rear covers of
this operating manual.
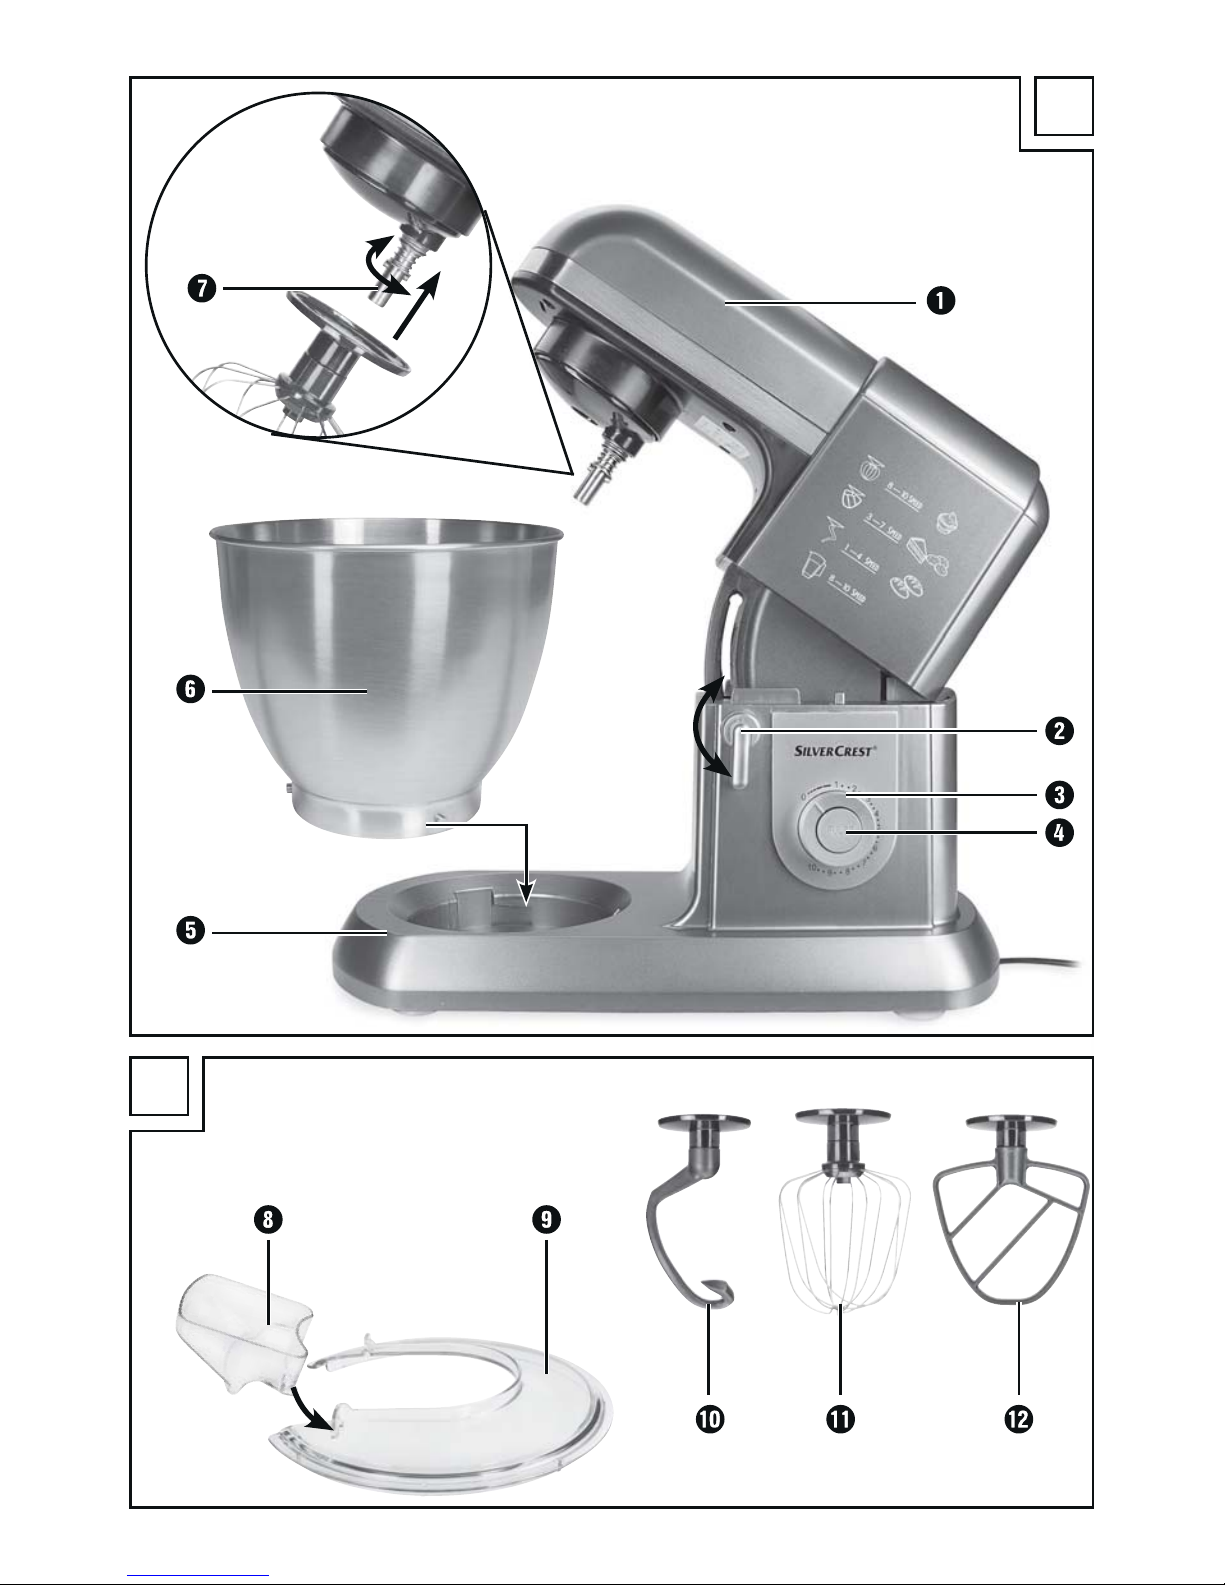
Front flap
Figure A:
Swivelling arm
Release lever
Rotary switch
PULSE button
Base
Mixing bowl
Drive shaft
Figure B:
Filling nose
Lid
Kneading hook
- Whisk
3 Beater
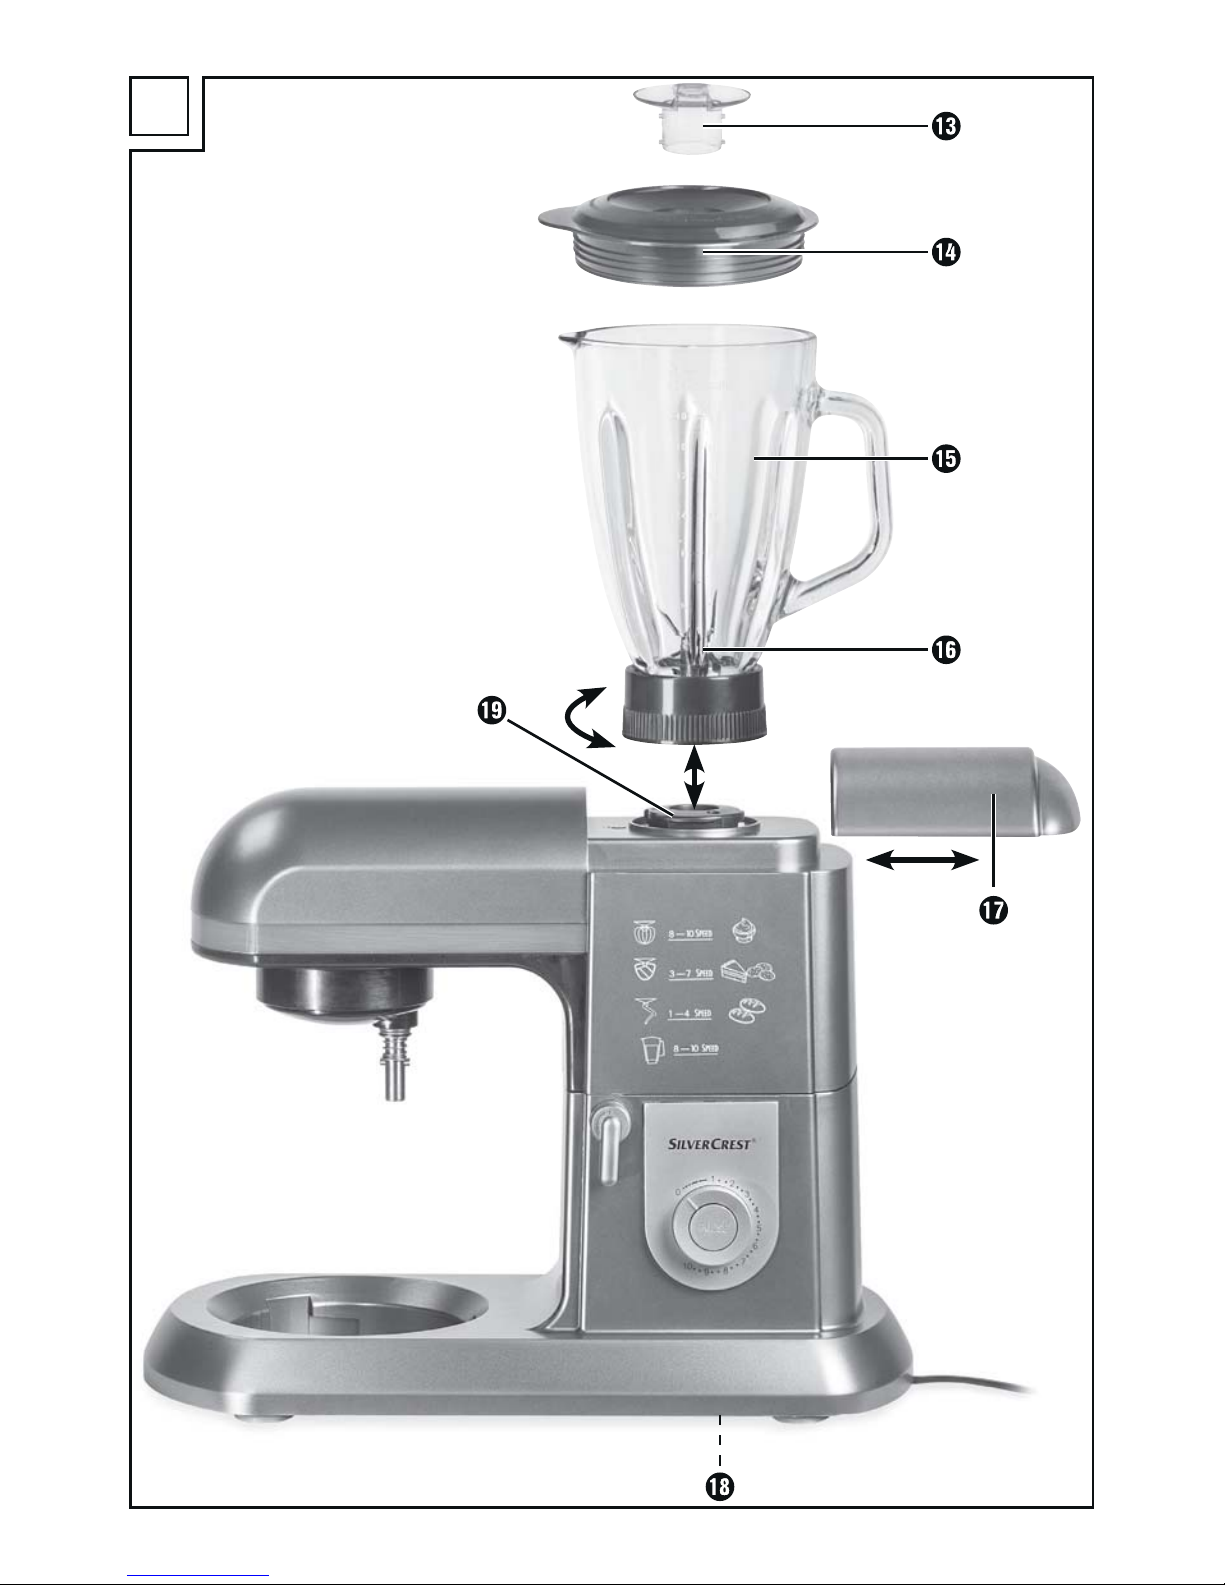
Back flap:
Figure C:
! Small measuring cup
. Blender lid
0 Blender
6 Blade
1 Drive unit lid
% Cable spool
+ Blender drive unit
Page 7

GB│IE
│
3 ■
SKMP 1300 B3
Safety instructions
DANGER – ELECTRIC SHOCK!
► The appliance must only be connected to a correctly installed and
earthed mains power socket. Ensure that the rating for your local
power supply corresponds with the details on the rating plate of the
appliance.
► Ensure that the power cable does not become wet or moist during
use. Route the cable in such a way that it cannot be crushed or
damaged.
► Keep the power cable away from hot surfaces.
► Do not perform any repairs on the appliance. All repairs must be
performed by our Customer Service Unit or by a qualified specialist
technician.
► Remove the plug from the mains power socket when the appliance is
being cleaned or in the event of a fault. Just switching off the appliance
is not sufficient, as the appliance is subject to mains voltage for as
long as the plug is connected to the mains power socket.
► Always remove the plug from the mains power socket when the
appliance is not in use.
► To prevent accidents, have defective plugs and/or power cables
replaced immediately by an authorised specialist technician or our
Customer Service department.
► The appliance and its connecting cable must be kept away from
children.
Never submerge the appliance in water or other liquids.
Page 8

■ 4 │ GB
│
IE
SKMP 1300 B3
WARNING! RISK OF INJURY!
► Always disconnect the appliance from the mains power supply when
fitting or removing accessories. This will prevent unintentional activation
of the appliance.
The appliance will begin running again after any power outage is
over!
► The appliance should always be disconnected from the mains when
unattended and before assembly, disassembly or cleaning.
► This appliance should not be used by children.
► Use only the original accessory parts for this appliance. Accessory
parts from other manufacturers may not be suitable, and this may
lead to risks!
► This appliance may be used by persons with limited physical, sensory
or mental capabilities or lack of experience and knowledge, provided
that they are under supervision or have been told how to use the
appliance safely and are aware of the potential risks.
► Children must not play with the appliance.
► Caution: The blade is very sharp!
► Be careful when cleaning the blade.
Page 9

GB│IE
│
5 ■
SKMP 1300 B3
WARNING! RISK OF INJURY!
► Caution: the blade is very sharp! For this reason, take great care
when removing the blender jug.
► Never use the appliance for purposes other than those described in
these instructions. Otherwise there is a risk of serious injury!
► Do not change accessories unless the drive unit is entirely at a stand-
still and the blender is unplugged from the power supply! The appliance will run on for a short time after being switched off!
► Never leave the appliance unattended!
► Before changing any accessories or additional parts that move during
operation, the appliance must be switched off and disconnected from
mains power.
► While the appliance is in operation, do not put anything other than
the ingredients to be processed into the mixing bowl or blender.
► Do not put hands and foreign objects into the filling nose or the
blender, to avoid the risk of injury or damage to the appliance.
CAUTION! PROPERTY DAMAGE!
► Do not operate the appliance without ingredients. Risk of overheating!
► Never fill the appliance with hot ingredients!
Page 10
■ 6 │ GB
│
IE
SKMP 1300 B3
Preparation
1) Take all the parts out of the box and remove
the packaging material and any protective
wrapping or stickers.
2) Clean all com
ponents as described in the
section “Cleaning and Care”. Ensure that all
parts are completely dry.
3) Unwind the power cable from the cable
spool %.
4) Place the appliance on a smooth, clean surface
and secure it using the four suction cups.
5) Insert the power plug into the socket.
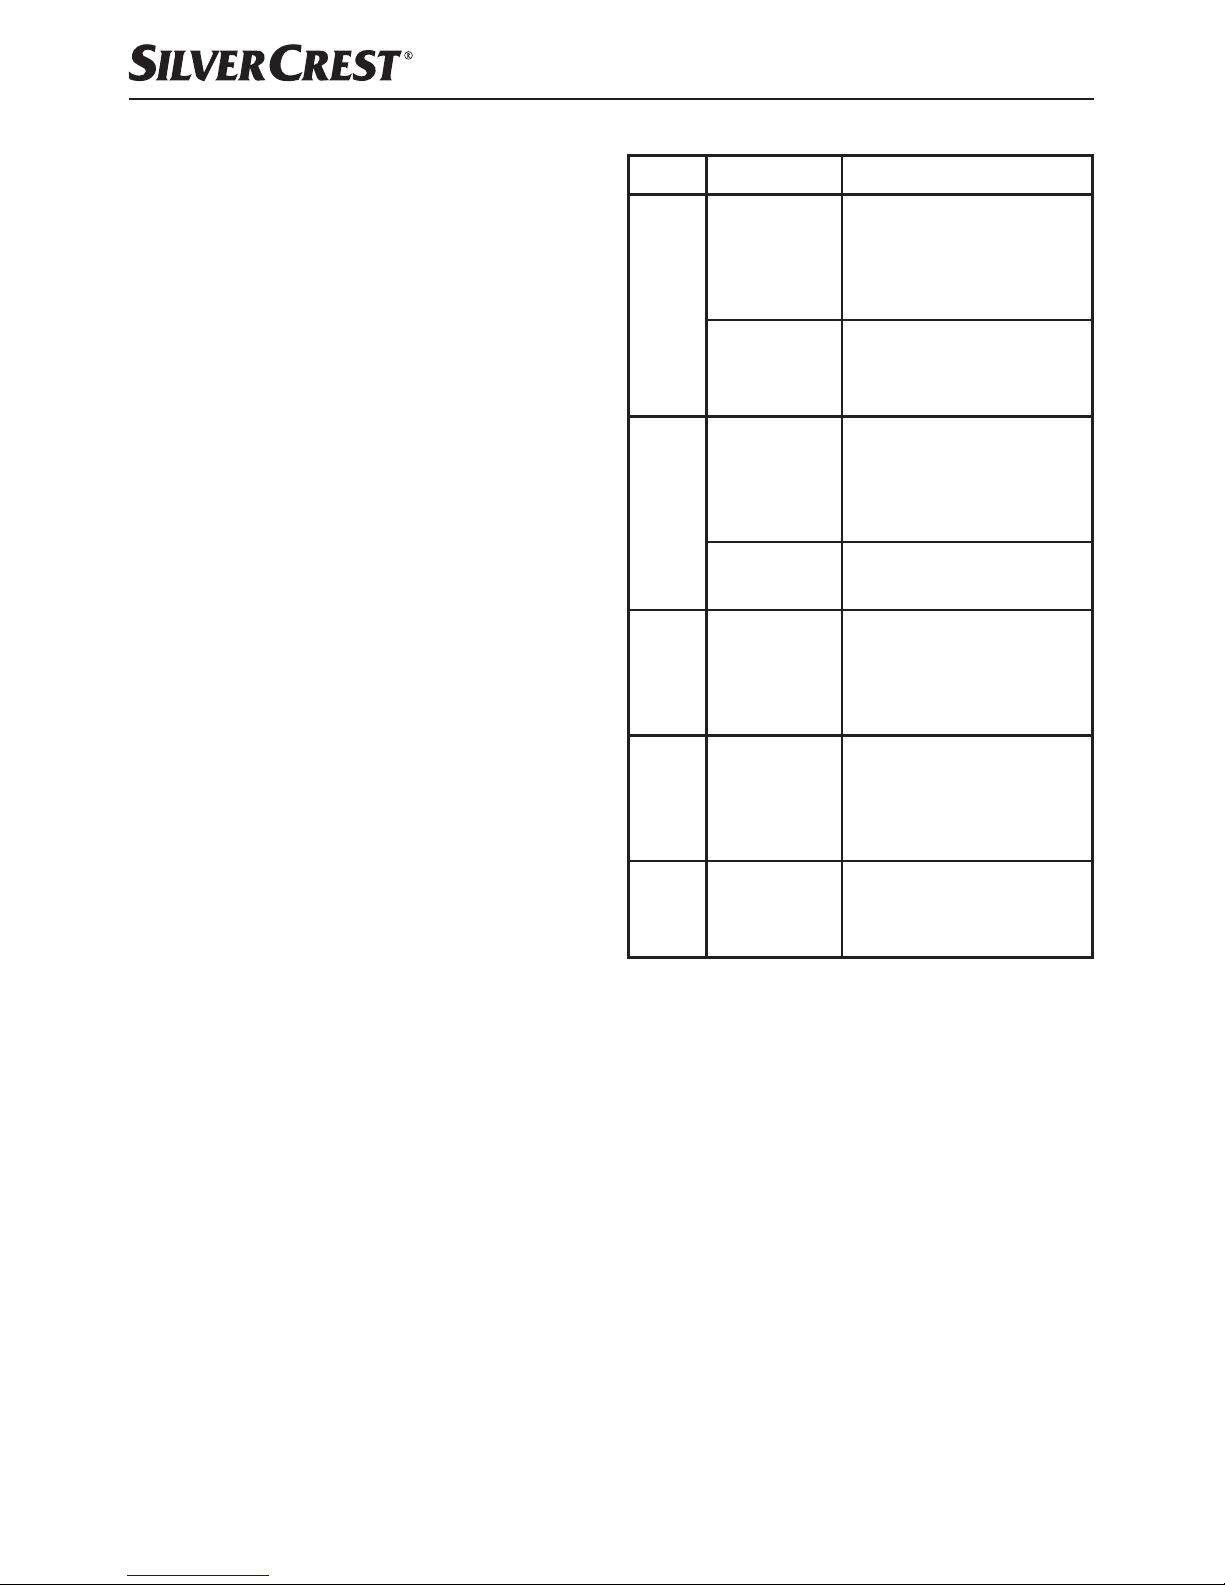
Speed levels
Level Application suitable for...
1 - 2
all
- Starting position
for all blending and
stirring processes
- For adding ingredients
Kneading
hook
Beater 3
- Kneading and blending
of firm dough or firmer
ingredients
2 - 4
Beater 3
- Blending thick batter
- Blending butter and
flour
- Blending yeast dough
Kneading
hook
- Kneading yeast dough
- Kneading thick batter
4 - 6
Beater 3
- Cake mix
- Creaming butter and
sugar
- Biscuit dough
6 - 10
Whisk -
- Whipped cream
- Egg whites
- Mayonnaise
- Whipping butter
Pulse
Blender 0
- Blending or shredding of soft or liquid
ingredients
Page 11
GB│IE
│
7 ■
SKMP 1300 B3
Working with the kneading
hook, beater and whisk
WARNING! RISK OF INJURY!
► Under no circumstances should you place
your hands or fingers in the mixing bowl
during operation! Danger of injury due to
rotating parts!
► Switch from one accessory to another only
when the drive unit is at a complete standstill!
After being switched off, the drive continues
to run for a short time.
► In cases of malfunction, switch the appliance
off and remove the plug from the wall socket.
This will prevent the appliance from becoming
switched on again unintentionally.
CAUTION – PROPERTY DAMAGE!
► When working with kneading hooks ,
whisk - or beater 3, we recommend
allowing the appliance to cool down after
10 minutes of operation.
NOTE
► When you are working with the kneading
hook , whisk - or beater 3, the drive unit
lid 1 must be in place. If not, the appliance
will not start.
To prepare the device for tasks involving the kneading hooks , whisk - or beater 3, proceed as
follows:
1) Push the release lever upwards and move
the swivelling arm to the highest position.
2) Insert the mixing bowl so that the locking
mechanisms on the mixing bowl fit into the
recess in the base . Rotate the mixing bowl
clockwise (cf. symbols
and
on the
base ) until it is locked and stable.
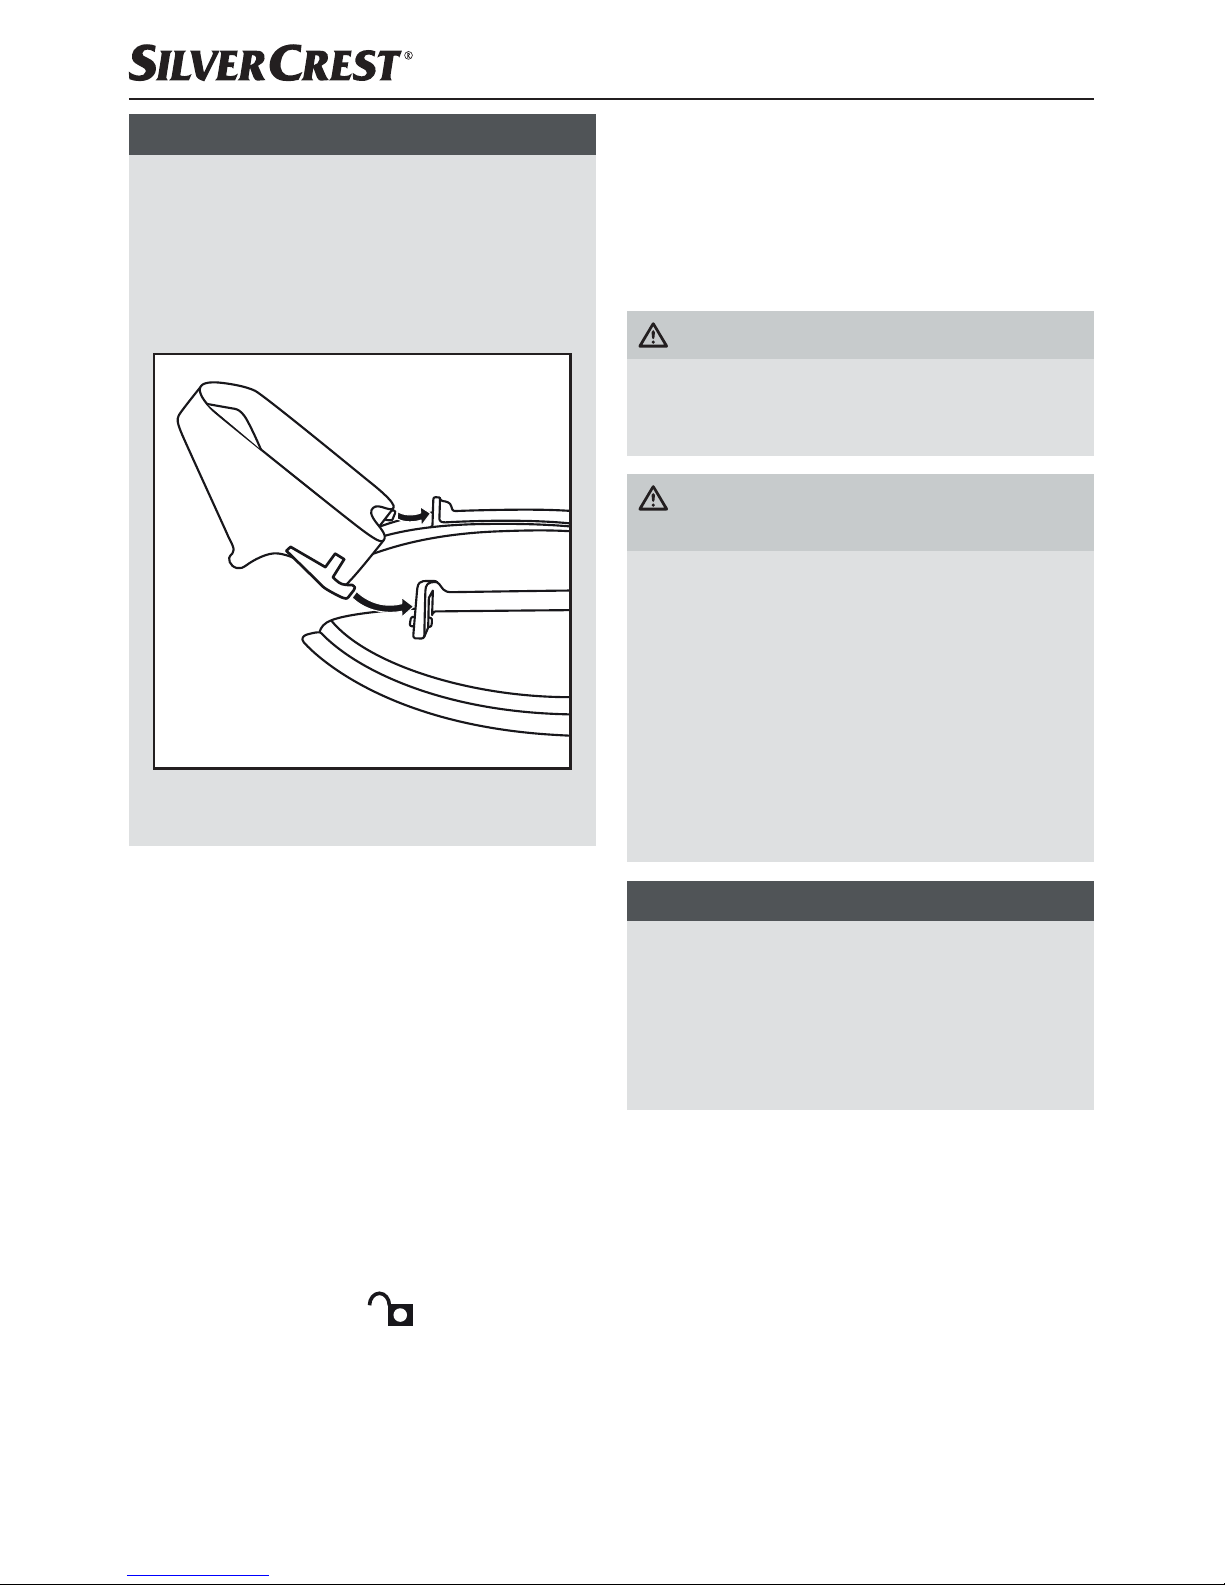
3) Depending on type of application, mount either
the kneading hook , whisk - or beater 3
onto the drive shaft :
– Place the kneading hook , whisk - or
beater 3onto the drive shaft so that
both metal pins on the drive shaft fit into
the recesses in the inset -3.
– Push the inset -3 firmly onto the drive
shaft until the spring is compressed while
rotating the inset a little anticlockwise (direc-
tion
).
– Let go of the inset. It is now firmly attached
to the drive shaft .
4) Add the ingredients you wish to process to the
mixing bowl .
NOTE
► Please note that the dough in the mixing bowl
will increase in volume or will be pressed
upwards by the movement during the kneading
or mixing process. Therefore, never fill the
mixing bowl to the brim!
5) Push the release lever upwards and push
the swivelling arm into its working position
with the mounted inset facing downwards.
6) Push the lid onto the mixing bowl .
Page 12
■ 8 │ GB
│
IE
SKMP 1300 B3
NOTE
► If desired, you can mount the filling nose
onto the lid :
– Rotate the lid a little until the opening
is pointing at you.
– Hook the filling nose into the eyelets
in the lid :
You can now add ingredients, even while the
device is in operation.
7) Turn the rotary switch to the required setting
(cf. section “Speed Levels”).
After you have finished using your
appliance
1) Switch the appliance off using the rotary
switch .
2) If mounted, remove the filling nose .
3) Remove the lid from the mixing bowl .
4) Push the release lever upwards and move
the swivelling arm to the highest position.
5) Remove the inset -3 from the drive shaft
by pushing the inset -3 against the
drive shaft and simultaneously rotating
it clockwise (direction
). Now you can
remove the inset.
6) Remove the mixing bowl by rotating it
anticlockwise and lifting it off the base.
7) Clean all parts of the appliance (see section
“Cleaning and care”).
Working with the blender
WARNING! RISK OF INJURY!
► Allow hot fluids to cool to a lukewarm tem-
perature (approx. 30–40°C) before pouring
them into the blender 0.
WARNING! RISK OF INJURY FROM
SHARP BLADE / ROTATING DRIVE!
► Never put your hand into the blender 0
while it is attached!
► Only remove the blender 0 when the blade 6
is at a complete standstill.
► Only use the blender 0 with the lid . with
measuring cup !firmly in position.
► In cases of malfunction, switch the appliance
off and remove the plug from the wall socket.
This will prevent the appliance from becoming
switched on again unintentionally.
CAUTION! PROPERTY DAMAGE!
► Never use the mixing bowl and the
blender 0 simultaneously! This will overload
the drive!
► When working with the blender 0, we
recommend allowing the appliance to cool
down after 3 minutes of operation.
Proceed as follows to prepare the appliance for
operation using the blender 0. Refer to figure C
on the back flap.
1) Push the release lever upwards and push
the swivelling arm down into its working
position.
Page 13
GB│IE
│
9 ■
SKMP 1300 B3
2) Pull off the drive unit lid 1.
NOTE
► Ensure that the rotary switch is set to the
"0" position before fitting the blender onto
the drive unit. Otherwise, the appliance will
start automatically as soon as the blender is
locked in.
3) Place the blender 0 onto the blender drive
unit + so that the locking mechanisms on the
bottom of the blender 0 fit into the recesses
in the blender drive unit +. The arrow on the
blender 0 must point to the
symbol on
the appliance. Rotate the blender 0 clockwise
as far as it will go. The arrow on the blender 0
will then point to the
symbol on the appliance.
4) Add the ingredients.
5) Place the blender lid . with measuring cup !
onto the unit, making sure that the lip on the
lid . seals the spout.
6) Turn the rotary switch to the required setting.
NOTE
► The optimal speed depends on the consistency
of the food to be processed. More liquid
contents can be blended faster.
► For short, powerful pulses, set the rotary
switch at least to level 1 and simultaneously press the PULSE button . The PULSE
button does not lock, in order to avoid
overloading the drive. Therefore, hold the
PULSE button in this position only for a
short period.
Adding more ingredients
1) Switch the appliance off using the rotary
switch .
2) Remove the blender lid . and insert the
ingredients.
or
3) Rotate the measuring cup ! situated within the
blender lid . 90° and remove it. Then gradually add the ingredients using the opening.
After you have finished using your
appliance
1) Switch the appliance off using the rotary
switch .
2) Rotate the blender 0 anticlockwise until the
arrow on the blender 0 points to the
symbol on the appliance, then remove it.
NOTE
► Ideally, you should clean the blender 0 im-
mediately after use (see the section "Cleaning
and care"). This makes food residues easier
to remove.
Cleaning and care
DANGER – ELECTRIC SHOCK!
► Before cleaning the appliance, disconnect
the power plug from the mains power socket!
There is a risk of electric shock!
NEVER immerse the appliance in water or
any other liquid!
CAUTION! PROPERTY DAMAGE!
► Do not use abrasive or aggressive cleaning
materials. These may damage the surfaces
of your appliance.
Page 14

■ 10 │ GB
│
IE
SKMP 1300 B3
NOTES
► It is best to clean the appliance directly after
use. This makes food residues easier to
remove.
► Processing foodstuffs containing strong pig-
ments, such as carrots, may cause staining of
the plastic parts. Such stains can be removed
using a little cooking oil.
Cleaning the appliance
■ Wipe the appliance with a damp cloth. For stub-
born soiling use a mild detergent on the cloth.
Wipe off any detergent residue using a cloth
moistened with clean water. Then carefully dry
the appliance.
Cleaning accessories
■ Clean the mixing bowl , lid , filling nose ,
blender lid . with measuring cup !, drive unit
lid 1 and the insets -3 in warm water
with a small quantity of detergent. Any residues
can be removed with a washing-up brush. Rinse
all parts with clear, warm water and make sure
that all parts are dry before re-using them.
NOTE
► The insets -3, mixing bowl and the
blender lid . with measuring cup !can
also be cleaned using a dishwasher.
► If you clean them in the dishwasher, please
ensure that no plastic parts become trapped
under pressure between other objects. This
may cause them to become deformed.
► Wherever possible, place all plastic parts in
the top basket of the dishwasher.
Cleaning the blender
WARNING! RISK OF INJURY!
► Do not touch the blade 6 with bare hands.
■ Clean the blender 0 in warm water with a
little mild detergent. Afterwards, rinse all parts
with clean water so that no detergent residues
remain.
In most cases, you can also achieve sufficiently
hygienic cleaning directly after use in the following
way:
1) Put some water containing a little detergent
into the fully assembled blender 0.
2) Place the blender lid . with measuring cup !
onto the unit, making sure that the lip on the
lid . seals the spout.
3) Switch on the blender 0 for a few seconds.
4) Pour out the washing water. Any residues can
be removed with a washing-up brush.
5) Afterwards, rinse out the blender 0 with
plenty of clean water, so that all detergent
residues are removed.
NOTE
► The blender 0 is suitable for cleaning in
a dishwasher.
► When cleaning the blender 0 in a dish-
washer, make sure that its plastic part is not
trapped between other objects. This may
cause it to become deformed!
Storage
■ Wind the power cable around the cable spool %
for storage.
■ Store the cleaned appliance in a clean, dust-free
and dry place.
Page 15
GB│IE
│
11 ■
SKMP 1300 B3
Troubleshooting
If the appliance suddenly stops working:
■ The appliance has overheated and triggered
the automatic safety cut-out.
– Turn the rotary switch to 0.
– Remove the plug from the wall socket.
– Allow the appliance to cool for 15 minutes.
– If the appliance has not yet cooled off com-
pletely after 15 minutes, it will not start.
– Wait a further 15 minutes and try switching
on again.
If the appliance cannot be switched on:
– Check that the plug is correctly connected
to a wall socket.
– Make sure that the swivelling arm has
clicked into place in the right position.
Technical data
Input voltage: 220 - 240 V ~/ 50 Hz
Power consumption: 1300 W
Protection class: II
Max. capacity
Mixing bowl : approx. 6.3 l
Blender 0: approx. 1.5 l
All of the parts of this appliance that come
into contact with food are food-safe.
We recommend the following operating times:
When working with kneading hooks , whisk -
or beater 3, allow the appliance to cool down
after 10 minutes of operation.
When working with the blender 0, allow the appliance to cool down after 3 minutes of operation.
If you exceed these operating times, the device can
overheat and be damaged!
Warranty and service
This appliance is provided with a 3-year warranty
valid from the date of purchase. This appliance
has been manufactured with care and inspected
meticulously prior to delivery. Please retain your
receipt as proof of purchase. In the event of a
warranty claim, please contact your Customer
Service unit by telephone. This is the only way
to guarantee free return of your goods.
The warranty only covers claims for material and
manufacturing defects, not for damage sustained
during carriage, components subject to wear and
tear or damage to fragile components such as
switches or batteries. This appliance is intended
solely for private use and not for commercial
purposes.
The warranty shall be deemed void in cases of
misuse or improper handling, use of force and
modifications/repairs which have not been carried
out by one of our authorised Service centres.
Your statutory rights are not restricted by this
warranty.
The warranty period is not prolonged by repairs
effected under the warranty. This also applies to
replaced and repaired components. Any damage
and defects present at the time of purchase must be
reported immediately after unpacking, but no later
than two days after the date of purchase. Repairs
carried out after expiry of the warranty period shall
be subject to charge.
Service Great Britain
Tel.: 0871 5000 720 (£ 0.10/Min.)
E-Mail: kompernass@lidl.co.uk
IAN 276995/276996/277709
Service Ireland
Tel.: 1890 930 034
(0,08 EUR/Min., (peak))
(0,06 EUR/Min., (off peak))
E-Mail: kompernass@lidl.ie
IAN 276995/276996/277709
Page 16

■ 12 │ GB
│
IE
SKMP 1300 B3
Disposal
Never dispose of the appliance
in the normal domestic waste.
This product is subject to the
provisions of European Directive
2012/19/EU.
Dispose of the appliance via an approved waste
disposal company or your municipal waste disposal
facility. Please observe applicable regulations.
Please contact your waste disposal centre if you
are in any doubt.
The packaging is made from environ-
mentally friendly material and can be
disposed of at your local recycling plant.
Importer
KOMPERNASS HANDELS GMBH
BURGSTRASSE 21
44867 BOCHUM
GERMANY
www.kompernass.com
Recipes
Carrot soup
Ingredients:
■ 500 g carrots
■ 250 ml water
■ 500 ml meat stock (glass)
■ 125 ml cream
■ 125 ml white wine
■ Salt
■ Pepper
■ 50 g cold butter
■ Fresh chervil
Preparation:
1) Wash and peel the carrots.
2) Cut them small enough to fit into the blender 0.
3) Put 250 ml of water into a saucepan and boil
the carrots for 20 minutes. Then purée all of it in
the blender 0 until no large pieces are left over.
4) Afterwards, return the puréed carrots to the pot.
5) Now add the meat stock, cream and white wine.
6) Heat the soup and season it to taste.
7) Blend the butter into the soup in small pieces
and then serve it with the chervil.
Page 17

GB│IE
│
13 ■
SKMP 1300 B3
Tuna spread
Ingredients:
■ 1 can of tuna in sauce with vegetables
■ 3 tbsp yoghurt
■ 1 tsp lemon juice, freshly pressed
■ 1 pinch salt
■ Freshly ground pepper
■ 2 hard-boiled eggs, diced
To serve:
■ Whole wheat bread in slices
■ Butter for buttering the bread
■ 1 hard-boiled egg, diced
■ Chives, chopped
Preparation:
1) Blend all ingredients in the blender 0 until the
desired consistency is reached (approx. 15
seconds), then season to taste.
2) Spread butter and the tuna mixture onto the
bread and sprinkle with chopped egg and chives.
Traditional pancakes
Ingredients:
■ 2 - 3 eggs
■ 375 ml milk
■ 1 pinch salt
■ 250 g flour
■ Fat for frying
Preparation:
1) Mix the eggs, milk and salt with the beater 3.
2) Sieve the flour and then add it to the mixture.
Mix everything together with the beater 3
until you have a smooth batter.
3) Leave the batter to rest for 20 minutes.
4) Heat the fat and, with a small ladle, place some
batter in the pan. (Add only as much as is
needed to thinly cover the pan bottom.)
5) Fry the pancakes until golden brown on both
sides and serve hot.
Sponge pastry
Ingredients:
■ 3 eggs
■ 3 - 4 tbsp of hot water
■ 150 g sugar
■ 1 packet of vanilla sugar
■ 100 g pastry flour
■ 100 g cornflour
■ 2 - 3 level tsp of baking powder
Preparation:
1) Line the bottom of a baking tin (diameter: 28 cm)
with baking paper. Do not grease the edge, as
the surface will then not be evenly smooth and
browned.
2) Beat the whole eggs in the mixing bowl and
add the hot water.
3) Then beat the mixture at the highest level with
the beater 3 for about 1 minute until fluffy.
4) Stir in the sugar and vanilla sugar and beat the
mixture for a further two minutes at the highest
level.
5) Mix the flour, cornflour and baking powder
together and sift half of it onto the creamed
eggs, then briefly stir everything at Level 4.
6) Now stir in the remaining flour in the same way
and pour the mixture into the prepared baking tin.
7) Immediately bake the tin in a pre-heated oven
with top and bottom heat at 175-200°C for
approx. 20 - 30 minutes.
Page 18

■ 14 │ GB
│
IE
SKMP 1300 B3
Shortcrust pastry
Ingredients:
■ 250 g wheat flour
■ 1/2 level tsp of baking powder
■ 100 - 125 g sugar
■ 1 packet of vanilla sugar
■ 1 pinch salt
■ 1 egg
■ 125 g butter
Preparation:
1) Mix the flour and baking powder in the mixing
bowl , then add all of the other ingredients.
2) Knead everything with the kneading hook
first for about 1 minute at level 2, then for
about 3 minutes at level 2 - 4.
3) Do not knead the pastry for too long, as it
could otherwise turn out too soft.
4) Put the pastry in the refrigerator for half an
hour, then shape it into a flan case or small
pastries.
5) For a flan case, roll out 2/3 of the pastry and
place it in a greased baking tin.
6) Roll the remaining pastry into a roll.
7) Place this roll on the pastry and press it onto
the side of the cake to form an edge with a
height of approx. 3 cm.
8) Pierce the base repeatedly with a fork
9) Pre-heat the oven for approx. 5 minutes and
bake the shortcrust for approx. 15 - 20 minutes
with top and bottom heat at 200 - 225 °C.
Sponge batter
Ingredients:
■ 250 g soft butter or margarine
■ 250 g sugar
■ 1 packet of vanilla sugar
■ 1 pinch salt
■ 4 eggs
■ 500 g wheat flour
■ 1 pack baking powder
■ Approx. 125 ml milk
Preparation:
1) Place all ingredients into the mixing bowl
and stir everything with the beater 3 for half a
minute at level 1, then for 30 seconds at level
2 and then for about 5 minutes at level 4.
2) Grease a baking mould or line it with baking
paper.
3) Pour the batter into the baking mould and bake
it for approx. 50 - 60 minutes with top and
bottom heat at 175 - 200 °C.
4) Before removing the cake from the oven, check
whether it is done properly: Insert a wooden
skewer into the middle of the cake. If no batter
is sticking to it, the cake is baked.
5) Now tip the cake onto a wire rack and allow
it to cool.
Page 19

GB│IE
│
15 ■
SKMP 1300 B3
Yeast dough
Ingredients:
■ 500 g wheat flour
■ 25 g fresh yeast or 1 pack dried yeast
■ Approx. 1/4 l lukewarm milk
■ 80 g butter or margarine (room temperature)
■ 80 g sugar
■ 1 egg
Preparation:
1) Place the flour, dry yeast or crumbled yeast
and all other ingredients (not directly on the
yeast) into the mixing bowl .
2) Slowly mix everything using the kneading
hook at level 1, then continue for 3 - 4
minutes at level 3.
3) Cover the bowl with a tea towel, place it in a
warm place and let the dough rise until it has
visibly increased in size.
4) Then knead the dough once again.
5) After that, the dough is finished and can be
further processed.
Waffles
Ingredients:
■ 200 g sugar
■ 500 g flour
■ 5 g baking powder
■ 5 eggs
■ 400 ml milk
■ 250 g butter (room temperature),
■ 2 packets of vanilla sugar
Preparation:
1) Add the eggs, sugar and butter into the mixing
bowl and blend everything into a smooth
batter using the whisk -.
2) Add the flour, vanilla sugar and baking
powder.
3) Gradually stir in the milk until the batter has
a smooth, soft consistency.
4) Bake the waffles in a waffle iron.
Banana vanilla shake
Ingredients:
■ 3 bananas
■ 500 ml milk
■ 2 packets of vanilla sugar
■ 1 tbsp. vanilla ice cream
Preparation:
1) Peel the bananas.
2) Put the peeled bananas, milk, vanilla ice cream
and the vanilla sugar into the blender 0.
3) Blend everything at speed level 8.
Page 20

■ 16 │ GB
│
IE
SKMP 1300 B3
Banana-kiwi smoothie
Ingredients:
■ 200 ml orange juice (freshly pressed)
■ 1 kiwi
■ 1/2 banana
Preparation:
1) Peel the kiwi.
2) Peel the banana.
3) Put the kiwi, banana and orange juice into the
blender 0.
4) Blend everything at speed level 8.
Page 21

SE
│
17 ■
SKMP 1300 B3
Innehållsförteckning
Inledning .............................................................18
Föreskriven användning ................................................18
Leveransens innehåll ...................................................18
Beskrivning ...........................................................18
Säkerhetsanvisningar ..................................................19
Förberedelser .........................................................22
Hastigheter ...........................................................22
Arbeta med degkrok och vispar .........................................23
När produkten arbetat färdigt ........................................................24
Använda mixern ......................................................24
Fylla på ingredienser ...............................................................25
När produkten arbetat färdigt ........................................................25
Rengöring och skötsel ..................................................25
Rengöra produkten ................................................................26
Rengöra tillbehören ................................................................26
Rengöra mixern ...................................................................26
Förvaring ............................................................26
Åtgärda fel ...........................................................27
Tekniska data .........................................................27
Garanti och service ....................................................27
Kassering ............................................................28
Importör .............................................................28
Recept ...............................................................28
Morotssoppa .....................................................................28
Tonfiskröra .......................................................................29
Traditionella pannkakor .............................................................29
Sockerkaka ......................................................................29
Mördeg .........................................................................30
Mjuk kaka .......................................................................30
Jäsdeg ..........................................................................31
Våfflor ..........................................................................31
Banan- och vaniljshake .............................................................31
Smoothie med kiwi och banan .......................................................32
Page 22

■ 18 │ SE
SKMP 1300 B3
Inledning
Ett stort grattis till din nyinköpta produkt.
Du har valt en produkt med hög kvalitet. Bruksanvis-
ningen ingår som en del av leveransen. Den innehåller viktig information om säkerhet, användning
och återvinning. Läs noga igenom alla användar- och
säkerhetsanvisningar innan du börjar använda produkten. Använd endast produkten enligt beskrivningarna och i de syften som anges här. Lämna över all
dokumentation tillsammans med produkten om du
överlåter den till någon annan person.
Föreskriven användning
Den här produkten ska endast användas för att
bearbeta livsmedel i de mängder som förekommer
i privata hushåll. Produkten är endast avsedd för
privat bruk i hemmet. Använd inte produkten
yrkesmässigt!
Produkten är endast avsedd för privat bruk i skyddade utrymmen som inte utsätts för regn. Den får
inte användas utomhus!
Endast originaltillbehör får användas tillsammans
med produkten.
Leveransens innehåll
Köksmaskin
Blandarskål med lock
Mixer med lock och måttkopp
Degkrok
Ballongvisp
Grovvisp
Bruksanvisning
Snabbinstruktion
OBSERVERA
► Kontrollera att leveransen är komplett och
inte har några skador så snart du packat upp
produkten. Kontakta kundservice om så inte
är fallet.
Beskrivning
Fäll upp sidorna vid det främre och bakre omslaget
på den här bruksanvisningen:
Främre uppfällbar sida
Bild A:
Fällbar arm
Upplåsningsspak
Skruvknapp
Knapp PULSE
Sockel
Blandarskål
Drivaxel
Bild B:
Påfyllningshjälp
Lock
Degkrok
- Ballongvisp
3 Grovvisp
Bakre uppfällbar sida:
Bild C:
! Liten måttkopp
. Mixerlock
0 Mixer
6 Knivar
1 Skyddskåpa till drivanordning
% Kabelhållare
+ Drivanordning för mixer
Page 23

SE
│
19 ■
SKMP 1300 B3
Säkerhetsanvisningar
FARA - RISK FÖR ELCHOCK!
► Produkten får endast anslutas till ett godkänt och jordat eluttag.
Nätspänningen måste överensstämma med angivelserna på produktens typskylt.
► Akta så att kabeln inte blir våt eller fuktig när du använder produkten.
Lägg den så att den inte kan klämmas fast någonstans eller skadas.
► Håll kabeln på avstånd från heta ytor.
► Försök inte själv reparera produkten. Alla reparationer måste utföras
av kundtjänst eller kvalificerad fackpersonal.
► Dra alltid ut kontakten ur uttaget när produkten rengörs eller vid even-
tuella fel. Det räcker inte att bara stänga av den, eftersom det finns
spänning kvar i produkten så länge kontakten sitter i uttaget.
► Dra alltid ut kontakten ur uttaget när du inte ska använda produkten.
► Låt omedelbart en auktoriserad fackverkstad eller vår kundtjänst byta
ut skadade kontakter och kablar för att undvika olyckor.
► Produkten och dess anslutningsledning ska hållas på avstånd från
barn.
Du får absolut inte doppa ner produkten i vatten eller andra vätskor.
Page 24

■ 20 │ SE
SKMP 1300 B3
VARNING! RISK FÖR PERSONSKADOR!
► Bryt alltid strömförbindelsen helt när du ska sätta på eller ta av tillbe-
hör. Om kontakten dras ut kan produkten inte sättas på av misstag.
Efter ett strömavbrott sätter produkten igång igen!
► Bryt alltid strömförbindelsen till produkten när den inte hålls under
uppsikt, när den tas isär eller sätts ihop eller när den rengörs.
► Den här produkten får inte användas av barn.
► Använd endast originaltillbehör till den här produkten. Delar från
andra tillverkare kanske inte är lämpliga och kan leda till olyckor!
► Den här produkten får användas av personer med begränsad fysisk,
sensorisk eller mental förmåga eller bristande erfarenhet och/eller
kunskap om de hålls under uppsikt eller instruerats i hur produkten
används på ett säkert sätt och inser vilka risker det innebär.
► Barn får inte leka med produkten.
► Varning: Kniven är mycket vass!
► Var försiktig när du rengör kniven!
Page 25

SE
│
21 ■
SKMP 1300 B3
VARNING! RISK FÖR PERSONSKADOR!
► Varning: Kniven är mycket vass! Var därför försiktig när du tar av
mixerkannan!
► Missbruka inte produkten genom att använda den i andra syften än
de som anges i den här anvisningen. Annars finns risk för personskador!
► Byt endast tillbehör då produkten är avstängd och kontakten är utdra-
gen! Produkten fortsätter gå en stund efter att den stängts av!
► Lämna aldrig produkten utan uppsikt.
► Innan tillbehör eller delar som rör sig under driften byts ut måste pro-
dukten stängas av och kontakten dras ur.
► När produkten arbetar får endast de ingredienser som ska bearbetas
tillsättas i skålen eller mixerkannan.
► Undvik skador på dig själv och produkten genom att aldrig sticka in
fingrar eller andra föremål i påfyllningshjälpen eller mixern.
AKTA! RISK FÖR SAKSKADOR!
► Använd aldrig produkten utan ingredienser! Risk för överhettning!
► Fyll aldrig produkten med heta ingredienser!
Page 26

■ 22 │ SE
SKMP 1300 B3
Förberedelser
1) Ta upp alla delar ur kartongen och ta bort allt
förpackningsmaterial och ev. skyddsfolie och
klistermärken.
2) R
engör alla delar så som beskrivs i kapitel
Rengöring och skötsel. Försäkra dig om att
alla delar är helt torra.
3) Linda ut hela kabeln från hållaren %.
4) Ställ produkten på en slät och ren yta och fäst
den med de fyra sugkopparna.
5) Sätt kontakten i ett eluttag.
Hastigheter
Läge Tillbehör passar för...
1 - 2
alla
- Startläge för all
mixning och rörning
- När ingredienser
tillsätts
Degkrok
Grovvisp 3
- För att knåda och
blanda hårda degar
och ingredienser
2 - 4
Grovvisp 3
- För att blanda tjock
smet
- För att blanda smör
och mjöl
- För att blanda jäsdeg
Degkrok
- För att knåda jäsdeg
- För att knåda tjock
smet
4 - 6
Grovvisp 3
- Kaksmet
- För att vispa ihop
smör och socker
- Plättsmet
6 - 10
Ballongvisp -
- Vispgrädde
- Äggvita
- Majonäs
- För att vispa smör
pösigt
Puls
Mixer 0
- För att mixa och
hacka sönder mjuka
eller flytande ingredienser
Page 27

SE
│
23 ■
SKMP 1300 B3
Arbeta med degkrok och vispar
VARNING!
RISK FÖR PERSONSKADOR!
► Stoppa aldrig ner handen i blandarskålen
när produkten arbetar! Risk för personskador
av roterande delar!
► Byt bara tillbehör när drivanordningen står
stilla! Drivanordningen fortsätter snurra en
stund efter att produkten stängts av.
► Vid störningar ska du stänga av produkten
och dra ut kontakten så att den inte kan
sättas på av misstag.
AKTA! RISK FÖR SAKSKADOR!
► När man arbetat med degkroken , bal-
long- - eller grovvispen 3 10 minuter i
sträck rekommenderar vi att låta produkten
kallna.
OBSERVERA
► När man arbetar med degkroken , bal-
longvispen - eller grovvispen 3måste
skyddskåpan 1 alltid sitta över drivanordningen. Annars kommer produkten inte att
starta.
Gör så här för att förbereda produkten när du ska
arbeta med degkroken , ballongvispen - eller
grovvispen 3:
1) För upplåsningsspaken uppåt och flytta den
fällbara armen till det övre läget.
2) Sätt in blandarskålen så att arreteringarna
på blandarskålen griper fast i öppningen
på sockeln . Vrid blandarskålen medsols
(se symbol
och på sockeln ) så att
den låser fast ordentligt.
3) Montera degkroken , ballong- - eller grov-
vispen 3, beroende på vad du ska göra, på
drivaxeln :
– Sätt degkroken , ballong- - eller grov-
vispen 3på drivaxeln så att båda
metallstiften på drivaxeln griper tag i
öppningarna på tillbehöret -3.
– Tryck fast tillbehöret -3 kraftigt på
drivaxeln så att fjädern trycks ihop och
vrid samtidigt tillbehöret en aning motsols
(mot
).
– Släpp tillbehöret. Det sitter nu fast på driv-
axeln .
4) Fyll sedan blandarskålen med de ingredienser som ska bearbetas.
OBSERVERA
► Tänk på att degens volym ökar när den knådas
eller rörs i blandarskålen och att den pres-
sas upp lite mot kanterna av rörelsen. Fyll
därför aldrig blandarskålen ända upp till
kanten!
5) För upplåsningsspaken uppåt och flytta
den fällbara armen med monterat tillbehör
nedåt till arbetspositionen.
6) Sätt locket på blandarskålen .
Page 28

■ 24 │ SE
SKMP 1300 B3
OBSERVERA
► Om du vill kan du montera påfyllningshjäl-
pen på locket :
– Vrid locket en aning tills öppningen
pekar mot dig.
– Haka fast påfyllningshjälpen i fästena
på locket :
Sedan kan du fylla på ingredienser även när
produkten arbetar.
7) Sätt skruvknappen på önskat läge (se
kapitel Hastigheter).
När produkten arbetat färdigt
1) Stäng av produkten med skruvknappen .
2) Ta ev. bort påfyllningshjälpen .
3) Dra loss locket från blandarskålen .
4) För upplåsningsspaken uppåt och flytta den
fällbara armen till det övre läget.
5) Ta bort tillbehöret -3 från drivaxeln
genom att trycka tillbehöret -3mot
drivaxeln och samtidigt vrida det medsols
(mot
). Sedan kan du ta av tillbehöret.
6) Ta bort blandarskålen genom att vrida den
motsols och lyfta av den.
7) Rengör alla delar (se kapitel Rengöring och
skötsel).
Använda mixern
VARNING!
RISK FÖR PERSONSKADOR!
► Låt alltid heta vätskor svalna tills de blir
handljumma (ca 30-40°C) innan du häller
dem i mixern 0.
VARNING! RISK FÖR PERSONSKA-
DOR PÅ GRUND AV VASSA KNIVAR/
ROTERANDE DRIVANORDNING!
► Stoppa aldrig ner handen i den monterade
mixern 0!
► Ta bara av mixern 0 när knivarna 6 står
stilla.
► Använd bara mixern 0 när locket .med
måttkoppen ! sitter på.
► Vid störningar ska du stänga av produkten
och dra ut kontakten så att den inte kan
sättas på av misstag.
AKTA! RISK FÖR SAKSKADOR!
► Använd aldrig blandarskålen och mixern 0
samtidigt! Då kommer motorn att överbelastas!
► När man arbetat med mixern 0 3 minuter
i sträck rekommenderar vi att låta produkten
kallna.
Gör så här för att förbereda produkten att arbeta
med mixern 0: Titta på bild C på den bakre
uppfällbara sidan.
1) För upplåsningsspaken uppåt och flytta den
fällbara armen nedåt till arbetspositionen.
Page 29

SE
│
25 ■
SKMP 1300 B3
2) Ta av skyddskåpan 1 över drivanordningen.
OBSERVERA
► Försäkra dig om att skruvknappen står på
läge 0 innan du sätter mixern på dess drivanordning. Annars startar produkten direkt så
snart mixern låser fast.
3) Sätt mixern 0 på drivanordningen för mixern +
så att arreteringarna på mixerns 0 undersida
griper fast i öppningarna på mixerns drivanordning +. Pilen på mixern 0 måste då peka
mot symbolen
på produkten. Vrid mixern
0 medsols tills det tar stopp. Pilen på mixern 0
pekar då mot symbolen på produkten.
4) Lägg i ingredienserna.
5) Sätt på mixerlocket . med måttkoppen ! så
att listen på mixerlocket . täcker pipen också.
6) Sätt skruvknappen på önskat läge.
OBSERVERA
► Vilken hastighet som passar bäst beror på
konsistensen på det som ska mixas. Ju mer
flytande ingredienser, desto snabbare kan
det mixas.
► För en kort och kraftig pulsdrift sätter du
skruvknappen på minst läge 1 och trycker
samtidigt på PULSE-knappen . PULSEknappen låser inte fast i det här läget för
att motorn inte ska överbelastas. Håll därför
bara PULSE-knappen inne en kort stund.
Fylla på ingredienser
1) Stäng av produkten med skruvknappen .
2) Ta av mixerlocket . och fyll på ingredienserna
eller
3) Vrid måttkoppen ! som sitter på mixerlocket .
i 90° och ta bort den. Fyll sedan på ingredienserna lite åt gången genom öppningen.
När produkten arbetat färdigt
1) Stäng av produkten med skruvknappen .
2) Vrid mixern 0 motsols så att pilen på mixern 0
pekar på symbolen
på produkten och ta
sedan av den.
OBSERVERA
► Rengör helst mixern 0 direkt efter använd-
ningen (se kapitel Rengöring och skötsel).
Då går det lättare att få bort alla rester av
ingredienserna.
Rengöring och skötsel
FARA - RISK FÖR ELCHOCK!
► Dra alltid ut kontakten ur eluttaget innan du ren-
gör produkten! Annars finns risk för elchocker!
Doppa aldrig ner produkten i vatten eller
andra vätskor!
AKTA! RISK FÖR SAKSKADOR!
► Använd inte slipande medel eller starka ren-
göringsmedel. De kan skada produktens yta!
Page 30

■ 26 │ SE
SKMP 1300 B3
OBSERVERA
► Rengör helst produkten direkt efter använd-
ningen. Då är det lättare att få bort alla rester
av livsmedel.
► Plastdelarna kan missfärgas om man bearbe-
tar mycket färgrika ingredienser, t ex morötter.
Missfärgningarna kan tas bort med lite matolja.
Rengöra produkten
■ Torka av produkten med en fuktig trasa. Envisa
fläckar tas bort med lite milt diskmedel på en
trasa. Torka bort rester av diskmedlet med rent
vatten på en trasa. Torka sedan av produkten
ordentligt.
Rengöra tillbehören
■ Rengör blandarskålen , locket , påfyllnings-
hjälpen , mixerlocket . med måttkoppen !,
drivanordningens skyddskåpa 1 och tillbehören -3 i varmt vatten med lite diskmedel.
Ta bort eventuella rester med en diskborste.
Skölj alla delar i rent, varmt vatten och försäkra
dig om att de är helt torra innan du använder
dem igen.
OBSERVERA
► Tillbehören -3, blandarskålen och
mixerlocket . med måttkoppen !kan
också diskas i maskin.
► Akta så att plastdelarna inte kläms fast i
diskmaskinen. Då kan de förlora formen!
► Lägg helst plastdelarna i diskmaskinens övre
korg om det är möjligt.
Rengöra mixern
VARNING!
RISK FÖR PERSONSKADOR!
► Rör inte knivarna 6 med bara händer.
■ Rengör mixern 0 i varmt vatten med lite milt
diskmedel. Skölj sedan av den i rent vatten så
att alla rester av diskmedel försvinner.
För det mesta blir det tillräckligt rent om man gör
så här direkt efter användningen:
1) Fyll den monterade mixern 0 med vatten och
lite diskmedel.
2) Sätt på mixerlocket . med måttkoppen ! så
att listen på locket . täcker pipen också.
3) Sätt på mixern 0 och låt den arbeta i några
sekunder.
4) Häll ut diskvattnet. Ta bort eventuella rester
med en diskborste.
5) Skölj sedan ur mixern 0 med rikligt med rent
vatten så att alla rester av diskmedel försvinner.
OBSERVERA
► Mixern 0 kan diskas i maskin.
► Akta så att mixerns 0 plastdelar inte kläms
fast i diskmaskinen. Då kan de förlora
formen!
Förvaring
■ Linda upp kabeln på kabelhållaren %.
■ Förvara den rengjorda produkten på ett rent,
dammfritt och torrt ställe.
Page 31

SE
│
27 ■
SKMP 1300 B3
Åtgärda fel
Om produkten plötsligt stannar:
■ Produkten har överhettats och det automatiska
säkerhetsstoppet har aktiverats.
– Sätt skruvknappen på läge 0.
– Dra ut kontakten ur uttaget
– Låt produkten svalna i 15 minuter.
– Om produkten inte är tillräckligt kall efter
15 minuter kommer den inte att starta.
– Vänta då i 15 minuter till innan du försöker
igen.
Om produkten inte går att sätta på:
– Kontrollera om kontakten verkligen sitter
i uttaget.
– Kontrollera om den fällbara armen står
i rätt position.
Tekniska data
Nätspänning: 220 - 240 V ~/ 50 Hz
Effektförbrukning: 1300 W
Skyddsklass: II
Max volym
Blandarskål : ca 6,3 l
Mixer 0: ca 1,5 l
Alla delar av produkten som kommer i
kontakt med livsmedel är godkända för
livsmedel.
Vi rekommenderar följande a:
Låt produkten kallna när du arbetat med deg-
kroken , ballong- - eller grovvispen 3 i 10
minuter.
Låt produkten kallna när du arbetat med mixern 0
i 3 minuter.
Om man låter produkten arbeta längre kan den
överhettas och skadas.
Garanti och service
För den här produkten lämnar vi 3 års garanti
från och med inköpsdatum. Produkten har tillverkats med omsorg och testats noga innan leveransen. Spara kassakvittot som köpbevis.
För garantiärenden ber vi dig kontakta vår kundtjänst per telefon. Bara då kan du skicka in
produkten utan kostnad.
Garantin gäller endast för material- eller fabrikationsfel, den täcker inte transportskador, förslitningsdelar eller skador på ömtåliga delar, tex knappar
och batterier. Produkten är endast avsedd för privat
bruk och ska inte användas yrkesmässigt.
Garantin gäller inte vid missbruk och felaktig
behandling, användande av våld och vid ingrepp
som inte gjorts av vår auktoriserade servicefilial.
Dina lagstadgade rättigheter begränsas inte av
denna garanti.
Garantitiden förlängs inte för att man utnyttjat garantin. Det gäller även för utbytta och reparerade
delar. Eventuella skador och brister som existerar
redan vid köpet måste rapporteras så snart produkten packats upp, dock senast två dagar efter
inköpsdatum. När garantitiden är slut måste man
själv betala för eventuella reparationer.
Service Sverige
Tel.: 0770 930739
E-Mail: kompernass@lidl.se
IAN 276995/276996/277709
Service Suomi
Tel.: 010309 3582
E-Mail: kompernass@lidl.fi
IAN 276995/276996/277709
Page 32

■ 28 │ SE
SKMP 1300 B3
Kassering
Produkten får absolut inte
kastas bland hushållssoporna.
Den här produkten faller under
det europeiska direktivet
2012/19/EU.
Lämna in produkten till ett godkänt återvinningsföretag eller din kommunala avfallsanläggning. Följ
gällande föreskrifter. Kontakta din avfallsanläggning om du har några frågor.
Förpackningen består av miljövänligt
material som kan lämnas in till den
lokala återvinningen.
Importör
KOMPERNASS HANDELS GMBH
BURGSTRASSE 21
44867 BOCHUM
GERMANY
www.kompernass.com
Recept
Morotssoppa
Ingredienser:
■ 500 g morötter
■ 2,5 dl vatten
■ 5 dl köttfond (i glasflaska)
■ 1,25 dl grädde
■ 1,25 dl vitt vin
■ salt
■ peppar
■ 50 g kallt smör
■ färsk körvel
Tillagning:
1) Tvätta och skala morötterna.
2) Skär upp dem i bitar som är lagom stora för
mixern 0.
3) Häll 2,5 dl vatten i en kastrull och koka morötterna i 20 minuter. Kör sedan allt i mixern 0
tills det bildas en slät smet utan stora bitar.
4) Häll tillbaka de mosade morötterna i kastrullen.
5) Tillsätt köttfond, grädde och vitt vin.
6) Hetta upp soppan och smaka av.
7) Rör ner smöret i små bitar och dekorera soppan
med körvel.
Page 33

SE
│
29 ■
SKMP 1300 B3
Tonfiskröra
Ingredienser:
■ 1 burk tonfisk i sås med grönsaker
■ 3 msk yoghurt
■ 1 tsk citronsaft, färskpressad
■ 1 nypa salt
■ nymalen peppar
■ 2 hårdkokta, hackade ägg
Till servering:
■ Skivat fullkornsbröd
■ Smör att breda på brödet
■ 1 hårdkokt, hackat ägg
■ Hackad gräslök
Tillagning:
1) Mixa alla ingredienserna till önskad konsistens
i mixern 0 (ca 15 sekunder) och smaka av.
2) Bred smör och tonfiskröra på brödskivorna och
strö hackat ägg och gräslök över.
Traditionella pannkakor
Ingredienser:
■ 2-3 ägg
■ 3,75 dl mjölk
■ 1 nypa salt
■ 250 g mjöl
■ Fett till stekning
Tillagning:
1) Blanda ägg, mjölk och salt med grovvispen 3.
2) Sikta ner mjölet. Rör sedan ihop allt till en slät
smet med grovvispen 3.
3) Låt smeten svälla i ca 20 minuter.
4) Hetta upp fettet och häll lite smet i pannan
med en liten slev (bara så pass mycket att det
täcker stekpannans botten.).
5) Grädda pannkakorna gyllenbruna på båda
sidorna och servera dem varma.
Sockerkaka
Ingredienser:
■ 3 ägg
■ 3 - 4 msk hett vatten
■ 150 g socker
■ 1 kuvert vaniljsocker (ca 7 g)
■ 100 g vanligt vetemjöl (typ 405)
■ 100 g potatismjöl, majsstärkelse eller annan
stärkelse
■ 2 - 3 strukna tsk bakpulver
Tillagning:
1) Lägg bakpapper i botten av en springform
(diameter: 28 cm). Smörj inte kanten, då blir
ytan inte jämnt slät och brun.
2) Vispa äggen i blandarskålen och tillsätt det
heta vattnet.
3) Vispa sedan på högsta hastighet tills smeten
blir pösig i ca 1 minut med grovvispen 3.
4) Rör ner socker och vaniljsocker och fortsätt
vispa på högsta hastighet i 2 minuter.
5) Blanda mjöl, stärkelse och bakpulver, sikta
hälften av blandningen över äggsmeten och
rör ihop det snabbt på läge 4.
6) Tillsätt sedan resten av mjölet på samma sätt
och häll smeten i den förberedda springformen.
7) Grädda genast i den förvärmda ugnen med
över- och undervärme på 175 - 200°C ca
20 - 30 minuter.
Page 34

■ 30 │ SE
SKMP 1300 B3
Mördeg
Ingredienser:
■ 250 g vetemjöl
■ 1/2 struken tsk bakpulver
■ 100 - 125 g socker
■ 1 kuvert vaniljsocker (ca 7 g)
■ 1 nypa salt
■ 1 ägg
■ 125 g smör
Tillagning:
1) Blanda ihop mjöl och bakpulver i blandarskålen och tillsätt sedan övriga ingredienser.
2) Knåda först ihop allt med degkroken i ca
1 minut på läge 2 och sedan i ca 3 minuter på
läge 2 - 4.
3) Knåda inte degen för länge, då kan den bli
för mjuk.
4) Låt degen vila en halvtimme i kylskåpet och
forma den sedan till en tårtbotten eller till
småkakor.
5) Till en tårtbotten kavlar du ut 2/3 av degen
och lägger den i en smord springform.
6) Gör en rulle av resten av degen.
7) Lägg rullen längs kanten av formen och tryck
ut den med två fingrar till en ca 3 cm hög kant.
8) Stick några gånger med en gaffel i bottnen.
9) Förvärm ugnen i ca 5 minuter och grädda
mördegen ca 15 - 20 minuter med över- och
undervärme i 200 - 225 °C.
Mjuk kaka
Ingredienser:
■ 250 g mjukt smör eller margarin
■ 250 g socker
■ 1 kuvert vaniljsocker (ca 7 g)
■ 1 nypa salt
■ 4 ägg
■ 500 g vetemjöl
■ 1 kuvert bakpulver (ca 7 g)
■ ca 1,25 dl mjölk
Tillagning:
1) Lägg alla ingredienserna i blandarskålen
och rör ihop dem med grovvispen 3 i 1/2 minut på läge 1 därefter i 30 sekunder på läge
2 och till sist ca 5 minuter på läge 4.
2) Smörj en bakform eller lägg bakpapper i den.
3) Fyll formen och grädda kakan ca 50 - 60 minuter med över- och undervärme i 175 - 200 °C.
4) Testa om kakan är genomgräddad innan du
tar ut den ur ugnen: Stick då in en trästicka mitt
i kakan. Om den är torr när du drar ut den är
kakan färdig.
5) Vänd formen över ett galler och låt kakan
svalna på det.
Page 35

SE
│
31 ■
SKMP 1300 B3
Jäsdeg
Ingredienser:
■ 500 g vetemjöl
■ 25 g färsk jäst eller 1 paket torrjäst
■ ca 2,5 dl ljummen mjölk
■ 80 g smör eller margarin (rumsvarmt)
■ 80 g socker
■ 1 ägg
Tillagning:
1) Lägg mjöl, smulad färsk jäst eller torrjäst och
alla övriga ingredienser i skålen (inte direkt
på jästen).
2) Blanda långsamt ihop alltihop med degkroken
på läge 1 och sedan i 3 - 4 minuter på
läge 3.
3) Täck skålen med en ren kökshandduk och låt
degen jäsa upp ordentligt på ett varmt ställe.
4) Knåda degen en gång till.
5) Sedan är degen färdig att bakas ut på olika
sätt.
Våfflor
Ingredienser:
■ 200 g socker
■ 500 g mjöl
■ 5 g bakpulver
■ 5 ägg
■ 4 dl mjölk
■ 250 g smör (rumstempererat),
■ 2 kuvert vaniljsocker (ca 14 g)
Tillagning:
1) Tillsätt ägg, socker och smör i blandarskålen
och rör ihop allt till en slät smet med ballongvispen -.
2) Tillsätt mjöl, vaniljsocker och bakpulver.
3) Rör till sist ner mjölken lite i taget tills smeten
får en slät och mjuk konsistens.
4) Grädda våfflorna i ett våffeljärn.
Banan- och vaniljshake
Ingredienser:
■ 3 bananer
■ 5 dl mjölk
■ 2 kuvert vaniljsocker (ca 14 g)
■ 1 msk vaniljglass
Tillagning:
1) Skala bananerna.
2) Lägg de skalade bananerna, mjölken, vaniljglassen och vaniljsockret i mixern 0.
3) Mixa allt på läge 8.
Page 36

■ 32 │ SE
SKMP 1300 B3
Smoothie med kiwi och banan
Ingredienser:
■ 2 dl apelsinjuice (färskpressad)
■ 1 kiwi
■ 1/2 banan
Tillagning:
1) Skala kiwin.
2) Skala bananen.
3) Tillsätt kiwi, banan och apelsinsaft i mixern 0.
4) Mixa allt på läge 8.
Page 37

PL
│
33 ■
SKMP 1300 B3
Spis treści
Wstęp ...............................................................34
Użytkowanie zgodne z przeznaczeniem ...................................34
Zakres dostawy .......................................................34
Opis urządzania .......................................................34
Wskazówki bezpieczeństwa ............................................35
Czynności przygotowawcze .............................................38
Stopnie prędkości .....................................................38
Praca przy użyciu haków do wyrabiania ciasta,
trzepaczek i łopatek do mieszania .......................................39
Po pracy .........................................................................40
Korzystanie z miksera ..................................................40
Dodawanie składników .............................................................41
Po pracy .........................................................................41
Czyszczenie i konserwacja ..............................................41
Czyszczenie urządzenia ............................................................42
Czyszczenie akcesoriów ............................................................42
Mycie miksera ....................................................................42
Przechowywanie ......................................................42
Usuwanie usterek .....................................................43
Dane techniczne .......................................................43
Gwarancja i serwis ....................................................43
Utylizacja ............................................................44
Importer .............................................................44
Przepisy .............................................................44
Zupa z marchwi ...................................................................44
Pasta z tuńczyka ..................................................................45
Tradycyjne naleśniki ................................................................45
Ciasto biszkoptowe ................................................................45
Ciasto kruche .....................................................................46
Rzadkie ciasto ....................................................................46
Ciasto drożdżowe .................................................................47
Gofry ...........................................................................47
Shake bananowo-waniliowy .........................................................47
Smoothie z banana i owoców kiwi ....................................................48
Page 38

■ 34 │ PL
SKMP 1300 B3
Wstęp
Serdecznie gratulujemy zakupu nowego urządzenia.
Wybrany produkt charakteryzuje się wysoką
jakością. Instrukcja obsługi jest częścią składową
produktu. Zawiera ona ważne informacje na temat
bezpieczeństwa, użytkowania i utylizacji. Przed
rozpoczęciem użytkowania produktu należy zapoznać się ze wszystkimi informacjami dotyczącymi
obsługi i bezpieczeństwa. Produkt należy użytkować
wyłącznie zgodnie z zamieszczonym tu opisem
oraz w podanym zakresie zastosowań. W przypadku przekazania urządzenia osobie trzeciej
należy dołączyć również całą dokumentację.
Użytkowanie zgodne z
przeznaczeniem
Niniejsze urządzenie przeznaczone jest wyłącznie
do przetwarzania produktów spożywczych w
ilościach typowych dla gospodarstwa domowego.
Urządzenie przeznaczone jest wyłącznie do stosowania w gospodarstwie domowym. Nie należy go
używać do celów komercyjnych!
Urządzenie przeznaczone jest wyłącznie do użytku
prywatnego, wewnątrz pomieszczeń. Nie używać
urządzenia na otwartej przestrzeni!
Urządzenie można użytkować wyłącznie z oryginalnym oprzyrządowaniem.
Zakres dostawy
Profesjonalny robot kuchenny
Naczynie do mieszania z przykrywką
Mikser z przykrywką i kubkiem miarowym
Haki do wyrabiania ciasta
Trzepaczka do piany
Końcówki do zagniatania
Instrukcja obsługi
Skrócona instrukcja obsługi
WSKAZÓWKA
► Bezpośrednio po rozpakowaniu sprawdź,
czy dostarczony produkt jest kompletny oraz
czy nie wykazuje on żadnych uszkodzeń. Jeśli
będzie taka potrzeba, zwróć się do serwisu.
Opis urządzania
Rozłóż rozkładane strony części przedniej i tylnej
okładki tej instrukcji obsługi:
przednia rozkładana strona
Rysunek A:
Ramię wychylne
Dźwignia zwalniająca
Przełącznik obrotowy
Przycisk PULSE
Podstawa
Misa do mieszania
Oś napędowa
Rysunek B:
Lejek do napełniania
Pokrywka
Hak do wyrabiania ciasta
- Trzepaczka do piany
3 Łopatka do mieszania
Tylna strona rozkładana:
Rysunek C:
! Mały kubek miarowy
. Pokrywka miksera
0 Mikser
6 Nóż
1 Pokrywka ochronna napędu
% Miejsce na zwinięcie kabla
+ Napęd miksera
Page 39

PL
│
35 ■
SKMP 1300 B3
Wskazówki bezpieczeństwa
NIEBEZPIECZEŃSTWO PORAŻENIA
PRĄDEM ELEKTRYCZNYM!
► Podłączać urządzenie tylko i wyłącznie do prawidłowo zainstalowa-
nego i uziemionego gniazda zasilania. Napięcie w sieci elektrycznej
musi być zgodne z danymi podanymi na tabliczce znamionowej
urządzenia.
► Należy zwracać uwagę na to, aby podczas pracy urządzenia kabel
sieciowy nie był mokry ani wilgotny. Kabel należy tak poprowadzić,
aby nie został zakleszczony ani uszkodzony.
► Kabel sieciowy trzymać z dala od gorących powierzchni.
► Nie wolno samodzielnie wykonywać żadnych napraw urządzenia.
Wszelkie naprawy mogą być wykonywane tylko przez serwis lub
przez wykwalifikowanych specjalistów.a
► Wyciągnąć wtyk z gniazda sieciowego, gdy urządzenie jest
czyszczone lub w przypadku błędnego działania. Samo wyłączenie
urządzenia nie wystarczy, gdyż jest ono nadal podłączone do napięcia sieci, dopóki wtyk sieciowy znajduje się w gnieździe sieciowym.
► Wyciągnij wtyk z gniazda sieciowego, gdy urządzenie nie jest używane.
► Naprawę uszkodzonego wtyku lub kabla sieciowego zleć niezwłocznie
wykwalifikowanemu specjaliście lub serwisowi, aby uniknąć wszelkich
zagrożeń.
► Urządzenie oraz jego kabel zasilający należy trzymać poza zasię-
giem dzieci.
Nigdy nie zanurzać urządzenia w wodzie ani żadnej innej cieczy.
Page 40

■ 36 │ PL
SKMP 1300 B3
OSTRZEŻENIE! NIEBEZPIECZEŃSTWO OBRAŻEŃ!
► Podczas demontażu lub montażu akcesoriów należy z zasady
zawsze odłączać urządzenie od zasilania sieciowego. W ten sposób
można uniknąć przypadkowego włączenia urządzenia.
Po przerwie w zasilaniu urządzenie ponownie się uruchomi!
► Przy braku nadzoru oraz przed montażem, złożeniem, rozłożeniem
lub czyszczeniem należy zawsze odłączać urządzenie od zasilania
sieciowego.
► Dzieci nie mogą używać tego urządzenia.
► Do niniejszego urządzenia należy stosować wyłącznie oryginalne
akcesoria. Akcesoria innych producentów mogą nie być do tego celu
odpowiednie i mogą stanowić zagrożenia podczas użytkowania!
► To urządzenie może być używane przez osoby o zmniejszonych
zdolnościach fizycznych, sensorycznych lub umysłowych lub też
osoby nieposiadające odpowiedniego doświadczenia i/lub wiedzy,
wyłącznie pod nadzorem lub po przeszkoleniu w zakresie bezpiecznego używania urządzenia oraz wynikających z niego zagrożeń.
► Dzieciom nie wolno bawić się urządzeniem.
► Uwaga: Nóż jest bardzo ostry!
► Zachowaj ostrożność podczas obsługi oraz czyszczenia noża!
Page 41

PL
│
37 ■
SKMP 1300 B3
OSTRZEŻENIE! NIEBEZPIECZEŃSTWO OBRAŻEŃ!
► Uwaga: Nóż jest bardzo ostry! Dlatego podczas zdejmowania po-
jemnika do miksowania należy zachować ostrożność.
► Nie używać urządzenia do innych celów niż opisane w tej instrukcji.
W przeciwnym razie istnieje zagrożenie odniesieniem obrażeń!
► Akcesoria wymieniać wyłącznie po zatrzymaniu napędu oraz po
wyjęciu wtyku sieciowego. Urządzenie po wyłączeniu obraca się
jeszcze przez pewien czas!
► Nigdy nie zostawiać urządzenia bez nadzoru.
► Przed wymianą osprzętu lub elementów dodatkowych, które podczas
pracy są w ruchu, należy wyłączyć urządzenie i odłączyć je od sieci
elektrycznej.
► W czasie pracy urządzenia do misy do mieszania lub miksera wrzu-
cać wyłącznie składniki przeznaczone do danego zastosowania.
► Nigdy nie wkładać rąk ani wrzucać przedmiotów obcych do lejka
do napełniania lub do miksera, aby zapobiec obrażeniom i uszkodzeniom urządzenia.
UWAGA! SZKODY MATERIALNE!
► Nigdy nie uruchamiać urządzenia bez uprzedniego umieszczenia w
nim składników spożywczych! Niebezpieczeństwo przegrzania!
► Nie nalewaj do urządzenia żadnych gorących składników!
Page 42

■ 38 │ PL
SKMP 1300 B3
Czynności przygotowawcze
1) Wyjmij wszystkie elementy z kartonu i usuń
opakowania oraz ewentualnie folie ochronne
i naklejki.
2) W
yczyść wszystkie elementy zgodnie z opisem
w rozdziale „Czyszczenie i pielęgnacja”.
Upewnij się, że wszystkie części są całkowicie
suche.
3) Rozwiń do końca kabel sieciowy z nawijaka
kabla %.
4) Ustaw urządzenie na gładkiej, czystej powierzchni i przymocuj je za pomocą czterech
przyssawek
5) Podłącz wtyk do gniazda zasilania.
Stopnie prędkości
Stopień Zastosowanie nadaje się do ...
1 - 2
wszystkie
- Pozycja startowa
dla każdego procesu miksowania
i mieszania
- Przy dodawaniu
składników
Haki do wyrabiania ciasta
Łopatka do
mieszania 3
- Wyrabia i
miesza stałe
ciasto lub twardsze składniki
2 - 4
Łopatka do
mieszania 3
- Mieszanie
gęstego ciasta
- Mieszanie masła
i mąki
- Mieszanie ciasta
drożdżowego
Haki do wyrabiania ciasta
- Wyrabianie
ciasta drożdżowego
- Wyrabianie
gęstego ciasta
4 - 6
Łopatka do
mieszania 3
- Zaczyn na ciasto
- Ubijanie masła
z cukrem
- Zaczyn na
ciasteczka
6 - 10
Trzepaczka do
piany -
- Bita śmietana
- Białko
- Majonez
- Ubijanie na
pianę masła
Pulse
Mikser 0
- Miksowanie i rozdrabnianie miękkich lub płynnych
składników
Page 43

PL
│
39 ■
SKMP 1300 B3
Praca przy użyciu haków do
wyrabiania ciasta, trzepaczek
i łopatek do mieszania
OSTRZEŻENIE!
NIEBEZPIECZEŃSTWO OBRAŻEŃ!
► W czasie pracy urządzenia nigdy nie wkła-
daj rak do misy do mieszania ! Niebezpieczeństwo odniesienia obrażeń o obracające
się elementy!
► Oprzyrządowanie wymieniać wyłącznie po za-
trzymaniu napędu! Po wyłączeniu urządzenia
napęd obraca się jeszcze przez pewien czas.
► W przypadku błędnego działania wyłącz
urządzenie i wyciągnij wtyk z gniazda, by nie
dopuścić do niezamierzonego ponownego
włączenia się urządzenia.s
UWAGA! SZKODY MATERIALNE!
► Podczas prac z użyciem haków do wyrabiania
ciasta , trzepaczek do ubijania piany -
lub łopatek do mieszania 3 zalecamy po
10 minutach pracy pozostawienie urządzenie do ostygnięcia.
WSKAZÓWKA
► Jeśli pracujesz z założonymi końcówkami
do wyrabiania ciasta , trzepaczkami do
piany - i łopatkami do mieszania 3, musi
być założona pokrywka ochronna napędu 1.
Nieprawidłowo zamknięte urządzenie nie
włączy się.
Aby przygotować urządzenie do pracy z użyciem
haków do wyrabiania ciasta , trzepaczek do
piany - i łopatek do mieszania 3, postępuj
w następujący sposób:
1) Naciśnij dźwignię zwalniającą do góry i ustaw
ramię wychylne w najwyższym położeniu.
2) Umieść misę do mieszania w taki sposób,
aby zatrzaski na misce do mieszania za-
blokowały się w zagłębieniu w podstawie .
Obróć misę do mieszania w prawo (patrz
symbole
i na podstawie ), aby
została zablokowana i była dobrze osadzona.
3) W zależności od zadania zamontuj haki do
wyrabiania ciasta , trzepaczkę do ubijania
piany - lub łopatkę do mieszania 3 na osi
napędowej :
– Załóż hak do wyrabiania ciasta , trze-
paczkę do ubijania piany - lub łopatkę
do mieszania 3w taki sposób na oś
napędową , by oba metalowe trzpienie
na osi napędowej weszły w zagłębienia
na wkładzie -3.
– Wciśnij wkład -3 mocno na oś na-
pędu , aby sprężyna się zacisnęła i obróć
przy tym wkład nieco w prawo (kierunek
).
– Puść wkład. Jest on teraz mocno osadzony
na osi napędowej .
4) Dodaj składniki do misy do mieszania .
WSKAZÓWKA
► Pamiętaj, że podczas zagniatania, wzgl.
mieszania ciasta w misie do mieszania
przybywa lub na skutek ruchu obrotowego
ciasto nieco podchodzi do góry. Dlatego też,
nigdy nie wypełniaj misy do mieszania po
brzegi!
5) Naciśnij dźwignię zwalniającą do góry i
przesuń ramię wychylne wraz z zamontowanym wkładem do dołu, do pozycji roboczej.
6) Załóż pokrywkę na misę do mieszania .
Page 44

■ 40 │ PL
SKMP 1300 B3
WSKAZÓWKA
► W razie potrzeby można zamontować lejek
do napełniania na pokrywie :
– Obróć pokrywę nieco, aby otwór
wskazywał w swoją stronę.
– Zaczep lejek do napełniania w szczeliny
w pokrywie :
Możesz teraz dodawać składniki nawet w czasie
pracy.
7) Ustaw przełącznik obrotowy na żądanym
poziomie prędkości (patrz rozdział „Stopnie
prędkości”).
Po pracy
1) Wyłącz urządzenie przełącznikiem obrotowym .
2) Jeśli zamontowany: zdejmij lejek do napełniania .
3) Zdejmij pokrywę z misy do mieszania .
4) Naciśnij dźwignię zwalniającą do góry
i ustaw ramię wychylne w najwyższym
położeniu.
5) Zdejmij wkład -3 z osi napędowej ,
wciskając wkład -3 w kierunku osi
napędowej i jednocześnie obracając go
w prawo (kierunek
). Następnie można
wyjąć wkład.
6) Zdejmij misę do mieszania , obracając ją
w prawo i zdejmując do góry.
7) Oczyść wszystkie elementy (patrz rozdział
„Czyszczenie i pielęgnacja“).
Korzystanie z miksera
OSTRZEŻENIE!
NIEBEZPIECZEŃSTWO OBRAŻEŃ!
► Gorące płyny ostudź zawsze do letniej tem-
peratury (około 30-40°C) i dopiero potem
wlej je do miksera 0.
OSTRZEŻENIE! NIEBEZPIECZEŃSTWO
SKALECZENIA O OSTRE NOŻE /
OBRACAJĄCY SIĘ NAPĘD!
► Nigdy nie sięgać do środka założonego
miksera 0!
► Zdejmuj mikser 0 tylko po pełnym zatrzyma-
niu się noży 6.
► Korzystaj z miksera 0 tylko przy założonej
pokrywce miksera .z kubkiem miarowym !.
► W przypadku błędnego działania wyłącz
urządzenie i wyciągnij wtyk z gniazda, by nie
dopuścić do niezamierzonego ponownego
włączenia się urządzenia.
UWAGA! SZKODY MATERIALNE!
► Nigdy nie używaj misy do mieszania i
miksera 0 w tym samym czasie! Prowadzi
to do przeciążenia silnika!
► Podczas prac z użyciem miksera 0, zale-
camy po 3 minutach pracy pozostawienie
urządzenie do ostygnięcia.
Aby przygotować urządzenie do użycia miksera 0,
postępuj w następujący sposób: Dla ułatwienia,
skorzystaj z rysunku C znajdującego się na tylnej
rozkładanej stronie okładki.
1) Naciśnij dźwignię zwalniającą do góry
i przesuń ramię wychylne do dołu, do
pozycji roboczej.
Page 45

PL
│
41 ■
SKMP 1300 B3
2) Zdejmij pokrywkę ochronną napędu 1.
WSKAZÓWKA
► Upewnij się, że przełącznik obrotowy
ustawiony jest na „0“, zanim ustawisz mikser
na napędzie miksera. W przeciwnym razie
urządzenie uruchomi się niezwłocznie, gdy
tylko mikser się zatrzaśnie.
3) Załóż mikser 0 w taki sposób na napęd
miksera +, aby blokady od dołu miksera 0
chwytały w zagłębienia napędu miksera +.
Strzałka na mikserze 0 musi przy tym wska-
zywać na symbol
na urządzeniu. Obróć
mikser 0 aż do oporu w prawo. Strzałka na
mikserze 0 wskazuje wtedy na symbol
na urządzeniu.
4) Dodać składniki.
5) Załóż pokrywkę miksera . z kubkiem miarowym ! tak, aby uszczelka na pokrywce
miksera . obejmowała również wylewkę.
6) Ustaw przełącznik obrotowy na żądany
poziom prędkości.
WSKAZÓWKA
► Idealna prędkość zależy od konsystencji
mieszanego produktu. Im bardziej ciekła jest
zawartość, tym szybciej można miksować.
► Na potrzeby krótkiego, mocnego sterowania
impulsowego ustaw przełącznik obrotowy
co najmniej na poziom 1 i jednocześnie
naciśnij przycisk PULSE . Przycisk PULSE
nie blokuje się, aby nie przeciążyć silnika.
Dlatego przytrzymuj przycisk PULSE tylko
przez krótki czas w tym położeniu.
Dodawanie składników
1) Wyłącz urządzenie przełącznikiem obrotowym .
2) Zdejmij pokrywkę miksera . i dodaj składniki
lub
3) Obróć kubek miarowy !, który znajduje się
na pokrywce miksera . o 90° i zdejmij go.
Następnie po kolei wkładaj składniki przez
przewidziany do tego otwór.
Po pracy
1) Wyłącz urządzenie przełącznikiem obrotowym .
2) Obróć mikser 0 w lewo tak, aby strzałka na
mikserze 0 wskazywała na symbol
na
urządzeniu i zdejmij go.
WSKAZÓWKA
► Oczyść mikser 0najlepiej natychmiast
po użyciu (patrz rozdział „Czyszczenie i
pielęgnacja”). Wtedy łatwiej jest usuwać
pozostałości produktów spożywczych.
Czyszczenie i konserwacja
NIEBEZPIECZEŃSTWO PORAŻENIA
PRĄDEM ELEKTRYCZNYM!
► Przed każdym czyszczeniem należy wycią-
gnąć wtyk z gniazda sieciowego! Istnieje
zagrożenie porażenia prądem elektrycznym!
W żadnym przypadku nie zanurzaj urządzenia w wodzie ani w innej cieczy!
UWAGA! SZKODY MATERIALNE!
► Nie używać żrących ani szorujących środków
czyszczących. Mogłyby one uszkodzić
powierzchnie!
Page 46

■ 42 │ PL
SKMP 1300 B3
WSKAZÓWKI
► Urządzenie czyścić najlepiej natychmiast po
użyciu. Wtedy łatwiej jest usuwać pozostałości
produktów spożywczych.
► Podczas przetwarzania farbujących produktów,
jak na przykład marchew, tworzywa sztuczne
mogą się zabarwić. Takie przebarwienia
można usunąć, używając do tego niewielkiej
ilości oleju jadalnego.
Czyszczenie urządzenia
■ Urządzenie należy czyścić zwilżoną szmatką.
Do wyczyszczenia uporczywych zabrudzeń
dodać na szmatkę delikatnego środka do mycia
naczyń. Wytrzeć resztki środka do mycia ściereczką zwilżoną w czystej wodzie. Następnie
dobrze wysusz urządzenie.
Czyszczenie akcesoriów
■ Czyść misę do mieszania , pokrywkę ,
lejek do napełniania , pokrywkę miksera .
z kubkiem miarowym !, pokrywkę ochronną
napędu 1 oraz wkłady -3 w ciepłej
wodzie z dodatkiem niewielkiej ilości płynu do
mycia naczyń. Ewentualnie pozostałe resztki
usuwaj szczotką do zmywania. Wypłucz wszystkie części w czystej, ciepłej wodzie i przed
ponownym użyciem upewnij się, że wszystkie
części są suche.
WSKAZÓWKA
► Wkłady -3, misa do mieszania oraz
pokrywka miksera . z kubkiem miarowym !
są również przystosowane do zmywania
w zmywarce do naczyń.
► Podczas zmywania w zmywarce do naczyń
należy uważać na to, aby części z tworzywa
sztucznego nie zakleszczyły się. W przeciwnym razie mogą się odkształcić!
► O ile to możliwe, części te należy układać
w górnym koszu zmywarki.
Mycie miksera
OSTRZEŻENIE!
NIEBEZPIECZEŃSTWO OBRAŻEŃ!
► Nie dotykać noży 6 gołymi rękoma.
■ Czyść mikser 0 w ciepłej wodzie dodając do
niej delikatnego płynu do mycia naczyń. Spłucz
następnie wszystkie elementy czystą wodą, aby
na częściach nie pozostały żadne pozostałości
płynu do mycia naczyń.
W większości przypadków, wystarczającą higienicznie czystość można uzyskać przez czyszczenie
bezpośrednio po użyciu, korzystając z następującej
alternatywy:
1) Do założonego miksera 0 dodaj wodę
z płynem do mycia naczyń.
2) Załóż pokrywkę miksera . z kubkiem miarowym ! tak, aby uszczelka na pokrywce
miksera . obejmowała również wylewkę.
3) Włącz mikser 0 na kilka sekund.
4) Wylej wodę do płukania. Ewentualnie pozostałe
resztki usuwaj szczotką do zmywania.
5) Następnie wypłucz mikser 0 dużą ilością
czystej wody, by usunąsć resztki płynu do
mycia naczyń.
WSKAZÓWKA
► Mikser 0 nadaje się do zmywania w zmy-
warce do naczyń.
► Podczas zmywania w zmywarce do naczyń
należy uważać na to, aby części miksera 0
wykonane z tworzywa sztucznego nie zakleszczyły się. W przeciwnym razie może się
on odkształcić!
Przechowywanie
■ Kabel sieciowy nawiń na nawijak kabla %.
■ Umyte urządzenie należy przechowywać w
czystym, wolnym od pyłów i suchym miejscu.
Page 47

PL
│
43 ■
SKMP 1300 B3
Usuwanie usterek
Jeśli urządzenie nagle się zatrzyma:
■ Urządzenie uległo przegrzaniu i uruchomił się
automatyczny wyłącznik bezpieczeństwa.
– Przełącznik obrotowy ustaw w położeniu 0.
– Wyjmij wtyk z gniazda zasilania.
– Pozostaw urządzenie na 15 minut do
ostygnięcia.
– Jeśli robot po 15 minutach nadal nie ostygł,
nie będzie można go można jeszcze
uruchomić.
– Odczekaj kolejne 15 minut i ponownie
włącz urządzenie.
Jeśli nie można włączyć urządzenia:
– Sprawdź, czy wtyk sieciowy jest włożony
do gniazda sieciowego.
– Sprawdź, czy ramie wychylne znajduje
się w prawidłowym położeniu.
Dane techniczne
Napięcie sieciowe: 220 - 240 V ~/ 50 Hz
Pobór mocy: 1300 W
Klasa ochrony: II
maks. pojemność
Misa do mieszania : ok. 6,3 l
Mikser 0: ok. 1,5 l
Wszystkie części tego urządzenia mające
kontakt z żywnością, są do tego odpowiednio przystosowane.
Zalecamy stosowanie następujących czasów pracy:
Podczas prac z użyciem haków do wyrabiania
ciasta , trzepaczek do ubijania piany - lub
łopatek do mieszania 3 należy po 10 minutach
pracy pozostawić urządzenie do ostygnięcia.
Podczas prac z użyciem miksera 0 należy po 3 minutach pracy pozostawić urządzenie do ostygnięcia.
W przypadku przekroczenia tych czasów pracy
może dojść do uszkodzenia urządzenia wskutek
przegrzania.
Gwarancja i serwis
To urządzenie objęte jest 3-letnią gwarancją,
licząc od daty zakupu. Urządzenie zostało
starannie wykonane i przed wysyłką z zakładu
poddane skrupulatnej kontroli. Paragon należy
zachować jako dowód zakupu. W przypadku
konieczności przeprowadzenia naprawy gwarancyjnej należy skontaktować się telefonicznie
z najbliższym punktem serwisowym. Tylko w
ten sposób można zagwarantować bezpłatną
wysyłkę zakupionego produktu.
Gwarancja obejmuje wyłącznie wady materiałowe i fabryczne, nie obejmuje natomiast szkód
transportowych, części ulegających zużyciu ani
uszkodzeń części łatwo łamliwych, np. wyłącznika
lub akumulatorów. Produkt przeznaczony jest wyłącznie do użytku domowego, a nie do zastosowań przemysłowych.
Niewłaściwe użytkowanie urządzenia, używanie
go w sposób niezgodny z jego przeznaczeniem,
użycie siły lub ingerencja w urządzenie, dokonywana poza naszymi autoryzowanymi punktami
serwisowymi powoduje utratę gwarancji.
Niniejsza gwarancja nie ogranicza ustawowych
praw nabywcy urządzenia.
Wykonanie usługi gwarancyjnej nie przedłuża
okresu gwarancji. Dotyczy to również wymienionych i naprawionych części. Wszelkie szkody i
wady wykryte w chwili zakupu należy zgłosić
bezpośrednio po rozpakowaniu urządzenia, nie
później niż po upływie dwóch dni od daty zakupu.
Po upływie okresu gwarancji wszelkie naprawy są
wykonywane odpłatnie.
Serwis Polska
Tel.: 22 397 4996
E-Mail: kompernass@lidl.pl
IAN 276995/276996/277709
Page 48

■ 44 │ PL
SKMP 1300 B3
Utylizacja
W żadnym przypadku nie
wolno wyrzucać urządzenia
wraz z normalnymi odpadami
domowymi. Ten produkt podlega dyrektywie europejskiej
nr 2012/19/EU.
Zużyte urządzenie należy oddać do certyfikowanego zakładu utylizacji odpadów lub do
komunalnego zakładu oczyszczania. Przestrzegać
aktualnie obowiązujących przepisów. W razie
pytań i wątpliwości dotyczących zasad utylizacji
skontaktuj się z najbliższym zakładem utylizacji.
Opakowanie urządzenia jest wykonane
z materiałów przyjaznych dla środowiska
naturalnego, które można zutylizować
w lokalnych punktach recyklingu.
Importer
KOMPERNASS HANDELS GMBH
BURGSTRASSE 21
44867 BOCHUM
GERMANY
www.kompernass.com
Przepisy
Zupa z marchwi
Składniki:
■ 500 g marchewki
■ 250 ml wody
■ 500 ml wywaru mięsnego (słoik)
■ 125 ml śmietany
■ 125 ml białego wina
■ Sól
■ Pieprz
■ 50 g zimnego masła
■ Świeża trybula
Przygotowanie:
1) Umyj i obierz marchew.
2) Pokrój marchew tak drobno, aby dobrze pasowała do miksera 0.
3) Dodaj 250 ml wody do garnka i gotuj przez
w nim marchew przez 20 minut. Następnie
zmiksuj wszystko w mikserze 0, aż nie pozo-
staną żadne większe kawałki.
4) Wlej zmiksowaną marchew ponownie do
garnka.
5) Teraz dodaj wywar mięsny, śmietanę i białe wino.
6) Podgrzej zupę i spróbuj ją.
7) Wymieszaj masło w małych kawałkach w zupie
i dodawaj odpowiednio do smaku trybulę.
Page 49

PL
│
45 ■
SKMP 1300 B3
Pasta z tuńczyka
Składniki:
■ 1 puszka tuńczyka w sosie z warzywami
■ 3 łyżki stołowe jogurtu
■ 1 łyżeczka soku świeżo wyciśniętego z cytryny
■ 1 szczypta soli
■ Czarny pieprz z młynka
■ 2 jajka na twardo, pokrojone w kostkę
Do przygotowania:
■ Pieczywo pełnoziarniste w kromkach
■ Masło do posmarowania
■ 1 jajko na twardo, pokrojone w kostkę
■ Szczypiorek, siekany
Przygotowanie:
1) Wymieszać wszystkie składniki w mikserze 0
aż do osiągnięcia wymaganej konsystencji
(około 15 sekund) i następnie spróbować.
2) Posmarować chleb masłem i pastą z tuńczyka
oraz posypać wszystko posiekanym jajkiem
i szczypiorkiem.
Tradycyjne naleśniki
Składniki:
■ 2-3 jaja
■ 375 ml mleka
■ 1 szczypta soli
■ 250 g mąki
■ Tłuszcz do smażenia
Przygotowanie:
1) Wymieszać jajka, mleko i sól łopatką do
mieszania 3.
2) Przesiać mąkę i dodać. Wymieszać wszystko
łopatką do mieszania 3, aż uzyska się gładkie
ciasto.
3) Pozostaw ciasto na ok. 20 minut, by odpoczęło.
4) Rozgrzać tłuszcz i nalewać małą łyżką wazową
ciasto. (Zawsze tylko tyle, aby cienko pokryte
zostało dno patelni.)
5) Piecz naleśniki z obu stron na złoty kolor i
podawaj je gorąco.
Ciasto biszkoptowe
Składniki:
■ 3 jaja
■ 3 - 4 łyżki stołowe gorącej wody
■ 150 g cukru
■ 1 opakowanie cukru waniliowego
■ 100 g mąki, typ 405
■ 100 g mąki ziemniaczanej
■ 2-3 płaskie łyżeczki proszku do pieczenia
Przygotowanie:
1) Wyłóż dno tortownicy (o średnicy: 28 cm)
papierem do pieczenia. Nie smaruj brzegu,
gdyż powierzchnia nie będzie równomiernie
gładka i równomiernie zbrązowiona.
2) Ubij całe jaja w misie do mieszania i dodaj
do nich gorącej wody.
3) Następnie ubijaj całość przez około 1 minutę
na najwyższym poziomie prędkości trzepaczką
do ubijania piany 3 aż do uzyskania piany.
4) Wymieszaj cukier i cukier waniliowy i ubijaj
wszystko przez 2 minuty na najwyższym
poziomie prędkości.
5) Dodaj mąkę, mąkę ziemniaczaną i proszek
do pieczenia i przesiej połowę ilości na krem
z jaj i wymieszaj wszystko krótko na poziomie
prędkości 4.
6) Następnie wymieszaj pozostałą mąkę w taki
sam sposób, a następnie nalej ciasto do przygotowanej tortownicy.
7) Natychmiast piecz wszystko w rozgrzanym
wcześniej piekarniku przy włączonym ogrzewaniu górnym i dolnym w temp. 175-200°C
przez około 20 - 30 minut.
Page 50

■ 46 │ PL
SKMP 1300 B3
Ciasto kruche
Składniki:
■ 250 g mąki pszennej
■ 1/2 płaskiej łyżeczki proszku do pieczenia
■ 100-125 g cukru
■ 1 opakowanie cukru waniliowego
■ 1 szczypta soli
■ 1 jajko
■ 125 g masła
Przygotowanie:
1) Wymieszaj mąkę i proszek do pieczenia w
misie do mieszania , a następnie dodaj
wszystkie pozostałe składniki.
2) Ugniataj wszystko hakiem do wyrabiania
ciasta najpierw przez około 1 minutę na
poziomie 2, a następnie przez około 3 minuty
na poziomie 2-4.
3) Nie ugniataj ciasta zbyt długo, w przeciwnym
razie ciasto mogłyby stać się zbyt miękkie.
4) Wstaw ciasto do lodówki na pół godziny i
wyrób je następnie do uzyskania podkładu
pod tort lub ciasteczek.
5) W celu uzyskania podkładu tortowego rozwałkuj 2/3 ciasta i umieść je w wysmarowanej
tłuszczem tortownicy.
6) Resztę ciasta zwiń w rolkę.
7) Ułóż tę rolkę jako brzeg na cieście i dociśnij
ją dwoma palcami do krawędzi, aby uzyskać
brzeg o wysokości ok. 3 cm.
8) Nakłuj ciasto widelcem kilka razy.
9) Rozgrzej piekarnik przez około 5 minut i piecz
kruche ciasto przez ok. 15 - 20 minut przy
włączonym ogrzewaniu górnym i dolnym w
temp. 200-225°C.
Rzadkie ciasto
Składniki:
■ 250 g miękkiego masła lub margaryny
■ 250 g cukru
■ 1 opakowanie cukru waniliowego
■ 1 szczypta soli
■ 4 jaja
■ 500 g mąki pszennej
■ 1 opakowanie proszku do pieczenia
■ ok. 125 ml mleka
Przygotowanie:
1) Umieść wszystkie składniki w misie do mieszania i mieszaj wszystko łopatka do mieszania
3 przez 1/2 minuty na poziomie 1, następnie
przez 30 sekund na poziomie 2, a następnie
przez 5 minut na poziomie 4.
2) Nasmaruj tłuszczem formę do pieczenia lub
wyłóż ją papierem do pieczenia.
3) Wypełnij formę do pieczenia i piecz kruche
ciasto przez ok. 50 - 60 minut przy włączonym
ogrzewaniu górnym i dolnym w temp. 175200°C.
4) Przed wyjęciem ciasta z piekarnika należy
sprawdzić, czy się upiekło: W tym celu nakłuj
ciasto drewnianym patyczkiem na środku ciasta. Gdy ciasto nie przykleja się do patyczka,
oznacza to, że się upiekło.
5) Ustaw ciasto wtedy na kratce kuchennej i
pozostaw do ostygnięcia.
Page 51

PL
│
47 ■
SKMP 1300 B3
Ciasto drożdżowe
Składniki:
■ 500 g mąki pszennej
■ 25 g świeżych drożdży lub 1 kostka drożdży
suchych
■ ok 1/4 l letniego mleka
■ 80 g masła lub margaryny
(temperatura pokojowa)
■ 80 g cukru
■ 1 jajko
Przygotowanie:
1) Dodaj mąkę, suche drożdże lub pokruszone
drożdże i wszystkie inne składniki (nie bezpośrednio na drożdże) do misy do mieszania .
2) Mieszaj wszystko powoli hakiem do wyrabiania ciasta na poziomie 1, a następnie
przez 3-4 minut na poziomie 3.
3) Przykryj misę ścierką, ustaw ją w ciepłym miejscu i pozostaw ciasto do urośnięcia.
4) Następnie zagnieć ciasto ponownie.
5) Wtedy ciasto jest gotowe i można je dalej
przetwarzać.
Gofry
Składniki:
■ 200 g cukru
■ 500 g mąki
■ 5 g proszku do pieczenia
■ 5 jaj
■ 400 ml mleka
■ 250 g masła (temp. pok.)
■ 2 opakowania cukru waniliowego
Przygotowanie:
1) Dodaj jaja, cukier oraz masło do misy do mieszania i wymieszaj wszystko trzepaczką do
piany - aż do uzyskania gładkiego ciasta.
2) Dodaj mąkę, cukier waniliowy i proszek do
pieczenia.
3) Ciągle mieszając, stopniowo dodawać mleko,
aż ciasto uzyska gładką i miękką konsystencję.
4) Piecz gofry za pomocą gofrownicy.
Shake bananowo-waniliowy
Składniki:
■ 3 banany
■ 500 ml mleka
■ 2 opakowania cukru waniliowego
■ 1 łyżka stołowa lodów waniliowych
Przygotowanie:
1) Obierz banany.
2) Dodaj obrane banany, mleko, lody waniliowe
i cukier waniliowy do miksera 0.
3) Zmiksuj wszystko korzystając z funkcji Impulse.
Page 52

■ 48 │ PL
SKMP 1300 B3
Smoothie z banana i owoców kiwi
Składniki:
■ 200 ml świeżo wyciśniętego soku z pomarańczy
■ 1 owoc kiwi
■ 1/2 banana
Przygotowanie:
1) Obierz kiwi.
2) Obierz banana.
3) Dodaj kiwi, banany, oraz sok pomarańczowy
do miksera 0.
4) Wymieszaj wszystko na poziomie 8.
Page 53

LT
│
49 ■
SKMP 1300 B3
Turinys
Įžanga ...............................................................50
Naudojimas pagal paskirtį ..............................................50
Tiekiamas rinkinys .....................................................50
Prietaiso aprašas ......................................................50
Saugos nurodymai .....................................................51
Parengiamieji darbai ...................................................54
Greičio pakopos .......................................................54
Minkymo antgalio, maišymo antgalio ir plakimo šluotelės naudojimas .........55
Baigus darbą .....................................................................56
Plakimo indo naudojimas ...............................................56
Papildomų produktų sudėjimas .......................................................57
Baigus darbą .....................................................................57
Valymas ir priežiūra ...................................................57
Prietaiso valymas ..................................................................58
Priedų valymas ....................................................................58
Plakimo indo valymas ..............................................................58
Laikymas ............................................................58
Trikčių šalinimas .......................................................59
Techniniai duomenys ...................................................59
Garantija ir klientų aptarnavimas ........................................59
Utilizavimas ..........................................................60
Importuotojas .........................................................60
Receptai .............................................................60
Morkų sriuba .....................................................................60
Tuno užtepėlė ....................................................................61
Tradiciniai lietiniai .................................................................61
Biskvitinė tešla ....................................................................61
Trapi tešla .......................................................................62
Minkšta trapi tešla .................................................................62
Mielinė tešla .....................................................................63
Vafliai ...........................................................................63
Vanilinis bananų kokteilis ............................................................63
Bananų ir kivių tirštasis kokteilis .......................................................64
Page 54

■ 50 │ LT
SKMP 1300 B3
Įžanga
Sveikiname įsigijus naują prietaisą.
Jūs pasirinkote kokybišką gaminį. Naudojimo instruk-
cija yra sudedamoji šio gaminio dalis. Joje pateikti
svarbūs saugos, naudojimo ir utilizavimo nurodymai.
Prieš pradėdami naudoti gaminį, susipažinkite su
visais naudojimo ir saugos nurodymais. Gaminį
naudokite tik taip, kaip aprašyta, ir tik nurodytais
naudojimo tikslais. Perduodami gaminį tretiesiems
asmenims, kartu perduokite visus jo dokumentus.
Naudojimas pagal paskirtį
Šis prietaisas skirtas tik namuose įprastiems maisto
produktų kiekiams apdoroti. Šis prietaisas skirtas
tik buitinio naudojimo reikmėms. Nenaudokite jo
komerciniais tikslais!
Šį prietaisą galima naudoti tik privačioms reikmėms
uždarose ir nuo lietaus apsaugotose patalpose.
Nenaudokite jo lauke!
Šį prietaisą galima naudoti tik su rinkinyje esančiais
priedais.
Tiekiamas rinkinys
Profesionalus virtuvinis kombainas
Maišymo dubuo su dangčiu
Plakimo indas su dangteliu ir matavimo indeliu
Minkymo antgalis
Plakimo šluotelė
Maišymo antgalis
Naudojimo instrukcija
Trumpas vadovas
NURODYMAS
► Išpakavę iškart patikrinkite tiekiamą rinkinį ir
įsitikinkite, kad nieko netrūksta ir nėra pažeidimų. Jei reikia, kreipkitės į klientų aptarnavimo
tarnybą.
Prietaiso aprašas
Atlenkite priekinį ir galinį šios naudojimo instrukcijos
atvartus:
priekinis atvartas:
A paveikslėlis
Atlenkiamasis modulis
Fiksavimo svirtis
Sukamasis jungiklis
Mygtukas PULSE
Stovas
Maišymo dubuo
Varomoji ašis
B paveikslėlis:
Piltuvas
Dangtelis
Minkymo antgalis
- Plakimo šluotelė
3 Maišymo antgalis
galinis atvartas:
C paveikslėlis:
! Matavimo indelis
. Plakimo indo dangtelis
0 Plakimo indas
6 Peilis
1 Pavaros apsauginis gaubtas
% Laido ritė
+ Plakimo indo pavara
Page 55

LT
│
51 ■
SKMP 1300 B3
Saugos nurodymai
ELEKTROS SMŪGIO PAVOJUS!
► Prietaisą prijunkite tik prie tinkamai įrengto ir įžeminto elektros lizdo.
Tinklo įtampa turi atitikti įtampą, nurodytą prietaiso duomenų lentelėje.
► Pasirūpinkite, kad naudojant prietaisą maitinimo laidas nesušlaptų
ir nesudrėktų. Maitinimo laidą nutieskite taip, kad jis neįstrigtų ir jo
nebūtų galima pažeisti.
► Užtikrinkite, kad maitinimo laidas nesiliestų prie karštų paviršių.
► Neremontuokite prietaiso patys. Remontuoti prietaisą gali tik klientų
aptarnavimo tarnyba arba kvalifikuoti specialistai.
► Prieš valydami prietaisą arba jam sugedus, ištraukite tinklo kištuką iš
elektros lizdo. Kol tinklo kištukas yra elektros lizde, prietaise išlieka
tinklo įtampa, todėl vien tik išjungti prietaisą nepakanka.
► Jei prietaisas nenaudojamas, ištraukite tinklo kištuką iš elektros lizdo!
► Kad išvengtumėte pavojų, pažeistus tinklo kištukus arba maitinimo
laidus nedelsdami paveskite pakeisti įgaliotiems specialistams arba
klientų aptarnavimo tarnybos darbuotojams.
► Prietaisą ir jo prijungimo laidą laikykite vaikams nepasiekiamoje
vietoje.
Niekada nenardinkite prietaiso į vandenį ar kitus skysčius.
Page 56

■ 52 │ LT
SKMP 1300 B3
ĮSPĖJIMAS! PAVOJUS SUSIŽALOTI!
► Prieš nuimdami ar uždėdami priedus, kas kartą atjunkite prietaisą nuo
elektros tinklo. Taip išvengsite netyčinio prietaiso įjungimo. Atnaujinus
elektros energijos tiekimą, prietaisas vėl pradės veikti!
► Kas kartą išjunkite prietaisą iš elektros tinklo, kai paliekate jį be prie-
žiūros, prieš surinkdami, išrinkdami ar valydami.
► Vaikams naudoti prietaisą draudžiama.
► Naudokite tik originalius šio prietaiso priedus. Kitų gamintojų priedai
prietaisui gali netikti ir kelti pavojų!
► Asmenys, kurių fiziniai, jutiminiai ar protiniai gebėjimai mažesni ir
kurie turi mažiau patirties ir (arba) žinių, šį prietaisą gali naudoti tik
tada, jei yra prižiūrimi arba buvo išmokyti saugiai naudoti prietaisą
ir supranta prietaiso keliamą pavojų.
► Vaikams su prietaisu žaisti draudžiama.
► Atsargiai! Peilis yra labai aštrus!
► Valydami peilį būkite atsargūs!
Page 57

LT
│
53 ■
SKMP 1300 B3
ĮSPĖJIMAS! PAVOJUS SUSIŽALOTI!
► Atsargiai! Peilis yra labai aštrus! Todėl nuimdami plakimo indą būkite
atsargūs.
► Nenaudokite prietaiso kitiems tikslams, išskyrus aprašytus šioje nau-
dojimo instrukcijoje. Antraip kyla pavojus susižaloti!
► Priedus keiskite tik sustojus pavarai ir ištraukę tinklo kištuką! Išjungtas
prietaisas dar kurį laiką veikia!
► Niekada nepalikite prietaiso be priežiūros.
► Prieš keičiant priedus ar papildomas dalis, kurios prietaisui veikiant
juda, prietaisas turi būti išjungtas ir atjungtas nuo elektros tinklo.
► Veikiant prietaisui, į maišymo dubenį arba plakimo indą dėkite tik tuos
maisto produktus, kuriuos norite apdoroti.
► Niekada nekiškite į piltuvą arba plakimo indą rankų ar kokių nors
pašalinių daiktų, kad nesusižeistumėte ir nesugadintumėte prietaiso.
DĖMESIO! MATERIALINĖ ŽALA!
► Prietaisas niekada neturi veikti tuščias! Perkaitimo pavojus!
► Niekada nedėkite į prietaisą karštų produktų!
Page 58

■ 54 │ LT
SKMP 1300 B3
Parengiamieji darbai
1) Visas dalis išimkite iš kartoninės dėžės ir nuimkite visas pakuotės medžiagas bei apsauginę
plėvelę ir lipdukus.
2) Nuv
alykite visas dalis, kaip aprašyta skyriuje
„Valymas ir priežiūra“. Įsitikinkite, kad visos
dalys visiškai nudžiūvo.
3) Nuvyniokite maitinimo laidą nuo laido ritės %.
4) Pastatykite prietaisą ant lygaus bei švaraus
paviršiaus ir pritvirtinkite jį keturiais siurbtukais.
5) Įkiškite tinklo kištuką į elektros lizdą.
Greičio pakopos
Pakopa
Naudojamas
priedas
tinka...
1 - 2
visi
- Pradedant maišyti
ar plakti bet kokius
produktus
- Įdedant produktų
Minkymo
antgalis
Maišymo
antgalis 3
- Kietai tešlai arba kietesniems produktams
minkyti ir maišyti
2 - 4
Maišymo
antgalis 3
- Tirštos konsistencijos
minkštai trapiai tešlai
maišyti
- Sviestui ir miltams
maišyti
- Mielinei tešlai
maišyti
Minkymo
antgalis
- Mielinei tešlai
minkyti
- Tirštos konsistencijos
minkštai trapiai tešlai
minkyti
4 - 6
Maišymo
antgalis 3
- Pyrago tešlai maišyti
- Sviestui su cukrumi
plakti
- Sausainių tešlai
maišyti
6 - 10
Plakimo
šluotelė -
- Grietinėlei plakti
- Kiaušinio baltymui
plakti
- Majonezui plakti
- Sviestui iki purumo
išsukti
„Pulse“
Plakimo indas
0
- Minkštiems arba
skystiems produktams maišyti ir
smulkinti
Page 59

LT
│
55 ■
SKMP 1300 B3
Minkymo antgalio, maišymo
antgalio ir plakimo šluotelės
naudojimas
ĮSPĖJIMAS! PAVOJUS SUSIŽALOTI!
► Veikiant prietaisui, niekada nekiškite rankų
į maišymo dubenį ! Besisukančios dalys
kelia pavojų susižeisti!
► Keiskite priedus tik sustojus pavarai! Išjungus
prietaisą, pavara dar kurį laiką veikia.
► Sutrikus veikimui, prietaisą išjunkite ir ištraukite
tinklo kištuką, kad išvengtumėte netyčinio
prietaiso įjungimo.
DĖMESIO! MATERIALINĖ ŽALA!
► Naudojant tešlos minkymo antgalį , plaki-
mo šluotelę - arba maišymo antgalį 3, po
10 minučių veikimo rekomenduojame leisti
prietaisui atvėsti.
NURODYMAS
► Kai naudojate minkymo antgalį , plakimo
šluotelę - arba maišymo antgalį 3, pavaros
apsauginis gaubtas 1 turi būti uždėtas.
Antraip prietaisas neįsijungs.
Kai prietaisą norite naudoti su minkymo antgaliu ,
plakimo šluotele - ar maišymo antgaliu 3, veikite
taip:
1) Fiksavimo svirtį paspauskite aukštyn ir
atlenkiamąjį modulį pakelkite į aukščiausią
padėtį.
2) Maišymo dubenį padėkite taip, kad maišymo
dubens fiksatoriai būtų stovo įdubose.
Maišymo dubenį sukite pagal laikrodžio
rodyklę (žr. ženklus
ir ant stovo ),
kol jis užsifiksuos ir tvirtai laikysis.
3) Pagal poreikį ant varomosios ašies uždėkite
minkymo antgalį , plakimo šluotelę - arba
maišymo antgalį 3:
– Minkymo antgalį , plakimo šluotelę -
arba maišymo antgalį 3ant varomosios
ašies užmaukite taip, kad abu metaliniai
kaiščiai ant varomosios ašies būtų antgalio -3 įdubose.
– Stipriai stumkite antgalį -3 ant varo-
mosios ašies , kol suspausite spyruoklę, ir
šiek tiek pasukite jį prieš laikrodžio rodyklę
(kryptis
).
– Paleiskite antgalį. Dabar jis tvirtai laikosi ant
varomosios ašies .
4) Į maišymo dubenį sudėkite maisto produktus, kuriuos norite apdoroti.
NURODYMAS
► Atkreipkite dėmesį į tai, kad minkant arba
maišant tešlą, jos tūris maišymo dubenyje
didėja arba sukama tešla šiek tiek pakyla
aukštyn. Todėl niekada nepripildykite maišymo dubens iki kraštų!
5) Fiksavimo svirtį paspauskite aukštyn ir atlen-
kiamąjį modulį su uždėtu antgaliu nulenkite
žemyn į darbinę padėtį.
6) Užstumkite dangtį ant maišymo dubens .
Page 60

■ 56 │ LT
SKMP 1300 B3
NURODYMAS
► Jei reikia, ant dangčio galite sumontuoti
piltuvą .
– Šiek tiek pasukite dangtį , kad anga
būtų atsukta į jus.
– Įtvirtinkite piltuvą dangtyje esan-
čiuose laikikliuose.
Dabar net ir prietaisui veikiant galite dėti produktus.
7) Sukamuoju jungikliu nustatykite norimą greičio
pakopą (žr. skyrių „Greičio pakopos“).
Baigus darbą
1) Išjunkite prietaisą sukamuoju jungikliu .
2) Nuimkite piltuvą , jei jis uždėtas.
3) Nuo maišymo dubens nutraukite dangtį .
4) Fiksavimo svirtį paspauskite aukštyn ir
atlenkiamąjį modulį pakelkite į aukščiausią
padėtį.
5) Spausdami antgalį -3 varomosios ašies
kryptimi ir tuo pat metu sukdami pagal
laikrodžio rodyklę (kryptis
), nuo varomosios ašies nuimkite antgalį -3. Dabar
antgalį galite nuimti.
6) Išimkite maišymo dubenį , pasukę jį prieš
laikrodžio rodyklę ir pakėlę į viršų.
7) Nuvalykite visas dalis (žr. skyrių „Valymas ir
priežiūra“).
Plakimo indo naudojimas
ĮSPĖJIMAS! PAVOJUS SUSIŽALOTI!
► Visada palaukite, kol karšti skysčiai atauš
ir taps drungni (maždaug 30–40°C) ir tik
tada pilkite juos į plakimo indą 0.
ĮSPĖJIMAS! AŠTRUS PEILIS /
BESISUKANTI PAVARA KELIA
PAVOJŲ SUSIŽEISTI!
► Niekada nekiškite rankų į uždėtą plakimo
indą 0!
► Plakimo indą 0 nuimkite tik peiliams 6
sustojus.
► Plakimo indą 0 naudokite tik uždėję jo
dangtelį .su matavimo indeliu !.
► Sutrikus veikimui, prietaisą išjunkite ir ištraukite
tinklo kištuką, kad išvengtumėte netyčinio
prietaiso įjungimo.
DĖMESIO! MATERIALINĖ ŽALA!
► Niekada vienu metu nenaudokite maišymo
dubens ir plakimo indo 0! Variklis bus
perkrautas!
► Naudojant plakimo indą 0, po 3 minučių
veikimo rekomenduojame leisti prietaisui
atvėsti.
Kai prietaisą norite naudoti su plakimo indu 0,
veikite taip. Vadovaukitės galiniame atvarte pateiktu C paveikslėliu.
1) Fiksavimo svirtį paspauskite aukštyn ir atlen-
kiamąjį modulį nulenkite žemyn į darbinę
padėtį.
Page 61

LT
│
57 ■
SKMP 1300 B3
2) Nuimkite pavaros apsauginį gaubtą 1.
NURODYMAS
► Prieš uždėdami plakimo indą ant plakimo
indo pavaros įsitikinkite, kad sukamasis
jungiklis nustatytas į „0“ padėtį. Antraip
prietaisas pradės veikti, kai tik plakimo indas
užsifiksuos.
3) Uždėkite plakimo indą 0 ant plakimo indo
pavaros + taip, kad plakimo indo 0 apatinė-
je pusėje esantys fiksatoriai būtų plakimo indo
pavaros + įdubose. Rodyklė ant plakimo indo
0 turi būti nukreipta į ženklą
ant prietaiso. Plakimo indą 0 pasukite pagal laikrodžio
rodyklę iki galo. Tada rodyklė ant plakimo
indo 0 yra nukreipta į ženklą
ant prietaiso.
4) Sudėkite produktus.
5) Plakimo indo dangtelį . su matavimo indeliu !
uždėkite taip, kad plakimo indo dangtelio .
liežuvėlis uždengtų ir snapelį.
6) Sukamuoju jungikliu nustatykite norimą
greičio pakopą.
NURODYMAS
► Tinkamiausias greitis parenkamas atsižvel-
giant į plakamų produktų tirštumą. Kuo skystesni produktai, tuo greičiau galite juos plakti.
► Norėdami plakti trumpais ir stipriais impul-
sais, sukamuoju jungikliu nustatykite bent
jau 1 greičio pakopą ir tuo pat metu spauskite mygtuką PULSE . Mygtukas PULSE
neužsifiksuoja, kad nebūtų perkrautas variklis.
Todėl mygtuką PULSE šioje padėtyje
laikykite trumpai.
Papildomų produktų sudėjimas
1) Išjunkite prietaisą sukamuoju jungikliu .
2) Nuimkite plakimo indo dangtelį . ir sudėkite
produktus
arba
3) plakimo indo dangtelyje . esantį matavimo
indelį ! pasukite 90° kampu ir išimkite. Pro
pripildymo angą vieną po kito sudėkite produktus.
Baigus darbą
1) Išjunkite prietaisą sukamuoju jungikliu .
2) Plakimo indą 0 pasukite prieš laikrodžio
rodyklę, kad rodyklė ant plakimo indo 0 būtų
nukreipta į ženklą
ant prietaiso ir indą
nuimkite.
NURODYMAS
► Plakimo indą 0 geriausia valyti iškart po
naudojimo (žr. skyrių „Valymas ir priežiūra“).
Taip lengviau pašalinsite maisto produktų
likučius.
Valymas ir priežiūra
ELEKTROS SMŪGIO PAVOJUS!
► Prieš valydami prietaisą visada ištraukite
tinklo kištuką iš elektros lizdo! Kyla elektros
smūgio pavojus!
Niekada nenardinkite prietaiso į vandenį ar
kitus skysčius!
DĖMESIO! MATERIALINĖ ŽALA!
► Nenaudokite šveičiamųjų ar agresyvių valymo
priemonių. Jos gali sugadinti paviršius!
Page 62

■ 58 │ LT
SKMP 1300 B3
NURODYMAI
► Rekomenduojame valyti prietaisą iškart po
naudojimo. Taip lengviau pašalinsite maisto
produktų likučius.
► Apdorojant dažančius maisto produktus,
pavyzdžiui, morkas, gali pakisti plastikinių
dalių spalva. Tokias nudažytas vietas galite
nuvalyti maistiniu aliejumi.
Prietaiso valymas
■ Valykite prietaisą drėgna šluoste. Jei nešvaru-
mai prikibę tvirčiau, sudrėkinkite šluostę švelniu
plovikliu. Ploviklio likučius nuvalykite švariu vandeniu sudrėkinta šluoste. Paskui prietaisą gerai
nusausinkite.
Priedų valymas
■ Maišymo dubenį , dangtį , piltuvą ,
plakimo indo dangtelį . su matavimo indeliu !,
pavaros apsauginį gaubtą 1 ir antgalius -
3 plaukite šiltame vandenyje su trupučiu ploviklio. Produktų likučius pašalinkite indų plovimo
šepetėliu. Visas dalis nuskalaukite švariu šiltu
vandeniu ir prieš vėl naudodami prietaisą įsitikinkite, kad visos jo dalys sausos.
NURODYMAS
► Antgalius -3, maišymo dubenį ir
plakimo indo dangtelį . su matavimo indeliu
!galite plauti ir indaplovėje.
► Plaudami indaplovėje pasirūpinkite, kad
plastikinės dalys neįstrigtų. Antraip jos gali
deformuotis!
► Plastikines dalis stenkitės sudėti į viršutinį
indaplovės krepšį.
Plakimo indo valymas
ĮSPĖJIMAS! PAVOJUS SUSIŽALOTI!
► Nelieskite peilio 6 plikomis rankomis.
■ Plakimo indą 0 plaukite šiltu vandeniu, įpylę į
jį švelnaus ploviklio. Paskui nuplaukite jį švariu
vandeniu, kad neliktų ploviklio likučių.
Jei plakimo indą valysite iš karto vos panaudoję,
daugeliu atvejų užtikrinsite pakankamą švarą tokiu
alternatyviu būdu:
1) Į uždėtą plakimo indą 0 įpilkite vandens ir
šiek tiek ploviklio.
2) Plakimo indo dangtelį . su matavimo indeliu !
uždėkite taip, kad plakimo indo dangtelio .
liežuvėlis uždengtų ir snapelį.
3) Kelioms sekundėms įjunkite plakimo indą 0.
4) Išpilkite plovimo vandenį. Produktų likučius
pašalinkite indų plovimo šepetėliu.
5) Paskui plakimo indą 0 praplaukite dideliu
kiekiu švaraus vandens, kad nuplautumėte visus
ploviklio likučius.
NURODYMAS
► Plakimo indą 0 galite plauti ir indaplovėje.
► Plaudami indaplovėje pasirūpinkite, kad
neįstrigtų plastikinės plakimo indo 0 dalys.
Antraip jos gali deformuotis!
Laikymas
■ Padėdami nenaudojamą prietaisą, suvyniokite
maitinimo laidą ant laido ritės %.
■ Išvalytą prietaisą laikykite švarioje, nedulkėtoje
ir sausoje vietoje.
Page 63

LT
│
59 ■
SKMP 1300 B3
Trikčių šalinimas
Jei prietaisas staiga sustoja:
■ Prietaisas perkaito ir suveikė automatinis saugos
jungiklis.
– Sukamąjį jungiklį nustatykite į „0“ padėtį.
– Ištraukite tinklo kištuką iš elektros lizdo.
– 15 minučių palaukite, kol prietaisas atvės.
– Jei prietaisas po 15 minučių dar nebus visiškai
atvėsęs, jis neįsijungs.
– Palaukite dar 15 minučių ir vėl jį įjunkite.
Jei prietaisas neįsijungia:
– Patikrinkite, ar maitinimo kištukas įkištas į
elektros lizdą.
– Patikrinkite, ar atlenkiamasis modulis yra
tinkamoje padėtyje.
Techniniai duomenys
Maitinimo įtampa: 220 - 240 V ~/ 50 Hz
Galia: 1300 W
Apsaugos klasė: II
maks. talpa
Maišymo dubuo : apie 6,3 l
Plakimo indas 0: apie 1,5 l
Visos su maisto produktais besiliečiančios
šio prietaiso dalys tinka sąlyčiui su maistu.
Rekomenduojamas veikimo laikas:
Naudojant minkymo antgalį , plakimo šluotelę -
arba maišymo antgalį 3, rekomenduojame po
10 minučių veikimo leisti prietaisui atvėsti.
Naudojant plakimo indą 0, rekomenduojame
po 3 minučių veikimo leisti prietaisui atvėsti.
Viršijus šį veikimo laiką, prietaisas gali perkaisti ir
sugesti!
Garantija ir klientų
aptarnavimas
Šiam prietaisui nuo įsigijimo datos suteikiama
3 metų garantija. Prietaisas pagamintas laikantis
kruopštumo principų ir prieš pristatant buvo
išbandytas. Saugokite kasos čekį kaip pirkimo
įrodymo dokumentą. Prireikus teikti garantiją,
telefonu susisiekite su klientų aptarnavimo tarnyba. Tik taip galėsite prekę išsiųsti nemokamai.
Garantija taikoma tik medžiagų arba gamybos
trūkumams ir netaikoma gabenant atsiradusiems
trūkumams, susidėvinčioms dalims arba lūžtančių
dalių, pavyzdžiui, jungiklių ar akumuliatorių, gedimams. Gaminys skirtas tik buitinio, o ne komercinio
naudojimo reikmėms.
Garantija netaikoma, jei piktnaudžiaujama, netinkamai naudojama, naudojama jėga ir jei remontuoja ne mūsų įgaliotoji klientų aptarnavimo tarnyba.
Šiomis garantijos teikimo sąlygomis neapribojamos
teisės aktais reglamentuojamos jūsų teisės.
Garantijos teikimo laikotarpiu suteikus garantinių
paslaugų, garantijos teikimo laikotarpis nepratęsiamas. Ta pati sąlyga taikoma ir pakeistoms bei sutaisytoms dalims. Apie įsigijus pastebėtus pažeidimus
ir trūkumus būtina pranešti nedelsiant ir ne vėliau
kaip per dvi dienas nuo įsigijimo dienos. Pasibaigus
garantijos teikimo laikotarpiui už remonto darbus
imamas mokestis.
Priežiūra
Tel. 880 033 144
Elektroninio pašto adresas
kompernass@lidl.lt
IAN 276995/276996/277709
Page 64

■ 60 │ LT
SKMP 1300 B3
Utilizavimas
Prietaiso jokiu būdu neišmes-
kite kartu su buitinėmis
atliekomis. Šiam gaminiui
taikoma Europos direktyva
2012/19/EU.
Prietaisą utilizuokite jį atiduodami sertifikuotai atliekų
utilizavimo įmonei arba komunalinei atliekų utilizavimo tarnybai. Laikykitės galiojančių teisės aktų.
Kilus abejonių, susisiekite su atliekų utilizavimo
tarnyba.
Pakuotė pagaminta iš aplinką tauso-
jančių medžiagų, kurias galite utilizuoti
vietos utilizavimo įmonėse.
Importuotojas
KOMPERNASS HANDELS GMBH
BURGSTRASSE 21
44867 BOCHUM
GERMANY
www.kompernass.com
Receptai
Morkų sriuba
Sudedamosios dalys
■ 500 g morkų
■ 250ml vandens
■ 500 ml mėsos sultinio (iš stiklainio)
■ 125 ml grietinėlės
■ 125 ml baltojo vyno
■ Druskos
■ Pipirų
■ 50 g šalto sviesto
■ Šviežių daržinių builių
Paruošimas
1) Morkas nuplaukite ir nuskuskite.
2) Supjaustykite jas gabaliukais, laisvai telpančiais į plakimo indą 0.
3) Įpilkite į puodą 250 ml vandens ir virkite jame
morkas 20 minučių. Tada plakimo inde 0
viską trinkite, kol neliks didesnių gabaliukų.
4) Sutrintas morkas sudėkite atgal į puodą.
5) Supilkite į tyrę mėsos sultinį, grietinėlę ir baltąjį
vyną.
6) Pakaitinkite sriubą ir pagardinkite prieskoniais.
7) Įmaišykite į sriubą mažais gabaliukais supjaustytą sviestą ir pabarstykite daržiniais builiais.
Page 65

LT
│
61 ■
SKMP 1300 B3
Tuno užtepėlė
Sudedamosios dalys
■ 1 skardinė tuno padaže su daržovėmis
■ 3 valgomieji šaukštai jogurto
■ 1 arbatinis šaukštelis šviežiai spaustų citrinos
sulčių
■ 1 žiupsnelis druskos
■ Šviežiai maltų pipirų
■ 2 kietai virti susmulkinti kiaušiniai
Patiekimas:
■ Riekelėmis supjaustyta visų grūdo dalių duona
■ Sviestas (užtepti)
■ 1 kietai virtas susmulkintas kiaušinis
■ Susmulkinti laiškiniai česnakai
Paruošimas
1) Visas sudedamąsias dalis sumaišykite plakimo
inde 0 iki norimo tirštumo (apie15 sekundžių)
ir pagardinkite prieskoniais.
2) Ant duonos užtepkite sviesto bei tuno kremo,
tada pabarstykite smulkintu kiaušiniu ir laiškiniais česnakais.
Tradiciniai lietiniai
Sudedamosios dalys
■ 2 ar 3 kiaušiniai
■ 375ml pieno
■ 1 žiupsnelis druskos
■ 250 g miltų
■ Riebalų kepti
Paruošimas
1) Kiaušinius, pieną ir druską sumaišykite maišymo
antgaliu 3.
2) Į juos suberkite persijotus miltus. Viska maišykite
maišymo antgaliu 3, kol tešla taps vientisa.
3) Leiskite tešlai maždaug 20minučių brinkti.
4) Įkaitinkite keptuvėje riebalus ir nedideliu samčiu
pilkite į ją tešlą. (Tik tiek, kad tešla plonu sluoksniu uždengtų keptuvės dugną.)
5) Kepkite lietinius iš abiejų pusių , kol jie taps
rusvai geltonos spalvos, ir patiekite karštus.
Biskvitinė tešla
Sudedamosios dalys
■ 3 kiaušiniai
■ 3–4 valgomieji šaukštai karšto vandens
■ 150 g cukraus
■ 1 pakelis vanilinio cukraus
■ 100 g miltų (405 tipo)
■ 100 g krakmolo
■ 2–3 nubraukti arbatiniai šaukšteliai kepimo
miltelių
Paruošimas
1) Išardomosios kepimo formos (28 cm skersmens) dugną išklokite kepimo popieriumi.
Netepkite kraštų riebalais, nes tada biskvito
paviršius nebus visiškai lygus ir tolygiai rusvas.
2) Maišymo dubenyje suplakite visus kiaušinius
ir įpilkite karšto vandens.
3) Tada, nustatę aukščiausią greičio pakopą, toliau
viską plakite maišymo antgaliu 3 maždaug
1 minutę, kol suputos.
4) Suberkite cukrų bei vanilinį cukrų ir viską plakite
dar 2 minutes nustatę aukščiausią greičio
pakopą.
5) Sumaišykite miltus, krakmolą ir kepimo miltelius; maždaug pusę mišinio persijoję suberkite
į kiaušinių plakinį ir nustatę 4 greičio pakopą
trumpai sumaišykite.
6) Tada tokiu pačiu būdu įmaišykite likusius miltus
ir supilkite tešlą į paruoštą išardomąją kepimo
formą.
7) Apie 20–30 minučių kepkite iš anksto iki maždaug 175–200 °C temperatūros įkaitintoje
orkaitėje įjungę kaitinimo iš viršaus ir iš apačios
funkciją.
Page 66

■ 62 │ LT
SKMP 1300 B3
Trapi tešla
Sudedamosios dalys
■ 250g kvietinių miltų
■ 1/2 nubraukto arbatinio
šaukštelio kepimo miltelių
■ 100–125 g cukraus
■ 1 pakelis vanilinio cukraus
■ 1 žiupsnelis druskos
■ 1 kiaušinis
■ 125g sviesto
Paruošimas
1) Maišymo dubenyje sumaišykite miltus su
kepimo milteliais ir tada sudėkite kitas sudedamąsias dalis.
2) Pirmiausia minkymo antgaliu viską minkykite
maždaug 1 minutę 2 greičio pakopa, o tada –
maždaug 3 minutes 2–4 greičio pakopa.
3) Neminkykite tešlos per ilgai, kad ji netaptų per
minkšta.
4) Palaikykite tešlą šaldytuve 1/2 valandos,
paskui suformuokite iš jos torto pagrindą arba
sausainius.
5) Gamindami torto pagrindą, iškočiokite 2/3
tešlos ir įdėkite ją į riebalais išteptą išardomąją
formą.
6) Iš likusios tešlos suformuokite ritinį.
7) Uždėkite šį ritinį ant tešlos krašto ir dviem pirštais
spauskite prie krašto, suformuodami apie 3 cm
aukščio kraštą.
8) Pabadykite torto pagrindą šakute.
9) Pakaitinkite orkaitę iš anksto apie 5 minutes ir,
įjungę kaitinimo iš viršaus ir iš apačios funkciją,
kepkite trapią tešlą maždaug 15–20 minučių
iki 200–225°C temperatūros įkaitintoje orkaitėje.
Minkšta trapi tešla
Sudedamosios dalys
■ 250g minkšto sviesto arba margarino
■ 250 g cukraus
■ 1 pakelis vanilinio cukraus
■ 1 žiupsnelis druskos
■ 4 kiaušiniai
■ 500g kvietinių miltų
■ 1 pakelis kepimo miltelių
■ Apie 125ml pieno
Paruošimas
1) Į maišymo dubenį sudėkite visus maisto
produktus ir maišykite viską maišymo antgaliu
3maždaug 1/2 minutės nustatę 1 greičio
pakopą, tada 30 sekundžių nustatę 2 greičio
pakopą, o paskui maždaug 5 minutes nustatę
4 greičio pakopą.
2) Patepkite kepimo formą riebalais arba išklokite
ją kepimo popieriumi.
3) Sudėkite tešlą į formą ir, įjungę kaitinimo iš
viršaus ir iš apačios funkciją, kepkite tešlą maždaug 50–60 minučių iki 175–200°C temperatūros įkaitintoje orkaitėje.
4) Prieš išimdami pyragą iš orkaitės patikrinkite,
ar jis iškepęs: įsmeikite į pyrago vidurį smailų
medinį pagaliuką. Jei ant ištraukto pagaliuko
nėra prilipusios tešlos, pyragas iškepęs.
5) Tada išėmę iš formos padėkite pyragą ant
grotelių ir palikite atvėsti.
Page 67

LT
│
63 ■
SKMP 1300 B3
Mielinė tešla
Sudedamosios dalys
■ 500g kvietinių miltų
■ 25 g šviežių mielių arba 1 pak. sausų mielių
■ maždaug 1/4 l drungno pieno
■ 80g sviesto arba margarino
(kambario temperatūros)
■ 80 g cukraus
■ 1 kiaušinis
Paruošimas
1) Miltus, sausas mieles arba sutrupintas šviežias
mieles bei visus kitus produktus sudėkite į maišymo dubenį (nedėkite tiesiai ant mielių).
2) Minkymo antgaliu lėtai viską maišykite
nustatę 1 greičio pakopą, o tada maždaug
3–4 minutes nustatę 3 greičio pakopą.
3) Uždenkite dubenį virtuviniu rankšluosčiu, pastatykite jį šiltoje vietoje ir palikite tešlą kilti, kol jos
tūris pastebimai padidės.
4) Tada išminkykite tešlą dar kartą.
5) Dabar tešla yra paruošta ir iš jos galima formuoti kepinius.
Vafliai
Sudedamosios dalys
■ 200 g cukraus
■ 500 g miltų
■ 5 g kepimo miltelių
■ 5 kiaušiniai
■ 400ml pieno
■ 250g sviesto (kambario temperatūros)
■ 2 pakeliai vanilinio cukraus
Paruošimas
1) Kiaušinius, cukrų ir sviestą sudėkite į maišymo
dubenį ir plakite plakimo šluotele -, kol
tešla taps vientisa.
2) Įmaišykite miltus, vanilinį cukrų ir kepimo miltelius.
3) Po truputį pilkite pieną, kol tešla taps vientisa
ir minkšta.
4) Kepkite vaflius vaflinėje.
Vanilinis bananų kokteilis
Sudedamosios dalys
■ 3 bananai
■ 500ml pieno
■ 2 pakeliai vanilinio cukraus
■ 1 valgomasis šaukštas vanilinių ledų
Paruošimas
1) Nulupkite bananus.
2) Nuluptus bananus, pieną, vanilinius ledus ir
vanilinį cukrų sudėkite į plakimo indą 0.
3) Maišykite nustatę 8 greičio pakopą.
Page 68

■ 64 │ LT
SKMP 1300 B3
Bananų ir kivių tirštasis kokteilis
Sudedamosios dalys
■ 200 ml apelsinų sulčių (šviežiai spaustų)
■ 1 kivis
■ 1/2 banano
Paruošimas
1) Nulupkite kivį.
2) Nulupkite bananą.
3) Kivį, bananą ir apelsinų sultis sudėkite į plakimo
indą 0.
4) Maišykite nustatę 8 greičio pakopą.
Page 69

DE│AT│CH
│
65 ■
SKMP 1300 B3
Inhaltsverzeichnis
Einleitung ............................................................66
Bestimmungsgemäßer Gebrauch .........................................66
Lieferumfang .........................................................66
Gerätebeschreibung ...................................................66
Sicherheitshinweise ....................................................67
Vorbereitungen .......................................................70
Geschwindigkeitsstufen ................................................70
Arbeiten mit Knethaken, Schnee- und Rührbesen ...........................71
Nach der Arbeit ..................................................................72
Arbeiten mit dem Mixer ................................................72
Zutaten nachfüllen .................................................................73
Nach der Arbeit ..................................................................73
Reinigen und Pflegen ...................................................73
Gerät reinigen ....................................................................74
Zubehör reinigen ..................................................................74
Mixer reinigen ....................................................................74
Aufbewahrung ........................................................74
Fehler beheben ........................................................75
Technische Daten ......................................................75
Garantie und Service ...................................................75
Entsorgung ...........................................................76
Importeur ............................................................76
Rezepte ..............................................................76
Möhrensuppe ....................................................................76
Thunfisch-Aufstrich .................................................................77
Traditionelle Pfannkuchen ...........................................................77
Biskuitteig ........................................................................77
Mürbeteig .......................................................................78
Rührteig .........................................................................78
Hefeteig .........................................................................79
Waffeln .........................................................................79
Bananen-Vanille-Shake .............................................................79
Bananen-Kiwi-Smoothie .............................................................80
Page 70

■ 66 │ DE
│AT│
CH
SKMP 1300 B3
Einleitung
Herzlichen Glückwunsch zum Kauf Ihres neuen
Gerätes.
Sie haben sich damit für ein hochwertiges Produkt
entschieden. Die Bedienungsanleitung ist Bestandteil dieses Produkts. Sie enthält wichtige Hinweise
für Sicherheit, Gebrauch und Entsorgung. Machen
Sie sich vor der Benutzung des Produkts mit allen
Bedien- und Sicherheitshinweisen vertraut. Benutzen Sie das Produkt nur wie beschrieben und für
die angegebenen Einsatzbereiche. Händigen Sie
alle Unterlagen bei Weitergabe des Produkts an
Dritte mit aus.
Bestimmungsgemäßer
Gebrauch
Dieses Gerät dient ausschließlich dem Verarbeiten
von Lebensmitteln in haushaltsüblichen Mengen.
Dieses Gerät ist ausschließlich für die Benutzung in
privaten Haushalten bestimmt. Benutzen Sie es nicht
gewerblich!
Dieses Gerät ist nur für den privaten Gebrauch in
geschlossenen, regengeschützten Räumen vorgesehen. Benutzen Sie es nicht im Freien!
Das Gerät darf nur mit Originalzubehör benutzt
werden.
Lieferumfang
Profi-Küchenmaschine
Rührschüssel mit Deckel
Mixer mit Deckel und Messbecher
Knethaken
Schneebesen
Rührbesen
Bedienungsanleitung
Kurzanleitung
HINWEIS
► Kontrollieren Sie den Lieferumfang direkt
nach dem Auspacken auf Vollständigkeit und
Beschädigungen. Wenden Sie sich, wenn
nötig, an den Service.
Gerätebeschreibung
Klappen Sie die Ausklappseiten im vorderen und
hinteren Umschlag dieser Bedienungsanleitung aus:
vordere Ausklappseite
Abbildung A:
Schwenkarm
Entriegelungshebel
Drehschalter
Taste PULSE
Sockel
Rührschüssel
Antriebsachse
Abbildung B:
Einfüllhilfe
Deckel
Knethaken
- Schneebesen
3 Rührbesen
hintere Ausklappseite:
Abbildung C:
! kleiner Messbecher
. Mixer-Deckel
0 Mixer
6 Messer
1 Antriebsschutzdeckel
% Kabelaufwicklung
+ Mixerantrieb
Page 71

DE│AT│CH
│
67 ■
SKMP 1300 B3
Sicherheitshinweise
GEFAHR - ELEKTRISCHER SCHLAG!
► Schließen Sie das Gerät nur an eine vorschriftsmäßig installierte und
geerdete Netzsteckdose an. Die Netzspannung muss mit den Angaben auf dem Typenschild des Gerätes übereinstimmen.
► Achten Sie darauf, dass im Betrieb das Netzkabel nicht nass oder
feucht wird. Führen Sie es so, dass es nicht eingeklemmt oder beschädigt werden kann.
► Halten Sie das Netzkabel von heißen Oberflächen fern.
► Führen Sie keine Reparaturarbeiten am Gerät durch. Jegliche Repara-
turen müssen durch den Kundendienst oder von qualifiziertem Fachpersonal durchgeführt werden.
► Ziehen Sie den Netzstecker aus der Netzsteckdose, wenn das Gerät
gereinigt wird oder im Fehlerfall. Ausschalten alleine genügt nicht,
weil noch immer Netzspannung im Gerät anliegt, solange der Netzstecker in der Netzsteckdose steckt.
► Ziehen Sie den Netzstecker aus der Netzsteckdose, wenn das Gerät
nicht benutzt wird!
► Lassen Sie beschädigte Netzstecker oder Netzkabel sofort von au-
torisiertem Fachpersonal oder dem Kundenservice austauschen, um
Gefährdungen zu vermeiden.
► Das Gerät und seine Anschlussleitung sind von Kindern fernzuhalten.
Sie dürfen das Gerät keinesfalls in Wasser oder andere Flüssigkeiten tauchen.
Page 72

■ 68 │ DE
│AT│
CH
SKMP 1300 B3
WARNUNG! VERLETZUNGSGEFAHR!
► Trennen Sie das Gerät grundsätzlich vom Stromnetz, wenn Sie Zube-
hörteile abnehmen oder anbringen. Ein unbeabsichtigtes Einschalten
des Gerätes wird so vermieden.
Nach Stromunterbrechung läuft das Gerät wieder an!
► Das Gerät ist bei nicht vorhandener Aufsicht und vor dem Zusam-
menbau, dem Auseinandernehmen oder Reinigen stets vom Netz zu
trennen.
► Dieses Gerät darf nicht von Kindern benutzt werden.
► Verwenden Sie nur die Original-Zubehörteile zu diesem Gerät. Zube-
hörteile anderer Hersteller sind dafür möglicherweise nicht geeignet
und führen zu Gefährdungen!
► Dieses Gerät kann von Personen mit reduzierten physischen, senso-
rischen oder mentalen Fähigkeiten oder Mangel an Erfahrung und/
oder Wissen benutzt werden, wenn sie beaufsichtigt oder bezüglich
des sicheren Gebrauchs des Gerätes unterwiesen wurden und die
daraus resultierenden Gefahren verstanden haben.
► Kinder dürfen nicht mit dem Gerät spielen.
► Vorsicht: Das Messer ist sehr scharf!
► Seien Sie vorsichtig bei der Reinigung des Messers!
Page 73

DE│AT│CH
│
69 ■
SKMP 1300 B3
WARNUNG! VERLETZUNGSGEFAHR!
► Vorsicht: Das Messer ist sehr scharf! Gehen Sie daher vorsichtig beim
Abnehmen des Mixbehälters vor.
► Missbrauchen Sie das Gerät nicht für andere Zwecke, als in dieser
Bedienungsanleitung beschrieben. Ansonsten besteht Verletzungsgefahr!
► Wechseln Sie das Zubehör nur bei Stillstand des Antriebs und bei ge-
zogenem Netzstecker! Das Gerät läuft nach dem Ausschalten noch
kurze Zeit nach!
► Lassen Sie das Gerät niemals unbeaufsichtigt.
► Vor dem Auswechseln von Zubehör oder Zusatzteilen, die im Betrieb
bewegt werden, muss das Gerät ausgeschaltet und vom Netz getrennt werden.
► Geben Sie während das Gerät läuft, ausschließlich die zu verarbei-
tenden Zutaten in die Rührschüssel oder in den Mixer.
► Stecken Sie niemals Hände oder Fremdgegenstände in die Einfüllhilfe
oder in den Mixer, um Verletzungen und Beschädigungen des Gerätes
zu vermeiden.
ACHTUNG! SACHSCHÄDEN!
► Betreiben Sie das Gerät nie ohne Zutaten! Überhitzungsgefahr!
► Füllen Sie niemals heiße Zutaten in das Gerät!
Page 74

■ 70 │ DE
│AT│
CH
SKMP 1300 B3
Vorbereitungen
1) Entnehmen Sie alle Teile aus dem Karton und
entfernen Sie das Verpackungsmaterial und
eventuelle Schutzfolien und Aufkleber.
2) R
einigen Sie alle Teile, wie im Kapitel „Reinigen und Pflegen“ beschrieben. Stellen Sie
sicher, dass alle Teile vollständig getrocknet sind.
3) Wickeln Sie das Netzkabel von der Kabelaufwicklung %.
4) Stellen Sie das Gerät auf einen glatten und
sauberen Untergrund und befestigen Sie es mit
den vier Saugnäpfen.
5) Stecken Sie den Netzstecker in die Steckdose.
Geschwindigkeitsstufen
Stufe Einsatz geeignet für...
1 - 2
alle
- Startstellung bei
allen Mix- und
Rührvorgängen
- Bei der Zugabe von
Zutaten
Knethaken
Rührbesen 3
- Kneten und Mischen
von festem Teig oder
festeren Zutaten
2 - 4
Rührbesen 3
- Mischen von dickem
Rührteig
- Mischen von Butter
und Mehl
- Mischen von Hefeteig
Knethaken
- Kneten von Hefeteig
- Kneten von dickem
Rührteig
4 - 6
Rührbesen 3
- Kuchenteig
- Aufschlagen von
Butter mit Zucker
- Plätzchenteig
6 - 10
Schneebesen -
- Schlagsahne
- Eiweiß
- Majonnaise
- schaumig schlagen
von Butter
Pulse
Mixer 0
- Mixen und zerkleinern
weicher oder flüssiger
Zutaten
Page 75

DE│AT│CH
│
71 ■
SKMP 1300 B3
Arbeiten mit Knethaken,
Schnee- und Rührbesen
WARNUNG! VERLETZUNGSGEFAHR!
► Greifen Sie während des Betriebes niemals in
die Rührschüssel ! Verletzungsgefahr durch
rotierende Teile!
► Wechseln Sie Zubehör nur bei Stillstand des
Antriebs! Nach dem Ausschalten läuft der
Antrieb kurze Zeit nach.
► Schalten Sie im Fehlerfall das Gerät aus und
ziehen Sie den Netzstecker, um ein unbeabsichtigtes Einschalten des Gerätes zu vermeiden.
ACHTUNG! SACHSCHADEN!
► Bei Arbeiten mit Knethaken , Schnee- -
oder Rührbesen 3 empfehlen wir nach 10
Minuten Betrieb das Gerät abkühlen zu
lassen.
HINWEIS
► Wenn Sie mit Knethaken , Schnee- - und
Rührbesen 3arbeiten, muss der Antriebsschutzdeckel 1 aufgesteckt sein. Ansonsten
startet das Gerät nicht.
Um das Gerät für den Betrieb mit Knethaken ,
Schnee- - und Rührbesen 3 vorzubereiten,
gehen Sie wie folgt vor:
1) Drücken Sie den Entriegelungshebel nach
oben und bringen Sie den Schwenkarm in
die höchste Position.
2) Setzen Sie die Rührschüssel so ein, dass die
Arretierungen an der Rührschüssel in die
Aussparung am Sockel greifen. Drehen Sie
die Rührschüssel im Uhrzeigersinn (siehe
Symbole
und am Sockel ), so dass
diese verriegelt ist und fest sitzt.
3) Montieren Sie je nach Aufgabe Knethaken
, Schnee- - oder Rührbesen 3 auf der
Antriebsachse :
– Stecken Sie den Knethaken , Schnee- -
oder Rührbesen 3so auf die Antriebsachse ,dass die beiden Metallstifte an der
Antriebsachse in die Aussparungen am
Einsatz -3 greifen.
– Drücken Sie den Einsatz -3 kräftig
auf die Antriebsachse , so dass sich die
Feder zusammendrückt und drehen Sie
dabei den Einsatz ein wenig gegen den
Uhrzeigersinn (Richtung ).
– Lassen Sie den Einsatz los. Dieser sitzt nun
fest auf der Antriebsachse .
4) Füllen Sie die zu verarbeitenden Zutaten in die
Rührschüssel .
HINWEIS
► Beachten Sie, dass während des Knet-, bzw.
Rührvorgangs der Teig in der Rührschüssel
an Volumen zunimmt oder durch die Bewegung
etwas nach oben gedrückt wird. Füllen Sie
daher niemals die Rührschüssel bis zum
Rand voll!
5) Drücken Sie den Entriegelungshebel nach
oben und schieben Sie den Schwenkarm
mit dem montieren Einsatz nach unten in die
Arbeitsposition.
6) Schieben Sie den Deckel auf die Rührschüssel .
Page 76

■ 72 │ DE
│AT│
CH
SKMP 1300 B3
HINWEIS
► Falls gewünscht, können Sie die Einfüllhilfe
am Deckel montieren:
– Drehen Sie den Deckel etwas, so dass
die Öffnung zu Ihnen weist.
– Haken Sie die Einfüllhilfe in die Auf-
nahmen am Deckel :
Sie können nun, auch während des Betriebs,
Zutaten einfüllen.
7) Stellen Sie den Drehschalter auf die
gewünschte Stufe (siehe Kapitel „Geschwindigkeitsstufen“).
Nach der Arbeit
1) Schalten Sie das Gerät am Drehschalter aus.
2) Falls montiert: nehmen Sie die Einfüllhilfe ab.
3) Ziehen Sie den Deckel von der Rührschüssel ab.
4) Drücken Sie den Entriegelungshebel nach
oben und bringen Sie den Schwenkarm in
die höchste Position.
5) Nehmen Sie den Einsatz -3 von der
Antriebsachse , indem Sie den Einsatz
-3 gegen die Antriebsachse drücken
und gleichzeitig im Uhrzeigersinn (Richtung
) drehen. Dann können Sie den Einsatz
abnehmen.
6) Entnehmen Sie die Rührschüssel , indem Sie
diese gegen den Uhrzeigersinn dehen und
dann nach oben abnehmen.
7) Reinigen Sie alle Teile (siehe Kapitel „Reinigen
und Pflegen“).
Arbeiten mit dem Mixer
WARNUNG! VERLETZUNGSGEFAHR!
► Lassen Sie heiße Flüssigkeiten immer auf
eine handwarme Temperatur (ca. 30-40°C)
abkühlen, bevor Sie diese in den Mixer 0
einfüllen.
WARNUNG! VERLETZUNGSGEFAHR
DURCH SCHARFE MESSER /
ROTIERENDEN ANTRIEB!
► Greifen Sie niemals in den aufgesetzten
Mixer 0!
► Nehmen Sie den Mixer 0 nur bei Stillstand
der Messer 6 ab.
► Betreiben Sie den Mixer 0 nur mit aufgesetz-
tem Mixer-Deckel .mit Messbecher !.
► Schalten Sie im Fehlerfall das Gerät aus
und ziehen Sie den Netzstecker, um ein
unbeabsichtigtes Einschalten des Gerätes zu
vermeiden.
ACHTUNG! SACHSCHADEN!
► Benutzen Sie niemals die Rührschüssel und
den Mixer 0 gleichzeitig! Dies führt zu einer
Überlastung des Motors!
► Bei Arbeiten mit dem Mixer 0 empfehlen wir
nach 3 Minuten Betrieb das Gerät abkühlen
zu lassen.
Um das Gerät für den Betrieb mit dem Mixer 0
vorzubereiten, gehen Sie wie folgt vor. Nehmen
Sie die Abbildung C auf der hinteren Ausklappseite
zur Hilfe.
1) Drücken Sie den Entriegelungshebel nach
oben und schieben Sie den Schwenkarm
nach unten in die Arbeitsposition.
2) Ziehen Sie den Antriebsschutzdeckel 1 ab.
Page 77

DE│AT│CH
│
73 ■
SKMP 1300 B3
HINWEIS
► Stellen Sie sicher, dass der Drehschalter
auf „0“ steht, bevor Sie den Mixer auf den Mixerantrieb stellen. Ansonsten startet das Gerät
unvermittelt sobald der Mixer eingerastet ist.
3) Setzen Sie den Mixer 0 so auf den Mixerantrieb +, so dass die Arretierungen an der Unterseite des Mixers 0 in die Aussparungen am
Mixerantrieb + greifen. Der Pfeil am Mixer 0
muss dabei auf das Symbol
am Gerät
weisen. Drehen Sie den Mixer 0 bis zum Anschlag im Uhrzeigersinn. Der Pfeil am Mixer 0
weist dann auf das Symbol
am Gerät.
4) Füllen Sie die Zutaten ein.
5) Setzen Sie den Mixer-Deckel . mit Mess-
becher ! auf, so dass die Lippe am Mixer-
Deckel . auch den Ausgießer verschließt.
6) Stellen Sie den Drehschalter auf die ge-
wünschte Stufe.
HINWEIS
► Die ideale Geschwindigkeit hängt von der
Konsistenz des Mixgutes ab. Je flüssiger der
Inhalt ist, um so schneller können Sie mixen.
► Für kurzen, kraftvollen Impulsbetrieb, stellen Sie
den Drehschalter mindestens auf Stufe 1 und
drücken Sie gleichzeitig die Taste PULSE .
Die Taste PULSE rastet nicht ein, um den
Motor nicht zu überlasten. Halten Sie die
Taste PULSE deshalb nur kurz in dieser
Stellung.
Zutaten nachfüllen
1) Schalten Sie das Gerät am Drehschalter aus.
2) Nehmen Sie den Mixer-Deckel . ab und füllen
Sie die Zutaten ein
oder
3) Drehen Sie den Messbecher !, der sich im
Mixer-Deckel . befindet, um 90° und nehmen
Sie ihn heraus. Füllen Sie die Zutaten nach und
nach durch die Nachfüllöffnung ein.
Nach der Arbeit
1) Schalten Sie das Gerät am Drehschalter aus.
2) Drehen Sie den Mixer 0 gegen den Uhrzeigersinn, so dass der Pfeil am Mixer 0 auf das
Symbol
am Gerät weist und nehmen Sie
ihn ab.
HINWEIS
► Reinigen Sie den Mixer 0 am besten sofort
nach dem Gebrauch (siehe Kapitel „Reinigen
und Pflegen“). So lassen sich Lebensmittelreste
leichter entfernen.
Reinigen und Pflegen
GEFAHR - ELEKTRISCHER SCHLAG!
► Ziehen Sie vor jeder Reinigung den Netzste-
cker aus der Netzsteckdose! Es besteht die
Gefahr eines elektrischen Schlages!
Tauchen Sie das Gerät niemals in Wasser
oder andere Flüssigkeiten!
ACHTUNG! SACHSCHADEN!
► Verwenden Sie keine scheuernden oder
aggressiven Reinigungsmittel. Diese können
die Oberflächen beschädigen!
Page 78

■ 74 │ DE
│AT│
CH
SKMP 1300 B3
HINWEISE
► Reinigen Sie das Gerät am besten sofort
nach der Benutzung. Dann lassen sich
Lebensmittelreste leichter entfernen.
► Bei der Verarbeitung von farbstoffreichen
Lebensmitteln, wie zum Beispiel Karotten,
können sich die Kunststoffteile verfärben.
Diese Verfärbungen können Sie mit ein wenig
Speiseöl entfernen.
Gerät reinigen
■ Wischen Sie das Gerät mit einem feuchten
Tuch ab. Bei hartnäckigeren Verschmutzungen,
geben Sie ein mildes Spülmittel auf das Tuch.
Wischen Sie Spülmittelreste mit einem mit klarem
Wasser befeuchteten Tuch ab. Trocknen Sie das
Gerät danach gut ab.
Zubehör reinigen
■ Reinigen Sie die Rührschüssel , den Deckel ,
die Einfüllhilfe , den Mixer-Deckel . mit
Messbecher !, den Antriebsschutzdeckel 1
und die Einsätze -3 im warmen Wasser
mit etwas Spülmittel. Entfernen Sie eventuelle
Rückstände mit einer Spülbürste. Spülen Sie alle
Teile mit klarem, warmem Wasser ab und stellen
Sie sicher, dass alle Teile vor einer erneuten
Benutzung trocken sind.
HINWEIS
► Die Einsätze -3, die Rührschüssel
und der Mixer-Deckel . mit Messbecher !
sind auch für die Reinigung in der Spülmaschine geeignet.
► Achten Sie bei der Reinigung in der Spülma-
schine darauf, dass die Kunststoffteile nicht
eingeklemmt werden. Ansonsten können sich
diese verformen!
► Legen Sie die Kunststoffteile, wenn möglich, in
den oberen Korb der Spülmaschine.
Mixer reinigen
WARNUNG! VERLETZUNGSGEFAHR!
► Messer 6 nicht mit bloßen Händen berühren.
■ Reinigen Sie den Mixer 0 in warmem Wasser
und geben Sie ein mildes Spülmittel hinzu.
Spülen Sie ihn danach mit klarem Wasser ab, so
dass keine Spülmittelreste mehr daran haften.
In den meisten Fällen kann eine ausreichend hygienische Reinigung direkt nach der Benutzung durch
folgende Alternative erreicht werden:
1) Geben Sie Wasser mit etwas Spülmittel in den
aufgesetzten Mixer 0.
2) Setzen Sie den Mixer-Deckel . mit Mess-
becher ! auf, so dass die Lippe am Mixer-
Deckel . auch den Ausgießer verschließt.
3) Schalten Sie den Mixer 0 für einige Sekunden
ein.
4) Schütten Sie das Spülwasser aus. Entfernen Sie
eventuelle Rückstände mit einer Spülbürste.
5) Spülen Sie danach den Mixer 0 mit viel klarem
Wasser ab, so dass alle Spülmittelreste beseitigt
sind.
HINWEIS
► Der Mixer 0 ist zur Reinigung in der Spülma-
schine geeignet.
► Achten Sie bei der Reinigung in der Spül-
maschine darauf, dass der Kunststoffteil des
Mixers 0 nicht eingeklemmt wird. Ansonsten
kann sich dieser verformen!
Aufbewahrung
■ Wickeln Sie zur Aufbewahrung das Netzkabel
um die Kabelaufwicklung %.
■ Bewahren Sie das gereinigte Gerät an einem
sauberen, staubfreien und trockenen Ort auf.
Page 79

DE│AT│CH
│
75 ■
SKMP 1300 B3
Fehler beheben
Wenn das Gerät plötzlich stehen bleibt:
■ Das Gerät ist überhitzt und die automatische
Sicherheitsabschaltung ist aktiviert.
– Drehschalter auf 0 stellen.
– Netzstecker aus der Steckdose ziehen.
– Das Gerät 15 Minuten abkühlen lassen.
– Ist das Gerät nach den 15 Minuten noch
nicht vollständig abgekühlt, wird es nicht
angehen.
– Weitere 15 Minuten warten und erneut
einschalten.
Wenn das Gerät sich nicht einschalten lässt:
– Überprüfen Sie, ob sich der Netzstecker in
der Steckdose befindet.
– Überprüfen Sie, ob sich der Schwenkarm
in der korrekten Position befindet.
Technische Daten
Netzspannung: 220 - 240 V ~/ 50 Hz
Leistungsaufnahme: 1300 W
Schutzklasse: II
max. Fassungsvermögen
Rührschüssel : ca. 6,3 l
Mixer 0: ca. 1,5 l
Alle Teile dieses Gerätes, die mit
Lebensmitteln in Berührung kommen,
sind lebensmittelecht.
Wir empfehlen folgende Betriebszeiten:
Lassen Sie das Gerät bei Arbeiten mit Knethaken
, Schnee- - oder Rührbesen 3 nach 10 Minuten Betrieb abkühlen.
Lassen Sie das Gerät bei Arbeiten mit dem Mixer
0 nach 3 Minuten Betrieb abkühlen.
Wenn diese Betriebszeiten überschritten werden,
kann es durch Überhitzung zu Schäden am Gerät
führen.
Garantie und Service
Sie erhalten auf dieses Gerät 3 Jahre Garantie
ab Kaufdatum. Das Gerät wurde sorgfältig
produziert und vor Anlieferung gewissenhaft
geprüft. Bitte bewahren Sie den Kassenbon als
Nachweis für den Kauf auf. Bitte setzen Sie sich
im Garantiefall mit Ihrer Servicestelle telefonisch
in Verbindung. Nur so kann eine kostenlose
Einsendung Ihrer Ware gewährleistet werden.
Die Garantieleistung gilt nur für Material- oder
Fabrikationsfehler, nicht aber für Transportschäden,
Verschleißteile oder für Beschädigungen an zerbrechlichen Teilen, z. B. Schalter oder Akkus. Das Produkt
ist lediglich für den privaten und nicht für den
gewerblichen Gebrauch bestimmt.
Bei missbräuchlicher und unsachgemäßer Behandlung, Gewaltanwendung und bei Eingriffen, die nicht
von unserer autorisierten Service-Niederlassung
vorgenommen wurden, erlischt die Garantie.
Ihre gesetzlichen Rechte werden durch diese Garantie
nicht eingeschränkt.
Die Garantiezeit wird durch die Gewährleistung
nicht verlängert. Dies gilt auch für ersetzte und reparierte Teile. Eventuell schon beim Kauf vorhandene
Schäden und Mängel müssen sofort nach dem
Auspacken gemeldet werden, spätestens aber zwei
Tage nach Kaufdatum. Nach Ablauf der Garantiezeit
anfallende Reparaturen sind kostenpflichtig.
Page 80

■ 76 │ DE
│AT│
CH
SKMP 1300 B3
Service Deutschland
Tel.: 0800 5435 111 (Kostenfrei aus dem
dt. Festnetz/Mobilfunknetz)
E-Mail: kompernass@lidl.de
IAN 276995/276996/277709
Service Österreich
Tel.: 0820 201 222 (0,15 EUR/Min.)
E-Mail: kompernass@lidl.at
IAN 276995/276996/277709
Service Schweiz
Tel.: 0842 665566 (0,08 CHF/Min.,
Mobilfunk max. 0,40 CHF/Min.)
E-Mail: kompernass@lidl.ch
IAN 276995/276996/277709
Entsorgung
Werfen Sie das Gerät kei-
nesfalls in den normalen
Hausmüll. Dieses Produkt
unterliegt der europäischen
Richtlinie 2012/19/EU.
Entsorgen Sie das Gerät über einen zugelassenen
Entsorgungsbetrieb oder über Ihre kommunale
Entsorgungseinrichtung. Beachten Sie die aktuell
geltenden Vorschriften. Setzen Sie sich im Zweifelsfall mit Ihrer Entsorgungseinrichtung in Verbindung.
Die Verpackung besteht aus umwelt-
freundlichen Materialien, die Sie über
die örtlichen Recyclingstellen entsorgen
können.
Importeur
KOMPERNASS HANDELS GMBH
BURGSTRASSE 21
44867 BOCHUM
GERMANY
www.kompernass.com
Rezepte
Möhrensuppe
Zutaten:
■ 500 g Karotten
■ 250 ml Wasser
■ 500 ml Fleischfond (Glas)
■ 125 ml Sahne
■ 125 ml Weißwein
■ Salz
■ Pfeffer
■ 50 g kalte Butter
■ Frischer Kerbel
Zubereitung:
1) Waschen und schälen Sie die Möhren.
2) Schneiden Sie sie so klein, dass Sie gut in den
Mixer 0 passen.
3) Geben Sie 250 ml Wasser in einen Topf
und kochen Sie die Möhren für 20 Minuten
darin. Anschließend pürieren Sie das Ganze
im Mixer 0, bis keine größeren Stücke mehr
übrig sind.
4) Geben Sie die pürierten Möhren danach
zurück in den Topf.
5) Gießen Sie nun Fleischfond, Sahne und Weißwein hinzu.
6) Erhitzen Sie die Suppe und schmecken Sie sie
ab.
7) Rühren Sie die Butter in kleinen Stückchen unter
die Suppe und richten Sie danach mit dem
Kerbel an.
Page 81

DE│AT│CH
│
77 ■
SKMP 1300 B3
Thunfisch-Aufstrich
Zutaten:
■ 1 Dose Thunfisch in Sauce mit Gemüseeinlage
■ 3 EL Joghurt
■ 1 TL Zitronensaft, frisch gepresst
■ 1 Prise Salz
■ Pfeffer aus der Mühle
■ 2 hartgekochte Eier, gewürfelt
Zum Anrichten:
■ Vollkornbrot in Scheiben
■ Butter zum Bestreichen
■ 1 hartgekochtes Ei, gewürfelt
■ Schnittlauch, geschnitten
Zubereitung:
1) Mischen Sie alle Zutaten im Mixer 0 bis die
gewünschte Konsistenz erreicht ist (ca. 15
Sekunden) und schmecken Sie danach ab.
2) Bestreichen Sie das Brot mit Butter und
Thunfisch-Creme und bestreuen Sie das Ganze
mit dem gehackten Ei und dem Schnittlauch.
Traditionelle Pfannkuchen
Zutaten:
■ 2-3 Eier
■ 375 ml Milch
■ 1 Prise Salz
■ 250 g Mehl
■ Fett zum Backen
Zubereitung:
1) Mischen Sie die Eier, die Milch und das Salz
mit dem Rührbesen 3.
2) Sieben Sie das Mehl durch und geben Sie es
dazu. Mischen Sie alles mit dem Rührbesen 3,
bis ein glatter Teig entsteht.
3) Lassen Sie den Teig für ca. 20 Minuten
quellen.
4) Erhitzen Sie das Fett und geben Sie mit einer
kleinen Kelle Teig hinein. (Immer nur so viel,
dass der Pfannenboden dünn bedeckt ist.)
5) Backen Sie die Pfannkuchen von beiden Seiten
goldbraun und servieren Sie sie heiß.
Biskuitteig
Zutaten:
■ 3 Eier
■ 3 - 4 EL Wasser, heiß
■ 150 g Zucker
■ 1 Päckchen Vanillinzucker
■ 100 g Mehl, Type 405
■ 100 g Speisestärke
■ 2-3 gestr. TL Backpulver
Zubereitung:
1) Legen Sie den Boden einer Springform (Durchmesser: 28 cm) mit Backpapier aus. Fetten Sie
nicht den Rand, da sonst die Oberfläche nicht
gleichmäßig glatt und gebräunt wird.
2) Schlagen Sie die ganzen Eier in der Rührschüssel und geben Sie heißes Wasser dazu.
3) Schlagen Sie das Ganze dann für ca. 1
Minute auf höchster Stufe mit dem Rührbesen 3
schaumig.
4) Rühren Sie Zucker und Vanillinzucker unter und
schlagen Sie alles für 2 Minuten auf höchster
Stufe weiter.
5) Mischen Sie Mehl, Speisestärke und Backpulver und sieben Sie die Hälfte davon auf die
Eiercreme und rühren Sie alles kurz auf Stufe
4 unter.
6) Rühren Sie dann das restliche Mehl auf dieselbe Weise unter und füllen Sie den Teig in die
vorbereitete Springform.
7) Backen Sie das Ganze sofort im vorgeheizten
Backofen bei Ober- und Unterhitze 175 200°C für ca. 20 - 30 Minuten.
Page 82

■ 78 │ DE
│AT│
CH
SKMP 1300 B3
Mürbeteig
Zutaten:
■ 250 g Weizenmehl
■ 1/2 gestr. TL Backpulver
■ 100-125 g Zucker
■ 1 Päckchen Vanillinzucker
■ 1 Prise Salz
■ 1 Ei
■ 125 g Butter
Zubereitung:
1) Mischen Sie Mehl und Backpulver in der Rührschüssel und geben Sie anschließend alle
übrigen Zutaten hinzu.
2) Kneten Sie alles mit dem Knethaken zuerst
für ca. 1 Minute auf Stufe 2, dann für ca. 3
Minuten auf Stufe 2-4.
3) Kneten Sie den Teig nicht zu lange, der Teig
könnte sonst zu weich werden.
4) Lassen Sie den Teig im Kühlschrank für 1/2
Stunde ruhen und verarbeiten Sie ihn danach
zu einem Tortenboden oder zu Kleingebäck.
5) Für einen Tortenboden rollen Sie 2/3 des
Teiges aus und legen ihn in eine gefettete
Springform.
6) Rollen Sie den restlichen Teig zu einer Rolle.
7) Legen Sie diese Rolle als Rand auf den Teig
und drücken Sie ihn mit zwei Fingern so an den
Rand, dass ein ca. 3 cm hoher Rand entsteht.
8) Stechen Sie den Tortenboden mit einer Gabel
mehrfach ein.
9) Heizen Sie den Backofen ca. 5 Minuten vor
und backen Sie den Mürbeteig ca. 15 - 20
Minuten bei Ober- und Unterhitze und 200 225 °C.
Rührteig
Zutaten:
■ 250 g weiche Butter oder Margarine
■ 250 g Zucker
■ 1 Päckchen Vanillinzucker
■ 1 Prise Salz
■ 4 Eier
■ 500 g Weizenmehl
■ 1 Päckchen Backpulver
■ Ca. 125 ml Milch
Zubereitung:
1) Geben Sie alle Zutaten in die Rührschüssel
und rühren Sie alles mit dem Rührbesen 3 für
1/2 Minute auf Stufe 1, dann für 30 Sekunden
auf Stufe 2 und danach für ca. 5 Minuten auf
Stufe 4.
2) Fetten Sie die Backform oder legen Sie sie mit
Backpapier aus.
3) Befüllen Sie die Backform und backen Sie
den Teig ca. 50 - 60 Minuten bei Ober- und
Unterhitze und 175 - 200 °C.
4) Bevor Sie den Kuchen aus dem Ofen nehmensollten Sie eine Garprobe machen: Stechen
Sie dazu mit einem spitzen Holzstäbchen in
die Mitte des Kuchens. Wenn kein Teig dran
hängen bleibt, ist der Kuchen gar.
5) Stürzen Sie dann den Kuchen auf einen Kuchenrost und lassen Sie ihn abkühlen.
Page 83

DE│AT│CH
│
79 ■
SKMP 1300 B3
Hefeteig
Zutaten:
■ 500 g Weizenmehl
■ 25 g frische Hefe oder 1 Pck. Trockenhefe
■ ca. 1/4 l lauwarme Milch
■ 80 g Butter oder Margarine (Raumtemperatur)
■ 80 g Zucker
■ 1 Ei
Zubereitung:
1) Geben Sie Mehl, Trockenhefe oder zerbröselte
Hefe und alle anderen Zutaten (nicht direkt auf
die Hefe) in die Rührschüssel .
2) Vermengen Sie alles langsam mit dem Knethaken auf Stufe 1, danach für 3-4 Minuten
auf Stufe 3.
3) Decken Sie die Schüssel mit einem Geschirrtuch ab, stellen Sie sie an einen warmen Ort
und lassen Sie den Teig gehen, bis er sich
sichtbar vergrößert hat.
4) Kneten Sie den Teig dann noch einmal durch.
5) Danach ist der Teig fertig und Sie können ihn
weiterverarbeiten.
Waffeln
Zutaten:
■ 200 g Zucker
■ 500 g Mehl
■ 5 g Backpulver
■ 5 Eier
■ 400 ml Milch
■ 250 g Butter (Raumtemperatur)
■ 2 Päckchen Vanillezucker
Zubereitung:
1) Geben Sie die Eier, den Zucker und die Butter
in die Rührschüssel und verrühren Sie alles
mit dem Schneebesen - zu einem glatten Teig.
2) Fügen Sie das Mehl, den Vanillezucker und
das Backpulver hinzu.
3) Rühren Sie die Milch nach und nach unter bis
der Teig eine glatte und weiche Konsistenz hat.
4) Backen Sie die Waffeln in einem Waffeleisen
aus.
Bananen-Vanille-Shake
Zutaten:
■ 3 Bananen
■ 500 ml Milch
■ 2 Päckchen Vanillezucker
■ 1 EL Vanilleeis
Zubereitung:
1) Schälen Sie die Bananen.
2) Geben Sie die geschälten Bananen, die Milch,
das Vanilleeis und den Vanillezucker in den
Mixer 0.
3) Mixen Sie alles auf Stufe 8.
Page 84

■ 80 │ DE
│AT│
CH
SKMP 1300 B3
Bananen-Kiwi-Smoothie
Zutaten:
■ 200 ml Orangensaft (frisch gepresst)
■ 1 Kiwi
■ 1/2 Banane
Zubereitung:
1) Enthäuten Sie die Kiwi.
2) Schälen Sie die Banane.
3) Geben Sie die Kiwi, die Banane und den
Orangensaft in den Mixer 0.
4) Mixen Sie alles auf Stufe 8.
Page 85

3
IAN 276995/276996/277709
KOMPERNASS HANDELS GMBH
BURGSTRASSE 21
44867 BOCHUM
DEUTSCHLAND / GERMANY
www.kompernass.com
Last Information Update · Informationsstatus
Stan informacji · Informacijos data · Stand der Informationen:
03 /2016 · Ident.-No.: SKMP1300B3-022016-1
 Loading...