

Page 1
PROFESSIONAL FOOD PROCESSOR SKMP 1300 B3
IAN 276995/276996/277709
PROFESSIONAL FOOD PROCESSOR
Operating instructions
КУХНЕНСКИ РОБОТ
Ръководство за експлоатация
ROBOT DE BUCĂTĂRIE PROFESIONAL
Instrucţiuni de utilizare
ΚΟΥΖΙΝΟΜΗΧΑΝΗ
Οδηүίες χρήσης
PROFI -KÜCHENMASCHINE
Bedienungsanleitung
Page 2

GB / CY Operating instructions Page 1
RO Instrucţiuni de utilizare Pagina 17
BG Ръководство за експлоатация Cтраница 33
GR / CY Οδηүίες χρήσης Σελίδα 49
DE / AT / CH Bedienungsanleitung Seite 65
Before reading, unfold the page containing the illustrations and familiarise yourself with all functions of
the device.
Înainte de a citi instrucţiunile, priviţi imaginile şi familiarizaţi-vă cu toate funcţiile aparatului.
Преди да прочетете отворете страницата с фигурите и след това се запознайте с всички функции
на уреда.
Πριν ξεκινήσετε την ανάγνωση, ανοίξτε τη σελίδα με τις εικόνες και εξοικειωθείτε με όλες τις λειτουργίες
της συσκευής.
Klappen Sie vor dem Lesen die Seite mit den Abbildungen aus und machen Sie sich anschließend mit allen
Funktionen des Gerätes vertraut.
Page 3

B
A
Page 4
C
Page 5

GB│CY
│
1 ■
SKMP 1300 B3
Contents
Introduction . . . . . . . . . . . . . . . . . . . . . . . . . . . . . . . . . . . . . . . . . . . . . . . . . . . . . . . . . . .2
Intended use . . . . . . . . . . . . . . . . . . . . . . . . . . . . . . . . . . . . . . . . . . . . . . . . . . . . . . . . . . .2
Package contents . . . . . . . . . . . . . . . . . . . . . . . . . . . . . . . . . . . . . . . . . . . . . . . . . . . . . . .2
Description of the appliance . . . . . . . . . . . . . . . . . . . . . . . . . . . . . . . . . . . . . . . . . . . . . .2
Safety instructions . . . . . . . . . . . . . . . . . . . . . . . . . . . . . . . . . . . . . . . . . . . . . . . . . . . . . .3
Preparation . . . . . . . . . . . . . . . . . . . . . . . . . . . . . . . . . . . . . . . . . . . . . . . . . . . . . . . . . . .6
Speed levels . . . . . . . . . . . . . . . . . . . . . . . . . . . . . . . . . . . . . . . . . . . . . . . . . . . . . . . . . . .6
Working with the kneading hook, beater and whisk . . . . . . . . . . . . . . . . . . . . . . . . .7
After you have fi nished using your appliance . . . . . . . . . . . . . . . . . . . . . . . . . . . . . . . . . . . . . . . . . . . . . 8
Working with the blender . . . . . . . . . . . . . . . . . . . . . . . . . . . . . . . . . . . . . . . . . . . . . . . .8
Adding more ingredients . . . . . . . . . . . . . . . . . . . . . . . . . . . . . . . . . . . . . . . . . . . . . . . . . . . . . . . . . . . . . 9
After you have fi nished using your appliance . . . . . . . . . . . . . . . . . . . . . . . . . . . . . . . . . . . . . . . . . . . . . 9
Cleaning and care . . . . . . . . . . . . . . . . . . . . . . . . . . . . . . . . . . . . . . . . . . . . . . . . . . . . . .9
Cleaning the appliance . . . . . . . . . . . . . . . . . . . . . . . . . . . . . . . . . . . . . . . . . . . . . . . . . . . . . . . . . . . . . 10
Cleaning accessories . . . . . . . . . . . . . . . . . . . . . . . . . . . . . . . . . . . . . . . . . . . . . . . . . . . . . . . . . . . . . . . 10
Cleaning the blender . . . . . . . . . . . . . . . . . . . . . . . . . . . . . . . . . . . . . . . . . . . . . . . . . . . . . . . . . . . . . . . 10
Storage . . . . . . . . . . . . . . . . . . . . . . . . . . . . . . . . . . . . . . . . . . . . . . . . . . . . . . . . . . . . . .10
Troubleshooting . . . . . . . . . . . . . . . . . . . . . . . . . . . . . . . . . . . . . . . . . . . . . . . . . . . . . . .11
Technical data . . . . . . . . . . . . . . . . . . . . . . . . . . . . . . . . . . . . . . . . . . . . . . . . . . . . . . . . .11
Warranty and service . . . . . . . . . . . . . . . . . . . . . . . . . . . . . . . . . . . . . . . . . . . . . . . . . .11
Disposal . . . . . . . . . . . . . . . . . . . . . . . . . . . . . . . . . . . . . . . . . . . . . . . . . . . . . . . . . . . . .12
Importer . . . . . . . . . . . . . . . . . . . . . . . . . . . . . . . . . . . . . . . . . . . . . . . . . . . . . . . . . . . . .12
Recipes . . . . . . . . . . . . . . . . . . . . . . . . . . . . . . . . . . . . . . . . . . . . . . . . . . . . . . . . . . . . . .12
Carrot soup . . . . . . . . . . . . . . . . . . . . . . . . . . . . . . . . . . . . . . . . . . . . . . . . . . . . . . . . . . . . . . . . . . . . . . 12
Tuna spread . . . . . . . . . . . . . . . . . . . . . . . . . . . . . . . . . . . . . . . . . . . . . . . . . . . . . . . . . . . . . . . . . . . . . . 13
Traditional pancakes . . . . . . . . . . . . . . . . . . . . . . . . . . . . . . . . . . . . . . . . . . . . . . . . . . . . . . . . . . . . . . . 13
Sponge pastry . . . . . . . . . . . . . . . . . . . . . . . . . . . . . . . . . . . . . . . . . . . . . . . . . . . . . . . . . . . . . . . . . . . . 13
Shortcrust pastry . . . . . . . . . . . . . . . . . . . . . . . . . . . . . . . . . . . . . . . . . . . . . . . . . . . . . . . . . . . . . . . . . . 14
Sponge batter . . . . . . . . . . . . . . . . . . . . . . . . . . . . . . . . . . . . . . . . . . . . . . . . . . . . . . . . . . . . . . . . . . . . 14
Yeast dough . . . . . . . . . . . . . . . . . . . . . . . . . . . . . . . . . . . . . . . . . . . . . . . . . . . . . . . . . . . . . . . . . . . . . . 15
Waffl es . . . . . . . . . . . . . . . . . . . . . . . . . . . . . . . . . . . . . . . . . . . . . . . . . . . . . . . . . . . . . . . . . . . . . . . . . 15
Banana vanilla shake . . . . . . . . . . . . . . . . . . . . . . . . . . . . . . . . . . . . . . . . . . . . . . . . . . . . . . . . . . . . . . 15
Banana-kiwi smoothie . . . . . . . . . . . . . . . . . . . . . . . . . . . . . . . . . . . . . . . . . . . . . . . . . . . . . . . . . . . . . . 16
Page 6

■ 2 │ GB
│
CY
SKMP 1300 B3
Introduction
Congratulations on the purchase of your new
appliance.
You have selected a high-quality product.
The operating instructions are part of this product.
They contain important information on safety, usage
and disposal. Before using the product, familiarise
yourself with all handling and safety guidelines.
Use the product only as described and for the range
of applications specifi ed. Please also pass these
operating instructions on to any future owner(s).
Intended use
This appliance is intended exclusively for processing
foodstuff s in normal household quantities. This
appliance is intended solely for use in private
households. It is not suitable for commercial use!
This appliance is intended only for private use in
enclosed, dry spaces. It must not be used outdoors.
The appliance may only be used with original
accessories.
Package contents
Professional Food Processor
Mixing bowl with lid
Blender with lid and measuring cup
Kneading hook
Whisk
Beater
Operating instructions
Quick guide
NOTE
►
Check contents for completeness and damage immediately after unpacking. Contact
Customer Services if necessary.
Description of the appliance
Fold out the fl aps on the front and rear covers of
this operating manual.
Front fl ap
Figure A:
1 Swivelling arm
2 Release lever
3 Rotary switch
4 PULSE button
5 Base
6 Mixing bowl
7 Drive shaft
Figure B:
8 Filling nose
9 Lid
0 Kneading hook
q Whisk
w Beater
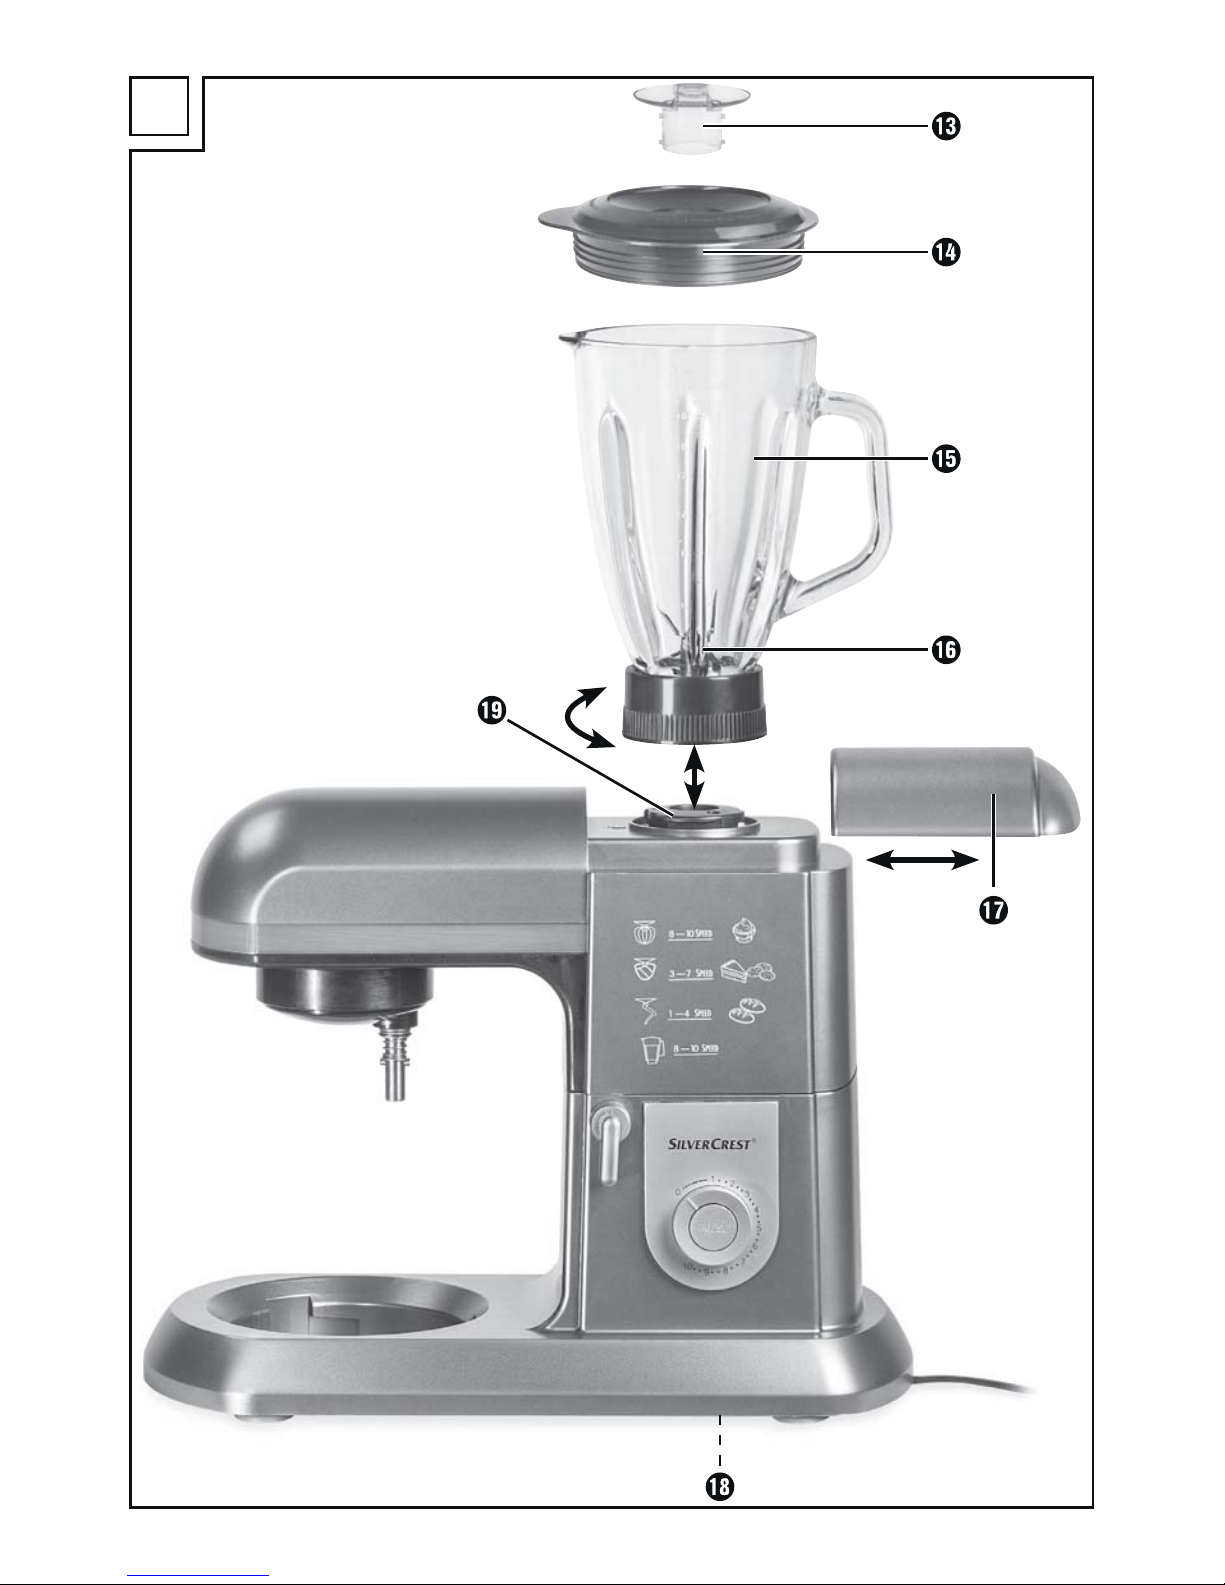
Back fl ap:
Figure C:
e Small measuring cup
r Blender lid
t Blender
z Blade
u Drive unit lid
i Cable spool
o Blender drive unit
Page 7

GB│CY
│
3 ■
SKMP 1300 B3
Safety instructions
DANGER – ELECTRIC SHOCK!
► The appliance must only be connected to a correctly installed and
earthed mains power socket. Ensure that the rating for your local
power supply corresponds with the details on the rating plate of the
appliance.
► Ensure that the power cable does not become wet or moist during
use. Route the cable in such a way that it cannot be crushed or
damaged.
► Keep the power cable away from hot surfaces.
► Do not perform any repairs on the appliance. All repairs must be
performed by our Customer Service Unit or by a qualifi ed specialist
technician.
► Remove the plug from the mains power socket when the appliance is
being cleaned or in the event of a fault. Just switching off the appliance
is not suffi cient, as the appliance is subject to mains voltage for as
long as the plug is connected to the mains power socket.
► Always remove the plug from the mains power socket when the
appliance is not in use.
► To prevent accidents, have defective plugs and/or power cables
replaced immediately by an authorised specialist technician or our
Customer Service department.
► The appliance and its connecting cable must be kept away from
children.
Never submerge the appliance in water or other liquids.
Page 8

■ 4 │ GB
│
CY
SKMP 1300 B3
WARNING! RISK OF INJURY!
► Always disconnect the appliance from the mains power supply when
fi tting or removing accessories. This will prevent unintentional activation
of the appliance.
The appliance will begin running again after any power outage is
over!
► The appliance should always be disconnected from the mains when
unattended and before assembly, disassembly or cleaning.
► This appliance should not be used by children.
► Use only the original accessory parts for this appliance. Accessory
parts from other manufacturers may not be suitable, and this may
lead to risks!
► This appliance may be used by persons with limited physical, sensory
or mental capabilities or lack of experience and knowledge, provided
that they are under supervision or have been told how to use the
appliance safely and are aware of the potential risks.
► Children must not play with the appliance.
► Caution: The blade is very sharp!
► Be careful when cleaning the blade.
Page 9

GB│CY
│
5 ■
SKMP 1300 B3
WARNING! RISK OF INJURY!
► Caution: the blade is very sharp! For this reason, take great care
when removing the blender jug.
► Never use the appliance for purposes other than those described in
these instructions. Otherwise there is a risk of serious injury!
► Do not change accessories unless the drive unit is entirely at a stand-
still and the blender is unplugged from the power supply! The appliance will run on for a short time after being switched off !
► Never leave the appliance unattended!
► Before changing any accessories or additional parts that move during
operation, the appliance must be switched off and disconnected from
mains power.
► While the appliance is in operation, do not put anything other than
the ingredients to be processed into the mixing bowl or blender.
► Do not put hands and foreign objects into the fi lling nose or the
blender, to avoid the risk of injury or damage to the appliance.
CAUTION! PROPERTY DAMAGE!
► Do not operate the appliance without ingredients. Risk of overheating!
► Never fi ll the appliance with hot ingredients!
Page 10
■ 6 │ GB
│
CY
SKMP 1300 B3
Preparation
1) Take all the parts out of the box and remove
the packaging material and any protective
wrapping or stickers.
2) Clean all components as described in the
section “Cleaning and Care”. Ensure that all
parts are completely dry.
3) Unwind the power cable from the cable
spool i.
4) Place the appliance on a smooth, clean surface
and secure it using the four suction cups.
5) Insert the power plug into the socket.
Speed levels
Level Application suitable for...
1 - 2
all
- Starting position
for all blending and
stirring processes
- For adding ingredients
Kneading
hook 0
Beater w
- Kneading and blending
of fi rm dough or fi rmer
ingredients
2 - 4
Beater w
- Blending thick batter
- Blending butter and
fl our
- Blending yeast dough
Kneading
hook 0
- Kneading yeast dough
- Kneading thick batter
4 - 6
Beater w
- Cake mix
- Creaming butter and
sugar
- Biscuit dough
6 - 10
Whisk q
- Whipped cream
- Egg whites
- Mayonnaise
- Whipping butter
Pulse
Blender t
- Blending or shredding of soft or liquid
ingredients
Page 11

GB│CY
│
7 ■
SKMP 1300 B3
Working with the kneading
hook, beater and whisk
WARNING! RISK OF INJURY!
► Under no circumstances should you place
your hands or fi ngers in the mixing bowl 6
during operation! Danger of injury due to
rotating parts!
► Switch from one accessory to another only
when the drive unit is at a complete standstill!
After being switched off , the drive continues
to run for a short time.
► In cases of malfunction, switch the appliance
off and remove the plug from the wall socket.
This will prevent the appliance from becoming
switched on again unintentionally.
CAUTION – PROPERTY DAMAGE!
►
When working with kneading hooks 0,
whisk q or beater w, we recommend
allowing the appliance to cool down after
10 minutes of operation.
NOTE
►
When you are working with the kneading
hook 0, whisk q or beater w, the drive unit
lid u must be in place. If not, the appliance
will not start.
To prepare the device for tasks involving the kneading hooks 0, whisk q or beater w, proceed as
follows:
1) Push the release lever 2 upwards and move
the swivelling arm 1 to the highest position.
2) Insert the mixing bowl 6 so that the locking
mechanisms on the mixing bowl 6 fi t into the
recess in the base 5. Rotate the mixing bowl 6
clockwise (cf. symbols
and
on the
base 5) until it is locked and stable.
3) Depending on type of application, mount either
the kneading hook 0, whisk q or beater w
onto the drive shaft 7:
– Place the kneading hook 0, whisk q or
beater w onto the drive shaft 7 so that
both metal pins on the drive shaft 7 fi t into
the recesses in the inset 0 q w.
– Push the inset 0 q w fi rmly onto the drive
shaft 7 until the spring is compressed while
rotating the inset a little anticlockwise (direc-
tion
).
– Let go of the inset. It is now fi rmly attached
to the drive shaft 7.
4) Add the ingredients you wish to process to the
mixing bowl 6.
NOTE
►
Please note that the dough in the mixing bowl
6 will increase in volume or will be pressed
upwards by the movement during the kneading
or mixing process. Therefore, never fi ll the
mixing bowl 6 to the brim!
5) Push the release lever 2 upwards and push
the swivelling arm 1 into its working position
with the mounted inset facing downwards.
6) Push the lid 9 onto the mixing bowl 6.
Page 12
■ 8 │ GB
│
CY
SKMP 1300 B3
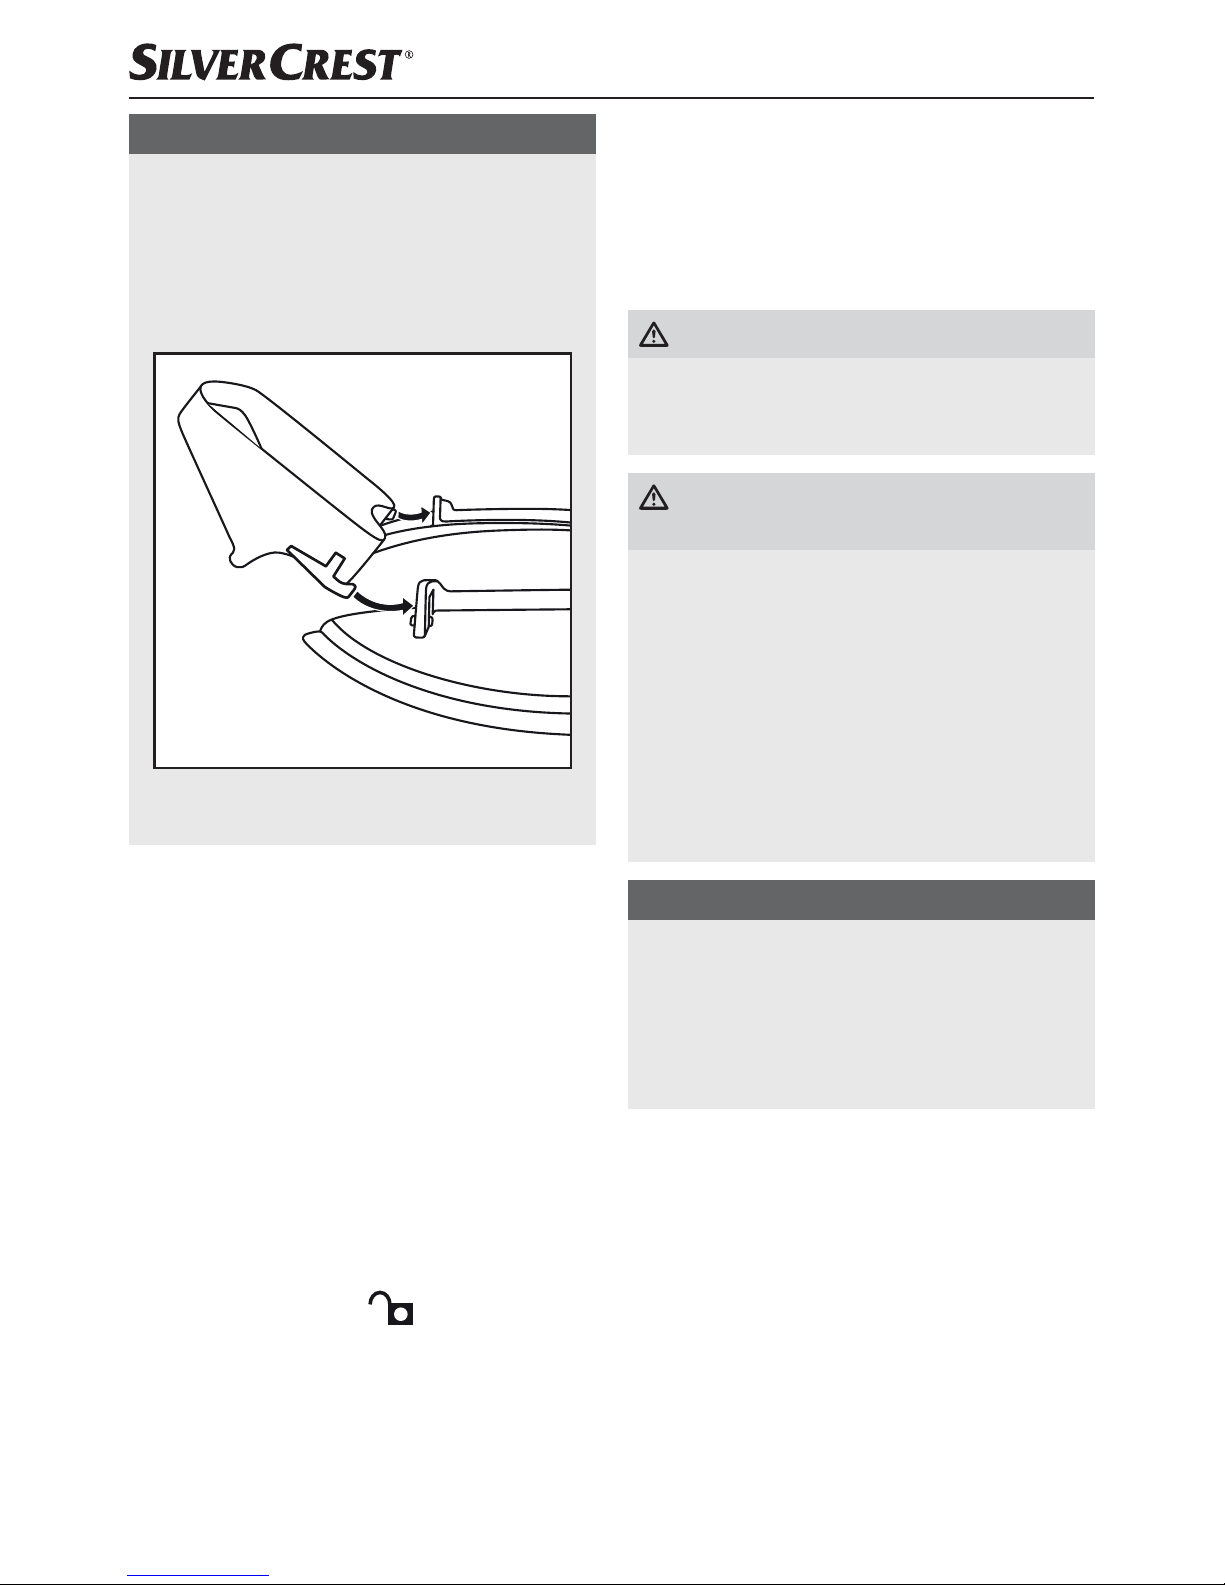
NOTE
►
If desired, you can mount the fi lling nose 8
onto the lid 9:
– Rotate the lid 9 a little until the opening
is pointing at you.
– Hook the fi lling nose 8 into the eyelets
in the lid 9:
You can now add ingredients, even while the
device is in operation.
7) Turn the rotary switch 3 to the required setting
(cf. section “Speed Levels”).
After you have fi nished using your
appliance
1) Switch the appliance off using the rotary
switch 3.
2) If mounted, remove the fi lling nose 8.
3) Remove the lid 9 from the mixing bowl 6.
4) Push the release lever 2 upwards and move
the swivelling arm 1 to the highest position.
5) Remove the inset 0 q w from the drive shaft
7 by pushing the inset 0 q w against the
drive shaft 7 and simultaneously rotating
it clockwise (direction
). Now you can
remove the inset.
6) Remove the mixing bowl 6 by rotating it
anticlockwise and lifting it off the base.
7) Clean all parts of the appliance (see section
“Cleaning and care”).
Working with the blender
WARNING! RISK OF INJURY!
► Allow hot fl uids to cool to a lukewarm tem-
perature (approx. 30–40°C) before pouring
them into the blender t.
WARNING! RISK OF INJURY FROM
SHARP BLADE / ROTATING DRIVE!
► Never put your hand into the blender t
while it is attached!
► Only remove the blender t when the blade z
is at a complete standstill.
► Only use the blender t with the lid r with
measuring cup e fi rmly in position.
► In cases of malfunction, switch the appliance
off and remove the plug from the wall socket.
This will prevent the appliance from becoming
switched on again unintentionally.
CAUTION! PROPERTY DAMAGE!
►
Never use the mixing bowl 6 and the
blender t simultaneously! This will overload
the drive!
► When working with the blender t, we
recommend allowing the appliance to cool
down after 3 minutes of operation.
Proceed as follows to prepare the appliance for
operation using the blender t. Refer to fi gure C
on the back fl ap.
1) Push the release lever 2 upwards and push
the swivelling arm 1 down into its working
position.
Page 13

GB│CY
│
9 ■
SKMP 1300 B3
2) Pull off the drive unit lid u.
NOTE
►
Ensure that the rotary switch 3 is set to the
"0" position before fi tting the blender onto
the drive unit. Otherwise, the appliance will
start automatically as soon as the blender is
locked in.
3) Place the blender t onto the blender drive
unit o so that the locking mechanisms on the
bottom of the blender t fi t into the recesses
in the blender drive unit o. The arrow on the
blender t must point to the
symbol on
the appliance. Rotate the blender t clockwise
as far as it will go. The arrow on the blender t
will then point to the
symbol on the appliance.
4) Add the ingredients.
5) Place the blender lid r with measuring cup e
onto the unit, making sure that the lip on the
lid r seals the spout.
6) Turn the rotary switch 3 to the required setting.
NOTE
►
The optimal speed depends on the consistency
of the food to be processed. More liquid
contents can be blended faster.
► For short, powerful pulses, set the rotary
switch 3 at least to level 1 and simultaneously press the PULSE button 4. The PULSE
button 4 does not lock, in order to avoid
overloading the drive. Therefore, hold the
PULSE button 4 in this position only for a
short period.
Adding more ingredients
1) Switch the appliance off using the rotary
switch 3.
2) Remove the blender lid r and insert the
ingredients.
or
3) Rotate the measuring cup e situated within the
blender lid r 90° and remove it. Then gradually add the ingredients using the opening.
After you have fi nished using your
appliance
1) Switch the appliance off using the rotary
switch 3.
2) Rotate the blender t anticlockwise until the
arrow on the blender t points to the
symbol on the appliance, then remove it.
NOTE
►
Ideally, you should clean the blender t im-
mediately after use (see the section "Cleaning
and care"). This makes food residues easier
to remove.
Cleaning and care
DANGER – ELECTRIC SHOCK!
►
Before cleaning the appliance, disconnect
the power plug from the mains power socket!
There is a risk of electric shock!
NEVER immerse the appliance in water or
any other liquid!
CAUTION! PROPERTY DAMAGE!
►
Do not use abrasive or aggressive cleaning
materials. These may damage the surfaces
of your appliance.
Page 14

■ 10 │ GB
│
CY
SKMP 1300 B3
NOTES
►
It is best to clean the appliance directly after
use. This makes food residues easier to
remove.
► Processing foodstuff s containing strong pig-
ments, such as carrots, may cause staining of
the plastic parts. Such stains can be removed
using a little cooking oil.
Cleaning the appliance
■ Wipe the appliance with a damp cloth. For stub-
born soiling use a mild detergent on the cloth.
Wipe off any detergent residue using a cloth
moistened with clean water. Then carefully dry
the appliance.
Cleaning accessories
■ Clean the mixing bowl 6, lid 9, fi lling nose 8,
blender lid r with measuring cup e, drive unit
lid u and the insets 0 q w in warm water
with a small quantity of detergent. Any residues
can be removed with a washing-up brush. Rinse
all parts with clear, warm water and make sure
that all parts are dry before re-using them.
NOTE
►
The insets 0 q w, mixing bowl 6 and the
blender lid r with measuring cup e can
also be cleaned using a dishwasher.
► If you clean them in the dishwasher, please
ensure that no plastic parts become trapped
under pressure between other objects. This
may cause them to become deformed.
► Wherever possible, place all plastic parts in
the top basket of the dishwasher.
Cleaning the blender
WARNING! RISK OF INJURY!
► Do not touch the blade z with bare hands.
■ Clean the blender t in warm water with a
little mild detergent. Afterwards, rinse all parts
with clean water so that no detergent residues
remain.
In most cases, you can also achieve suffi ciently
hygienic cleaning directly after use in the following
way:
1) Put some water containing a little detergent
into the fully assembled blender t.
2) Place the blender lid r with measuring cup e
onto the unit, making sure that the lip on the
lid r seals the spout.
3) Switch on the blender t for a few seconds.
4) Pour out the washing water. Any residues can
be removed with a washing-up brush.
5) Afterwards, rinse out the blender t with
plenty of clean water, so that all detergent
residues are removed.
NOTE
►
The blender t is suitable for cleaning in
a dishwasher.
► When cleaning the blender t in a dish-
washer, make sure that its plastic part is not
trapped between other objects. This may
cause it to become deformed!
Storage
■ Wind the power cable around the cable spool i
for storage.
■ Store the cleaned appliance in a clean, dust-free
and dry place.
Page 15
GB│CY
│
11 ■
SKMP 1300 B3
Troubleshooting
If the appliance suddenly stops working:
■ The appliance has overheated and triggered
the automatic safety cut-out.
– Turn the rotary switch 3 to 0.
– Remove the plug from the wall socket.
– Allow the appliance to cool for 15 minutes.
– If the appliance has not yet cooled off com-
pletely after 15 minutes, it will not start.
– Wait a further 15 minutes and try switching
on again.
If the appliance cannot be switched on:
– Check that the plug is correctly connected
to a wall socket.
– Make sure that the swivelling arm 1 has
clicked into place in the right position.
Technical data
Input voltage: 220 - 240 V ~/ 50 Hz
Power consumption: 1300 W
Protection class: II
Max. capacity
Mixing bowl 6: approx. 6.3 l
Blender t: approx. 1.5 l
All of the parts of this appliance that come
into contact with food are food-safe.
We recommend the following operating times:
When working with kneading hooks 0, whisk q
or beater w, allow the appliance to cool down
after 10 minutes of operation.
When working with the blender t, allow the appliance to cool down after 3 minutes of operation.
If you exceed these operating times, the device can
overheat and be damaged!
Warranty and service
This appliance is provided with a 3-year warranty
valid from the date of purchase. This appliance
has been manufactured with care and inspected
meticulously prior to delivery. Please retain your
receipt as proof of purchase. In the event of a
warranty claim, please contact your Customer
Service unit by telephone. This is the only way
to guarantee free return of your goods.
The warranty only covers claims for material and
manufacturing defects, not for damage sustained
during carriage, components subject to wear and
tear or damage to fragile components such as
switches or batteries. This appliance is intended
solely for private use and not for commercial
purposes.
The warranty shall be deemed void in cases of
misuse or improper handling, use of force and
modifi cations/repairs which have not been carried
out by one of our authorised Service centres.
Your statutory rights are not restricted by this
warranty.
The warranty period is not prolonged by repairs
eff ected under the warranty. This also applies to
replaced and repaired components. Any damage
and defects present at the time of purchase must be
reported immediately after unpacking, but no later
than two days after the date of purchase. Repairs
carried out after expiry of the warranty period shall
be subject to charge.
Service Great Britain
Tel.: 0871 5000 720 (£ 0.10/Min.)
E-Mail: kompernass@lidl.co.uk
IAN 276995/276996/277709
CY
Service Cyprus
Tel.: 8009 4409
E-Mail: kompernass@lidl.com.cy
IAN 276995/276996/277709
Page 16

■ 12 │ GB
│
CY
SKMP 1300 B3
Disposal
Never dispose of the appliance
in the normal domestic waste.
This product is subject to the
provisions of European Directive
2012/19/EU.
Dispose of the appliance via an approved waste
disposal company or your municipal waste disposal
facility. Please observe applicable regulations.
Please contact your waste disposal centre if you
are in any doubt.
The packaging is made from environ-
mentally friendly material and can be
disposed of at your local recycling plant.
Importer
KOMPERNASS HANDELS GMBH
BURGSTRASSE 21
44867 BOCHUM
GERMANY
www.kompernass.com
Recipes
Carrot soup
Ingredients:
■ 500 g carrots
■ 250 ml water
■ 500 ml meat stock (glass)
■ 125 ml cream
■ 125 ml white wine
■ Salt
■ Pepper
■ 50 g cold butter
■ Fresh chervil
Preparation:
1) Wash and peel the carrots.
2) Cut them small enough to fi t into the blender t.
3) Put 250 ml of water into a saucepan and boil
the carrots for 20 minutes. Then purée all of it in
the blender t until no large pieces are left over.
4) Afterwards, return the puréed carrots to the pot.
5) Now add the meat stock, cream and white wine.
6) Heat the soup and season it to taste.
7) Blend the butter into the soup in small pieces
and then serve it with the chervil.
Page 17

GB│CY
│
13 ■
SKMP 1300 B3
Tuna spread
Ingredients:
■ 1 can of tuna in sauce with vegetables
■ 3 tbsp yoghurt
■ 1 tsp lemon juice, freshly pressed
■ 1 pinch salt
■ Freshly ground pepper
■ 2 hard-boiled eggs, diced
To serve:
■ Whole wheat bread in slices
■ Butter for buttering the bread
■ 1 hard-boiled egg, diced
■ Chives, chopped
Preparation:
1) Blend all ingredients in the blender t until the
desired consistency is reached (approx. 15
seconds), then season to taste.
2) Spread butter and the tuna mixture onto the
bread and sprinkle with chopped egg and chives.
Traditional pancakes
Ingredients:
■ 2 - 3 eggs
■ 375 ml milk
■ 1 pinch salt
■ 250 g fl our
■ Fat for frying
Preparation:
1) Mix the eggs, milk and salt with the beater w.
2) Sieve the fl our and then add it to the mixture.
Mix everything together with the beater w
until you have a smooth batter.
3) Leave the batter to rest for 20 minutes.
4) Heat the fat and, with a small ladle, place some
batter in the pan. (Add only as much as is
needed to thinly cover the pan bottom.)
5) Fry the pancakes until golden brown on both
sides and serve hot.
Sponge pastry
Ingredients:
■ 3 eggs
■ 3 - 4 tbsp of hot water
■ 150 g sugar
■ 1 packet of vanilla sugar
■ 100 g pastry fl our
■ 100 g cornfl our
■ 2 - 3 level tsp of baking powder
Preparation:
1) Line the bottom of a baking tin (diameter: 28 cm)
with baking paper. Do not grease the edge, as
the surface will then not be evenly smooth and
browned.
2) Beat the whole eggs in the mixing bowl 6 and
add the hot water.
3) Then beat the mixture at the highest level with
the beater w for about 1 minute until fl uff y.
4) Stir in the sugar and vanilla sugar and beat the
mixture for a further two minutes at the highest
level.
5) Mix the fl our, cornfl our and baking powder
together and sift half of it onto the creamed
eggs, then briefl y stir everything at Level 4.
6) Now stir in the remaining fl our in the same way
and pour the mixture into the prepared baking tin.
7) Immediately bake the tin in a pre-heated oven
with top and bottom heat at 175-200°C for
approx. 20 - 30 minutes.
Page 18

■ 14 │ GB
│
CY
SKMP 1300 B3
Shortcrust pastry
Ingredients:
■ 250 g wheat fl our
■ 1/2 level tsp of baking powder
■ 100 - 125 g sugar
■ 1 packet of vanilla sugar
■ 1 pinch salt
■ 1 egg
■ 125 g butter
Preparation:
1) Mix the fl our and baking powder in the mixing
bowl 6, then add all of the other ingredients.
2) Knead everything with the kneading hook 0
fi rst for about 1 minute at level 2, then for
about 3 minutes at level 2 - 4.
3) Do not knead the pastry for too long, as it
could otherwise turn out too soft.
4) Put the pastry in the refrigerator for half an
hour, then shape it into a fl an case or small
pastries.
5) For a fl an case, roll out 2/3 of the pastry and
place it in a greased baking tin.
6) Roll the remaining pastry into a roll.
7) Place this roll on the pastry and press it onto
the side of the cake to form an edge with a
height of approx. 3 cm.
8) Pierce the base repeatedly with a fork
9) Pre-heat the oven for approx. 5 minutes and
bake the shortcrust for approx. 15 - 20 minutes
with top and bottom heat at 200 - 225 °C.
Sponge batter
Ingredients:
■ 250 g soft butter or margarine
■ 250 g sugar
■ 1 packet of vanilla sugar
■ 1 pinch salt
■ 4 eggs
■ 500 g wheat fl our
■ 1 pack baking powder
■ Approx. 125 ml milk
Preparation:
1) Place all ingredients into the mixing bowl 6
and stir everything with the beater w for half a
minute at level 1, then for 30 seconds at level
2 and then for about 5 minutes at level 4.
2) Grease a baking mould or line it with baking
paper.
3) Pour the batter into the baking mould and bake
it for approx. 50 - 60 minutes with top and
bottom heat at 175 - 200 °C.
4) Before removing the cake from the oven, check
whether it is done properly: Insert a wooden
skewer into the middle of the cake. If no batter
is sticking to it, the cake is baked.
5) Now tip the cake onto a wire rack and allow
it to cool.
Page 19

GB│CY
│
15 ■
SKMP 1300 B3
Yeast dough
Ingredients:
■ 500 g wheat fl our
■ 25 g fresh yeast or 1 pack dried yeast
■ Approx. 1/4 l lukewarm milk
■ 80 g butter or margarine (room temperature)
■ 80 g sugar
■ 1 egg
Preparation:
1) Place the fl our, dry yeast or crumbled yeast
and all other ingredients (not directly on the
yeast) into the mixing bowl 6.
2) Slowly mix everything using the kneading
hook 0 at level 1, then continue for 3 - 4
minutes at level 3.
3) Cover the bowl with a tea towel, place it in a
warm place and let the dough rise until it has
visibly increased in size.
4) Then knead the dough once again.
5) After that, the dough is fi nished and can be
further processed.
Waffl es
Ingredients:
■ 200 g sugar
■ 500 g fl our
■ 5 g baking powder
■ 5 eggs
■ 400 ml milk
■ 250 g butter (room temperature),
■ 2 packets of vanilla sugar
Preparation:
1) Add the eggs, sugar and butter into the mixing
bowl 6 and blend everything into a smooth
batter using the whisk q.
2) Add the fl our, vanilla sugar and baking
powder.
3) Gradually stir in the milk until the batter has
a smooth, soft consistency.
4) Bake the waffl es in a waffl e iron.
Banana vanilla shake
Ingredients:
■ 3 bananas
■ 500 ml milk
■ 2 packets of vanilla sugar
■ 1 tbsp. vanilla ice cream
Preparation:
1) Peel the bananas.
2) Put the peeled bananas, milk, vanilla ice cream
and the vanilla sugar into the blender t.
3) Blend everything at speed level 8.
Page 20

■ 16 │ GB
│
CY
SKMP 1300 B3
Banana-kiwi smoothie
Ingredients:
■ 200 ml orange juice (freshly pressed)
■ 1 kiwi
■ 1/2 banana
Preparation:
1) Peel the kiwi.
2) Peel the banana.
3) Put the kiwi, banana and orange juice into the
blender t.
4) Blend everything at speed level 8.
Page 21

RO │ 17 ■
SKMP 1300 B3
Cuprins
Introducere . . . . . . . . . . . . . . . . . . . . . . . . . . . . . . . . . . . . . . . . . . . . . . . . . . . . . . . . . . .18
Utilizarea conform destinaţiei. . . . . . . . . . . . . . . . . . . . . . . . . . . . . . . . . . . . . . . . . . . .18
Furnitura . . . . . . . . . . . . . . . . . . . . . . . . . . . . . . . . . . . . . . . . . . . . . . . . . . . . . . . . . . . . .18
Descrierea aparatului . . . . . . . . . . . . . . . . . . . . . . . . . . . . . . . . . . . . . . . . . . . . . . . . . .18
Indicaţii de siguranţă . . . . . . . . . . . . . . . . . . . . . . . . . . . . . . . . . . . . . . . . . . . . . . . . . . .19
Pregătiri . . . . . . . . . . . . . . . . . . . . . . . . . . . . . . . . . . . . . . . . . . . . . . . . . . . . . . . . . . . . .22
Trepte de viteză . . . . . . . . . . . . . . . . . . . . . . . . . . . . . . . . . . . . . . . . . . . . . . . . . . . . . . .22
Modul de lucru cu cârligul de frământat, telul și paleta de amestecare . . . . . . . . .23
După lucru . . . . . . . . . . . . . . . . . . . . . . . . . . . . . . . . . . . . . . . . . . . . . . . . . . . . . . . . . . . . . . . . . . . . . . . 24
Modul de lucru cu mixerul . . . . . . . . . . . . . . . . . . . . . . . . . . . . . . . . . . . . . . . . . . . . . . .24
Completarea cu ingrediente . . . . . . . . . . . . . . . . . . . . . . . . . . . . . . . . . . . . . . . . . . . . . . . . . . . . . . . . . 25
După lucru . . . . . . . . . . . . . . . . . . . . . . . . . . . . . . . . . . . . . . . . . . . . . . . . . . . . . . . . . . . . . . . . . . . . . . . 25
Curăţarea şi îngrijirea . . . . . . . . . . . . . . . . . . . . . . . . . . . . . . . . . . . . . . . . . . . . . . . . . .25
Curăţarea aparatului . . . . . . . . . . . . . . . . . . . . . . . . . . . . . . . . . . . . . . . . . . . . . . . . . . . . . . . . . . . . . . . 26
Curăţarea accesoriilor . . . . . . . . . . . . . . . . . . . . . . . . . . . . . . . . . . . . . . . . . . . . . . . . . . . . . . . . . . . . . . 26
Curăţarea aparatului . . . . . . . . . . . . . . . . . . . . . . . . . . . . . . . . . . . . . . . . . . . . . . . . . . . . . . . . . . . . . . . 26
Depozitarea . . . . . . . . . . . . . . . . . . . . . . . . . . . . . . . . . . . . . . . . . . . . . . . . . . . . . . . . . .26
Remedierea defecţiunilor . . . . . . . . . . . . . . . . . . . . . . . . . . . . . . . . . . . . . . . . . . . . . . .27
Date tehnice . . . . . . . . . . . . . . . . . . . . . . . . . . . . . . . . . . . . . . . . . . . . . . . . . . . . . . . . . .27
Garanţia şi service-ul . . . . . . . . . . . . . . . . . . . . . . . . . . . . . . . . . . . . . . . . . . . . . . . . . . .27
Eliminarea . . . . . . . . . . . . . . . . . . . . . . . . . . . . . . . . . . . . . . . . . . . . . . . . . . . . . . . . . . . .28
Importator . . . . . . . . . . . . . . . . . . . . . . . . . . . . . . . . . . . . . . . . . . . . . . . . . . . . . . . . . . .28
Reţete . . . . . . . . . . . . . . . . . . . . . . . . . . . . . . . . . . . . . . . . . . . . . . . . . . . . . . . . . . . . . . .28
Supă de morcovi . . . . . . . . . . . . . . . . . . . . . . . . . . . . . . . . . . . . . . . . . . . . . . . . . . . . . . . . . . . . . . . . . .28
Salată tartinabilă de ton . . . . . . . . . . . . . . . . . . . . . . . . . . . . . . . . . . . . . . . . . . . . . . . . . . . . . . . . . . . . 29
Clătite tradiţionale . . . . . . . . . . . . . . . . . . . . . . . . . . . . . . . . . . . . . . . . . . . . . . . . . . . . . . . . . . . . . . . . . 29
Pandişpan . . . . . . . . . . . . . . . . . . . . . . . . . . . . . . . . . . . . . . . . . . . . . . . . . . . . . . . . . . . . . . . . . . . . . . . 29
Aluat fraged . . . . . . . . . . . . . . . . . . . . . . . . . . . . . . . . . . . . . . . . . . . . . . . . . . . . . . . . . . . . . . . . . . . . . . 30
Aluat . . . . . . . . . . . . . . . . . . . . . . . . . . . . . . . . . . . . . . . . . . . . . . . . . . . . . . . . . . . . . . . . . . . . . . . . . . . 30
Aluat dospit . . . . . . . . . . . . . . . . . . . . . . . . . . . . . . . . . . . . . . . . . . . . . . . . . . . . . . . . . . . . . . . . . . . . . . 31
Vafe . . . . . . . . . . . . . . . . . . . . . . . . . . . . . . . . . . . . . . . . . . . . . . . . . . . . . . . . . . . . . . . . . . . . . . . . . . . . 31
Shake de banane şi vanilie . . . . . . . . . . . . . . . . . . . . . . . . . . . . . . . . . . . . . . . . . . . . . . . . . . . . . . . . . . 31
Smoothie de banane şi kiwi . . . . . . . . . . . . . . . . . . . . . . . . . . . . . . . . . . . . . . . . . . . . . . . . . . . . . . . . . . 32
Page 22

■ 18 │ RO
SKMP 1300 B3
Introducere
Felicitări pentru cumpărarea noului dvs. aparat.
Aţi decis să alegeţi un produs de calitate superioară.
Instrucţiunile de utilizare fac parte integrantă din
acest produs. Acestea cuprind informaţii importante
privind siguranţa, utilizarea şi eliminarea. Înainte
de utilizarea produsului familiarizaţi-vă cu toate
indicaţiile privind utilizarea şi siguranţa. Utilizaţi
produsul numai în modul descris şi numai în scopurile menţionate. În cazul transmiterii produsului unei
alte persoane, predaţi-i toate documentele aferente
acestuia.
Utilizarea conform destinaţiei
Acest aparat este destinat exclusiv prelucrării alimentelor în cantităţi mici. Acest aparat este destinat
exclusiv uzului casnic. A nu se utiliza în scopuri
comerciale!
Acest aparat este destinat numai uzului privat, în
încăperi închise, protejate de ploaie. Nu utilizaţi
aparatul în aer liber!
Acest aparat trebuie utilizat numai cu accesorii
originale.
Furnitura
Robot de bucătărie profesional
Vas pentru amestecat cu capac
Mixer cu capac şi pahar gradat
Cârlig de frământat
Tel
Paletă de amestecare
Instrucţiuni de utilizare
Scurte instrucţiuni
INDICAŢIE
►
Imediat după dezambalare verifi caţi dacă
furnitura este completă şi nu prezintă deteriorări. Dacă este cazul, adresaţi-vă centrului
de service.
Descrierea aparatului
Desfaceţi paginile pliate din coperta din faţă şi din
spate ale acestor instrucţiuni de utilizare:
pagina pliată din faţă
Figura A:
1 Braţ pivotant
2 Manetă de deblocare
3 Comutator rotativ
4 Tasta PULSE
5 Suport
6 Vas de amestecare
7 Arbore de antrenare
Figura B:
8 Accesoriu de umplere
9 Capac
0 Cârlig de frământat
q Tel
w Paletă de amestecare
pagina pliată din spate:
Figura C:
e Pahar gradat mic
r Capacul mixerului
t Mixer
z Cuţit
u Capac de protecţie a mecanismului
de antrenare
i Suport înfăşurare cablu
o Mecanism de antrenare mixer
Page 23

RO │ 19 ■
SKMP 1300 B3
Indicaţii de siguranţă
PERICOL DE ELECTROCUTARE!
► Conectaţi aparatul numai la o priză instalată regulamentar şi împă-
mântată. Tensiunea reţelei trebuie să corespundă indicaţiilor de pe
plăcuţa de fabricaţie a aparatului.
► Evitaţi contactul cablului de reţea cu lichide sau umezirea acestuia în
timpul funcţionării aparatului. Ghidaţi cablul astfel încât să nu poată fi
deteriorat sau blocat de alte obiecte din jur.
► Ţineţi cablul de reţea departe de suprafeţele fi erbinţi.
► Nu efectuaţi niciun fel de reparaţii la acest aparat. Orice fel de repa-
raţii trebuie efectuate de către serviciul tehnic sau de către specialişti
califi caţi.
► Pentru curăţarea aparatului sau în caz de defecţiune, scoateţi întot-
deauna ştecărul din priză. Simpla oprire nu este sufi cientă, deoarece
în aparat mai există încă tensiune, atât timp cât ştecărul este în priză.
► Scoateţi ştecărul din priză dacă aparatul nu este utilizat!
► Pentru a evita pericolele, solicitaţi imediat înlocuirea de către perso-
nalul de specialitate autorizat sau de către serviciul clienţi a ştecărelor
sau a cablurilor de alimentare deteriorate.
► Aparatul şi cablul de conexiune nu se vor lăsa la îndemâna copiilor.
Nu este permisă introducerea aparatului în apă sau în alte lichide.
Page 24

■ 20 │ RO
SKMP 1300 B3
AVERTIZARE! PERICOL DE RĂNIRE!
► Deconectaţi întotdeauna aparatul de la sursa de curent când montaţi
sau demontaţi accesoriile. Astfel se evită pornirea neintenţionată a
aparatului. După întreruperea curentului aparatul va reporni!
► Atunci când nu este posibilă supravegherea şi înaintea asamblării,
dezasamblării sau curăţării, aparatul trebuie scos întotdeauna din
priză.
► Acest aparat nu trebuie utilizat de către copii.
► Utilizaţi numai accesoriile originale ale acestui aparat. Este posibil
ca piesele provenite de la alţi producători să nu fi e adecvate şi să
provoace periclitări!
► Acest aparat poate fi utilizat de persoane cu abilităţi fi zice, senzo-
riale sau mentale reduse sau fără experienţă şi/sau fără cunoştinţe
necesare, dacă sunt supravegheate sau dacă au fost instruite cu
privire la utilizarea sigură a acestui aparat şi au înţeles pericolele cu
privire la acesta.
► Copiilor le este interzis să se joace cu aparatul.
► Precauţie: Cuţitul este foarte ascuţit!
► Acţionaţi cu atenţie în timpul curăţării cuţitului!
Page 25

RO │ 21 ■
SKMP 1300 B3
AVERTIZARE! PERICOL DE RĂNIRE!
► Precauţie: Cuţitul este foarte ascuţit! De aceea aveţi grijă atunci când
detaşaţi recipientul de amestecare.
► Nu utilizaţi aparatul în alte scopuri decât cele descrise în prezentele
instrucţiuni de utilizare. Altfel, există pericol de rănire!
► Înlocuiţi accesoriile numai cu motorul oprit şi ştecărul scos din priză!
După oprire aparatul mai funcţionează scurt timp!
► Nu lăsaţi niciodată aparatul să funcţioneze nesupravegheat.
► Înainte de înlocuirea accesoriilor sau componentelor care se mişcă în
timpul funcţionării, aparatul trebuie să fi e oprit şi scos din priză.
► În timpul funcţionării aparatului puneţi în vasul de amestecare sau în
mixer doar ingredientele care trebuie prelucrate.
► Nu introduceţi niciodată mâinile sau obiecte în accesoriul de umplere
sau în mixer, pentru a evita rănirile şi deteriorarea aparatului.
ATENŢIE! PAGUBE MATERIALE!
► Nu utilizaţi niciodată aparatul fără ingrediente! Pericol de supraîncăl-
zire!
► Nu introduceţi niciodată ingrediente fi erbinţi în aparat!
Page 26

■ 22 │ RO
SKMP 1300 B3
Pregătiri
1) Scoateţi toate componentele din cutie şi îndepărtaţi ambalajul, eventualele folii de protecţie
şi autocolantele.
2) Curăţaţi toate componentele conform descrierii
din capitolul „Curăţarea şi îngrijirea”. Asiguraţi-vă
că toate componentele sunt complet uscate.
3) Desfăşuraţi cablul de alimentare de pe suportul
de înfăşurare cablu i.
4) Amplasaţi aparatul pe o suprafaţă netedă,
curată şi fi xaţi-l cu cele patru ventuze.
5) Introduceţi ştecărul în priză.
Trepte de viteză
Treaptă Utilizare adecvat pentru...
1 - 2
tot
- Poziţia de pornire
la toate procedurile
de mixare şi de
amestecare
- La adăugarea
ingredientelor
Cârlig de
frământat 0
Paletă de
amestecare w
- Frământarea şi
amestecarea aluatului
consistent sau a ingredientelor solide
2 - 4
Paletă de
amestecare w
- Amestecarea aluatului
gros
- Amestecarea untului
şi a făinii
- Amestecarea aluatului
dospit
Cârlig de
frământat 0
- Frământarea aluatului
dospit
- Amestecarea aluatului
gros
4 - 6
Paletă de
amestecare w
- Aluat de prăjituri
- Amestecarea untului
cu zahărul
- Aluat pentru fursecuri
6 - 10
Tel q
- Frişcă
- Albuş
- Maioneză
- Baterea spumă a
untului
Pulse
Mixer t
- Mixarea și mărunţirea
ingredientelor moi
sau lichide
Page 27

RO │ 23 ■
SKMP 1300 B3
Modul de lucru cu cârligul de
frământat, telul și paleta de
amestecare
AVERTIZARE! PERICOL DE RĂNIRE!
► Nu introduceţi niciodată mâna în vasul de
amestecare 6 pe durata funcţionării! Pericol
de rănire din cauza componentelor rotative!
► Înlocuiţi accesoriile numai cu motorul oprit!
După oprire, mecanismul de antrenare mai
funcţionează scurt timp.
► În caz de defecţiune deconectaţi aparatul şi
scoateţi ştecărul din priză pentru a preveni
pornirea neintenţionată a aparatului.
ATENŢIE! PAGUBE MATERIALE!
►
La lucrul cu cârligul de frământat 0, telul q
sau paleta de amestecare w vă recomandăm
ca după 10 minute de funcţionare să lăsaţi
aparatul să se răcească.
INDICAŢIE
►
Atunci când lucraţi cu cârligul de frământat 0,
telul q şi paleta de amestecare w, trebuie să
fi e fi xat capacul de protecţie a mecanismului
de antrenare u. Altfel, aparatul nu porneşte.
Pentru a pregăti aparatul în vederea utilizării cu
cârligul de frământat 0, telul q şi paleta de
amestecare w, procedaţi după cum urmează:
1) Apăsaţi în sus maneta de deblocare 2 şi adu-
ceţi braţul pivotant 1 în poziţia cea mai înaltă.
2) Poziţionaţi vasul de amestecare 6 astfel încât
piedicile de la vasul de amestecare 6 să intre
în decupajele de pe suport 5. Rotiţi vasul de
amestecare 6 în sens orar (a se vedea simbo-
lurile
şi de pe suport 5), astfel încât
acesta să fi e blocat şi să stea fi x.
3) Montaţi în funcţie de cerinţă cârligul de frământat 0, telul q sau paleta de amestecare w pe
arborele de antrenare 7:
– Introduceţi cârligul de frământat 0, telul q
sau paleta de amestecare w în aşa fel pe
arborele de antrenare 7, încât cele două
ştifturi metalice de pe arborele de antrenare
7 să intre în decupajele de pe accesoriu 0
q w.
– Apăsaţi accesoriul 0 q w cu putere pe
arborele de antrenare 7, astfel încât să se
preseze arcul şi învârtiţi concomitent acceso-
riul, uşor, în sens antiorar (direcţia
).
– Eliberaţi accesoriul. Acesta stă acum fi xat pe
arborele de antrenare 7.
4) Introduceţi ingredientele de prelucrat în vasul
de amestecare 6.
INDICAŢIE
►
Se va avea în vedere faptul că în timpul procesului de frământare, respectiv de amestecare, aluatul din vasul de amestecare 6 creşte
în volum sau este împins uşor în sus din cauza
mişcării. Din acest motiv nu umpleţi niciodată
vasul de amestecare 6 până la margine!
5) Apăsaţi în sus maneta de deblocare 2 şi îm-
pingeţi braţul pivotant 1 cu accesoriul montat,
în jos, în poziţia de lucru.
6) Împingeţi capacul 9
pe vasul de amestecare 6.
Page 28

■ 24 │ RO
SKMP 1300 B3
INDICAŢIE
►
Dacă doriţi, puteţi monta accesoriul de
umplere 8 pe capac 9:
– Rotiţi uşor capacul 9, astfel încât deschi-
zătura să fi e orientată înspre dvs.
– Fixaţi accesoriul de umplere 8 în fantele
de pe capac 9:
Acum puteţi adăuga ingrediente şi în timpul
funcţionării.
7) Rotiţi comutatorul rotativ 3 pe treapta dorită
(a se vedea capitolul „Trepte de viteză”).
După lucru
1) Deconectaţi aparatul de la comutatorul rotativ 3.
2) Dacă este montat: detaşaţi accesoriul de
umplere 8.
3) Scoateţi capacul 9 de pe vasul de ameste-
care 6.
4) Apăsaţi în sus maneta de deblocare 2 şi adu-
ceţi braţul pivotant 1 în poziţia cea mai înaltă.
5) Scoateţi accesoriul 0 q w de pe arborele de
antrenare 7 prin apăsarea accesoriului 0
q w pe arborele de antrenare 7 şi rotirea
concomitentă în sens orar (direcţia
).
Apoi puteţi scoate accesoriul.
6) Îndepărtaţi vasul de amestecare 6 prin rotirea
acestuia în sens antiorar şi prin scoaterea lui
ulterioară în sus.
7) Curăţaţi toate componentele (a se vedea
capitolul „Curăţarea şi îngrijirea”).
Modul de lucru cu mixerul
AVERTIZARE! PERICOL DE RĂNIRE!
► Lăsaţi întotdeauna lichidele fi erbinţi să se
răcească la temperatura corpului (cca 3040°C) înainte de a le introduce în mixer t.
AVERTIZARE! PERICOL DE RĂNIRE
DIN CAUZA CUŢITELOR ASCUŢITE/
MECANISMULUI DE ANTRENARE ÎN
ROTAŢIE!
► Nu introduceţi niciodată mâinile în mixerul t
montat!
► Detaşaţi mixerul t numai după oprirea
cuţitelor z.
► Utilizaţi mixerul t numai cu capacul mixeru-
lui r cu paharul gradat e montat.
► În caz de defecţiune deconectaţi aparatul şi
scoateţi ştecărul din priză pentru a preveni
pornirea neintenţionată a aparatului.
ATENŢIE! PAGUBE MATERIALE!
►
Nu folosiţi niciodată vasul de amestecare 6
şi mixerul t concomitent! Acest lucru duce
la suprasolicitarea motorului!
► Când lucraţi cu mixerul t vă recomandăm
ca după 3 minute de funcţionare să lăsaţi
aparatul să se răcească.
Pentru a pregăti aparatul pentru lucrul cu mixerul t
procedaţi după cum urmează. Pentru ajutor consultaţi fi g. C de pe pagina pliată din spate.
1) Apăsaţi în sus maneta de deblocare 2 şi
împingeţi braţul pivotant 1 în jos, în poziţia
de lucru.
Page 29

RO │ 25 ■
SKMP 1300 B3
2) Scoateţi capacul de protecţie a mecanismului
de antrenare u.
INDICAŢIE
►
Asiguraţi-vă că este poziţionat pe „0” comutatorul rotativ 3 înaintea fi xării mixerului pe
mecanismul de antrenare al acestuia. Altfel,
aparatul va porni imediat după ce mixerul
s-a fi xat.
3) Aşezaţi mixerul t pe mecanismul său de
antrenare o astfel încât piedicile de pe partea
inferioară a mixerului t să intre în decupajele
de pe mecanismul de antrenare a mixerului o.
Săgeata de pe mixer t trebuie să fi e orientată
către simbolul
de pe aparat. Rotiţi mixerul
t până la limită, în sens orar. Săgeata de pe
mixer t este apoi orientată către simbolul
de pe aparat.
4) Introduceţi ingredientele.
5) Aşezaţi capacul mixerului r cu pahar gradat
e astfel încât marginea capacului mixerului r
să acopere şi ciocul de turnare.
6) Rotiţi comutatorul rotativ 3 pe treapta dorită.
INDICAŢIE
►
Viteza ideală depinde de consistenţa produsului de mixat. Cu cât este mai lichid conţinutul,
cu atât mai repede puteţi mixa.
► Pentru o funcţionare cu impulsuri scurtă, puter-
nică rotiţi comutatorul rotativ 3 minimum la
treapta 1 și apăsaţi simultan tasta PULSE 4.
Tasta PULSE 4 nu se fi xează pentru a nu
suprasolicita motorul. Prin urmare, ţineţi tasta
PULSE 4 numai pentru scurt timp în această
poziţie.
Completarea cu ingrediente
1) Deconectaţi aparatul de la comutatorul rotativ 3.
2) Scoateţi capacul mixerului r şi introduceţi
ingredientele
sau
3) Rotiţi paharul gradat e care se afl ă în capa-
cul mixerului r la 90° şi scoateţi-l. Introduceţi
ingredientele treptat prin orifi ciul de umplere.
După lucru
1) Deconectaţi aparatul de la comutatorul rotativ 3.
2) Rotiţi mixerul t în sens antiorar, astfel încât
săgeata de pe mixer t să fi e orientată către
simbolul
de pe aparat şi scoateţi-l.
INDICAŢIE
►
Curăţaţi mixerul t cel mai bine imediat după
utilizare (a se vedea capitolul „Curăţarea şi
îngrijirea”). Astfel, resturile de alimente pot fi
îndepărtate mai uşor.
Curăţarea şi îngrijirea
PERICOL DE ELECTROCUTARE!
►
Înainte de fi ecare curăţare, scoateţi ştecărul
din priză! Pericol de electrocutare!
Nu introduceţi niciodată aparatul în apă
sau în alte lichide!
ATENŢIE! PAGUBE MATERIALE!
►
Nu utilizaţi substanţe de curăţare abrazive sau
agresive. Acestea pot deteriora suprafeţele!
Page 30

■ 26 │ RO
SKMP 1300 B3
INDICAŢII
►
Se recomandă curăţarea aparatului imediat
după utilizare. Astfel, resturile de alimente pot
fi îndepărtate mai ușor.
► În cazul prelucrării alimentelor foarte pigmen-
tate, precum morcovii, piesele din plastic se
pot colora. Această colorare poate fi îndepărtată cu puţin ulei alimentar.
Curăţarea aparatului
■ Ştergeţi aparatul cu o lavetă umedă. În cazul
unor impurităţi persistente, adăugaţi pe lavetă
un detergent delicat. Ştergeţi resturile de detergent
cu ajutorul unei lavete umezite în apă curată.
Uscaţi apoi complet aparatul.
Curăţarea accesoriilor
■ Curăţaţi vasul de amestecare 6, capacul 9,
accesoriul de umplere 8, capacul mixerului r
cu pahar gradat e, capacul de protecţie a mecanismului de antrenare u şi accesoriile 0 q
w în apă caldă cu puţin detergent. Îndepărtaţi
eventualele resturi cu ajutorul unei perii.
Clătiţi toate componentele cu apă curată, caldă
şi înainte de o nouă utilizare asiguraţi-vă că
acestea sunt uscate.
INDICAŢIE
►
Accesoriile 0 q w, vasul de amestecare 6
şi capacul mixerului r cu pahar gradat e
sunt adecvate şi pentru curăţarea în maşina
de spălat vase.
► În cazul curăţării în maşina de spălat vase,
asiguraţi-vă că piesele din plastic nu sunt blocate. În caz contrar, acestea se pot deforma!
► Dacă este posibil, introduceţi toate piesele
din plastic în coşul superior al maşinii de
spălat vase.
Curăţarea aparatului
AVERTIZARE! PERICOL DE RĂNIRE!
► Nu atingeţi cuţitul z cu mâinile goale.
■ Curăţaţi mixerul t în apă caldă şi adăugaţi un
detergent delicat. Clătiţi-l apoi cu apă curată
pentru a îndepărta toate resturile de detergent.
În majoritatea cazurilor, curăţarea poate fi realizată
imediat după utilizare în condiţii sufi ciente de igienă
prin următoarea metodă alternativă:
1) Puneţi apă cu puţin detergent în mixerul t
montat.
2) Aşezaţi capacul mixerului r cu pahar gradat
e astfel încât marginea capacului mixerului r
să acopere şi ciocul de turnare.
3) Porniţi mixerul t timp de câteva secunde.
4) Vărsaţi apa de spălare. Îndepărtaţi eventualele
resturi cu ajutorul unei perii.
5) Clătiţi apoi mixerul t cu apă curată din
abundenţă pentru a îndepărta toate resturile
de detergent.
INDICAŢIE
►
Mixerul t este adecvat şi pentru curăţarea
în maşina de spălat vase.
► În cazul curăţării în maşina de spălat vase,
asiguraţi-vă că piesa din plastic a mixerului
t nu este blocată. În caz contrar, aceasta
se poate deforma!
Depozitarea
■ Înfăşuraţi cablul de alimentare pe suportul de
înfăşurare cablu i în vederea depozitării.
■ Păstraţi aparatul curăţat într-un loc curat, lipsit
de praf şi uscat.
Page 31

RO │ 27 ■
SKMP 1300 B3
Remedierea defecţiunilor
Când aparatul se oprește brusc:
■ Aparatul este supraîncălzit şi se activează oprirea
automată de siguranţă.
– Aduceţi comutatorul rotativ 3 pe 0.
– Scoateţi ştecărul din priză.
– Lăsaţi aparatul să se răcească timp de
15 minute.
– Dacă aparatul nu s-a răcit complet după
15 minute, acesta nu va porni.
– Aşteptaţi încă 15 minute şi reporniţi-l.
Dacă aparatul nu poate fi pornit:
– Verifi caţi dacă aţi introdus ştecărul în priză.
– Verifi caţi dacă braţul pivotant 1 se afl ă în
poziţia corectă.
Date tehnice
Tensiunea de reţea: 220 - 240 V ~/ 50 Hz
Consum: 1300 W
Clasa de protecţie: II
capacitatea max.
Vas de amestecare 6: cca 6,3 l
Mixer t: cca 1,5 l
Toate componentele acestui aparat care
intră în contact cu alimentele, sunt adecvate
pentru uz alimentar
Vă recomandăm următoarele perioade de funcţionare:
La lucrul cu cârligul de frământat 0, telul q sau
cu paleta de amestecare w lăsaţi aparatul să se
răcească după 10 minute de funcţionare.
La lucrul cu mixerul t lăsaţi aparatul să se răcească
după 3 minute de funcţionare.
Dacă aceste perioade sunt depăşite, aparatul se
poate deteriora prin supraîncălzire.
Garanţia şi service-ul
Pentru acest aparat se acordă o garanţie de 3 ani
de la data cumpărării. Aparatul a fost produs cu
grijă şi verifi cat cu rigurozitate înaintea livrării.
Păstraţi bonul fi scal pentru a dovedi cumpărarea.
În caz de defecţiuni în perioada de garanţie,
contactaţi telefonic centrul dvs. de service.
Numai astfel poate fi asigurată o expediere
gratuită a produsului dvs.
Garanţia acoperă numai defectele de material sau
de fabricaţie, nu şi deteriorările rezultate în urma
transportului, piesele de uzură sau deteriorările
apărute la componentele fragile, de exemplu comutatoare sau acumulatori. Aparatul este destinat
numai uzului privat şi nu utilizărilor comerciale.
În cazul manevrării abuzive sau necorespunzătoare,
al uzului de forţă şi al intervenţiilor care nu au fost
realizate de către fi liala noastră autorizată de
service, garanţia îşi pierde valabilitatea.
Drepturile dvs. legale nu sunt limitate prin această
garanţie.
Perioada de garanţie nu este prelungită după
efectuarea reparaţiilor realizate în perioada de
garanţie. Acest lucru este valabil şi pentru piesele
înlocuite şi reparate. Deteriorările şi defi cienţele
prezente deja la cumpărare trebuie semnalate imediat după dezambalare sau cel târziu la două zile
de la data cumpărării. Reparaţiile necesare după
expirarea perioadei de garanţie se efectuează
contra cost.
R
Service România
Tel.: 0800896637
E-Mail: kompernass@lidl.ro
IAN 276995/276996/277709
Page 32

■ 28 │ RO
SKMP 1300 B3
Eliminarea
În niciun caz nu aruncaţi
aparatul în gunoiul menajer
obişnuit. Acest produs face
obiectul Directivei europene
2012/19/EU.
Eliminaţi aparatul prin intermediul unei fi rme autorizate sau prin intermediul serviciului local de eliminare a deşeurilor. Respectaţi prevederile actuale în
vigoare. Dacă aveţi nelămuriri, contactaţi serviciul
local de eliminare a deşeurilor.
Ambalajul este format din materiale
ecologice pe care le puteţi elimina prin
intermediul centrelor locale de reciclare.
Importator
KOMPERNASS HANDELS GMBH
BURGSTRASSE 21
44867 BOCHUM
GERMANY
www.kompernass.com
Reţete
Supă de morcovi
Ingrediente:
■ 500 g morcovi
■ 250 ml apă
■ 500 ml fond de carne (pahar)
■ 125 ml smântână
■ 125 ml vin alb
■ sare
■ piper
■ 50 g unt rece
■ asmăţui proaspăt
Prepararea:
1) Spălaţi şi curăţaţi morcovii.
2) Tăiaţi-i mărunt, astfel încât să fi e adecvaţi
pentru mixer t.
3) Turnaţi 250 ml apă într-o oală şi fi erbeţi morcovii timp de 20 de minute. Apoi pasaţi totul în
mixer t până nu mai rămân bucăţi mari.
4) Apoi turnaţi morcovii pasaţi înapoi în oală.
5) Adăugaţi fondul de carne, smântâna şi vinul
alb.
6) Încălziţi supa şi condimentaţi-o după gust.
7) Amestecaţi untul tăiat în bucăţi mici în supă şi
apoi asezonaţi-o cu asmăţui.
Page 33

RO │ 29 ■
SKMP 1300 B3
Salată tartinabilă de ton
Ingrediente:
■ 1 cutie de ton în sos cu legume
■ 3 linguri iaurt
■ 1 linguriţă suc de lămâie, stors proaspăt
■ 1 priză de sare
■ piper măcinat
■ 2 ouă fi erte tari, tăiate cuburi
Pentru asezonare:
■ pâine integrală tăiată felii
■ unt pentru uns
■ 1 ou fi ert tare, tăiat cuburi
■ arpagic tăiat
Prepararea:
1) Amestecaţi toate ingredientele în mixer t
până ce se atinge consistenţa dorită (cca
15 secunde) şi apoi condimentaţi după gust.
2) Ungeţi pâinea cu unt şi pastă de ton şi presăraţi
deasupra oul tăiat şi arpagicul.
Clătite tradiţionale
Ingrediente:
■ 2-3 ouă
■ 375 ml lapte
■ 1 priză de sare
■ 250 de g făină
■ grăsime pentru copt
Prepararea:
1) Amestecaţi ouăle, laptele şi sarea cu paleta de
amestecare w.
2) Cerneţi făina şi adăugaţi-o. Amestecaţi totul cu
paleta de amestecare w până rezultă un aluat
uniform.
3) Lăsaţi aluatul să dospească cca. 20 minute.
4) Încălziţi grăsimea şi adăugaţi peste aceasta
aluat cu ajutorul unui polonic mic. (Numai cât
să se acopere cu un strat subţire fundul tigăii.)
5) Coaceţi clătitele pe ambele părţi până se
rumenesc şi serviţi-le fi erbinţi.
Pandişpan
Ingrediente:
■ 3 ouă
■ 3-4 linguri apă fi erbinte
■ 150 g zahăr
■ 1 pacheţel de zahăr vanilinat
■ 100 g făină, tip 405
■ 100 g amidon
■ 2-3 linguriţe rase de praf de copt
Prepararea:
1) Tapetaţi cu hârtie de copt fundul unei forme
de copt cu pereţi detaşabili (diametru: 28 cm).
Nu ungeţi cu grăsime marginea, deoarece
altfel suprafaţa nu va fi complet uniformă şi se
va arde.
2) Bateţi ouăle întregi în vasul de amestecare 6
şi adăugaţi apă fi erbinte.
3) Bateţi apoi spumă compoziţia timp de cca
1 minut la cea mai ridicată treaptă cu ajutorul
paletei de amestecare w.
4) Adăugaţi zahărul şi zahărul vanilinat şi bateţi
apoi totul timp de 2 minute la cea mai ridicată
treaptă.
5) Amestecaţi făina, amidonul şi praful de copt
şi cerneţi jumătate din amestec peste crema
de ou, apoi mixaţi totul pentru scurt timp la
treapta 4.
6) Amestecaţi apoi restul de făină în acelaşi mod
şi turnaţi aluatul în forma de copt cu pereţi
detaşabili pregătită.
7) Coaceţi aluatul imediat la 175-200°C în
cuptorul preîncălzit , cu căldură de sus şi de
jos, timp de cca 20-30 de minute.
Page 34

■ 30 │ RO
SKMP 1300 B3
Aluat fraged
Ingrediente:
■ 250 g făină de grâu
■ 1/2 linguriţă rasă de praf de copt
■ 100-125 g zahăr
■ 1 pacheţel de zahăr vanilinat
■ 1 priză de sare
■ 1 ou
■ 125 g unt
Prepararea:
1) Amestecaţi făina şi praful de copt în vasul de
amestecare 6 şi adăugaţi apoi toate celelalte
ingrediente.
2) Frământaţi totul cu cârligul de frământat 0,
mai întâi cca 1 minut la treapta 2, apoi pentru
cca 3 minute la treptele 2-4.
3) Nu frământaţi aluatul prea mult timp, în caz
contrar acesta poate deveni prea moale.
4) Lăsaţi aluatul în frigider pentru o jumătate de
oră şi apoi prelucraţi-l pentru a obţine un blat
de tort sau biscuiţi.
5) Pentru blatul de tort, rulaţi 2/3 din aluat şi
introduceţi-l într-o formă de copt cu pereţi
detaşabili unsă.
6) Rulaţi restul de aluat obţinând o rolă.
7) Întindeţi această rolă ca margine peste aluat şi
apăsaţi cu două degete, astfel încât să rezulte
o margine cu o înălţime de cca 3 cm.
8) Înţepaţi de mai multe ori blatul de tort cu o
furculiţă.
9) Preîncălziţi cuptorul cca 5 minute şi coaceţi
aluatul fraged cca 15-20 minute, cu căldură
de sus şi de jos, la 200-225 °C.
Aluat
Ingrediente:
■ 250 g unt moale sau margarină
■ 250 g zahăr
■ 1 pacheţel de zahăr vanilinat
■ 1 priză de sare
■ 4 ouă
■ 500 g făină de grâu
■ 1 pliculeţ de praf de copt
■ Cca 125 ml lapte
Prepararea:
1) Puneţi toate ingredientele în vasul de amestecare 6 şi amestecaţi totul cu paleta de amestecare w timp de o jumătate de minut la treapta
1, apoi pentru 30 de secunde la treapta 2 şi
apoi pentru cca 5 minute la treapta 4.
2) Ungeţi forma de copt sau tapetaţi-o cu hârtie
de copt.
3) Umpleţi forma de copt şi coaceţi aluatul cca
50-60 minute, cu căldură de sus și de jos, la
175-200 °C.
4) Înainte să scoateţi prăjitura din cuptor, ar trebui
să o încercaţi: Pentru aceasta înţepaţi cu un
beţişor ascuţit din lemn în partea din mijloc a
prăjiturii. Dacă pe acesta nu rămâne deloc
aluat, prăjitura este gata.
5) Răsturnaţi apoi prăjitura pe un grătar pentru
prăjituri şi lăsaţi-o să se răcească.
Page 35

RO │ 31 ■
SKMP 1300 B3
Aluat dospit
Ingrediente:
■ 500 g făină de grâu
■ 25 g drojdie proaspătă sau 1
pacheţel de drojdie uscată
■ cca 1/4 l lapte călduţ
■ 80 g unt sau margarină
(la temperatura camerei)
■ 80 g zahăr
■ 1 ou
Prepararea:
1) Adăugaţi făina, drojdia uscată sau drojdia mărunţită şi toate celelalte ingrediente (nu direct
peste drojdie) în vasul de amestecare 6.
2) Amestecaţi încet totul cu cârligul de frământat 0
la treapta 1, apoi pentru 3-4 minute la treapta 3.
3) Acoperiţi vasul cu un prosop de bucătărie, aşezaţi-l într-un loc cald şi lăsaţi aluatul să crească
până devine în mod vizibil mai mare.
4) Frământaţi apoi încă o dată aluatul.
5) Aluatul este apoi gata şi îl puteţi prelucra mai
departe.
Vafe
Ingrediente:
■ 200 g zahăr
■ 500 g făină
■ 5 g praf de copt
■ 5 ouă
■ 400 ml lapte
■ 250 g unt (la temperatura camerei)
■ 2 pliculeţe de zahăr vanilinat
Prepararea:
1) Adăugaţi ouăle, zahărul şi untul în vasul de
amestecare 6 şi amestecaţi totul cu telul q
până ce obţineţi un aluat omogen.
2) Adăugaţi făina, zahărul vanilinat şi praful de
copt.
3) Apoi adăugaţi treptat laptele şi amestecaţi de
jos aluatul până când acesta are o consistenţă
omogenă şi moale.
4) Coaceţi vafele într-o gaufrieră.
Shake de banane şi vanilie
Ingrediente:
■ 3 banane
■ 500 ml lapte
■ 2 pliculeţe de zahăr vanilinat
■ 1 lingură de îngheţată de vanilie
Prepararea:
1) Curăţaţi bananele.
2) Adăugaţi bananele curăţate, laptele, îngheţata
de vanilie şi zahărul vanilinat în mixer t.
3) Amestecaţi totul la treapta 8.
Page 36

■ 32 │ RO
SKMP 1300 B3
Smoothie de banane şi kiwi
Ingrediente:
■ 200 ml suc de portocale (proaspăt stors)
■ 1 kiwi
■ 1/2 banană
Prepararea:
1) Curăţaţi kiwi.
2) Curăţaţi banana.
3) Adăugaţi kiwi, banana şi sucul de portocale în
mixer t.
4) Amestecaţi totul la treapta 8.
Page 37

BG
│
33 ■
SKMP 1300 B3
Съдържание
Въведение . . . . . . . . . . . . . . . . . . . . . . . . . . . . . . . . . . . . . . . . . . . . . . . . . . . . . . . . . . .34
Употреба по предназначение . . . . . . . . . . . . . . . . . . . . . . . . . . . . . . . . . . . . . . . . . .34
Окомплектовка на доставката . . . . . . . . . . . . . . . . . . . . . . . . . . . . . . . . . . . . . . . . . .34
Описание на уреда . . . . . . . . . . . . . . . . . . . . . . . . . . . . . . . . . . . . . . . . . . . . . . . . . . .34
Указания за безопасност . . . . . . . . . . . . . . . . . . . . . . . . . . . . . . . . . . . . . . . . . . . . . . .35
Подготовка . . . . . . . . . . . . . . . . . . . . . . . . . . . . . . . . . . . . . . . . . . . . . . . . . . . . . . . . . .38
Степени на скорост . . . . . . . . . . . . . . . . . . . . . . . . . . . . . . . . . . . . . . . . . . . . . . . . . . . .38
Работа с куката за месене, телта за разбиване и приставката за бъркане . . . . .39
След приключване на работа . . . . . . . . . . . . . . . . . . . . . . . . . . . . . . . . . . . . . . . . . . . . . . . . . . . . . . 40
Работа с миксера . . . . . . . . . . . . . . . . . . . . . . . . . . . . . . . . . . . . . . . . . . . . . . . . . . . . .40
Добавяне на продукти . . . . . . . . . . . . . . . . . . . . . . . . . . . . . . . . . . . . . . . . . . . . . . . . . . . . . . . . . . . . 41
След приключване на работа . . . . . . . . . . . . . . . . . . . . . . . . . . . . . . . . . . . . . . . . . . . . . . . . . . . . . . 41
Почистване и поддръжка . . . . . . . . . . . . . . . . . . . . . . . . . . . . . . . . . . . . . . . . . . . . . .41
Почистване на уреда . . . . . . . . . . . . . . . . . . . . . . . . . . . . . . . . . . . . . . . . . . . . . . . . . . . . . . . . . . . . . 42
Почистване на принадлежностите . . . . . . . . . . . . . . . . . . . . . . . . . . . . . . . . . . . . . . . . . . . . . . . . . . . 42
Почистване на миксера . . . . . . . . . . . . . . . . . . . . . . . . . . . . . . . . . . . . . . . . . . . . . . . . . . . . . . . . . . . 42
Съхранение . . . . . . . . . . . . . . . . . . . . . . . . . . . . . . . . . . . . . . . . . . . . . . . . . . . . . . . . . .42
Отстраняване на повреди . . . . . . . . . . . . . . . . . . . . . . . . . . . . . . . . . . . . . . . . . . . . . .43
Технически характеристики . . . . . . . . . . . . . . . . . . . . . . . . . . . . . . . . . . . . . . . . . . . .43
Гаранция и сервиз . . . . . . . . . . . . . . . . . . . . . . . . . . . . . . . . . . . . . . . . . . . . . . . . . . . .43
Предаване за отпадъци . . . . . . . . . . . . . . . . . . . . . . . . . . . . . . . . . . . . . . . . . . . . . . . .44
Вносител . . . . . . . . . . . . . . . . . . . . . . . . . . . . . . . . . . . . . . . . . . . . . . . . . . . . . . . . . . . . .44
Рецепти . . . . . . . . . . . . . . . . . . . . . . . . . . . . . . . . . . . . . . . . . . . . . . . . . . . . . . . . . . . . .44
Супа от моркови . . . . . . . . . . . . . . . . . . . . . . . . . . . . . . . . . . . . . . . . . . . . . . . . . . . . . . . . . . . . . . . . . 44
Крем за намазване от риба тон . . . . . . . . . . . . . . . . . . . . . . . . . . . . . . . . . . . . . . . . . . . . . . . . . . . . . 45
Традиционни палачинки . . . . . . . . . . . . . . . . . . . . . . . . . . . . . . . . . . . . . . . . . . . . . . . . . . . . . . . . . . . 45
Пандишпанено тесто . . . . . . . . . . . . . . . . . . . . . . . . . . . . . . . . . . . . . . . . . . . . . . . . . . . . . . . . . . . . . . 45
Пясъчно тесто . . . . . . . . . . . . . . . . . . . . . . . . . . . . . . . . . . . . . . . . . . . . . . . . . . . . . . . . . . . . . . . . . . . . 46
Кексово тесто . . . . . . . . . . . . . . . . . . . . . . . . . . . . . . . . . . . . . . . . . . . . . . . . . . . . . . . . . . . . . . . . . . . . 46
Тесто с мая . . . . . . . . . . . . . . . . . . . . . . . . . . . . . . . . . . . . . . . . . . . . . . . . . . . . . . . . . . . . . . . . . . . . . . 47
Гофрети . . . . . . . . . . . . . . . . . . . . . . . . . . . . . . . . . . . . . . . . . . . . . . . . . . . . . . . . . . . . . . . . . . . . . . . .47
Шейк с банан и ванилия . . . . . . . . . . . . . . . . . . . . . . . . . . . . . . . . . . . . . . . . . . . . . . . . . . . . . . . . . . 47
Смути с банан и киви . . . . . . . . . . . . . . . . . . . . . . . . . . . . . . . . . . . . . . . . . . . . . . . . . . . . . . . . . . . . . 48
Page 38

■ 34 │ BG
SKMP 1300 B3
Въведение
Поздравяваме ви за покупката на вашия нов уред.
Избрали сте висококачествен продукт. Ръковод-
ството за потребителя е неразделна част от този
продукт. То съдържа важни указания относно
безопасността, употребата и предаването за
отпадъци. Преди да използвате продукта, се
запознайте с всички указания за обслужване и
безопасност. Използвайте продукта единствено
според описанието и за указаните области на
приложение. Предавайте продукта на трети
лица заедно с цялата документация.
Употреба по предназначение
Този уред служи само за преработване на
хранителни продукти в обичайни за домакинството количества. Този уред е предназначен
единствено за битова употреба. Не го използвайте за професионални цели!
Този уред е предназначен само за битова употреба в затворени, защитени от дъжд помещения. Не използвайте уреда на открито!
Уредът трябва да се използва само с оригинални принадлежности.
Окомплектовка на доставката
Kyxненски робот
Купа за разбъркване с капак
Миксер с капак и мерителна чаша
Кука за месене
Тел за разбиване
Приставка за бъркане
Ръководство за потребителя
Кратко ръководство
УКАЗАНИЕ
►
Веднага след разопаковането проверете
доставката за комплектност и повреди. При
необходимост се обърнете към сервиза.
Описание на уреда
Отворете разгъващите се страници на предната и задната обложка на ръководството за
потребителя.
Предна разгъваща се страница
Фигура A:
1 Накланящо се рамо
2 Лостче за деблокиране
3 Въртящ се превключвател
4 Бутон PULSE
5 Основа
6 Купа за разбъркване
7 Задвижващ вал
Фигура Б:
8 Помощно приспособление за пълнене
9 Капак
0 Кука за месене
q Тел за разбиване
w Приставка за бъркане
Задна разгъваща се страница
Фигура В:
e Малка мерителна чаша
r Капак на миксера
t Миксер
z Нож
u Защитен капак за задвижващия механизъм
i Място за навиване на кабела
o Задвижващ механизъм на миксера
Page 39

BG
│
35 ■
SKMP 1300 B3
Указания за безопасност
ОПАСНОСТ – ТОКОВ УДАР!
► Включвайте уреда само към инсталиран съгласно разпоредбите
и заземен контакт. Мрежовото напрежение трябва да съвпада с
данните от фабричната табелка на уреда.
► По време на работа внимавайте кабелът да не се мокри или
навлажнява. Разположете го така, че да не може да бъде притиснат или повреден.
► Дръжте кабела далече от горещи повърхности.
► Не извършвайте ремонти по уреда. Всички ремонти трябва да се
извършват от сервизната служба или квалифициран специалист.
► При почистване или в случай на повреда изключвайте щепсела
от контакта. Не е достатъчно да изключите уреда само от бутона,
тъй като докато щепселът е включен в мрежовия контакт, в уреда
има все още мрежово напрежение.
► Изключвайте щепсела от контакта, когато уредът не се използва!
► Повредени щепсели или кабели трябва незабавно да се сменят
от оторизирани специалисти или сервиз, за да се избегнат опасности.
► Уредът и захранващият кабел трябва да се държат далече от деца.
В никакъв случай не потапяйте уреда във вода или други течности.
Page 40

■ 36 │ BG
SKMP 1300 B3
ПРЕДУПРЕЖДЕНИЕ! ОПАСНОСТ ОТ НАРАНЯВАНЕ!
► По принцип изключвайте уреда от електрическата мрежа,
когато поставяте или сваляте принадлежности. Така се избягва
неволно включване на уреда. a
При възстановяване на захранването след прекъсване на тока
уредът започва да работи отново!
► Когато уредът не е под наблюдение и преди сглобяване, разгло-
бяване или почистване, винаги го изключвайте от мрежата.
► Този уред не трябва да се използва от деца.
► Използвайте само оригиналните принадлежности към този уред.
Възможно е принадлежности от други производители да не са
подходящи и да доведат до опасности!
► Този уред може да се използва от лица с ограничени физически,
сетивни или умствени възможности или без опит и/или знания,
ако са под наблюдение или са инструктирани по отношение
на безопасната употреба на уреда и са разбрали опасностите,
произтичащи от работата с него.
► Не допускайте деца да играят с уреда.
► Повишено внимание: Ножът е много остър!
► Бъдете предпазливи при почистване на ножа!
Page 41

BG
│
37 ■
SKMP 1300 B3
ПРЕДУПРЕЖДЕНИЕ! ОПАСНОСТ ОТ НАРАНЯВАНЕ!
► Повишено внимание: Ножът е много остър! Затова действайте
внимателно при изваждането на съда за миксиране.
► Никога не използвайте уреда за цели, различни от описаните
в настоящото ръководство за потребителя. В противен случай
съществува опасност от нараняване!
► Сменяйте принадлежностите само при спрян задвижващ меха-
низъм и при изключен мрежов щепсел! След изключване уредът
работи още известно време по инерция!
► Никога не оставяйте уреда без наблюдение.
► Преди смяна на принадлежности или приставки, които се дви-
жат по време на работа, уредът трябва да се изключи от мрежата и от контакта.
► Когато уредът работи, поставяйте единствено продуктите за пре-
работка в купата за разбъркване или миксера.
► Никога не поставяйте ръцете си или несвойствени предмети
в помощното приспособление за пълнене или миксера, за да
избегнете наранявания и повреди на уреда.
ВНИМАНИЕ! МАТЕРИАЛНИ ЩЕТИ!
► Никога не оставяйте уреда да работи без продукти! Опасност
от прегряване!
► Никога не сипвайте горещи съставки в уреда!
Page 42

■ 38 │ BG
SKMP 1300 B3
Подготовка
1) Извадете всички части от кутията и отстранете опаковъчния материал и евентуалните
предпазни фолиа и стикери.
2) Почистете всички части, както е описано в
глава „Почистване и поддръжка“. Уверете
се, че всички части са напълно сухи.
3) Развийте кабела за свързване към мрежата
от мястото за навиване на кабела i.
4) Поставете уреда върху равна и чиста основа
и го закрепете с четирите вендузи.
5) Включете щепсела в контакта.
Степени на скорост
Степен
Приставка Подходяща за...
1 – 2
Всички
- Начално положение
при всички процеси за смесване и
разбъркване
- При прибавяне на
продукти
Кука за
месене 0
Приставка за
бъркане w
- Месене или
смесване на твърдо
тесто или по-твърди
продукти
2 – 4
Приставка за
бъркане w
- Смесване на гъсто
кексово тесто
- Смесване на
масло и брашно
- Смесване на
тесто с мая
Кука за
месене 0
- Месене на тесто
с мая
- Месене на гъсто
кексово тесто
4 – 6
Приставка за
бъркане w
- Тесто за сладкиши
- Разбиване на масло със захар
- Тесто за сладки
6 – 10
Тел за разбиване q
- Бита сметана
- Белтъци
- Майонеза
- Разбиване на
масло на пяна
Pulse
Миксер t
- Смесване и накълцване на меки или
течни продукти
Page 43

BG
│
39 ■
SKMP 1300 B3
Работа с куката за месене,
телта за разбиване и приставката за бъркане
ПРЕДУПРЕЖДЕНИЕ!
ОПАСНОСТ ОТ НАРАНЯВАНЕ!
► По време на работа никога не поставяйте
ръка в купата за разбъркване 6! Опасност от нараняване от въртящи се части!
► Сменяйте принадлежностите само при
спрян задвижващ механизъм! След
изключване задвижващият механизъм
работи кратко време по инерция.
► В случай на повреда изключете уреда и
издърпайте щепсела от контакта, за да избегнете непредвидено включване на уреда.
ВНИМАНИЕ!
ОПАСНОСТ ОТ МАТЕРИАЛНИ ЩЕТИ!
►
Внимание! Опасност от материални щети!
При работи с куката за месене 0, телта за
разбиване q или приставката за бъркане
w препоръчваме да оставите уреда да се
охлади след 10 минути работа.
УКАЗАНИЕ
►
Когато работите с куката за месене 0,
телта за разбиване q и приставката за
бъркане w, трябва да е поставен защитният капак за задвижващия механизъм u. В
противен случай уредът не се включва.
За да подготвите уреда за работа с куката за
месене 0, телта за разбиване q и приставката за бъркане w, постъпете както следва:
1) Натиснете лостчето за деблокиране 2 нагоре и поставете накланящото се рамо 1 на
най-висока позиция.
2) Поставете купата за разбъркване 6 така, че
фиксаторите на купата за разбъркване 6
да влязат в прореза на основата 5. Завъртете купата за разбъркване 6 по часовни-
ковата стрелка (вж. символите
и
на основата 5), така че да се блокира и
стои неподвижно.
3) В зависимост от процеса на обработка
монтирайте куката за месене 0, телта за
разбиване q или приставката за разбъркване w на задвижващия вал 7:
– Поставете куката за месене 0, телта за
разбиване q или приставката за разбъркване w на задвижващия вал 7 така, че
двата метални щифта на задвижващия
вал 7 да влязат в отворите на приставката 0 q w.
– Натиснете силно приставката 0 q w
към задвижващия вал 7, така че пружината да се свие и същевременно завъртете
леко приставката обратно на часовнико-
вата стрелка (посока
).
– Отпуснете приставката. Сега тя стои
неподвижно на задвижващия вал 7.
4) Сипете продуктите, които ще преработвате,
в купата за разбъркване 6.
УКАЗАНИЕ
►
Вземете под внимание, че по време на месенето респ. бъркането тестото в купата за
разбъркване 6 увеличава обема си или
се изтласква от движението малко нагоре.
Затова никога не напълвайте купата за
разбъркване 6 до ръба!
5) Натиснете лостчето за деблокиране 2 нагоре и тласнете накланящото се рамо 1 с
монтираната приставка надолу в работна
позиция.
6) Поставете капака 9 върху купата за раз-
бъркване 6.
Page 44

■ 40 │ BG
SKMP 1300 B3
УКАЗАНИЕ
►
Ако желаете, можете да монтирате помощното приспособление за пълнене 8
на капака 9:
– Завъртете леко капака 9 така, че
отворът да сочи към вас.
– Закачете помощното приспособление за
пълнене 8 в държачите на капака 9:
Сега можете да сипвате продукти и по време
на работа.
7) Поставете въртящия се превключвател 3
на желаната степен (вж. глава „Степени
на скорост“).
След приключване на работа
1) Изключете уреда с въртящия се превключвател 3.
2) В случай че е монтирано, отстранете помощното приспособление за пълнене 8.
3) Свалете капака 9 от купата за разбърква-
не 6.
4) Натиснете лостчето за деблокиране 2 нагоре и поставете накланящото се рамо 1 на
най-висока позиция.
5) Свалете приставката 0 q w от задвижва-
щия вал 7, като натиснете приставката 0
q w към задвижващия вал 7 и същевременно я завъртите по часовниковата
стрелка (посока
). След това можете
да отстраните приставката.
6) Отстранете купата за разбъркване 6, като
я завъртите обратно на часовниковата
стрелка и след това я извадите нагоре.
7) Почистете всички части (вж. глава „Почистване и поддръжка“).
Работа с миксера
ПРЕДУПРЕЖДЕНИЕ!
ОПАСНОСТ ОТ НАРАНЯВАНЕ!
► Оставете горещите течности да се охладят
до температурата на ръката (около 30 –
40 °C), преди да ги налеете в миксера t.
ПРЕДУПРЕЖДЕНИЕ! ОПАСНОСТ
ОТ НАРАНЯВАНЕ ОТ ОСТРИЯ НОЖ/
ВЪРТЯЩИЯ СЕ ЗАДВИЖВАЩ
МЕХАНИЗЪМ!
► Никога не поставяйте ръка в поставения
миксер t!
► Сваляйте миксера t само при спрян
нож z.
► Работете с миксера t само при поставен
капак на миксера r с мерителна чаша e.
► В случай на повреда изключете уреда и
издърпайте щепсела от контакта, за да
избегнете непредвидено включване на
уреда.
ВНИМАНИЕ!
ОПАСНОСТ ОТ МАТЕРИАЛНИ ЩЕТИ!
►
Никога не използвайте едновременно
купата за разбъркване 6 и миксера t!
Това води до претоварване на двигателя!
► При работи с миксера t препоръчваме
да оставите уреда да се охлади след 3
минути работа.
За да подготвите уреда за работа с миксера t,
постъпете както следва. За справка използвайте
фигура В на задната разгъваща се страница.
1) Натиснете лостчето за деблокиране 2
нагоре и тласнете накланящото се рамо 1
надолу в работна позиция.
Page 45

BG
│
41 ■
SKMP 1300 B3
2) Свалете защитния капак на задвижващия
механизъм u.
УКАЗАНИЕ
►
Уверете се, че въртящият се превключвател 3 е на „0“, преди да поставите
миксера на задвижващия механизъм на
миксера. В противен случай уредът се
включва непосредствено след фиксирането на миксера.
3) Поставете миксера t на задвижващия
механизъм на миксера o така, че фиксаторите от долната страна на миксера t да
влязат в прорезите на задвижващия механизъм на миксера o. При това стрелката на
миксера t трябва да сочи символа
на уреда. Завъртете миксера t до упор по
часовниковата стрелка. Тогава стрелката
на миксера t сочи символа
на уреда.
4) Сипете продуктите.
5) Поставете капака на миксера r с мерителната чаша e така, че уплътнението на
капака на миксера r да затваря и улея за
изливане.
6) Поставете въртящия се превключвател 3
на желаната степен.
УКАЗАНИЕ
►
Идеалната скорост зависи от гъстотата на
продукта за смесване. Колкото по-течно е
съдържанието, толкова по-бързо можете
да смесвате.
► За кратък, интензивен импулсен режим
поставете въртящия се превключвател 3
минимум на степен 1 и същевременно
натиснете бутона PULSE 4.
Бутонът PULSE 4 не се фиксира, за да
не претоварва двигателя. Затова дръжте
бутона PULSE 4 само за кратко в това
положение.
Добавяне на продукти
1) Изключете уреда с въртящия се превключвател 3.
2) Свалете капака на миксера r и сипете
продуктите
или
3) Завъртете мерителната чаша e, намираща се в капака на миксера r, на 90° и
я извадете. След това постепенно сипете
продуктите през отвора за допълване.
След приключване на работа
1) Изключете уреда с въртящия се превключвател 3.
2) Завъртете миксера t обратно на часовни-
ковата стрелка така, че стрелката на мик-
сера t да сочи символа
на уреда и
свалете миксера.
УКАЗАНИЕ
►
Препоръчва се да почиствате миксера t
веднага след употреба (вж. глава „Почистване и поддръжка“). Тогава остатъците
от хранителни продукти се отстраняват
по-лесно.
Почистване и поддръжка
ОПАСНОСТ – ТОКОВ УДАР!
►
Преди почистване винаги изключвайте
щепсела от контакта! Съществува опасност от токов удар!
Никога не потапяйте уреда във вода или
други течности!
ВНИМАНИЕ!
ОПАСНОСТ ОТ МАТЕРИАЛНИ ЩЕТИ!
►
Не използвайте абразивни или агресивни
почистващи препарати. Те могат да повредят повърхностите!
Page 46

■ 42 │ BG
SKMP 1300 B3
УКАЗАНИЯ
►
Препоръчително е да почиствате уреда
веднага след употреба. Тогава остатъците
от хранителни продукти се отстраняват
по-лесно.
► При обработка на силно пигментирани
хранителни продукти, например моркови,
пластмасовите части могат да се оцветят.
Можете да отстраните тези оцветявания с
малко олио.
Почистване на уреда
■ Избърсвайте уреда с влажна кърпа. При
упорити замърсявания сипете мек миещ препарат върху кърпата. Избършете остатъците
от миещия препарат с навлажнена с чиста
вода кърпа. След това подсушете добре
уреда.
Почистване на принадлежностите
■ Почистете купата за разбъркване 6, капака
9, помощното приспособление за пълнене
8, капака на миксера r с мерителната
чаша e, защитния капак на задвижващия
механизъм u и приставките 0 q w с
топла вода и малко миещ препарат. Отстранете евентуалните остатъци с четка за миене.
Изплакнете всички части с чиста, топла вода
и преди да ги използвате отново, се уверете,
че всички части са сухи.
УКАЗАНИЕ
►
Приставките 0 q w, купата за разбъркване 6 и капакът на миксера r с мерителната чаша e са годни за миене и в
съдомиялна машина.
► При миенето в съдомиялна машина вни-
мавайте пластмасовите части да не се
притискат. В противен случай могат да
се деформират!
► По възможност поставяйте пластмасовите
части в горната кошница на съдомиялната
машина.
Почистване на миксера
ПРЕДУПРЕЖДЕНИЕ!
ОПАСНОСТ ОТ НАРАНЯВАНЕ!
► Не докосвайте ножа z с голи ръце.
■ Почистете миксера t с топла вода, в която
е прибавен мек миещ препарат. След това
го изплакнете с чиста вода така, че по него
да не остават следи от миещия препарат.
В повечето случаи достатъчно хигиенично почистване непосредствено след употреба може
да се постигне по следния алтернативен начин:
1) Сипете вода с малко миещ препарат в
поставения миксер t.
2) Поставете капака на миксера r с мерителната чаша e така, че уплътнението на
капака на миксера r да затваря и улея за
изливане.
3) Включете миксера t за няколко секунди.
4) Изсипете водата от миенето. Отстранете
евентуалните остатъци с четка за миене.
5) След това изплакнете миксера t с
обилно количество чиста вода, така че да
се отстранят всички остатъци от миещия
препарат.
УКАЗАНИЕ
►
Миксерът t е годен за миене в съдомиялна машина.
► При миенето в съдомиялна машина вни-
мавайте пластмасовата част на миксера
t да не се притиска. В противен случай
може да се деформира!
Съхранение
■ Преди прибиране навийте кабела на място-
то за навиване на кабела i.
■ Съхранявайте почистения уред на чисто,
защитено от прах, сухо място.
Page 47

BG
│
43 ■
SKMP 1300 B3
Отстраняване на повреди
Ако уредът спре внезапно:
■ Уредът е прегрял и автоматичното предпазно
изключване се е активирало.
– Поставете въртящия се превключвател
3 на 0.
– Издърпайте щепсела от контакта.
– Оставете уреда да се охлади в продъл-
жение на 15 минути.
– Ако след 15 минути уредът все още не се
е охладил напълно, той няма да започне
да работи.
– Изчакайте още 15 минути и го включете
отново.
Ако уредът не може да се включи:
– Проверете дали щепселът се намира в
контакта.
– Проверете дали накланящото се рамо 1
се намира в правилна позиция.
Технически характеристики
Напрежение на
мрежата: 220 – 240 V ~/50 Hz
Консумирана мощност: 1300 W
Клас на защита: II
Макс. вместимост
купа за разбъркване 6: около 6,3 l
миксер t: около 1,5 l
Всички части на този уред, влизащи в
контакт с хранителни продукти, са от
материали, разрешени за контакт с
хранителни продукти.
Препоръчваме следните времена за работа:
Оставете уреда да се охлади след10 минути
работа след работи с куката за месене 0,
телта за разбиване q или приставката за
бъркане w.
При работи с миксера t оставете уреда да се
охлади след 3 минути работа.
При превишаване на тези времена за работа са
възможни повреди по уреда поради прегряване.
Гаранция и сервиз
За този уред вие получавате гаранция от
3 години от датата на закупуване. Уредът е
произведен старателно и е изпитан щателно
преди доставката. Запазете касовата бележка
като доказателство за покупката. Ако се наложи да се възползвате от гаранцията, първо
се свържете по телефона със сервиза. Само
по този начин може да се осигури безплатно
връщане на вашата стока.
Предоставянето на гаранция важи само за
материални или фабрични дефекти, но не и
за транспортни щети, износващи се части или
при повреда на лесно чупливи части, напр.
превключватели или акумулаторни батерии.
Продуктът е предназначен единствено за битова, а не за професионална употреба.
При неправилна и нецелесъобразна употреба,
упражняване на сила или ремонтни дейности,
които не са извършени от нашия оторизиран
сервизен филиал, гаранцията отпада.
Законовите ви права не се ограничават от тази
гаранция.
Гаранционният срок не се удължава от гаранцията. Това важи и за сменени и ремонтирани
части. Евентуално наличните още при закупуването повреди и дефекти трябва да се съобщят
незабавно след разопаковането, но най-късно
два дни след датата на закупуване. След като
изтече гаранционният срок, ремонтите се
заплащат.
Сервизно обслужване България
Тел.: 00800 111 4920
Е-мейл: kompernass@lidl.bg
IAN 276995/276996/277709
Page 48

■ 44 │ BG
SKMP 1300 B3
Предаване за отпадъци
В никакъв случай не изхвър-
ляйте уреда с обикновените
битови отпадъци. Този продукт подлежи на европейската директива 2012/19/EU.
Предайте уреда за отпадъци чрез лицензирана
фирма за управление на отпадъци или общинската служба за управление на отпадъците.
Спазвайте действащите в момента разпоредби.
В случай на съмнение се обърнете към местния
пункт за събиране на отпадъци.
Опаковката е произведена от еко-
логични материали, които могат да
се предават в местните пунктове за
рециклиране.
Вносител
KOMPERNASS HANDELS GMBH
BURGSTRASSE 21
44867 BOCHUM
ГЕРМАНИЯ
www.kompernass.com
Рецепти
Супа от моркови
Продукти:
■ 500 g моркови
■ 250 ml вода
■ 500 ml месен бульон (консерва)
■ 125 ml сметана
■ 125 ml бяло вино
■ сол
■ черен пипер
■ 50 g студено масло
■ пресен див кервиз
Приготвяне:
1) Измийте и обелете морковите.
2) Нарежете ги на парчета, с подходящ за
миксера t размер.
3) Сипете 250 ml вода в тенджера и варете
морковите 20 минути в нея. След това
пюрирайте всичко в миксера t, докато
не останат повече големи парчета.
4) Върнете пюрираните моркови обратно в
тенджерата.
5) Добавете месния бульон, сметаната и
бялото вино.
6) Загрейте супата и я овкусете.
7) Прибавете маслото на малки парченца
в супата и след това гарнирайте с дивия
кервиз.
Page 49

BG
│
45 ■
SKMP 1300 B3
Крем за намазване от риба тон
Продукти:
■ 1 консерва риба тон в сос със зеленчуци
■ 3 с.л. кисело мляко
■ 1 ч.л. лимонов сок, прясно изцеден
■ 1 щипка сол
■ прясно смлян черен пипер
■ 2 твърдо сварени яйца, на кубчета
За гарниране:
■ пълнозърнест хляб на филийки
■ масло за намазване
■ 1 твърдо сварено яйце, на кубчета
■ див лук, нарязан
Приготвяне:
1) Разбърквайте всички продукти в миксера t,
докато се получи желаната гъстота (около
15 секунди) и след това овкусете.
2) Намажете хляба с маслото и крема от
риба тон и поръсете всичко с накълцаното
яйце и дивия лук.
Традиционни палачинки
Продукти:
■ 2 – 3 яйца
■ 375 ml мляко
■ 1 щипка сол
■ 250 g брашно
■ мазнина за пържене
Приготвяне:
1) Смесете яйцата, млякото и солта с приставката за бъркане w.
2) Пресейте брашното и го прибавете към
сместа. Разбърквайте всичко с приставката
за бъркане w, докато получите гладко
тесто.
3) Оставете тестото да втаса за около
20 минути.
4) Загрейте мазнината и с малък черпак
сипвайте в нея тесто (винаги само толкова,
че дъното на тигана да се покрие с тънък
пласт).
5) Изпържете палачинките от двете страни до
златистокафяво и ги сервирайте горещи.
Пандишпанено тесто
Продукти:
■ 3 яйца
■ 3 – 4 с.л. вода, гореща
■ 150 g захар
■ 1 пакетче ванилова захар
■ 100 g брашно, тип 405
■ 100 g нишесте
■ 2 – 3 равни ч.л. бакпулвер
Приготвяне:
1) Застелете дъното на форма с подвижен
борд (диаметър: 28 cm) с хартия за печене.
Не намазнявайте ръба, тъй като повърхността
няма да се заглади и зачерви равномерно.
2) Разбийте яйцата в купата за разбъркване 6
и прибавете гореща вода.
3) След това разбийте всичко на пяна в продължение на около 1 минута на най-висока
степен с приставката за бъркане w.
4) Разбъркайте в сместа захарта и ваниловата
захар и продължете да разбивате всичко
на най-висока степен още 2 минути.
5) Прибавете брашното, нишестето и бакпулвера, пресейте половината върху яйчения
крем и разбъркайте всичко за кратко на
степен 4.
6) След това разбъркайте останалото брашно
по същия начин и изсипете тестото в подготвената форма с подвижен борд.
7) Опечете незабавно тестото в предварително
загрята до 175 – 200 °C фурна при горно
и долно нагряване в продължение на около
20 – 30 минути.
Page 50

■ 46 │ BG
SKMP 1300 B3
Пясъчно тесто
Продукти:
■ 250 g пшенично брашно
■ 1/2 равна ч.л. бакпулвер
■ 100 – 125 g захар
■ 1 пакетче ванилова захар
■ 1 щипка сол
■ 1 яйце
■ 125 g масло
Приготвяне:
1) Смесете брашното и бакпулвера в купата
за разбъркване 6 и след това прибавете
всички останали съставки.
2) Месете всичко с куката за месене 0 първо
около 1 минута на степен 2, след това
около 3 минути на степен 2 – 4.
3) Не месете тестото твърде продължително,
в противен случай може силно да омекне.
4) Оставете тестото да втаса за около 1/2 час
в хладилника и след това пригответе от него
блат за торта или дребни сладки.
5) За блат за торта разточете 2/3 от тестото и
го поставете в намазнена форма с подвижен
борд.
6) От останалото тесто оформете руло.
7) Поставете това руло по края на тестото и го
натиснете с два пръста по борда на формата, така че да се получи ръб с височина от
около 3 cm.
8) Набодете многократно блата за торта с
вилица.
9) Загрейте фурната предварително около
5 минути и печете пясъчното тесто около
15 – 20 минути при горно и долно нагряване на 200 – 225 °C.
Кексово тесто
Продукти:
■ 250 g меко масло или маргарин
■ 250 g захар
■ 1 пакетче ванилова захар
■ 1 щипка сол
■ 4 яйца
■ 500 g пшенично брашно
■ 1 пакетче бакпулвер
■ около 125 ml прясно мляко
Приготвяне:
1) Сипете всички съставки в купата за разбъркване 6 и бъркайте всичко с приставката
за бъркане w около 1/2 минута на степен
1, след това 30 секунди на степен 2 и след
това около 5 минути на степен 4.
2) Намазнете формата за печене или я застелете с хартия за печене.
3) Напълнете формата за печене и печете
тестото около 50 – 60 минути при горно и
долно нагряване на 175 – 200 °C.
4) Преди да извадите сладкиша от фурната,
трябва да проверите дали е добре изпечен:
за целта боднете с остра дървена пръчица в
средата на сладкиша. Ако по нея не остане
тесто, сладкишът е добре изпечен.
5) Обърнете сладкиша върху кухненска скара
и го оставете да се охлади.
Page 51

BG
│
47 ■
SKMP 1300 B3
Тесто с мая
Продукти:
■ 500 g пшенично брашно
■ 25 g прясна мая или 1 п. суха мая
■ около 1/4 l хладко мляко
■ 80 g масло или маргарин (със стайна тем-
пература)
■ 80 g захар
■ 1 яйце
Приготвяне:
1) Сипете брашното, сухата или натрошената
прясна мая и всички други продукти (не
директно върху маята) в купата за разбъркване 6.
2) Смесете всичко бавно с куката за месене 0
на степен 1, след това около 3 – 4 минути
на степен 3.
3) Покрийте купата с кърпа за съдове, оставете тестото на топло място да втаса, докато
видимо увеличи обема си.
4) Омесете още веднъж тестото.
5) След това тестото е готово за по-нататъшна
обработка.
Гофрети
Продукти:
■ 200 g захар
■ 500 g брашно
■ 5 g бакпулвер
■ 5 яйца
■ 400 ml мляко
■ 250 g масло (със стайна температура)
■ 2 пакетчета ванилова захар
Приготвяне:
1) Сипете яйцата, захарта и маслото в купата
за разбъркване 6 и разбъркайте всичко на
гладко тесто с телта за разбиване q.
2) Добавете брашното, ваниловата захар и
бакпулвера.
3) Прибавете постепенно млякото, като бъркате
непрекъснато, докато тестото придобие
гладка и мека консистенция.
4) Изпечете гофретите в гофретник.
Шейк с банан и ванилия
Продукти:
■ 3 банана
■ 500 ml мляко
■ 2 пакетчета ванилова захар
■ 1 с.л. ванилов сладолед
Приготвяне:
1) Обелете бананите.
2) Сипете обелените банани, млякото, ваниловия сладолед и ваниловата захар в
миксера t.
3) Смесете всичко на степен 8.
Page 52

■ 48 │ BG
SKMP 1300 B3
Смути с банан и киви
Продукти:
■ 200 ml портокалов сок (прясно изцеден)
■ 1 киви
■ 1/2 банан
Приготвяне:
1) Обелете кивито.
2) Обелете банана.
3) Сипете кивито, банана и портокаловия сок
в миксера t.
4) Смесете всичко на степен 8.
Page 53

GR│CY
│
49 ■
SKMP 1300 B3
Περιεχόμενα
Εισαγωγή . . . . . . . . . . . . . . . . . . . . . . . . . . . . . . . . . . . . . . . . . . . . . . . . . . . . . . . . . . . .50
Προβλεπόμενη χρήση . . . . . . . . . . . . . . . . . . . . . . . . . . . . . . . . . . . . . . . . . . . . . . . . . .50
Παραδοτέος εξοπλισμός . . . . . . . . . . . . . . . . . . . . . . . . . . . . . . . . . . . . . . . . . . . . . . . .50
Περιγραφή συσκευής . . . . . . . . . . . . . . . . . . . . . . . . . . . . . . . . . . . . . . . . . . . . . . . . . . .50
Υποδείξεις ασφαλείας. . . . . . . . . . . . . . . . . . . . . . . . . . . . . . . . . . . . . . . . . . . . . . . . . . .51
Προετοιμασίες . . . . . . . . . . . . . . . . . . . . . . . . . . . . . . . . . . . . . . . . . . . . . . . . . . . . . . . . .54
Βαθμίδες ταχύτητας . . . . . . . . . . . . . . . . . . . . . . . . . . . . . . . . . . . . . . . . . . . . . . . . . . . .54
Εργασία με άγκιστρο ζυμώματος, χτυπητήρι και αναδευτήρα . . . . . . . . . . . . . . . . . .55
Μετά την εργασία . . . . . . . . . . . . . . . . . . . . . . . . . . . . . . . . . . . . . . . . . . . . . . . . . . . . . . . . . . . . . . . . . 56
Εργασία με το μίξερ . . . . . . . . . . . . . . . . . . . . . . . . . . . . . . . . . . . . . . . . . . . . . . . . . . . .56
Προσθήκη υλικών . . . . . . . . . . . . . . . . . . . . . . . . . . . . . . . . . . . . . . . . . . . . . . . . . . . . . . . . . . . . . . . . . 57
Μετά την εργασία . . . . . . . . . . . . . . . . . . . . . . . . . . . . . . . . . . . . . . . . . . . . . . . . . . . . . . . . . . . . . . . . . 57
Καθαρισμός και φροντίδα . . . . . . . . . . . . . . . . . . . . . . . . . . . . . . . . . . . . . . . . . . . . . . .57
Καθαρισμός συσκευής . . . . . . . . . . . . . . . . . . . . . . . . . . . . . . . . . . . . . . . . . . . . . . . . . . . . . . . . . . . . . 58
Καθαρισμός των αξεσουάρ . . . . . . . . . . . . . . . . . . . . . . . . . . . . . . . . . . . . . . . . . . . . . . . . . . . . . . . . . 58
Καθαρισμός μίξερ . . . . . . . . . . . . . . . . . . . . . . . . . . . . . . . . . . . . . . . . . . . . . . . . . . . . . . . . . . . . . . . . . 58
Αποθήκευση . . . . . . . . . . . . . . . . . . . . . . . . . . . . . . . . . . . . . . . . . . . . . . . . . . . . . . . . . .58
Διόρθωση σφαλμάτων . . . . . . . . . . . . . . . . . . . . . . . . . . . . . . . . . . . . . . . . . . . . . . . . . .59
Τεχνικά χαρακτηριστικά . . . . . . . . . . . . . . . . . . . . . . . . . . . . . . . . . . . . . . . . . . . . . . . .59
Εγγύηση και σέρβις . . . . . . . . . . . . . . . . . . . . . . . . . . . . . . . . . . . . . . . . . . . . . . . . . . . .59
Απόρριψη . . . . . . . . . . . . . . . . . . . . . . . . . . . . . . . . . . . . . . . . . . . . . . . . . . . . . . . . . . . .60
Εισαγωγέας . . . . . . . . . . . . . . . . . . . . . . . . . . . . . . . . . . . . . . . . . . . . . . . . . . . . . . . . . . .60
Συνταγές . . . . . . . . . . . . . . . . . . . . . . . . . . . . . . . . . . . . . . . . . . . . . . . . . . . . . . . . . . . . .60
Καροτόσουπα . . . . . . . . . . . . . . . . . . . . . . . . . . . . . . . . . . . . . . . . . . . . . . . . . . . . . . . . . . . . . . . . . . . . 60
Επάλειμμα τόνου . . . . . . . . . . . . . . . . . . . . . . . . . . . . . . . . . . . . . . . . . . . . . . . . . . . . . . . . . . . . . . . . . . 61
Παραδοσιακή ομελέτα . . . . . . . . . . . . . . . . . . . . . . . . . . . . . . . . . . . . . . . . . . . . . . . . . . . . . . . . . . . . . . 61
Ζύμη μπισκότων . . . . . . . . . . . . . . . . . . . . . . . . . . . . . . . . . . . . . . . . . . . . . . . . . . . . . . . . . . . . . . . . . . . 61
Ζύμη τάρτας . . . . . . . . . . . . . . . . . . . . . . . . . . . . . . . . . . . . . . . . . . . . . . . . . . . . . . . . . . . . . . . . . . . . . 62
Βασική ζύμη. . . . . . . . . . . . . . . . . . . . . . . . . . . . . . . . . . . . . . . . . . . . . . . . . . . . . . . . . . . . . . . . . . . . . . 62
Ζύμη με μαγιά . . . . . . . . . . . . . . . . . . . . . . . . . . . . . . . . . . . . . . . . . . . . . . . . . . . . . . . . . . . . . . . . . . . . 63
Βάφλες . . . . . . . . . . . . . . . . . . . . . . . . . . . . . . . . . . . . . . . . . . . . . . . . . . . . . . . . . . . . . . . . . . . . . . . . . . 63
Σέικ μπανάνας-βανίλιας . . . . . . . . . . . . . . . . . . . . . . . . . . . . . . . . . . . . . . . . . . . . . . . . . . . . . . . . . . . . 63
Smoothie με μπανάνα και ακτινίδιο . . . . . . . . . . . . . . . . . . . . . . . . . . . . . . . . . . . . . . . . . . . . . . . . . . . . 64
Page 54

■ 50 │ GR
│
CY
SKMP 1300 B3
Εισαγωγή
Συγχαρητήρια για την αγορά της νέας σας
συσκευής.
Αποφασίσατε έτσι για την απόκτηση ενός προϊόντος υψηλής ποιότητας. Οι οδηγίες χρήσης είναι
τμήμα αυτού του προϊόντος. Περιέχουν σημαντικές
υποδείξεις για την ασφάλεια, τη χρήση και την
απόρριψη. Πριν από τη χρήση του προϊόντος,
εξοικειωθείτε με όλες τις υποδείξεις χειρισμού και
ασφάλειας. Χρησιμοποιείτε το προϊόν μόνο όπως
περιγράφεται και για τους αναφερόμενους τομείς
χρήσης. Παραδώστε όλα τα έγγραφα σε περίπτωση παράδοσης του προϊόντος σε τρίτους.
Προβλεπόμενη χρήση
Αυτή η συσκευή προορίζεται αποκλειστικά για την
επεξεργασία τροφίμων σε συνηθισμένες ποσότητες.
Αυτή η συσκευή προορίζεται αποκλειστικά για
χρήση σε νοικοκυριά. Μην τη χρησιμοποιείτε για
επαγγελματικό σκοπό!
Αυτή η συσκευή ενδείκνυται μόνο για ιδιωτική χρήση
σε κλειστούς και προστατευμένους από τη βροχή
χώρους. Μην τη χρησιμοποιείτε σε εξωτερικούς
χώρους!
Η συσκευή επιτρέπεται να χρησιμοποιείται μόνο με
γνήσια εξαρτήματα.
Παραδοτέος εξοπλισμός
Κουζινομηχανή
Μπολ ανάμειξης με καπάκι
Μίξερ με καπάκι και δοχείο μέτρησης
Άγκιστρο ζυμώματος
Χτυπητήρι
Αναδευτήρας
Οδηγίες χρήσης
Σύντομες οδηγίες
ΥΠΟΔΕΙΞΗ
►
Ελέγξτε τον παραδοτέο εξοπλισμό ως προς
την πληρότητα και για ζημιές, απευθείας μετά
την αποσυσκευασία. Απευθυνθείτε, εάν απαιτείται, στο τμήμα σέρβις.
Περιγραφή συσκευής
Ξεδιπλώστε τις αναδιπλούμενες σελίδες στο
μπροστινό και πίσω κάλυμμα αυτών των οδηγιών
χρήσης:
Μπροστινή αναδιπλούμενη σελίδα
Εικόνα A:
1 Περιστρεφόμενος βραχίονας
2 Μοχλός απασφάλισης
3 Περιστρεφόμενος διακόπτης
4 Πλήκτρο PULSE
5 Υποδοχή
6 Μπολ ανάμειξης
7 Άξονας κίνησης
Εικόνα B:
8 Βοήθημα πλήρωσης
9 Καπάκι
0 Άγκιστρο ζυμώματος
q Χτυπητήρι
w Αναδευτήρας
Πίσω αναδιπλούμενη σελίδα:
Εικόνα C:
e Μικρό δοχείο μέτρησης
r Καπάκι μίξερ
t Μίξερ
z Λεπίδα
u Καπάκι προστασίας μετάδοσης κίνησης
i Διάταξη τύλιξης καλωδίου
o Μοτέρ μίξερ
Page 55

GR│CY
│
51 ■
SKMP 1300 B3
Υποδείξεις ασφαλείας
ΚΙΝΔΥΝΟΣ ΗΛΕΚΤΡΟΠΛΗΞΙΑΣ!
► Συνδέετε τη συσκευή μόνο σε μια σύμφωνα με τις προδιαγραφές
εγκατεστημένη και γειωμένη πρίζα. Η τάση δικτύου πρέπει να συμφωνεί με τα στοιχεία στην πινακίδα τύπου της συσκευής.
► Προσέχετε ώστε κατά τη λειτουργία το καλώδιο να μη βρέχεται ή
υγραίνεται. Περνάτε το κατά τέτοιο τρόπο, ώστε να μην πιάνεται ή
φθείρεται.
► Κρατάτε το καλώδιο μακριά από καυτές επιφάνειες.
► Μην επισκευάζετε τη συσκευή. Οποιεσδήποτε επισκευές πρέπει να
διεξάγονται από το τμήμα εξυπηρέτησης πελατών ή από ειδικό προσωπικό.
► Τραβάτε το βύσμα από την πρίζα, όταν καθαρίζετε τη συσκευή ή σε
περίπτωση βλάβης. Η απενεργοποίηση από μόνη της δεν αρκεί, διότι
υπάρχει ακόμα τάση στη συσκευή, όσο το βύσμα βρίσκεται στην
πρίζα.
► Αποσυνδέετε το βύσμα από την πρίζα, εάν η συσκευή δεν χρησιμο-
ποιείται.
► Τα βύσματα ή τα καλώδια που έχουν υποστεί βλάβη πρέπει να
αντικαθίστανται αμέσως από εξουσιοδοτημένο εξειδικευμένο προσωπικό ή από το τμήμα εξυπηρέτησης πελατών, ώστε να αποφεύγονται
κίνδυνοι.
► Η συσκευή και το καλώδιο σύνδεσής της πρέπει να φυλάσσονται
μακριά από τα παιδιά.
Δεν επιτρέπεται σε καμία περίπτωση να βυθίσετε τη συσκευή σε νερό
ή άλλα υγρά.
Page 56

■ 52 │ GR
│
CY
SKMP 1300 B3
ΠΡΟΕΙΔΟΠΟΙΗΣΗ! ΚΙΝΔΥΝΟΣ ΤΡΑΥΜΑΤΙΣΜΟΥ!
► Αποσυνδέετε τη συσκευή από την παροχή ρεύματος όταν τοποθετείτε
ή απομακρύνετε εξαρτήματα. Έτσι αποφεύγεται μια μη ηθελημένη
ενεργοποίηση της συσκευής.
Μετά από μια διακοπή ρεύματος η συσκευή ενεργοποιείται πάλι!
► Η συσκευή πρέπει να αποσυνδέεται πάντα από το δίκτυο όταν δεν
επιτηρείται και πριν από τη συναρμολόγηση, την αποσυναρμολόγηση ή τον καθαρισμό.
► Η συσκευή αυτή δεν επιτρέπεται να χρησιμοποιείται από παιδιά.
► Χρησιμοποιείτε μόνο τα γνήσια αξεσουάρ για αυτή τη συσκευή.
Αξεσουάρ άλλων κατασκευαστών πιθανώς να μην ενδείκνυνται και
μπορεί να ενέχουν κινδύνους!
► Μπορεί να γίνεται χρήση αυτής της συσκευής από άτομα με μει-
ωμένες φυσικές, αισθητηριακές ή νοητικές ικανότητες ή με έλλειψη
εμπειρίας και/ή γνώσεων, εφόσον επιτηρούνται ή έχουν εκπαιδευτεί
αναφορικά με την ασφαλή χρήση της συσκευής και έχουν κατανοήσει τους επακόλουθους κινδύνους.
► Τα παιδιά δεν επιτρέπεται να παίζουν με τη συσκευή.
► Προσοχή: Η λεπίδα είναι πολύ κοφτερή!
► Να είστε προσεκτικοί κατά τον καθαρισμό της λεπίδας!
Page 57

GR│CY
│
53 ■
SKMP 1300 B3
ΠΡΟΕΙΔΟΠΟΙΗΣΗ! ΚΙΝΔΥΝΟΣ ΤΡΑΥΜΑΤΙΣΜΟΥ!
► Προσοχή: Η λεπίδα είναι πολύ κοφτερή! Γι' αυτό να είστε προσεκτικοί
κατά την αφαίρεση του δοχείου ανάμειξης.
► Μη χρησιμοποιείτε τη συσκευή για άλλους σκοπούς από τους περι-
γραφόμενους στις παρούσες οδηγίες. Σε αντίθετη περίπτωση υπάρχει
κίνδυνος τραυματισμού!
► Αλλάζετε τα αξεσουάρ μόνο όταν η μετάδοση κίνησης είναι ακινη-
τοποιημένη και το βύσμα έχει αποσυνδεθεί! Η συσκευή συνεχίζει να
λειτουργεί για λίγο μετά την απενεργοποίηση!
► Ποτέ μην αφήνετε τη συσκευή χωρίς επιτήρηση.
► Πριν από την αντικατάσταση αξεσουάρ ή πρόσθετων εξαρτημάτων,
τα οποία κινούνται κατά τη λειτουργία, η συσκευή πρέπει να απενεργοποιηθεί και να αποσυνδεθεί από το δίκτυο.
► Όσο η συσκευή λειτουργεί, βάζετε αποκλειστικά τα προς επεξεργα-
σία υλικά στο μπολ ανάμειξης ή στο μίξερ.
► Ποτέ μην βάζετε τα χέρια σας ή ξένα αντικείμενα στο βοήθημα πλή-
ρωσης ή στο μίξερ, ώστε να αποφεύγετε τραυματισμούς και βλάβες
στη συσκευή.
ΠΡΟΣΟΧΗ! ΥΛΙΚΕΣ ΖΗΜΙΕΣ!
► Ποτέ μην λειτουργείτε τη συσκευή χωρίς υλικά! Κίνδυνος υπερθέρ-
μανσης!
► Μη γεμίζετε με καυτά υλικά τη συσκευή!
Page 58

■ 54 │ GR
│
CY
SKMP 1300 B3
Προετοιμασίες
1) Απομακρύνετε όλα τα εξαρτήματα από το
χαρτοκιβώτιο και αφαιρέστε το υλικό συσκευασίας, καθώς και ενδεχόμενες προστατευτικές
μεμβράνες και αυτοκόλλητα.
2) Καθαρίστε όλα τα εξαρτήματα, όπως περιγράφεται στο Κεφάλαιο «Καθαρισμός και
φροντίδα». Βεβαιωθείτε ότι όλα τα εξαρτήματα
είναι εντελώς στεγνά.
3) Ξετυλίξτε το καλώδιο δικτύου από τη διάταξη
τύλιξης καλωδίου i.
4) Τοποθετήστε τη συσκευή επάνω σε μία λεία
και καθαρή επιφάνεια και στερεώστε τη με τις
τέσσερις βεντούζες.
5) Εισάγετε το βύσμα στην πρίζα.
Βαθμίδες ταχύτητας
Βαθμίδα
Χρήση Κατάλληλη για...
1 - 2
Όλα
- Θέση εκκίνησης για
όλες τις διαδικασίες
ανάμειξης και ζυμώματος
- Για την προσθήκη
υλικών
Άγκιστρο
ζυμώματος 0
Αναδευτήρας w
- Ζύμωμα και ανάμειξη
στέρεας ζύμης ή πιο
στερεών υλικών
2 - 4
Αναδευτήρας w
- Ανάμειξη χοντρής
βασικής ζύμης
- Ανάμειξη βουτύρου
και αλευριού
- Ανάμειξη ζύμης με
μαγιά
Άγκιστρο
ζυμώματος 0
- Ζύμωμα ζύμης με
μαγιά
- Ζύμωμα χοντρής
βασικής ζύμης
4 - 6
Αναδευτήρας w
- Ζύμη κέικ
- Χτύπημα βουτύρου
με ζάχαρη
- Ζύμη για μπισκότα
6 - 10
Χτυπητήρι q
- Σαντιγί
- Ασπράδι
- Μαγιονέζα
- Χτύπημα βουτύρου
σε αφρό
Pulse
[Παλμός]
Μίξερ t
- Ανάμειξη και τεμάχισμα μαλακών ή
υγρών υλικών
Page 59

GR│CY
│
55 ■
SKMP 1300 B3
Εργασία με άγκιστρο ζυμώματος, χτυπητήρι και αναδευτήρα
ΠΡΟΕΙΔΟΠΟΙΗΣΗ!
ΚΙΝΔΥΝΟΣ ΤΡΑΥΜΑΤΙΣΜΟΥ!
► Ποτέ μην πιάνετε μέσα στο μπολ ανάμειξης 6
κατά τη διάρκεια της λειτουργίας! Κίνδυνος
τραυματισμού λόγω περιστρεφόμενων εξαρτημάτων!
► Αλλάζετε τα εξαρτήματα μόνο όταν η μετάδο-
ση κίνησης είναι σταματημένη! Μετά την απενεργοποίηση η μετάδοση κίνησης συνεχίζει
να λειτουργεί για λίγο.
► Σε περίπτωση σφάλματος απενεργοποιήστε
τη συσκευή και αποσυνδέστε το βύσμα, ώστε
να αποφύγετε μη ηθελημένη ενεργοποίηση
της συσκευής.
ΠΡΟΣΟΧΗ! ΥΛΙΚΕΣ ΖΗΜΙΕΣ!
►
Σε εργασίες με το άγκιστρο ζυμώματος 0, το
χτυπητήρι q ή τον αναδευτήρα w συστήνουμε
να αφήνετε τη συσκευή να κρυώνει μετά από
λειτουργία 10 λεπτών.
ΥΠΟΔΕΙΞΗ
►
Όταν δουλεύετε με το άγκιστρο ζυμώματος 0,
το χτυπητήρι q και τον αναδευτήρα w, το
καπάκι προστασίας μετάδοσης κίνησης u
πρέπει να είναι τοποaθετημένο. Αλλιώς η
συσκευή δεν εκκινείται.
Για να προετοιμάσετε τη συσκευή για τη λειτουργία
με το άγκιστρο ζυμώματος 0, το χτυπητήρι q
και τον αναδευτήρα w, ακολουθήστε την εξής
διαδικασία:
1) Πιέστε το μοχλό απασφάλισης 2 προς τα
επάνω και φέρτε τον περιστρεφόμενο βραχίονα
1 στην ψηλότερη θέση.
2) Τοποθετήστε το μπολ ανάμειξης 6 κατά τέτοιο
τρόπο, ώστε οι ασφάλειες του μπολ ανάμειξης
6 να πιάσουν στην εγκοπή της υποδοχής 5.
Γυρίστε το μπολ ανάμειξης 6 προς τα δεξιά
(βλ. σύμβολα
και στην υποδοχή 5),
ώστε να ασφαλίσει και να εδράζεται σωστά.
3) Αναλόγως της εργασίας, τοποθετήστε το άγκιστρο ζυμώματος 0, το χτυπητήρι q ή τον
αναδευτήρα w στον άξονα κίνησης 7:
– Τοποθετήστε το άγκιστρο ζυμώματος 0, το
χτυπητήρι q ή τον αναδευτήρα w κατά
τέτοιο τρόπο επάνω στον άξονα κίνησης 7,
ώστε οι δύο μεταλλικοί πείροι του άξονα
κίνησης 7 να πιάσουν στις εγκοπές του
εξαρτήματος 0 q w.
– Πιέστε το εξάρτημα 0 q w με δύναμη
επάνω στον άξονα κίνησης 7, ώστε το
ελατήριο να συμπιεστεί, περιστρέφοντας
παράλληλα το εξάρτημα ελαφρώς προς
τα αριστερά (φορά
).
– Αφήστε ελεύθερο το εξάρτημα.
Αυτό τώρα εδράζεται καλά επάνω στον
άξονα κίνησης 7.
4) Γεμίστε το μπολ ανάμειξης 6 με τα προς
επεξεργασία υλικά.
ΥΠΟΔΕΙΞΗ
►
Προσέχετε, διότι, κατά τη διαδικασία ζυμώματος ή ανάμειξης, η ζύμη φουσκώνει μέσα
στο μπολ ανάμειξης 6 ή, λόγω της κίνησης,
πιέζεται λίγο προς τα επάνω. Γι' αυτό μη
γεμίζετε ποτέ το μπολ ανάμειξης 6 μέχρι
τέρμα επάνω!
5) Πιέστε το μοχλό απασφάλισης 2 προς τα
επάνω και σπρώξτε τον περιστρεφόμενο βραχίονα 1 με το τοποθετημένο εξάρτημα προς τα
κάτω, στη θέση εργασίας.
6) Σπρώξτε το καπάκι 9 επάνω στο μπολ ανάμειξης 6.
Page 60

■ 56 │ GR
│
CY
SKMP 1300 B3
ΥΠΟΔΕΙΞΗ
►
Εάν επιθυμείτε, μπορείτε να τοποθετήσετε το
βοήθημα πλήρωσης 8 στο καπάκι 9:
– Γυρίστε λίγο το καπάκι 9, ώστε το άνοιγμα
να δείχνει προς τα εσάς.
– Πιάστε το βοήθημα πλήρωσης 8 στις
υποδοχές του καπακιού 9:
Μπορείτε τώρα, ακόμη και κατά τη λειτουργία,
να προσθέσετε υλικά.
7) Θέστε τον περιστρεφόμενο διακόπτη 3 στην
επιθυμητή βαθμίδα (βλ. Κεφάλαιο «Βαθμίδες
ταχύτητας»).
Μετά την εργασία
1) Απενεργοποιήστε τη συσκευή από τον περιστρεφόμενο διακόπτη 3.
2) Εάν έχει τοποθετηθεί: αφαιρέστε το βοήθημα
πλήρωσης 8.
3) Απομακρύνετε το καπάκι 9 από το μπολ
ανάμειξης 6.
4) Πιέστε το μοχλό απασφάλισης 2 προς τα
επάνω και φέρτε τον περιστρεφόμενο βραχίονα
1 στην ψηλότερη θέση.
5) Αφαιρέστε το εξάρτημα 0 q w από τον
άξονα κίνησης 7, πιέζοντάς το 0 q w
αντίθετα από τον άξονα κίνησης 7 και περιστρέφοντάς το, ταυτόχρονα, προς τα δεξιά
(φορά
). Στη συνέχεια, μπορείτε να
απομακρύνετε το εξάρτημα.
6) Αφαιρέστε το μπολ ανάμειξης 6, περιστρέφοντάς το προς τα αριστερά και στη συνέχεια
τραβώντας το προς τα επάνω.
7) Καθαρίστε όλα τα μέρη (βλ. Κεφάλαιο «Καθαρισμός και φροντίδα»).
Εργασία με το μίξερ
ΠΡΟΕΙΔΟΠΟΙΗΣΗ! ΚΙΝΔΥΝΟΣ
ΤΡΑΥΜΑΤΙΣΜΟΥ!
► Αφήνετε πάντα τα καυτά υγρά να κρυώσουν,
έως ότου χλιαρύνουν (περ. 30-40°C), πριν
τα τοποθετήσετε στο μίξερ t.
ΠΡΟΕΙΔΟΠΟΙΗΣΗ! ΚΙΝΔΥΝΟΣ
ΤΡΑΥΜΑΤΙΣΜΟΥ ΛΟΓΩ ΑΙΧΜΗΡΗΣ
ΛΕΠΙΔΑΣ/ΠΕΡΙΣΤΡΕΦΟΜΕΝΗΣ
ΜΕΤΑΔΟΣΗΣ ΚΙΝΗΣΗΣ!
► Μην πιάνετε ποτέ το τοποθετημένο μίξερ t!
► Βγάζετε το μίξερ t μόνο αφού έχει ακινητο-
ποιηθεί η λεπίδα z.
► Λειτουργείτε το μίξερ t μόνο με τοποθετημένο
το καπάκι r με δοχείο μέτρησης e.
► Σε περίπτωση σφάλματος απενεργοποιήστε
τη συσκευή και αποσυνδέστε το βύσμα, ώστε
να αποφύγετε μη ηθελημένη ενεργοποίηση
της συσκευής.
ΠΡΟΣΟΧΗ! ΥΛΙΚΕΣ ΖΗΜΙΕΣ!
►
Μην χρησιμοποιείτε ποτέ ταυτόχρονα το
μπολ ανάμειξης 6 και το μίξερ t! Αυτό
θα προκαλούσε υπερφόρτωση του μοτέρ!
► Σε εργασίες με το μίξερ t συστήνουμε
μετά από λειτουργία 3 λεπτών να αφήνετε τη
συσκευή να κρυώνει.
Για να προετοιμάσετε τη συσκευή για τη λειτουργία
με το μίξερ t, ακολουθήστε την εξής διαδικασία:
Συμβουλευθείτε την Εικόνα C στην πίσω αναδιπλούμενη σελίδα.
1) Πιέστε το μοχλό απασφάλισης 2 προς τα
επάνω και σπρώξτε τον περιστρεφόμενο βραχίονα 1 προς τα κάτω, στη θέση εργασίας.
Page 61

GR│CY
│
57 ■
SKMP 1300 B3
2) Απομακρύνετε το καπάκι προστασίας μετάδοσης κίνησης u.
ΥΠΟΔΕΙΞΗ
►
Βεβαιωθείτε ότι ο περιστρεφόμενος διακόπτης 3 βρίσκεται στη θέση "0", προτού
τοποθετήσετε το μίξερ στη μετάδοση κίνησης.
Αλλιώς, η συσκευή εκκινείται ξαφνικά, μόλις
το μίξερ ασφαλίσει.
3) Τοποθετήστε το μίξερ t κατά τέτοιο τρόπο
στο μοτέρ o, ώστε οι ασφάλειες στην κάτω
πλευρά του μίξερ t να πιάσουν στις εγκοπές
του μοτέρ o. Το βέλος στο μίξερ t πρέπει
να δείχνει στο σύμβολο
της συσκευής.
Περιστρέψτε το μίξερ t τέρμα δεξιά. Το βέλος
στο μίξερ t δείχνει στο σύμβολο
της
συσκευής.
4) Προσθέστε τα υλικά.
5) Τοποθετήστε το καπάκι του μίξερ r με το
δοχείο μέτρησης e κατά τέτοιο τρόπο, ώστε
το χείλος στο καπάκι του μίξερ r να κλείνει
και τη σήτα έκχυσης.
6) Θέστε τον περιστρεφόμενο διακόπτη 3 στην
επιθυμητή βαθμίδα.
ΥΠΟΔΕΙΞΗ
►
Η ιδανική ταχύτητα εξαρτάται από τη συνοχή
του υλικού ανάμειξης. Όσο πιο υγρό είναι το
περιεχόμενο, τόσο γρηγορότερα μπορείτε να
αναμιγνύετε.
► Για σύντομη και δυνατή παλμική λειτουργία,
θέστε τον περιστρεφόμενο διακόπτη 3 τουλάχιστον στη βαθμίδα 1, πιέζοντας ταυτόχρονα
το πλήκτρο PULSE 4. Το πλήκτρο PULSE 4
δεν ασφαλίζει, ώστε να μην επιβαρύνει το
μοτέρ. Γι' αυτό κρατάτε το πλήκτρο PULSE 4
σε αυτή τη θέση μόνο για λίγο.
Προσθήκη υλικών
1) Απενεργοποιήστε τη συσκευή από τον περιστρεφόμενο διακόπτη 3.
2) Βγάλτε το καπάκι του μίξερ r και προσθέστε
τα υλικά
ή
3) Γυρίστε το δοχείο μέτρησης e, το οποίο βρίσκεται στο καπάκι του μίξερ r, κατά 90° και
αφαιρέστε το. Προσθέστε τα υλικά διαδοχικά
μέσα από το άνοιγμα πλήρωσης.
Μετά την εργασία
1) Απενεργοποιήστε τη συσκευή από τον περιστρεφόμενο διακόπτη 3.
2) Περιστρέψτε το μίξερ t προς τα αριστερά,
ώστε το βέλος στο μίξερ t να δείχνει στο
σύμβολο
της συσκευής και αφαιρέστε το.
ΥΠΟΔΕΙΞΗ
►
Καθαρίζετε το μίξερ t κατά προτίμηση
αμέσως μετά τη χρήση (βλ. Κεφάλαιο "Καθαρισμός και φροντίδα"). Έτσι, υπολείμματα
τροφίμων απομακρύνονται ευκολότερα.
Καθαρισμός και φροντίδα
ΚΙΝΔΥΝΟΣ ΗΛΕΚΤΡΟΠΛΗΞΙΑΣ!
►
Πριν από κάθε καθαρισμό αποσυνδέετε το
βύσμα από την πρίζα! Υπάρχει κίνδυνος
ηλεκτροπληξίας!
Ποτέ μη βυθίζετε τη συσκευή σε νερό ή σε
άλλα υγρά!
ΠΡΟΣΟΧΗ! ΥΛΙΚΕΣ ΖΗΜΙΕΣ!
►
Μη χρησιμοποιείτε τριβικά ή επιθετικά απορρυπαντικά. Αυτά μπορεί να φθείρουν τις
επιφάνειες.
Page 62

■ 58 │ GR
│
CY
SKMP 1300 B3
ΥΠΟΔΕΙΞΕΙΣ
►
Κατά προτίμηση καθαρίζετε τη συσκευή
αμέσως μετά τη χρήση. Έτσι, υπολείμματα
τροφίμων απομακρύνονται ευκολότερα.
► Κατά την επεξεργασία τροφίμων πλούσιων σε
χρωστικές, όπως παραδείγματος χάριν καρότων, τα πλαστικά μέρη μπορεί να αλλάξουν
χρώμα. Αυτοί οι αποχρωματισμοί μπορούν
να αφαιρεθούν με λίγο λάδι μαγειρικής.
Καθαρισμός συσκευής
■ Σκουπίζετε τη συσκευή με ένα νωπό πανί. Σε
επίμονες βρομιές προσθέτετε στο πανί ένα ήπιο
απορρυπαντικό. Σκουπίζετε τα υπολείμματα
του απορρυπαντικού με ένα πανί βρεγμένο με
καθαρό νερό. Στη συνέχεια στεγνώνετε καλά τη
συσκευή.
Καθαρισμός των αξεσουάρ
■ Καθαρίζετε το μπολ ανάμειξης 6, το καπάκι
9, το βοήθημα πλήρωσης 8, το καπάκι του
μίξερ r με το δοχείο μέτρησης e, το καπάκι
προστασίας μετάδοσης κίνησης u και τα εξαρτήματα 0 q w σε ζεστό νερό με λίγο απορρυπαντικό. Απομακρύνετε τυχόν υπολείμματα
με μια βούρτσα καθαρισμού. Ξεπλένετε όλα τα
μέρη με καθαρό, ζεστό νερό και βεβαιωθείτε
ότι έχουν στεγνώσει, προτού χρησιμοποιηθούν
ξανά.
ΥΠΟΔΕΙΞΗ
►
Τα εξαρτήματα 0 q w, το μπολ ανάμειξης
6 και το καπάκι του μίξερ r με το δοχείο
μέτρησης e μπορούν να πλυθούν και στο
πλυντήριο πιάτων.
► Κατά τον καθαρισμό στο πλυντήριο πιάτων
προσέχετε ώστε τα πλαστικά μέρη να μην
μαγκώσουν. Ειδάλλως μπορεί να παραμορφωθούν!
► Αν είναι δυνατό, τοποθετήστε τα πλαστικά
μέρη στο επάνω καλάθι του πλυντηρίου
πιάτων.
Καθαρισμός μίξερ
ΠΡΟΕΙΔΟΠΟΙΗΣΗ! ΚΙΝΔΥΝΟΣ
ΤΡΑΥΜΑΤΙΣΜΟΥ!
► Μην αγγίζετε τη λεπίδα z με γυμνά χέρια.
■ Καθαρίζετε το μίξερ t σε ζεστό νερό, προσθέ-
τοντας ένα ήπιο απορρυπαντικό. Στη συνέχεια
ξεπλύνετέ το με καθαρό νερό, έτσι ώστε να μην
μένουν υπολείμματα απορρυπαντικού.
Στις περισσότερες περιπτώσεις ένας επαρκής
υγιεινός καθαρισμός μπορεί να επιτευχθεί αμέσως
μετά τη χρήση με την εξής εναλλακτική:
1) Για τον καθαρισμό, βάλτε νερό με λίγο απορρυπαντικό στο τοποθετημένο μίξερ t.
2) Τοποθετήστε το καπάκι του μίξερ r με το
δοχείο μέτρησης e κατά τέτοιο τρόπο, ώστε
το χείλος στο καπάκι του μίξερ r να κλείνει
και τη σήτα έκχυσης.
3) Ενεργοποιήστε το μίξερ t για μερικά δευτερόλεπτα.
4) Αδειάστε το νερό πλύσης. Απομακρύνετε τυχόν υπολείμματα με μια βούρτσα καθαρισμού.
5) Στη συνέχεια ξεπλύνετε το μίξερ t με άφθονο
καθαρό νερό, έτσι ώστε να απομακρυνθούν
όλα τα υπολείμματα απορρυπαντικού.
ΥΠΟΔΕΙΞΗ
►
Το μίξερ t μπορεί να καθαριστεί στο πλυντήριο πιάτων.
► Κατά τον καθαρισμό στο πλυντήριο πιάτων
προσέχετε ώστε τα πλαστικά μέρη του μίξερ t
να μην μαγκώσουν. Ειδάλλως μπορεί να
παραμορφωθεί!
Αποθήκευση
■ Για τη φύλαξη, τυλίξτε το καλώδιο δικτύου γύρω
από τη διάταξη τύλιξης καλωδίου i.
■ Φυλάξτε την καθαρή συσκευή σε έναν καθαρό
και στεγνό χώρο χωρίς σκόνη.
Page 63

GR│CY
│
59 ■
SKMP 1300 B3
Διόρθωση σφαλμάτων
Όταν η συσκευή σταματά ξαφνικά:
■ Η συσκευή έχει υπερθερμανθεί και η αυτόματη
απενεργοποίηση ασφαλείας έχει ενεργοποιηθεί.
– Θέστε τον περιστρεφόμενο διακόπτη 3 στη
θέση 0.
– Τραβήξτε το βύσμα από την πρίζα.
– Αφήστε τη συσκευή να κρυώσει για 15 λεπτά.
– Εάν η συσκευή δεν έχει κρυώσει εντελώς μετά
από 15 λεπτά, δεν θα ενεργοποιηθεί.
– Περιμένετε άλλα 15 λεπτά και ενεργοποιήστε
εκ νέου.
Όταν η συσκευή δεν μπορεί να ενεργοποιηθεί:
– Ελέγξτε εάν το βύσμα βρίσκεται στην πρίζα.
– Ελέγξτε εάν ο περιστρεφόμενος βραχίονας 1
είναι στη σωστή θέση.
Τεχνικά χαρακτηριστικά
Τάση δικτύου: 220 - 240 V ~/ 50 Hz
Απορρόφηση ισχύος: 1300 W
Κατηγορία προστασίας: II
Μέγ. χωρητικότητα
Μπολ ανάμειξης 6: περ. 6,3 λ.
Μίξερ t: περ. 1,5 λ.
Όλα τα εξαρτήματα αυτής της συσκευής
που έρχονται σε επαφή με τρόφιμα μπορούν να χρησιμοποιούνται με ασφάλεια στα
τρόφιμα.
Προτείνουμε τους ακόλουθους χρόνους λειτουργίας:
Επιτρέπετε η συσκευή να κρυώνει μετά από 10
λεπτά λειτουργία με το άγκιστρο ζυμώματος 0, το
χτυπητήρι q ή τον αναδευτήρα w.
Σε εργασίες με το μίξερ t επιτρέπετε η συσκευή να
κρυώνει μετά από λειτουργία 3 λεπτών.
Εάν γίνει υπέρβαση αυτών των χρόνων λειτουργίας, ενδέχεται μέσω υπερθέρμανσης να προκληθούν ζημιές στη συσκευή.
Εγγύηση και σέρβις
Η παρούσα συσκευή διαθέτει 3 χρόνια εγγύηση από την ημερομηνία αγοράς. Η συσκευή
κατασκευάστηκε και ελέγχθηκε προσεκτικά πριν
από την αποστολή. Παρακαλούμε φυλάξτε την
απόδειξη ταμείου ως απόδειξη για την αγορά.
Σε περίπτωση απαίτησης εγγύησης επικοινωνήστε τηλεφωνικώς με το τμήμα σέρβις. Μόνο έτσι
μπορεί να εξασφαλιστεί δωρεάν αποστολή του
εμπορεύματός σας.
Η απόδοση εγγύησης ισχύει μόνο για σφάλματα
υλικού ή κατασκευής, όχι όμως για ζημιές από τη
μεταφορά, για εξαρτήματα φθοράς ή για βλάβες
σε εύθραυστα εξαρτήματα, π.χ. διακόπτες ή συσσωρευτές. Το προϊόν προορίζεται μόνο για ιδιωτική
και όχι για επαγγελματική χρήση.
Σε περίπτωση κακής μεταχείρισης και ακατάλληλης
χρήσης, χρήσης βίας και παρεμβάσεων, οι οποίες
δεν διεξήχθησαν από το εξουσιοδοτημένο μας
τμήμα σέρβις, η εγγύηση παύει να ισχύει.
Τα νομικά σας δικαιώματα δεν περιορίζονται μέσω
αυτής της εγγύησης.
Ο χρόνος εγγύησης δεν επιμηκύνεται μέσω της εγγύησης. Αυτό ισχύει και για εξαρτήματα, τα οποία
έχουν αντικατασταθεί και επισκευαστεί. Ενδεχόμενες
ήδη υπάρχουσες ζημιές και ελλείψεις κατά την
αγορά πρέπει να γνωστοποιηθούν αμέσως μετά το
άνοιγμα της συσκευασίας, το αργότερο ωστόσο
δύο ημέρες μετά την ημερομηνία αγοράς. Μετά τη
λήξη του χρόνου εγγύησης, τυχόν εμφανιζόμενες
επισκευές χρεώνονται.
Σέρβις Ελλάδα
Tel.: 801 5000 019 (0,03 EUR/Min.)
E-Mail: kompernass@lidl.gr
IAN 276995/276996/277709
CY
Σέρβις Κύπρος
Tel.: 8009 4409
E-Mail: kompernass@lidl.com.cy
IAN 276995/276996/277709
Page 64

■ 60 │ GR
│
CY
SKMP 1300 B3
Απόρριψη
Σε καμία περίπτωση μην
απορρίπτετε τη συσκευή στα
οικιακά απορρίμματα.
Αυτό το προϊόν υπόκειται
στην Ευρωπαϊκή Οδηγία
2012/19/ΕU.
Απορρίπτετε τη συσκευή μέσω μιας εγκεκριμένης
επιχείρησης απόρριψης ή μέσω της κοινοτικής
επιχείρησης απόρριψης. Τηρείτε τις ισχύουσες
προδιαγραφές. Σε περίπτωση αμφιβολιών επικοινωνείτε με την αρμόδια επιχείρηση απόρριψης.
Η συσκευασία αποτελείται από φιλικά
προς το περιβάλλον υλικά, τα οποία
μπορείτε να απορρίψετε μέσω των τοπικών σημείων ανακύκλωσης.
Εισαγωγέας
KOMPERNASS HANDELS GMBH
BURGSTRASSE 21
44867 BOCHUM
GERMANY
www.kompernass.com
Συνταγές
Καροτόσουπα
Υλικά:
■ 500 γρ. καρότα
■ 250 ml νερό
■ 500 ml ζωμός κρέατος (γυάλινη συσκευασία)
■ 125 ml κρέμα γάλακτος
■ 125 ml λευκό κρασί
■ Αλάτι
■ Πιπέρι
■ 50 γρ. κρύο βούτυρο
■ Φρέσκο μυρώνι
Ετοιμασία:
1) Πλένετε και καθαρίζετε τα καρότα.
2) Τα κόβετε τόσο μικρά, ώστε να χωράνε καλά
στο μίξερ t.
3) Βάζετε 250 ml νερό σε μια κατσαρόλα και
βράζετε τα καρότα για 20 λεπτά. Στη συνέχεια,
πολτοποιείτε τα υλικά στο μίξερ t, έως ότου
να μην υπάρχουν πλέον χοντρά κομμάτια.
4) Στη συνέχεια βάζετε τα πολτοποιημένα καρότα
πάλι στην κατσαρόλα.
5) Τώρα προσθέτετε το ζωμό κρέατος, την κρέμα
γάλακτος και το λευκό κρασί.
6) Ζεσταίνετε τη σούπα και καρυκεύετε.
7) Ανακατεύετε το βούτυρο σε μικρά κομμάτια
μέσα στη σούπα και στη συνέχεια σερβίρετε
με το μυρώνι.
Page 65

GR│CY
│
61 ■
SKMP 1300 B3
Επάλειμμα τόνου
Υλικά:
■ 1 κονσέρβα τόνος σε σάλτσα με λαχανικά
■ 3 ΚΣ γιαούρτι
■ 1 ΚΓ χυμός λεμονιού φρεσκοστυμμένος
■ 1 πρέζα αλάτι
■ Φρεσκοτριμμένο πιπέρι
■ 2 καλοβρασμένα αυγά, κομμένα σε κύβους
Για το σερβίρισμα:
■ Ψωμί ολικής άλεσης σε φέτες
■ Βούτυρο για επάλειψη
■ 1 καλοβρασμένο αυγό, κομμένο σε κύβους
■ Πρασουλίδα, κομμένη
Ετοιaμασία:
1) Αναμιγνύετε όλα τα υλικά στο μίξερ t, έως
ότου επιτευχθεί η επιθυμητή συνοχή (περ.
15 δευτερόλεπτα) και στη συνέχεια καρυκεύετε.
2) Αλείφετε το ψωμί με βούτυρο και κρέμα τόνου
και πασπαλίζετε με το κομμένο αυγό και την
πρασουλίδα.
Παραδοσιακή ομελέτα
Υλικά:
■ 2-3 αυγά
■ 375 ml γάλα
■ 1 πρέζα αλάτι
■ 250 γρ. αλεύρι
■ Λίπος για το τηγάνισμα
Ετοιμασία:
1) Ανακατεύετε τα αυγά, το γάλα και το αλάτι με
το χτυπητήρι w.
2) Κοσκινίζετε το αλεύρι και το προσθέτετε.
Ανακατεύετε τα πάντα με το χτυπητήρι w,
έως ότου δημιουργηθεί μια λεία ζύμη.
3) Αφήνετε τη ζύμη να φουσκώσει για περ.
20 λεπτά.
4) Ζεσταίνετε το λίπος και βάζετε μέσα τη ζύμη με
μια μικρή κουτάλα. (Πάντα τόσο, ώστε η στρώση στον πάτο του τηγανιού να είναι λεπτή.)
5) Τηγανίζετε την τηγανίτα και από τις δύο πλευρές μέχρι να ροδίσει και τη σερβίρετε ζεστή.
Ζύμη μπισκότων
Υλικά:
■ 3 αυγά
■ 3 - 4 ΚΣ νερό, ζεστό
■ 150 γρ. ζάχαρη
■ 1 πακετάκι βανίλια
■ 100 γρ. αλεύρι τύπου 405
■ 100 γρ. κόρν-φλάουρ
■ 2-3 κοφτές ΚΓ μπέικιν πάουντερ
Ετοιμασία:
1) Τοποθετείτε χαρτί ψησίματος σε μία στρογγυλή
φόρμα (διάμετρος: 28 εκ.). Μη λαδώνετε τα
άκρα, διότι αλλιώς η επιφάνεια δεν θα γίνει
ομοιόμορφα λεία και ροδισμένη.
2) Χτυπάτε τα αυγά στο μπολ ανάμειξης 6 και
προσθέτετε καυτό νερό.
3) Τα χτυπάτε για περ. 1 λεπτό στην ανώτερη
βαθμίδα με το χτυπητήρι w, έως ότου γίνουν
αφρός.
4) Ανακατεύετε τη ζάχαρη και τη ζάχαρη βανίλιας
και τα χτυπάτε όλα για 2 λεπτά στην ανώτερη
βαθμίδα.
5) Ανακατεύετε το αλεύρι, το κόρν-φλάουρ και το
μπέικιν πάουντερ και κοσκινίζετε το μισό στην
κρέμα με τα αυγά, ανακατεύοντας τα όλα για
λίγο στη βαθμίδα 4.
6) Στη συνέχεια, ανακατεύετε το υπόλοιπο αλεύρι
με τον ίδιο τρόπο και γεμίζετε με τη ζύμη την
προετοιμασμένη στρογγυλή φόρμα.
7) Ψήνετε αμέσως σε προθερμασμένο φούρνο,
στην επάνω και κάτω αντίσταση, στους 175200°C για περ. 20 - 30 λεπτά.
Page 66

■ 62 │ GR
│
CY
SKMP 1300 B3
Ζύμη τάρτας
Υλικά:
■ 250 γρ. σιτάλευρο
■ 1/2 κοφτή ΚΓ μπέικιν πάουντερ
■ 100-125 γρ. ζάχαρη
■ 1 πακετάκι βανίλια
■ 1 πρέζα αλάτι
■ 1 αυγό
■ 125 γρ. βούτυρο
Ετοιμασία:
1) Ανακατεύετε το αλεύρι και το μπέικιν πάουντερ
στο μπολ ανάμειξης 6 και στη συνέχεια
προσθέτετε όλα τα υπόλοιπα υλικά.
2) Τα ζυμώνετε όλα με το άγκιστρο ζυμώματος 0
πρώτα για περ. 1 λεπτό στη βαθμίδα 2 και στη
συνέχεια για περ. 3 λεπτά στη βαθμίδα 2-4.
3) Μη ζυμώνετε τη ζύμη για πολύ, γιατί αλλιώς
μπορεί να μαλακώσει πολύ.
4) Αφήνετε τη ζύμη στο ψυγείο για 1/2 ώρα να
καθίσει και στη συνέχεια τη δουλεύετε, μέχρι
να γίνει βάση για τούρτα ή μικρά γλυκάκια.
5) Για βάση τούρτας, ξετυλίγετε τα 2/3 της ζύμης
και τα βάζετε σε μια λαδωμένη στρογγυλή
φόρμα.
6) Την υπόλοιπη ζύμη την κάνετε ρολό.
7) Τοποθετείτε αυτό το ρολό στα άκρα της ζύμης
και το πιέζετε με τα δύο δάχτυλα έτσι ώστε να
δημιουργηθεί ένα περίγραμμα περ 3 εκ.
8) Τρυπάτε πολλές φορές τον πάτο της τούρτας
με ένα πιρούνι.
9) Προθερμαίνετε το φούρνο για περ. 5 λεπτά και
ψήνετε τη ζύμη τάρτας για περ. 15 - 20 λεπτά
στην επάνω και κάτω αντίσταση, στους 200 225 °C.
Βασική ζύμη
Υλικά:
■ 250 γρ. μαλακό βούτυρο ή μαργαρίνη
■ 250 γρ. ζάχαρη
■ 1 πακετάκι βανίλια
■ 1 πρέζα αλάτι
■ 4 αυγά
■ 500 γρ. σιτάλευρο
■ 1 πακετάκι μπέικιν πάουντερ
■ Περ. 125 ml γάλα
Ετοιμασία:
1) Βάζετε όλα τα υλικά στο μπολ ανάμειξης 6
και τα ανακατεύετε με το χτυπητήρι w για
1/2 λεπτό στη βαθμίδα 1, στη συνέχεια για
30 δευτερόλεπτα στη βαθμίδα 2 και μετά για
περ. 5 λεπτά στη βαθμίδα 4.
2) Λαδώνετε τη φόρμα ή τοποθετείτε χαρτί
ψησίματος.
3) Γεμίζετε τη φόρμα και ψήνετε τη ζύμη για περ.
50 - 60 λεπτά στην επάνω και κάτω αντίσταση,
στους 175 - 200 °C.
4) Προτού βγάλετε το γλυκό από το φούρνο,
πρέπει να δείτε εάν έχει ψηθεί: Για το σκοπό
αυτό, τρυπήστε με ένα μυτερό ξυλάκι στο
κέντρο του γλυκού. Εάν δεν μείνει ζύμη στο
ξυλάκι, το γλυκό έχει ψηθεί.
5) Ρίχνετε, στη συνέχεια, το γλυκό σε μια σχάρα
και το αφήνετε να κρυώσει.
Page 67

GR│CY
│
63 ■
SKMP 1300 B3
Ζύμη με μαγιά
Υλικά:
■ 500 γρ. σιτάλευρο
■ 25 γρ. φρέσκια μαγιά ή 1 πακετάκι ξηρά μαγιά
■ Περ. 1/4 λ. χλιαρό γάλα
■ 80 γρ. βούτυρο ή μαργαρίνη (θερμοκρασία
δωματίου)
■ 80 γρ. ζάχαρη
■ 1 αυγό
Ετοιμασία:
1) Βάζετε το αλεύρι, την ξηρά μαγιά ή τη θρυμματισμένη μαγιά και όλα τα άλλα υλικά (όχι
απευθείας στη μαγιά) στο μπολ ανάμειξης 6.
2) Τα ανακατεύετε όλα αργά με το άγκιστρο ζυμώματος 0 στη βαθμίδα 1, στη συνέχεια για
3-4 λεπτά στη βαθμίδα 3.
3) Καλύπτετε το μπολ με μια πετσέτα κουζίνας,
το τοποθετείτε σε ένα ζεστό σημείο και αφήνετε
τη ζύμη να φουσκώσει, έως ότου μεγαλώσει
ορατά.
4) Στη συνέχεια, ζυμώνετε ξανά τη ζύμη.
5) Μετά, η ζύμη είναι έτοιμη και μπορείτε να
συνεχίσετε την επεξεργασία.
Βάφλες
Υλικά:
■ 200 γρ. ζάχαρη
■ 500 γρ. αλεύρι
■ 5 γρ. μπέικιν πάουντερ
■ 5 αυγά
■ 400 ml γάλα
■ 250 γρ. βούτυρο (θερμοκρασία δωματίου)
■ 2 πακετάκια ζάχαρη βανίλιας
Ετοιμασία:
1) Ρίχνετε τα αυγά, τη ζάχαρη και το βούτυρο στο
μπολ ανάμειξης 6 και τα ανακατεύετε με το
χτυπητήρι q, μέχρι να γίνουν μία λεία ζύμη.
2) Προσθέτετε το αλεύρι, τη ζάχαρη βανίλια και
το μπέικιν πάουντερ.
3) Ανακατεύετε σιγά σιγά το γάλα, έως ότου η
ζύμη αποκτήσει λεία και απαλή υφή.
4) Ψήνετε τις βάφλες σε μία βαφλιέρα.
Σέικ μπανάνας-βανίλιας
Υλικά:
■ 3 μπανάνες
■ 500 ml γάλα
■ 2 πακετάκια ζάχαρη βανίλιας
■ 1 ΚΣ παγωτό βανίλια
Ετοιμασία:
1) Ξεφλουδίζετε τις μπανάνες.
2) Ρίχνετε τις ξεφλουδισμένες μπανάνες, το γάλα,
το παγωτό βανίλια και τη ζάχαρη βανίλιας στο
μίξερ t.
3) Τα ανακατεύετε στη βαθμίδα 8.
Page 68

■ 64 │ GR
│
CY
SKMP 1300 B3
Smoothie με μπανάνα και ακτινίδιο
Υλικά:
■ 200 ml χυμός πορτοκαλιού (φρεσκοστυμμένος)
■ 1 ακτινίδιο
■ 1/2 μπανάνα
Ετοιμασία:
1) Καθαρίζετε το ακτινίδιο.
2) Ξεφλουδίζετε τη μπανάνα.
3) Ρίχνετε το ακτινίδιο, τη μπανάνα και το χυμό
πορτοκάλι στο μίξερ t.
4) Τα ανακατεύετε στη βαθμίδα 8.
Page 69

DE│AT│CH
│
65 ■
SKMP 1300 B3
Inhaltsverzeichnis
Einleitung . . . . . . . . . . . . . . . . . . . . . . . . . . . . . . . . . . . . . . . . . . . . . . . . . . . . . . . . . . . .66
Bestimmungsgemäßer Gebrauch . . . . . . . . . . . . . . . . . . . . . . . . . . . . . . . . . . . . . . . . .66
Lieferumfang . . . . . . . . . . . . . . . . . . . . . . . . . . . . . . . . . . . . . . . . . . . . . . . . . . . . . . . . .66
Gerätebeschreibung . . . . . . . . . . . . . . . . . . . . . . . . . . . . . . . . . . . . . . . . . . . . . . . . . . .66
Sicherheitshinweise . . . . . . . . . . . . . . . . . . . . . . . . . . . . . . . . . . . . . . . . . . . . . . . . . . . .67
Vorbereitungen . . . . . . . . . . . . . . . . . . . . . . . . . . . . . . . . . . . . . . . . . . . . . . . . . . . . . . .70
Geschwindigkeitsstufen . . . . . . . . . . . . . . . . . . . . . . . . . . . . . . . . . . . . . . . . . . . . . . . .70
Arbeiten mit Knethaken, Schnee- und Rührbesen . . . . . . . . . . . . . . . . . . . . . . . . . . .71
Nach der Arbeit . . . . . . . . . . . . . . . . . . . . . . . . . . . . . . . . . . . . . . . . . . . . . . . . . . . . . . . . . . . . . . . . . . 72
Arbeiten mit dem Mixer . . . . . . . . . . . . . . . . . . . . . . . . . . . . . . . . . . . . . . . . . . . . . . . .72
Zutaten nachfüllen . . . . . . . . . . . . . . . . . . . . . . . . . . . . . . . . . . . . . . . . . . . . . . . . . . . . . . . . . . . . . . . . . 73
Nach der Arbeit . . . . . . . . . . . . . . . . . . . . . . . . . . . . . . . . . . . . . . . . . . . . . . . . . . . . . . . . . . . . . . . . . . 73
Reinigen und Pfl egen . . . . . . . . . . . . . . . . . . . . . . . . . . . . . . . . . . . . . . . . . . . . . . . . . . .73
Gerät reinigen . . . . . . . . . . . . . . . . . . . . . . . . . . . . . . . . . . . . . . . . . . . . . . . . . . . . . . . . . . . . . . . . . . . .74
Zubehör reinigen . . . . . . . . . . . . . . . . . . . . . . . . . . . . . . . . . . . . . . . . . . . . . . . . . . . . . . . . . . . . . . . . . . 74
Mixer reinigen . . . . . . . . . . . . . . . . . . . . . . . . . . . . . . . . . . . . . . . . . . . . . . . . . . . . . . . . . . . . . . . . . . . . 74
Aufbewahrung . . . . . . . . . . . . . . . . . . . . . . . . . . . . . . . . . . . . . . . . . . . . . . . . . . . . . . . .74
Fehler beheben . . . . . . . . . . . . . . . . . . . . . . . . . . . . . . . . . . . . . . . . . . . . . . . . . . . . . . . .75
Technische Daten . . . . . . . . . . . . . . . . . . . . . . . . . . . . . . . . . . . . . . . . . . . . . . . . . . . . . .75
Garantie und Service . . . . . . . . . . . . . . . . . . . . . . . . . . . . . . . . . . . . . . . . . . . . . . . . . . .75
Entsorgung . . . . . . . . . . . . . . . . . . . . . . . . . . . . . . . . . . . . . . . . . . . . . . . . . . . . . . . . . . .76
Importeur . . . . . . . . . . . . . . . . . . . . . . . . . . . . . . . . . . . . . . . . . . . . . . . . . . . . . . . . . . . .76
Rezepte . . . . . . . . . . . . . . . . . . . . . . . . . . . . . . . . . . . . . . . . . . . . . . . . . . . . . . . . . . . . . .76
Möhrensuppe . . . . . . . . . . . . . . . . . . . . . . . . . . . . . . . . . . . . . . . . . . . . . . . . . . . . . . . . . . . . . . . . . . . . 76
Thunfi sch-Aufstrich . . . . . . . . . . . . . . . . . . . . . . . . . . . . . . . . . . . . . . . . . . . . . . . . . . . . . . . . . . . . . . . . . 77
Traditionelle Pfannkuchen . . . . . . . . . . . . . . . . . . . . . . . . . . . . . . . . . . . . . . . . . . . . . . . . . . . . . . . . . . . 77
Biskuitteig . . . . . . . . . . . . . . . . . . . . . . . . . . . . . . . . . . . . . . . . . . . . . . . . . . . . . . . . . . . . . . . . . . . . . . . . 77
Mürbeteig . . . . . . . . . . . . . . . . . . . . . . . . . . . . . . . . . . . . . . . . . . . . . . . . . . . . . . . . . . . . . . . . . . . . . . . 78
Rührteig . . . . . . . . . . . . . . . . . . . . . . . . . . . . . . . . . . . . . . . . . . . . . . . . . . . . . . . . . . . . . . . . . . . . . . . . . 78
Hefeteig . . . . . . . . . . . . . . . . . . . . . . . . . . . . . . . . . . . . . . . . . . . . . . . . . . . . . . . . . . . . . . . . . . . . . . . . . 79
Waff eln . . . . . . . . . . . . . . . . . . . . . . . . . . . . . . . . . . . . . . . . . . . . . . . . . . . . . . . . . . . . . . . . . . . . . . . . . 79
Bananen-Vanille-Shake . . . . . . . . . . . . . . . . . . . . . . . . . . . . . . . . . . . . . . . . . . . . . . . . . . . . . . . . . . . . . 79
Bananen-Kiwi-Smoothie . . . . . . . . . . . . . . . . . . . . . . . . . . . . . . . . . . . . . . . . . . . . . . . . . . . . . . . . . . . . . 80
Page 70

■ 66 │ DE
│AT│
CH
SKMP 1300 B3
Einleitung
Herzlichen Glückwunsch zum Kauf Ihres neuen
Gerätes.
Sie haben sich damit für ein hochwertiges Produkt
entschieden. Die Bedienungsanleitung ist Bestandteil dieses Produkts. Sie enthält wichtige Hinweise
für Sicherheit, Gebrauch und Entsorgung. Machen
Sie sich vor der Benutzung des Produkts mit allen
Bedien- und Sicherheitshinweisen vertraut. Benutzen Sie das Produkt nur wie beschrieben und für
die angegebenen Einsatzbereiche. Händigen Sie
alle Unterlagen bei Weitergabe des Produkts an
Dritte mit aus.
Bestimmungsgemäßer
Gebrauch
Dieses Gerät dient ausschließlich dem Verarbeiten
von Lebensmitteln in haushaltsüblichen Mengen.
Dieses Gerät ist ausschließlich für die Benutzung in
privaten Haushalten bestimmt. Benutzen Sie es nicht
gewerblich!
Dieses Gerät ist nur für den privaten Gebrauch in
geschlossenen, regengeschützten Räumen vorgesehen. Benutzen Sie es nicht im Freien!
Das Gerät darf nur mit Originalzubehör benutzt
werden.
Lieferumfang
Profi -Küchenmaschine
Rührschüssel mit Deckel
Mixer mit Deckel und Messbecher
Knethaken
Schneebesen
Rührbesen
Bedienungsanleitung
Kurzanleitung
HINWEIS
►
Kontrollieren Sie den Lieferumfang direkt
nach dem Auspacken auf Vollständigkeit und
Beschädigungen. Wenden Sie sich, wenn
nötig, an den Service.
Gerätebeschreibung
Klappen Sie die Ausklappseiten im vorderen und
hinteren Umschlag dieser Bedienungsanleitung aus:
vordere Ausklappseite
Abbildung A:
1 Schwenkarm
2 Entriegelungshebel
3 Drehschalter
4 Taste PULSE
5 Sockel
6 Rührschüssel
7 Antriebsachse
Abbildung B:
8 Einfüllhilfe
9 Deckel
0 Knethaken
q Schneebesen
w Rührbesen
hintere Ausklappseite:
Abbildung C:
e kleiner Messbecher
r Mixer-Deckel
t Mixer
z Messer
u Antriebsschutzdeckel
i Kabelaufwicklung
o Mixerantrieb
Page 71

DE│AT│CH
│
67 ■
SKMP 1300 B3
Sicherheitshinweise
GEFAHR - ELEKTRISCHER SCHLAG!
► Schließen Sie das Gerät nur an eine vorschriftsmäßig installierte und
geerdete Netzsteckdose an. Die Netzspannung muss mit den Angaben auf dem Typenschild des Gerätes übereinstimmen.
► Achten Sie darauf, dass im Betrieb das Netzkabel nicht nass oder
feucht wird. Führen Sie es so, dass es nicht eingeklemmt oder beschädigt werden kann.
► Halten Sie das Netzkabel von heißen Oberfl ächen fern.
► Führen Sie keine Reparaturarbeiten am Gerät durch. Jegliche Repara-
turen müssen durch den Kundendienst oder von qualifi ziertem Fachpersonal durchgeführt werden.
► Ziehen Sie den Netzstecker aus der Netzsteckdose, wenn das Gerät
gereinigt wird oder im Fehlerfall. Ausschalten alleine genügt nicht,
weil noch immer Netzspannung im Gerät anliegt, solange der Netzstecker in der Netzsteckdose steckt.
► Ziehen Sie den Netzstecker aus der Netzsteckdose, wenn das Gerät
nicht benutzt wird!
► Lassen Sie beschädigte Netzstecker oder Netzkabel sofort von au-
torisiertem Fachpersonal oder dem Kundenservice austauschen, um
Gefährdungen zu vermeiden.
► Das Gerät und seine Anschlussleitung sind von Kindern fernzuhalten.
Sie dürfen das Gerät keinesfalls in Wasser oder andere Flüssigkeiten tauchen.
Page 72

■ 68 │ DE
│AT│
CH
SKMP 1300 B3
WARNUNG! VERLETZUNGSGEFAHR!
► Trennen Sie das Gerät grundsätzlich vom Stromnetz, wenn Sie Zube-
hörteile abnehmen oder anbringen. Ein unbeabsichtigtes Einschalten
des Gerätes wird so vermieden.
Nach Stromunterbrechung läuft das Gerät wieder an!
► Das Gerät ist bei nicht vorhandener Aufsicht und vor dem Zusam-
menbau, dem Auseinandernehmen oder Reinigen stets vom Netz zu
trennen.
► Dieses Gerät darf nicht von Kindern benutzt werden.
► Verwenden Sie nur die Original-Zubehörteile zu diesem Gerät. Zube-
hörteile anderer Hersteller sind dafür möglicherweise nicht geeignet
und führen zu Gefährdungen!
► Dieses Gerät kann von Personen mit reduzierten physischen, senso-
rischen oder mentalen Fähigkeiten oder Mangel an Erfahrung und/
oder Wissen benutzt werden, wenn sie beaufsichtigt oder bezüglich
des sicheren Gebrauchs des Gerätes unterwiesen wurden und die
daraus resultierenden Gefahren verstanden haben.
► Kinder dürfen nicht mit dem Gerät spielen.
► Vorsicht: Das Messer ist sehr scharf!
► Seien Sie vorsichtig bei der Reinigung des Messers!
Page 73

DE│AT│CH
│
69 ■
SKMP 1300 B3
WARNUNG! VERLETZUNGSGEFAHR!
► Vorsicht: Das Messer ist sehr scharf! Gehen Sie daher vorsichtig beim
Abnehmen des Mixbehälters vor.
► Missbrauchen Sie das Gerät nicht für andere Zwecke, als in dieser
Bedienungsanleitung beschrieben. Ansonsten besteht Verletzungsgefahr!
► Wechseln Sie das Zubehör nur bei Stillstand des Antriebs und bei ge-
zogenem Netzstecker! Das Gerät läuft nach dem Ausschalten noch
kurze Zeit nach!
► Lassen Sie das Gerät niemals unbeaufsichtigt.
► Vor dem Auswechseln von Zubehör oder Zusatzteilen, die im Betrieb
bewegt werden, muss das Gerät ausgeschaltet und vom Netz getrennt werden.
► Geben Sie während das Gerät läuft, ausschließlich die zu verarbei-
tenden Zutaten in die Rührschüssel oder in den Mixer.
► Stecken Sie niemals Hände oder Fremdgegenstände in die Einfüllhilfe
oder in den Mixer, um Verletzungen und Beschädigungen des Gerätes
zu vermeiden.
ACHTUNG! SACHSCHÄDEN!
► Betreiben Sie das Gerät nie ohne Zutaten! Überhitzungsgefahr!
► Füllen Sie niemals heiße Zutaten in das Gerät!
Page 74

■ 70 │ DE
│AT│
CH
SKMP 1300 B3
Vorbereitungen
1) Entnehmen Sie alle Teile aus dem Karton und
entfernen Sie das Verpackungsmaterial und
eventuelle Schutzfolien und Aufkleber.
2) Reinigen Sie alle Teile, wie im Kapitel „Reinigen und Pfl egen“ beschrieben. Stellen Sie
sicher, dass alle Teile vollständig getrocknet sind.
3) Wickeln Sie das Netzkabel von der Kabelaufwicklung i.
4) Stellen Sie das Gerät auf einen glatten und
sauberen Untergrund und befestigen Sie es mit
den vier Saugnäpfen.
5) Stecken Sie den Netzstecker in die Steckdose.
Geschwindigkeitsstufen
Stufe Einsatz geeignet für...
1 - 2
alle
- Startstellung bei
allen Mix- und
Rührvorgängen
- Bei der Zugabe von
Zutaten
Knethaken 0
Rührbesen w
- Kneten und Mischen
von festem Teig oder
festeren Zutaten
2 - 4
Rührbesen w
- Mischen von dickem
Rührteig
- Mischen von Butter
und Mehl
- Mischen von Hefeteig
Knethaken 0
- Kneten von Hefeteig
- Kneten von dickem
Rührteig
4 - 6
Rührbesen w
- Kuchenteig
- Aufschlagen von
Butter mit Zucker
- Plätzchenteig
6 - 10
Schneebesen q
- Schlagsahne
- Eiweiß
- Majonnaise
- schaumig schlagen
von Butter
Pulse
Mixer t
- Mixen und zerkleinern
weicher oder fl üssiger
Zutaten
Page 75

DE│AT│CH
│
71 ■
SKMP 1300 B3
Arbeiten mit Knethaken,
Schnee- und Rührbesen
WARNUNG! VERLETZUNGSGEFAHR!
► Greifen Sie während des Betriebes niemals in
die Rührschüssel 6! Verletzungsgefahr durch
rotierende Teile!
► Wechseln Sie Zubehör nur bei Stillstand des
Antriebs! Nach dem Ausschalten läuft der
Antrieb kurze Zeit nach.
► Schalten Sie im Fehlerfall das Gerät aus und
ziehen Sie den Netzstecker, um ein unbeabsichtigtes Einschalten des Gerätes zu vermeiden.
ACHTUNG! SACHSCHADEN!
►
Bei Arbeiten mit Knethaken 0, Schnee- q
oder Rührbesen w empfehlen wir nach 10
Minuten Betrieb das Gerät abkühlen zu
lassen.
HINWEIS
►
Wenn Sie mit Knethaken 0, Schnee- q und
Rührbesen w arbeiten, muss der Antriebsschutzdeckel u aufgesteckt sein. Ansonsten
startet das Gerät nicht.
Um das Gerät für den Betrieb mit Knethaken 0,
Schnee- q und Rührbesen w vorzubereiten,
gehen Sie wie folgt vor:
1) Drücken Sie den Entriegelungshebel 2 nach
oben und bringen Sie den Schwenkarm 1 in
die höchste Position.
2) Setzen Sie die Rührschüssel 6 so ein, dass die
Arretierungen an der Rührschüssel 6 in die
Aussparung am Sockel 5 greifen. Drehen Sie
die Rührschüssel 6 im Uhrzeigersinn (siehe
Symbole
und am Sockel 5), so dass
diese verriegelt ist und fest sitzt.
3) Montieren Sie je nach Aufgabe Knethaken
0, Schnee- q oder Rührbesen w auf der
Antriebsachse 7:
– Stecken Sie den Knethaken 0, Schnee- q
oder Rührbesen w so auf die Antriebsachse 7,dass die beiden Metallstifte an der
Antriebsachse 7 in die Aussparungen am
Einsatz 0 q w greifen.
– Drücken Sie den Einsatz 0 q w kräftig
auf die Antriebsachse 7, so dass sich die
Feder zusammendrückt und drehen Sie
dabei den Einsatz ein wenig gegen den
Uhrzeigersinn (Richtung
).
– Lassen Sie den Einsatz los. Dieser sitzt nun
fest auf der Antriebsachse 7.
4) Füllen Sie die zu verarbeitenden Zutaten in die
Rührschüssel 6.
HINWEIS
►
Beachten Sie, dass während des Knet-, bzw.
Rührvorgangs der Teig in der Rührschüssel 6
an Volumen zunimmt oder durch die Bewegung
etwas nach oben gedrückt wird. Füllen Sie
daher niemals die Rührschüssel 6 bis zum
Rand voll!
5) Drücken Sie den Entriegelungshebel 2 nach
oben und schieben Sie den Schwenkarm 1
mit dem montieren Einsatz nach unten in die
Arbeitsposition.
6) Schieben Sie den Deckel 9 auf die Rührschüssel 6.
Page 76

■ 72 │ DE
│AT│
CH
SKMP 1300 B3
HINWEIS
►
Falls gewünscht, können Sie die Einfüllhilfe 8
am Deckel 9 montieren:
– Drehen Sie den Deckel 9 etwas, so dass
die Öff nung zu Ihnen weist.
– Haken Sie die Einfüllhilfe 8 in die Auf-
nahmen am Deckel 9:
Sie können nun, auch während des Betriebs,
Zutaten einfüllen.
7) Stellen Sie den Drehschalter 3 auf die
gewünschte Stufe (siehe Kapitel „Geschwindigkeitsstufen“).
Nach der Arbeit
1) Schalten Sie das Gerät am Drehschalter 3 aus.
2) Falls montiert: nehmen Sie die Einfüllhilfe 8 ab.
3) Ziehen Sie den Deckel 9 von der Rührschüssel 6 ab.
4) Drücken Sie den Entriegelungshebel 2 nach
oben und bringen Sie den Schwenkarm 1 in
die höchste Position.
5) Nehmen Sie den Einsatz 0 q w von der
Antriebsachse 7, indem Sie den Einsatz 0
q w gegen die Antriebsachse 7 drücken
und gleichzeitig im Uhrzeigersinn (Richtung
) drehen. Dann können Sie den Einsatz
abnehmen.
6) Entnehmen Sie die Rührschüssel 6, indem Sie
diese gegen den Uhrzeigersinn dehen und
dann nach oben abnehmen.
7) Reinigen Sie alle Teile (siehe Kapitel „Reinigen
und Pfl egen“).
Arbeiten mit dem Mixer
WARNUNG! VERLETZUNGSGEFAHR!
► Lassen Sie heiße Flüssigkeiten immer auf
eine handwarme Temperatur (ca. 30-40°C)
abkühlen, bevor Sie diese in den Mixer t
einfüllen.
WARNUNG! VERLETZUNGSGEFAHR
DURCH SCHARFE MESSER /
ROTIERENDEN ANTRIEB!
► Greifen Sie niemals in den aufgesetzten
Mixer t!
► Nehmen Sie den Mixer t nur bei Stillstand
der Messer z ab.
► Betreiben Sie den Mixer t nur mit aufgesetz-
tem Mixer-Deckel r mit Messbecher e.
► Schalten Sie im Fehlerfall das Gerät aus
und ziehen Sie den Netzstecker, um ein
unbeabsichtigtes Einschalten des Gerätes zu
vermeiden.
ACHTUNG! SACHSCHADEN!
►
Benutzen Sie niemals die Rührschüssel 6 und
den Mixer t gleichzeitig! Dies führt zu einer
Überlastung des Motors!
► Bei Arbeiten mit dem Mixer t empfehlen wir
nach 3 Minuten Betrieb das Gerät abkühlen
zu lassen.
Um das Gerät für den Betrieb mit dem Mixer t
vorzubereiten, gehen Sie wie folgt vor. Nehmen
Sie die Abbildung C auf der hinteren Ausklappseite
zur Hilfe.
1) Drücken Sie den Entriegelungshebel 2 nach
oben und schieben Sie den Schwenkarm 1
nach unten in die Arbeitsposition.
Page 77

DE│AT│CH
│
73 ■
SKMP 1300 B3
2) Ziehen Sie den Antriebsschutzdeckel u ab.
HINWEIS
►
Stellen Sie sicher, dass der Drehschalter 3
auf „0“ steht, bevor Sie den Mixer auf den Mixerantrieb stellen. Ansonsten startet das Gerät
unvermittelt sobald der Mixer eingerastet ist.
3) Setzen Sie den Mixer t so auf den Mixerantrieb o, so dass die Arretierungen an der Unterseite des Mixers t in die Aussparungen am
Mixerantrieb o greifen. Der Pfeil am Mixer t
muss dabei auf das Symbol
am Gerät
weisen. Drehen Sie den Mixer t bis zum Anschlag im Uhrzeigersinn. Der Pfeil am Mixer t
weist dann auf das Symbol
am Gerät.
4) Füllen Sie die Zutaten ein.
5) Setzen Sie den Mixer-Deckel r mit Mess-
becher e auf, so dass die Lippe am Mixer-
Deckel r auch den Ausgießer verschließt.
6) Stellen Sie den Drehschalter 3 auf die ge-
wünschte Stufe.
HINWEIS
►
Die ideale Geschwindigkeit hängt von der
Konsistenz des Mixgutes ab. Je fl üssiger der
Inhalt ist, um so schneller können Sie mixen.
► Für kurzen, kraftvollen Impulsbetrieb, stellen Sie
den Drehschalter 3 mindestens auf Stufe 1 und
drücken Sie gleichzeitig die Taste PULSE 4.
Die Taste PULSE 4 rastet nicht ein, um den
Motor nicht zu überlasten. Halten Sie die
Taste PULSE 4 deshalb nur kurz in dieser
Stellung.
Zutaten nachfüllen
1) Schalten Sie das Gerät am Drehschalter 3 aus.
2) Nehmen Sie den Mixer-Deckel r ab und füllen
Sie die Zutaten ein
oder
3) Drehen Sie den Messbecher e, der sich im
Mixer-Deckel r befi ndet, um 90° und nehmen
Sie ihn heraus. Füllen Sie die Zutaten nach und
nach durch die Nachfüllöff nung ein.
Nach der Arbeit
1) Schalten Sie das Gerät am Drehschalter 3 aus.
2) Drehen Sie den Mixer t gegen den Uhrzeigersinn, so dass der Pfeil am Mixer t auf das
Symbol
am Gerät weist und nehmen Sie
ihn ab.
HINWEIS
►
Reinigen Sie den Mixer t am besten sofort
nach dem Gebrauch (siehe Kapitel „Reinigen
und Pfl egen“). So lassen sich Lebensmittelreste
leichter entfernen.
Reinigen und Pfl egen
GEFAHR - ELEKTRISCHER SCHLAG!
►
Ziehen Sie vor jeder Reinigung den Netzstecker aus der Netzsteckdose! Es besteht die
Gefahr eines elektrischen Schlages!
Tauchen Sie das Gerät niemals in Wasser
oder andere Flüssigkeiten!
ACHTUNG! SACHSCHADEN!
►
Verwenden Sie keine scheuernden oder
aggressiven Reinigungsmittel. Diese können
die Oberfl ächen beschädigen!
Page 78

■ 74 │ DE
│AT│
CH
SKMP 1300 B3
HINWEISE
►
Reinigen Sie das Gerät am besten sofort
nach der Benutzung. Dann lassen sich
Lebensmittelreste leichter entfernen.
► Bei der Verarbeitung von farbstoff reichen
Lebensmitteln, wie zum Beispiel Karotten,
können sich die Kunststoff teile verfärben.
Diese Verfärbungen können Sie mit ein wenig
Speiseöl entfernen.
Gerät reinigen
■ Wischen Sie das Gerät mit einem feuchten
Tuch ab. Bei hartnäckigeren Verschmutzungen,
geben Sie ein mildes Spülmittel auf das Tuch.
Wischen Sie Spülmittelreste mit einem mit klarem
Wasser befeuchteten Tuch ab. Trocknen Sie das
Gerät danach gut ab.
Zubehör reinigen
■ Reinigen Sie die Rührschüssel 6, den Deckel 9,
die Einfüllhilfe 8, den Mixer-Deckel r mit
Messbecher e, den Antriebsschutzdeckel u
und die Einsätze 0 q w im warmen Wasser
mit etwas Spülmittel. Entfernen Sie eventuelle
Rückstände mit einer Spülbürste. Spülen Sie alle
Teile mit klarem, warmem Wasser ab und stellen
Sie sicher, dass alle Teile vor einer erneuten
Benutzung trocken sind.
HINWEIS
►
Die Einsätze 0 q w, die Rührschüssel 6
und der Mixer-Deckel r mit Messbecher e
sind auch für die Reinigung in der Spülmaschine geeignet.
► Achten Sie bei der Reinigung in der Spülma-
schine darauf, dass die Kunststoff teile nicht
eingeklemmt werden. Ansonsten können sich
diese verformen!
► Legen Sie die Kunststoff teile, wenn möglich, in
den oberen Korb der Spülmaschine.
Mixer reinigen
WARNUNG! VERLETZUNGSGEFAHR!
► Messer z nicht mit bloßen Händen berühren.
■ Reinigen Sie den Mixer t in warmem Wasser
und geben Sie ein mildes Spülmittel hinzu.
Spülen Sie ihn danach mit klarem Wasser ab, so
dass keine Spülmittelreste mehr daran haften.
In den meisten Fällen kann eine ausreichend hygienische Reinigung direkt nach der Benutzung durch
folgende Alternative erreicht werden:
1) Geben Sie Wasser mit etwas Spülmittel in den
aufgesetzten Mixer t.
2) Setzen Sie den Mixer-Deckel r mit Mess-
becher e auf, so dass die Lippe am Mixer-
Deckel r auch den Ausgießer verschließt.
3) Schalten Sie den Mixer t für einige Sekunden
ein.
4) Schütten Sie das Spülwasser aus. Entfernen Sie
eventuelle Rückstände mit einer Spülbürste.
5) Spülen Sie danach den Mixer t mit viel klarem
Wasser ab, so dass alle Spülmittelreste beseitigt
sind.
HINWEIS
►
Der Mixer t ist zur Reinigung in der Spülmaschine geeignet.
► Achten Sie bei der Reinigung in der Spül-
maschine darauf, dass der Kunststoff teil des
Mixers t nicht eingeklemmt wird. Ansonsten
kann sich dieser verformen!
Aufbewahrung
■ Wickeln Sie zur Aufbewahrung das Netzkabel
um die Kabelaufwicklung i.
■ Bewahren Sie das gereinigte Gerät an einem
sauberen, staubfreien und trockenen Ort auf.
Page 79

DE│AT│CH
│
75 ■
SKMP 1300 B3
Fehler beheben
Wenn das Gerät plötzlich stehen bleibt:
■ Das Gerät ist überhitzt und die automatische
Sicherheitsabschaltung ist aktiviert.
– Drehschalter 3 auf 0 stellen.
– Netzstecker aus der Steckdose ziehen.
– Das Gerät 15 Minuten abkühlen lassen.
– Ist das Gerät nach den 15 Minuten noch
nicht vollständig abgekühlt, wird es nicht
angehen.
– Weitere 15 Minuten warten und erneut
einschalten.
Wenn das Gerät sich nicht einschalten lässt:
– Überprüfen Sie, ob sich der Netzstecker in
der Steckdose befi ndet.
– Überprüfen Sie, ob sich der Schwenkarm 1
in der korrekten Position befi ndet.
Technische Daten
Netzspannung: 220 - 240 V ~/ 50 Hz
Leistungsaufnahme: 1300 W
Schutzklasse: II
max. Fassungsvermögen
Rührschüssel 6: ca. 6,3 l
Mixer t: ca. 1,5 l
Alle Teile dieses Gerätes, die mit
Lebensmitteln in Berührung kommen,
sind lebensmittelecht.
Wir empfehlen folgende Betriebszeiten:
Lassen Sie das Gerät bei Arbeiten mit Knethaken
0, Schnee- q oder Rührbesen w nach 10 Minuten Betrieb abkühlen.
Lassen Sie das Gerät bei Arbeiten mit dem Mixer
t nach 3 Minuten Betrieb abkühlen.
Wenn diese Betriebszeiten überschritten werden,
kann es durch Überhitzung zu Schäden am Gerät
führen.
Garantie und Service
Sie erhalten auf dieses Gerät 3 Jahre Garantie
ab Kaufdatum. Das Gerät wurde sorgfältig
produziert und vor Anlieferung gewissenhaft
geprüft. Bitte bewahren Sie den Kassenbon als
Nachweis für den Kauf auf. Bitte setzen Sie sich
im Garantiefall mit Ihrer Servicestelle telefonisch
in Verbindung. Nur so kann eine kostenlose
Einsendung Ihrer Ware gewährleistet werden.
Die Garantieleistung gilt nur für Material- oder
Fabrikationsfehler, nicht aber für Transportschäden,
Verschleißteile oder für Beschädigungen an zerbrechlichen Teilen, z. B. Schalter oder Akkus. Das Produkt
ist lediglich für den privaten und nicht für den
gewerblichen Gebrauch bestimmt.
Bei missbräuchlicher und unsachgemäßer Behandlung, Gewaltanwendung und bei Eingriff en, die nicht
von unserer autorisierten Service-Niederlassung
vorgenommen wurden, erlischt die Garantie.
Ihre gesetzlichen Rechte werden durch diese Garantie
nicht eingeschränkt.
Die Garantiezeit wird durch die Gewährleistung
nicht verlängert. Dies gilt auch für ersetzte und reparierte Teile. Eventuell schon beim Kauf vorhandene
Schäden und Mängel müssen sofort nach dem
Auspacken gemeldet werden, spätestens aber zwei
Tage nach Kaufdatum. Nach Ablauf der Garantiezeit
anfallende Reparaturen sind kostenpfl ichtig.
Page 80

■ 76 │ DE
│AT│
CH
SKMP 1300 B3
Service Deutschland
Tel.: 0800 5435 111 (Kostenfrei aus dem
dt. Festnetz/Mobilfunknetz)
E-Mail: kompernass@lidl.de
IAN 276995/276996/277709
Service Österreich
Tel.: 0820 201 222 (0,15 EUR/Min.)
E-Mail: kompernass@lidl.at
IAN 276995/276996/277709
Service Schweiz
Tel.: 0842 665566 (0,08 CHF/Min.,
Mobilfunk max. 0,40 CHF/Min.)
E-Mail: kompernass@lidl.ch
IAN 276995/276996/277709
Entsorgung
Werfen Sie das Gerät kei-
nesfalls in den normalen
Hausmüll. Dieses Produkt
unterliegt der europäischen
Richtlinie 2012/19/EU.
Entsorgen Sie das Gerät über einen zugelassenen
Entsorgungsbetrieb oder über Ihre kommunale
Entsorgungseinrichtung. Beachten Sie die aktuell
geltenden Vorschriften. Setzen Sie sich im Zweifelsfall mit Ihrer Entsorgungseinrichtung in Verbindung.
Die Verpackung besteht aus umwelt-
freundlichen Materialien, die Sie über
die örtlichen Recyclingstellen entsorgen
können.
Importeur
KOMPERNASS HANDELS GMBH
BURGSTRASSE 21
44867 BOCHUM
GERMANY
www.kompernass.com
Rezepte
Möhrensuppe
Zutaten:
■ 500 g Karotten
■ 250 ml Wasser
■ 500 ml Fleischfond (Glas)
■ 125 ml Sahne
■ 125 ml Weißwein
■ Salz
■ Pfeff er
■ 50 g kalte Butter
■ Frischer Kerbel
Zubereitung:
1) Waschen und schälen Sie die Möhren.
2) Schneiden Sie sie so klein, dass Sie gut in den
Mixer t passen.
3) Geben Sie 250 ml Wasser in einen Topf
und kochen Sie die Möhren für 20 Minuten
darin. Anschließend pürieren Sie das Ganze
im Mixer t, bis keine größeren Stücke mehr
übrig sind.
4) Geben Sie die pürierten Möhren danach
zurück in den Topf.
5) Gießen Sie nun Fleischfond, Sahne und Weißwein hinzu.
6) Erhitzen Sie die Suppe und schmecken Sie sie
ab.
7) Rühren Sie die Butter in kleinen Stückchen unter
die Suppe und richten Sie danach mit dem
Kerbel an.
Page 81

DE│AT│CH
│
77 ■
SKMP 1300 B3
Thunfi sch-Aufstrich
Zutaten:
■ 1 Dose Thunfi sch in Sauce mit Gemüseeinlage
■ 3 EL Joghurt
■ 1 TL Zitronensaft, frisch gepresst
■ 1 Prise Salz
■ Pfeff er aus der Mühle
■ 2 hartgekochte Eier, gewürfelt
Zum Anrichten:
■ Vollkornbrot in Scheiben
■ Butter zum Bestreichen
■ 1 hartgekochtes Ei, gewürfelt
■ Schnittlauch, geschnitten
Zubereitung:
1) Mischen Sie alle Zutaten im Mixer t bis die
gewünschte Konsistenz erreicht ist (ca. 15
Sekunden) und schmecken Sie danach ab.
2) Bestreichen Sie das Brot mit Butter und
Thunfi sch-Creme und bestreuen Sie das Ganze
mit dem gehackten Ei und dem Schnittlauch.
Traditionelle Pfannkuchen
Zutaten:
■ 2-3 Eier
■ 375 ml Milch
■ 1 Prise Salz
■ 250 g Mehl
■ Fett zum Backen
Zubereitung:
1) Mischen Sie die Eier, die Milch und das Salz
mit dem Rührbesen w.
2) Sieben Sie das Mehl durch und geben Sie es
dazu. Mischen Sie alles mit dem Rührbesen w,
bis ein glatter Teig entsteht.
3) Lassen Sie den Teig für ca. 20 Minuten
quellen.
4) Erhitzen Sie das Fett und geben Sie mit einer
kleinen Kelle Teig hinein. (Immer nur so viel,
dass der Pfannenboden dünn bedeckt ist.)
5) Backen Sie die Pfannkuchen von beiden Seiten
goldbraun und servieren Sie sie heiß.
Biskuitteig
Zutaten:
■ 3 Eier
■ 3 - 4 EL Wasser, heiß
■ 150 g Zucker
■ 1 Päckchen Vanillinzucker
■ 100 g Mehl, Type 405
■ 100 g Speisestärke
■ 2-3 gestr. TL Backpulver
Zubereitung:
1) Legen Sie den Boden einer Springform (Durchmesser: 28 cm) mit Backpapier aus. Fetten Sie
nicht den Rand, da sonst die Oberfl äche nicht
gleichmäßig glatt und gebräunt wird.
2) Schlagen Sie die ganzen Eier in der Rührschüssel 6 und geben Sie heißes Wasser dazu.
3) Schlagen Sie das Ganze dann für ca. 1
Minute auf höchster Stufe mit dem Rührbesen w
schaumig.
4) Rühren Sie Zucker und Vanillinzucker unter und
schlagen Sie alles für 2 Minuten auf höchster
Stufe weiter.
5) Mischen Sie Mehl, Speisestärke und Backpulver und sieben Sie die Hälfte davon auf die
Eiercreme und rühren Sie alles kurz auf Stufe
4 unter.
6) Rühren Sie dann das restliche Mehl auf dieselbe Weise unter und füllen Sie den Teig in die
vorbereitete Springform.
7) Backen Sie das Ganze sofort im vorgeheizten
Backofen bei Ober- und Unterhitze 175 200°C für ca. 20 - 30 Minuten.
Page 82

■ 78 │ DE
│AT│
CH
SKMP 1300 B3
Mürbeteig
Zutaten:
■ 250 g Weizenmehl
■ 1/2 gestr. TL Backpulver
■ 100-125 g Zucker
■ 1 Päckchen Vanillinzucker
■ 1 Prise Salz
■ 1 Ei
■ 125 g Butter
Zubereitung:
1) Mischen Sie Mehl und Backpulver in der Rührschüssel 6 und geben Sie anschließend alle
übrigen Zutaten hinzu.
2) Kneten Sie alles mit dem Knethaken 0 zuerst
für ca. 1 Minute auf Stufe 2, dann für ca. 3
Minuten auf Stufe 2-4.
3) Kneten Sie den Teig nicht zu lange, der Teig
könnte sonst zu weich werden.
4) Lassen Sie den Teig im Kühlschrank für 1/2
Stunde ruhen und verarbeiten Sie ihn danach
zu einem Tortenboden oder zu Kleingebäck.
5) Für einen Tortenboden rollen Sie 2/3 des
Teiges aus und legen ihn in eine gefettete
Springform.
6) Rollen Sie den restlichen Teig zu einer Rolle.
7) Legen Sie diese Rolle als Rand auf den Teig
und drücken Sie ihn mit zwei Fingern so an den
Rand, dass ein ca. 3 cm hoher Rand entsteht.
8) Stechen Sie den Tortenboden mit einer Gabel
mehrfach ein.
9) Heizen Sie den Backofen ca. 5 Minuten vor
und backen Sie den Mürbeteig ca. 15 - 20
Minuten bei Ober- und Unterhitze und 200 225 °C.
Rührteig
Zutaten:
■ 250 g weiche Butter oder Margarine
■ 250 g Zucker
■ 1 Päckchen Vanillinzucker
■ 1 Prise Salz
■ 4 Eier
■ 500 g Weizenmehl
■ 1 Päckchen Backpulver
■ Ca. 125 ml Milch
Zubereitung:
1) Geben Sie alle Zutaten in die Rührschüssel 6
und rühren Sie alles mit dem Rührbesen w für
1/2 Minute auf Stufe 1, dann für 30 Sekunden
auf Stufe 2 und danach für ca. 5 Minuten auf
Stufe 4.
2) Fetten Sie die Backform oder legen Sie sie mit
Backpapier aus.
3) Befüllen Sie die Backform und backen Sie
den Teig ca. 50 - 60 Minuten bei Ober- und
Unterhitze und 175 - 200 °C.
4) Bevor Sie den Kuchen aus dem Ofen nehmensollten Sie eine Garprobe machen: Stechen
Sie dazu mit einem spitzen Holzstäbchen in
die Mitte des Kuchens. Wenn kein Teig dran
hängen bleibt, ist der Kuchen gar.
5) Stürzen Sie dann den Kuchen auf einen Kuchenrost und lassen Sie ihn abkühlen.
Page 83

DE│AT│CH
│
79 ■
SKMP 1300 B3
Hefeteig
Zutaten:
■ 500 g Weizenmehl
■ 25 g frische Hefe oder 1 Pck. Trockenhefe
■ ca. 1/4 l lauwarme Milch
■ 80 g Butter oder Margarine (Raumtemperatur)
■ 80 g Zucker
■ 1 Ei
Zubereitung:
1) Geben Sie Mehl, Trockenhefe oder zerbröselte
Hefe und alle anderen Zutaten (nicht direkt auf
die Hefe) in die Rührschüssel 6.
2) Vermengen Sie alles langsam mit dem Knethaken 0 auf Stufe 1, danach für 3-4 Minuten
auf Stufe 3.
3) Decken Sie die Schüssel mit einem Geschirrtuch ab, stellen Sie sie an einen warmen Ort
und lassen Sie den Teig gehen, bis er sich
sichtbar vergrößert hat.
4) Kneten Sie den Teig dann noch einmal durch.
5) Danach ist der Teig fertig und Sie können ihn
weiterverarbeiten.
Waff eln
Zutaten:
■ 200 g Zucker
■ 500 g Mehl
■ 5 g Backpulver
■ 5 Eier
■ 400 ml Milch
■ 250 g Butter (Raumtemperatur)
■ 2 Päckchen Vanillezucker
Zubereitung:
1) Geben Sie die Eier, den Zucker und die Butter
in die Rührschüssel 6 und verrühren Sie alles
mit dem Schneebesen q zu einem glatten Teig.
2) Fügen Sie das Mehl, den Vanillezucker und
das Backpulver hinzu.
3) Rühren Sie die Milch nach und nach unter bis
der Teig eine glatte und weiche Konsistenz hat.
4) Backen Sie die Waff eln in einem Waff eleisen
aus.
Bananen-Vanille-Shake
Zutaten:
■ 3 Bananen
■ 500 ml Milch
■ 2 Päckchen Vanillezucker
■ 1 EL Vanilleeis
Zubereitung:
1) Schälen Sie die Bananen.
2) Geben Sie die geschälten Bananen, die Milch,
das Vanilleeis und den Vanillezucker in den
Mixer t.
3) Mixen Sie alles auf Stufe 8.
Page 84

■ 80 │ DE
│AT│
CH
SKMP 1300 B3
Bananen-Kiwi-Smoothie
Zutaten:
■ 200 ml Orangensaft (frisch gepresst)
■ 1 Kiwi
■ 1/2 Banane
Zubereitung:
1) Enthäuten Sie die Kiwi.
2) Schälen Sie die Banane.
3) Geben Sie die Kiwi, die Banane und den
Orangensaft in den Mixer t.
4) Mixen Sie alles auf Stufe 8.
Page 85

IAN 276995/276996/277709
KOMPERNASS HANDELS GMBH
BURGSTRASSE 21
44867 BOCHUM
DEUTSCHLAND / GERMANY
www.kompernass.com
Last Information Update · Versiunea informaţiilor
Актуалност на информацията · Έκδοση των πληροφοριών
Stand der Informationen: 03 /2016 · Ident.-No.: SKMP1300B3-022016-1
 Loading...