

Page 1
IAN 277091
RECHARGEABLE HAND-HELD AND UPRIGHT
VACUUM CLEANER SHSS 12 C2
RECHARGEABLE HAND-HELD AND
UPRIGHT VACUUM CLEANER
Operating instructions
AKKU-HAND- UND
-BODENSTAUBSAUGER
Bedienungsanleitung
AKKUS KÉZI ÉS PADLÓPORSZÍVÓ
Használati utasítás
ROČNI IN TALNI
AKUMULATORSKI SESALNIK
Navodila za uporabo
AKUMULÁTOROVÝ VYSAVAČ
Návod k obsluze
AKUMULÁTOROVÝ RUČNÝ A
PODLAHOVÝ VYSÁVAČ
Návod na obsluhu
Page 2
GB Operating instructions Page 1
HU Használati utasítás Oldal 13
SI Navodila za uporabo Stran 25
CZ Návod k obsluze Strana 35
SK Návod na obsluhu Strana 47
DE / AT / CH Bedienungsanleitung Seite 59
Before reading, unfold the page containing the illustrations and familiarise yourself with all functions of
the device.
Olvasás előtt kattintson az ábrát tartalmazó oldalra és végezetül ismerje meg a készülék mindegyik
funkcióját.
Pred branjem odprite stran s slikami in se nato seznanite z vsemi funkcijami naprave.
Před čtením si otevřete stranu s obrázky a potom se seznamte se všemi funkcemi přístroje.
Pred čítaním si odklopte stranu s obrázkami a potom sa oboznámte so všetkými funkciami prístroja.
Klappen Sie vor dem Lesen die Seite mit den Abbildungen aus und machen Sie sich anschließend mit allen
Funktionen des Gerätes vertraut.
Page 3
A B C
Page 4

SHSS 12 C2
GB
│
1 ■
Contents
Introduction ...........................................................2
Intended use ..........................................................2
Package contents ......................................................2
Appliance description
................................................... 2
Technical data .........................................................3
Safety guidelines ......................................................3
Before first use
........................................................6
Charging the appliance .................................................6
Assembly/disassembly .................................................6
Connecting the hand element to the handle/removal from handle ............................ 6
Operation ............................................................7
Using the hand element with the handle ................................................ 7
Using the hand element
............................................................. 7
Cleaning and care ......................................................7
Emptying the dirt container
.......................................................... 8
Cleaning the appliance ............................................................. 8
Cleaning the rotary brush ............................................................ 8
Storage ..............................................................9
Troubleshooting .......................................................9
Disposal
.............................................................. 9
Disposal of the appliance. . . . . . . . . . . . . . . . . . . . . . . . . . . . . . . . . . . . . . . . . . . . . . . . . . . . . . . . . . . . 9
Disposal of (rechargeable) batteries .................................................. 10
Kompernass Handels GmbH warranty ...................................10
Service
.........................................................................11
Importer ........................................................................11
Page 5

SHSS 12 C2
■ 2 │ GB
RECHARGEABLE HAND-HELD
AND UPRIGHT VACUUM
CLEANER
Introduction
Congratulations on the purchase of your new
appliance.
You have selected a high-quality product.
The operating instructions are part of this product.
They contain important information on safety, usage
and disposal. Before using the product, familiarise
yourself with all handling and safety guidelines.
Use the product only as described and for the range
of applications specified. Please also pass these
operating instructions on to any future owner(s).
Intended use
This appliance has been designed exclusively for
vacuum cleaning dry surfaces and dry residues.
This appliance is intended solely for use in private
homes. Do not vacuum people or animals with this
appliance. Any other usage of or modification to
the appliance is deemed to be improper usage
and carries the risk of serious personal injury. The
manufacturer accepts no liability for damages that
result from improper use of the appliance or are
caused by the incorrect operation of it.
The appliance is not intended for commercial use.
Package contents
Rechargeable Hand-Held and Upright Vacuum
Cleaner
Brush nozzle
Upholstery nozzle
Crevice tool
Extension handle with floor nozzle
Cradle (with charging socket)
Charger
Operating instructions
Check the delivery contents for completeness
immediately after unpacking.
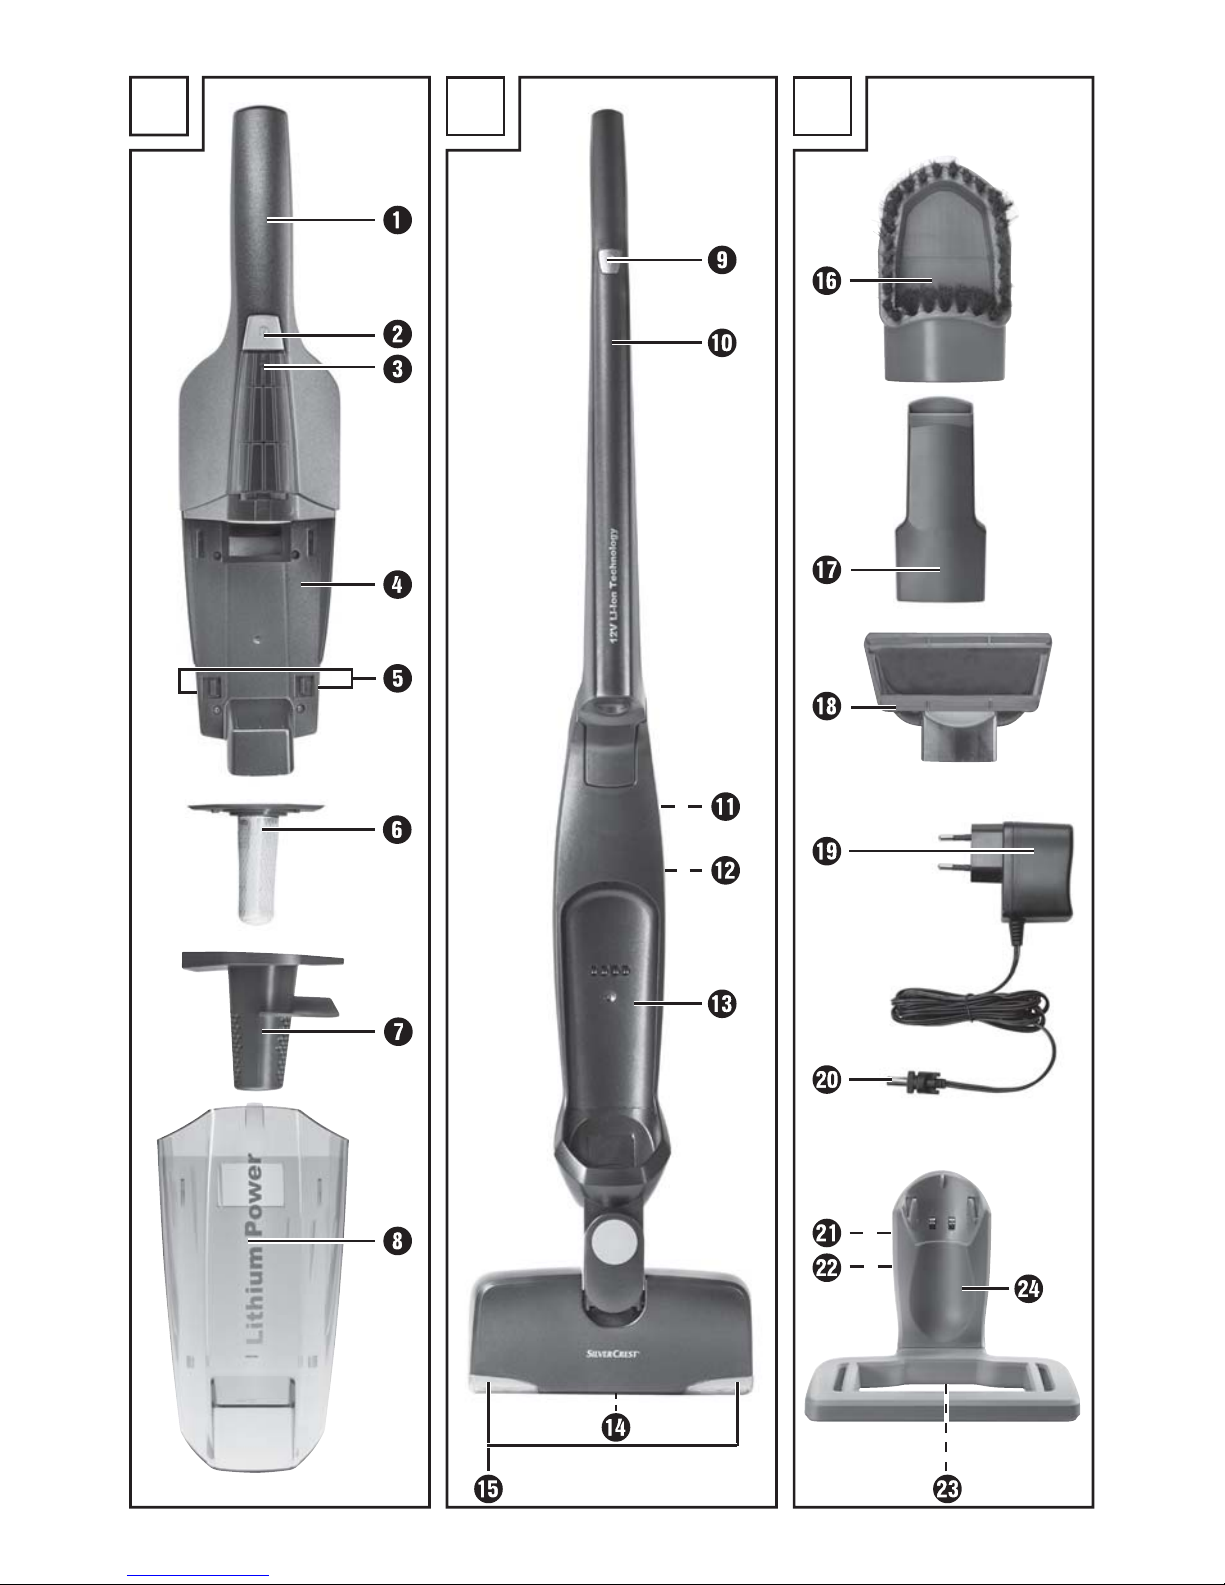
Appliance description
Figure A:
Grip, hand element
On/Off switch
Charge indicator lamp
Hand element
Buttons
Dust filter
Coarse filter
Dirt container
Figure B:
On/Off switch
Grip
- “Grip” release
3 “Hand element” release
! Hand element recess
. Rotary brush
0 LED lamp
Figure C:
6 Brush nozzle
1 Crevice tool
% Upholstery nozzle
+ Charger
, Charger barrel jack
Holder for brush nozzle
/ Holder for crevice tool
Charging socket
" Cradle (with charging socket)
Page 6
SHSS 12 C2
GB
│
3 ■
Technical data
Charger
Input: 100–240 V ~50/60 Hz 300 mA Max.
Output: 13.5 V
500 mA
Type designation: SHSS 12 C2-1
Protection class: II /
Floor nozzle
Nominal power: 5 W
Protection class: III /
Input voltage: 10.8 V 1800 mAh
Appliance
Input voltage/current: 13.5 V
500 mA
Nominal power: 75 W
Protection class: III /
Batteries: 10.8 V/1800 mAh Li-ion battery
Battery Pack: 3 cells each of 3.6 V
Operating time with full battery charge
(depending on floor covering): approx. 15 min.
Charging time with empty battery: 5–6 hours
Safety guidelines
DANGER – ELECTRIC SHOCK!
► Do not charge or use the appliance outdoors.
► Never use the handheld vacuum cleaner if the cable, plug or casing
are damaged.
► To avoid risks, arrange for damaged power cables and/or plugs to
be replaced as soon as possible by a qualified specialist or by our
Customer Services.
► Arrange for repairs to be carried out only by specialist workshops.
Under no circumstances should you open the appliance yourself.
Repairs that are not carried out by a specialist workshop could lead
to physical injuries.
► Before charging the appliance, make sure that the mains voltage corre-
sponds to the voltage indicated in the technical data for the charger.
► Never touch the mains adapter/charger or the appliance with wet or
damp hands.
► Do not use the mains adapter/charger with an extension cable; con-
nect the mains adapter directly to a power socket.
Page 7
SHSS 12 C2
■ 4 │ GB
WARNING! RISK OF INJURY!
► Do not change any accessories while the appliance is switched on.
► Do not use the handheld vacuum cleaner for vacuuming up water or
other liquids.
► Do not use the handheld vacuum cleaner for vacuuming up sharp
objects or glass shards.
► Never vacuum up burning matches, glowing ashes or cigarette butts.
► Do not use the handheld vacuum cleaner for vacuuming up chemical
products, stone dust, gypsum, cement or similar particles.
► This appliance is not suitable for use with inflammable and explosive
substances or chemical and aggressive liquids.
► Always store the appliance indoors. To prevent accidents, keep the
appliance in a dry location when not in use.
► Under extreme conditions, leaks in the battery cells may occur. In
the event that battery fluid comes into contact with skin or eyes, the
affected area must be rinsed off with water immediately. Contact a
physician.
► This appliance may be used by children aged 8 years and above
and by persons with limited physical, sensory or mental capabilities
or lack of experience and knowledge, provided that they are under
supervision or have been told how to use the appliance safely and
are aware of the potential risks. Children must not use the appliance
as a plaything. Cleaning and user maintenance tasks may not be carried out by children unless they are supervised.
Page 8
SHSS 12 C2
GB
│
5 ■
WARNING! RISK OF INJURY!
► Use only accessories recommended by the manufacturer.
► The mains adapter may not be used for other purposes.
► Always grip the power plug to disconnect the appliance from the
power supply.
► Always be sure to keep the handheld vacuum cleaner away from
heating elements, ovens or other heated appliances and surfaces.
► Always make certain that the ventilation slits are not obstructed. A
blocked ventilation circuit can result in overheating and damage to
the appliance.
► Take special care when using the handheld vacuum cleaner on stairs.
► This product contains rechargeable batteries. Do not throw the appli-
ance into a fire and do not subject it to high temperatures. There is a
risk of explosion!
► Always remove the floor nozzle from the handle before cleaning the
rotary brush to avoid accidental starting of the rotary brush.
ATTENTION! MATERIAL DAMAGE!
► Do not use the handheld vacuum cleaner without the dust filter inserted.
► Do not use the mains adapter for a different product and do not at-
tempt to charge this appliance with a different charger. Use only the
charger supplied with this appliance.
► Never charge non-rechargeable batteries!
Page 9

SHSS 12 C2
■ 6 │ GB
Before first use
NOTE
► This appliance is supplied with non-charged
batteries. The batteries must be charged for
6 hours before the first use.
■ Remove all packaging materials and protective
stickers from the appliance, especially the protective sticker on the contacts on the back of the
hand element .
■ Place the cradle " on the stand so that the
cradle "clicks into place.
Charging the appliance
NOTE
► Ensure that the appliance is switched off
before starting to charge the batteries.
■ To charge the appliance, connect the charger +
to a mains socket and insert the barrel jack ,
into the charging socket on the cradle ".
Feed the cable through the cable channel on the
charging socket , so that the cradle " is not
resting on the cable.
■ Place the handle with the attached hand ele-
ment onto the cradle ".
The charge indicator lamp lights up red.
– for the model in
anthracite/green:
When the appliance is fully charged, the
charge indicator lamp lights up green.
– for the model in
anthracite/red:
When the appliance is fully charged, the
charge indicator lamp lights up orange.
Assembly/disassembly
Connecting the hand element to the
handle/removal from handle
Fig. 1 Fig. 2
■ To connect the hand element to the handle,
push the tip of the hand element into the
opening in the hand element recess !.
■ Then press the grip of the hand element
into the handle so that the hand element
clicks firmly into position (Fig. 1).
■ To remove the hand element from the handle,
press the “Hand element” release 3.
■ Then pull the hand element upwards and
forwards out of the hand element recess !
(Fig. 2).
Page 10

SHSS 12 C2
GB
│
7 ■
Operation
ATTENTION! MATERIAL DAMAGE!
► The suction opening must always be open and
unblocked. Blockages lead to overheating and
damage to the motor.
► Do not vacuum shag pile carpet with the floor
nozzle. The rotary brush . can get caught in
the carpet and block!
NOTE
► Make certain that the dust filter and the
coarse filter are always inserted before
using the appliance.
► As soon as the suction power of the appliance
begins to diminish noticeably, connect the
appliance to the charger +.
Using the hand element with the
handle
1) Insert the hand element into the hand
element recess ! as described in the chapter
“Assembly/disassembly”.
2) Fold out the grip by pressing the “Grip”
release - and at the same time pulling the
grip upwards.
3) Switch on the appliance using the on/off
switch . The LED lamp 0 on the floor nozzle
will illuminate and the rotary brush . starts
turning.
4) Guide the floor nozzle over the area to be
vacuumed. Hold the grip so that the floor
nozzle moves smoothly over the floor.
5) Press the on/off switch when you have
finished vacuuming. The rotary brush . stops
and the LED lamp 0 goes out.
Using the hand element
1) Remove the hand element from the hand
element recess ! as described in the chapter
“Assembly/disassembly”.
2) As required, attach the crevice tool 1, the
brush nozzle 6 or the upholstery nozzle %.
3) Set the on/off switch to start vacuuming the
desired areas.
4) When you have finished vacuuming, press the
on/off switch again.
Cleaning and care
WARNING! RISK OF INJURY!
► Always disconnect the charger +from the
mains socket and remove the barrel jack ,
from the charging socket on the cradle "
before cleaning the cradle ".
► Always remove the hand element from the
hand element recess ! on the handle before
cleaning the hand element , the handle or
the rotary brush ..
To achieve the best results, empty the dirt container
and clean the dust filter after every use.
ATTENTION! MATERIAL DAMAGE!
► Do not use abrasive or aggressive cleaning
materials. These could damage the surface
of the appliance!
NOTE
► The LED lamp 0 is maintenance-free.
The LEDs cannot be changed.
Page 11
SHSS 12 C2
■ 8 │ GB
Emptying the dirt container
1) To open the dirt container , remove the hand
element from the hand element recess !.
2) Press both buttons
and, at the same time,
pull the dirt container upwards.
You can now lift this off upwards/forwards.
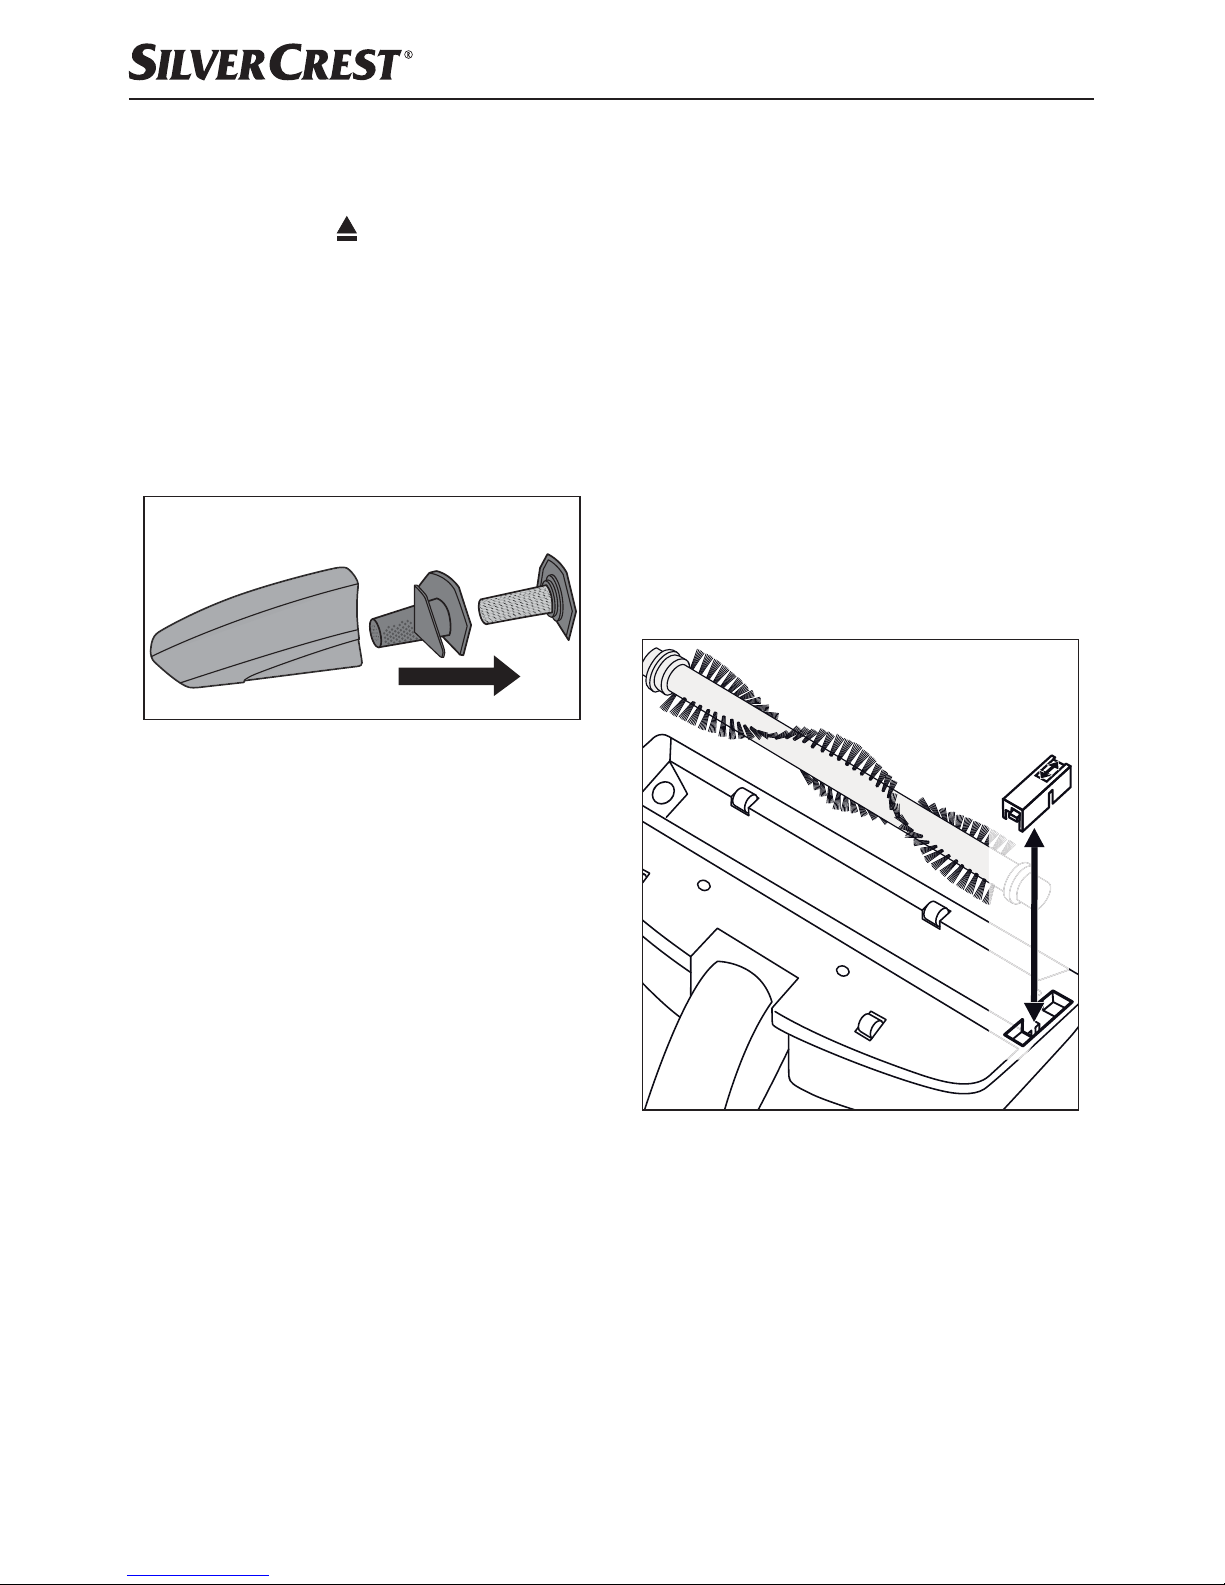
3) Remove the dust filter by pulling it out with
your fingers. Rinse the dust filter in clear
water and let it air dry. Do not use hot air to
dry the dust filter .
4) Then remove the coarse filter also by simply
pulling it out.
Fig. 3
5) Empty the dirt container .
6) Now you can re-insert first the coarse filter
and then the dust filter .
7) Replace the dirt container by first inserting
the catch into the notch in the hand element
and then pushing the front part of the dirt container firmly downwards so that the dirt
container clicks firmly into place.
Cleaning the appliance
Wipe the appliance with a damp cloth. For stubborn
dirt, wipe, adding mild detergent to the cloth.
Ensure that the appliance is completely dry before
the next use.
Cleaning the rotary brush
The rotary brush . can become covered in
residues, such as hair, after a while. To remove this
dirt, you can remove the rotary brush . (Fig. 4).
1) Turn the floor nozzle upside down.
2) Push the catch on the cover plate to the rear
so that you can remove the cover plate.
3) Lift out the rotary brush ..
4) To replace the rotary brush ., first push the
broad end onto the drive shaft so that the
rotary brush . hooks into place.
5) Then push the other end into the mount so that the
rotary brush . sits straight in the floor nozzle.
6) Replace the cover plate and fasten it firmly into
place.
Fig. 4
Page 12
SHSS 12 C2
GB
│
9 ■
Storage
■ When you are not using the appliance, place it
on the cradle ".
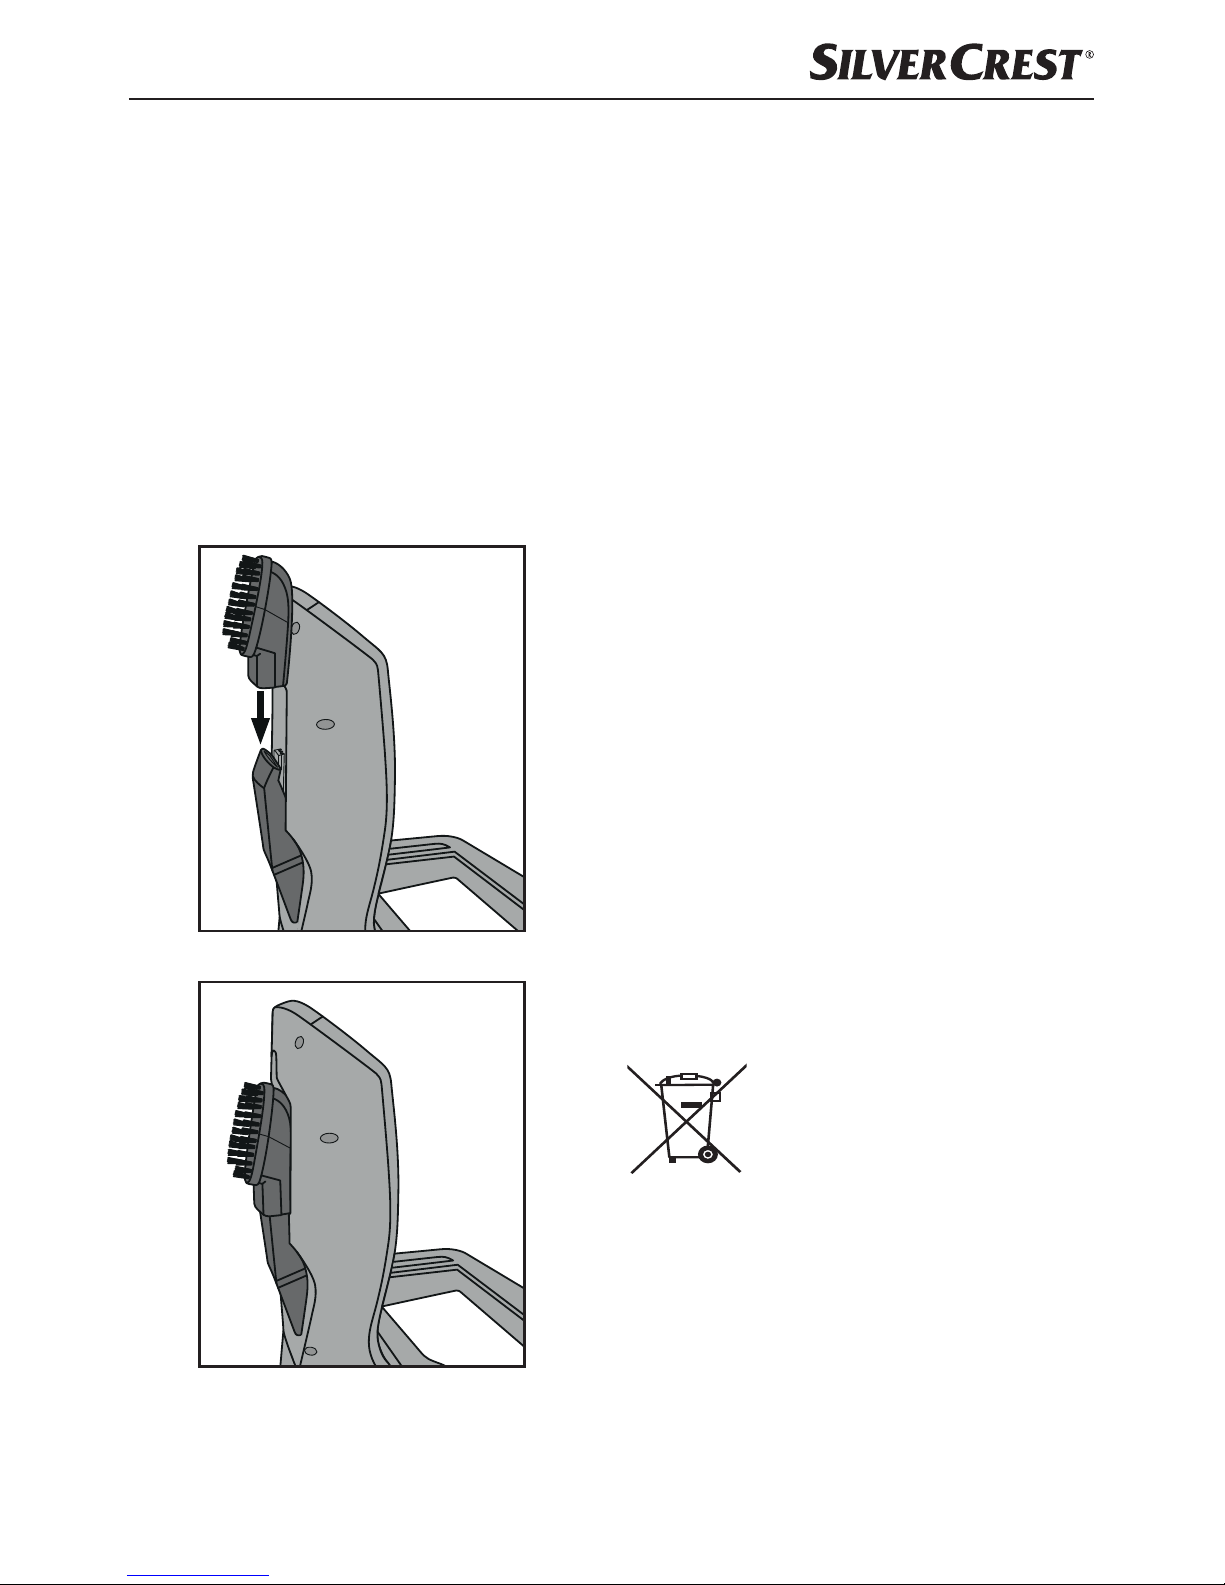
■ You can store the crevice tool 1 and the brush
nozzle 6 on the rear side of the cradle "
in the holder for the brush nozzle and the
holder for the crevice tool /.
– First, put the crevice tool 1onto the crevice
tool holder / so that the suction opening is
facing towards the cradle ".
– Then fit the brush nozzle 6 onto the brush
nozzle holder so that it cover the end of
the crevice tool 1 (Fig. 5 and 6).
Fig. 5
Fig. 6
■ Store the appliance in a dust-free and dry location.
Troubleshooting
The appliance is not working.
■ The battery is not charged.
♦ Connect the appliance to the charger +.
■ The appliance is defective.
♦ Contact the Customer Service department.
The appliance is running but hardly
sucking up any dirt.
■ The battery is not sufficiently charged.
♦ Connect the appliance to the charger +.
■ The dirt container is full.
♦ Empty the dirt container .
■ The dust filter is blocked.
♦ Clean the dust filter .
The appliance will not charge.
■ The charger + is not correctly connected to
the socket/mains plug.
♦ Check the connections of the charger +.
■ The charger + is defective.
♦ Contact the Customer Service department.
Disposal
Disposal of the appliance
Under no circumstances should
you dispose of the appliance
in the normal domestic waste.
This product is subject to the
provisions of European
Directive 2012/19/EU.
Dispose of the appliance via an approved waste
disposal company or your municipal waste disposal
facility. Please observe applicable regulations.
Please contact your waste disposal facility if you
are in any doubt.
Page 13
SHSS 12 C2
■ 10 │ GB
Disposal of (rechargeable) batteries
Used batteries may not be
disposed of in household
waste.
Consumers are legally obliged to dispose of batteries at a collection point in their community/city
district or at a retail store.
The purpose of this obligation is to ensure that
batteries are disposed of in an environmentally
congruent manner. Only dispose of batteries when
they are fully discharged.
ATTENTION! MATERIAL DAMAGE!
► If you open the housing and dispose of the
batteries, the appliance will be irreparably
damaged!
1) Before you start removing the battery, discharge
it completely.
2) Remove the dirt collector .
3) Undo the 5 screws on the rear of the hand
element and pull the two halves of the
housing apart.
4) Remove the motor from the housing half.
5) Undo the two screws on the plastic bracket
that holds the blue battery and remove the
plastic bracket.
6) Use pliers to cut the cable that leads to the
blue battery. Make sure that you do not shortcircuit the bare cable ends with the metal parts
of the pliers.
7) Remove the battery and dispose of it in an
environmentally friendly manner.
The packaging is made from environ-
mentally friendly material and can be
disposed of at your local recycling plant.
Kompernass Handels GmbH
warranty
Dear Customer,
This appliance has a 3-year warranty valid from
the date of purchase. If this product has any faults,
you, the buyer, have certain statutory rights. Your
statutory rights are not restricted in any way by the
warranty described below.
Warranty conditions
The validity period of the warranty starts from the
date of purchase. Please keep your original receipt
in a safe place. This document will be required as
proof of purchase.
If any material or production fault occurs within
three years of the date of purchase of the product,
we will either repair or replace the product for you
at our discretion. This warranty service is dependent
on you presenting the defective appliance and
the proof of purchase (receipt) and a short written
description of the fault and its time of occurrence.
If the defect is covered by the warranty, your product
will either be repaired or replaced by us. The repair
or replacement of a product does not signify the
beginning of a new warranty period.
Warranty period and statutory
claims for defects
The warranty period is not prolonged by repairs
effected under the warranty. This also applies to
replaced and repaired components. Any damage
and defects present at the time of purchase must
be reported immediately after unpacking. Repairs
carried out after expiry of the warranty period shall
be subject to a fee.
Page 14
SHSS 12 C2
GB
│
11 ■
Scope of the warranty
This appliance has been manufactured in accordance with strict quality guidelines and inspected
meticulously prior to delivery.
The warranty covers material faults or production
faults. The warranty does not extend to product
parts subject to normal wear and tear or fragile
parts such as switches, batteries, baking moulds or
parts made of glass.
The warranty does not apply if the product has been
damaged, improperly used or improperly maintained.
The directions in the operating instructions for the
product regarding proper use of the product are
to be strictly followed. Uses and actions that are
discouraged in the operating instructions or which
are warned against must be avoided.
This product is intended solely for private use and
not for commercial purposes. The warranty shall be
deemed void in cases of misuse or improper handling,
use of force and modifications/repairs which have
not been carried out by one of our authorised
Service centres.
Warranty claim procedure
To ensure quick processing of your case, please
observe the following instructions:
▯ Please have the till receipt and the item number
(e.g. IAN 12345) available as proof of purchase.
▯ You will find the item number on the type plate,
an engraving on the front page of the instructions
(bottom left), or as a sticker on the rear or bottom
of the appliance.
▯ If functional or other defects occur, please
contact the service department listed either by
telephone or by e-mail.
▯ You can return a defective product to us free of
charge to the service address that will be provided
to you. Ensure that you enclose the proof of purchase (till receipt) and information about what
the defect is and when it occurred.
You can download these instructions
along with many other manuals,
product videos and software on
www.lidl-service.com.
Service
Service Great Britain
Tel.: 0871 5000 720 (£ 0.10/Min.)
E-Mail: kompernass@lidl.co.uk
IAN 277091
Importer
Please note that the following address is not the
service address. Please use the service address
provided in the operating instructions.
KOMPERNASS HANDELS GMBH
BURGSTRASSE 21
44867 BOCHUM
GERMANY
www.kompernass.com
Page 15

SHSS 12 C2
■ 12 │ GB
Page 16
SHSS 12 C2
HU
│
13 ■
Tartalomjegyzék
Bevezető ............................................................14
Rendeltetésszerű használat .............................................14
A csomag tartalma ....................................................14
A készülék leírása
....................................................14
Műszaki adatok ......................................................15
Biztonsági utasítások ..................................................15
Az első használat előtt
.................................................18
A készülék feltöltése ..................................................18
Összeszerelés/szétszerelés .............................................18
Kézi egység csatlakoztatása a nyélre / leválasztása a nyélről ................................18
Kezelés .............................................................19
Kézi egység használata nyéllel ......................................................19
A kézi egység használata
..........................................................19
Tisztítás és ápolás .....................................................19
Portartály ürítése
..................................................................20
A készülék tisztítása ...............................................................20
Hengerkefe tisztítása ..............................................................20
Tárolás ..............................................................21
Hibaelhárítás ........................................................21
Ártalmatlanítás
.......................................................21
A készülék ártalmatlanítása .........................................................21
Az elemek/akkumulátorok ártalmatlanítása .............................................22
A Kompernass Handels GmbH garanciája .................................22
Szerviz
.........................................................................23
Gyártja ......................................................................... 23
Page 17

SHSS 12 C2
■ 14 │ HU
AKKUS KÉZI
ÉS PADLÓPORSZÍVÓ
Bevezető
Gratulálunk új készüléke megvásárlásához!
Vásárlásával kiváló minőségű termék mellett döntött.
A használati utasítás a termék része. Fontos tudnivalókat tartalmaz a biztonságra, használatra és
ártalmatlanításra vonatkozóan. A termék használata előtt ismerkedjen meg valamennyi használati
útmutatóval és biztonsági figyelmeztetéssel. Csak
a leírtak szerint és a megadott célokra használja
a készüléket. A készülék harmadik személynek
történő továbbadása esetén adja át a készülékhez
tartozó valamennyi leírást is.
Rendeltetésszerű használat
A készülék kizárólag száraz felületek, illetve száraz
anyagok szívására alkalmas. A készülék kizárólag
magánháztartásokban használható. Nem szabad
emberre vagy állatra irányítani. A készülék minden
más felhasználása nem rendeltetésszerűnek minősül
és jelentős balesetveszélyt okozhat. A gyártó nem
vállal felelősséget olyan károkért, amelyek a nem
rendeltetésszerű használat vagy a helytelen kezelés
miatt keletkeztek.
A készülék nem alkalmas ipari használatra.
A csomag tartalma
akkus kézi és padlóporszívó
kefés szívófej
kárpitfúvóka
réstisztító szívófej
hosszabbító nyél padlótisztító szívófejjel
tartó (töltőaljzattal)
töltő
használati útmutató
Közvetlenül kicsomagolás után ellenőrizze, hogy
hiánytalan-e a készülék.
A készülék leírása
„A“ ábra:
kézi egység fogantyúja
be-/kikapcsoló
töltésjelző
kézi egység
gombok
porszűrő
durva szűrő
portartály
„B“ ábra:
be-/kikapcsoló
fogantyú
- „fogantyú" kioldógombja
3 „kézi egység“ kioldógombja
! kézi egység mélyedése
. seprőhenger
0 LED - világítás
„C“ ábra:
6 kefés szívófej
1 réstisztító szívófej
% kárpitfúvóka
+ töltőkészülék
, töltőkészülék DC csatlakozója
kefés szívófej tartója
/ réstisztító szívófej tartója
töltőaljzat
" tartóegység (töltőaljzattal)
Page 18
SHSS 12 C2
HU
│
15 ■
Műszaki adatok
Töltő
Bemenet: 100 - 240 V ~, 50 / 60 Hz,
300 mA max
Kimenet: 13,5 V
500 mA
Típusjelzés: SHSS 12 C2-1
Védelmi osztály: II /
Padlótisztító szívófej
Névleges teljesítmény: 5 W
Védelmi osztály: III /
Bemeneti feszültség: 10,8 V 1800 mAh
Készülék
Bemeneti feszültség / áram: 13,5 V
500 mA
Névleges teljesítmény: 75 W
Védelmi osztály: III /
Akkumulátor: Li-Ion akkumulátor (10,8 V),
1800 mAh
Akkumulátor csomag: 3 cella á 3,6 V
Működési idő teljes feltöltöttség esetén
(padlóburkolattól függően): kb. 15 perc
Töltési idő üres akkumulátor esetén: 5 - 6 óra
Biztonsági utasítások
VESZÉLY - ELEKTROMOS ÁRAMÜTÉS!
► Ne töltse és ne használja a készüléket a szabadban.
► Soha ne használja a kézi porszívót, ha a kábel, a csatlakozó vagy a
készülék burkolata sérült.
► A kockázatok elkerülése érdekében a sérült hálózati csatlakozót vagy
hálózati kábelt azonnal cseréltesse ki erre felhatalmazott szakemberrel.
► Javításokat csak szakszervizben végeztessen. Semmi esetre se sze-
relje szét saját maga a készüléket. Az olyan beavatkozások, melyet
nem szakértő végez, sérülést okozhatnak.
► A készülék bekapcsolása előtt győződjön meg róla, hogy a készülék
műszaki adatai között feltüntetett feszültség megegyezik a hálózati
feszültséggel.
► Ne fogja meg a tápegységet / töltő készüléket vagy a készüléket
vizes vagy nedves kézzel.
► Ne használja a tápegységet / töltő készüléket hosszabbító kábellel,
a tápegységet közvetlenül a hálózati aljzattal kapcsolja össze.
Page 19

SHSS 12 C2
■ 16 │ HU
FIGYELMEZTETÉS! SÉRÜLÉSVESZÉLY!
► A készülék működése közben ne cseréljen ki készülék-tartozékokat.
► Ne használja a kézi porszívót víz vagy más folyadékok felszívására.
► Ne használja a kézi porszívót hegyes tárgyak vagy üvegcserepek
felszívására.
► Soha nem porszívózzon fel égő gyufát, parázsló hamut vagy cigaretta-
véget.
► Ne használja a kézi porszívót vegyipari termékek, kőpor, gipsz, ce-
ment vagy hasonló részecskék felszívására.
► A készülék nem alkalmas gyúlékony és robbanékony anyagok vagy
vegyszerek és agresszív folyadékok felszívására.
► A készüléket mindig zárt helyen tárolja. A balesetek elkerülése végett
a készüléket használat után száraz helyen tárolja.
► Szélsőséges körülmények között az akkumulátor cellái szivároghatnak.
Ha a folyadék érintkezésbe kerül a bőrrel vagy a szembe jut, az érintett
testrészt azonnal öblítse ki vagy öblítse le tiszta vízzel. Forduljon
orvoshoz.
► A készüléket 8 éves kor alatti gyermekek és csökkent fizikai, érzékszervi
vagy mentális képességű vagy tapasztalattal, illetve tudással nem
rendelkező személyek csak felügyelet mellett használhatják, vagy ha
felvilágosították őket a készülék biztonságos használatáról és megértették az ebből eredő veszélyeket. Gyermekek nem játszhatnak a
készülékkel. Tisztítást és a felhasználó által végzendő karbantartást
felügyelet nélküli gyermekek nem végezhetnek.
Page 20

SHSS 12 C2
HU
│
17 ■
FIGYELMEZTETÉS! SÉRÜLÉSVESZÉLY!
► Csak a gyártó által ajánlott tartozékokat használjon.
► A tápegység nem használható más célokra.
► Mindig a hálózati csatlakozót fogja meg, ha a készüléket le akarja
választani az áramellátásról.
► Feltétlenül ügyeljen arra, hogy a kézi porszívót ne állítsa fűtőtest,
tűzhely vagy más felhevült készülék vagy felület mellé.
► Ügyeljen mindig arra, hogy a szellőzőnyílások szabadok legyenek.
A levegőmozgás akadályoztatása a készülék felhevüléséhez és sérüléséhez vezethet.
► Különösen figyeljen oda, ha a kézi porszívót lépcsőn használja.
► Ez a készülék újratölthető akkumulátort tartalmaz. Ne dobja tűzbe és
ne tegye ki magas hőmérsékletnek a készüléket. Robbanásveszély áll
fenn!
► A hengerkefe tisztítása előtt mindig vegye le a kézi egységet a nyél-
ről, így elkerülheti a hengerkefe véletlen elindítását.
FIGYELEM! ANYAGI KÁR VESZÉLYE!
► Ne használja a kézi porszívót berakott porszűrő nélkül.
► A töltőt ne használja más termékhez és ne próbálja meg feltölteni a
készüléket másik töltővel. Csak a készülékkel együtt szállított töltőt
használja.
► Soha ne töltsön fel nem újratölthető akkumulátorokat!
Page 21

SHSS 12 C2
■ 18 │ HU
Az első használat előtt
TUDNIVALÓ
► A készüléket feltöltetlen akkumulátorral szállít-
juk. A készülék első használata előtt az akkumulátorokat 6 órán keresztül kell tölteni.
■ Távolítsa el a készüléken lévő csomagoló-
anyagot és védőmatricákat, különösen azokat,
amelyek a kéziegység hátoldalán lévő
érintkezőket védik.
■ A tartóegységbe " helyezze az állványra, így
az bekattan a tartóegységbe ".
A készülék feltöltése
TUDNIVALÓ
► Győződjön meg róla, hogy a készülék ki van
kapcsolva, mielőtt elkezdené a töltést.
■ A készülék feltöltéséhez csatlakoztassa a töltő-
készüléket + egy hálózati aljzathoz és helyezze a DC csatlakozót ,a tartóegységen "
lévő töltőaljzatba .
Vezesse a kábelt a kábelcsatornán keresztül a
töltőaljzathoz olyan módon, hogy a tartóegység " ne a kábelen legyen.
■ A kézi egységgel felszerelt nyelet helyezze
a tartóegységre ".
A töltésjelző lámpa pirosan világít.
– Az antracit / zöld színű modell esetén:
Ha a készülék feltöltődött, akkor a töltésjelző
lámpa zölden világít.
– Az antracit / piros színű modell esetén:
Ha a készülék feltöltődött, akkor a töltésjelző
lámpa narancssárgán világít.
Összeszerelés/szétszerelés
Kézi egység csatlakoztatása a nyélre /
leválasztása a nyélről
1. ábra 2. ábra
■ Ahhoz, hogy a kézi egységet a nyélre csatla-
koztassa, tolja a kézi egység keskeny végét
a kézi egység mélyedésébe !.
■ Nyomja be a kézi egység fogantyúját a
nyélbe úgy, hogy a kézi egység bekattanjon
és rögzítve maradjon (1. ábra).
■ A kézi egység nyélről történő leválasztásához
nyomja meg a „kézi egység“ kioldógombját 3.
■ Húzza a kézi egységet felfelé / előre a kézi
egység mélyedéséből ! (2. ábra).
Page 22
SHSS 12 C2
HU
│
19 ■
Kezelés
FIGYELEM! ANYAGI KÁR VESZÉLYE!
► A szívónyílás mindig legyen szabadon és
ne legyen eltömődve. Az eltömődés a motor
túlhevüléséhez és sérüléséhez vezet.
► Ne porszívózzon hosszú szálú szőnyeget a
padlótisztító fejjel. A hengerkefe . beleakad
a szőnyegbe és beszorul!
TUDNIVALÓ
► Ügyeljen arra, hogy a porszűrő és a durva
szűrő mindig be legyen helyezve, mielőtt a
készüléket használja.
► Amint a szívó teljesítmény érezhetően csökken,
csatlakoztassa a készüléket a töltőhöz +.
Kézi egység használata nyéllel
1) Helyezze a kézi egységet a kézi egység
mélyedésébe ! az „Összeszerelés/szétszere-
lés“ fejezetben leírtak szerint.
2) Hajtsa ki a fogantyút oly módon, hogy
megnyomja a „fogantyú“ kioldógombját -
és egyidejűleg felfelé húzza a fogantyút .
3) Kapcsolja be a készüléket a be-/kikapcsoló
gombbal . A padlótisztító szívófejen található LED lámpa 0 világít és a hengerkefe .
forog.
4) Haladjon végig a padlótisztító szívófejjel a
porszívózandó helyeken. A fogantyút úgy
tartsa, hogy a padlótisztító szívófej egyenesen
csússzon a felületen.
5) Ha be akarja fejezni a porszívózást, nyomja
meg a be-/kikapcsoló gombot .
A hengerkefe . megáll és a LED - világítás 0
kialszik.
A kézi egység használata
1) Emelje ki a kézi egységet a kézi egység
mélyedéséből ! az „Összeszerelés/szétsze-
relés" fejezetben leírtak szerint.
2) Igény szerint helyezze fel a réstisztító szívófejet 1,
a kefés szívófejet 6 vagy a kárpitfúvókát %.
3) Nyomja meg a be-/kikapcsoló gombot és
porszívózzon a kívánt helyen.
4) Ha be akarja fejezni a porszívózást, nyomja
meg még egyszer a be-/kikapcsoló gombot .
Tisztítás és ápolás
FIGYELMEZTETÉS SÉRÜLÉSVESZÉLY!
► Mindig húzza ki a töltőkészüléket +a há-
lózati csatlakozóaljzatból és húzza ki a DC
csatlakozót , a töltőaljzatból a tartóegységen ", mielőtt megkezdi wwa tartóegység
" tisztítását.
► A kézi egység , a nyél vagy a hengerkefe .
tisztítása előtt a kézi egységet mindig vegye
ki a nyélen lévő kéziegység-mélyedésből !.
A legjobb eredmény elérése érdekében minden
használat után ürítse ki a portartályt és tisztítsa
meg a porszűrőt .
FIGYELEM! ANYAGI KÁR VESZÉLYE!
► Ne használjon súrolószert vagy erős hatású
tisztítószert! Ezek kárt tehetnek a felületben.
TUDNIVALÓ
► A LED - világítás 0 nem igényel karbantartást.
Az akkumulátorokat nem lehet cserélni!
Page 23

SHSS 12 C2
■ 20 │ HU
Portartály ürítése
1) A portartály kinyitásához vegye ki a kézi
egységet a kézi egység mélyedésből !.
2) Nyomja meg egyidejűleg a
gombokat,
és ugyanakkor húzza felfelé a portartályt .
Ezután felfelé/előre kiemelheti a tartályt.
3) Vegye ki a porszűrőt oly módon, hogy
kihúzza az ujjaival. Öblítse ki a porszűrőt
tiszta vízben és hagyja megszáradni a levegőn.
Ne használjon forró levegőt a porszűrő
szárításához.
4) Ezután vegye ki a durva szűrőt úgy, hogy
ezt is kihúzza.
3. ábra
5) Ürítse ki a portartályt .
6) Először a durva szűrőt , majd a száraz
porszűrőt helyezze vissza.
7) Helyezze vissza a portartályt úgy, hogy a
reteszt először a kézi egységen található
nyílásba tolja, majd a portartály elülső
részét erősen lefelé nyomja oly módon, hogy
a portartály bekattanjon és rögzítve
maradjon.
A készülék tisztítása
A készüléket nedves kendővel törölje át. Makacs
szennyeződések esetén tegyen enyhe mosogatószert a kendőre. Ügyeljen arra, hogy a készülék az
ismételt használat előtt újra teljesen száraz legyen.
Hengerkefe tisztítása
A hengerkefére . a használat során piszok, mint
például hajszál tapad. A szennyeződés eltávolításához a hengerkefét . ki lehet venni (4. ábra).
1) Fordítsa meg a padlótisztító kefét.
2) A fedőlemez reteszelését tolja hátra, így leveheti a fedőlemezt.
3) Emelje ki a hengerkefét ..
4) A hengerkefe . visszahelyezéséhez először
tolja a széles végét a meghajtó tengelyre, úgy
hogy a hengerkefe . ott beakadjon.
5) Ezt követően toljsa a másik végét a befogóba
úgy, hogy a hengerkefe egyenesen a padlótisztító szívófejen . legyen.
6) Helyezze vissza a fedőlemezt és reteszelje
megfelelően.
4. ábra
Page 24

SHSS 12 C2
HU
│
21 ■
Tárolás
■ A használaton kívüli készüléket helyezze a
tartóegységre ".
■ A réstisztító szívófejet 1 és a kefés szívófejet 6
a tartóegység " hátoldalán, a kefés szívófej
tartójára és a réstisztító szívófej tartójára /
helyezheti fel.
– Először a réstisztító szívófejet 1 úgy helyez-
ze a réstisztító szívófej tartójára /, hogy a
szívónyílás a tartóegység " felé mutasson.
– A kefés szívófejet 6 úgy helyezze fel a
kefés szívófej tartójára , hogy a réstisztító
szívófej 1 átfedje (5 és 6 ábra).
5. ábra
6. ábra
■ A készüléket pormentes és száraz helyen tárolja.
Hibaelhárítás
A készülék nem működik.
■ Az akkumulátor nincs feltöltve.
♦ Kösse össze a készüléket a töltőkészülékkel +.
■ A készülék elromlott.
♦ Forduljon az ügyfélszolgálathoz.
A készülék működik, de alig szívja fel
a port.
■ Az akkumulátor nincs eléggé feltöltve.
♦ Csatlakoztassa a készüléket a töltőkészülékhez +.
■ A portartály megtelt.
♦ Ürítse ki a portartályt .
■ A porszűrő eltömődött.
♦ Tisztítsa meg a porszűrőt .
A készülék nem töltődik fel.
■ A töltőkészülék + helytelenül csatlakozik a töl-
tőcsatlakozóba / hálózati csatlakozóaljzatba.
♦ Ellenőrizze a töltőkészülék + csatlakozásait.
■ A töltőkészülék + elromlott.
♦ Forduljon az ügyfélszolgálathoz.
Ártalmatlanítás
A készülék ártalmatlanítása
A készüléket semmi esetre se
dobja a háztartási szemétbe.
A termékre a 2012/19/EU
uniós irányelv vonatkozik.
A készüléket engedélyezett hulladékgyűjtő helyen,
vagy a helyi hulladékeltávolító üzemnél tudja leadni.
Vegye figyelembe a hatályos előírásokat. Ha bizonytalan, vegye fel a kapcsolatot a hulladékkezelővel.
Page 25

SHSS 12 C2
■ 22 │ HU
Az elemek/akkumulátorok
ártalmatlanítása
Az elemeket / akkumulátorokat tilos a háztartási szemétbe
dobni.
Minden felhasználó törvényben előírt kötelessége,
hogy az elemeket / akkumulátorokat települése
vagy városrésze gyűjtőhelyén vagy kereskedőnél
leadja.
Ez a kötelezettség azt a célt szolgálja, hogy az
elemek/akkumulátorok környezetkímélő ártalmatlanításra kerülhessenek. Az elemeket és akkumulátorokat csak lemerült állapotban adja le.
FIGYELEM! ANYAGI KÁR VESZÉLYE!
► Ha kinyitja a készüléket és az akkumulátort
kidobja, akkor a készülék javíthatatlanul sérül!
1) Az akkumulátor kiszerelése előtt teljesen süsse
ki az akkumulátort.
2) Vegye le a portartályt .
3) Lazítsa meg a kézi egység 5 hátoldalán
található rögzítőcsavart és nyissa szét a
készülékház két felét.
4) Húzza ki a motort a házfélből.
5) Csavarja ki a kék akkumulátort tartó két csavart
a műanyagtartón és vegye ki a műanyagtartót.
6) Harapófogó segítségével egyesével és egymás
után vágja át a kék akkumulátorhoz vezető kábeleket. Ügyeljen arra, hogy a fogó fémrészei
ne zárják rövidre a csupasz vezetékvégeket.
7) Vegye ki az akkumulátort és környezetbarát
módon ártalmatlanítsa.
A csomagolás környezetbarát anyagok-
ból van, amelyeket a helyi hulladékhasznosítónál adhat le.
A Kompernass Handels GmbH
garanciája
Tisztelt Vásárlónk!
A készülékre a vásárlás napjától számított 3 év
garanciát vállalunk. A termék meghibásodása
esetén. Önt jogszabályban foglalt jogok illetik meg
az eladóval szemben. Az alábbi garanciánk nem
korlátozza vagy szünteti meg a jogszabályban
biztosított jogokat.
Garanciális feltételek
A garanciális időszak a vásárlás napján kezdődik.
Gondosan őrizze meg az eredeti pénztári blokkot.
Ez a dokumentum a vásárlás igazolásához szükséges.
Ha a termékvásárlás napjától számított három éven
belül anyag- vagy gyártási hibát észlel, akkor a
terméket saját belátásunk szerint ingyenesen megjavítjuk vagy kicseréljük. A garancia feltétele, hogy
a három éves garanciaidőn belül be kell mutatni a
hibás készüléket és a vásárlást igazoló bizonylatot
(pénztári blokk) és röviden le kell írni, hogy miben
nyilvánul meg a hiba és mikor történt.
Ha garanciánk fedezetet nyújt a hibára, akkor
javított vagy egy új terméket kap vissza. A termék
javítása vagy cseréje esetén a garancia nem
kezdődik elölről.
Garanciális idő és a jogszabályban
foglalt szavatossági igények
A garancia ideje nem hosszabbodik meg a
jótállással. Ez a cserélt és javított alkatrészekre is
vonatkozik. Az esetlegesen már a vásárláskor is
fennálló sérüléseket és hiányosságokat a kicsomagolás után azonnal jelezni kell. A garanciai lejárta
után esedékes javítások díjkötelesek.
Page 26

SHSS 12 C2
HU
│
23 ■
A garancia köre
A készüléket szigorú minőségi előírások szerint
gyártottuk és kiszállítás előtt lelkiismeretesen
ellenőriztük.
A garancia anyag- vagy gyártási hibákra vonatkozik. A garancia nem terjed ki a termék normális
elhasználódásnak kitett és ezért kopó alkatrészeknek tekinthető alkatrészeire vagy a kapcsolókhoz,
akkumulátorokhoz, sütőformákhoz vagy üvegből
készült alkatrészekhez hasonló, törékeny alkatrészek sérülésére.
A garancia megszűnik akkor, ha a termék megsérül, nem megfelelően használják vagy nem tartják
karban. A termék megfelelő használata érdekében
a használati útmutatóban foglalt összes utasítást
pontosan be kell tartani. Feltétlenül kerülni kell
minden olyan felhasználási és kezelési módot, amit
a használati útmutató nem javasol, vagy amelynek
elkerülésére kifejezetten figyelmeztet.
A termék csak magánhasználatra és nem ipari
használatra készült. A garancia érvényét veszti viszszaélésszerű vagy szakszerűtlen kezelés, erőszak
alkalmazása vagy olyan beavatkozások esetén,
amelyeket általunk nem engedélyezett szervizben
végeztek el.
A garancia érvényesítése
Ügyének gyors feldolgozása érdekében kövesse a
következő utasításokat:
▯ Kérjük, hogy minden kapcsolatfelvételnél tartsa
készenlétben a vásárlást igazoló pénztári blokkot
és a cikkszámot (pl. IAN 12345).
▯ A cikkszámot az adattáblára gravírozottan, a
használati útmutató címlapján (bal alsó része)
vagy a termék hátoldalán, illetve az alján lévő
címkén található.
▯ Működési hiba vagy más hiba észlelése esetén
vegye fel a kapcsolatot az alábbi szervizrészleggel telefonon vagy e-mailben.
▯ Küldje el díjmentesen a megadott szerviz címére
a hibásnak talált terméket és a vásárlást igazoló
bizonylatot (pénztári blokk), illetve röviden írja
le azt is, hogy hol és mikor jelentkezett a hiba.
Más használati útmutatókhoz,
termékbemutató videókhoz és szoftverekhez hasonlóan ezt is letöltheti a
www.lidl-service.com oldalról.
Szerviz
Szerviz Magyarország
Tel.: 06800 21225
E-Mail: kompernass@lidl.hu
IAN 277091
Gyártja
Ügyeljen arra, hogy az alábbi cím nem a szerviz
címe. Először forduljon a megjelölt szervizhez.
KOMPERNASS HANDELS GMBH
BURGSTRASSE 21
44867 BOCHUM
GERMANY
www.kompernass.com
Page 27

SHSS 12 C2
■ 24 │ HU
Page 28

SHSS 12 C2
SI
│
25 ■
Kazalo
Uvod ...............................................................26
Predvidena uporaba ..................................................26
Vsebina kompleta ....................................................26
Opis naprave
........................................................26
Tehnični podatki ......................................................27
Varnostni napotki .....................................................27
Pred prvo uporabo
....................................................30
Polnjenje naprave ....................................................30
Vgradnja/odstranjevanje ..............................................30
Pritrditev ročnega sesalnika na ročaj in njegova odstranitev ................................30
Uporaba ............................................................31
Uporaba ročnega sesalnika z ročajem sesalnika za prah ...................................31
Uporaba ročnega sesalnika
......................................................... 31
Čiščenje in vzdrževanje ................................................31
Praznjenje zbiralnika umazanije
......................................................32
Čiščenje naprave .................................................................32
Čiščenje valjčka s krtačo ...........................................................32
Shranjevanje .........................................................33
Odprava napak ......................................................33
Odstranjevanje med odpadke
..........................................33
Odstranitev naprave med odpadke ...................................................33
Odstranitev baterij/akumulatorjev ....................................................34
Proizvajalec .........................................................34
Pooblaščeni serviser. . . . . . . . . . . . . . . . . . . . . . . . . . . . . . . . . . . . . . . . . . . . . . . . . . . 34
Garancijski list .......................................................34
Page 29

SHSS 12 C2
■ 26 │ SI
ROČNI IN TALNI
AKUMULATORSKI SESALNI
Uvod
Iskrene čestitke ob nakupu vaše nove naprave.
Odločili ste se za kakovosten izdelek. Navodila
za uporabo so sestavni del izdelka. Vsebujejo
pomembne napotke za varnost, uporabo in odstranjevanje naprave med odpadke. Preden začnete
izdelek uporabljati, se seznanite z vsemi napotki
o njegovi uporabi in varnosti. Izdelek uporabljajte
le tako, kot je opisano v navodilih, in samo za
navedena področja uporabe. Ob predaji izdelka
tretji osebi zraven priložite vso dokumentacijo.
Predvidena uporaba
Ta naprava je namenjena izključno za sesanje
suhih površin oz. suhih snovi za sesanje. Naprava
je namenjena izključno za uporabo v zasebnih
gospodinjstvih. Ljudi ali živali se s to napravo ne
sme sesati. Vsaka druga vrsta uporabe ali sprememba naprave velja za nepredvideno in pomeni
bistveno nevarnost nezgod. Proizvajalec ne odgovarja za škodo, ki bi nastala zaradi nepredvidene
ali napačne uporabe. Naprava ni predvidena za
poslovno uporabo.
Vsebina kompleta
Ročni in talni akumulatorski sesalnik
Šoba s krtačo
Šoba za blazine
Šoba za reže
Podaljšek ročaja s šobo za tla
Držalo (z vtičnico za polnjenje)
Polnilnik
Navodila za uporabo
Takoj po razpakiranju preverite, ali so v kompletu
vsi potrebni deli.
Opis naprave
Slika A:
ročaj ročnega sesalnika
stikalo za vklop/izklop
kontrolna lučka polnjenja
ročni sesalnik
tipki
filter za prah
grobi filter
zbiralnik umazanije
Slika B:
stikalo za vklop/izklop
ročaj
- tipka za sprostitev ročaja
3 tipka za sprostitev ročnega sesalnika
! vdolbina za ročni sesalnik
. valjček s krtačo
0 LED-osvetljava
Slika C:
6 šoba s krtačo
1 ozka šoba
% šoba za blazine
+ polnilnik
, votli vtič polnilnika
držalo šobe s krtačo
/ držalo ozke šobe
vtičnica za polnjenje
" držalo (z vtičnico za polnjenje)
Page 30

SHSS 12 C2
SI
│
27 ■
Tehnični podatki
Polnilnik
Vhod: 100 - 240 V~ 50/60 Hz, 300 mA max.
Izhod: 13,5 V
500 mA
Oznaka tipa: SHSS 12 C2-1
Razred zaščite: II /
Šoba
Nazivna moč: 5 W
Razred zaščite: III /
Vhodna napetost: 10,8 V 1800 mAh
Naprava
Vhodna napetost/tok: 13,5 V
500 mA
Nazivna moč: 75 W
Razred zaščite: III /
Akumulatorske
baterije: Li-Ion (10,8 V) 1800 mAh
Akumulatorski paket: 3 celice s po 3,6 V
Čas delovanja pri polnih akumulatorskih baterijah
(odvisno od talne obloge): pribl. 15 minut
Čas polnjenja prazne akum. baterije: 5–6 ur
Varnostni napotki
NEVARNOST ‒ ELEKTRIČNI UDAR!
► Naprave ne polnite ali uporabljajte na prostem.
► Sesalnika za prah nikoli ne uporabljajte, če so kabel, vtič ali ohišje
poškodovani.
► Da se izognete nevarnosti, naj vam poškodovane električne vtiče ali
električne kable takoj zamenja pooblaščeno strokovno osebje.
► Napravo dajte v popravilo samo ustreznemu strokovnemu servisu.
Naprave nikoli ne odpirajte sami. Posegi, ki jih ni izvedlo strokovno
podjetje, lahko privedejo do poškodb.
► Pred vklopom naprave se prepričajte, da napetost, navedena v teh-
ničnih podatkih naprave, odgovarja omrežni napetosti.
► Električnega napajalnika/polnilnika ali naprave nikoli ne prijemajte z
mokrimi ali vlažnimi rokami.
► Električnega napajalnika/polnilnika ne uporabljajte s podaljškom za
kabel, temveč električni napajalnik neposredno priključite v vtičnico.
Page 31

SHSS 12 C2
■ 28 │ SI
OPOZORILO! NEVARNOST TELESNE POŠKODBE!
► Med delovanjem naprave ne zamenjujte delov pribora.
► Sesalnika za prah ne uporabljajte za sesanje vode ali drugih tekočin.
► Sesalnika za prah ne uporabljajte za sesanje ostrih predmetov ali
črepinj.
► Nikoli ne sesajte gorečih vžigalic, tlečega pepela ali cigaretnih ogorkov.
► Sesalnika za prah ne uporabljajte za sesanje kemičnih izdelkov,
kamnitega praha, mavca, cementa ali drugih podobnih delcev.
► Naprava ni primerna za vnetljive in eksplozivne snovi ali kemične in
agresivne tekočine.
► Napravo zmeraj hranite v zaprtih prostorih. Za preprečevanje ne-
zgod napravo po uporabi shranite na suhem mestu.
► Pod izrednimi pogoji lahko pride do nastanka mest puščanja na
celicah akumulatorske baterije. Ob stiku tekočine s kožo ali očmi je
treba prizadeto mesto takoj izprati oz. splahniti s čisto vodo. Poiščite
zdravniško pomoč.
► Otroci od 8. leta starosti naprej in osebe z zmanjšanimi fizičnimi,
zaznavnimi ali duševnimi sposobnostmi ali s pomanjkljivimi izkušnjami in znanjem smejo to napravo uporabljajo le, če jih pri tem nekdo
nadzoruje ali jih je poučil o varni uporabi naprave in so razumeli
nevarnosti, ki izhajajo iz uporabe naprave. Otroci se z napravo ne
smejo igrati. Otroci tudi ne smejo naprave čistiti ali vzdrževati kot
uporabniki, če pri tem niso pod nadzorom.
Page 32

SHSS 12 C2
SI
│
29 ■
OPOZORILO! NEVARNOST TELESNE POŠKODBE!
► Uporabljajte samo dele pribora, ki jih priporoča proizvajalec.
► Električnega napajalnika ni dovoljeno uporabljati za druge namene.
► Da napravo ločite od oskrbe z električnim tokom, zmeraj primite
električni vtič.
► Nujno pazite, da sesalnika za prah ne odložite poleg radiatorjev,
peči ali drugih segretih naprav ali površin.
► Zmeraj preverite, ali so prezračevalne reže proste. Blokiran krogotok
zraka lahko privede do pregretja in poškodbe naprave.
► Bodite še posebej pozorni, ko sesalnik za prah uporabljate na stopnicah.
► Ta izdelek vsebuje akumulatorske baterije za polnjenje. Naprave ne
vrzite v ogenj in je ne izpostavljajte visokim temperaturam. Obstaja
nevarnost eksplozije!
► Pred čiščenjem valjčka s krtačo vedno vzemite ročni sesalnik iz ročaja
sesalnika za prah, da preprečite nenamerni zagon valjčka s krtačo.
POZOR! MATERIALNA ŠKODA!
► Sesalnika za prah ne uporabljajte brez vstavljenega filtra za prah.
► Polnilnika ne uporabljajte za kakšen drug izdelek in ne poskušajte te
naprave polniti z drugim polnilnikom. Uporabljajte samo polnilnik,
priložen tej napravi.
► Nikoli ne poskušajte polniti baterij, ki niso namenjene za polnjenje.
Page 33

SHSS 12 C2
■ 30 │ SI
Pred prvo uporabo
NAPOTEK
► Naprava se dobavi s praznimi akumulatorskimi
baterijami. Pred prvo uporabo je akumulatorske
baterije najprej treba polniti 6 ur.
■ Z naprave odstranite vse embalažne materiale
in zaščitne nalepke, zlasti pa zaščitno nalepko
na kontaktih na hrbtni strani ročnega dela .
■ Držalo " nataknite na stojalo, da se držalo "
zaskoči.
Polnjenje naprave
NAPOTEK
► Pred začetkom polnjenja se prepričajte, da je
naprava izklopljena.
■ Za polnjenje naprave povežite polnilnik +
z električno vtičnico in vtaknite votli vtič ,
v vtičnico za polnjenje na držalu ".
Speljite kabel skozi kabelski kanal na vtičnici
za polnjenje , tako da držalo " ne stoji na
kablu.
■ Namestite ročaj z vstavljenim ročnim sesalnikom
na držalo ".
Kontrolna lučka polnjenja sveti rdeče.
– Pri modelu v barvi
antracit/zelena:
Ko je naprava napolnjena, sveti kontrolna
lučka polnjenja zeleno.
– Pri modelu v barvi
antracit/rdeča:
Ko je naprava napolnjena, sveti kontrolna
lučka polnjenja oranžno.
Vgradnja/odstranjevanje
Pritrditev ročnega sesalnika na ročaj
in njegova odstranitev
Slika 1 Slika 2
■ Za pritrditev ročnega sesalnika na ročaj
sesalnika za prah potisnite konico ročnega
sesalnika v odprtino vdolbine za ročni
sesalnik !.
■ Potem potisnite ročaj ročnega sesalnika
v ročaj sesalnika za prah, tako da se ročni
sesalnik zaskoči in je trdno pritrjen (slika1).
■ Za odstranite ročnega sesalnika iz ročaja
sesalnika za prah pritisnite tipko za sprostitev
ročaja 3.
■ Povlecite ročni sesalnik navzgor/naprej iz
vdolbine za ročni sesalnik ! (slika2).
Page 34

SHSS 12 C2
SI
│
31 ■
Uporaba
POZOR! MATERIALNA ŠKODA!
► Sesalna odprtina mora biti ves čas prosta in
ne sme biti zamašena. Zamašitve privedejo
do pregretja in poškodbe motorja.
► S šobo za tla ne sesajte debelih preprog.
Valjček s krtačo . bi se zataknil v preprogi
in zablokiral!
NAPOTEK
► Pazite na to, da sta filter za prah in grobi
filter pred začetkom uporabe naprave
zmeraj vstavljena.
► Ko se moč sesanja opazno zmanjša, napravo
ponovno priključite na polnilnik +.
Uporaba ročnega sesalnika z ročajem
sesalnika za prah
1) Vstavite ročni sesalnik v vdolbino za ročni
sesalnik !, kot je opisano v poglavju »Vgradnja/odstranjevanje«.
2) Razprite ročaj , tako da pritisnete tipko
za sprostitev ročaja - in istočasno ročaj
potegnete navzgor.
3) Napravo vklopite s stikalom za vklop/izklop .
LED-osvetljava 0 na šobi za tla sveti in valjček
s krtačo . se vrti.
4) Šobo za tla pomikajte čez mesta, ki jih želite
posesati. Pri tem ročaj držite tako, da šoba
neprekinjeno drsi po tleh.
5) Ko želite sesanje zaključiti, pritisnite stikalo za
vklop/izklop . Valjček s krtačo . se zaustavi
in LED-osvetljava 0 ugasne.
Uporaba ročnega sesalnika
1) Vzemite ročni sesalnik iz vdolbine za ročni
sesalnik !, kot je opisano v poglavju »Vgradnja/odstranjevanje«.
2) Po želji namestite ozko šobo 1, nastavek s
ščetko 6ali šobo za blazine %.
3) Pritisnite stikalo za vklop/izklop in želena
mesta posesajte.
4) Ko želite sesanje zaključiti, še enkrat pritisnite
stikalo za vklop/izklop .
Čiščenje in vzdrževanje
OPOZORILO!
NEVARNOST TELESNE POŠKODBE!
► Vedno povlecite polnilnik +iz električne
vtičnice in ločite votli vtič , iz vtičnice za
polnjenje na držalu ", preden začnete
čistiti držalo ".
► Vedno vzemite ročni sesalnik iz vdolbine
za ročni sesalnik !na ročaju sesalnika za
prah, preden začnete ročni sesalnik , ročaj
sesalnika za prah ali valjček s krtačo . čistiti.
Za najboljše rezultate zbiralnik umazanije izpraznite in očistite filter za prah po vsaki uporabi.
POZOR! MATERIALNA ŠKODA!
► Ne uporabljajte grobih ali agresivnih čistilnih
sredstev. Ta bi lahko poškodovala površino!
NAPOTEK
► LED-osvetljave 0 ni treba vzdrževati.
LED-lučk tudi ni mogoče zamenjati!
Page 35

SHSS 12 C2
■ 32 │ SI
Praznjenje zbiralnika umazanije
1) Za odpiranje zbiralnika umazanije vzemite
ročni sesalnik iz vdolbine za ročni sesalnik !.
2) Istočasno pritisnite obe tipki
in pri tem
povlecite zbiralnik umazanije navzgor.
Sedaj ga lahko pomaknete navzgor/naprej.
3) Odstranite filter za prah , tako da ga izvle-
čete s prsti. Izperite filter za prah s čisto
vodo in ga pustite, da se posuši na zraku. Ne
uporabljajte vročega zraka za sušenje filtra za
prah .
4) Potem odstranite grobi filter in tudi tega
izvlecite.
Slika 3
5) Izpraznite zbiralnik umazanije .
6) Najprej vstavite grobi filter , potem pa še
suhi filter za prah .
7) Ponovno namestite zbiralnik umazanije ,
tako da zaskočni nastavek najprej potisnete
v odprtino na ročnem sesalniku in potem
sprednji del zbiralnika umazanije krepko
potisnete navzdol, tako da se zbiralnik umazanije zaskoči in je trdno pritrjen.
Čiščenje naprave
Napravo obrišite z vlažno krpo. V primeru trdovratne
umazanije dodajte na krpo še blago sredstvo za
pomivanje. Poskrbite, da bo naprava pred naslednjo
uporabo popolnoma suha.
Čiščenje valjčka s krtačo
Na valjček s krtačo . se lahko sčasoma prilepi
umazanija, npr. lasje. Za odstranitev te umazanije
lahko valjček s krtačo . odstranite (slika 4).
1) Šobo za tla obrnite.
2) Potisnite zapah na prekrivni plošči nazaj, tako
da lahko prekrivno ploščo snamete.
3) Dvignite valjček s krtačo . in ga vzemite ven.
4) Za ponovno vstavitev valjčka s krtačo .
najprej potisnite širši konec na pogonsko gred,
tako da se valjček s krtačo . tam zaskoči.
5) Potem potisnite drugi konec v sprejemni nastavek, tako da se valjček s krtačo . šobi za tla
ravno prilega.
6) Ponovno namestite prekrivno ploščo in jo trdno
privijte.
Slika 4
Page 36

SHSS 12 C2
SI
│
33 ■
Shranjevanje
■ Ko naprave ne uporabljate, jo odložite na
držalo ".
■ Ozko šobo 1 in šobo s krtačo 6 lahko nata-
knete na zadnji strani držala " na držalo šobe
s krtačo in na držalo ozke šobe /.
– Najprej nataknite ozko šobo 1 na držalo
za ozko šobo /, tako da je sesalna odprtina obrnjena proti držalu ".
– Nato nataknite šobo s krtačo 6 na držalo
šobe s krtačo , tako da se prekriva s
koncem ozke šobe 1 (slika 5 in 6).
Slika 5
Slika 6
■ Napravo hranite na čistem in suhem mestu brez
prisotnosti prahu.
Odprava napak
Naprava ne deluje.
■ Akumulatorska baterija ni napolnjena.
♦ Napravo priključite na polnilnik +.
■ Naprava je okvarjena.
♦ Obrnite se na servisno službo.
Naprava teče, vendar sesa le malo
umazanije.
■ Akumulatorska baterija ni dovolj napolnjena.
♦ Napravo priključite na polnilnik +.
■ Zbiralnik umazanije je poln.
♦ Izpraznite zbiralnik umazanije .
■ Filter za prah je zamašen.
♦ Očistite filter za prah .
Naprave ni mogoče napolniti.
■ Polnilnik + ni pravilno vtaknjen v vtičnico/
električni vtič.
♦ Preverite priključke polnilnika +.
■ Polnilnik + je okvarjen.
♦ Obrnite se na servisno službo.
Odstranjevanje med odpadke
Odstranitev naprave med odpadke
Naprave nikakor ne odvrzite
med običajne gospodinjske
odpadke. Za izdelek
velja evropska direktiva
2012/19/EU.
Napravo oddajte pri podjetju, registriranem za
odstranjevanje odpadkov, ali pri svojem komunalnem
podjetju za odstranjevanje odpadkov. Upoštevajte trenutno veljavne predpise. V primeru dvoma se obrnite
na najbližje podjetje za odstranjevanje odpadkov.
Page 37

SHSS 12 C2
Odstranitev baterij/akumulatorjev
Baterij/akumulatorjev ne
smete odvreči v gospodinjske
odpadke.
Vsak porabnik je po zakonu dolžan oddati baterije/
akumulatorje na zbirališču svoje občine/svoje četrti
ali jih oddati v trgovini.
Ta obveza služi temu, da se baterije/akumulatorji
lahko oddajo za okolju prijazno odstranjevanje.
Baterije/akumulatorje oddajajte samo prazne.
POZOR! MATERIALNA ŠKODA!
► Če napravo odprete in odstranite akumulatorske
baterije, se naprava nepopravljivo poškoduje!
1) Preden akumulatorsko baterijo začnete odstranjevati, jo popolnoma izpraznite.
2) Snemite zbiralnik umazanije 8.
3) Odvijte 5 vijakov na hrbtni strani ročnega
sesalnika 4 in obe polovici ohišja razstavite.
4) Povlecite motor iz polovice ohišja.
5) Odvijte oba vijaka na plastičnem držalu, ki
drži modro akumulatorsko baterijo, in plastični
držalo vzemite ven.
6) S kleščami posamično in eno za drugo presekajte žile, ki vodijo do modre akumulatorske
baterije. Pazite na to, da golih koncev kabla
ne zvežete na kratko s kovinskimi deli klešč.
7) Akumulatorsko baterijo vzemite ven in jo
odstranite na ekološko primeren način.
Embalaža je iz okolju prijaznih mate-
rialov in jo lahko oddate na lokalnih
zbirališčih reciklažnih odpadkov.
Proizvajalec
KOMPERNASS HANDELS GMBH
BURGSTRASSE 21
44867 BOCHUM
GERMANY
www.kompernass.com
Pooblaščeni serviser
Garancijski list
1) S tem garancijskim listom Kompernass Handels
GmbH jamčimo, da bo izdelek v garancijskem
roku ob normalni in pravilni uporabi brezhibno
deloval in se zavezujemo, da bomo ob izpolnjenih spodaj navedenih pogojih odpravili
morebitne pomanjkljivosti in okvare zaradi napak
v materialu ali izdelavi oziroma po svoji presoji
izdelek zamenjali ali vrnili kupnino.
2) Garancija je veljavna na ozemlju Republike
Slovenije.
3) Garancijski rok za proizvod je 3 leta od datuma izročitve blaga. Datum izročitve blaga je
razviden iz računa.
4) Kupec je dolžan okvaro javiti pooblaščenemu
servisu oziroma se informirati o nadaljnjih postopkih na zgoraj navedeni telefonski številki.
Svetujemo vam, da pred tem natančno preberete navodila o sestavi in uporabi izdelka.
5) Kupec je dolžan pooblaščenemu servisu
predložiti garancijski list in račun, kot potrdilo
in dokazilo o nakupu ter dnevu izročitve blaga.
6) V primeru, da proizvod popravlja nepooblaščeni servis ali oseba, kupec ne more uveljavljati
zahtevkov iz te garancije.
7) Vzroki za okvaro oziroma nedelovanje izdelka
morajo biti lastnosti stvari same in ne vzroki, ki
so zunaj proizvajalčeve oziroma prodajalčeve
sfere. Kupec ne more uveljavljati zahtevkov iz
te garancije, če se ni držal priloženih navodil
za sestavo in uporabo izdelka ali če je izdelek
kakorkoli spremenjen ali nepravilno vzdrževan.
8) Jamčimo servisiranje in rezervne dele za minimalno dobo, ki je zahtevana s strani zakonodaje.
9) Obrabni deli oz. potrošni material so izvzeti iz
garancije.
10) Vsi potrebni podatki za uveljavljanje garancije
se nahajajo na dveh ločenih dokumentih
(garancijski list, račun).
11) Ta garancija proizvajalca ne izključuje pravic
potrošnika, ki izhajajo iz odgovornosti prodajalca
za napake na blagu.
Servis Slovenija
Tel.: 080080917
E-Mail: kompernass@lidl.si
IAN 277091
■ 34 │ SI
Prodajalec:
Lidl Slovenija d.o.o. k.d., Pod lipami 1, SI-1218
Komenda
Page 38

SHSS 12 C2
CZ
│
35 ■
Obsah
Úvod ...............................................................36
Použití vsouladu surčením .............................................36
Rozsah dodávky ......................................................36
Popis přístroje
........................................................36
Technické údaje ......................................................37
Bezpečnostní pokyny ..................................................37
Před prvním použitím
..................................................40
Nabíjení přístroje .....................................................40
Montáž / demontáž ...................................................40
Vložení/vyjmutí ručního vysavače do / znásady ..........................................40
Obsluha .............................................................41
Použití ručního vysavače snásadou ...................................................41
Použití ručního vysavače
...........................................................41
Čištění a údržba ......................................................41
Vyprázdnění prachové nádobky
.....................................................42
Čištění přístroje ................................................................... 42
Čištění rotačního kartáče ...........................................................42
Skladování ..........................................................43
Odstranění poruch ....................................................43
Likvidace
............................................................43
Likvidace přístroje .................................................................43
Likvidace baterií / akumulátorů ......................................................44
Záruka společnosti Kompernass Handels GmbH ............................44
Servis
..........................................................................45
Dovozce ........................................................................45
Page 39

SHSS 12 C2
■ 36 │ CZ
AKUMULÁTOROVÝ VYSAVAČ
Úvod
Gratulujeme vám kzakoupení nového přístroje.
Rozhodli jste se pro vysoce kvalitní výrobek. Návod
kobsluze je součástí tohoto výrobku. Obsahuje
důležité informace obezpečnosti, použití a likvidaci.
Před použitím výrobku se prosím dobře seznamte
se všemi provozními a bezpečnostními pokyny.
Výrobek používejte pouze předepsaným způsobem
a pro uvedené oblasti použití. Při předávání výrobku
třetím osobám předejte spolu sním i tyto podklady.
Použití vsouladu surčením
Tento přístroj slouží výhradně kvysávání suchých
ploch, resp. suchého materiálu. Tento přístroj je určen
výhradně kpoužití vdomácnostech pro soukromé
účely. Prach zlidí a zvířat se nesmí tímto přístrojem
vysávat. Jakékoli jiné použití nebo úprava přístroje
jsou považovány za použití vrozporu surčením
a představují závažné nebezpečí zranění. Výrobce
neodpovídá za škody vzniklé použitím kjinému
účelu nebo za škody vzniklé nesprávnou obsluhou.
Přístroj není určen pro komerční použití.
Rozsah dodávky
akumulátorový vysavač
kartáčová hubice
tryska na čalounění
štěrbinová hubice
prodlužovací násada spodlahovou hubicí
stojánek (snabíjecí zdířkou)
nabíječka
návod kobsluze
Ihned po vybalení výrobku zkontrolujte, zda je
vkompletním stavu.
Popis přístroje
ObrázekA:
rukojeť ručního vysavače
vypínač
kontrolka nabíjení
ruční vysavač
tlačítka
prachový filtr
hrubý filtr
prachová nádobka
ObrázekB:
vypínač
rukojeť
- odblokování „rukojeti“
3 odblokování „ručního vysavače“
! prohlubeň pro ruční vysavač
. rotační kartáč
0 LED diody
ObrázekC:
6 kartáčová hubice
1 štěrbinová hubice
% tryska na čalounění
+ nabíječka
, dutý konektor nabíječky
držák kartáčové hubice
/ držák štěrbinové hubice
nabíjecí zdířka
" stojánek (snabíjecí zdířkou)
Page 40

SHSS 12 C2
CZ
│
37 ■
Technické údaje
Nabíječka
Vstup: 100 - 240V ~, 50 / 60Hz, 300mA max.
Výstup: 13,5V
500mA
Označení typu: SHSS 12 C2-1
Třída ochrany: II /
Podlahová hubice
Jmenovitý výkon: 5W
Třída ochrany: III /
Vstupní napětí: 10,8V 1800mAh
Přístroj
Vstupní napětí /
vstupní proud: 13,5V
500mA
Jmenovitý výkon: 75W
Třída ochrany: III /
Akumulátory: Li-Ion (10,8V) 1800mAh
Pouzdro s bateriemi: 3články po 3,6V
Doba provozu při plném nabití akumulátorů
(vzávislosti na podlahové krytině): cca 15min.
Doba nabíjení vpřípadě
prázdných akumulátorů: 5 - 6hod.
Bezpečnostní pokyny
NEBEZPEČÍ ÚRAZU ELEKTRICKÝM PROUDEM!
► Nenabíjejte, resp. nepoužívejte tento přístroj venku.
► Ruční vysavač nikdy nepoužívejte, je-li poškozen kabel, zástrčka nebo
kryt přístroje.
► Poškozenou napájecí zástrčku nebo poškozený napájecí kabel nechte
okamžitě vyměnit autorizovaným odborným personálem, aby se tak
zabránilo nebezpečí.
► Opravy nechte provádět pouze odbornou servisní firmou. Za žád-
ných okolností přístroj sami neotvírejte. Zásahy a opravy, které nebyly
provedeny odbornou firmou, mohou vést ke zranění.
► Před zapnutím přístroje se přesvědčte otom, zda napětí uvedené
vtechnických údajích přístroje odpovídá napětí ve vaší síti.
► Nedotýkejte se síťového zdroje/nabíječky nebo přístroje mokrýma či
vlhkýma rukama.
► Nepoužívejte síťový zdroj/nabíječku sprodlužovacím kabelem, spojte
síťový zdroj přímo se zásuvkou.
Page 41

SHSS 12 C2
■ 38 │ CZ
VÝSTRAHA! NEBEZPEČÍ ZRANĚNÍ!
► Nevyměňujte díly příslušenství, dokud je přístroj vprovozu.
► Nepoužívejte ruční vysavač kvysávání vody či jiných kapalin.
► Nepoužívejte ruční vysavač kvysávání ostrých předmětů nebo skle-
něných střepů.
► Nikdy nevysávejte hořící zápalky, žhavý popel nebo cigaretové
nedopalky.
► Nepoužívejte ruční vysavač kvysávání chemických produktů, kamen-
ného prachu, sádry, cementu nebo jiných podobných částic.
► Přístroj není vhodný pro vysávání hořlavých a výbušných látek nebo
chemických a agresivních kapalin.
► Přístroj uchovávejte vždy vuzavřených místnostech. Abyste zabránili
nehodám, uchovávejte přístroj po použití na suchém místě.
► Za extrémních podmínek mohou akumulátorové články vytéct. Při
zasažení očí nebo pokožky kapalinou musí být zasažené místo ihned
vypláchnuto, resp. opláchnuto čistou vodou. Vyhledejte lékaře.
► Děti od 8let a osoby somezenými fyzickými, smyslovými nebo
mentálními schopnostmi či nedostatkem zkušeností a znalostí mohou
používat tento přístroj pouze tehdy, pokud jsou pod dohledem nebo
pokud byly poučeny obezpečném používání přístroje a pokud porozuměly ztoho vyplývajícímu nebezpečí. Děti si nesmí hrát spřístrojem.
Čištění a uživatelskou údržbu nesmí provádět děti bez dozoru.
Page 42

SHSS 12 C2
CZ
│
39 ■
VÝSTRAHA! NEBEZPEČÍ ZRANĚNÍ!
► Používejte jen příslušenství doporučené výrobcem.
► Síťový zdroj se nesmí používat pro jiné účely.
► Chcete-li přístroj odpojit od napájení, uchopte zástrčku a vytáhněte ji
ze zásuvky.
► Bezpodmínečně dbejte na to, abyste ruční vysavač neodstavili
vedle topných těles, pečicích trub nebo jiných zahřátých spotřebičů
či ploch.
► Dbejte na to, aby větrací štěrbiny byly stále volné. Zablokovaný oběh
vzduchu může vést kpřehřátí a poškození přístroje.
► Postupujte velmi opatrně, používáte-li ruční vysavač na schodech.
► Tento výrobek obsahuje dobíjecí akumulátory. Nevhazujte přístroj do
ohně a nevystavujte jej vysokým teplotám. Hrozí nebezpečí výbuchu!
► Před čištěním rotačního kartáče vždy vyjměte ruční vysavač znásady,
aby se zabránilo nechtěnému spuštění rotačního kartáče.
POZOR! VĚCNÉ ŠKODY!
► Nepoužívejte ruční vysavač bez nasazeného prachového filtru.
► Nepoužívejte dodanou nabíječku pro jiný výrobek a nepokoušejte se
nabíjet tento přístroj jinou nabíječkou. Používejte pouze nabíječku
dodanou stímto přístrojem.
► Nikdy se nepokoušejte nabíjet běžné baterie (které nelze nabíjet)!
Page 43

SHSS 12 C2
■ 40 │ CZ
Před prvním použitím
UPOZORNĚNÍ
► Přístroj se dodává snenabitými bateriemi. Před
prvním použitím přístroje se baterie nejprve
musí 6hodin nabíjet.
■ Odstraňte z přístroje veškerý obalový materiál a
ochrannou nálepku, zejména ochrannou nálepku na kontaktech na zadní straně ruční části .
■ Nasaďte držák " na stojánek tak, aby držák "
zaskočil.
Nabíjení přístroje
UPOZORNĚNÍ
► Před nabíjením se ujistěte, že je přístroj vypnutý.
■ Chcete-li přístroj nabít, zapojte nabíječku + do
síťové zásuvky a zasuňte dutý konektor , do
nabíjecí zdířky na stojánku ".
Protáhněte kabel kabelovým kanálem unabíjecí
zdířky , aby stojánek " nestál na kabelu.
■ Postavte násadu se vsazeným ručním vysavačem
do stojánku ".
Kontrolka nabíjení svítí červeně.
– U tohoto modelu v barvách
antracitová / zelená:
Když je přístroj nabitý, svítí kontrolka
nabíjení zeleně.
– U tohoto modelu v barvách
antracitová / červená:
Když je přístroj nabitý, svítí kontrolka
nabíjení oranžově.
Montáž / demontáž
Vložení/vyjmutí ručního vysavače do /
znásady
Obr.1 Obr.2
■ Kvložení ručního vysavače do násady zasuňte
špičku ručního vysavače do vybrání vpro-
hlubni pro ruční vysavač !.
■ Poté zatlačte rukojeť ručního vysavače do
násady tak, aby do ní ruční vysavač pevně
zacvakl (Obr.1).
■ Kvyjmutí ručního vysavače znásady stiskněte
odblokování „ručního vysavače“ 3.
■ Ruční vysavač vytáhněte směrem nahoru/
dopředu zprohlubně pro ruční vysavač !
(Obr.2).
Page 44

SHSS 12 C2
CZ
│
41 ■
Obsluha
POZOR! VĚCNÉ ŠKODY!
► Sací otvor musí být neustále volný a nesmí být
ucpaný. Ucpání vede kpřehřátí a poškození
motoru.
► Nevysávejte podlahovou hubicí koberce svy-
sokým vlasem. Rotační kartáč . se vkoberci
zachytí a zablokuje!
UPOZORNĚNÍ
► Dbejte na to, aby před použitím přístroje byl
vždy nasazen prachový filtr a hrubý filtr .
► Vpřípadě citelného snížení sacího výkonu
zapojte přístroj do nabíječky +.
Použití ručního vysavače snásadou
1) Vložte ruční vysavač do prohlubně pro ruční
vysavač ! tak, jak je popsáno vkapitole
„Montáž / demontáž“.
2) Stisknutím odblokovacího tlačítka „rukojeti“ a současným tahem za rukojeť směrem
nahoru vyklopte rukojeť .
3) Zapněte přístroj vypínačem . LED diody 0
na podlahové hubici svítí a rotační kartáč .
se točí.
4) Přejíždějte podlahovou hubicí přes místa, která
chcete vysát. Rukojeť přitom držte tak, aby
podlahová hubice rovně klouzala po podlaze.
5) Pokud chcete vysávání ukončit, stiskněte
vypínač . Rotační kartáč . se zastaví a LED
diody 0 zhasnou.
Použití ručního vysavače
1) Vyjměte ruční vysavač zprohlubně pro ruční
vysavač ! tak, jak je popsáno vkapitole
„Montáž / demontáž“.
2) V případě potřeby nasaďte štěrbinovou
hubici 1, kartáčový nástavec 6 nebo trysku
na čalounění %.
3) Stiskněte vypínač a vysajte požadovaná
místa.
4) Pokud chcete vysávání ukončit, stiskněte opět
vypínač .
Čištění a údržba
VÝSTRAHA! NEBEZPEČÍ ZRANĚNÍ!
► Před čištěním stojánku " vytáhněte vždy nabí-
ječku +ze síťové zásuvky a dutý konektor ,
znabíjecí zdířky na stojánku ".
► Před čištěním ručního vysavače , násady
nebo rotačního kartáče . vždy vyjměte ruční
vysavač zprohlubně pro ruční vysavač !
na násadě.
Pro dosažení nejlepších výsledků po každém použití vyprázdněte prachovou nádobku a vyčistěte
prachový filtr .
POZOR! VĚCNÉ ŠKODY!
► Nepoužívejte abrazivní nebo agresivní čisticí
prostředky. Mohou poškodit povrch přístroje!
UPOZORNĚNÍ
► LED diody 0 jsou bezúdržbové. LED diody
nelze vyměnit!
Page 45

SHSS 12 C2
■ 42 │ CZ
Vyprázdnění prachové nádobky
1) Kotevření prachové nádobky vyjměte ruční
vysavač zprohlubně pro ruční vysavač !.
2) Stiskněte současně obě tlačítka
a vytáhněte přitom prachovou nádobku směrem
nahoru.
Nyní ji můžete odklopit směrem nahoru/
dopředu.
3) Pomocí prstů vytáhněte prachový filtr .
Propláchněte prachový filtr včisté vodě a
nechte jej na vzduchu vyschnout. Nepoužívejte
ksušení prachového filtru horký vzduch.
4) Poté vytáhněte i hrubý filtr .
Obr.3
5) Vyprázdněte prachovou nádobku .
6) Vložte opět hrubý filtr a následně i suchý
prachový filtr .
7) Prachovou nádobku opět nasadíte tak,
že nejprve zasunete zarážku do vybrání na
ručním vysavači a poté silně zatlačíte na
přední část prachové nádobky směrem
dolů tak, aby prachová nádobka pevně
zacvakla.
Čištění přístroje
Otřete přístroj vlhkým hadříkem. Vpřípadě většího
znečištění přidejte na hadřík jemný mycí prostředek.
Dbejte na to, aby byl přístroj před dalším použitím
úplně suchý.
Čištění rotačního kartáče
Na rotačním kartáči . se mohou časem usazovat
nečistoty jako např. vlasy. Kodstranění těchto
nečistot lze rotační kartáč . demontovat (Obr.4).
1) Otočte podlahovou hubici.
2) Odsuňte blokování na krytu dozadu, aby bylo
možné kryt sejmout.
3) Vyjměte rotační kartáč ..
4) Pro opětovné vložení rotačního kartáče .
nasuňte nejprve jeho široký konec na hnací
hřídel, aby se vněm rotační kartáč . zahákl.
5) Poté zasuňte druhý konec do uchycení, aby rotační kartáč . ležel rovně vpodlahové hubici.
6) Opět nasaďte kryt a zablokujte jej.
Obr.4
Page 46

SHSS 12 C2
CZ
│
43 ■
Skladování
■ Pokud přístroj nepoužíváte, postavte jej do
stojánku ".
■ Štěrbinovou hubici 1 a kartáčovou hubici 6
můžete nasadit do držáku kartáčové hubice /
a držáku štěrbinové hubice na zadní straně
stojánku ".
– Zasuňte nejdříve štěrbinovou hubici 1 do
držáku štěrbinové hubice / tak, aby sací
otvor ukazoval směrem k držáku ".
– Poté zasuňte kartáčovou hubici 6 do
držáku kartáčové hubice tak, aby tato
překrývala konec štěrbinové hubice 1
(obr. 5 a 6).
Obr. 5
Obr. 6
■ Přístroj uložte na bezprašném a suchém místě.
Odstranění poruch
Přístroj nefunguje.
■ Akumulátor není nabitý.
♦ Zapojte přístroj do nabíječky +.
■ Přístroj je vadný.
♦ Obraťte se na zákaznický servis.
Přístroj běží, ale téměř nevysává.
■ Akumulátor není dostatečně nabitý.
♦ Zapojte přístroj do nabíječky +.
■ Prachová nádobka je plná.
♦ Vyprázdněte prachovou nádobku .
■ Prachový filtr je zanesený.
♦ Vyčistěte prachový filtr .
Přístroj se nenabíjí.
■ Nabíječka + není správně zapojená do
zdířky/elektrické zástrčky.
♦ Zkontrolujte připojení nabíječky +.
■ Nabíječka + je defektní.
♦ Obraťte se na zákaznický servis.
Likvidace
Likvidace přístroje
Přístroj vžádném případě ne-
vhazujte do běžného domovního odpadu. Tento výrobek
podléhá evropské směrnici
č. 2012/19/EU.
Přístroj předejte klikvidaci odborné firmě oprávněné knakládání sodpady nebo využijte možnost
likvidace zajišťovanou obcí. Dodržujte aktuálně
platné předpisy. Vpřípadě pochybností se informujte ve sběrném dvoře.
Page 47

SHSS 12 C2
■ 44 │ CZ
Likvidace baterií / akumulátorů
Baterie / akumulátory nesmí
přijít do domovního odpadu.
Každý spotřebitel je ze zákona povinen baterie
a akumulátory odevzdat na sběrném místě ve své
obci / městské čtvrti nebo vobchodě.
Tato povinnost slouží ktomu, aby mohly být baterie/
akumulátory odevzdány kekologické likvidaci.
Baterie / akumulátory odevzdávejte pouze zcela
vybité.
POZOR! VĚCNÉ ŠKODY!
► Pokud přístroj otevřete a vyjmete akumulátory,
je přístroj nevratně poškozen!
1) Před vyjmutím akumulátorů je kompletně vybijte.
2) Odejměte prachovou nádobku .
3) Povolte 5šroubů na zadní straně ručního
vysavače a oddělte od sebe obě poloviny
krytu přístroje.
4) Vytáhněte motor zjedné poloviny krytu.
5) Uvolněte oba šrouby na plastovém uchycení
modrého akumulátoru a vyjměte plastové
uchycení.
6) Kleštěmi přeštípněte jednu po druhé žíly, které
vedou kmodrému akumulátoru. Dbejte na to,
aby nedošlo ke zkratu mezi obnaženými konci
kabelu a kovovými částmi kleští.
7) Vyjměte baterii a odevzdejte ji kekologické
likvidaci.
Obal se skládá zekologických materiálů,
které lze vkomunálních sběrných dvorech
odevzdat krecyklaci.
Záruka společnosti
Kompernass Handels GmbH
Vážená zákaznice, vážený zákazníku,
na tento přístroj získáváte záruku vtrvání 3 let od
data zakoupení. V případě závad tohoto výrobku
máte zákonná práva vůči prodejci výrobku. Tato
zákonná práva nejsou omezena naší níže uvedenou
zárukou.
Záruční podmínky
Záruční doba začíná plynout dnem nákupu. Dobře
uschovejte originál pokladního lístku. Tento doklad
je potřebný jako důkaz o koupi.
Pokud do tří let od data zakoupení tohoto výrobku
dojde k vadě materiálu nebo vý robní závadě, pak
Vám podle našeho uvážení výrobek zdarma opravíme nebo vyměníme. Předpokladem této záruky
je, že bude během tříleté lhůty předložen vadný
přístroj a doklad o koupi (pokladní lístek) a stručně
se popíše v čem závada spočívá a kdy se vyskytla.
Vztahuje-li se na závadu naše záruka, obdržíte
zpět buď opravený nebo nový produkt. Opravou
nebo výměnou výrobku nezačne plynout nová
záruční doba.
Záruční doba a zákonné nároky
vyplývající ze závad
Záručním plněním se záruční doba neprodlužuje.
To platí ipro vyměněné a opravené součásti.
Poškození nebo vady vyskytující se případně již
při nákupu se musí oznámit ihned po vybalení. Po
uplynutí záruční doby podléhají veškeré opravy
zpoplatnění.
Page 48

SHSS 12 C2
CZ
│
45 ■
Rozsah záruky
Přístroj byl vyroben pečlivě podle přísných směrnic
kvality a před expedicí byl svědomitě vyzkoušen.
Záruka se vztahuje na materiálové nebo výrobní
vady. Tato záruka se nevztahuje na součásti produktu, které jsou vystaveny normálnímu opotřebení,
a proto je lze považovat za opotřebovatelné díly
nebo za poškození křehkých součástí jako jsou
např. spínače, akumulátory, formy na pečení nebo
části, které jsou vyrobeny ze skla.
Tato záruka zaniká, pokud je výrobek poškozen,
nebyl řádně používán nebo udržován. Pro zajištění
správného používání výrobku se musí přesně dodržovat všechny pokyny uvedené v návodu kobsluze. Účelům použití a úkonům, které se v návodu
kobsluze nedoporučují nebo se před nimi varuje,
je třeba se bezpodmínečně vyhnout.
Výrobek je určen pouze pro soukromé účely a ne
pro komerční použití. Při nesprávném a neodborném
používání, při použití násilí a při zásazích, které
nebyly provedeny našimi autorizovanými servisními
provozovnami, záruční nároky zanikají.
Vyřízení v případě záruky
Pro zajištění rychlého Vaší žádosti postupujte podle
následujících pokynů:
▯ Pro všechny dotazy mějte připraven pokladní
lístek a číslo výrobku (např. IAN 12345) jako
doklad o koupi.
▯ Číslo výrobku naleznete na typovém štítku, rytině,
na titulní straně svého návodu (vlevo dole) nebo
jako nálepku na zadní nebo spodní straně.
▯ Pokud by se měly vyskytovat funkční vady nebo
jiné závady, kontaktujte nejprve níže uvedené
servisní oddělení telefonicky nebo e-mailem.
▯ Výrobek, zaevidovaný jako vadný výrobek pak
můžete při přiložení dokladu o nákupu (pokladní
lístek) a při uvedení, v čem spočívá vada a kdy k
ní došlo, poslat výrobek pro Vás bez poštovného
na adresu, kterou Vám oznámí servis.
Na webových stránkách
www.lidl-service.com si můžete stáhnout
tyto a mnoho dalších příruček, videí o
výrobku a software.
Servis
Servis Česko
Tel.: 800143873
E-Mail: kompernass@lidl.cz
IAN 277091
Dovozce
Dbejte prosím na to, že následující adresa není adresou servisu. Kontaktujte nejprve uvedený servis.
KOMPERNASS HANDELS GMBH
BURGSTRASSE 21
44867 BOCHUM
GERMANY
www.kompernass.com
Page 49

SHSS 12 C2
■ 46 │ CZ
Page 50

SHSS 12 C2
SK
│
47 ■
Obsah
Úvod ...............................................................48
Používanie vsúlade surčením ..........................................48
Rozsah dodávky ......................................................48
Popis prístroja
........................................................48
Technické údaje ......................................................49
Bezpečnostné upozornenia .............................................49
Pred prvým použitím
..................................................52
Nabíjanie prístroja ....................................................52
Montáž a demontáž ...................................................52
Spojenie ručného dielu s tyčovou rukoväťou/uvoľnenie z rukoväti ...........................52
Obsluha .............................................................53
Použitie ručného dielu s tyčovou rukoväťou .............................................53
Použitie ručného dielu
.............................................................53
Čistenie aošetrovanie .................................................53
Vyprázdnenie nádoby na nečistoty
...................................................54
Čistenie elektrického spotrebiča ......................................................54
Čistenie rotačnej kefy ..............................................................54
Skladovanie .........................................................55
Odstraňovanie porúch .................................................55
Likvidácia
...........................................................55
Likvidácia prístroja ................................................................55
Likvidácia batérií/akumulátorov ......................................................56
Záruka spoločnosti Kompernass Handels GmbH ...........................56
Servis
..........................................................................57
Dovozca ........................................................................57
Page 51

SHSS 12 C2
■ 48 │ SK
AKUMULÁTOROVÝ RUČNÝ A
PODLAHOVÝ VYSÁVAČ
Úvod
Srdečne vám gratulujeme ku kúpe vášho nového
prístroja.
Touto kúpou ste sa rozhodli pre vysokokvalitný výrobok. Návod na obsluhu je súčasťou tohto výrobku.
Obsahuje dôležité upozornenia týkajúce sa bezpečnosti, používania alikvidácie. Pred používaním
výrobku sa oboznámte sovšetkými pokynmi na
obsluhu abezpečnostnými upozorneniami. Výrobok
používajte iba podľa popisu a vuvedených oblastiach použitia. Pri postúpení výrobku tretej osobe
jej sním odovzdajte aj všetky podklady.
Používanie vsúlade surčením
Tento prístroj slúži výlučne na vysávanie suchých
povrchov, resp. na suché vysávanie. Je určený výlučne na používanie vsúkromných domácnostiach.
Nesmie sa používať na vysávanie ľudí ani zvierat.
Akýkoľvek iný spôsob používania alebo zmeny
prístroja sa považujú za používanie v rozpore
surčením, s čím súvisia vážne nebezpečenstva
úrazu. Výrobca neručí za škody, ktoré sú spôsobené
nesprávnou obsluhou alebo používaním v rozpore
surčením. Prístroj nie je určený na komerčné použitie.
Rozsah dodávky
Akumulátorový ručný a podlahový vysávač
Hubica s kefou
Dýza na čalúnenie
Štrbinová hubica
Teleskopická trubica s podlahovou hubicou
Držiak (s nabíjacou zástrčkou)
Nabíjačka
Návod na obsluhu
Ihneď po vybalení prekontrolujte úplnosť dodávky.
Popis prístroja
Obrázok A:
Rukoväť ručného dielu
Spínač zap./vyp.
Kontrolka nabíjania
Ručný diel
Tlačidlá
Prachový filter
Hrubý filter
Nádoba na nečistoty
Obrázok B:
Spínač zap./vyp.
Rukoväť
- Odistenie „rukoväti“
3 Odistenie „ručného dielu“
! Priehlbina pre ručný diel
. Rotačná kefa
0 LED osvetlenie
Obrázok C:
6 Hubica s kefou
1 Štrbinová hubica
% Dýza na čalúnenie
+ Nabíjačka
, Konektor nabíjačky
Držiak hubice s kefou
/ Držiak štrbinovej hubice
Nabíjacia zásuvka
" Držiak (s nabíjacou zásuvkou)
Page 52

SHSS 12 C2
SK
│
49 ■
Technické údaje
Nabíjačka
Vstup: 100 – 240V ~, 50/60Hz, 300mA max.
Výstup: 13,5V
500mA
Typové označenie: SHSS 12 C2-1
Trieda ochrany: II /
Podlahová hubica
Menovitý výkon: 5W
Trieda ochrany: III /
Vstupné napätie: 10,8V 1800mAh
Prístroj
Vstupné napätie/vstupný prúd:
13,5V
500mA
Menovitý výkon: 75W
Trieda ochrany: III /
Akumulátory: Li-Ion (10,8V) 1800mAh
Akumulátor: 3 články po 3,6V
Prevádzková doba pri plnom nabití akumulátora
(v závislosti od podlahovej krytiny): približne 15 min.
Čas nabíjania pri vybitom akumulátore: 5 – 6 hodín.
Bezpečnostné upozornenia
NEBEZPEČENSTVO ZÁSAHU ELEKTRICKÝM PRÚDOM!
► Nenabíjajte, resp. nepoužívajte tento prístroj v exteriéri.
► Nikdy nepoužívajte ručný vysávač, ak je poškodený kábel, zástrčka
alebo kryt.
► Poškodenú elektrickú zástrčku alebo sieťový kábel nechajte ihneď vyme-
niť autorizovanému odbornému personálu, aby ste sa vyhli ohrozeniu
bezpečnosti.
► Opravy zverte len špecializovanej opravovni. V žiadnom prípade
nerozoberajte prístroj sami. Neodborné zásahy môžu spôsobiť úrazy.
► Pred zapnutím prístroja sa presvedčte, či napätie uvedené v technic-
kých údajoch prístroja zodpovedá sieťovému napätiu.
► Nedotýkajte sa sieťového adaptéra/nabíjačky alebo prístroja mokrý-
mi alebo vlhkými rukami.
► Nepoužívajte sieťový adaptér/nabíjačku s predlžovacím káblom, ale
sieťový adaptér zastrčte priamo do zásuvky.
Page 53

SHSS 12 C2
■ 50 │ SK
VAROVANIE! NEBEZPEČENSTVO PORANENIA!
► Nevymieňajte žiadne príslušenstvo, keď je prístroj v prevádzke.
► Nepoužívajte ručný vysávač na vysávanie vody alebo iných tekutín.
► Nepoužívajte ručný vysávač na vysávanie ostrých predmetov alebo
sklenených črepín.
► Nikdy nevysávajte horiace zápalky, tlejúci popol alebo cigaretové
ohorky.
► Nepoužívajte ručný vysávač na vysávanie chemických látok, kamen-
ného prachu, sadry, cementu alebo podobných látok.
► Prístroj nie je vhodný na vysávanie horľavých a výbušných látok ani
chemických alebo agresívnych tekutín.
► Prístroj vždy skladujte v uzavretých priestoroch. Aby sa zabránilo neho-
dám, prístroj po použití uschovávajte na suchom mieste.
► Pri extrémnych podmienkach môže dochádzať k úniku elektrolytu z
akumulátorových článkov. Pri kontakte elektrolytu s pokožkou alebo
očami je potrebné postihnuté miesto okamžite opláchnuť, príp. vypláchnuť čistou vodou. Vyhľadajte lekára.
► Tento prístroj môžu používať deti staršie ako 8 rokov, ako aj osoby so
zníženými fyzickými, zmyslovými alebo mentálnymi schopnosťami alebo nedostatkom skúseností avedomostí, ak sú pod dohľadom alebo
boli o bezpečnom používaní spotrebiča poučené apochopili z toho
vyplývajúce nebezpečenstvá. Deti sa nesmú hrať s prístrojom. Deti
nesmú vykonávať čistenie apoužívateľskú údržbu bez dohľadu.
Page 54

SHSS 12 C2
SK
│
51 ■
VAROVANIE! NEBEZPEČENSTVO PORANENIA!
► Používajte iba také príslušenstvo, ktoré odporúča výrobca.
► Sieťový adaptér sa nesmie používať na iné účely.
► Ak chcete prístroj odpojiť od napájania elektrickým prúdom, vždy
uchopte sieťovú zástrčku.
► Bezpodmienečne dbajte na to, aby ste neukladali ručný vysávač
vedľa ohrievacích telies, sporákov alebo iných zohriatych prístrojov
alebo plôch.
► Dbajte vždy na to, aby vetracie otvory zostali voľné. Blokovaná cirku-
lácia vzduchu môže viesť k prehriatiu a poškodeniu prístroja.
► Buďte zvlášť opatrní, keď používate ručný vysávač na schodoch.
► Tento výrobok obsahuje dobíjateľné akumulátory. Prístroj nehádžte do
ohňa anevystavujte ho vysokým teplotám. Hrozí nebezpečenstvo
výbuchu!
► Pred čistením rotačnej kefy vždy vyberte ručný diel z tyčovej rukoväti,
aby ste zabránili náhodnému spusteniu rotačnej kefy.
POZOR! VECNÉ ŠKODY!
► Nepoužívajte ručný vysávač bez nasadeného prachového filtra.
► Nepoužívajte túto nabíjačku na iný výrobok a neskúšajte nabíjať toto
zariadenie pomocou inej nabíjačky. Používajte iba nabíjačku, ktorá
bola dodaná spolu s týmto prístrojom.
► Nikdy nenabíjajte batérie, ktoré nie sú opätovne nabíjateľné!
Page 55

SHSS 12 C2
■ 52 │ SK
Pred prvým použitím
UPOZORNENIE
► Prístroj sa dodáva s nenabitými akumulátormi.
Pred prvým použitím prístroja musíte akumulátory nechať nabíjať 6 hodín.
■ Odstráňte z prístroja všetok obalový materiál a
ochrannú nálepku, najmä ochrannú nálepku na
kontaktoch na zadnej strane ručného dielu .
■ Zastrčte držiak " do stojana tak, aby držiak "
zaklapol.
Nabíjanie prístroja
UPOZORNENIE
► Pred začiatkom nabíjania sa uistite, či prístroj
je vypnutý.
■ Na nabitie prístroja zastrčte nabíjačku + do
sieťovej zásuvky a zasuňte konektor , do nabíjacej zásuvky na držiaku ". Kábel veďte
cez káblový kanál na nabíjacej zásuvke tak,
aby držiak " nestál na kábli.
■ Postavte tyčovú rukoväť s nasadeným ručným
dielom na držiak ".
Kontrolka nabíjania svieti na červeno.
– U modelu v antracitovej /
zelenej farbe:
Keď je prístroj nabitý, kontrolka nabíjania
svieti na zeleno
– U modelu v antracitovej
červenej farbe:
Keď je prístroj nabitý, kontrolka nabíjania
svieti oranžovo.
Montáž a demontáž
Spojenie ručného dielu s tyčovou
rukoväťou/uvoľnenie z rukoväti
Obr. 1 Obr. 2
■ Aby ste spojili ručný diel s tyčovou rukoväťou,
zasuňte hrot ručného dielu do výrezu v
priehlbine pre ručný diel !.
■ Potom zatlačte rukoväť ručného dielu do
tyčovej rukoväti tak, aby ručný diel zaklapol
a pevne držal (Obr. 1).
■ Na uvoľnenie ručného dielu z tyčovej ruko-
väti, stlačte odistenie „ručného dielu“ 3.
■ Vytiahnite ručný diel smerom hore/dopredu
z priehlbiny pre ručný diel ! (Obr. 2).
Page 56

SHSS 12 C2
SK
│
53 ■
Obsluha
POZOR! VECNÉ ŠKODY!
► Sací otvor musí byť vždy voľný a nesmie byť
zapchatý. Upchatie vedie k prehriatiu a
poškodeniu motora.
► Podlahovou hubicou nevysávajte koberce
s vysokým vlasom. Rotačná kefa . sa
zapletie do koberca a zablokuje!
UPOZORNENIE
► Dbajte na to, aby bol prachový filter a
hrubý filter vložený vždy pred používaním
prístroja.
► Len čo sací výkon výrazne klesne, pripojte
prístroj znovu na nabíjačku +.
Použitie ručného dielu s tyčovou
rukoväťou
1) Ručný diel nasaďte do priehlbiny pre ručný
diel ! podľa popisu v kapitole „Montáž/
demontáž“.
2) Rukoväť rozložte stlačením odistenia „ruko-
väti“ - a zároveň ťahajte rukoväť smerom
nahor.
3) Prístroj zapnite spínačom zap./vyp. .
LED osvetlenie 0 na podlahovej hubici svieti
a rotačná kefa . sa točí.
4) Podlahovou hubicou prechádzajte cez miesta,
ktoré chcete vysávať. Rukoväť pritom držte
tak, aby sa podlahová hubica posúvala po
podlahe rovno.
5) Na ukončenie vysávania stlačte spínač zap./
vyp. . Rotačná kefa . sa zastaví a LED
osvetlenie 0 zhasne.
Použitie ručného dielu
1) Ručný diel uvoľnite z priehlbiny pre ručný
diel ! podľa popisu v kapitole „Montáž/
demontáž“.
2) V prípade potreby nasaďte štrbinovú
hubicu 1, kefový nadstavec 6 alebo dýzu
na čalúnenie %.
3) Stlačte spínač zap./vyp. a vysajte požadované miesta.
4) Na ukončenie vysávania stlačte ešte raz
spínač zap./vyp. .
Čistenie aošetrovanie
VAROVANIE!
NEBEZPEČENSTVO PORANENIA!
► Nabíjačku +vždy vytiahnite zo sieťovej
zásuvky a konektor , vyberte z nabíjacej
zásuvky na držiaku " predtým, ako
držiak " vyčistíte.
► Ručný diel vždy vyberte z priehlbiny
pre ručný diel !na rukoväti predtým, ako
ručný diel , rukoväť alebo rotačnú kefu .
vyčistíte.
Aby bolo vysávanie čo najúčinnejšie, po každom
použití vyprázdnite nádobu na nečistoty a
vyčistite prachový filter .
POZOR! VECNÉ ŠKODY!
► Nepoužívajte žiadne abrazívne alebo agre-
sívne čistiace prostriedky. Mohli by poškodiť
povrch!
UPOZORNENIE
► LED osvetlenie 0 si nevyžaduje údržbu.
Svetelné LED diódy sa nedajú vymeniť!
Page 57

SHSS 12 C2
■ 54 │ SK
Vyprázdnenie nádoby na nečistoty
1) Aby ste mohli nádobu na nečistoty otvoriť,
vyberte ručný diel z priehlbiny pre ručný
diel !.
2) Stlačte súčasne obidve tlačidlá
a zároveň
ťahajte nádobu na nečistoty smerom nahor.
Teraz ju môžete vybrať smerom nahor/dopredu.
3) Vyberte prachový filter tak, že ho vytiahnete
prstami. Prachový filter opláchnite čistou
vodou a nechajte ho voľne vysušiť. Na vysušenie prachového filtra nepoužívajte horúci
vzduch.
4) Potom vyberte hrubý filter tak, že ho tiež
vytiahnete von.
Obr. 3
5) Vyprázdnite nádobu na nečistoty .
6) Znovu nasaďte najprv hrubý filter a potom
suchý prachový filter .
7) Znovu nasaďte nádobu na nečistoty tak, že
aretáciu zasuniete najprv do výrezu na ručnom
diele a potom silno zatlačíte prednú časť
nádoby na nečistoty smerom nadol tak, že
nádoba na nečistoty zaklapne a pevne drží.
Čistenie elektrického spotrebiča
Spotrebič utierajte vlhkou handrou. Pri odolných
nečistotách naneste na navlhčenú utierku niekoľko
kvapiek jemného čistiaceho prostriedku. Dbajte
nato, aby bol prístroj pred opätovným použitím
znovu úplne suchý.
Čistenie rotačnej kefy
Na rotačnej kefe . sa môžu časom zachytiť
nečistoty, ako napr. vlasy. Aby ste tieto nečistoty
odstránili, môžete rotačnú kefu . vymontovať
(Obr. 4).
1) Otočte podlahovú hubicu.
2) Posuňte zaistenie na kryte smerom dozadu tak,
aby ste mohli kryt odstrániť.
3) Vyberte rotačnú kefu ..
4) Na opätovné nasadenie rotačnej kefy .
nasuňte najprv široký koniec na hnací hriadeľ
tak, aby sa tam rotačná kefa . zahákla.
5) Potom posúvajte druhý koniec do upevnenia
tak, aby bola rotačná kefa . osadená v
podlahovej hubici rovno.
6) Kryt znovu nasaďte a zablokujte ho.
Obr. 4
Page 58

SHSS 12 C2
SK
│
55 ■
Skladovanie
■ Keď prístroj nepoužívate, postavte ho na
držiak ".
■ Štrbinovú hubicu 1 a hubicu s kefou 6 môžete
pripevniť na zadnú stranu držiaka " na držiak
hubice s kefou a držiak štrbinovej hubice /.
– Zastrčte najskôr štrbinovú hubicu 1 do
držiaka štrbinovej hubice / tak, aby sací
otvor ukazoval smerom k držiaku ".
– Potom zastrčte hubicu s kefou 6 do držiaka
hubice s kefou tak, aby táto prekrývala
koniec štrbinovej hubice 1 (obr. 5 a 6).
Obr. 5
Obr. 6
■ Prístroj uskladnite na suchom a bezprašnom
mieste.
Odstraňovanie porúch
Prístroj nefunguje.
■ Akumulátor nie je nabitý.
♦ Prístroj pripojte na nabíjačku +.
■ Prístroj je poškodený.
♦ Obráťte sa na zákaznícky servis.
Prístroj funguje, ale takmer nevysáva
nečistoty.
■ Akumulátor nie je dostatočne nabitý.
♦ Prístroj pripojte na nabíjačku +.
■ Nádoba na nečistoty je plná.
♦ Vyprázdnite nádobu na nečistoty .
■ Prachový filter je upchatý.
♦ Vyčistite prachový filter .
Prístroj sa nenabíja.
■ Nabíjačka + nie je správne zapojená
v zásuvke/elektrickej zástrčke.
♦ Skontrolujte prípojky nabíjačky +.
■ Nabíjačka + je poškodená.
♦ Obráťte sa na zákaznícky servis.
Likvidácia
Likvidácia prístroja
Prístroj vžiadnom prípade
nevyhadzujte do bežného komunálneho odpadu. Na tento
výrobok sa vzťahuje európska
smernica č. 2012/19/EU.
Prístroj likvidujte odovzdaním vautorizovanej prevádzke na likvidáciu odpadov alebo vo vašejkomunálnej zberni odpadov. Dodržiavajte pritom
aktuálne platné predpisy. V prípade pochybností
kontaktujte vašu zberňu odpadov.
Page 59

SHSS 12 C2
■ 56 │ SK
Likvidácia batérií/akumulátorov
Batérie/akumulátory nesmiete
likvidovať spolu s komunálnym odpadom.
Každý spotrebiteľ je zo zákona povinný odovzdať
batérie/akumulátory vzbernom stredisku vobci,
mestskej štvrti alebo vobchode.
Táto povinnosť má prispieť kekologickej likvidácii
batérií aakumulátorov Batérie aakumulátory
odovzdajte len vo vybitom stave.
POZOR! VECNÉ ŠKODY!
► Po rozobratí prístroja a likvidácii akumulátorov
je prístroj neopraviteľne poškodený!
1) Pred demontážou akumulátora ho úplne vybite.
2) Vyberte nádobu na nečistoty .
3) Uvoľnite 5 skrutiek na zadnej strane ručného
dielu a rozoberte obidve polovice telesa.
4) Vytiahnite motor z polovice telesa.
5) Uvoľnite obidve skrutky na plastovom držiaku,
ktorý drží modrý akumulátor a vyberte ho.
6) Postupne kliešťami prestrihnite vodiče vedúce
do modrého akumulátora. Dávajte pozor, aby
holé konce vodičov neskratovali s kovovými
časťami klieští.
7) Vyberte akumulátor a ekologicky ho zlikvidujte.
Obal sa skladá z ekologických materiá-
lov, ktoré môžete likvidovať vmiestnych
recyklačných zberniach odpadov.
Záruka spoločnosti
Kompernass Handels GmbH
Vážená zákazníčka, vážený zákazník,
natento prístroj máte záruku 3roky od dátumu za-
kúpenia. V prípade nedostatkov tohto výrobku máte
práva vyplývajúce zo zákona voči predajcovi tohto
výrobku. Tieto Vaše práva vyplývajúce zo zákona
nie sú obmedzené našou zárukou, uvedenou nižšie.
Záručné podmienky
Záručná doba začína plynúť dátumom nákupu.
Prosím, uschovajte si originálny pokladničný blok.
Tento doklad slúži ako doklad ozakúpení.
Ak v priebehu troch rokov od dátumu zakúpenia
tohto výrobku dôjde k chybe materiálu alebo výrobnej chybe, výrobok Vám podľa nášho uváženia
bezplatne opravíme alebo vymeníme. Podmienkou
tohto záručného plnenia je, že počas trojročnej
lehoty sa poškodený prístroj a doklad o zakúpení
(pokladničný blok) predložia so stručným popisom,
v čom spočíva chyba prístroja a kedy k nej došlo.
Ak je chyba pokrytá našou zárukou, zašleme Vám
späť opravený alebo nový výrobok. Opravou alebo
výmenou výrobku nezačína plynúť žiadna nová
záručná doba.
Záručná doba a zákonné nároky na
odstránenie chýb
Záručná doba sa záručným plnením nepredĺži. To
platí aj pre vymenené aopravené diely. Poškodenia
a chyby zistené prípadne už pri kúpe, sa musia
hlásiť okamžite po vybalení. Po uplynutí záručnej
doby podliehajú prípadné opravy poplatku.
Page 60

SHSS 12 C2
SK
│
57 ■
Rozsah záruky
Prístroj bol starostlivo vyrobený v súlade s prísnymi
smernicami kvality apred dodaním bol svedomito
preskúšaný.
Záručné plnenie sa vzťahuje na chyby materiálu a
výrobné chyby. Táto záruka sa nevzťahuje na časti
výrobku, ktoré sú vystavené bežnému opotrebovaniu,
a preto ich možno pokladať za opotrebované diely
alebo za poškodenia krehkých dielov, ako sú napríklad spínače, akumulátory, formy na pečenie alebo
diely vyrobené zo skla.
Táto záruka zaniká v prípade poškodenia výrobku
neodborným používaním alebo neodbornou
údržbou. Na správne používanie výrobku sa musia
presne dodržiavať všetky pokyny, uvedené v návode
na obsluhu. Bezpodmienečne sa musí zabrániť použitiu alebo úkonom, ktoré sa v návode na obsluhu
neodporúčajú alebo pred ktorými sa varuje.
Výrobok je určený len na súkromné použitie a nie na
priemyselné používanie Záruka zaniká pri nesprávnom aneodbornom zaobchádzaní, pri použití
násilia apri zásahoch, ktoré neboli vykonané naším
autorizovaným servisom.
Vybavenie v prípade záruky
Na zaručenie rýchleho vybavenia Vašej žiadosti
postupujte podľa nasledujúcich pokynov:
▯ Na všetky otázky majte pripravený pokladničný
doklad a číslo výrobku (napr. IAN 12345) ako
doklad o nákupe.
▯ Číslo výrobku nájdete na výrobnom štítku, gravúre,
na titulnej stránke Vášho návodu na obsluhu
(dole vľavo) alebo ako nálepku na zadnej
alebo spodnej strane.
▯ Ak dôjde k funkčným poruchám alebo iným
nedostatkom, kontaktujte najprv nižšie uvedené
servisné oddelenie telefonicky alebo
e-mailom.
▯ Výrobok, zaevidovaný ako poruchový, môžete
potom spolu s dokladom o nákupe (pokladničný
blok) a uvedením popisu chyby a dátumu, kedy
k nej došlo, bezplatne odoslať na adresu servisného strediska, ktorá Vám bude oznámená.
Na webových stránkach
www.lidl-service.com si môžete
stiahnuť tieto a mnoho ďalších príručok,
videá o výrobkoch a softvéry.
Servis
Servis Slovensko
Tel. 0850 232001
E-Mail: kompernass@lidl.sk
IAN 277091
Dovozca
Majte na pamäti, že nižšie uvedená adresa nie je
adresou servisného strediska. Najprv kontaktujte
uvedené servisné stredisko.
KOMPERNASS HANDELS GMBH
BURGSTRASSE 21
44867 BOCHUM
GERMANY
www.kompernass.com
Page 61

SHSS 12 C2
■ 58 │ SK
Page 62

SHSS 12 C2
DE│AT│CH
│
59 ■
Inhaltsverzeichnis
Einleitung ............................................................60
Bestimmungsgemäßer Gebrauch ........................................60
Lieferumfang .........................................................60
Gerätebeschreibung.
. . . . . . . . . . . . . . . . . . . . . . . . . . . . . . . . . . . . . . . . . . . . . . . . . . 60
Technische Daten .....................................................61
Sicherheitshinweise ...................................................61
Vor dem ersten Gebrauch
..............................................64
Gerät aufladen .......................................................64
Montage/Demontage .................................................64
Handteil mit Stiel verbinden / vom Stiel lösen ............................................64
Bedienen ............................................................65
Handteil mit Stiel verwenden ........................................................65
Handteil verwenden
............................................................... 65
Reinigung und Pflege ..................................................65
Schmutzbehälter leeren
............................................................66
Gerät reinigen ...................................................................66
Bürstenrolle reinigen ...............................................................66
Lagerung ............................................................67
Fehlerbehebung ......................................................67
Entsorgung
..........................................................67
Gerät entsorgen ..................................................................67
Batterien/Akkus entsorgen ..........................................................68
Garantie der Kompernaß Handels GmbH .................................68
Service
.........................................................................69
Importeur .......................................................................69
Page 63

SHSS 12 C2
■ 60 │ DE
│AT│
CH
AKKU-HAND- UND -BODENSTAUBSAUGER
Einleitung
Herzlichen Glückwunsch zum Kauf Ihres neuen
Gerätes.
Sie haben sich damit für ein hochwertiges Produkt
entschieden. Die Bedienungsanleitung ist Bestandteil dieses Produkts. Sie enthält wichtige Hinweise
für Sicherheit, Gebrauch und Entsorgung. Machen
Sie sich vor der Benutzung des Produkts mit allen
Bedien- und Sicherheitshinweisen vertraut. Benutzen
Sie das Produkt nur wie beschrieben und für die
angegebenen Einsatzbereiche. Händigen Sie alle
Unterlagen bei Weitergabe des Produkts an Dritte
mit aus.
Bestimmungsgemäßer
Gebrauch
Dieses Gerät dient ausschließlich dem Saugen von
trockenen Oberflächen bzw. trockenem Sauggut.
Dieses Gerät ist ausschließlich für die Benutzung
in privaten Haushalten bestimmt. Das Gerät darf
nicht dazu verwendet werden Menschen oder
Tiere abzusaugen. Jede andere Verwendung oder
Veränderung des Gerätes gilt als nicht bestimmungsgemäß und birgt erhebliche Unfallgefahren.
Der Hersteller haftet nicht für Schäden, die durch
nicht bestimmungsgemäßen Gebrauch oder falsche
Bedienung verursacht werden. Das Gerät ist nicht für
den gewerblichen Gebrauch bestimmt.
Lieferumfang
Akku-Hand- und -Bodenstaubsauger
Bürstenaufsatz
Polsterdüse
Fugendüse
Verlängerungsstiel mit Bodendüse
Halterung (mit Ladebuchse)
Ladegerät
Bedienungsanleitung
Kontrollieren Sie direkt nach dem Auspacken den
Lieferumfang auf Vollständigkeit.
Gerätebeschreibung
Abbildung A:
Griff Handteil
Ein-/Aus-Schalter
Ladekontrollleuchte
Handteil
Tasten
Staubfilter
Grobfilter
Schmutzbehälter
Abbildung B:
Ein-/Aus-Schalter
Griff
- Entriegelung „Griff“
3 Entriegelung „Handteil“
! Handteilmulde
. Bürstenrolle
0 LED - Beleuchtung
Abbildung C:
6 Bürstenaufsatz
1 Fugendüse
% Polsterdüse
+ Ladegerät
, Hohlstecker Ladegerät
Halterung Bürstenaufsatz
/ Halterung Fugendüse
Ladebuchse
" Halterung (mit Ladebuchse)
Page 64

SHSS 12 C2
DE│AT│CH
│
61 ■
Technische Daten
Ladegerät
Eingang: 100 - 240 V ~, 50 / 60 Hz,
300 mA max.
Ausgang: 13,5 V
500 mA
Typenbezeichnung: SHSS 12 C2-1
Schutzklasse: II /
Bodendüse
Nennleistung: 5 W
Schutzklasse: III /
Eingangsspannung: 10,8 V 1800 mAh
Gerät
Eingangsspannung/-strom: 13,5 V
500 mA
Nennleistung: 75 W
Schutzklasse: III /
Akkus: Li-Ion (10,8 V) 1800 mAh
Akku-Pack: 3 Zellen zu je 3,6 V
Betriebszeit bei voller Akkuladung
(abhängig vom Bodenbelag): ca. 15 Min
Ladezeit bei leerem Akku: 5 - 6 Std.
Sicherheitshinweise
GEFAHR - ELEKTRISCHER SCHLAG!
► Laden bzw. verwenden Sie dieses Gerät nicht im Freien.
► Den Handstaubsauger niemals gebrauchen, wenn Kabel, Stecker
oder Gehäuse beschädigt sind.
► Lassen Sie beschädigte Netzstecker oder Netzkabel sofort von autori-
siertem Fachpersonal austauschen, um Gefährdungen zu vermeiden.
► Lassen Sie Reparaturen nur von einer Fachwerkstatt durchführen. Öff-
nen Sie unter keinen Umständen selbst das Gerät. Eingriffe, die nicht
durch einen Fachbetrieb vorgenommen wurden, können zu Verletzungen führen.
► Überzeugen Sie sich vor dem Laden des Gerätes, dass die in den
technischen Daten des Netzteils/Ladegeräts verzeichnete Spannung
der Netzspannung entspricht.
► Fassen Sie das Netzteil/Ladegerät oder das Gerät nicht mit nassen
oder feuchten Händen an.
► Verwenden Sie das Netzteil/Ladegerät nicht mit einem Verlängerungs-
kabel, sondern verbinden Sie das Netzteil direkt mit einer Steckdose.
Page 65

SHSS 12 C2
■ 62 │ DE
│AT│
CH
WARNUNG! VERLETZUNGSGEFAHR!
► Wechseln Sie keine Zubehörteile aus, wenn das Gerät in Betrieb ist.
► Benutzen Sie den Handstaubsauger nicht zum Aufsaugen von Wasser
oder anderen Flüssigkeiten.
► Benutzen Sie den Handstaubsauger nicht zum Aufsaugen von spitzen
Gegenständen oder Glasscherben.
► Niemals brennende Streichhölzer, glimmende Asche oder Zigaretten-
stummel aufsaugen.
► Gebrauchen Sie den Handstaubsauger nicht zum Aufsaugen von
chemischen Produkten, Steinstaub, Gips, Zement, oder anderen ähnlichen Partikeln.
► Das Gerät ist nicht für entflammbare und explosive Stoffe oder chemi-
sche und aggressive Flüssigkeiten geeignet.
► Lagern Sie das Gerät immer in geschlossenen Räumen. Um Unfälle
zu verhindern, bewahren Sie das Gerät nach Gebrauch an einem
trockenen Ort auf.
► Unter extremen Bedingungen können Leckagen an den Akkuzellen
auftreten. Bei Kontakt der Flüssigkeit mit Haut oder Augen ist die
betreffende Stelle sofort mit sauberem Wasser aus- bzw. abzuspülen.
Suchen Sie einen Arzt auf.
► Dieses Gerät kann von Kindern ab 8 Jahren und darüber sowie von
Personen mit verringerten physischen, sensorischen oder mentalen
Fähigkeiten oder Mangel an Erfahrung und Wissen benutzt werden,
wenn sie beaufsichtigt oder bezüglich des sicheren Gebrauchs des
Gerätes unterwiesen wurden und die daraus resultierenden Gefahren
verstehen. Kinder dürfen nicht mit dem Gerät spielen. Reinigung und
Benutzer-Wartung dürfen nicht von Kindern ohne Beaufsichtigung
durchgeführt werden.
Page 66

SHSS 12 C2
DE│AT│CH
│
63 ■
WARNUNG! VERLETZUNGSGEFAHR!
► Verwenden Sie nur Zubehörteile, die vom Hersteller empfohlen werden.
► Das Netzteil darf nicht für andere Zwecke benutzt werden.
► Fassen Sie immer den Netzstecker an, um das Gerät von der Stromver-
sorgung zu trennen.
► Achten Sie unbedingt darauf, dass Sie den Handstaubsauger nicht
neben Heizkörpern, Backöfen oder anderen erhitzten Geräten oder
Flächen abstellen.
► Achten Sie immer darauf, dass die Lüftungsschlitze frei sind. Ein blo-
ckierter Luftkreislauf kann zur Überhitzung und Beschädigung des
Gerätes führen.
► Üben Sie besondere Sorgfalt aus, wenn Sie den Handstaubsauger
auf Treppen benutzen. Sturzgefahr!
► Dieses Produkt enthält wiederaufladbare Akkus. Werfen Sie das Ge-
rät nicht ins Feuer und setzen Sie es nicht hohen Temperaturen aus. Es
besteht Explosionsgefahr!
► Nehmen Sie vor dem Reinigen der Bürstenrolle immer das Handteil
aus dem Stiel, um versehentliches Starten der Bürstenrolle zu vermeiden.
ACHTUNG! SACHSCHADEN!
► Benutzen Sie den Handstaubsauger nicht ohne eingesetzten
Staubfilter.
► Benutzen Sie das Ladegerät nicht für ein anderes Produkt und versu-
chen Sie nicht, dieses Gerät mittels eines anderen Ladegerätes aufzuladen. Verwenden Sie nur das mit diesem Gerät gelieferte Ladegerät.
► Laden Sie niemals nicht wiederaufladbare Batterien auf!
Page 67

SHSS 12 C2
■ 64 │ DE
│AT│
CH
Vor dem ersten Gebrauch
HINWEIS
► Das Gerät wird mit nicht geladenen Akkus
geliefert. Vor dem ersten Gebrauch des
Gerätes sind die Akkus zunächst für 6 Stunden
zu laden.
■ Entfernen Sie alle Verpackungsmaterialien und
Schutzaufkleber vom Gerät, insbesonders den
Schutzaufkleber an den Kontakten auf der
Rückseite des Handteils .
■ Stecken Sie die Halterung " auf den Ständer,
so dass die Halterung " einrastet.
Gerät aufladen
HINWEIS
► Vergewissern Sie sich, dass das Gerät
ausgeschaltet ist, bevor Sie mit dem Laden
beginnen.
■ Um das Gerät aufzuladen, verbinden Sie das
Ladegerät + mit einer Netzsteckdose und stecken
Sie den Hohlstecker , in die Ladebuchse an
der Halterung ". Führen Sie das Kabel durch
den Kabelkanal an der Ladebuchse , so dass
die Halterung " nicht auf dem Kabel steht.
■ Stellen Sie den Stiel mit eingesetztem Handteil
auf die Halterung ".
Die Ladekontrollleuchte leuchtet rot.
– Bei dem Modell in der Farbe
Anthrazit / Grün:
Wenn das Gerät aufgeladen ist, leuchtet die
Ladekontrollleuchte grün.
– Bei dem Modell in der Farbe
Anthrazit / Rot:
Wenn das Gerät aufgeladen ist, leuchtet die
Ladekontrollleuchte orange.
Montage/Demontage
Handteil mit Stiel verbinden /
vom Stiel lösen
Abb. 1 Abb. 2
■ Um das Handteil mit dem Stiel zu verbinden,
schieben Sie die Spitze des Handteils in die
Aussparung der Handteilmulde !.
■ Drücken Sie dann den Griff des Handteils
in den Stiel, so dass das Handteil einrastet
und fest sitzt (Abb.1).
■ Um das Handteil vom Stiel zu lösen, drücken
Sie die Entriegelung „Handteil“ 3.
■ Ziehen Sie das Handteil nach oben/vorne
aus der Handteilmulde ! (Abb.2).
Page 68

SHSS 12 C2
DE│AT│CH
│
65 ■
Bedienen
ACHTUNG! SACHSCHADEN!
► Die Saugöffnung muss jederzeit frei und darf
nicht verstopft sein. Verstopfungen führen zu
Überhitzung und Beschädigung des Motors.
► Saugen Sie keine hochflorigen Teppiche mit
der Bodendüse. Die Bürstenrolle . verfängt
sich im Teppich und blockiert!
HINWEIS
► Achten Sie darauf, dass der Staubfilter
und der Grobfilter immer eingesetzt sind,
bevor Sie das Gerät verwenden.
► Sobald die Saugleistung spürbar nachlässt,
verbinden Sie das Gerät wieder mit dem
Ladegerät +.
Handteil mit Stiel verwenden
1) Setzen Sie das Handteil in die Handteilmulde ! wie im Kapitel „Montage/Demontage“
beschrieben.
2) Klappen Sie den Griff aus, indem Sie die
Entriegelung „Griff“ - drücken und gleichzeitig
den Griff nach oben ziehen.
3) Schalten Sie das Gerät am Ein-/Aus-Schalter
ein. Die LED -Beleuchtung 0 an der Bodendüse leuchtet und die Bürstenrolle . dreht sich.
4) Fahren Sie mit der Bodendüse über die zu
saugenden Stellen. Halten Sie den Griff
dabei so, dass die Bodendüse plan über den
Boden gleitet.
5) Drücken Sie den Ein-/Aus-Schalter , wenn
Sie das Saugen beenden wollen. Die Bürstenrolle . stoppt und die LED - Beleuchtung 0
erlischt.
Handteil verwenden
1) Lösen Sie das Handteil aus der Handteilmulde ! wie im Kapitel „Montage/Demontage“
beschrieben.
2) Setzen Sie, wenn gewünscht, die Fugendüse 1,
den Bürstenaufsatz 6 oder die Polsterdüse %
auf.
3) Drücken Sie den Ein-/Aus-Schalter und
saugen Sie die gewünschten Stellen.
4) Wenn Sie das Saugen beenden wollen, drücken
Sie noch einmal den Ein-/Aus-Schalter .
Reinigung und Pflege
WARNUNG! VERLETZUNGSGEFAHR!
► Ziehen Sie immer das Ladegerät +aus der
Netzsteckdose und lösen Sie den Hohlstecker ,
aus der Ladebuchse an der Halterung ",
bevor Sie die Halterung " reinigen.
► Nehmen Sie das Handteil immer aus der
Handteilmulde !am Stiel, bevor Sie das
Handteil , den Stiel oder die Bürstenrolle .
reinigen.
Um beste Ergebnisse zu erzielen, leeren Sie den
Schmutzbehälter und reinigen Sie den Staubfilter nach jedem Gebrauch.
ACHTUNG! SACHSCHADEN!
► Verwenden Sie keine scheuernden oder
aggressiven Reinigungsmittel. Diese können
die Oberfläche beschädigen!
HINWEIS
► Die LED - Beleuchtung 0 ist wartungsfrei. Die
LEDs können nicht ausgewechselt werden!
Page 69

SHSS 12 C2
■ 66 │ DE
│AT│
CH
Schmutzbehälter leeren
1) Um den Schmutzbehälter zu öffnen, nehmen
Sie das Handteil aus der Handteilmulde !.
2) Drücken Sie gleichzeitig die beiden Tasten
und ziehen Sie gleichzeitig den Schmutzbehälter nach oben.
Sie können diesen nun nach oben/vorne
abheben.
3) Entnehmen Sie den Staubfilter , indem Sie
ihn mit den Fingern herausziehen. Spülen Sie
den Staubfilter in klarem Wasser aus und
lassen Sie ihn an der Luft trocknen. Benutzen
Sie keine heiße Luft, um den Staubfilter zu
trocknen.
4) Entnehmen Sie dann den Grobfilter , indem
Sie auch diesen herausziehen.
Abb. 3
5) Entleeren Sie den Schmutzbehälter .
6) Setzen Sie erst den Grobfilter und dann
den trockenen Staubfilter wieder ein.
7) Setzen Sie den Schmutzbehälter wieder ein,
indem Sie die Arretierung zuerst in die Aussparung am Handteil schieben und dann den
vorderen Teil des Schmutzbehälters kräftig
herunter drücken, so dass der Schmutzbehälter
einrastet und fest sitzt.
Gerät reinigen
Wischen Sie das Gerät mit einem feuchten Tuch
ab. Bei hartnäckigen Verschmutzungen geben Sie
ein mildes Spülmittel auf das Tuch. Achten Sie
darauf, dass das Gerät vor der erneuten Benutzung
wieder vollständig trocken ist.
Bürstenrolle reinigen
An der Bürstenrolle . kann sich mit der Zeit
Schmutz, wie z.B. Haare, festsetzen. Um diesen
Schmutz zu entfernen können Sie die Bürstenrolle .
ausbauen (Abb. 4).
1) Drehen Sie die Bodendüse um.
2) Schieben Sie die Verriegelung an der Abdeckplatte nach hinten, so dass Sie die Abdeckplatte
abnehmen können.
3) Heben Sie die Bürstenrolle . raus.
4) Um die Bürstenrolle . wieder einzusetzen,
schieben Sie zuerst das breite Ende auf die
Antriebswelle, so dass die Bürstenrolle . dort
eingehakt ist.
5) Dann schieben Sie das andere Ende in die
Aufnahme, so dass die Bürstenrolle . grade
in der Bodendüse liegt.
6) Setzen Sie die Abdeckplatte wieder auf und
verriegeln Sie sie.
Abb. 4
Page 70

SHSS 12 C2
DE│AT│CH
│
67 ■
Lagerung
■ Wenn Sie das Gerät nicht benutzen, stellen Sie
es auf die Halterung ".
■ Die Fugendüse 1 und den Bürstenaufsatz 6
können Sie auf die Rückseite der Halterung "
auf die Halterung Bürstenaufsatz und die
Halterung Fugendüse / stecken:
– Stecken Sie zuerst die Fugendüse 1 so
auf die Halterung Fugendüse /, dass die
Saugöffnung zur Halterung " weist.
– Stecken Sie dann den Bürstenaufsatz 6
so auf die Halterung Bürstenaufsatz ,
dass diese das Ende der Fugendüse 1 mit
überdeckt (Abb. 5 und 6).
Abb. 5
Abb. 6
■ Bewahren Sie das Gerät an einem staubfreien
und trockenen Ort auf.
Fehlerbehebung
Das Gerät funktioniert nicht.
■ Der Akku ist nicht aufgeladen.
♦ Verbinden Sie das Gerät mit dem Ladegerät +.
■ Das Gerät ist defekt.
♦ Wenden Sie sich an den Kundendienst.
Das Gerät läuft, saugt aber kaum den
Schmutz auf.
■ Der Akku ist nicht ausreichend geladen.
♦ Verbinden Sie das Gerät mit dem Ladegerät +.
■ Der Schmutzbehälter ist voll.
♦ Leeren Sie den Schmutzbehälter .
■ Der Staubfilter ist verstopft.
♦ Reinigen Sie den Staubfilter .
Das Gerät lädt sich nicht auf.
■ Das Ladegerät + steckt nicht korrekt in der
Buchse/dem Netzstecker.
♦ Kontrollieren Sie die Anschlüsse des Ladegerä-
tes +.
■ Das Ladegerät + ist defekt.
♦ Wenden Sie sich an den Kundendienst.
Entsorgung
Gerät entsorgen
Werfen Sie das Gerät keines-
falls in den normalen Hausmüll.
Dieses Produkt unterliegt
der europäischen Richtlinie
2012/19/EU.
Entsorgen Sie das Gerät über einen zugelassenen
Entsorgungsbetrieb oder über Ihre kommunale
Entsorgungseinrichtung. Beachten Sie die aktuell
geltenden Vorschriften. Setzen Sie sich im Zweifelsfall mit Ihrer Entsorgungseinrichtung in Verbindung.
Page 71

SHSS 12 C2
■ 68 │ DE
│AT│
CH
Batterien/Akkus entsorgen
Batterien/Akkus dürfen nicht
im Hausmüll entsorgt werden.
Jeder Verbraucher ist gesetzlich verpflichtet, Batterien /
Akkus bei einer Sammelstelle seiner Gemeinde /
seines Stadtteils oder im Handel abzugeben.
Diese Verpflichtung dient dazu, dass Batterien/Akkus einer umweltschonenden Entsorgung zugeführt
werden können. Geben Sie Batterien/Akkus nur im
entladenen Zustand zurück.
ACHTUNG! SACHSCHADEN!
► Wenn Sie das Gerät öffnen und die Akkus
entsorgen ist das Gerät irreparabel beschädigt!
1) Entladen Sie den Akku vollständig, bevor Sie
mit dem Ausbau des Akkus beginnen.
2) Nehmen Sie den Schmutzbehälter ab.
3) Lösen Sie die 5 Schrauben auf der Rückseite
des Handteils und nehmen Sie die beiden
Gehäusehälften auseinander.
4) Ziehen Sie den Motor aus der Gehäusehälfte.
5) Lösen Sie die beiden Schrauben an der
Plastikhalterung, die den blauen Akku hält und
entnehmen Sie die Plastikhalterung.
6) Knipsen Sie mit einer Zange die Adern, die zu
dem blauen Akku führen, einzeln und nacheinander durch. Achten Sie darauf, dass Sie die
blanken Leitungsenden nicht mit den Metallteilen der Zange kurzschließen.
7) Entnehmen Sie den Akku und entsorgen Sie
diesen umweltgerecht.
Die Verpackung besteht aus umweltfreundli-
chen Materialien, die Sie über die örtlichen
Recyclingstellen entsorgen können.
Garantie der
Kompernaß Handels GmbH
Sehr geehrte Kundin, sehr geehrter Kunde,
Sie erhalten auf dieses Gerät 3 Jahre Garantie ab
Kaufdatum. Im Falle von Mängeln dieses Produkts
stehen Ihnen gegen den Verkäufer des Produkts
gesetzliche Rechte zu. Diese gesetzlichen Rechte
werden durch unsere im Folgenden dargestellte
Garantie nicht eingeschränkt.
Garantiebedingungen
Die Garantiefrist beginnt mit dem Kaufdatum. Bitte
bewahren Sie den Original Kassenbon gut auf.
Diese Unterlage wird als Nachweis für den Kauf
benötigt.
Tritt innerhalb von drei Jahren ab dem Kaufdatum
dieses Produkts ein Material- oder Fabrikationsfehler auf, wird das Produkt von uns – nach unserer
Wahl – für Sie kostenlos repariert oder ersetzt.
Diese Garantieleistung setzt voraus, dass innerhalb
der Drei-Jahres-Frist das defekte Gerät und der
Kaufbeleg (Kassenbon) vorgelegt und schriftlich
kurz beschrieben wird, worin der Mangel besteht
und wann er aufgetreten ist.
Wenn der Defekt von unserer Garantie gedeckt ist,
erhalten Sie das reparierte oder ein neues Produkt
zurück. Mit Reparatur oder Austausch des Produkts
beginnt kein neuer Garantiezeitraum.
Garantiezeit und gesetzliche
Mängelansprüche
Die Garantiezeit wird durch die Gewährleistung
nicht verlängert. Dies gilt auch für ersetzte und
reparierte Teile. Eventuell schon beim Kauf vorhandene Schäden und Mängel müssen sofort nach
dem Auspacken gemeldet werden. Nach Ablauf
der Garantiezeit anfallende Reparaturen sind
kostenpflichtig.
Page 72

SHSS 12 C2
DE│AT│CH
│
69 ■
Garantieumfang
Das Gerät wurde nach strengen Qualitätsrichtlinien
sorgfältig produziert und vor Auslieferung gewissenhaft geprüft.
Die Garantieleistung gilt für Material- oder Fabrikationsfehler. Diese Garantie erstreckt sich nicht auf
Produktteile, die normaler Abnutzung ausgesetzt
sind und daher als Verschleißteile angesehen werden
können oder für Beschädigungen an zerbrechlichen
Teilen, z. B. Schalter, Akkus, Backformen oder Teile
die aus Glas gefertigt sind.
Diese Garantie verfällt, wenn das Produkt beschädigt,
nicht sachgemäß benutzt oder gewartet wurde. Für
eine sachgemäße Benutzung des Produkts sind alle
in der Bedienungsanleitung aufgeführten Anweisungen genau einzuhalten. Verwendungszwecke und
Handlungen, von denen in der Bedienungsanleitung
abgeraten oder vor denen gewarnt wird, sind unbedingt zu vermeiden.
Das Produkt ist nur für den privaten und nicht für
den gewerblichen Gebrauch bestimmt. Bei missbräuchlicher und unsachgemäßer Behandlung,
Gewaltanwendung und bei Eingriffen, die nicht
von unserer autorisierten Service-Niederlassung
vorgenommen wurden, erlischt die Garantie.
Abwicklung im Garantiefall
Um eine schnelle Bearbeitung ihres Anliegens
zu gewährleisten, folgen Sie bitte den folgenden
Hinweisen:
▯ Bitte halten Sie für alle Anfragen den Kassenbon
und die Artikelnummer (z. B. IAN 12345) als
Nachweis für den Kauf bereit.
▯ Die Artikelnummer entnehmen Sie bitte dem
Typenschild, einer Gravur, auf dem Titelblatt
ihrer Anleitung (unten links) oder als Aufkleber
auf der Rück- oder Unterseite.
▯ Sollten Funktionsfehler oder sonstige Mängel
auftreten kontaktieren Sie zunächst die nachfolgend benannte Serviceabteilung telefonisch
oder per E-Mail.
▯ Ein als defekt erfasstes Produkt können Sie dann
unter Beifügung des Kaufbelegs (Kassenbon)
und der Angabe, worin der Mangel besteht und
wann er aufgetreten ist, für Sie portofrei an die
Ihnen mitgeteilte Service Anschrift übersenden.
Auf www.lidl-service.com können Sie
diese und viele weitere Handbücher,
Produktvideos und Software herunterladen.
Service
Service Deutschland
Tel.: 0800 5435 111 (Kostenfrei aus dem
dt. Festnetz/Mobilfunknetz)
E-Mail: kompernass@lidl.de
Service Österreich
Tel.: 0820 201 222 (0,15 EUR/Min.)
E-Mail: kompernass@lidl.at
Service Schweiz
Tel.: 0842 665566 (0,08 CHF/Min.,
Mobilfunk max. 0,40 CHF/Min.)
E-Mail: kompernass@lidl.ch
IAN 277091
Importeur
Bitte beachten Sie, dass die folgende Anschrift
keine Serviceanschrift ist. Kontaktieren Sie zunächst
die benannte Servicestelle.
KOMPERNASS HANDELS GMBH
BURGSTRASSE 21
44867 BOCHUM
GERMANY
www.kompernass.com
Page 73

4
IAN 277091
KOMPERNASS HANDELS GMBH
BURGSTRASSE 21
44867 BOCHUM
DEUTSCHLAND / GERMANY
www.kompernass.com
Last Information Update · Információk állása · Stanje informacij
Stav informací · Stav informácií · Stand der Informationen:
07 / 2016 · Ident.-No.: SHSS12C2-062016-2
 Loading...