

Page 1

VoltBot User Manual
1
Graphical DC charger & Power Supply
User Manual
V1.1
SillyComm
2019/05/27
Page 2

VoltBot User Manual
2
Catalog
1. Summary ...................................................................................................................................................... 3
2. Introduction ................................................................................................................................................. 3
1) Ports and Symbols ........................................................................................................................... 3
2) Functions and Parameters ............................................................................................................ 4
Working Conditions ........................................................................................................................ 4
Charger Parameters ........................................................................................................................ 5
DC Supply Parameters ................................................................................................................... 5
Other Functions ................................................................................................................................ 6
3. Graphical UI ................................................................................................................................................. 8
A. Overview .................................................................................................................................... 8
B. Channel Icons ........................................................................................................................... 8
C. System Icons ............................................................................................................................. 9
4. Quick Start Guide .................................................................................................................................... 10
1) Charge a Normal Phone .............................................................................................................. 10
2) Charge an iPhone X (PD support) ............................................................................................ 10
3) Power a Gadget .............................................................................................................................. 10
5. Connect VoltBot with a Web-browser ............................................................................................. 11
6. Touch Key .................................................................................................................................................. 18
7. Connect VoltBot with Arduino ............................................................................................................ 22
8. Connect VoltBot with App ................................................................................................................... 24
A. App download ....................................................................................................................... 24
B. APP requirement: .............................................................................................................. 24
C. Demos ...................................................................................................................................... 25
9. Share VoltBot on Internet ..................................................................................................................... 38
10. Clear all Configuration ................................................................................................................. 44
11. Trouble Shooting ........................................................................................................................... 44
12. Tips ...................................................................................................................................................... 45
13. Privacy Disclaimer .......................................................................................................................... 45
14. Moral Disclaimer ............................................................................................................................. 45
15. Customer Service ........................................................................................................................... 45
Page 3

VoltBot User Manual
3
1. Summary
Volt-Bot is a multi-channel charger and power supply.
Support quick charge technology
Real-time feedback of current change
Monitor power consumption and power curves
Digital interfaces: Wi-Fi and UART
2. Introduction
1) Ports and Symbols
Page 4

VoltBot User Manual
4
TERMINOLOGY
DETAILS
CHANNEL
A circuit module that implement independent functions.
Channels are working parallel, with no interference between
each.
USB PORT
USB 2.0 has four leads. VBUS and GND are power leads. D+
and D- are data leads. Standard USB 2.0 ports has a current
limit of 0.5A (such as PC, notebook). Normal USB Battery
Charger has a current limit of 1.5A or 2A. USB port on VoltBot
is specially fabricated and can stand 3A and higher current
(Depend on the lead material, lead thickness, contact resistor
and contact force).
TOUCH KEY
Capacitor sensor, when a finger or an object comes near and
changes the electric field, it will generate a touch signal.
Calibrated every power-up to fit the environment.
DC INPUT
Normal 5.5*2.5 socket, but it only fits for 5.5*2.5*12mm plug.
5.5*2.5*9mm plug is too short to reach the leads.
LIGHT SENSOR
Sense the environment light to auto-adjust the LCD backlight.
UART
3.3V TTL UART,115200 Baud, 8N1, no parity, no flow-control.
Meant to be used to connect with external MCU, PLC or PC.
RESERVED PORT
A reserved port, do not use it.
PRESS KEY
Single press: enable touch-key for a while
Double press: switch on/off screen
Long press: switch on/off sound
2) Functions and Parameters
Working Conditions
Recommended Input
14.5V~20V
Input Range
7~20V
Maximum Rated Input
20V
Weight
120g
Dimension
97*74*18mm
Wireless
Wi-Fi:802.1 b/g/n
LCD
3.5’ 72*49mm
Resolution
480*320
Input Plug
5.5*2.5mm DC-005 12mm length
Page 5
VoltBot User Manual
5
Recommended Power of
Adapter
60~65W
Output Socket
USB2.0 (Strengthened for 3A)
USB-Type C (Extendable)
Recommended Environment
Condition
Temperature 0~55℃,Humidity 0%~60%
Maximum Rated
Environment Condition
Temperature -20~75℃,Humidity 0%~99%
Charger Parameters
Output
5.0~12V 3A
Maximum Ports
4
Short Protect
4A
Charge Mode
Quick charge and Normal charge
Quickcharge protocols
QC 1/2/3、MTK Pump-express,Compatible with QC4 and
higher、MTK Pump-express 2 and higher.
Apple 2.4A, Samsung 2.1A
Battery Protect
Auto Shutdown with current thread
Auto Shutdown with timer
Charge Curve
Graphical: Power, Voltage, Current
Raw Data Sheet (CSV): Power, Voltage, Current
Curve Type
1 second: precision 0.1s
1 minute: precision 1s
1 hour: precision 1min
1 day: precision 10min
DC Supply Parameters
Output
Min: 2.50V
Max: the lower between (Vin-2) and 12.5 V
For Example: if input with 9V, the maximum output is 7V
If input with 15V, the maximum output is 12.5V
Precision
0.01V
Voltage Accuracy
1%
Page 6

VoltBot User Manual
6
Current Accuracy
1% plus 0.02A
Line regulation
<0.5%
Load regulation
<0.5%
Ripple Vrms(no-load)
<0.1mV
Ripple Vpp(no-load)
<1mV
Ripple Vpp(full-load)
<5mV
Efficiency (full-load)
94%
Transient Characteristics
Short Protect One-time
11A
Short Protect Recoverable
4A
Current limits (>250ms)
3~4A
Current limits (<250ms)
8A
Note: 1. For pulsed current (below 250ms) larger than 11A would cause the channel being
totally shut-down. It needs a re-power-up to recover.
2: The contact resistor of USB connector limits the continuous current. Considerable
temperature rise would occur if current is larger than 3A. Due to contact resistor is not
predictable, you can touch the plug to make sure the temperature is OK. If the temperature
Charge Curve
Graphical: Power, Voltage, Current
Raw Data Sheet (CSV): Power, Voltage, Current
Curve Type
1 second: precision 0.1s
1 minute: precision 1s
1 hour: precision 1min
1 day: precision 10min
Other Functions
Backlight Adjustment
Auto adjusting backlight intensity with reference of
environment light.
Channel Smart Switch
Equipped
LCD Flipping
Equipped
Unique ID
To identify several VoltBots in the same room, two numbers
can be post-fixed to wireless name. These two numbers are
also shown on screen.
WiFi channel
WiFi channel=unique ID tailing digit+1
Page 7

VoltBot User Manual
7
Sound Switch
Equipped
Touch-key Switch
Equipped
UART Port
3.3V TTL-Level Baud 115200 8N1
Leads:VBUS: Floating, ID: Floating, D-: RX, D+: TX, GND
There are a level convertor board shipped with VoltBot
Wireless Configuration
WPA/WPA2 security, Static IP, Configurable host address
Page 8

VoltBot User Manual
8
3. Graphical UI
A. Overview
B. Channel Icons
Channel Number
Charger Mode
DC source Mode
Apple supported
Android supported
Quickcharge enabled
Quickcharge detected
Device detected
Voltage 9Volts
Current 2Amper
Power 5W/ring
Channel
Icons
System Icons
Unique ID
Input Voltage
Page 9

VoltBot User Manual
9
Unused
Reserved, factory use
C. System Icons
Backlight:
Auto-mode: bright
Manual-mode: dim
WIFI:
Wi-Fi on: bright
Wi-Fi off: dim
Communication: blink
Joined to hotspot: bright
Un-joined: dim
Communication: blink
Reserved, it indicate some
internal process has
unexpected response
UART Link: blink
Sound on: bright
Sound off: dim
Over heat or over
current: bright
Otherwise: dim
Touch-key off: bright
Touch-key on: dim
Page 10

VoltBot User Manual
10
4. Quick Start Guide
1) Charge a Normal Phone
1. Connect Power Input
2. Channel 4 for example. Check channel 4 is under charger mode
3. Check channel 4 has quick charge switch on
4. Connect data-cable in channel 4 and start charging.
2) Charge an iPhone X (PD support)
1. Plug-in the A-to-C (Type-C) extender.
2. Follow the steps in previous section and adapt a C to Lightening Data Cable.
3. The iPhone 8P/9P/X/XR/Xmax will start quickcharge and auto set the voltage into 9V.
3) Power a Gadget
1. Make sure the input voltage required by the gadget (possible: 5V, 3.3V, 9V)
2. Press the side-key once. There will be something shown on the screen. You will see 1324
is the right code to configure output.
3. Touch these symbols as 1324 in a row.
4. If you touched the wrong button, touch any key 3~4 times to see “Fail”, or press the side-
Page 11

VoltBot User Manual
11
key again. (Old code cleared and new code are ready).
5. Select a channel, touch 1 for example
6. Choose mode for channel 1, touch 2
7. Choose the voltage, touch 3 for 5V
8. Use the USB-to-DC cable to connect Port 1 and the Arduino board.
5. Connect VoltBot with a Web-browser
Here is a demo to turn Channel 1 into DC output of 9v, and then restore Channel 1 back
into quick charge model.
1. Power on VoltBot.
2. Search the WiFi hotspot list of your phone, find one named with “VoltBot”.
3. Join it.
4. Check the IP you got. (if you don’t know how, google “What is my iPhone's IP?”)
5. You probably see the IP is 1.1.1.X or 10.1.1.X.
6. Open the web browser on your phone (Safari).
7. Type in http://1.1.1.1 or http://10.1.1.1. It depends on the result by replacing X with 1 in
the IP of step 5. Then press “Go” open this address.
Page 12

VoltBot User Manual
12
8. Press “Output”
Page 13

VoltBot User Manual
13
9. Press “1”, “DC Source” in turn, then enter the number 9.00 and press “Submit”. Now you
probably see the Channel 1 in VoltBot has been assigned with 9.00 Volts and under DC
power supply mode now.
Page 14

VoltBot User Manual
14
10. Press “Home”
Page 15

VoltBot User Manual
15
11. Press “Output”
Page 16

VoltBot User Manual
16
12. Press “1” “Charger” “Quick Charger” in turn.
Page 17

VoltBot User Manual
17
13. “Success” will be shown on the image. The Channel 1 in VoltBot comes back to Charge
mode now.
Page 18

VoltBot User Manual
18
14. If you opened 1.1.1.1 and find it is a site named “Cloud Flare” instead the page above.
This is because the phone didn’t request the right address from VoltBot. You need to
close mobile data link (forcedly request every address with VoltBot), and clear the history
of the web-browser (request the page with real action instead fetch the one stored in
cache).
6. Touch Key
Here is a demo to turn Channel 1 into DC output of 9v and then restore Channel 1 back into
quick charge model through touch key.
1. Press the side-key (the single yellow key on the side of VoltBot), then you will see the
image above. It requests you to input 1324.
2. Find these marks on the top of VoltBot. These marks is where you need to touch. 1324
is what they mean.
Page 19

VoltBot User Manual
19
3. If you touched the wrong sequence, “Failed” is shown on screen. If failed is shown, the
input is reset. And you could retry the right sequence.
4. Press the touch key 1324, and press 1 to choose channel 1.
Page 20

VoltBot User Manual
20
5. Press 2 to choose DC Source
6. Press 4 to choose 9v
7. “Success” will be showed on the image.
8. Repeat step 2 and 3
Page 21

VoltBot User Manual
21
9. Press 1 to choose Charger.
10. Press 1 to choose Quick Charger ON
11. “Success” will be shown on the image.
Page 22

VoltBot User Manual
22
Note: You could also click http://oss.sillycomm.com/demos/key_touch_01.mp4 to see the
process of turning Channel 1 into DC output of 9v.
Note: If the touch key triggered itself while no touch action did, go to the trouble-shooting
chapter.
7. Connect VoltBot with Arduino
Arduino is a convenient and flexible open source electronics prototyping platform which
includes Arduino boards and Arduino IDE. When you connect Arduino with your VoltBot, you
could follow the instructions below and communicate with UART Communication Protocol.
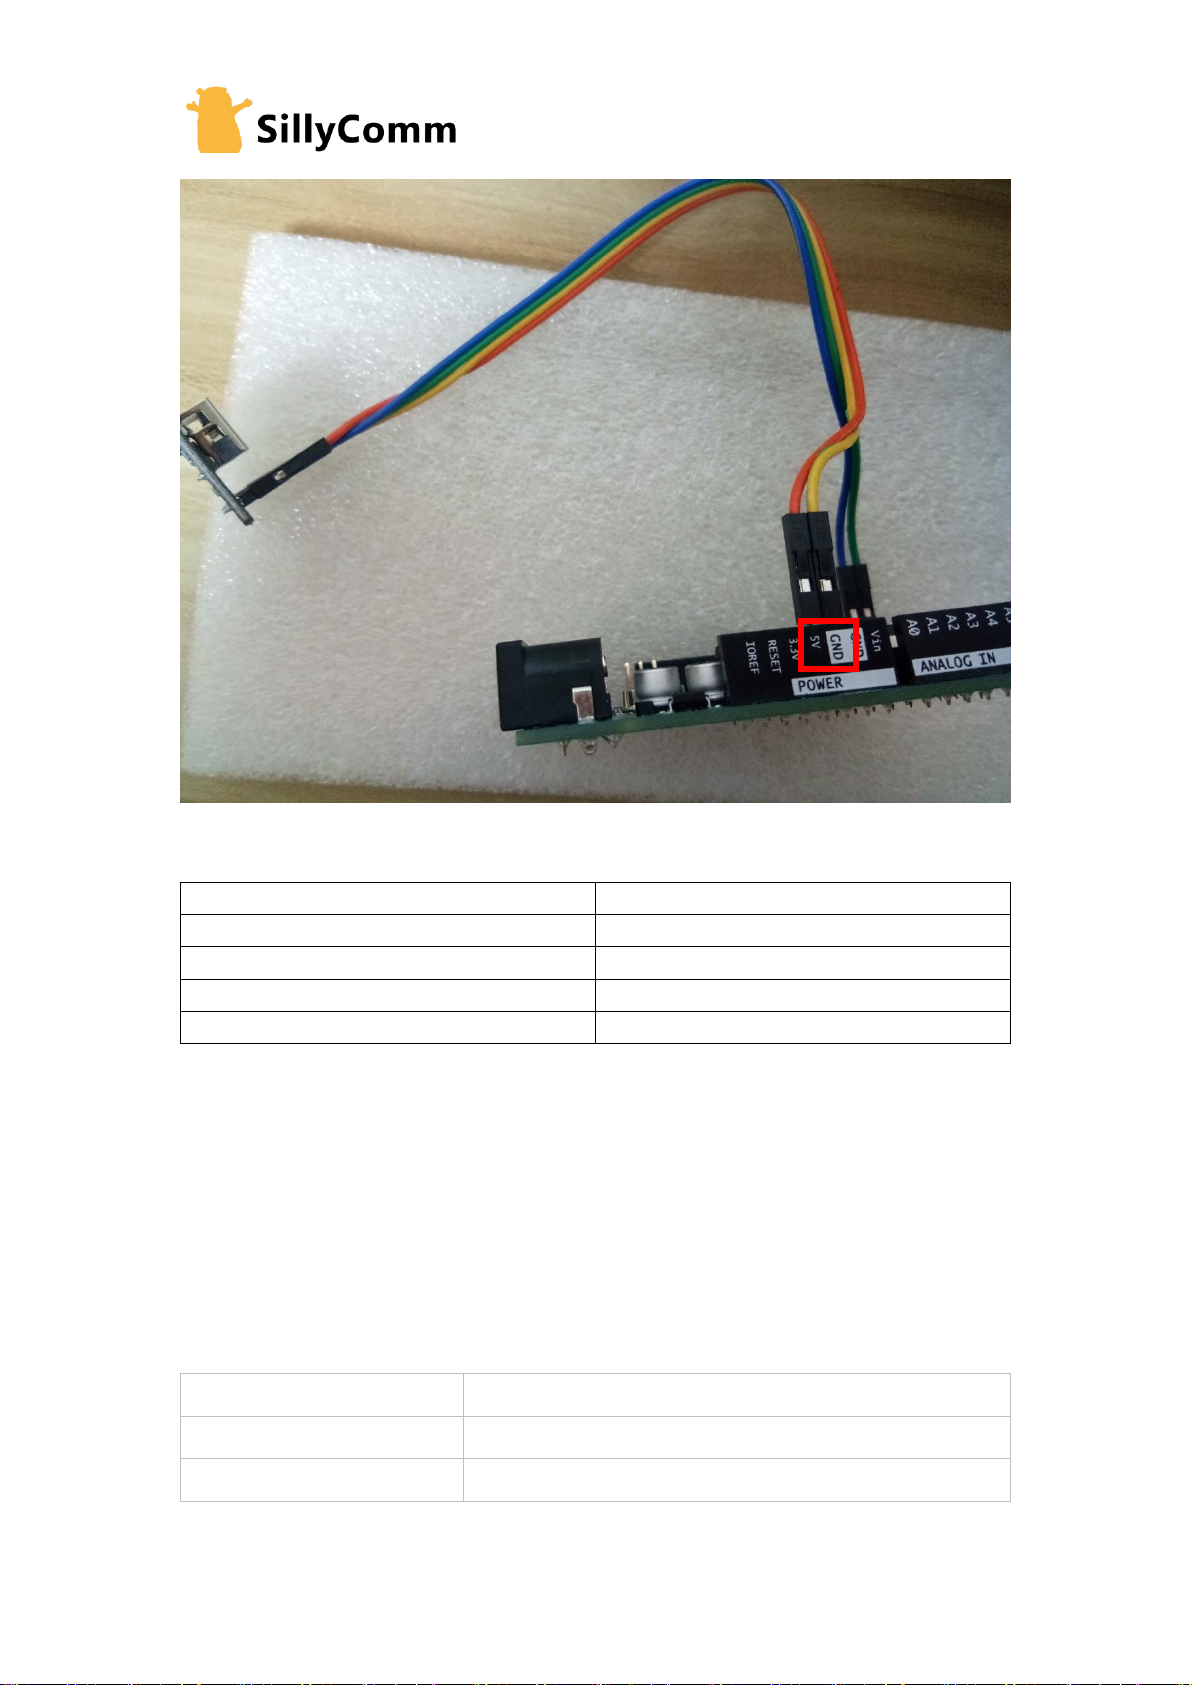
Here is something you need:
Level Convertor
Arduino
Jump wires
USB to Micro-USB cable
Then here is the way to connect:
Level
Convertor
Jump wires
Arduino
Page 23

VoltBot User Manual
23
Page 24
VoltBot User Manual
24
Arduino
Level Convertor
GND
GND
RX
RX
TX
TX
5V
UMOD
8. Connect VoltBot with App
A. App download
Google Play or App Store, search VoltBot.
B. APP requirement:
Android Version
4.0 and higher
IOS Version
10.0 and higher
Screen Resolution
1280*720 and higher
Page 25

VoltBot User Manual
25
C. Demos
Demo to connect VoltBot
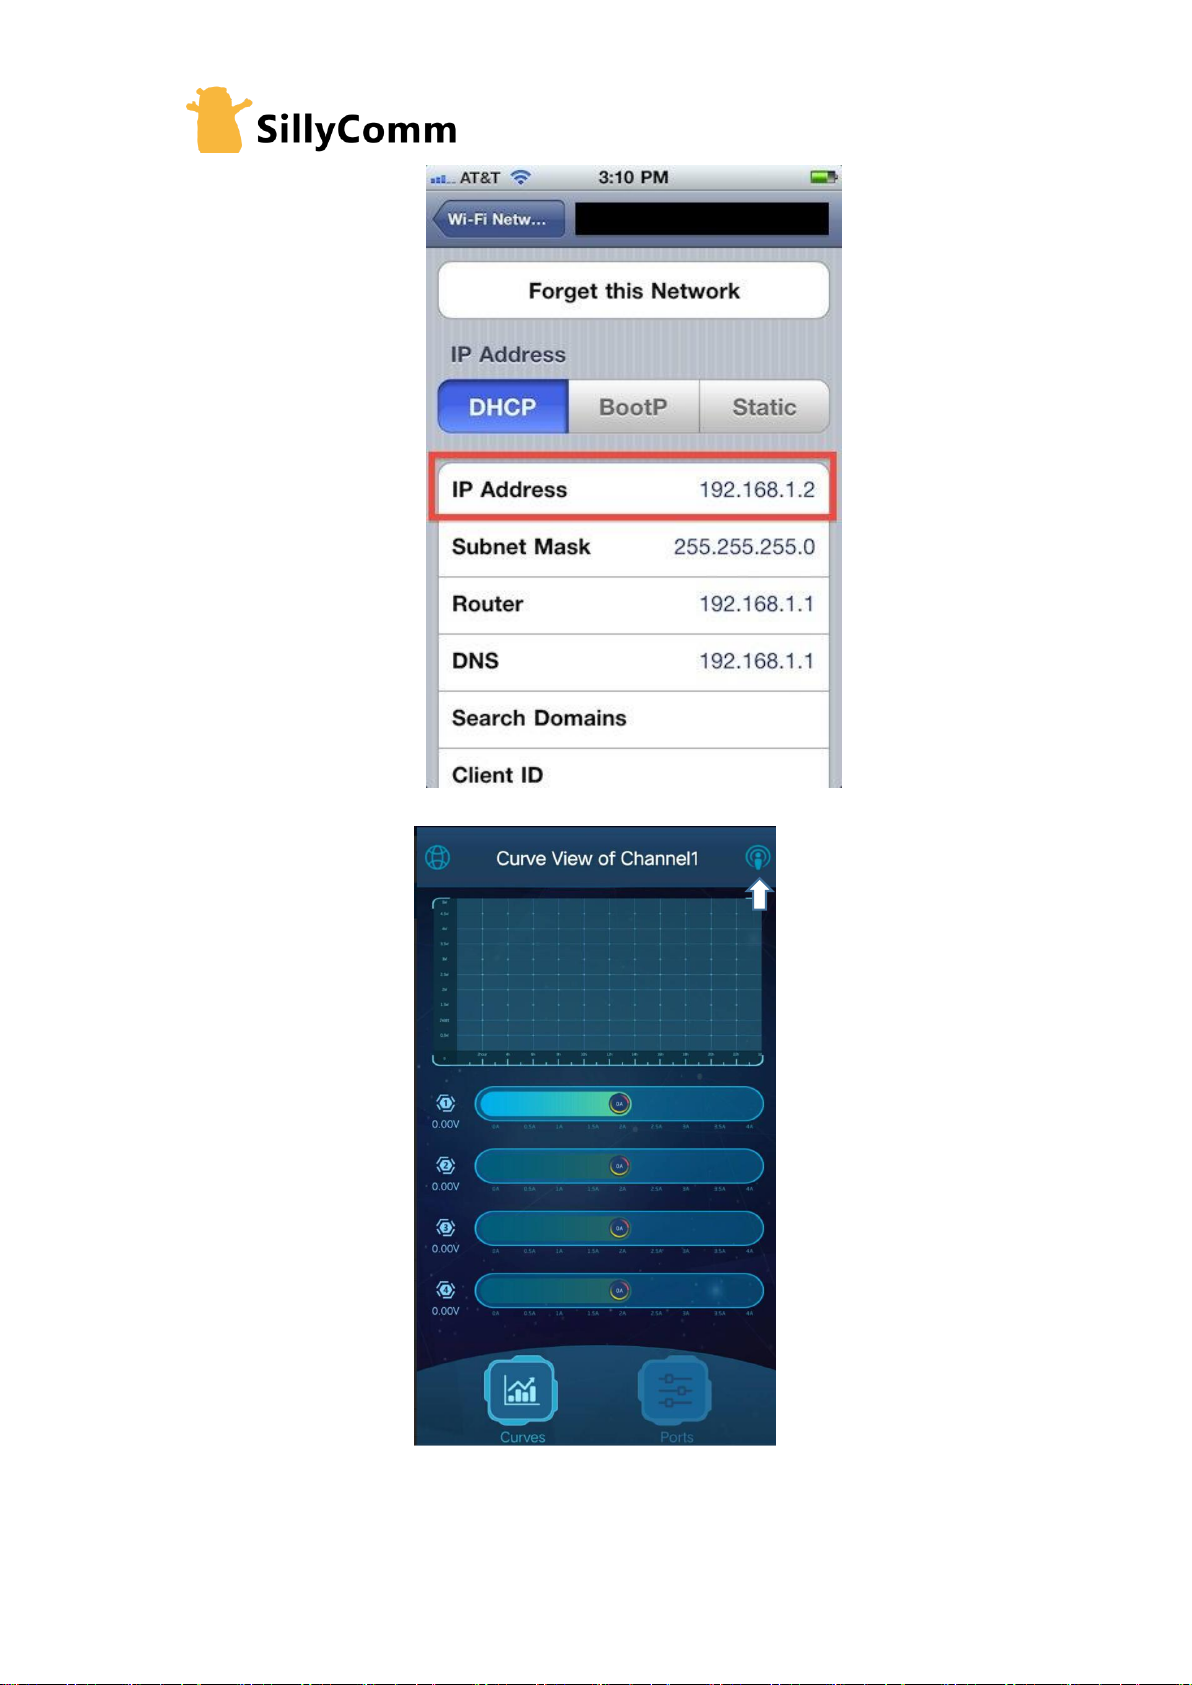
1. Connect VoltBot WiFi. Tap the info button on the right side.
Page 26
VoltBot User Manual
26
2. Read the Router line or Gateway line. That’s the VoltBot IP.
3. Open the APP-VoltBot. Then you could press the radio icon.
Page 27

VoltBot User Manual
27
4. Press the button labeled with A.
Note:
A: Using the gateway IP as VoltBot IP. The app will auto-search the IP of the phone, and
then replace the last digit into 1 as VoltBot IP.
B: Assign VoltBot IP manually. This applies to situations that VoltBot has double IPs or a
wrong IP are assigned by auto-searching. Therefore, this option allows to access VoltBot via
the Internet, which will be elaborated in next chapters.
A
B
Page 28

VoltBot User Manual
28
Demo to watch curves of Channel 1.
1. Press the first column to choose Channel 1, then the power curve of Channel 1 is
shown on the screen.
Page 29

VoltBot User Manual
29
2. Press the curve.
3. Then voltage, current and power curves are shown on the screen. Slide left or right,
you could toggle the curves among 6 seconds, 1 minute, 1 hour and 1 day. If you
Voltage curve
Power curve
Current curve
Page 30

VoltBot User Manual
30
touch one of the three, it will zoom. If you long-touch on it, the raw data in the
curve will be paste into the clipboard.
Demo to turn Channel 1 into DC output of 9V.
1. Press “Ports”
Page 31

VoltBot User Manual
31
2. Press “1” to choose Channel 1
3. Press the DC Mode, enter 9 volts, and press “OK”. Then you will see the output of
Page 32

VoltBot User Manual
32
Channel 1 is 9 volts on VoltBot.
Demo to restore Channel 1 back into quick charge model.
1. Press the Charge Mode, and “Quick Charge” in turn. Then your Channel 1 of VoltBot is
in Quick Charger mode.
Page 33

VoltBot User Manual
33
Demo to shutdown Channel 1
1. Click the section in the picture, you will see the On/Off setting.
Demo to update firmware
1. Open Google Play or App Store to check the APP is the newest version.
Page 34
VoltBot User Manual
34
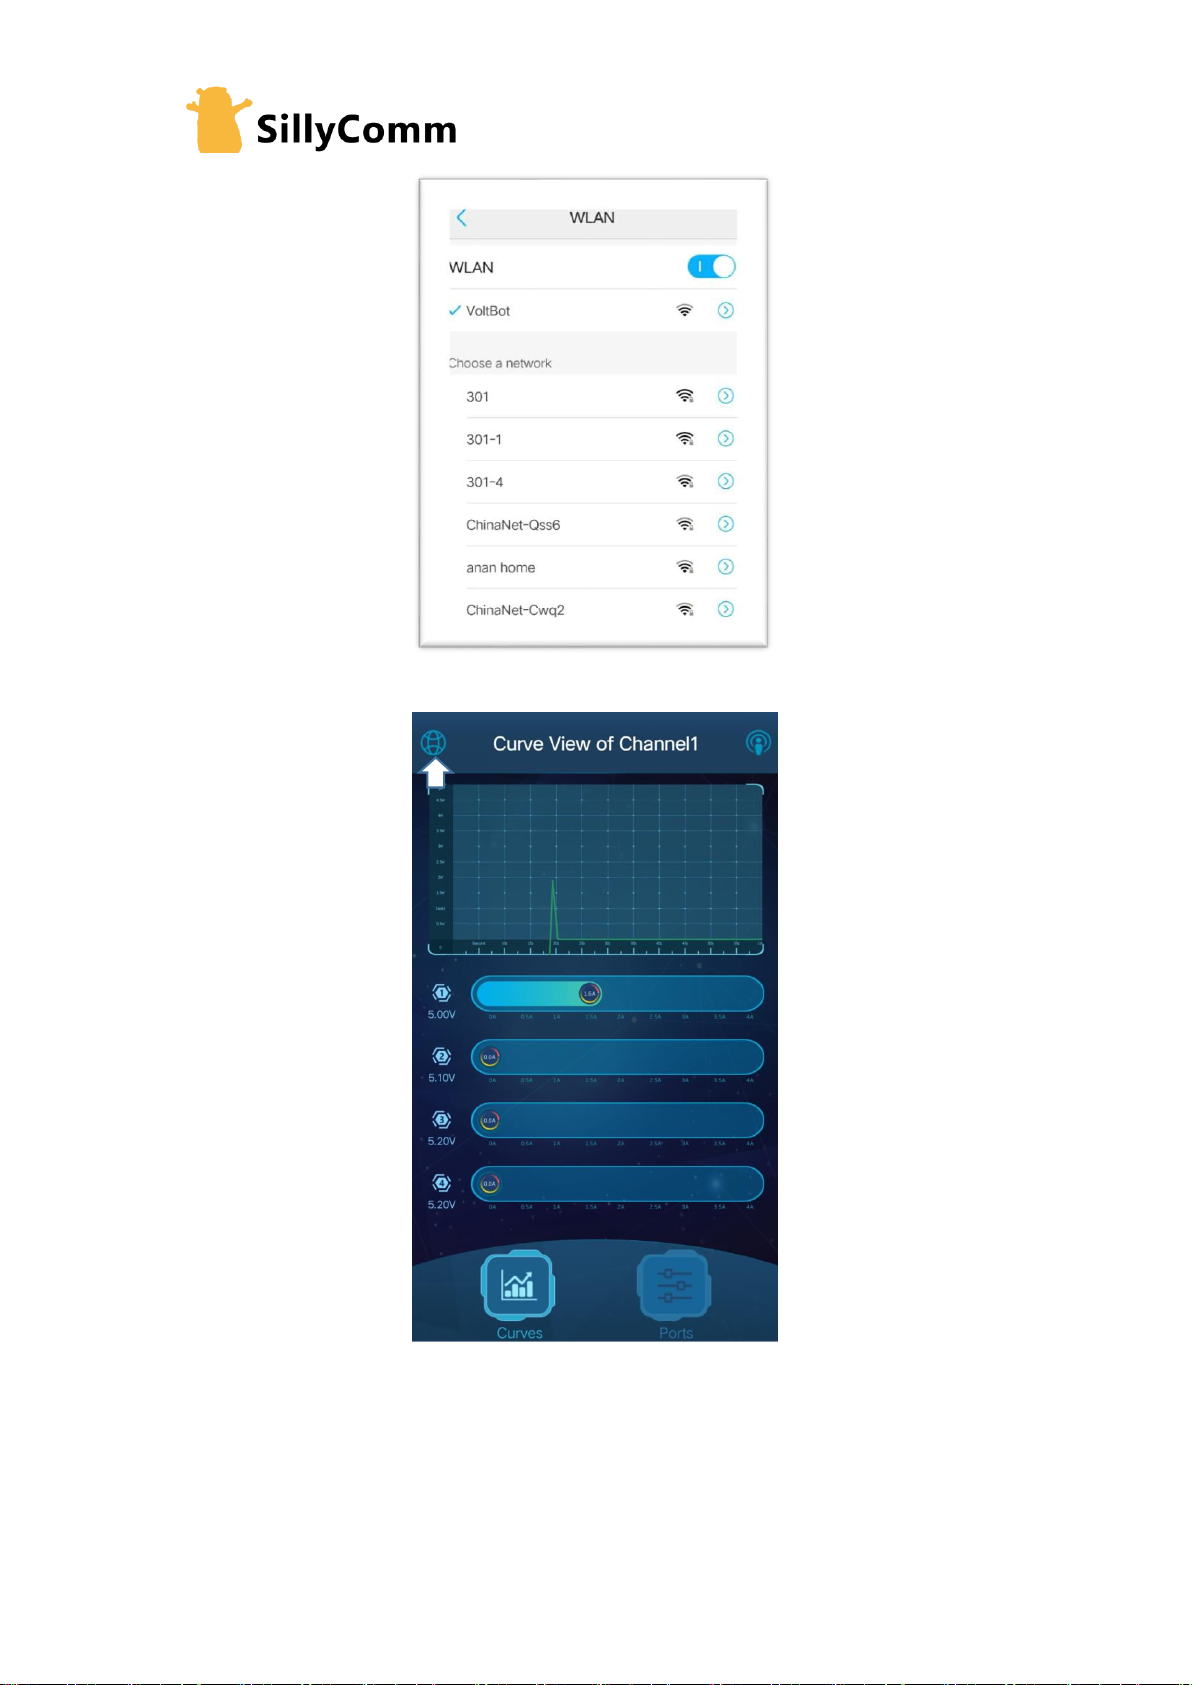
2. Connect VoltBot’s WiFi.
3. Press the System Setting icon.
Page 35

VoltBot User Manual
35
4. Press “Update firmware”
5. S1: If a VoltBot is connected, the title of S2 will go bright. Otherwise, diagnose the IP
setting.
S1
S2
S2
Page 36

VoltBot User Manual
36
S2: In this step, the APP need to connect to update server to check updates. Currently
we connected the hotspot ‘VoltBot’, which has only local access instead of Internet
access. So we need to shutdown WiFi connection, use mobile data and retry step 2. Or
we could connect another hotspot which has Internet access. If the APP connect the
server successfully, the newest version will show, then you could decide whether to
update the VoltBot.
S3: In this step, the APP need to connect to VoltBot to download the update files. So we
need to enable WiFi connection back, or connect VoltBot’s hotspot back. If done, both
the APP and VoltBot will show the progress of downloading.
6. Just wait until its done, but don’t be afraid of any break. Because this downloading is
not in real-time. If it 100% done, next power-up will enter the new version. If it not done,
Page 37

VoltBot User Manual
37
next power-up will keep the current version and nothing bad will happen.
7. Re-power your VoltBot, and the new version will show.
Note: After the updating, there are two issues in updating process of some very old
firmware:
1. Sounds off
When you start updating, the sound is turned off by default. You could long press the key
on the right side of your VoltBot to turn sounds back on.
Page 38

VoltBot User Manual
38
2. Channel 1 off
This is a bug if the version is lower than 27112018, Channel 1 will be closed by mistake. You
could re-enable Channel 1 after you have updated your VoltBot.
9. Share VoltBot on Internet
Here is a demo to make VoltBot join the home WiFi
1. Connect VoltBot WiFi
2. Connect VoltBot with a Web-browser
Page 39

VoltBot User Manual
39
3. Press” Wireless”, this page will take a while to open. Because it will instruct VoltBot to scan
every hotspot it can reach.
Page 40

VoltBot User Manual
40
4. Check whether your home WiFi is in the connectable list (If the name is too long, only first
characters will show). Then fill-in its full-name and its password, then press “Submit”
Page 41

VoltBot User Manual
41
5. Wait about 60 seconds generally, the image above will be shown, then press “Home”.
6.
7. Press “Wireless” again.
Page 42

VoltBot User Manual
42
8. Remember the joined Hotspot IP.
Page 43

VoltBot User Manual
43
9. Connect your home WiFi (the 301 is an example).
10. Enter the Joined Hotspot IP in the web-browser.
Page 44

VoltBot User Manual
44
11. You could use this IP as VoltBot IP from now on. It is a better way because:
No need to connect VoltBot’s hotspot every time. One-click then VoltBot is there.
You can surf the Internet at the same time.
No need to switch the connection in firmware updating.
If you know how to set port forwarding on your router. You can access VoltBot
remotely just as a web-http-server.
10. Clear all Configuration
Press side-key then plug-in power cable, hold side-key until “Factory Reset” screen appears.
This could clear all channel setting and wireless setting. It will be helpful when you forget
wireless password or static IP address.
11. Trouble Shooting
You could visit the link below.
http://www.sillycomm.com/voltbot/trouble-shooting/
Page 45

VoltBot User Manual
45
12. Tips
1. If charge iPhone X, purchase a PD kit to unlock quickcharge.
2. Engineer Kit might help you if you use VoltBot as a DC power supply.
3. You could use Mount Kit to power VoltBot by car.
4. If you travel a lot, use a travel kit or a PD kit + a newest GaN Type-C adapter. The newest
generation-GaN adapter is not cheap but only in 30% size of the old generation.
13. Privacy Disclaimer
The APP only store configuration of VoltBot, it collects no user data or environment data.
VoltBot stores power data to show curves, no other data related. VoltBot only takes passive
connections. It has no function that requires an active connection, and we have no server to
accept any active connection.
14. Moral Disclaimer
SillyComm is a manufacturer of industrial instruments, established in 2012. We are an entity
owned by 100% private shareholders and we will not have any contract with the CCP
government, or its agents (including state-owned research facility, state-owned enterprises,
social group, and so on). We believe in freedom could help the improvement of technology
and we confidently provide noble, decent, stable and reliable products for customers in the
world.
15. Customer Service
Full Name
Beijing SillyComm Co., Ltd.
中文 Name
北京易信通达科技有限责任公司
Site
www.sillycomm.com
Support E-mail
[email protected](suggested), [email protected]
 Loading...