

Page 1

Preface
Thank you for purchasing this camera.
Equipped with four shooting modes (Capture Mode, Scene Mode, Movie
Mode, and Audio Mode) and one playback button, this camera will fulfill all
your digital picture processing needs. This card-sized and lightweight
camera offers 5.36 mega pixels high-quality image along with precise 4 M
digital zoom. The built-in internal memory can store your images and
videos. Through the USB cable connection, pictures and movie clips can
be easily transferred from the camera to the PC. The TV-out function
allows pictures to be screened through the TV unit. Continuous shooting
function allows users to take multiple frames in quick succession.
To make the best out of this camera, it is strongly suggested that you read
through this manual prior to operating this camera.
1
Page 2
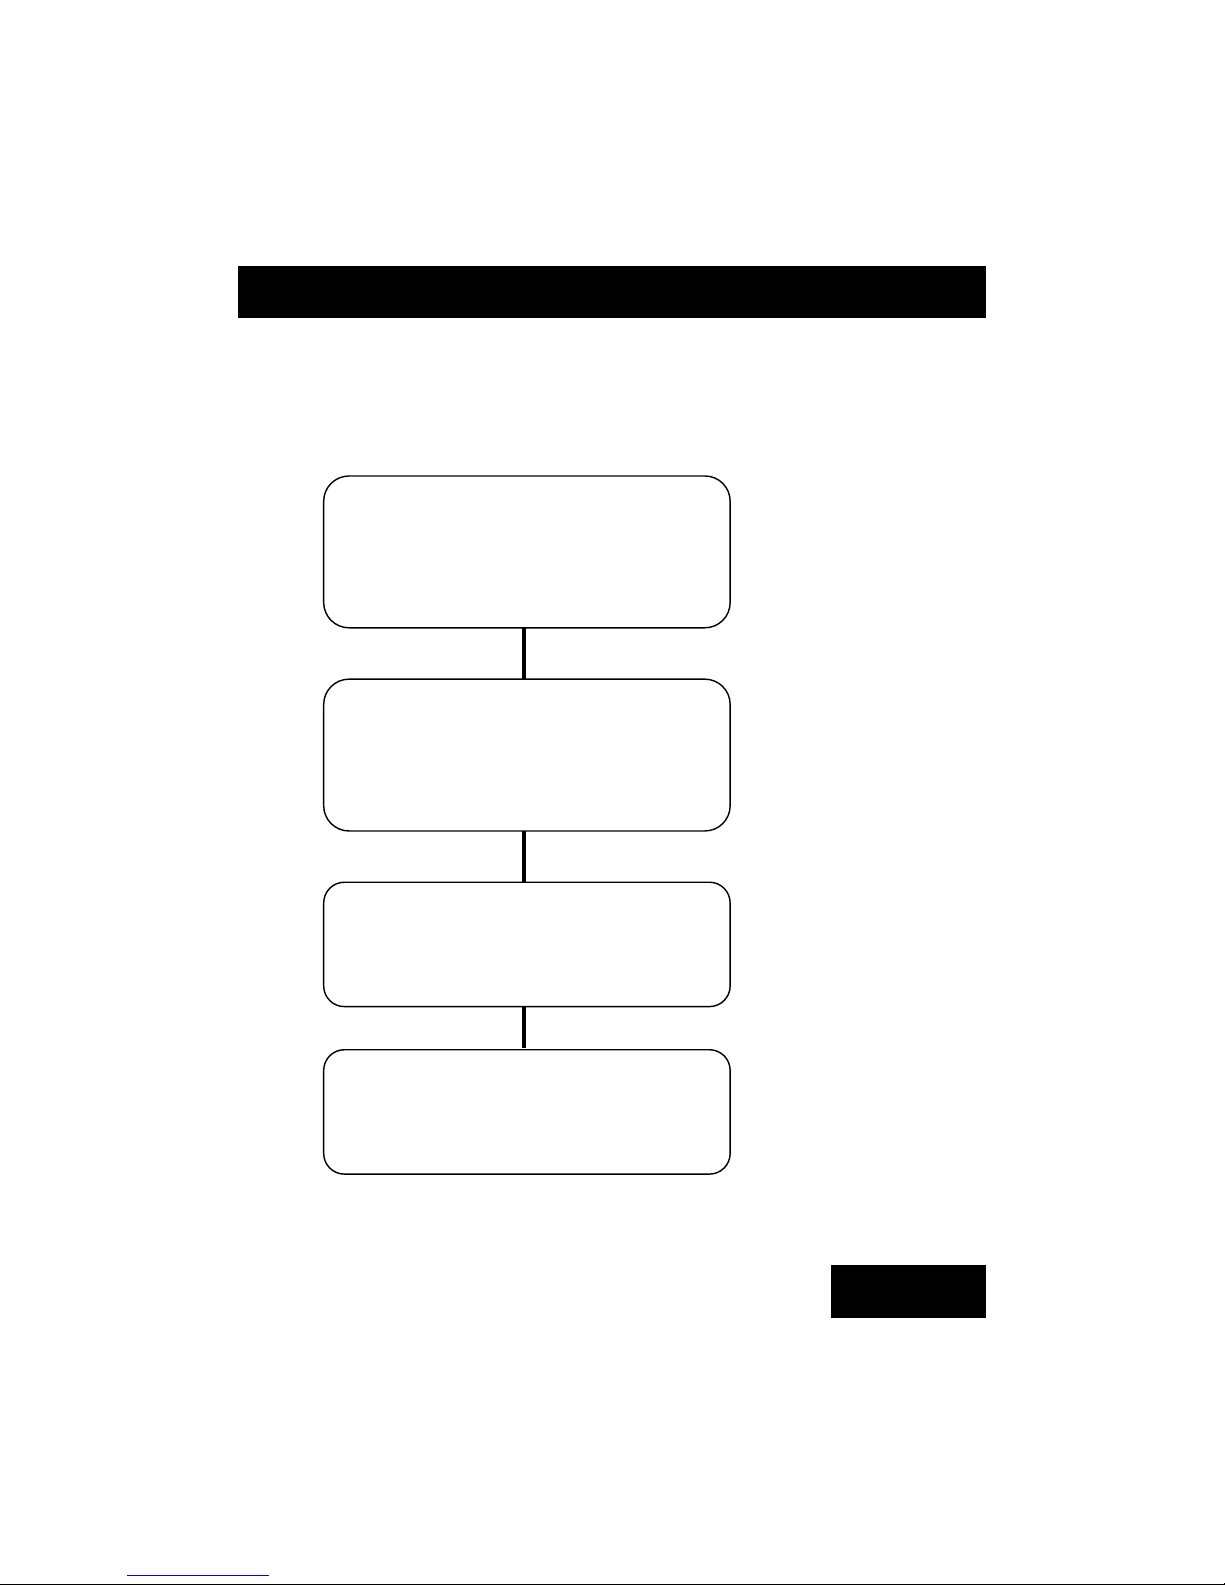
Quick Start
This quick start guide provides an overview function of this camera.
For quick reference, please refer to the following flow chart:
Before shooting:
Turning the camera On and Off (Page 11)
Flash setting (Page 7)
Zooming In and Out (Page 12)
Installing the software (Page 33)
Basic Shooting
Shooting images (Page 12)
Viewing images (Page 13)
Deleting images (Page 13)
Other functions
Recording audio (Page 24)
Recording video (Page 23)
Downloading images to your PC
Connecting through USB (Page 34)
Connecting through TV-out (Page 35)
2
Table of Contents
Page 3

Preface........................................................................................................1
Quick Start................................................................................................. 2
Prior to Operating the Camera................................................................. 4
Unpacking the Camera .............................................................................. 4
Identifying Components ..............................................................................5
Basic Function Buttons ...............................................................................6
Loading the Batteries and SD Memory Card ............................................. 9
Basic Settings ...........................................................................................10
Formatting the Internal Memory and SD Card ..........................................10
Basic Operating Procedure.................................................................... 1 1
Turning the Camera ON/OFF.....................................................................11
Basic Shooting ......................................................................................... 12
Zooming In/Out......................................................................................... 12
Viewing Pictures ...................................................................................... 13
Protecting and Deleting Pictures.............................................................. 13
Four Main Modes and Instructions ....................................................... 14
Scene Mode.............................................................................................. 16
Capture Mode........................................................................................... 18
Movie Mode.............................................................................................. 23
Audio Mode .............................................................................................. 24
Playback Button........................................................................................ 25
Setup Function ......................................................................................... 28
Making Connections .............................................................................. 33
Installing Software .................................................................................... 33
Connecting through USB …….................................................................. 34
Connecting through TV-out ...................................................................... 35
Appendix................................................................................................. 36
3
Page 4
Prior to Operating the Camera
Setting up this digital camera is quick and simple. Follow these
steps, and you’ll be on your way to infinite boundaries.
Unpacking the Camera
1. Clear all items from the box. (It is highly recommended that
the box and wrappings are kept for future usage)
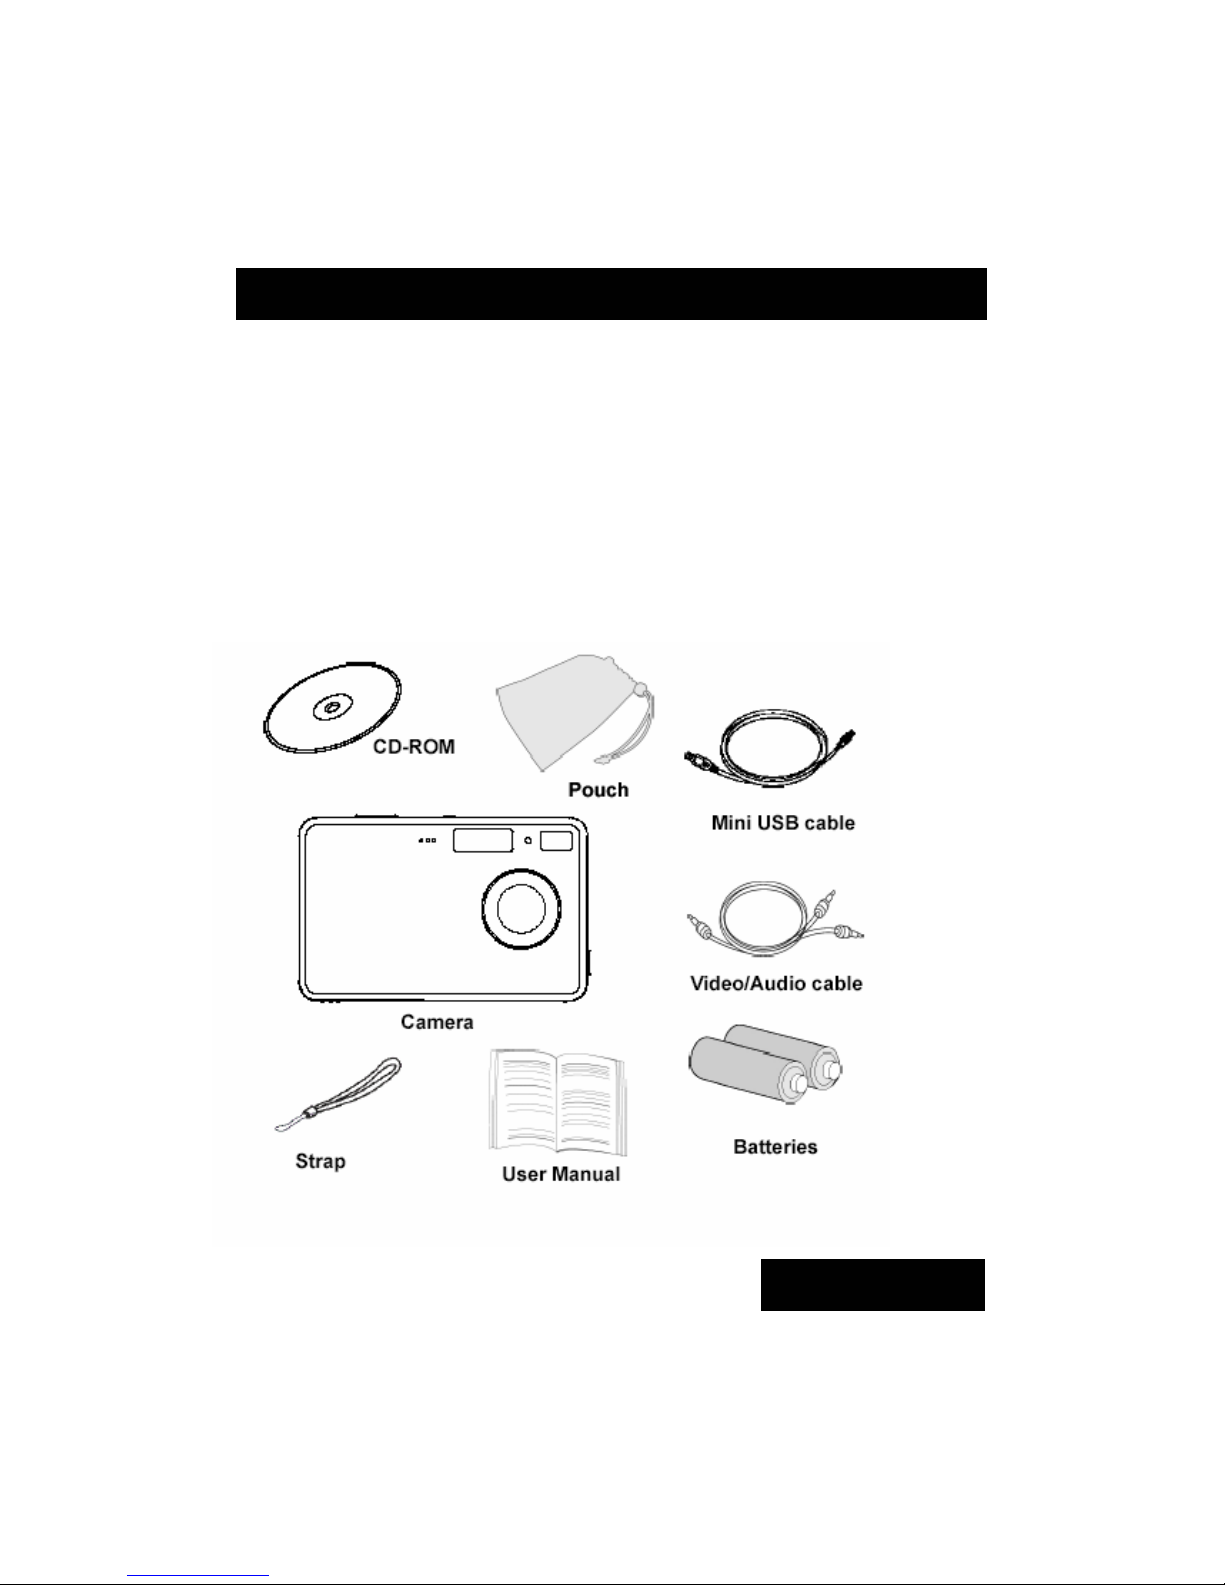
2. Double check for the following items:
4
Prior to O
p
eratin
g
the Camera
Page 5
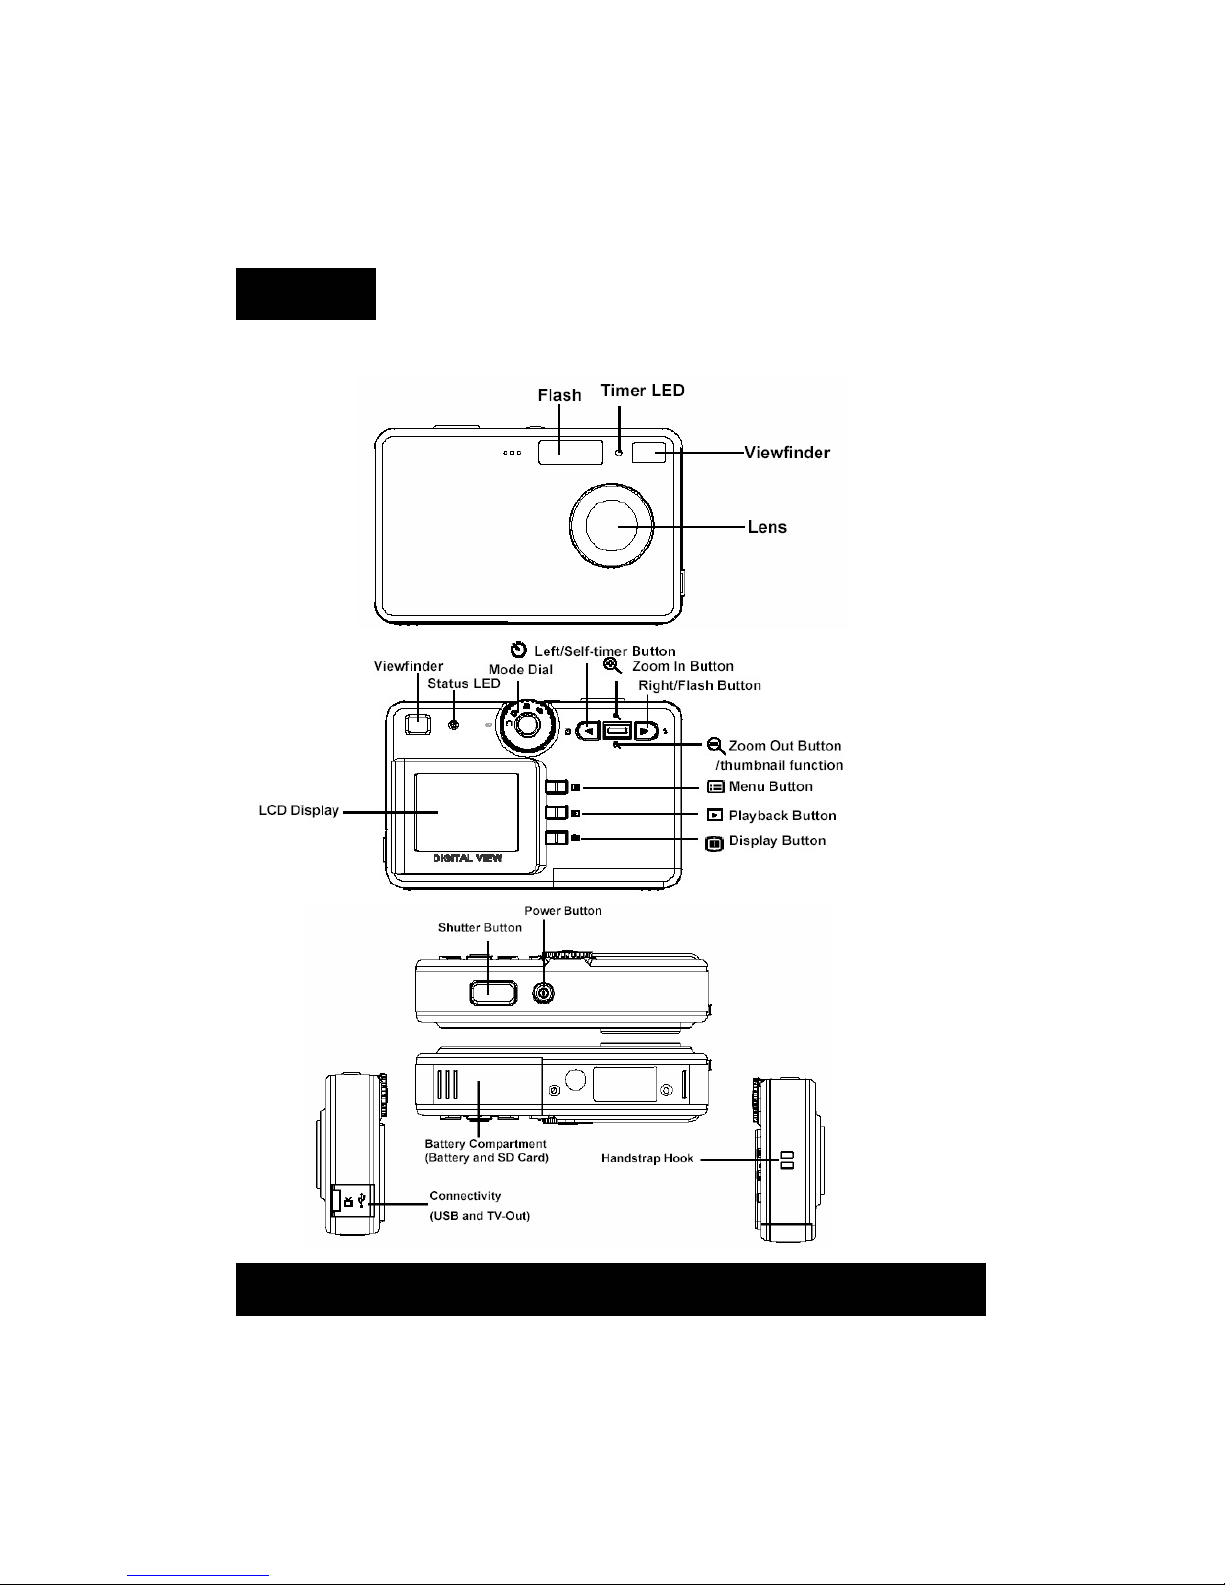
Identifying Components
5
Page 6
Basic Function Buttons
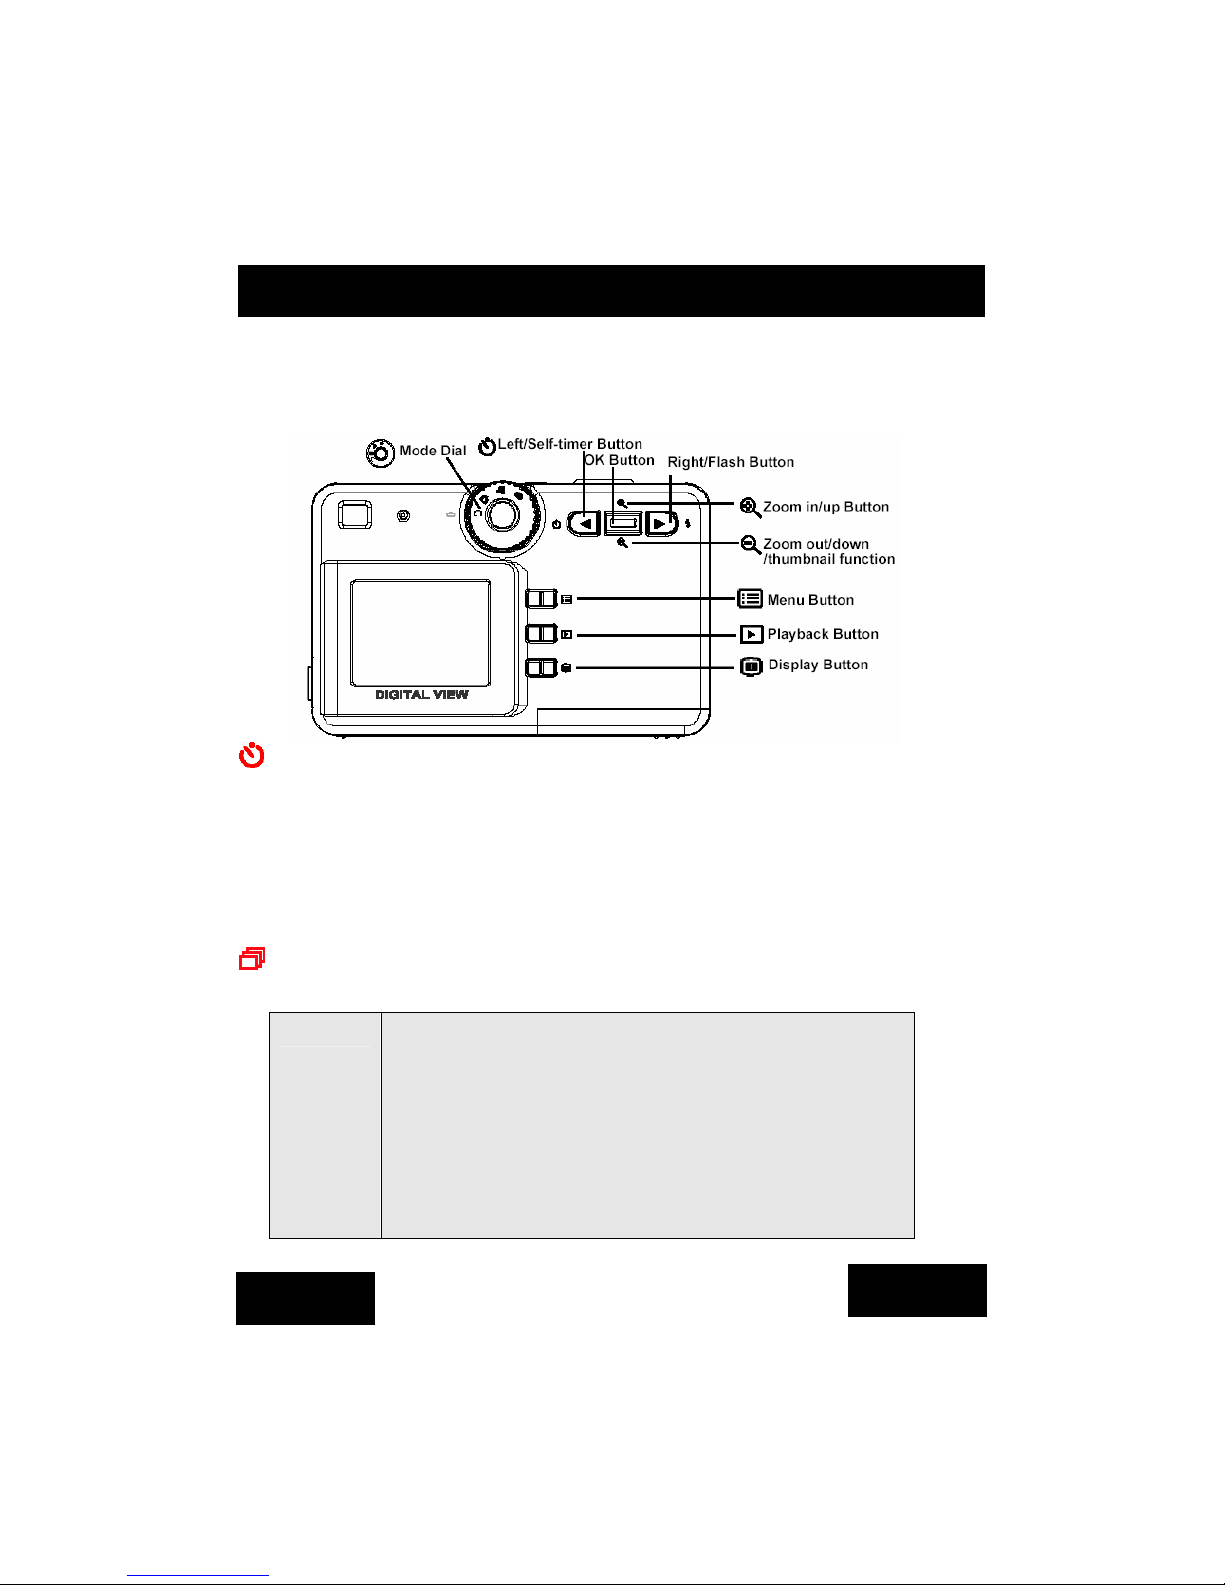
This section will explain the basic function buttons to instantly
operate this camera.
Self-timer: The self-timer function is used in any of the following
modes: capture, scene, and movie. A tripod is highly recommended
when using the self-timer. Press the left button to select self-timer.
When the icon appears on the LCD, press the shutter button to
activate. To set the time frame for the self-timer, select “Menu”
followed by the setup function.
Continuous shot: This function allows 3 continuous shots.
Press the left button twice to activate this function.
NOTE:
1. Turn off the Flash prior to using the continuous shot function.
2. Under continuous shot, the flash will remain inactive.
3. If the internal or SD card has run out of memory, the continuous
shot will not function.
4. Once instant review is selected, the picture displayed on the
LCD will be the last frame taken.
5. While in the continuo us shot function, the LCD will remain off
until the 3 frames have been executed.
6. 6. Under resolution 8.0M/10.0M (SW interpolation), the
continuous shot will remain inactive.
6
Prior to O
p
eratin
g
the Camera
Page 7

Flash: This button sets flash to; force off, auto red eye
reduction, force on and slow.
Force off: Default setting of flash mode
Auto Red eye reduction: Press flash button once for auto red eye reduction
Force on: Press flash button twice for force on
Slow: Press flash button three times for slow shot
Zoom: This camera has 4x digital zoom.
Resolution Digital Zoom
10.0 M (3648x2736) x 1
8.0M (3264x2448) x 1
5.0M (2560x1920) x 4
3.0M (2048x1536) x 4
2.0M (1600x1200) x 4
1.3M (1280x960) x 4
VGA (640x480) x 4
Under Capture and Scene Mode:
Zoom in: Press Zoom in button to magnify image.
Zoom out: Press Zoom out button to narrow the image.
Under Playback mode: (Magnify / Thumbnail).
Zoom in: Press Zoom in button to magnify image.
Zoom out: Press Zoom out button to thumbnail (3x3).
Page 8
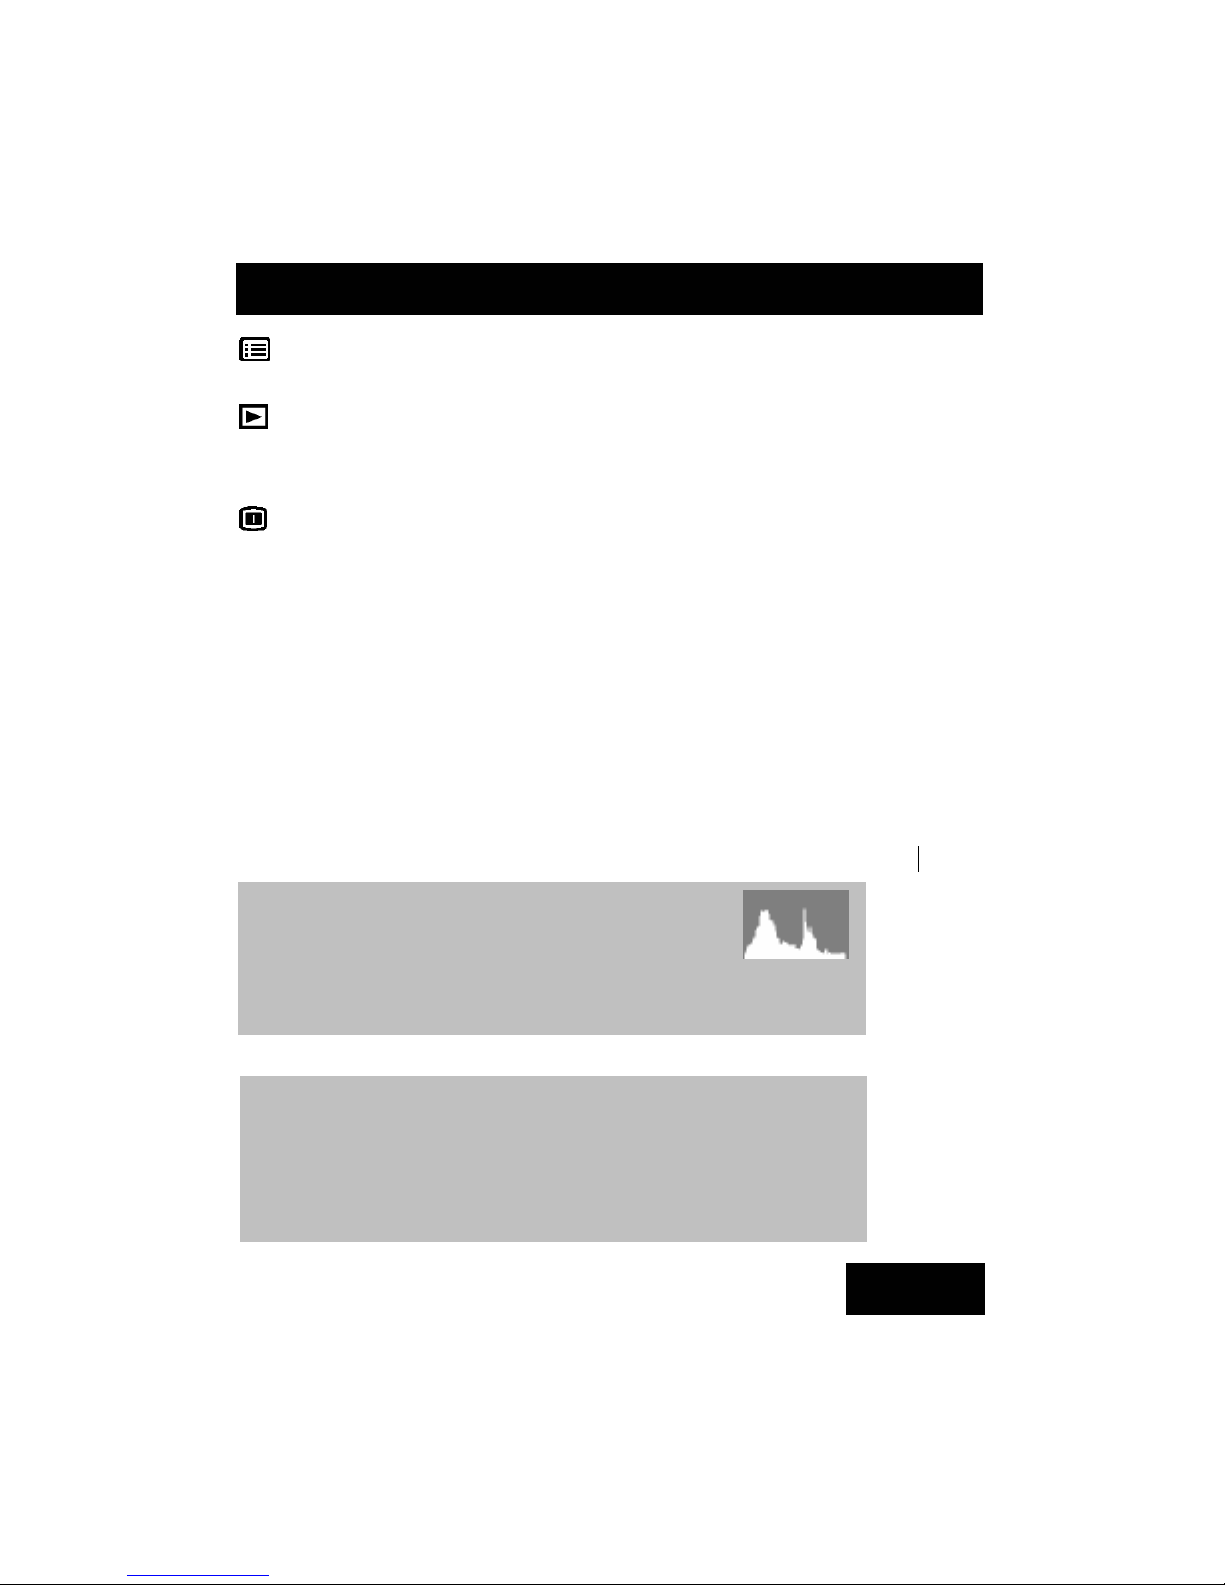
Menu: Accessible under scene, capture, and playback mode,
this function allows users to change the camera setting.
Playback: This button allows users to view their recorded
images, video, and audio. Press the playback button to view.
To exit, simply press the playback button again.
Display: This button allows you to turn the display On or
Off. When the LCD is initially switched on, the battery status
will be displayed for 5 seconds.
Under Capture/Scene mode: Press the display button once for
Capture information, second time to access the 3x3 grid display
(this grid display assists users in composing the picture), third
time for image only, and fourth time to turn the LCD off.
Under Playback mode: Press the display button once to get image
information, twice for the image, and three times to turn off the LCD.
NOTE: 1. The LCD will turn off automatically in 30
seconds if user doesn't operate the camera.
The LCD will turn on immediately once user
touches any button.
2. Anti-handshake icon
User can find a yellow icon on the right of LCD screen
to remind user to hold the camera steady.
8
Prior to O
p
eratin
g
the Camera
Tip: HV / Histogram Value
Histogram Value showing the brightness and contrast
of the subject. It enables precise exposure control. In
playback mode, histogram shows the brightness and contrast
information of recorded pictures. You can set histogram display by
pressing display button in shooting and playback modes.
Page 9
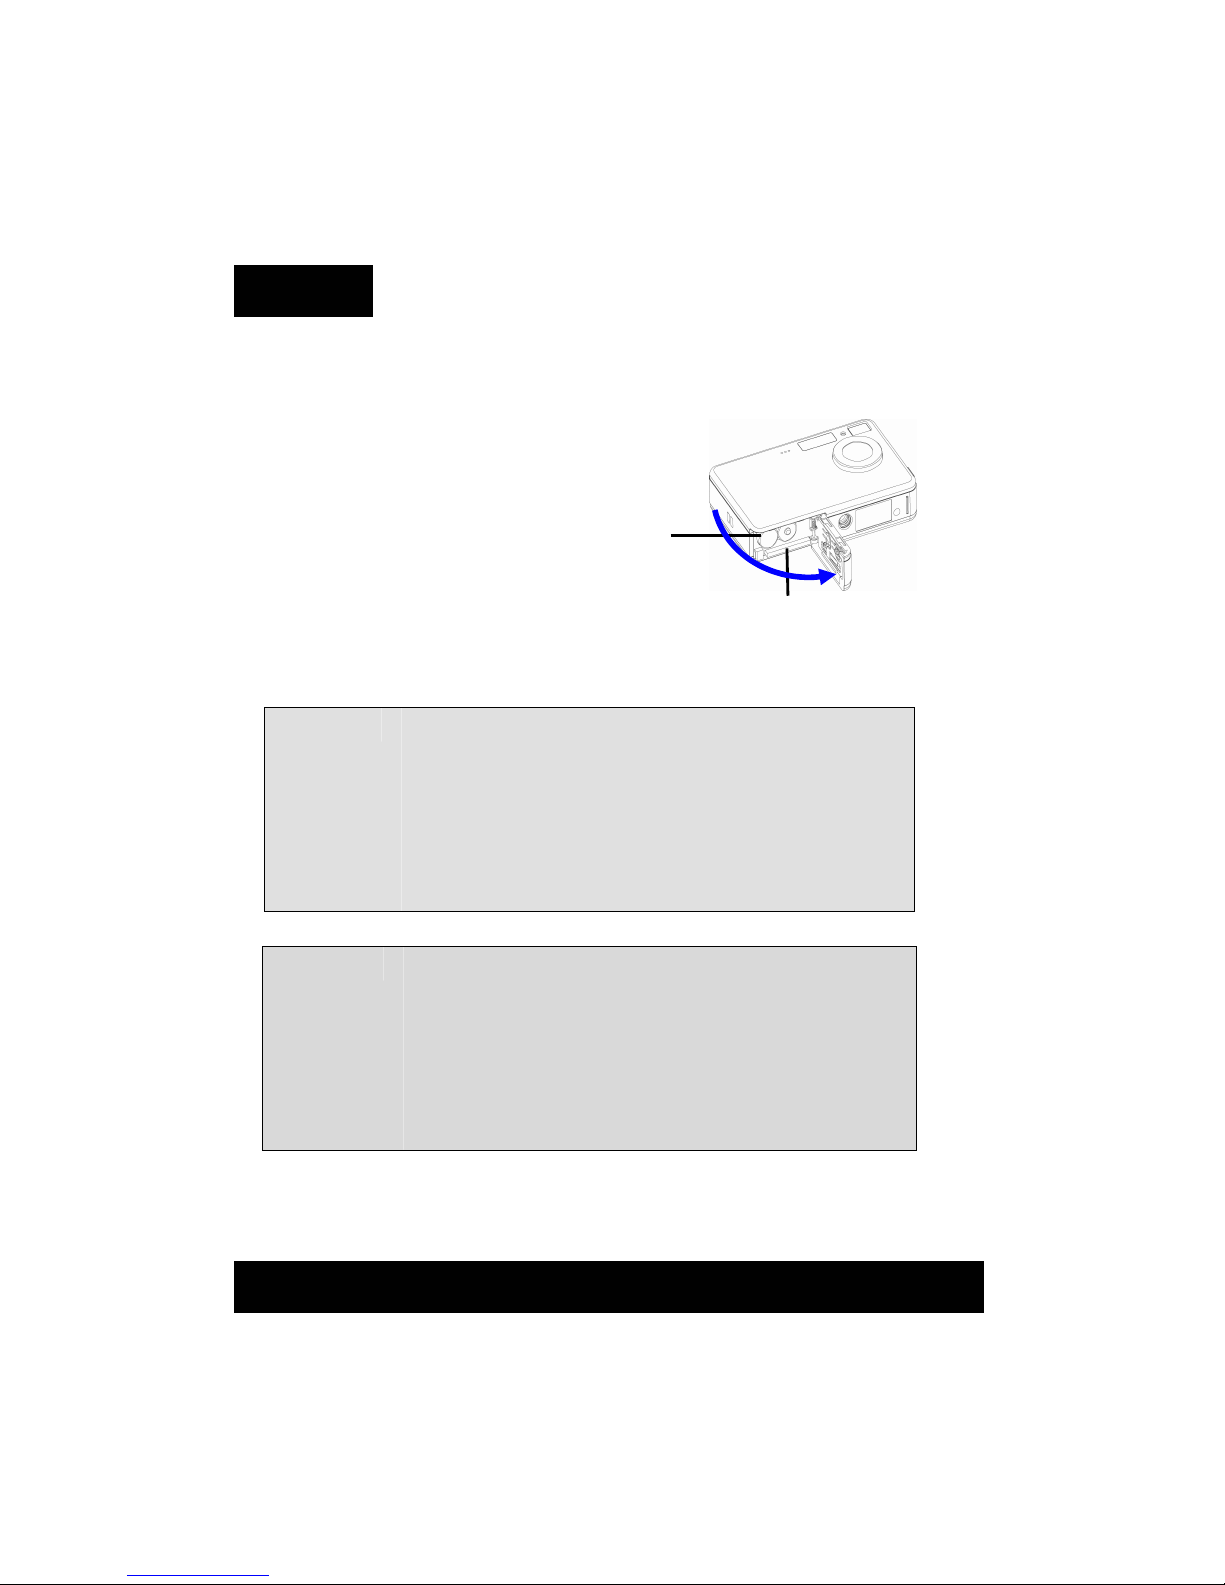
Loading the Batteries and SD Memory Card
This camera uses 2 AAA batteries. The batteries and SD card share the
same compartment and door.
1. Slide the battery/SD card cover in the
direction of the arrow, then lift to open.
2. Load the included batteries
into the battery compartment. (a)
3. Insert the SD card into the slot. (b)
4. Close the battery/SD Card cover.
Note: A directional arrow guides the insertion of the SD card in the
compartment.
CAUTION!
1. It is highly recommended that rechargeable batteries be
used.
2. To improve battery performance, replace all installed
batteries at the same time and keep batteries away from
heat.
3. Do not mix battery types or it may cause a fire or
explosion. Use only one battery type at one time.
4. Batteries should be inserted in the battery compartment
with the "+" and "-" sides facing correctly.
NOTE:
1. Do not open the battery compartment while the USB file
transfer is in process.
2. Once new batteries are loaded, users will need to reset
the date and time.
3. Do not open the battery/SD card cover or remove the
batteries when the camera is ON. Only remove the
batteries and SD card when the camera is OFF.
4. If you do not plan on using the camera for a long period
of time, please remove the batteries and SD card.
a
b
9
Page 10

Basic Settings
Upon turning the camera on, a “welcome image” will appear on the
LCD display. Please proceed with the following settings:
NOTE: Users have the option of changing the camera’s “welcome image,”
by selecting background setting under the menu section of
Playback mode.
Language Preference Setting
There are a total of nine languages to choose from to interact with
this camera. Please refer to setup function. (Page 31)
Date and Time Setting
Please refer to the Date and Time setting under setup function.
(Page 28)
NOTE: The last date and time setting will be stored when new batteries
are installed.
Formatting the Internal Memory and SD Card
Prior to its initial usage, format the SD card.
To format the SD card, please insert your compatible SD card into the SD
slot. Then proceed with the following steps:
1. In the mode function, press the Menu button to enter the setup function
to select “Format”.
2. You will then be asked "Format SD card?"
3. Press the OK button to confirm and proceed with formatting.
As a result, once you withdraw the SD Card from the camera, the LCD
display will show the following message for confirmation: "Format internal
memory?" Then, press OK button to complete formatting the internal
memory.
10
Prior to O
p
eratin
g
the Camera
Page 11
NOTE:
1. Prior to formatting the SD card, deactivate the “Protect” SD card”
function.
2. The internal memory cannot be formatted when the SD card is in the
camera.
Basic Operating Procedure
From this section, you will learn how to turn the camera on and off, shoot
pictures, zoom in and out, view and protect pictures.
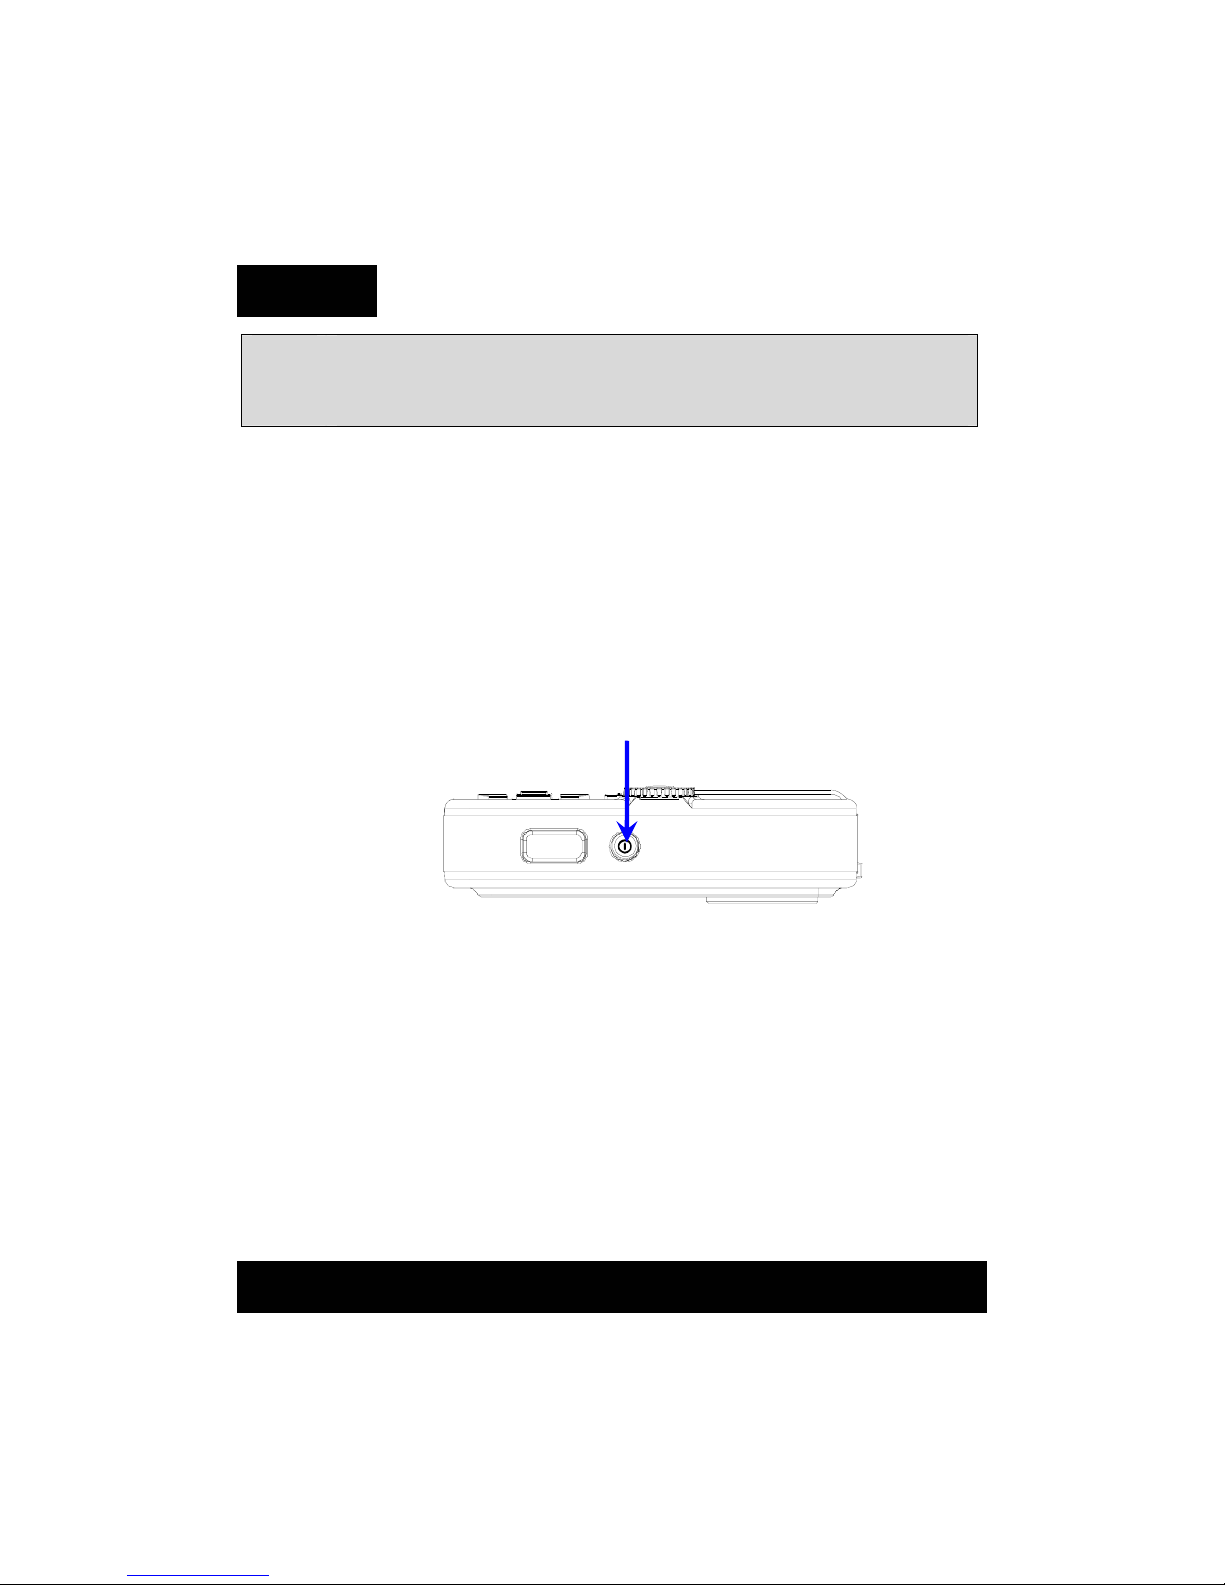
Turning the Camera ON/OFF
To Turn the camera on or off, press the power button located on top of the
camera.
**The backside LED indicator will remain green while the power is turned
on**
11
Page 12
Basic Shooting
Zooming In/Out
This camera has 4X digital zoom. The zoom bar, located on the right
side of the LCD display, informs users of the zoom status while the
zoom in or out button is pressed. Users can see the result from LCD
display.
NOTE: The digital zoom will not activate while shooting at a resolution of
8.0M and 10.0M.
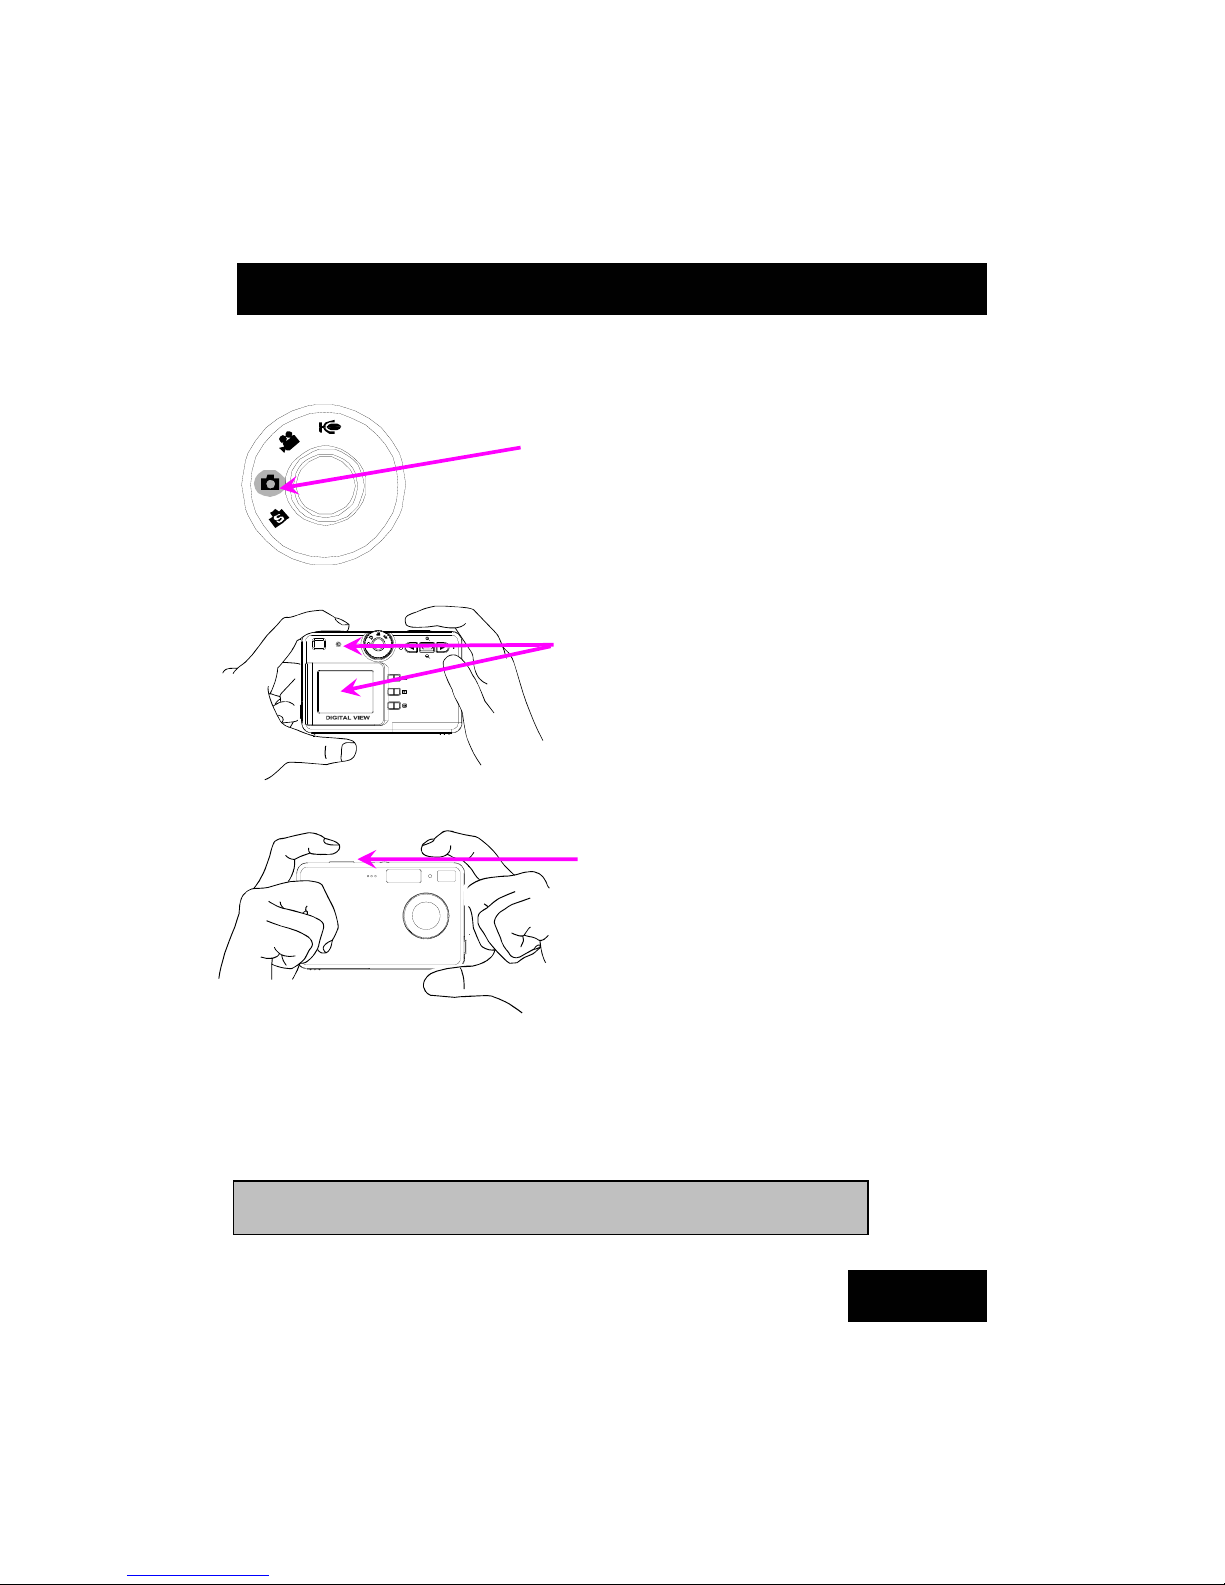
1. Turn the mode dial to the Capture
Mode.
2. Look into the viewfinder and try
to align your subject in the box.
3. When you are ready, press
the shutter button once.
12
Basic O
p
eratin
g
Procedure
Page 13

Viewing Pictures
Users can select from these two options to view their pictures:
1. Instant Review: Allows users to immediately view the picture they just
took on the LCD for a second. The time frame can be adjusted under
Instant Review.
2. Playback button: Users can check the still images already stored in the
camera. The last picture will appear on the LCD display.
NOTE:
To zoom in or out on a picture, press the up or down button. Press the left
or right button to navigate the picture on either side. When users want to
navigate the picture up or down, switch to the up or down function by
pressing on the display button and press on the up or down button to
navigate the picture up or down.
Protecting and Deleting Pictures
To instantly protect the pictures you just took, simply press the playback
button on the camera, select “Menu” followed by the “Protect and Erase.”
13
Page 14

Four Main Modes and Instructions
This section will describe the four modes included in this camera. An
in-depth coverage of these modes will be further described. Setup
functions can be found in Scene and Capture mode. Setup functions
begin on page 28.
14
Four Main Modes and Instructions
16
Mode
Functions
Page
Page 15
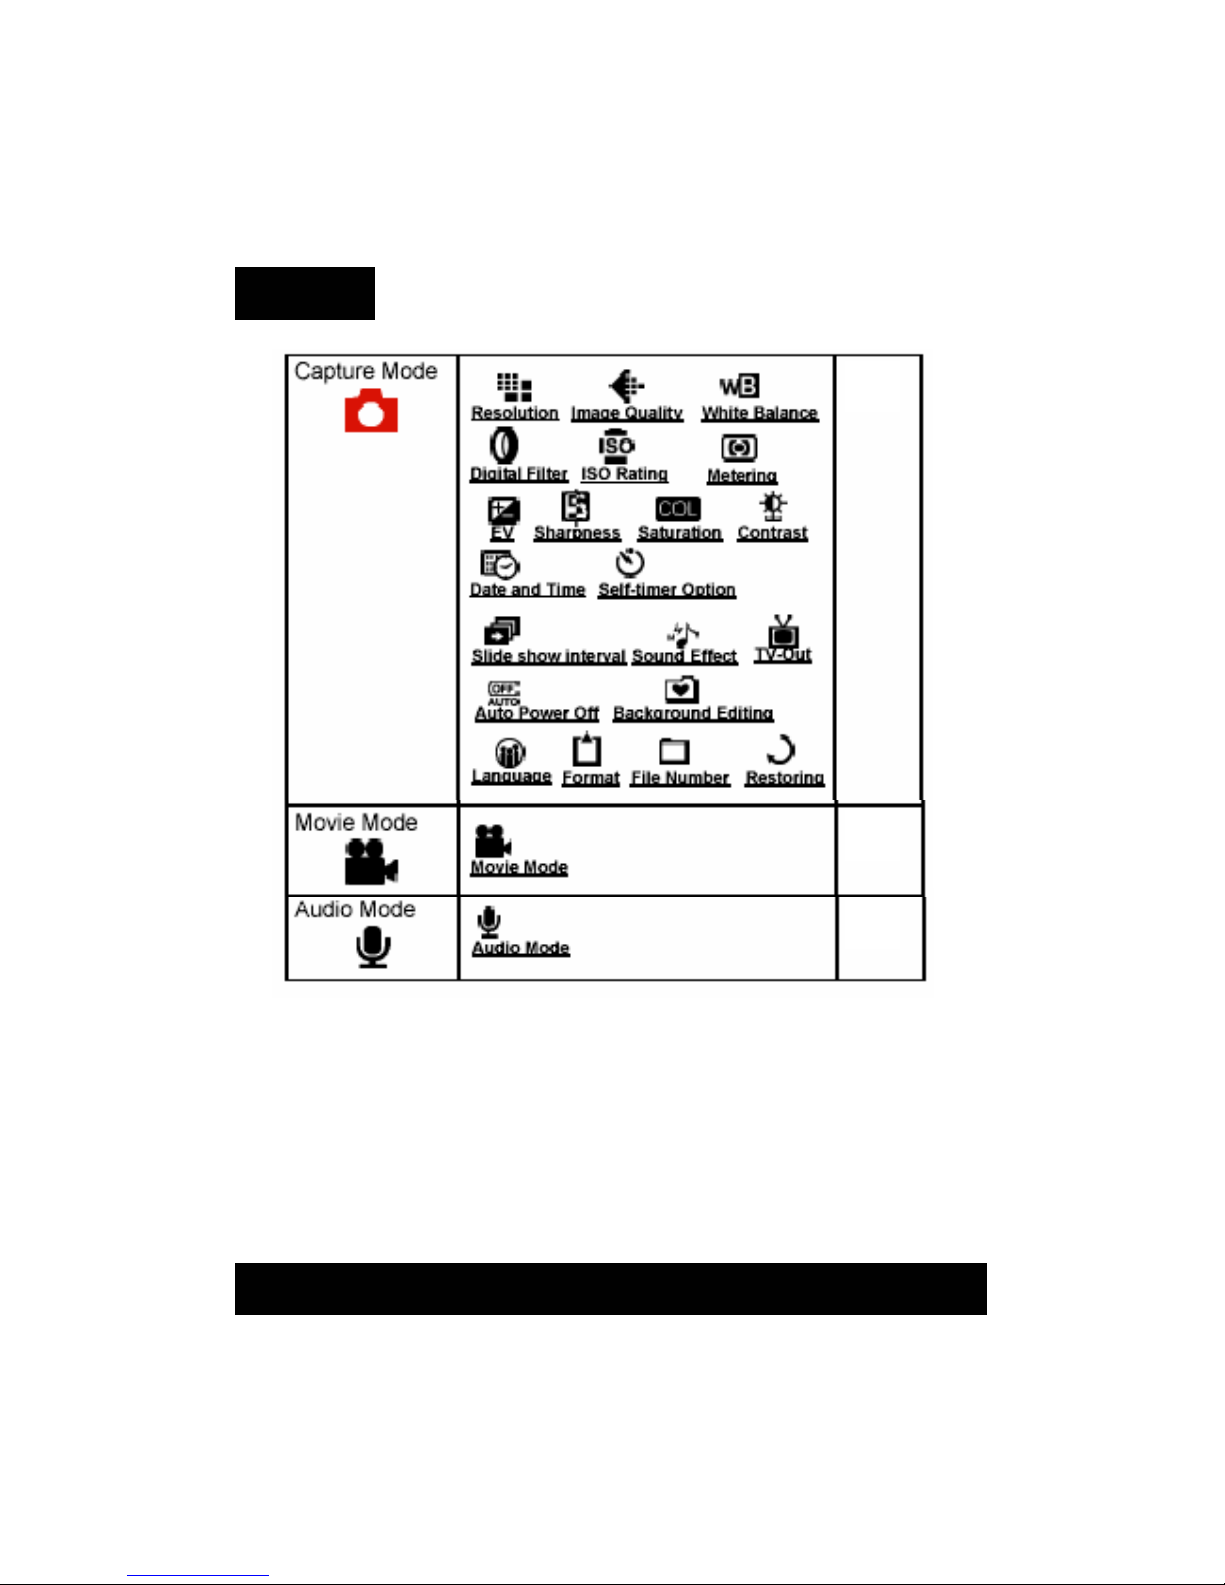
15
18
23
24
Page 16
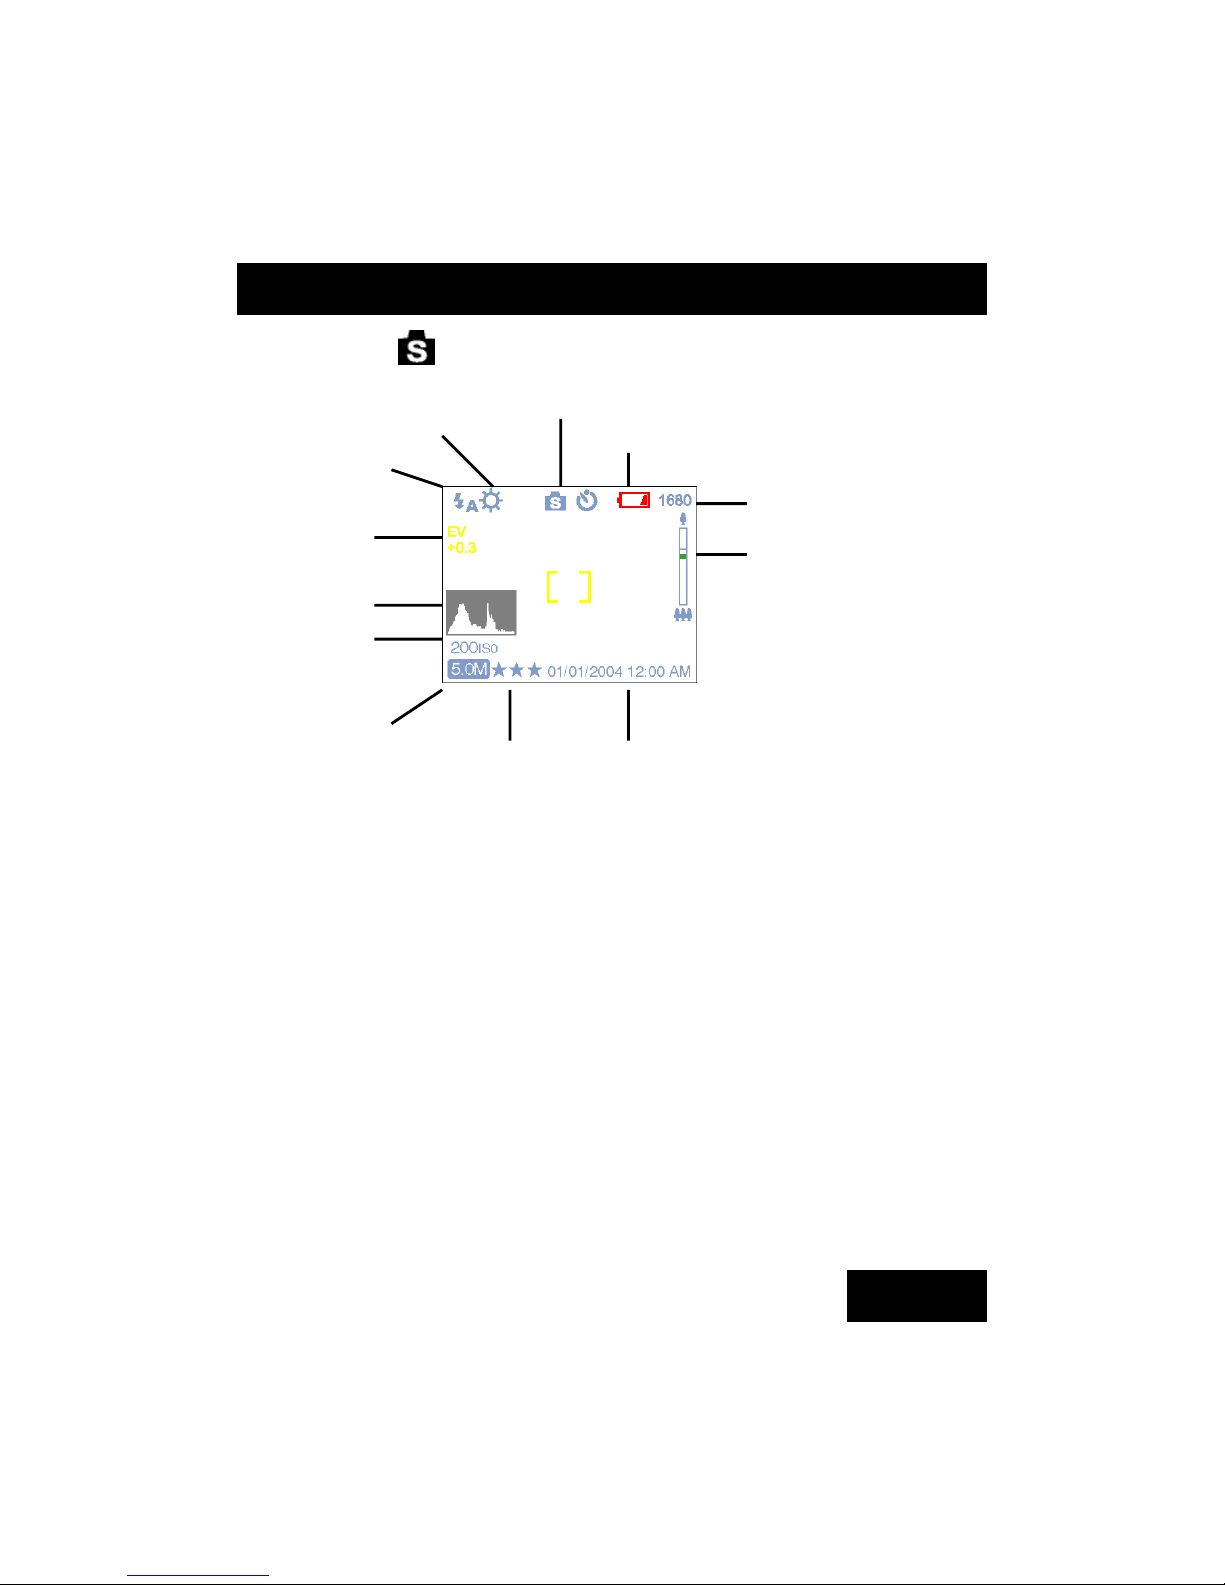
Scene Mode
Turn the mode dial to the Scene Mode. Press the Menu button
to access. Press Up/Down arrow to select the desired function. Once you
have selected the function, press Left / Right arrow to adjust the setting.
Press OK to confirm the selection. To exit the Menu screen, press the
Menu button again.
Scene
When the camera is set to Auto (the default setting of the camera), it will
select the best setting for users to take their pictures.
16
Four Main Modes and Instructions
EV
HV
ISO
Flash
White Balance
Scene Mode
Timer/Burst Shot
Counter
Zoom Bar
Date Time Quality
Image resolution
Page 17
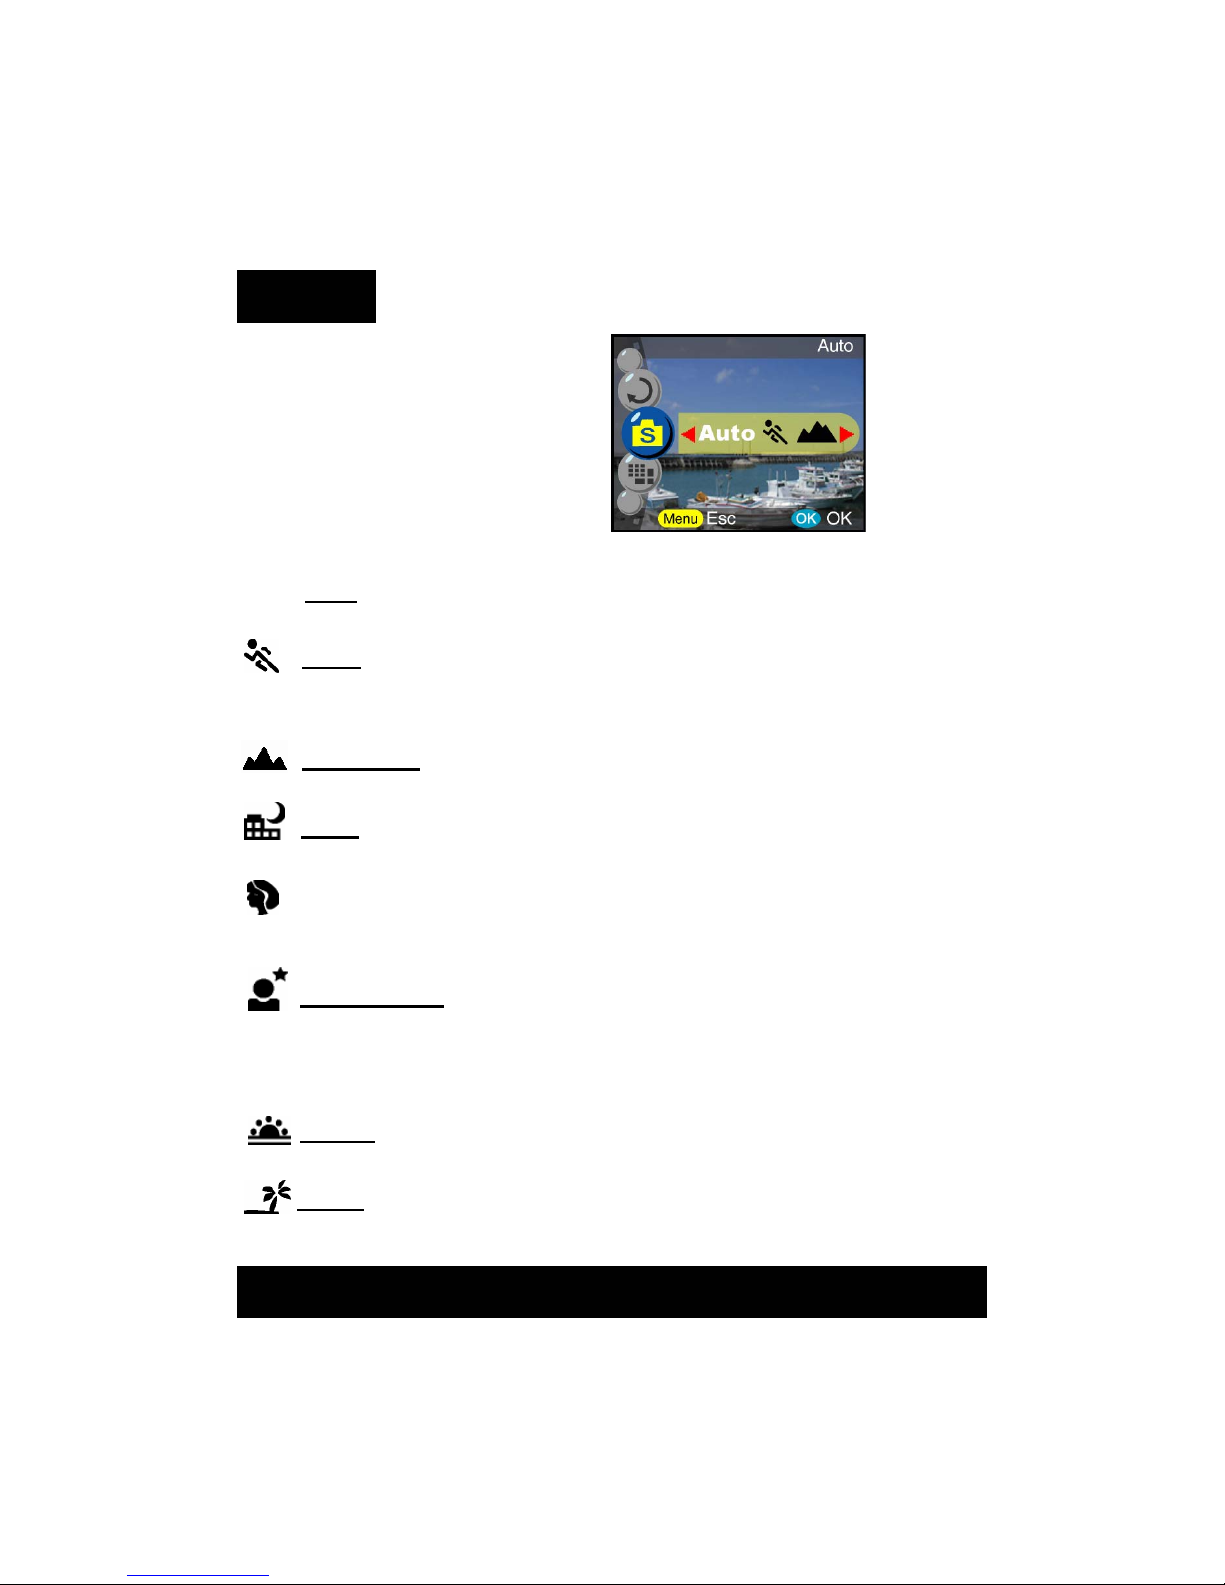
Users can select from the
following modes to use for
their pictures: Auto/Sport/Landscape/Night/Portrait/Night Portrait/Sunset/Beach/Back light
Autumn/Natural/Sky/Party/Text
Auto Auto- This mode allows the camera to select the best
setting for the shot. This is the default mode.
Sport- This is for fast-moving subjects when you want to
freeze the action.
Landscape- This is used for wide scenic views.
Night- Night scenes.
Portrait- This mode focuses on the subject in the center
of the frame.
Night Portrait- This mode is for images taken during
twilight or at night. The flash illuminates the subject while
a slow sync speed cap-tures a natural exposure of the
background.
Sunset- To enhance the red hue for taking sunset pictures.
Beach- This is for taking a beach shot with enhanced blue
color.
17
Page 18
Timer
Capture Mode
Back light - For taking the picture of back light object by
changing metering.
Autumn- This is for foliage views.
Natural- This is suitable for forest or grassland views.
Sky- This is for sky views.
Party- Enables you to take pictures under a darker
environment with different lighting.
Text- This mode will project the text by enhancement of the
black and white contrast.
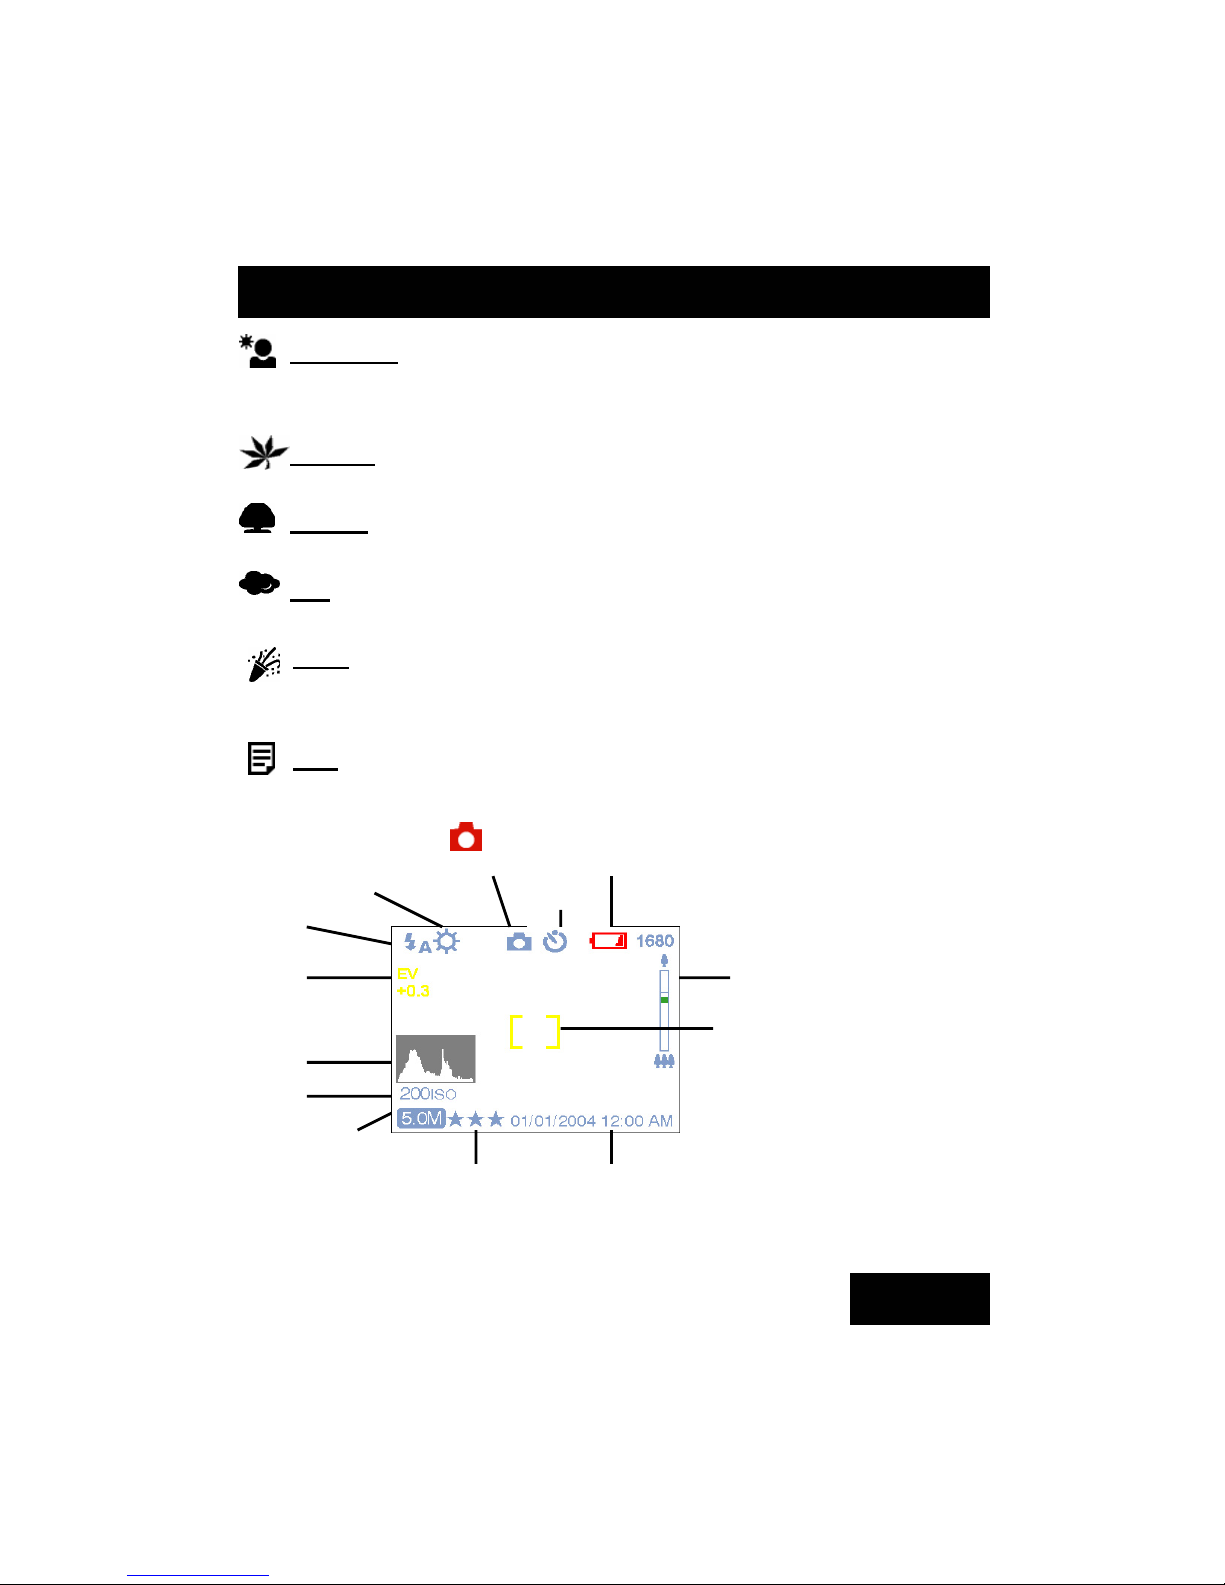
Capture Mode
Turn the mode dial to the Capture Mode. Press the Menu button
to access the following options. Press Up/Down arrow to select
18
Four Main Modes and Instructions
White Balance
Flash
EV
ISO
HV
Image resolution
Image Quality Date Time
Zoom Bar
Focus area
Battery
Page 19
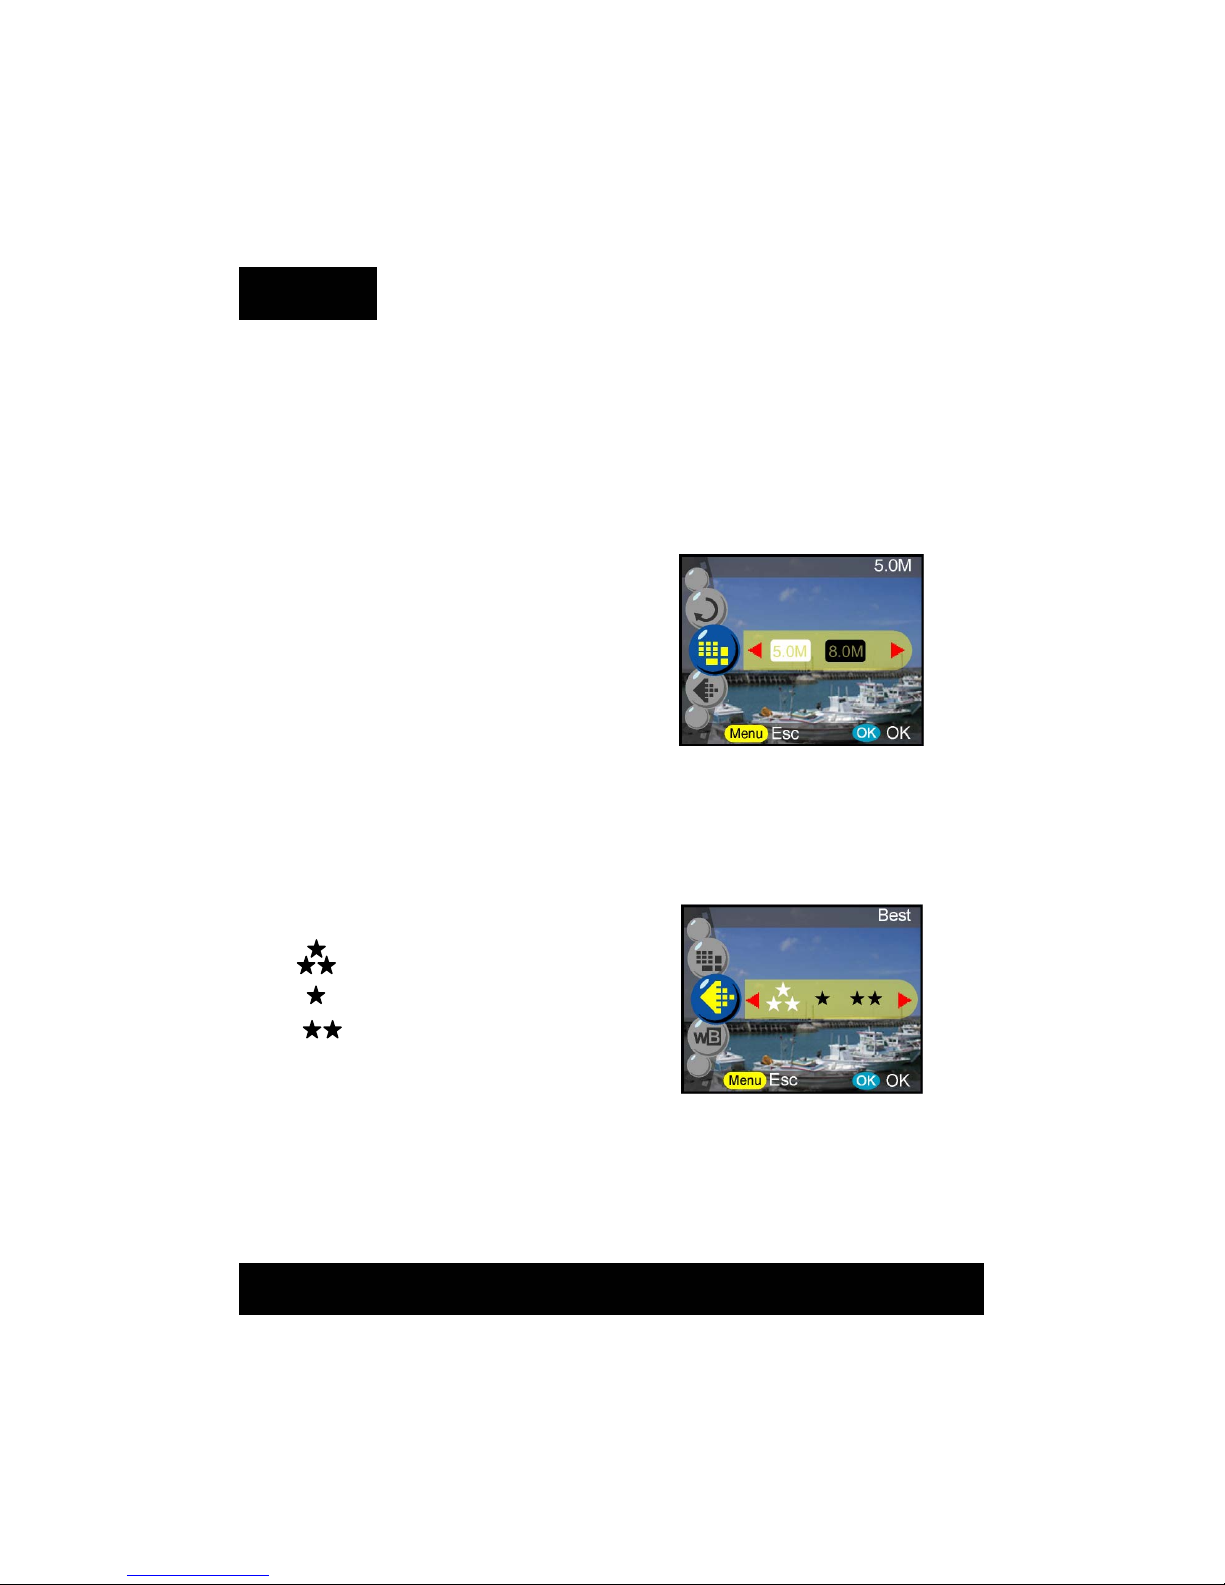
the settings. Once you have selected the option, press Left/ Right arrow to
adjust the setting. Press "OK" to confirm the setting or press "menu" to
cancel and quit.
Resolution
This mode allows you to set the picture resolution.
3648 x 2736 (10.0M)
3264 x 2448 (8.0M)
2560 x 1920 (5.0M) - Default
2048 x 1536 (3.0M)
1600 x 1200 (2.0M)
1280 x 960 (1.3M)
640 x 480 (VGA)
Image Quality
The widely-used JPEG format is used for image-recording quality set-ting.
Users can select from the following quality:
Best - Default
Basic
Better
19
Page 20
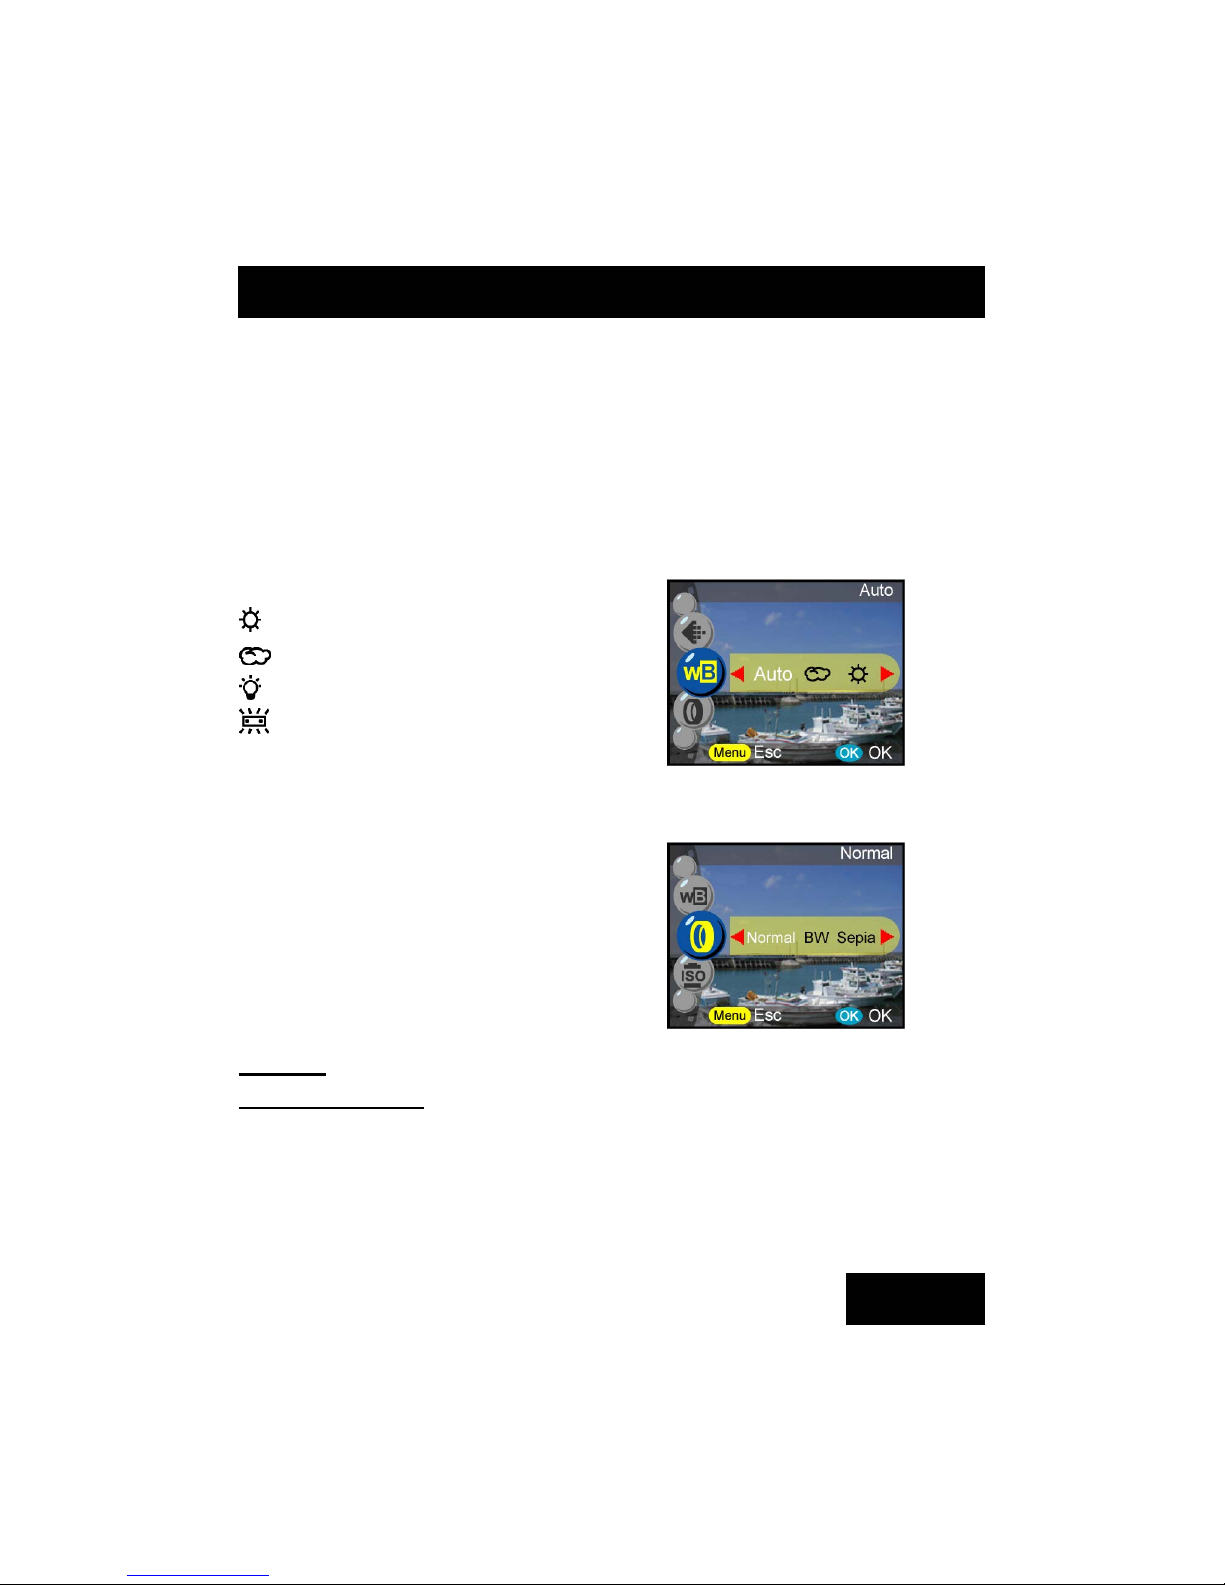
White Balance
Normally, the "Auto" WB setting will set the optimum white balance
automatically.
If natural colors cannot be obtained with auto WB, you can set
the white balance manually to suit the respective light source.
Users can select the following white balance:
Auto: Auto
: Sun
: Shade
: Tungsten
: Fluorescent
Digital Filter
This sets and converts according to the
different colors and effects: Normal / BW /
Sepia / Red / Pink / Purple / Blue / Green /
Yellow / Solarize / Negative Artwork.
Normal is the default setting.
Solarize- Shows the picture when it is exposed to light.
Negative Artwork- Provides a negative image of the original picture.
20
Four Main Modes and Instructions
Page 21
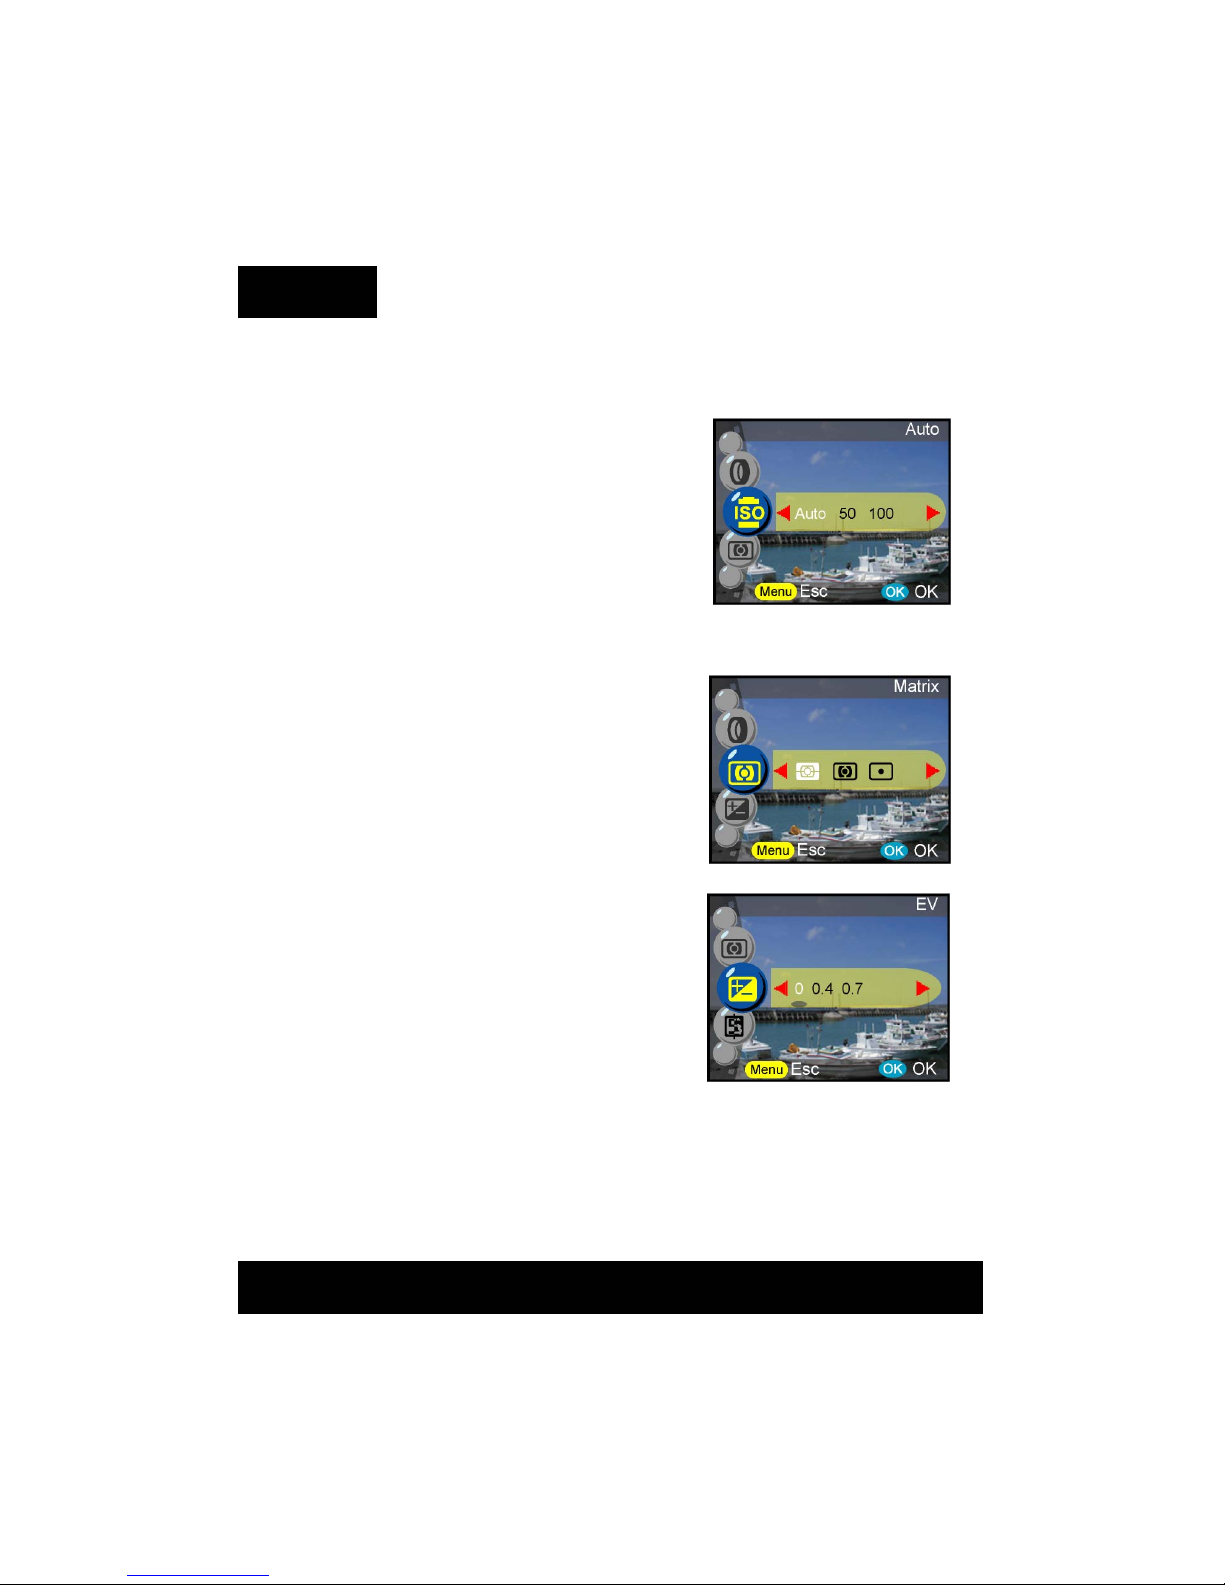
ISO Rating
The ISO speed is the sensitivity to light. The higher the ISO speed number,
the higher the sensitivity light.
Auto - Default
50
100
200
Metering
This calculates the best overall exposure value. The camera has three
metering modes:
Matrix - Default
Center
Spot
EV
Exposure compensation is used to alter the
camera's standard exposure setting. You can
darken or lighten the image.
(decrease or increase exposure)
from -2 to +2 ( 0 is the default setting )
21
Page 22

Sharpness
Enhances the borders of the subject.
Normal / High / Low
( Normal is the default setting )
Saturation
Saturation is the degree of color intensity
associated with color's perceptual difference
from a white, black or gray of equal lightness.
from -5 to +5 ( 0 is the default setting )
Contrast
Exaggerate lightness differences between
foreground and background colors.
from -5 to +5 ( 0 is the default setting )
22
Four Main Modes and Instructions
Page 23
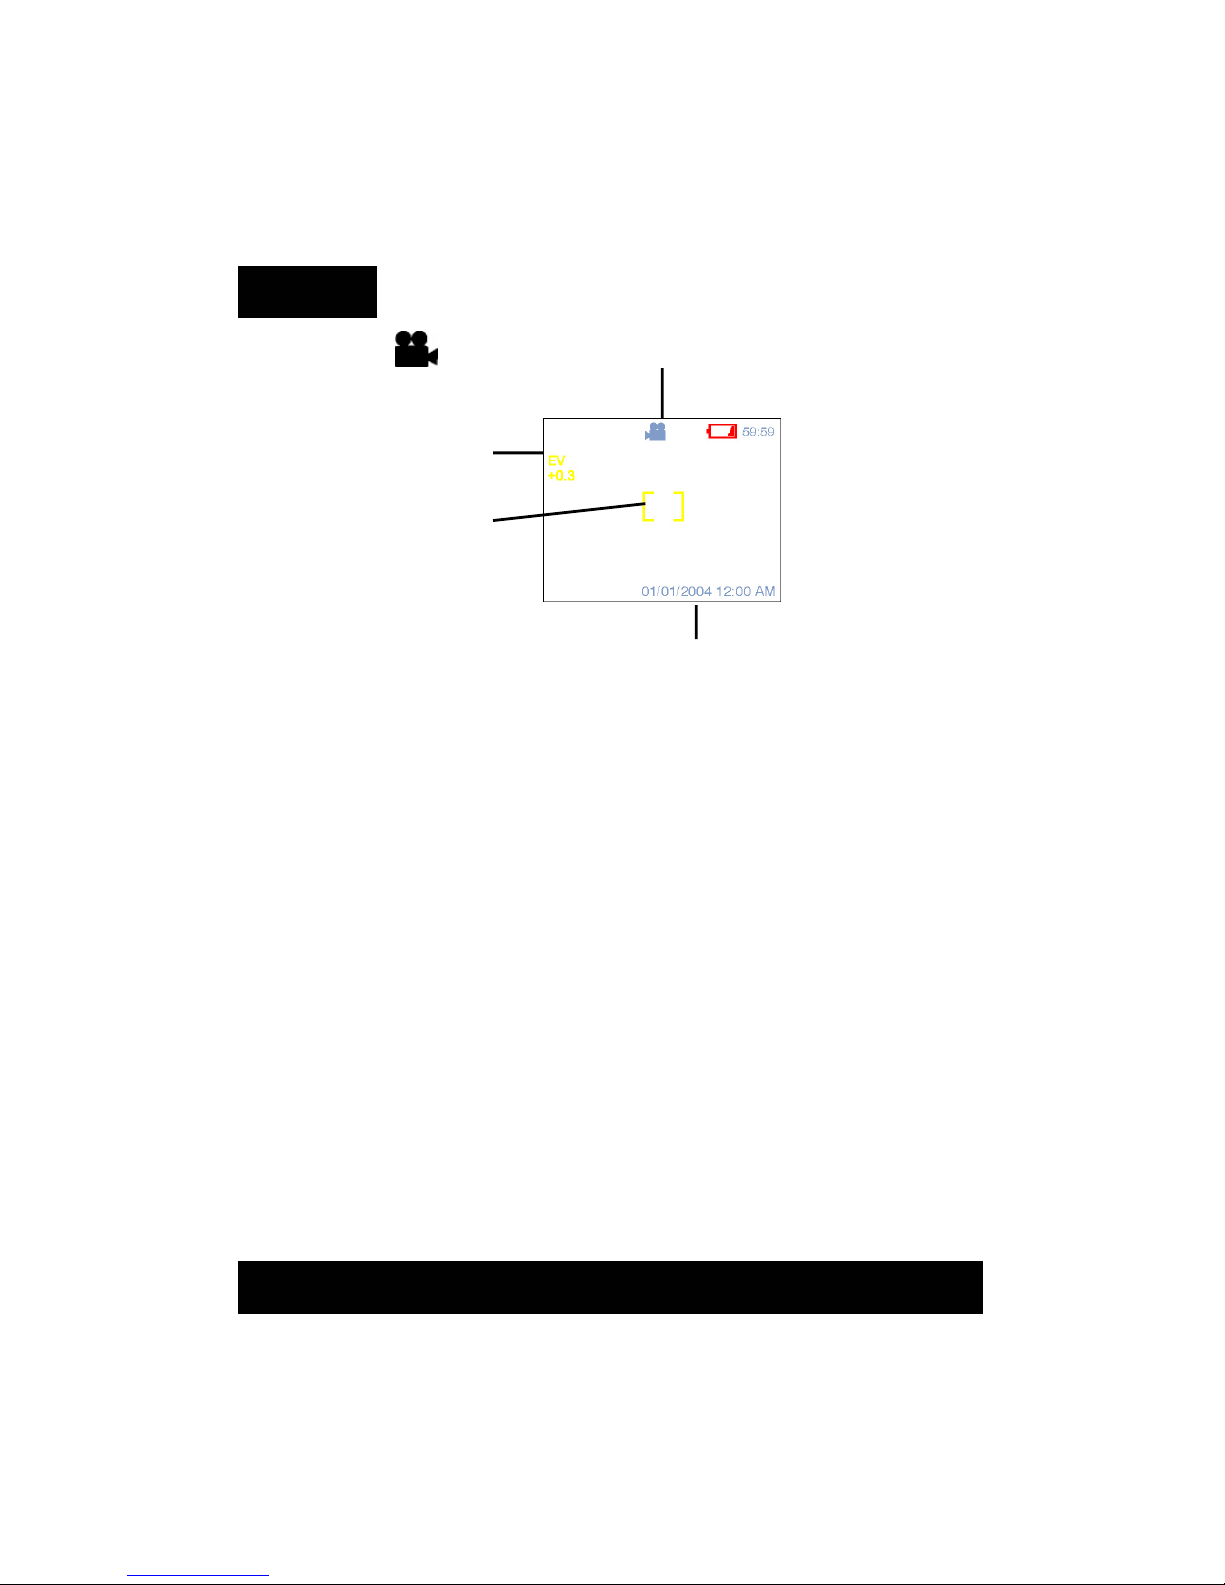
Movie Mode
Movie Mode allows you to use the camera as a movie recorder.
The length is based on the capacity of the internal memory or
SD card.
1. Turn the mode dial to the Movie Mode.
2. To start recording a movie, press the shutter button. The camera will
check the capacity of the memory prior to recording a movie. If it is full,
a warning sign will display on the LCD, and will automatically exit the
movie recording state.
3. To playback movie, press the OK button. Play, Rewind, Forward, and
Pause icon will appear on the LCD. Press up and down to select any of
these functions. To clear these icons, press the back button on the
upper left hand side of the LCD.
4. If there are no warning messages, the camera will start recording. To
stop recording, press the shutter button again.
23
Movie mode
EV
Focus mode
Date/Time
Page 24
Note!
1. To set the Self-timer under the movie mode, press the left button
once to activate the Self-timer. You will have ten seconds to get
ready after pressing the shutter button. The countdown will be
displayed on the LCD and followed by a beep sound.
2. The icons can be removed from the display by pressing the
display button once.
Tip:
1. The file format of the movie will be MPEG 4. (.asf)
2. When you playback video in PC, system will require Windows
Media Player 9.0 codec. Please link to Microsoft server for
getting the codec. Or you can playback the movie through a
bundled AP.
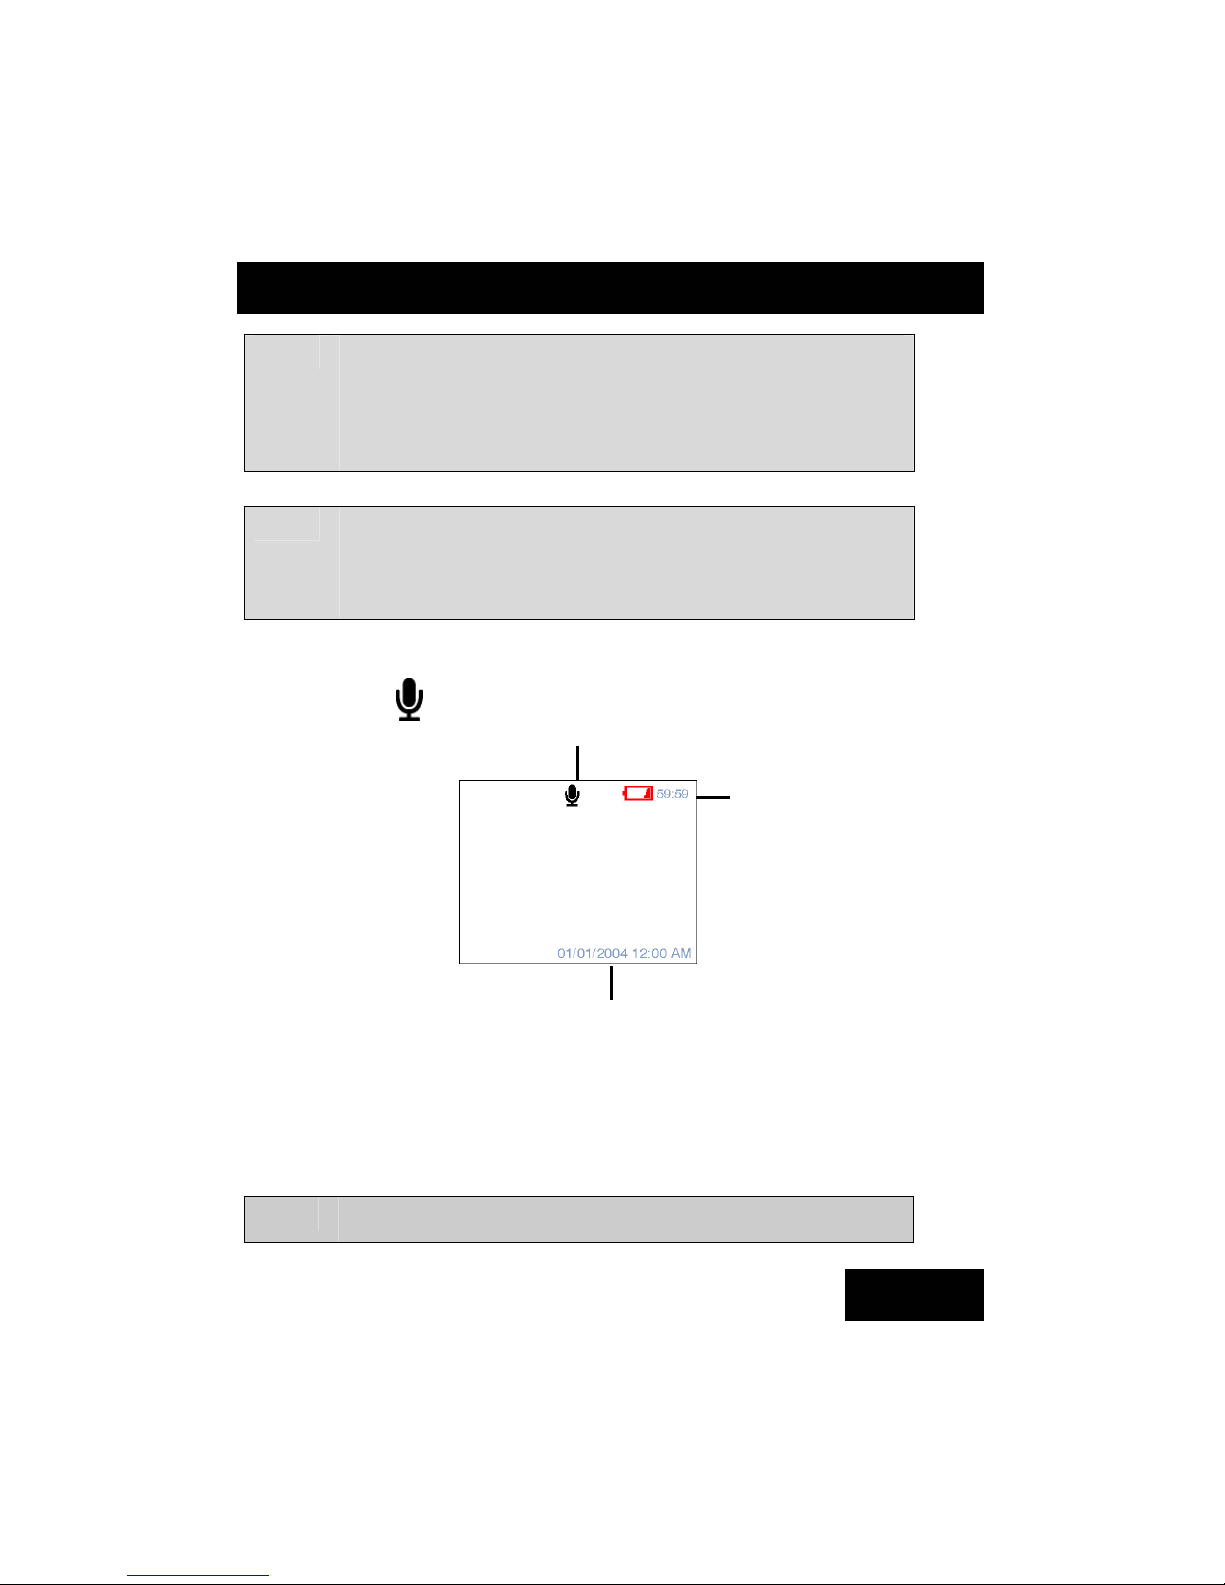
Audio Mode
This function allows you to record audio. Turn the mode dial to
the Audio Mode. Press the shutter to start the Audio recording.
Tip:
Since audio sound cannot be played on the camera, it is suggested
that the sound be projected through a PC.
Four Main Modes and Instructions
24
Audio mode
Battery
Date/Time
Page 25
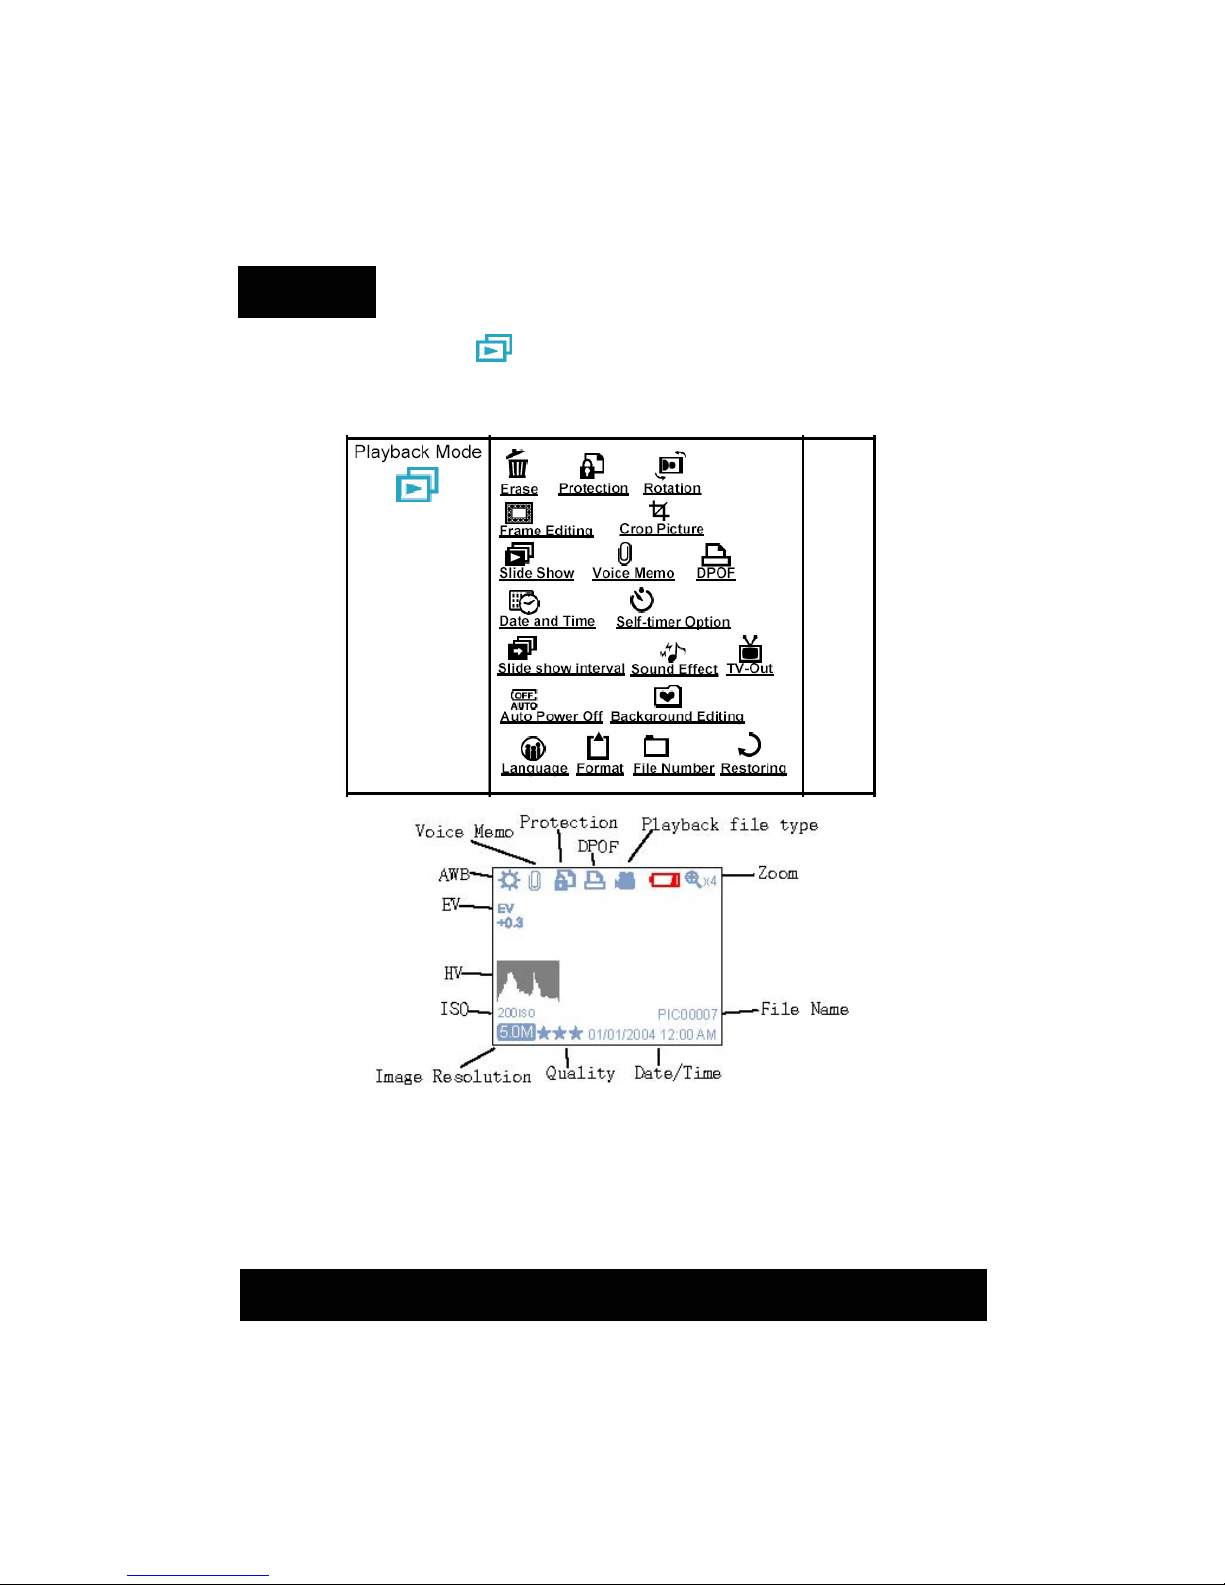
Playback Button
This section will describe how to playback your pictures. Setup
functions can be found in this mode. Setup functions begin on page 28.
Press the Playback button. Users can view the
images by pressing the Left/Right button or press the display
button to get the image information. To view thumbnails and
magnified pictures, press zoom in / out button. Users will be able to set the
following functions after entering menu.
25
25
Page 26
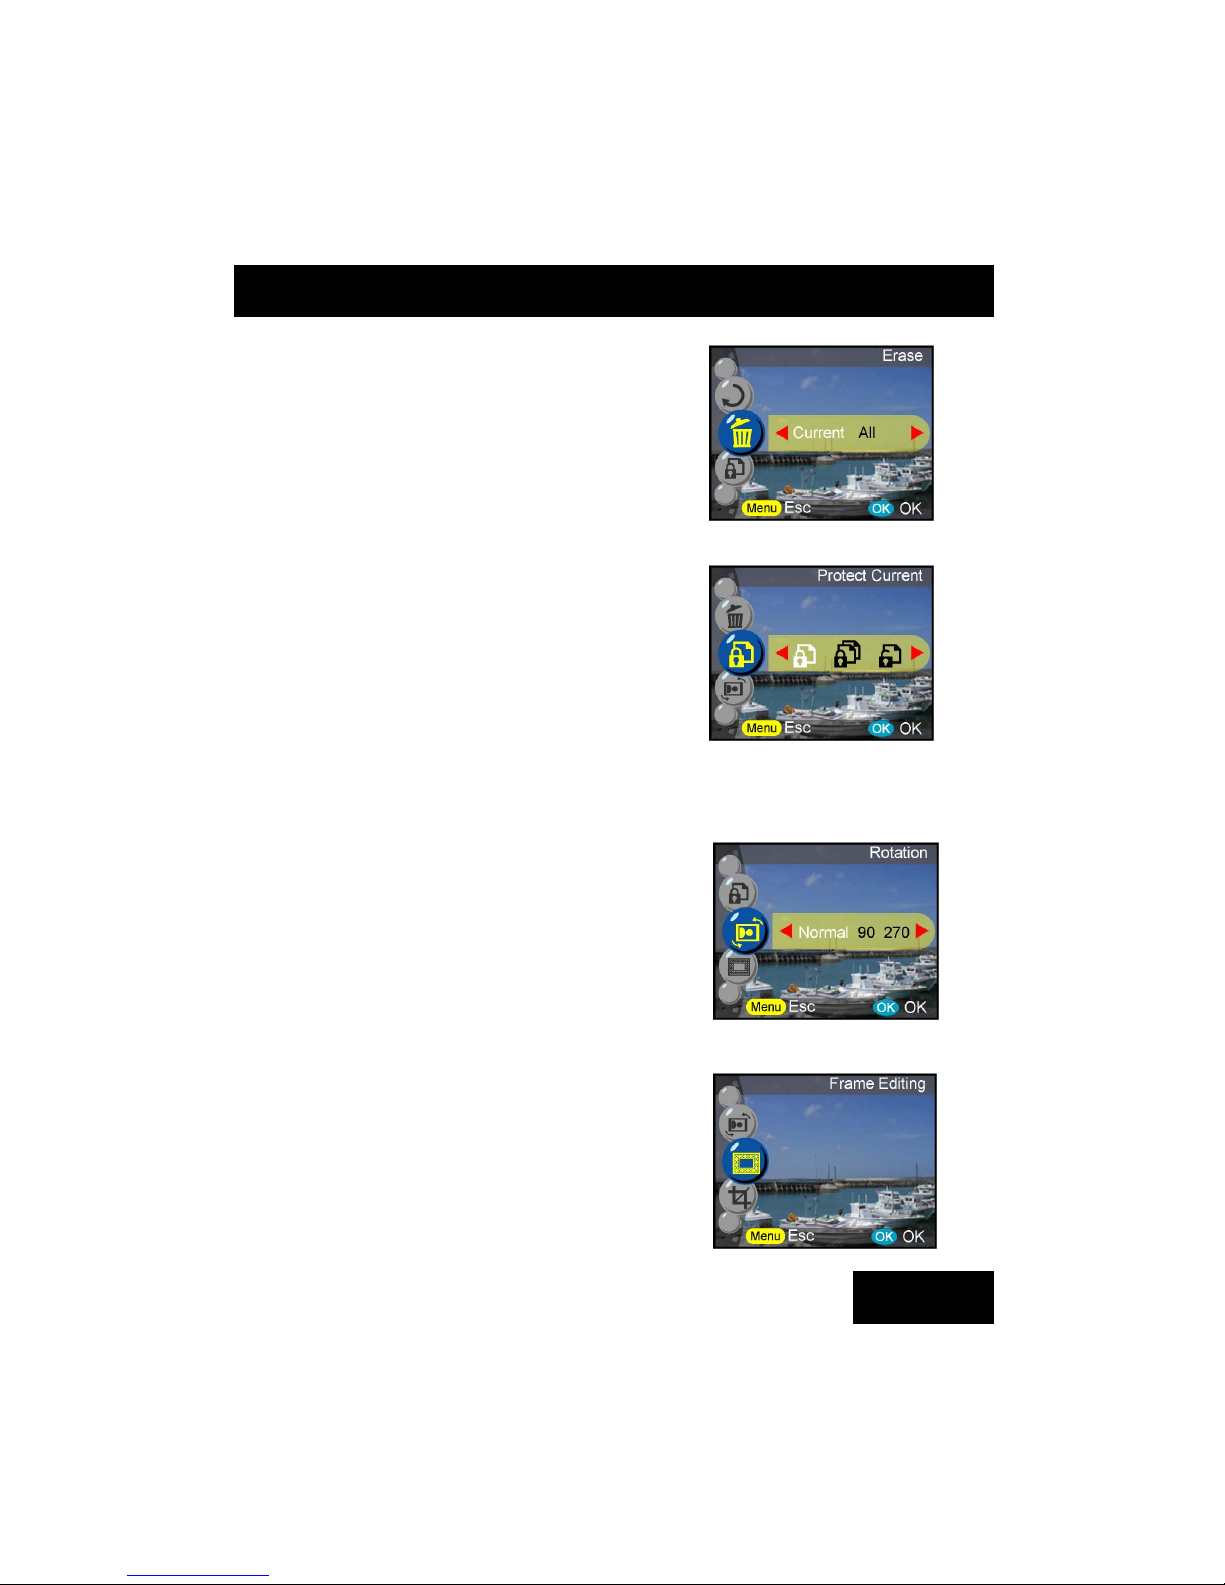
Erase
User can erase current or all under this mode.
Users can select to erase:
Erase Current
Erase All
Protection
You can prevent images from accidental
erasure.
This function choose to:
Protect Current
Protect All
Unprotect Current
Unprotect All
Rotation
This Rotate function can rotate an
image 900 and 2700.
Normal
90 degrees
270 degrees
Frame Editing
This camera provides different frames
for quick
image editing on LCD.
26
Four Main Modes and Instructions
Page 27
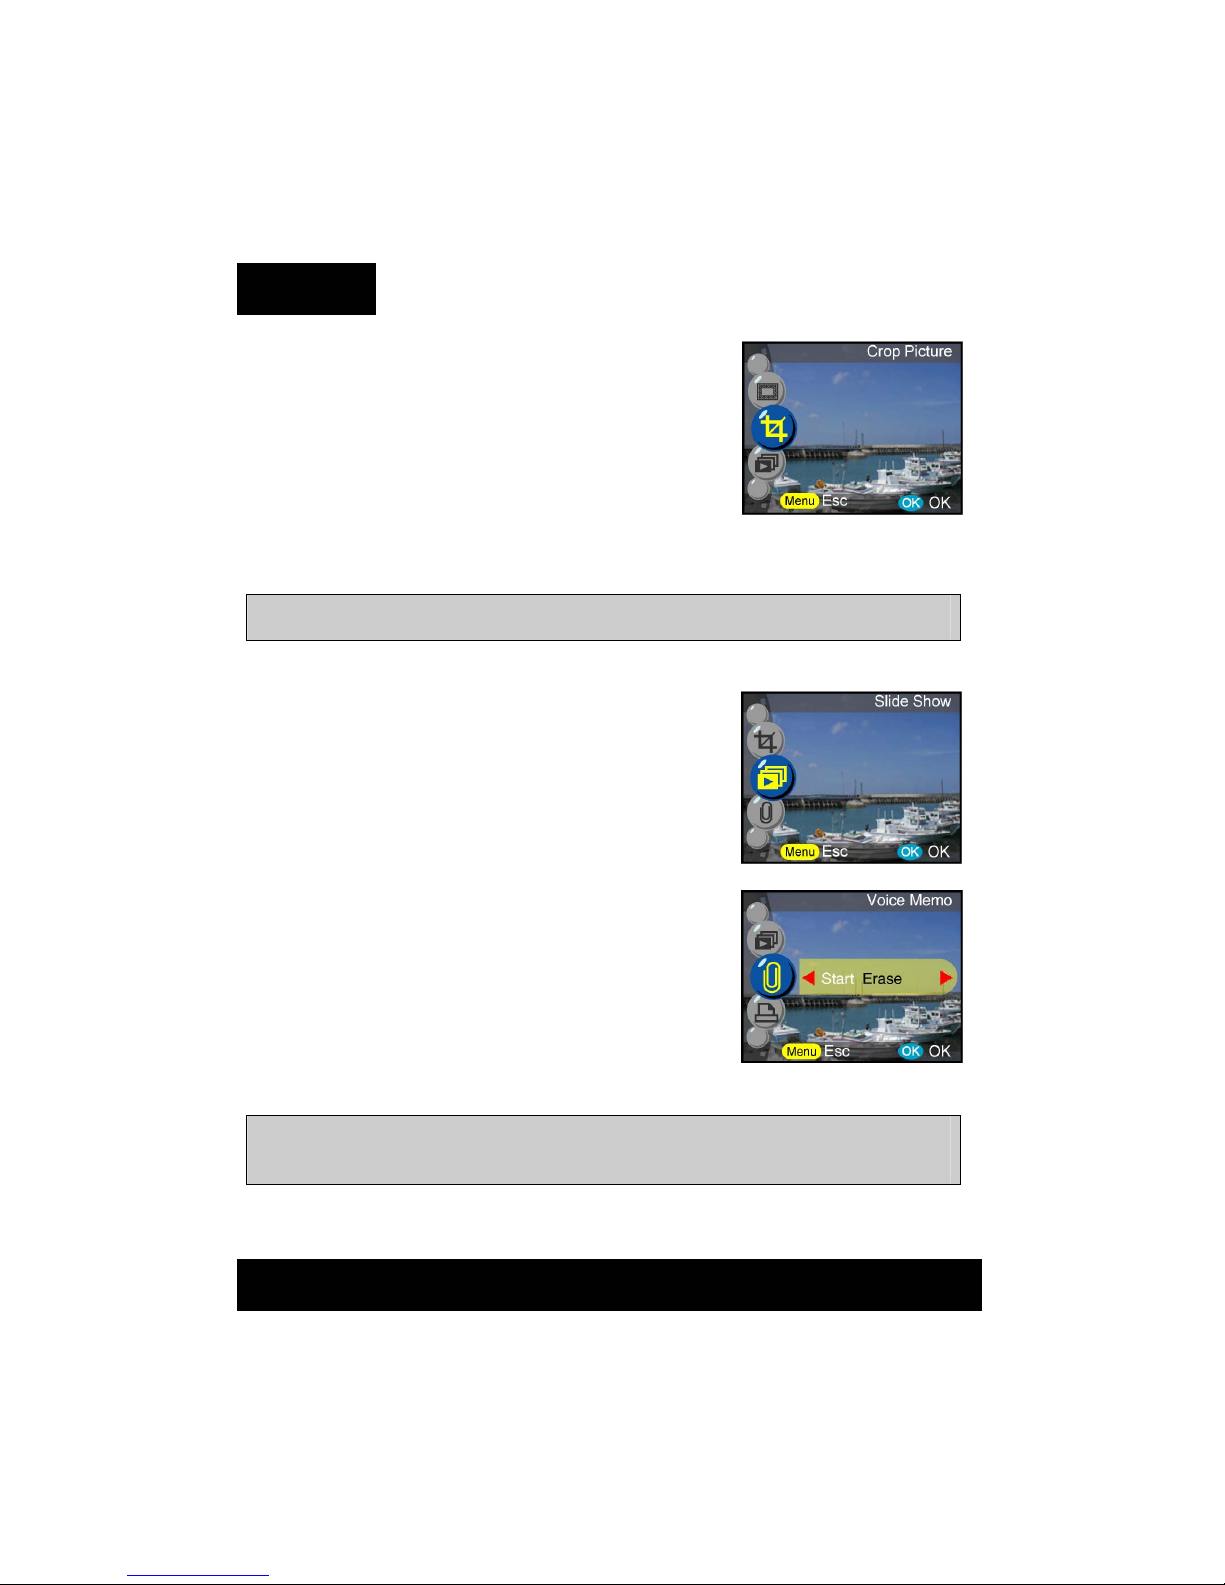
Crop Picture
Users can crop images through the desired
magnified area. Press OK to confirm. After
pressing the zoom in/out button, the navigation
arrows will appear on the screen. Use the
thumbnails to navigate the image. Once a
desired section of the picture is selected, press OK to crop.
Note:
The newly edited picture (using Rotation, Frame Editing, and Crop
Picture) will be added to the list of still images.
Slide Show
Allow user to slide show all images.
Voice Memo
This function provides 20 seconds voice memo
for still image. Select “Voice Memo” and press
OK to start the recording session. A recording
bar will indicate how much time is left in the
recording session. Press OK to end the recording.
Tip:
To view the recorded memo, quit menu and press OK again to enter
control bar. Since audio sound cannot be played on the camera, it is
suggested that the sound be projected through a PC.
27
Page 28
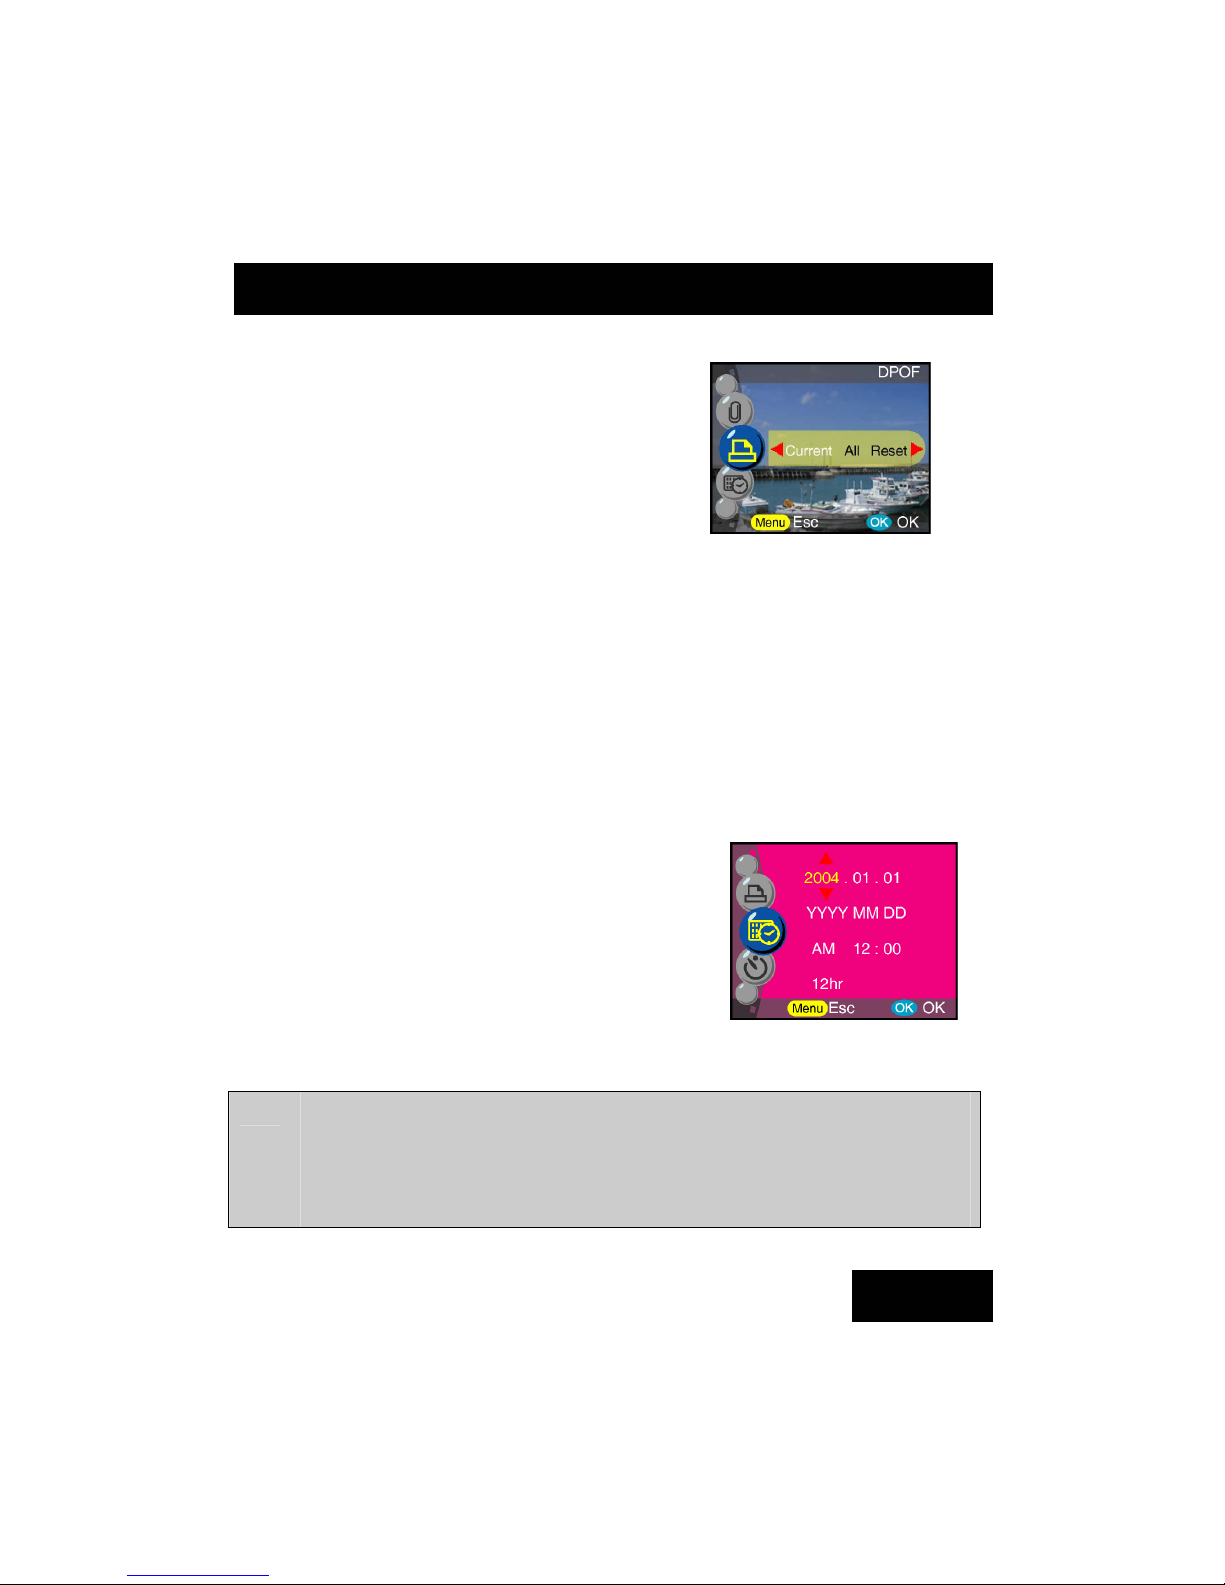
DPOF
DPOF is a format used to record automatic
print information from cameras.
By specifying which pictures are to be printed,
the pictures can be printed easily by
DPOF-compatible printing service labs or
on a personal DPOF-compatible printer. Users can select to print:
Current/All/Reset
Setup Function
Setup function can be activated under Scene, Capture, and Playback
modes. Users can set the following settings when selecting Setup
function:
Date and Time
Reset date and time when changing battery.
Users can select to set:
Date
Date format
Time
Time format
Five Main Modes and Instructions
Tip:
Dates can be set in these formats:
YYYY/MM/DD
MM/DD/YYYY
Time can be set in these formats:
12hr
24hr
28
Four Main Modes and Instructions
Page 29
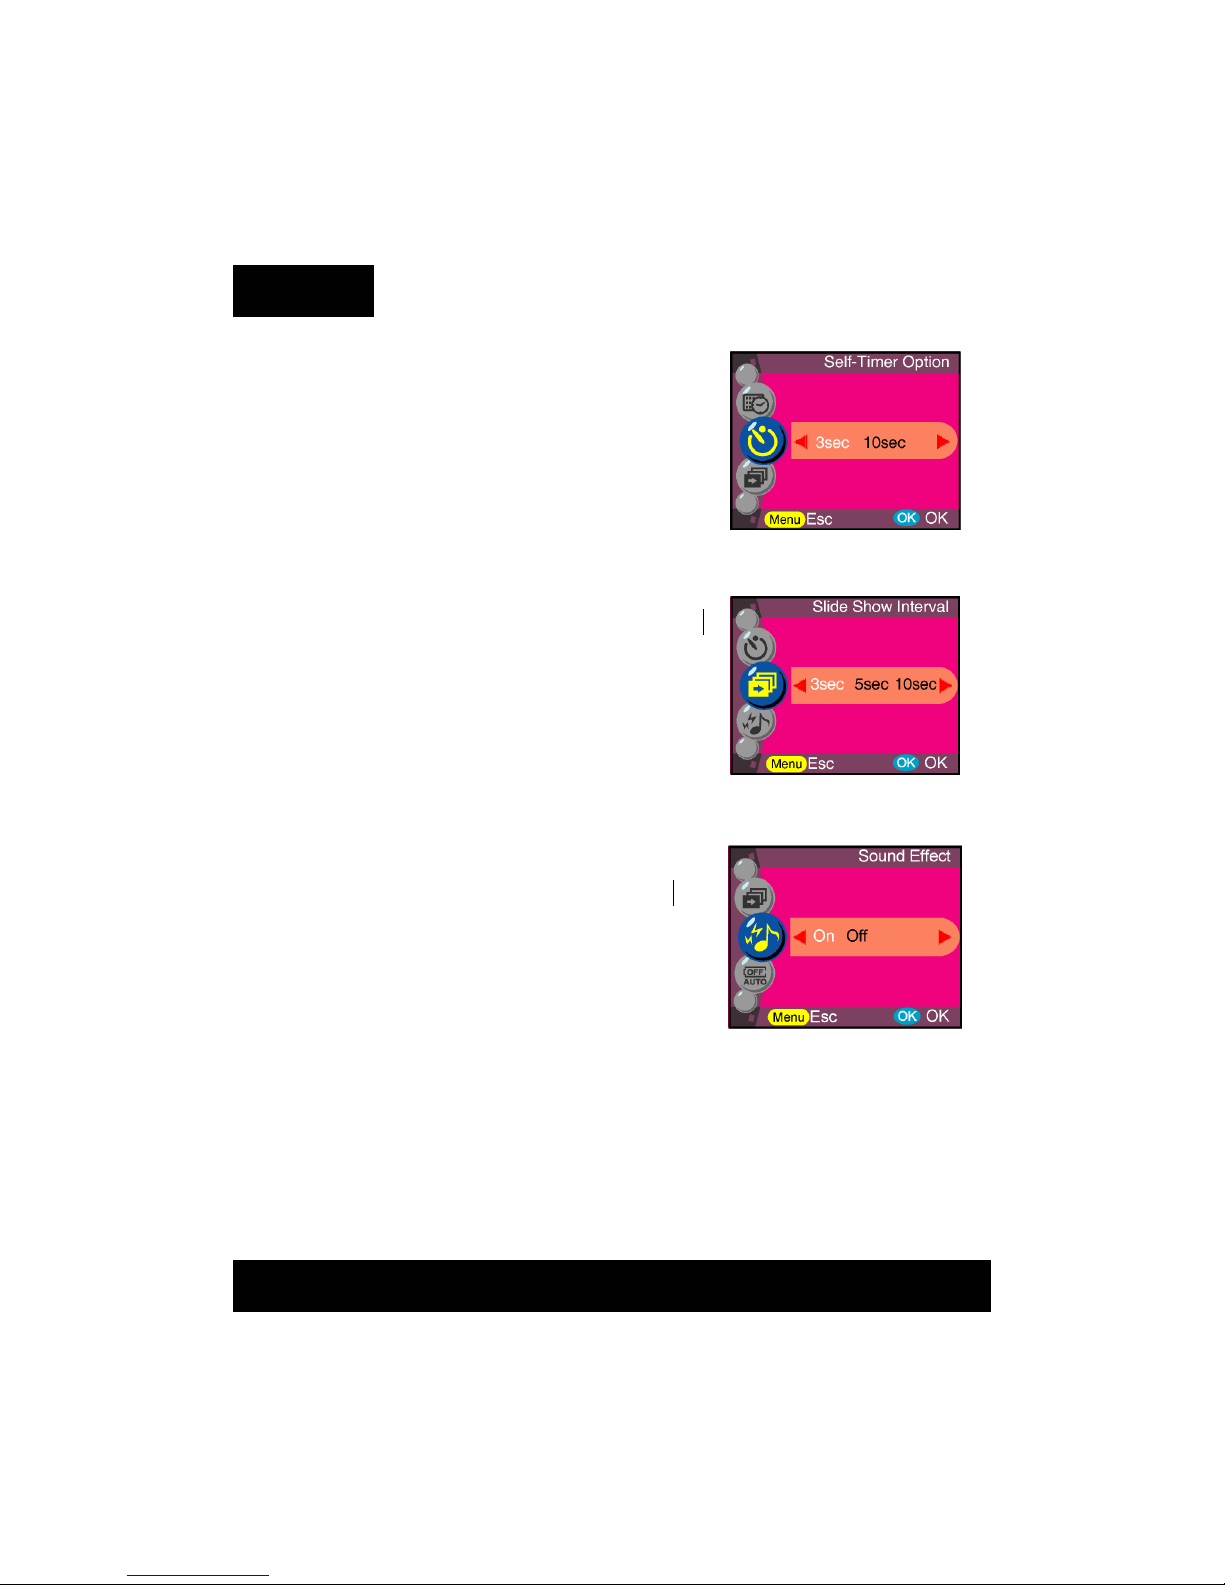
Self-timer Option
This function provides users different
timer settings. 2 sec is usually applied with
camera. It's suggested to use self-timer with
tripod to prevent user from moving the
camera after releasing shutter key.
Slide show Interval
Under this setting, users can set the interval of
seconds they want the slide show to proceed
per slide. Users can select:
3 seconds
5 seconds
10 seconds
Sound Effect
This function allows users to turn the sound
effect on or off:
On
Off
29
Page 30
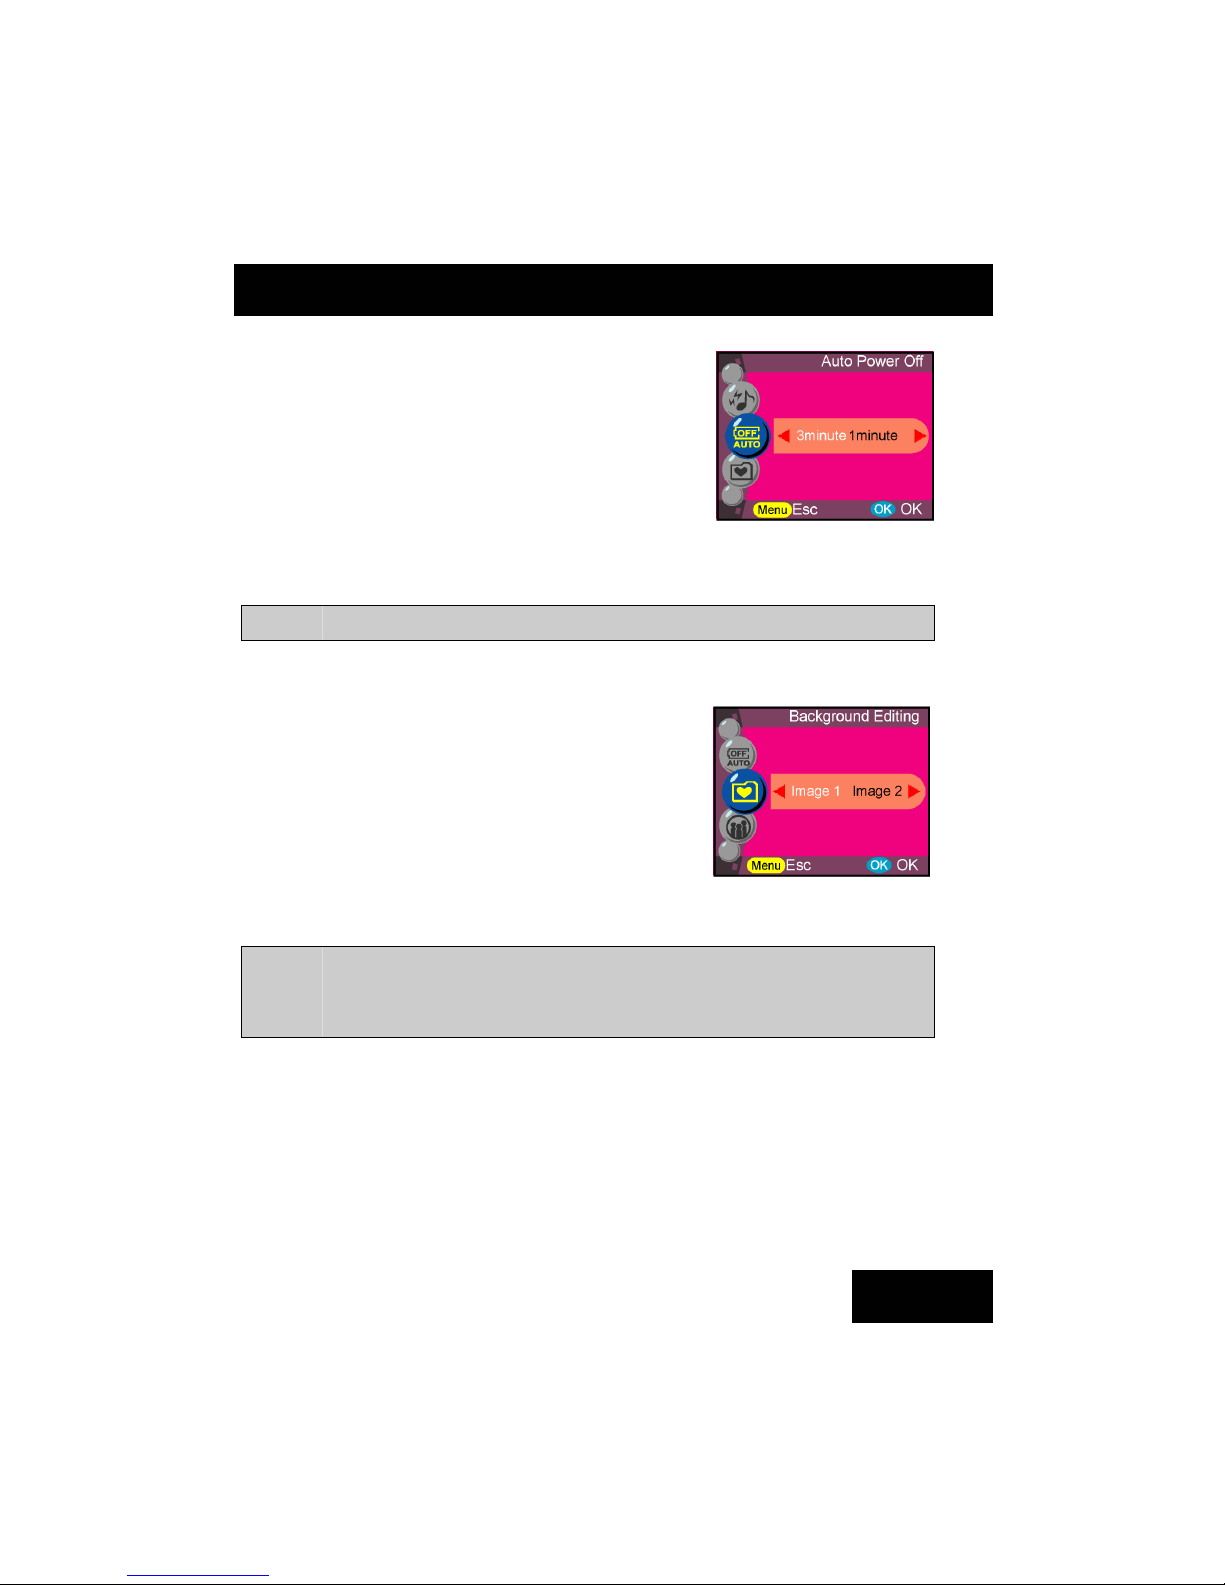
Auto Power Off
This setting automatically turns off the camera.
Users can select the following minutes to Auto
Power Off the camera.
Off
1 min
3 mins
Tip:
Prior to shutting off, the LCD will shut itself off automatically
Background Editing
Allows users to select their preferred image
or taken photo as background.
Image 1
Image 2
My Photo
Editing
Tip:
This background will replace the default image of the welcome p age and
setup mode background. My photo will retain last set photo. To change
new photo, press editing for thumbnails and press OK button to confirm
new photo.
30
Four Main Modes and Instructions
Page 31
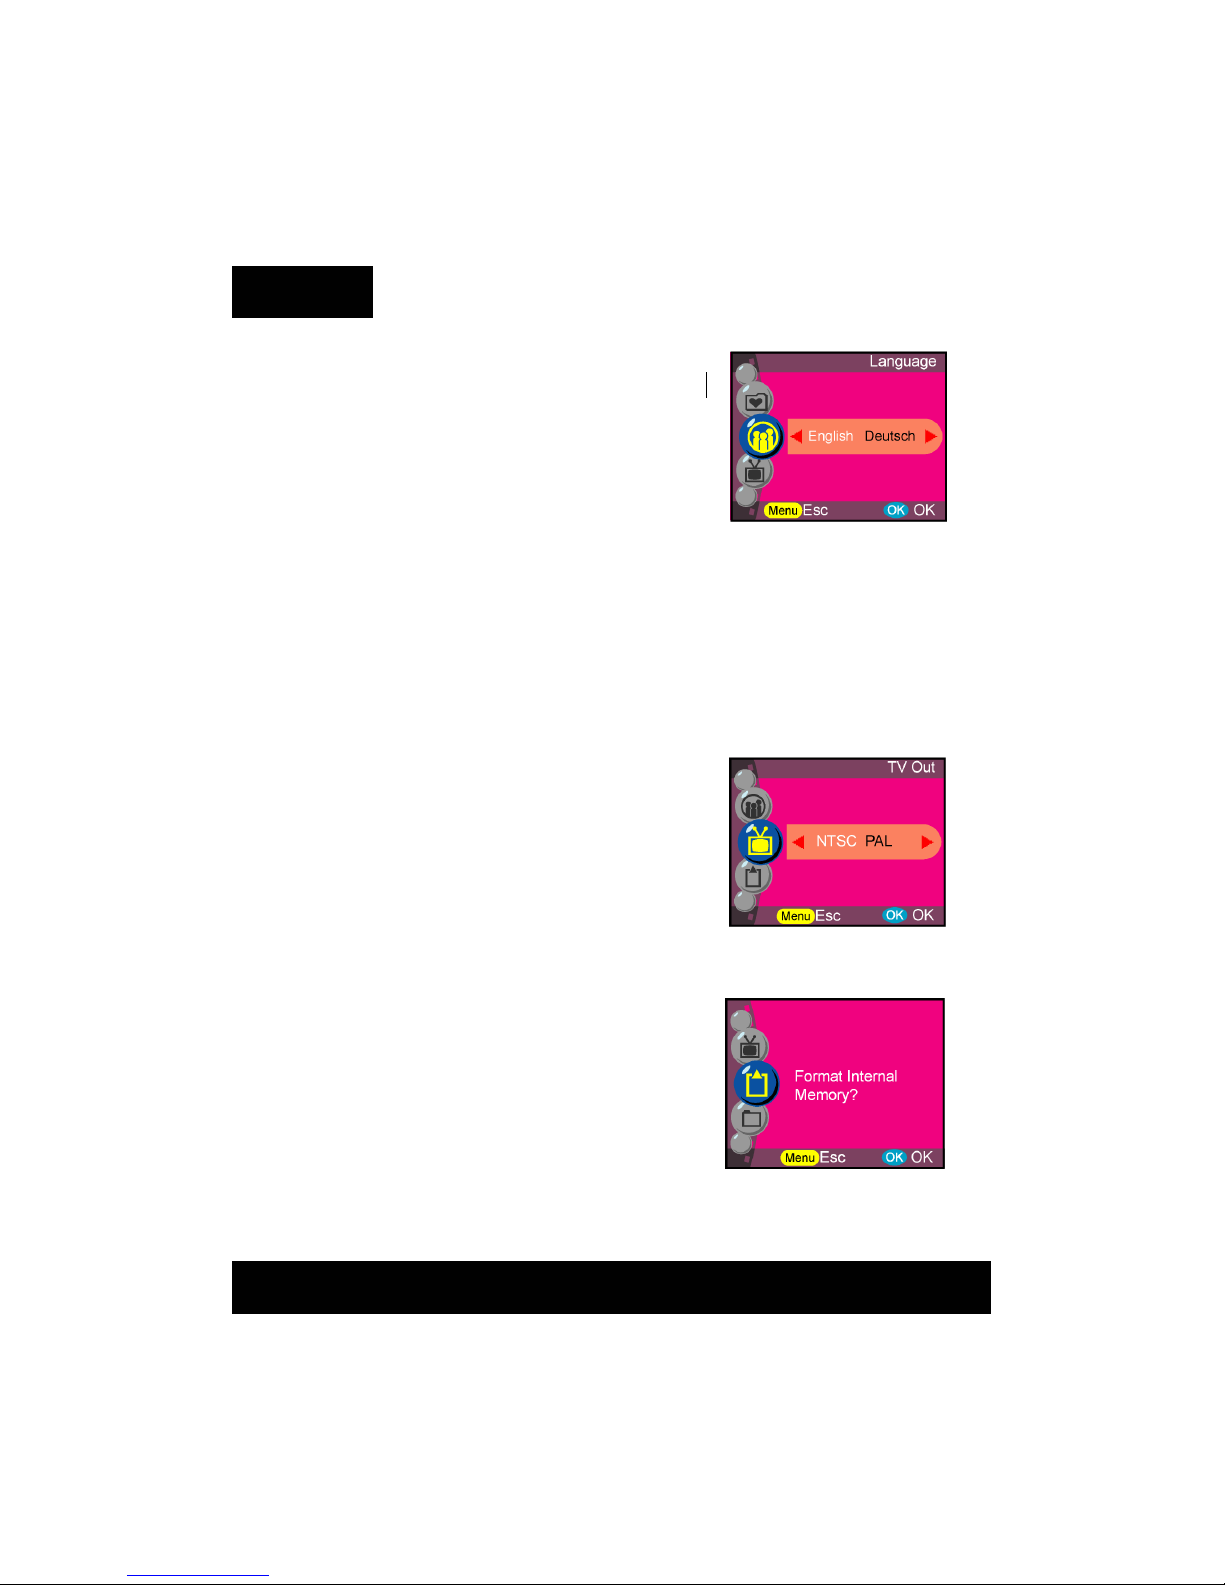
Languages
Users can select from the following languages:
English
German
French
Spanish
Italian
Japanese
Korean
Simplified Chinese
Traditional Chinese
TV out
Depending on your location, different
regions require different systems for TV-out
function. Connect Video cable for TV out.
NTSC
PAL
Format
Formats the internal or external memory. Press
OK button to confirm or menu button to escape
formatting.
31
Page 32
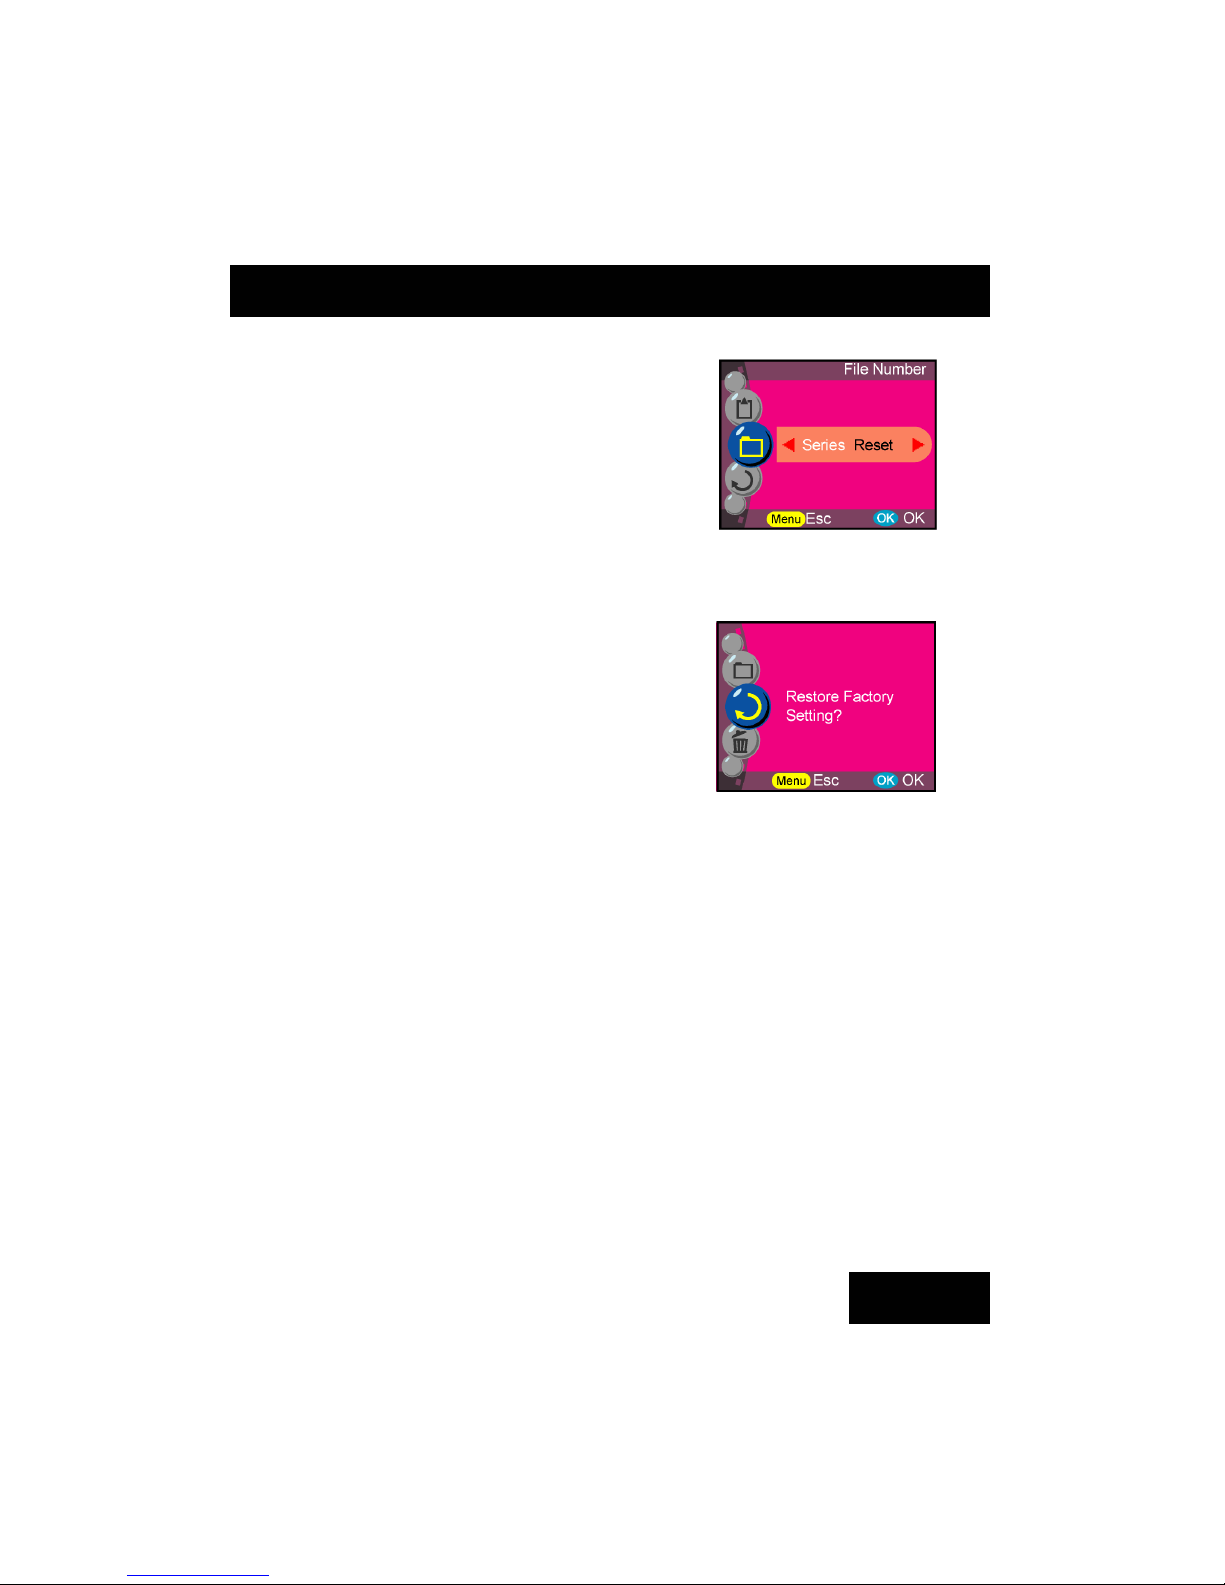
File Number
The image count will reset to zero once
the pictures in memory have been erased
under reset condition. Sets the order of pictures
stored in the camera:
Reset-File number counting from zero
Series- File number counting from serial number
Restoring
Resets the camera to factory setting.
32
Four Main Modes and Instructions
Page 33
Making Connections
In this section you will be able to connect the camera to your PC to
download or edit photos.
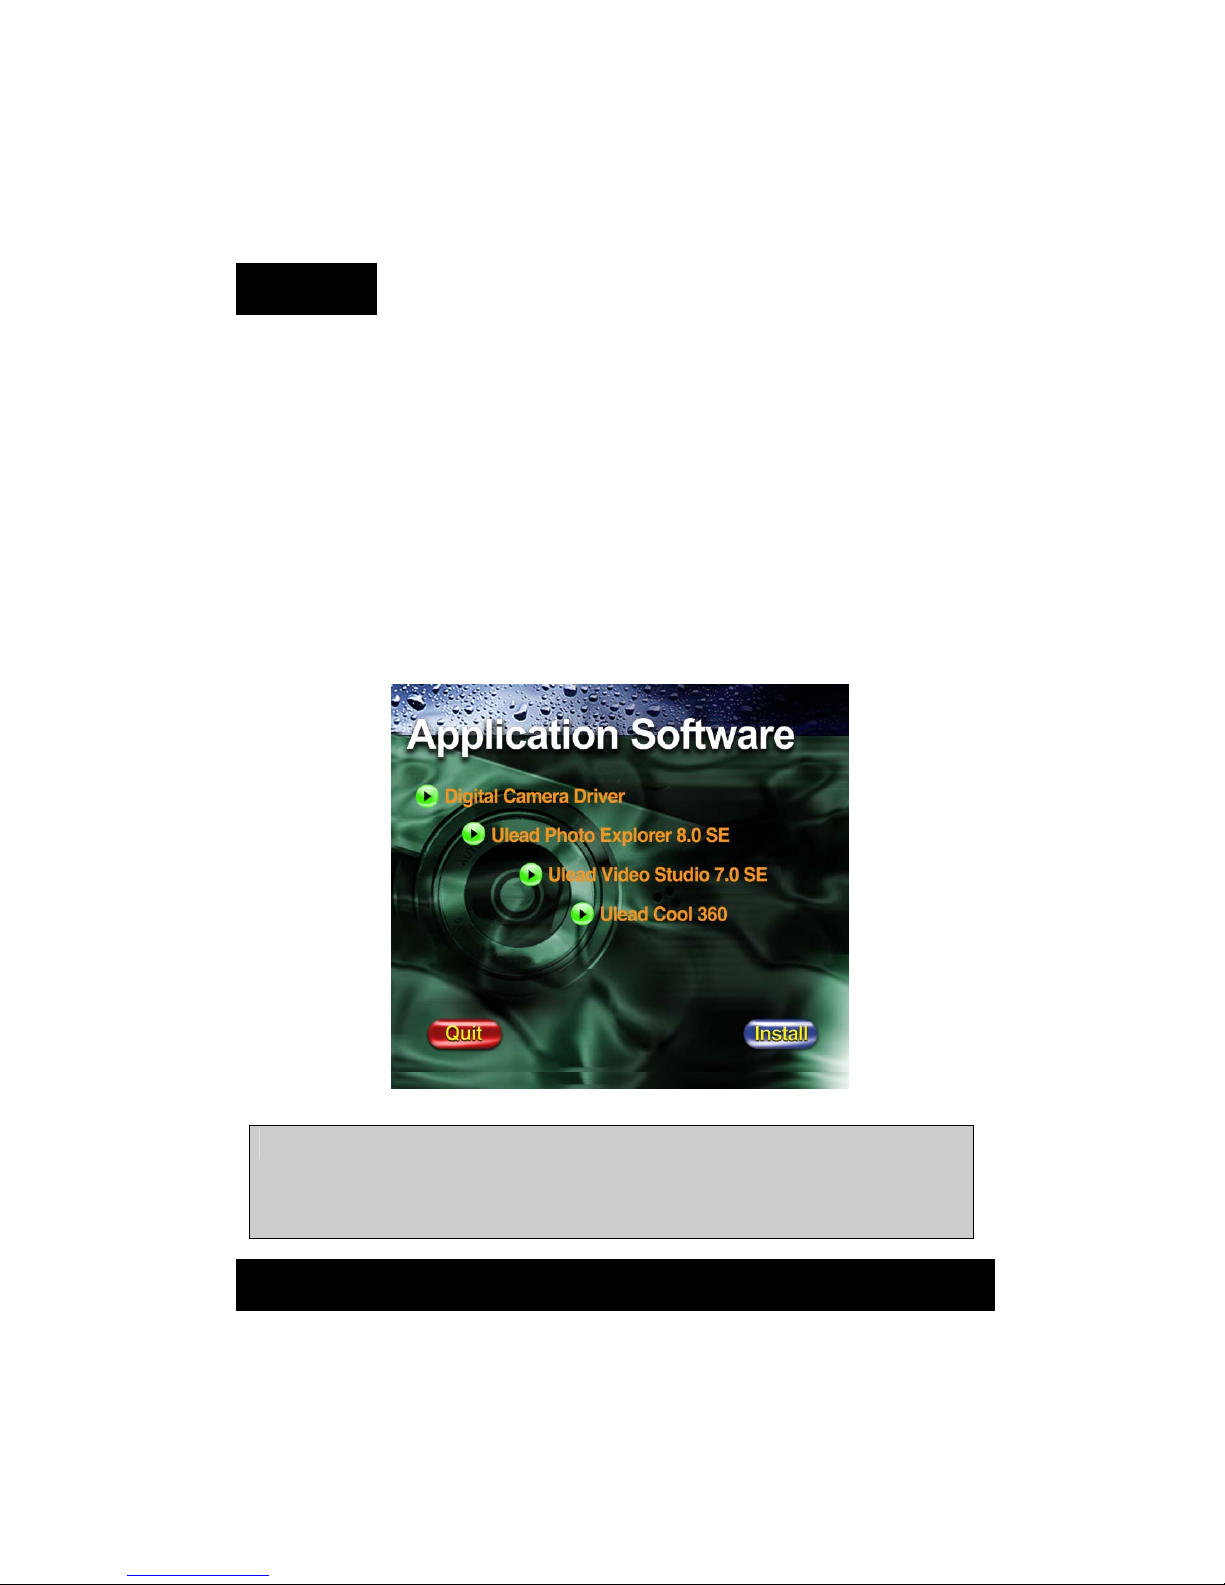
Installing Software
1. Insert the CD-ROM into your CD-ROM drive.
2. Click “Digital Camera Driver” and Install if your operating system is
Windows 98. Users can pick 4 selections and click Install (it can all be done
at the same time).
3. The installation wizard will guide you through the installation.
4. You will be able to use the application once it’s installed.
Caution:
1. Driver is for uploading pictures to your computer, if the ope ration
system is Win 98.
2. If you didn’t install the driver before plugging in the USB device.
System will detect new device. Please insert the CD-ROM and
complete the driver installation.
33
Page 34
Connecting through USB
This section will show you how to download images from camera to
PC through the USB cable.
1. This camera allows users to move the images or movies from camera to
PC by MSDC support.
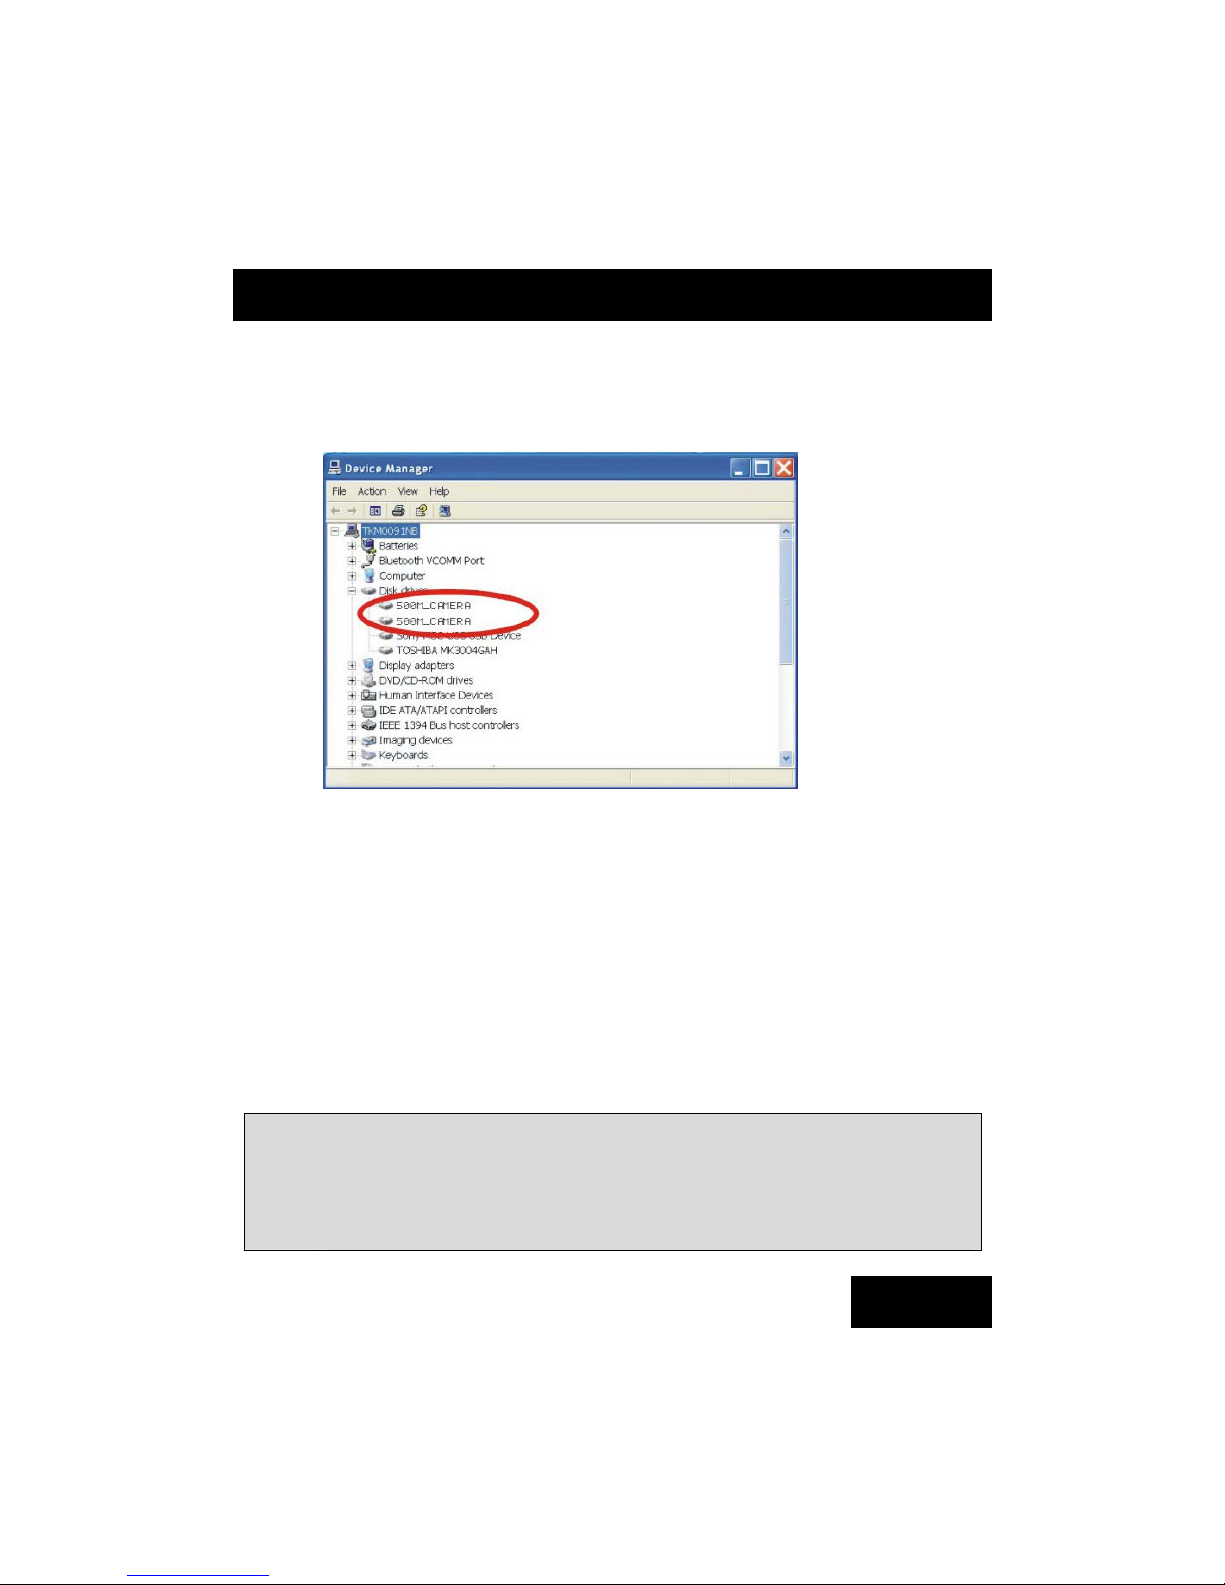
2. When the camera is connected to your PC, there will be 2 disks under
“My computer” named “DCIM”.
3. Simply click the folder named “1004 MDSC”, you can find the saved
files.
4. Copy or remove these files from camera to your PC. You can edit the
images as you wish.
Note:
1. Voice memo files will include three different file format as ".jpg", ".wav"
and ".html". Which have the same file name. The recommended format
for users (desiring to include their recorded voice memo in their selected
pictures) is HTML.
2. You may find the recorded files of internal and external memory from 2
different disks respectively.
34
Making Connections
Page 35

Connecting through TV-out
Before you proceed, please determine your corresponding TV-Out mode.
This camera will enable you to achieve full camera functions by TV-out
connection. User can enable each function through the TV monitor instead
of the LCD display.
1. Connect the video cable into the video out connector.
2. Connect the other end of the video cable into the TV¡¦s video-in jack.
3. Turn the camera ON, you should then be able to operate the camera
with TV screen. (The LCD will turn off while connected to TV-out).
35
Page 36
Appendix
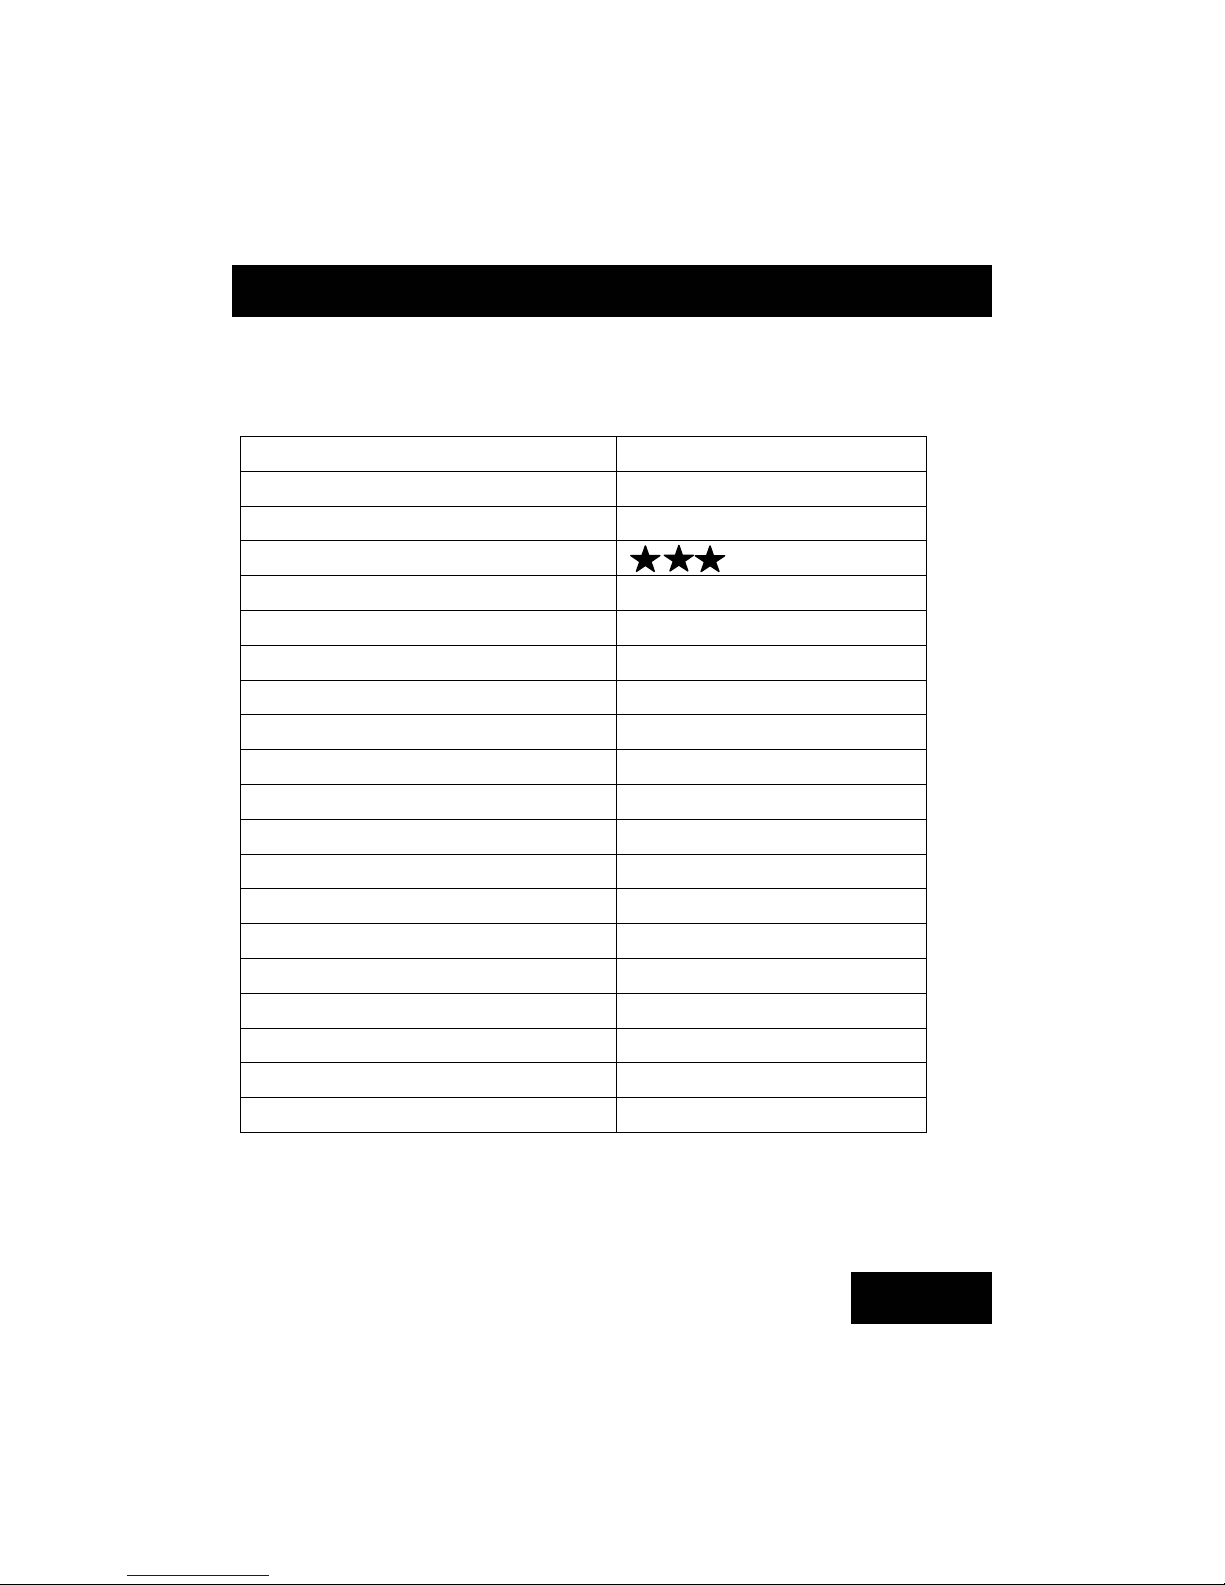
Camera Default Setting
Scene Mode Auto
Capture Mode Auto
Resolution 10.0M (3648 x 2736)
Image Quality
White Balance Auto
Digital Filter Normal
ISO Auto
Metering Matrix
EV 0
Sharpness Normal
Saturation 0
Contrast 0
Date and Time 2004/1/1
Self-timer Option 10 seconds
Slide Show Interval 3 seconds
Auto Power Off 1 minute
Background Editing Image 1
Languages English
TV-out NTSC
File Number Series
36
Appendix
Page 37

LED Status
Status LED Timer LED Camera
Condition
Green Red Orange Red
Power Off Off Off Off Off
Standby On Off Off Off
Strobe charging Off Off Flicker Off
Processing Flicker Off Off Off
Warning/Error Off Flicker Off Off
Battery low Off Off Flicker Off
USB plug in Flicker Off Off Off
TV-out Flicker Off Off Off
Self-timer Flicker Off Off Flicker
Video/Audio
recording
Off Flicker Off Off
Information Code
Error Possible Cause Corrective Action
Card Full
No more pictures can be
stored
Delete the pictures or
insert another card
Write-Protect Card has been protected
Remove write-protect
latch of card
Card Error
Cannot record, playback
or erase pictures in this
card
Format this card or
replace another card
Picture Error
This recorded picture
cannot be playback
with camera
View the image
through PC. If it
cannot be done, the
picture is damaged
37
Appendix
Page 38
No picture
There’s no image in
storage, so there’s
nothing in playback
Take pictures or insert
another card with images
Card Setup This card is not formatted
Format this card
before using
Battery Empty
Battery low for taking
pictures
Install new or charged
batteries
Specifications
Features Content
Max. Resolution 3648 x 2736 (Interpolation)
Still Image Size
3648x2736 / 3264x2448
2560x1920 / 2048x1536
1600x1200 / 1280x960
640x480
Image Sensor CCD
Sensitivity equivalent ISO Auto, 50, 100, 200
Lens Aperture F2.8
Digital Zoom Up to 4x digital zoom
Viewfinder Virtual image
Shutter speed 4~1/1000 sec
Internal Memory Built-in
Estimated number of storable
pictures
10.0M: 6 pictures
8.0M: 7 pictures
5.0M: 10 pictures
3.0M: 16 pictures
2.0M: 26 pictures
1.3M: 40 pictures
VGA: 144 pictures
Storage media SD/MMC
Focus distance 1.5m ~ infinity
A
pp
endix
38
Page 39
Video/Audio Clip Up to 20 fps@QVGA
Continuous shot Yes
Self-timer 2/10 sec. self-timer
Compatibility
WIN98/ME/2000/XP
MAC 9.2 and above
File Format MPEG4/JPEG/EXIF 2.2/DPOF
Dimension 92x58x20(mm)
Weight 100 grams
Flash range 3-6 feet
Manual setting Auto/ Force on/ Force off/ Slow sync
USB Output B type mini USB 2.0 full speed
Video Output NTSC/PAL
Battery type AAA Alkaline
DC-in No
LCD 1.6” TFT, 354 x 240
Playback Zoom Up to 8x
USB storage class support MSDC
Multiple languages E/F/G/I/S/TC/SC/K/J
Tripod mount Plastic
Body material Plastic
Batteries AAA Alkaline x 2
USB Cable Yes
Composite Video Cable Yes
Hand Strap Yes
Pouch Yes
Quick Guide Yes
Application Software
Digital Camera Driver
Ulead Photo Explorer 8.0
Ulead Video Studio 7.0
Ulead Cool 360
User Manual
39
 Loading...