

Page 1

AN0046: USB Hardware Design Guidelines
This application note gives recommendations on hardware design for implementing USB
host and device applications using USB capable EFM32 microcontrollers along with
some example schematics for different applications.
KEY POINTS
• Example Schematics for a variety of
applications
• PCB Design Guidelines for new
applications
silabs.com | Building a more connected world. Rev. 1.02
Page 2

AN0046: USB Hardware Design Guidelines
Introduction
1. Introduction
Some EFM32 microcontrollers, for instance selected members of the Giant Gecko and Leopard Gecko families, offer on-chip USB support. The USB peripheral embedded on these devices include the USB PHY and an internal voltage regulator, thus requiring only a
minimum number of external components. The on-chip voltage regulator's primary purpose is to power the EFM32 USB PHY. But as it
can deliver more current than the EFM32 needs, it can be used to power other components as well, even in non-USB applications. This
can be very useful when component cost or PCB area is of concern.
This document will explain how to connect the USB pins of an EFM32 microcontroller, and will give general guidelines on PCB design
for USB applications. First some quick rules-of-thumb for routing and layout are presented before a more detailed explanation follows.
The information in this document is meant to supplement the information already presented in Energy Micro application notes AN0002
Hardware Design Considerations and AN0016 Oscillator Design Considerations, and it is recommended to follow these guidelines as
well.
The EFM32GG-STK3700 has been tested and passes the requirements as a USB Device. A test report confirming this is attached.
silabs.com | Building a more connected world. Rev. 1.02 | 2
Page 3

AN0046: USB Hardware Design Guidelines
USB Connection
2. USB Connection
This section gives a brief overview of the different USB roles an EFM32 Microcontroller is capable of. For more in-depth details, please
refer to the device family reference manual.
USB can be operated in 2 different modes; host or device, with hub being a special version of a USB device. A supplement to the USB
standard introduces "On-The-Go" mode, which enables a USB product to operate as either a host or a device depending on which kind
of controller is in the other end of the cable. A typical example for this would be a smartphone or a tablet that can both connect to a
computer as a USB Mass Storage Device, or act as a host if a memory card reader or a USB memory stick is connected.
A USB capable EFM32 microcontroller can operate as a host, a device or as an OTG dual role device. EFM32 microcontrollers do not
support operation as a USB hub. The EFM32 USB stack supports host mode and device mode, but not OTG mode.
2.1 EFM32 USB Pin Descriptions
The USB peripheral on EFM32 microcontrollers feature the following pins:
USB_DP - Data line
USB_DM - Inverted data line
USB_VBUS - Sensing if VBUS is connected.
USB_VBUSEN - VBUS Enable, a control signal for enabling VBUS in host applications. Connect to external VBUS switch.
USB_DMPU - Data Minus Pull-Up, a control signal for enabling external 4.7 kohm pull-up on USB_DM for low-speed operation. If VDD
is 3.3 V pull-up may be connected directly to USB_DMPU pin.
USB_ID - ID for determining which device should act as bus master in a link between two OTG Dual Role devices. Connect to ID pin on
USB Micro-AB receptacle.
USB_VREGI - Voltage regulator input.
USB_VREGO - Voltage regulator output.
silabs.com | Building a more connected world. Rev. 1.02 | 3
Page 4

AN0046: USB Hardware Design Guidelines
USB Connection
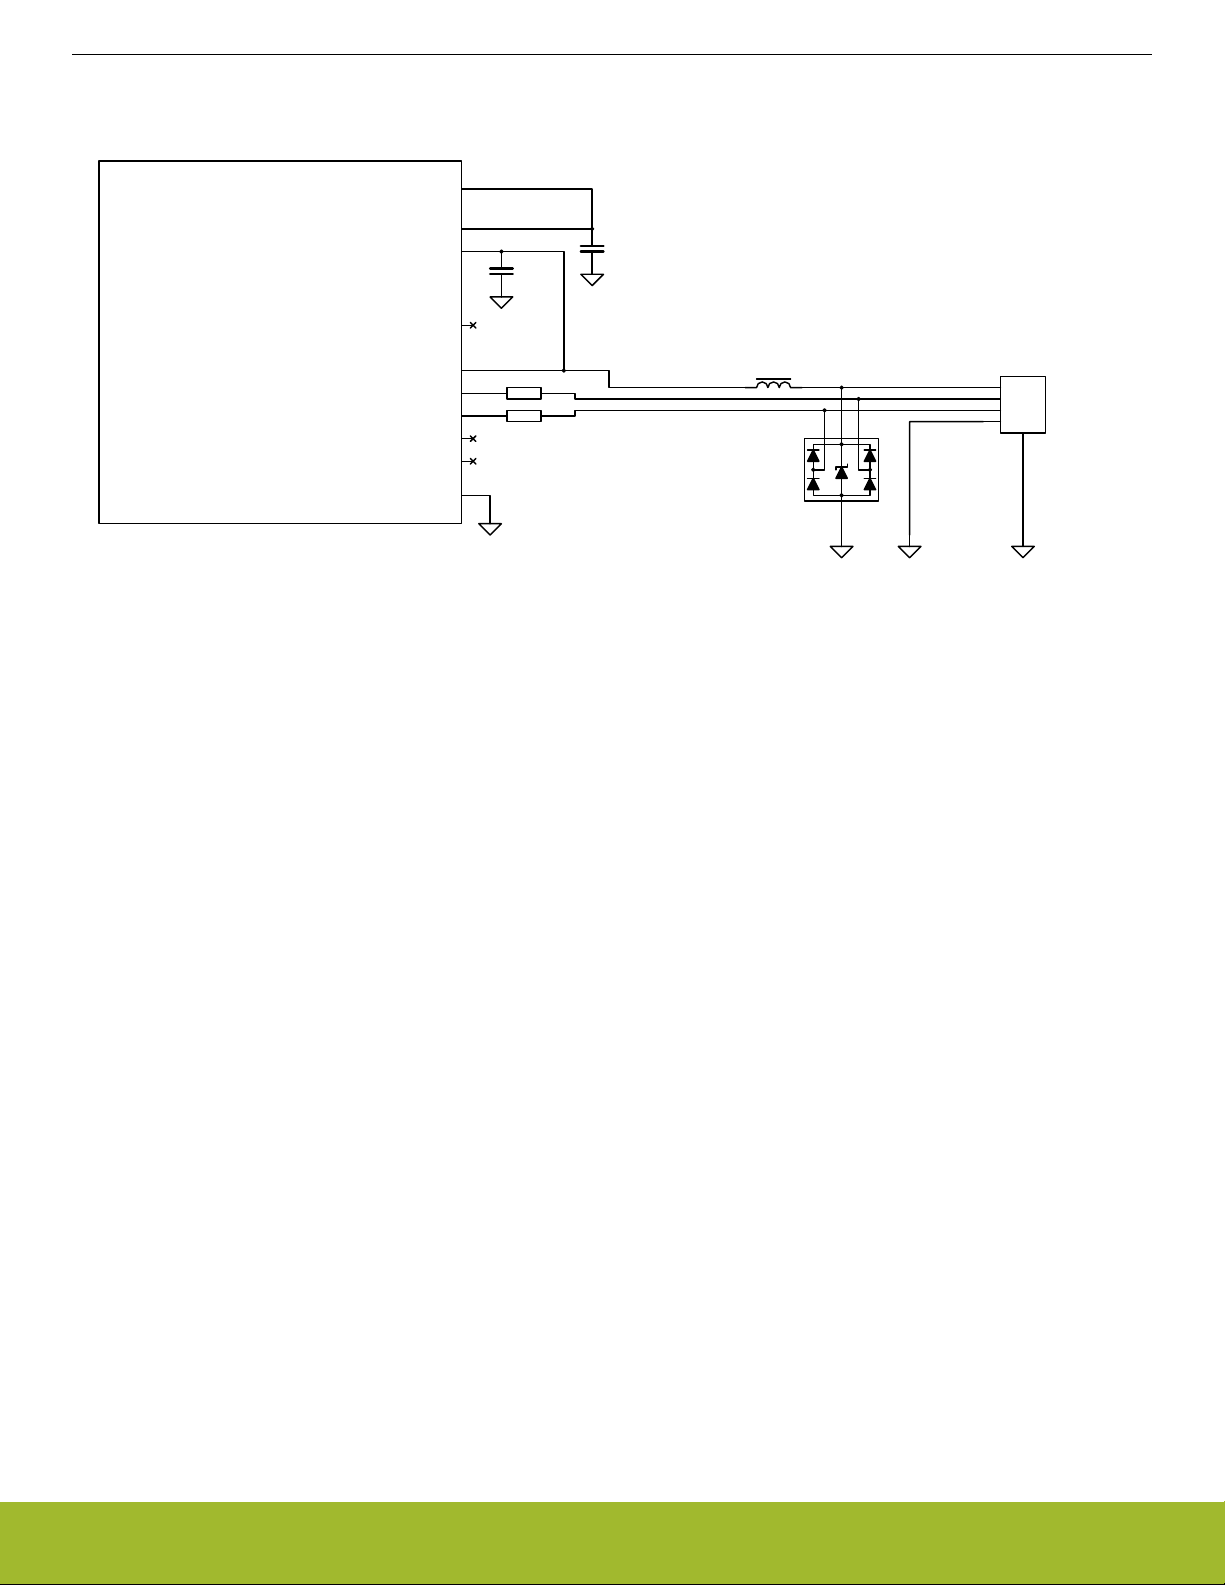
2.2 EFM32 as USB Host
In host mode, the EFM32 acts as the bus master and is responsible of enumerating the USB devices, a process that includes inquiring
connecting devices for configuration information and assigning them an address on the USB bus. The USB host also controls data flow
on the bus by sequentially polling all devices for data, meaning that no device can transmit on the bus without a host request.
A USB host must be able to supply power to a connected USB device through the +5 V VBUS line.
3.0 – 3.6 V 5.0 V
VDD
USB_VREGO
USB_VREGI
GPIO
USB_VBUSEN
EFM32
USB_VBUS
USB_DP
USB_DM
USB_DMPU
USB_ID
VSS
15 R
15 R
1 µF
OC
EN
V
SW
V
in
out
> 96 µF
Figure 2.1. USB Host Schematics
When designing hardware for USB Host, remember the following:
• Use a 48 MHz (2500 ppm) crystal.
• Use a ferrite bead for VBUS. Place near receptacle.
• Use a switch that can shut off VBUS if current exceeds 500 mA.
• Provide at least 96 uF decoupling capacitance on VBUS. Place near USB receptacle.
• Terminate D+ and D- with 15 ohm serial resistors. Place near EFM32.
• Use an ESD protection device. Place near USB receptacle.
• Select a USB Series A type receptacle.
USB Series A
receptacle
VBUS
D+
DGND
Connector
shield
2.3 EFM32 as USB Device
USB devices are bus slaves that provide functionality to the USB host. Devices must provide configuration information to the host so
that the host can configure the connection. Devices are separated in different classes depending on their functionality. Two different
types of device classes exist; hubs and functions. Hubs provide a host with more attachment points, while functions provides additional
functionality. Examples of functions are human interface devices, mass storage devices and communication devices.
USB devices will transmit data or control information over the bus when requested by the host. EFM32 microcontrollers can not operate
as a USB hub device. As a USB host provides +5 V over the VBUS line, a USB device can either be powered over the USB cable, or it
can be self powered. The following sections present schematics for how to connect an EFM32 as both a bus powered device and a self
powered device. Please refer to the USB specifications for details on how much current can be drawn over the USB bus for different
configurations.
silabs.com | Building a more connected world. Rev. 1.02 | 4
Page 5

2.3.1 Self Powered Device
AN0046: USB Hardware Design Guidelines
USB Connection
1.85 – 3.6 V
VDD
USB_VREGO
USB_VREGI
4.7 µF
USB_VBUSEN
1 µF
EFM32
USB_VBUS
USB_DP
USB_DM
USB_DMPU
USB_ID
VSS
Figure 2.2. USB Self Powered Device Schematics
When designing hardware for a self powered USB Device, consider the following:
• Use a 48 MHz (2500 ppm) crystal.
• Use a ferrite bead for VBUS. Place near receptacle.
• Provide at least 4.7 uF decoupling capacitance on USB_VREGI. Place near EFM32.
• Keep total load capacitance on VBUS below 10 uF
• Provide at least 1 uF decoupling capacitance on USB_VREGO. Place near EFM32.
• Terminate D+ and D- with 15 ohm serial resistors. Place near EFM32.
• Use an ESD protection device. Place near USB receptacle.
15 R
15 R
USB Series B,
USB Series Mini-B or
USB Series Micro-B
receptacle
VBUS
D+
DGND
Connector
shield
silabs.com | Building a more connected world. Rev. 1.02 | 5
Page 6
2.3.2 Bus Powered Device
AN0046: USB Hardware Design Guidelines
USB Connection
VDD
USB_VREGO
USB_VREGI
4.7 µF
USB_VBUSEN
1 µF
EFM32
USB_VBUS
USB_DP
USB_DM
USB_DMPU
USB_ID
VSS
Figure 2.3. USB Bus Powered Device Schematics
When designing hardware for a bus powered USB Device, consider the following:
• Use a 48 MHz (2500 ppm) crystal.
• Use a ferrite bead for VBUS. Place near receptacle.
• Provide at least 4.7 uF decoupling capacitance on USB_VREGI. Place near EFM32.
• Keep total load capacitance on VBUS below 10 uF
• Provide at least 1 uF decoupling capacitance on USB_VREGO. Place near EFM32.
• Connect USB_VREGO to VDD.
• Provide decoupling capacitance on VDD as per AN0002 Hardware Design Considerations.
• Terminate D+ and D- with 15 ohm serial resistors. Place near EFM32.
• Use an ESD protection device. Place near USB receptacle.
15 R
15 R
USB Series B,
USB Series Mini-B or
USB Series Micro-B
receptacle
VBUS
D+
DGND
Connector
shield
silabs.com | Building a more connected world. Rev. 1.02 | 6
Page 7

AN0046: USB Hardware Design Guidelines
USB Connection
2.3.3 Low-speed
Speed identification of USB devices is done with a pull-up on one of the data lines. A low-speed capable device is identified by a 1.5
kohm pull-up resistor on the D- line. The internal pull-up resistor on EFM32 microcontrollers is approximately 2.2 kohm, so an external
4.7 kohm resistor must be placed in parallel to be standard compliant. This resistor should be connected to the USB_DMPU pin so it
can be switched on and off by the USB PHY.
Even if omitting the external pull-up resistor will most likely work, it will not be USB compliant because the internal resistor value is
outside the USB specification.
It should also be noted that according to USB specification, low-speed mode is defined to support a limited number of low-bandwidth
devices, such as mice. Low-speed devices are not allowed to use standard USB cables, and a separate specification for low-speed
cables exist.
VDD
USB_VREGO
USB_VREGI
4.7 µF
USB_VBUSEN
1 µF
EFM32
USB_VBUS
USB_DP
USB_DM
USB_DMPU
USB_ID
VSS
Figure 2.4. USB Low-speed Device Schematics
When designing hardware for a Low-speed USB Device, consider the following:
• Use a 48 MHz 2500 ppm crystal.
• Use a ferrite bead for VBUS. Place near receptacle.
• Connect a 4.7 kohm resistor between USB_DMPU and D-
• Provide at least 4.7 uF decoupling capacitance on USB_VREGI. Place near EFM32.
• Keep total load capacitance on VBUS below 10 uF
• Provide at least 1 uF decoupling capacitance on USB_VREGO. Place near EFM32.
• Terminate D+ and D- with 15 ohm serial resistors. Place near EFM32.
• Use an ESD protection device. Place near USB receptacle or where the cable connects to the PCB.
• Do not use a standard USB receptacle.
15 R
15 R
4k7
USB Captive Cable
VBUS
D+
DGND
Cable
shield
In the above schematics, a bus powered device is shown. A low speed device may also be self powered, but if VDD is below
USB_VREGO (3.3 V) the external pull-up should be connected to USB_VREGO instead of USB_DMPU and a switch should be used to
turn it on or off through USB_DMPU. If this is not done, there will be a leakage current from VREGO to VDD through the pull-up.
silabs.com | Building a more connected world. Rev. 1.02 | 7
Page 8

AN0046: USB Hardware Design Guidelines
USB Connection
2.4 EFM32 as USB On-The-Go Dual Role Device
On-The-Go Dual Role Device (OTG) is not yet supported in the EFM32 USB stack, but EFM32 hardware is OTG capable.
When operating as a OTG Dual Role Device, a USB product is capable of operating both as a USB host and a USB device. A dual role
capable device must use a Micro-AB receptacle which can accept both a Micro-A plug and a Micro-B plug. Two dual role devices can
be connected together with a cable that has a Micro-A plug in one end and a Micro-B plug in the other end. In this case the device
where the Micro-A plug is inserted will act as host and must provide +5 V on VBUS. The plug type is detected by the ID pin, which is
shorted to GND on a Micro-A plug.
3.0 – 3.6 V 5.0 V
VDD
USB_VREGO
USB_VREGI
GPIO
USB_VBUSEN
EFM32
USB_VBUS
USB_DP
USB_DM
USB_DMPU
USB_ID
VSS
15 R
15 R
1 µF
OC
EN
V
SW
V
in
out
< 6.5 µF
Figure 2.5. USB On-the-Go Dual Role Device Schematics
When designing hardware for an OTG Dual Role Device, consider the following:
• Use a 48 MHz 2500 ppm crystal.
• Use a ferrite bead for VBUS. Place near receptacle.
• Connect the ID pin on the receptacle to USB_ID
• Ensure that total capacitance on VBUS is less than 6.5 uF
• Provide at least 1 uF decoupling capacitance on USB_VREGO. Place near EFM32.
• Terminate D+ and D- with 15 ohm serial resistors. Place near EFM32.
• Use an ESD protection device. Place near USB receptacle or where the cable connects to the PCB.
• Use a USB Series Micro-AB receptacle.
USB Series Micro-AB
receptacle
VBUS
D+
DID
GND
Connector
shield
silabs.com | Building a more connected world. Rev. 1.02 | 8
Page 9

AN0046: USB Hardware Design Guidelines
PCB Design Guidelines
3. PCB Design Guidelines
This section presents some basic guidelines for high-speed PCB design as well as some specific rules of thumb for USB full-speed
design.
3.1 Recommended Routing Rules of Thumb
• Route D+ and D- as 90 ohm differential pair
• Always provide a good return path (ground) for current
• Do not route over a gap in the reference plane
• Keep away from the edge of the reference plane
• Keep skew less than 400 ps
• Route D+ and D- on top layer
• Route D+ and D- as short as reasonably possible
3.2 PCB Stackup
When designing high speed signal traces on a PCB, thought must be given to the PCB stackup. The two common approaches are to
either route high speed signals on an inner layer, or to keep them on the top layer. The advantage of using an inner layer is improved
noise immunity and to avoid any track impedance discontinuities when routing the signal under components, connectors etc. The benefits with outer layer routing is to avoid vias which easily cause discontinuities in the return current path unless special care is taken. For
USB signals on EFM32 microcontrollers the preferred solution is normally to route the signal on an outer layer, as PCB traces usually
are short.
Independently of whether the signals are routed on an inner or outer layer, they should always be routed over a solid reference plane.
Thus the PCB should have minimum 2 layers.
3.3 Routing
When a signal trace on a PCB is long relative to the highest frequency component of the signal, transmission line effects must be taken
into consideration. The transition between when a wire should be modeled as a transmission line and a wire with "no length" is gradual,
but common practice is to apply transmission line models when the trace length is more than 1/10th of the wavelength of the highest
frequency component on the trace. For traces shorter than this, it is safe to assume that the voltage level is the same over the entire
trace.
For digital signals the shortest wavelength is dependent on the signal bandwidth which again depends on the shortest rise and fall
times. Faster rise times equals higher frequency content. A common approximation is that
0.35
BW ≈
where tr is the minimum rise time from 10-90%. USB specifies a minimum rise time of 4 ns, which equals a maximum signal bandwidth
of 87.5 MHz or a minimum wavelength of 1.7 meters on a typical PCB trace. Thus if PCB traces are shorter than 170 mm, it can be
argued that the characteristic impedance of a track is not important. However, good design practice is to route USB signals as an impedance matched differential pair according to specification.
t
r
silabs.com | Building a more connected world. Rev. 1.02 | 9
Page 10

AN0046: USB Hardware Design Guidelines
PCB Design Guidelines
3.3.1 Differential Pairs
The USB data lines, D- and D+, should be routed as a differential pair. The trace impedance should be matched to the USB cable
differential impedance, which is nominally 90 ohms for the signal pair.
The impedance of a signal track is mainly determined by its geometry (i.e. trace width and height above the reference plane) and the
dielectric constant of the material between the traces and a reference plane. When two tracks are closely spaced, they will be coupled
and the differential impedance will also be dependent on the distance between the two tracks comprising the pair.
In general one can say that if the two traces of a differential pair is spaced far apart, the differential impedance will be twice the impedance of each trace. I.e. the two traces can be considered a shunt impedance. When the distance between the two traces is reduced,
coupling between the traces will cause the differential impedance to decrease. Thus to create a differential pair with 90 ohms impedance, the single ended impedance of each trace should be above 45 ohms. Reducing the trace width will increase the single-ended
impedance while reducing the distance between the traces in a pair reduces the impedance. This allows routing of very closely spaced
differential pairs that use little PCB area. Note, however that thin traces will be more difficult to manufacture, and that for high frequencies loss due to skin effect comes into play.
Most PCB design tools support differential pairs, and can create such pairs with specified parameters. If such a tool is not available,
there are many online impedance calculators that can calculate track parameters.
To avoid differential imbalance, skew (or trace length difference) between the two traces in a differential pair should be under control. A
common rule of thumb is to keep the skew less than 1/10th of the fastest rise time. For USB full-speed this translates to 400 ps or 60
mm. However, this is the total skew over the entire communication link so skew in the USB cable as well as in the other communicating
party must also be included. According to the USB specification the maximum allowed skew in a cable is 100 ps, which leaves a maximum of 300 ps (45 mm) of skew to be distributed amongst the host and device. Still, as you never know the characteristics of the other
end, good design practice is to keep skew at a reasonable minimum.
When high speed signals are routed from one layer to another, care should also be taken to provide a path for the return signals. Remember that even differential signals use a reference plane as return path. This is particularly important when designing PCBs with
many layers.
Return
current
path
TOP
GND
GND
BOTTOM
Signal
path
Figure 3.1. Changing layers on PCB
Stubs should also be avoided as they may cause signal reflections. For USB, this is seldom a problem as the data traces are point-topoint. If a test point is desired, the signal should be routed through the test point, in a fly-by manner, rather than having a long trace
from the trace to the test point.
Figure 3.2. Recommended routing of test points
silabs.com | Building a more connected world. Rev. 1.02 | 10
Page 11

AN0046: USB Hardware Design Guidelines
PCB Design Guidelines
3.3.2 Reference Planes
Routing high speed signals across a split in the reference plane should be avoided. In high speed digital design, one always have to
consider the complete current loop from a transmitter output and back to the transmitter reference terminal, including the return current
in ground or another reference plane.
The path of the current from the transmitter output to the receiver is usually well defined, whereas the path of the return current often
can be more complex. For low frequencies, the return impedance is dominated by resistance in the reference plane and the return current will be distributed over much of the reference plane. For higher frequencies, the inductance of the current loop will come into play,
and as frequency increases the return current will start seeking a path as close to the signal trace as possible. However, if the trace
crosses a split in the reference plane, the return current will be forced to follow a longer path, thereby creating a larger loop area which
will both radiate more and be more susceptible to noise.
If crossing a split cannot be avoided, a good path for the high frequency return current should be provided. For instance by connecting
the two planes with one capacitor (100 nF in a 0603 or smaller package could be a good size) per trace located near the high speed
trace. A voltage plane can also be used as reference plane for a high speed signal as long as a proper path for the return current is
provided.
GND Vss
Figure 3.3. Crossing a split in the reference plane
When crossing from one plane to another, the crossing angle should be 90 degrees.
3.4 Input Impedance
Regardless of which routing strategy is chosen, care should be taken to ensure that the input impedance is within specification to avoid
any reflections back on the cable.
The USB standard specifies a maximum input capacitance of 150 pF for a downstream port (i.e. host mode) and 100 pF on an upstream port (device mode).
For low-speed devices with captive cables, special requirements exist. Please refer to the USB specification for details.
To ensure a constant impedance, it is recommended to route the USB signals more than 3*H away from the edge of the reference
plane. See figure.
> 3*H
H
Figure 3.4. Distance to edge of reference plane
silabs.com | Building a more connected world. Rev. 1.02 | 11
Page 12

AN0046: USB Hardware Design Guidelines
USB Electrical Specifications
4. USB Electrical Specifications
The EFM32 USB peripheral are USB 2.0 compliant and can operate as a USB host, USB device and as an On-The-Go dual-role device. The USB 2.0 standard specifies three data rates:
• Low-speed (1.5 Mbps),
• Full-speed (12 Mbps), and
• High-speed (480 Mbps).
A USB 2.0 compliant device does not need to support all three data rates. The EFM32 supports full-speed and low-speed.
The following sections gives a brief overview of the electrical requirements on a USB interface. For extensive information, please refer
to the USB specification. As EFM32 devices only support Full-speed and Low-speed data rates, this document gives most attention to
these.
4.1 Signalling Levels
USB 2.0 defines two different signaling levels. There is one requirement for Full-speed and Low-speed data rates and another requirement for High-speed data rate.
3.6 V
V
OH
2.8 V
1.3-2.0 V
0.3 V
V
OL
0.0 V
UI
Figure 4.1. USB Full-speed/low-speed Signal Levels
Low-speed and full-speed: VOD: 0.0 - 0.3 V VOH: 2.8 - 3.6 V
Low-speed: Bit period (UI) = 667 ns Full-speed: Bit period (UI) = 83 ns
4.2 Signal Rise and Fall Times
Rise and fall times are measured from 10-90% of the signal low and high levels.
V
OH
0.9 * V
OH
0.9 * V
V
OH
OH
1.1 * V
OL
V
t
f
OL
1.1 * V
OL
t
r
Figure 4.2. USB Full-speed/low-speed Rise Time and Fall Time
4.2.1 Full-speed
Full speed: Rise/fall time (10-90%) 4-20 ns
silabs.com | Building a more connected world. Rev. 1.02 | 12
Page 13

AN0046: USB Hardware Design Guidelines
USB Electrical Specifications
4.2.2 Low-speed
Low speed: Rise/fall time (10-90%) 75-300 ns.
4.3 Speed Identification
A USB device must identify its data rate capabilites to the USB host. To do this, the USB standard has set up a scheme where USB
hosts have a weak pull-down resistor on both data lines, and devices have a strong pull-up resistor on one of the data lines. The size of
these resistors are set to ensure that the pull-up on the device-end will pull the data line from 0 V to high (3.0-3.6 V) as seen from the
host.
Nominal values for these resistors are 15 ohm for the pull-downs on the host side, and 1.5 kohm for the pull-up on the device-end.
When a device is connected to a host, the host checks which of the data lines is pulled high.
• Full-speed capable devices has the pull-up on D+
• Low-speed capable devices has the pull-up on D-
High-speed USB connections are initialized as a full-speed connection, before a negotiation sequence sets up the transition to highspeed.
4.4 USB Connectors
Several different USB connectors exist. The USB standard clearly defines which connector type are allowed for the different operating
modes.
Series A receptacles are used for USB hosts and Series B receptacles are used for USB devices while Series Micro-AB receptacles are
used for On-the-Go devices that are capable of acting in both host and device mode. Series Micro-AB receptacles accept both Micro-A
and Micro-B connectors.
silabs.com | Building a more connected world. Rev. 1.02 | 13
Page 14

4.4.1 USB Receptacles
AN0046: USB Hardware Design Guidelines
USB Electrical Specifications
Figure 4.3. USB Series A Receptacle for USB Host
Figure 4.4. USB Series B Receptacle for USB Device
Figure 4.5. USB Series Mini-B Receptacle for USB Device. Smaller form factor.
Figure 4.6. USB Series Micro-AB Receptacle for USB OTG Dual Role Devices only. Even smaller form factor.
Figure 4.7. USB Series Micro-B Receptacle for USB Device
silabs.com | Building a more connected world. Rev. 1.02 | 14
Page 15

AN0046: USB Hardware Design Guidelines
Power
5. Power
5.1 USB Voltage Regulator
The EFM32 feature an on-chip 5 V to 3.3 V regulator that is used to power the internal USB PHY. This ensures that the USB signaling
levels remain constant and within specification regardless of the voltage level on the rest of the device.
But as the regulator can output up to 50 mA, it can also be used to power both the rest of the EFM32 as well as external components.
Please refer to the device family reference manual for more details on how to connect the regulator for different configurations.
If another 3.3 V source is available, and the internal regulator is not desirable to use, the USB PHY can be powered by applying 3.3 V
to USB_VREGO. In this configuration, USB_VREGI must also be connected to 3.3 V to stabilize the regulator.
The voltage regulator can also be used even if the USB functionality is not used.
5.2 Bus Power Switch
In Figure 5.1 USB Battery Power Switch on page 15 a simple switch is presented. This switch enables a self-powered device to
switch from battery power to +5V when connected to a USB host. This is typically useful for extending the battery life of USB enabled
devices by avoiding current consuming USB operations from draining the battery.
VREGO
VBUS
4.7 k
N-channel
VDD
P-channel
6.8 k
VBAT
Figure 5.1. USB Battery Power Switch
The two MOSFETs used in this circuit are an FDC6420C which contains one N-channel and one P-channel MOSFET. USB VBUS is
used to control the switching transistors. When VBUS is present, the N-channel FET is switched on and the P-channel FET is switched
off and vice versa. Note that the P-channel transistor is oriented with the source towards VDD to prevent applying high voltage to the
battery through the body diode. The switching time can be fine tuned by changing the resistor values in the voltage divider on the transistor gates.
Note that this simple switch has certain limitations. The main being that the MOSFETs are depending on a certain voltage difference
between gate and source to switch on and off, and that when switching VBUS on and off there will be a short time when both transistors
are off. During this time, VDD will drop slightly until the body diode starts conducting.
The switching characteristics are also temperature dependent, so VDD will drop more for lower temperatures. The above circuit has
been tested on battery voltages above 2.5 V in temperatures from 0 to 55 degrees C.
It is therefore recommended to use the above circuit as a starting point only, and always ensure that the operation will be as expected
considering application specific requirements on VDD current consumption, operating temperatures and battery voltages.
silabs.com | Building a more connected world. Rev. 1.02 | 15
Page 16

AN0046: USB Hardware Design Guidelines
Environmental Considerations
6. Environmental Considerations
In this section these phenomena are discussed:
• EMI (Electromagnetic Interference); electromagnetic noise generated by an apparatus
• EMC (Electromagnetic Compatibility); an apparatus' immunity against electromagnetic noise
• ESD (Electrostatic Discharge); an apparatus' immunity against electrostatic discharges
6.1 Isolation of Cable Shield
Any cable will act as an antenna that can radiate as well as and pick up electromagnetic noise. As the USB cable shield is terminated to
the USB receptacle chassis, care should be taken to decouple the USB receptacle chassis from signal ground.
To avoid problems with EMI and EMC, the USB connector should be surrounded by a solid ground plane. A ferrite bead can be used to
isolate the +5V line of the connector.
silabs.com | Building a more connected world. Rev. 1.02 | 16
Page 17

AN0046: USB Hardware Design Guidelines
Environmental Considerations
6.2 ESD Protection
The USB pins on EFM32 devices are tolerant of a 2 kV discharge according to the Human Body Model (HBM). Designers should be
aware that the HBM model is only intended to model ESD events that may happen in a production environment. I.e. a device that is
designed to withstand a HBM discharge will survive being handled during production.
Outside the controlled environment of a production facility, ESD events are of a different character. To account for this, a series of system level ESD tests are defined in the standard IEC61000-4-2.
Figure 6.1. Comparison of IEC 61000-4-2 and Human Body Model ESD pulses
Figure 6.1 Comparison of IEC 61000-4-2 and Human Body Model ESD pulses on page 17 by Protek Devices, there is a significant
difference both in the peak level and the rise-time of the test pulses between HBM and IEC 61000-4-2. A common problem is that devices whose protection are only HBM compliant can be damaged by the quick initial ESD spike before the protection circuits are activated.
To protect the EFM32 from damage from ESD discharges on the USB interface, external ESD protection must be used. On the EFM32
kits, an NXP IP4220CZ6 ESD protection device is used as shown in Figure 6.2 Recommended ESD Protection on page 18. Note that
this device has a maximum output voltage of 9 V, which is considerably higher than the tolerance rating of an EFM32. However, as
most of the energy of an applied ESD event will be dissipated in the ESD protection device, the residue energy is well below the levels
that the EFM32 tolerates, and the total ESD protection is sufficient.
silabs.com | Building a more connected world. Rev. 1.02 | 17
Page 18

Figure 6.2. Recommended ESD Protection
AN0046: USB Hardware Design Guidelines
Environmental Considerations
The EFM32GG-STK3700 Giant Gecko Starter Kit has been tested according to IEC 61000-4-2 and has passed an 8 kV contact discharge.
The ESD protection cirquitry should be placed near the USB connector to prevent the high voltages and frequencies of an ESD event to
propagate far into the PCB.
silabs.com | Building a more connected world. Rev. 1.02 | 18
Page 19

AN0046: USB Hardware Design Guidelines
Further Reading
7. Further Reading
Universal Serial Bus Specification (Revision 2.0) including USB On-The-Go and Embedded Host Supplement to the USB Revision 2.0
Specification.
• https://www.usb.org/sites/default/files/documents/usb_otg_and_eh_3-0_release_1_1_10may2012.pdf
Human Body Model vs. IEC 61000-4-2 (Protek Devices)
• http://www.protekdevices.com/xyz/documents/kb/tech/ta1036.pdf
High Speed USB Platform Design Guidelines (Intel)
• http://citeseerx.ist.psu.edu/viewdoc/download?doi=10.1.1.169.6351&rep=rep1&type=pdf
AN0002 Hardware Design Considerations (Silicon Labs)
• http://www.silabs.com/Support%20Documents/TechnicalDocs/AN0002.pdf
AN0016 Oscillator Design Considerations (Silicon Labs)
• http://www.silabs.com/Support%20Documents/TechnicalDocs/AN0016.pdf
silabs.com | Building a more connected world. Rev. 1.02 | 19
Page 20

8. Revision History
Revision 1.02
June 2020
• Revised example schematics to remove unnecessary ferrite beads
• Updated document links
Revision 1.01
September 2013
• New Cover Layout
Revision 1.00
January 2013
• Initial Revision.
AN0046: USB Hardware Design Guidelines
Revision History
silabs.com | Building a more connected world. Rev. 1.02 | 20
Page 21

Smart.
Connected.
Energy-Friendly.
Products
www.silabs.com/products
Disclaimer
Silicon Labs intends to provide customers with the latest, accurate, and in-depth documentation of all peripherals and modules available for system and software implementers using or
intending to use the Silicon Labs products. Characterization data, available modules and peripherals, memory sizes and memory addresses refer to each specific device, and "Typical"
parameters provided can and do vary in different applications. Application examples described herein are for illustrative purposes only . Silicon Labs reserves the right to make changes without
further notice to the product information, specifications, and descriptions herein, and does not give warranties as to the accuracy or completeness of the included information. Without prior
notification, Silicon Labs may update product firmware during the manufacturing process for security or reliability reasons. Such changes will not alter the specifications or the performance
of the product. Silicon Labs shall have no liability for the consequences of use of the information supplied in this document. This document does not imply or expressly grant any license
to design or fabricate any integrated circuits. The products are not designed or authorized to be used within any FDA Class III devices, applications for which FDA premarket approval is
required, or Life Support Systems without the specific written consent of Silicon Labs. A "Life Support System" is any product or system intended to support or sustain life and/or health,
which, if it fails, can be reasonably expected to result in significant personal injury or death. Silicon Labs products are not designed or authorized for military applications. Silicon Labs
products shall under no circumstances be used in weapons of mass destruction including (but not limited to) nuclear, biological or chemical weapons, or missiles capable of delivering
such weapons. Silicon Labs disclaims all express and implied warranties and shall not be responsible or liable for any injuries or damages related to use of a Silicon Labs product in such
unauthorized applications.
Trademark Information
Silicon Laboratories Inc.®, Silicon Laboratories®, Silicon Labs®, SiLabs® and the Silicon Labs logo®, Bluegiga®, Bluegiga Logo®, ClockBuilder®, CMEMS®, DSPLL®, EFM®, EFM32®,
EFR, Ember®, Energy Micro, Energy Micro logo and combinations thereof, "the world’s most energy friendly microcontrollers", Ember®, EZLink®, EZRadio®, EZRadioPRO®, Gecko®,
Gecko OS, Gecko OS Studio, ISOmodem®, Precision32®, ProSLIC®, Simplicity Studio®, SiPHY®, Telegesis, the Telegesis Logo®, USBXpress® , Zentri, the Zentri logo and Zentri DMS, ZWave®, and others are trademarks or registered trademarks of Silicon Labs. ARM, CORTEX, Cortex-M3 and THUMB are trademarks or registered trademarks of ARM Holdings. Keil is a
registered trademark of ARM Limited. Wi-Fi is a registered trademark of the Wi-Fi Alliance. All other products or brand names mentioned herein are trademarks of their respective holders.
Silicon Laboratories Inc.
400 West Cesar Chavez
Austin, TX 78701
USA
Quality
www.silabs.com/quality
Support and Community
community.silabs.com
http://www.silabs.com
 Loading...