

Page 1

QSG166: WF200 Wi-Fi Development Kit
Quick Start Guide
The WF200 Wi-Fi Development Kit is an excellent way to get started with WF200 Wi-Fi transceiver IC to achieve performance evaluation and software development.
It supports various hardware and software use cases, as described below.
Two versions of devkits are available:
• SLEXP8022A contains WF200 development board (BRD8022A), that can be connected to Silicon Labs EFM32 Starter kits (STK3701 for GG11) or to a Raspberry Pi for
the Linux case. It also contains a micro-SD card allowing fast startup with a Raspberry Pi.
•
SLEXP8022B is a superset of SLEXP8022A with a Raspberry Pi 2 model V1.2 included.
This document described the first steps to get a Wi-Fi connection for the Linux case
(Raspberry Pi), Silicon Labs MCUs, as well as a case with a 3rd party MCU.
Note: Refer to UG379 for more details about the board.
KEY CONTENTS
• Expansion Board with the WF200 Wi-Fi
transceiver IC onboard.
• Direct connection to Silicon Labs EFM32
hosts (20 pin EXP)
•
Direct connection to Raspberry Pi for the
Linux use case
• Support of 3rd party MCUs
• Selectable SPI or SDIO host interface
silabs.com | Building a more connected world. Rev. 0.4
Page 2

Table of Contents
1. Getting Started with Raspberry Pi and Linux ...................
1.1 Requirements ..............................3
1.1.1 Hardware ..............................3
1.1.2 Software ..............................3
1.2 Hardware Setup .............................3
1.3 SSH Connection .............................4
1.4 Wi-Fi Demos...............................4
1.4.1 Station Demo .............................4
1.4.2 Access Point Demo ...........................5
1.5 Update SD Card .............................5
1.6 Software Repositories ...........................5
1.7 Documentation ..............................5
3
2. Getting Started with STM32 MCU, with FreeRTOS, and LwIP .............6
2.1 Requirements ..............................6
2.1.1 Hardware ..............................6
2.1.2 Software ..............................6
2.2 Hardware Setup .............................7
2.3 Getting Started ..............................8
2.3.1 Flashing the STM32 Using IAR .......................8
2.3.2 Flashing the STM32 using TrueSTUDIO ....................9
2.4 Using the Demo .............................12
3. Additional Information ...........................13
3.1 Additional Resources ............................13
3.2 Customer Support .............................13
silabs.com | Building a more connected world. Rev. 0.4 | 2
Page 3
QSG166: WF200 Wi-Fi Development Kit Quick Start Guide
Getting Started with Raspberry Pi and Linux
1. Getting Started with Raspberry Pi and Linux
1.1 Requirements
1.1.1 Hardware
To use this guide, the following components are needed:
•
Raspberry Pi board
• Versions supported: Pi2 model B V1.2 or Pi3 model B.
Note: Pi3 model B+ is not supported.
• Raspberry Pi power supply
• WF200 devkit (BRD8022A)
• Silabs SD card
• Network cable
1.1.2 Software
Note: Please use Firefox or Chrome to download the following software because Internet Explorer is not supported.
To remotely access the Raspberry Pi from a Windows machine, some tools need to be installed:
• To enable ssh access with X11 support, download and install MobaXterm Home Edition (Installer edition) from https://mobax-
term.mobatek.net/
• To enable multicast name resolution (mDNS), download and install Apple Bonjour from: https://support.apple.com/kb/DL999 (During
installation, we recommend that you uncheck all options.)
1.2 Hardware Setup
1. Insert Silabs SD card in Raspberry Pi.
2. Plug the WF200 devkit on top of the Raspberry Pi (WARNING: make sure the devkit does not touch HDMI connector on Raspberry
Pi).
3. Configure the switches on WF200 devkit:
• Left switch (power): “On Board LDO”
• Right switch: “SDIO”
4. Connect the Raspberry Pi directly to a computer with an Ethernet cable. (WARNING: Do NOT use a switch connected to a net-
work!)
5. Power the Raspberry Pi.
6. On the first boot, wait 60 seconds for the Raspberry Pi to start before proceeding.
silabs.com | Building a more connected world. Rev. 0.4 | 3
Page 4

QSG166: WF200 Wi-Fi Development Kit Quick Start Guide
Getting Started with Raspberry Pi and Linux
1.3 SSH Connection
With MobaXterm, create and open a ssh session to the Raspberry Pi with the following parameters:
• Host:
• Username: pi
• Password: default_password
All the following commands will be entered in the newly open ssh console.
silabs-pi-demo.local
Figure 1.1. SSH Console
1.4 Wi-Fi Demos
The SD card includes demos for the two supported modes: station and access point.
Note: On first version of the SD cards, the driver must be loaded first with the following command:
sudo wfx_driver_reload
1.4.1 Station Demo
This demo configures the Raspberry Pi and WF200 to work as a Wi-Fi station which can connect to an access point. To start it run:
sudo wfx_demo_station
Note: Minimize MobaXterm window, then wait a few seconds for the Wi-Fi tool to appear.
This will launch a graphical tool named “wpa_gui” which support the following actions:
1. Scan.
2.
Select the desired Wi-Fi access point.
3. Enter credentials if need be, and then add.
Once connected, it is possible to perform some traffic:
ping silabs.com
Note: With keyboard,
mouse, and screen attached to the Raspberry Pi, it is possible to launch a browser by clicking the “Silicon Labs
website” icon on the desktop.
silabs.com | Building a more connected world. Rev. 0.4 | 4
Page 5

QSG166: WF200 Wi-Fi Development Kit Quick Start Guide
Getting Started with Raspberry Pi and Linux
1.4.2 Access Point Demo
This demo configures the Raspberry Pi and WF200 to work as a Wi-Fi access point which can accept stations. To start it, run:
sudo wfx_demo_ap
Then it is possible to connect to the Raspberry Pi using a Wi-Fi capable device and the following credentials:
• SSID: silabs-pi-demo
• Passphrase: default_password
On the device, use a browser to open http://silabs-pi-demo.wlan/.
1.5 Update SD Card
To download and install an SD card image, go to https://github.com/SiliconLabs/wfx-linux-tools/blob/master/RELEASES.md
1.6 Software Repositories
For development purposes, software can be found in the locations listed below:
• WF200 firmware is available in https://github.com/SiliconLabs/wfx-firmware
• The Linux driver is available in https://github.com/SiliconLabs/wfx-linux-driver
1.7 Documentation
Complete documentation for development with a Raspberry Pi is available here: https://github.com/SiliconLabs/wfx-linux-tools/blob/
master/README.md
silabs.com | Building a more connected world. Rev. 0.4 | 5
Page 6

QSG166: WF200 Wi-Fi Development Kit Quick Start Guide
Getting Started with STM32 MCU, with FreeRTOS, and LwIP
2. Getting Started with STM32 MCU, with FreeRTOS, and LwIP
2.1 Requirements
2.1.1 Hardware
To use the WF200_driver_F429ZI_FreeRTOS project, a user will need the following list:
• A WF200 Wi-Fi expansion board BRD802XX
• A NUCLEO-F429ZI board with the associated micro-USB cable
• A hardware interposer to connect the Silicon Labs expansion board to the NUCLEO board
• A PC where to install the following software prerequisites
• A Wi-Fi access point
2.1.2 Software
In addition to the previous hardware, a user will need software listed below:
• Get the software example (WF200_driver_F429ZI_FreeRTOS-LwIP) in https://github.com/SiliconLabs/wfx-fullMAC-tools and open it
on IAR or TrueSTUDIO
• Licensed IAR Embedded Workbench IDE for ARM installed or Atollic TrueSTUDIO for STM32 IDE available from the this link:
https://atollic.com/truestudio/
• ST-link driver either installed during IDE installation or through the following link: https://www.st.com/content/st_com/en/products/
development-tools/software-development-tools/stm32-software-development-tools/stm32-utilities/stsw-link009.html
• A UART console. For example, Tera Term:https://osdn.net/projects/ttssh2/releases/
• The FMAC driver source code is available in https://github.com/SiliconLabs/wfx-fullMAC-driver
silabs.com | Building a more connected world. Rev. 0.4 | 6
Page 7

2.2 Hardware Setup
QSG166: WF200 Wi-Fi Development Kit Quick Start Guide
Getting Started with STM32 MCU, with FreeRTOS, and LwIP
Mount the
WF200 expansion board on top on the NUCLEO board using the hardware interposer as shown on the figure below. Make
sure the power switch is on the “on Board LDO” position and the bus switch on the “SPI” one.
Figure 2.1. WF200 Expansion Board Mounted on a NUCLEO Board
Connect the NUCLEO board to your PC with the micro-USB cable. Make sure to connect your PC to the correct end as shown
below. The NUCLEO-144 has two different USB-micro ports. If detected correctly, it should appear as USB storage with the name
“NODE_F429ZI”.
Figure 2.2. NUCLEO-144 Board
silabs.com | Building a more connected world. Rev. 0.4 | 7
Page 8

QSG166: WF200 Wi-Fi Development Kit Quick Start Guide
Getting Started with STM32 MCU, with FreeRTOS, and LwIP
2.3 Getting Started
2.3.1 Flashing the STM32 Using IAR
1. Open the IAR project “Project.eww” located in the path \WF200_driver_F429ZI_FreeRTOS-LwIP\EWARM.
In IAR Workspace view, open the header file “lwip_freertos.h”. The project workspace is shown in the Figure 2.3.
2.
Figure 2.3. IAR Project Workspace
3. In “lwip_freertos.h”, change the WLAN_SSID, WLAN_PASSKEY and WLAN_SECURITY defines to the values of the access point
you want to use.
Open Tera Term and connect to the STLink Virtual COM port of the NUCLEO board. In the “Setup\Serial Port” panel, select
4.
115200 for the speed.
5. “Make” the project by clicking on the appropriate icon.
6. “Download and Debug” the project by clicking on the associated icon.
7. Wait for the project to be flashed in the STM32 .
8. Once in debug mode, click on the "GO" icon.
silabs.com | Building a more connected world. Rev. 0.4 | 8
Page 9
Getting Started with STM32 MCU, with FreeRTOS, and LwIP
2.3.2 Flashing the STM32 using TrueSTUDIO
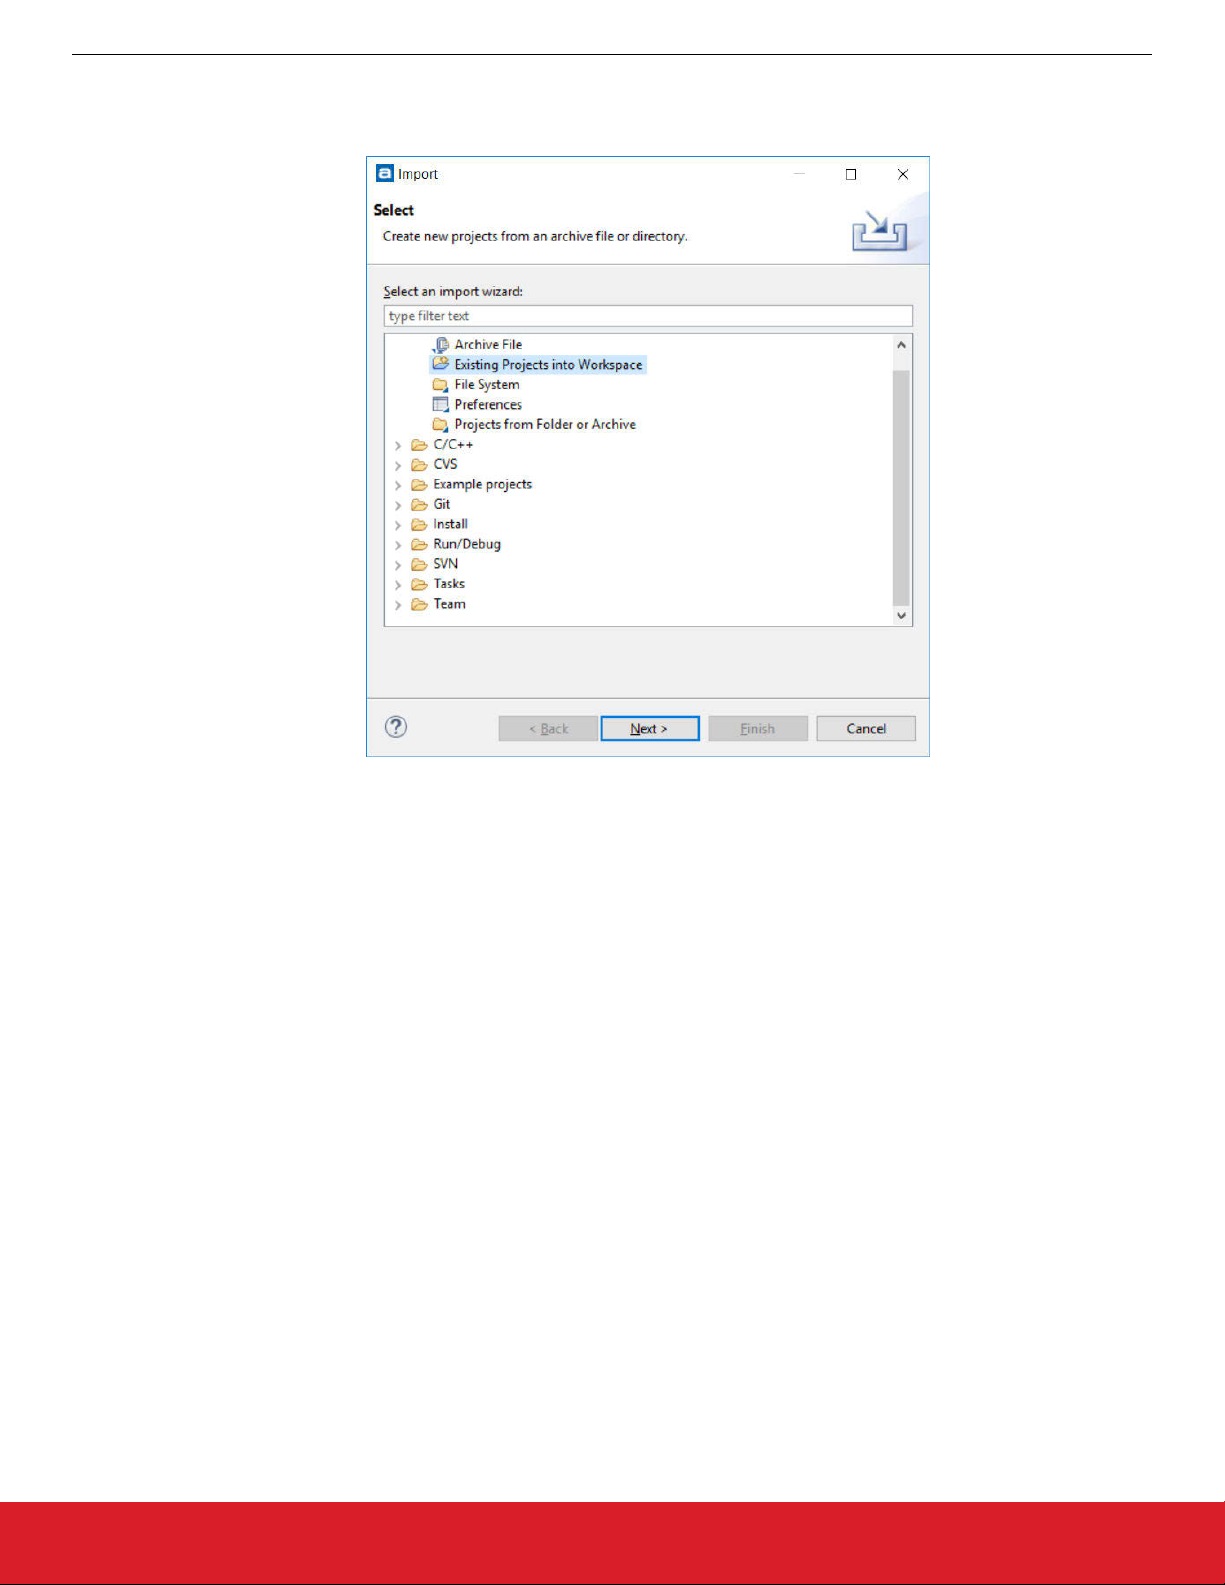
1. Import the project by opening the File menu and choosing “Import…”
QSG166: WF200 Wi-Fi Development Kit Quick Start Guide
. You will see the dialog box below.
Figure 2.4. TrueSTUDIO Import Dialog
silabs.com | Building a more connected world. Rev. 0.4 | 9
Page 10

QSG166: WF200 Wi-Fi Development Kit Quick Start Guide
Getting Started with STM32 MCU, with FreeRTOS, and LwIP
2. Choose “Existing Projects into Workspace” and then select the path \WF200_driver_F429ZI_FreeRTOS-LwIP\TrueSTUDIO
will see the following result:
. You
Figure 2.5. TrueSTUDIO Import Projects Dialog
silabs.com | Building a more connected world. Rev. 0.4 | 10
Page 11

Getting Started with STM32 MCU, with FreeRTOS, and LwIP
3. In the project explorer, you will find "lwip_freertos.h" under Application\User.
QSG166: WF200 Wi-Fi Development Kit Quick Start Guide
Figure 2.6. TrueSTUDIO Project Explorer
4. In “lwip_freertos.h”, change the WLAN_SSID, WLAN_PASSKEY, and WLAN_SECURITY defines to the values of the access point
you want to use.
5.
Open Tera Term and connect to the STLink Virtual COM port of the NUCLEO board. In the “Setup\Serial Port” panel, select
115200 for the speed.
6. Press F11 to build and then run the debugger
7. Once the STM32 has been flashed, and the debugger reaches the beginning of main(), press F8 to run the demo
silabs.com | Building a more connected world. Rev. 0.4 | 11
Page 12

QSG166: WF200 Wi-Fi Development Kit Quick Start Guide
Getting Started with STM32 MCU, with FreeRTOS, and LwIP
2.4 Using the Demo
1. In the terminal window, you should see the text below, where xxx.xxx.xxx.xxx is replaced with the STM32 IP address
WF200 init successful
Connected
IP address: xxx.xxx.xxx.xxx
You can now use the webserver or the Iperf TCP server embedded in the STM32.
2.
3. In a web browser, enter the displayed IP address. You should see the webpage below.
Figure 2.7. Webpage Hosted by the STM32
Note: The webpage can be used to drive the two LEDs onboard the NUCLEO board.
4. The setup
xxx.xxx.xxx.xxx” (xxx.xxx.xxx.xxx being the address displayed by the terminal at boot). You should see a result like the one displayed on the Figure below. The test takes 10 seconds by default.
supports also Iperf TCP test. Use a PC with Iperf installed as a client to start an Iperf test with the command “iperf -c
Figure 2.8. Iperf TCP Test Results
silabs.com | Building a more connected world. Rev. 0.4 | 12
Page 13

3. Additional Information
3.1 Additional Resources
For more information review the following:
• WF200 Wi-Fi Expansion Kit User’s Guide
• WF200 Wi-Fi transceiver IC Data Short
3.2 Customer Support
For customer support:
1. Register on https://www.silabs.com/
2. Go to Community & Support → Technical Support → E-mail Support Request.
QSG166: WF200 Wi-Fi Development Kit Quick Start Guide
Additional Information
silabs.com | Building a more connected world. Rev. 0.4 | 13
Page 14

Smart.
Connected.
Energy-Friendly.
Products
www.silabs.com/products
Quality
www.silabs.com/quality
Support and Community
community.silabs.com
http://www.silabs.com
Silicon Laboratories Inc.
400 West Cesar Chavez
Austin, TX 78701
USA
Disclaimer
Silicon Labs intends to provide customers with the latest, accurate, and in-depth documentation of all peripherals and modules available for system and software implementers using or
intending to use the Silicon Labs products. Characterization data, available modules and peripherals, memory sizes and memory addresses refer to each specific device, and "Typical"
parameters provided can and do vary in different applications. Application examples described herein are for illustrative purposes only. Silicon Labs reserves the right to make changes without
further notice to the product information, specifications, and descriptions herein, and does not give warranties as to the accuracy or completeness of the included information. Without prior
notification, Silicon Labs may update product firmware during the manufacturing process for security or reliability reasons. Such changes will not alter the specifications or the performance
of the product. Silicon Labs shall have no liability for the consequences of use of the information supplied in this document. This document does not imply or expressly grant any license to
design or fabricate any integrated circuits. The products are not designed or authorized to be used within any FDA Class III devices, applications for which FDA premarket approval is required
or Life Support Systems without the specific written consent of Silicon Labs. A "Life Support System" is any product or system intended to support or sustain life and/or health, which, if it fails,
can be reasonably expected to result in significant personal injury or death. Silicon Labs products are not designed or authorized for military applications. Silicon Labs products shall under no
circumstances be used in weapons of mass destruction including (but not limited to) nuclear, biological or chemical weapons, or missiles capable of delivering such weapons. Silicon Labs
disclaims all express and implied warranties and shall not be responsible or liable for any injuries or damages related to use of a Silicon Labs product in such unauthorized applications.
Trademark Information
Silicon Laboratories Inc.® , Silicon Laboratories®, Silicon Labs®, SiLabs® and the Silicon Labs logo®, Bluegiga®, Bluegiga Logo®, Clockbuilder®, CMEMS®, DSPLL®, EFM®, EFM32®,
EFR, Ember®, Energy Micro, Energy Micro logo and combinations thereof, "the world’s most energy friendly microcontrollers", Ember®, EZLink®, EZRadio®, EZRadioPRO®, Gecko®, Gecko
OS, Gecko OS Studio, ISOmodem®, Precision32®, ProSLIC®, Simplicity Studio®, SiPHY®, Telegesis, the Telegesis Logo®, USBXpress® , Zentri, the Zentri logo and Zentri DMS, Z-Wave®,
and others are trademarks or registered trademarks of Silicon Labs. ARM, CORTEX, Cortex-M3 and THUMB are trademarks or registered trademarks of ARM Holdings. Keil is a registered
trademark of ARM Limited. Wi-Fi is a registered trademark of the Wi-Fi Alliance. All other products or brand names mentioned herein are trademarks of their respective holders.
 Loading...