

Page 1

SGI® UV™ 20 System User Guide
007-5900-001
Page 2

COPYRIGHT
© 2013 Silicon Graphics International Corp. All rights reserved; provided portions may be copyright in third parties, as indicated elsewhere herein. No
permission is granted to copy , distribute, or create derivative works from the con tents of this electronic documentation in any manner, in whole or in part,
without the prior written permission of SGI.
LIMITED RIGHTS LEGEND
The software described in this document is “commercial computer software” provided with restricted rights (except as to included open/free source) as specified
in the FA R 52.227-19 and/or the DFAR 227.7202, o r successive sections. Use beyond license prov isions is a violation of worldwide intellectual property laws,
treaties and conventions. This document is provided with limited rights as defined in 52.227-14.
The electronic (software) version of this document was developed at private expense; if acquired under an agreement with the USA government or any
contractor thereto, it is acquired as “commercial computer software” subject to the provisions of its applicable license agreement, as specified in (a) 48 CFR
12.212 of the FAR; or, if acquired for Department of Defense units, (b) 48 CFR 227-7202 of the DoD FAR Supplement; or sections succeeding thereto.
Contractor/manufacturer is SGI, 46600 Landing Parkway, Fremont, CA 94538.
TRADEMARKS AND ATTRIBUTIONS
Silicon Graphics, SGI, and the SGI logo, and SGI UV are trademarks or registered trademarks of Silicon Graphics International Corp. in the United States
and/or other countries worldwide.
InfiniBand is a registered trademark of the InfiniBand Trade Association. Intel and Xeon are trademarks or registered trademarks of Intel Corporation or its
subsidiaries in the United States and other countries. Linux is a registered trademark of Linus Torvalds, used with permission by SGI. MegaRAID and LSI
Logic are trademarks or registered trademarks of LSI Logic Corporation. PCIe and PCI-X are registered trademarks of PCI SIG.
All other trademarks mentioned herein are the property of their respective owners.
Adaptec, HostRAID, and the Adaptec logo are registered trademarks of Adaptec Inc.
Page 3

Record of Revision
Version Description
001 February 2013
Original printing.
007-5900-001 iii
Page 4

Page 5

Contents
Record of Revision . . . . . . . . . . . . . . . . . . . . . . . iii
About This Guide . . . . . . . . . . . . . . . . . . . . . . . xi
1 System Overview . . . . . . . . . . . . . . . . . . . . . . . 1
System Features and Configuration Options . . . . . . . . . . . . . . . . 2
Server Components . . . . . . . . . . . . . . . . . . . . . . . 4
Hard Disk Drive (HDD) Bays and Front Panel . . . . . . . . . . . . . . . . 4
Control Panel . . . . . . . . . . . . . . . . . . . . . . . . 5
Back Panel . . . . . . . . . . . . . . . . . . . . . . . . . 6
I/O Devices . . . . . . . . . . . . . . . . . . . . . . . . . 8
Hard Disk Drives . . . . . . . . . . . . . . . . . . . . . . 9
Slimline Optical Drives. . . . . . . . . . . . . . . . . . . . . 9
Solid-State Drives (SSDs) . . . . . . . . . . . . . . . . . . . . 10
2 System Safety . . . . . . . . . . . . . . . . . . . . . . . . 11
Electrical Safety Precautions . . . . . . . . . . . . . . . . . . . . 11
General Safety Precautions . . . . . . . . . . . . . . . . . . . . . 13
ESD Precautions. . . . . . . . . . . . . . . . . . . . . . . . 14
3 System Operation and Monitoring . . . . . . . . . . . . . . . . . . 15
Front Panel Controls and LEDs . . . . . . . . . . . . . . . . . . . . 16
Hard Disk Drive (HDD) LEDs . . . . . . . . . . . . . . . . . . . . 18
Power Supply LED . . . . . . . . . . . . . . . . . . . . . . . 20
4 Chassis Maintenance . . . . . . . . . . . . . . . . . . . . . . 21
Before You Start. . . . . . . . . . . . . . . . . . . . . . . . 22
Tools and Supplies Needed. . . . . . . . . . . . . . . . . . . . 22
Left-Right and User Position . . . . . . . . . . . . . . . . . . . 22
Removing and Installing the Front Fan Bezel . . . . . . . . . . . . . . . . 23
007-5900-001 v
Page 6

Contents
Removing the Front Fan Bezel . . . . . . . . . . . . . . . . . . . 23
Installing the Front Fan Bezel . . . . . . . . . . . . . . . . . . . 24
Removing the Rack Handles . . . . . . . . . . . . . . . . . . . . . 25
Installing the Rack Handles . . . . . . . . . . . . . . . . . . . . . 26
Removing the System Top Cover . . . . . . . . . . . . . . . . . . . 27
Replacing the System Cover . . . . . . . . . . . . . . . . . . . . . 29
Replacing the Power Supply Modules . . . . . . . . . . . . . . . . . . 30
Removing the Power Supply Modules . . . . . . . . . . . . . . . . . 30
Installing the Power Supply Modules . . . . . . . . . . . . . . . . . 31
Installing Hot-Swap Hard Drives . . . . . . . . . . . . . . . . . . . 32
Replacing a Fan Module . . . . . . . . . . . . . . . . . . . . . . 35
Replacing a Front Fan . . . . . . . . . . . . . . . . . . . . . 36
Replacing a Middle Fan . . . . . . . . . . . . . . . . . . . . . 37
Mounting the Chassis to a Rack . . . . . . . . . . . . . . . . . . . . 39
Removing the Chassis from a Rack . . . . . . . . . . . . . . . . . . . 42
A Power and Environmental Specifications . . . . . . . . . . . . . . . . . 45
Power Rating . . . . . . . . . . . . . . . . . . . . . . . . . 45
Wattage Limitation of the PCI Loading . . . . . . . . . . . . . . . . . . 46
Environmental Specifications . . . . . . . . . . . . . . . . . . . . 46
B Regulatory Compliance Information . . . . . . . . . . . . . . . . . . 49
C Rail Kit Installation. . . . . . . . . . . . . . . . . . . . . . . 51
D BMC Error Codes . . . . . . . . . . . . . . . . . . . . . . . 55
vi 007-5900-001
Page 7

Figures
Figure 1 -1 SGI UV 20 Server . . . . . . . . . . . . . . . 1
Figure 1-2 Overhead View of Server with the Top Cover Removed . . . . . 4
Figure 1 -3 Hard Disk Drive Bays . . . . . . . . . . . . . . 4
Figure 1 -4 Front Control Panel . . . . . . . . . . . . . . . 5
Figure 1 -5 Back Panel . . . . . . . . . . . . . . . . . 6
Figure 1 -6 Front Panel I/O Connections . . . . . . . . . . . . . 8
Figure 1 -7 Back Panel I/O Connections . . . . . . . . . . . . . 8
Figure 2 -1 Installing the Onboard Battery . . . . . . . . . . . . 12
Figure 3 -1 Front Control Panel . . . . . . . . . . . . . . . 15
Figure 3 -2 Control Panel Components . . . . . . . . . . . . . 16
Figure 3 -3 HDD Carrier LEDs . . . . . . . . . . . . . . . 18
Figure 4-1 Removing the Front Fan Bezel . . . . . . . . . . . . 23
Figure 4-2 Installing the Front Fan Bezel . . . . . . . . . . . . 24
Figure 4 -3 Removing a Rack Handle . . . . . . . . . . . . . 25
Figure 4 -4 Installing a Rack Handle . . . . . . . . . . . . . . 26
Figure 4 -5 Removing the System Top Cover . . . . . . . . . . . 28
Figure 4-6 Installing the System Cover . . . . . . . . . . . . . 29
Figure 4 -7 Removing a Power Supply Module . . . . . . . . . . . 30
Figure 4-8 Installing a Power Supply Module . . . . . . . . . . . 31
Figure 4 -9 Removing HDD Carrier . . . . . . . . . . . . . . 32
Figure 4 -10 Removing Drive Blank . . . . . . . . . . . . . . 33
Figure 4 -11 Inserting Drive into Carrier . . . . . . . . . . . . . 33
Figure 4 -12 Inserting HDD Carrier into Chassis . . . . . . . . . . . 34
Figure 4 -13 System Fans . . . . . . . . . . . . . . . . . 35
Figure 4 -14 Replacing a Front Fan . . . . . . . . . . . . . . 36
Figure 4 -15 Removing a Middle Fan . . . . . . . . . . . . . . 37
Figure 4 -16 Inserting a Middle Fan . . . . . . . . . . . . . . 38
Figure 4-17 Removing Inner Member from Slides . . . . . . . . . . 39
007-5900-001 vii
Page 8

Figures
Figure 4 -18 Attaching Slides to the Rack . . . . . . . . . . . . . 40
Figure 4 -19 Installing the Inner Members to the Chassis . . . . . . . . . 41
Figure 4 -20 Installing the Chassis in the Rack. . . . . . . . . . . . 41
Figure 4-21 Extending Slides to Remove the Chassis . . . . . . . . . . 42
Figure 4-22 Removing the Inner Member from the Chassis . . . . . . . . 43
Figure C-1 Attaching Rail Slides to Rack. . . . . . . . . . . . . 51
Figure C-2 Extending Rail Slides . . . . . . . . . . . . . . . 52
Figure C-3 Attaching Chassis to Rail Slides . . . . . . . . . . . . 53
Figure C-4 Rail Slide Release Tab . . . . . . . . . . . . . . 54
viii 007-5900-001
Page 9

Tables
Tables
Table 1-1 Features and Configuration Options . . . . . . . . . . . 2
Table 1-2 Control Panel Buttons and LEDs. . . . . . . . . . . . 5
Table 1-3 Back Panel Components . . . . . . . . . . . . . . 7
Table 1-4 I/O Connections . . . . . . . . . . . . . . . . 9
Table 3-1 Control Panel Components and Functions . . . . . . . . . 16
Table 3-2 HDD Status LED Functions . . . . . . . . . . . . . 19
Table 3-3 HDD Activity LED Functions . . . . . . . . . . . . 19
Table 3-4 Power Supply LED States . . . . . . . . . . . . . 20
Table A-1 Power Rating of the Power Supply . . . . . . . . . . . 45
Table A-2 Wattage Limitation of the PCIe Loading . . . . . . . . . 46
Table A-3 Environmental Specifications . . . . . . . . . . . . 46
Table B-1 Product Regulatory Compliance . . . . . . . . . . . . 49
Table D-1 BMC Beep Codes . . . . . . . . . . . . . . . 55
007-5900-001 ix
Page 10

Page 11

About This Guide
This guide provides an overview of the features and the major components of the SGI®UV™20
server. It also provides system monitoring and maintenance information as well as important
safety and regulatory specifications.
Audience
This guide is written for owners, installers, system administrators, and users of the UV 20 server.
It is written with the assumption that the reader has a good working knowledge of computers and
computer systems.
Chapter Descriptions
The following topics are covered in this guide:
• Chapter 1, “System Overview”
Provides an overview of the server features and components.
• Chapter 2, “System Safety”
Provides system safety information.
• Chapter 3, “System Operation and Monitoring”
Describes control buttons and LEDs on the control panel as well as LEDs on the disk drive
carriers.
• Chapter 4, “Chassis Maintenance”
Describes procedures for replacing system components.
007-5900-001 xi
Page 12

About This Guide
• Appendix A, “Power and Environmental Specifications,”
• Appendix B, “Regulatory Compliance Information,”
• Appendix C, “Rail Kit Installation,”
• Appendix D, “BMC Error Codes,”
Related Publications
The following SGI and LSI documents are relevant to the UV 20 server:
• MegaRAID
• SGI Foundation Software Start Here, publication number 007-5641-xxx
Lists input/output voltage specifications for the power supplies and also environmental
specifications for operating the system.
Summarizes the product regulatory information.
Describes the steps to install the rail kit.
Describes the BMC beep codes associated with failure conditions.
®
SAS Software User’s Guide, publication number, publication number
860-0488-xxx
• SGI Performance Suite Start Here, publication number 007-5680-xxx
• SGI InfiniteStorage series documentation
• Man pages (online)
You can obtain SGI documentation (as well as the pertinent LSI books), release notes, or man
pages in the following ways:
• Refer to the SGI Technical Publications Library at http://docs.sgi.com. Various formats are
available. This library contains the most recent and most comprehensive set of online books,
release notes, man pages, and other information.
• You can also view man pages by typing man <title> on a command line.
xii 007-5900-001
Page 13

Conventions
About This Guide
The following conventions are used throughout this document:
Convention Meaning
Command This fixed-space font denotes literal items such as commands, files,
routines, path names, signals, messages, and programming language
structures.
variable The italic typeface denotes variable entries and words or concepts being
defined. Italic typeface is also used for book titles.
user input This bold fixed-space font denotes literal items that the user enters in
interactive sessions. Output is shown in nonbold, fixed-space font.
[ ] Brackets enclose optional portions of a command or directive line.
... Ellipses indicate that a preceding element can be repeated.
man page(x) Man page section identifiers appear in parentheses after man page names.
GUI element This font denotes the names of graphical user interface (GUI) elements such
as windows, screens, dialog boxes, menus, toolbars, icons, buttons, boxes,
fields, and lists.
Product Support
SGI provides a comprehensive product support and maintenance program for its products. SGI
also offers services to implement and integrate Linux applications in your environment.
• Refer to http://www.sgi.com/support/
• If you are in North America, contact the Technical Assistance Center at
+1 800 800 4SGI or contact your authorized service provider.
• If you are outside North America, contact the SGI subsidiary or authorized distributor in
your country.
007-5900-001 xiii
Page 14

About This Guide
Reader Comments
If you have comments about the technical accuracy, content, or organization of this document,
contact SGI. Be sure to include the title and document number of the manual with your comments.
(Online, the document number is located in the front matter of the manual. In printed manuals, the
document number is located at the bottom of each page.)
You can contact SGI in any of the following ways:
• Send e-mail to the following address: techpubs@sgi.com
• Contact your customer service representative and ask that an incident be filed in the SGI
incident tracking system.
• Send mail to the following address:
SGI
Technical Publications
46600 Landing Parkway
Fremont, CA 94538
SGI values your comments and will respond to them promptly.
xiv 007-5900-001
Page 15
Chapter 1
1. System Overview
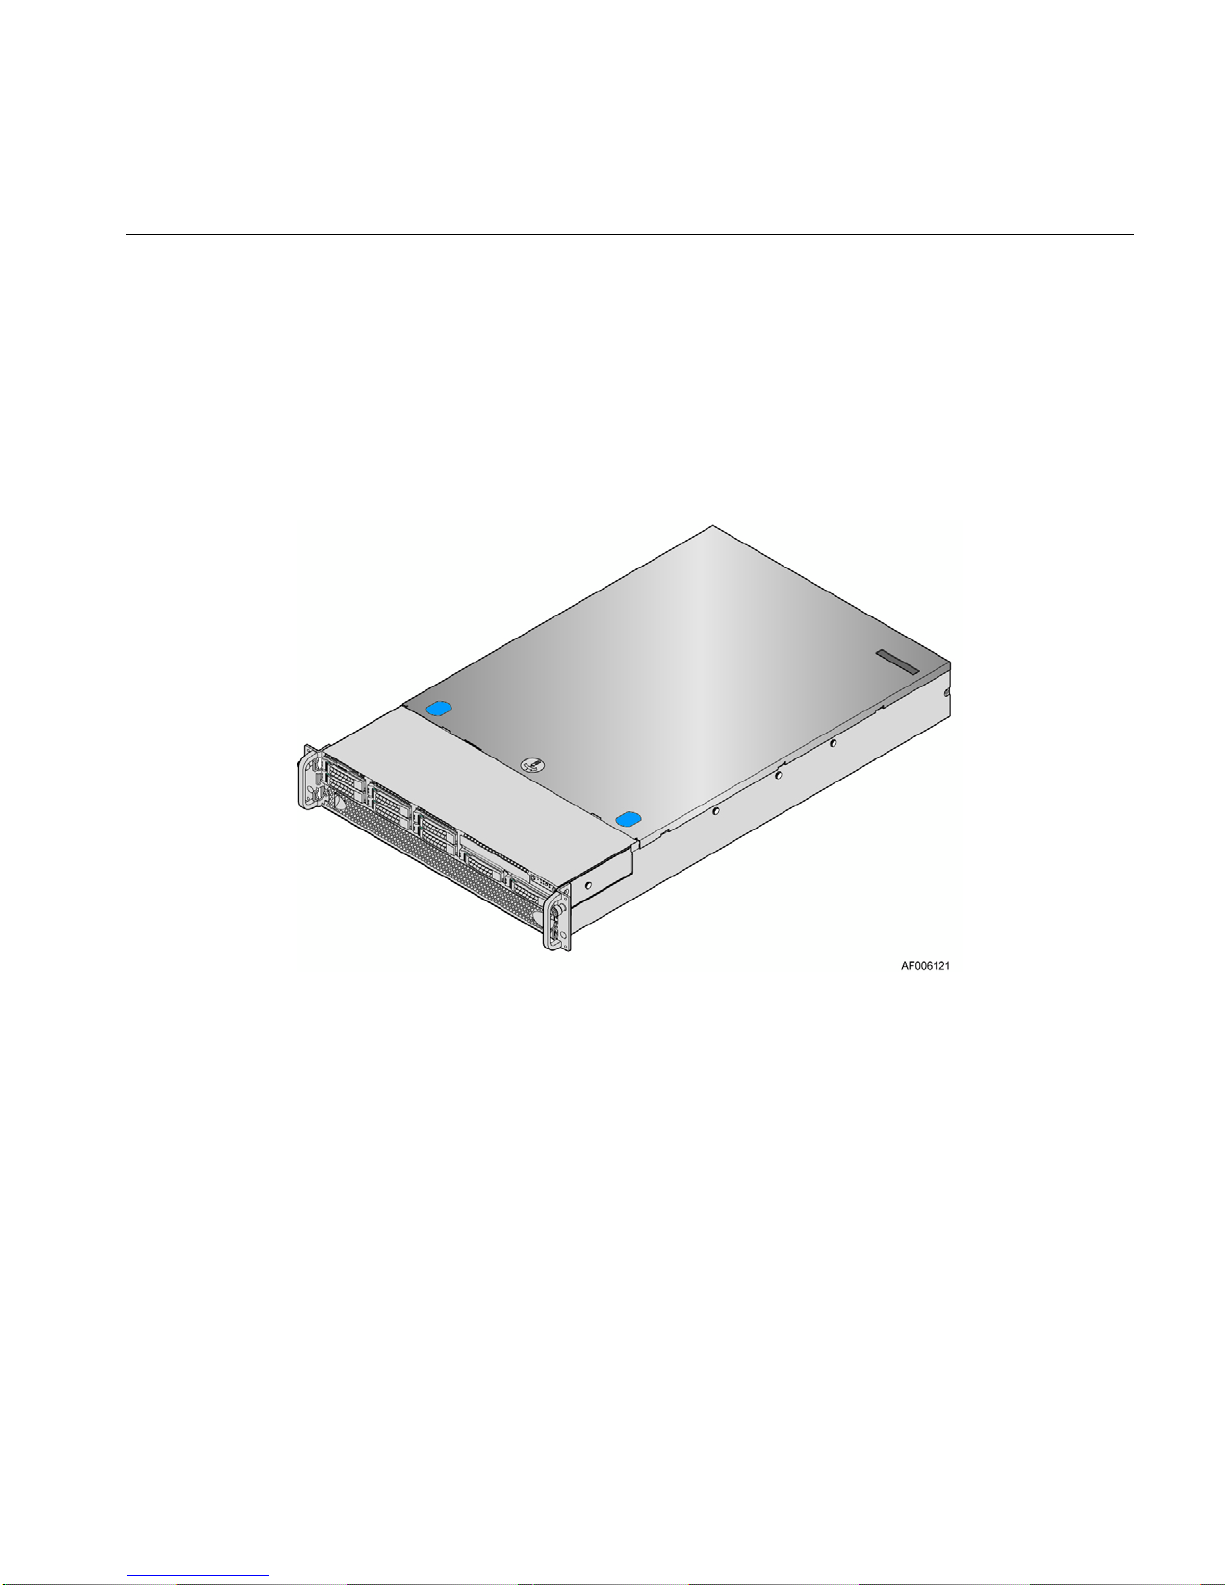
The SGI UV 20 server is a 2U rackmount server (see Figure 1-1). It has two main subsystems: the
2U server chassis and a quad-processor serverboard.
Figure 1-1 SGI UV 20 Server
This chapter describes the main features and configuration options of the server as well as the
components pertinent to monitoring and maintaining your server.
007-5900-001 1
Page 16
1: System Overview
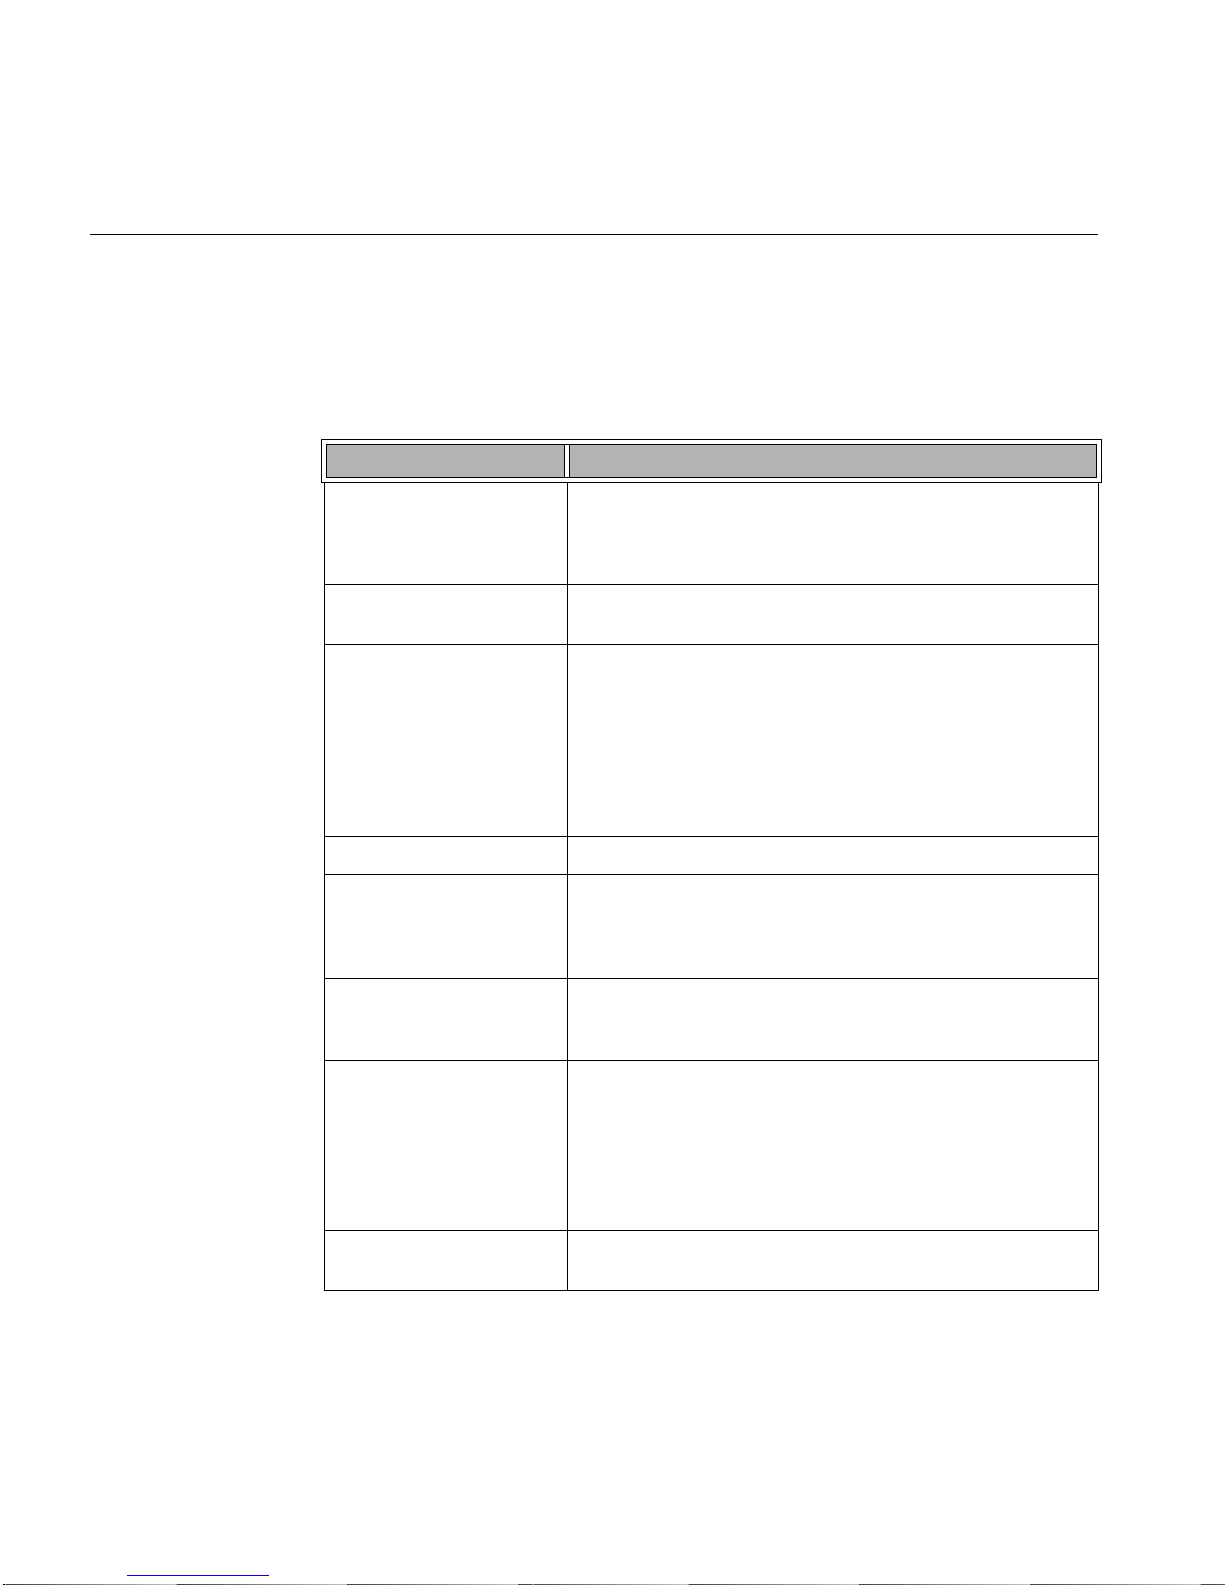
System Features and Configuration Options
Table 1-1 summarizes the features and configuration options of the SGI UV 20 server.
Table 1-1 Features and Configuration Options
Feature Description
Dimensions – Height: 3.43 inches (87.3 mm)
– Width: 17.24 inches (438.0 mm)
– Depth: 28.0 inches (712 mm)
– Weight: approximately 75 pounds (38 kg)
Processor Support Supports up to four Intel
with a Thermal Design Power (TDP) of up to 130 W.
Memory – 48 DIMM slots
– 3 DIMMs per channel
– 4 Memory channels per processor
– Registered DDR3 DIMMs
– Memory DDR3 data transfer rates of 800, 1066, 1333 MT/s and 1600
MT/s
– DDR3 standard I/O voltage of 1.5V (all speed) and DDR3 low voltage
of 1.35V
®
Xeon® processors E5-4600 product family
Chipset Intel C600-A chipset
External I/O Connections – Video (back panel)
– RJ-45 Serial-A port
– 2 RJ-45 network interface connectors supporting 100/1000/10000Mb
– USB 2.0 connectors (4 on back panel)
Internal I/O
Connectors/Headers
A vailable I/O Module Options The following I/O modules utilize a single proprietary on-board
System Fans – 11 dual-rotor -managed system fans
2 007-5900-001
– One Type-A USB 2.0 connector
– One internal USB header
– One DH-10 Serial-B port connector
connector. An installed I/O module can be supported in addition to
standard on-board features and any add-in expansion cards.
– Quad-Port 1 GbE module based on Intel I350 Ethernet controller
– Dual-Port 10GBase-T module based on Intel I350 Ethernet controller
– Dual-SFP+ port 10GbE module based on Intel 82500 10GbE controller
– Single-Port FDR-speed InfiniBand module with QSFP connector
– 1 internal power supply fan for each installed power supply unit
Page 17
System Features and Configuration Options
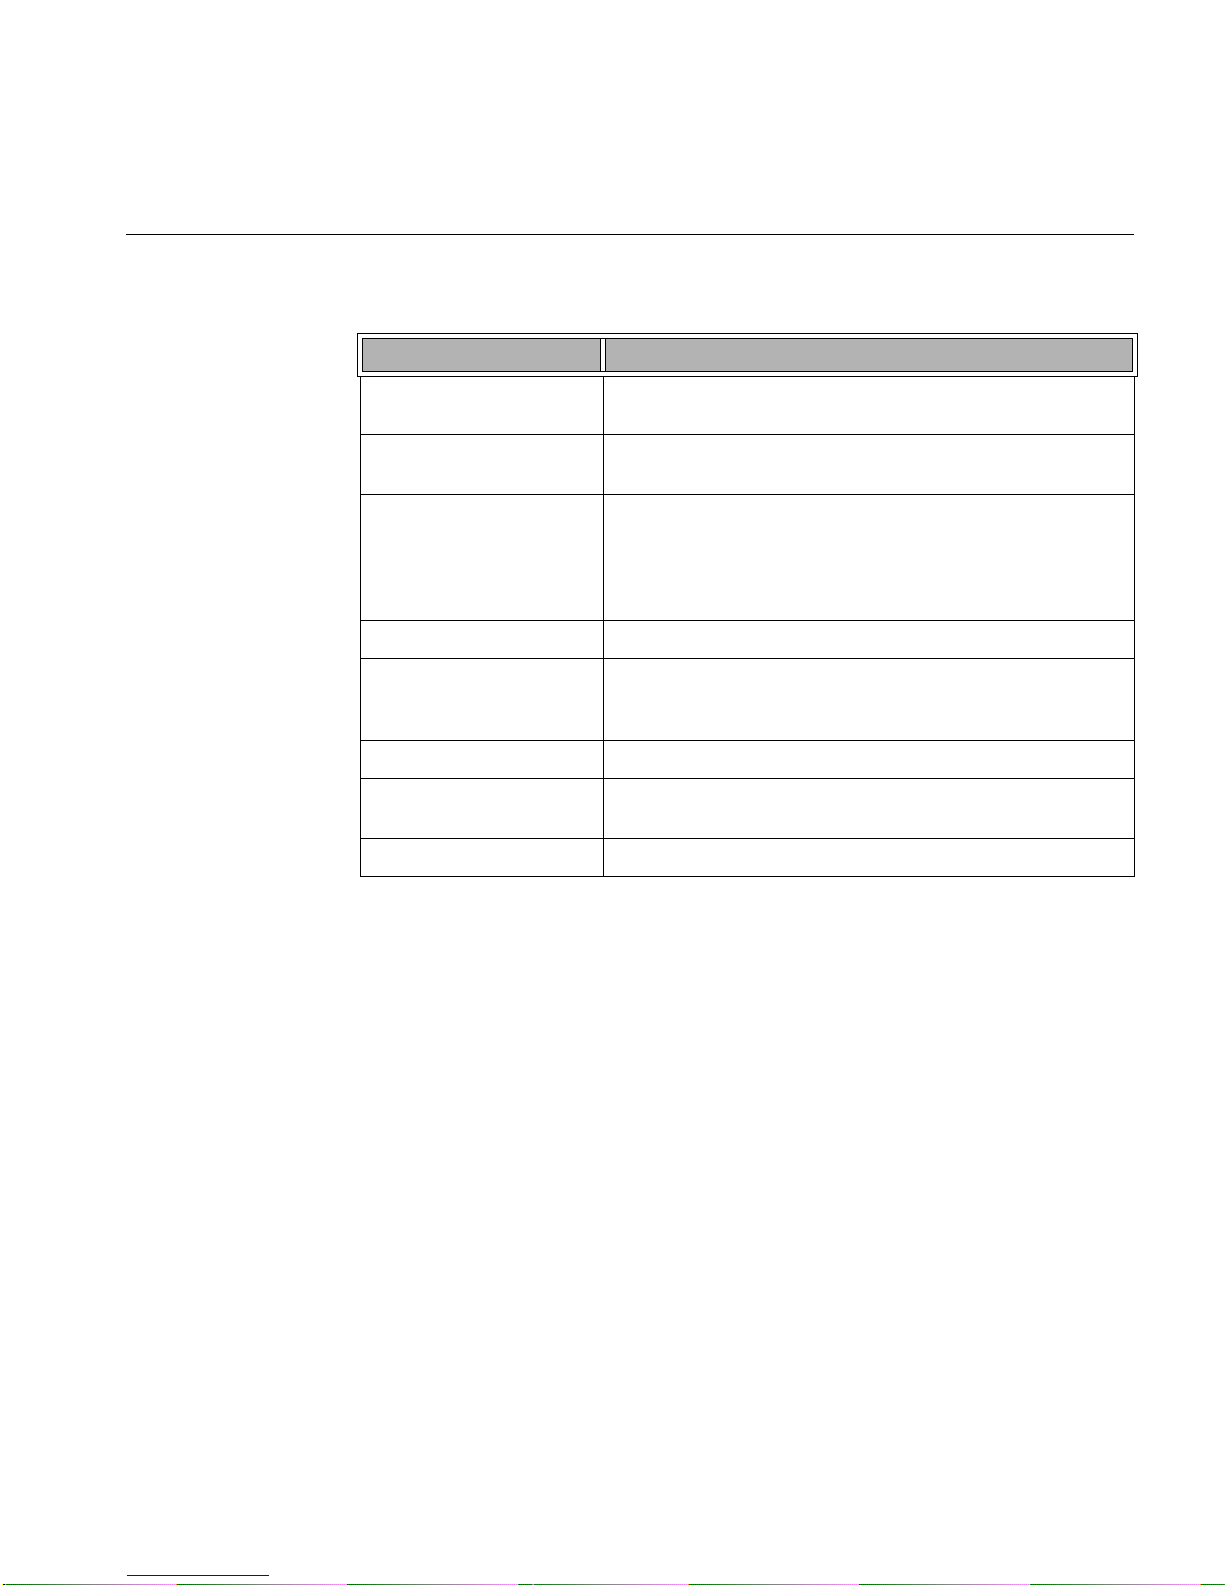
Table 1-1 Features and Configuration Options (continued)
Feature Description
Riser Cards Support for two riser card slots. Each riser card slot supports three PCIe
Gen 3 x16 slots.
Video – Integrated 2D video controller
– 16 MB DDR3 memory
On-board Storage Controllers
and Options
– One low-profile eUSB 2x5 pin connector to support low-profile
eUSB solid state devices
– Two single-port SATA connectors capable of supporting up to
6 GB/sec
– Two 4-port mini-SAS connectors supporting up to 3 GB/s SAS/SAT A
Server Management Integrated Baseboard Management Controller (IPMI 2.0 compliant)
Power Supply Options Two power supplies with the following options:
– 1600W (1+1), redundant, hot-swap capable
– 1600W (1+0 or 2+ 0), not redundant
Storage Bay Options 8 x 2.5” SATA/SAS hot-swap HDD bays
Solid-State Drive (SSD)
Up to two 2.5” internal SSDs are supported.
Support
Rack Mount Kit Options Basic slide rail kit, bundled with system package
007-5900-001 3
Page 18
1: System Overview
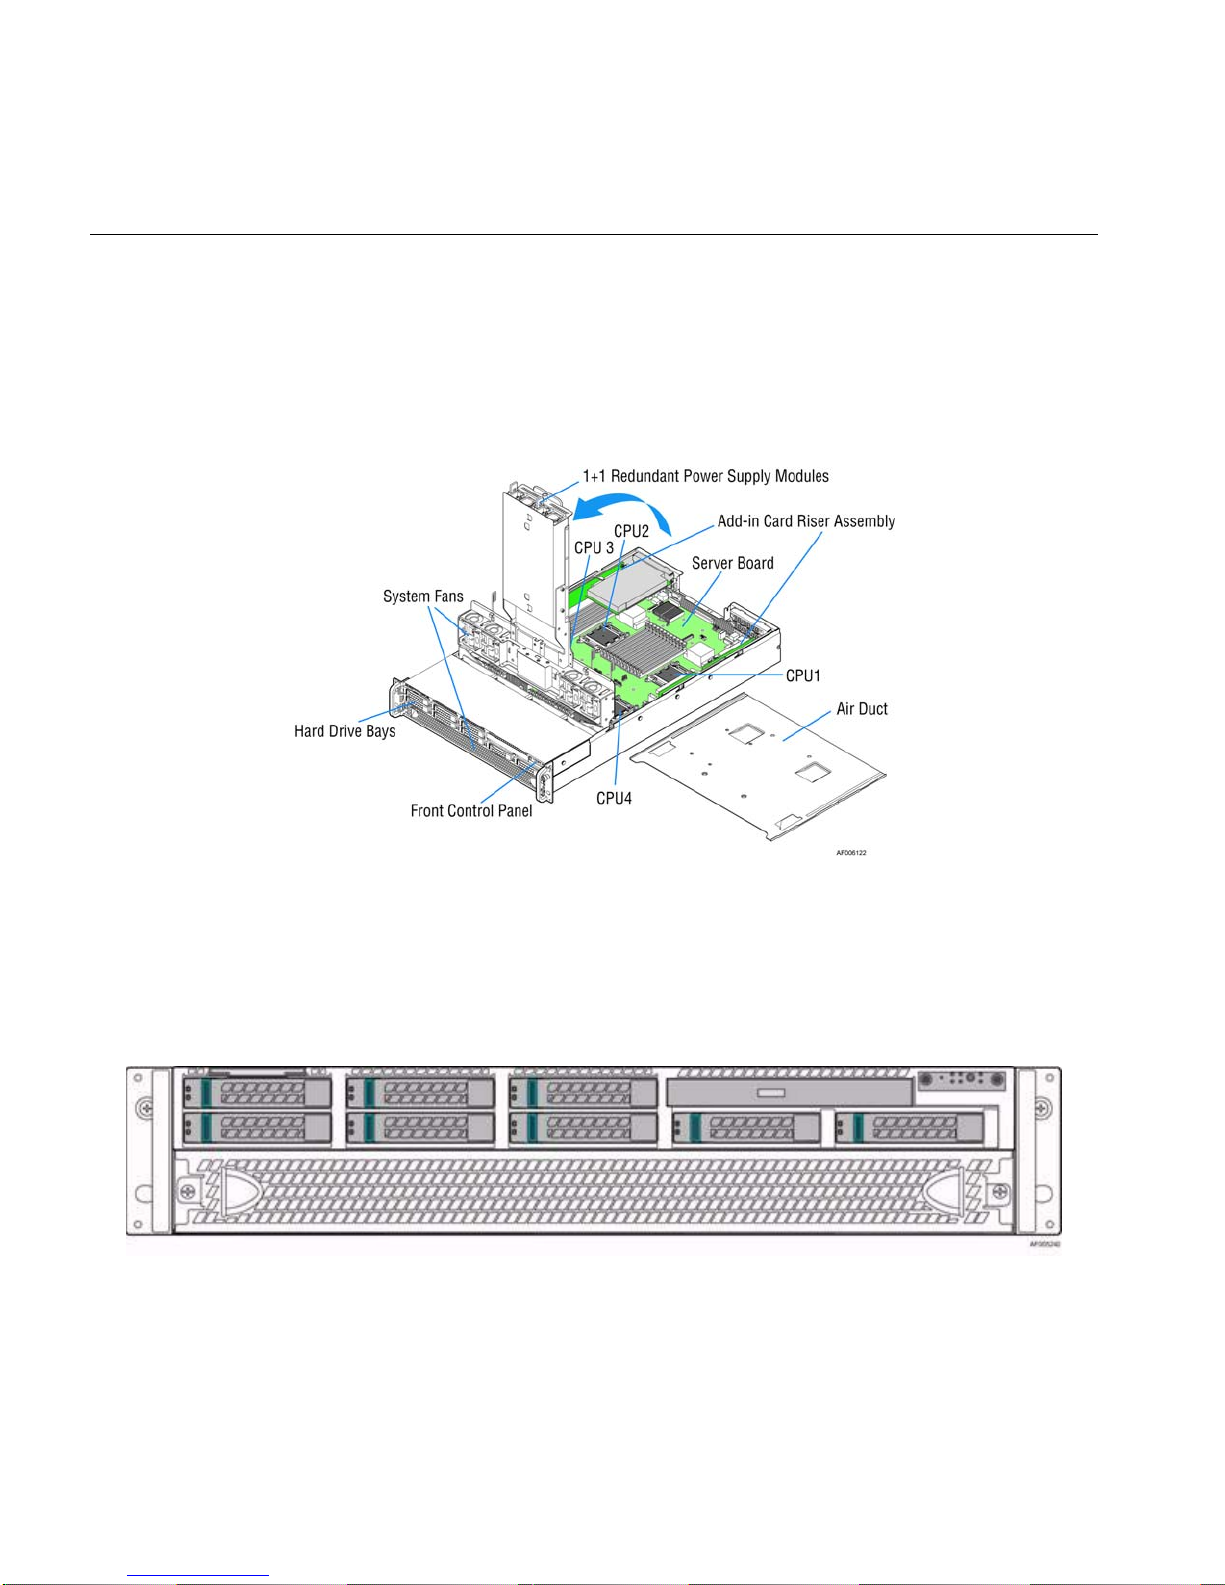
Server Components
This section describes the server components pertinent to monitoring and maintaining your server.
There are also quick reference labels inside of the chassis cover to assist you in identifying
components. Figure 1-2 provides an overhead view of the server with the top cover removed.
Figure 1-2 Overhead View of Server with the Top Cover Removed
Hard Disk Drive (HDD) Bays and Front Panel
The UV 20 server supports the 8 x 2.5”configuration of hard disk drives. Figure 1-3 shows the
8-bay configuration.
Figure 1-3 Hard Disk Drive Bays
4 007-5900-001
Page 19

Control Panel
Control Panel
As shown in Figure 1-3, the control panel is in the top right portion of the front panel. Figure 1-4
shows the control buttons and LEDs on the control panel.
Figure 1-4 Front Control Panel
T able 1-2 identifies the components. For a description of the function of these buttons and LEDs,
see Chapter 3, “System Operation and Monitoring.”
Table 1-2 Control Panel Buttons and LEDs
Label Description Label Description
A System ID Button with integrated LED F System Status LED
B NMI Button (recessed, tool required for
use)
C NIC-1 Activity LED H Hard Drive Activity LED
D Not used I Not used
E System Cold Reset Button J NIC-2 Activity LED
007-5900-001 5
G Power Button with integrated LED
Page 20

1: System Overview
Back Panel
Figure 1-5 shows the components on the back panel of the server.
Figure 1-5 Back Panel
6 007-5900-001
Page 21
Back Panel
Table 1-3 identifies the components shown in Figure 1-5.
Table 1-3 Back Panel Components
Label Description Label Description
A USB ports H I/O module ports/connectors (optional)
B USB ports I Add-in adapter slots from riser card
C I/O module ports/connectors (optional) J RMM4 NIC port (optional)
D Video connector K Power supply module #2
E NIC-1 L Power supply module #1
F NIC-2 M Add-in adapter slots from riser card
G RJ-45 Serial-A port
007-5900-001 7
Page 22

1: System Overview
I/O Devices
The UV 20 server supports a variety of I/O devices such as hard drives, DVD drives, and SSDs.
The connections for I/O devices are located on the front or back panel of the server, as shown in
Figure 1-6 and Figure 1-7.
Figure 1-6 Front Panel I/O Connections
Figure 1-7 Back Panel I/O Connections
8 007-5900-001
Page 23

Hard Disk Drives
I/O Devices
Table 1-4 identifies the various I/O connections shown in Figure 1-6 and Figure 1-7.
Table 1-4 I/O Connections
Label Description
A Slimline optical drive bay
B Hard disk drive bays
C USB ports
D USB ports
E Video port
The UV 20 server supports a maximum of 8 x 2.5” hard drives. For instructions on installing hard
drives, “Installing Hot-Swap Hard Drives” on page 32.
Notes:
• SAS drives are only supported when proper Intel RAID C600 Upgrade Key or Intel
Integrated RAID Module is installed.
• Drives can consume up to 17 watts of power each. Drives must be specified to run at a
maximum ambient temperature of 45ºC.
Slimline Optical Drives
The slimline optical drive carrier can be used with a single slimline optical drive. One slim line
carrier is included with your server system. The optical drive must be purchased separately.
The drive in the optical drive carrier is NOT hot-swappable. The system power must be turned off
to insert or remove the slimline optical drive carrier.
007-5900-001 9
Page 24

1: System Overview
Solid-State Drives (SSDs)
The SSDs are mounted under a shelf behind the power supplies. The following items describe the
UV 20 SSD support:
• Up to two internal 2.5” SSDs are supported.
• Two types of SSDs are supported:
• Each SSD requires one of the single-port, 6GB/s SATA ports. So does a DVD. If you have a
• The SSDs are not hot-swappable.
– 160 GB, 3 GB/s SATA, MLC flash memory
– 300 GB, 3 GB/s SATA, MLC flash memory
DVD configured, the server then supports only one SSD.
10 007-5900-001
Page 25

Chapter 2
2. System Safety
This chapter describes basic safety precautions.
Electrical Safety Precautions
Basic electrical safety precautions should be followed to protect yourself from harm and the
SGI UV 20 system from damage, as follows:
• Be aware of the locations of the power on/off switch on the chassis as well as the room's
emergency power-off switch, disconnection switch or electrical outlet. If an electrical accident
occurs, you can then quickly remove power from the system.
• Do not work alone when working with high voltage components.
• Power should always be disconnected from the system when removing or installing main system
components, such as the serverboard, memory modules and disk drives. When disconnecting
power, you should first power down the operating system first and then unplug the power cords.
The unit has more than one power supply cord. Disconnect two power supply cords before
servicing to avoid electrical shock .
• When working around exposed electrical circuits, another person who is familiar with the
power-off controls should be nearby to switch off the power if necessary.
• Use only one hand when working with powered-on electrical equipment. This is to avoid making
a complete circuit, which will cause electrical shock. Use extreme caution when using metal tools,
which can easily damage any electrical components or circuit boards they come into contact with.
• Do not use mats designed to decrease static electrical discharge as protection from electrical
shock. Instead, use rubber mats that have been specifically designed as electrical insulators.
• The power supply power cords must include a grounding plug and must be plugged into
grounded electrical outlets.
007-5900-001 11
Page 26

2: System Safety
• Serverboard Battery
Caution: There is a danger of explosion if the onboard battery is installed upside down,
!
which will reverse its polarites (see Figure 2-1). This battery must be replaced only with the
same or an equivalent type recommended by the manufacturer. Dispose of used batteries
according to the manufacturer's instructions.
• Mainboard replaceable soldered-in fuses: Self-resetting PTC (Positive T emperature Coef ficient)
fuses on the mainboard must be replaced by trained service technicians only. The new fuse must
be the same or equivalent as the one replaced. Contact technical support for details and support.
Lithium battery
Battery holder
Figure 2-1 Installing the Onboard Battery
12 007-5900-001
Page 27

General Safety Precautions
Follow these rules to ensure general safety:
• Keep the area around the SGI UV 20 system clean and free of clutter.
• The SGI UV 20 system might approach 75 lbs (38 kg) when fully loaded. When lifting the
system, two people at either end should lift slowly with their feet spread out to distribute the
weight. Always keep your back straight and lift with your legs.
• Place the chassis top cover and any system components that have been removed away from
the system or on a table so that they won't accidentally be stepped on.
• While working on the system, do not wear loose clothing such as neckties and unbuttoned
shirt sleeves, which can come into contact with electrical circuits or be pulled into a cooling
fan.
• Remove any jewelry or metal objects from your body, which are excellent metal conductors
that can create short circuits and harm you if they come into contact with printed circuit
boards or areas where power is present.
• After accessing the inside of the system, close the system back up and secure it to the rack
unit with the retention screws after ensuring that all connections have been made.
General Safety Precautions
007-5900-001 13
Page 28

2: System Safety
ESD Precautions
!
Caution: Electrostatic discharge (ESD) is generated by two objects with different electrical
charges coming into contact with each other. An electrical discharge is created to neutralize this
difference, which can damage electronic com ponents and printed circuit boards.
The following measures are generally sufficient to neutralize this difference before contact is
made to protect your equipment from ESD:
• Use a grounded wrist strap designed to prevent static discharge.
• Keep all components and printed circuit boards (PCBs) in their antistatic bags until ready for
use.
• Touch a grounded metal object before removing the board from the antistatic bag.
• Do not let components or PCBs come into contact with your clothing, which may retain a
charge even if you are wearing a wrist strap.
• Handle a board by its edges only; do not touch its components, peripheral chips, memory
modules or contacts.
• When handling chips or modules, avoid touching their pins.
• Put the serverboard and peripherals back into their antistatic bags when not in use.
• For grounding purposes, make sure your computer chassis provides excellent conductivity
between the power supply, the case, the mounting fasteners and the serverboard.
14 007-5900-001
Page 29

Chapter 3
3. System Operation and Monitoring
Figure 3-1 shows the control panel at the top right of the front panel. There are several LEDs on
the control panel as well as others on the hard drive carriers and power supplies. The LEDs keep
you constantly informed of the overall status of the system as well as the activity and health of
specific components. There are also control buttons on the control panel. This chapter describes
the buttons and LEDs.
Figure 3-1 Front Control Panel
007-5900-001 15
Page 30

3: System Operation and Monitoring
Front Panel Controls and LEDs
The control panel contains control buttons and status LEDs. Figure 3-2 shows the components of
a control panel.
Figure 3-2 Control Panel Components
Table 3-1 describes the control panel components and their functions.
Table 3-1 Control Panel Components and Functions
Label Button/LED Color Condition Function
A System ID
Button with LED
B NMI Button Used for diagnostics.
Network
C,J
D Not used.
E System Cold
16 007-5900-001
Link/Activity
LEDs
Reset Button
Blue On Highlights targeted system. Can be activated by the
button or software.
On No access to LAN link.
Green
Blink LAN activity.
Off No link.
When pressed, this button reboots and re-intializes
the system.
Page 31

Front Panel Controls and LEDs
Table 3-1 Control Panel Components and Functions (continued)
Label Button/LED Color Condition Function
On System ready/No alarm.
Blink System ready, but degraded:
Green
– Redundancy lost such as the power supply or fan
failure.
– Non-critical temp/voltage threshold.
– Battery failure.
– Predictive power supply failure.
F
System Status
LED
On Critical Alarm: critical power modu les fai lure,
critical fans failure, voltage (power supply), critical
temperature and voltage
Blink Non-Critical Alarm: Redundant fan failure,
Amber
redundant power module failure, non-critical
temperature and voltage
Off – Power off: System unplugged.
– Power on: System powered off and in standby , no
prior degraded\non-critical\critical state.
On Power On/ACPI S0 state
G
System Power
Button with LED
Green
Blink Sleep/ACPI S1 state
Off Power Off/ACPI S5 state
H Hard Drive
Activity LED
When lit, indicates drive activity from the on-board
HDD controllers.
I Not used.
007-5900-001 17
Page 32
3: System Operation and Monitoring
Notes:
• Blink rate is ~1 Hz at 50% duty cycle.
• It is also off when the system is powered off (S5) or in a sleep state (S1).
• The power LED sleep indication is maintained on standby by the chipset. If the system is
powered down without going through the BIOS, the LED state in effect at the time of power
off is restored when the system is powered on until the BIOS clear it.
• If the system is not powered down normally, it is possible the Power LED will blink at the
same time the system status LED is off due to a failure or configuration change that prevents
the BIOS from running.
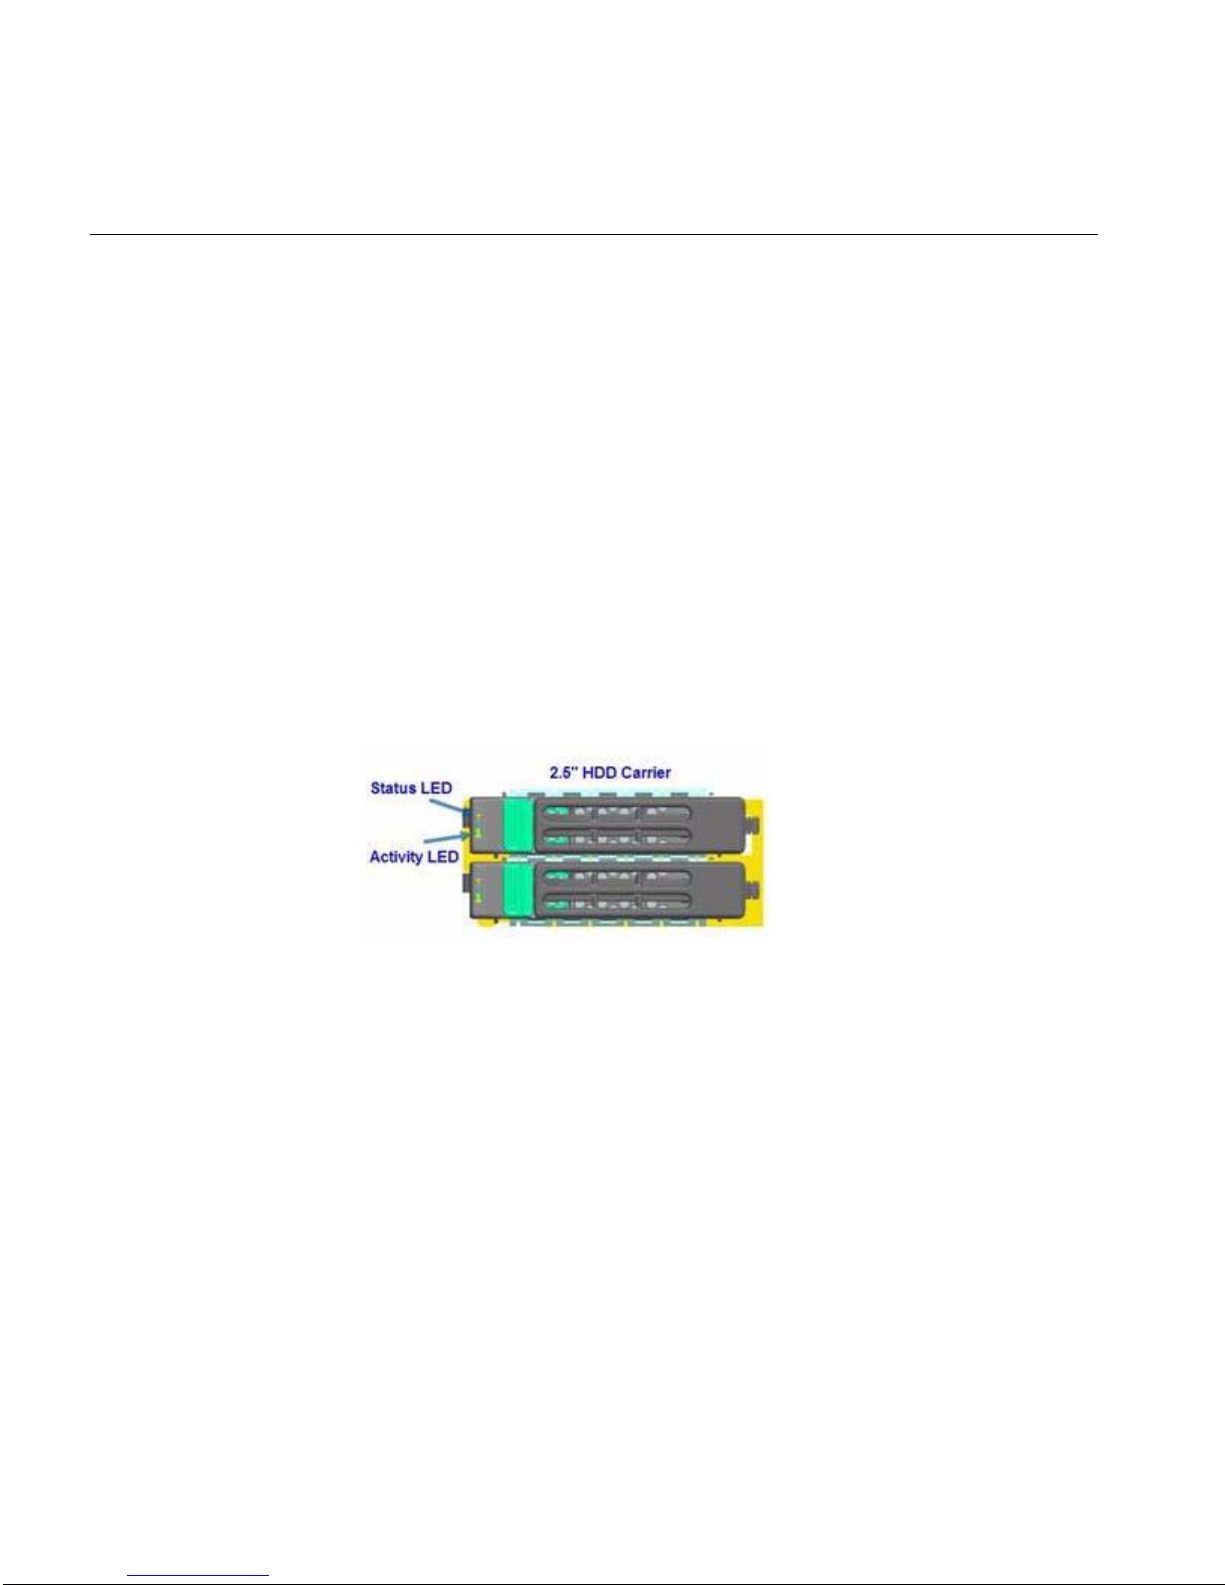
Hard Disk Drive (HDD) LEDs
Figure 3-3 shows the location of the LEDs for HDD carriers.
Figure 3-3 HDD Carrier LEDs
18 007-5900-001
Page 33

Table 3-2 describes the functions of the Status LED.
Table 3-2 HDD Status LED Functions
LED
LED Color
Behavior Drive Status
Off No access and no fault.
Hard Disk Drive (HDD) LEDs
Amber
Solid On Hard drive fault has occurred.
Blink – RAID rebuild in progress (1Hz).
– Identify (2Hz).
Table 3-3 describes the functions of the Activity LED.
Table 3-3 HDD Activity LED Functions
LED
Color Drive Condition
Power on with no drive activity.
Power on with drive activity.
Green
Power on and drive spun down.
Power on and drive spinning up.
Drive
Type LED Behavior
SAS LED stays on.
SATA LED stays off.
SAS LED blinks off when
SATA LED blinks off when
SAS LED stays off.
SATA LED stays off.
SAS LED blinks.
SATA LED stays off.
processing a command.
processing a command.
007-5900-001 19
Page 34

3: System Operation and Monitoring
Power Supply LED
There is a single bi-color LED (green/amber) to indicate the power supply status. Table 3-4
describes the different states of the LED.
Table 3-4 Power Supply LED States
LED State Power Supply (PS) State
Off No AC power to any PS.
Green Output on and Ok.
Green, 1Hz blink AC present (only 12VSB on). PS off or PS in cold redundant state.
Green, 2Hz blink PS firmware updating.
Amber – PS critical event causing a shutdown/failure (OCP, OVP , fan failure)
– AC cord unplugged or AC power lost. A second power supply in
parallel still has AC input power.
Amber, 1Hz blink PS warning events where the power supply continues to operate (high
temperature, high power, high current, slow fan).
20 007-5900-001
Page 35

Chapter 4
4. Chassis Maintenance
For warranty and safety considerations, SGI designates the following chassis components as
customer-replaceable units (CRUs):
• Power supplies
•Fans
• Disk drives
These components are all hot-swappable; that is, you can replace them without powering down
the server. A trained service technician should install and replace all other components.
This chapter describes the following chassis maintenance activities:
• “Removing and Installing the Front Fan Bezel” on page 23
• “Removing the Rack Handles” on page 25
• “Installing the Rack Handles” on page 26
• “Removing the System Top Cover” on page 27
• “Replacing the System Cover” on page 29
• “Replacing the Power Supply Modules” on page 30
• “Installing Hot-Swap Hard Drives” on page 32
• “Replacing a Fan Module” on page 35
• “Mounting the Chassis to a Rack” on page 39
• “Removing the Chassis from a Rack” on page 42
007-5900-001 21
Page 36

4: Chassis Maintenance
Before You Start
!
servicing this chassis. These include the items described in Chapter 2, “System Safety.”
Tools and Supplies Needed
Warning: Review the warnings and pr ecautions listed in this manual befor e setting up or
• Phillips (cross head) screwdriver (#1 bit and #2 bit)
• Needle-nosed pliers
• Anti-static wrist strap and conductive foam pad (recommended)
Left-Right and User Position
All references to left, right, front, top, and bottom assume you are facing the front of the chassis
as it would be positioned for normal operation.
22 007-5900-001
Page 37

Removing and Installing the Front Fan Bezel
As shown in Figure 4-1, 7 of the 11 system fans are located at the front of the chassis and are
covered by a bezel.
Removing the Front Fan Bezel
Follow these steps to remove the front fan bezel:
1. Loosen the two screws on left and right ends.
See A in Figure 4-1.
2. Remove the front fan bezel from the chassis.
See B in Figure 4-1.
Removing and Installing the Front Fan Bezel
Figure 4-1 Removing the Front Fan Bezel
007-5900-001 23
Page 38

4: Chassis Maintenance
Installing the Front Fan Bezel
Follow these steps to install the front fan bezel:
1. Slide in the bezel.
See A in Figure 4-2.
2. Secure the bezel to the chassis with the two screws on left and right ends.
See B in Figure 4-2.
Figure 4-2 Installing the Front Fan Bezel
24 007-5900-001
Page 39
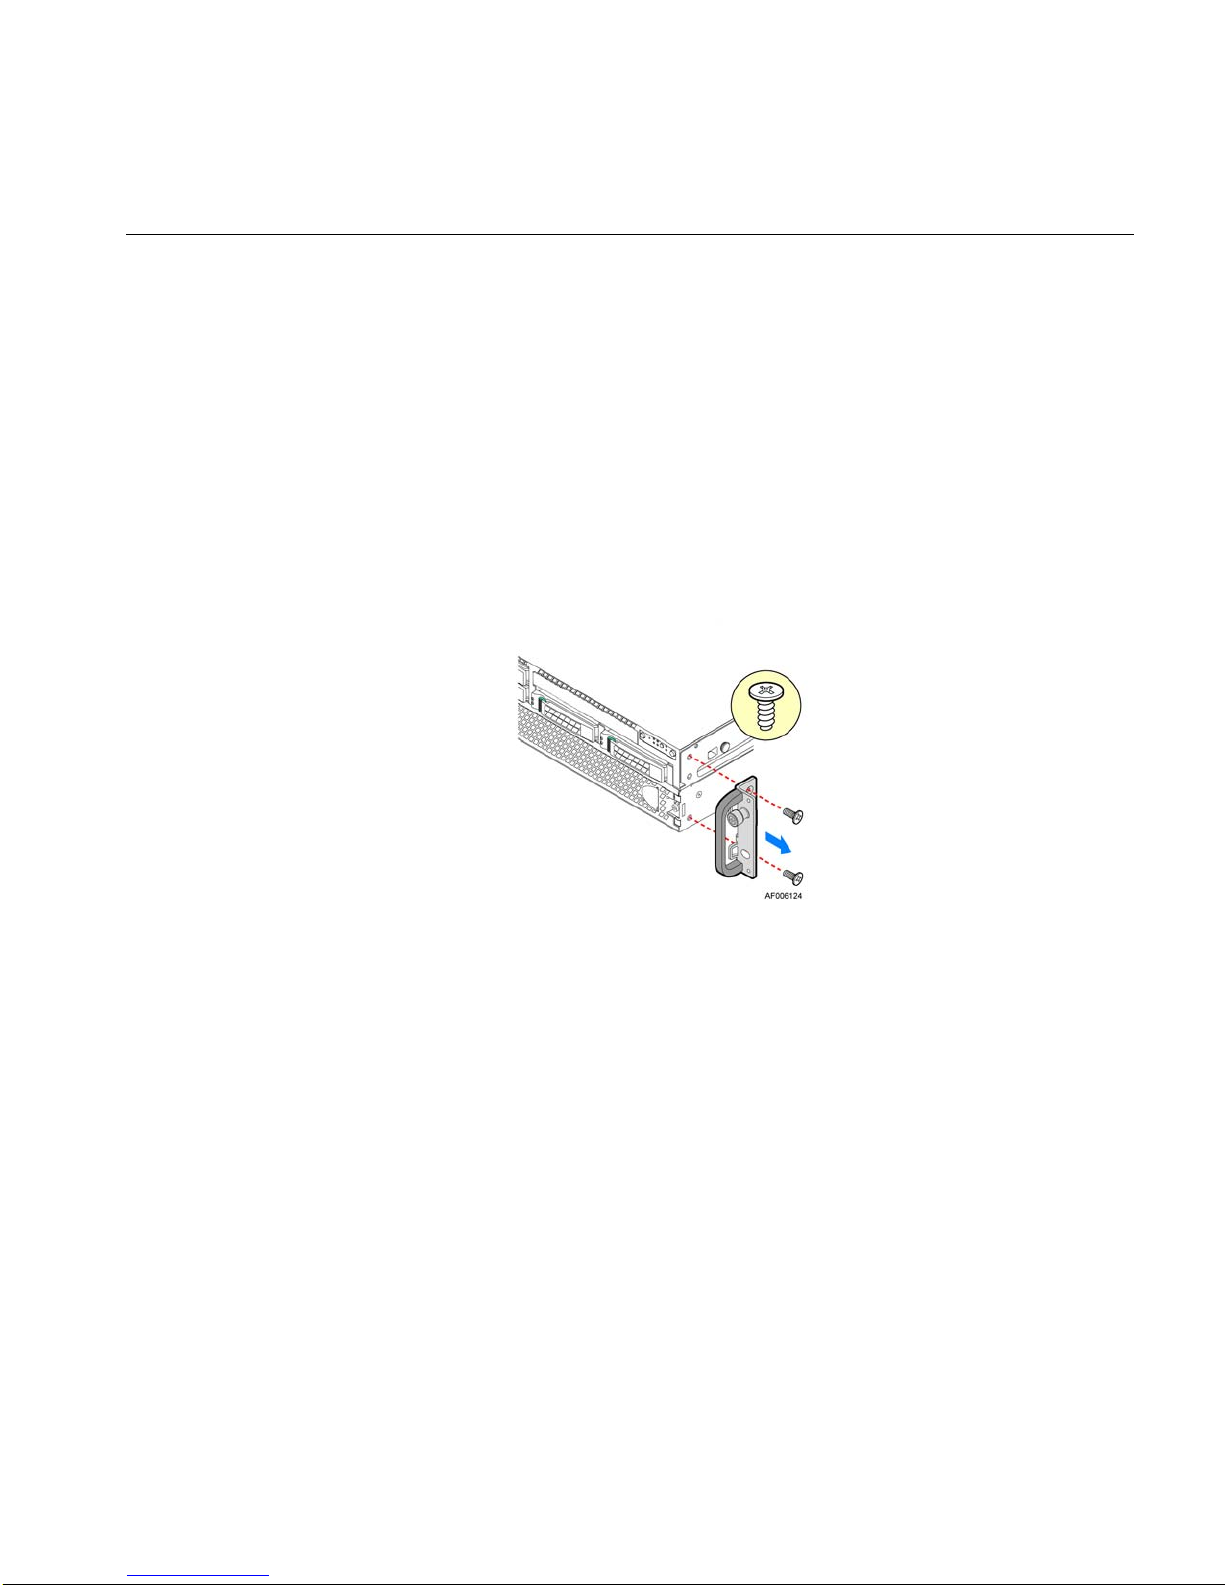
Removing the Rack Handles
To remove a rack handle, do the following:
1. Remove the two screws holding the rack handle in place.
See Figure 4-3.
2. Remove the rack handle from the chassis.
See Figure 4-3.
Removing the Rack Handles
Figure 4-3 Removing a Rack Handle
007-5900-001 25
Page 40

4: Chassis Maintenance
Installing the Rack Handles
To install a rack handle, do the following:
1. Align the rack handle with the two holes on the side of the chassis.
See Figure 4-4.
2. Attach the rack handle to the chassis with two screws.
See Figure 4-4.
Figure 4-4 Installing a Rack Handle
26 007-5900-001
Page 41

Removing the System Top Cover
The server system must be operated with the system cover in place to ensure proper cooling. You
will need to remove the top cover to add or replace components inside of the server. Before
removing the top cover, power down the server and unplug all peripheral devices and the power
cable(s).
Note: A non-skid surface or a stop behind the server system may be needed to prevent the server
system from sliding on your work surface.
To remove the system cover, use the following steps:
1. Observe the safety and ESD precautions in Chapter 2, “System Safety.”.
2. Turn off all peripheral devices connected to the server.
3. Turn off the server.
4. Disconnect the power cord.
Removing the System Top Cover
007-5900-001 27
Page 42

4: Chassis Maintenance
5. Remove the screws.
See A in Figure 4-5.
6. Depress the latches.
See B in Figure 4-5.
7. Slide the cover back and lift upward.
Figure 4-5 Removing the System Top Cover
28 007-5900-001
Page 43
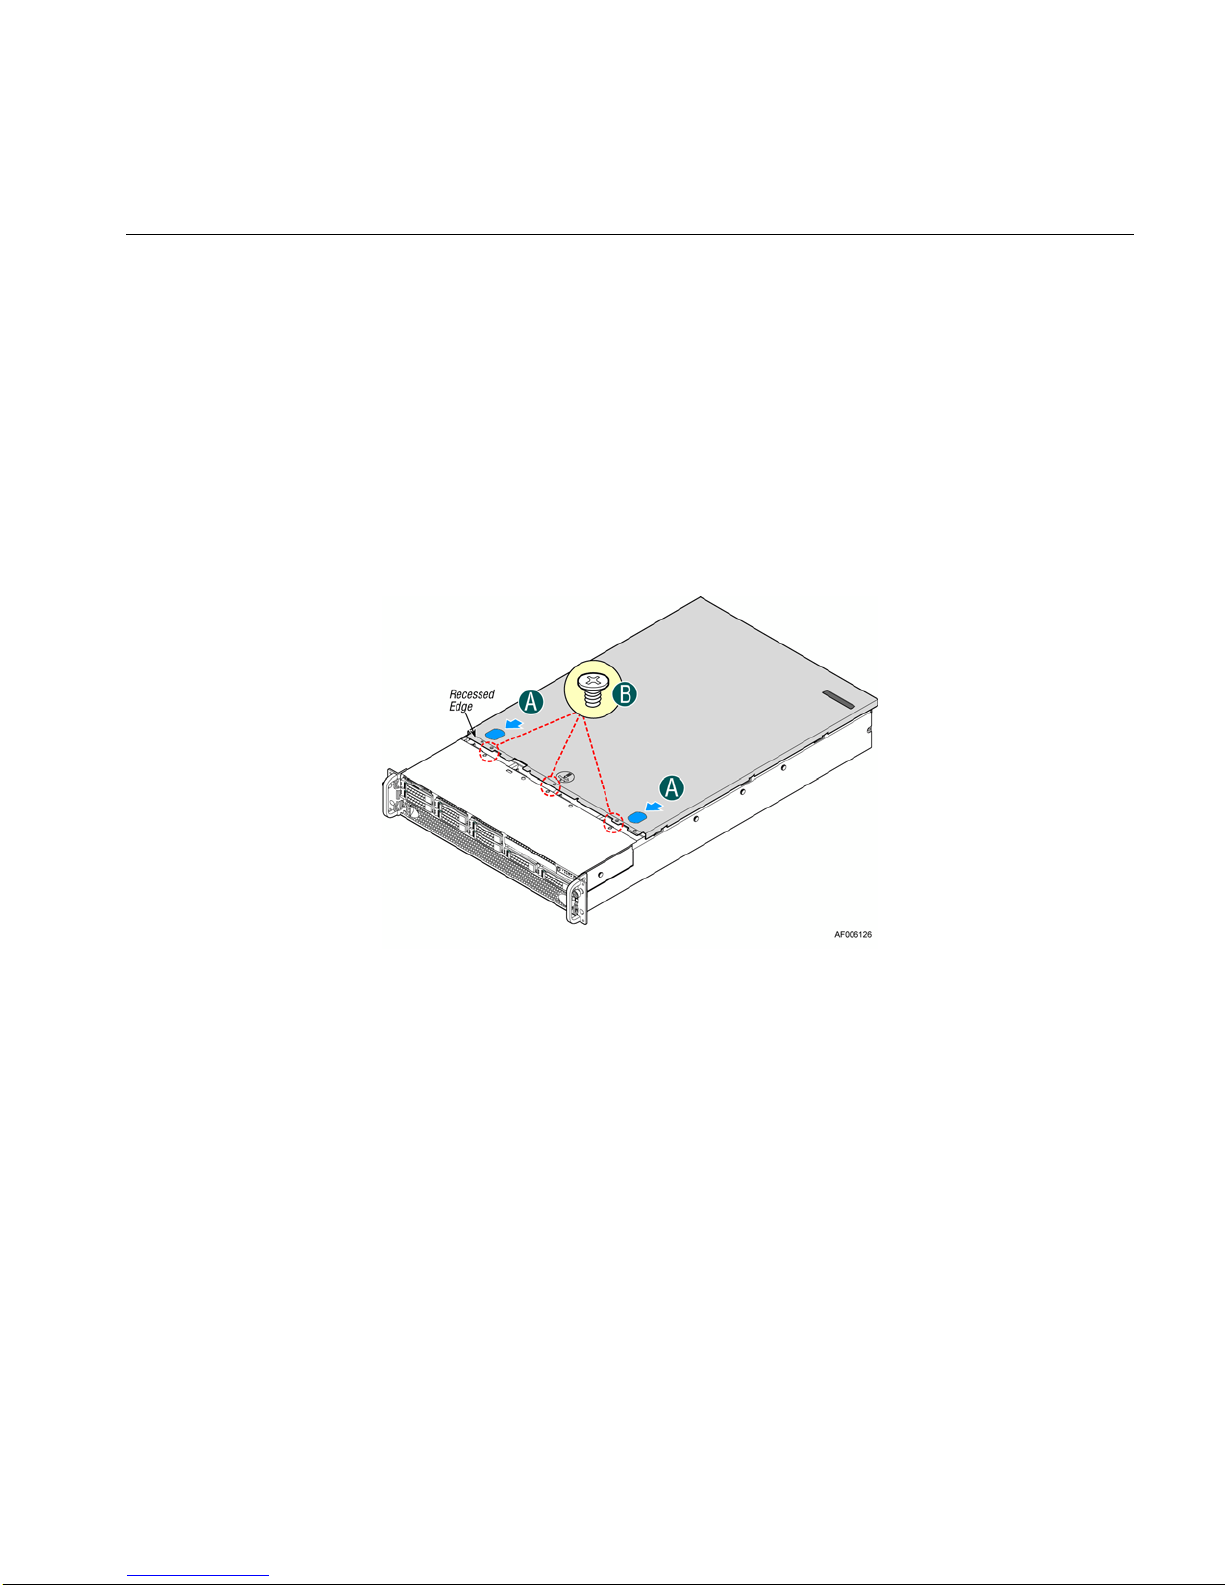
Replacing the System Cover
To replace the system cover, use the following steps:
1. Place the system cover onto the chassis and slide the cover forward to engage the recessed
edge at the front of the cover.
See A in Figure 4-6.
2. Tighten the screw at the front.
See B in Figure 4-6.
Replacing the System Cover
Figure 4-6 Installing the System Cover
007-5900-001 29
Page 44

4: Chassis Maintenance
Replacing the Power Supply Modules
The system is equipped with two power supply modules for redundancy. They are hot-swappable.
Note: A server configured with multiple GPGPU cards may not be configured with redundant
power supplies. In this case, the power supplies are not hot-swappable.
Removing the Power Supply Modules
To remove the power supply modules, use the following steps:
1. As shown in Figure 4-7, push the green latch in the direction shown while pulling the
module out of the chassis by the handle.
2. Repeat step 1 to remove the second power supply module.
Figure 4-7 Removing a Power Supply Module
30 007-5900-001
Page 45

Installing the Power Supply Modules
To install the power supply modules, use the following steps:
1. Align and slide the module into the power supply cage as shown in Figure 4-8.
2. Push the module along the rail until the latch locks in position with a click.
3. Repeat steps 1 and 2 to install the second module.
Replacing the Power Supply Modules
Figure 4-8 Installing a Power Supply Module
007-5900-001 31
Page 46

4: Chassis Maintenance
Installing Hot-Swap Hard Drives
Caution: To maintain proper system cooling, use drive carriers with plastic drive blanks to
populate drive days that would be otherwise empty.
To install a HDD into the chassis, use the following steps.
1. Remove the drive carrier by pressing the green latch to unlock it.
See A in Figure 4-9.
2. Pull out the black lever and slide the carrier out.
See B in Figure 4-9.
Figure 4-9 Removing HDD Carrier
32 007-5900-001
Page 47

Installing Hot-Swap Hard Drives
3. Remove the four screws securing the plastic drive blank from the HDD carrier.
See C in Figure 4-10.
4. Remove the plastic drive blank from the HDD carrier.
See D in Figure 4-10.
Figure 4-10 Removing Drive Blank
5. Install the hard disk drive using the four screws and ensure the connector end of the drive
matches the backplane connector.
See E in Figure 4-11.
Figure 4-11 Inserting Drive into Carrier
007-5900-001 33
Page 48
4: Chassis Maintenance
6. W ith the lever open, insert the hard disk drive assembly into the chassis and push in the lever
to lock it into place.
See F in Figure 4-12.
Figure 4-12 Inserting HDD Carrier into Chassis
34 007-5900-001
Page 49

Replacing a Fan Module
As shown in Figure 4-13, seven of the system fans are located at the front of the chassis (front
fans). The other four fans are in the middle of the chassis (middle fans).
Replacing a Fan Module
Figure 4-13 System Fans
007-5900-001 35
Page 50
4: Chassis Maintenance
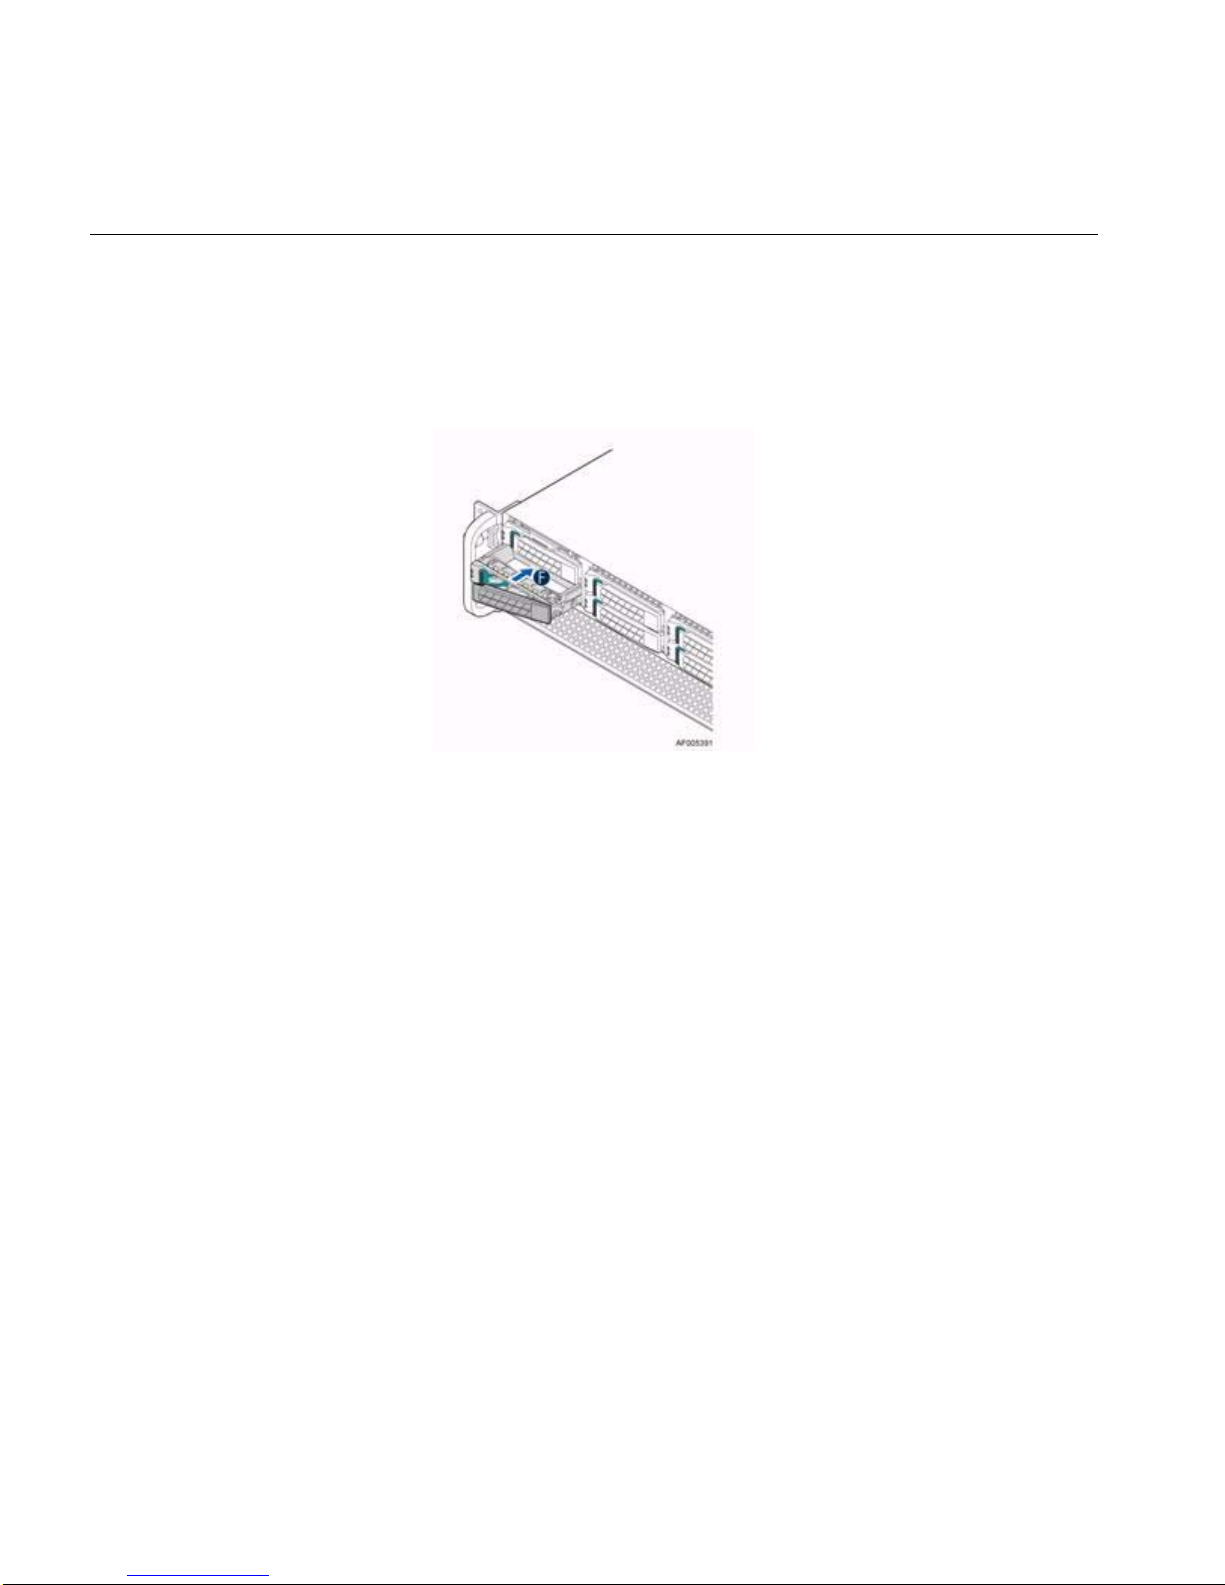
Replacing a Front Fan
To replace a front fan, do the following:
1. Remove the front fan bezel.
See section “Removing and Installing the Front Fan Bezel” on page 23.
2. Pull the system fan straight out to remove it from the fan slot.
See Figure 4-14.
3. Replace the system fan by guiding it into the slot and firmly pressing in to ensure that it is
properly seated.
Figure 4-14 Replacing a Front Fan
36 007-5900-001
Page 51

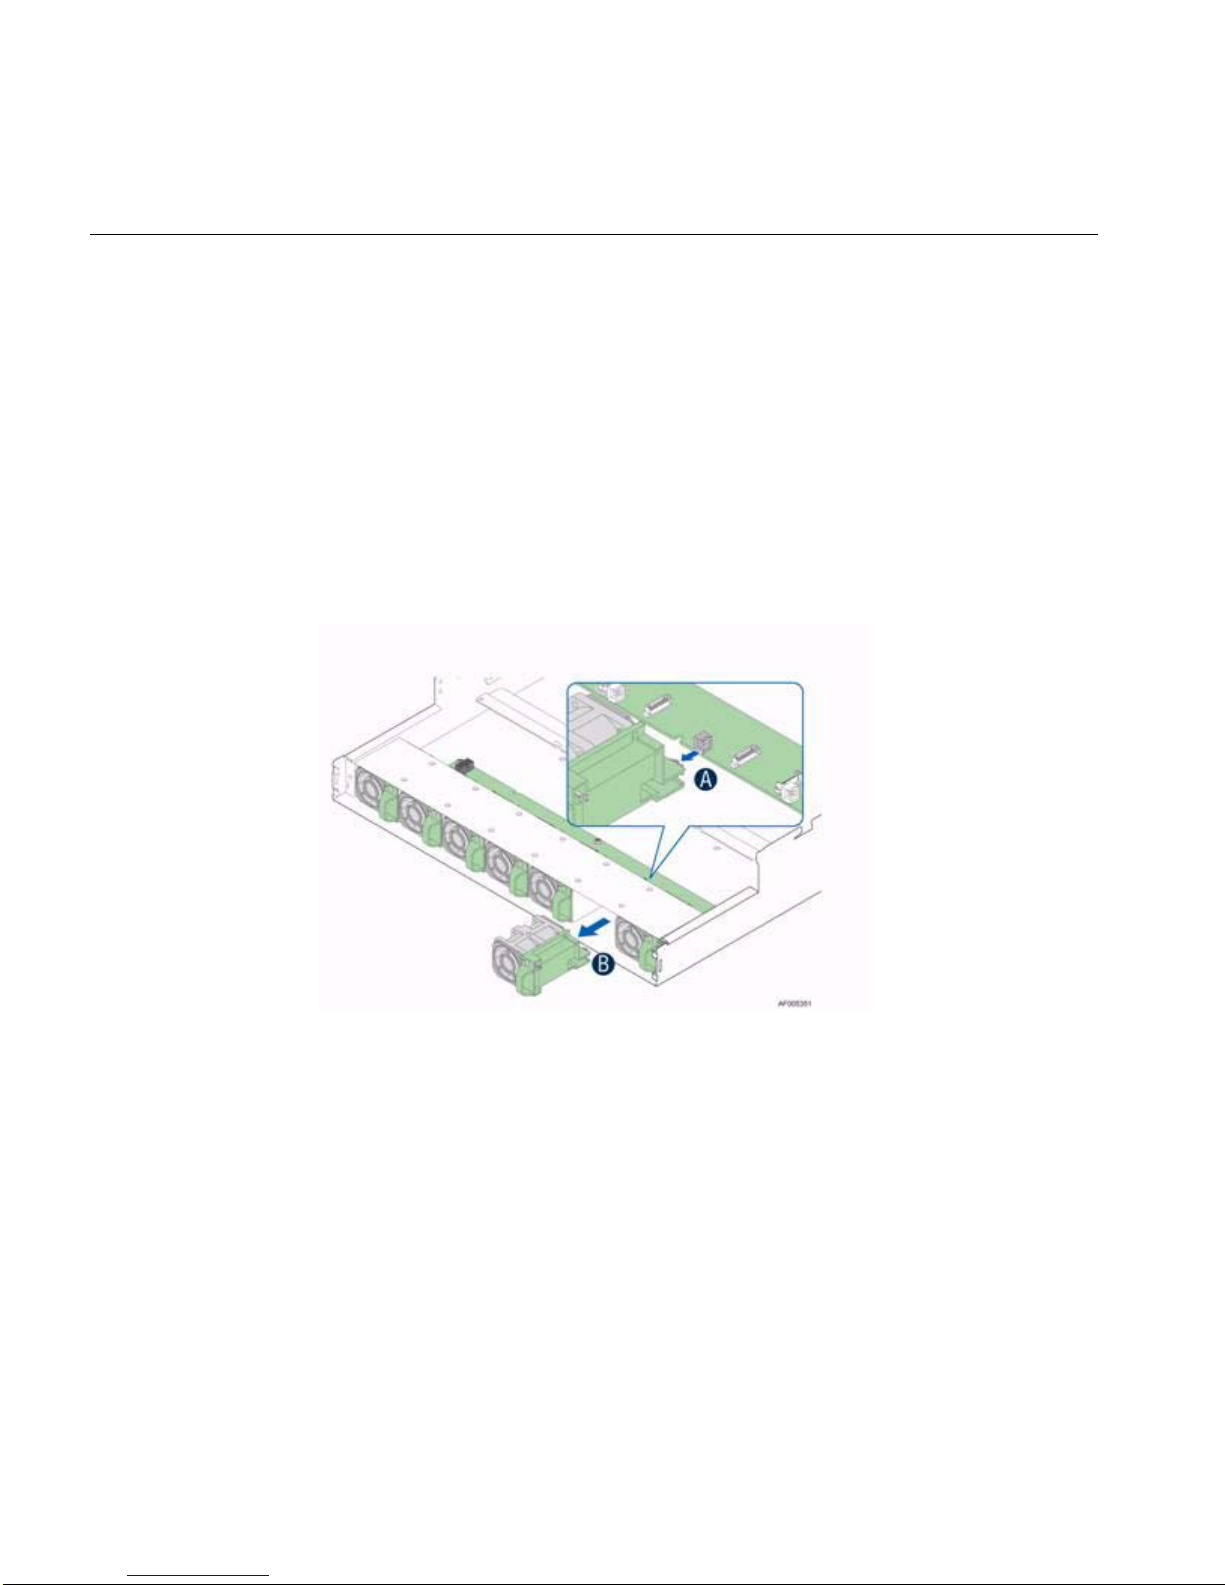
Replacing a Middle Fan
To replace a middle fan, do the following:
1. Remove the system cover.
2. Pull the system fan straight up to remove it from the fan slot.
Replacing a Fan Module
See section “Removing the System Top Cover” on page 27.
See Figure 4-15.
Figure 4-15 Removing a Middle Fan
007-5900-001 37
Page 52
4: Chassis Maintenance
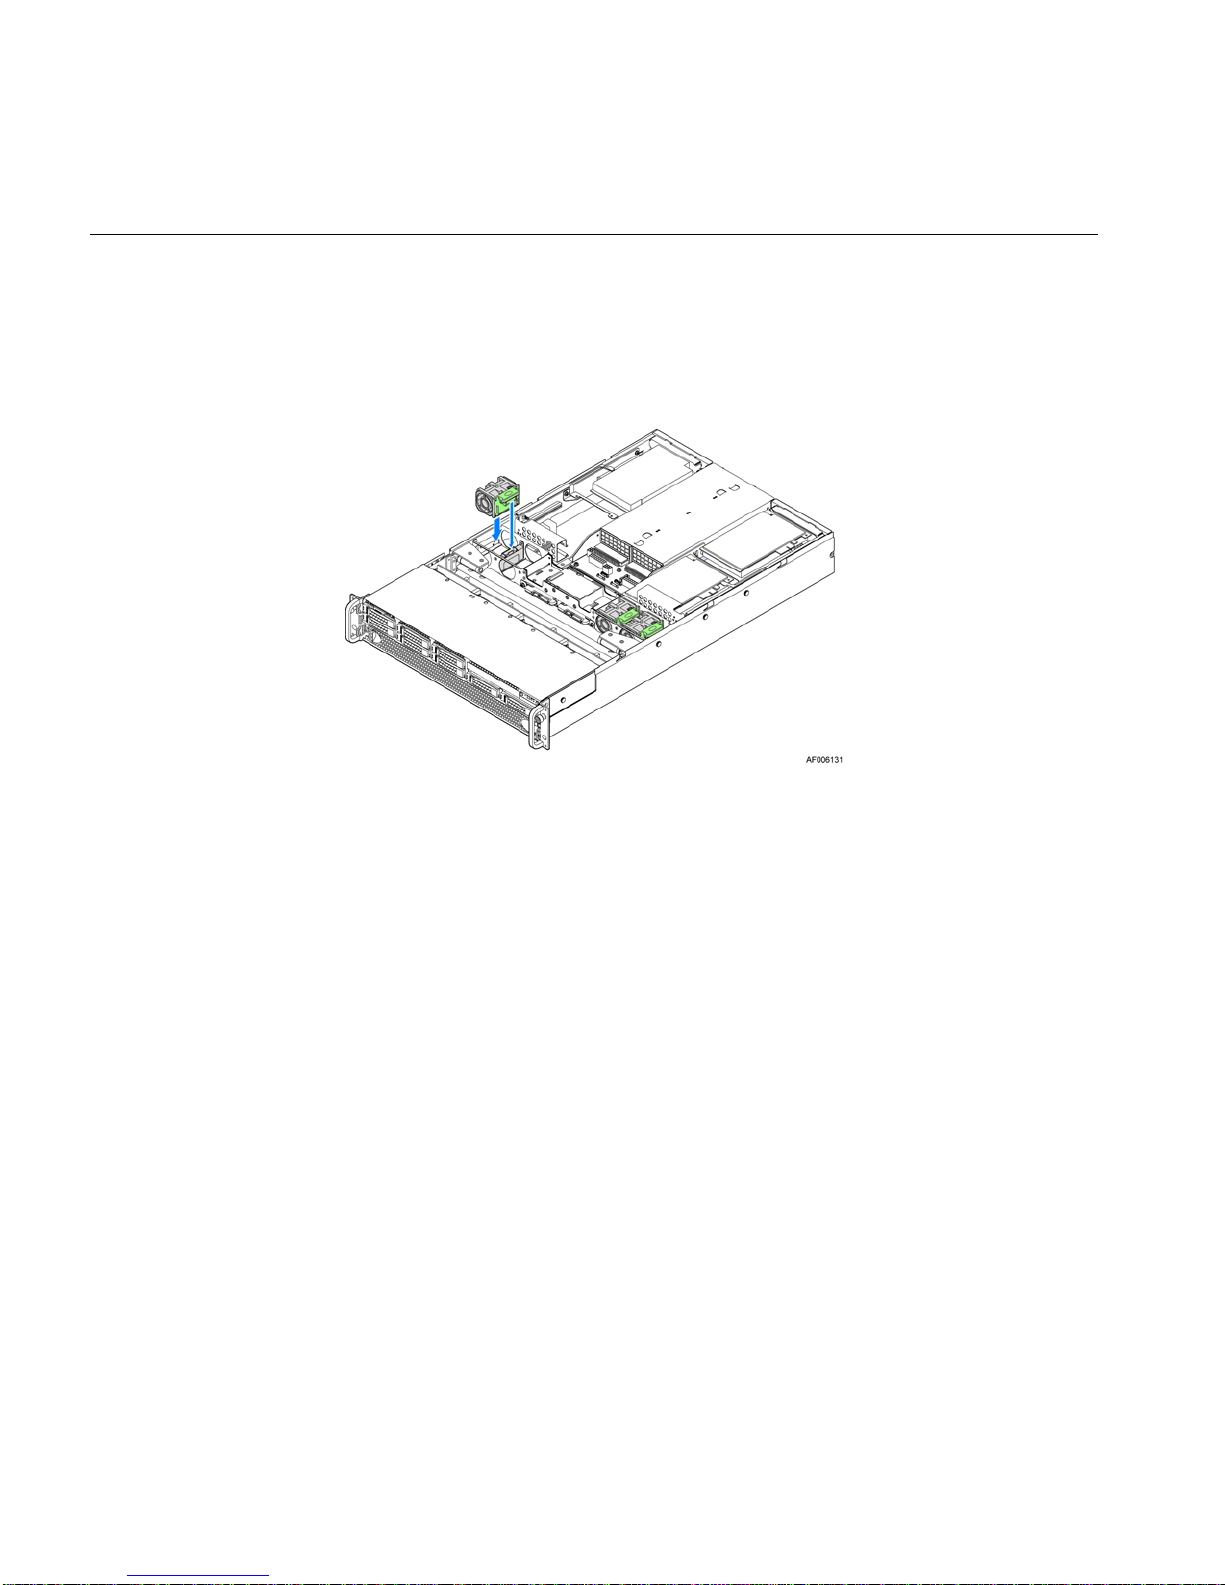
3. Replace the system fan by guiding it into the slot and firmly pressing down to ensure that it
is properly seated.
See Figure 4-16.
Figure 4-16 Inserting a Middle Fan
38 007-5900-001
Page 53

Mounting the Chassis to a Rack
A slide rail kit is bundled with the server and is packed in the same shipping box with the chassis.
Use the following steps to install the chassis in the rack.
1. Remove the inner member from the slides as shown in Figure 4-17.
Mounting the Chassis to a Rack
Figure 4-17 Removing Inner Member from Slides
007-5900-001 39
Page 54

4: Chassis Maintenance
2. Attach the slides to the rack as shown in Figure 4-18.
Figure 4-18 Attaching Slides to the Rack
40 007-5900-001
Page 55

3. Install the inner members to the chassis as shown in Figure 4-19.
Figure 4-19 Installing the Inner Members to the Chassis
4. Install the chassis to the fixed slides as shown in Figure 4-20.
Mounting the Chassis to a Rack
Figure 4-20 Installing the Chassis in the Rack
007-5900-001 41
Page 56

4: Chassis Maintenance
Removing the Chassis from a Rack
To remove the chassis from a rack, use the following steps:
1. Extend the slides as shown in Figure 4-21.
Figure 4-21 Extending Slides to Remove the Chassis
42 007-5900-001
Page 57

Removing the Chassis from a Rack
2. Remove the inner members from the chassis as shown in Figure 4-22.
Figure 4-22 Removing the Inner Member from the Chassis
007-5900-001 43
Page 58

Page 59
Power Rating
Appendix A
A. Power and Environmental Specifications
This appendix describes the following:
• “Power Rating” on page 45
• “Wattage Limitation of the PCI Loading” on page 46
• “Environmental Specifications” on page 46
Table A-1 summarizes the power rating of the power supply.
Table A-1 Power Rating of the Power Supply
VIN Tota l Available Power
100~127VAC
(AC low-line)
200~240VAC
(AC high-line)
007-5900-001 45
1120W
1600W
Page 60

A: Power and Environmental Specifications
Wattage Limitation of the PCI Loading
Table A-2 summarizes the wattage limitation of the PCI loading.
Table A-2 Wattage Limitation of the PCIe Loading
VIN Power Supply Configuration Maximum PCI Loading
90–140VAC
(AC low-line)
180–264VAC
(AC high-line)
Environmental Specifications
Table A-3 lists the system-level operation and non-operating environmental limits.
Table A-3 Environmental Specifications
Attribute Limits
Operating temperature +10
Non-operating
temperature
Operating humidity range 20%–80%, non-condensing
Non-operating humidity 8%–80%, non-condensing at 35
Acoustic noise Sound power:
1600W (1+1) redundant, hot-swap capable
1600W (1+0 or 2+0) non-redundant
1600W (1+1) redundant, hot-swap capable
1600W (1+0 or 2+0) non-redundant
ºC to +35ºC with the maximum rate of change not to exceed 10ºC per hour
-40
ºC to +70ºC
ºC
– 3.5” HDD SKU: 6.9BA at idle and 7.4BA at active mode
– 2.5” HDD SKU: 6.5BA at idle and 7.07BA at active mode.
260W
450W
Shock, operating Half sine, 2 g peak, 11 milliseconds
Shock, unpackaged Trapezoidal, 25 g, velocity change 136 inches/second (40 lbs to less than 80
Shock, packaged Non-palletized free fall in height 24 inches (40 lbs to less than 80 lbs)
Vibration, unpackaged 5 Hz to 500 Hz, 2.20 g RMS random
46 007-5900-001
lbs)
Page 61

Environmental Specifications
Table A-3 Environmental Specifications (continued)
Attribute Limits
ESD +/-12 KV, except I/O port +/- 8 KV per test specification
System cooling
requirement in BTU/Hr
1200 Watt Max – 4095 BTU/hour
1600 Watt Max – 5459 BTU/hour
007-5900-001 47
Page 62

Page 63

Appendix B
B. Regulatory Compliance Information
Table B-1summarizes the product regulatory compliance.
Table B-1 Product Regulatory Compliance
Category
Electromagnetic
Emissions
Electromagnetic
Immunity
Safety CSA/EN/IEC/UL 60950-1 Compliant, UL or CSA Listed (USA and
Perchlorate Materials California Best Management Practices Regulations for Perchlorate
Compliance Information
FCC Class A, EN 55022 Class A, EN 61000-3-2/-3-3, CISPR 22 Class A
EN 55024/CISPR 24, (EN 61000-4-2, EN 61000-4-3, EN 61000-4-4, EN
61000-4-5, EN 61000-4-6, EN 61000-4-8, EN 61000-4-11)
Canada), CE Marking (Europe)
Materials:
”This Perchlorate warning applies only to products containing CR
(Manganese Dioxide) Lithium coin cells. Special handling for perchlorate
material may apply. See www.dtsc.ca.gov/hazardouswaste/perchlorate.”
007-5900-001 49
Page 64

Page 65

Appendix C
C. Rail Kit Installation
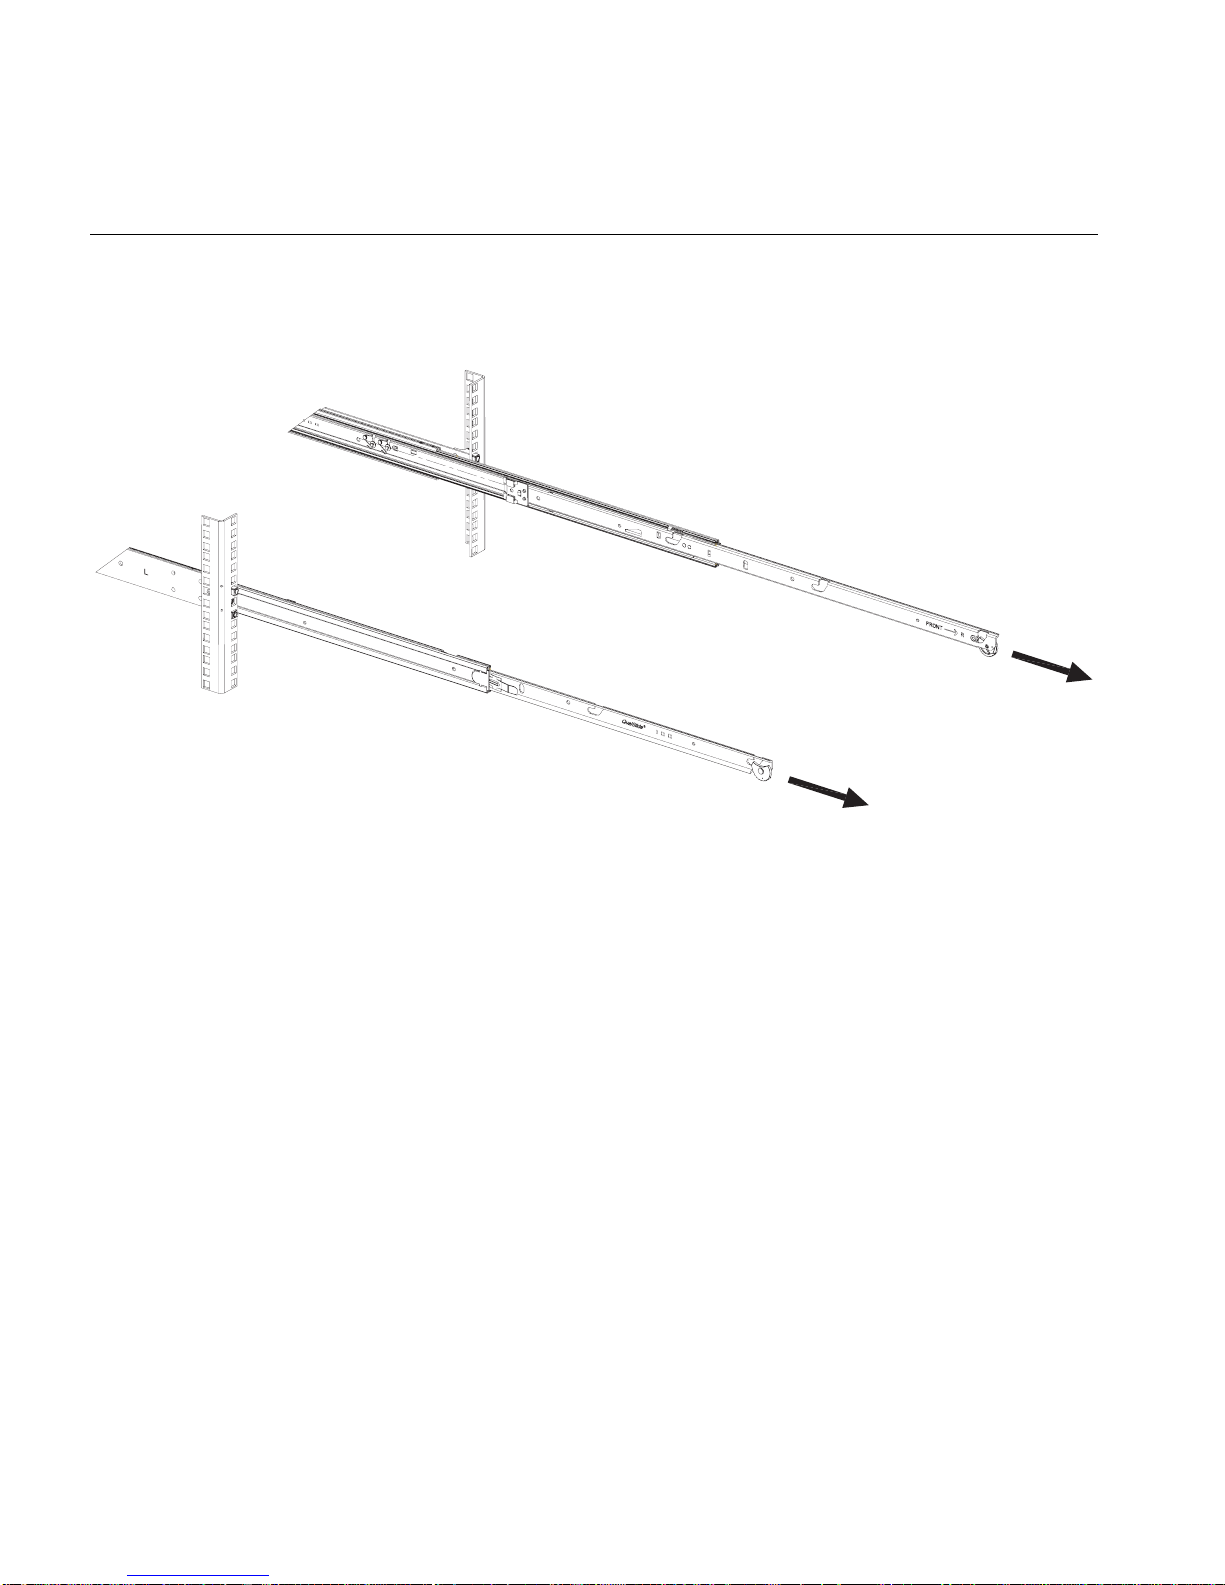
If the chassis for your server does not have pre-installed rail slides, SGI provides a rail kit. Use the
following steps to install the rail kit.
1. Attach the slide rails to the racks as shown in Figure C-1.
1
2
3
Figure C-1 Attaching Rail Slides to Rack
007-5900-001 51
Page 66
C: Rail Kit Installation
2. Fully extend the rail slides as shown in Figure C-2.
Figure C-2 Extending Rail Slides
52 007-5900-001
Page 67
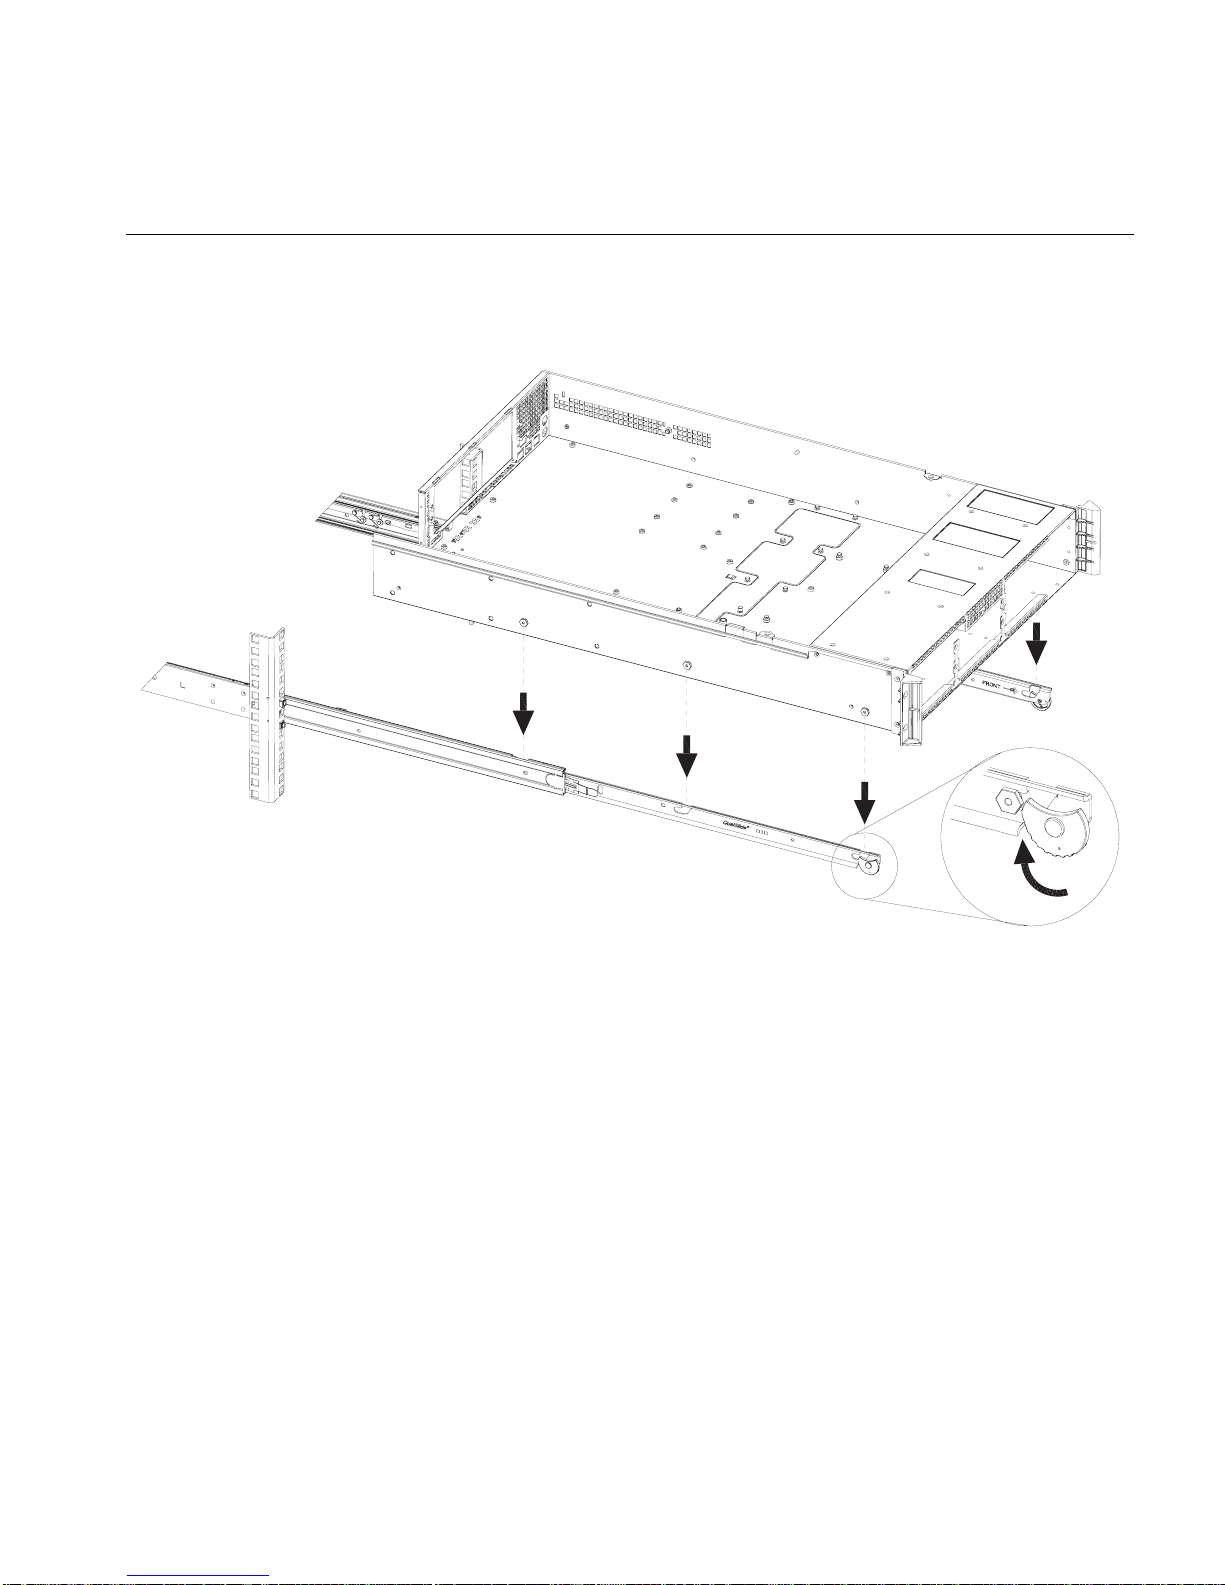
3. Attach the chassis to the rail slides as shown in Figure C-3.
Figure C-3 Attaching Chassis to Rail Slides
007-5900-001 53
Page 68

C: Rail Kit Installation
4. Push the release tab and push the chassis into the rack as shown in Figure C-4.
2
1
Figure C-4 Rail Slide Release Tab
54 007-5900-001
Page 69

Appendix D
D. BMC Error Codes
The BMC may generate beep codes upon detection of failure conditions. Beep codes are sounded
each time the problem is discovered (for example, on each power-up attempt) but are not sounded
continuously. Common supported codes are listed in Table D-1.
In Table D-1, each digit in the code is represented by a sequence of beeps whose count is equal to
the digit.
Table D-1 BMC Beep Codes
Associated
Beep Code Reason for Beep
Sensors Supported
1-5-2-1 No CPUs installed or first CPU socket is
empty.
1-5-2-4 MSID Mismatch. MSID Mismatch
1-5-4-2 Power fault: DC power is unexpectedly
lost (power good dropout).
1-5-4-4 Power control fault (power good assertion
timeout).
1-5-1-2 VR Watchdog Timer sensor assertion VR Watchdog timer
1-5-1-4 The system does not power on or
unexpectedly powers off and a power
supply unit (PSU) is present that is an
incompatible model with one or more
other PSUs in the system.
CPU Missing sensor Yes
sensor.
Power unit—power
unit failure offset.
Power unit—soft
power control failure
offset.
PSU status
Yes
Yes
Yes
007-5900-001 55
Page 70

 Loading...