

Page 1
1-1About PRICOM 7000
Users Manual SX
1. About PRICOM 7000
This chapter explains about PRICOM operating environment, outline and how to connect
PRICOM to the network.
Features
- 64bit RISC CPU
- Uses Linux operating system
- Supports USB2.0
- Printing Job Management Function
- USB Network Scanner Function
- DHCP/DNS Server Function
- Multi-port; USB port x 2, Parallel port x 1
- Supports 10BASE-T and 100BASE-TX (Auto-detection)
- Popup Printer Status Monitoring
- "Quick Setup" is included in the accessory kit for easy configuration.
- "AdminManager" is included in the accessory kit.
- Printing software "JC-Print2002" is included in the accessory kit.
- USB Utility "PRICOM USB Utility" is included in the accessory kit.
- Embedded HTTP enables you to configure PRICOM via Web browser.
USB2 port
USB1 port
Parallel port
USB HUB
Page 2

1-2About PRICOM 7000
Users Manual SX
Print Server Operating Environment
[Required device to connect printer to network]
- Network cable (category 5 or above in 100BASE-TX environment)
- Parallel cable or USB cable
- Printer or USB scanner
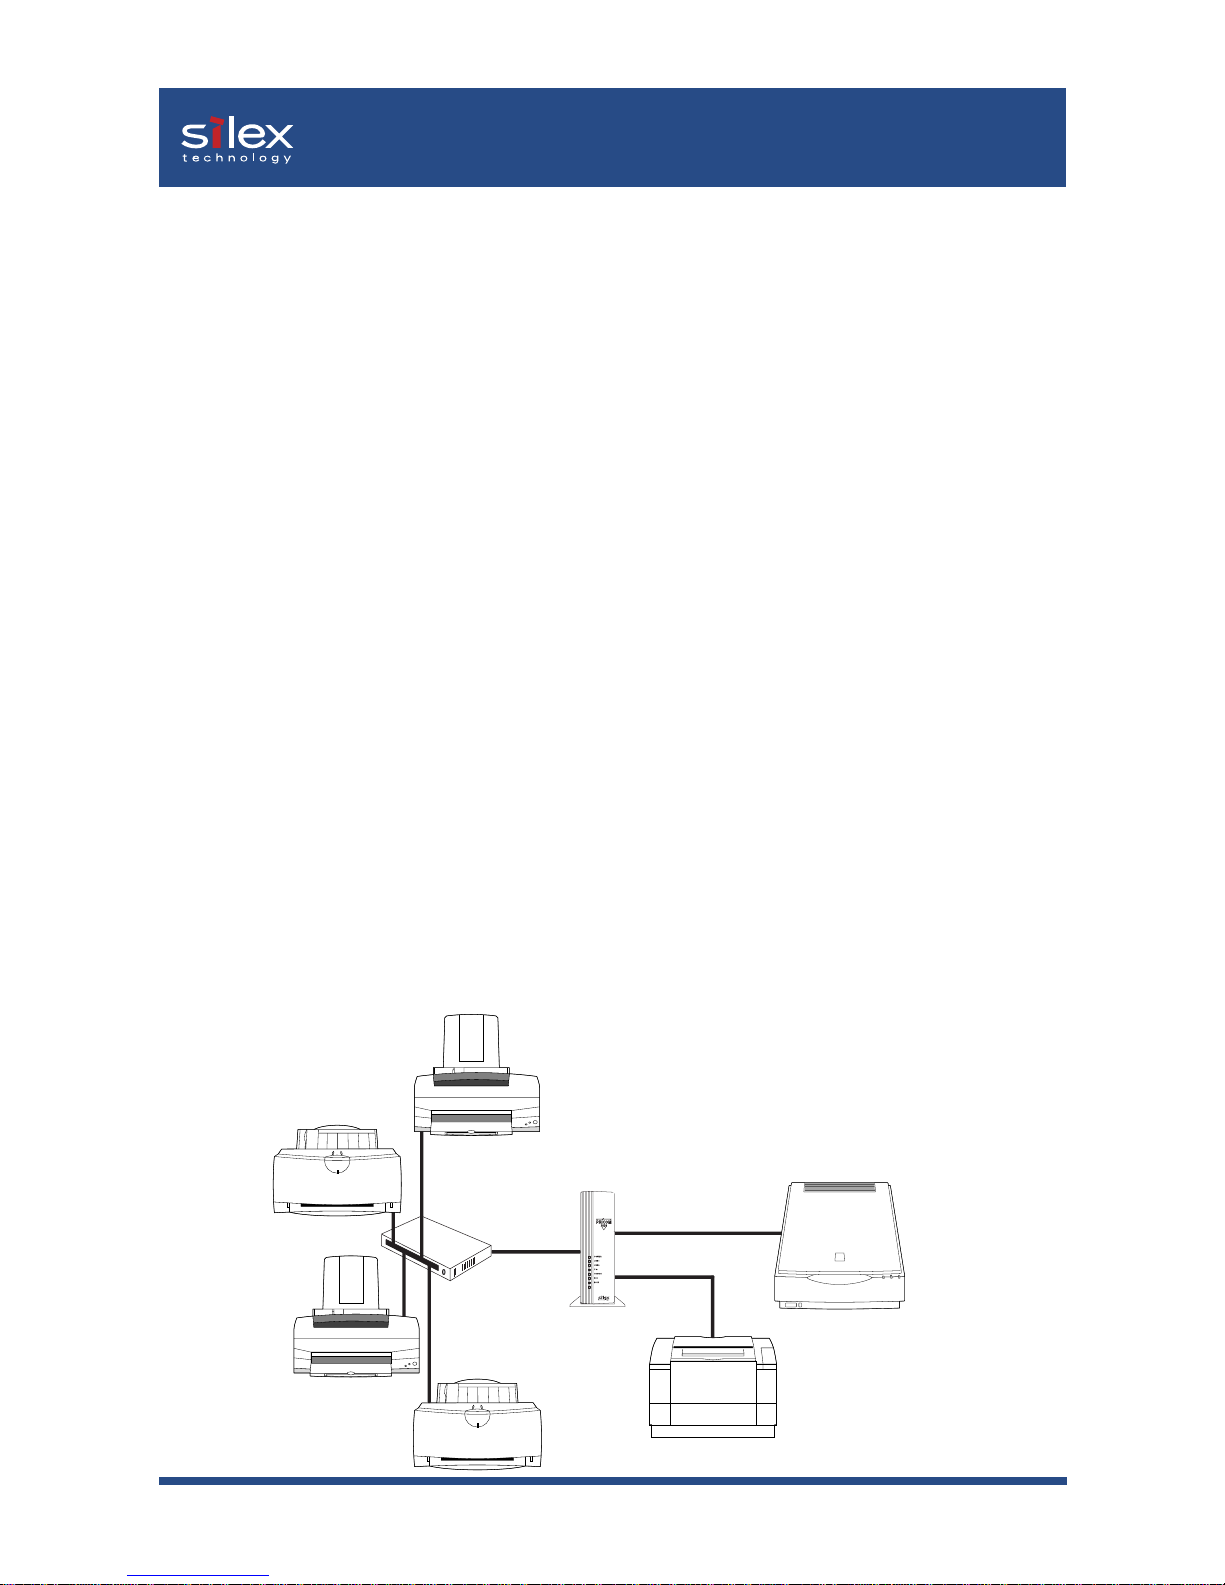
- Maximum of 5 printers are connectable.
(4 printers to USB port by using USB HUB and 1 printer to parallel port)
[Supported protocol / Operating system]
- Supported protocol: TCP/IP
- Supported OS : Windows 95/98/Me, Windows NT 4.0, Windows 2000, Windows XP
UNIX, Linux
Scanner Server Operating Environment
[Required device to connect scanner to network]
- USB cable
- Scanner
- You can connect only one scanner to PRICOM.
[Supported protocol / Operating system]
- Supported protocol: TCP/IP
- Supported OS : Windows 2000, Windows XP
NOTENOTE
NOTENOTE
NOTE
TIPTIP
TIPTIP
TIP
Page 3

1-3About PRICOM 7000
Users Manual SX
DHCP/DNS Server Operating Environment
- This DHCP/DNS server function does not support the cooperation with WINS (Windows Internet
Name Service) and DDNS (Dynamic Domain Name Service).
[Required environment to use DHCP/DNS server function]
- The network which consists of about 20 apparatus (recommend)
[DHCP server fuction]
- Assign IP address
[DNS server fuction]
- Manage Domain name
TIPTIP
TIPTIP
TIP
Page 4

1-4About PRICOM 7000
Users Manual SX
Parts on PRICOM 7000
Parts and Function
<Front>
1. POWER LED
Lights when PRICOM is switched on.
2. USB1 LED
Lights during USB1 port link.
3. USB2 LED
Lights during USB2 port link
4. PIO LED
Lights during PIO port link.
5. STATUS LED
Flashes during data transfer.
6. 10B LED
Lights when a proper 10BASE-T network connection is established.
7. 100B LED
Lights when a proper 100BASE-TX network connection is established.
13. Power Connector
9. Network Port
(10BASE-T/100BASE-TX)
Back
10. USB1 Port
11. USB2 Port
12. Parallel Port
8. Push Switch
Front
1. POWER LED
3. USB2 LED
2. USB1 LED
4.
PIO LED
5. STATUS LED
6. 10B LED
7. 100B LED
Page 5

1-5About PRICOM 7000
Users Manual SX
Initialization / Reset to factory default
1. Make sure that the Power supply cord is not connected to PRICOM.
2. While pressing the push switch, connect Power supply cord to PRICOM. The STATUS LED will blink once
when the connection is made.
3. Keep pressing the push switch for 2 seconds. The STATUS LED will blink again when factory default is
successfully completed. Remove your hand from the push switch.
- Do not turn off the power of PRICOM while it is initializing to factory default.
- When PRICOM is switched on again after factory default is complete or the self-diagnostic
report is executed, do not press the push switch.
Diagnostic / Configuration report
1. While PRICOM is in use, press the push switch for more than 5 seconds.
2. The test print will be executed.
- Self-diagnostic report is available only with printers with fonts connected to parallel port.
- When there are any NG in the self-diagnostic report, please inquire to our customer support
center.
Push Switch Operation
<Back>
8. Push Switch
You can initialize PRICOM to factory default and print self-diagnostic report.
9. Network Port (10BASE-T/100BASE-TX Auto-detection)
Connect to the network cable. (Category 5 or above in 100BASE-TX environment)
10. USB1 Port (type A)
Connect to USB cable attached to printer or scanner.
11. USB2 Port (type A)
Connect to USB cable attached to printer or scanner.
12. Parallel Port (D-sub 25pin / IEEE1284 compliant)
Connect to parallel cable attached with printer.
13. Power Connector
Connect to the Power supply.
TIPTIP
TIPTIP
TIP
TIPTIP
TIPTIP
TIP
Page 6

1-6About PRICOM 7000
Users Manual SX
USB cable
Install Hardware
Attach PRICOM to the Printer
Connect PRICOM with printer or scanner. Please check the interface of the printer or scanner
to be connected with PRICOM, then prepare the following cables.
- Please make sure to read the operation instructions of printer or scanner to be used before
attaching PRICOM. The method and attachment position may vary depending on the printers or
scanners to be connected.
- Please make sure to remove the power cord of a printer or a scanner, then attach PRICOM.
- If you have already used PRICOM in another network, make sure to initialize PRICOM to factory
default.
Connect PRICOM after turning off a printer or scanner, then remove a power cord. At this
time, make sure that power supply is not connected to PRICOM.
1.1.
1.1.
1.
or
Parallel cable
- When connecting USB products, PRICOM can be connected without turning off a printer or a
scanner.
- The connector of a USB cable has 2 different forms.
The USB port of PRICOM 7000 is Type A. Please check the proper form for the connection.
Type A Type B
TIPTIP
TIPTIP
TIP
NOTENOTE
NOTENOTE
NOTE
Page 7

1-7About PRICOM 7000
Users Manual SX
Connect PRICOM to the Network
The following items are required to connect PRICOM to the network.
- Prepare 100BASE-TX supported Ethernet HUB and network cable (category 5 or above.)
Ethernet HUB
Network cable
Switch off the printer after you make sure the power supply is not connected to PRICOM.
Connect the network cable to the network port of PRICOM.
Connect the other end of the network cable to the Ethernet HUB.
Connect the power supply to PRICOM and switch on the printer.
Check for the printer proper function.
- Please do not use AC adapters other than AC adapter of PRICOM attachment. It causes failure.
2.2.
2.2.
2.
3.3.
3.3.
3.
1.1.
1.1.
1.
4.4.
4.4.
4.
TIPTIP
TIPTIP
TIP
TIPTIP
TIPTIP
TIP
 Loading...