

Page 1
Setup Guide
Color Laser Printer
Model No. KX-CL400
KX-CL600
Thank you for purchasing the Panasonic Color Laser Printer.
The major difference between the two models is as follows:
• The print speed of KX-CL600 is faster than KX-CL400.
• An automatic duplex unit is provided with KX-CL600 as standard. (An option for KX-CL400)
Using Manuals:
C
o
lo
r
L
a
Setup Guide
Model No.
K
X
C
L
5
0
0
/K
Please carefully read this manual and keep this documentation in a safe place for
future reference.
This manual describes basic setup procedures for the Panasonic Color Laser Printer and
s
e
r
P
r
in
t
e
r
X
C
L
5
1
0
necessary precautions for safety and use. First read this guide to setup the printer.
For other detailed information, refer to Operating Instructions included in the printer CD-ROM.
To read Operating Instructions, Adobe Reader must be installed on the computer. If it is not
installed, you need to install it on your computer by downloading it from Adobe's Web site or by
other means.
Page 2

Features
Panasonic KX-CL400/KX-CL600 printer provides optimum
performance for all your color and monochrome
applications, plus quality, speed, versatility, ease of use
and extensive network solutions, all in a compact design.
Panasonic's one-pass technology is optimized to deliver
fast color printing. Print quality up to a 1,200 x 1,200 dpi
possible.
■ Fast Printing
•
Up to 18 ppm (with KX-CL400)
*2
Up to 22 ppm (with KX-CL600)
(in Color and Monochrome, Letter, Standard quality,
Simplex print with standard media tray)
■ Automatic Duplex Printing
• KX-CL600: standard / KX-CL400: option
■ Equipped with Network, Parallel and USB
interface
■ Max. paper capacity 1,690 sheets with two
optional Paper Feeders (20 lb. paper)
■ High yield, easy-to-replace consumables
■ Economical and Environmental
• Saves energy while the printer is idle (ENERGY STAR
compliant).
• Toner Save mode
■ Versatile Print Feature
• Watermark, Overlay, Pages per Sheet, Zoom, etc.
■ Effective Utilities
• Device Monitor, Embedded Web Launcher, Network
Setup Tool, etc.
■ Additional Features
If you install Upgrade Kit (option), the following features
are available.
3
*
• PostScript printing in Windows
• Direct Printing System (enables PDF file printing
without opening such files)
*1
Additional memory is recommended to insure printing in
Enhance quality regardless of image size, paper size
and duplex print.
*2
Measured by Panasonic's method.
3
*
Microsoft Windows operating system (hereafter
referred to as Windows)
and Macintosh
*1
As an ENERGY STAR Partner, Panasonic has
determined that this product meets the
E
NERGY STA R
(E
NERGY STAR and the ENERGY STAR
certification mark are registered US marks.)
• Agfa® and the Agfa rhombus are registered trademarks of
Agfa-Gevaert N.V. registered in the U.S. Patent and Trademark
Office and may be registered in other jurisdictions. Monotype®
is a registered trademark of AMT registered in the U.S. Patent
and Trademark Office and may be registered in other
jurisdictions. ColorTune® is a registered trademark of AgfaGevaert N.V. registered in the U.S. Patent and Trademark
Office and may be registered in other jurisdictions. Profile Tool
TM
Kit
,
Profile StudioTM
AMT and may be registered in certain jurisdictions.
• Microsoft, Windows, Windows NT and Windows Server are
either registered trademarks or trademarks of Microsoft
Corporation in the United States and/or other countries.
• Apple, AppleTalk, ColorSync, LaserWriter, Mac, Mac OS,
Macintosh, Rendezvous and TrueType are trademarks of
Apple Computer, Inc.
• PCL is a trademark of Hewlett-Packard Company.
• Intel, Pentium and Pentium II are trademarks or registered
trademarks of Intel Corporation or its subsidiaries in the United
States and other countries.
• PowerPC is a trademark of International Business Machines
Corporation in the United States, other countries, or both.
•
PeerlessPageTM is a trademark of Peerless Systems Corporation.
• PeerlessPrint® and Memory Reduction Technology® are
registered trademarks of Peerless Systems Corporation.
• Tornado and VxWorks are registered trademarks of Wind
River Systems, Inc.
• All other acknowledgements are trademarks or registered
trademarks of their respective holders.
The instructions are subject to change without notice.
Screen shot(s) reprinted with permission from Microsoft Corporation.
COPYRIGHT © 2004 Peerless Systems Corporation. All Rights
Reserved.
COPYRIGHT © 1993 - 2004 Adobe Systems Incorporated. All
Rights Reserved.
Adobe® PostScript® 3
Systems Incorporated. All Rights Reserved.
Copyright © 2002 Wind River Systems, Inc. All right reserved.
This product contains an implementation of LZW licensed under
U.S.Patent 4,558,302.
silex technology, Inc. 1998-2005
2005 Panasonic Communications Co., Ltd. All Rights Reserved.
TM
guidelines for energy efficiency.
Adobe, the Adobe logo, Acrobat, the
Acrobat logo, Reader, Adobe Type
Manager, ATM, PostScript, PostScript 3
and the PostScript 3 logo are either
registered trademarks or trademarks of
Adobe Systems Incorporated in the
United States and/or other countries.
Scalable type outlines are licensed from
Agfa Monotype Corporation. CG,
Intellifont, MicroType and Universal Font
Scaling Technology (UFST) are
trademarks of Agfa Monotype
Corporation and may be registered in
some jurisdictions.
and Profile OptimizerTM
Copyright © 1993 - 2004 Adobe
are trademarks of
2
Page 3

Manuals in CD-ROM
The Operating Instructions in the printer CD-ROM consist
of the following 7 files (manuals). When referring to
sections (Installation, etc.) in the Operating Instructions,
see the manuals in the printer CD-ROM.
To read the manuals, Adobe Reader must be installed on
the computer. If it is not installed, you need to install it on
your computer by downloading it from Adobe’s Web site
or by other means.
Table of Contents
For Your Safety
Notice . . . . . . . . . . . . . . . . . . . . . . . . . . . . . . . 4
Before You Start
Precautions . . . . . . . . . . . . . . . . . . . . . . . . . . . 6
Accessories . . . . . . . . . . . . . . . . . . . . . . . . . . . 8
Part Names . . . . . . . . . . . . . . . . . . . . . . . . . . . 9
Contents.pdf
Setup.pdf Setup Guide (This manual)
Install.pdf Installation
Print.pdf Settings and Printing
Mainte.pdf Maintenance and Specifications
Network.pdf Network
PCM.pdf Print Count Manager
Contents of
• Features
• Schema for Color Printing
• This manual describes basic setup
procedures for this printer and
necessary precaution for safety and
use. First read this guide to setup
the printer.
• This section contains information for
the printer driver and utilities
installation. When setting up the
printer at first, read this section with
the above Setup Guide.
• This section contains information for
tray, printer panel, printer drivers
and utilities.
Information on printer equipped with
Upgrade Kit is also included in this
section.
• This section contains information for
replacing supplies, cleaning the
printer, clearing jams,
troubleshooting, repacking and
specifications of this printer.
• This section contains information for
configuring printer on a network
environment or using the network
utilities.
• This section contains information on
a utility for tracking and managing
the print volume of user groups (this
utility can check how many color and
grayscale pages are printed).
Operating Instructions
Printer Panel . . . . . . . . . . . . . . . . . . . . . . . . . . 10
System Requirements . . . . . . . . . . . . . . . . . . . 11
Minimum Space Requirements . . . . . . . . . . . . 11
Setup
Setting up the Printer . . . . . . . . . . . . . . . . . . . 12
Installing the Toner Cartridges . . . . . . . . . . . 12
Installing the Print Cartridges . . . . . . . . . . . . 12
Installing the Automatic Duplex Unit . . . . . . 14
Pasting the Re-order Label . . . . . . . . . . . . . 14
Tray . . . . . . . . . . . . . . . . . . . . . . . . . . . . . . . . . 15
Using the Media Tray . . . . . . . . . . . . . . . . . . 15
Using the Multi-Purpose Tray. . . . . . . . . . . . 16
Settings and Printing
Power On . . . . . . . . . . . . . . . . . . . . . . . . . . . . 17
Setting the LCD Language . . . . . . . . . . . . . . . 17
Printing the Configuration Page . . . . . . . . . . . 17
Connecting the Printer to a Computer. . . . . . . 18
Installing Driver and Utilities . . . . . . . . . . . . . . 18
Contents of the Printer Software . . . . . . . . . 18
Installing Printer Driver . . . . . . . . . . . . . . . . . 19
Using the Printer Driver . . . . . . . . . . . . . . . . 20
Removing Driver and Utilities . . . . . . . . . . . . . 20
Maintenance
Clearing a Jam . . . . . . . . . . . . . . . . . . . . . . . . 21
Replacing Supplies . . . . . . . . . . . . . . . . . . . . . 21
Adjusting Color Density . . . . . . . . . . . . . . . . . . 21
Setting “Adjust to Media”. . . . . . . . . . . . . . . . . 21
Cleaning the Printer . . . . . . . . . . . . . . . . . . . . 21
Repacking . . . . . . . . . . . . . . . . . . . . . . . . . . . . 21
Troubleshooting / Others
Troubleshooting. . . . . . . . . . . . . . . . . . . . . . . . 22
Options and Supplies . . . . . . . . . . . . . . . . . . . 23
3
Page 4

For Your Safety
Notice
Installation and Relocation
[ WARNING ]
• To prevent fire or shock hazard, do not expose this
product to rain or any type of moisture.
[ CAUTION ]
• The printer weighs approximately 32 kg (70 lbs.). It must
be handled by two people. Turn the power off and
remove the power cord when handling the printer.
• Do not place the printer on an uneven or unstable
surface.
• Avoid the media tray going across an edge of a desk.
Dropping the printer may cause injury.
• Do not place the printer in an area where there is a lot of
smoke, dust, chemical fumes or vibration.
• When moving the printer, be sure to unplug the power
cord from the AC outlet. If the printer is moved with the
power cord attached, it can cause damage to the cord
which could result in fire or electric shock.
• Take care when handling the media tray or print
cartridge because they are heavy. Dropping either may
cause injury.
Laser Safety
CLASS 1 LASER PRODUCT
[ CAUTION ]
• This printer utilizes a laser. Use of controls or
adjustments or performance of procedures other than
those specified herein may result in hazardous radiation
exposure.
Laser diode properties (4 provided)
Laser output: 5 mW max
Wavelength: 785 nm
Emission duration: Continuous
Power Source
[ WARNING ]
• The power source voltage of this printer is listed on the
nameplate. Only plug the printer into an AC outlet with
the proper voltage.
• When you operate this equipment, the AC outlet should
be near the equipment and accessible.
• To ensure safe operation the power cord supplied must
be inserted into a standard three-prong AC outlet which
is effectively grounded (earthed) through the normal
wiring.
• The fact that the equipment operates satisfactorily does
not imply that the power point is grounded (earthed) and
that the installation is completely safe. For your safety, if
in any doubt about the effective grounding (earthing) of
the power point, consult a qualified electrician.
• If the plug cannot be inserted into the AC outlet, contact
a licensed electrician to replace the AC outlet with a
properly grounded (earthed) one.
• Do not defeat the purpose of the grounding (earthing)
plug (ex. do not use a conversion plug).
• Plug the power cord firmly into an AC outlet. Otherwise,
it can cause fire or electric shock.
• Do not attempt to repair, pull, bend, chafe or otherwise
damage the power cord. Do not place a heavy object on
the cord. A damaged cord can cause fire or electric
shocks.
• Ensure that the plug connection is free of dust. In a
damp environment, a contaminated connector can draw
a significant amount of current that can generate heat
and eventually cause fire if left unattended over an
extended period of time.
• Never touch a power cord with wet hands. Danger of
electric shock exists.
• Stop operation immediately if your printer emits smoke,
excessive heat, abnormal smell or unusual noise.
These conditions can cause fire or electric shock.
Immediately turn the printer off and unplug the power
cord, and contact an authorized service representative.
• When disconnecting the printer, grasp the plug instead
of the cord. Pulling on a cord forcibly can damage it and
cause fire or electric shock.
[ CAUTION ]
• Do not leave the power cord plugged into the AC outlet
if the printer will not be used for an extended period.
• Be sure to use the provided power cord. Otherwise, it
may cause fire or electric shock.
4
Page 5

For Your Safety
For Your SafetyFor Your Safety
Operating Safeguards
[ WARNING ]
• If metal fragments or water gets into the printer, turn the
printer off and unplug the printer immediately. Contact
an authorized service representative. Operating the
contaminated printer can cause fire or electric shock.
• Do not open covers and do not attempt to repair the
printer yourself. Contact an authorized service
representative.
• Do not alter the printer or modify any parts. Alteration or
modification can cause fire or electric shock.
• Do not place any liquids near the printer. Accidental
spillage of liquid into the printer may cause severe
damage. If this occurs, turn the printer off, unplug the
power cord and contact an authorized service
representative.
• This product uses low frequency electromagnetic fields
and can cause harmful interference to sensitive medical
implant devices. If you have a cardiac pacemaker or
implantable defibrillator, please consult your doctor for
additional suggestion or advice.
• Do not use the printer near medical instruments, which
can cause improper operation.
• Do not use the printer near automatic control machines
(automatic doors, fire alarms, etc.). The electromagnetic
fields can cause improper operation.
[ CAUTION ]
• Do not insert hands inside the printer when closing the
door or cover. Pinching a hand or finger may cause
injury.
• Do not touch hot or heated areas. Touching hot or
heated areas may cause burns.
• If the printer is dropped or damaged, turn the printer off
and unplug the power cord. Otherwise, it may cause fire
or electric shock.
• Be sure to hold the media tray with both hands so that
you do not drop it. The media tray weighs approximately
6.4 kg (14 lbs.) when it is fully loaded.
Waste Disposal
[ WARNING ]
• Do not incinerate toner or toner containers. Toner dust
may cause flashback when exposed to an open flame.
Caution on Toner Use
[ CAUTION ]
• Avoid ingestion, inhalation, eye or skin contact.
− If ingestion occurs, drink several glasses of water to
dilute stomach contents.
− If inhalation occurs, remove to fresh air.
− If skin contact occurs, wash thoroughly with soap and
water.
− If eye contact occurs, flush thoroughly with water.
− In all cases, seek medical treatment if adverse
symptoms occur.
• When the toner cartridge is at the end of its life, do not
dispose in fire.
• Keep the toner cartridge out of children's reach. Store in
a cool and dry place.
Black Toner
Cyan Toner
Magenta Toner
Yellow Toner
For USA only
Distributed by Panasonic Digital Document Company,
Unit of Panasonic Corporation of North America
Secaucus, NJ 07094
INGREDIENTS:
Carbon black (1333-86-4)
Silica (68909-20-6)
Charge control agent (31714-55-3)
Polyester resin (2 kinds)
INGREDIENTS:
Silica (68909-20-6)
Charge control agent (72869-85-3)
Polyester resin (2 kinds)
Wax (1 kind)
Ozone Release
[ WARNING ]
• Make sure that the printer is installed in a well ventilated
room so as not to increase density of ozone in the air.
Since ozone is heavier than air, it is recommended that
air at floor level be ventilated.
5
Page 6

For Your Safety
Caution Labels
CAUTION
HOT SURFACE
DO NOT TOUCH.
Precautions
FOR USERS IN THE UNITED STATES
This equipment has been tested and found to comply with
the limits for a Class B digital device, pursuant to Part 15
and 18 of the FCC Rules. These limits are designed to
provide reasonable protection against harmful
interference in a residential installation.
This equipment generates, uses, and can radiate radio
frequency energy and, if not installed and used in
accordance with the instructions, may cause harmful
interference to radio communications.
However, there is no guarantee that interference will not
occur in a particular installation. If this equipment does
cause harmful interference to radio or television
reception, which can be determined by turning the
equipment off and on, the user is encouraged to try to
correct the interference by one or more of the following
measures:
• Reorient or relocate the receiving antenna.
• Increase the separation between the equipment and
receiver.
• Connect the equipment into an outlet on a circuit
different from that to which the receiver is connected.
• Consult the dealer or an experienced radio/TV
technician for help.
• The user may find the booklet “Something About
Interference” available from FCC local regional offices
helpful.
CAUTION
HOT SURFACE
DO NOT TOUCH.
CAUTION
HOT SURFACE
DO NOT TOUCH.
FCC Warning: To assure continued FCC emission limit
compliance, the user must use the recommended
shielded interfacing cable when connecting to a host
computer. Also, any unauthorized changes or
modifications to this equipment would void the user's
authority to operate this device.
FCC Declaration of Conformity
Trade Name: Panasonic
Model Number: KX-CL400 or KX-CL600
Responsible Party:Panasonic Corporation of North
America
One Panasonic Way
Secaucus, NJ 07094 U.S.A.
Telephone No.: 1-800-726-2797
This device complies with Part 15 and 18 of the FCC
Rules.
Operation is subject to the following two conditions: (1)
This device may not cause harmful interference, and (2)
this device must accept any interference received,
including interference that may cause undesired operation.
6
Page 7

Before You Start
Precautions
■ General
To avoid printer malfunction, do not use the equipment under the following conditions:
• Unstable or uneven
surfaces.
• Direct exposure to sunlight.
• Extremely high or low
temperature [temperature
range: 10°C to 32.5°C (50°F
to 90.5°F)]
• Extremely high or low
humidity. (humidity range:
15% to 80% RH)
• Condensation due to rapid
change of temperature.
• Directly in front of air
conditioning vents.
Before You Start
• Areas of poor ventilation.
• Areas of high dust or
chemical fume
concentration. (solvent etc.)
• Liquids near the equipment.
• A very large stack of media
into the manual feed.
■ CD-ROM
To prevent the CD-ROM from accidental damage:
• Do not touch or write on the
surface of the disc.
• Do not place heavy objects on the
disc case or drop the case.
• Do not leave the disc out of its
protective bag.
• To clean the disc, hold the disc by its
edges and wipe it from the center to
the edges with a dry, soft cloth.
Media for ink jet (paper,
transparency, etc.)
• Do not leave the disc in direct
sunlight or near heat surfaces.
7
Page 8
Before You Start
■ Static Electricity Damage
To prevent static electricity damage to any of the following
components, touch a grounded metal surface, such as the
printer's bare metal frame prior to touching the
component.
• Interface connectors: network, USB, parallel, and
connector for optional paper feeder
• Connector pins on the optional paper feeder
• Electrical components, connectors inside the printer
■ Interface Cable
Always use a shielded interface cable. Use of an
unshielded cable can result in radio interference with
data.
■ Power Source
The voltage level of the power source must not vary more
than ±10% from the voltage level marked on the
nameplate (located on the rear of the printer).
Do not use an extension cord.
Do not use a line conditioner, transient suppressor or
surge protector as it may cause a printer error.
■ Ventilation Space
The ventilation space is needed more than 20 mm (0.8")
between the printer and a wall.
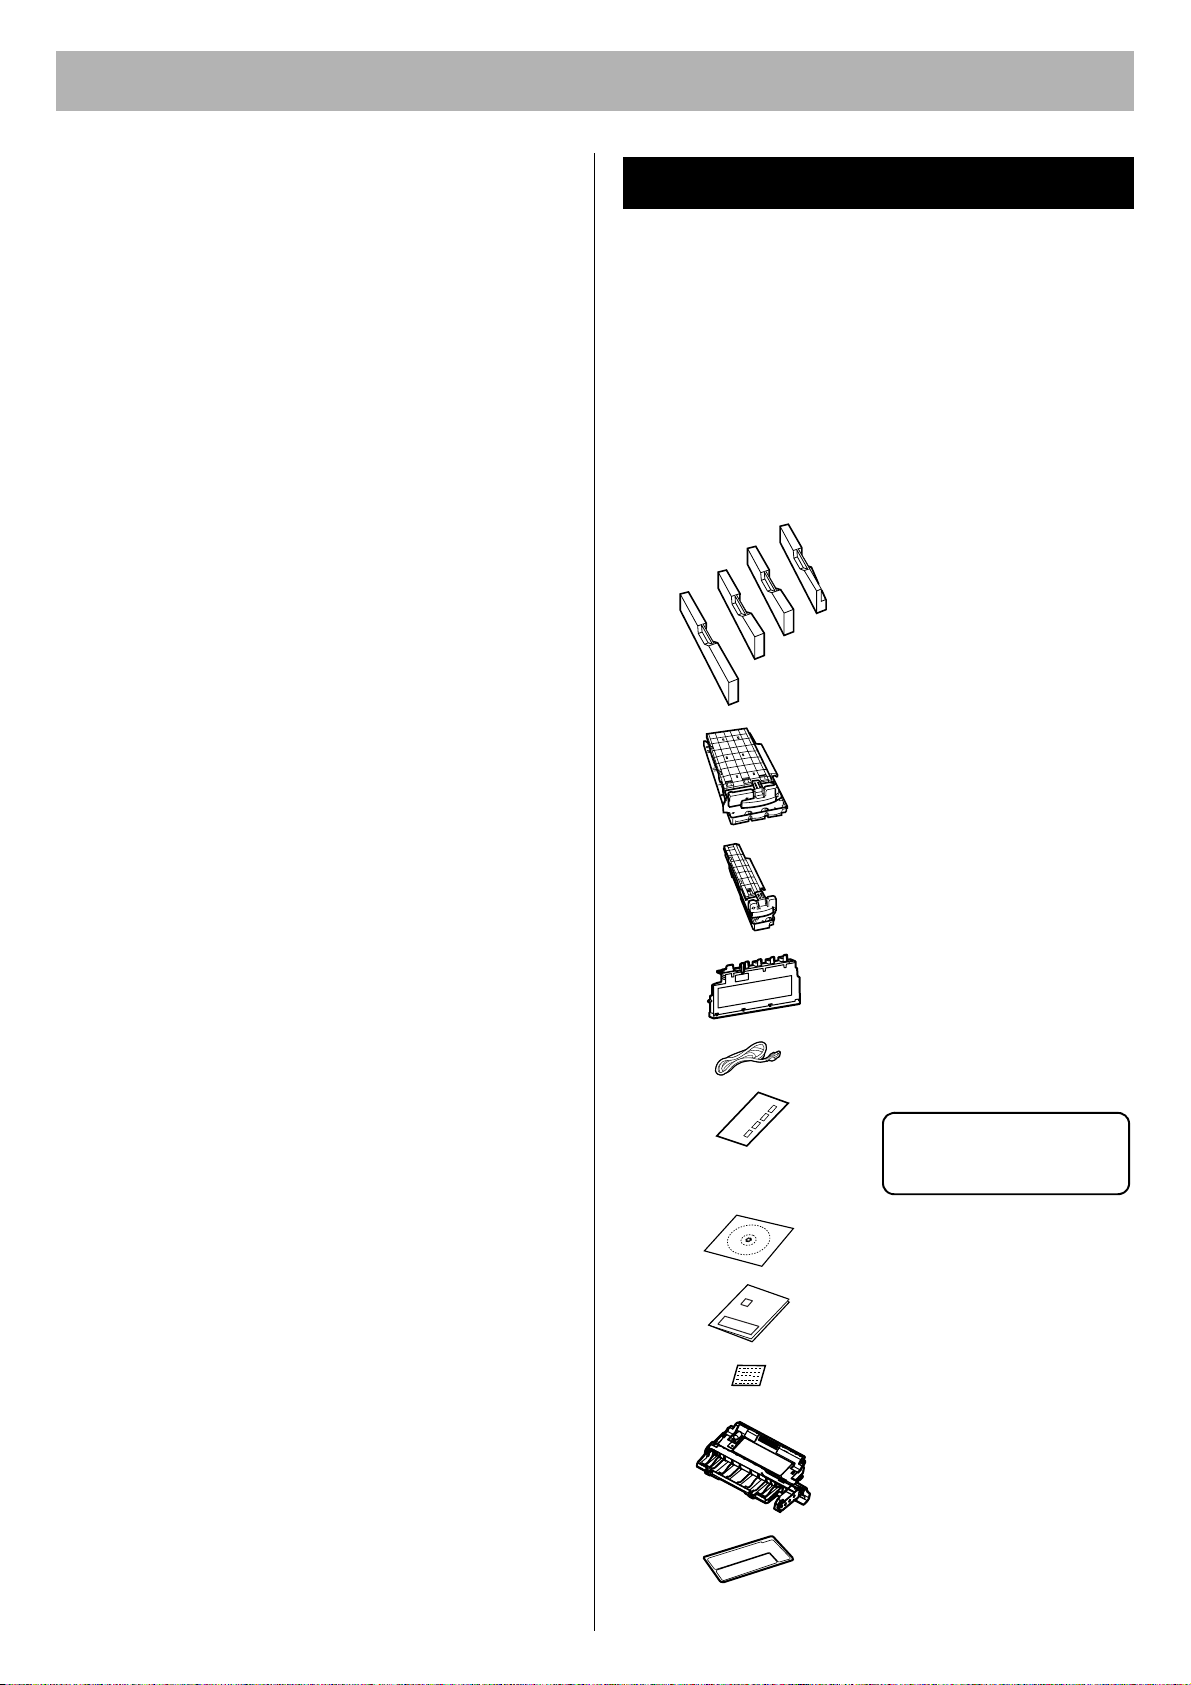
Accessories
Make sure that all accessories shown below were
provided and have not been damaged. Report damage or
shortages to the reseller from which the printer was
purchased. The final page includes an area for recording
important information such as the name of reseller, serial
number, and date of purchase.
NOTE:
• Save the original carton and packing materials for future
shipping and transportation of the printer. They have
been specifically designed to protect the equipment
during shipment.
.
Toner cartridges
(Cyan, Magenta, Yellow,
Black)
Printer includes free
starter toner cartridges
that yield 2,500 pages
(based on 5% page
coverage per color).
Color print cartridge
Black print cartridge
Waste toner cartridge
Power cord
Color calibration card
Keep this Color calibration
card for adjusting color
density.
Printer CD-ROM
x
x
x
x
x
x
x
x
x
x
x
x
x
x
x
x
x
x
x
x
x
x
x
x
Setup Guide (this manual)
Supplies Re-order Label
(see page 14)
Automatic duplex unit
(KX-CL400: option /
KX-CL600: standard)
Jam clear label (provided
with KX-CL400 only)
Refer to page 14 in detail.
Save it carefully!
8
Page 9

Before You Start
Part Names
■ Front View
Front door
Media tray /
Multi-purpose tray
■ Rear View
Toner door
Before You Start
Output tray
Paper support
Printer panel
Front door release
Right side door
Parallel interface connector
Rear cover
Network interface connector
USB interface connector
Optional paper feeder
cable cover
AC inlet
Rear tray cover
Power switch
9
Page 10

Before You Start
Printer Panel
Button Operation
Button Operation
While Ready is displayed
In Menu mode, pressing this button exits Menu mode and Ready is displayed on the LCD.
When Processing or Printing is displayed in the upper line of the LCD, pressing this button will
allow you to pause printing.
While Pause printing is displayed on the LCD, pressing this button will allow you to resume printing.
Pressing this button displays the previous item of the same level menu.
Pressing this button decreases the numerical value one by one. Holding down this button will allow you
to scroll faster.
Pressing this button displays the next item of the same level menu.
Pressing this button increases the numerical value one by one. Holding down this button will allow you
to scroll faster.
Pressing this button advances to the lower level menu.
will be ignored.
When performing the manual duplex printing function, after even pages are printed, odd pages are
printed by pressing this button.
When
LOAD Letter
how by pressing this button. However, the print may not be proper.
Pressing this button advances to the upper level menu. If an upper level menu does not exist, the
action will be ignored.
on the LCD
or
Memory Overflow
, pressing this button will allow you to enter Menu mode.
If a lower level menu does not exist, the action
, etc.
appears on the LCD, you can print the current job any-
10
While the printer prints, pressing this button will allow you to stop printing or cancel processing the
current job.
Pressing this button advances to the lower level menu.
The selection is activated by pressing this button if the lower level menu does not exist.
When the life of an Accumulator Unit, Fuser Unit or Transfer Roller is worn out in the middle of
printing, hold down this button more than 3 seconds after replacing the component.
The remaining life is reset and the replacement error will be cleared.
Page 11

Before You Start
Indicators
Four indicators show the following printer states.
Indicators Printer Status
• Printer is turned on.
• Printer is in Power Save
mode.
• Printer is turned off.
• Printer is On Line and
ready for printing.
• Printer is Off Line.
System Requirements
PC
■ CPU:
For Windows:
Pentium II or greater
For Macintosh (with Upgrade Kit):
PowerPC G3, PowerPC G4, PowerPC G5
■ Operating System:
For Windows:
Windows 98*
Windows NT 4.0*
Windows 2000*
Windows XP*
Windows Server
For Macintosh (with Upgrade Kit):
Requires Mac OS 8.6 through 9.2; built for Mac OS X.
Requires Mac OS X v10.1, 10.2, 10.3.
■ RAM:
64 MB or more
1
, Windows 98 SE*2, Windows Me*3,
4
(Service Pack 6),
5
(Service Pack 4),
6
(Service Pack 1, Service Pack 2),
TM
2003*
7
Before You Start
• Printer is in normal ready
condition.
• Printer is receiving data or
printing.
• Data remains in the
memory.
• Printer is in Menu mode.
• User recoverable error
(media jam, media empty,
etc.) has occurred.
• A system error (Call for
Service Error) has
occurred.
(Please contact the
reseller from which the
printer was purchased.)
On
Blink
■ Free disk space:
200 MB or more
■ Drive:
CD-ROM drive
*1Microsoft Windows 98 operating system (hereafter
referred to as Windows 98)
2
Microsoft Windows 98 Second Edition operating system
*
(hereafter referred to as Windows 98 SE)
3
Microsoft Windows Millennium Edition operating system
*
(hereafter referred to as Windows Me)
4
Microsoft Windows NT operating system Version 4.0
*
(hereafter referred to as Windows NT 4.0)
5
Microsoft Windows 2000 operating system (hereafter
*
referred to as Windows 2000)
6
Microsoft Windows XP operating system (hereafter
*
referred to as Windows XP)
7
Microsoft Windows ServerTM 2003 operating system
*
(hereafter referred to as Windows Server 2003)
Minimum Space Requirements
120 mm (4.8")
For toner door
110 mm (4.4")
130 mm (5.2")
For toner door
For power cord
Off
650 mm (25.6")
For media tray
350 mm (13.8")
For right side door
NOTE:
• When you install a consumable component or replace it
with a new one, additional space may be required.
11
Page 12

.
Setup
Setting up the Printer
Installing the Toner Cartridges
1 Open the toner door and remove the sealing tapes.
2 Open the plastic bags and take out the toner
cartridges.
3 Shake the toner cartridges several times.
Installing the Print Cartridges
1 Open the right side door.
2 Unlock and open the print cartridge holder.
4 Insert the toner cartridges in the appropriately labeled
slots. From right to left, the order of the color toner
cartridges is Black (1), Cyan (2), Magenta (3),
Yellow (4).
(4) (3) (2) (1)
3 Open the plastic bags and take out the print
cartridges.
4 Remove the protective caps and seal cover.
Color print cartridge
44
Protective caps
Seal cover
Black print cartridge
2
Protective cap
Seal cover
1
2
3
1
5 Close the toner door.
12
Page 13

Setup
2
2
2
2
5 Holding the color print cartridge with the protective
tray, match the arrow marks ( ) then insert the color
print cartridge halfway into the printer.
( )
( )
NOTES:
To prevent damage to the print cartridges,
• Do not touch the green drum surface.
• Do not expose to light for more than 45 seconds.
• Do not expose to direct sunlight.
Protective tray
7 Repeat Step 3 - 6 for the Black print cartridge.
( )
Protective tray
( )
8 Install the waste toner cartridge (1) and slide the lock
lever to the left (2).
Setup
Green
drum
6 Firmly push the color print cartridge until it snaps into
place.
• Save the protective trays, seal covers, protective
caps, packing materials and cartons for future
repacking.
1
9 Close the print cartridge holder until it clicks (1) and
lock it (2).
2
2
1
10 Close the right side door.
13
Page 14

Setup
B
11
Installing the Automatic Duplex Unit
An automatic duplex unit is provided with KX-CL600 as
standard. (An option for KX-CL400)
1 Push the front door release button (1) and open the
front door (2).
222
11
2 Insert the automatic duplex unit while confirming the
position (A and B).
3 Push the automatic duplex unit down (1) (and paste
the label (2) provided with KX-CL400 only so it is
overlapped on the jam clear label that has been
pasted).
Jam clear label
for KX-CL400
11
222
NOTES:
• The label is provided with KX-CL400 for referring to
how to clear a media jam for when installing an
automatic duplex unit (option) in future. Save it
A
carefully for the time.
• If it is difficult to paste the Jam clear label, take the
automatic duplex unit out of the printer and paste it.
4 Close the front door.
Pasting the Re-order Label
Paste the enclosed “Supplies Re-order Label” near the
printer’s LCD panel to assist you in interpreting the
supplies related messages that may appear on the
printer’s LCD display.
14
B
Page 15

Setup
Tray
When placing media in the tray, refer to the instructions
below.
When using the multi-purpose tray, refer to page 16.
CAUTION:
• Be sure to hold the media tray with both hands so that
you do not drop it. The media tray weighs approximately
6.4 kg (14 lbs.) when it is fully loaded.
NOTE:
• When the tray cover is open or the multi-purpose tray is
used, you cannot pull the media tray out of the printer or
open the front door.
Be sure to close the multi-purpose tray and the tray
cover before pulling the media tray out of the printer or
opening the front door.
2 Pinch the media guides and slide them to the width of
the media.
Media guides
3 Slide the length guide unit to adjust it to the media
length. Slide the length guide unit (2) while pressing
the PUSH mark (1) to extend it.
Length guide unit
Setup
Tray cover
Using the Media Tray
Media Type Media Weight Media Size
Plain paper
Bond/Letterhead
Recycled paper
Thin paper 60 - 75 g/m2
75 - 105 g/m
(20 - 28 lb.)
(16 - 20 lb.)
2
Letter, Legal, A4,
B5 (JIS)
1 Pull the media tray (1) out of the printer while slightly
raising its front portion and remove the tray pad (2).
1
2
Slide stopper
NOTE:
• When adjusting the length guide unit to the media
length, make sure the slide stopper of the length
guide unit is fixed by the slit of the media tray.
4 Tap the media stack on an even surface to avoid
media jams or skewed printing.
NOTES:
• Be careful not to leave fingerprints on the media,
which can result in a smudged print.
• Reusing media (used paper or jammed paper) that
has been fed through the printer once can reduce
the life of the consumables and paper path
components.
15
Page 16

Setup
5 Place media with the printing side up under the
hooks in the tray.
Hook
Upper limit
Load media with the
printing side up.
NOTES:
• When loading thick paper, card stock, coated
paper, transparencies, labels, envelopes or
Japanese postcards, use the multi-purpose tray.
See “Available Media” in the Maintenance and
Specifications section.
• Most media has instructions recommending the
side to be printed first.
• Do not mix different types or thickness of media in
the media tray at one time; this may cause a media
jam.
• Loading media exceeding the upper limit may
cause a media jam or miss feed.
6 Confirm the media guides are adjusted to the media
size, then make sure to fix the length guide unit.
Using the Multi-Purpose Tray
The multi-purpose tray serves as an additional tray (for
detailed information, refer to “Available Media” in the
Maintenance and Specifications section).
1 Open the tray cover (1) and pull it to expand the
multi-purpose tray (2).
1
2
2 Separate the media guides to the approximate width
of the media.
Media guides
3 Insert media with the printing side down into the
multi-purpose tray while adjusting the media guides
to the media width.
(For Plain Paper, etc.)
7 Slide the media tray completely into the printer.
CAUTION:
• Be sure to hold the media tray with both hands so
that you do not drop it. The media tray weighs
approximately 6.4 kg (14 lbs.) when it is fully
loaded.
8 Pull (1) and raise (2) the paper support so that the
media does not drop from the output tray.
Paper support
1
2
Upper limit
Load media with the
printing side down.
(For Envelope)
Upper limit
Flap
Load media with the
printing side down.
16
Page 17

Settings and Printing
NOTES:
• Loading media exceeding the upper limit may
cause a media jam or miss feed.
• When printing on envelopes, close the flap and
insert with the flap side on the left side into the
multi-purpose tray.
• Envelopes with openings on the shorter edge
cannot be used.
• When printing on some types of envelope, a wrinkle
may occur. For detailed information, refer to
"Envelope Specifications" in the Maintenance and
Specifications section.
• When printing on transparencies, refer to “Using
the Multi-purpose Tray” of the Basics in the
Settings and Printing section.
4 Pull the paper support (1) and raise (2) so that the
media does not drop from the output tray.
Setting the LCD Language
• English* is the default language. (* denotes the default
setting.)
• Select English, German, French, Spanish or Italian as
the language that appears on the LCD panel.
1 Press Menu/Exit (Pause) button to enter Menu
mode.
2 Press S button until the System menu appears.
3 Press X button.
The Language menu appears.
4 Press X button.
The English* menu appears.
5 Press S button until the desired language is
displayed.
6 Press Enter button to activate your selection.
Paper support
1
2
Power On
Connect the power cord to the printer. Turn the printer on.
The Power indicator lights. After the printer is ready, the
Ready indicator also lights and Ready is displayed on the
printer LCD panel.
Printing the Configuration Page
It is possible to confirm the printer's settings by printing
the Configuration Page as below.
If the printer is connected to the network, consult with the
network administrator for the printer’s network setting
before printing the Configuration Page. For detailed
information, refer to “Setting up TCP/IP on the Printer” in
the Installation section.
1 Press Menu/Exit (Pause) button to enter Menu
mode.
The System Information menu appears.
NOTE:
• If the hard disk drive is installed in the printer, press
S
button to display the System Information
menu.
Settings and Printing
NOTES:
• If Self Calibration is performed, it will take some time to
complete.
• When the printer enters Power Save mode, the Power
indicator will start blinking and Power Save will be
displayed on the printer LCD panel.
• When you turn on the printer for the first time, it will take
about 5 minutes to fill the printer with toner. When the
process is completed, Ready is displayed on the printer
LCD panel.
2 Press X button.
The Menu Map menu appears.
3 Press S until the Configuration Page menu
appears.
4 Press Enter button.
The printer will start printing the Configuration Page.
17
Page 18

Settings and Printing
Connecting the Printer to a Computer
Three types printer to computer connections exist.
NOTE:
• If you do not have a network, parallel or USB interface
cable, you may need to purchase one.
[A] When using the network interface cable:
NOTES:
• Use category 5 shielded twisted pair cable with RJ-45
connectors.
• Do not connect connectors other than 100Base-TX /
10Base-T. Excessive current flow may cause damage of
the printer.
1 Connect the interface cable from the printer to a
network device.
2 Print the Configuration Page to confirm the IP
Address of the printer.
[B] When using the parallel interface cable:
NOTES:
• Use a shielded cable 2.0 m (6.6 ft.) or less in length.
1 Turn off the printer.
• Be sure to turn off the printer to avoid the Plug and
Play installation.
2 Connect the interface cable from the printer to a
computer.
[C] When using the USB interface cable:
NOTES:
• Use a shielded cable 5.0 m (16.4 ft.) or less in length.
• For Windows 98, only Windows 98 SE is available when
using a USB interface.
• Windows NT 4.0 does not support USB interface.
1 Turn off the printer.
2 Connect the interface cable to a computer.
• Be sure to turn off the printer and not to connect the
interface cable to the printer to avoid the Plug and
Play installation.
Installing Driver and Utilities
KX-CL400 or KX-CL600 is the model of the PCL printer. If
you install an Upgrade Kit (for PostScript 3) in the printer,
the model name displayed on the printer driver and utility
window becomes KX-CL410 or KX-CL610 respectively.
KX-CL410: KX-CL400 with Upgrade Kit
KX-CL610: KX-CL600 with Upgrade Kit
The following steps are for when installing the printer
driver for the KX-CL400 or KX-CL410. For other models,
replace the model name with the actual one.
Contents of the Printer Software
The following is the list of drivers and utilities included in
the printer CD-ROM provided with the model of the PCL
printer or Upgrade Kit. To install the driver, refer to the
following steps.
To install utilities, refer to the Installation section.
■ For Windows
Printer Drivers and Utilities
PCL 6 Printer Driver
PostScript 3 Printer Driver
Device Monitor
Embedded Web Launcher
Direct Printing System
HDD Utility
(with Hard Disk Drive)
Print Media Test Pattern
Network Setup Tool
Web Administrative Tool
Remote Maintenance
Setting Tool
Print Count Manager
KX-CL400
KX-CL600
99
–
99
99
–
99
99
99
99
99
99
Upgrade
Kit
9
9
[A] Network
interface
[C] USB
interface
Computer
18
[B] Parallel interface
9: included –: not included
■ For Macintosh (with Upgrade Kit)
Printer Drivers and Utilities
PostScript 3 Printer Driver
Status Display
Network Setup Tool
9
: included –: not included
KX-CL400
KX-CL600
–
–
–
Upgrade
Kit
9
9
9
Page 19

Settings and Printing
Installing Printer Driver
NOTES:
•
If using the
the printer with a network interface cable and to turn it on.
•
If using the
off the printer or not to connect the printer with an interface
cable to avoid the Plug and Play installation.
Network
Parallel
interface cable, be sure to connect
or
USB
interface cable, be sure to turn
■ For Windows
There are the following two methods to install the printer
driver for Windows.
• Automated Driver Installation
• Custom Driver Installation
This Setup Guide only briefly explains Automated Driver
Installation. For detailed instructions, refer to the
Installation section.
NOTE:
• For Windows NT 4.0, Windows 2000, Windows XP and
Windows Server 2003, make sure to log on as an
administrator.
1
Insert the printer CD-ROM into the CD-ROM drive.
The CD-ROM launches automatically.
NOTE:
• If the CD-ROM does not launch automatically,
perform the following steps (1) - (2).
(1) Double-click the My computer icon.
(Windows XP / Windows Server 2003: Start My Computer)
(2) Double-click the CD-ROM icon.
2 Click English.
3 Click Install Printer Driver.
4 Click Automated Driver Installation.
The License Agreement window is displayed.
5 Click [Yes].
The Printer port selection window is displayed.
6 [A] When using the Network interface cable:
Click on Select the Network port for KX-CL400
check button, and select the printer of the IP Address
confirmed on the Configuration Page (refer to
“Printing the Configuration Page” on page 17).
8 Click on the check box of the installed options in your
printer and select the total memory from the Memory
list, and click [Next >].
The setup program starts installing the printer driver.
9 [A] When using the Network interface cable:
(1) Click [Finish].
[B] When using the Parallel interface cable:
(1) Click [Finish] and turn the printer on.
If the Welcome to the Found New Hardware
Wizard window is displayed, refer to the
Installation section.
[C] When using the USB interface cable:
NOTE:
• For Windows 98, only Windows 98 SE is available
when using a USB interface.
(1) When the Connect the printer to the computer
window is displayed, connect the USB interface
cable and turn the printer on.
Perform the following steps depending on the
operating system:
For Windows 98 / Windows Me:
(2) When the InstallShield Wizard Complete
window is displayed, click [Finish].
For Windows 2000:
(2) If the Digital Signature Not Found window is
displayed, click [Yes].
The InstallShield Wizard Complete window is
displayed.
(3) Click [Finish].
For Windows XP / Windows Server 2003:
(2) If the Welcome to the Found New Hardware
Wizard window is displayed, refer to the
Installation section.
(3) Click [Finish].
NOTE:
• Restarting of the computer may be required
depending on your computer environment. In this
case, restart your computer.
Settings and Printing
[B] When using the Parallel interface cable:
Click on Select an existing printer port check
button, and click on the LPT port (Example: LPT1).
[C] When using the USB interface cable:
Click on Install via the USB port (plug and play
installation) check button.
7 Click [Next>].
The Installed Options window is displayed.
■ For Windows (with Upgrade Kit)
When installing the printer driver for the printer equipped
with the Upgrade Kit, use the printer CD-ROM provided
with the Upgrade Kit.
The Automated Driver Installation is the same with the
above steps. For detailed instructions, refer to the
Installation section.
19
Page 20

Settings and Printing
■ For Macintosh (with Upgrade Kit)
To print from a Macintosh, the optional Upgrade Kit
must be installed in the printer.
For detailed instructions, refer to the Installation section.
For Mac OS 8.6 - 9.2
Step 1: Installing the PPD file and utilities
Install the KX-CL410 PPD (PostScript Printer
Description) file, and then install the Adobe
PostScript printer driver.
1 Insert the printer CD-ROM in your CD-ROM drive.
2
Open the
English
folder (
KX-CL410:Mac OS: English
3 Double-click the KX-CL410 Installer icon.
The END-USER LICENSE AGREEMENT window is
displayed.
4 Follow the instruction on the screen to complete the
installation.
Step 2: Installing the Adobe PostScript printer driver
1 Insert the printer CD-ROM in your CD-ROM drive.
2
Open the
English
folder (
KX-CL410:Mac OS: English
3 Double-click the AdobePS 8.8 Installer icon.
The Adobe PostScript Driver window is displayed.
4 Follow the instruction on the screen to complete the
installation.
For Mac OS X 10.1 - 10.3
Using the Printer Driver
■ For Windows
For example, to print a document created in Microsoft
WordPad, perform the following steps.
1 Click [Start], select Programs (All Programs for
Windows XP / Windows Server 2003) and select
Accessories, then click WordPad.
The WordPad window is displayed.
2 Click the File menu, then click Print....
The Print window is displayed.
3 Select Panasonic KX-CL400 PCL6.
).
4 For Windows 98 / Windows Me / Windows NT 4.0:
Click Properties.
For Windows 2000:
Proceed to the step 5.
For Windows XP / Windows Server 2003:
Click Preferences.
5 Click a tab to set each setting.
• When setting the printer from an application, the
setting is returned to the default setting if the
application is closed.
).
6 (Click [OK] and) Click [Print] or [OK] in the Print
window of the application to print the document.
NOTE:
• The Print window appearance depends on the
application for Windows. Refer to the application
manual.
Installing the PPD file and printer driver
1 Insert the printer CD-ROM in your CD-ROM drive.
2
Open the
(KX-CL410:Mac OS X:English).
English
folder
3 Double-click the KX-CL410 Installer icon.
4 Follow the instructions to complete the installation.
NOTE:
• If you want to print Classic application documents, you
are required to install the KX-CL410 software for Mac
OS 9.2, then set the computer and printer. Refer to "For
Mac OS 8.6 - 9.2" in this section.
■ For Macintosh (with Upgrade Kit)
To set the computer and printer, refer to the Settings and
Printing section.
Removing Driver and Utilities
For the instructions to remove the printer driver and
utilities, refer to “Removing Driver and Utilities” for
Windows or Macintosh in the Installation section.
20
Page 21

Maintenance
Clearing a Jam
If a media jam occurs, the printer panel displays
"Jam <#>". (#: indicates the jam portion)
To clear the media jam, refer to “Clearing a Jam” in the
Maintenance and Specifications section.
NOTE:
• When a media jam occurs while you are using the multipurpose tray, be sure to push the multi-purpose tray and
close the tray cover before you pull the media tray out of
the printer or open the front door.
Replacing Supplies
When the life of a component is worn out, the printer
cannot print.
For detailed information, refer to the installation guide
included in the supply’s carton to install it.
When the printer panel displays that a supply needs to be
replaced, make sure that you have replacement supplies
on hand.
• Toner Cartridge
• Waste Toner Cartridge
• Print Cartridge
• Fuser Unit
• Accumulator Unit
• Transfer Roller
Please contact the reseller from which the printer was
purchased.
For detailed information, refer to “User Replaceable
Components” in the Maintenance and Specifications
section.
Setting “Adjust to Media”
This function is available in Windows only (not available in
Macintosh).
If the print quality deteriorates when you print on other
than recommended media, change the Adjust to Media
settings. You can examine the print quality by printing out
the test pattern.
To change the setting of Adjust to Media, refer to “Setting
“Adjust to Media” (Windows Only)” of Basics in the
Settings and Printing section.
Cleaning the Printer
Periodic cleaning of the printer is recommended. The
frequency of cleaning is dependent upon the environment
in which the printer is used. You should clean the printer:
• At least once a month.
• When the printer experiences frequent media jams.
• When print quality has become deteriorated.
For detailed information, refer to “Cleaning the Printer” in
the Maintenance and Specifications section.
Repacking
It is highly recommended that you keep the original carton
and ALL packing materials.
Should you need to transport or ship your printer, please
follow the instructions “Repacking” in the Maintenance
and Specifications section.
Adjusting Color Density
The printer panel provides an interface to adjust the
density of the toner applied to the media.
This feature compensates for changes that can occur as
environmental conditions change, replacement of
accumulator unit and/or print cartridge.
To adjust the color density, refer to “Adjusting the Color
Density (Color Calibration)” of Basics in the Settings and
Printing section.
Maintenance
21
Page 22

Troubleshooting / Others
Troubleshooting
Before contacting an authorized service representative,
perform the following step.
Error message is
displayed on the LCD
panel.
Trouble occurs during
printing.
Trouble occurs when
printing to the network
printer.
Prints have dull, faded
colors.
Technical Support Calls
If you have read this manual, then tried the
troubleshooting procedures and you are still having
difficulty, please contact the reseller from which the printer
was purchased.
LCD Panel Message
Trouble Corrective Action
Load Letter • Load Letter size media.
JAM1
See front door label
TC-K
Replace
WTC
Replace
PC-Black
Replace
PC-Color
Replace
Printer Error (digit)
Call for Service.
For other LCD panel messages, refer to “LCD Panel
Message” in the Maintenance and Specifications
section.
• Clear the media jam.
• Replace the Black toner
• Replace the waste toner
• Replace the Black print
• Replace the color print
• Turn the printer off and back on
Refer to “LCD Panel
Message”.
X
X Refer to “Printer
Troubleshooting”.
Refer to “Trouble with
Network Printing”.
X Refer to “Trouble with
Print Quality”.
cartridge.
cartridge.
cartridge.
cartridge.
again. If the problem persists,
contact an authorized service
representative.
Printer Troubleshooting
Trouble Corrective Action
The printer is not
operating.
The printer does
not print correctly.
The setting for
printing is not
effective.
Media is not fed
from the multipurpose tray.
Frequent paper
picking errors or
media jams
occur.
Error indicator is
blinking.
Error indicator is
on.
• Plug the power cord into an AC
outlet firmly and turn the printer
on.
• Connect the appropriate
interface cable(s) properly.
Appropriate driver may not be
installed or this printer may not be
selected.
• Install the proper printer driver
or select the appropriate printer
when printing a document. Refer
to the Installation section.
Some applications may not allow
you to change the settings
through the printer driver's setting
window.
• Change the application's
settings.
• Select Multi-Purpose Tray for
Paper Source in the printer
driver.
• Make sure that the media is
installed under the hooks at the
front of the media tray.
• Do not overfill the media tray
(upper limit label).
• Be sure to gently insert the
media tray into the slot of the
printer when installing it.
• Clean the delay pad and pickup
rollers of the media tray.
A recoverable error has occurred
such as an open door or a media
jam.
• Correct the condition displayed
on the printer panel (close the
door or clear the media jam,
etc.).
A system error has occurred.
• Turn the printer off and back on
again. If the problem persists,
contact an authorized service
representative.
22
Trouble with Network Printing
Refer to "Trouble with Network Printing" in the Maintenance
and Specifications section.
Page 23

Troubleshooting / Others
Trouble with Print Quality
To check the print quality, execute a test print as follows.
1 Press Menu/Exit (Pause) button on the printer panel.
2 Press S button until the System Information menu
appears.
3 Press X button.
4 Press S button until the Test Print menu appears.
5 Press Enter button to print each color page.
Trouble Corrective Action
On the Test Print,
a single color is not
uniform or many
vertical streaks
(both light and dark)
of slightly different
density and nonuniform color are
present.
On the Test Print,
halftone area has
areas of weak color.
A single color
appears faded.
For detailed information, refer to “Trouble with Print
Quality” in the Maintenance and Specifications section.
■ Media
This printer is designed to work well with most types of
paper. However, differences in paper may have significant
effects on the quality of the print or the reliability of paper
handling. For detailed information, refer to “Media” in the
Maintenance and Specifications section.
The toner is almost depleted.
• Replace the toner cartridge.
The print cartridge is damaged.
• Replace the print cartridge.
Paper does not match the
environmental conditions, or it
has too much moisture.
• Try fresh paper, or another
type of paper.
• Store media in the original,
dust-free package in the
same environmental
conditions as the printer.
The color density is set
incorrectly in the printer panel.
Refer to "Adjusting the Color
Density (Color Calibration)" in
the Settings and Printing
section.
The toner is almost depleted.
• Replace the toner cartridge.
The print cartridge is damaged.
• Replace the print cartridge.
Options and Supplies
Please contact the reseller from which the printer was
purchased when purchasing options or supplies.
Options
Model Number Description
KX-CLAD1 Automatic Duplex Unit for KX-CL400
KX-CLPF1 Optional Paper Feeder
KX-CLUG2 Upgrade Kit (for PostScript 3)
for KX-CL400
KX-CLUG3 Upgrade Kit (for PostScript 3)
for KX-CL600
KX-CLEM3 128 MB DIMM (Memory)
KX-CLEM4 256 MB DIMM (Memory)
KX-CLHD2 2.5” Hard Disk Drive
Supplies
It is recommended that genuine Panasonic supplies are
used.
Model
Number
KX-CLTC3
KX-CLTC4
KX-CLTM3
KX-CLTM4
KX-CLTY3
KX-CLTY4
KX-CLTK3
KX-CLPC3
KX-CLPK3
KX-CLFU3
KX-CLWT3
KX-CLAU3
KX-CLTR3
1
*
The rated life expectancy of each consumable is based
on printing under specific operating conditions such as
page coverage for a particular paper size (5% coverage
per color at standard quality on A4 size paper). The
actual consumables life will vary depending on its use
and other printing variables including page coverage,
paper size, media type, print quality, continuous or
intermittent printing, number of color planes, ambient
temperature and humidity.
Cyan Toner Cartridge 6K
Cyan Toner Cartridge 3K
Magenta Toner Cartridge 6K
Magenta Toner Cartridge 3K
Yellow Toner Cartridge 6K
Yellow Toner Cartridge 3K
Black Toner Cartridge 6K
Color Print Cartridge
Black Print Cartridge
Fuser Unit
Waste Toner Cartridge
Accumulator Unit
Transfer Roller
Description
Average Life
(pages)*
1
6,000
3,000
6,000
3,000
6,000
3,000
6,000
15,000
15,000
100,000
14,000
100,000
100,000
Troubleshooting / Others
23
Page 24

The serial number is located on the label on the
rear of the printer. For your convenience, record the
number below and keep this book along with your
proof of purchase, in the event of a theft or for
future reference.
MODEL NO.
NAME OF
RESELLER
SERIAL NO.
DATE OF
PURCHASE
Panasonic Canada Inc.
5770 Ambler Drive, Mississauga, Ontario, L4W2T3
http://www.panasonic.ca/
Matsushita Electric Industrial Co., Ltd.
http://panasonic.co.jp/global/
World Wide Web Support: http://panasonic.co.jp/pcc/products/en/printer/
Printed in Japan PJQQC0033ZA K0505S0
 Loading...