

Page 1
Before You Begin
DS-510
Setup Guide
English
WA101800XD
Thank you for purchasing the USB Device Server “DS-510”.
This Setup Guide provides information on how to congure
and use the DS-510 in your network.
Package Contents
DS-510
Warranty Booklet
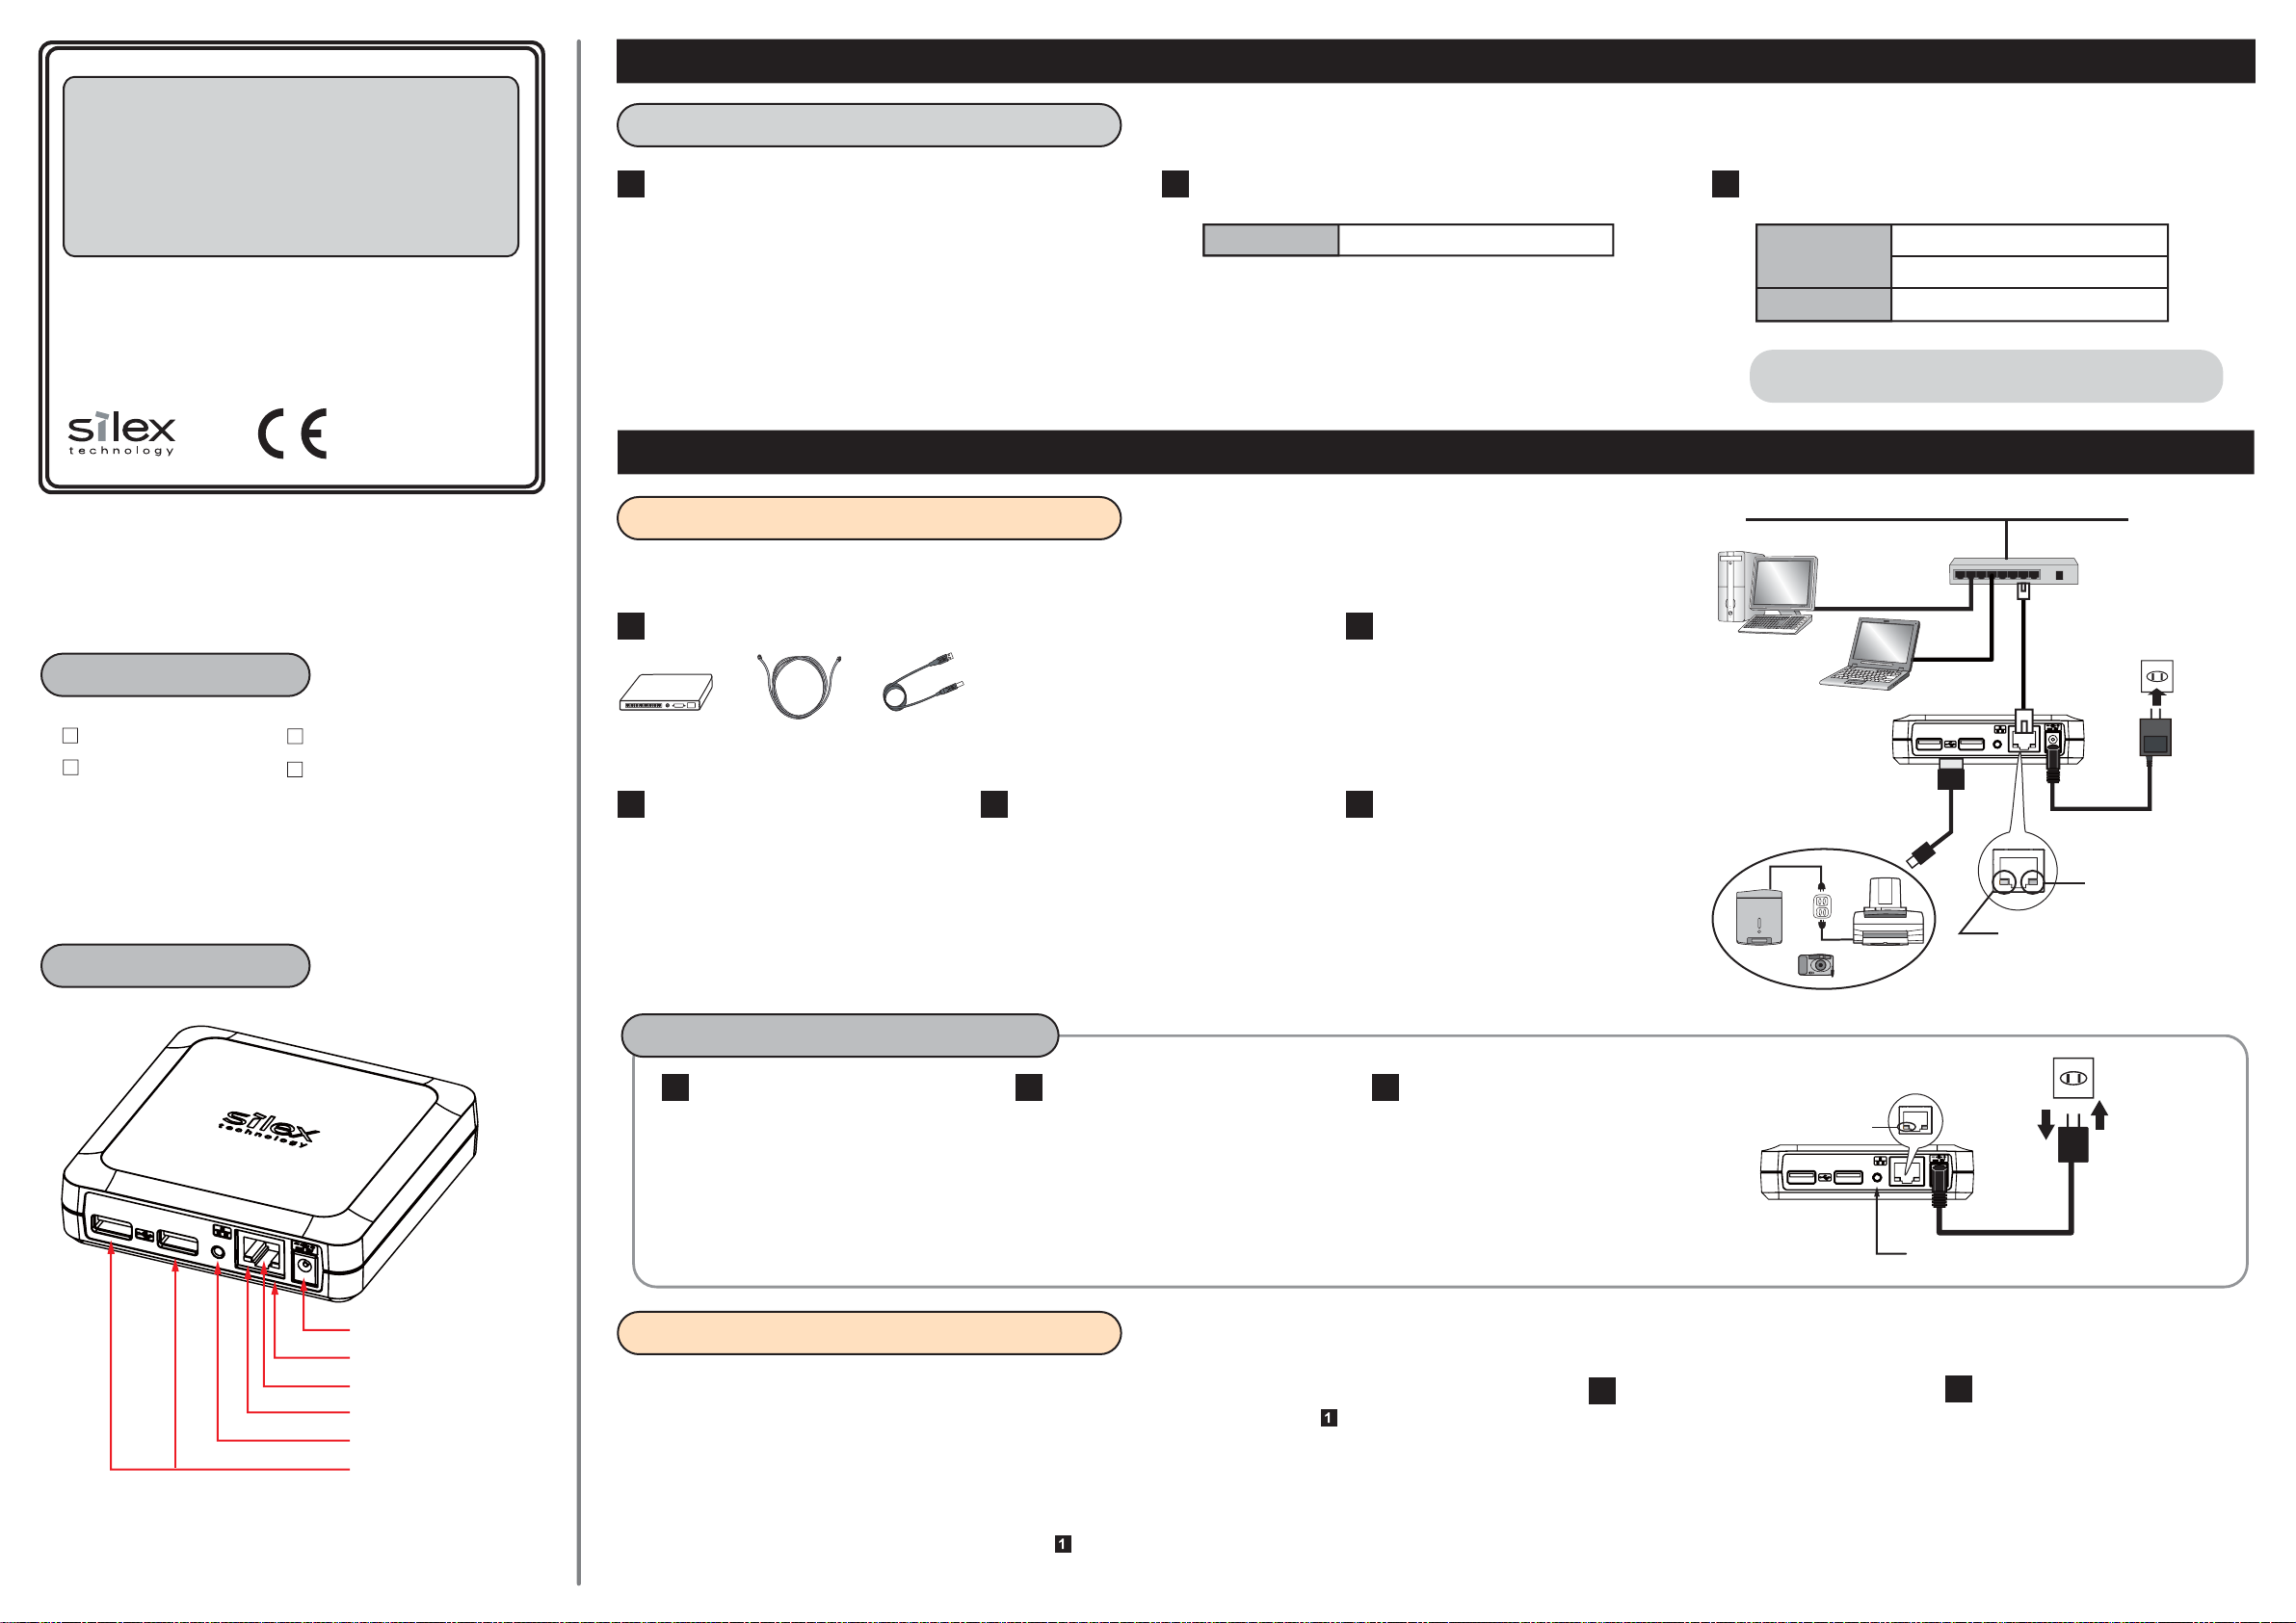
Name of Parts
AC adaptor
Setup Guide (this document)
Downloading the necessary items
Access the URL below from the computer you are using to
1 2
congure the DS-510.
URL: https://www.silextechnology.com/
1-1. Power on
How to power on the DS-510 is explained:
The following items are required.
1
Ethernet HUB Network cable USB cable
Connect the DS-510 to the USB device
3
using a USB cable (2).
* There are USB devices not supported due to
the driver specification. Please check the
latest compatibility information on our
website.
* For each USB port, only 1 device can run on
bus power.
* If the DS-510 has been used in another network,
reset it to factory default first (see below for
details).
Connect the AC adaptor to the DS-510 (3)
4 5
and the AC plug to the power outlet (4).
Check that POWER LED and LINK LED
turn on (5).
* Be sure to use the AC adaptor that came
with the DS-510.
This section explains how to download the necessary utilities and user's manual from our website.
Go to the Support page and select the product model.
Product Model
DS-510
Download the utilities and user's manual below and extract them on
3
your computer.
Utility
User's Manual
There are Windows version and Macintosh version for each utility.
Please download the one appropriate for your operating system.
Device Server Setup
SX Virtual Link
DS-510 User's Manual
Step 1. Power on and Conguration
Connect the DS-510 to the Ethernet
2
HUB using a network cable (1).
If the USB device requires external
power, use the power supply cable (6).
(6)
USB Device
USB Cable
Network
(2)
Ethernet HUB
Network Cable
(1)
(5)
LINK LED
Power Outlet
(4)
(3)
AC Adaptor
POWER LED
Power connector
POWER LED
Network port
LINK LED
Push Switch
USB port
Factory Default Conguration
Remove the AC plug from the power
122 3
outlet (1).
Push and hold the push switch (2)
with a fine tipped object such as a pen
or pencil while inserting the AC plug
back into the power outlet (3).
Continue holding.
1-2. Conguration
How to congure the DS-510 is explained:
By default, the DS-510 is configured to automatically obtain an IP
address from the DHCP server. If the DHCP server is installed on
your network, the configuration will not be necessary. In such a
case, go on to install the SX Virtual Link (see the back).
When you want to configure the IP address manually or you are not
sure if there is the DHCP server on your network, move on to .
* Before moving on to , please temporarily disable
the rewall function of the computer you use for
conguration. Some of the methods to disable the
rewall are provided in the FAQ on our homepage.
- Standard Windows XP rewall
- Commercial security software's rewall function
When the LINK LED starts to blink (4),
the factory default configuration is
complete.
Release the push switch.
Extract the Device Server Setup le
1
that you have downloaded at
Downloading the necessary items.
LINK LED
(4)
(2)
Push Switch
Power Outlet
(1)
AC Adaptor
See the contained PDF manual (Device
22
Server Conguration) to congure the
DS-510 using the Device Server Setup
utility.
(3)
Page 2

Step 2. Using the USB Devices over Network
Step1.本製品の設置と設定
The SX Virtual Link is the software program to make a
communication between your computer and the USB
devices connected to the device server.
To use the USB devices over the network, you have to
connect to or disconnect from it using the SX Virtual Link.
2-2. Basic Use of the SX Virtual Link
Starting the SX Virtual Link
Connecting the USB devices
* When using the USB device for the rst time, you may
need to install the device driver for that USB device.
To install the driver, refer to the operating manual that
came with the USB device, or follow the instructions on
the screen displayed after clicking the Connect button
in the SX Virtual Link.
Windows
Click the application icon ( ) in the task tray
or click Start - (All) Programs - SX Virtual
Link - SX Virtual Link.
2-1. Installing the SX Virtual Link
If the SX Virtual Link is not installed to your computer,
install it by following the instructions in this section.
Macintosh
Click the application icon ( ) in the Dock or
click Macintosh HD - Applications - SX
Virtual Link.
Select a USB device and click the Connect button ( ).
1
The USB device can be connected when the status icon
[ ] is displayed.
* The USB device can also be connected by selecting
and double-clicking it on the SX Virtual Link.
* If a device server is not displayed on a list, please click
the Refresh button ( ).
* Do not unplug the USB cable or network cable, or click
the Disconnect button ( ) on the SX Virtual Link
while the USB device is in use.
1
Windows
Extract the SX Virtual Link le that you have downloaded
at Downloading the necessary items.
Macintosh
See the contained PDF manual (SX Virtual Link Installation) to
2
2
install the SX Virtual Link.
The SX Virtual Link installer will restart your computer after it is
installed. Make sure that you nished all software programs on your
computer before starting the installation.
The Plug and Play function automatically creates an
2
2
appropriate environment to use the selected device.
The USB device will be ready to use once the status
icon has changed to [ ]. See the operating manual
that came with your USB device for how to use it.
* Only one device can be connected at a time. When
the USB device is in use by another computer, the
status icon [ ] is displayed, which means that the
USB device is not available now.
Disconnecting the USB devices
When you have nished using the USB device,
disconnect the device by selecting it and
clicking the Disconnect button ( ).
* The USB device can also be disconnected by selecting
and double-clicking it on the SX Virtual Link.
Accessing Online Help
Click the Help button ( ) and
select Help from the menu displayed.
Windows
Macintosh
Customer Support
USA : silex technology america, Inc.
E-mail : support@silexamerica.com
URL : https://www.silextechnology.com/
Phone : +1-657-218-5199
Europe : silex technology europe GmbH
E-mail : support@silexeurope.com
URL : https://www.silextechnology.com/
Phone : +49 -2154-88967-0
 Loading...