

Silent Gliss 11092
Single Channel Timer Unit
User manual and setting instructions
Intelligent timer remote control
Features
• Radio control
• Battery operated
• LCD display
• Touch button control
• Timing function with 2 independently programmable
time points per day for daily and weekly cycles
• Surface mounted back box with magnetic holder

Technical Data
Part number 11092
Power Supply 2 x CR2032 (3V) batteries
Power 10mW Max
Radio Frequency 433.92 MHz
Number of channels 1
Operation method Touch screen
Timer settings 2 Programmable timing points per day
Timing setting
Clock setting
Week display
Function button
Left
Right
Signal status
Screen locking
power status
Power
Timing status
close
Stop
open
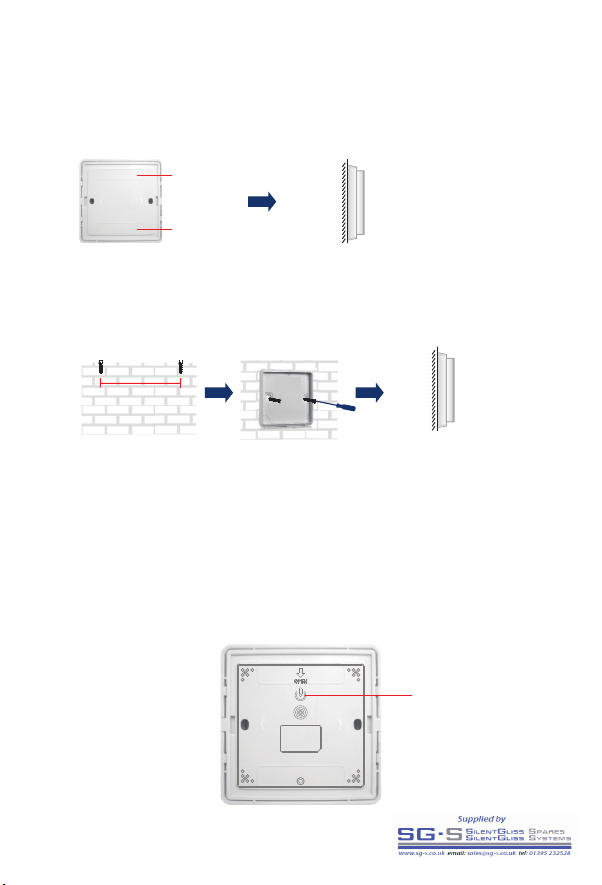
Rear view
Screen display and button functions
Power
Press for 1sec. to
turn on – display
will activate
Installation
Installation with adhesive tape – suitable for glass and smooth tiles
Standard wall fixing
adhesive
tape
60mm
adhesive
tape
Remove backing tapes
Drill and insert
wall plugs
Operating Instructions
Activation
Fiix the magnetic
holder
Place timer in
magnetic holder
Wall
Stick on glass
or smooth tile.
Glass or smooth tiles

Addressing Timer unit to Motor
On Motor
On Timer Unit
If at this point pressing open closes the curtains follow the following steps to
change the direction.
1. Press stop on the timer for 5 secs
2. LED on motor flashes red slowly
3. Release stop and re-press within 10 secs
4. LED on motor flashes blue x 3 – direction changed
Please note: During operation the timer locks the screen if there is no further
operation within 30 seconds.
LED Programming button
1. Push programming button with a
pin for 1 sec
2. LED blinks red
3. Please do following step below
within the next 10 sec
1. Press function
button for 3s to enter
control window
2. Press open to
send signal to motor

Time and day setting (24 - hour)
For example, if you need to set Thursday 16.35, please follow the steps below
1. Press function
button for 3s to
enter control
window
2. Press function
button and hold 3s
to enter setting
window
3. Press stop
function to enter
timing setting
window
Manual Operation
1. Press function
button for 3s to enter
control window
2. Press open, close,
stop to achieve
open, close, stop
movements manually

1. Press function
button for 3s to
enter control
window
Timer setting (2 time points per day – 14 max – Select A,B.C,E,F,G,H,I,J,L,O,P,S,U).
For example if you want to set time point B (2nd timing point) to open at 8.30
Monday follow the steps below.
1. Enter timing window
2. Press function
button and hold 3s
to enter setting
window
4. Press left/right to
change the
time/week
5. Press open/close
to set time/week,
set the time as
16:35, week day as
Thursday
6. Press function
button and hold for
3s, then back to
control window

7. Press
open/close
to set the time
point as ON
8. Press right to
timing setting
Set the working time (8.30)
To set time point (time point 2)
5. Press open/close
to change the time
point number and
choose point B
6. Press right to
ON/OFF
4. Press stop enter
timing setting
window
3. Press right to
change to timing
setting
9. Press open/close
to set hour 8, press
right to minutes,
press open / to set
30, so now 8.30

13. Press
open/close to move
week day, press
stop to add/delete
days
12. Press right to
week setting
Set days of week (Monday to Friday)
10. Press right to
open/close setting
Set the timer point to up or down (up)
11. Press
open/close to set it
as open
Note:
= open, = close

15. Press and hold
the function button
for 3s to save and
exit from the
window
Time point setting now complete.
Note
If you want to assign a time point to more than one day follow steps 13 – 14,
to choose the weekdays required.
If you do not require a particular day press right to ignore the day or press
stop to delete it.
Trouble Reasons Solution
The display is not Please check the Please change battery
completed show power display re-set time/day
and not clear (time points are
stored permanently)
Poor remote sensitivity Please check the Please change the
installation ambient installation position
if there is metal things
No response after 1. Screen is locked 1. Please press
pressing button 2. Please touch it function button 3s to
in correct area unlock the screen
2. Please touch
it in correct area
Trouble shooting
14. To set the
weekly day from
Monday to Friday

www.silentgliss.co.uk
Silent Gliss Ltd.
Pyramid Business Park
Poorhole Lane, Broadstairs
Kent CT10 2PT
Great Britain
Tel: +44 (0) 1843 863571
Fax: +44 (0) 1843 864503
info@silentgliss.co.uk
SGGB_0816
 Loading...