

Silent Alert TD4A-2227-UK Quick Start Manual

Quick start guide TD4A-2227-UK
Mini telephone monitor
1
2
3
4
5
6
7
8
9
10
11
12
13
14
15
16
1 = System Code 1
2= System Code 2
3 = System Code 3
4 = System Code 4
5 = Audio Monitoring
6 = Zone Multiplier (7-12)
7 = Short Audio Delay
8 = Medium Audio Delay
7 & 8 = Long Audio Delay
9 = PIR Delay 5 Mins
10 = PIR Delay 10 Mins
9 & 10 = PIR Delay 15 mins
11 = Zone 6
12 = Zone 5
13 = Zone 4
14 = Zone 3
15 = Zone 2
16 = Zone 1
MOVE KEY DOWN
TO SWITCH ON
Any questions? Call us on 01246 450789
TM
Silent
Alert
12:14
SNZ
PM
Status light
Test button
Configuration
switch Cover
PP3 battery
contacts
Screw cap
Screw cap
CCD4A-2220-EU
CARE CALL
MINI MAGNETIC
DOOR MONITOR
USE ALKALINE PP3
9 V BATTERY ONLY
Batch 06/01/14
www.silent-alert.co.uk
Clofield Ltd. UK
Tel: 01246-260045
Keys 1-4 System
Channel
Key 5=10 SecDelay
Key 6=20 SecDelay
Keys 5+6=30 Sec Delay
Key 7 Leave ON
Key 8 Not Used
USE WITH MAGNET SUPPLIED
PP3 Battery
The light will then will flash
green several times to show the
battery voltage.
9 flashes = 9Volts in the battery.
When a battery is first fitted the
indicator light will flash red then
green a few times.
1.
Install a 9 volt PP3 alkaline or lithium battery
making sure to observe the correct polarity.
If the light flashes red at this
point the battery is flat
and will need to be replaced.
To repeat the battery check remove the battery, press the test
button then re-insert the battery to start the sequence again.
TD4A
MONITOR
USE ALKALINE PP3
9 V BATTERY ONLY
Batch 06/01/14
www.silent-alert.co.uk
Clofield Ltd. UK
Tel: 01246-260045
Keys 1-4 System
Channel
Key 5=10 Sec Delay
Key 6=20 Sec Delay
Keys 5+6=30 Sec Delay
Key 7 Leave ON
Key 8 Not Used
USE WITH MAGNET SUPPLIED
BT phone
plug
1 2 3 4 5 6 7 8
Configuration switches shown
with cover removed. Do not alter
these without referring to page 2
3.
ADSL
PHONE
LINE
ADSL
Plug the mini monitor into a
telephone socket. If the line is
broadband enabled the
monitor should be first
connected to an ADSL
microfilter
(not supplied)
2.
Press and hold the
test button on the
front of
the monitor for
around 10 seconds.
The light will shine green for
a few seconds.
Check the Pager or
SignWave receives a signal.
If you have a system
channel code set on the
receiver refer to the
advanced settings overleaf.
4.
Ring the phone line the monitor
is connected to.
The light will shine green
when a call is detected and
the monitor will transmit.
WARNING! Your device and its accessories are not toys. They may contain small parts. Keep them out of the reach of small children.
Advanced settings TD4A-2227-UK
Mini telephone monitor
Any questions? Call us on 01246 450789
TM
Silent
Alert
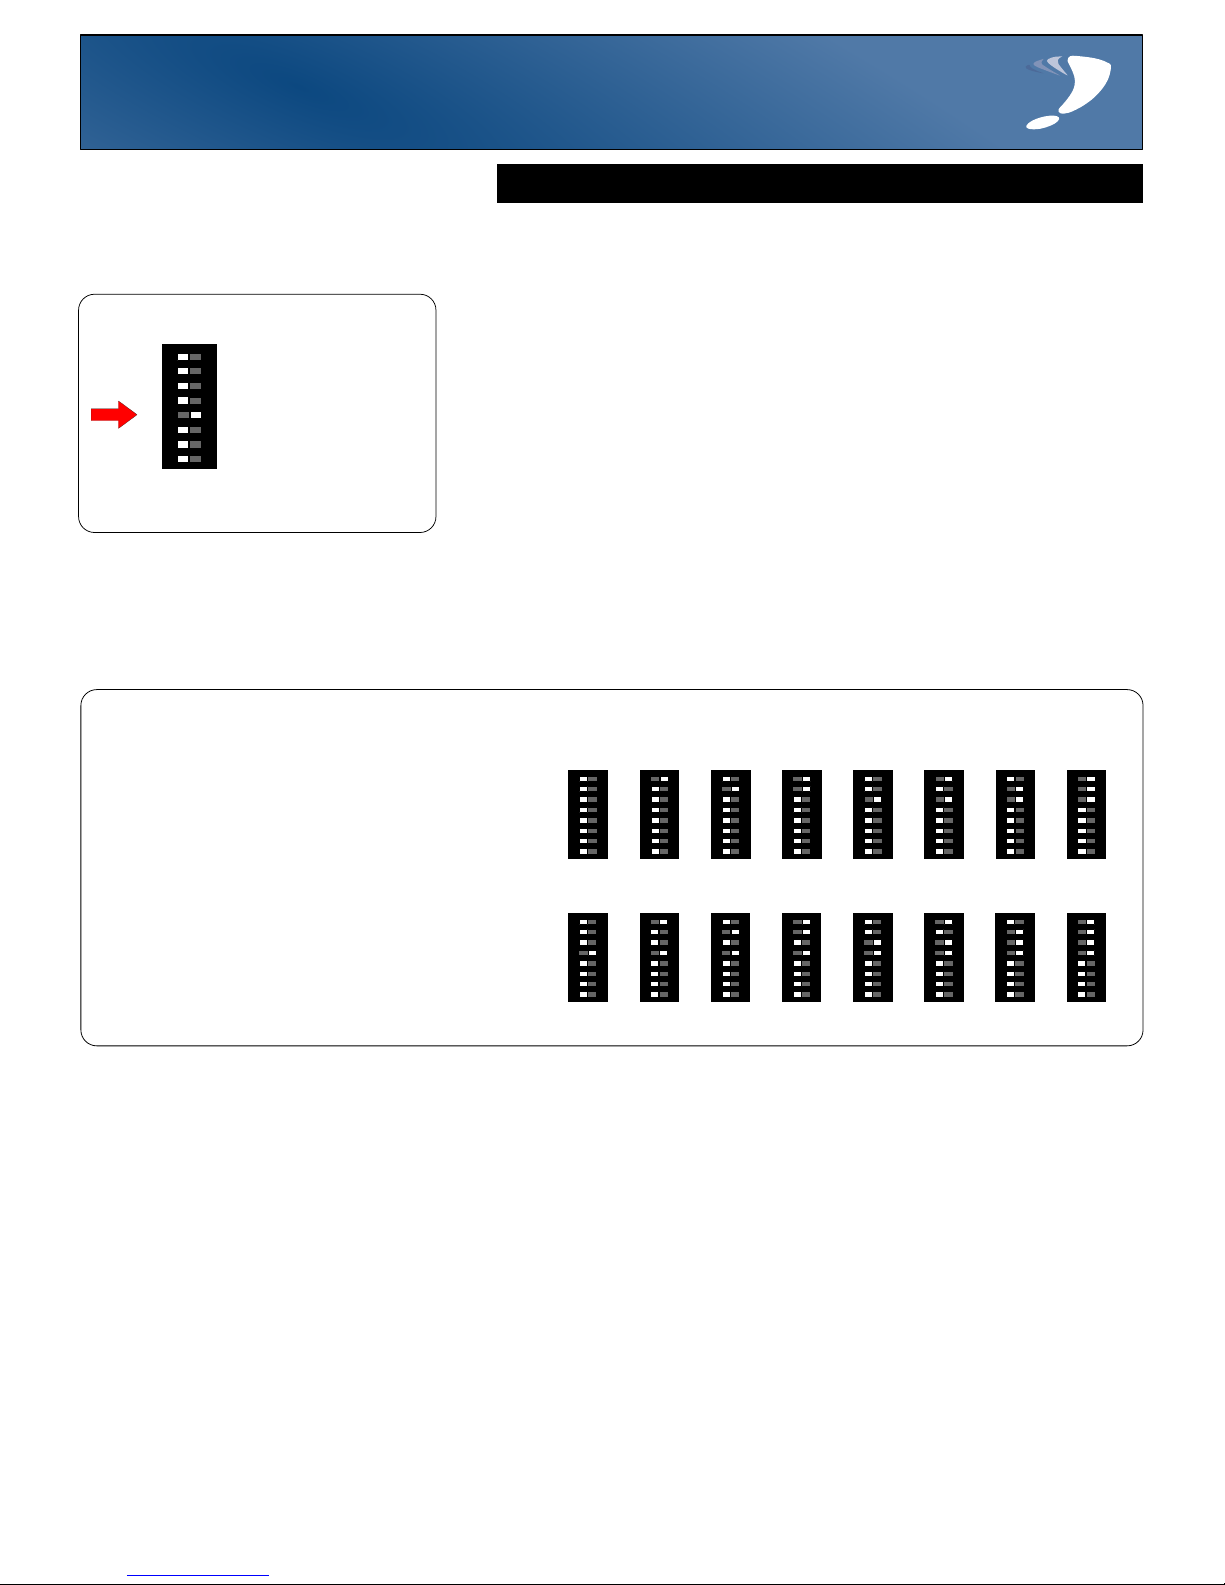
Changing the system channel code
NOTE. In most cases it is not necessary to change the system code. However, when one or
more systems are in close proximity, system codes can be used to avoid interference from
other SA3000 systems using up to a maximum of 16 channels.
1 2 3 4 5 6 7 8
1 2 3 4 5 6 7 8
1 2 3 4 5 6 7 8
The monitor is supplied with no
system code switches set (system code 1).
For reference this is the factory setting
should you need to re-set the unit.
System codes can be set using
key switches 1 - 4.
The diagram to the right shows the 16
possible combinations.
Be sure that the same system code is set on
the receiver to be used and any other
monitoring options in that system.
2
3
4
5
6 7 8
1
1 2 3 4 5 6 7 8
1 2 3 4 5 6 7 8
1 2 3 4 5 6 7 8
1 2 3 4 5 6 7 8
1 2 3 4 5 6 7 8
9
1 2 3 4 5 6 7 8
10
1 2 3 4 5 6 7 8
12
1 2 3 4 5 6 7 8
11
1 2 3 4 5 6 7 8
13
1 2 3 4 5 6 7 8
14
1 2 3 4 5 6 7 8
15
1 2 3 4 5 6 7 8161 2 3 4 5 6 7 8
It is possible for the monitor to send a person to person signal. This is ideal when two
telephone lines need to be monitored.
1 2 3 4 5 6 7 8
Move key 5 to the right
to change to
person to person.
Press the test button
and check the correct
event is received by the
Pager or SignWave
 Loading...