


USERS MANUAL
This unit is designed for professional installation only.
Please visit our website at www.magnadyne.com
For Warranty Information:

2-WAY LCD REMOTE CONTROL - SLRF90
A. CHANGING THE BATTERIES
BATTERY REPLACEMENT: SLRF90
The Two-Way remote transmitter is powered by one “AAA” Battery. When the power of the battery
weakens a
beep sounds to indicate the power is back up on the transmitter.
BATTERY REPLACEMENT: SLRF902
One-way remote is powered by one CR2450 Battery.
icon shall be displayed on the LCD screen. When the old battery is replaced, there will be
Coin Slot to Open
UM_FULL_55SL_REV_A 2
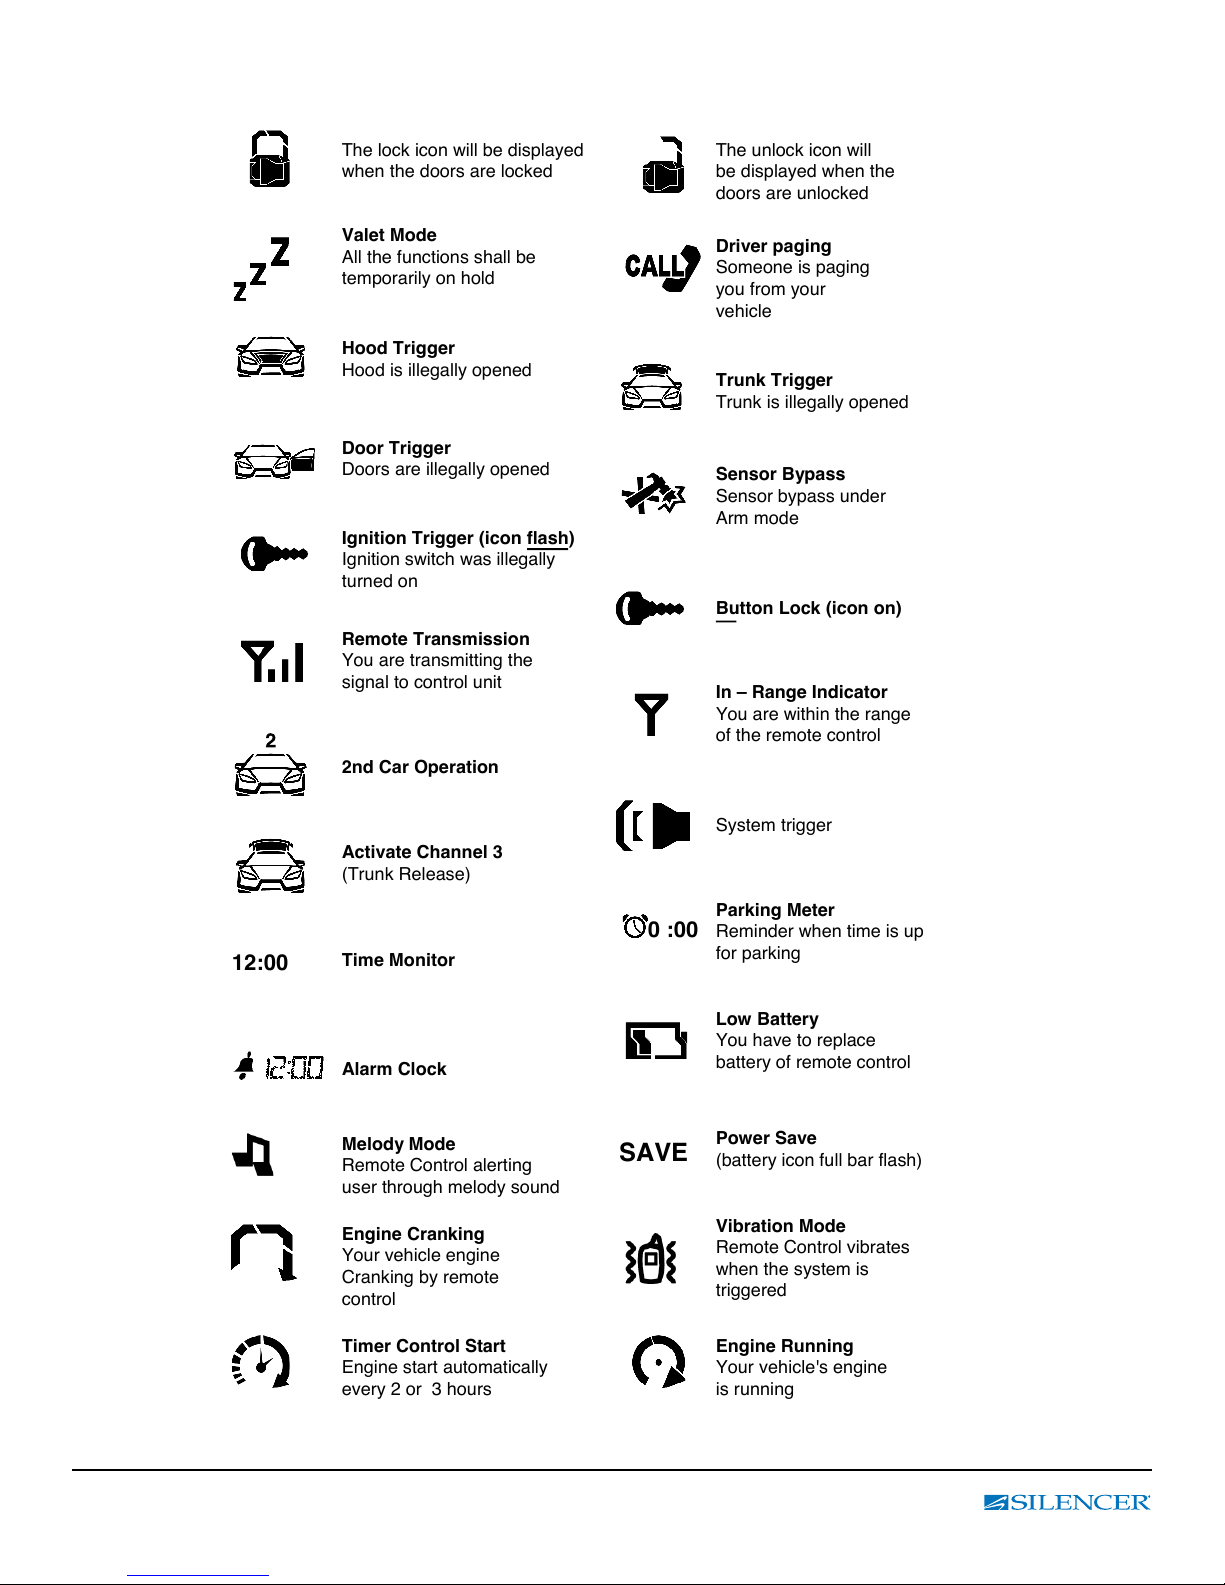
The lock icon will be displayed
when the doors are locked
The unlock icon will
be displayed when the
doors are unlocked
Valet Mode
All the functions shall be
temporarily on hold
Driver paging
Someone is paging
you from your
vehicle
Sensor Bypass
Sensor bypass under
Arm mode
Ignition Trigger (icon flash)
Ignition switch was illegally
turned on
Button Lock (icon on)
Remote Transmission
You are transmitting the
signal to control unit
In – Range Indicator
You are within the range
of the remote control
System trigger
0 :00
Parking Meter
Reminder when time is up
for parking
12:00
Time Monitor
Low Battery
You have to replace
battery of remote control
Alarm Clock
Power Save
(battery icon full bar flash)
SAVE
Melody Mode
Remote Control alerting
user through melody sound
Vibration Mode
Remote Control vibrates
when the system is
triggered
Engine Cranking
Your vehicle engine
Cranking by remote
control
Engine Running
Your vehicle's engine
is running
Timer Control Start
Engine start automatically
every 2 or 3 hours
Hood Trigger
Hood is illegally opened
Door Trigger
Doors are illegally opened
Trunk Trigger
Trunk is illegally opened
Activate Channel 3
(Trunk Release)
2nd Car Operation
B. STANDARD LCD ICON CONFIGURATIONS
UM_FULL_55SL_REV_A 3
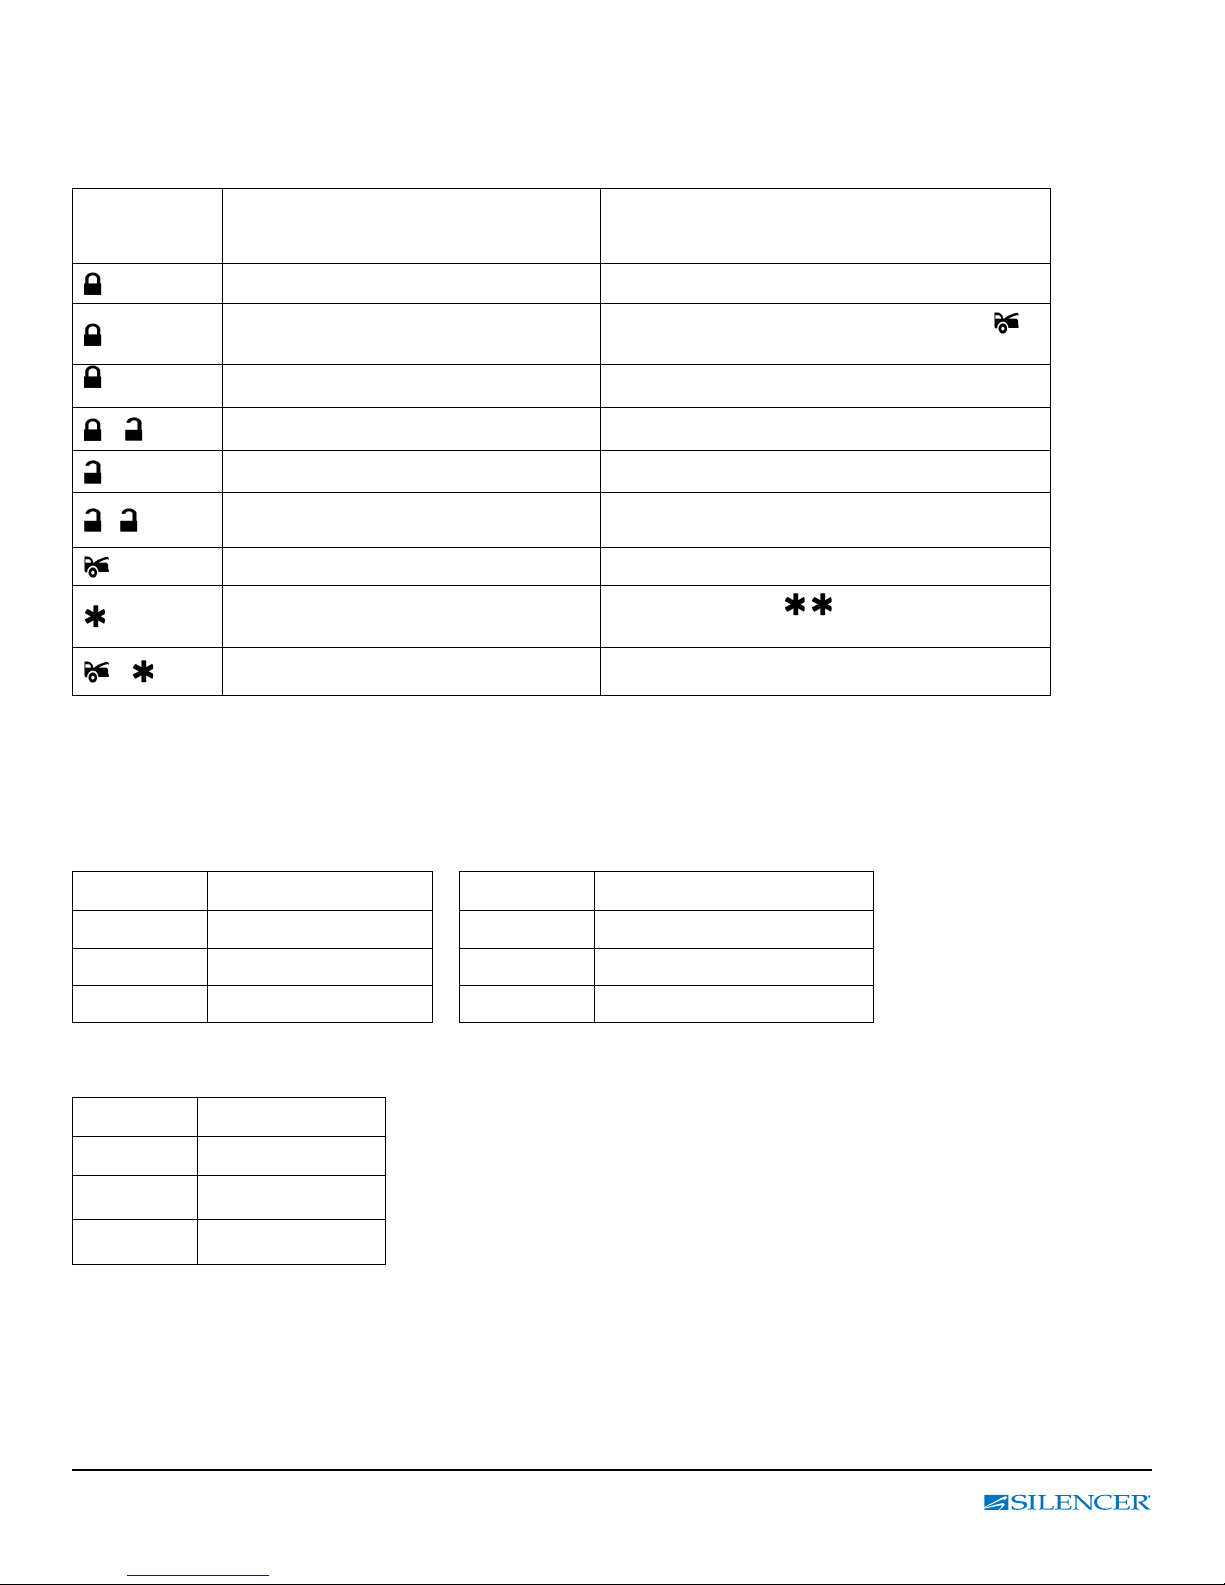
OPERATION
C. REMOTE TRANSMITTER OPERATION:
Transmitter
Button
+
-
+
System Function Remark
Lock Doors & Arm System
Panic Function
Car Locator Press when in armed mode.
Silent Lock / Unlock Press at the same time.
Unlock Doors & Disarm System
Two Steps Door (optional) Press twice within 3 seconds.
Trunk Release (Channel 3) Press and hold for 3 seconds
Activate or Turn Off The Remote Start
Switch Code for 2nd Car Operation For SL-91 remote transmitter only.
Press and hold for 3 seconds. Press Trunk
button to stop panic function.
Press button once. Press Twice if set to
start safety mode.
D.
CHIRP INDICATORS: PARKING LIGHT:
Chirp Function Parking light Function
1 chirp Lock 1 ash Lock
2 chirps Unlock 2 ashes Unlock
ON Running on remote start
LED INDICATORS
LED Function
Off Unlock
Slow Flash Locked
On (Solid) Valet Mode
UM_FULL_55SL_REV_A 4

WARNINGS
As with any product that performs automatic functions, there are certain safety precautions that you must
practice and be aware of.
• Keep the transmitter out of children’s reach.
• Do not leave anyone in the vehicle while running on remote control.
• Alert servicing personnel that the vehicle can be started automatically.
• Do not start the vehicle by remote while it’s in an enclosed area or garage.
• Always apply the parking brake and lock the vehicle as you exit the vehicle.
• The vehicle windows must be rolled up.
• Should the unit malfunction, disconnect the fuse until the problem is corrected.
• The use and operations of this system are the sole responsibility of the operator.
• Some areas may have local ordinances that prohibit leaving a vehicle running on public streets.
• THIS DEVICE CANNOT BE USED ON ANY STANDARD TRANSMISSION VEHICLE.
FOR AUTOMATIC TRANSMISSIONS ONLY!
E. ACTIVE LOCK
Press button on the transmitter.
The horn will chirp once and parking light will ash once indicating that the system is now locked.
The vehicle’s doors will lock upon arming if interfaced with the security system.
SILENT Lock / Unlock: Press the transmitter and buttons at the same time. This will lock or unlock your security
system, No chirp sound will be heard and lock / unlock conrmation will be through the vehicles parking lights only.
F. ACTIVE UNLOCK
1. Press button on the transmitter.
2. The horn will chirp twice and the parking lights will ash twice indicating that the security system is now disarmed.
The vehicle’s doors will unlock and the dome light will turn on for 30 seconds upon disarming.
(Note: Power door locks and domelight supervision must be installed with the system.)
PATHWAY ILLUMINATION: When receiving an unlock /disarm signal, this feature will turn the parking lights “ON” for
30 seconds and for 10 seconds receiving a the lock signal. (Programmable)
TWO STEPS DOOR UNLOCK (Optional): This feature will independently unlock the driver’s door only when
disarming the system. Pushing the
button a second time within 3 seconds will unlock the other doors.
G. DEACTIVATING WITHOUT A TRANSMITTER
OVERRIDE THE ALARM WITHOUT A PASSWORD PIN CODE: (Factory Default Setting)
The Override function may be used if the remote transmitter is lost or inoperative.
1. Enter the vehicle and turn the ignition switch to the “ON” position.
2. Within 10 seconds push and release the valet switch. The alarm will stop sounding and enter the disarm mode.
You can now start and operate the vehicle normally.
UM_FULL_55SL_REV_A 5

H. VALET MODE
VALET MODE: (System is in Disarm Mode)
The valet switch allows you to temporarily bypass all functions, eliminating the need to hand your transmitter to parking
attendants or garage mechanics. When the system is in valet mode, all functions and remote start functions are bypassed,
however, the remote panic feature and remote door locks will remain operational. To use the valet mode, the system must
rst be disarmed either by using your remote transmitter, or by operating the Manual Override sequence.
Get into/out valet mode using the ignition key.
Enter Valet Mode:
a). Under disarm mode, turn the ignition to “ON/OFF/ON” position.
b). Press and hold valet switch for 2 seconds until the LED turns “ON” solid. The LED will remain on
as long as the system is in ‘valet mode.
Exit Valet Mode:
a). Turn ignition “ON/OFF/ON”.
b). Push and hold valet switch for 2 seconds. The LED will turn off indicating the system is exiting the valet mode.
I. CAR LOCATOR
Under armed mode, press the button to activate car locator function. The horn will chirp 6 times and
the parking lights will ash 12 times to assist you in easily locating your car.
J. PANIC FUNCTION
The transmitter can be used as a remote panic switch to manually trigger the horn in case of an emergency.
1. Press and hold the button for 3 seconds. The alarm will immediately sound.
2. During panic mode, the normal function of this transmitter button will be disabled. The transmitter and buttons can
be used to lock and unlock the door (if the option is installed). However once the button is pressed,
the vehicle’s starter disable device (where installed) will be disengaged, allowing the vehicle to start.
3. To stop the alarm, press the trunk button on the remote control.
If the button is not pressed, the alarm will automatically stop after 30 seconds.
K. IGNITION CONTROL DOOR LOCK/UNLOCK (Programmable Feature)
If the vehicle’s door locks have been interfaced to the security system, the system will automatically lock the vehicle’s
doors when the ignition is turned “ON” and /or unlock the vehicle’s doors when the ignition is turned “OFF”.
(Default setting is “OFF”) Note: If doors are open upon starting the engine, the doors will not lock.
L. TRUNK RELEASE (CHANNEL 3) OUTPUT
Press and hold the button on the transmitter for 3 seconds to remotely control the trunk release.
M. POWER ON MEMORY
This security system is equipped with circuitry that will allow the unit to remember its alarm state if the
power is lost and then reconnected.
N. CLEAR THE FLASH ICON AND MELODY SOUND (Applies to the LCD Transmitter Only)
The Transmitter will reset the ashing icons the next time the Ignition is cycled to the “ON” position.
O. STOP THE TRIGGER MELODY SOUND (Applies to the LCD Transmitter Only)
While triggering the alarm, the LCD screen will alert the user through a melody sound and a ashing trigger icon.
Press any button on the LCD remote transmitter to stop the melody sound only.
UM_FULL_55SL_REV_A 6

REMOTE START OPERATION
A. TO REMOTE START THE VEHICLE:
When you want to start your vehicle;
1. Press the button once on the transmitter.
2. The parking light will activate to indicate the remote start received the signal.
3. The engine will start in approximately 5 seconds.
4. Once the engine is running, after a couple seconds the parking lights will turn on and the climate controls will activate
and adjust the vehicle’s interior temperature to your preset settings. (While the vehicle is running, the “minutes” digit on
the LCD screen will ash and will indicate the countdown timer based on the 5, 10, 20 or 30 minute run time set up by
your installation center.)
5. The vehicle will run for a programmable 5 to 30 minute cycle before shutting down. (When the unit shuts off the
countdown timer will turn off and the transmitter will play a melody.)
NOTE: The Remote Start Unit will not start the vehicle if any one of the following conditions exists:
1. The hood is opened.
2. The brake pedal is pressed.
3. The optional remote start enable toggle is switched to the “OFF” position. (If installed)
4. The gear selector is in any gear other then “PARK” or “NEUTRAL”.
PROGRAMMABLE SAFETY START (Child safety mode)
By default, your Silencer remote starter is programmed to start/stop after pressing the button 1 time. This default
setting can be re-programmed to require 2 presses of the button to remote start/stop the vehicle. This setting is known
as “Child Safety Mode”.
Contact your installer to reprogram this feature if needed.
B. OPERATE THE VEHICLE WHILE RUNNING FROM THE REMOTE START
To operate the vehicle while the engine is running from the remote start,
1. Insert the ignition key and turn it to “ON” (not the start) position.
2. Press the brake pedal.
Note: If the brake pedal is pressed before the key is in the “ON” position, the engine will shut down.
C. TEMPORARY STOP FEATURE
This feature allows the vehicle to remain running after the key has been removed from the ignition. This feature is useful
for occasions when you wish to exit and lock the vehicle for short periods of time, but would like to leave the motor running
and the climate control on.
1. Before turning off the engine, press the button once on the transmitter and the LED indicator will ash
3 times to conrm enter.
2. Turn the ignition key to “OFF” position. (The engine will stay running.)
3. The engine will run until the pre-programmed time has elapsed or shutdown input is received.
UM_FULL_55SL_REV_A 7

D. TO TURN OFF THE REMOTE START
When the engine is running (by remote start) and you want to stop it;
1. Press button once on the remote transmitter under the remote start mode.
2. Move the optional remote start enable toggle switch to “OFF” position. (If installed)
3. Press the brake pedal
The vehicle will shut down and turn off the parking light to indicate that the engine has stopped.
E. SHUT-DOWN INPUT FOR REMOTE STARTER
If any of the following conditions exist while the system is operating, the engine will not start or will shut down immediately:
1. The hood is opened.
2. The brake pedal is pressed.
3. The parking (hand) brake is released (For Turbo Timer Mode).
4. Engine is over-revved. (“Tachometer checking type” only).
5. The pre-programmed run time (5 /10 / 20 / 30 minutes) has elapsed.
6. Press
button on the remote transmitter under remote start mode.
7. The system trigger.
8. The vehicle refused to start running after 3 unsuccessful attempts.
ANTENNA
The long range antenna should be located somewhere on the windshield of the vehicle.
This antenna also contains a blue status LED as well as the Valet Button / Switch.
TRANSMITTER PROGRAMMING
Enter:
1. Turn the Ignition ‘switch “OFF/ON” 3 TIMES and stay in “ON” position. Within 15 seconds.
2. Push the Valet switch 3 times and hold in on the 3rd push. When a long chirp is heard, release the valet switch.
You are now in the Transmitter programming mode.
Program:
1. Press any button on transmitter until the siren responds with a conrming chirp;
the rst transmitter is now programmed.
2. Press any button on the second transmitter until the siren responds with a conrming chirp;
the second transmitter is now programmed.
3. Apply the same procedure to program 3rd and 4th transmitters.
Exit:
Turn Ignition to the “OFF” position, or leave it for 15 seconds. 3 long chirps and 3 parking light ashes will conrm exit.
Note: If more than 4 transmitters programmed, the system will only keep the last four.
UM_FULL_55SL_REV_A 8

ADVANCED USER’S MODE
LCD REMOTE CONTROL PROGRAM SETTINGS
Table 1: Pre-Arm Settings
ENTER: Press & hold “ F “ button until one beep is heard then release F-button.
Next, press F button within 5 sec. to move forward to the feature option you want to program.
F Button
Press and hold the
until 1 beeps sound
Press and release the
nd
a 2
time (1 beep)
Press and release the
a 3rd time (1 beep)
Press and release the
a 4th time (1 beep)
EXIT: Press & hold “ F “ button for 2 sec. or do nothing for 5 sec. for automatic exit.
(1 beep = Conrm Exit)
F Button
F button
F button
F button
LCD Display Indicator Button
Press
1 – 1
1 – 2
1 – 3
1 - 4 No Function
icon On
icon On
icon On
arm and bypass the Shock Sensor.
Press
arm with Hidden Alarm Function.
With the ignition key in the “on”
position, press the
activate the anti-car jacking functions.
Note: The anti-carjacking feature
must be programmed on at
installation for this feature to operate
button to enable the alarm
button to enable the alarm
button to
UM_FULL_55SL_REV_A 9

Table 2: System Check Functions
ENTER: Press & hold “ F “ button until 2 beeps are heard then release F-button.
Next, press “F” button within 5 sec. to move forward to the feature option you
want to program.
F Button
Press and hold the
F button until 2 beeps
are heard
LCD display Indicator Button
2 – 1 (2- Way LCD Manual
Program Mode)
Press
programming menu mode for clock
setting (see below)
button twice to enter
Press and release the
F button a 2
(1 beep)
nd
time
2 – 2 STATUS CHECK
Press
status check.
button to enable vehicle’s
Press and release the
F button a 3rd time
(1 beep)
2 – 3 ALARM CHECK
Press
trigger status check.
button to enable vehicle’s
Press and release the
F button a 4
(1 beep)
th
time
2 – 4 VOLTS CHECK
Press
voltage check.
button to enable vehicle’s
Press and release the
F button a 5th time
2 – 5 No Setting No Setting Available
(1 beep)
EXIT: Press & hold “ F “ button for 2 sec. or wait for 5 sec. for automatic exit.
(1 beep = Conrm Exit)
Table 3: LCD Programming
ENTER: Press & hold “ F “ button until 2 beeps are heard and then release;
1. The LCD will display “ 2 – 1”. Press the
button twice to enter Clock Setting Mode (21 1).
(The LCD will display the clock and the hours will be ashing (12:00).
2. Press button to increase value, or Enable the selected feature.
3. Press button to decrease value, or Disable the selected feature.
4. Press button to conrm its selection, move to the next setting.
Order Menu Option LCD display Functions
1st Clock Setting
Adjust clock hours
from 0 to 12
21 1
12 : 00
12 is ashing
Default is 12:00 (Only on rst time setting)
Press
Press
Press
button = (+) or
button = (-)
button conrm its selection, move to
the minutes setting.
button = (+) or
button = (-)
button conrm its selection, move to
Adjust clock minutes
from 0 to 59
12: 00
00 is ashing
Press
Press
Press
next option (21 2).
UM_FULL_55SL_REV_A 10

2nd Alarm Clock set up 21 2 Default is OFF
Adjust Alarm Clock
hours from 0 to 12
Adjust Alarm Clock
minutes from 0 to 59
Select Alarm Clock
Enable or Disable
3rd Parking Meter
countdown
Adjust Parking
Meter countdown
hours from 0 to 2
button = (+) or
button = (-)
button conrm the selection, move to
12 :00
12 is ashing
Press
Press
Press
the minutes setting.
button = (+) or
button = (-)
button conrm the selection, move to
12: 00
00 is ashing
Press
Press
Press
next option (On/Off setting).
button = ON or
button = OFF
button conrm the selection, move to
ON + LCD Icon or
OFF
Press
Press
Press
next option (21 3).
21 3 Default is OFF
button = (+) or
button = (-)
button conrm its selection, move to
0 :00
0 is ashing
Press
Press
Press
the minutes setting.
Adjust Parking Meter
countdown minutes
0 : 30
30 is ashing
from 0 to 59.
Select Parking meter
ON + or
countdown Enable or
Disable
OFF
4th Power Save 21 4
Select Power Save
SAVE or OFF
Enable or Disable
Press
Press
Press
button = (+) or
button = (-)
button conrm its selection, move to
next option (On/Off setting).
Press
Press
Press
button = Enable or
button = Disable
button conrm its selection, move to
next option (21 4).
Note: There is a beep warning at 5 min. before parking
countdown reaches 0.
Default is OFF
Press
Press
button = Enable or
button = Disable
Note: When power save mode is ON, the LCD remote uses
“0” battery current. Pressing any button on the remote
switches the “SAVE” mode to OFF.
Press
button conrm its selection, move to
next option (21 5).
UM_FULL_55SL_REV_A 11

5th Function Indicator
Setting
Transmitter conrmation by melody or
vibration or both
21 5 Default is Buzzer
Press button = Melody (3 presses = both)
or
or
+
Press
Press
button = Vibration (3 presses = both)
button conrm the selection, move to
next option (21 6).
6th Second Car System
Control
7th Backlight turn off
delay
8th Transmitter Button
Lock
9th CAR ICON Illumina-
tion
21 6 Default is CAR 1 (C – 1)
C – 1 or C - 2
Press
Press
Press
= CAR 1 operation (C – 1).
= CAR 2 operation (C – 2)
button conrm the selection, move to
next option (21 7).
21 7 Default is OFF
3 SEC. or
5 SEC. or
OFF
Press
1 time = 3 sec.
Press 2 times = 5 sec.
Press 3 times = OFF.
21 8 Default is OFF
Press
Press
button = Enable (Icon ashing) or
button = Disable (Icon not displayed)
Note: Once the button lock feature is active you
(Flashing)
must re-enter programming mode to turn it off.
Press & hold “ F “ button until 2 beeps are heard
then release. You will auto skip to the 21 8
program mode Press
21 9 Default Car icon is OFF
button to disable.
Icon displayed or not
10th No Setting 21 10 No Setting Available
UM_FULL_55SL_REV_A 12
Press
Press
button = always displayed or
button = displayed when required
by the 2- way information system

Table 4: Remote Start Quick Feature Programming
ENTER: Press & hold “ F “ button until 3 beeps are heard then release;
LCD displays ashing
icon rst, press and release “F” button to move blinking cursor to the
desired icon that you want to program.
Press the button to enable the feature.
Note: Cursor method: a constant illumination means the selected feature is enabled.
Exit: Press & hold “ F “ button for 2 seconds or do nothing wait for 5 seconds for automatic exit.
(1 beep) = Conrm Exit.
F Button
Press and hold the “F”
LCD display • Button
Press
3 - 1
Turbo Timer mode.
button to enable
Button until 3 beeps have
sounded
Press & Release “ F”
button to move cursor
ash to Daily Start icon
Press & Release “ F”
button to move cursor
ash to TIMER START
icon
Icon ashing
3 – 2 then 24H
No Setting
3 – 3
Timer Start icon Flashing
icon ash = Enable
Icon Off = Disable
No Setting Available
Press button to enable
Timer Start mode.
Icon On = Enable
Icon Off = Disable
E. TIMER START:
Timer Start: Your Silencer System can be programmed to start and run the engine every 3 / 2
hours depending on the initial setup programming (Default timing is 3 hours).
IMPORTANT: Timer Start should be used only in open areas, never start and run the vehicle in an
enclosed space such as a garage or carport.
TIMER START:
Enter:
1. Turn the Ignition key On then Off
2. Within 15 seconds, press and hold the “F” button on the LCD remote until 3 beeps sound.
Release and press the “F” button (2) more times until the LCD displays the
icon ashing.
Press button to activate Time Start. The icon will illuminate on LCD display, parking light will
ash and siren chirps 3 or 2 times to conrm. The vehicle is now programmed to start every 3 or 2
hours. (Default setting is 3 hours (3 light ashes, 3 horn chirps) unless programming was changed)
Exit: Turn the Ignition On (LED and parking light ash 4 times, and siren chirp 4 times conrm exit
Timer Start). Press the
or button to turn off icon on 2-way remote.
UM_FULL_55SL_REV_A 13

Table 5: Return All Transmitter Settings and Programming to the default settings
Enter: Press & hold “ F “ button until 4 beeps heard, release F-button.
F Button
Press and hold
the
F Button until
4 beeps sounded
LCD display Button
3 – 1
Press & hold
2 seconds to return all settings
back to default, (1 chip to conrm)
button for
EXIT: Press & hold “ F “ button for 2 sec. or wait for 5 sec. for automatic exit.
(1 beep = Conrm Exit)
UM_FULL_55SL_REV_A 14

SILENCER LIMITED LIFETIME WARRANTY
Magnadyne Corporation or its authorized agents will, for the life of the vehicle and to the original purchaser, repair, replace or refund the retail
sales price of said product or any part thereof, at the option of the Magnadyne Corporation or its authorized agents, if said product or part is found
defective in materials or workmanship, when properly connected and operating on the correct power requirements designated for the specic
product. This warranty and Magnadyne Corporation or its authorized agents obligations, hereunder do not apply where the product was: damaged
while in the possession of the consumer, subjected to unreasonable or unintended use, not reasonably maintained, utilized in commercial or
industrial operation, or serviced by anyone other than Magnadyne Corporation or its authorized agent, or where the warning seal on the product
is broken or the power plugs or wires are detached from the unit. Magnadyne Corporation or any of its authorized agents do not assume any
labor costs for the removal and reinstallation of any product found to be defective, or the cost of transportation to Magnadyne Corporation or its
authorized agents. Such costs are the sole responsibility of the purchaser.
This warranty does not cover the cabinet, appearance items, normal wear and tear or accessories used in connection with the product resulting
from improper installation, alteration, accident, misuse, abuse or acts of nature.
This Limited Life Time Warranty applies only to the receiver section of the security system. Neither the siren, transmitters, wire harness or any
accessory item added to or used with a Remote Mobile security system are covered by this Limited Life Time Warranty. Sirens, transmitters, wire
harness or any accessory item are covered by our standard 12 month limited warranty.
Magnadyne Corporation or its authorized agents shall not be liable to anyone for consequential or incidental damages or claims that may arise
due to failure of product to operate properly except those accorded by law. Magnadyne’s or its authorized agents liability to the repair, replacement
of the product as stated above if all conditions of the warranty are met. No expressed warranty or implied warranty is given except those set
forth herein. Magnadyne does not warrant or guarantee against break in damage or the theft of the vehicle in part or whole, or against the loss
or damage to the contents of any vehicle in which a security system is installed. Magnadyne security systems are only a deterrent against
possible theft.
This warranty extends only to the original purchaser of the product and for the vehicle in which it was originally installed. This warranty is not
transferable or assignable to any person or vehicle. Defective merchandise should be returned to the original point of purchase or secondly to
Magnadyne Corporation, 1111 W. Victoria Street, Compton, CA 90220. A return authorization must be obtained before sending, or merchandise
may be refused.
LIMITED LIFETIME WARRANTY REGISTRATION CARD
Complete and mail now. Please print clearly.
LAST NAME
ADDRESS
CITY
DEALER
DATE OF PURCHASE
MAKE OF CAR
MODEL #
FIRST NAMEI NITIAL
STATE
YEARL ICENSE#
ZIP
It is the purchaser’s responsibility to register this product for any future warranty service.
Warning: Some batteries may contain Perchlorate
What is Perchlorate? Perchlorate is both a naturally occurring and manmade contaminant increasingly found in groundwater, surface water and soil.
Most perchlorate manufactured in the U.S. is used as an ingredient in solid fuel for rockets and missiles. In addition, perchlorate-based chemicals
are also used in the construction of highway safety ares, reworks, pyrotechnics, explosives, common batteries, and automobile restraint systems.
Perchlorate contamination has been reported in at least 20 states. Perchlorate greatly impacts human health by interfering with iodide uptake into
the thyroid gland. In adults, the thyroid gland helps regulate the metabolism by releasing hormones, while in children; the thyroid helps in proper
development. Perchlorate is becoming a serious threat to human health and water resources. “Perchlorate Material – Special handling may apply.”
For more information, go to http://www.dtsc.ca.gov/hazardouswaste/perchlorate/
UM_FULL_55SL_REV_A 15

Magnadyne Corporation 1111 W. Victoria Street Compton CA 90220 (800) 340-3200
Please visit our website at www.magnadyne.com Made in Taiwan. All Rights Reserved
 Loading...