

Page 1

Bewahren Sie diese Betriebsanleitung zum Nachschlagen auf.
Geben Sie diese Betriebsanleitung bei der Veräußerung des Gerätes mit.
© SIKA • Ba_ECmAV2 • 03/2015 .
Monofunktions-Simulator Baureihe EC
Typ EC mAV 2
Betriebsanleitung
(Original)
Betriebsanleitung
.................................................... Seite 1 - 24
Operating manual
.................................................. page 25 - 48
Page 2

EC mAV 2
- 2 - © SIKA • Ba_ECmAV2 • 03/2015
Inhaltsverzeichnis Seite
0 Hinweise zur Betriebsanleitung .................................................................................... 3
1 Gerätebeschreibung ...................................................................................................... 4
1.1 Bestimmungsgemäße Verwendung ........................................................................... 4
1.2 Haftungsausschluss .................................................................................................... 4
2 Sicherheitshinweise ...................................................................................................... 5
3 Übersicht und Funktionen ............................................................................................. 6
3.1 Beschreibung des Displays ......................................................................................... 6
4 Batteriewechsel / Ein- und Ausschalten EC mAV 2 ..................................................... 7
5 Ausgang EC mAV 2 ........................................................................................................ 8
5.1 Ausgangskenndaten .................................................................................................... 8
5.2 Stromausgang ............................................................................................................. 9
5.3 Stromausgang in 25 % Schritten ................................................................................ 9
5.4 Stromausgang für Nullpunkt & Endwert.................................................................. 10
5.5 Auto-ramp-Ausgang ................................................................................................. 10
5.6 Simulation eines Transmitter-Ausgangs (XMT) ....................................................... 11
6 Messfunktion ............................................................................................................... 12
6.1 Eingangskenndaten................................................................................................... 12
6.2 Gleichstrom messen ................................................................................................. 13
6.3 Gleichspannung messen ........................................................................................... 14
6.4 24 V Stromversorgung zum Messen von Schleifenstrom ........................................ 14
7 Wartung und Reinigung ............................................................................................... 15
7.1 Reinigung .................................................................................................................. 15
7.2 Sicherung austauschen ............................................................................................ 15
7.3 Rekalibrierung .......................................................................................................... 16
7.3.1 Auswahl der Standardausrüstung ........................................................................ 16
7.3.2 Umgebungsbedingungen für Rekalibrierung ...................................................... 16
7.3.3 Rekalibrierung des Ausgangs .............................................................................. 17
7.4 Rekalibrierung des Eingangs .................................................................................... 18
7.4.1 Strommessung kalibrieren .................................................................................. 18
7.4.2 Spannungsmessung kalibrieren .......................................................................... 19
8 Außerbetriebnahme und Entsorgung ......................................................................... 20
9 Technische Daten ........................................................................................................ 21
9.1 Kenndaten EC mAV 2 ................................................................................................ 21
Urheberschutzvermerk:
Weitergabe sowie Vervielfältigung dieser Betriebsanleitung, Verwertung und Mitteilung seines Inhalts
sind verboten, soweit nicht ausdrücklich gestattet. Zuwiderhandlungen verpflichten zu Schadenersatz.
Alle Rechte für den Fall der Patent
-, Gebrauchsmuster- oder Geschmacksmustereintragung vorbe-
halten.
Page 3

EC mAV 2 Hinweise zur Betriebsanleitung
Technische Änderungen vorbehalten - 3 -
0 Hinweise zur Betriebsanleitung
• Die Betriebsanleitung richtet sich an Facharbeiter und angelernte Arbeitskräfte.
• Lesen Sie vor jedem Arbeitsschritt die dazugehörigen Hinweise sorgfältig durch und
halten Sie die vorgegebene Reihenfolge ein.
• Lesen Sie den Abschnitt „Sicherheitshinweise“ besonders aufmerksam durch.
Sollten Sie Probleme oder Fragen haben, wenden Sie sich an Ihren Lieferanten oder direkt
an:
Dr. Siebert & Kühn GmbH & Co. KG
Struthweg 7-9 • D - 34260 Kaufungen
05605-803 0 • 05605-803 54
info@sika.net • www.sika.net
Verwendete Gefahrenzeichen und Symbole:
VORSICHT! Elektrischer Strom!
Dieses Zeichen kennzeichnet Gefahren, die beim Umgang mit elektrischem Strom entstehen
können.
VORSICHT! Verletzungsgefahr!
Dieses Zeichen kennzeichnet Gefahren, die Personenschäden verursachen, die zu gesund-
heitlichen Schäden führen oder erheblichen Sachschaden verursachen können.
VORSICHT! Materialschaden!
Dieses Zeichen weist auf Handlungen hin, die mögliche Sach- und Umweltschäden verursa-
chen können.
BETRIEBSANLEITUNG BEACHTEN!
HINWEIS!
Dieses Zeichen gibt Ihnen wichtige Hin-
weise, Tipps oder Informationen.
KEIN HAUSMÜLL!
Das Gerät darf nicht zusammen mit
Hausmüll entsorgt werden.
Beachten und befolgen Sie die damit ge-
kennzeichneten Informationen.
Befolgen Sie die angegebenen Anweisun-
gen bzw. Handlungsschritte.
Halten Sie die Reihenfolge ein.
Überprüfen Sie die angegebenen Punkte o-
der Hinweise.
Verweis auf einen anderen Abschnitt, Doku-
ment oder Quelle.
• Gliederungspunkt.
Page 4

Gerätebeschreibung EC mAV 2
- 4 - © SIKA • Ba_ECmAV2 • 03/2015
1 Gerätebeschreibung
Der EC mAV 2 ist ein tragbarer Monofunktions-Simulator, der für die Kalibrierung und Wartung geeignet ist und entweder vor Ort oder im Labor eingesetzt werden kann. Er kann
Gleichstrom und Gleichspannung messen sowie Gleichstrom generieren. Außerdem bietet er
die Funktion, lineare Treppen und Rampen zu generieren.
Durch die implementierten Geberfunktionen wird eine zur Einspeisung benötigte Kenngröße
nachgebildet und ein genau vorgegebener Wert am Ausgang dargestellt. Das unterscheidet
einen Signalkalibrator von den herkömmlichen Messfunktionen eines Multimeters.
Lieferumfang und Zubehör:
Überprüfen Sie vor Einbau des Gerätes den Lieferumfang und das bestellte Zubehör.
1x EC mAV 2.
1x Betriebsanleitung.
Ein Paar CF-36 Industrie-Messleitungen (mit Krokodilklemmen).
Ggf. Verpackung oder Transportschutz.
1.1 Bestimmungsgemäße Verwendung
Der Monofunktions-Simulator Typ EC mAV 2 darf nur zum Messen von Gleichstrom und
Gleichspannung sowie zum Erzeugen von Gleichstrom verwendet werden.
Die Betriebssicherheit des gelieferten Gerätes ist nur bei bestimmungsgemäßer Verwendung
gewährleistet. Die angegebenen Grenzwerte ( § 9 "Technische Daten") dürfen keinesfalls
überschritten werden.
Dies gilt insbesondere für die Einhaltung der zulässigen Spannung, die an den Klemmen angelegt wird.
1.2 Haftungsausschluss
Für Schäden und Betriebsstörungen, die durch Montagefehler, nicht bestimmungsgemäßer
Verwendung oder Nichtbeachtung dieser Betriebsanleitung entstehen, wird keine Haftung
übernommen.
Page 5

EC mAV 2 Sicherheitshinweise
Technische Änderungen vorbehalten - 5 -
2 Sicherheitshinweise
Bevor Sie den EC mAV 2 installieren, lesen Sie diese Betriebsanleitung sorgfältig durch.
Werden die darin enthaltenen Anweisungen, insbesondere die Sicherheitshinweise nicht
beachtet, können Gefahren für Mensch, Umwelt, Gerät und Anlage die Folge sein.
Der EC mAV 2 entspricht dem aktuellen Stand der Technik. Dies betrifft die Genauigkeit, die
Funktionsweise und den sicheren Betrieb des Gerätes.
Um eine sichere Bedienung zu gewährleisten, ist sachkundiges und sicherheitsbewusstes
Verhalten der Bediener erforderlich.
SIKA gewährt persönlich oder durch entsprechende Literatur Hilfestellung für die Anwendung der Produkte. Der Kunde prüft die Einsetzbarkeit des Produktes auf der Basis unserer
technischen Informationen. In kunden- und anwendungsspezifischen Tests überprüft der
Kunde die Eignung des Produktes für seinen Verwendungszweck. Mit dieser Prüfung gehen
Gefahr und Risiko auf unseren Kunden über; unsere Gewährleistung erlischt.
Qualifiziertes Personal:
Das Personal, das mit der Bedienung und der Instandhaltung des EC mAV 2 beauftragt
wird, muss die entsprechende Qualifikation aufweisen. Dies kann durch Schulung oder
entsprechende Unterweisung geschehen.
Dem Personal muss der Inhalt der vorliegenden Betriebsanleitung bekannt und jederzeit
zugänglich sein.
Allgemeine Sicherheitshinweise:
Betreiben Sie das Gerät nicht in der Nähe von entflammbaren oder explosiven Gasen so-
wie Dampf.
Legen Sie niemals mehr als 30 V zwischen den beiden Anschlussbuchsen an oder zwi-
schen einer Anschlussbuchse und der Masse an.
Das teilbare Gehäuse darf nur von einem qualifizierten Techniker entfernt werden.
Reinigen Sie das Gerät, indem Sie das Gehäuse mit einem feuchten Tuch und Reini-
gungsmittel regelmäßig abwischen; verwenden Sie keine ätzenden Lösungsmittel.
Für eine optimale Genauigkeit halten Sie eine Warmlaufphase von 5 Minuten vor dem Be-
trieb ein.
Spezielle Sicherheitshinweise:
Warnhinweise, die sich speziell auf einzelne Funktionsabläufe oder Tätigkeiten beziehen, finden Sie vor den entsprechenden Stellen in dieser Betriebsanleitung.
Page 6
Übersicht und Funktionen EC mAV 2
- 6 - © SIKA • Ba_ECmAV2 • 03/2015
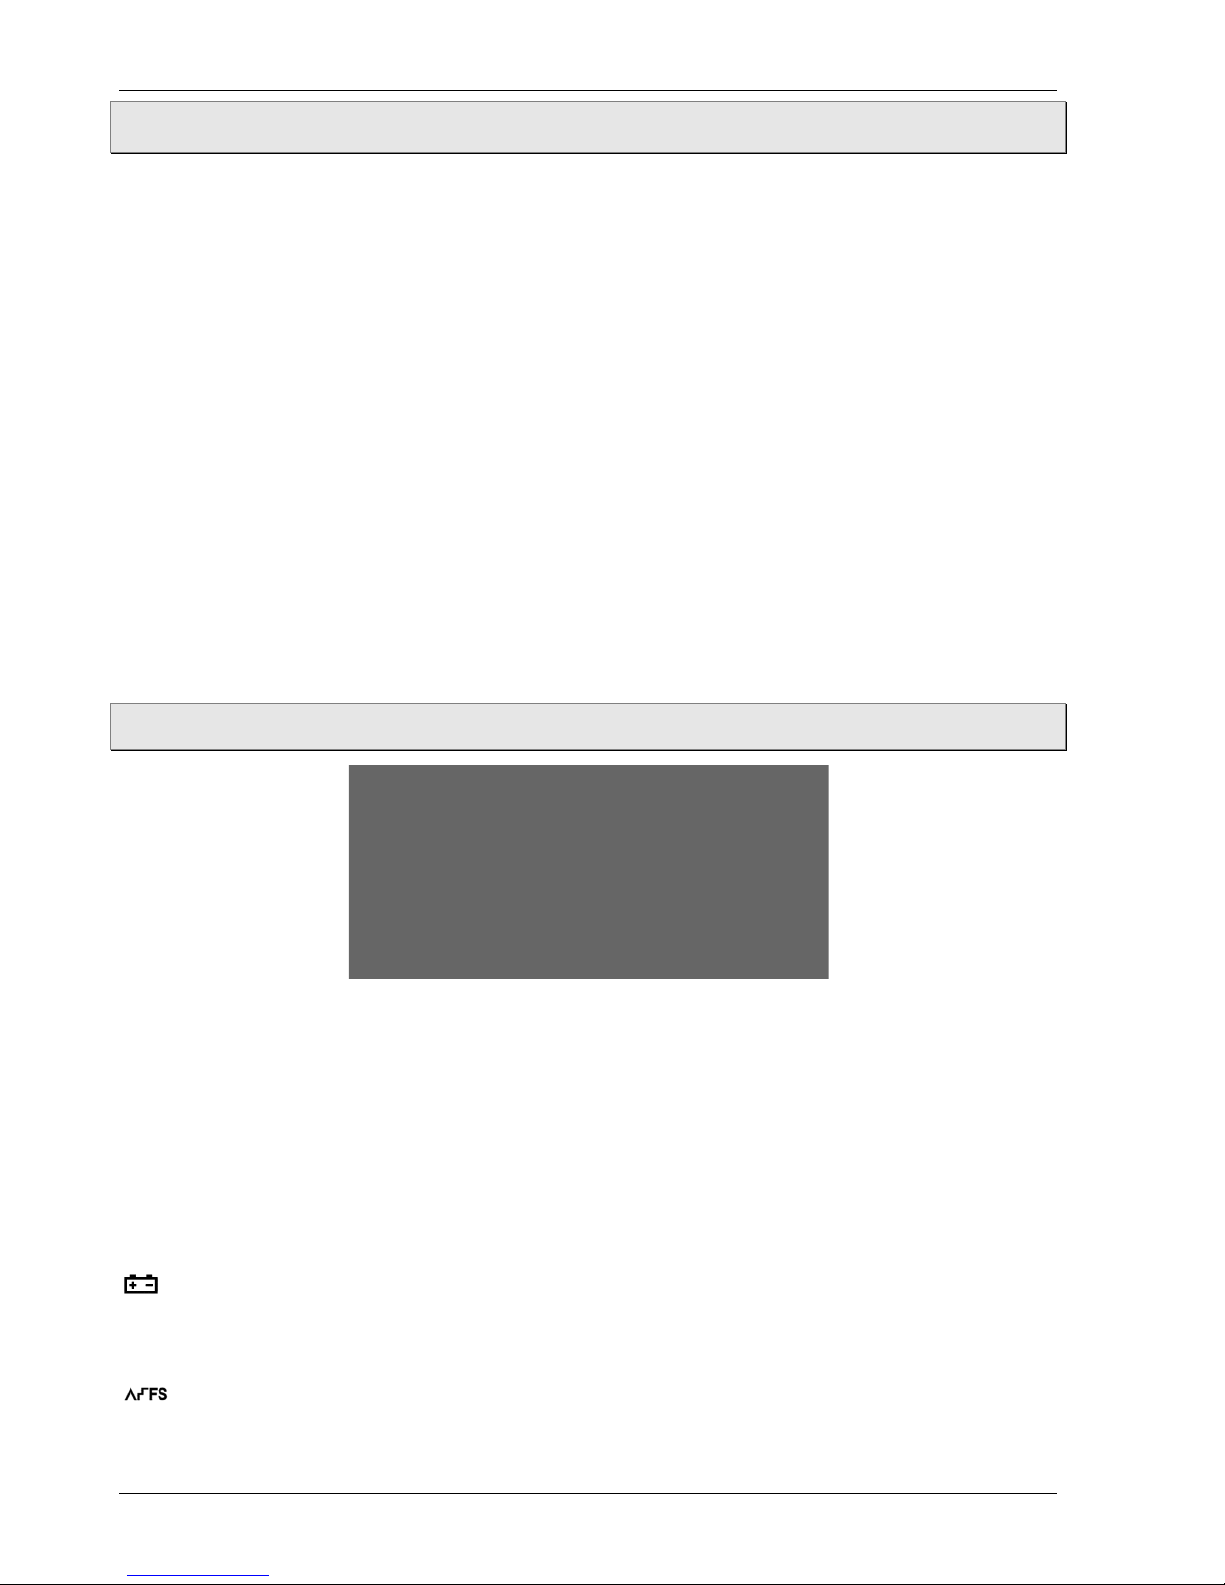
3 Übersicht und Funktionen
LC-Display.
Ausgang / Eingang auswählen.
mA% / V auswählen.
0% & 100% Einstellung
Auto Ramp-Start.
25% Single Step
Auto Ramp.
Eingangs-/Ausgangsanschlüsse.
Dezimalpunkt bei Eingabe bewegen ◄►
Ausgangswert einstellen ▲▼
Cursor bewegen ◄►.
Single Step
Auto Switch.
Ein-/Aus-Taste.
3.1 Beschreibung des Displays
ON, OFF Eingangs- bzw. Ausgangssignale sind ein- oder ausgeschaltet.
OUTPUT Drücken Sie die OUTPUT/INPUT Taste, wenn das Symbol OUPUT erscheint.
Ausgang ist aktiv.
INPUT Drücken Sie die OUTPUT/INPUT Taste, wenn das Symbol INPUT erscheint
Eingang ist aktiv.
CAL Kalibrierung ist aktiv.
0 FS Kalibrierung ist aktiv; Nullpunkt oder Messbereichsendpunkt befindet sich in
der Kalibrierung.
Batterie ist schwach und muss ersetzt werden.
▲ Ausgangsziffern müssen eingestellt werden.
V, mA, % Aktueller Ausgangs- oder Eingangswert (Maßeinheit).
High / Low Speed Auto Ramp, Auto-Step-Ramp
Page 7
EC mAV 2 Batteriewechsel / Ein- und Ausschalten EC mAV 2
Technische Änderungen vorbehalten - 7 -
4 Batteriewechsel / Ein- und Ausschalten EC mAV 2
Wenn das Symbol auf dem Display erscheint, müssen die Batterien ausgetauscht werden. Dieses Gerät wird mit zwei AA-Batterien (LR6) betrieben.
VORSICHT! Elektrischer Strom!
Um einen Stromschlag oder Personenschaden zu vermeiden:
Entfernen Sie alle Messleitungen vom Gerät bevor Sie das Batteriefach öffnen.
Schließen und verriegeln Sie den Batteriefachdeckel bevor Sie das Gerät verwenden.
VORSICHT! Batterietyp und Polarität beachten!
Werden beim Batteriewechsel Batterien eines anderen Typs verwendet oder die Batterien falsch eingelegt, kann dies zu Schäden am Gerät führen.
Verwenden Sie beim Austausch nur neue Batterien des gleichen Typs (LR6 - AA).
Achten Sie beim Einlegen auf die richtige Polarität.
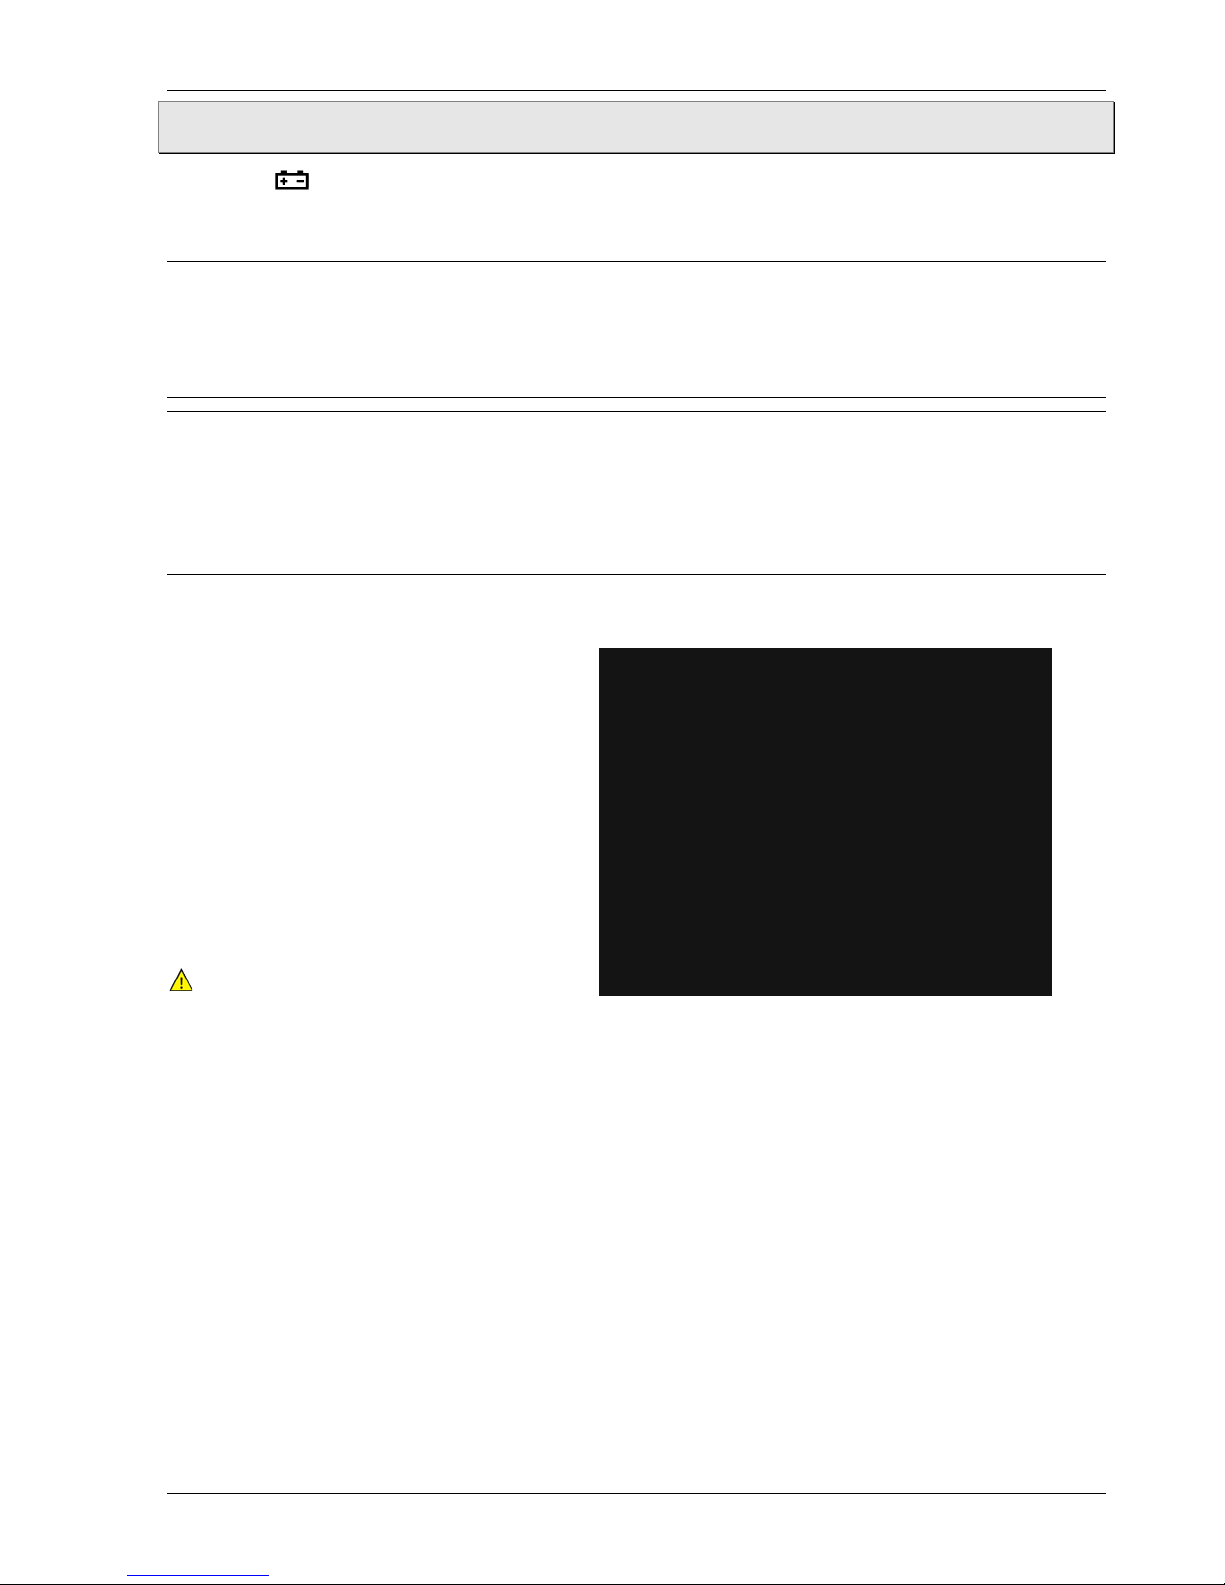
Beachten Sie beim Batteriewechsel die nachfolgenden Anweisungen (siehe Abbildung 4-1):
Schalten Sie das Gerät aus.
Entfernen Sie alle Messleitungen
von den Anschlüssen.
Nehmen Sie die Schutzabdeckung
des Gerätes ab.
Öffnen Sie den Batteriefachdeckel:
Entfernen Sie alle Schrauben vom
Batteriefachdeckel.
Entnehmen Sie das Batteriefach.
Entnehmen Sie die alten Batterien.
Kein Hausmüll!
Batterien müssen entsorgt werden.
Legen Sie zwei neue Batterien ein.
!!! POLARITÄT beachten !!!
Setzen Sie das Batteriefach wieder ein
und ziehen Sie die Schrauben fest.
Abbildung 4-1
Page 8
Ausgang EC mAV 2 EC mAV 2
- 8 - © SIKA • Ba_ECmAV2 • 03/2015
Einschalten:
Drücken Sie die Ein-Aus-Taste, um das Gerät einzuschalten.
Wenn das Gerät eingeschaltet ist, führt es intern eine Selbstdiagnose durch und der gesamte
Bildschirm wird angezeigt. Danach kann das Gerät in Betrieb genommen werden.
Ausschalten:
Drücken Sie die Ein-Aus-Taste für eine Sekunde, um das Gerät auszuschalten.
HINWEIS!
Um den korrekten Betrieb des Gerätes zu gewährleisten, empfiehlt es sich, das Gerät für
5 Sekunden auszuschalten und dann wieder einzuschalten.
Automatische Abschaltung:
Das Gerät schaltet sich automatisch nach 15 Minuten ohne Gebrauch ab. Sie können die automatische Abschaltung wie folgt deaktivieren:
1. Schalten Sie das Gerät aus.
2. Drücken Sie gleichzeitig die Ein-Aus- und mA%/V Taste, um das Gerät einzuschalten.
3. Wenn alle Display-Elemente erscheinen, lassen Sie die mA%/V-Taste los.
Das Gerät wechselt in den Einstellungsmodus und die Symbole AP-XX erscheinen auf
dem Display.
4. Drücken Sie die ▲/▼ Taste, um die Abschaltfunktion ein- oder auszuschalten.
AP-OF bedeutet, dass die automatische Abschaltfunktion deaktiviert ist.
AP-ON bedeutet, dass die automatische Abschaltfunktion aktiviert ist.
5. Drücken Sie die 100%/START-Taste, um die Einstellung zu speichern.
6. Schalten Sie das Gerät wieder aus, um den Einstellungsmodus zu verlassen.
5 Ausgang EC mAV 2
Der Ausgangsanschluss des Geräts generiert einen vom Benutzer eingestellten Gleichstrom
oder simuliert einen Transmitter.
VORSICHT! Materialschaden!
Wenn eine unzulässige Spannung an den Ausgangsanschluss angelegt wird, führt dies
zu Schäden an der internen Schaltung.
Legen Sie keine Spannung an den Ausgangsanschluss während des Betriebs an.
5.1 Ausgangskenndaten
Arbeitsbereich % Betrieb Anzeige Einstellbereich
I = 0…20 mA DC
mA
↨
mA %
00,000 mA
-0,25.00 mA%
00,000…22,000 mA
-025.00…112,50 mA%
Page 9

EC mAV 2 Ausgang EC mAV 2
Technische Änderungen vorbehalten - 9 -
5.2 Stromausgang
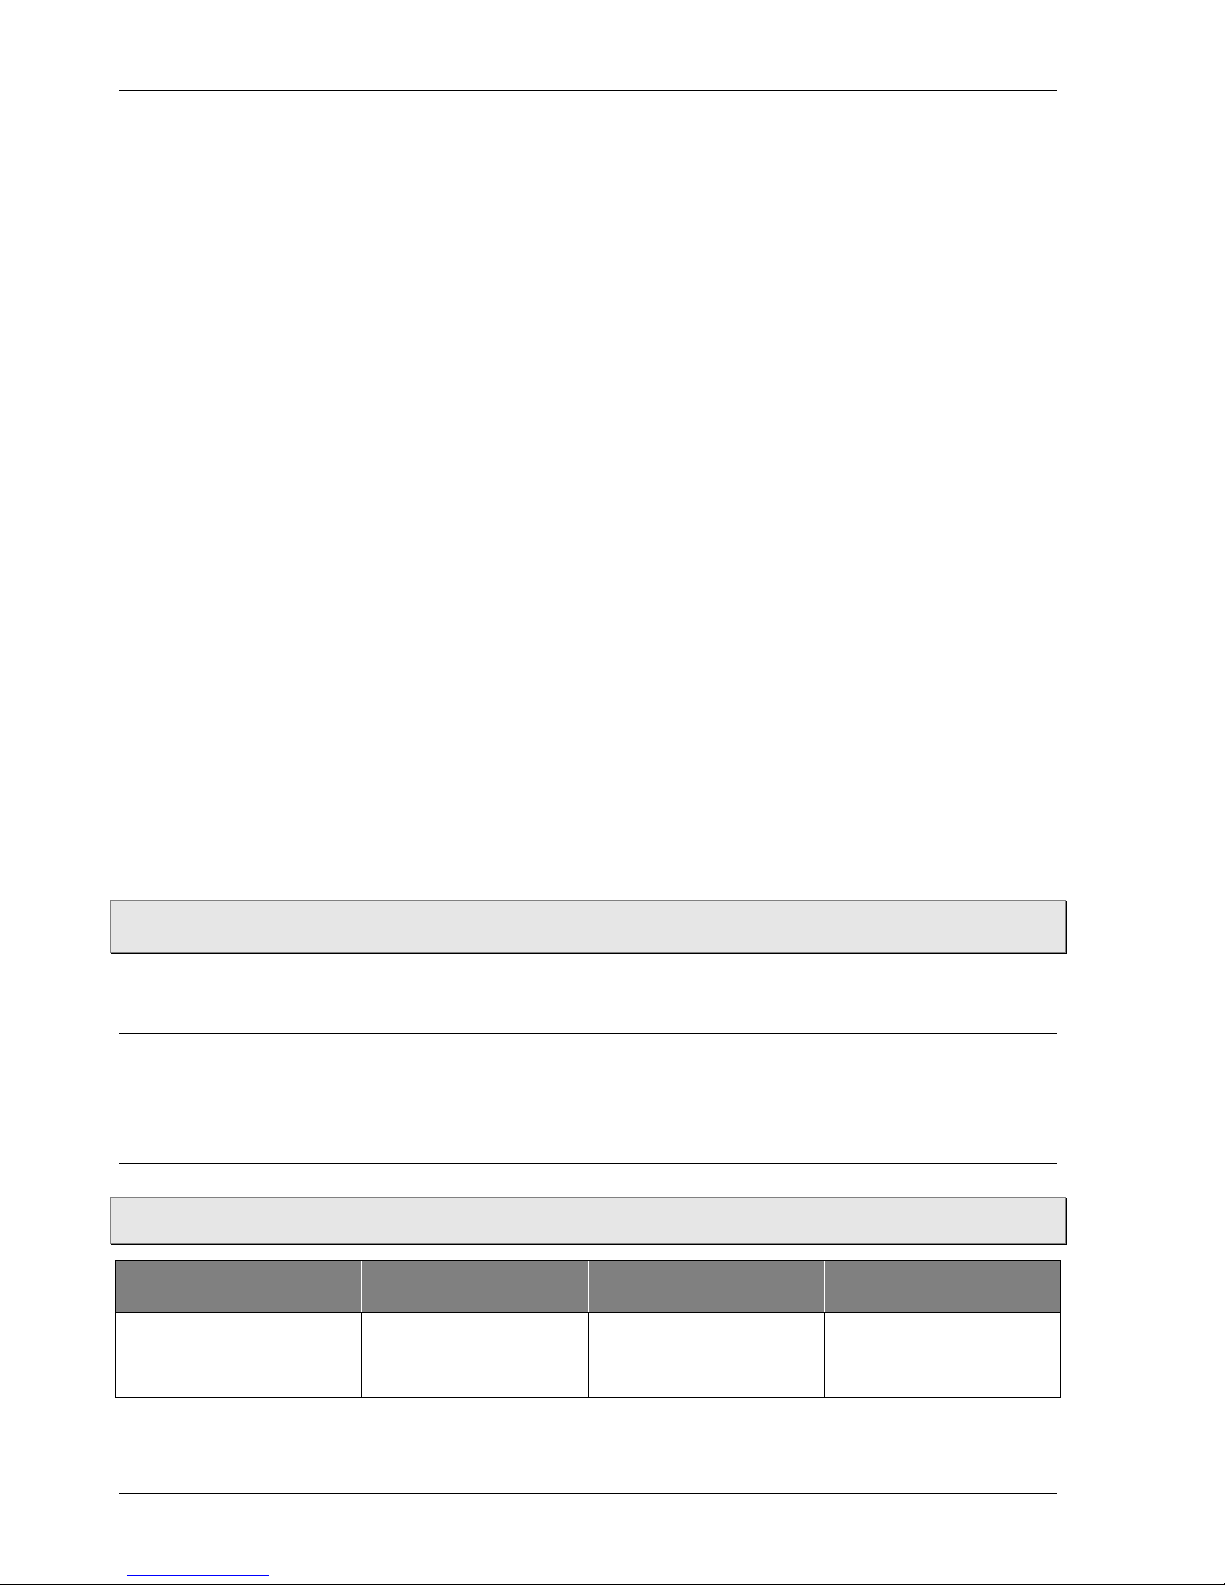
1. Stecken Sie ein Ende der Messleitung in die +mA-Ausgangsbuchse (OUTPUT) des EC
mAV 2 und das andere Ende in den Eingang des Gerätes wie in Abbildung 5-1 gezeigt:
Abbildung 5-1
2. Drücken Sie die OUTPUT/INPUT Taste und OUTPUT erscheint auf dem Display.
Der Ausgang des Simulators ist aktiv.
3. Drücken Sie die mA%/V Taste, um entweder mA oder % als Ausgang auszuwählen.
Die Einheit mA oder mA% erscheint auf dem Display, wobei 0% für 4 mA und 100 % für
20 mA steht.
4. Drücken Sie die ◄ / ► Taste, um die Ausgangsziffern auszuwählen.
5. Drücken Sie die ▲/ ▼Taste, um den Wert der eingestellten Ziffern zu ändern.
Halten Sie die Taste gedrückt und der Wert verändert sich.
5.3 Stromausgang in 25 % Schritten
1. Verbinden Sie die Messleitungen mit dem EC mAV 2 wie in § 5.2 beschrieben.
2. Drücken Sie die OUTPUT/INPUT Taste und OUTPUT erscheint auf dem Display.
Der Ausgang des Simulators ist aktiv.
3. Drücken Sie die 25%/RAMP Taste und ɅҐFS sowie ▲ erscheinen auf dem Display.
4. Drücken Sie die mA%/ V Taste, um den Ausgang auf mA oder % einzustellen.
Die Einheit mA oder mA% erscheint auf dem Display.
5. Drücken Sie die ▲/ ▼ Taste, um den Ausgang in 25 %-Schritten zu ändern, wobei 0%
für 4 mA und 100 % für 20 mA steht.
6. Drücken Sie wieder die 25 %/RAMP Taste, um den Vorgang zu beenden.
Page 10

Ausgang EC mAV 2 EC mAV 2
- 10 - © SIKA • Ba_ECmAV2 • 03/2015
5.4 Stromausgang für Nullpunkt & Endwert
1. Verbinden Sie die Messleitungen mit dem EC mAV 2 wie in § 5.2 beschrieben.
2. Drücken Sie die OUTPUT/INPUT Taste und OUTPUT erscheint auf dem Display.
Der Ausgang des Simulators ist aktiv.
3. Drücken Sie die 100%/START Taste und ɅҐFS, ▲, 0, FS erscheinen auf dem Display.
4. Drücken Sie die ▲Taste, um auf 100 % zu setzen und der Stromausgang ist 20 mA.
Drücken Sie die ▼ Taste, um auf 0 % zu setzen und der Stromausgang ist 4mA.
6. Drücken Sie wieder Sie die 100%/START Taste, um den Vorgang zu beenden.
5.5 Auto-ramp-Ausgang
1. Verbinden Sie die Messleitungen mit dem EC mAV 2 wie in § 5.2 beschrieben.
2. Drücken Sie die OUTPUT/INPUT Taste und OUTPUT erscheint auf dem Display.
Der Ausgang des Simulators ist aktiv.
3. Drücken Sie die STEP/AUTO Taste und OUTPUT, OFF, ɅҐFS sowie 4 mA erscheinen auf
dem Display.
Das Gerät wechselt in den RAMP-Modus.
4. Drücken Sie die 25%/RAMP Taste, um den Typ der Ausgangsrampe zu ändern. Der Typ
erscheint als ɅҐFS in der richtigen Reihenfolge. Diese Symbole stehen entsprechend
für einen Low Speed Ramp und eine High Speed Ramp. Erstere ist auf einen Zyklus von
60 Sekunden und letztere auf einen Zyklus von 30 Sekunden eingestellt, während die
Auto-Stair Step Ramp nach jedem Schritt 5 Sekunden pausiert.
5. Drücken Sie die 100%/START Taste, um die ausgewählte Rampe auszugeben, wenn das
ON Symbol erscheint.
Drücken Sie wieder die 100%/START Taste und der Ausgang wird beim momentanen
Wert pausieren und das OFF Symbol erscheint.
Drücken Sie die 100%/START Taste, um die Ausgabe der eingestellten Rampe vom Pausenwert fortzusetzen. Wenn OFF erscheint, drücken Sie eine der ◄, ►, ▲, ▼Tasten,
um den Ausgang wieder auf 0 % zu setzen.
Dann erscheint der Wert von 4 mA auf dem Display.
Page 11

EC mAV 2 Ausgang EC mAV 2
Technische Änderungen vorbehalten - 11 -
5.6 Simulation eines Transmitter-Ausgangs (XMT)
Stecken Sie ein Ende der Messleitung an die XMT-Ausgangsbuchse des EC mAV 2 und
das andere Ende an die Eingangsbuchse des Gerätes wie in Abbildung 5-2 gezeigt:
Abbildung 5-2
Die Bedienung ist dieselbe wie in § 5.2 "Stromausgang" beschrieben.
NOTICE!
• Bereich der Stromversorgung: 5 bis 25 VDC.
• Während des Betriebs des Stromausgangs verwenden Sie eine externe 24 VDC
Stromversorgung, wenn Sie einen Transmitter anschließen, um die Batterielebens dauer zu verlängern.
Page 12
Messfunktion EC mAV 2
- 12 - © SIKA • Ba_ECmAV2 • 03/2015
6 Messfunktion
VORSICHT! Verletzungsgefahr und Materialschaden!
Spannungen größer als 30 V führen zu möglichen Personenschäden und Schäden am
Gerät.
Niemals mehr als 30 V zwischen beiden Anschlussbuchsen oder zwischen einer An-
schlussbuchse und der Masse anlegen.
VORSICHT! Materialschaden!
Das Überschreiten des Messbereichs führt zu möglichen Schäden am Gerät.
Legen Sie keine Spannung oder keinen Strom an den Eingangsanschluss an, die bzw.
der den Messbereich überschreitet.
VORSICHT! Materialschaden!
Das Anschließen eines eingeschalteten Geräts führt zu möglichen Schäden am Simulator.
Schalten Sie das zu prüfende Gerät aus, bevor Sie es an den Simulator anschließen.
6.1 Eingangskenndaten
Arbeitsbereich % Betrieb Anzeige Messbereich
I = 0…20 mA DC
mA
↨
mA %
00,000 mA
-0,25.00 mA%
-1,000…22,000 mA
-31,25…112,50 mA%
U = 0…28 VDC
0,000 V
-0,2000…28,000 V
Page 13

EC mAV 2 Messfunktion
Technische Änderungen vorbehalten - 13 -
6.2 Gleichstrom messen
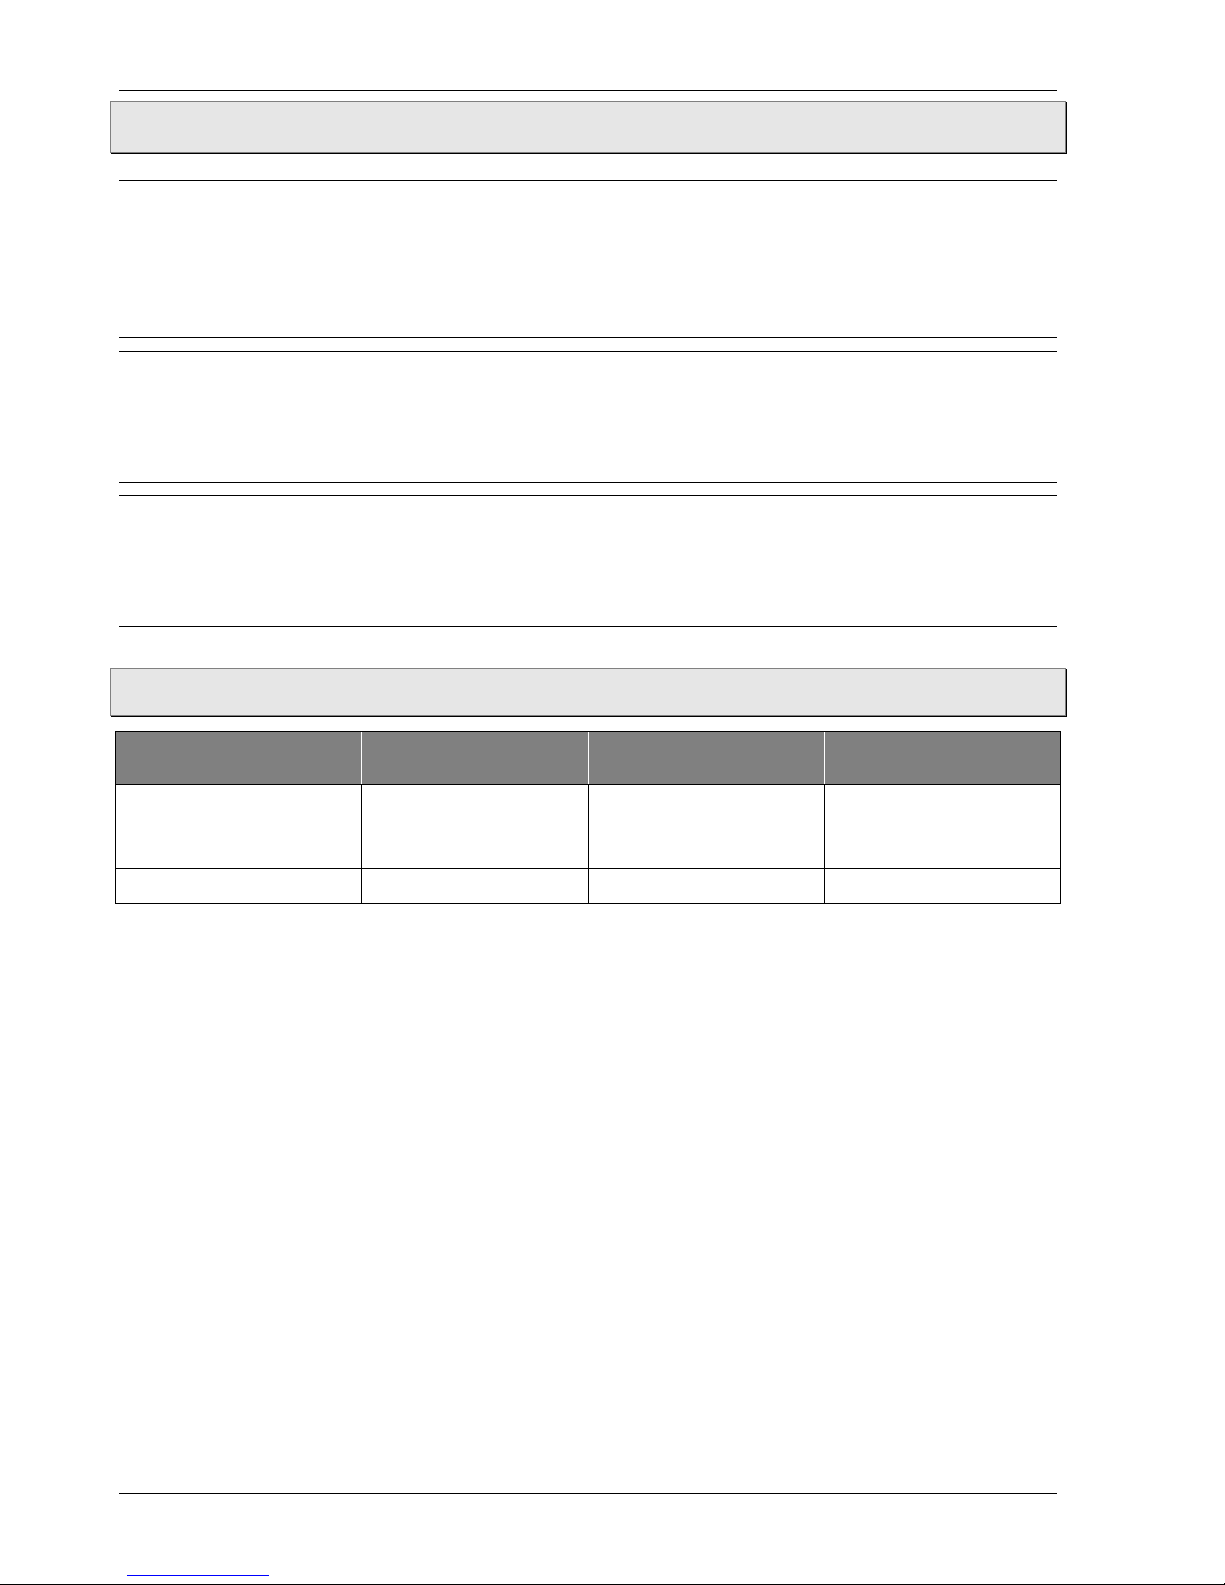
1. Stecken Sie ein Ende der Messleitung in die mA-Eingangsbuchse (INPUT) des EC mAV 2
und das andere Ende in den Ausgang des Gerätes wie in Abbildung 6-1 gezeigt:
Abbildung 6-1
2. Drücken Sie die OUTPUT / INPUT Taste, wenn INPUT auf dem Display erscheint.
Der Eingang des Simulators ist aktiv.
3. Drücken Sie die mA%/V Taste, um mA oder mA% auszuwählen.
Der Wert 0 % entspricht 4 mA und der Wert 100 % entspricht 20 mA.
Das Gerät beginnt die Messung und ON erscheint auf dem Display.
4. Das Gerät aktualisiert sich zweimal pro Sekunde. Wenn der gemessene Wert den
Messbereich überschreitet, erscheint OL auf dem Display.
Page 14

Messfunktion EC mAV 2
- 14 - © SIKA • Ba_ECmAV2 • 03/2015
6.3 Gleichspannung messen
1. Stecken Sie ein Ende der Messleitung in die V-Eingangsbuchse (INPUT) des EC mAV 2
und das andere Ende in den Ausgang des Gerätes wie in Abbildung 6-2 gezeigt:
Abbildung 6-2
2. Drücken Sie die OUTPUT / INPUT Taste und INPUT erscheint auf dem Display.
Der Eingang des Simulators ist aktiv.
3. Drücken Sie die mA%/V Taste, um die V-Funktion auszuwählen.
V erscheint auf dem Display.
Das Gerät beginnt die Messung und ON erscheint auf dem Display.
5. Das Gerät aktualisiert sich zweimal pro Sekunde. Wenn der gemessene Wert den
Messbereich überschreitet, erscheint OL auf dem Display.
6.4 24 V Stromversorgung zum Messen von Schleifenstrom
Stecken Sie die Messleitung in die +LOOP- und mA-Eingangsbuchsen (INPUT) des EC
mAV 2 wie in Abbildung 6-3 gezeigt:
Abbildung 6-3
Die Bedienung ist dieselbe wie in § 6.2 "Gleichstrom messen" beschrieben.
Page 15
EC mAV 2 Wartung und Reinigung
Technische Änderungen vorbehalten - 15 -
7 Wartung und Reinigung
Der Monofunktions-Simulator Typ EC mAV 2 ist wartungsfrei und kann auch nicht vom Anwender repariert werden. Bei einem Defekt muss das Gerät ausgetauscht oder zur Reparatur an den Hersteller zurückgeschickt werden.
Regelmäßig zu wechseln sind lediglich die Batterien.
VORSICHT! Materialschaden!
Beim Öffnen des Geräts können wichtige Teile oder Komponenten beschädigt werden.
Öffnen Sie niemals das Gerät oder führen selbst Reparaturen durch.
WICHTIG! Batterien entfernen!
Bei längerer Nichtbenutzung des Gerätes sollten die Batterien aus dem Gerät entfernt
werden, damit es nicht zu Auslaufschäden kommt.
7.1 Reinigung
Reinigen Sie den EC mAV 2 mit einem trockenen oder leicht angefeuchteten, weichen Tuch.
Verwenden Sie keine scharfen Gegenstände oder aggressive Reinigungsmittel beim Reinigen.
Wichtig! Reinigen Sie die Anschlussbuchsen!
Schmutz oder Feuchtigkeit können die Messwerte beeinträchtigen:
Schalten Sie das Gerät aus und entfernen Sie alle Messleitungen.
Entfernen Sie Schmutz aus den Buchsen durch vorsichtiges Schütteln.
Reinigen Sie jede Buchse mit einem in Alkohol getränkten Wattestäbchen.
7.2 Sicherung austauschen
VORSICHT! Verletzungsgefahr und Materialschaden!
Verwenden Sie nur die angegebene Sicherung (63 mA, 250 V schnell schmelzend), um
Personenschäden oder Schäden am Simulator zu vermeiden.
Beim Austausch der Sicherung die nachfolgenden Anweisungen (siehe Abb. 7-1) beachten:
Schalten Sie das Gerät aus.
Entfernen Sie alle Messleitungen
aus den Anschlussbuchsen.
Nehmen Sie die Schutzabdeckung
des Geräts ab.
Entfernen Sie die Schrauben.
Nehmen Sie die Abdeckung ab.
Ersetzen Sie die durchgebrannten
Sicherungen.
Montieren Sie wieder die Abdeckung
und die Schutzabdeckung.
Abbildung 7-1
Page 16
Wartung und Reinigung EC mAV 2
- 16 - © SIKA • Ba_ECmAV2 • 03/2015
7.3 Rekalibrierung
Um die vorgesehene Genauigkeit dieses Gerätes zu erhalten, empfiehlt es sich, den Kalibrator einmal pro Jahr zu kalibrieren Das folgende Beispiel zeigt die Verwendung von empfohlener Standardausrüstung, um die Kalibrierung durchzuführen.
VORSICHT! Materialschaden!
Überspannung führt zu möglichen Schäden an den Eingängen.
Legen Sie niemals mehr als die höchstzulässige Spannung an den Eingang des Kalib-
rators an.
VORSICHT! Materialschaden!
Jegliche Fehlbedienung führt zu möglichen Schäden an den internen Schaltkreisen.
Verhindern Sie Kurzschlüsse und legen Sie niemals mehr als die höchstzulässige
Spannung an den Ausgang des Gerätes oder ein anderes angeschlossenes Gerät an.
7.3.1 Auswahl der Standardausrüstung
EC mAV 2 (wird kalibriert) Referenz Bereich Genauigkeit
Generieren
(Ausgang)
20 mA DC
Digitales Messgerät
& Standardwider-
stand
max. 22 mA
(Eingang)
± (50 ppm + 0,4 µA)
Messen
(Eingang)
20 mA DC
mA Quelle
max. 33 mA
(Ausgang)
± (100 ppm +
0,2 µA)
28 VDC
V Quelle
max. 33 V
(Ausgang)
± (12 ppm + 15 µV)
7.3.2 Umgebungsbedingungen für Rekalibrierung
Umgebungstemperatur: 23 °C ± 1 °C
Relative Luftfeuchtigkeit: 45… 75 % rH
Vorwärmen: Das Gerät sollte für die angegebene Zeit vorgewärmt werden;
Lassen Sie das Gerät für 24 Stunden in der Umgebung für die
Kalibrierung, stellen Sie dann die Stromversorgung her,
deaktivieren Sie die automatische Abschaltung und
erwärmen Sie das Gerät für eine halbe Stunde.
WICHTIG!
Während der Kalibrierung empfiehlt es sich, 2x 1,5 V AA (LR6) Batterien zu verwenden.
Page 17
EC mAV 2 Wartung und Reinigung
Technische Änderungen vorbehalten - 17 -
7.3.3 Rekalibrierung des Ausgangs
Führen Sie die Kalibrierung in der Reihenfolge der Einträge und der Kalibrierungspunkte
durch:
Eintrag-Nr. Ausgangsbereich Kalibrierungspunkt
1
Strom I = 20 mA DC
0
0 FS
FS
1. Im ausgeschalteten Zustand drücken Sie gleichzeitig die OUTPUT / INPUT und die Ein-
Aus-Taste, um das Gerät einzuschalten.
Der EC mAV 2 wechselt in den Kalibrierungsmodus und die Symbole CAL 0 erscheinen
auf dem Display.
2. Drücken Sie die OUTPUT / INPUT Taste, um die Ausgangsfunktion auszuwählen und
OUTPUT, mA erscheinen auf dem Display.
3. Schließen Sie den EC mAV 2 an die Geräte wie in Abbildung 7-2 gezeigt an:
Abbildung 7-2
4. Stellen Sie das digitale Messgerät auf einen geeigneten Bereich ein.
5. Wenn der Ausgang stabil ist, drücken Sie die ◄/►Taste und die ▲/ ▼ Taste, um den
Kalibrator auf einen Wert einzustellen, der dem Messwert des digitalen Messgerätes
entspricht.
6. Drücken Sie die 100%/START Taste und SAVE erscheint auf dem Display.
Der Kalibrierungspunkt wurde gespeichert.
7. Drücken Sie die STEP/AUTO Taste und CAL 0 FS erscheint auf dem Display.
Wenn der Ausgang stabil ist, wiederholen Sie die Schritte 5 und 6.
Page 18
Wartung und Reinigung EC mAV 2
- 18 - © SIKA • Ba_ECmAV2 • 03/2015
7.4 Rekalibrierung des Eingangs
Führen Sie die Kalibrierung in der Reihenfolge der Einträge und der Kalibrierungspunkte
durch:
Eintrag-Nr. Eingangsbereich Kalibrierungspunkt
1
Strom I = 20 mA DC
0: 0.000 mA
FS: 19.000 mA
2
Spannung U = 28 VDC
0: 0.000 V
FS: 19.000 V
7.4.1 Strommessung kalibrieren
1. Im ausgeschalteten Zustand drücken Sie gleichzeitig die OUTPUT / INPUT und die Ein-
Aus-Taste, um das Gerät einzuschalten.
Der EC mAV 2 wechselt in den Kalibrierungsmodus und CAL 0 erscheint auf dem Display.
2. Drücken Sie die OUTPUT / INPUT Taste, um die Messfunktion auszuwählen und INPUT,
mA erscheinen auf dem Display.
3. Schließen Sie den EC mAV 2 an das Gerät wie in Abbildung 7-3 gezeigt an:
Abbildung 7-3
4. Stellen Sie die Quelle (Standard Source) auf einen geeigneten Bereich ein.
5. Stellen Sie den Ausgang der Quelle (Standard Source) auf den gegebenen Wert in der
Tabelle aus § 7.4 ein und wenn der Ausgang stabil ist, drücken Sie die 100%/START
Taste und SAVE erscheint auf dem Display.
Der Kalibrierungspunkt wurde gespeichert.
6. Drücken Sie die STEP/AUTO Taste und CAL FS erscheint auf dem Display.
Wiederholen Sie Schritt 5.
Page 19

EC mAV 2 Wartung und Reinigung
Technische Änderungen vorbehalten - 19 -
7.4.2 Spannungsmessung kalibrieren
1. Drücken Sie die mA % / V Taste, um die Spannungsmessfunktion auszuwählen und
INPUT, CAL 0, V erscheinen auf dem Display.
2. Schließen Sie den EC mAV 2 an das Gerät in Abbildung gezeigt 7-4 an.
3. Stellen Sie die Quelle (Standard Source) auf einen geeigneten Bereich ein.
4. Stellen Sie den Ausgang der Quelle (Standard Source) auf den gegebenen Wert in der
Tabelle aus § 7.4 ein und wenn der Ausgang stabil ist, drücken Sie die 100%/START
Taste und SAVE erscheint auf dem Display.
Der Kalibrierungspunkt wurde gespeichert.
5. Drücken Sie die STEP/AUTO Taste und CAL FS erscheint auf dem Display.
Wiederholen Sie Schritt 4.
Abbildung 7-4
Page 20

Außerbetriebnahme und Entsorgung EC mAV 2
- 20 - © SIKA • Ba_ECmAV2 • 03/2015
8 Außerbetriebnahme und Entsorgung
VORSICHT! Verletzungsgefahr!
Entfernen Sie niemals das Gerät während des Betriebs.
Sorgen Sie dafür, dass das Gerät abgeschaltet ist.
Vor der Außerbetriebnahme:
Überprüfen Sie vor der Außerbetriebnahme, ob
der EC mAV 2 ausgeschaltet ist.
Außerbetriebnahme:
Entfernen Sie alle Messleitungen.
Entsorgung:
Konform zu den Richtlinien 2002/95/CE (RoHS) und 2002/96/EG (WEEE) muss das Gerät separat als Elektro- und Elektronikschrott entsorgt werden.
Beachten Sie die gesetzlichen Regelungen des Landes, in dem das Gerät vertrieben wurde.
KEIN HAUSMÜLL!
Der EC mAV 2 besteht aus unterschiedlichen Werkstoffen. Er darf nicht zusammen mit
Hausmüll entsorgt werden.
Führen Sie den EC mAV 2 der lokalen Wiederver-
wertung zu
oder
schicken Sie den EC mAV 2 zur Entsorgung an den
Lieferanten bzw. SIKA zurück.
Page 21
EC mAV 2 Technische Daten
Technische Änderungen vorbehalten - 21 -
9 Technische Daten
Bei kundenspezifischen Ausführungen können technische Daten gegenüber den Angaben
dieser Anleitung abweichen. Bitte beachten Sie die Angaben auf dem Typenschild.
Anwendbar auf einen Temperaturbereich von 18 °C bis 28 °C innerhalb eines Jahres nach
der Kalibrierung.
9.1 Kenndaten EC mAV 2
Kenndaten EC mAV 2
Ausgang
Gleichstrom generieren *1
- Bereich
- Ausgangsbereich
- Auflösung
- Genauigkeit
20 mA
0…22 mA
0,001 mA
± (0,05 % + 4 µA)
Transmitter-Simulation*2
- Bereich
- Ausgangsbereich
- Auflösung
- Genauigkeit
-20 mA
0…22 mA
0,001 mA
± (0,05 % + 4 µA)
Schleifenversorgung *3
- Bereich
- Genauigkeit
24 V
± 10 %
Eingang
Spannung *4
- Bereich
- Ausgangsbereich
- Auflösung
- Genauigkeit
28 V
-0.2…28 V
0,001 V
± (0,02 % + 2 mV)
Strom *5
- Bereich
- Ausgangsbereich
- Auflösung
- Genauigkeit
20 mA
-1…22 mA
0,001 mA
± (0,02 % + 4 µA)
Schleifenstrom *6
- Bereich
- Ausgangsbereich
- Auflösung
- Genauigkeit
20 mA
0…22 mA
0,001 mA
± (0,02% + 4 µA)
*1 max. Last 1 kΩ bei 20 mA.
*2 max. Last 1 kΩ bei 20 mA, Versorgungsspannungsbereich 5…25 VDC.
*3 max Ausgangsstrom bis zu 25 mA.
*4 Eingangswiderstand ca. 1 MΩ.
*5 Widerstand ca. 20 Ω.
*6 Bereitstellung von 24 V Schleifenversorgung.
Page 22
Technische Daten EC mAV 2
- 22 - © SIKA • Ba_ECmAV2 • 03/2015
Kenndaten EC mAV 2
Elektrische Kenndaten
Versorgungsspannung
Batterie 2 x1,5 VDC AA (LR6 –AA), Alkaline (Mignon)
Batterielebensdauer
ca. 20 Stunden
(ca. 400 mAh /3V unter der Bedingung von 10 mA miz1kΩ Last)
Max. zulässige Spannung
30 V
(zwischen den Klemmen oder zwischen einer Klemme und Mas-
se)
Umgebungsbedingungen und Prozessvariablen
Betriebstemperatur
0…50 °C
Relative Luftfeuchtigkeit (Betrieb)
≤80 % rH
Lagertemperatur
-10…50 °C
Relative Luftfeuchtigkeit
(Lagerung)
≤90 % rH
Temperaturkoeffizient
0,1× (gekennzeichnete Genauigkeit)%/°C(5 °C~18 °C, 28 °C
~
40 °C)
Abmessungen (LxBxH)
180×90×47 mm (mit Holster)
Gewicht
500 g (mit Holster)
Page 23

EC mAV 2 Technische Daten
Technische Änderungen vorbehalten - 23 -
Für Ihre Notizen
Page 24

EC mAV 2
- 24 - © SIKA • Ba_ECmAV2 • 03/2015
Mechanische Messtechnik
Mechanical measuring instruments
Durchflussmesstechnik
Flow measuring instruments
Elektronische Mess- & Kalibriertechnik
Electronic measuring- & calibration instruments
SIKA Dr. Siebert & Kühn GmbH & Co. KG
Struthweg 7–9
D-34260 Kaufungen Germany
+49 (0)5605 803-0
+49 (0)5605 803-54
info@sika.net
www.sika.net
Page 25

Please keep this operating manual for future reference.
If the device is resold, please provide the operating manual along with it.
© SIKA • Ba_ECmAV2 • 03/2015 .
Monofunction simulator series EC
Type EC mAV 2
Operating manual
(Translation)
Betriebsanleitung
.................................................... Seite 1 - 24
Operating manual
.................................................. page 25 - 48
Page 26

EC mAV 2
- 26 - © SIKA • Ba_ECmAV2 • 03/2015
Table of contents page
0 About this operating manual ....................................................................................... 27
1 Device description ....................................................................................................... 28
1.1 Intended use .............................................................................................................. 28
1.2 Exclusion of liability .................................................................................................. 28
2 Safety instructions ....................................................................................................... 29
3 Overview and Functions .............................................................................................. 30
3.1 Display description .................................................................................................... 30
4 Battery replacement and power-on/off EC mAV 2 ..................................................... 31
5 Output from EC mAV 2 ................................................................................................ 32
5.1 Output Operation Procedure ..................................................................................... 32
5.2 Current output ........................................................................................................... 33
5.3 25 % Step Current Output ......................................................................................... 33
5.4 Current Output Set for Zero Point & Full Scale ....................................................... 34
5.5 Auto-ramp Output ..................................................................................................... 34
5.6 Simulating Transmitter Output (XMT)....................................................................... 35
6 Instrument Measurement ........................................................................................... 36
6.1 Input Operation Procedure ....................................................................................... 36
6.2 Measuring Direct Current ......................................................................................... 37
6.3 Measuring DC Voltage ............................................................................................... 38
6.4 Providing 24 V Power Supply for Measuring Loop Current ...................................... 38
7 Maintenance and cleaning .......................................................................................... 39
7.1 Cleaning..................................................................................................................... 39
7.2 Replace the fuse ........................................................................................................ 39
7.3 Recalibration ............................................................................................................. 40
7.3.1 Selecting Standard Equipment ............................................................................. 40
7.3.2 Ambient Condition for Recalibration .................................................................... 40
7.3.3 Output Recalibration ............................................................................................. 41
7.4 Input Calibration ........................................................................................................ 42
7.4.1 Current Measurement Calibration ....................................................................... 42
7.4.2 Voltage Measurement Calibration ........................................................................ 43
8 Decommissioning and disposal .................................................................................. 44
9 Technical data ............................................................................................................. 45
9.1 Characteristics EC mAV 2 ......................................................................................... 45
Copyright notice:
The reproduction, distribution and utilization of this operating manual as well as the communication of
its contents to others without express authorization is prohibited. Offenders will be held liable for the
payment of damages. All rights reserved in the
event of the grant of a patent, utility model or design.
Page 27

EC mAV 2 About this operating manual
Technical changes reserved - 27 -
0 About this operating manual
• The operating manual is aimed at specialists and semi-skilled personnel.
• Before each step, read through the relevant advice carefully and keep to the specified
order.
• Thoroughly read and understand the information in the section “Safety instructions”.
If you have any problems or questions, please contact your supplier or contact us directly at:
Dr. Siebert & Kühn GmbH & Co. KG
Struthweg 7-9 • D - 34260 Kaufungen
05605-803 0 • 05605-803 54
[email protected] • www.sika.net
Hazard signs and other symbols used:
CAUTION! Electric current!
This sign indicates dangers which could arise from handling of electric current.
CAUTION! Risk of injury!
This sign indicates dangers that cause personal injuries that can lead to health defects or
cause considerable damage to property.
CAUTION! Material damage!
This sign indicates actions which could lead to possible damage to material or environmental
damage.
ADHERE TO OPERATING MANUAL!!
NOTICE!
This symbol indicates important notices,
tips or information.
NO DOMESTIC WASTE!
The device must not be disposed of to-
gether with domestic waste.
Pay attention to and comply with infor-
mation that is marked with this symbol.
Follow the specified instructions and steps.
Adhere to the given order.
Check the specified points or notices.
Reference to another section, document or
source.
• Item.
Page 28

Device description EC mAV 2
- 28 - © SIKA • Ba_ECmAV2 • 03/2015
1 Device description
The EC mAV 2 is a hand-held monofunction simulator which is intended for calibration and
maintenance and can be used either on site or in the laboratory. It can measure direct current and DC voltage as well as generate direct current. Furthermore, it offers the function to
generate linear steps and ramps.
The implemented sensor functions simulate specific supply variables and display an exact
given value. This distinguishes a signal calibrator from the conventional measuring functions
of a multimeter.
Scope of delivery and accessories:
Before using the device, check the delivered items:
1x EC mAV 2.
1x Operating manual.
A set of CF-36 industrial test lead (with alligator clips attached to probes).
Packaging or transport protection (if applicable).
1.1 Intended use
The monofunction simulator type EC mAV 2 may only be used for measuring direct current
and DC voltage and for generating direct current.
The operational safety of the device supplied is only guaranteed by intended use. The specified limits ( § 9 "Technical data") may under no circumstances be exceeded.
This applies especially to the compliance with the permissible voltage applied to the terminals.
1.2 Exclusion of liability
We accept no liability for any damage or malfunctions resulting from incorrect installation,
in-appropriate use of the device or failure to follow the instructions in this operating manual.
Page 29

EC mAV 2 Safety instructions
Technical changes reserved - 29 -
2 Safety instructions
Before you install the EC mAV 2, read through this operating manual carefully. If the instructions contained within it are not followed, in particular the safety guidelines, this
could result in danger for people, the environment, and the device and the system it is
connected to.
The EC mAV 2 corresponds to the state-of-the-art technology. This concerns the accuracy,
the operating mode and the safe operation of the device.
In order to guarantee that the device operates safely, the operator must act competently and
be conscious of safety issues.
SIKA provides support for the use of its products either personally or via relevant literature.
The customer verifies that our product is fit for purpose based on our technical information.
The customer performs customer- and application-specific tests to ensure that the product
is suitable for the intended use. With this verification all hazards and risks are transferred to
our customers; our warranty is not valid.
Qualified personnel:
The personnel who are charged for the operation and maintenance of the EC mAV 2 must
hold a relevant qualification. This can be based on training or relevant tuition.
The personnel must be aware of this operating manual and have access to it at all times.
General safety instructions:
Do not operate the instrument in the presence of flammable gas, explosive gas or vapour.
Never apply more than 30 V between any two terminals, or between any terminal and
ground.
The split case may not to be removed, unless by qualified technicians.
To clean the device, periodically wipe the case with a damp cloth and detergent; do not
use any corrosive solvents.
For optimal accuracy, allow the instrument to warm up for 5 minutes before operating.
Special safety instructions:
Warnings that are specifically relevant to individual operating procedures or activities can be
found at the beginning of the relevant sections of this operating manual.
Page 30
Overview and Functions EC mAV 2
- 30 - © SIKA • Ba_ECmAV2 • 03/2015
3 Overview and Functions
LC display.
Output / Input selection.
mA% / V selection.
0% & 100% setting
Auto ramp start.
25% single step
Auto ramp.
Input / Output terminals.
Input Decimal Point Positioning ◄►
Output Value Setting ▲▼
Cursor Positioning ◄►.
Single step
Auto switch.
ON / OFF switch.
3.1 Display description
ON, OFF Input / output signals are on or off.
OUTPUT Press the OUTPUT/INPUT button when the symbol OUTPUT appears.
Instrument is in an output state.
INPUT Press the OUTPUT/INPUT button when the symbol INPUT appears.
Instrument is in an input state.
CAL Instrument is in a calibration state.
0 FS Instrument is in a calibration state, denoting that the zero point or the full scale
point is now in calibration.
Battery power is low and needs to be replaced.
▲ Output digits need to be set.
V, mA, % Present output or input value (unit of measure).
High and low-speed auto-ramp, auto-step ramp.
Page 31
EC mAV 2 Battery replacement and power-on/off EC mAV 2
Technical changes reserved - 31 -
4 Battery replacement and power-on/off EC mAV 2
When the symbol appears on the display, the batteries need to be replaced. This device
is powered by two AA batteries (LR6).
CAUTION! Electric current!
To avoid electrical shock or personal injury:
Remove any test leads from the device before opening the battery compartment.
Close and latch the battery cover before using the device.
CAUTION! Observe the battery type and polarity!
Damage can be caused if a different type of batteries is used or the batteries are incorrectly inserted during replacement.
Use only fresh batteries of the same type (LR6 - AA).
Pay attention to the correct polarity when inserting.
Comply with the following instructions when replacing the batteries (see figure 4-1):
Switch off the device.
Remove any test leads from the
terminals.
Take off the protector of the device.
Open the battery cover:
Remove the screws from the battery
door.
Take off the battery case.
Remove the old batteries.
No domestic waste!
The batteries must be disposed of.
Insert two new batteries.
!!! Pay attention to the POLARITY !!!
Reinstall the battery case and tight-
en the screws.
Figure 4-1
Page 32
Output from EC mAV 2 EC mAV 2
- 32 - © SIKA • Ba_ECmAV2 • 03/2015
Power on:
Press the power button to turn on the device.
When the device is turned on, it starts to make self-diagnosis internally and the full screen is
in display. After this, appropriate operation should be carried out.
Power off:
Press the power button for one second to turn off the device.
NOTICE!
To ensure correct operation of the device, it is recommended to turn off the device for
5 seconds and then restart the instrument.
Automatic Power-off:
The device will automatically turn itself off after 15 minutes without any action. Follow the
steps below to disable the Auto Power-off function:
1. Turn off the device.
2. Press simultaneously the power and mA%/V buttons to turn on the device.
3. When the LCD shows all its contents, release the mA%/V button
The device enters into the setting mode, and the symbols AP-XX appear in the LCD.
4. Press the ▲/▼ button to activate or deactivate the power-off function.
AP-OF indicates that automatic power-off is disabled.
AP-ON indicates that automatic power-off is enabled.
5. Press the 100%/START button to save the setting.
6. Turn off the device again to exit from the setting function.
5 Output from EC mAV 2
The output terminal of the device generates direct current set by the user or simulates a
transmitter.
CAUTION! Material damage!
If any improper voltage is applied to the output terminal, it will cause damage to the internal circuit.
Do not any apply voltage to the output terminal during the operation.
5.1 Output Operation Procedure
Function operation % operation Display Set range
I = 0…20 mA DC
mA
↨
mA %
00.000 mA
-0.25.00 mA%
00.000…22.000 mA
-025.00…112.50 mA%
Page 33

EC mAV 2 Output from EC mAV 2
Technical changes reserved - 33 -
5.2 Current output
1. Insert one end of the test leads into the +mA output jack (OUTPUT) of the EC mAV 2 and
connect the other end to the input of the user's instrument, as shown in figure 5-1:
Figure 5-1
2. Press the OUTPUT/INPUT button and OUTPUT appears on the display.
This indicates that the instrument is in an output state.
3. Press the mA%/V button to select the output to be either mA or %.
The unit mA or mA% appears on the display, in which 0% indicates 4 mA and 100 % indicates 20 mA.
4. Press the ◄ / ► button to select the output digits.
5. Press the ▲/ ▼button to change the value of the set digits.
Hold the button and the value will keep varying.
5.3 25 % Step Current Output
1. Connect the test leads to the EC mAV 2 as stated in § 5.2.
2. Press the OUTPUT/INPUT button and OUTPUT appears on the display.
This indicates that the device is in an output state.
3. Press the 25%/RAMP button and ɅҐFS as well as ▲ will appear on the display.
4. Press the mA%/ V button to select the set output to mA or %
The unit mA or mA% appears on the display.
5. Press the ▲/ ▼ button to change the output in a value of 25 %, in which 0 % indicates
4 mA and 100 % indicates 20 mA.
6. Press the 25 %/RAMP button again to exit.
Page 34

Output from EC mAV 2 EC mAV 2
- 34 - © SIKA • Ba_ECmAV2 • 03/2015
5.4 Current Output Set for Zero Point & Full Scale
1. Connect the test leads to the EC mAV 2 as stated in § 5.2.
2. Press the OUTPUT/INPUT button and OUTPUT appears on the display.
This indicates that the device is in an output state.
3. Press the 100%/START button and ɅҐFS, ▲, 0, FS will appear on the display.
4. Press the ▲button to set to 100 % and the current output will be 20mA.
Press the ▼ button to set to 0 % and the current output will be 4mA.
6. Press the 100%/START button again to exit.
5.5 Auto-ramp Output
1. Connect the test leads to the EC mAV 2 as stated in § 5.2.
2. Press the OUTPUT/INPUT button and OUTPUT appears on the display.
This indicates that the device is in an output state.
3. Press the STEP/AUTO and OUTPUT, OFF, ɅҐFS as well as 4 mA appear on the display.
This indicates that the device is entering RAMP mode.
4. Press the 25%/RAMP button to change the type of the output ramp. The type appears
with ɅҐFS in proper order. These symbols indicate a low speed ramp and a high speed
ramp respectively. The former is set to a cycle of 60 seconds and the latter is set to
30 seconds, while the auto-stair step ramp pauses 5 seconds at each step.
5. Press the 100%/START button to start the output of the selected output ramp when the
symbol ON appears.
Press the 100%/START button again and the output will pause on the current value and
the symbol OFF will appear.
Press the 100%/START button to resume the output at the set ramp from the pause value. When OFF appears, press any one of the ◄, ►, ▲, ▼buttons to bring the output
back to 0%.
Then the value of 4mA appears on the display.
Page 35

EC mAV 2 Output from EC mAV 2
Technical changes reserved - 35 -
5.6 Simulating Transmitter Output (XMT)
Insert one end of the test lead to the ‘XMT’ output jack of the EC mAV 2 and connect the
other end to the input terminal of the user’s device as shown in the Figure 5-2:
Figure 5-2
The operation is the same as described in § 5.2 "Current output".
NOTICE!
• Range of power supply: 5 to 25 VDC.
• During the operation of the current output, use the external 24 VDC power
supply in a mode of connecting a transmitter in order to prolong the battery life.
Page 36
Instrument Measurement EC mAV 2
- 36 - © SIKA • Ba_ECmAV2 • 03/2015
6 Instrument Measurement
CAUTION! Risk of injury and material damage!
Any voltage higher than 30 V will lead to possible personal injury and damage to the device.
Never apply more than 30 V between any two terminals, or between any terminal and
ground.
CAUTION! Material damage!
Exceeding the measuring range will cause possible damage to the device.
Do not apply a voltage or current exceeding the measuring range to the input termi-
nal.
CAUTION! Material damage!
Any connection with a device without cutting off its power supply will cause possible
damage to the device.
When connecting to the device, the power supply of the device under test should be
cut off.
6.1 Input Operation Procedure
Function operation % operation Display Measuring range
I = 0…20 mA DC
mA
↨
mA %
00.000 mA
-0.25.00 mA%
-1.000…22.000 mA
-31.25…112.50 mA%
U = 0…28 VDC
0.000 V
-0.2000…28.000 V
Page 37

EC mAV 2 Instrument Measurement
Technical changes reserved - 37 -
6.2 Measuring Direct Current
1. Insert one end of the test lead into the mA input jack (INPUT) of the EC mAV 2 and con-
nect the other end of the output of the user’s device as shown in Figure 6-1:
Figure 6-1
2. Press the OUTPUT / INPUT button when INPUT appears on the display.
It indicates that the device is in an input state.
3. Press the mA%/V button to select mA or mA%.
The value of 0 % indicates 4 mA and the value of 100 % indicates 20 mA.
The device starts measurement and ON will appear on the display.
4. The unit refreshes twice per second. If the measured value exceeds the measuring
range, OL will appear on the display.
Page 38

Instrument Measurement EC mAV 2
- 38 - © SIKA • Ba_ECmAV2 • 03/2015
6.3 Measuring DC Voltage
1. Insert one end of the test lead into the V input jack (INPUT) of the EC mAV 2 and connect
the other end to the output of the user’s device as shown in Figure 6-2:
Figure 6-2
2. Press the OUTPUT / INPUT button and INPUT will appear on the display.
It indicates that the device is in an input state.
3. Press the mA%/V button to select the V function
V appears on the display.
The device starts measurement and ON will appear on the display.
5. The unit refreshes twice per second. If the measured value exceeds the measuring
range, OL will appear on the display.
6.4 Providing 24 V Power Supply for Measuring Loop Current
Insert the test lead into the +LOOP and mA input jacks (INPUT) of the EC mAV 2 as shown
in Figure 6-3:
Figure 6-3
The operation is the same as described in § 6.2 "Measuring Direct Current".
Page 39
EC mAV 2 Maintenance and cleaning
Technical changes reserved - 39 -
7 Maintenance and cleaning
The monofunction simulator type EC mAV 2 is maintenance-free and cannot be repaired by
the user. In case of a defect, the device must be replaced or returned to the manufacturer for
repair.
The only thing that needs to be regularly replaced is the batteries.
CAUTION! Material damage!
When opening the device, critical parts or components can be damaged.
Never open the device and perform any repair yourself.
IMPORTANT! Remove the batteries!
If the device will not be used for longer periods, the batteries should be removed from
the device to preclude any leaking damage.
7.1 Cleaning
Clean the EC mAV 2 with a dry or slightly damp lint-free cloth. Do not use sharp objects or
aggressive agents for cleaning.
IMPORTANT! Clean the terminals!
Dirt or moisture in the terminals can affect readings:
Turn the device off and remove all test leads.
Shake out carefully any dirt that may be in the terminals.
Soak a new swab with alcohol and clean each terminal with the swab.
7.2 Replace the fuse
CAUTION! Risk of injury and material damage!
To avoid personnel injury or damage to the meter, use only the specified fuse (63 mA,
250 V fast-melt).
Comply with the following instructions when replacing the fuse (see figure 7-1):
Turn off the device.
Remove all test leads from the ter-
minals.
Take off the protector of the device.
Remove the four screws.
Take off the cover.
Replace the blown fuse(s).
Reinstall the cover and the protector.
Figure 7-1
Page 40
Maintenance and cleaning EC mAV 2
- 40 - © SIKA • Ba_ECmAV2 • 03/2015
7.3 Recalibration
In order to keep the designed accuracy of this device, it is recommended to calibrate your
calibrator once a year. The following example shows the use of recommended standard
equipment to perform the calibration.
CAUTION! Material damage!
Overvoltage will lead to possible damage to the input section.
Never apply more than the max. permitted voltage to the input of the calibrator.
CAUTION! Material damage!
Any mal-operation will cause possible damage to their internal circuits.
Avoid short circuit and never apply more than the max. permitted voltage to the out-
put of the device or to a co-working standard device.
7.3.1 Selecting Standard Equipment
EC mAV 2 (to be calibrated)
Reference
standard
Range Accuracy
Generation
(output)
20 mA DC
Digital meter &
standard re-
sistance
max. 22 mA
(input)
± (50 ppm + 0.4 µA)
Measurement
(input)
20 mA DC
mA Source
max. 33 mA
(output)
± (100 ppm +
0.2 µA)
28 VDC
V Source
max. 33 V
(output)
± (12 ppm + 15 µV)
7.3.2 Ambient Condition for Recalibration
Ambient temperature: 23 °C ± 1 °C
Relative humidity: 45… 75 % rH
Pre-heating: Standard device should be pre-heated to specified time;
Put this Instrument in calibration environment for 24 hours, then
connect to the power, and set it in non-auto-power-off state, and
preheat for half an hour
IMPORTANT!
During the calibration, it is recommended to use 2x 1.5 V AA (LR6) batteries.
Page 41
EC mAV 2 Maintenance and cleaning
Technical changes reserved - 41 -
7.3.3 Output Recalibration
Operating calibration in order of items and calibration points listed in the table below:
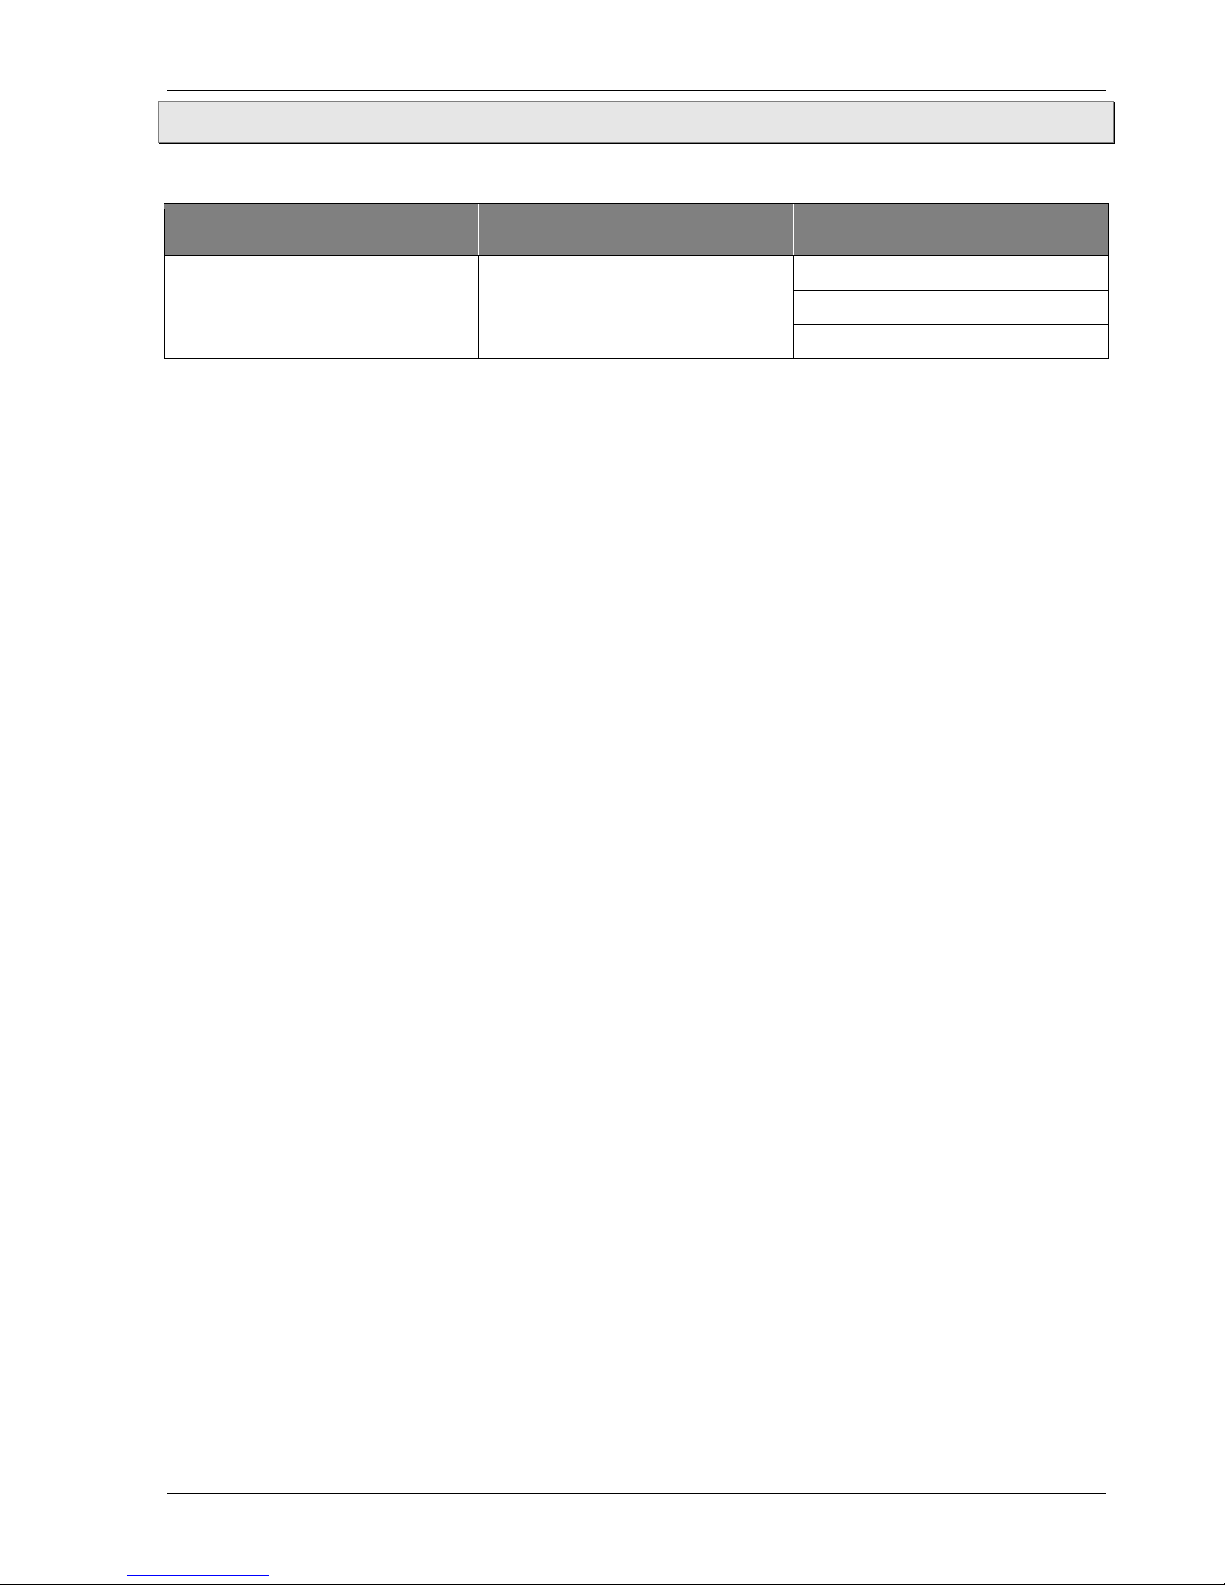
Item No. Output range Calibration point
1
Current I = 20 mA DC
0
0 FS
FS
1. In power-off state, press simultaneously the OUTPUT /INPUT and the power button to
turn on the device.
The EC mAV 2 enters into the calibration mode, and the symbols CAL 0 appear on the
display.
2. Press the OUTPUT / INPUT button to select the output function and OUTPUT, mA will
appear on the display.
3. Connect the EC mAV 2 to the equipment as shown in Figure 7-2:
Figure 7-2
4. Set the digital meter to an appropriate range.
5. When the output is stabilized, press the ◄/►button and the ▲/ ▼ button to adjust the
calibrator to a value in which corresponds to the reading of the digital meter.
6. Press the 100%/START button and SAVE will appear on the display.
The calibrated point has been stored.
7. Press the STEP/AUTO button and CAL 0 FS will appear on the display.
With the output stabilized, repeat the operation of steps 5 and 6.
Page 42
Maintenance and cleaning EC mAV 2
- 42 - © SIKA • Ba_ECmAV2 • 03/2015
7.4 Input Calibration
Operating calibration in order of items and calibration points in the table below:
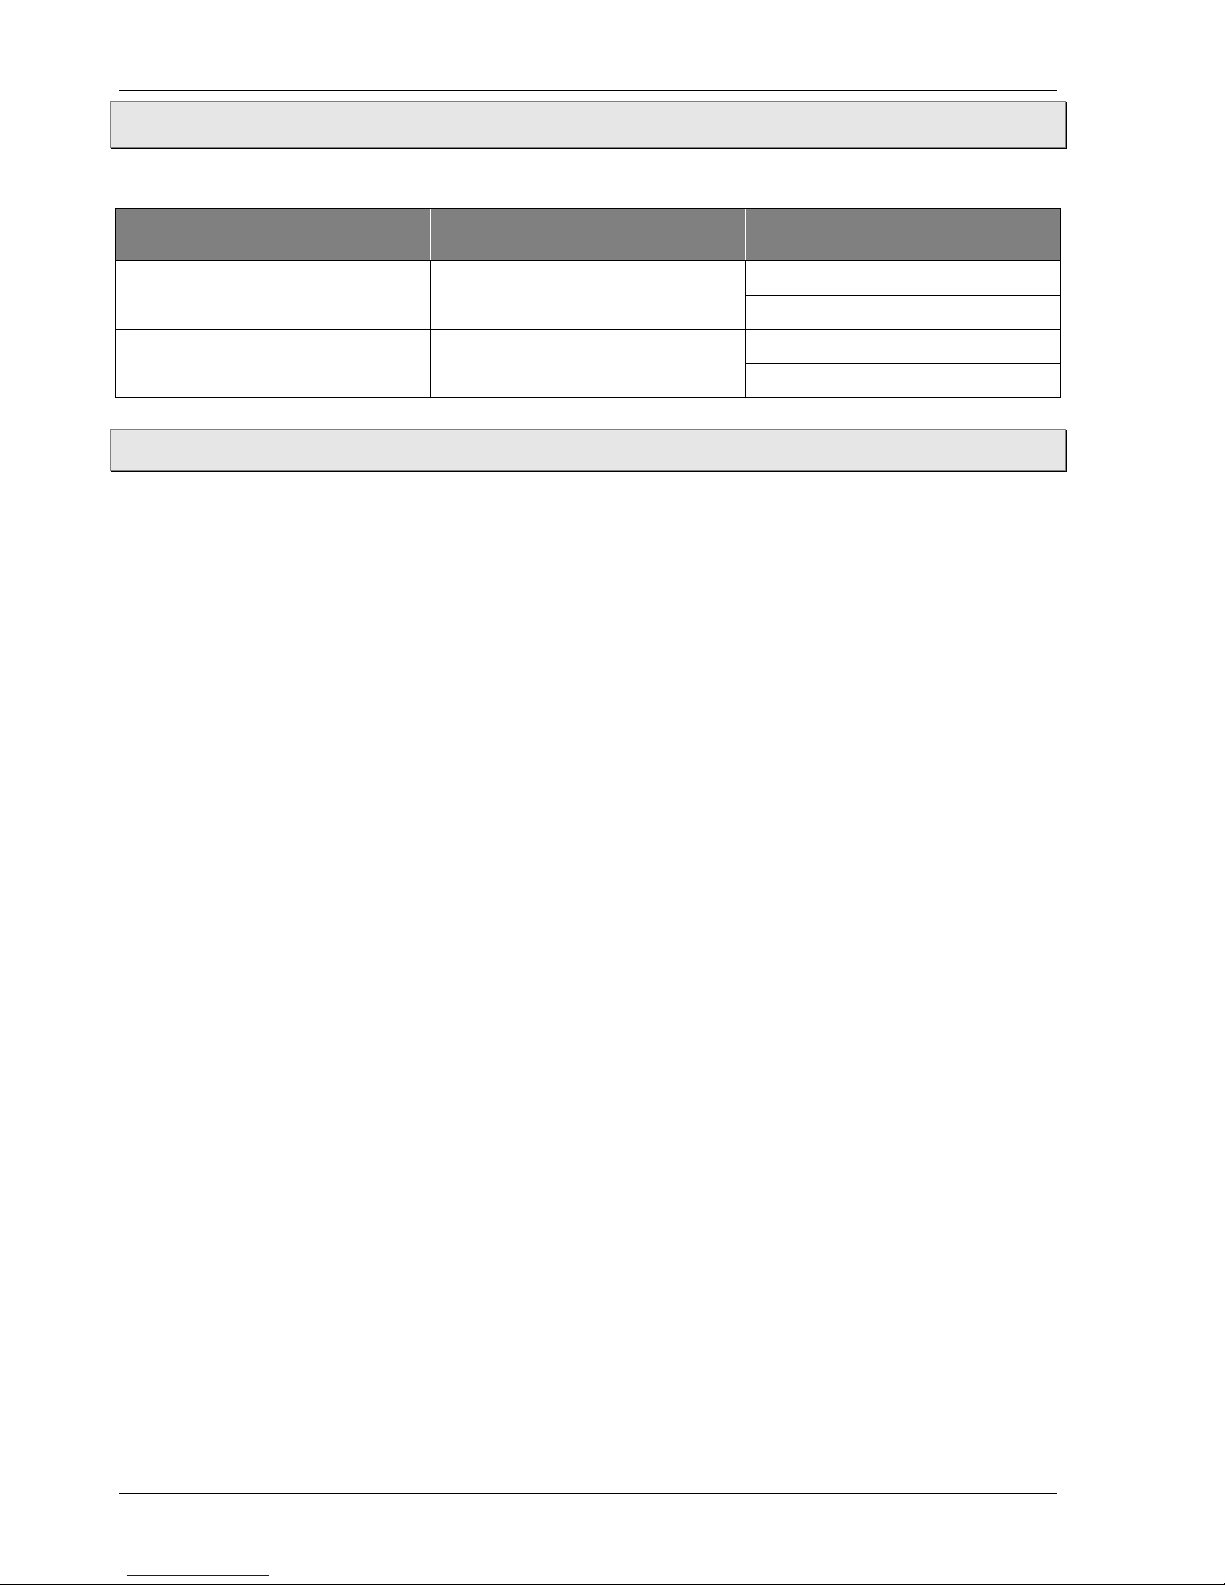
Item No. Input range Calibration point
1
Current I = 20 mA DC
0: 0.000 mA
FS: 19.000 mA
2
Voltage U = 28 VDC
0: 0.000 V
FS: 19.000 V
7.4.1 Current Measurement Calibration
1. In power-off state, press simultaneously the OUTPUT / INPUT and power button to pow-
er on.
The EC mAV 2 enters into the calibration mode, CAL 0 will appear on the display.
2. Press the OUTPUT / INPUT button to select the measurement function, and INPUT, mA
will appear on the display.
3. Connect the EC mAV 2 to the equipment as shown in Figure 7-3:
Figure 7-3
4. Set the standard source to an appropriate range.
5. Set the output of standard source as the value given in the table from § 7.4 and when
the output stabilized, press the 100%/START button, and SAVE will appear on the display.
The calibrated point has been stored.
6. Press the STEP/AUTO button and CAL FS will appear on the display.
Repeat the operation of step 5.
Page 43

EC mAV 2 Maintenance and cleaning
Technical changes reserved - 43 -
7.4.2 Voltage Measurement Calibration
1. Press the mA % / V button to select the voltage measurement function, and INPUT, CAL
0, V will appear on the display.
2. Connect the EC mAV 2 to the equipment as shown in Figure 7-4.
3. Set the standard source to an appropriate range.
4. Set the output of the standard source to the value given in the table in § 7.4 and when
the output is stabilized, press the 100%/START button, and SAVE will appear on the display.
The calibrated point has been stored.
5. Press the STEP/AUTO button and CAL FS will appear on the display.
Repeat the operation of step 4.
Figure 7-4
Page 44

Decommissioning and disposal EC mAV 2
- 44 - © SIKA • Ba_ECmAV2 • 03/2015
8 Decommissioning and disposal
CAUTION! Risk of injury!
Never remove the device during operation.
Make sure that the device is turned off.
Before decommissioning:
Prior to decommissioning, ensure that
the EC mAV 2 is turned off.
Decommissioning:
Remove all test leads.
Disposal:
In conformance with the 2002/95/EC (RoHS) and 2002/96/EC (WEEE) directives, the device
must be disposed of as electrical and electronic waste.
Observe the legal regulations of the country in which the device is marketed.
NO HOUSEHOLD WASTE!
The EC mAV 2 consists of various different materials. It must not be disposed of with
household waste.
Take the EC mAV 2 to your local recycling plant
or
send the EC mAV 2 back to your supplier or to SIKA.
Page 45
EC mAV 2 Technical data
Technical changes reserved - 45 -
9 Technical data
The technical data of customised versions may differ from the data in these instructions.
Please observe the information specified on the type plate.
Applicable to a temperature range from 18 °C to 28 °C, within one year after calibration.
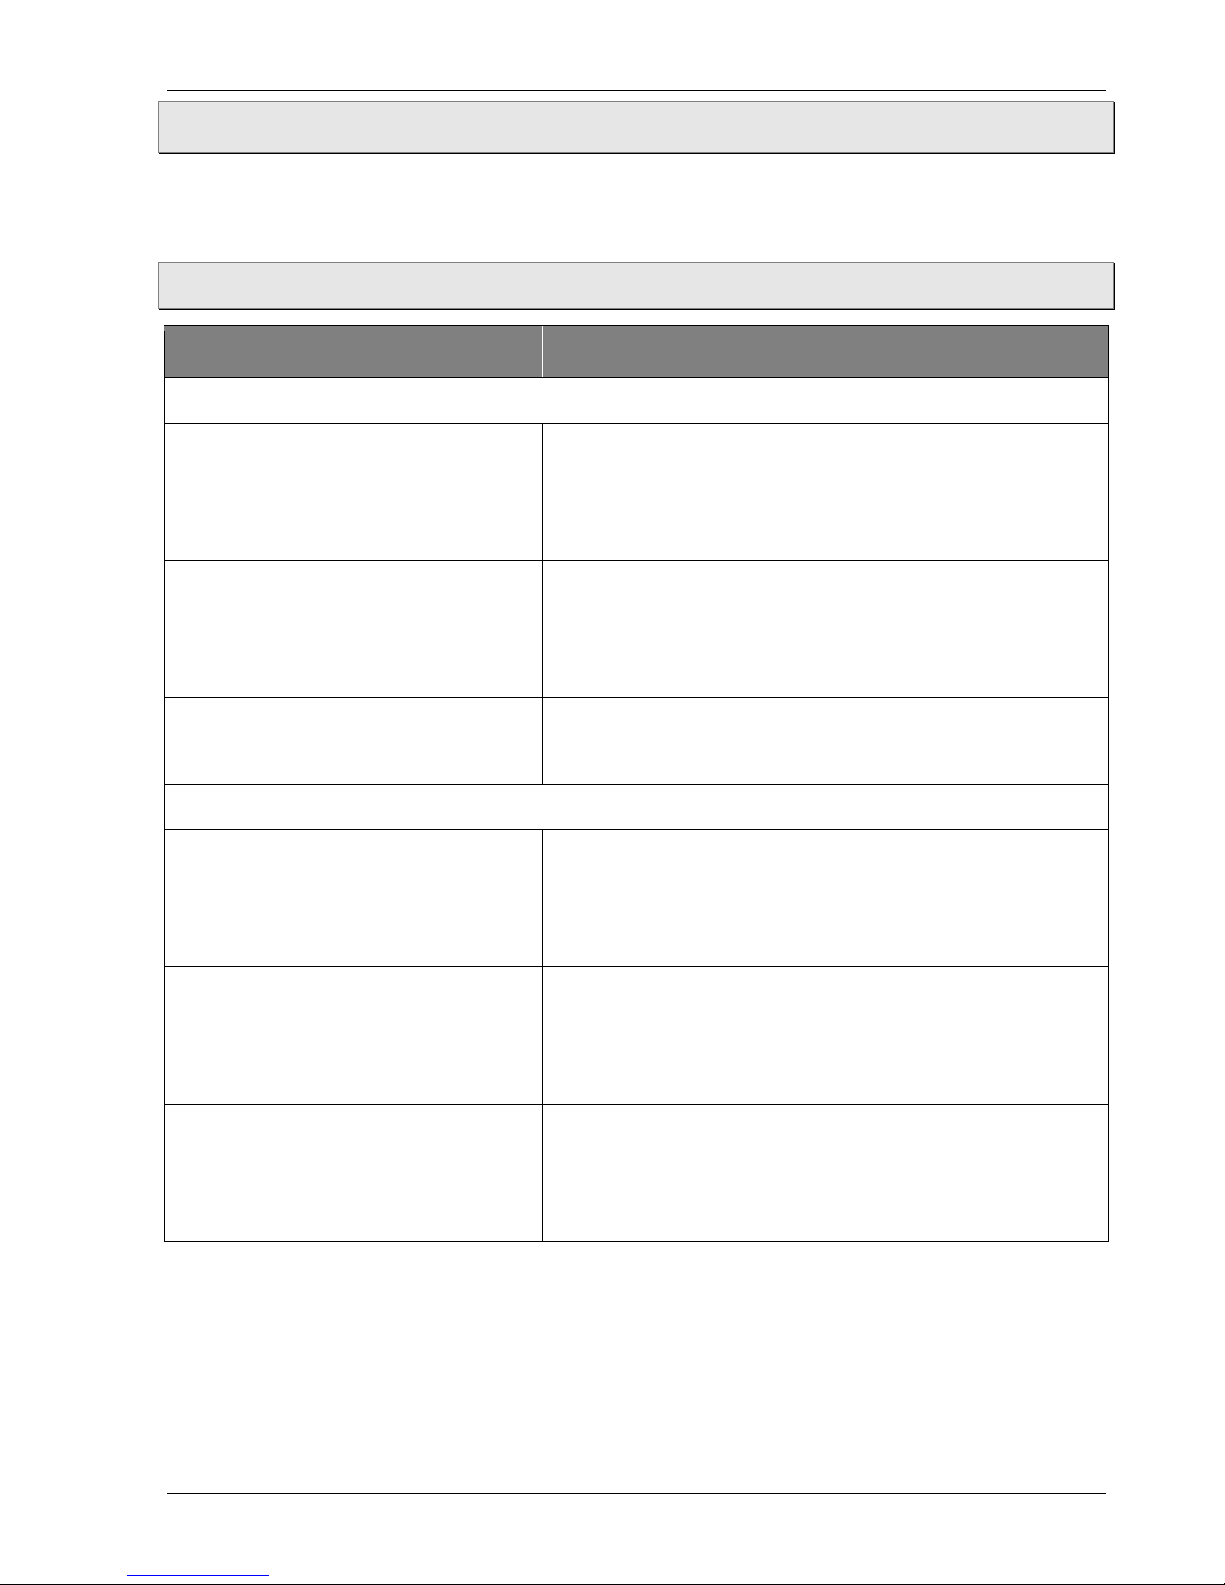
9.1 Characteristics EC mAV 2
Characteristics EC mAV 2
Output
DC mA generation *1
- Range
- Output range
- Resolution
- Accuracy
20 mA
0…22 mA
0.001 mA
± (0.05 % + 4 µA)
Transmitter simulation *2
- Range
- Output range
- Resolution
- Accuracy
-20 mA
0…22 mA
0.001 mA
± (0.05 % + 4 µA)
Loop supply *3
- Range
- Accuracy
24 V
± 10 %
Input
Voltage *4
- Range
- Output range
- Resolution
- Accuracy
28 V
-0.2…28 V
0.001 V
± (0.02 % + 2 mV)
Current *5
- Range
- Output range
- Resolution
- Accuracy
20 mA
-1…22 mA
0.001 mA
± (0.02 % + 4 µA)
Loop current *6
- Range
- Output range
- Resolution
- Accuracy
20 mA
0…22 mA
0.001 mA
± (0.02% + 4 µA)
*1 max. load 1 kΩ at 20 mA.
*2 max. load 1 kΩ at 20 mA, power supply range 5…25 VDC.
*3 max output current up to 25 mA.
*4 input resistance about 1 MΩ.
*5 resistance about 20 Ω.
*6 providing 24 V loop supply.
Page 46
Technical data EC mAV 2
- 46 - © SIKA • Ba_ECmAV2 • 03/2015
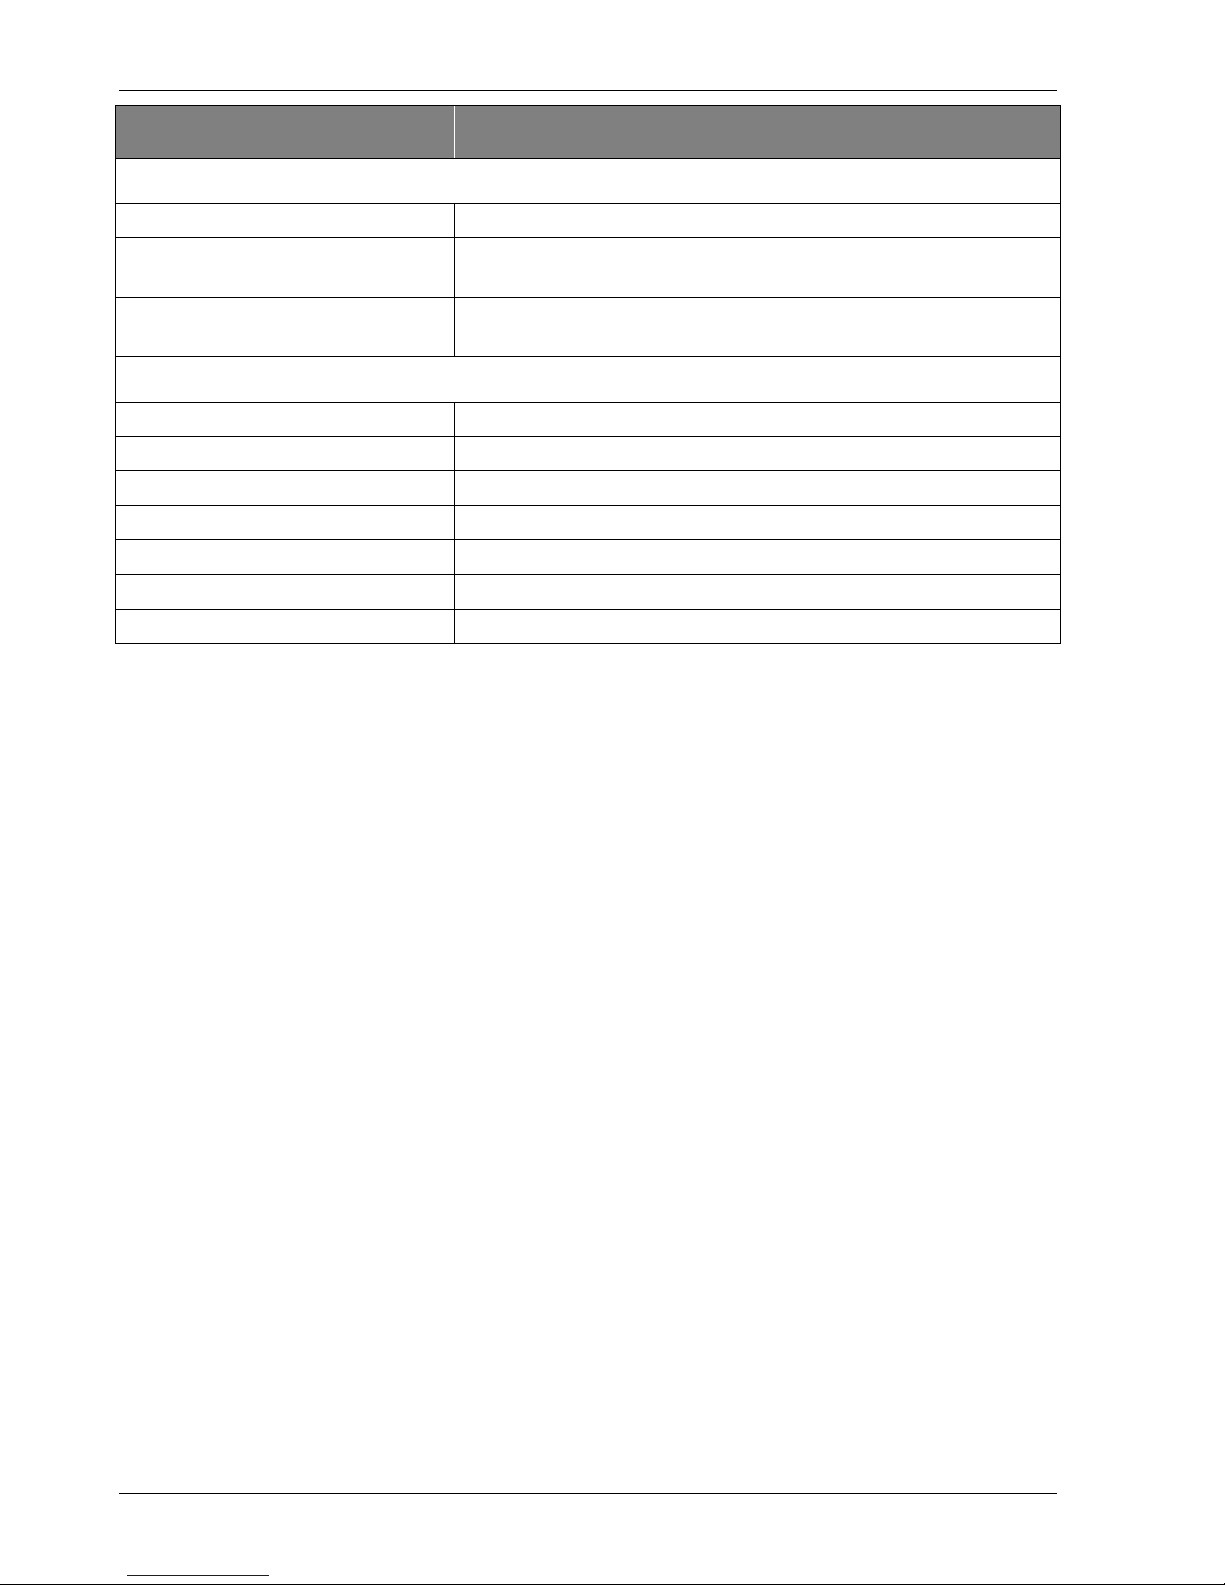
Characteristics EC mAV 2
Electrical characteristics
Supply voltage
Battery 2 x1.5 VDC AA (LR6 –AA), Alkaline (Mignon)
Battery life
approx. 20 hrs
(about 400 mAh /3V under the condition of 10 mA with 1kΩ load)
Max. permitted voltage
30 V
(between any terminals or between any terminal and ground)
Ambient conditions and process variables
Operating temperature
0…50 °C
Operating relative humidity
≤80 % rH
Storage temperature
-10…50 °C
Storage relative humidity
≤90 % rH
Temperature co-efficiency
0.1× (designated accuracy)%/°C(5 °C~18 °C, 28 °C~40 °C)
Dimensions (LxWxD)
180×90×47 mm (with holster)
Weight
500 g (with holster)
Page 47

EC mAV 2 Technical data
Technical changes reserved - 47 -
For your notes
Page 48

EC mAV 2
- 48 - © SIKA • Ba_ECmAV2 • 03/2015
Mechanische Messtechnik
Mechanical measuring instruments
Durchflussmesstechnik
Flow measuring instruments
Elektronische Mess- & Kalibriertechnik
Electronic measuring- & calibration instruments
SIKA Dr. Siebert & Kühn GmbH & Co. KG
Struthweg 7–9
D-34260 Kaufungen Germany
+49 (0)5605 803-0
+49 (0)5605 803-54
info@sika.net
www.sika.net
 Loading...