

Page 1

1
USB 2.0+FireWire CardBus DV Kit
Quick Installation Guide
04-0274B
Features and Benefits
• Fully compliant with USB specifications revision 2.0
and IEEE 1394-1995, P1394a-2000 and OHCI 1.1
Standards
• Combo CardBus PC Card design allows you to add
the USB 2.0 and FireWire (1394a) interface into your
notebook or Tablet PC at once
• Two USB 2.0 ports support 480Mbps, 12Mbps,
1.5Mbps data transfer modes
• Two FireWire ports support serial bus data transfer
rates of 400 Mbps, 200 Mbps, and 100 Mbps
• Includes Ulead VideoStudio editing software
• Includes a high quality switching power adapter to
provide standard power output for the USB ports
NOTE: USB 1.1 devices are limited to USB 1.1
speeds even when they are connected to USB 2.0
host adapter or USB 2.0 hubs.
System Requirements
• Pentium or equivalent notebook PC with an available
CardBus Type II slot
• Windows 98SE/ME/2000/XP
Recommended system for Video capturing/editing:
• Pentium III or above notebook PC
• 128MB of RAM and CD-ROM drive
• 4GB of available hard disk space
• Windows 98SE or later
Page 2
2
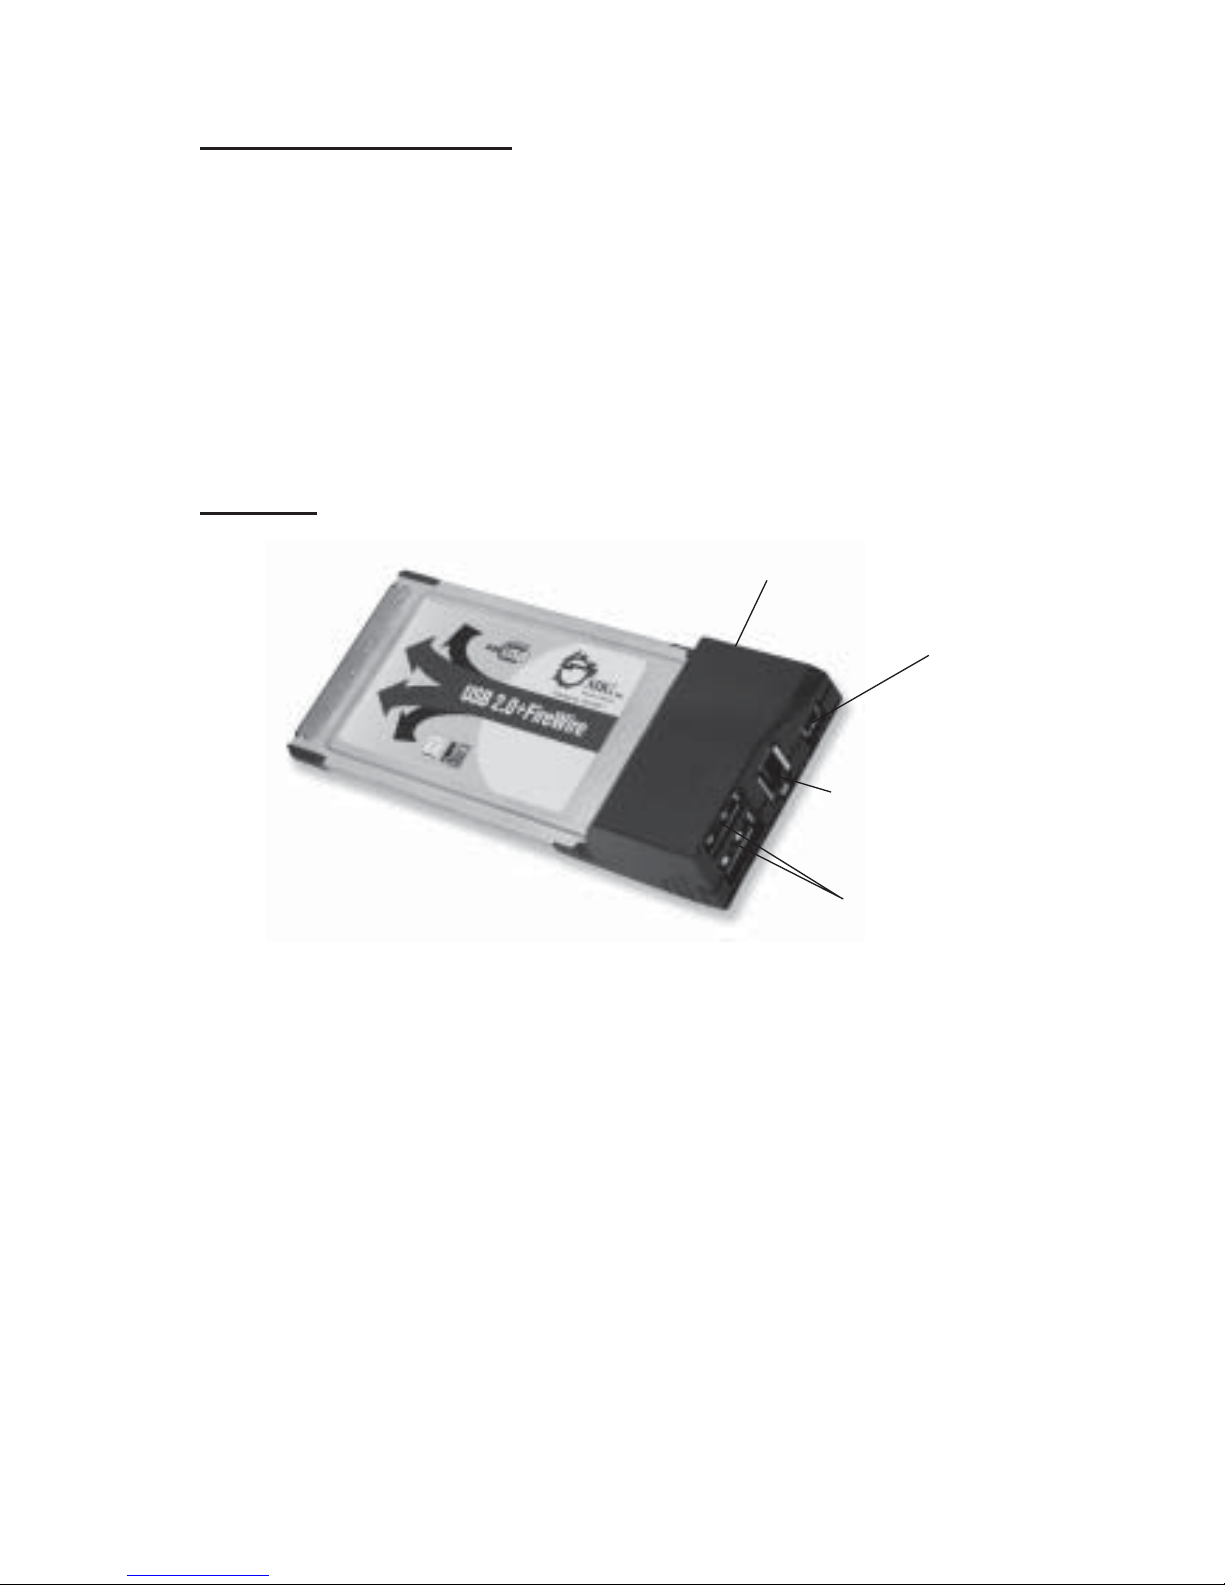
USB 2.0
Power Adapter Jack*
FireWire** 6-pin
FireWire** 4-pin
Package Contents
• (1) USB 2.0+FireWire CardBus
• (1) Switching power adapter
• (1) Driver CD
• (1) Ulead VideoStudio DV editing software CD
• (1) 1394 6-pin/4-pin DV cable
• This quick installation guide
Layout
Figure 1. Layout
* NOTE: In most cases, the power adapter doesn't need
to be plugged in. However, some USB devices may
require additional power in order to work. Please plug in
the power adapter if your device needs it. Refer to the
device's manual for more detail.
** NOTE: The FireWire (1394) ports do not ouput any
power. Therefore, only 1394 devices with their own
power supplies will work. The included power supply
only provides standard power output for the USB 2.0
ports.
Page 3
3
1. Hardware Installation
General instructions for installing the card are provided
below, since the design of notebook computers may vary.
Refer to your system’s reference manual for further
information, if needed.
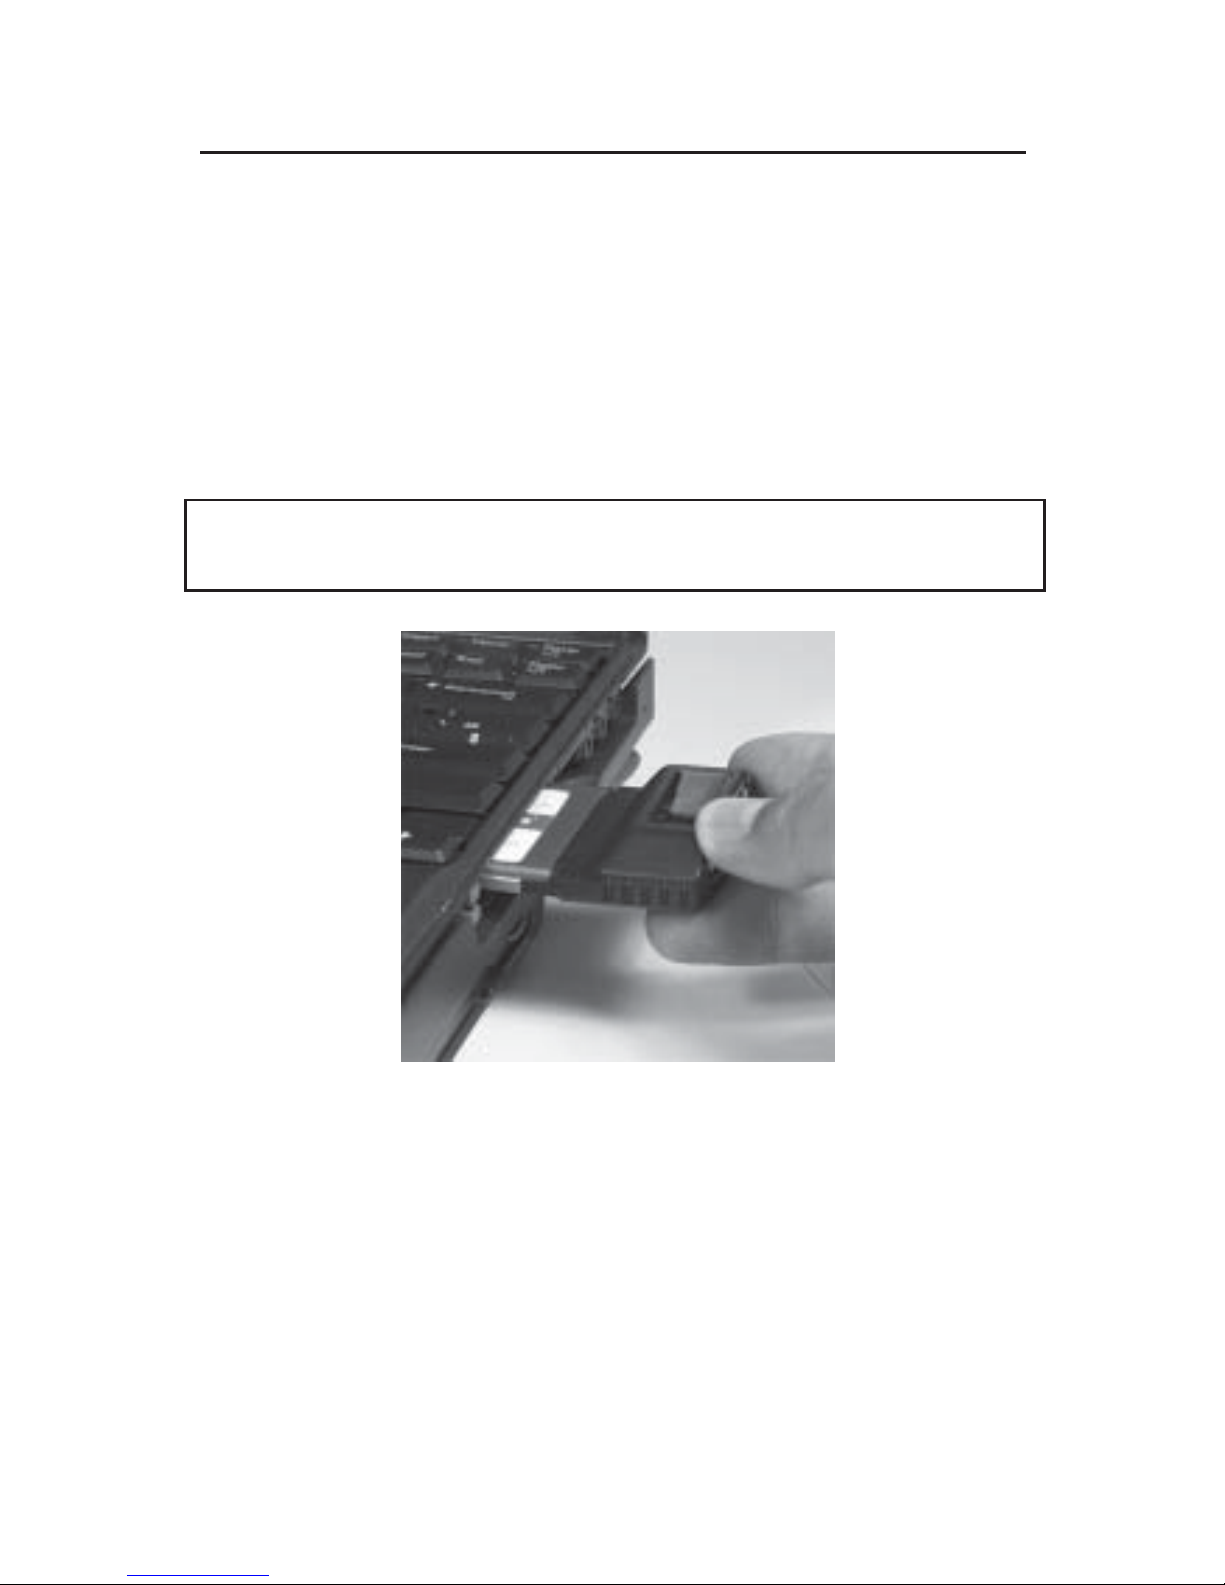
Insert the PC Card into the CardBus Type II slot of your
notebook computer with its 68-pin connector facing the
slot. Make sure it is inserted all the way in for a solid
connection.
Important: Make sure the driver is installed prior to
inserting the USB 2.0+FireWire CardBus.
Figure 2. Inserting the PC Card
Page 4

4
2. Software Installation
Important: Make sure the driver is installed prior to
inserting the USB 2.0+FireWire CardBus.
2-1) Windows 98SE Driver Installation
1. Insert the driver CD. Click Start, Run, type in
X:\Setup.exe, then click OK. (Replace X: with the
drive letter of your CD-ROM)
2. Click Next, then Finish to restart Windows.
3. After Windows resumes, insert the CardBus.
4. At the Add New Hardware Wizard, click Next,
and Next again.
5. Clear all check boxes and click Next.
6. Click Next and Next again.
NOTE: If prompted for Windows Installation
CD-ROM, click OK. Insert this CD and click OK.
7. Click Finish.
8. Repeat steps 4-7 two more times.
9. At the Add New Hardware Wizard, click Next four
times.
10. If you are prompted to keep the current files, click
Yes (up to five times).
11. Click Finish to complete.
Page 5

5
2-2) Windows ME Driver Installation
1. Insert the driver CD. Click Start, Run, type in
X:\Setup.exe, then click OK. (Replace X: with the
drive letter of your CD-ROM)
2. Click Next, then Finish to restart Windows.
3. After Windows resumes, insert the CardBus.
4. At the Add New Hardware Wizard, choose
Automatic search for a better driver
(Recommended), and click Next.
5. Click Finish and restart Windows to complete.
2-3) Windows 2000 Driver Installation
NOTE: If you have Windows 2000 with Service
Pack 4 (SP4) or later, the drivers will be installed
automatically by the operating system. Otherwise,
follow the instructions below.
1. Insert the driver CD. Click Start, Run, type in
X:\Setup.exe, then click OK. (Replace X: with the
drive letter of your CD-ROM)
2. Click Next, Finish, then restart Windows.
3. After Windows resumes, insert the CardBus.
4. On the restart, Windows automatically installs the
correct drivers for the CardBus.
Page 6

6
2-4) Windows XP Driver Inst allation
NOTE: If you have Windows XP with Service Pack
1 (SP1) or later, the drivers will be installed
automatically by the operating system. Otherwise,
follow the instructions below.
1. Insert the driver CD. Click Start, Run, type in
X:\Setup.exe, then click OK. (Replace X: with the
drive letter of your CD-ROM)
2. Click Next, Finish, then restart Windows.
3. After Windows resumes, insert the CardBus.
4. At the Found New Hardware Wizard, choose Install
the software automatically (Recommended), click
Next, then Finish.
5. Repeat step 4 one more time to complete.
2-5) To verify successful driver installation:
1. Check Device Manager to verify successful driver
installation.
Windows 98SE/ME: From the main desktop, right
click My Computer, then click Properties. Click
Device Manager tab.
Windows 2000/XP: Right click My Computer, then
click Manage. Click Device Manager.
2. The drivers for this controller show up differently
under different versions of Windows. Please refer
to the correct Windows version to verify.
Page 7

7
2-5.1) Windows 98SE/ME
a) Under the 1394 Bus Controller:
- OHCI Compliant IEEE 1394 Host Controller
b) Under the Network Adapters: (WinME only)
- NDIS 1394 Net Adapter
c) Under the Universal Serial Bus controllers:
- ALi PCI to USB Enhanced Host Controller
- ALi PCI to USB Open Host Controller
- ALi PCI to USB Open Host Controller
- ALi PCI to USB Open Host Controller
- USB 2.0 Root Hub
- USB Root Hub
- USB Root Hub
- USB Root Hub
2-5.2) Windows 2000 (with sp3 or earlier)/XP
(without sp):
a) Under the IEEE 1394 Bus host controllers:
- OHCI Compliant IEEE 1394 Host Controller
b) Under the Network Adapters: (WinXP only)
- 1394 Net Adapter
c) Under the 1st Universal Serial Bus controllers:
- ALi PCI to USB Enhanced Host Controller
- USB 2.0 Root Hub
d) Under the 2nd Universal Serial Bus controllers:
- ALi PCI to USB Open Host Controller
- ALi PCI to USB Open Host Controller
- ALi PCI to USB Open Host Controller
Page 8

8
- USB Root Hub
- USB Root Hub
- USB Root Hub
2-5.3) Windows 2000 (with sp4 or later)/XP (with
sp1 or later):
a) Under the IEEE 1394 Bus host controllers:
- OHCI Compliant IEEE 1394 Host Controller
b) Under the Network Adapters: (WinXP only)
- 1394 Net Adapter
c) Under the Universal Serial Bus controllers:
- ALi PCI to USB Enhanced Host Controller
- ALi PCI to USB Open Host Controller
- ALi PCI to USB Open Host Controller
- Standard Enhanced PCI to USB Host Controller
- USB 2.0 Root Hub (USB Root Hub in WinXP)
- USB Root Hub
- USB Root Hub
- USB Root Hub
3. If these options DO NOT appear, eject
the Cardbus, re-insert it while in Windows and
refer to software installation section to re-install
the CardBus.
Page 9

9
2-6) Ulead VideoStudio software installation:
The USB 2.0+FireWire CardBus DV Kit includes Ulead
VideoStudio digital video editing software for producing
home videos complete with attractive titles, transitions
and sounds.
1. Insert the Ulead VideoStudio DV software CD. Autorun should start automatically. If not, click Start,
Run, type in X:\Autorun.exe, then click OK.
(Replace X: with the drive letter of your CD-ROM)
2. Choose Install Ulead VideoStudio and follow the
on-screen instructions to complete.
NOTE: For instructions on how to use Ulead
VideoStudio, please refer to VStudio.pdf file located
in the Document\Manual directory on the Ulead
VideoStudio DV editing software CD.
3. Connecting a DV Camcorder
Before setting up the digital video camcorder, verify the
USB 2.0+FireWire CardBus' driver has been successfully
installed in your system, then follow the procedures
below.
1. Boot up your system.
2. Connect the 4-pin connector of the provided FireWire
(1394) DV cable to your camcorder.
3. Connect the 6-pin connector to the FireWire (1394)
port.
4. Power on the camcorder. The camcorder should
now appear in Device Manager.
Page 10

10
To verify successful DV camcorder setup:
1. Check Device Manager to verify successful driver
installation.
Windows 98SE/ME: From the main desktop, right
click My Computer, then click Properties. Click
Device Manager tab.
Windows 2000/XP: Right click My Computer, then
click Manage. Click Device Manager.
2. Under Imaging Device(s), a Microsoft DV Camera
and VCR or DV Camcorder should be displayed.
Page 11

11
Technical Support
QUESTIONS? SIIG’s Online Support has the answers!
Simply visit our Web site at www.siig.com and click on
Support. Our online support database is updated daily with
new drivers and solutions. The answers to your problems
could be just a few clicks away.
If you can't find answers or solutions to your questions, you
have an option to submit the problems online to one of our
technical support analysts and we will promptly respond to
you with answers or solutions.
The 5-year manufacturer warranty supplied with this product
is offered by SIIG, Inc. If you should happen to encounter any
problems with this product, please follow the procedures
below.
1. If it is within the store's return policy period, please
return the product to the store where you purchased
from.
2. If your purchase has passed the store's return policy
period, please contact SIIG. See SIIG's Limited 5-year
Warranty card for more information.
Online Store
SIIG offers all of our products online at our company
store. Visit us at http://onlinestore.siig.com to find
our complete line of products, including hard to find
items and accessories (power adapters, cables, upgrade
kits, etc.).
Page 12

USB 2.0+FireWire CardBus DV Kit is a trademark of SIIG, Inc.
SIIG and SIIG logo are registered trademarks of SIIG, Inc. Microsoft and Windows are
registered trademarks of Microsoft Corporation. Pentium is a registered trademark of Intel
Corporation. Other names used in publication are for identification only and may be trademarks
of their respective companies.
October, 2003 Copyright ©2003 by SIIG, Inc. All rights reserved.
PRODUCT NAME MODEL NUMBER
USB 2.0+FireWire CardBus DV Kit US2273
FCC RULES: TESTED TO COMPLY WITH FCC PART 15, CLASS B
OPERATING ENVIRONMENT: FOR HOME OR OFFICE USE
FCC COMPLIANCE STATEMENT:
This device complies with part 15 of the FCC Rules. Operation is subject
to the following two conditions: (1) This device may not cause harmful
interference, and (2) this device must accept any interference received,
including interference that may cause undesired operation.
THE PARTY RESPONSIBLE FOR
PRODUCT COMPLIANCE
SIIG, Inc.
6078 Stewart Ave.
Fremont, CA 94538-3152
About SIIG, Inc.
Founded in 1985, SIIG, Inc. is a leading computer upgrade
manufacturer of I/O connectivity products, including PCI & ISA
serial and parallel ports, USB, Serial ATA & UltraATA controllers,
FireWire (1394a/b), Networking, Sound Cards, and other accessories.
SIIG is the premier one-stop source of upgrades.
SIIG products offer comprehensive user manuals, many user-friendly
features, and all products are backed by a 5-year manufacturer
warranty. High-quality control standards are evident by the overall
ease of installation and compatibility of our products, as well as one
of the lowest defective return rates in the industry. SIIG products
can be found in most computer retail stores, mail order catalogs, and
e-commerce sites in the Americas and the UK, as well as through
major distributors, system integrators, and VARs.
 Loading...