

Page 1

1
Introduction
The Wireless 1080P HDMI Video Kit - Mid-Range transmits
HDMI A/V signals up to 165ft (line-of-sight) wirelessly
and supports high-definition video signals up to 1080p
@60Hz.
Features and Benefits
• Transmits HDMI A/V signals wirelessly up to 165ft,
no complicated cable or wire installation needed
• An ideal solution to setup your home entertainment
system or remote display in apartments, condos
and where wiring is prohibited, also great for digital
signage, POP for small business office and
showrooms
• Supports high-definition vivid video up 1080p
@60Hz, streaming flawless stereo audio, and works
with most HDMI equipped devices including
Blu-ray players, set-top boxes, AV receivers, cable/
satellite boxes, and computers
• Built-in IR signal extension feature allows you to
control the playback device remotely
• Plug-n-play installation, no software installation or
Wi-Fi connection required, wall-mountable case
design provides multiple placement options for
best signal broadcasting or reception angles
04-1048B
Wireless 1080P HDMI
Video Kit - Mid-Range
Installation Guide
Page 2
2
Package Contents
• Wireless 1080P HDMI Video Kit - Mid-Range (TX &RX)
• IR blaster extension cable
• IR receiver extension cable
• Power adapters (x2)
• Power extension cables (x2)
• User Reference Guide
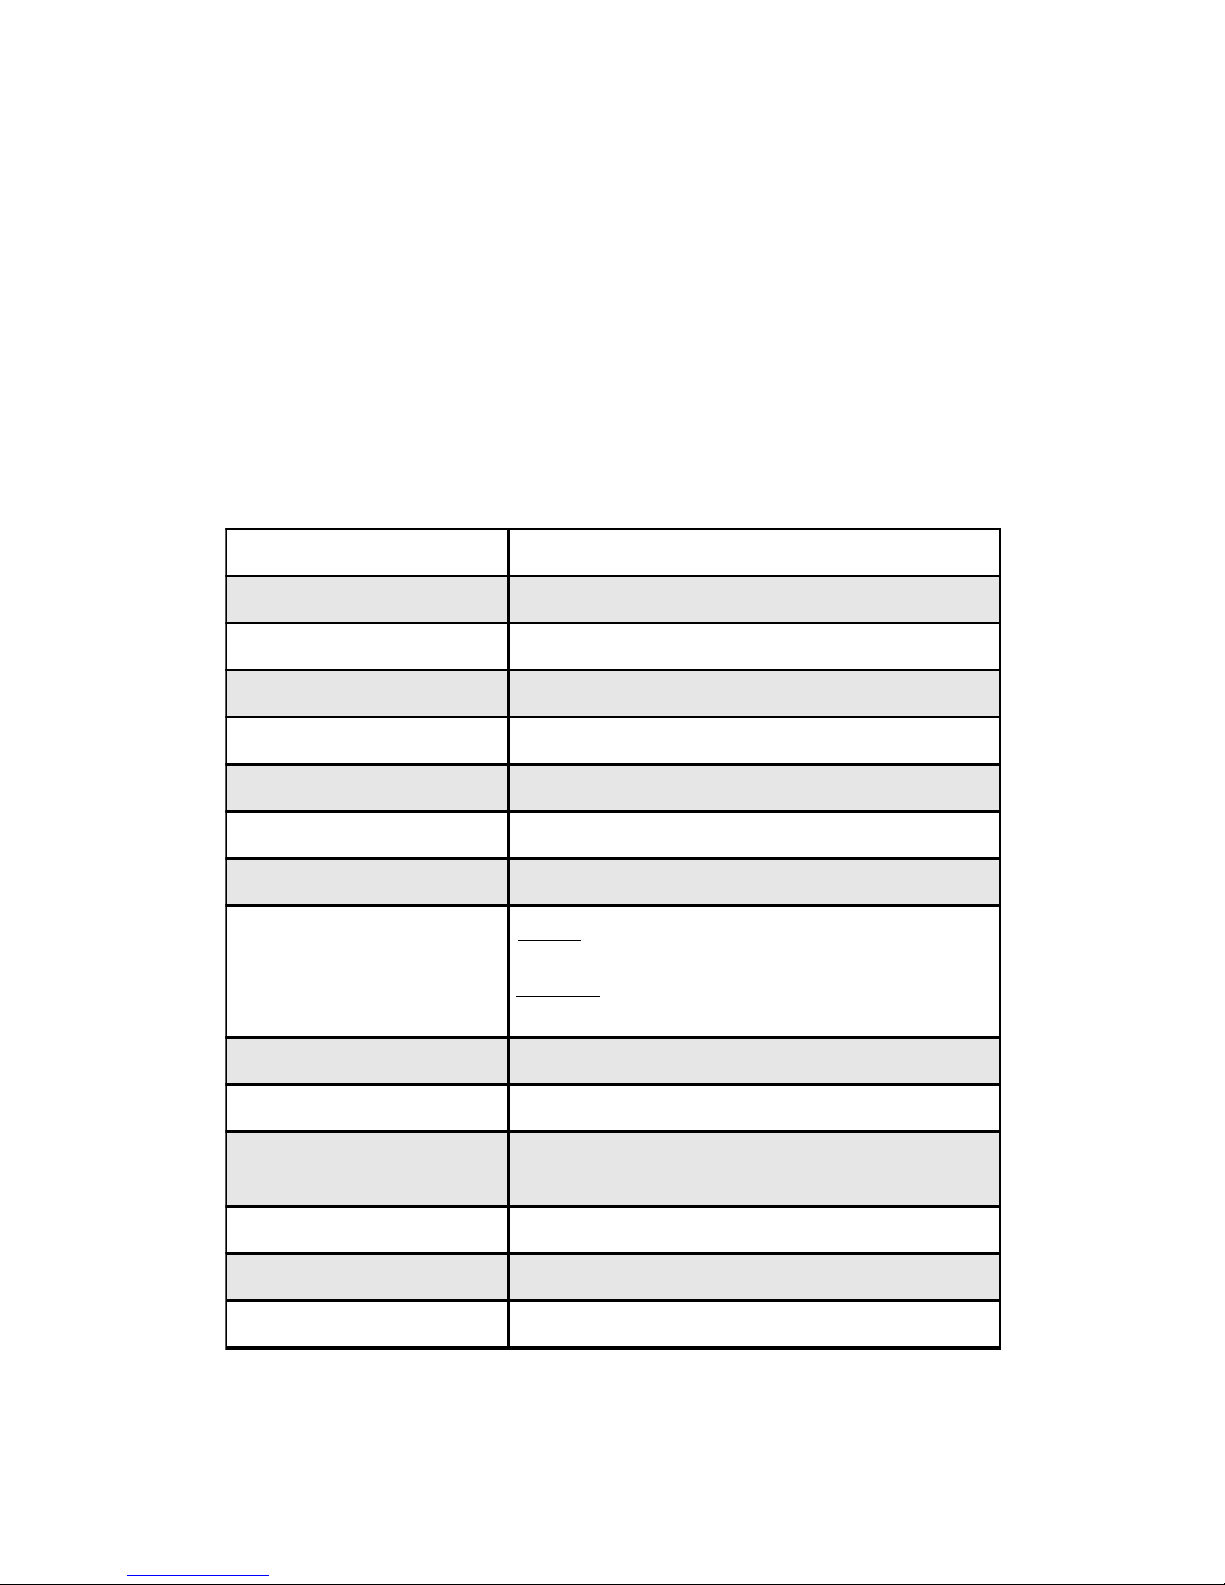
Specifications
Transport Protocol HDbitT
Signal Type HDMI
HDMI version HDMI 1.3 compatible
HDCP version HDCP 1.2 compatible
Transmission Distance Up to 50m (165ft) / line-of-sight
Supported Resolutions 1080p/1080i/720p/576p/576i/480p/480i
HDMI Cable Distance Up to 2m (Input & Output)
Audio format R/L stereo audio (2-ch)
Power
Input:
AC 100-240V, 50/60Hz
Output:
DC 5V/3A
Color Black
Dimensions (TX & RX) 7.69" (W) x 1.21" (H) x 5.41" (D)
Weight
Transmitter (TX): 1.17lbs
Receiver (RX): 1.16lbs
Operating Temperature 32 to 104 degrees F
Storage Temperature -4 to 158 degrees F
Operating Humidity 0% to 95% RH (non-condensing)
Note: The transmission distance will vary depending on building layout, electronic
interference, other environmental conditions, and may be much less than the
line-of-sight maximum.
Page 3

3
Product Layout
Figure 1: Transmitter (TX) - front side
Power LED
Data Transmission LED
Connection LED
• Power LED: On when the Transmitter is powered on
• Data Transmission LED:
- Slow blinking: Establishing wireless connection
- Fast blinking: The wireless connection is connected
successfully and transmitting data
• Connection LED: On when the wireless connection
is linked properly
Page 4

4
Figure 2: Transmitter (TX) - rear side
Power Jack
Reset
HDMI In
IR Out
• Power Jack: Connects to the included power adapter
• Reset: Press when the unit isn't working properly
• HDMI In: Connects to your HDMI source with an
HDMI cable (cable not included)
• IR Out: Infrared 3.5mm socket. Plug the IR Blaster
extension cable here
Page 5
5
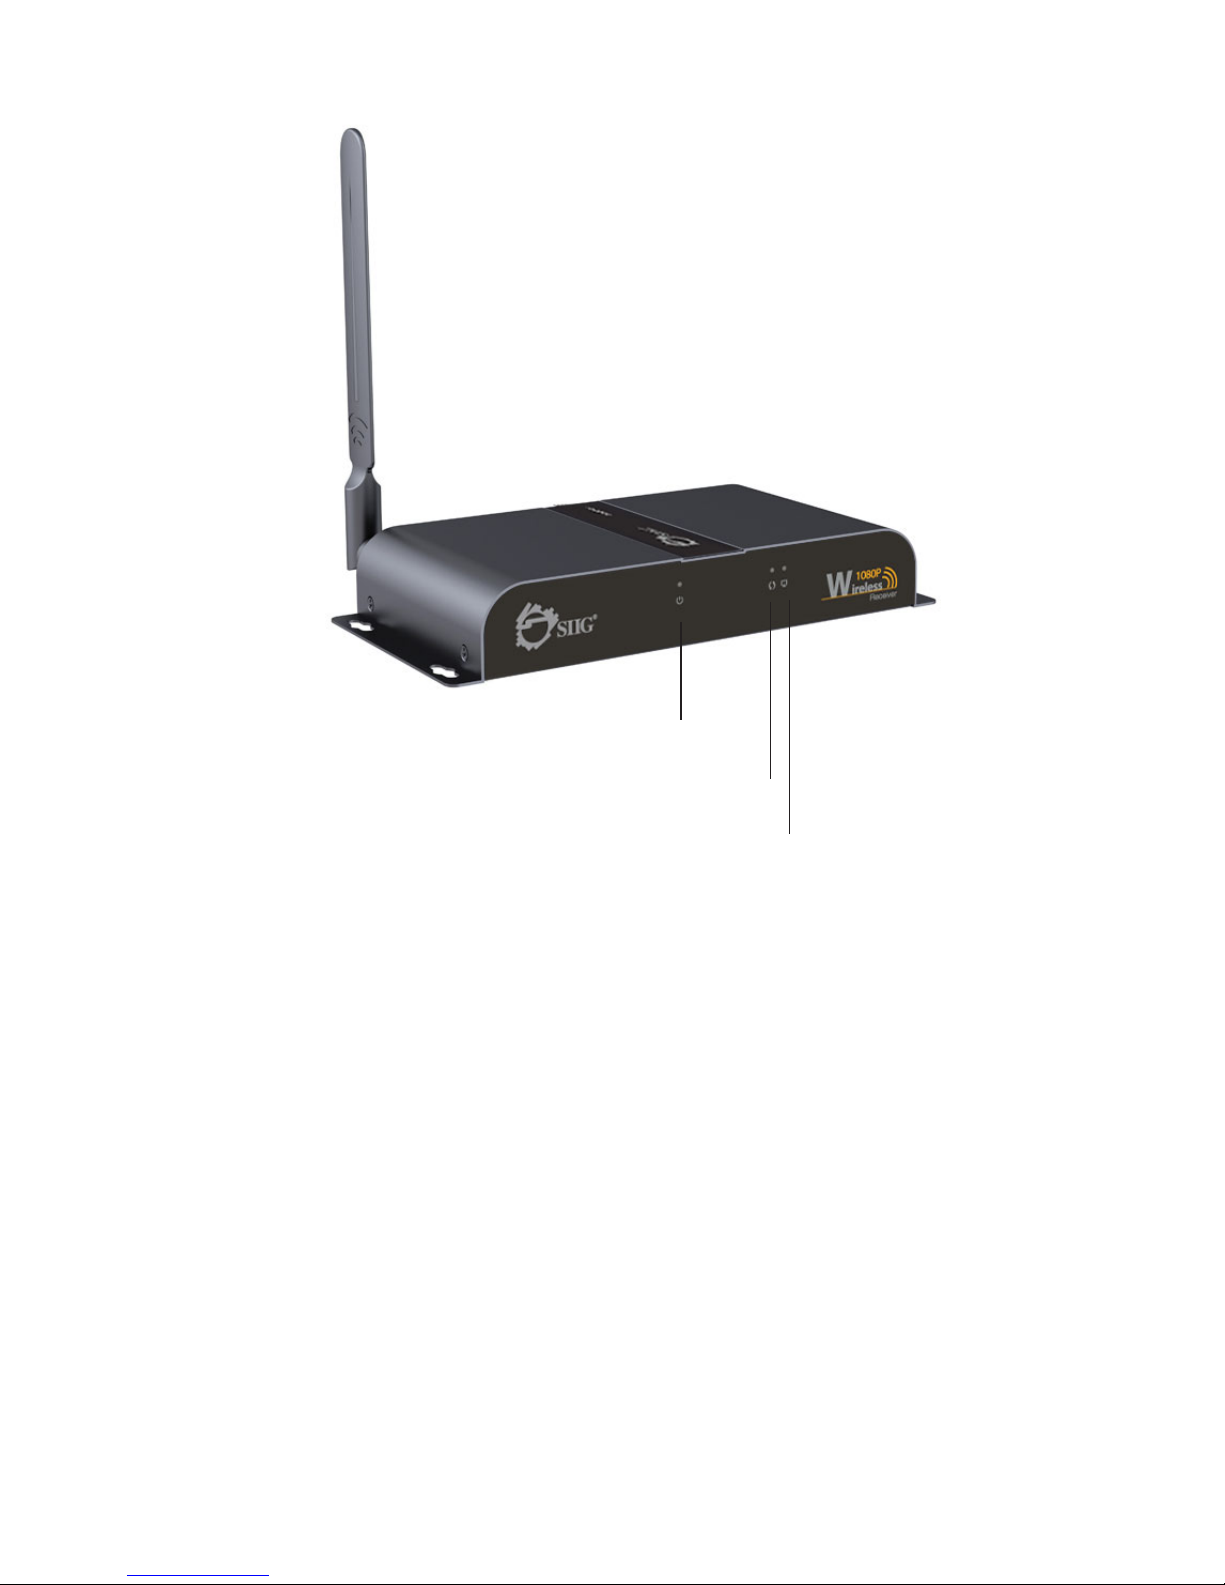
Power LED
Connection LED
• Power LED: On when the Receiver is powered on
• Data Transmission LED:
- Slow blinking: Establishing wireless connection
- Fast blinking: The wireless connection is connected
successfully and transmitting data
• Connection LED: On when the wireless connection
is linked properly
Figure 3: Receiver (RX) - front side
Data Transmission LED
Page 6
6
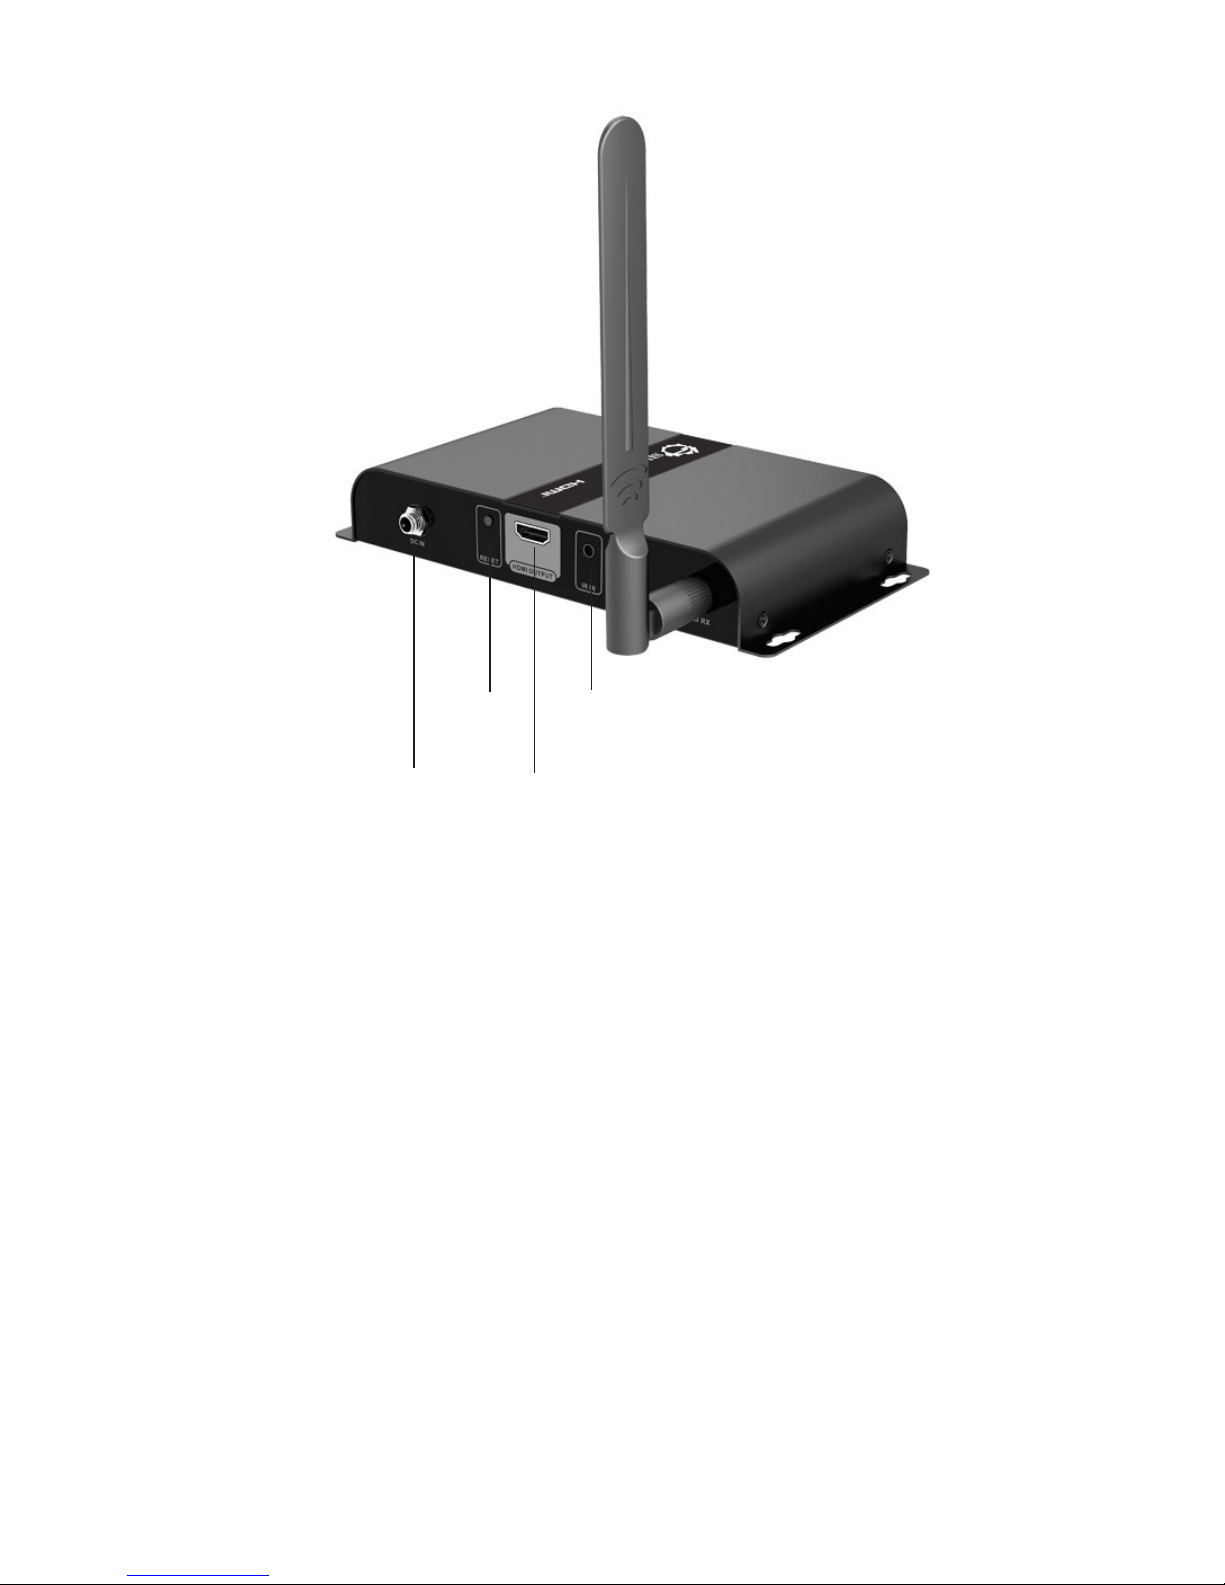
Figure 4: Receiver (RX) - rear side
Power Jack
Reset
HDMI Out
IR In
• Power Jack: Connects to the included power adapter
• Reset: Press when the unit isn't working properly
• HDMI Out: Connects to your HDMI display with an
HDMI cable (cable not included)
• IR In: Infrared 3.5mm socket. Plug the IR Receiver
extension cable here
Page 7
7
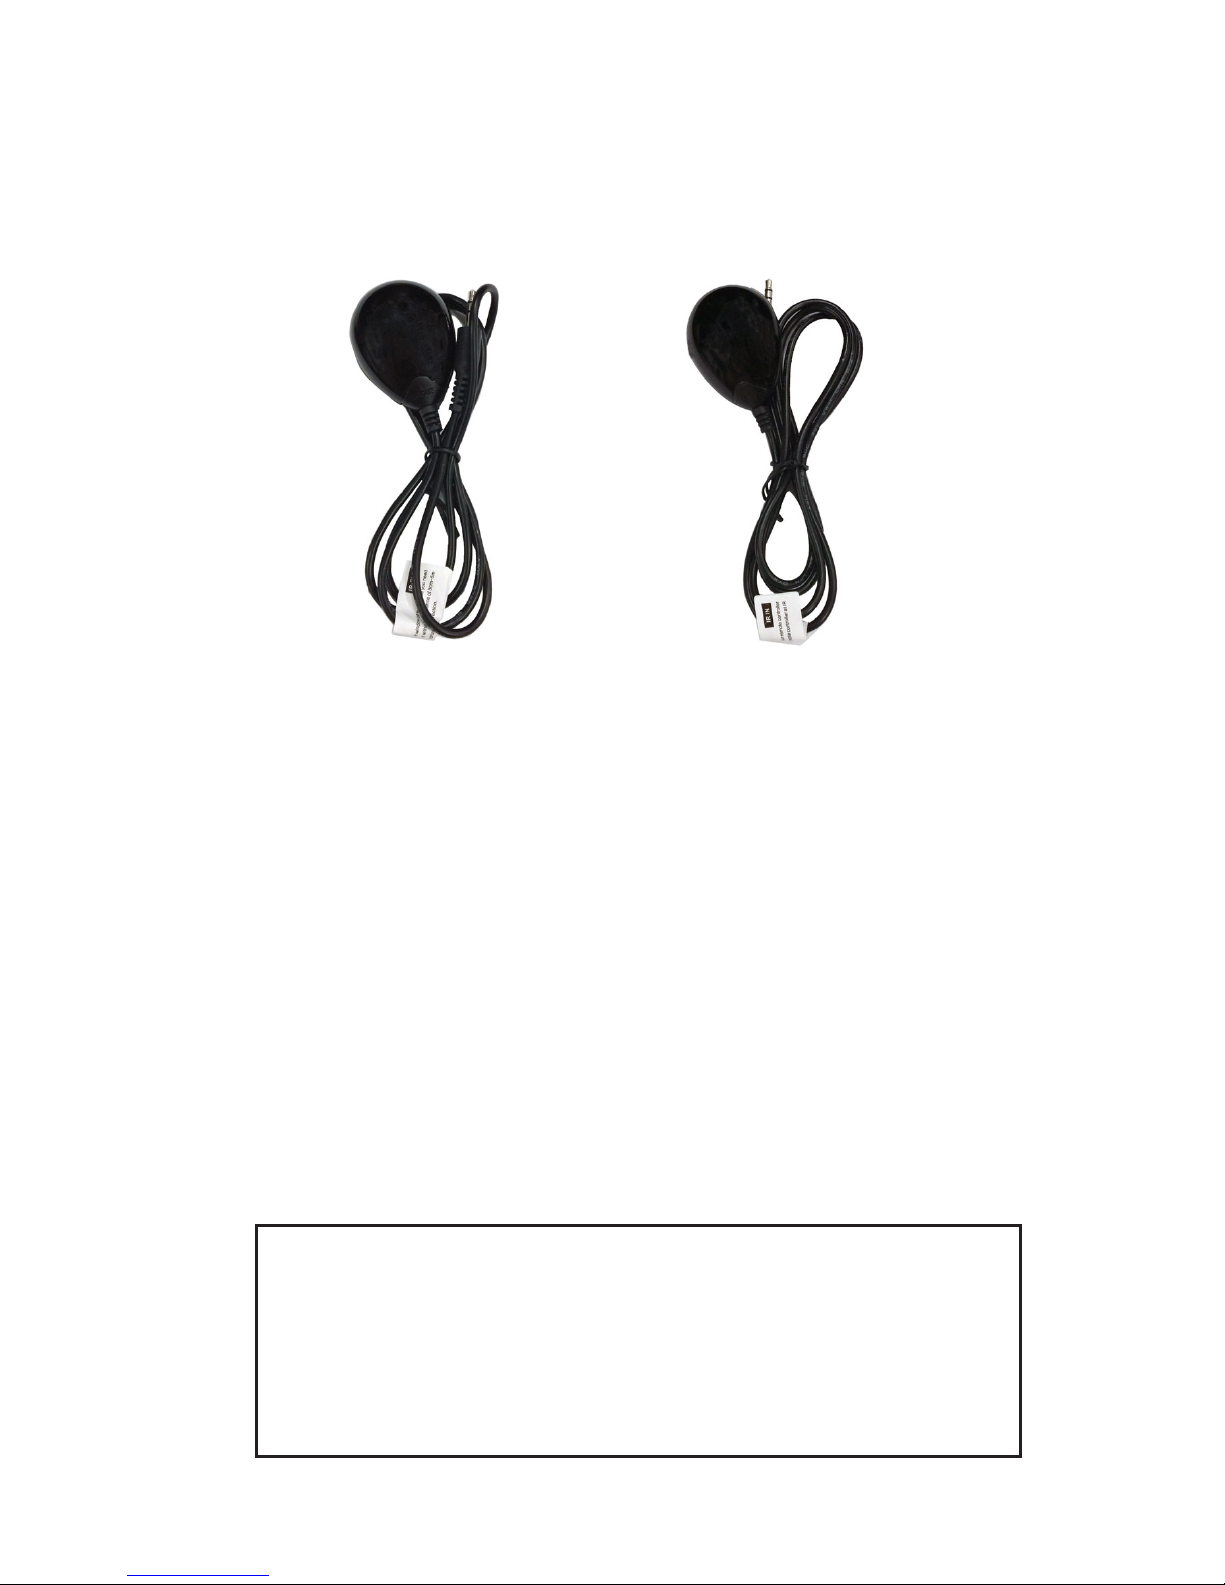
IR Extension cables (20-60Hz Frequency Range)
The IR Extension feature allows you to control your
HDMI source device from a remote location.
Figure 5: IR blaster
extension cable (IR OUT)
Figure 6: IR receiver
extension cable (IR IN)
• IR blaster extension cable (IR OUT): Plugs into the
Transmitter's IR Out socket. It emits the IR signals
received from the IR receiver extension cable of the
Receiver unit and directs it to the HDMI source's IR
receiver window
• IR receiver extension cable (IR IN): Plugs into the
Receiver's IR In socket. It receives IR signals from
the HDMI source's remote control and directs it to
the IR blaster extension cable of the Transmitter
unit
Note: Incorrect placement of the IR Blaster and IR
Receiver extension cables may result in failure of
these cables. Please check carefully before
plugging in the IR cables to ensure connecting to
the proper IR sockets.
Page 8
8
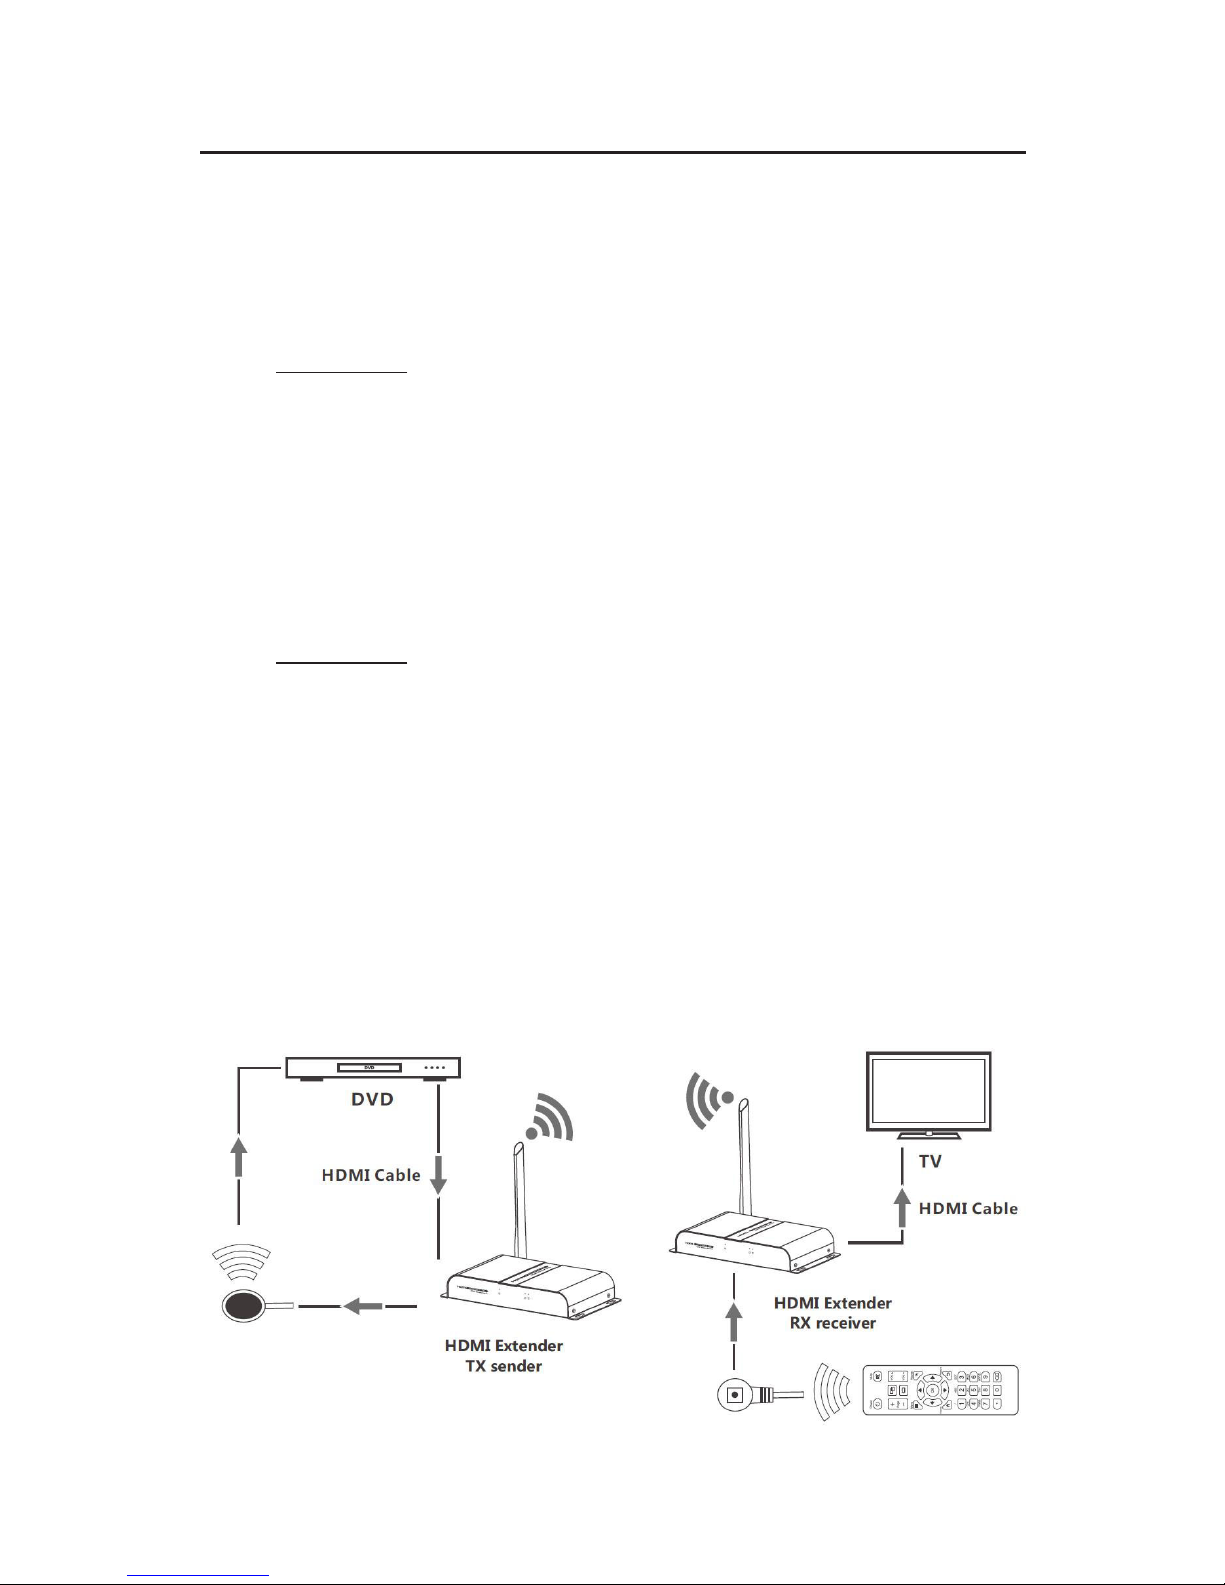
Hardware Installation
1. Power off all devices including your HDMI source
and display.
2. Connect your HDMI source to the Transmitter's
HDMI IN connector.
3. Optional: Connect the IR Blaster extension cable to
the Transmitter's IR Out. Face the eye towards your
HDMI device's IR window. This connection is
needed only if you need to control your HDMI
source from the remote location.
4. Connect your HDMI display to the Receiver's HDMI
OUT connector with an HDMI cable (not included).
5. Optional: Connect the IR Receiver extension cable
to the Receiver's IR In. This connection is needed
only if you need to control your HDMI source from
the remote location.
6. Plug the included power adapters into the
Transmitter's and Receiver's Power Jacks, then plug
both power adapters into reliable power outlets.
7. Power on your HDMI device and HDMI display.
8. The device is ready for use.
Figure 7
Page 9

9
Notice
• Wireless signals transmitted through walls, glass,
brick or other solid objects will cause signal loss
and decrease the transmission distance
• External wireless signals from microwaves, wireless
mice and wireless keyboards will interfere with
HDMI signal transmission
• Keep the unit in a well ventilated environment to
prevent it from overheating
• DO NOT expose the unit to rain, moisture, or liquids
• DO NOT place anything on the unit
• DO NOT open the housing, doing so will void the
warranty and may cause personal injury due to
electronic hazard
• DO NOT plug-in or take-out the IR extension cables
when the unit is powered on
Page 10

10
FAQ & Solutions
Q: The TV displays "Waiting for connection..." on the
bottom-right corner:
A: Check whether the power adapters of Transmitter
(TX) and Receiver (RX) are connected and power
LED is ON.
Q: The TV displays "Please check the TX input signal":
A: 1) Make sure the HDMI device is connected to the
Transmitter (TX).
2) Use different HDMI cables.
3) If still not working, connect the HDMI device to
the TV directly to see if there's a signal.
Q: The unit isn't working properly:
A: 1) Check the HDMI cable lengths are within 2m.
2) Check the transmission distance is within 50m
(line-of-sight).
3) Press the "Reset" button on the Transmitter and
Receiver units and reconnect.
4) Remove other wireless signals and move any
obstacles that are blocking the signal line-of-sight.
5) Decrease the distance between the transmitter
unit and the receiver unit.
Page 11

11
Technical Support and Warranty
QUESTIONS? SIIG’s Online Support has answers! Simply visit our web site
at www.siig.com and click Support. Our online support database is updated
daily with new drivers and solutions. Answers to your questions could be just
a few clicks away. You can also submit questions online and a technical support
analyst will promptly respond.
SIIG offers a 2-year manufacturer warranty with this product. This warranty
covers the original purchaser and guarantees the product to be free of any defects
in materials or workmanship for two (2) years from the date of purchase of the
product. This warranty is not transferable and is available only to the original
purchaser of the product.
SIIG will, at our discretion, repair or replace (with an identical product or product
having similar features and functionality) the product if defective in materials or
workmanship. This warranty gives you specific legal rights, and you may also
have other rights which vary from state to state. Please see our web site for more
warranty details.
If you encounter any problems with this product, please follow the procedures
below.
A) If it is within the store's return policy period, please return the product to the
store where you purchased it.
B) If your purchase has passed the store's return policy period, please follow these
steps to have the product repaired or replaced.
Step 1: Submit your RMA request. Go to www.siig.com, click Support, then
Request A Product Replacement to submit a request to
SIIG RMA or fax
a request to 510-657-5962. Your RMA request will be processed, if the product
is determined to be defective, an RMA number will be issued.
Step 2: After obtaining an RMA number, ship the product.
• Properly pack the product for shipping. All software, cable(s) and any
other accessories that came with the original package must be included
• Include a copy of your original sales receipt inside the package with date
of purchase and place of purchase circled and clearly visible
• Clearly write your RMA number on the top of the returned package. SIIG
will refuse to accept any shipping package, and will not be responsible for
a product returned without an RMA number posted on the outside of the
shipping carton
• You are responsible for the cost of shipping to SIIG. Ship the product to
the following address:
SIIG, Inc.
6078 Stewart Avenue
Fremont, CA 94538-3152, USA
RMA #:
• SIIG will ship the repaired or replaced product via Ground in the U.S. and
International Economy outside of the U.S. at no cost to the customer
Page 12

About SIIG, Inc.
Founded in 1985, SIIG, Inc. is a leading manufacturer of IT connectivity
solutions (including Serial ATA and Ultra ATA Controllers, FireWire, USB,
and legacy I/O adapters) that bridge the connection between Desktop/
Notebook systems and external peripherals. SIIG continues to grow by
adding A/V and Digital Signage connectivity solutions to our extensive
portfolio. All centered around the distribution and switching of A/V signals
over CAT5/6, these products include matrix switches, distribution amplifiers,
extenders, converters, splitters, cabling, and more.
SIIG is the premier one-stop source of upgrades and is committed to
providing high quality products while keeping economical and competitive
prices. High-quality control standards are evident by one of the lowest
defective return rates in the industry. Our products offer comprehensive
user manuals, user-friendly features, and are backed by an extensive
manufacturer warranty.
SIIG products can be found in many computer retail stores, mail order
catalogs, and e-commerce sites in the Americas, as well as through major
distributors, system integrators, VARs and e-commerce sites.
PRODUCT NAME
Wireless 1080P HDMI Video Kit - Mid-Range
FCC RULES: TESTED TO COMPLY WITH FCC PART 15, CLASS
B OPERATING ENVIRONMENT: FOR HOME OR OFFICE USE
FCC COMPLIANCE STATEMENT:
This device complies with part 15 of the FCC Rules. Operation is
subject to the following two conditions: (1) This device may not cause
harmful interference, and (2) this device must accept any interference
received, including interference that may cause undesired operation.
THE PARTY RESPONSIBLE FOR PRODUCT COMPLIANCE
SIIG, Inc.
6078 Stewart Avenue
Fremont, CA 94538-3152, USA
Phone: 510-657-8688
Wireless 1080P HDMI Video Kit - Mid-Range is a trademark of SIIG, Inc. SIIG and the SIIG logo are
registered trademarks of SIIG, Inc. Microsoft and Windows are registered trademarks of Microsoft
Corporation. All other names used in this publication are for identification only and may be trademarks
of their respective owners.
November
, 2016 Copyright © 2016 by SIIG, Inc. All rights reserved.
 Loading...