

Page 1

1394 3-Port MiniHub
Quick Installation Guide
This quick installation guide provides an overview of the
1394 3-Port MiniHub's features and operation.
Introducing the
The 1394 3-Port MiniHub is designed to support both 1394-
equipped PC and Mac computers. It provides 3
independent hot-pluggable 1394 ports with data transfer
rates up to 400Mbps and can operate in self-powered or buspowered mode depending on your system configuration.
With its unique design and features, the 1394 3-Port MiniHub
is the best affordable solution for your 1394 device
connections and expansions.
1394 3-Port MiniHub
Features and Benefits
Fully supports the IEEE 1394-1995 standard for high
performance serial bus and the P1394a Supplement
Fully compliant with FireWire and iLINK
implementation of IEEE 1394 standard
Full P1394a support includes: Connection Debounce,
Arbitrated Short Reset, Multi-speed Concatenation,
Arbitration Acceleration, Fly-by Concatenation, Port
Disable/Suspend/Resume
Provides three P1394a fully compliant cable ports
(400 Mbps) for device connections
High-efficiency, light-weight switching power adapter
(AC adapter) ensures reliable power source
Three independent ports allow you to connect/
disconnect any 1394 device without interrupting other
connected devices. (Without this hub, 1394 devices are
normally connected in a daisy-chain configuration and
the disconnection of a device in the early sequence of the
chain will interrupt all other devices connected to it
04-0195A
1
Page 2
Acts as a repeater to extend the cable length between each
device from 4.5m(standard) to 9m
Allows you to connect DV camcorders(Sony, Panasonic,
Canon, JVC, Sharp and more), hard disk drives, printers,
MO drives, digital cameras, scanners, and audio/video
devices including TV, VCR, DVD to your computer
System Requirements
For PC Computers:
Pentium 233MHz PC with one available 1394(FireWire)
port
Windows 98SE and up
For Mac/iMac DV computers:
Power Mac G3 or iMac DV with one available
FireWire(1394) port
Mac OS 8.6 and up
Package Contents
One 1394 3-Port MiniHub
One 1394 6-pin to 6-pin cable
One high-quality AC adapter
One 5-year warranty card
This quick installation guide
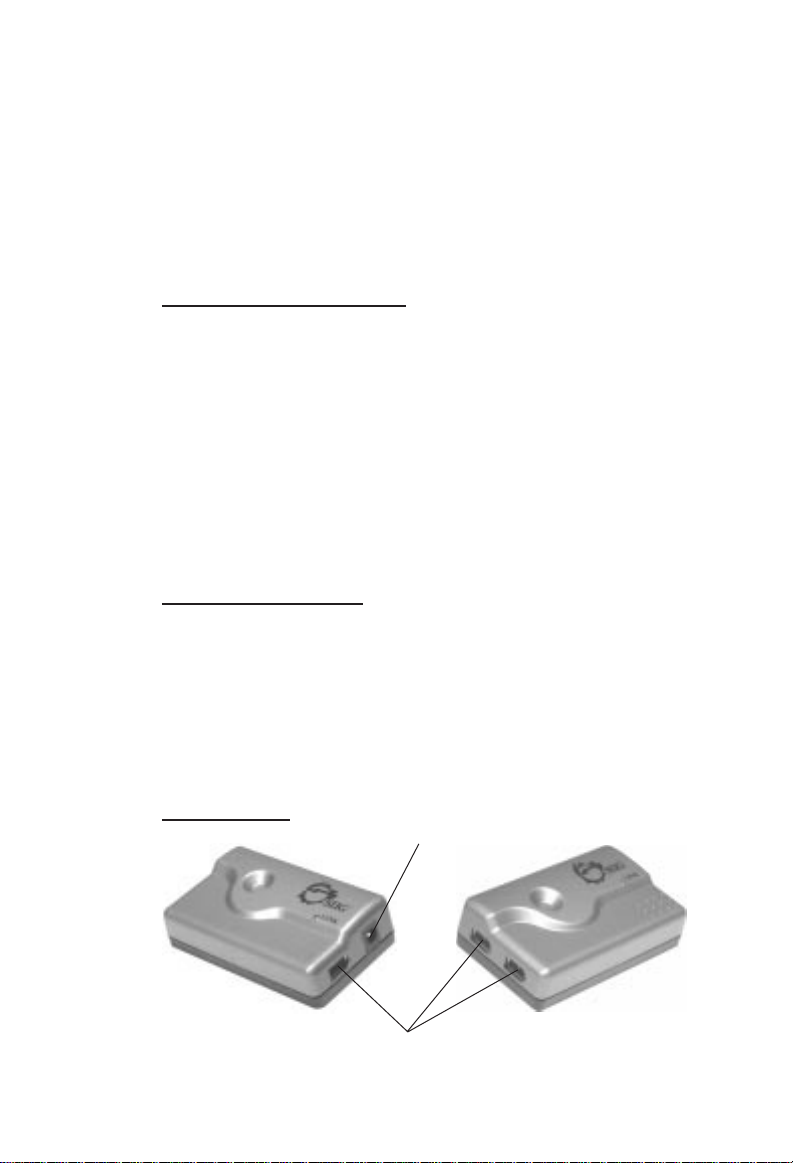
Hub Layout
2
AC Adapter Input
1394 FireWire Ports
Page 3

Safety Precautions
Do not open the case of the hub, or the warranty will be
voided.
Use the AC-DC power adapter comes with the hub only.
If the hub starts emitting unusual smells, sounds, or
smoke, unplug the unit immediately from it's power
supply. Stop using it and contact the store where it was
purchased from.
Always hold the plug when unplugging the cable from
the hub. Do not pull the cord section to prevent any
damage caused.
Disconnect the AC-DC power adapter if the hub will not
be in used for a long period of time.
Do not expose the hub to a location of high humidity,
high temperature, direct sunlight, excessive dust/
moisture, or strong magnetic field.
Do not touch the hub or cable with wet hand to prevent
any electric shock. Should the hub becomes wet, unplug
it from it's power source before handling.
Any modifications done to the hub by any unauthorized
personnel will result in voiding the warranty.
Any damage, electric shock, fire or loss of function
resulting from any unauthorized modifications done to
the hub will not be the responsibility of the manufacturer.
Always back-up data periodically. Any error or loss of
data will not be the responsibility of the manufacturer.
3
Page 4

Installing the
Please refer to the following sections to setup the
1394 3-Port MiniHub with your PC/Mac computers.
1394 3-Port MiniHub
Power Mode Settings
The 1394 3-Port MiniHub supports self-powered mode and
bus-powered mode. However, it is recommended to operate
the hub in self-powered mode since it provides a more
reliable power source when connecting multiple 1394
devices that don't have their own power sources.
Self-powered mode (recommended mode)
- Receives power from AC adapter (12V/1A max.)
Bus-powered mode
- Receives power from 1394 bus (8-40V/1A max.)
Note Power mode will be switched
automatically to bus-powered if power
adapter is not used.
Self-powered mode
Proceed with the following instructions to set up the hub in
self-powered mode:
1. Plug the AC adapter to a reliable power source then
connect the adapter jack into the hub. LED will display
green light.
2. Connect one end of the provided 1394 6-pin cable to any
port on the hub and the other end to an available 1394
port on your system.
3. The hub is now ready for device connection.
4
Page 5

Bus-powered mode
Proceed with the following instructions to set up the hub in
bus-powered mode:
1. Connect one end of the provided 1394 6-pin cable to any
port on the hub and the other end to an available 1394
port on your system.
2. LED will display green light indicating the hub is linked
to your system.
3. The hub is now ready for device connection.
5
Page 6

Technical Support & RMA
Questions? SIIGs Online Support has the answers! Simply visit our
web site at
for instant technical support. You may also e-mail us onlineat:
If you need additional help, Tech Support Specialists are available
from 8:00 a.m. to 5:00 p.m. Mon. Fri., PST at (510) 353-7542.
In order for SIIGs Technical Support to give you prompt service, you
will need the following information.
Part Number: ______________________________
Computer Configuration: ______________________
www.siig.com
http:\www.siig.com/technical_support_form.html
and click on the ONLINE SUPPORT icon
Return Merchandise Authorization (RMA)
SIIG warrants to the original buyer of the product that the hardware
is free of defects in materials and workmanship for a period of five
years from the date of purchase. If your product fails to be in good
working order during the warranty period, you may return it to SIIG
for repair or replacement at SIIG's option. To return a product:
Step 1: Call SIIG's RMA Department
Call the RMA Department at (510) 413-5333 for a Return Merchandise
Authorization (RMA) number. To get a RMA number, you must have
your product serial number. The serial number is located on the side
of the box it came in and on the back of the product.
Step 2: Complete the RMA form
Fill out the RMA form and include it with the product.
Properly pack the product for shipping. All software, cable(s) and
accessories that came with the original package must be included.
Clearly write your RMA number on the top of the returned package
and on the accompanying RMA form. SIIG will refuse any
shipping package, and not be responsible for a product returned
without a RMA number posted on the outside of the shipping
carton.
Step 3: Ship the product
You are responsible for the shipping cost to SIIG at the following
address:
SIIG, Inc. RMA#_______________
6078 Stewart Ave.
Fremont, CA 94538
SIIG will ship the repaired or replaced product via UPS Ground or
US Mail at no cost to you.
Page 7

PRODUCT NAME MODEL NUMBER
1394 3-Port MiniHub NN2629
FCC RULES: TESTED TO COMPLY WITH FCC PAR T 15, CLASS B
OPERA TING ENVIRONMENT : FOR HOME OR OFFICE USE
FCC COMPLIANCE STATEMENT:
This device complies with part 15 of the FCC Rules. Operation is subject to
the following two conditions: (1) This device may not cause harmful
interference, and (2) this device must accept any interference received,
including interference that may cause undesired operation.
FCC NOTICE:
This equipment has been tested and found to comply with the limits for a
Class B digital device, pursuant to part 15 of the FCC Rules. These limits are
designed to provide reasonable protection against harmful interference in a
residential installation. This equipment generates, uses, and can radiate radio
frequency energy and if not installed and used in accordance with the
instructions, may cause harmful interference to radio communications.
However, there is no guarantee that interference will not occur in a particular
installation. If this equipment does cause harmful interference to radio and
television reception, which can be determined by turning the equipment off
and on, the user is encouraged to try to correct the interference by one or more
of the following measures:
• Reorient or relocate the receiving antenna
• Increase the separation between the equipment and the receiver
• Connect the equipment into an outlet on a circuit different from that to
which the receiver is connected
• Consult the dealer or an experienced radio or TV technician for help
Caution:
Any changes or modifications not expressly approved by the party
responsible for compliance could void the user's authority to operate
this equipment
THE PARTY RESPONSIBLE FOR
PRODUCT COMPLIANCE
SIIG, Inc.
6078 Stewart Ave.
Fremont, CA 94538-3152
1394 3-Port MiniHub is a trademark of SIIG, Inc.
SIIG and SIIG logo are registered trademarks of SIIG, Inc. Microsoft, Windows and Windows
NT are registered trademarks of Microsoft Corporation. Pentium is a registered trademark of
Intel Corporation. Firewire, iMac, and Mac are registered trademarks of Apple Corporation.
i.Link is a trademark of Sony Electronics Inc. Other names used in this publication are for
identification only and may be trademarks of their respective companies.
04-0195A
May, 2000 Copyright ©2000 by SIIG, Inc. All rights reserved.
Page 8

CE Declaration of Conformity
Manufacturer's Name SIIG, Inc.
Manufacturer's Address 6078 Stewart Avenue
Fremont, CA 94538
USA
Declares, that the product
Product Name: 1394 3-Port MiniHub
Model Number(s): NN2629
Product Options: N/A
Conforms to the following Product Specifications:
EMC EN55022/CISPR22 Class B
EN50082-1:1992 IEC 801-2:1991 2kV CD, 8kV AD
IEC 801-3:1984 27-500MHz, 3V/M
IEC 801-4:1988 0.5kV Signal Lines,
1kV Power Lines
Application of Council Directive(s):
The product herewith complies with the requirements of the EMC
Directive 89/336/EEC
THE PARTY RESPONSIBLE FOR PRODUCT COMPLIANCE:
Ivell Trading Ltd.
Ivell House
Commerce Way
Colchester,
Essex
CO2 8HL
Telephone: 01206 799520
 Loading...