

Page 1
USB 2.0 to VGA
Installation Guide
Introduction
The USB 2.0 to VGA allows you to connect an
additional display to your desktop or notebook
PC and use it as an extended desktop or as an
additional larger/different display for your main
screen.
Features and Benefits
• Compliant with USB specification, Rev.2.0
• Supports suspend and wake-up modes
• Functionality: primary, extended and mirror
• Resolution: up to 1680 x1050 @ 32-bit color
Lot Number Sticker
For future product return or exchange, this lot
number is required. Please keep it for your
reference.
04-0473J
Lot Number Part Number
1
Page 2
System Requirements
• Pentium® 4 1.5GHz or equivalent PC
• An available USB 2.0 port
• Windows® 10 (32-/64-bit) / 8.x (32-/
64-bit) / 7 (32-/64-bit) / Vista (32-/64-bit)
/ XP (32-/64-bit) / Server 2003 & 2008 (32/64-bit) / Server 2008 R2
Package Contents
• USB 2.0 to VGA
• Driver CD
• Installation guide
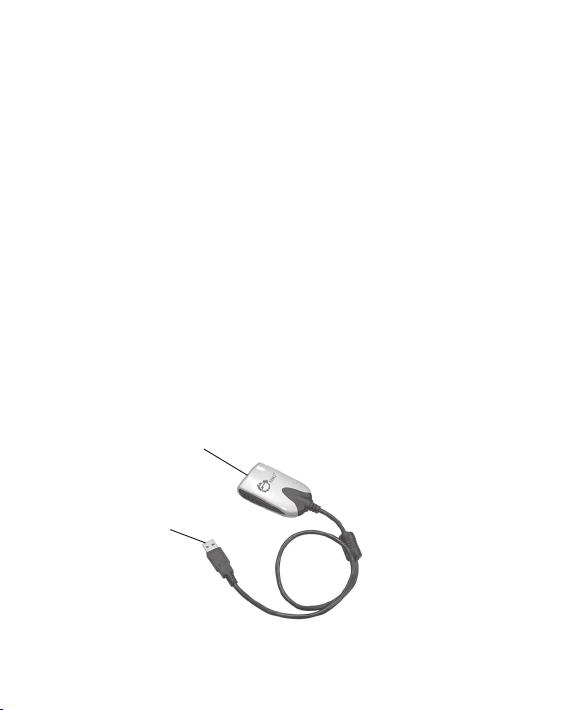
Layout
VGA port
USB port
Figure 1: USB 2.0 to VGA
2
Page 3

Installation
Make sure the proper version driver for your
graphics card is installed, the USB 2.0 to VGA is
not designed to work with Windows' Standard
VGA Graphics Adapter driver.
Note: DO NOT plug the USB 2.0 to VGA
adapter into your computer's USB port
until you are instructed to do so. The
driver installation will fail when the adapter
is plugged in prematurely.
1. Insert the driver CD, close the CD autoplay
box if prompted.
2. Enter This PC, Computer or My Computer,
and browse the CD/DVD.
3. Run Setup.exe, and choose Yes at User
Account Control window if prompted.
4. Follow the on-screen steps to install the
driver.
5. After installation process ends, select Yes, I
want to restart my computer now, then
click Finish.
3
Page 4

6. While Windows is restarting, connect your
second monitor to the USB 2.0 to VGA and
turn it on.
7. When Windows resumes, plug the USB 2.0
to VGA into the computer, and it's ready for
use.
To Verify Installation
1. From the desktop, right click This PC,
Computer or My Computer, then click
Manage.
For Windows 10 / 8 / 7 / XP / 2003: Click
Device Manager.
For Windows Vista: Click Continue, then
click Device Manager.
For Windows Server 2008 / 2008 R2: Double
click Diagnostics, then click Device
Manager.
2. Double click Trigger USB Graphic Family,
and USB Display Device (T1N) should be
displayed.
4
Page 5
Display Utility
After successful driver installation, the icon
will appear in the taskbar by the system clock.
This utility allows you to change the viewing
modes, screen resolution, screen rotation, and
physical arrangement of your monitors.
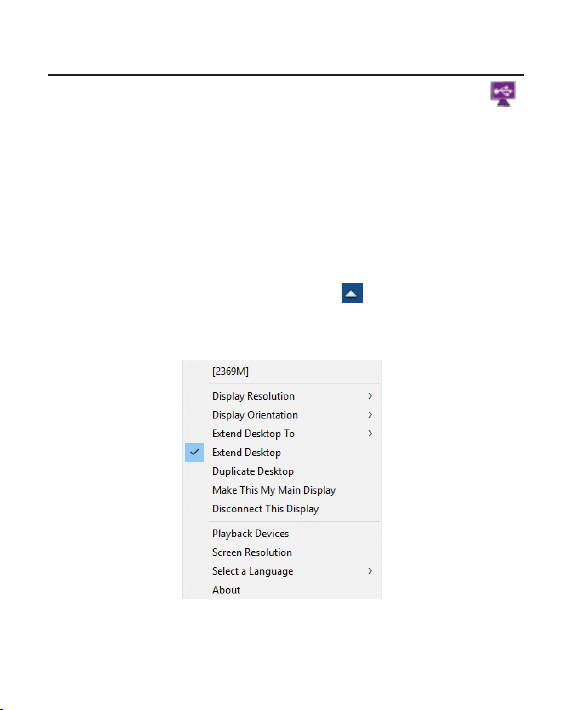
Access the utility by right clicking the icon. Note
that the utility icon may be hiddden in the
Windows System Tray. Click (arrow icon) to
bring up more icons.
Figure 2: Utility Settings
5
Page 6

Description of the Utility Settings
• Display Resolution: Click to select an
available resolution
• Display Orientation: Rotates the screen
according to the desired orientation
including Landscape, Portrait (Flipped),
Landscape (Flipped) and Portrait
• Extend Desktop To: Extends the screen
according to the desired orientation (Right/
Left/Top/Bottom)
• Extend Desktop: Extends your desktop for
easy viewing of multiple windows. To match
the physical arrangement of your displays,
go to Extend Desktop To for further settings
• Duplicate Desktop: Displays the same
image on both monitors (Mirror mode)
• Make This My Main Display: Sets the
connected display of the USB 2.0 to VGA as
the main display
• Disconnect This Display: Disables the
connected display of the USB 2.0 to VGA
• Playback Devices: Enables the Windows
audio configuration page, see Figure 3
6
Page 7
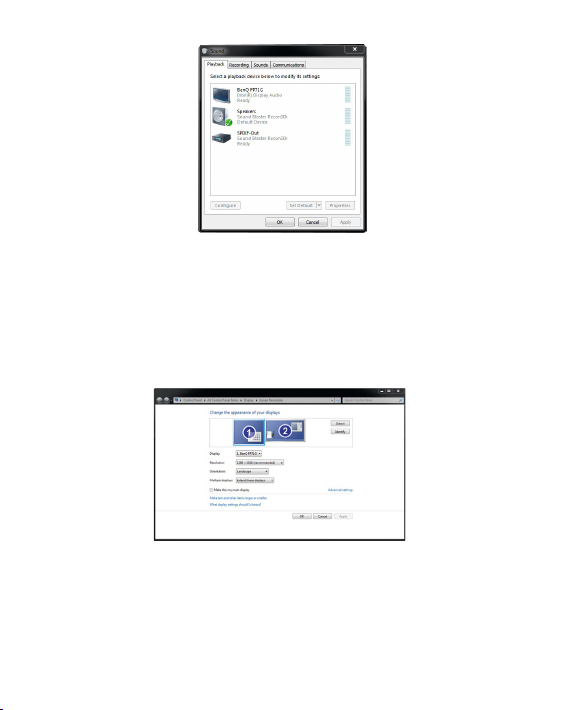
Figure 3
• Screen Resolution: Choose from advanced
options such as display resolution, display
orientation and multiple display modes
(Mirror / Extend / Primary), see Figure 4
Figure 4
• Select a Language: Choose the preferred
language from the list
• About: Shows the version of the software
7
Page 8

Frequently Asked Questions
Q1: Why won't my DVD video play when I move
it over to the extended display?
A1: Some DVD playback software packages do
not support playing on a secondary display
adapter. This is a limitation of the DVD
playback software.
Q2: There are lines running up and down my
screen or the screen is distorted
A2: This is due to a low or unsupported refresh
rate. Make sure you select the USB 2.0 to VGA
and not set the refresh rate higher than what
your monitor can support.
Q3: How do I move a Window to the extended
display?
A3: When a window is Maximized it can not be
moved to the extended display. Click on the
Restore Down button located in the upper
right hand corner of the window to the left of
the Close button. To move the window, place
the mouse cursor over the title bar, hold
down the left mouse button and drag the
window to the other screen.
8
Page 9

Blank page
9
Page 10

Blank page
10
Page 11

Technical Support and Warranty
QUESTIONS? SIIG’ s Online Support has answers! Simply visit our web site at
www.siig.com and click Support. Our online support database is updated daily with
new drivers and solutions. Answers to your questions could be just a few clicks away. You
can also submit questions online and a technical support analyst will promptly respond.
SIIG offers a 5-year manufacturer warranty with this product. This warranty covers the
original purchaser and guarantees the product to be free of any defects in materials or
workmanship for five (5) years from the date of purchase of the product. This warranty
is not transferable and is available only to the original purchaser of the product.
SIIG will, at our discretion, repair or replace (with an identical product or product having
similar features and functionality) the product if defective in materials or workmanship.
This warranty gives you specific legal rights, and you may also have other rights which
vary from state to state. Please see our web site for more warranty details.
If you encounter any problems with this product, please follow the procedures below.
A) If it is within the store's return policy period, please return the product to the store
where you purchased from.
B) If your purchase has passed the store's return policy period, please follow the steps
below to have the product repaired or replaced.
Step 1: Submit your RMA request.
Go to www.siig.com, click Support, then REQUEST A PRODUCT REPLACEMENT
to submit a request to
will be processed, if the product is determined to be defective, an RMA number will
be issued.
Step 2: After obtaining an RMA number, ship the product.
• Properly pack the product for shipping. All accessories that came with the
original package must be included
• Include a copy of your original sales receipt inside the package with date of
purchase and place of purchase circled and clearly visible
• Clearly write your RMA number on the top of the returned package. SIIG will
refuse to accept any shipping package, and will not be responsible for a product
returned without an RMA number posted on the outside of the shipping carton
• You are responsible for the cost of shipping to SIIG. Ship the product to the
following address:
SIIG, Inc.
6078 Stewart Avenue
Fremont, CA 94538-3152, USA
RMA #:
• SIIG will ship the repaired or replaced product via Ground in the U.S. and
International Economy outside of the U.S. at no cost to the customer
SIIG RMA or fax a request to 510-657-5962. Your RMA request
11
Page 12

About SIIG, Inc.
Founded in 1985, SIIG, Inc. is a leading manufacturer of IT connectivity solutions
(including Serial ATA and Ultra ATA Controllers, FireWire, USB, and legacy
I/O adapters) that bridge the connection between Desktop/Notebook systems
and external peripherals. SIIG continues to grow by adding A/V and Digital
Signage connectivity solutions to our extensive portfolio.
SIIG products offer comprehensive user manuals, many user-friendly features,
and are backed by an extensive manufacturer warranty. High quality control
standards are evident by the overall ease of installation and compatibility of
our products, as well as one of the lowest defective return rates in the industry.
SIIG products can be found in computer retail stores, mail order catalogs,
through major distributors, system integrators, VARs and through e-commerce
sites.
PRODUCT NAME
USB 2.0 to VGA
FCC RULES: TESTED TO COMPLY WITH FCC PART 15, CLASS B
OPERATING ENVIRONMENT: FOR HOME OR OFFICE USE
FCC COMPLIANCE STATEMENT:
This device complies with part 15 of the FCC Rules. Operation is subject
to the following two conditions: (1) This device may not cause harmful
interference, and (2) this device must accept any interference received,
including interference that may cause undesired operation.
THE PARTY RESPONSIBLE FOR PRODUCT COMPLIANCE
SIIG, Inc.
6078 Stewart Avenue
Fremont, CA 94538-3152, USA
Phone: 510-657-8688
USB 2.0 to VGA is a trademark of SIIG, Inc. SIIG and the SIIG logo are registered trademarks
of SIIG, Inc. All other names used in this publication are for identification only and may be
trademarks of their respective owners.
September, 2016 Copyright © 2016 by SIIG, Inc. All rights reserved.
 Loading...