

Page 1

UltraATA 100 PCI
Quick Installation Guide
Introducing the
The UltraATA 100 PCI is an ultra high-speed dual channel
UltraATA 100 controller board for use in Pentium-class
computer. With full support specified in ATA/ATAPI-5, it
achieves burst data transfer rates up to 100MB/sec and
supports drive capacities up to 128GB. And it also provides
full backward support for UltraATA 33/66, EIDE/Fast
ATA-2, IDE and ATAPI devices. PCI Plug-n-Play makes the
installation quick and easy, the enhanced BIOS auto-detects
device types and fine tunes to the best performance for each
connected IDE/ATAPI device.
UltraATA 100 PCI
Features and Benefits
• PCI Plug-n-play 2.1 compliant
• 2 independent IDE/ATA Channels, supports up to four
IDE/ATA devices and 128 Bytes buffer
• Supports ultra and multiword DMA timing modes
• CRC (Cyclical Redundancy Check)
• Built in 80-Pin cable detect circuitry
• Supports External BIOS
• 32-bit 33 MHz PCI Interface
• Supports bus master DMA at 133 MB/sec PCI burst rate
• Supports maximum IDE/ATA data transfer rate of 100
MB/sec
• Compatible with Microsoft IDE/ATA drivers (Windows
95/98, Windows NT 4.0 and Windows 2000)
• 3.3V Operating Voltage with 5V tolerant I/O
System Requirements
• Pentium-class computer with one available PCI slot
• Windows 95 OSR 2.0 w/ USBSupp or later
04-0196B
1
Page 2
Package Contents
• UltraATA 100 PCI board
• Driver software diskette
• One 5-year warranty card
• This quick installation guide
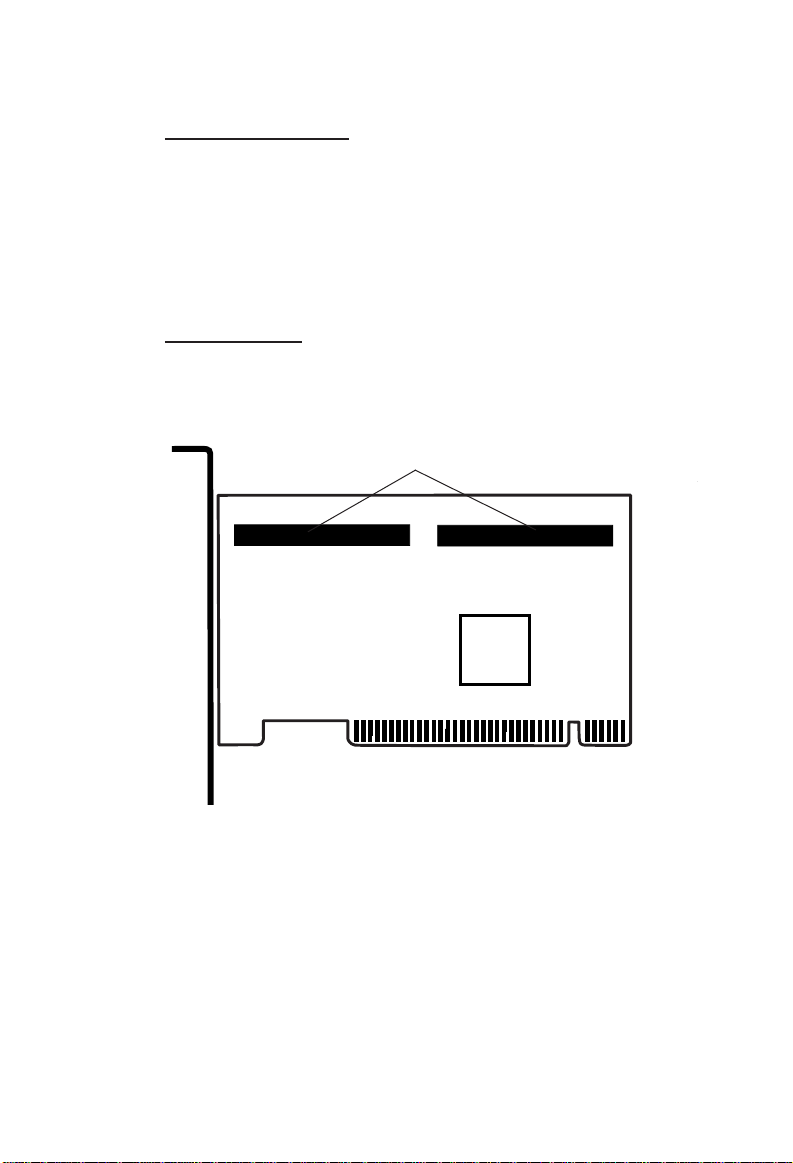
Board Layout
Dual Channel
UltraATA 100
Connectors
IDE1 IDE2
1
1
Figure 1-1. UltraATA 100 PCI board
2
Page 3

Hardware Installation
No specific setup is needed for your new PCI card. Simply
install the card following the standard procedures for any
PCI card. General instructions for installing the card are
provided below, since the design of computer cases and
motherboards vary. Refer to your computer’s reference
manual for further information, if needed.
Caution: Static Electricity Discharge may permanently
damage your system. To avoid possible static electricity
discharge during the installation, please follow the
guidelines below:
• Discharge any static electricity build up in your body
by touching a large grounded metal surface or the
computer’s case (if plugged in), for a few seconds.
• During the installation, avoid any contact with internal
parts. Handle cards only by their external edges.
1. Turn OFF the power to your computer and any other
connected peripheral devices.
2. Unplug the power cord from the back of the computer.
3. Remove your computer’s cover.
4. Remove the slot bracket from an available 32-bit PCI slot.
5. To install the card, carefully align the card's bus connector
with the selected PCI slot bus connector on the
motherboard. Push the board down firmly, but gently,
until it is well seated.
6. Replace the slot bracket's holding screw to secure the
card.
7. Replace the computer cover and reconnect the power
cord.
Device Connection
Note Only the 40-pin/80-wire Ultra ATA 100 cable can
achieve hard disk UDMA 100 performance. Also, we
suggest not to connect an UltraATA 100 (hard disk) with
a slower IDE/EIDE devices (such as CD-ROM or tape
backup drive) on the same channel.
3
Page 4
1. If you plan to install two hard disk drives on the IDE1
channel, make sure you configure the drives as a Master
and Slave according to the manufacturer’s instructions.
The same rule must be followed for connecting hard disk
drives to the IDE2 channel.
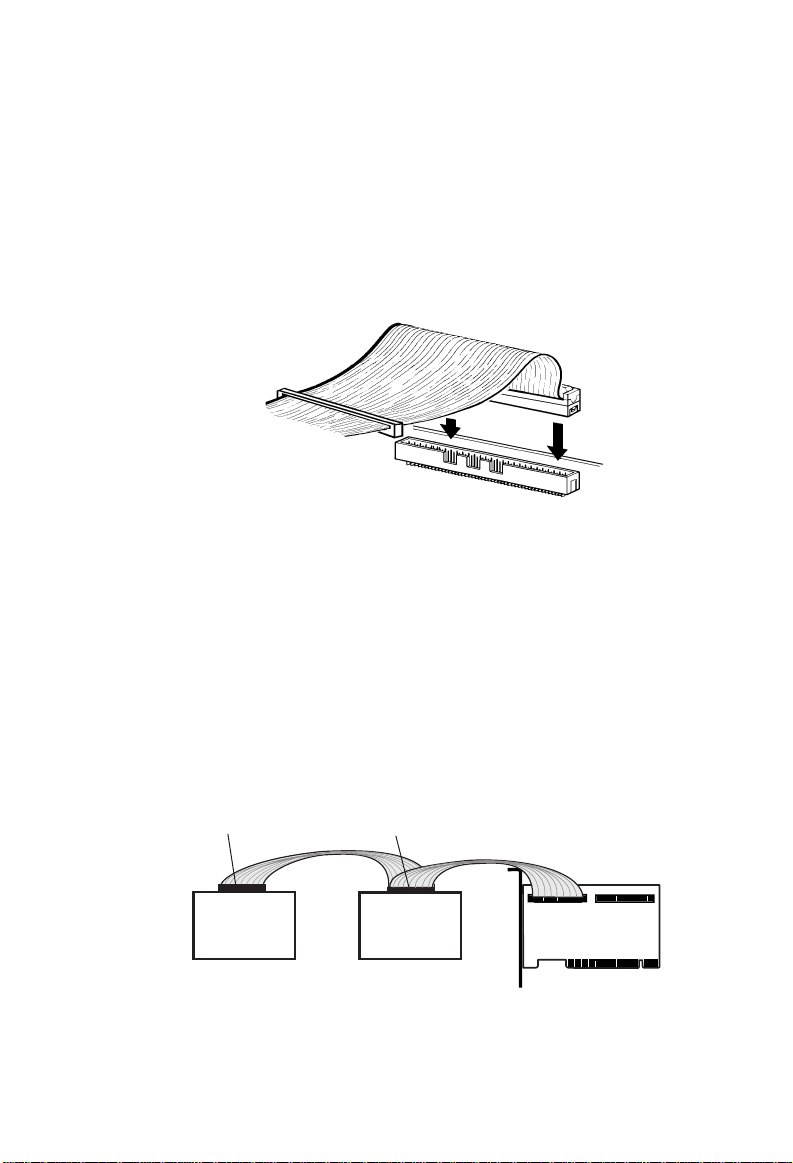
2. Attach one end of the included UltraATA 100 cable to the
IDE1 connector on the board. Make sure pin 1 on the
cable (indicated by the colored stripe) matches pin 1 on
the IDE1 connector.
Colored
Edge-stripe
Figure 2-3: Connecting the Cable to the On-Board
Connector
3. Install the hard disk drive to your computer. Attach the
end connector of the UltraATA 100 cable to the connector
on the hard disk drive. Make certain that pin 1 on the
cable (indicated by the colored stripe) matches pin 1 on
the hard disk drive’s connector.
Note The ribbon cable has two connectors. If you have
one hard disk drive, connect it to the end connector of
cable (Drive C). If you have a second hard disk drive,
connect it to the middle connector of cable (Drive D).
Middle ConnectorEnd Connector
Internal
Drive 1
Drive C Drive D
Internal
Drive 2
(If Any)
UltraATA 100 PCI
IDE1
Figure 2-4: Connecting Internal Drives
Same procedure applies when making connection to IDE2.
4
IDE2
Page 5

Software Installation
This section provides information on how to install the
UltraATA 100 PCI drivers for the following operating
systems:
New & Existing Windows 95
New & Existing Windows 98
New & Existing Windows NT 4.0
New & Existing Windows 2000
Windows 95 Driver Installation
For New Windows 95 systems
1. Follow Microsoft procedures to install Windows 95
accordingly.
2. Once Windows 95 is installed, re-boot the system into
Safe Mode by hitting the F8 key repeatedly during
Windows Logo boot-up screen.
3. Select My Computer/Control Panel/System/ Device
Manager.
4. Remove PCI RAID controller listed under Other Devices.
5. Restart your system manually and during boot up,
Windows will detect new hardware and prompt for
driver diskette.
6. Insert the Software Installation diskette into the floppy
drive. Click Next, select Other Locations, type in
A:\Win9x, click OK, then Finish. From the Insert Disk
window, select OK, then retype the path A:\Win9x and
click OK.
7. Remove the Software Installation diskette and select Yes
to restart Windows to complete driver installation.
Note Make sure to load the USBSupp in order for the
controller to install properly.
For Existing Windows 95 Systems
1. After installing the board, boot up Windows 95, Windows
will notify you of New Hardware Found.
2. Update Device Driver Wizard dialog box will appear,
click Next to continue.
5
Page 6

3. Insert the Software Installation diskette into the floppy
drive, click Other Locations and type in a:\Win9x, click
OK, and then Finish. From the Insert Disk window,
click OK. When the Copying Files dialog box appears,
type in a:\Win9x and then click OK.
4. Remove the Software Installation diskette and restart
Windows to complete driver installation.
Windows 98/98SE Driver Installation
For New Windows 98 Systems
1. Follow Microsoft procedures to install Windows 98
accordingly.
2. Once Windows has been installed, select My Computer/
Control Panel/System/Device Manager.
3. Double click PCI RAID controller listed under Other
Devices.
4. Select Driver tab and click Update Driver button.
5. Insert the Software Installation diskette into the floppy
drive and click Next.
6. Select Search for the best driver for your device option
and click Next.
7. Check Specify a location and type in a:\Win9x and click
Next. Click Next again and then Finish.
8. Remove the Software Installation diskette and restart
Windows to complete driver installation.
For Existing Windows 98 Systems
1. After installing the board, boot up Windows 98, the Add
New Hardware Wizard dialog box will appear. Click
Next to continue.
2. Select Search for the best driver for your device option
and then click Next.
3. Insert the Software Installation diskette into the floppy
drive. Check Specify a location and type in a:\Win9x
and click Next.
6
Page 7

4. Click Next and then Finish respectively.
5. Remove the Software Installation diskette and restart
Windows to complete driver installation.
Verify Proper Installation for Win95/98/98SE
1. Go to My Computer/Control Panel/ System/Device
Manager.
2. Select Hard Disk Controllers, CMD PCI-0649 Ultra
DMA IDE Controller is listed.
3. Highlight CMD PCI-0649 Ultra DMA IDE Controller
and click Properties. A message This device is working
properly is displayed in the dialog box, the driver has been
correctly installed. If any error message is displayed,
remove CMD PCI-0649 Ultra DMA IDE Controller and
restart your system.
Windows NT4.0 Driver Installation
For New Windows NT System
1. When the system is booting from Microsoft NT4.0 CD,
user will see the following screens.
2. Screen 1, Setup is inspecting your computer's hardware
configuration, press F6 key in order to specify and add
the UltraATA 100 NT4.0 driver.
3. Screen 2, Windows NT Setup, Setup is loading files,
keep pressing F6 key to add the UltraATA 100 NT4.0
driver.
4. If screen 3 does not appear for options to Specify
Additional Device then shut off system and repeat steps
1-3 otherwise continue to step 5.
5. Insert the Software Installation diskette and press S.
6. Screen 4, Windows NT Workstation Setup, highlight
Other and hit Enter.
7. Screen 5, Windows NT Setup, make sure Software
Installation diskette is in floppy drive and press Enter.
8. Screen 6, Windows NT Setup, highlight CMD CSA-64xx
IDE Driver and hit Enter to load the UltraATA 100
driver.
7
Page 8

9. Screen 7, Windows NT Setup, your UltraATA 100 driver,
CMD CSA-64xx IDE Driver should be listed. Hit Enter.
Setup will load drivers.
10.Follow onscreen instructions to complete setup for your
NT version.
For Existing Windows NT System
1. After installing the board, boot up Windows NT. Select
My Computer/Control Panel/SCSI Adapters, then click
on the "Drivers" tab.
2. Select Add… then Have Disk....
3. Insert the Software Installation diskette into the floppy
drive and type in A:\Winnt then click OK.
4. Highlight CMD PCI 646U2/648/649 Ultra DMA IDE
Controller and click OK.
5. Remove the Software Installation diskette and select Yes
to restart Windows.
Verify Proper Installation for WinNT 4.0
1. Go to My Computer/Control Panel/SCSI Adapters.
2. Highlight CMD PCI 646U2/648/649 Ultra DMA IDE
Controller from SCSI Adapters listing and select
Properties. A message This device is working properly is
displayed in the dialog box, the driver has been correctly
installed.
Windows 2000 Driver Installation
For New Windows 2000 Systems
1. After installing the board, boot up your system.
2. Hit F1 key when the UltraATA 100 BIOS shows up
prompting Press F1 or F11 for Windows 2000...
NOTE Windows 2000 Operating System installation will
require multiple re-booting of your system. Please make
sure you hit the F1 key EVERYTIME Windows 2000
restarts during the installation procedure. You will not
be required to do so once Windows 2000 has been loaded
completely.
8
Page 9

3. Once Windows 2000 installation completes, go to My
Computer/Control Panel/System, click Hardware tab
then click Device Manager button.
4. Double click IDE ATA/ATAPI Controllers then double
click Standard Dual Channel PCI IDE Controller icon to
display the driver properties dialog box.
5. Click Driver tab and the click Update Driver button to
start the Upgrade Device Driver Wizard, click Next to
continue.
6. Select Search for a suitable driver for my device
(recommended) and click Next.
7. Insert the Software Installation diskette into the floppy
drive, check Specify a location, click Next, type in
A:\Win2K and click OK then Next to continue.
8. If the Digital Signature Not Found message appears,
click Yes.
Note If prompted for Wndows 2000 CD-ROM, insert the
CD into your CD-ROM drive and click OK. Type in
D:\I386 (assuming D: is your CD-ROM drive) and click
OK and then Finish.
9. Click Finish and restart Windows to complete driver
installation.
For Existing Windows 2000 Systems
1. After installing the board, boot up Windows 2000.
Windows will attempt to detect the controller.
2. When Found New Hardware Wizard appears, click
Next to continue.
3. Select Search for a suitable driver for my device
(recommended) and click Next.
4. Insert the Software Installation diskette into the floppy
drive, check Specify a location, click Next, type in
A:\Win2K. Click OK and then Next to continue.
5. If the Digital Signature Not Found message appears,
click Yes.
9
Page 10

Note If prompted for Windows 2000 CD-ROM, insert the
CD into your CD-ROM drive and click OK. Type in
D:\I386 (assuming D: is your CD-ROM drive) and click
OK and then Finish.
6. Click Finish and restart Windows to complete driver
installation.
Verify Proper Installation for Win2000
1. Go to My Computer/Control Panel/System.
2. Click on Hardware then click Device Manager.
3. Double click IDE ATA/ATAPI Controllers, then double
click CMD PCI-0649 Ultra DMA IDE Controller to
display driver properties.
A message This device is working properly is displayed in
the dialog box, the driver has been correctly installed.
Bios Configuration
The UltraATA 100 PCI BIOS will appear everytime your
system starts up. If the bios doesn't show, please try your
controller in another PCI slot. During this (Post) process, the
bios will show up and indicate the devices attached to it. The
bios also shows up with a message Press F1 or F11 for
Windows 2000... This message only applies to New
Windows 2000 installation and you only need to press it
during installation. You do not need to press this key in any
other situation. Please see New Windows 2000 installation
for more details.
10
Page 11

Technical Support
QUESTIONS? SIIG’s Online Support has the answers! Simply
visit our web site at
online support database is updated daily with new drivers and
solutions. The answers to your problems could be just a few clicks
away.
www.siig.com
and click on SUPPORT. Our
Return Merchandise Authorization (RMA)
SIIG warrants to the original buyer of the product that the hardware
is free of defects in materials and workmanship for a period of one,
two or five years from the date of purchase. If your product fails to
be in good working order during the warranty period, you may
return it to SIIG for repair or replacement at SIIG's option.
To return the product, you need to follow these steps.
Step 1: Contact SIIG's RMA Department
To obtain an RMA number, SIIG's RMA Department can be reached
by phone at (510)413-5333 or fax at (510)657-5962 or email at
[email protected]. In order to issue an RMA number, the product
serial number is required. This number can be found on the side of
the box and on the back of the product.
Step 2: Complete the RMA form
• Fill out your Return Merchandise Authorization (RMA) form,
and include it in the package with the product.
• Properly pack the product for shipping. All software, cable(s)
and other accessories that came with the original package must
be included.
• Clearly write your RMA number on the top of the returned
package and on the accompanying RMA form.
SIIG will refuse to accept any shipping package, and will not
be responsible for a product returned without an RMA number
posted on the outside of the shipping carton.
Step 3: Ship the Product
You are responsible for the cost of shipping back to SIIG at the
following address:
SIIG, Inc. RMA#_______________
6078 Stewart Ave.
Fremont, CA 94538
SIIG will ship the repaired or replaced product via UPS Ground or
US Mail at no cost to you.
Page 12

PRODUCT NAME MODEL NUMBER
UltraATA 100 PCI CN2474
FCC RULES: TESTED TO COMPLY WITH FCC PART 15, CLASS B
OPERATING ENVIRONMENT: FOR HOME OR OFFICE USE
FCC COMPLIANCE STATEMENT:
This device complies with part 15 of the FCC Rules. Operation is subject to
the following two conditions: (1) This device may not cause harmful
interference, and (2) this device must accept any interference received,
including interference that may cause undesired operation.
FCC NOTICE:
This equipment has been tested and found to comply with the limits for a
Class B digital device, pursuant to part 15 of the FCC Rules. These limits are
designed to provide reasonable protection against harmful interference in a
residential installation. This equipment generates, uses, and can radiate radio
frequency energy and if not installed and used in accordance with the
instructions, may cause harmful interference to radio communications.
However, there is no guarantee that interference will not occur in a particular
installation. If this equipment does cause harmful interference to radio and
television reception, which can be determined by turning the equipment off
and on, the user is encouraged to try to correct the interference by one or more
of the following measures:
• Reorient or relocate the receiving antenna
• Increase the separation between the equipment and the receiver
• Connect the equipment into an outlet on a circuit different from that to
which the receiver is connected
• Consult the dealer or an experienced radio or TV technician for help
Caution:
Any changes or modifications not expressly approved by the party
responsible for compliance could void the user's authority to operate
this equipment
THE PARTY RESPONSIBLE FOR
PRODUCT COMPLIANCE
SIIG, Inc.
6078 Stewart Ave.
Fremont, CA 94538-3152
UltraATA 100 PCI is a trademark of SIIG, Inc.
SIIG and SIIG logo are registered trademarks of SIIG, Inc. Microsoft, Windows and Windows
NT are registered trademarks of Microsoft Corporation. Pentium is a registered trademark of
Intel Corporation. Other names used in this publication are for identification only and may be
trademarks of their respective companies.
October, 2000 Copyright ©2000 by SIIG, Inc. All rights reserved.
 Loading...